Cesium拾取源码分析
拾取大体上的思路是:在拾取的时候,将物体渲染到帧缓冲区,然后读取拾取的3x3区域像素值,再根据像素值去匹配拾取到的物体。在整个流程中,有两个重要的类:BatchTable和DerivedCommand,前者主要是负责准备渲染需要的纹理、变量,用于后续的查找,DerivedCommand则是负责创建渲染到帧缓冲区的绘制命令。分三个部分来展开说明:BatchTable的作用、DerivedCommand的作用、最后是拾取的流程。
1.BatchTable的作用
BatchTable在整个拾取的流程中扮演了一个非常重要的角色,所以在开始说明拾取流程之前,有必要先了解下,在几何转为DrawCommand的流程,BatchTable起到了什么样的作用。
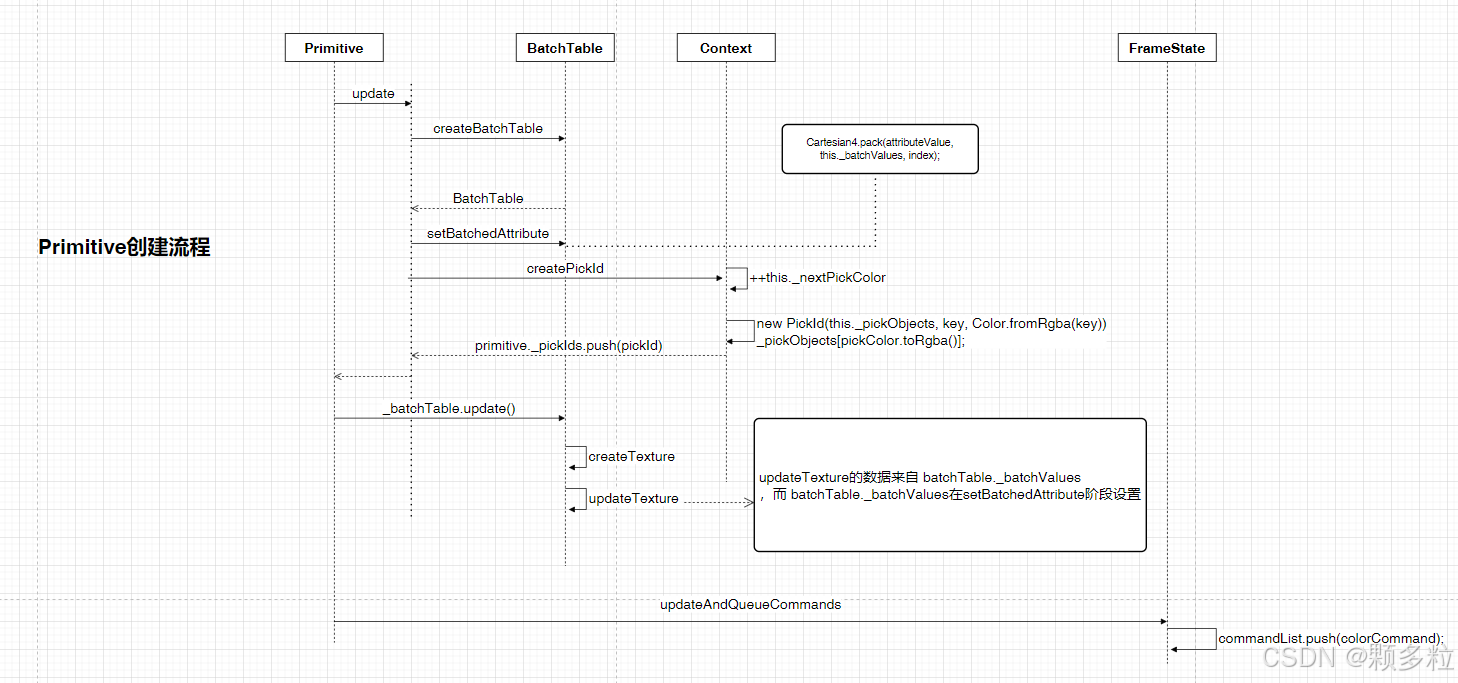
1.1 BatchTable的创建
在Primitive的update方法中,会执行createBatchTable()从而创建BatchTable,然后会执行batchTable.setBatchedAttribute(i, attributeIndex, value)方法设置BatchTable中用到的属性值,这些属性值会以数组的形式存放在batchTable._batchValues中。
然后是context.createPickId(pickObject),其中会调用createPickId创建PickId对象,PickId对象有:key、color、以及几何本身(Primitive),在创建的时候,此PickId对象会添加到context的_pickObjects字典,用于后面的查找。color的值同样写入batchTable._batchValues中。
Context.prototype.createPickId = function (object) {
  //>>includeStart('debug', pragmas.debug);
  Check.defined("object", object);
  //>>includeEnd('debug');

  // the increment and assignment have to be separate statements to
  // actually detect overflow in the Uint32 value
  ++this._nextPickColor[0];
  const key = this._nextPickColor[0];
  if (key === 0) {
    // In case of overflow
    throw new RuntimeError("Out of unique Pick IDs.");
  }

  this._pickObjects[key] = object;
  return new PickId(this._pickObjects, key, Color.fromRgba(key));
};
1.2 BatchTable的更新
这里主要是创建BatchTable的纹理,纹理的值来自前面提到的batchTable._batchValues,纹理宽度根据属性值多少来定,高度都是1。
BatchTable.prototype.update = function (frameState) {
  if (
    (defined(this._texture) && !this._batchValuesDirty) ||
    this._attributes.length === 0
  ) {
    return;
  }

  this._batchValuesDirty = false;

  if (!defined(this._texture)) {
    createTexture(this, frameState.context);
  }
  updateTexture(this);
};

function updateTexture(batchTable) {
  /*  for (let index = 0; index < batchTable._batchValues.length; index++) {
     batchTable._batchValues[index] = 100;

   } */
  const dimensions = batchTable._textureDimensions;
  batchTable._texture.copyFrom({
    source: {
      width: dimensions.x,
      height: dimensions.y,
      arrayBufferView: batchTable._batchValues,
    },
  });
}
2.DerivedCommand的作用
function updateDerivedCommands(scene, command, shadowsDirty) {
  ...
  let derivedCommands = command.derivedCommands;
  if (defined(command.pickId)) {
    derivedCommands.picking = DerivedCommand.createPickDerivedCommand(
      scene,
      command,
      context,
      derivedCommands.picking
    );
  }
}
在scene中的updateDerivedCommands方法中,会根据drawCommand是否有pickId来为为这个drawCommand创建用于拾取的DerivedCommand,其中,可以看到其创建的片元着色器有如下片段
...
    const newMain = `void main ()
{
    czm_non_pick_main();
    if (${outputColorVariable}.a == 0.0) {
        discard;
    }
    ${outputColorVariable} = ${pickId};
} `;
实际的内容是
void main ()
{
    czm_non_pick_main();
    if (out_FragColor.a == 0.0) {
        discard;
    }
    out_FragColor = v_pickColor;
}
可以看到其颜色来自于v_pickColor,如果我们再去看顶点着色器,则发现v_pickColor的值实际上是用czm_batchTable_pickColor方法计算得到
vec4 czm_batchTable_pickColor(float batchId)
{
    vec2 st = computeSt(batchId);
    st.x += batchTextureStep.x * float(8);
    vec4 textureValue = texture(batchTexture, st);
    vec4 value = textureValue;
value /= 255.0;
    return value;
}
这里的batchTexture就是我们前面BatchTable中创建的texture,前面我们提到texture的值来自BatchTable的属性值,当然也包括了几何的拾取颜色(PickId对象的color),这个color是不断递增的
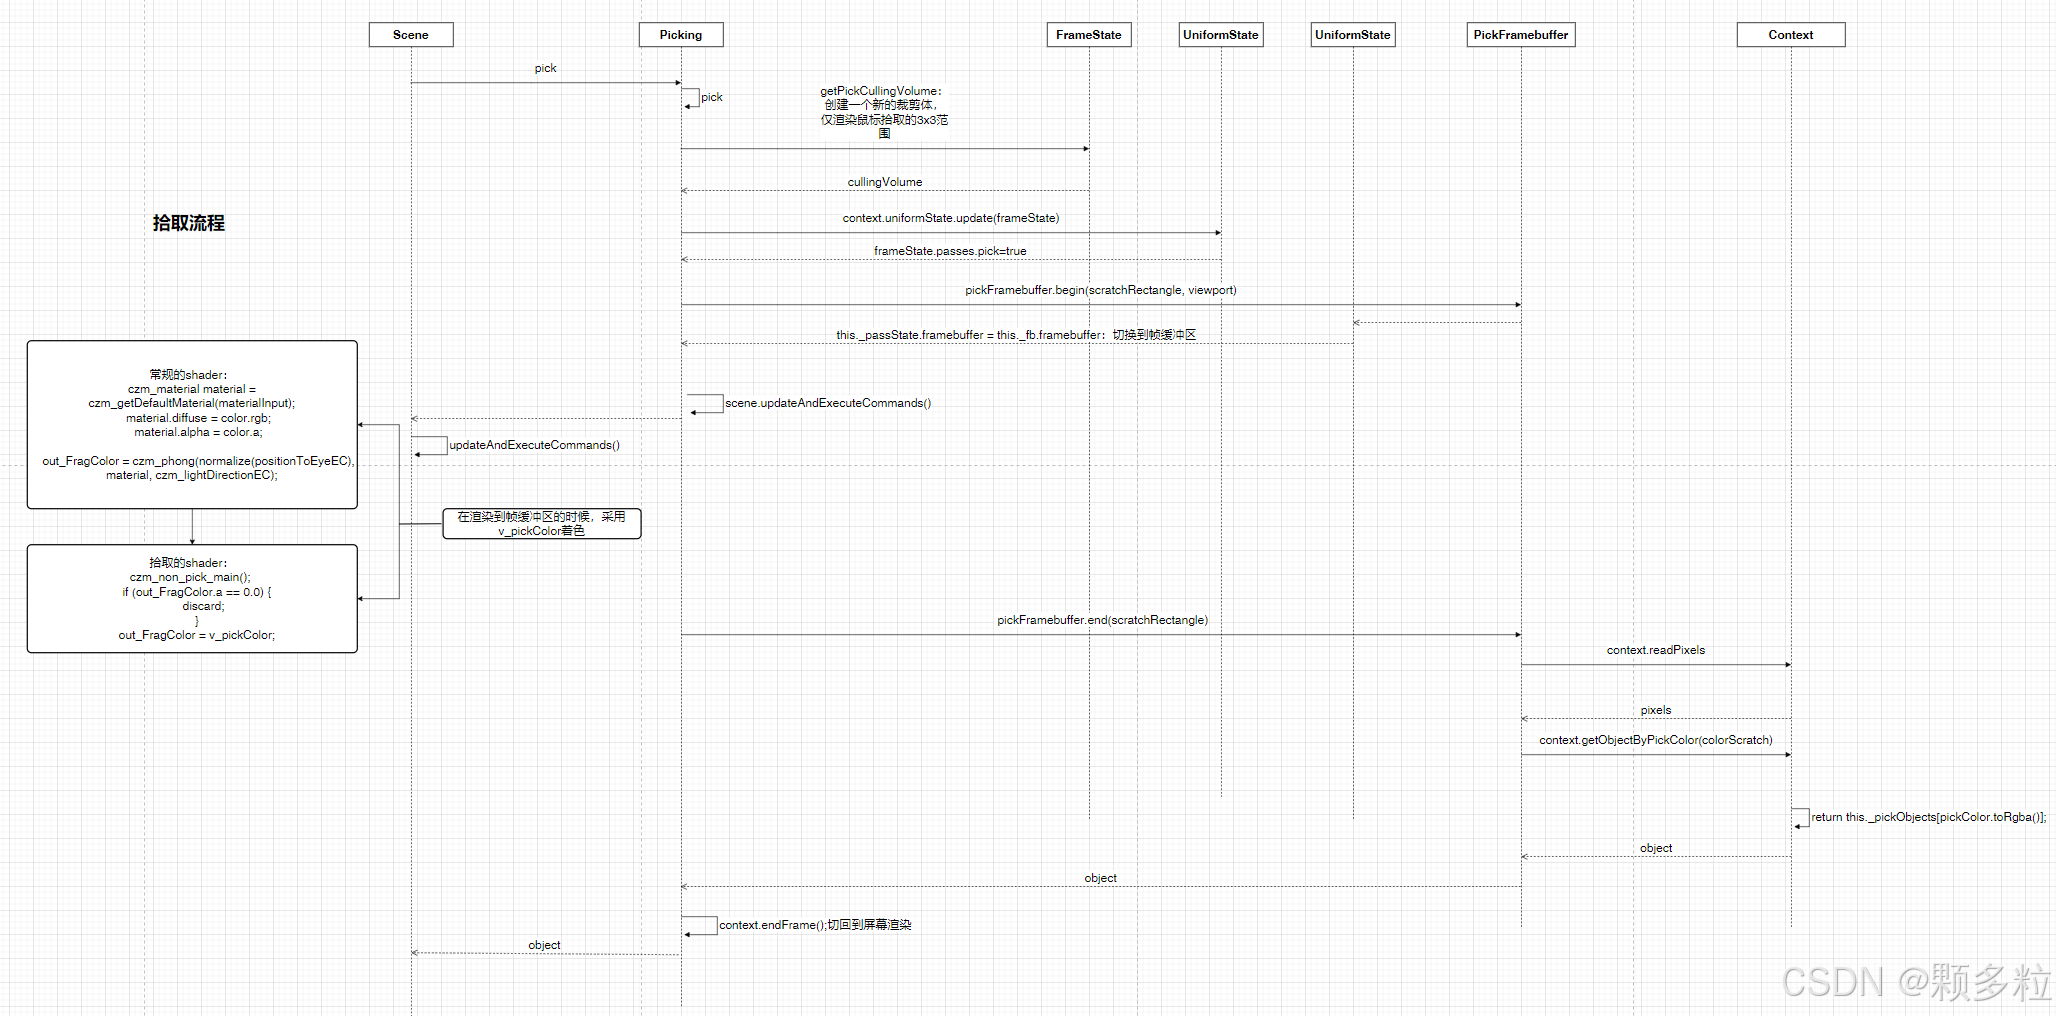
3.拾取流程
Picking.prototype.pick = function(scene, windowPosition, width, height) {
  ...
  frameState.passes.pick = true;
  passState = pickFramebuffer.begin(scratchRectangle, viewport);
  ...
  scene.updateAndExecuteCommands(passState, scratchColorZero);

  const object = pickFramebuffer.end(scratchRectangle);
  ...
  context.endFrame();
  return object;
};
拾取主要是Picking类负责,这里我们只看主要流程的代码,下面逐句说明其作用:
passState = pickFramebuffer.begin(scratchRectangle, viewport),表示切换渲染到帧缓冲区,那接下来执行的绘制命令并不会把结果绘制到屏幕上,而是渲染到帧缓冲区。
scene.updateAndExecuteCommands(passState, scratchColorZero),执行绘制命令,如果passes.pick为true并且该DrawCommand存在pickCommand,则执行pickCommand,而不是原来的command。对于不同的几何,其pickCommand渲染用的pickColor是不一样的,最终呈现的颜色也只和pickcolor有关,如此渲染到帧缓冲区后,不同的几何就呈现了不同的颜色。
function executeCommand(command, scene, context, passState, debugFramebuffer) {
  const frameState = scene._frameState;

  if (passes.pick || passes.depth) {
    if (
      passes.pick &&
      !passes.depth &&
      defined(command.derivedCommands.picking)
    ) {
      command = command.derivedCommands.picking.pickCommand;
      command.execute(context, passState);
      return;
    } else if (defined(command.derivedCommands.depth)) {
      ...
    }
  }
}
const object = pickFramebuffer.end(scratchRectangle),真正拾取的方法,其大体分两个流程,第一,先读取帧缓冲区的点击区域3x3范围的颜色值,然后通过pickcolor从列表里面匹配颜色一致的作为最终结果,这里列表就是Context的_pickObjects对象,前面我们说过,Primitive的update中会创建新的pickid对象添加到_pickObjects里面去。
PickFramebuffer.prototype.end = function (screenSpaceRectangle) {
  const context = this._context;
  const pixels = context.readPixels({
    x: screenSpaceRectangle.x,
    y: screenSpaceRectangle.y,
    width: width,
    height: height,
    framebuffer: this._fb.framebuffer,
  });
  ...
  for (let i = 0; i < length; ++i) {
    if (
      -halfWidth <= x &&
      x <= halfWidth &&
      -halfHeight <= y &&
      y <= halfHeight
    ) {
      const index = 4 * ((halfHeight - y) * width + x + halfWidth);

      colorScratch.red = Color.byteToFloat(pixels[index]);
      colorScratch.green = Color.byteToFloat(pixels[index + 1]);
      colorScratch.blue = Color.byteToFloat(pixels[index + 2]);
      colorScratch.alpha = Color.byteToFloat(pixels[index + 3]);

      const object = context.getObjectByPickColor(colorScratch);
      if (defined(object)) {
        return object;
      }
    }
    ...
  }

  return undefined;
};
context.endFrame(),最后将渲染对象切换回屏幕。
流程图
这里附上Primitive创建以及拾取的流程图
其实还是有很多地方没有讲到,文中的这个拾取是关于entities对象的,cesium的拾取分几种,这里只讲了一种,后续有时间再更新,不妥之处,还望大家指正,多多交流。