一、简介:
本篇博客是昇思大模型打卡营应用实践部分的第一次分享,主题是计算机视觉(CV)领域的FCN图像语义分割,接下来几天还会陆续分享其他CV领域的知识(doge)。
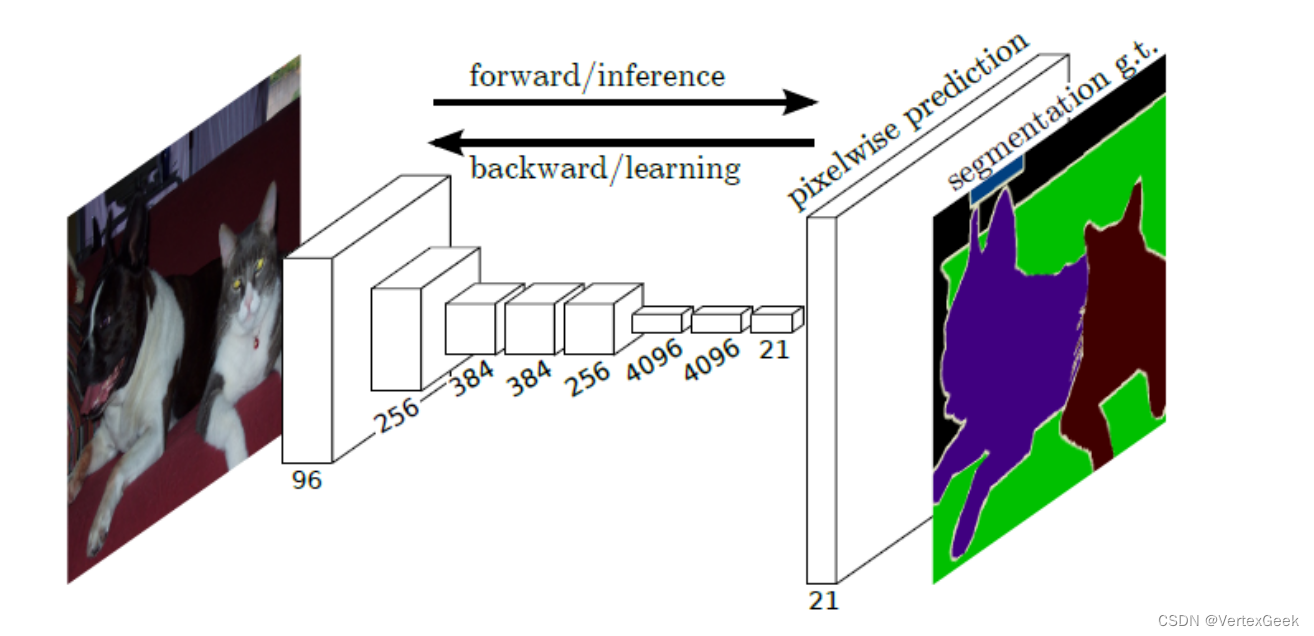
全卷积网络(Fully Convolutional Networks,FCN)是UC Berkeley的Jonathan Long等人于2015年在Fully Convolutional Networks for Semantic Segmentation[1]一文中提出的用于图像语义分割的一种框架。FCN是首个端到端(end to end)进行像素级(pixel level)预测的全卷积网络。
二、语义分割:
在具体介绍FCN之前,首先介绍何为语义分割:
图像语义分割(semantic segmentation)是图像处理和机器视觉技术中关于图像理解的重要一环,AI领域中一个重要分支,常被应用于人脸识别、物体检测、医学影像、卫星图像分析、自动驾驶感知等领域。
语义分割的目的是对图像中每个像素点进行分类。与普通的分类任务只输出某个类别不同,语义分割任务输出与输入大小相同的图像,输出图像的每个像素对应了输入图像每个像素的类别。语义在图像领域指的是图像的内容,对图片意思的理解,下图是一些语义分割的实例:
可以看到最右边的原始图像经过语义分割之后,实现了像素级别的目标物体识别。
三、模型简介:
FCN主要用于图像分割领域,是一种端到端的分割方法,是深度学习应用在图像语义分割的开山之作。通过进行像素级的预测直接得出与原图大小相等的label map。因FCN丢弃全连接层替换为全卷积层,网络所有层均为卷积层,故称为全卷积网络。
全卷积神经网络主要使用以下三种技术:
1、卷积化:
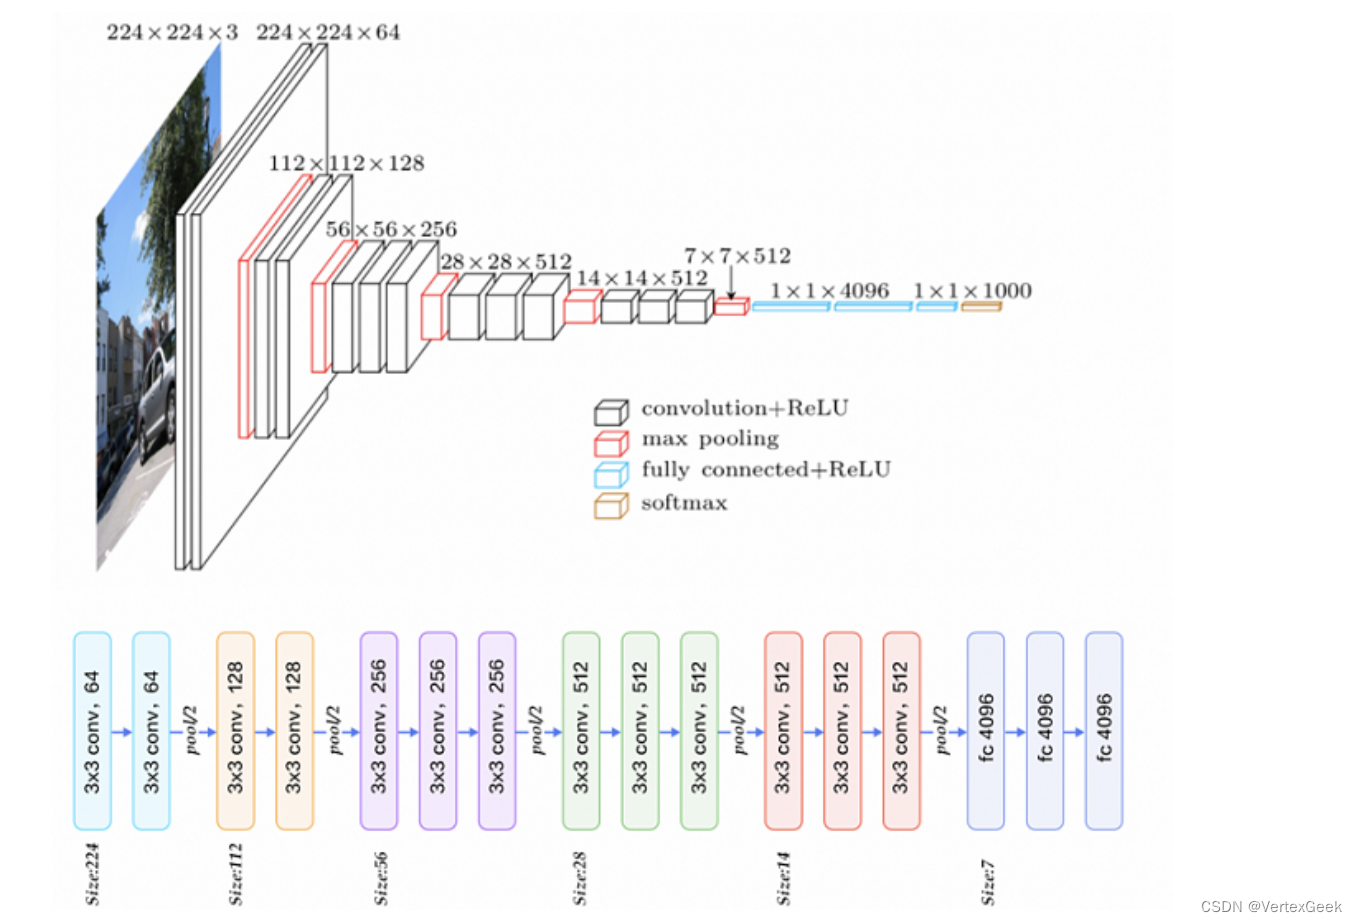
使用VGG-16作为FCN的backbone。VGG-16的输入为224*224的RGB图像,输出为1000个预测值。VGG-16只能接受固定大小的输入,丢弃了空间坐标,产生非空间输出。VGG-16中共有三个全连接层,全连接层也可视为带有覆盖整个区域的卷积。将全连接层转换为卷积层能使网络输出由一维非空间输出变为二维矩阵,利用输出能生成输入图片映射的heatmap。
2、上采样:
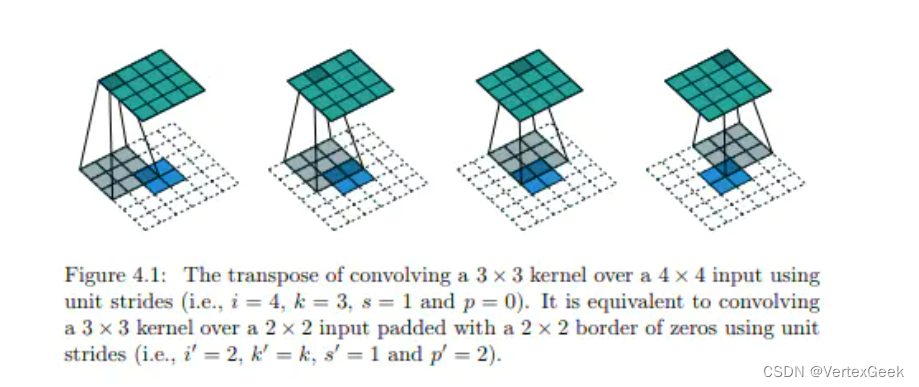
在卷积过程的卷积操作和池化操作会使得特征图的尺寸变小,为得到原图的大小的稠密图像预测,需要对得到的特征图进行上采样操作。使用双线性插值的参数来初始化上采样逆卷积的参数,后通过反向传播来学习非线性上采样。在网络中执行上采样,以通过像素损失的反向传播进行端到端的学习。
3、跳跃结构:
利用上采样技巧对最后一层的特征图进行上采样得到原图大小的分割是步长为32像素的预测,称之为FCN-32s。由于最后一层的特征图太小,损失过多细节,采用skips结构将更具有全局信息的最后一层预测和更浅层的预测结合,使预测结果获取更多的局部细节。将底层(stride 32)的预测(FCN-32s)进行2倍的上采样得到原尺寸的图像,并与从pool4层(stride 16)进行的预测融合起来(相加),这一部分的网络被称为FCN-16s。随后将这一部分的预测再进行一次2倍的上采样并与从pool3层得到的预测融合起来,这一部分的网络被称为FCN-8s。 Skips结构将深层的全局信息与浅层的局部信息相结合。
四、 数据处理:
开始下面的操作之前,需要先下载Mindspore,还没有下载的宝子,可以回看我的昇思25天学习打卡营第1天|快速入门-CSDN博客。
1、数据集下载:
import time
from download import download

url = "https://mindspore-website.obs.cn-north-4.myhuaweicloud.com/notebook/datasets/dataset_fcn8s.tar"

download(url, "./dataset", kind="tar", replace=True)
2、数据集加载:
import numpy as np
import cv2
import mindspore.dataset as ds

class SegDataset:
    def __init__(self,
                 image_mean,
                 image_std,
                 data_file='',
                 batch_size=32,
                 crop_size=512,
                 max_scale=2.0,
                 min_scale=0.5,
                 ignore_label=255,
                 num_classes=21,
                 num_readers=2,
                 num_parallel_calls=4):

        self.data_file = data_file
        self.batch_size = batch_size
        self.crop_size = crop_size
        self.image_mean = np.array(image_mean, dtype=np.float32)
        self.image_std = np.array(image_std, dtype=np.float32)
        self.max_scale = max_scale
        self.min_scale = min_scale
        self.ignore_label = ignore_label
        self.num_classes = num_classes
        self.num_readers = num_readers
        self.num_parallel_calls = num_parallel_calls
        max_scale > min_scale

    def preprocess_dataset(self, image, label):
        image_out = cv2.imdecode(np.frombuffer(image, dtype=np.uint8), cv2.IMREAD_COLOR)
        label_out = cv2.imdecode(np.frombuffer(label, dtype=np.uint8), cv2.IMREAD_GRAYSCALE)
        sc = np.random.uniform(self.min_scale, self.max_scale)
        new_h, new_w = int(sc * image_out.shape[0]), int(sc * image_out.shape[1])
        image_out = cv2.resize(image_out, (new_w, new_h), interpolation=cv2.INTER_CUBIC)
        label_out = cv2.resize(label_out, (new_w, new_h), interpolation=cv2.INTER_NEAREST)

        image_out = (image_out - self.image_mean) / self.image_std
        out_h, out_w = max(new_h, self.crop_size), max(new_w, self.crop_size)
        pad_h, pad_w = out_h - new_h, out_w - new_w
        if pad_h > 0 or pad_w > 0:
            image_out = cv2.copyMakeBorder(image_out, 0, pad_h, 0, pad_w, cv2.BORDER_CONSTANT, value=0)
            label_out = cv2.copyMakeBorder(label_out, 0, pad_h, 0, pad_w, cv2.BORDER_CONSTANT, value=self.ignore_label)
        offset_h = np.random.randint(0, out_h - self.crop_size + 1)
        offset_w = np.random.randint(0, out_w - self.crop_size + 1)
        image_out = image_out[offset_h: offset_h + self.crop_size, offset_w: offset_w + self.crop_size, :]
        label_out = label_out[offset_h: offset_h + self.crop_size, offset_w: offset_w+self.crop_size]
        if np.random.uniform(0.0, 1.0) > 0.5:
            image_out = image_out[:, ::-1, :]
            label_out = label_out[:, ::-1]
        image_out = image_out.transpose((2, 0, 1))
        image_out = image_out.copy()
        label_out = label_out.copy()
        label_out = label_out.astype("int32")
        return image_out, label_out

    def get_dataset(self):
        ds.config.set_numa_enable(True)
        dataset = ds.MindDataset(self.data_file, columns_list=["data", "label"],
                                 shuffle=True, num_parallel_workers=self.num_readers)
        transforms_list = self.preprocess_dataset
        dataset = dataset.map(operations=transforms_list, input_columns=["data", "label"],
                              output_columns=["data", "label"],
                              num_parallel_workers=self.num_parallel_calls)
        dataset = dataset.shuffle(buffer_size=self.batch_size * 10)
        dataset = dataset.batch(self.batch_size, drop_remainder=True)
        return dataset


# 定义创建数据集的参数
IMAGE_MEAN = [103.53, 116.28, 123.675]
IMAGE_STD = [57.375, 57.120, 58.395]
DATA_FILE = "dataset/dataset_fcn8s/mindname.mindrecord"

# 定义模型训练参数
train_batch_size = 4
crop_size = 512
min_scale = 0.5
max_scale = 2.0
ignore_label = 255
num_classes = 21

# 实例化Dataset
dataset = SegDataset(image_mean=IMAGE_MEAN,
                     image_std=IMAGE_STD,
                     data_file=DATA_FILE,
                     batch_size=train_batch_size,
                     crop_size=crop_size,
                     max_scale=max_scale,
                     min_scale=min_scale,
                     ignore_label=ignore_label,
                     num_classes=num_classes,
                     num_readers=2,
                     num_parallel_calls=4)

dataset = dataset.get_dataset()
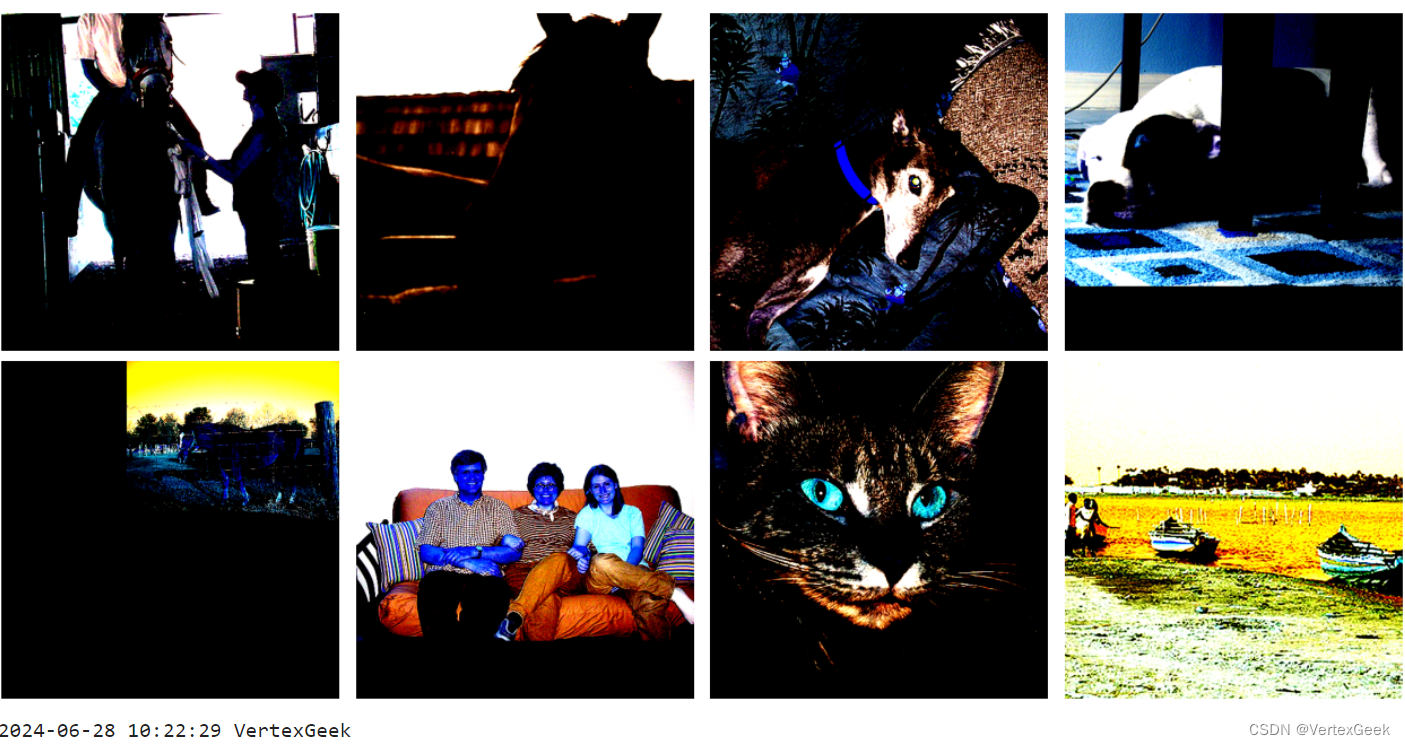
3、数据集可视化:
import numpy as np
import matplotlib.pyplot as plt

plt.figure(figsize=(16, 8))

# 对训练集中的数据进行展示
for i in range(1, 9):
    plt.subplot(2, 4, i)
    show_data = next(dataset.create_dict_iterator())
    show_images = show_data["data"].asnumpy()
    show_images = np.clip(show_images, 0, 1)
# 将图片转换HWC格式后进行展示
    plt.imshow(show_images[0].transpose(1, 2, 0))
    plt.axis("off")
    plt.subplots_adjust(wspace=0.05, hspace=0)
plt.show()

print(time.strftime("%Y-%m-%d %H:%M:%S", time.localtime(time.time())), 'VertexGeek')
np.clip这个函数之前,我们没有介绍过,这里补充一下,函数是NumPy库的一部分,用于将数组中的元素限制在给定的最小值和最大值之间。如果一个元素的值小于最小值,它将被设置为最小值;如果它的值大于最大值,它将被设置为最大值;如果在最小值和最大值之间,它将保持不变。np.clip(show_images,0,1)方法确保图像数据的值在0到1的范围内,这样它们就可以正确地显示或者用于后续的图像处理步骤 。
五、网络构建:
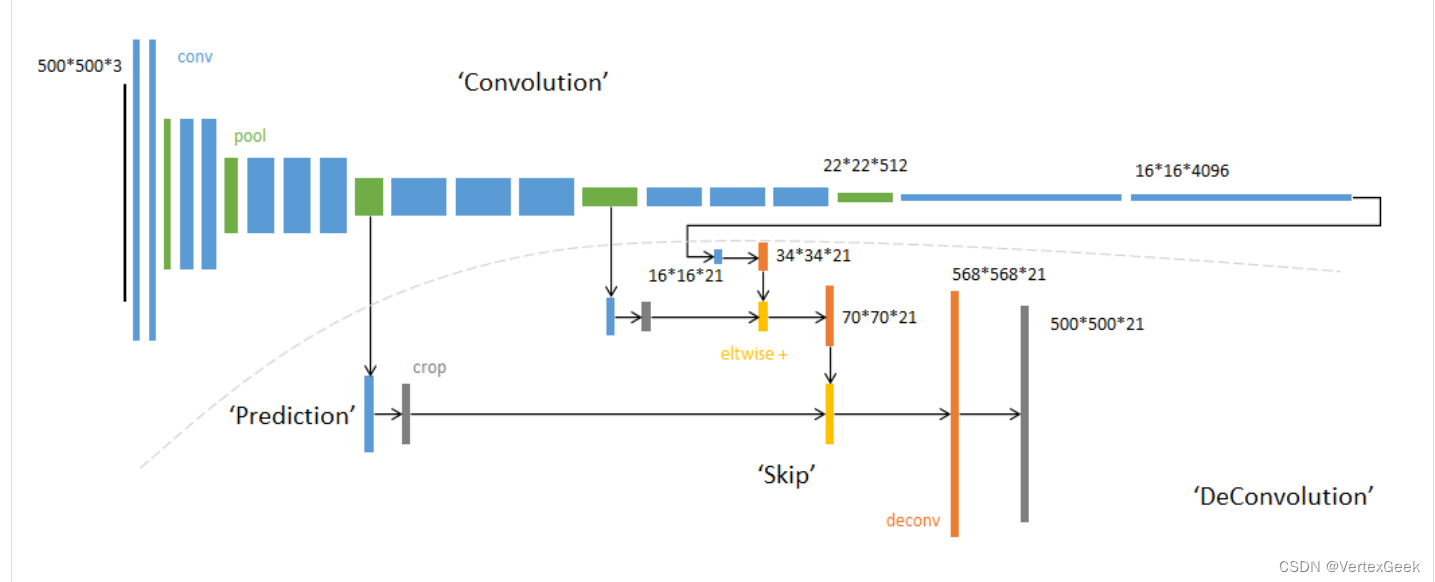
FCN网络的流程如下图所示:
- 输入图像image,经过pool1池化后,尺寸变为原始尺寸的1/2。
- 经过pool2池化,尺寸变为原始尺寸的1/4。
- 接着经过pool3、pool4、pool5池化,大小分别变为原始尺寸的1/8、1/16、1/32。
- 经过conv6-7卷积,输出的尺寸依然是原图的1/32。
- FCN-32s是最后使用反卷积,使得输出图像大小与输入图像相同。
- FCN-16s是将conv7的输出进行反卷积,使其尺寸扩大两倍至原图的1/16,并将其与pool4输出的特征图进行融合,后通过反卷积扩大到原始尺寸。
- FCN-8s是将conv7的输出进行反卷积扩大4倍,将pool4输出的特征图反卷积扩大2倍,并将pool3输出特征图拿出,三者融合后通反卷积扩大到原始尺寸。
使用以下代码构建一个FCN-8s网络:
import mindspore.nn as nn

class FCN8s(nn.Cell):
    def __init__(self, n_class):
        super().__init__()
        self.n_class = n_class
        self.conv1 = nn.SequentialCell(
            nn.Conv2d(in_channels=3, out_channels=64,
                      kernel_size=3, weight_init='xavier_uniform'),
            nn.BatchNorm2d(64),
            nn.ReLU(),
            nn.Conv2d(in_channels=64, out_channels=64,
                      kernel_size=3, weight_init='xavier_uniform'),
            nn.BatchNorm2d(64),
            nn.ReLU()
        )
        self.pool1 = nn.MaxPool2d(kernel_size=2, stride=2)
        self.conv2 = nn.SequentialCell(
            nn.Conv2d(in_channels=64, out_channels=128,
                      kernel_size=3, weight_init='xavier_uniform'),
            nn.BatchNorm2d(128),
            nn.ReLU(),
            nn.Conv2d(in_channels=128, out_channels=128,
                      kernel_size=3, weight_init='xavier_uniform'),
            nn.BatchNorm2d(128),
            nn.ReLU()
        )
        self.pool2 = nn.MaxPool2d(kernel_size=2, stride=2)
        self.conv3 = nn.SequentialCell(
            nn.Conv2d(in_channels=128, out_channels=256,
                      kernel_size=3, weight_init='xavier_uniform'),
            nn.BatchNorm2d(256),
            nn.ReLU(),
            nn.Conv2d(in_channels=256, out_channels=256,
                      kernel_size=3, weight_init='xavier_uniform'),
            nn.BatchNorm2d(256),
            nn.ReLU(),
            nn.Conv2d(in_channels=256, out_channels=256,
                      kernel_size=3, weight_init='xavier_uniform'),
            nn.BatchNorm2d(256),
            nn.ReLU()
        )
        self.pool3 = nn.MaxPool2d(kernel_size=2, stride=2)
        self.conv4 = nn.SequentialCell(
            nn.Conv2d(in_channels=256, out_channels=512,
                      kernel_size=3, weight_init='xavier_uniform'),
            nn.BatchNorm2d(512),
            nn.ReLU(),
            nn.Conv2d(in_channels=512, out_channels=512,
                      kernel_size=3, weight_init='xavier_uniform'),
            nn.BatchNorm2d(512),
            nn.ReLU(),
            nn.Conv2d(in_channels=512, out_channels=512,
                      kernel_size=3, weight_init='xavier_uniform'),
            nn.BatchNorm2d(512),
            nn.ReLU()
        )
        self.pool4 = nn.MaxPool2d(kernel_size=2, stride=2)
        self.conv5 = nn.SequentialCell(
            nn.Conv2d(in_channels=512, out_channels=512,
                      kernel_size=3, weight_init='xavier_uniform'),
            nn.BatchNorm2d(512),
            nn.ReLU(),
            nn.Conv2d(in_channels=512, out_channels=512,
                      kernel_size=3, weight_init='xavier_uniform'),
            nn.BatchNorm2d(512),
            nn.ReLU(),
            nn.Conv2d(in_channels=512, out_channels=512,
                      kernel_size=3, weight_init='xavier_uniform'),
            nn.BatchNorm2d(512),
            nn.ReLU()
        )
        self.pool5 = nn.MaxPool2d(kernel_size=2, stride=2)
        self.conv6 = nn.SequentialCell(
            nn.Conv2d(in_channels=512, out_channels=4096,
                      kernel_size=7, weight_init='xavier_uniform'),
            nn.BatchNorm2d(4096),
            nn.ReLU(),
        )
        self.conv7 = nn.SequentialCell(
            nn.Conv2d(in_channels=4096, out_channels=4096,
                      kernel_size=1, weight_init='xavier_uniform'),
            nn.BatchNorm2d(4096),
            nn.ReLU(),
        )
        self.score_fr = nn.Conv2d(in_channels=4096, out_channels=self.n_class,
                                  kernel_size=1, weight_init='xavier_uniform')
        self.upscore2 = nn.Conv2dTranspose(in_channels=self.n_class, out_channels=self.n_class,
                                           kernel_size=4, stride=2, weight_init='xavier_uniform')
        self.score_pool4 = nn.Conv2d(in_channels=512, out_channels=self.n_class,
                                     kernel_size=1, weight_init='xavier_uniform')
        self.upscore_pool4 = nn.Conv2dTranspose(in_channels=self.n_class, out_channels=self.n_class,
                                                kernel_size=4, stride=2, weight_init='xavier_uniform')
        self.score_pool3 = nn.Conv2d(in_channels=256, out_channels=self.n_class,
                                     kernel_size=1, weight_init='xavier_uniform')
        self.upscore8 = nn.Conv2dTranspose(in_channels=self.n_class, out_channels=self.n_class,
                                           kernel_size=16, stride=8, weight_init='xavier_uniform')

    def construct(self, x):
        x1 = self.conv1(x)
        p1 = self.pool1(x1)
        x2 = self.conv2(p1)
        p2 = self.pool2(x2)
        x3 = self.conv3(p2)
        p3 = self.pool3(x3)
        x4 = self.conv4(p3)
        p4 = self.pool4(x4)
        x5 = self.conv5(p4)
        p5 = self.pool5(x5)
        x6 = self.conv6(p5)
        x7 = self.conv7(x6)
        sf = self.score_fr(x7)
        u2 = self.upscore2(sf)
        s4 = self.score_pool4(p4)
        f4 = s4 + u2
        u4 = self.upscore_pool4(f4)
        s3 = self.score_pool3(p3)
        f3 = s3 + u4
        out = self.upscore8(f3)
        return out
六、训练准备:
1、VGG16权重导入:
FCN使用VGG-16作为骨干网络,用于实现图像编码。使用下面代码导入VGG-16预训练模型的部分预训练权重。
from download import download
from mindspore import load_checkpoint, load_param_into_net

url = "https://mindspore-website.obs.cn-north-4.myhuaweicloud.com/notebook/datasets/fcn8s_vgg16_pretrain.ckpt"
download(url, "fcn8s_vgg16_pretrain.ckpt", replace=True)
def load_vgg16():
    ckpt_vgg16 = "fcn8s_vgg16_pretrain.ckpt"
    param_vgg = load_checkpoint(ckpt_vgg16)
    load_param_into_net(net, param_vgg)

print(time.strftime("%Y-%m-%d %H:%M:%S", time.localtime(time.time())), "VertexGeek")
2、损失函数:
语义分割是对图像中每个像素点进行分类,仍是分类问题,故损失函数选择交叉熵损失函数来计算FCN网络输出与mask之间的交叉熵损失。这里我们使用的是mindspore.nn.CrossEntropyLoss()作为损失函数。
from mindspore.nn import CrossEntropyLoss

loss = CrossEntropyLoss()
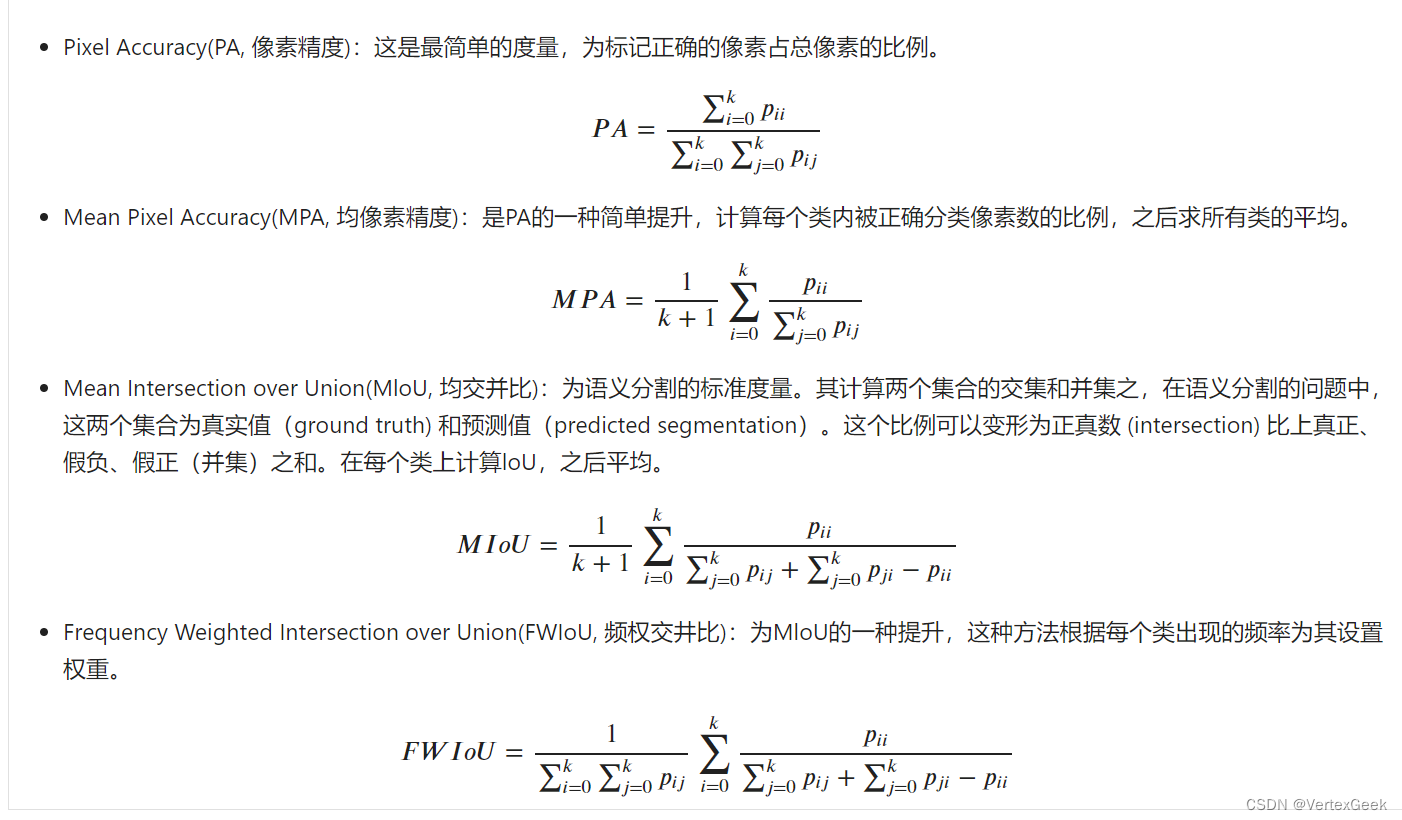
3、评估指标:
import numpy as np
import mindspore as ms
import mindspore.nn as nn
import mindspore.train as train

class PixelAccuracy(train.Metric):
    def __init__(self, num_class=21):
        super(PixelAccuracy, self).__init__()
        self.num_class = num_class

    def _generate_matrix(self, gt_image, pre_image):
        mask = (gt_image >= 0) & (gt_image < self.num_class)
        label = self.num_class * gt_image[mask].astype('int') + pre_image[mask]
        count = np.bincount(label, minlength=self.num_class**2)
        confusion_matrix = count.reshape(self.num_class, self.num_class)
        return confusion_matrix

    def clear(self):
        self.confusion_matrix = np.zeros((self.num_class,) * 2)

    def update(self, *inputs):
        y_pred = inputs[0].asnumpy().argmax(axis=1)
        y = inputs[1].asnumpy().reshape(4, 512, 512)
        self.confusion_matrix += self._generate_matrix(y, y_pred)

    def eval(self):
        pixel_accuracy = np.diag(self.confusion_matrix).sum() / self.confusion_matrix.sum()
        return pixel_accuracy


class PixelAccuracyClass(train.Metric):
    def __init__(self, num_class=21):
        super(PixelAccuracyClass, self).__init__()
        self.num_class = num_class

    def _generate_matrix(self, gt_image, pre_image):
        mask = (gt_image >= 0) & (gt_image < self.num_class)
        label = self.num_class * gt_image[mask].astype('int') + pre_image[mask]
        count = np.bincount(label, minlength=self.num_class**2)
        confusion_matrix = count.reshape(self.num_class, self.num_class)
        return confusion_matrix

    def update(self, *inputs):
        y_pred = inputs[0].asnumpy().argmax(axis=1)
        y = inputs[1].asnumpy().reshape(4, 512, 512)
        self.confusion_matrix += self._generate_matrix(y, y_pred)

    def clear(self):
        self.confusion_matrix = np.zeros((self.num_class,) * 2)

    def eval(self):
        mean_pixel_accuracy = np.diag(self.confusion_matrix) / self.confusion_matrix.sum(axis=1)
        mean_pixel_accuracy = np.nanmean(mean_pixel_accuracy)
        return mean_pixel_accuracy


class MeanIntersectionOverUnion(train.Metric):
    def __init__(self, num_class=21):
        super(MeanIntersectionOverUnion, self).__init__()
        self.num_class = num_class

    def _generate_matrix(self, gt_image, pre_image):
        mask = (gt_image >= 0) & (gt_image < self.num_class)
        label = self.num_class * gt_image[mask].astype('int') + pre_image[mask]
        count = np.bincount(label, minlength=self.num_class**2)
        confusion_matrix = count.reshape(self.num_class, self.num_class)
        return confusion_matrix

    def update(self, *inputs):
        y_pred = inputs[0].asnumpy().argmax(axis=1)
        y = inputs[1].asnumpy().reshape(4, 512, 512)
        self.confusion_matrix += self._generate_matrix(y, y_pred)

    def clear(self):
        self.confusion_matrix = np.zeros((self.num_class,) * 2)

    def eval(self):
        mean_iou = np.diag(self.confusion_matrix) / (
            np.sum(self.confusion_matrix, axis=1) + np.sum(self.confusion_matrix, axis=0) -
            np.diag(self.confusion_matrix))
        mean_iou = np.nanmean(mean_iou)
        return mean_iou


class FrequencyWeightedIntersectionOverUnion(train.Metric):
    def __init__(self, num_class=21):
        super(FrequencyWeightedIntersectionOverUnion, self).__init__()
        self.num_class = num_class

    def _generate_matrix(self, gt_image, pre_image):
        mask = (gt_image >= 0) & (gt_image < self.num_class)
        label = self.num_class * gt_image[mask].astype('int') + pre_image[mask]
        count = np.bincount(label, minlength=self.num_class**2)
        confusion_matrix = count.reshape(self.num_class, self.num_class)
        return confusion_matrix

    def update(self, *inputs):
        y_pred = inputs[0].asnumpy().argmax(axis=1)
        y = inputs[1].asnumpy().reshape(4, 512, 512)
        self.confusion_matrix += self._generate_matrix(y, y_pred)

    def clear(self):
        self.confusion_matrix = np.zeros((self.num_class,) * 2)

    def eval(self):
        freq = np.sum(self.confusion_matrix, axis=1) / np.sum(self.confusion_matrix)
        iu = np.diag(self.confusion_matrix) / (
            np.sum(self.confusion_matrix, axis=1) + np.sum(self.confusion_matrix, axis=0) -
            np.diag(self.confusion_matrix))

        frequency_weighted_iou = (freq[freq > 0] * iu[freq > 0]).sum()
        return frequency_weighted_iou
等把课程所有的内容都过一遍,我再仔细介绍这个网络的结构(先挖个坑)
七、模型训练:
准备完成之后,我们就可以开始训练了:
import mindspore
from mindspore import Tensor
import mindspore.nn as nn
from mindspore.train import ModelCheckpoint, CheckpointConfig, LossMonitor, TimeMonitor, Model

device_target = "Ascend"
mindspore.set_context(mode=mindspore.PYNATIVE_MODE, device_target=device_target)

train_batch_size = 4
num_classes = 21
# 初始化模型结构
net = FCN8s(n_class=21)
# 导入vgg16预训练参数
load_vgg16()
# 计算学习率
min_lr = 0.0005
base_lr = 0.05
train_epochs = 1
iters_per_epoch = dataset.get_dataset_size()
total_step = iters_per_epoch * train_epochs

lr_scheduler = mindspore.nn.cosine_decay_lr(min_lr,
                                            base_lr,
                                            total_step,
                                            iters_per_epoch,
                                            decay_epoch=2)
lr = Tensor(lr_scheduler[-1])

# 定义损失函数
loss = nn.CrossEntropyLoss(ignore_index=255)
# 定义优化器
optimizer = nn.Momentum(params=net.trainable_params(), learning_rate=lr, momentum=0.9, weight_decay=0.0001)
# 定义loss_scale
scale_factor = 4
scale_window = 3000
loss_scale_manager = ms.amp.DynamicLossScaleManager(scale_factor, scale_window)
# 初始化模型
if device_target == "Ascend":
    model = Model(net, loss_fn=loss, optimizer=optimizer, loss_scale_manager=loss_scale_manager, metrics={"pixel accuracy": PixelAccuracy(), "mean pixel accuracy": PixelAccuracyClass(), "mean IoU": MeanIntersectionOverUnion(), "frequency weighted IoU": FrequencyWeightedIntersectionOverUnion()})
else:
    model = Model(net, loss_fn=loss, optimizer=optimizer, metrics={"pixel accuracy": PixelAccuracy(), "mean pixel accuracy": PixelAccuracyClass(), "mean IoU": MeanIntersectionOverUnion(), "frequency weighted IoU": FrequencyWeightedIntersectionOverUnion()})

# 设置ckpt文件保存的参数
time_callback = TimeMonitor(data_size=iters_per_epoch)
loss_callback = LossMonitor()
callbacks = [time_callback, loss_callback]
save_steps = 330
keep_checkpoint_max = 5
config_ckpt = CheckpointConfig(save_checkpoint_steps=10,
                               keep_checkpoint_max=keep_checkpoint_max)
ckpt_callback = ModelCheckpoint(prefix="FCN8s",
                                directory="./ckpt",
                                config=config_ckpt)
callbacks.append(ckpt_callback)
model.train(train_epochs, dataset, callbacks=callbacks)

print(time.strftime('%Y-%m-%d %H:%M:%S', time.localtime(time.time())), 'VertexGeek')
尝试了训练一把,时间太长了,我这里手动截断了:
当然如果实在想体验一把完全体的训练,可以考虑手动调大batch_size和learning_rate。
八、模型评估:
import mindspore
from mindspore.nn import Adam
from mindspore import Tensor
import mindspore.nn as nn
from mindspore.train import ModelCheckpoint, CheckpointConfig, LossMonitor, TimeMonitor, Model

IMAGE_MEAN = [103.53, 116.28, 123.675]
IMAGE_STD = [57.375, 57.120, 58.395]
DATA_FILE = "dataset/dataset_fcn8s/mindname.mindrecord"


# 下载已训练好的权重文件
url = "https://mindspore-website.obs.cn-north-4.myhuaweicloud.com/notebook/datasets/FCN8s.ckpt"
download(url, "FCN8s.ckpt", replace=True)
net = FCN8s(n_class=num_classes)

ckpt_file = "FCN8s.ckpt"
param_dict = load_checkpoint(ckpt_file)
load_param_into_net(net, param_dict)
device_target = "Ascend"
mindspore.set_context(mode=mindspore.PYNATIVE_MODE, device_target=device_target)

# 定义损失函数
loss = nn.CrossEntropyLoss(ignore_index=255)
# 定义优化器
optimizer = nn.Momentum(params=net.trainable_params(), learning_rate=0.005, momentum=0.9, weight_decay=0.0001)
# 定义loss_scale
scale_factor = 4
scale_window = 3000
loss_scale_manager = ms.amp.DynamicLossScaleManager(scale_factor, scale_window)


if device_target == "Ascend":
    model = Model(net, loss_fn=loss, optimizer=optimizer, loss_scale_manager=loss_scale_manager, metrics={"pixel accuracy": PixelAccuracy(), "mean pixel accuracy": PixelAccuracyClass(), "mean IoU": MeanIntersectionOverUnion(), "frequency weighted IoU": FrequencyWeightedIntersectionOverUnion()})
else:
    model = Model(net, loss_fn=loss, optimizer=optimizer, metrics={"pixel accuracy": PixelAccuracy(), "mean pixel accuracy": PixelAccuracyClass(), "mean IoU": MeanIntersectionOverUnion(), "frequency weighted IoU": FrequencyWeightedIntersectionOverUnion()})

# 实例化Dataset
dataset = SegDataset(image_mean=IMAGE_MEAN,
                     image_std=IMAGE_STD,
                     data_file=DATA_FILE,
                     batch_size=train_batch_size,
                     crop_size=crop_size,
                     max_scale=max_scale,
                     min_scale=min_scale,
                     ignore_label=ignore_label,
                     num_classes=num_classes,
                     num_readers=2,
                     num_parallel_calls=4)
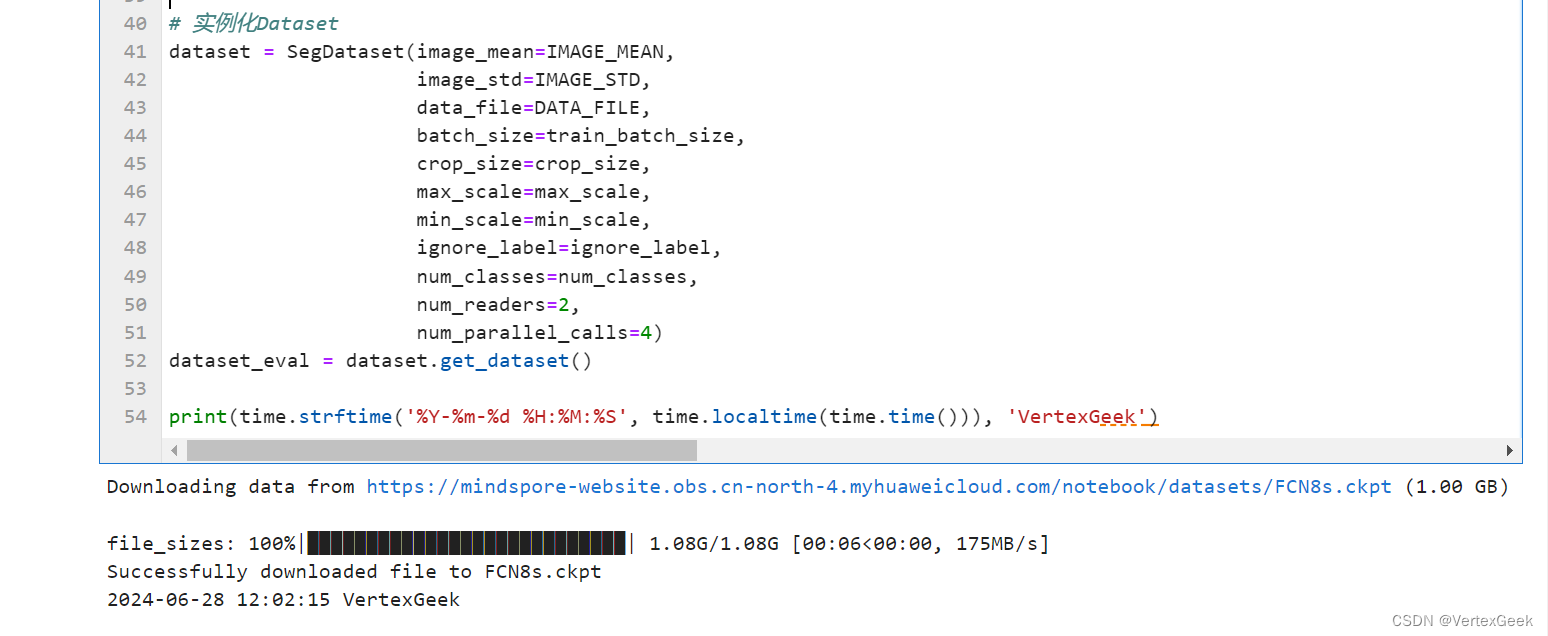
dataset_eval = dataset.get_dataset()

print(time.strftime('%Y-%m-%d %H:%M:%S', time.localtime(time.time())), 'VertexGeek')
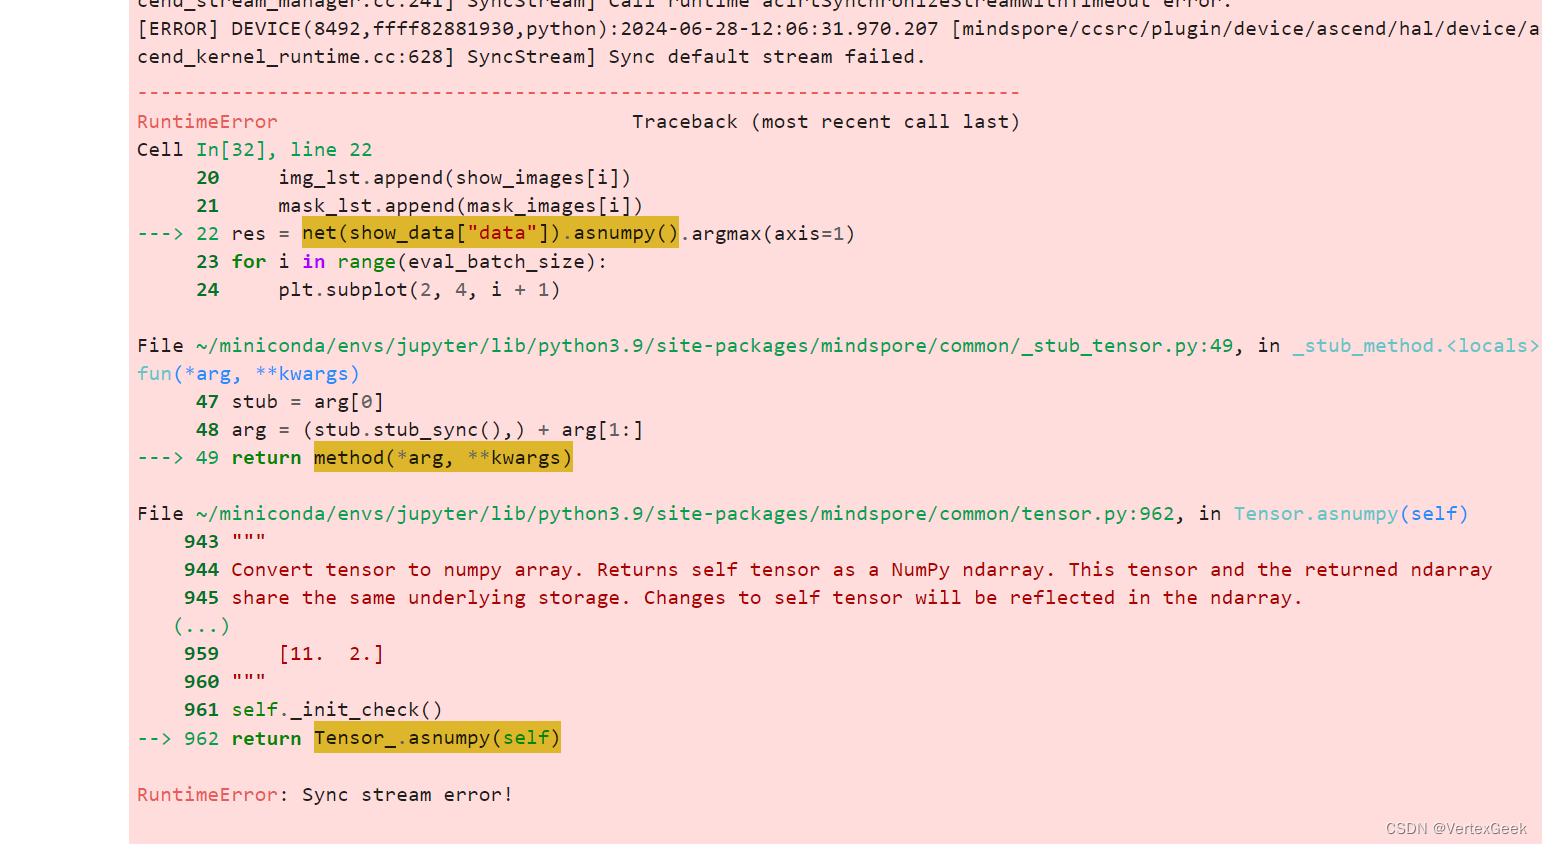
不过在运行model.eval()的时候遇到了同步流的问题,有知道怎么解决的宝子,私信我哈。

九、模型推理:
import cv2
import matplotlib.pyplot as plt

net = FCN8s(n_class=num_classes)
# 设置超参
ckpt_file = "FCN8s.ckpt"
param_dict = load_checkpoint(ckpt_file)
load_param_into_net(net, param_dict)
eval_batch_size = 4
img_lst = []
mask_lst = []
res_lst = []
# 推理效果展示(上方为输入图片,下方为推理效果图片)
plt.figure(figsize=(8, 5))
show_data = next(dataset_eval.create_dict_iterator())
show_images = show_data["data"].asnumpy()
mask_images = show_data["label"].reshape([4, 512, 512])
show_images = np.clip(show_images, 0, 1)
for i in range(eval_batch_size):
    img_lst.append(show_images[i])
    mask_lst.append(mask_images[i])
res = net(show_data["data"]).asnumpy().argmax(axis=1)
for i in range(eval_batch_size):
    plt.subplot(2, 4, i + 1)
    plt.imshow(img_lst[i].transpose(1, 2, 0))
    plt.axis("off")
    plt.subplots_adjust(wspace=0.05, hspace=0.02)
    plt.subplot(2, 4, i + 5)
    plt.imshow(res[i])
    plt.axis("off")
    plt.subplots_adjust(wspace=0.05, hspace=0.02)
plt.show()
print(time.strftime('%Y-%m-%d %H:%M:%S', time.localtime(time.time())), 'VertexGeek')
模型推理也出现了这个问题(苦笑),有佬帮忙解决一下吗?

