1.SpringBoot配置类
1.1自定义配置类
虽然SpringBoot中已经提供了强大的自动配置,默认配置的能力,但是由于我们还需要定义一些自定义组件,这些组件的配置还是需要自己使用自定义配置类来解决这个问题。
在Spring3.0之前,所有的配置类都要使用XML文件书写,相关的配置都需要定义在XML文件中。
在Spring3.0开始,Spring推出大量注解,无需将配置类书写在XML将文件中,使用注解就可以解决相关的问题。
Spring3.0推出了@Configuration注解将配置文件替代掉了,以后直接使用@Configuration声明配置类即可,无需再去编写任何XML文件。
要点:以前在Spring配置文件中声明的Bean,现在直接在@Configuration注解的类中配置即可。
SpringBoot启动类:
import org.springframework.boot.SpringApplication;
import org.springframework.boot.autoconfigure.SpringBootApplication;

@SpringBootApplication
public class MavenWrapperApplication {

    public static void main(String[] args) {
       SpringApplication.run(MavenWrapperApplication.class, args);
    }

}
SpringBoot默认提供的启动类上有一个@SpringBootApplication注解:
@Target({ElementType.TYPE})
@Retention(RetentionPolicy.RUNTIME)
@Documented
@Inherited
@SpringBootConfiguration
@EnableAutoConfiguration
@ComponentScan(
    excludeFilters = {@Filter(
    type = FilterType.CUSTOM,
    classes = {TypeExcludeFilter.class}
), @Filter(
    type = FilterType.CUSTOM,
    classes = {AutoConfigurationExcludeFilter.class}
)}
)
public @interface SpringBootApplication {...}
在@SpringBootApplication注解上,使用了@SpringBootConfiguration注解,这是SpringBoot提供的SpringBoot专用的配置注解。
SpringBootConfiguration注解定义如下:
import java.lang.annotation.Documented;
import java.lang.annotation.ElementType;
import java.lang.annotation.Retention;
import java.lang.annotation.RetentionPolicy;
import java.lang.annotation.Target;
import org.springframework.context.annotation.Configuration;
import org.springframework.core.annotation.AliasFor;
import org.springframework.stereotype.Indexed;

@Target({ElementType.TYPE})
@Retention(RetentionPolicy.RUNTIME)
@Documented
@Configuration
@Indexed
public @interface SpringBootConfiguration {
    @AliasFor(
        annotation = Configuration.class
    )
    boolean proxyBeanMethods() default true;
}
@SpringBootConfiguration注解上使用@Configuration注解。
其实无论是@SpringBootConfiguration还是@Configuration都可以被使用在SpringBoot项目中作为配置类,一个是SpringBoot换了个名字后的SpringBoot专用配置注解,一个是Spring原生注解。
要点:在SpringBoot应用中更加推荐使用@SpringBootConfiguration注解,当然使用@Configuration注解也可以解决问题。
譬如下面代码,我们使用@SpringBootConfiguration注解声明了配置类,并使用@Bean去编程式的配置了一个RedisTemplate对象。
import org.springframework.boot.SpringBootConfiguration;
import org.springframework.context.annotation.Bean;
import org.springframework.data.redis.connection.RedisConnectionFactory;
import org.springframework.data.redis.core.RedisTemplate;
import org.springframework.data.redis.core.StringRedisTemplate;

@SpringBootConfiguration
public class RedisConfiguration {
    @Bean
    public RedisTemplate<String, String> redisTemplate(RedisConnectionFactory redisConnectionFactory) {
        return new StringRedisTemplate(redisConnectionFactory);
    }
}
以上@Bean注解就代表在配置类中声明一个Bean,相当于XML配置文件中标签,Spring3.0+提供了一系列的注解来辅助配置Bean:@Lazy,@Primary,@Scope。
当然SpringBoot中也定义了一堆扩展的注解,可以辅助去搭建配置类,比如@SpringBootConfiguration注解。
1.2导入配置
1.2.1导入配置类
1.2.1.1导入配置类的原则
SpringBoot中可以通过一个配置类将所有的Bean都配置好,其实是大可不必的,因为这样会显得一个SpringBoot配置类非常冗长复杂,难以维护,我们完全可以按照职责拆分配置类,每个配置类都有其单一职责,这样做符合单一职责原则。
将原本的一个Configuration配置类可以按照单一职责原则进行以下拆分:
1.MainConfiguration:项目主要配置类,负责读取主要配置文件,整合其他配置文件。
2.DataSourceConfiguration:数据源配置类,一般配置关系型数据库的配置。
3.RedisConfiguration:Redis配置类。
....
将这些配置类按照单一职责划分后,就比较好用了。
1.2.1.2SpringBoot的默认包扫描
为什么我们定义的配置类/Bean可以被SpringBoot扫描到并托管到IOC中管理呢?
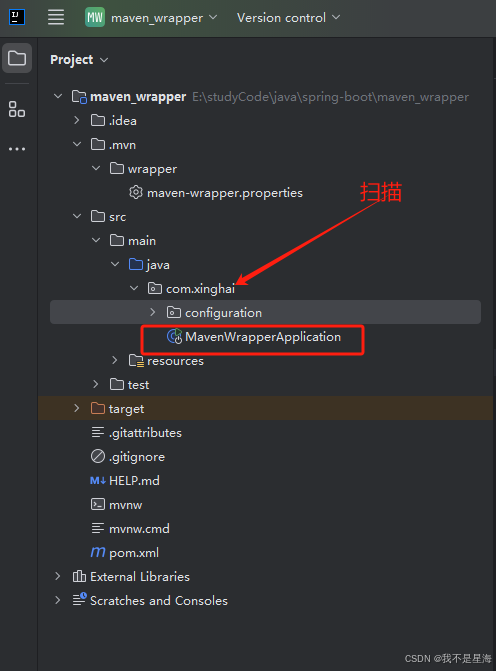
我们需要知道的是:无论我们使用SpringBoot静态Main方法还是Maven指令启动项目,都是在调用默认的启动类中的方法,里面的启动类注解使用了@ComponentScan注解,这个注解默认扫描的是当前包下所有的子包。
@Target({ElementType.TYPE})
@Retention(RetentionPolicy.RUNTIME)
@Documented
@Inherited
@SpringBootConfiguration
@EnableAutoConfiguration
@ComponentScan(
    excludeFilters = {@Filter(
    type = FilterType.CUSTOM,
    classes = {TypeExcludeFilter.class}
), @Filter(
    type = FilterType.CUSTOM,
    classes = {AutoConfigurationExcludeFilter.class}
)}
)
public @interface SpringBootApplication {...}
默认情况下,生成的启动类会在主包下面,其他编写的代码都会在子包里面,启动类都是可以扫描到的。
但是如果我们引入的是其他Jar包/组合的模块中配置类,此时就不可以依赖于使用SpringBoot启动类中的@ComponentScan包扫描将Jar包中的配置文件扫描到,所有我们必须要使用@Import来解决这个问题。
1.2.1.3@Import注解的基本使用
@Import注解的使用方式如下:
import java.lang.annotation.Documented;
import java.lang.annotation.ElementType;
import java.lang.annotation.Retention;
import java.lang.annotation.RetentionPolicy;
import java.lang.annotation.Target;

@Target({ElementType.TYPE})
@Retention(RetentionPolicy.RUNTIME)
@Documented
public @interface Import {
    Class<?>[] value();
}
@Import注解可以接收一个Class对象类型的数组,用于导入多个配置,能导入类型如下:
1.@Configuration1.@Configuration1.@Configuration
2.ImportSelector对象
3.ImportBeanDefinitionRegister对象
4.任何一个Component组件。
现在创建两个配置类,使用@Impoirt注解导入:
@SpringBootConfiguration
@Import({Configuration1.class, Configuration2.class})
public class RedisConfiguration {
    @Bean
    public RedisTemplate<String, String> redisTemplate(RedisConnectionFactory redisConnectionFactory) {
        return new StringRedisTemplate(redisConnectionFactory);
    }
}
当然还有一个解决方案就是:使用ComponentScan去扫描指定包下的路径(即SpringBoot默认扫描不到的地方,可以使用@Component去追加扫描)
1.2.2导入XML配置
Spring框架提供了一个@ImportResource注解,用于导入额外的XML配置文件,可以看一下注解的源码:
import java.lang.annotation.Documented;
import java.lang.annotation.ElementType;
import java.lang.annotation.Retention;
import java.lang.annotation.RetentionPolicy;
import java.lang.annotation.Target;
import org.springframework.beans.factory.support.BeanDefinitionReader;
import org.springframework.core.annotation.AliasFor;

@Retention(RetentionPolicy.RUNTIME)
@Target({ElementType.TYPE})
@Documented
public @interface ImportResource {
    @AliasFor("locations")
    String[] value() default {};

    @AliasFor("value")
    String[] locations() default {};

    Class<? extends BeanDefinitionReader> reader() default BeanDefinitionReader.class;
}
里面的value属性可以设置导入的XML文件路径,只需要指定类文件下面的路径就可以正常导入了。
一般@ImportResource是很少使用的,只有在Spring中没有提供某个XML配置的注解时,可以将配置信息配置在XML文件中,然后使用@ImportResouce导入到主配置文件中进行加载处理。
1.3总结
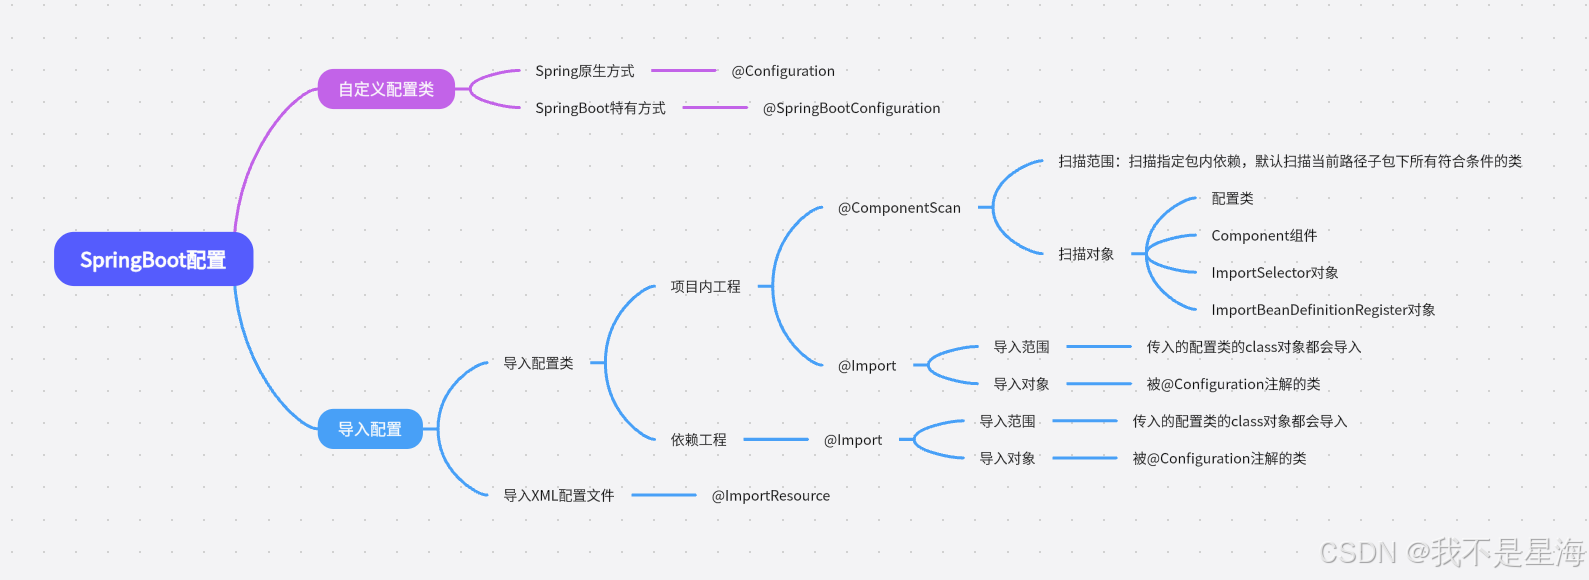
SpringBoot中的配置建议使用自定义配置类+导入配置的方案完成,整个体系如下:
2.配置文件
2.1application
SpringBoot应用中的配置参数主要在application配置文件中,这个配置文件可以有多种配置形式,并且配置文件可以有也可以没有。
可以查看SpringBoot源码中的org.springframework.boot.context.config包下的StandardConfigDataLocationResolver类中定义的配置文件的信息:
static final String CONFIG_NAME_PROPERTY = "spring.config.name";

static final String[] DEFAULT_CONFIG_NAMES = { "application" };
从源码可以得知配置文件的默认名称为application,设置配置文件的默认名称的属性为spring.config.name,可以通过这个属性设置配置文件的默认名称。
不想使用application作为默认的配置文件名称,可以在启动项目的时候指定spring.config.name参数:
java -jar myProject.jar --spring.config.name=app默认的配置文件搜索路径在SpringBoot源码中的org.springframework.boot.context.config包下的ConfigDataEnvironment类中的静态代码块中定义了:
static {
    List<ConfigDataLocation> locations = new ArrayList<>();
    locations.add(ConfigDataLocation.of("optional:classpath:/;optional:classpath:/config/"));
    locations.add(ConfigDataLocation.of("optional:file:./;optional:file:./config/;optional:file:./config/*/"));
    DEFAULT_SEARCH_LOCATIONS = locations.toArray(new ConfigDataLocation[0]);
}
解释一下这几个配置文件的意思:
1.classpath:/ :意思是/target/classes目录。
2.classpath:/ :意思是/target/classes/config目录。
3.file:./ :意思是当前maven执行指令的目录下的文件。
4.file:./config :意思是当前maven执行指令的目录下的config文件夹下的文件。
基本上我们都是将项目的配置文件编写在resource文件夹下,或者/resource/config文件夹下,这样在Maven打包的时候,就会将配置文件打包到/target/classes文件夹下,直接可以读取到里面的数据。
如果不想使用默认的配置文件可以在启动项目时,可以在项目启动时使用spring.config.location参数指定加载配置文件的路径,从SpringBoot源码中的org.springframework.boot.context.config包下的ConfigDataEnvironment类的静态字段中明确定义了:
static final String LOCATION_PROPERTY = "spring.config.location";调用的指令:
java -jar myProject.jar --spring.config.location=optional:classpath:/default.properties,optional:classpath/:override.properties其中optional前缀代表配置时可选的,如果指定配置文件不存在默认就会抛出异常,但是设置了optional之后,就不会抛出异常了(配置/不配置都可以)
如果想要应用忽略这种配置文件指定路径后找不到的异常,可以通过设置以下参数来忽略异常:
spring:
  config:
    on-not-found: ignore
2.2BootStrap
BootStrap也是一种配置文件,不过这种配置文件不能独立于SpringBoot引用而单独存在,其属于SpringCloud环境,需要引入SpringCloud依赖,BootStrap配置文件的加载优先级要优先于application配置文件,主要被用于从额外的外部资源加载配置(比如从配置中心加载配置等),或者是定义系统中不会被改变的参数(这些参数不会被本地相同的配置所覆盖)。
BootStrap相对于Application文件具有以下特点:
1.BootStrap加载的优先级高于Application文件。
2.BootStrap里面的参数不能被覆盖(定义系统中不可变的参数)
一般的SpringBoot应用使用application文件即可,只有满足以下三个条件时才建议使用BootStrap配置文件:
1.引入了SpringCloud框架依赖。
2.需要从外部配置中心拉取配置参数。
3.需要定义系统中不可变(不可覆盖)的参数。
2.3配置文件类型
配置文件类型可以时以下两种:
1.properties文件,key-value键值对形式。
2.yml文件,key-value树状格式。
现在使用properties文件和yml文件分别展示配置访问端口和访问路径的示例:
1.properties格式:
server.port=8080
server.servlet.context-path=/xinghai
2.yml格式:
server:
  port: 8080
  servlet:
    context-path: /xinghai
不同的配置文件要使用不同的注解去加载配置文件中的信息:
1.@PropertySource注解,使用这个注解可以加载系统中的Property文件中的配置信息,但是不能加载Yml文件中的配置信息。
2.@ConfigurationProperties注解,使用这个注解可以加载Propert文件和Yml文件中的配置信息。
3.虽然Yml文件不可被@PropertySource注解加载其中的配置信息,但是可以使用YmalPropertiesFactoryBean类加载为一个Properties参数类,也可以使用YamlMapFactoryBean类加载为一个Map,或者通过YmalPropertySourceLodaer加载为Spring环境中的PropertySource。
注解加载配置文件中信息的总结:
3.SpringBoot配置绑定
3.1Spring中的配置绑定
这里就不介绍XML怎么做配置加载绑定了,直接从主流开发模式,注解方向入手。
一般来说在Spring中使用的注解加载配置文件的方案是:使用@PropertySource注解加载resource文件夹下面的配置文件(将配置文件中的内容加载到Spring上下文环境中)
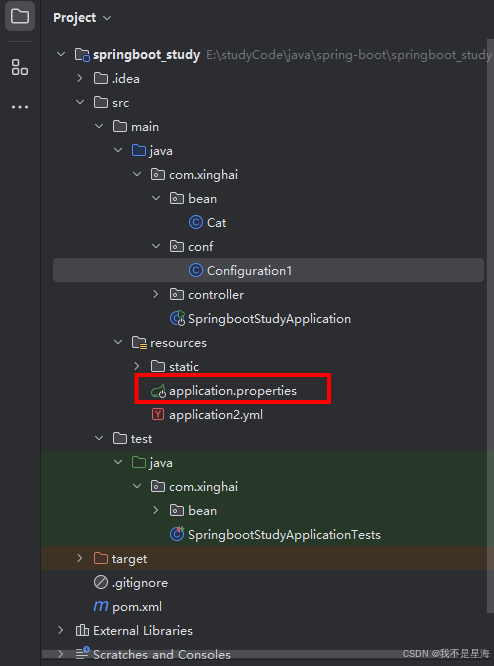
准备一个properties文件,这里命名为application.properties:
在文件中定义几个key-value键值对即可。
server.port=8080
server.servlet.context-path=/xinghai
使用@Component将Cat声明为Bean对象,挂载到IOC容器中。
使用@PropertySource("application.properties")注解,将application.properties文件加载到Spring上下文环境中。
使用@Value注解将sever.port键对应的数据注入到字段中存储。
使用Environment对象,可以使用Enviroment对象获取已经加载到Spring上下文(使用@PropertySource加载Sppring 上下文容器中)的配置文件中的key-value键值对对象。
import org.springframework.beans.factory.annotation.Autowired;
import org.springframework.beans.factory.annotation.Value;
import org.springframework.context.annotation.PropertySource;
import org.springframework.core.env.Environment;
import org.springframework.stereotype.Component;

@Component
@PropertySource("application.properties")
public class Cat {

    @Value("${server.port}")
    public String name;

    @Autowired
    public Environment environment;
}
使用@Configuration配置类,借助@Import注解将Server这个Component挂载到Spring IOC容器中。
import com.xinghai.bean.Server;
import org.springframework.context.annotation.Configuration;
import org.springframework.context.annotation.Import;

@Configuration
@Import({Server.class})
public class Configuration1 {
}
测试环境绑定读取:
@Test
void test() {
    ApplicationContext applicationContext = new AnnotationConfigApplicationContext(Configuration1.class);
    Server server = applicationContext.getBean(Server.class);
    System.out.println(server.name);
    System.out.println("=============================");
    System.out.println(server.environment.getProperty("server.port"));
}
测试结果:
总结Spring配置绑定:
Spring配置绑定的缺点:
1.这种绑定方式实在是不怎么优雅,字段上冗杂了大量的@Value注解和配置文件里的信息,整个代码的设计就十分冗余。
@Value("${server.port}")
public String port;

@Value("${server.servlet.context-path}")
public String prefixUrl;
2.@PropertySource注解并不支持其他格式的配置文件,只能使用property格式的配置,无法自适应更多如yml这种配置文件,并且@PropertySource注解必须和@Value注解强耦合绑定,实在是很不优雅。
@Component
@PropertySource("application.properties")
public class Server {

    @Value("${server.port}")
    public String port;

    @Value("${server.servlet.context-path}")
    public String prefixUrl;

    @Autowired
    public Environment environment;
}
但是SpringBoot提供了多种配置参数注入的方案,比如参数绑定,构造器绑定,支持多种配置文件格式,并且还提供了参数验证,让配置参数注入更加方便,灵活,安全。
3.2参数绑定
现在介绍使用setter更改器完成参数绑定。
3.2.1声明配置文件和配置类
首先介绍使用JavaBean中的setter更改器去将application.yml文件中的配置参数和JavaBean中的字段映射绑定。
首先在application.yml文件中添加xinghai.*的参数:
xinghai:
  name: 我不是星海
  site: www.xinghai.com
  author: 星海
  users:
    - CC
    - MuXue
    - WeiRan
  params:
    tel: 1008611
    address: China
  security:
    security-key: love
    security-code: 1314
准备一个属性配置类:
import lombok.Data;
import org.springframework.boot.context.properties.ConfigurationProperties;
import org.springframework.stereotype.Component;
import java.util.List;
import java.util.Map;

@Data
@ConfigurationProperties(prefix = "xinghai")
@Component
public class XingHaiProperties {

    private boolean enabled;

    private String name;

    private String site;

    private String author;

    private List<String> users;

    private Map<String, String> params;

    private Security security;

    @Data
    private static class Security {
        private String securityKey;
        private String securityCode;
    }

}
需要注意的是,属性类中要进行以下操作:
1.使用@ConfigurationProperties注解可以将一个配置文件映射到JavaBean的字段中,注解定义如下:
import java.lang.annotation.Documented;
import java.lang.annotation.ElementType;
import java.lang.annotation.Retention;
import java.lang.annotation.RetentionPolicy;
import java.lang.annotation.Target;
import org.springframework.core.annotation.AliasFor;
import org.springframework.stereotype.Indexed;

@Target({ElementType.TYPE, ElementType.METHOD})
@Retention(RetentionPolicy.RUNTIME)
@Documented
@Indexed
public @interface ConfigurationProperties {
    @AliasFor("prefix")
    String value() default "";

    @AliasFor("value")
    String prefix() default "";

    boolean ignoreInvalidFields() default false;

    boolean ignoreUnknownFields() default true;
}
可以在@ConfigurationProperties中的prefix属性/value属性指定需要映射的参数前缀,需要注意的前缀一般使用的都是英文小写,如果有多个英文单词,建议使用"-"进行分割。
2.需要注意的是,@ConfigurationProperties注解的原理其实是反射调用类中的setter更改器实现的参数注入,所以需要为类定义setter更改器,这里使用@Lombok注解在类上,为配置类添加setter更改器。
3.参数配置类命名规范,读取进来的参数配置类要命名为XxxProperties文件,这样才比较符合规范,将不同的配置类按这种命名方式区分开,可以更好更方便的快速定为到配置类。
4.需要特别注意的是,使用@ConfigurationProperties注解的类必须是一个可以被SpringIOC容器,即配置类必须使用@Component注解或者其派生注解进行标记。
最重要的是:需要在启动类(原理其实就是配置类)上使用@EnableConfigurationProperties注解。
@Slf4j
@EnableConfigurationProperties({XingHaiProperties.class})
@SpringBootApplication
public class SpringbootStudyApplication {

    public static void main(String[] args) {
        SpringApplication.run(SpringbootStudyApplication.class, args);
    }

}
@EnableConfigurationProperties注解接收的是一个数组(value属性),里面可以定义参数配置类的class对象数组。
import java.lang.annotation.Documented;
import java.lang.annotation.ElementType;
import java.lang.annotation.Retention;
import java.lang.annotation.RetentionPolicy;
import java.lang.annotation.Target;
import org.springframework.context.annotation.Import;

@Target({ElementType.TYPE})
@Retention(RetentionPolicy.RUNTIME)
@Documented
@Import({EnableConfigurationPropertiesRegistrar.class})
public @interface EnableConfigurationProperties {
    String VALIDATOR_BEAN_NAME = "configurationPropertiesValidator";

    Class<?>[] value() default {};
}
3.2.2测试参数绑定
这里使用的是启动类中提供的CommandLineRunner进行测试,CommandLineRunner是SpringBoot内置的命令运行器,用于在SpringBoot应用启动之后执行一些逻辑。
使用@Autowired将XingHaiProperties配置类注入到启动类中:
@Autowired
private XingHaiProperties xingHaiProperties;
在启动类中添加一个commandLineRunner方法,返回一个CommandLineRunner对象。
@Bean
public CommandLineRunner commandLineRunner() {
    return (args -> {
        log.info("XingHai properties: {}", xingHaiProperties);
    });
}
测试结果:
可以发现能够将配置数据注入到配置类中去。
3.2.3总结
在SpringBoot应用中,会默认将application.yml/application.properties加载到Spring上下文环境中,使用@ConfugurationProperties注解去加载已经被Spring加载到上下文中的配置信息(可以使用value/prefix指定属性配置的前缀),该注解可以自动将配置文件中的属性和JavaBean中的字段做映射。
1.支持属性名前缀绑定,将属性名前缀相同的属性绑定到JaveBean中。
2.支持配置参数默认值,JavaBean中的字段如果在配置文件中没有映射对应,不会抛出错误,会使用Java中定义的默认值。
3.支持松绑定自动转换,可以将"-"分割的多单词转换为小驼峰式的多单词。
4.支持Java集合/Map绑定。
5.支持嵌套类注入。
6.支持多配置文件注入,比如yml文件,properties文件,环境变量等。
7.需要在配置类上使用@EnableConfigurationProperties注解,并在其中注册声明的配置类。
要点:整体来看SpringBoot中提供的@ConfigurationProperties注解+@EnableConfigurationProperties很方便优雅的实现了配置文件的读取,相比于@PropertySource注解+@Value注解更加具有可维护性和优雅性。
3.3构造器绑定
现在介绍使用构造器完成配置文件和配置类之间的映射。
3.3.1声明配置文件和配置类
在application.yml配置文件中定义member.*配置参数:
member:
  name: Tom
  sex: 1
  age: 18
  birthday: 2005-01-19 12:00:00
定义配置类方便读取配置文件中的数据:
@Data
@NoArgsConstructor
@ConfigurationProperties(prefix = "member")
@EnableConfigurationProperties(MemberProperties.class)
public class MemberProperties {

    private String name;
    private int sex;
    private int age;
    private String country;
    private Date birthday;

    public MemberProperties(String name, int sex, int age) {
        this.name = name;
        this.sex = sex;
        this.age = age;
    }

    @ConstructorBinding
    public MemberProperties(String name,
                            int sex,
                            int age,
                            @DefaultValue("China") String country,
                            @DateTimeFormat(pattern = "yyyy-MM-dd HH:mm:ss") Date birthday) {
        this.name = name;
        this.sex = sex;
        this.age = age;
        this.country = country;
        this.birthday = birthday;
    }

}
读取配置文件中的数据,并借助构造函数注入到配置类中,需要借助的是@ConstructorBingding注解,具体细节如下:
1.类中定义想要读取的属性对应的字段,并且定义几个构造函数。
2.由于类中有多个构造函数,所以我们必须指定一个构造函数用于配置文件和类中字段之间构建映射关系。
3.在参数配置类上使用@ConfigurationProperties注解,并在其中指定参数配置的前缀。
4.由于@Component会和@ConstructorBinding注解产生冲突,所以不能使用@Component的方式将类托管为一个Bean。
5.但是@ConfigurartionProperties注解要求当前类必须有一个实例化对象被托管到IOC容器中作为一个Bean。
6.解决方案是:在类上使用@EnableConfigurationProperties(当前类的class对象),声明当前类是一个配置类,这样该类就会以一个配置类的形式,作为一个Bean初始化到IOC容器中。
7.为null值的可以使用@DefaultValue解决,日期想要规范格式化可以使用@DateTimeFormat(pattern)解决。
@Bean
public CommandLineRunner commandLineRunner() {
    return (args -> {
        log.info("XingHai properties: {}", xingHaiProperties);
        log.info("MemberProperties: {}", memberProperties);
    });
}
在启动类(其实就是配置类)上的@EnableConfigurationProperties注解的value指定的数组中,再传入一个MemberProperties的class对象,表示声明一个配置类。
@EnableConfigurationProperties({XingHaiProperties.class, MemberProperties.class})3.3.2测试参数绑定
使用@Autowired注解将配置类Bean对象注入到启动类中。
@Autowired
private MemberProperties memberProperties;
继续在CommandLineRunner方法中测试。
3.3.3@ConstructorBinding源码
@ConstructorBinding的源码如下:
1.SpringBoot2.x的源码,可以被注解在类/构造函数上。
package org.springframework.boot.context.properties;

import java.lang.annotation.Documented;
import java.lang.annotation.ElementType;
import java.lang.annotation.Retention;
import java.lang.annotation.RetentionPolicy;
import java.lang.annotation.Target;

@Target({ElementType.TYPE, ElementType.CONSTRUCTOR})
@Retention(RetentionPolicy.RUNTIME)
@Documented
public @interface ConstructorBinding {
}
从源码中不难发现,在SpringBoot2.x时ConstructorBinding被定义在context.properties包下,在SpringBoot3.x的时候,ConsturctorBinding被移动到context.properties.bind包下。
如果配置类中只有一个参数化的构造器,就无需使用@ConstructorBinding注解指定使用哪个参数化构造器实现配置类和参数配置之间映射。
但是如果有多个参数化的构造器,如果不使用@ConstructorBinding注解指定,就会直接使用无参构造器初始化Bean,并反射调用setter更改器注入属性。
3.3.4总结
在构造函数上使用@ConstructorBinding,可以配合@ConfigurationProperties注解完成使用构造器实现配置文件和Bean中字段的映射。
需要注意的是,使用@ConfigurationProperties注解声明配置类的时候,需要确保配置类是一个Bean,如果是采用反射settter更改器的方式,需要使用@Commponent注解,如果是采用反射构造器的方式,需要使用@EnableConfigurationProperties将配置类设置为一个Bean。
3.4Bean配置绑定
除了可以在类上使用@ConfigurationProperties注解映射配置以外,也可以在@Bean上使用@ConfigurationProperties进行映射配置。
@Bean可以以编程式的方式配置Bean,给予了程序员较高的操作权力,一般被用于第三方依赖(一般第三方依赖是不建议直接去改第三方的源码的),为了将第三方中的类实例化一个对象作为Bean,Spring官方推荐在配置类中编程式定义Bean。
在这里也是如此,如果我们想在编程式配置Bean时,读取配置文件中的参数配置,用于配置第三方Bean,也可以借助@ConfigurationProperties进行配置。
现在定义一个Bean:
@Data
@NoArgsConstructor
public class OtherMember {

    private String name;
    private int sex;
    private int age;

}
‘定义配置类,并采用编程式方案配置一个Bean:
PS:@SpringBootConfiguration上注解@Configuration,@Configuration上又注解了@Component,SpringBoot启动类上的注解中包含@ComponentScan,可以将扫描到当前目录下的所有被@Component注解的类,所以定义的配置类也会被扫描到。
@SpringBootConfiguration
public class MainConfig {

    @Bean
    @ConfigurationProperties("member")
    public OtherMember otherMember() {
        return new OtherMember();
    }

}
在启动类中测试配置类是否映射生效:
@Autowired
private OtherMember otherMember;

@Bean
public CommandLineRunner commandLineRunner() {
    return (args -> {
        log.info("XingHai properties: {}", xingHaiProperties);
        log.info("MemberProperties: {}", memberProperties);
        log.info("OtherMember: {}", otherMember);
    });
}
可以发现参数配置已经映射到配置类中了:
这种方式对于不能更改Bean类的情况是比较有用的,将参数配置直接注入,方便将配置非自定义类的Bean。
缺点:只能注入简单的数据类型,像Date目前也没有很好的办法能够解决。
3.5参数类扫描
现在的SpringBoot启动类:
@Slf4j
@EnableConfigurationProperties({XingHaiProperties.class, MemberProperties.class})
@SpringBootApplication
public class SpringbootStudyApplication {...}
@EnableConfigurationProperties注解中需要接收一个配置类数组,显得整体非常复杂。
所以现在SpringBoot提供了@ConfigurationPropertiesScan,利用这个注解声明在启动类(配置类)上,默认这个注解是去扫描当前包下所有的配置类,当然可以使用注解中提供的basePackage属性,可以指定扫描项目中哪个包下的注解。
可以发现使用@ConfigurationPropertiesScan,直接帮助我们省去了配置@EnableConfigurationProperties注解的麻烦:
@Slf4j
@ConfigurationPropertiesScan
@SpringBootApplication
public class SpringbootStudyApplication {...}
3.6配置验证
使用@ConfigurationProperties注解也可以进行参数配置数据做校验,SpringBoot支持JSR-303提案中的javax.validation规范注解,首先添加一个JSR-303提案标准实现的依赖:
<dependency>
    <groupId>org.hibernate.validator</groupId>
    <artifactId>hibernate-validator</artifactId>
</dependency>
在需要校验的配置类上加上@Validated注解,在name字段上加上@NotNull注解:
import lombok.Data;
import org.springframework.boot.context.properties.ConfigurationProperties;
import org.springframework.stereotype.Component;
import org.springframework.validation.annotation.Validated;

import javax.validation.constraints.NotNull;
import java.util.List;
import java.util.Map;

@Validated
@Data
@ConfigurationProperties(prefix = "xinghai")
@Component
public class XingHaiProperties {

    private boolean enabled;

    @NotNull
    private String name;

    private String site;

    private String author;

    private List<String> users;

    private Map<String, String> params;

    private Security security;

    @Data
    private static class Security {
        private String securityKey;
        private String securityCode;
    }

}
现在将配置文件中的name更改为names,即现在name参数为空:
xinghai:
  names: 我不是星海
  site: www.xinghai.com
  author: 星海
  users:
    - CC
    - MuXue
    - WeiRan
  params:
    tel: 1008611
    address: China
  security:
    security-key: love
    security-code: 1314
启动的时候就会发现因为name为空,所以启动失败·:


