添加城市及管理城市
页面跳转及数据传输
使用bindMenu()组件实现菜单栏,router组件实现页面跳转及信息传递
Image($r('app.media.menu'))
            .bindMenu([
              {
                value:"添加城市",
                action: () => {
                  router.pushUrl({
                    url:'pages/NewAddCity',
                    params:{
                      locationId: this.locationIdList,
                      cityName: this.cityNameList
                    }
                    //在跳转页面的同时将当前页面中数据传入下一个页面中
                  })
                }
              },
              //下边这个后续会做,这篇笔记中不涉及
              {
                value:"管理城市",
                action: () => {
                  router.pushUrl({
                    url:'pages/CityManage',
                    params:{
                      locationId: this.locationIdList,
                      cityName: this.cityNameList
                    }
                  })

                }
              },
              //随便塞的一个测试工具
              {
                value: "测试工具",
                action: () => {
                  getweatherUtil.getCityMessage_id_2(this.locationIdList)
                }
              }
            ])
            .width("40%")
            .backgroundImagePosition(Alignment.End)
            .position({ x: '180.00vp', y: '10vp' })
在跳转的页面中要接受数据,尝试过几种方法后我用的是这个
 @State locationIdList: string[] = (router.getParams() as Record<string,string[]>)['locationId']

  @State cityNameList: string[] = (router.getParams() as Record<string,string[]>)['cityName']
这样数据就成功传输到下一个页面了
数据持久化
按目前程序设计情况来看,只需要存储城市id和城市名即可,所以选择了用户首选项来存储信息。
首先先编写一个首选项工具类
import {preferences} from  '@kit.ArkData'
import { Context } from '@kit.AbilityKit'
import { location } from '../bean/CitySearch/location'
import Pref from '@ohos.data.preferences'

const PREFERENCES_NAME = 'mypreferences'
const KEY_NAME = 'keyName'
const KEY_ID = 'keyLocationId'

export class PreferencesUtil {
//创建数据库
  CreatePreferences(context:Context)
  {
    globalThis.Preferences  = (()=>{
      let pref = Pref.getPreferences(context, PREFERENCES_NAME)
      return pref
    })
  }

//存入数据
  saveMessage(cityName: string[],locationId: string[] )
  {
    globalThis.Preferences().then((preferences:ESObject)=>{
      preferences.put(KEY_NAME,cityName)
      preferences.put(KEY_ID,locationId)
      preferences.flush()
    }).catch((err: string) => {
      console.error('保存失败,err:' + err)
    })
  }

//获取数据
  async getCityName() {
    let cityname: string [] = ['北京']
    const preferences:ESObject = await globalThis.Preferences()
    cityname = await preferences.get(KEY_NAME,cityname)
    return cityname

  }

  async getLocationId() {
    let locationid: string[] = ['101010100']
    const preferences:ESObject = await globalThis.Preferences()
    locationid = await preferences.get(KEY_ID,locationid)
    return locationid

  }
}

export default new PreferencesUtil() //导出工具类在EntryAbility.ets中的onCreate()中添加创建数据库。
onCreate(want: Want, launchParam: AbilityConstant.LaunchParam): void {
    hilog.info(0x0000, 'testTag', '%{public}s', 'Ability onCreate');
    PreferenceUtil.CreatePreferences(this.context)  //<=
  }
然后就可以在需要存储/调用数据的时候使用工具类中方法了。
添加城市页面
首先我们需要明确如何实现城市的添加,既然我们是用城市id来获取全部的天气数据,那么我们只需要在交互中实现城市id存储和调用即可。
城市搜索和热门城市排行
大概界面就这样
热门城市获取数据用LIst组件做就行,没什么可以说的
搜索用TextInput()就行,内置一个onchange()实现搜索数据实时更新就行
实现联想词搜索
联想词搜索,顾名思义,就是在拼写过程中对输入内容进行联想进而调出你可能想要查询的内容。
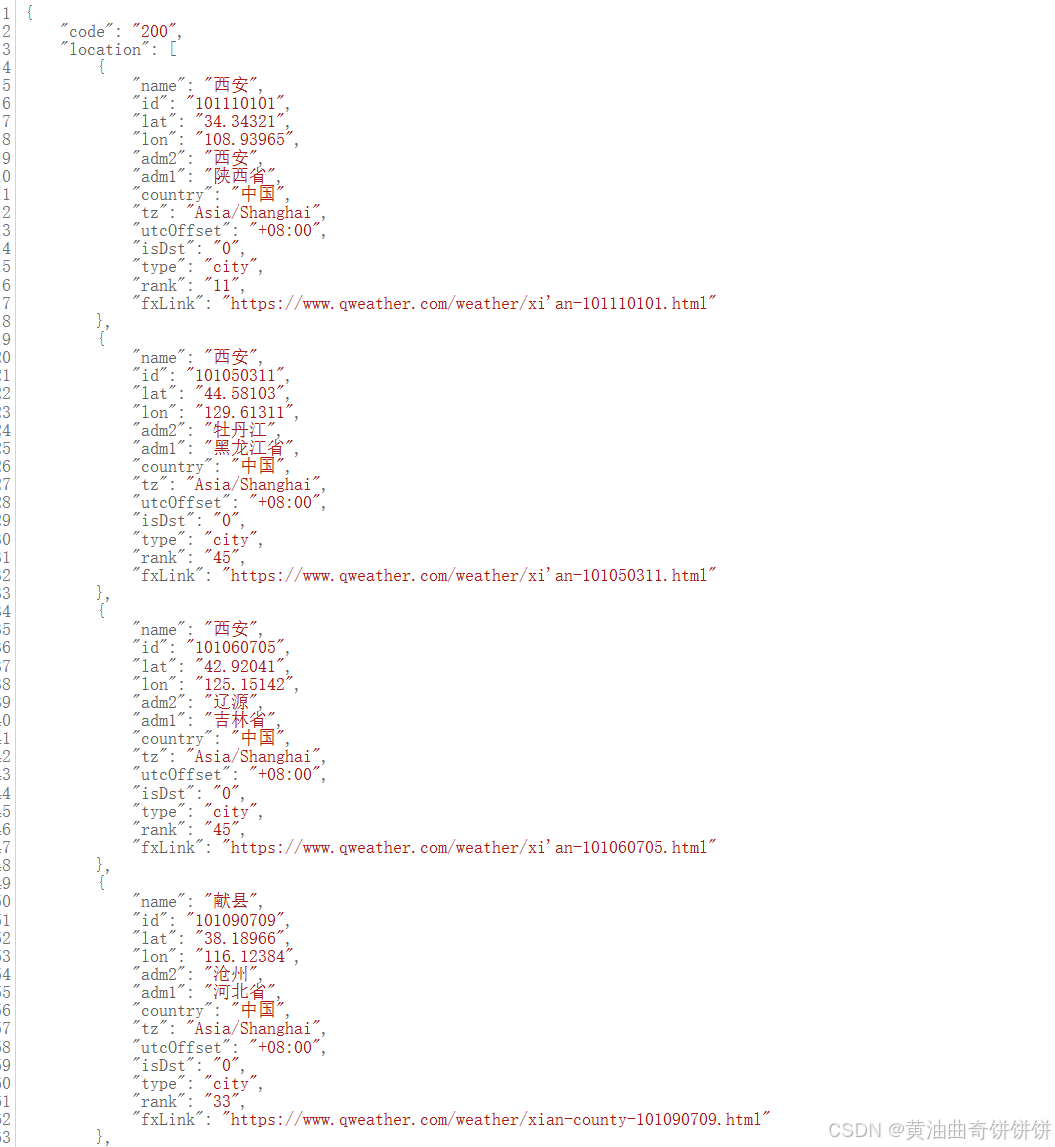
而在和风天气中的城市搜索api接口中,通过输入语句会调出以下数据
因此我们可以在调出的这些数据中选择“name”数据来构成我们的联想词列表。
如何同步输入内容和List联想词内容
我这里采用的方法是在TextInput组件中绑定一个onChange()事件,当输入框中发生改动时,调用事件来获取城市数据,再用获取到的数据实时更新List组件中的内容。
直接上代码
import { router } from '@kit.ArkUI'
import getweatherUtil from '../Util/getWeatherUtil'
import {CitySearch} from '../bean/CitySearch/CitySearch'
import { ExpectExtend } from '@ohos/hypium'
import {location} from '../bean/CitySearch/location'
import {HotCityComponent} from '../Components/HotCityComponent'
import PreferencesUtil from '../Util/PreferenceUtil'

@Entry
@Component
struct NewAddCity {

  @State locationIdList: string[] = (router.getParams() as Record<string,string[]>)['locationId']

  @State cityNameList: string[] = (router.getParams() as Record<string,string[]>)['cityName']

  @State AllLocationId: Array<string> = ['101010100','101110101','101100101','101020100','101190101','101280601','101101001']

  @State AllCityNameList: Array<string> = ['北京','西安','太原','上海','南京','深圳','忻州']

  @State SearchText: string = ''

  @State CityMessage: Array<location> = []

  @State timer: number | null = null  //计时器


  onPageShow(): void
  {
    console.log("使用了")

    this.initDate
  }

  async initDate(){

    console.log("使用了2")
    let result2: Array<CitySearch> = await getweatherUtil.getCityMessage_id_2(this.AllLocationId)
    this.CityMessage[0].name = ''

  }

  build() {
    Column(){

      //这里用了层叠组件,因为我想让联想词列表盖在热门城市上面(但是效果好像不太好的样子)
      Stack({alignContent:Alignment.Top}){
        Column(){
          HotCityComponent({locationIdList: this.locationIdList,cityNameList: this.cityNameList})
            .margin({top:100})
        }

        Column() {
          Row() {
            Image($r("app.media.fanhui"))
              .onClick(() => {
                router.back()
              })
              .width(20)
            TextInput({ placeholder: "搜索城市(中文/拼音)" })
              .onChange(async (value) => {
                //这里我使用了定时器来优化请求
                if(this.timer!==null){
                  clearTimeout(this.timer)
                }
                //设置一个新的定时器
                this.timer = setTimeout(async ()=>{
                  this.SearchText = value
                  let result: CitySearch = await getweatherUtil.getCityMessage_id_1(value);
                  this.CityMessage = result.location; // 更新城市信息
                  //定时器完成后将其清空
                  this.timer = null
                },800)


              })
              .backgroundColor("rgba(255,255,255,0.5)")
          }.margin({top:20})

          //联想词列表组件的构建
          List({ space: 5 }) {
            ForEach(this.CityMessage, (city: location) => {
              ListItem() {
                Column() {
                  Text(city.name)
                    .fontSize(30)
                    .fontColor(Color.White)
                    .textAlign(TextAlign.Start)
                  Blank()
                  Divider()
                }.width("90%")
                .alignItems(HorizontalAlign.Start)
                .margin({ top: 10, bottom: 10 })
                .onClick(()=>{
                  router.pushUrl({
                    //跳转至添加城市界面
                    url:'pages/NewCityPage',
                    params: {
                      locationId: this.locationIdList,   //这两个是记录所有城市数据的数组
                      cityName: this.cityNameList,
                      addLocationId: city.id,            //这两个是选择城市的id和name,导入到新页面
                      addLocationName: city.name
                    }
                  })
                })

              }
              .width("100%")

            })
          }.width("100%")
          .backgroundColor("rgba(255,255,255,0.5)")
        }
      }
      }
    .backgroundColor("#65aef3")
    .height("100%")
    .width("100%")
  }

}
在onChange()事件中,我使用了定时器来优化请求。在测试过程中,我发现每输入一个字符触发一次数据请求有些太浪费请求量了,所以我设定了个时间来进行缓冲,缓冲过后再请求数据。
添加城市页面
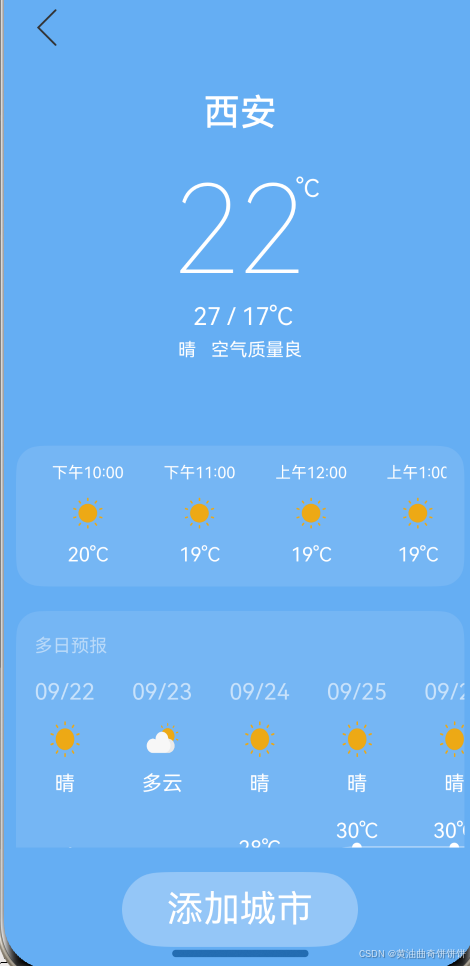
如图,该页面布局为返回键,城市预览界面(可滑动),添加城市按钮
其中城市预览界面可直接使用上期的AllComponent组件实现
重点是添加城市按钮中对数据的持久化保存
这里我们要使用先前写好的PreferenceUtil工具
import { router } from '@kit.ArkUI'
import getweatherUtil from '../Util/getWeatherUtil'
import {CitySearch} from '../bean/CitySearch/CitySearch'
import { ExpectExtend } from '@ohos/hypium'
import {location} from '../bean/CitySearch/location'
import { AllComponent } from '../Components/AllComponent'
import PreferencesUtil from '../Util/PreferenceUtil'

@Entry
@Component
struct NewCityPage {

 //接收数据
  @State locationIdList: string[] = (router.getParams() as Record<string,string[]>)['locationId']

  @State cityNameList: string[] = (router.getParams() as Record<string,string[]>)['cityName']

  @State addLocationId: string = (router.getParams() as Record<string,string>)['addLocationId']

  @State addLocationName: string = (router.getParams() as Record<string,string>)['addLocationName']

  @State CityMessage: Array<location> = []


  build() {

    Column(){

      //返回键及页面跳转事件绑定
      Row(){
        Image($r("app.media.fanhui"))
          .width(30)
          .onClick(()=>{
            router.back()
          })
          .margin({top:10,bottom:10,left: 20})
      }
      .width("100%")
      .alignItems(VerticalAlign.Top)
      .justifyContent(FlexAlign.Start)
      .backgroundColor("#65aef3")

      //依旧是层叠布局
      Stack({alignContent: Alignment.Bottom}){

        Column(){
          AllComponent({locationId:this.addLocationId})
          //城市预览界面
        }
        .height("100%")

        Column(){
          Row(){
            Text("添加城市")
              .fontColor(Color.White)
              .fontSize(30)
              .textAlign(TextAlign.Center)
          }
          .borderRadius(50)
          .backgroundColor("rgba(255,255,255,0.3)")
          //点击事件
          .onClick(()=>{
            this.locationIdList.push(this.addLocationId)
            this.cityNameList.push(this.addLocationName)
            //将数据存入用户首选项中
            PreferencesUtil.saveMessage(this.cityNameList,this.locationIdList)
            //保存完毕,跳转回主页面
            router.pushUrl({
              url: 'pages/Index2',
              params:{
                locationId: this.locationIdList,
                cityName: this.cityNameList,
              }
            })

          })
          .margin({bottom: 40,top: 20})
          .width("50%")
          .height("8%")
          .justifyContent(FlexAlign.Center)
          .alignItems(VerticalAlign.Center)
        }
        .width("100%")
        .backgroundColor("#65aef3")

      }
    }

  }

}
这样我们就把所需要的城市添加到主页面啦


