一.MybatisPlus简介
1.1 MybatisPlus概述
MyBatis-Plus(简称 MP)是一个 MyBatis 的增强工具,在 MyBatis 的基础上只做增
强不做改变,为简化开发、提高效率而生(提供了快速使用mybatis的方式)。
官网:https://mybatis.plus/或者MyBatis-Plus 🚀 为简化开发而生
MP愿景是成为 MyBatis 最好的搭档,就像 魂斗罗 中的 1P、2P,基友搭配,效率翻
倍。
1.2 MP特性
无侵入:只做增强不做改变,引入它不会对现有工程产生影响,如丝般顺滑
损耗小:启动即会自动注入基本 CURD,性能基本无损耗,直接面向对象操作
强大的 CRUD 操作:内置通用 Mapper、通用 Service,仅仅通过少量配置即可
实现单表大部分 CRUD 操作,更有强大的条件构造器,满足各类使用需求
支持 Lambda 形式调用:通过 Lambda 表达式,方便的编写各类查询条件,无
需再担心字段写错
支持主键自动生成:支持多达 4 种主键策略(内含分布式唯一 ID 生成器 -
Sequence),可自由配置,完美解决主键问题
支持 ActiveRecord 模式:支持 ActiveRecord 形式调用,实体类只需继承
Model 类即可进行强大的 CRUD 操作
支持自定义全局通用操作:支持全局通用方法注入( Write once, use anywhere
)
内置代码生成器:采用代码或者 Maven 插件可快速生成 Mapper 、 Model 、
Service 、 Controller 层代码,支持模板引擎,更有超多自定义配置等您来使用
内置分页插件:基于 MyBatis 物理分页,开发者无需关心具体操作,配置好插件
之后,写分页等同于普通 List 查询
分页插件支持多种数据库:支持 MySQL、MariaDB、Oracle、DB2、H2、
HSQL、SQLite、Postgre、SQLServer 等多种数据库
内置性能分析插件:可输出 Sql 语句以及其执行时间,建议开发测试时启用该功
能,能快速揪出慢查询
内置全局拦截插件:提供全表 delete 、 update 操作智能分析阻断,也可自定义
拦截规则,预防误操作
1.3 开发MP版本
<dependency>
    <groupId>com.baomidou</groupId>
    <artifactId>mybatis-plus</artifactId>
    <version>3.4.2</version>
</dependency>
二.MP快速入门
2.1 MP入门流程分析
SpringBoot 整合 MyBatis-Plus,并实现根据Id查询功能。
数据库环境准备
创建SpringBoot工程,引入MyBatisPlus场景依赖
在yml中编写DataSource相关配置
编写mapper
测试
2.2 数据库环境准备
| CREATE TABLE tb_user ( INSERT INTO tb_user VALUES (1, '赵一伤', '123456', 'zys', 19, |
2.3 创建工程,引入场景依赖
<?xml version="1.0" encoding="UTF-8"?>
<project xmlns="http://maven.apache.org/POM/4.0.0"
xmlns:xsi="http://www.w3.org/2001/XMLSchema-instance"
xsi:schemaLocation="http://maven.apache.org/POM/4.0.0
http://maven.apache.org/xsd/maven-4.0.0.xsd">
<modelVersion>4.0.0</modelVersion>

    <groupId>com.lzw</groupId>
    <artifactId>mp_01</artifactId>
    <version>1.0-SNAPSHOT</version>

<parent>
    <groupId>org.springframework.boot</groupId>
    <artifactId>spring-boot-starter-parent</artifactId>
    <version>2.3.10.RELEASE</version>
</parent>

<dependencies>
    <!-- mysql 驱动-->
    <dependency>
        <groupId>mysql</groupId>
        <artifactId>mysql-connector-java</artifactId>
    </dependency>
    <!-- lombok ,自动生成get,Set 方法-->
    <dependency>
        <groupId>org.projectlombok</groupId>
        <artifactId>lombok</artifactId>
        <optional>true</optional>
    </dependency>
    <dependency>
        <groupId>org.springframework.boot</groupId>
        <artifactId>spring-boot-starter-test</artifactId>
        <scope>test</scope>
    </dependency>
    <!--mybatisplus起步依赖-->
    <dependency>
        <groupId>com.baomidou</groupId>
        <artifactId>mybatis-plus-boot-starter</artifactId>
        <version>3.4.2</version>
    </dependency>
    </dependencies>
<build>
    <plugins>
        <plugin>
            <groupId>org.springframework.boot</groupId>
            <artifactId>spring-boot-maven-plugin</artifactId>
        </plugin>
    </plugins>
</build>

</project>
2.4 在yml中编写DataSource相关配置
#datasource
spring:
    datasource:
        url: jdbc:mysql://localhost:3306/mp?
        useUnicode=true&characterEncoding=UTF-8&serverTimezone=UTC
        username: root
        password: 123456
        driver-class-name: com.mysql.cj.jdbc.Drive
如果想在mybatis-plus自行是看打印的sql,可配置
#mybatis-plus配置控制台打印完整带参数SQL语句
mybatis-plus:
    configuration:
        log-impl: org.apache.ibatis.logging.stdout.StdOutImpl
2.5 编写代码
实体类:
/**
* @author lzw
* @create 2024-12-14 23:31
*
* @TableName("tb_user") 实体类基于注解与表进行映射
* 如果实体类名称与表名一致,可以省略该注解
*/
@Data
@NoArgsConstructor
@AllArgsConstructor
@TableName("tb_user")
public class User {
    private Long id;
    private String userName;//默认驼峰映射
    private String password;
    private String name;
    private Integer age;
    private String email;
}
@TableName("tb_user”) : 如果数据库的表名和实体类一致时可以省略
编写mapper接口:
/**
* @author lzw
* @create 2024-12-14 23:37
*
* 使用mp定义Mapper,需要让Mapper接口继承 BaseMapper接口。
*/
public interface UserMapper extends BaseMapper<User> {
}
启动类增加 @MapperScan 注解
@SpringBootApplication
@MapperScan("com.lzw.mapper")
public class SpringBootApp {
public static void main(String[] args) {
    SpringApplication.run(SpringBootApp.class, args);
 }
}
2.6 测试
package com.lzw.test;
import com.lzw.mapper.UserMapper;
import com.lzw.pojo.User;
import org.junit.jupiter.api.Test;
import org.springframework.beans.factory.annotation.Autowired;
import org.springframework.boot.test.context.SpringBootTest;
/**
* @author lzw
* @create 2024-12-14 23:40
*/
@SpringBootTest
public class UserMapperTest {
    @Autowired
    private UserMapper userMapper;

    //根据id查询
    @Test
    public void test01(){
        User user = userMapper.selectById(1L);
        System.out.println(user);
 }
}
三.MP实现常规增删改操作
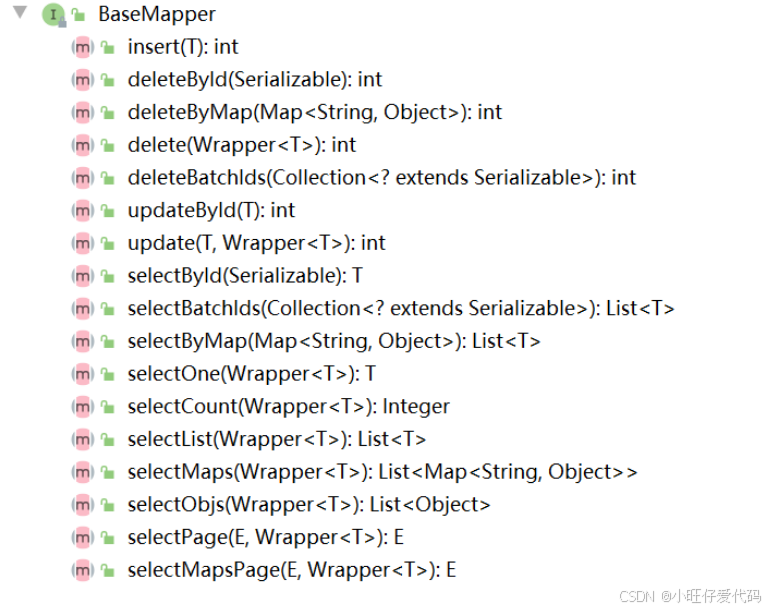
通过查看BaseMapper源码,我们发现该接口几乎定义了所有常规的增删改查操作:
3.1 MP实现插入操作
BaseMapper定义操作方法
/**
* 插入一条记录
*
* @param entity 实体对象
*/
int insert(T entity);
如果主键对应的实体类属性中没有设置主键的生成策略,那么MP自动为主键生
成值,且回填到实体对象下;
如果未指定主键生成策略,即使表的主键是主键自增,也不会使用主键自增;
插入数据时,我们发现表中ID设置默认自增,但是实际生成的id却是很长串的数
字?
//插入一条数据
@Test
public void test02(){
User user=new User();
user.setUserName("zhangsan");
user.setPassword("123456");
user.setAge(23);
user.setEmail("[email protected]");
user.setName("张三");
int row = userMapper.insert(user);
System.out.println(row);
}
3.2 MP主键字段注解-@TableId
@TableId注解作用:
映射表中主键字段与实体类属性的关系(尤其表中主键字段名称与实体类属
性名称不一致时);
定义主键生成策略;
@TableId使用:
添加在实体类的主键对应的成员属性上即可;
/**
* @author lzw
* @create 2024-12-14 23:31
*
* @TableName("tb_user") 实体类基于注解与表进行映射
* 如果实体类名称与表名一致,可以省略该注解
*/
@Data
@NoArgsConstructor
@AllArgsConstructor
@TableName("tb_user")
public class User {
/*
1.当表中列的名称与实体类中属性不一致时
2.指定主键值的生成策略,默认基于雪花算法生成
*/
    @TableId("id")
    private Long id;
    private String userName;//默认驼峰映射
    private String password;
    private String name;
    private Integer age;
    private String email;
}
3.3 MP主键生成策略
主键生成策略:
是指为数据库生成主键的方式,我们前面学的数据库主键自增也是一种生成主键的策
略,当然除了数据库服务端帮助我们维护主键之外,客户端也可以对主键值进行生成
维护。
MP主键生成策略示例
//指定主键自增的生成策略
@TableId(value = "user_id",type = IdType.AUTO)
private Integet userId;
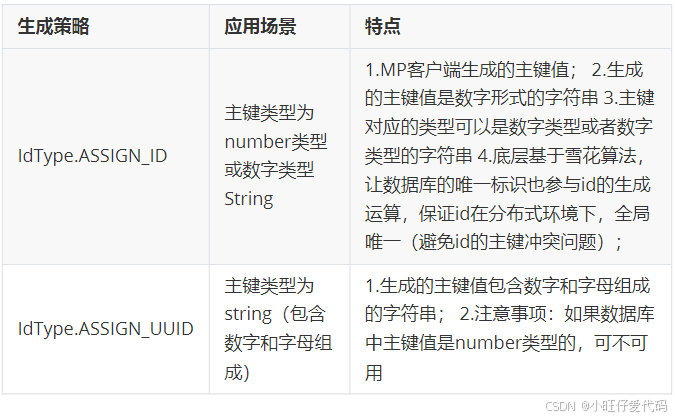
MP提供的常用主键生成策略如下:
3.4 普通列注解-@TableField
注解@TableField作用:
指定表中普通字段与实体类属性之间的映射关系;
忽略实体类中多余属性与表中字段的映射关系(@TableField(exist = false));
以下情况可以省略:
名称一样
数据库字段使用_分割,实体类属性名使用驼峰名称(自动开启驼峰映射)
/**
* @author lzw
* @create 2024-12-14 23:31
*
* @TableName("tb_user") 实体类基于注解与表进行映射
* 如果实体类名称与表名一致,可以省略该注解
*/
@Data
@NoArgsConstructor
@AllArgsConstructor
@TableName("tb_user")
public class User {
/*
1.当表中列的名称与实体类中属性不一致时
2.指定主键值的生成策略,默认基于雪花算法生成
*/
@TableId(value = "id",type = IdType.AUTO)
private Long id;
//表中的列名如果与实体类属性不遵循驼峰映射或者不一致,需要通过该注解指定
    @TableField(value = "user_name")
    private String realName;
    private String password;
    private String name;
    private Integer age;
    private String email;
    @TableField(exist = false)
    private String address;
}
3.5 MP实现删除操作
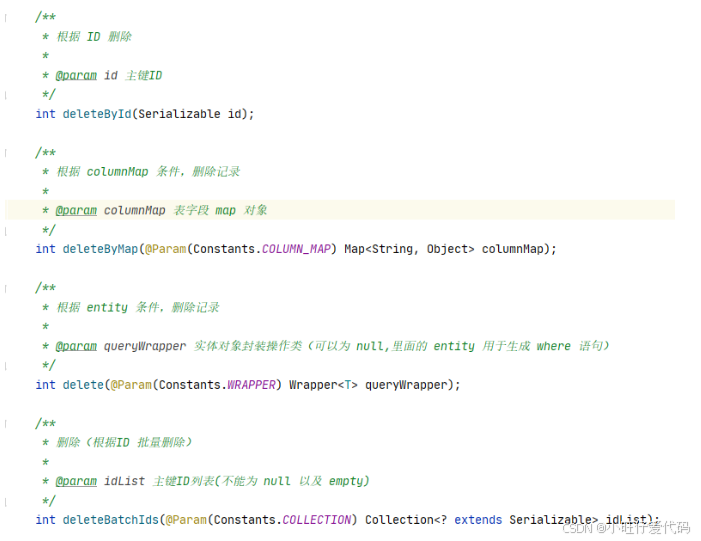
BaseMaper定义的常用删除方法:
根据id删除:
//根据id删除
@Test
public void test03(){
int row = userMapper.deleteById(19L);
System.out.println(row);
}
根据id集合批量删除
//根据id集合批量删除
@Test
public void test04(){
    int row = userMapper.deleteBatchIds(Arrays.asList(17L,18L));
    System.out.println(row);
}
根据map构造条件,删除
//根据Map集合构造条件 删除
@Test
public void test05(){
Map<String,Object> map=new HashMap<>();
map.put("user_name","赵五伤");
map.put("name","zws");
int row = userMapper.deleteByMap(map);
System.out.println(row);
}
3.6 MP实现更新操作
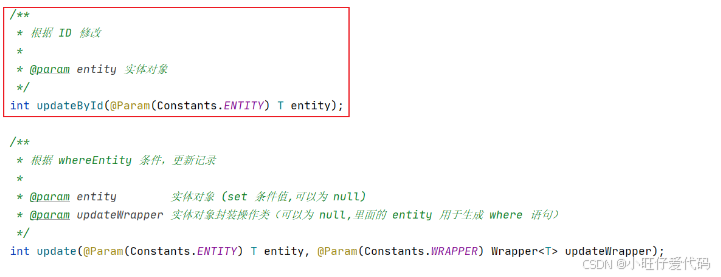
根据实体对象中的id更新数据
注意事项:只更新实体类中存在的数据,如果对应的属性为null,不更新;
//根据ID修改数据
@Test
public void test06(){
    User user=new User();
    user.setId(1L);
    user.setPassword("111111");
    int row = userMapper.updateById(user);
    System.out.println(row);
}
3.7 MP实现分页查询
配置分页拦截器:
package com.lzw.config;
import com.baomidou.mybatisplus.annotation.DbType;
import
com.baomidou.mybatisplus.extension.plugins.MybatisPlusInterceptor;
import
com.baomidou.mybatisplus.extension.plugins.inner.PaginationInnerIn
terceptor;
import org.springframework.context.annotation.Bean;
import org.springframework.context.annotation.Configuration;
/**
* @author lzw
* @create 2024-12-16 22:45
*/
@Configuration
public class MybatisPlusConfig {
@Bean
public MybatisPlusInterceptor mybatisPlusInterceptor(){
    MybatisPlusInterceptor interceptor = new MybatisPlusInterceptor();

    PaginationInnerInterceptor paginationInnerInterceptor
                = new PaginationInnerInterceptor(DbType.MYSQL);
    //设置请求的页面大于最大页后操作, true调回到首页,false 继续请求默认false
    // paginationInterceptor.setOverflow(false);
    // 设置最大单页限制数量,-1不受限制
    paginationInnerInterceptor.setMaxLimit(-1L);
    interceptor.addInnerInterceptor(paginationInnerInterceptor);
    return interceptor;
  }
}
查询测试
//不带条件分页查询
@Test
public void test07(){
int currPage=1;//当前页
int pageSize=5;//每页查多少
IPage<User> page = new Page(currPage,pageSize);
//分页相关数据会封装到IPage中
userMapper.selectPage(page,null);
//获取分页相关数据
long pages = page.getPages();//总页数
System.out.println(pages);
long total = page.getTotal();//总条数
System.out.println(total);
List<User> records = page.getRecords();//页面上显示的数据
System.out.println(records);
long current = page.getCurrent();//当前页
System.out.println(current);
long size = page.getSize();//当前页面条数
System.out.println(size);
}
3.8 QueryWrapper实现基础查询
3.8.1 QueryWrapper常用API
| Wrapper接口: QueryWrapper //查询 UpdateWrapper //更新 QueryWrapper常用API eq(): 等于 = ne(): 不等于 <> 或者 != gt(): 大于 > ge(): 大于等于 >= lt(): 小于 < le(): 小于等于 <= between(): BETWEEN 值1 AND 值2 notBetween(): NOT BETWEEN 值1 AND 值2 in(): in notIn():not in |
3.8.2 查询实现
要求:查询用户中姓名包含"伤",密码为"123456",且年龄为19或者25或者29,查询
结果按照年龄降序排序;
//查询实现
@Test
public void test08(){
/*
如果查询的条件过于复杂,mp还适合么?
简单的操作,直接使用mp
但是非常复杂的操作,比如多表关联查询 复杂条件查询等,建议使用
xml下sql实现
*/
//构建添加包装对象
QueryWrapper<User> wrapper = new QueryWrapper<>();
//设置条件
wrapper.like("user_name","伤")
.eq("password","123456")
//.in("age",19,25,29)
.in("age",Arrays.asList(19,25,29))
.orderByDesc("age");
//查询
/*
==> Preparing: SELECT
id,user_name,password,name,age,email FROM tb_user WHERE (user_name
LIKE ? AND password = ? AND age IN (?,?,?)) ORDER BY age DESC
==> Parameters: %伤%(String), 123456(String),
19(Integer), 25(Integer), 29(Integer)
*/

List<User> userList = userMapper.selectList(wrapper);
System.out.println(userList);
}
3.8.3 QueryWrapper逻辑查询or
通过QueryWrapper多条件查询时,默认使用and关键字拼接SQL;
通过QueryWrapper调用or()方法时,底层会使用or关键字拼接方法左右的查询条件;
要求:查询用户名为"lisi"或者年龄大于23的用户信息;
@Test
public void test09(){
//1.创建查询条件构建器
QueryWrapper<User> wrapper = new QueryWrapper<>();
//2.设置条件
wrapper.eq("user_name","lisi")
.or()
.lt("age",23);
/*
select * from tb_user where user_name = ? or age < ?
*/
List<User> userList = userMapper.selectList(wrapper);
System.out.println(userList);
}
3.8.4 QueryWrapper模糊查询like
like("表列名","条件值"); 作用:查询包含关键字的信息,底层会自动添加匹配关
键字,比如:%条件值%
likeLeft("表列名","条件值"); 作用:左侧模糊搜索,也就是查询以指定条件值结尾
的数据,比如:%条件值
likeRight("表列名","条件值");作用:右侧模糊搜索,也就是查询以指定条件值开
头的数据,比如:条件值%
@Test
public void test10(){
//1.创建查询条件构建器
QueryWrapper<User> wrapper = new QueryWrapper<>();
//2.设置条件
wrapper.likeLeft("user_name","zhang");
/*
SELECT id,user_name,password,name,age,email
from tb_user
where user_name like ?
%zhang
*/
List<User> userList = userMapper.selectList(wrapper);
System.out.println(userList);
}
3.8.5 QueryWrapper排序查询
orderByAsc 升序排序,方法内可传入多个字段
orderByDesc 降序排序,方法内可传入多个字段
需求:根据age升序排序
@Test
public void test11(){
//1.创建查询条件构建器
QueryWrapper<User> wrapper = new QueryWrapper<>();
//2.设置条件
wrapper.eq("user_name","lisi")
.or()
.lt("age",23)
.in("name","李四","王五")
.orderByDesc("age");
/*
select * from tb_user where user_name = ? or age < ?
and name in (?,?) order by age asc
*/
List<User> userList = userMapper.selectList(wrapper);
System.out.println(userList);
}
3.8.6 QueryWrapper限定字段查询
MP查询时,默认将表中所有字段数据映射查询,但是有时我们仅仅需要查询部分字
段信息,这是可以使用select()方法限定返回的字段信息,避免I/O资源的浪费;
示例:wrapper.select("字段1","字段2",......)
@Test
public void test12(){
//1.创建查询条件构建器
QueryWrapper<User> wrapper = new QueryWrapper<>();
//2.设置条件
wrapper.eq("user_name","lisi")
.or()
.lt("age",23)
.select("id","user_name as realName");
/*
==> Preparing: SELECT id,user_name as realName FROM
tb_user WHERE (user_name = ? OR age < ?)
==> Parameters: lisi(String), 23(Integer)
*/
List<User> userList = userMapper.selectList(wrapper);
System.out.println(userList);
}
3.8.7 QueryWrapper实现分页条件查询
方法说明:
//参数1:分页对象
//参数2:查询条件
mapper.selectPage(page,wrapper);
需求:查询年龄大于23的用户信息,并显示第2页,每页大小为3;
@Test
public void test13(){
int currPage=1;//当前页
int pageSize=5;//每页查多少
IPage<User> page = new Page(currPage,pageSize);
QueryWrapper<User> wrapper = new QueryWrapper();
wrapper.lt("age",23);
//分页相关数据会封装到IPage中
userMapper.selectPage(page,wrapper);
//获取分页相关数据
long pages = page.getPages();//总页数
System.out.println(pages);
long total = page.getTotal();//总条数
System.out.println(total);
List<User> records = page.getRecords();//页面上显示的数据
System.out.println(records);
long current = page.getCurrent();//当前页
System.out.println(current);
long size = page.getSize();//当前页面条数
System.out.println(size);
}
3.8.8 QueryWrapper实现条件删除
@Test
public void test14(){
QueryWrapper<User> wrapper = new QueryWrapper<>();
wrapper.eq("user_name","赵四伤");
int i = userMapper.delete(wrapper);
System.out.println(i);
}
3.8.9 QueryWrapper实现条件更新
@Test
public void test14(){
// 参数1: 最新的值
    User user = new User();
    user.setRealName("张三丰");
    //参数2:更新时条件
    QueryWrapper<User> wrapper = new QueryWrapper<>();
    wrapper.eq("id",12L);
    int update = userMapper.update(user, wrapper);
    System.out.println(update);
}
3.9 自定义查询接口实现分页查询
目前我们使用MP自带的分页插件可以很友好的实现分页查询操作,但是如果一些查
询需要我们自定义SQL,那该如何实现分页查询操作呢?
自定义接口中直接传入Page分页对象即可;
public interface UserMapper extends BaseMapper<User> {
/**
* 查询大于指定id的用户信息,并分页查询实现
* @param page
* @param id
* @return
*/
IPage<User> findGtIdByPage(IPage<User> page, @Param("id") Longid);
}
定义xml映射文件
<?xml version="1.0" encoding="UTF-8" ?>
<!DOCTYPE mapper
PUBLIC "-//mybatis.org//DTD Mapper 3.0//EN"
"http://mybatis.org/dtd/mybatis-3-mapper.dtd">
<mapper namespace="com.lzw.mapper.UserMapper">
<select id="findGtIdByPage" resultType="com.lzw.pojo.User">
select * from tb_user where id > #{id}
</select>
</mapper>
测试
@Test
public void test14(){
IPage<User> page=new Page<>(2,3);
    IPage<User> users = userMapper.findGtIdByPage(page, 3l);
    System.out.println(users.getRecords());
    System.out.println(users.getPages());
    System.out.println(users.getTotal());
}
四.MP实现Service封装
4.1 MP封装Service介绍
MybatisPlus为了开发更加快捷,对业务层也进行了封装,直接提供了相关的接口和
实现类; 我们在进行业务层开发时,可以继承它提供的接口和实现类,使得编码更加
高效;
实现流程
*定义一个服务扩展接口,该接口继承公共接口IService;
*定义一个服务实现类,该类继承ServiceImpl<Mapper,Entity>,并实现自定
义的扩展接口;
注意事项:
ServiceImpl父类已经注入了UserMapper对象,名称叫做baseMapper,所以当
前实现类直接可以使用baseMapper完成操作。
因为ServiceImpl已经实现了IService下的方法,所以当前服务类没有必要再次实现。
共性的业务代码交给框架封装维护,非共性的业务,在接口UserService定义,
然后在当前的服务类下实现;
4.2 核心API介绍
4.3 MP封装Service快速入门
定义服务扩展接口
//在公共接口的基础上扩展
public interface UserService extends IService<User> {
}
定义服务实现:
@Service
public class UserServiceImpl extends ServiceImpl<UserMapper, User>
implements UserService{
}
测试:
@SpringBootTest
public class UserServiceTest {
    @Autowired
    private UserService userService;
    //根据id查询
    @Test
    public void test01(){
    User user = userService.getById(1L);
    System.out.println(user);
 }
}
4.4 MP封装Service实现CRUD操作
/**
*测试条件查询,且仅返回一个
*sql查询的结果必须为1条或者没有,否则报错 !!!!
*/
@Test
public void test02(){
QueryWrapper<User> wrapper = new QueryWrapper<>();
wrapper.gt("age",20);
User user = userService.getOne(wrapper);
System.out.println(user);
}
/**
* 根据条件批量查询
*/
@Test
public void test03(){
QueryWrapper<User> wrapper = new QueryWrapper<>();
wrapper.gt("age",20);
List<User> userList = userService.list(wrapper);
System.out.println(userList);
}
/**
*根据条件批量查询并分页
*/
@Test
public void test04(){
    QueryWrapper<User> wrapper = new QueryWrapper<>();
    wrapper.gt("age",20);
    //构建分页对象
    IPage<User> page=new Page<>(2,3);
    userService.page(page,wrapper);
    System.out.println(page.getRecords());
    System.out.println(page.getPages());
    System.out.println(page.getTotal());
}
/**
* 测试服务层save保存单条操作
*/
@Test
    public void test05(){
    User user=new User();
    user.setRealName("zhangsan");
    user.setPassword("123456");
    user.setAge(23);
    user.setEmail("[email protected]");
    user.setName("张三");
    boolean isSuccess = userService.save(user);
    System.out.println(isSuccess?"保存成功":"保存失败");
}
/**
* 测试服务层批量保存
*/
    @Test
    public void test06(){
    User u01=new User();
    u01.setRealName("zhangsan");
    u01.setPassword("123456");
    u01.setAge(23);
    u01.setEmail("[email protected]");
    u01.setName("张三");
    User u02=new User();
    u02.setRealName("lisi");
    u02.setPassword("123456");
    u02.setAge(24);
    u02.setEmail("[email protected]");
    u02.setName("李四");
    boolean isSuccess =
    userService.saveBatch(Arrays.asList(u01, u02));
    System.out.println(isSuccess?"保存成功":"保存失败");
}
/*
*根据id删除操作
*/
    @Test
    public void test07(){
    boolean isSuccess = userService.removeById(14L);
    System.out.println(isSuccess?"保存成功":"保存失败");
}
/**
* @Description 根据条件批量删除
*/
    @Test
    public void test08(){
    QueryWrapper<User> wrapper = new QueryWrapper<>();
    wrapper.gt("id",12)
    .gt("age",20);
    boolean remove = userService.remove(wrapper);
    System.out.println(remove);
}
/*
*测试根据id更新数据
*/
    @Test
    public void test09(){
    User user=new User();
    user.setId(12L);
    user.setRealName("lisi");
    user.setPassword("123456");
    user.setAge(24);
    user.setEmail("[email protected]");
    user.setName("李四");
    boolean success = userService.updateById(user);
    System.out.println(success);
}
五.MP代码生成器
5.1 MP逆向工程介绍
开发中当有一个新的业务要实现时,通常我们需要构建一下信息:
*定义PO类
数据库表和实体类的映射 Java Bean,打各种mp的注解。
*定义DAO层
需要编写接口 Mapper ,接口 Mapper 需要去继承 MP 中的 BaseMapper 接口。
*定义Service层
编写 Service 层接口和实现类。
业务接口需要去继承 MP 中的 IService,业务实现类需要继承 MP 中的 ServiceImpl
和 实现业务接口。
*定义Controller层
编写 Controller 并标注 Spring MVC 中的相关注解。
显然上述存在固定的流程,且存在大量重复操作,you now 代码价值低且没效率!
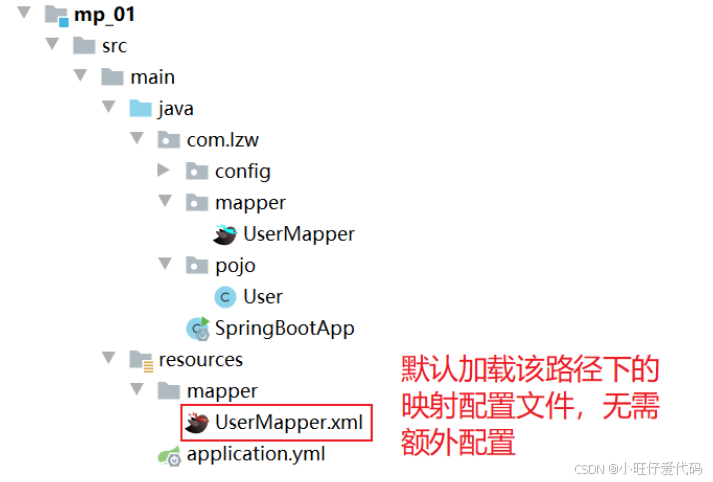
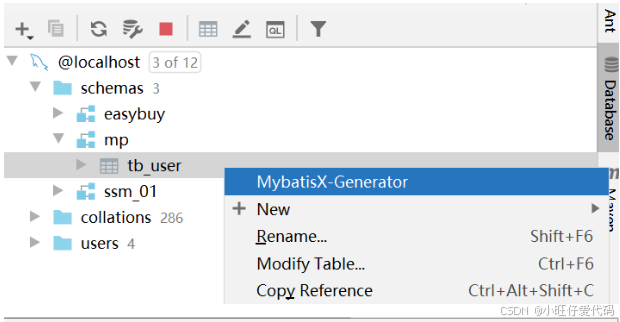
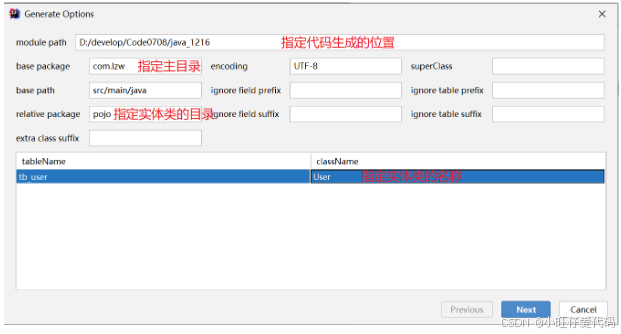
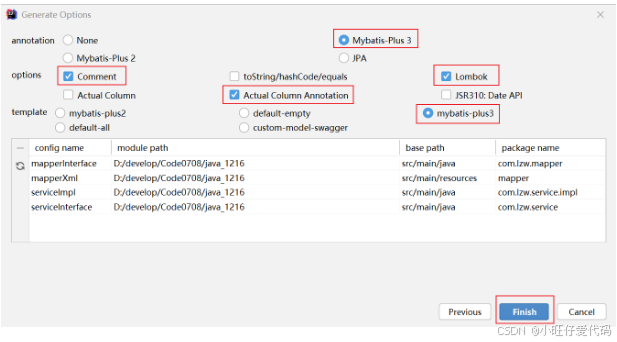
5.2 基于MybatisX实现逆向工程
六.逻辑删除
实际在删除数据时,为了数据留痕,一般选择逻辑删除,也就是为删除表添加逻辑删
除字段,通过修改字段状态值来表示数据是否被删除;
为tb_user添加逻辑删除字段:
mp配置:
| # 设置mp运行时行为 mybatis-plus: configuration: log-impl: org.apache.ibatis.logging.stdout.StdOutImpl # 控制台 输出sql global-config: db-config: logic-delete-field: deleted # 指定逻辑删除的表的列名 logic-delete-value: 1 # 指定删除的成功后字段的值 logic-not-delete-value: 0 # 指定没有删除的字段的值 |
调整实体类:
@Data
@NoArgsConstructor//主要用于mybatis底层反射构建user实体类对象
@AllArgsConstructor//主要是lombok基于构建者模式构建对象
@Builder
/**
* 如果变的名称与实体类名称一致,该注解可省略
*/
    @TableName("tb_user")
    public class User {
    //......
    @TableLogic//指定逻辑删除字段
    private Integer deleted;
}
测试:
@Test
public void testDelete(){
    //根据id删除
    int count = userMapper.deleteById(15l);
    System.out.println(count);
}
但是对应的查询如果不加添加,则删除的无法查询到:
@Test
public void testGetById(){
User user = userMapper.selectById(15l);
System.out.println(user);
}
逻辑删除本质就是拦截sql,动态追加sql片段
查询 deleted=0
删除: 将sql转化成update操作;

