@本文章作者 Ruoduan.cn 转载请注明出处
-
缘起
公司中台系统要新增公司项目 —— IM即时聊天 的后台管理,由本人全程负责,前端技术选型 想采用目前比较新比较hot的技术 —— reactHook + react-Router5 + Typescript + (mobx | useContext + useState),
至于括号内的稍后解答,个人觉得可以一定程度上替代 mobx 和 redux 的状态管理 -
本文将会从 Typescript,React-Hook,reactHook.TSX(实践)这三个方面来叙述
-
Typescript
- 项目搭建
- 类型定义
- 应用分析
- …
-
React-Hook ⭐️
- useState
- useEffect
- useContext
- …
-
Hook 与 mobx redux 等,实现自己状态管理
-
React 全家桶的东西不详细讲解带过 …
-
好了,下面让我们开始吧
Typescript
React-Typescript 项目搭建
nodejs环境需具备 Not 下载链接
我们采用脚手架create-react-app 直接搭建react-typescript项目环境
版本要求 nodejs 8+ , Yarn 0.25+
npx create-react-app my-app --typescript

npm init react-app my-app --typescript

yarn create react-app my-app --typescript
Typescript 项目文件
- 这里讲解一下typescript的一些文件定义
./
/src
    ./react-app-env.d.ts // 全局声明文件

tsconfig.json // typescript 配置文件
tsconfig.json详解
这里例举🌰几个 :
{
  "compilerOptions": {
      "experimentalDecorators": true,
    "target": "es5", //语言编译目标
    "lib": [
      "dom",
      "dom.iterable",
      "esnext"
    ],
    "allowJs": true,
    "skipLibCheck": true,
    "esModuleInterop": true,
    "allowSyntheticDefaultImports": true,
    "strict": true,
    "forceConsistentCasingInFileNames": true,
    "module": "esnext",
    "moduleResolution": "node",
    "resolveJsonModule": true,
    "isolatedModules": true,
    "noEmit": true,
    "jsx": "react" // 组件语法环境
  },
  "include": [ //编译目标目录
    "src",
  ]
}
- react-app-env.d.ts 是TypeScript声明文件
🌰例如:
你引入了jQuery在typescript中:
$('#dom');
// or
jQuery('#dom');
// ERROR: Cannot find name ‘jQuery’.
报错了,因为ts编译器并不认识$() or jQuery
我们需要全局定义一下这个变量 用declare修饰符 🌰
declare var jQuery: (selector: string) => any;

jQuery('#foo');
这样我们就可以快乐的使用jquery了
但是前人种树后人乘凉 很多库 社区已经给我定义好了 我们至于要安装就可以了
yarn add @types/jquery --save-dev
我们在后期项目中还会使用到 @types 类型安装
到这里 我们已经初步了解 Typescript 的项目结构了 正如它官网说的 它是js 的超集,渐进式语言,我们可以直接撸,它兼容js目前大部分新语法,并且对其增加类型
安装 antd, react-router-dom, 。。。
yarn add antd react-router-dom
这里就不一一例举🌰了
注意⚠️: react-router-dom 需要安装@types哦
yarn add @types/react-router-dom --save-dev
下面让我的步入重点~
React-hook
我们知道 react中分为2中组件,一种为类组件,一种为函数组件
区别
| 区别 | class | func |
|---|---|---|
| 定义方式 | class | func |
| 状态 | 有(state) | 无 |
| this | 有 | 无 |
| 声明周期 | 有 | 无 |
| 简洁度 | 普通 | 较为简洁 |
通过比较我们可以看到 传统的函数组件没有state and 生命周期
所以在之前的开发中 函数式组件通常作为 一些 简单的组件 补充
而react-hook 可以让我们在 函数式组件中使用 state 组件状态管理,还可以实现声明周期 —— 副作用,而且还极大的简化了代码,让代码更加简洁明了易于理解
userState
我们看下面2段代码
import React, { useState } from 'react';

function Example() {
  // 声明一个叫 "count" 的 state 变量
  const [count, setCount] = useState(0);

  return (
    <div>
      <p>You clicked {count} times</p>
      <button onClick={() => setCount(count + 1)}>
        Click me
      </button>
    </div>
  );
}
等价于
class Example extends React.Component {
  constructor(props) {
    super(props);
    this.state = {
      count: 0
    };
  }

  render() {
    return (
      <div>
        <p>You clicked {this.state.count} times</p>
        <button onClick={() => this.setState({ count: this.state.count + 1 })}>
          Click me
        </button>
      </div>
    );
  }
}
- 可以看到我们导入了
useState使用数组的解构语法来 定义了2个变量count, setCount并且传入了一个初始值 0,而且在下面的使用中我们摆脱了恶心的this直接可以使用 - conut 是我们的hook变量 相当于
state - setCount 是我们针对
count的赋值函数 相当于this.setState()
Effect Hook
Effect Hook 可以让你在函数组件中执行副作用操作
看下面的代码
import React, { useState, useEffect } from 'react';

function Example() {
  const [count, setCount] = useState(0);

  // 在组件中更新页面的title
  useEffect(() => {
    // 设置页面title
    document.title = `数字 ${count} `;
  });

  return (
    <div>
      <p>数字 {count}</p>
      <button onClick={() => setCount(count + 1)}>
        + 1
      </button>
    </div>
  );
}
等价于class
lass Example extends React.Component {
  constructor(props) {
    super(props);
    this.state = {
      count: 0
    };
  }

  componentDidMount() {
    document.title = `数字 ${this.state.count} `;
  }

  componentDidUpdate() {
    document.title = `数字 ${this.state.count} `;
  }

  render() {
    return (
      <div>
        <p>数字 {this.state.count} </p>
        <button onClick={() => this.setState({ count: this.state.count + 1 })}>
          + 1
        </button>
      </div>
    );
  }
}
我们可以看到其中的区别,在class组件中 我们重复的定义了生命周期 componentDidUpdate,componentDidMount
-
稍微分析下 我们使用class的state中的数据是为了什么?
-
我们知道定义在
class组件中state中的数据我们会在数据更新后重新渲染dom树 -
useEffect 在执行 DOM 更新之后调用它。在这个 effect 中,我们设置了 document 的 title 属性,不过我们也可以执行数据获取或调用其他命令式的 API。
-
注意⚠️:默认情况下,它在第一次渲染之后和每次更新之后都会执行。(我们稍后会谈到如何控制它。)
其实useEffect做的很简单就是告诉 React 组件需要在渲染后执行某些操作,然后每次渲染后都会执行下面我们介绍用
useEffect实现声明周期的componentDidMount和componentDidUpdate首先在我们的函数组件中是可以定义多个useState和useEffect的 他们会依顺序执行的写在前面useEffect的返回值决定这个副作用的
类型和销毁- return 函数:遇到清除的副作用
- return [] 空数组:只运行一次的 effect(仅在组件挂载和卸载时执行)
- 避免死循环
useEffect === componentDidMount 🌰
例如我们要在页面挂载是时请求数据且渲染到页面上
let [list, setList] = useEffect([])

// 获取数据
const getList = async () => {
    let res = await axios('xxx')
}

// 只挂载一次的副作用函数
useEffect(() => {
    getList()
}, [])
useEffect === componentDidUpdate 🌰
还是上面那个栗子 我们需要实时更新mobx中订阅的store中的数据到页面上
 let [list, setList] = useEffect([])
 let [data, setData] = useEffect(store.rows)

 // 获取数据
 const getList = async () => {
     let res = await axios('xxx')
 }

 // 获取store中数据
 const getStore = () => {
     @observer
     let res = store.getxxxxx
     ... 此处省略若干字

     setData(res)
 }

 // 只挂载一次的副作用函数
 useEffect(() => {
     getList()
 }, [])

 // 需清除的副作用函数
 useEffect(() =>
     (()=>
         getStore
     )()
 )
到这里我们已经基本了解 reactHook 的基本使用。下面将介绍一个基于ReactHook-useContext 来实现一个简单的Redux 状态管理
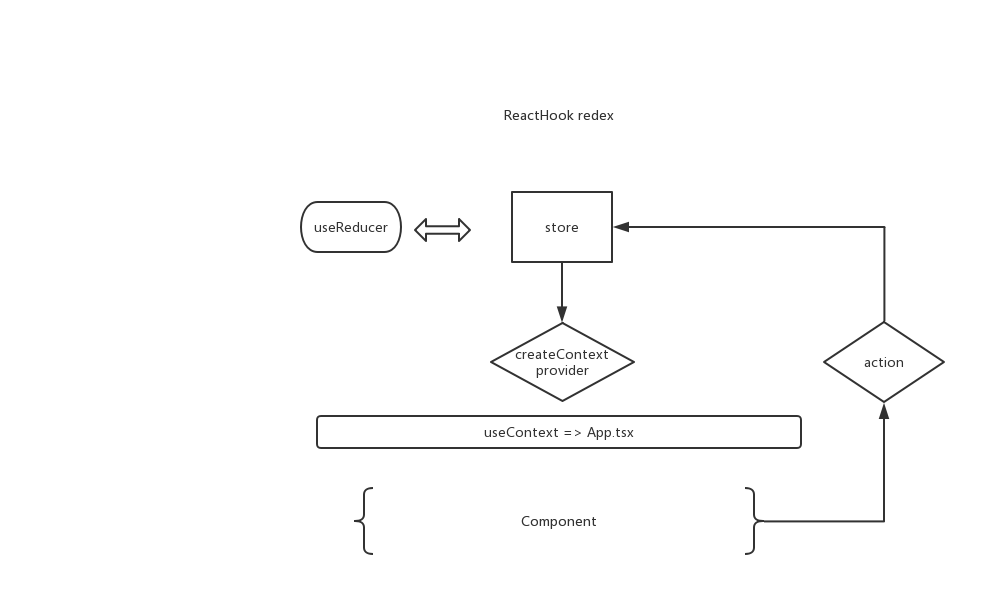
Other ReactHook 实现 basic
Redux基于 前面的 useReducer,和 createContext, useContext
我们先来看下 额外hook
useReducer:const [state, dispatch] = useReducer(reducer, initialArg, init);它接收一个形如 (state, action) => newState 的 reducer,并返回当前的 state 以及与其配套的 dispatch 方法。(是不是有点熟悉,用过redux 的童鞋~)
-
import * as React from 'react'
const { useContext, useReducer, createContext } = React

// 根据action.reduce返回状态
function reducerInAction(state, action) {
    if (typeof action.reducer == 'function') {
        return action.reducer(state)
    }
    return state
}
// 处理store数据
export default function createStore(params) {
    const { _State = {}, reducer
    } = {
        ...params,
        reducer: reducerInAction
    }

    // 由createContext 来进行状态管理数据分发
    const Appcontext = createContext()

    const upReducer = (lastState, action) => {
        //更新数据
        let netxState = reducer(lastState, action)
        store._state = netxState
        return netxState
    }
    const store = {
        _state: _State,
        dispatch: undefined,
        getState: () => {
            return store._state
        },
        useContext: () => {
            return useContext(Appcontext)
        }
    }
    // 处理数据后有返回
    const Provider = props => {
        const [state, dispatch] = useReducer(upReducer, _State)
        if (!store.dispatch) {
            store.dispatch = async (action) => {
                if (typeof action === 'function') {
                    await action(dispatch, store.getState())
                } else {
                    dispatch(action)
                }

            }
        }
        return <Appcontext.Provider {...props} value={state} />
    }

    return {
        Provider,
        store
    }
}
use ⬆️
import * as React from 'react'
import HooksRedux from '@/HooksRedux'
const {
    Provider,
    store
} = _HooksRedux({
    State: { name: '小明', age: '18' }

// 请求
const Add_action = () => {
    return {
        type: 'ADD',
        reducer(state) {
            return {
                ...state,
                age: state.age + 1
            }
        }
    }
ps:以上就是basic of redux,但是在我的实际项目中使用的还是mobx,他的设计模式,和面向对象的写法也比较舒服. 可参考
实践(TSX + Hook)
- 遇事不决 Any —— anyscript
ps: 这当然是不可取的咯~,但是我们在快速开发过程中 我们有时候一个
泛型|interface是不确定的我们可以暂时先用any然后后期更改
- 小栗子🌰
例如我们要通过props 向子组件传递一个对象,但是这个对象是接口数据,且现在还不能确定 对象里面的数据类型和属性 我们可以暂时用 any代替,我一般会在这个地方,打上TODO any Type,方便以后处理。
- React.FC
我们可以看到这样的代码:
const app: React.FC = () => {
    ...
}
FC = Functional Component
SFC = Stateless Functional Component (已弃用)
它是对函数组件的声明,我们看一下的Type
type React.FC<P = {}> = React.FunctionComponent<P>
在有的时候你不加也没什么问题,建议是加上,这样方便告诉Typescript你的函数组件
- jsDoc and interface
jsDoc 是一个插件 它用于在编辑器|IDE 中给func 添加格式化的注释,
在Typescript中我们使用强大的vscode interface是非常重要的,它用于描述我的接口,对象 …
这里我们要注意的是 jsDoc !== interface
- 必选属性 => “:” 带冒号的属性是必须存在的,不可以多也不能少
- 可选属性 => " ? " 表示有选择的选项,可有可无
- 只读属性 => " readonly ":
- 任意属性 [ propName : 类型 ] : any 表示定义了任意属性取string 类型的值
interface 写得好 让我们的代码很健壮
- 泛型 and type
例如下面这段代码
let _userList: Array<object> = []
let [userList, setUserList] = useState(_userList)

let _userList: object[] = []
let [userList, setUserList] = useState(_userList)
使用这2种方式都可以,但并不代编它们 ===
泛型 有着更为强大的用法
function createArray<T>(length: number, value: T): Array<any>
    ...

function createArray<T>(length: number, value: T): Array<T> {
    let result: T[] = [];
    for (let i = 0; i < length; i++) {
        result[i] = value;
    }
    return result;
}

createArray(3, 'x'); // ['x', 'x', 'x']
- 联合类型 and 返回值
function getLength(something: string | number): number {
    return something.length;
}
我们应该严格遵循此语法,来进行书写✍️,没有返回 void
- 插件
使用 ESlite 来规范我们书写的代码
公司项目Private 不便贴代码和项目地址