ElasticSearch(ES)详解(一)
前言
众所周知,ElasticSearch是一个智能搜索,分布式的搜索引擎,下面就来简单的介绍一下。
一、Why ElasticSearch?
正如百度、电商的兴起,对于数据的搜索需求越来越大,基于Lucene开发的ElasticSearch搜索引擎顺势崛起。
1.Why not Mysql
为什么不用数据库去实现搜索功能?肯定很多人会这样问。关系型数据库如Mysql是很常用的基础数据库,它的事务操作给数据的安全性上是其他数据库很难超越的,面对目前多样的查询搜索上,他却体现出了局限性。
如下图,当我们要查询保利的物业,查询语句肯定是select * from xx where xx like ‘%保利%’,而mysql对于模糊查询使用的是全表扫描假设有1亿条数据可以想象一次查询的消耗是非常巨大的。
这里肯定很多人说利用索引,没错索引对于搜索的提升是非常大的,但是mysql的索引也有他的弊端:
1.mysql的索引是B+树的数据结构,若对于每列都加索引,对于存储的消耗是非常巨大的;
2.mysql利用多个索引字段进行组合查询时,只会利用一个索引查询,其他条件仍然是全文扫描。
2.倒排索引
ES的解决方案是利用倒排索引的方式,来提升查询效率,下面对倒排索引做一个介绍:
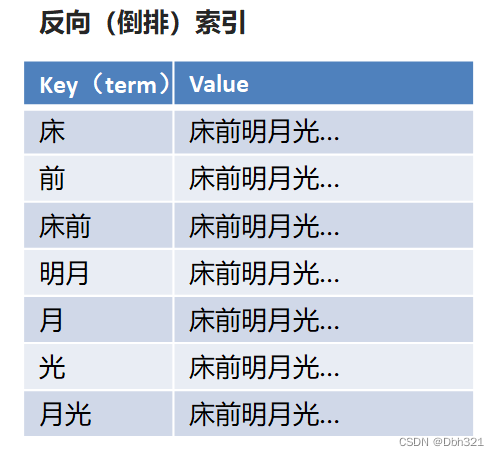
现在让我们想一首包含“前”字的诗文,肯定很难,但是让我们背一下《静夜思》,肯定能朗朗上口,而我们这种思维方式《静夜思》->床前明夜光,就是正向索引,根据诗歌标题记忆诗歌内容。反向索引简单点理解就是将内容(比如“窗前明月光”)进行分解成索引(比如“前”),而当检索包含“前”的诗句时,就想起内容,如下图。
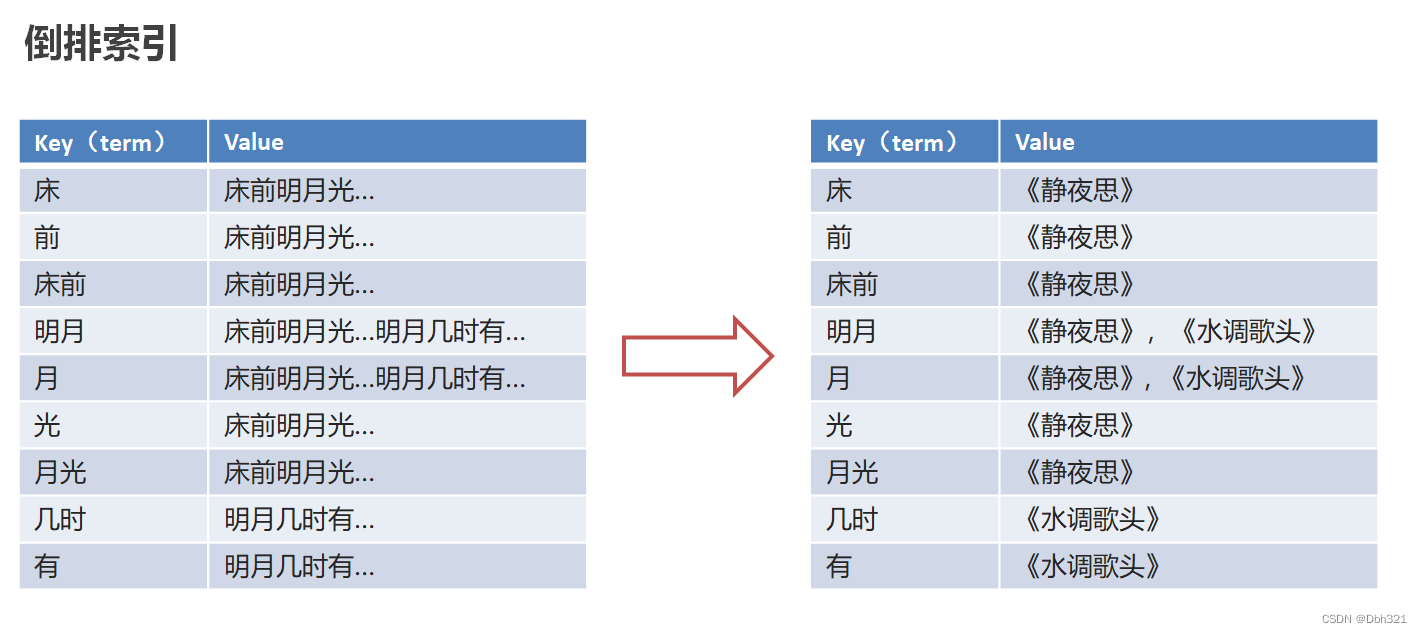
但是如果这样直接存诗句太占空间,可以将索引对应的连接为内容的唯一标识(比如诗歌名)
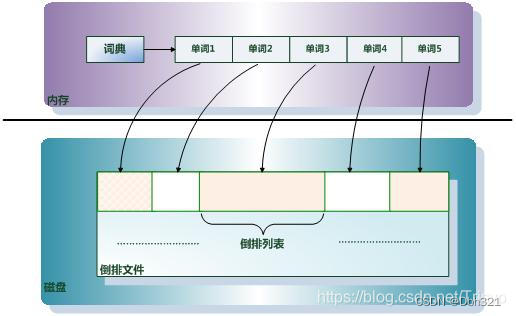
这便是倒排索引,这里肯定很多疑问,这样基于全文检索的倒排索引,相对于B+树岂不是更占空间,因此ES针对倒排索引的存储采用内存加磁盘的形式,将索引项(拆分的单词)放在内存,每个索引项(单词)指向一个倒排列表(里面存储包含单词的文档id以及单词在文档中出现的位置),而倒排列表通过倒排文件存储在磁盘中。当仍然过大可以采取分布式存储(后续写入)。
二、ElasticSearch简介
ES正是靠其独特的索引方式,实现了快速检索功能。下面对ES的组成和数据类型进行介绍。
1.核心部件
(1)索引(index)
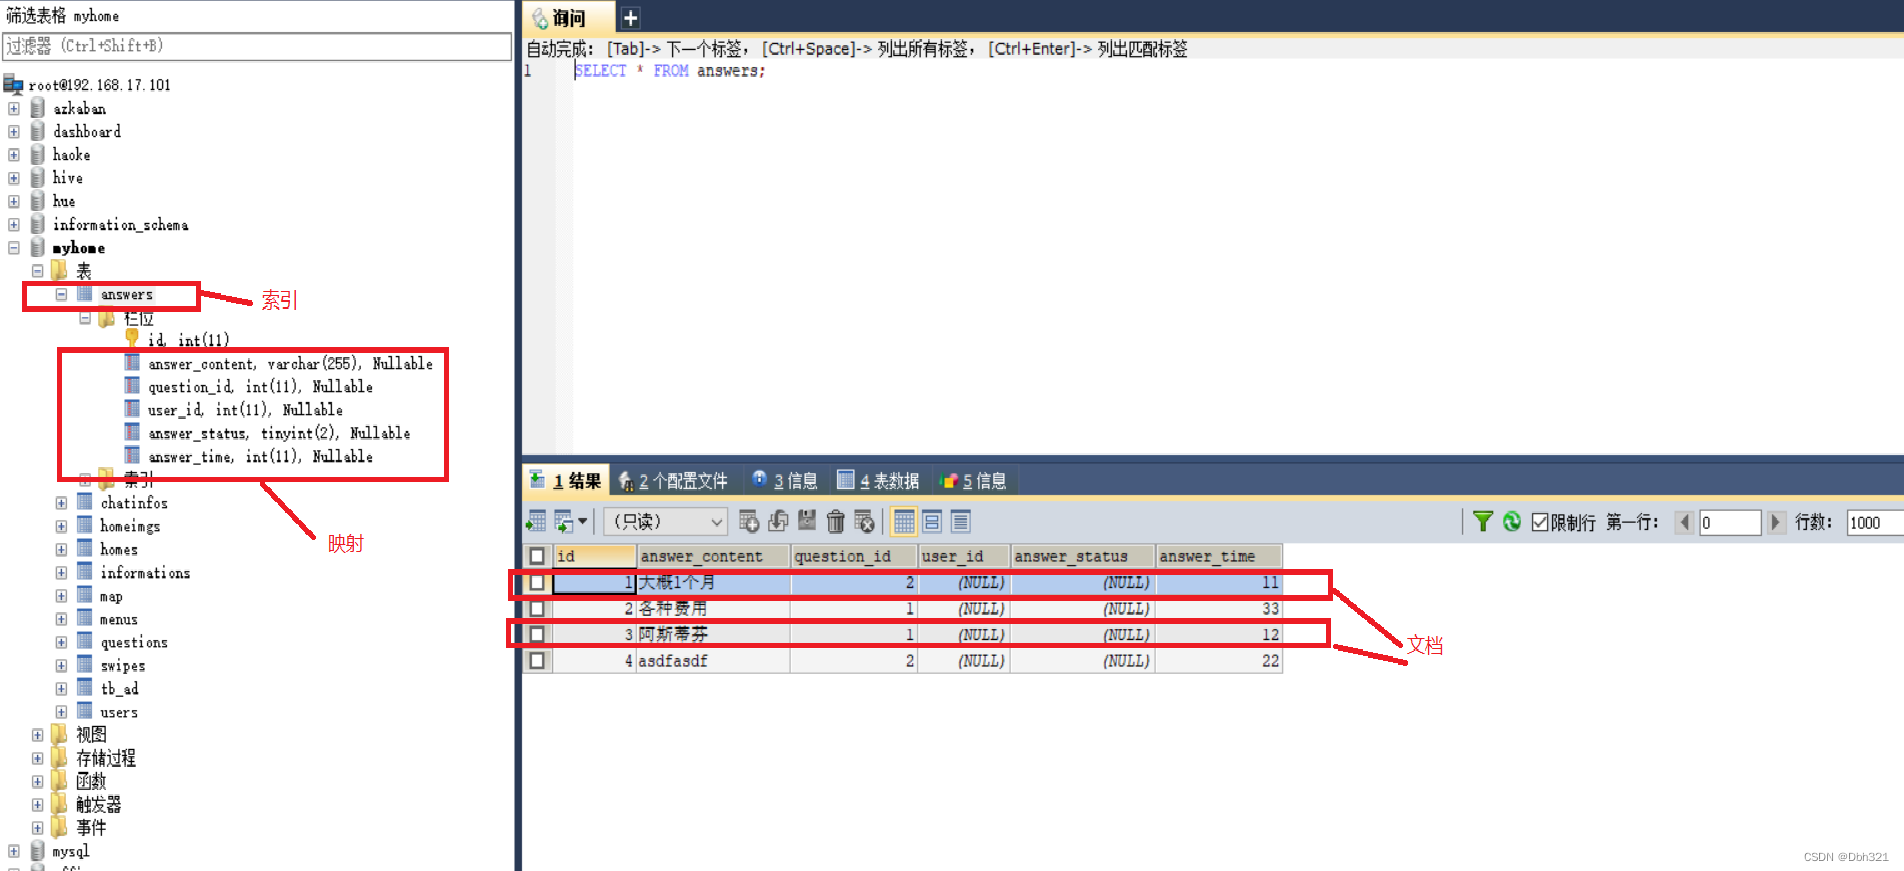
不同于传统意义上的的索引,ES的索引为其存放数据的地方,类似于Mysql中的数据库。
(2)映射(mapping)
mapping定义了每个字段的类型、字段所使用的分词器等,用来描述索引的数据结构的,相当于Mysql中的表结构。
(3)文档(document)
就是存储的最终数据,是ES里面最小的数据单元,就好比Mysql表里面的一条数据。
(4)字段(field)
一个document有一个或者多个field组成,好比Mysql中列的概念。
2.数据类型
ES根据document中每个字段的数据类型来建立不同数据结构的索引,比如text类型建立倒排索引。ES数据类型可大致分为简单数据类型和复杂数据类型。
(1)简单数据类型
- 字符串
text:会分词,不支持聚合

keyword:不会分词,将全部内容作为一个词条,支持聚合(聚合:相当于mysql 中的sum(求和))
-
数值
-
布尔:boolean
-
二进制:binary
-
范围类型
integer_range, float_range, long_range, double_range, date_range
- 日期:date
(2)复杂数据类型
•数组:[ ] Nested: nested (for arrays of JSON objects 数组类型的JSON对象)
•对象:{ } Object: object(for single JSON objects 单个JSON对象)
3.ES安装
ES及插件安装参照下面链接Elasticsearch 安装详细步骤(保姆级安装)
三、ElasticSearch基本操作
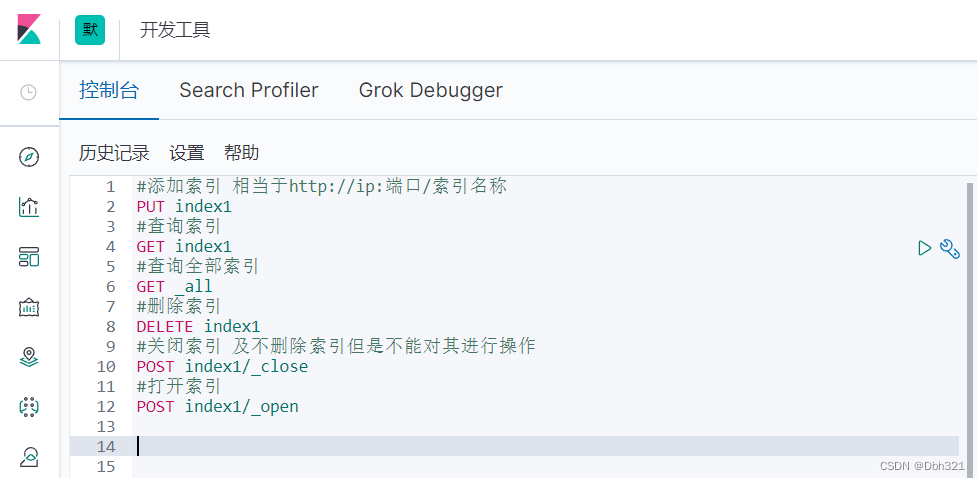
ES基于RESTful风格的网络接口操作。因此可以使用PostMan等网络工具操作,也可以使用kibana控制台操作,这里主要介绍使用kibana控制台操作。
1.索引操作
2.映射操作
#新建映射 对已有索引添加
PUT index1/_mapping
{
  "properties":{
    "name":{
      "type":"keyword"
    },
    "age":{
      "type":"integer"
    },
    "address":{
      "type":"text",
      "analyzer": "ik_max_word"
    }
  }
}
#新建映射 创建索引时设置映射
PUT index2
{
  "mappings": {
    "properties": {
       "name":{
      "type":"keyword"
    },
    "age":{
      "type":"integer"
    },
    "address":{
      "type":"text",
      "analyzer": "ik_max_word"
    }
    }
  }
}

#添加字段 对已有映射添加项
POST index2/_mapping
{
  "properties":{
    "hobby":{
      "type":"text",
      "analyzer":"ik_max_word"
    }

  }
}
这里特别说明,ES有一种情况会自己添加字段,在录入文档时,发现mapping中没有相应的字段,这里就会根据录入的数据,自己判断字段类型并给mapping新增该字段。
3.分词器
正如前面所讲,ES在text类型的字段存入时,会对该字段进行分词,并将分的词存入索引,分词器也就是干这个事的,但是在ES默认的分词器中对中文的兼容性很差,只能将中文分成单个字,所以需要自己下载第三方兼容中文的分词器IK分词器。
(1)分词器操作
GET _analyze
{
  "analyzer": "ik_max_word",
  "text": "我们爱打乒乓球"
}
#返回消息
{
  "tokens" : [
    {
      "token" : "我们",
      "start_offset" : 0,
      "end_offset" : 2,
      "type" : "CN_WORD",
      "position" : 0
    },
    {
      "token" : "爱打",
      "start_offset" : 2,
      "end_offset" : 4,
      "type" : "CN_WORD",
      "position" : 1
    },
    {
      "token" : "打乒乓球",
      "start_offset" : 3,
      "end_offset" : 7,
      "type" : "CN_WORD",
      "position" : 2
    },
    {
      "token" : "乒乓球",
      "start_offset" : 4,
      "end_offset" : 7,
      "type" : "CN_WORD",
      "position" : 3
    },
    {
      "token" : "乒乓",
      "start_offset" : 4,
      "end_offset" : 6,
      "type" : "CN_WORD",
      "position" : 4
    },
    {
      "token" : "球",
      "start_offset" : 6,
      "end_offset" : 7,
      "type" : "CN_CHAR",
      "position" : 5
    }
  ]
}
同时在mapping设定中,在指定字段类型的时候也可设置该字段的分词器
POST index2/_mapping
{
  "properties":{
    "hobby":{
      "type":"text",
      "analyzer":"ik_max_word" #分词器
    }

  }
}
(2)IK分词器下载及简介
参照链接(链接是在windows环境下部署,linux系统同理):ElasticSearch 入门(四)安装IK分析器
4.文档操作
在了解了分词器的概念后,我们看一下ES对文档的操作
#新建文档 自定义id
PUT index1/_doc/1
{
  "name":"张三",
  "age":12,
  "address":"北京海淀区"
}

#新建文档 系统自建id
POST index1/_doc
{
  "name":"李四",
  "age":15,
  "address":"上海浦东区"
}

#删除文档
DELETE index1/_doc/1


#修改文档 同新建文档, 当id存在时及为修改
PUT index1/_doc/1
{
   "name":"张三",
  "age":14,
  "address":"北京海淀区"
}

#查询文档
#查看索引下全部文档
GET index1/_search
#按词条查询 及查询的内容不会进行分词
GET index1/_search
{
  "query": {
    "term": {
      "address": {
        "value": "海淀"
      }
    }
    }
  }
}
#按全文查询 全文查询会分析查询条件,先将查询条件进行分词,然后查询,求并集
GET index1/_search
{
  "query": {
    "match": {
      "address": "北京海淀"
    }
  }
}
这里的操作指令其实是kibana进行了简化,可以看到ES的操作有规律可言的,按照Restful风格,通常put操作为添加操作,Post为修改,get为查询,delete为删除。
四、JAVA API
1.导入maven依赖
		<!--引入es的坐标-->
        <dependency>
            <groupId>org.elasticsearch.client</groupId>
            <artifactId>elasticsearch-rest-high-level-client</artifactId>
            <version>7.4.0</version>
        </dependency>
        <dependency>
            <groupId>org.elasticsearch.client</groupId>
            <artifactId>elasticsearch-rest-client</artifactId>
            <version>7.4.0</version>
        </dependency>
        <dependency>
            <groupId>org.elasticsearch</groupId>
            <artifactId>elasticsearch</artifactId>
            <version>7.4.0</version>
        </dependency>
2.创建RestHighLevelClient客服端对象
  @BeforeAll
    public void before() {
        RestHighLevelClient client = new RestHighLevelClient(
                                       RestClient.builder(
                                                     new HttpHost(
                                                             "192.168.17.101",//ES主机ip
                                                             9200 ,//端口号
                                                             "http"//传递协议
                                                     )));
    }
3.操作ES
package com.db123;

import com.dbh123.ElasticSearchDemoApp;
import org.apache.http.HttpHost;
import org.elasticsearch.action.admin.indices.delete.DeleteIndexRequest;
import org.elasticsearch.action.delete.DeleteRequest;
import org.elasticsearch.action.delete.DeleteResponse;
import org.elasticsearch.action.get.GetRequest;
import org.elasticsearch.action.get.GetResponse;
import org.elasticsearch.action.index.IndexRequest;
import org.elasticsearch.action.index.IndexResponse;
import org.elasticsearch.action.support.master.AcknowledgedResponse;
import org.elasticsearch.client.indices.CreateIndexRequest;
import org.elasticsearch.client.indices.CreateIndexResponse;
import org.elasticsearch.client.IndicesClient;
import org.elasticsearch.client.RequestOptions;
import org.elasticsearch.client.RestClient;
import org.elasticsearch.client.RestHighLevelClient;
import org.elasticsearch.client.indices.GetIndexRequest;
import org.elasticsearch.client.indices.GetIndexResponse;
import org.elasticsearch.cluster.metadata.MappingMetaData;
import org.elasticsearch.common.xcontent.XContentType;
import org.junit.jupiter.api.BeforeAll;
import org.junit.jupiter.api.Test;
import org.springframework.beans.factory.annotation.Autowired;
import org.springframework.boot.test.context.SpringBootTest;

import java.io.IOException;
import java.util.HashMap;
import java.util.Map;

/**
 * @description:
 * @author: DBH123
 * @date: 2022/6/27 23:09
 */
@SpringBootTest(classes = ElasticSearchDemoApp.class)
public class ElasticSearchTest {

    private static RestHighLevelClient client;

    @BeforeAll
    public static void before() {
        client = new RestHighLevelClient(
                RestClient.builder(
                        new HttpHost("node1" , 9200 , "http")
                )
        );
    }

    /**
     * @Description 添加索引
     * @Author: DBH123
     * @Date: 2022/6/28 16:39
     * @Params:
     * @Return:
     **/
    @Test
    public void addIndex() throws IOException {
        // 1.使用client获取操作索引对象
        IndicesClient indices = client.indices();
        // 2.具体操作获取返回值
        // 2.1 设置索引名
        CreateIndexRequest createIndexRequest = new CreateIndexRequest("student");
        // 2.2 创建索引
        CreateIndexResponse createIndexResponse = indices.create(createIndexRequest, RequestOptions.DEFAULT);
        // 3.输出返回值
        System.out.println(createIndexResponse.isAcknowledged());
    }

    /**
     * @Description 添加索引并添加映射
     * @Author: DBH123
     * @Date: 2022/6/28 16:49
     * @Params:
     * @Return:
     **/
    @Test
    public void addIndexAndMapping() throws IOException {
        //1.使用client获取操作索引对象
        IndicesClient indices = client.indices();
        //2.具体操作获取返回值
        //2.具体操作,获取返回值
        CreateIndexRequest createIndexRequest = new CreateIndexRequest("student1");
        //2.1 设置mappings
        String mapping = "{\n" +
                "      \"properties\" : {\n" +
                "        \"address\" : {\n" +
                "          \"type\" : \"text\",\n" +
                "          \"analyzer\" : \"ik_max_word\"\n" +
                "        },\n" +
                "        \"age\" : {\n" +
                "          \"type\" : \"long\"\n" +
                "        },\n" +
                "        \"name\" : {\n" +
                "          \"type\" : \"keyword\"\n" +
                "        }\n" +
                "      }\n" +
                "    }";
        createIndexRequest.mapping(mapping, XContentType.JSON);

        CreateIndexResponse createIndexResponse = indices.create(createIndexRequest, RequestOptions.DEFAULT);
        //3.根据返回值判断结果
        System.out.println(createIndexResponse.isAcknowledged());
    }

    /**
     * @Description 查询索引
     * @Author: DBH123
     * @Date: 2022/6/28 17:16
     * @Params:
     * @Return:
     **/

    @Test
    public void queryIndex() throws IOException {
        IndicesClient indices = client.indices();
        GetIndexRequest getIndexRequest = new GetIndexRequest("student1");
        GetIndexResponse getIndexResponse = indices.get(getIndexRequest, RequestOptions.DEFAULT);
        //获取结果
        Map<String, MappingMetaData> mappings = getIndexResponse.getMappings();
        for (String key : mappings.keySet()) {
            System.out.println(key+":" + mappings.get(key).getSourceAsMap());

        }
    }


    /**
     * @Description 删除索引
     * @Author: DBH123
     * @Date: 2022/6/28 17:19
     * @Params: []
     * @Return: void
     **/
    @Test
    public void deleteIndex() throws IOException {
        IndicesClient indices = client.indices();

        DeleteIndexRequest deleteRequest = new DeleteIndexRequest("student");
        AcknowledgedResponse response = indices.delete(deleteRequest, RequestOptions.DEFAULT);

        System.out.println(response.isAcknowledged());

    }

    /**
     * @Description 判断索引是否存在
     * @Author: DBH123
     * @Date: 2022/6/28 17:19
     * @Params: []
     * @Return: void
     **/
    @Test
    public void existIndex() throws IOException {
        IndicesClient indices = client.indices();

        GetIndexRequest getRequest = new GetIndexRequest("student1");
        boolean exists = indices.exists(getRequest, RequestOptions.DEFAULT);

        System.out.println(exists);

    }

//----------------------------------------------------------------------------------------


    /**
     * @Description 添加文档,使用map作为数据
     * @Author: DBH123
     * @Date: 2022/6/28 17:20
     * @Params: []
     * @Return: void
     **/
    @Test
    public void addDoc() throws IOException {
        //数据对象,map
        Map data = new HashMap();
        data.put("address","重庆渝北");
        data.put("name","张三");
        data.put("age",20);


        //1.获取操作文档的对象
        IndexRequest request = new IndexRequest("student1").id("1").source(data);
        //添加数据,获取结果
        IndexResponse response = client.index(request, RequestOptions.DEFAULT);

        //打印响应结果
        System.out.println(response.getId());


    }


    /**
     * @Description 修改文档:添加文档时,如果id存在则修改,id不存在则添加
     * @Author: DBH123
     * @Date: 2022/6/28 17:21
     * @Params: []
     * @Return: void
     **/
    @Test
    public void updateDoc() throws IOException {

    }


    /**
     * 根据id查询文档
     */
    @Test
    public void findDocById() throws IOException {

        GetRequest getReqeust = new GetRequest("student1","1");
        //getReqeust.id("1");
        GetResponse response = client.get(getReqeust, RequestOptions.DEFAULT);
        //获取数据对应的json
        System.out.println(response.getSourceAsString());


    }


    /**
     * 根据id删除文档
     */
    @Test
    public void delDoc() throws IOException {


        DeleteRequest deleteRequest = new DeleteRequest("student1","1");
        DeleteResponse response = client.delete(deleteRequest, RequestOptions.DEFAULT);
        System.out.println(response.getId());


    }

}

