提示:新手请勿喷,谢谢
文章目录
前言
提示:这里可以添加本文要记录的大概内容:
在Android开发中,布局是构建用户界面的基础。不同的布局方式适用于不同的场景,选择合适的布局可以极大地提高开发效率和用户体验。本文将详细介绍线性布局、约束布局、表格布局、帧布局和相对布局的特点、适用场景以及在实际项目中的应用方法。
提示:以下是本篇文章正文内容,下面案例可供参考
一、线性布局(LinearLayout)
特点
1.线性布局主要以水平或垂直方式去显示界面中的控件。注意:子控件之间不能重叠,可以设置权重。
2.通过设置LinearLayout的orientation属性,可以指定布局的排列方式。如果orientation属性设置为"horizontal",则子视图水平排列(显示顺序依次从左到右);如果orientation属性设置为"vertical",则子视图垂直排列(显示顺序依次从上到下)。
适用场景
当需要简单、直观地排列控件时,线性布局是一个很好的选择。例如,登录界面中的用户名和密码输入框以及登录按钮就可以使用线性布局来实现。
二、实例
1.水平方向排列
代码如下(示例):
<?xml version="1.0" encoding="utf-8"?>
<LinearLayout xmlns:android="http://schemas.android.com/apk/res/android"
    xmlns:app="http://schemas.android.com/apk/res-auto"
    xmlns:tools="http://schemas.android.com/tools"
    android:layout_width="match_parent"
    android:layout_height="match_parent"
    tools:context=".MainActivity"
    android:orientation="horizontal">

    <EditText
        android:id="@+id/username"
        android:layout_width="109dp"
        android:layout_height="88dp"
        android:hint="Username" />

    <EditText
        android:id="@+id/password"
        android:layout_width="wrap_content"
        android:layout_height="90dp"
        android:hint="Password"
        android:inputType="textPassword" />

    <Button
        android:id="@+id/loginButton"
        android:layout_width="112dp" // 注意这是所分配的权重,只有在linearlayout中,该属性才有效;
        android:layout_height="88dp"
        android:text="Login" />

</LinearLayout>
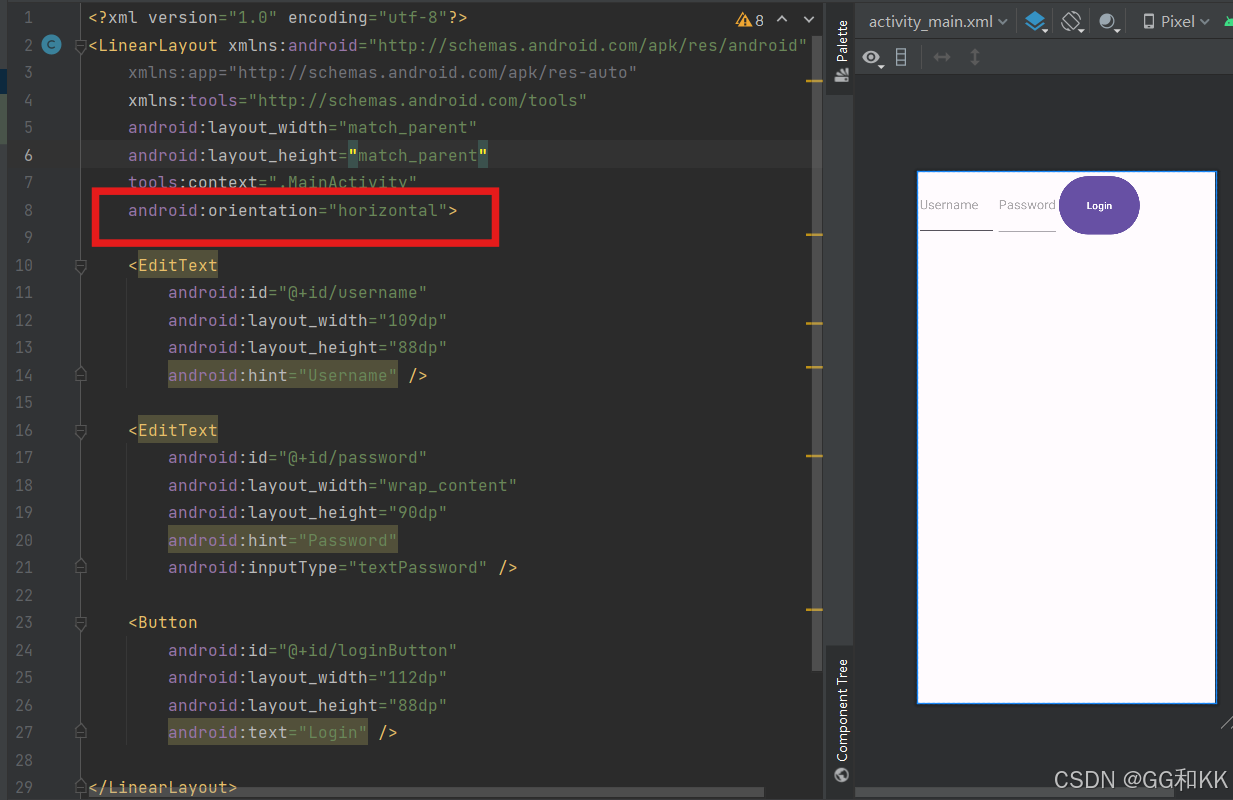
当android:orientation="horizontal"时,三个组件是呈现水平方向排列
效果图如下(实例):
2.垂直方向排列
代码如下(示例):
<?xml version="1.0" encoding="utf-8"?>
<LinearLayout xmlns:android="http://schemas.android.com/apk/res/android"
    xmlns:app="http://schemas.android.com/apk/res-auto"
    xmlns:tools="http://schemas.android.com/tools"
    android:layout_width="match_parent"
    android:layout_height="match_parent"
    tools:context=".MainActivity"
    android:orientation="vertical">

    <EditText
        android:id="@+id/username"
        android:layout_width="109dp"
        android:layout_height="88dp"
        android:hint="Username" />

    <EditText
        android:id="@+id/password"
        android:layout_width="wrap_content"
        android:layout_height="90dp"
        android:hint="Password"
        android:inputType="textPassword" />

    <Button
        android:id="@+id/loginButton"
        android:layout_width="112dp"
        android:layout_height="88dp"
        android:text="Login" />

</LinearLayout>
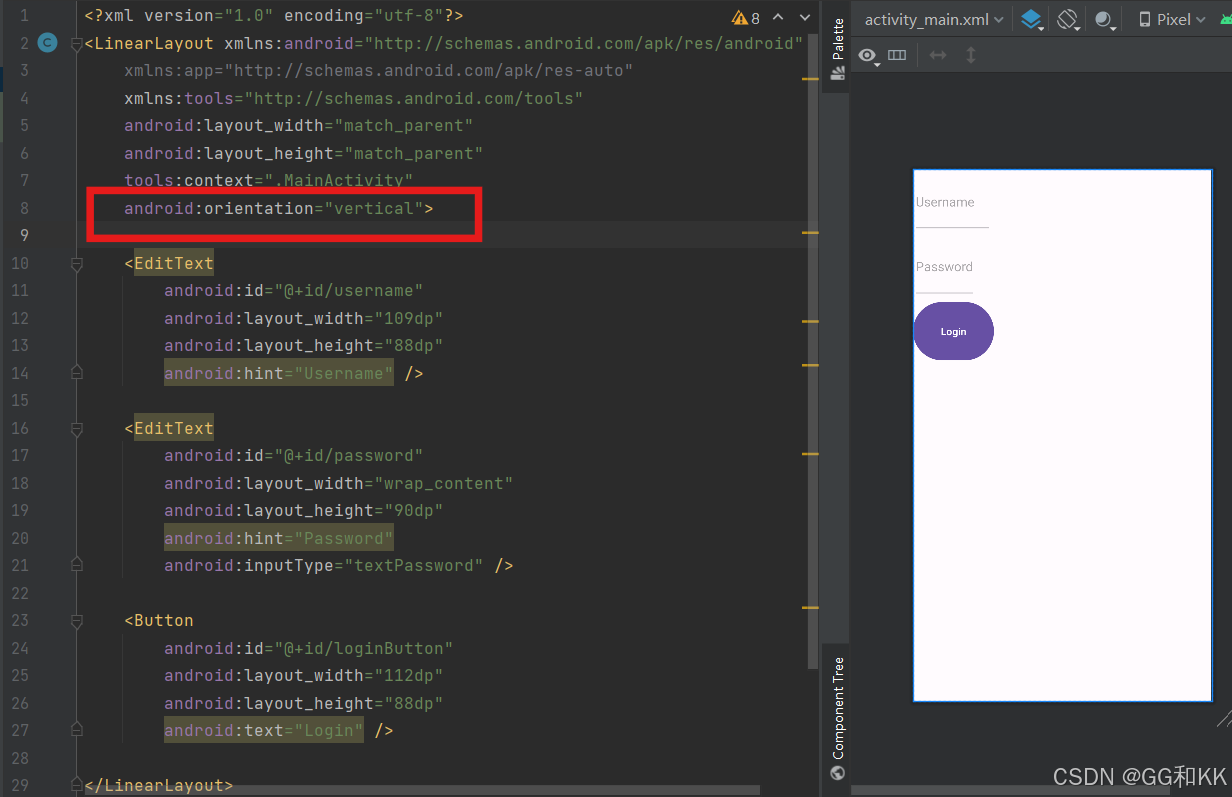
当android:orientation="vertical"时,三个组件是呈现垂直方向排列
效果图如下(实例):
二、约束布局(ConstraintLayout)
特点
1.约束布局是一种灵活且功能强大的布局方式,它允许我们通过设置约束条件来确定子视图的位置和大小。
2.可以创建复杂的布局而不需要嵌套其他布局,从而提高性能。
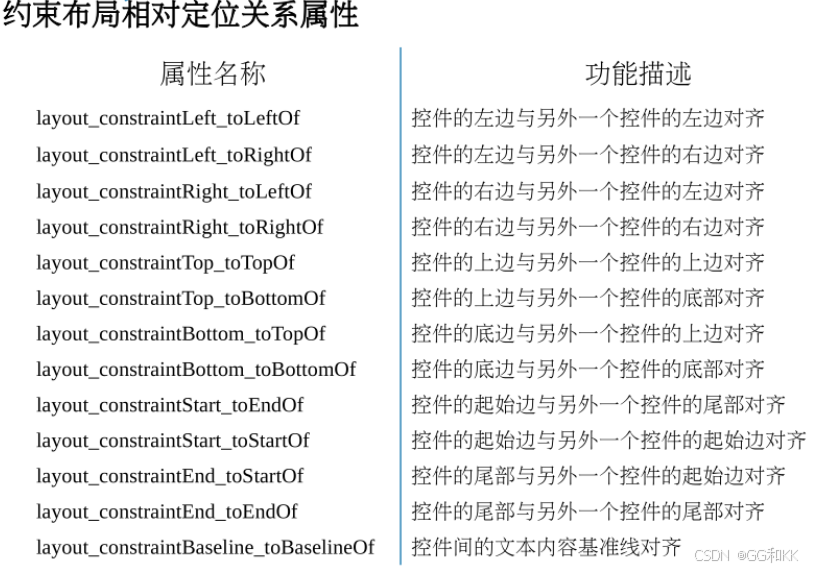
3.ConstraintLayout布局中的控件可以在横向和纵向上以添加约束关系的方式进行相对定位,其中,横向边包括Left、Start、Right、End,纵向边包括Top、Buttom、Baseline(文本底部的基准线)。
适用场景
当需要创建复杂的用户界面时,约束布局是一个很好的选择。例如,一个包含多个表单字段和个人资料图片的用户注册表单可以使用约束布局来实现。
二、实例
代码如下(示例):
<androidx.constraintlayout.widget.ConstraintLayout
    xmlns:android="http://schemas.android.com/apk/res/android"
    android:layout_width="match_parent"
    android:layout_height="match_parent">

    <ImageView
        android:id="@+id/profilePicture"
        android:layout_width="100dp"
        android:layout_height="100dp"
        android:src="@drawable/ic_launcher_background"
        app:layout_constraintTop_toTopOf="parent"
        app:layout_constraintStart_toStartOf="parent"
        app:layout_constraintEnd_toEndOf="parent"/>

    <EditText
        android:id="@+id/username"
        android:layout_width="0dp"
        android:layout_height="wrap_content"
        android:hint="Username"
        app:layout_constraintTop_toBottomOf="@id/profilePicture"
        app:layout_constraintStart_toStartOf="parent"
        app:layout_constraintEnd_toEndOf="parent"/>

    <!-- 更多控件... -->
</androidx.constraintlayout.widget.ConstraintLayout>
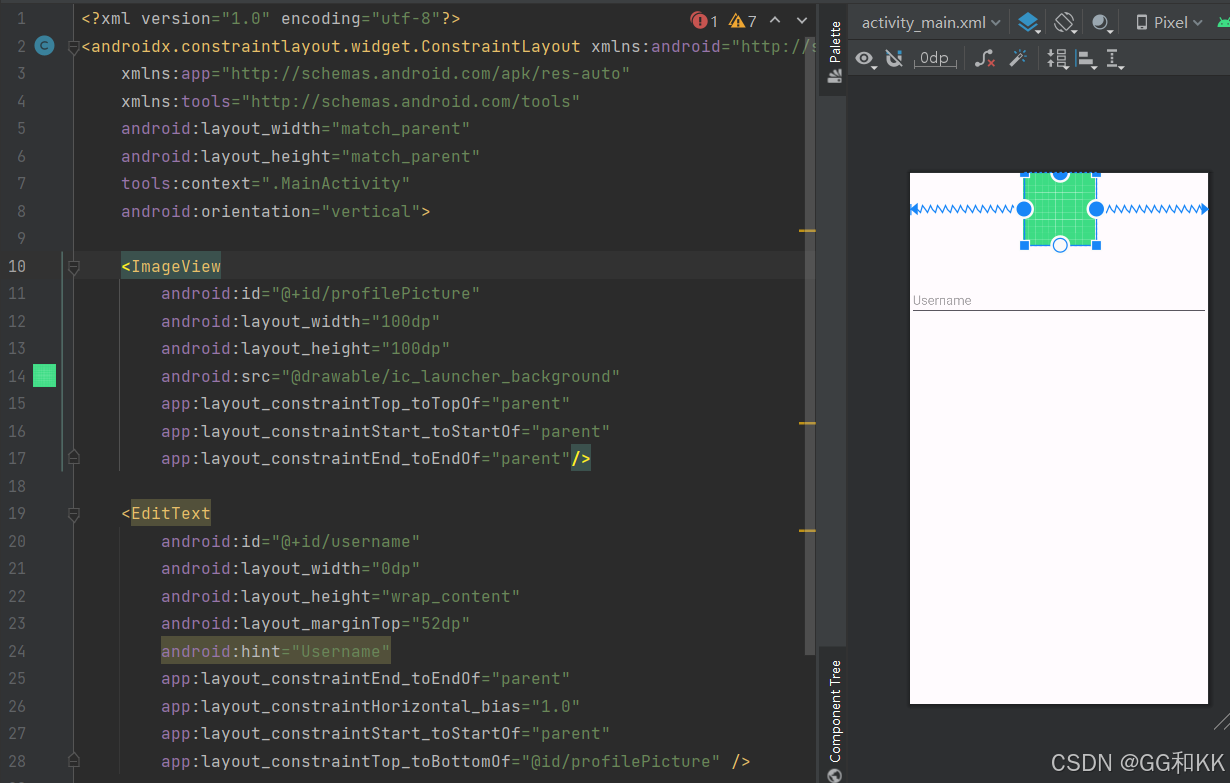
效果图如下(实例):
三、表格布局(TableLayout)
特点
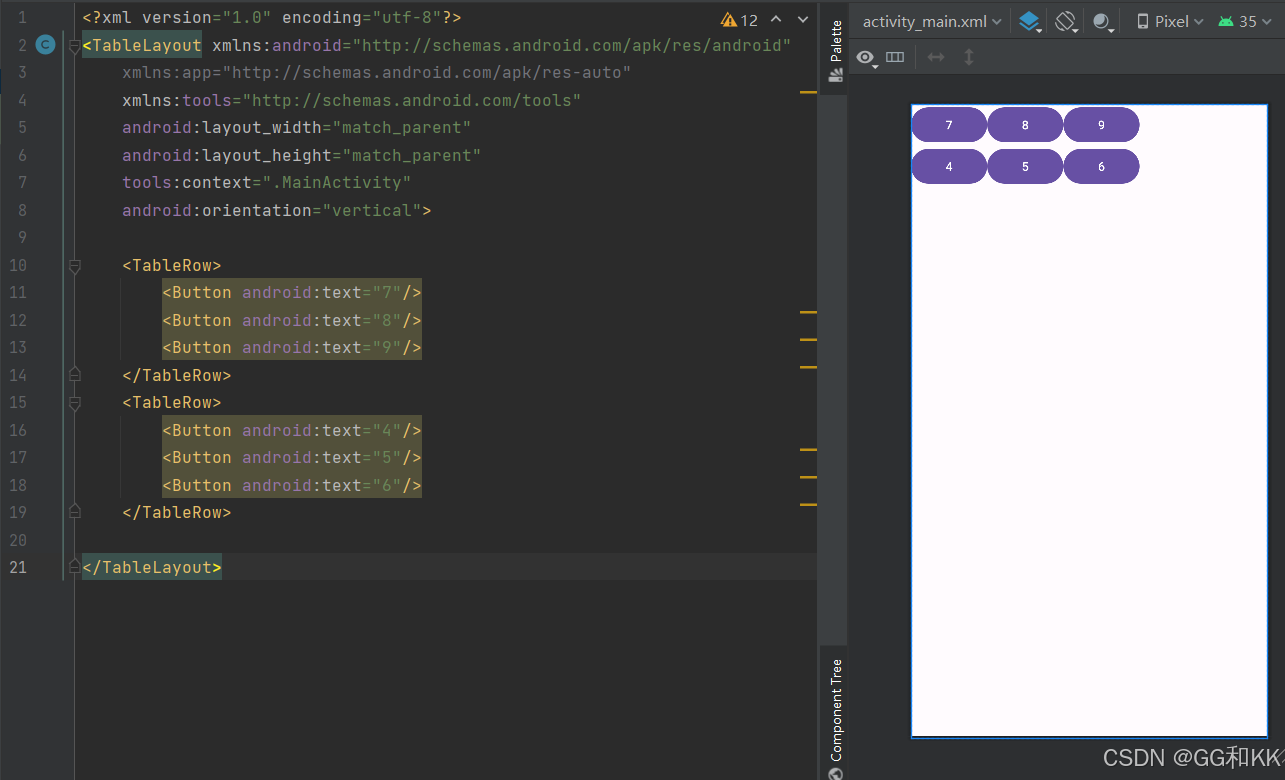
1.表格布局允许我们以行和列的形式来组织子视图。
2.每一行可以包含一个或多个单元格,每个单元格可以包含一个控件。
3.TableRow:表示表格中的一行。每向TableLayout添加一个TableRow,就增加了一个表格行。TableRow也是容器,可以不断地添加其他组件,每添加一个子组件,该表格就增加一列。
4.其他组件:如果直接向TableLayout中添加组件(而不是添加到TableRow中),那么这个组件将直接占用一行。
适用场景
当需要创建类似电子表格的结构时,表格布局是一个很好的选择。例如,一个简单的计算器界面可以使用表格布局来实现。
二、实例
代码如下(示例):
<TableLayout
    xmlns:android="http://schemas.android.com/apk/res/android"
    android:layout_width="match_parent"
    android:layout_height="match_parent">

    <TableRow>//当向TableLayout中添加组件时,如果希望这些组件出现在同一行中,则必须将它们放在TableRow中。
        <Button android:text="7"/>
        <Button android:text="8"/>
        <Button android:text="9"/>
    </TableRow>
    <TableRow>
        <Button android:text="4"/>
        <Button android:text="5"/>
        <Button android:text="6"/>
    </TableRow>
    <!-- 更多行... -->
</TableLayout>
效果图如下(实例):
四、帧布局(FrameLayout)
特点
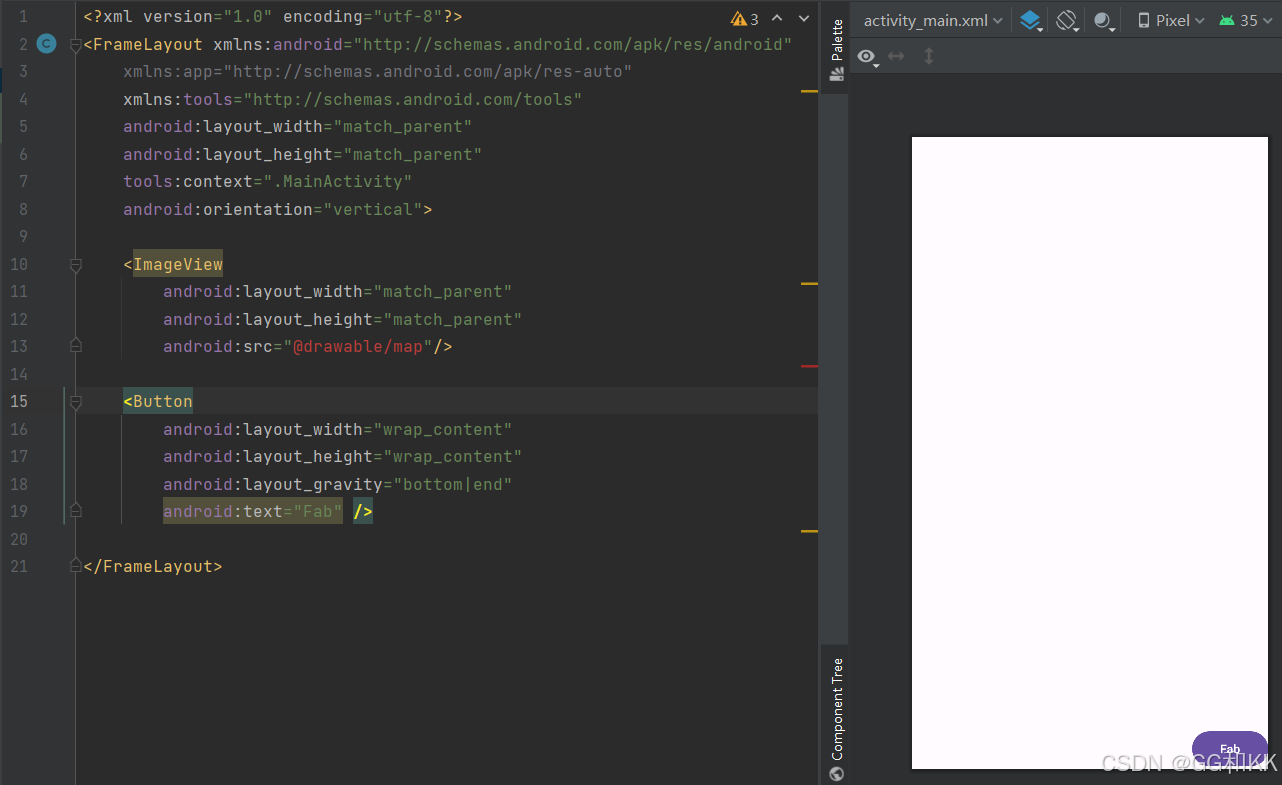
1.帧布局是一种简单的布局方式,它允许我们将多个控件堆叠在一起,后添加的视图会覆盖在前面添加的视图之上(所以需要注意子视图的添加顺序。如果需要显示某个元素,应确保它是最后添加的。)。
2.帧布局没有复杂的定位方式,相对简单且轻量,适用于快速布局。
3.注意:由于帧布局(FrameLayout)没有方便的定位方式,如果布局过于复杂,可能会导致代码难以维护。因此,在实际开发中,应根据需求选择合适的布局方式。
适用场景
当需要在屏幕上放置浮动按钮或其他覆盖物时,帧布局是一个很好的选择。例如,一个带有浮动操作按钮的地图应用可以使用帧布局来实现。
二、实例
代码如下(示例):
<FrameLayout
    xmlns:android="http://schemas.android.com/apk/res/android"
    android:layout_width="match_parent"
    android:layout_height="match_parent">

    <ImageView
        android:layout_width="match_parent"
        android:layout_height="match_parent"
        android:src="@drawable/map"/>

    <Button
        android:layout_width="wrap_content"
        android:layout_height="wrap_content"
        android:text="Fab"
        android:layout_gravity="bottom|end"/>
</FrameLayout>
效果图如下(实例):
五、相对布局(RelativeLayout)
特点
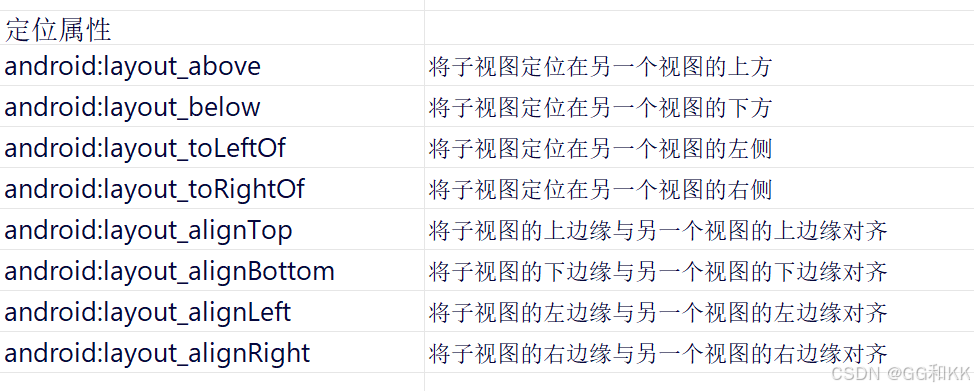
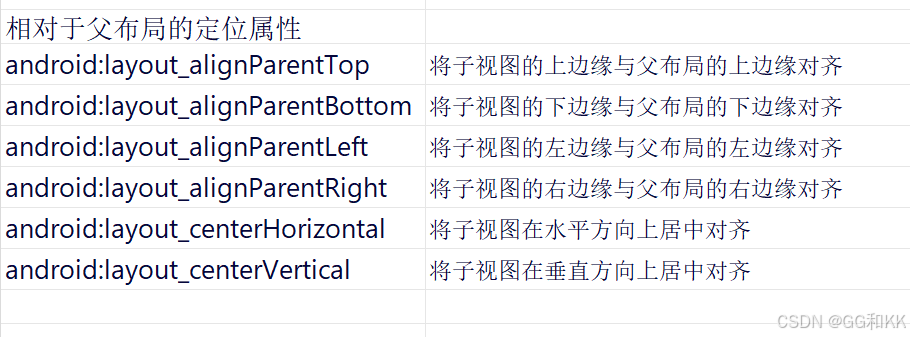
1.相对布局允许开发者通过定位子视图相对于父视图或其他子视图的位置来进行布局。在相对布局中,子视图的位置是相对于其他视图或父布局来确定的。
2.可以设置相对于父视图或兄弟视图的位置关系。
3.相对布局灵活性高,提供了多种属性来控制子视图的位置。
4.相对布局适应性强,可以根据子视图之间的相对关系进行自动调整,适用于不同屏幕尺寸和方向的适配。
5.相对布局方式多样,除了基本的定位属性外,相对布局还支持子视图的层叠效果、隐藏和显示控制等高级功能。
适用场景
当需要根据其他控件的位置来定位子视图时,相对布局是一个很好的选择。例如,一个包含文本视图和按钮的简单界面可以使用相对布局来实现。
二、实例
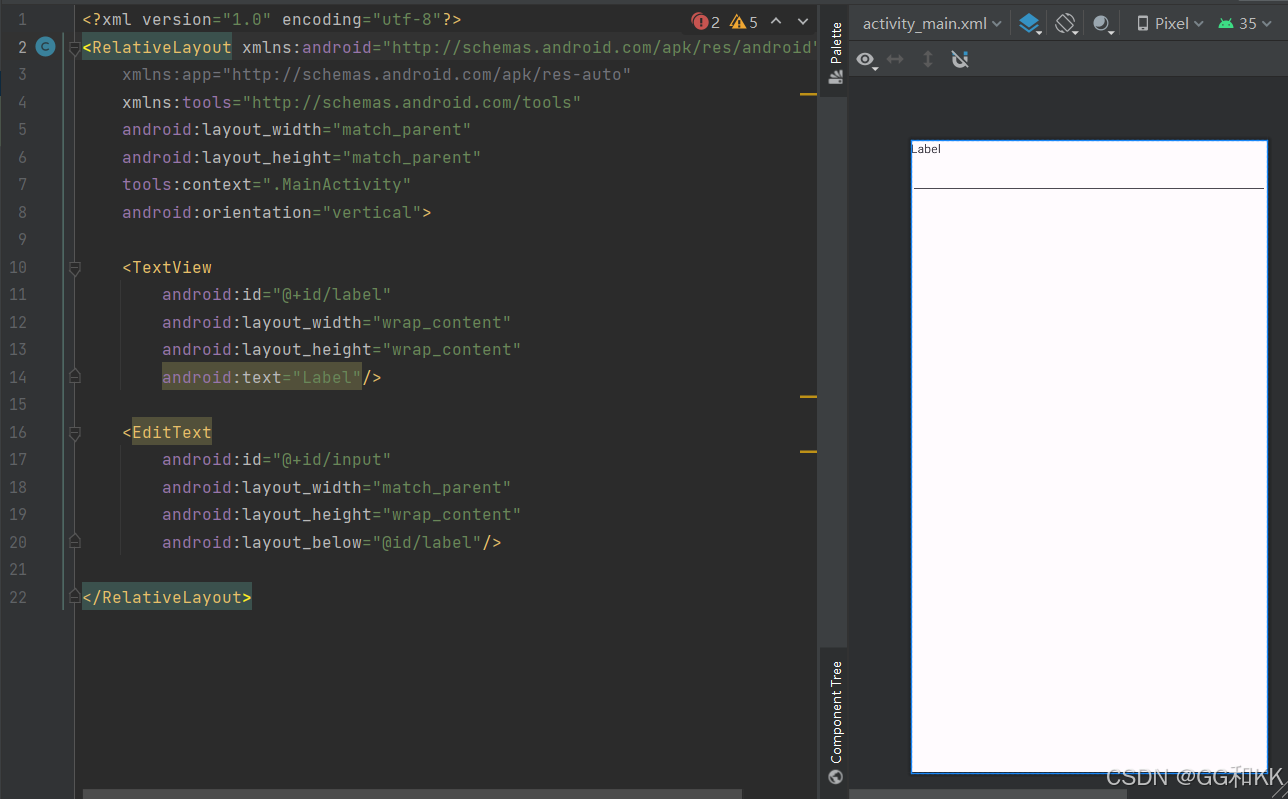
代码如下(示例):
<RelativeLayout  //相对布局虽然灵活,但过度嵌套可能会导致布局复杂且难以维护。因此,在设计布局时,应尽量简化结构,避免不必要的嵌套。
    xmlns:android="http://schemas.android.com/apk/res/android"
    android:layout_width="match_parent"
    android:layout_height="match_parent">

    <TextView
        android:id="@+id/label"
        android:layout_width="wrap_content"
        android:layout_height="wrap_content"
        android:text="Label"/>

    <EditText
        android:id="@+id/input"
        android:layout_width="match_parent"
        android:layout_height="wrap_content"
        android:layout_below="@id/label"/>
</RelativeLayout>
效果图如下(实例):
六、五个布局总结
Android的五大布局各有特色,广泛应用于不同的UI设计场景:
1.线性布局(LinearLayout):
以水平或垂直方式排列子视图,简单直观,适合构建基础界面。
2.约束布局(ConstraintLayout):
通过约束条件定义视图关系,灵活且强大,适用于复杂和自适应布局,能显著提升渲染性能。
3.表格布局(TableLayout):
以行列形式组织视图,适合展示具有明显行列结构的数据,如报表和成绩列表。
4.帧布局(FrameLayout):
子视图层叠显示,后添加的视图覆盖先添加的,适用于对话框和菜单等场景。
5.相对布局(RelativeLayout):
允许视图按相对位置或屏幕边缘排列,灵活构建复杂界面,控件间的相对位置关系易于实现。
这些布局方式各有优缺点,开发者需根据具体需求选择合适的布局来构建用户界面。
课程总结
在课程中,我学习了多种UI界面交互功能的实现方法,包括按钮点击事件、列表项点击事件、滑动操作、菜单项和对话框等。通过实际案例的学习,我掌握了这些功能的实现技巧。例如,通过为按钮设置OnClickListener,可以实现按钮点击事件的响应;通过为列表视图设置OnItemClickListener,可以实现列表项点击事件的响应。此外,我还学会了如何使用SwipeRefreshLayout实现滑动刷新功能,以及如何创建和使用菜单项和对话框。
为了提高我的技能水平,我采取了以下措施:首先,我查阅了大量的官方文档和教程,深入了解了各个UI组件的使用方法和最佳实践。其次,我积极参与讨论,向同学和老师请教问题,分享自己的经验和心得。最后,我不断进行实战练习,通过完成项目任务来巩固所学知识。
通过这些努力,我不仅提高了对安卓开发中各种布局的熟练程度,还增强了解决实际问题的能力。我相信,在未来的开发过程中,这些知识和技能将帮助我更好地应对各种挑战,创造出更加优秀的应用程序。
