目录
MHA概念
MHA:高可用模式下的故障切换,基于主从复制。它解决的是单点故障和主从复制不能切换的问题。它至少需要3台。故障切换过程0-30秒。它能根据VIP地址所在的主机,来确定主备。主和备不是优先级确定的,而是主从复制的时候就确定了主,备是在MHA的过程中确定。
MHA的组件
NODE:数据节点,每台mysql和管理服务器都要安装,用来负责监控服务器状态以及收集数据
manager:管理节点 它是用来管理mysql的高可用集群,可以单独部署在一台独立的服务器,也可以部署多个。用来实现主备之间切换。前提是主发生故障,切换到备
MHA的特点
1.通过manager来实现主备切换
2.数据同步还是依靠二进制日志,最大程度上保证数据的完整
3.使用半同步的方式,来实现数据的完整性
实验:搭建完成MHA的架构
目的:实现主备之间的切换,故障切换
架构
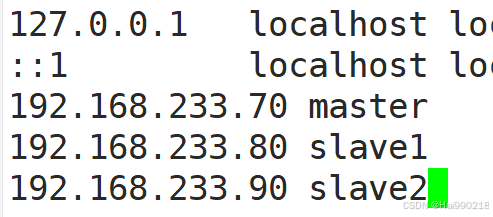
192.168.233.70 主 需要mysql8.0 node组件
192.168.233.80 从1 需要mysql8.0 node组件
192.168.233.90 从2 需要mysql8.0 node组件
192.168.233.10 管理节点 node组件 manager组件

实验:主备切换
1.修改 master、slave1、slave2 节点的主机名
hostnamectl set-hostname master
hostnamectl set-hostname slave1
hostnamectl set-hostname slave2
vim /etc/hosts
三台都要做
2.安装ntpdate(主从都要安装)
yum -y install ntpdate -y
然后查看时间是否一致

3.配置主的配置文件
vim /etc/my.cnf 添加

log-bin=master-bin
binlog_format=MIXED
log-slave-updates=true
然后重启服务systemctl restart mysqld
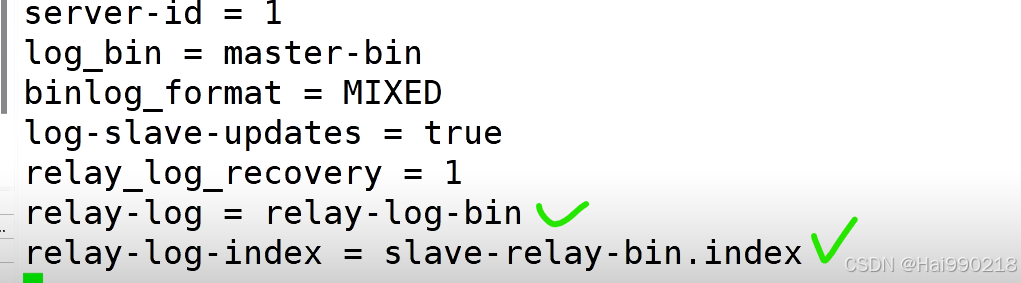
3.配置从1 的配置文件
vim /etc/my.cnf
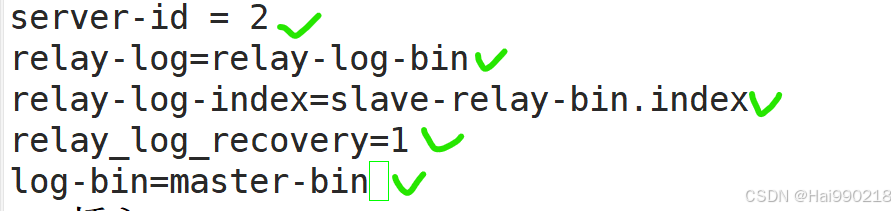
relay-log=relay-log-bin
relay-log-index=slave-relay-bin.index
relay_log_recovery=1
log-bin=master-bin
然后重启服务systemctl restart mysqld
4.配置从2 的配置文件
vim /etc/my.cnf
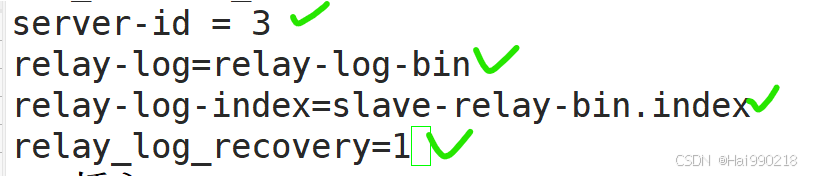
relay-log=relay-log-bin
relay-log-index=slave-relay-bin.index
relay_log_recovery=1
然后重启服务systemctl restart mysqld
5.在 master、slave1、slave2 节点上都创建两个软链接
ln -s /usr/local/mysql/bin/mysql /usr/sbin/
ln -s /usr/local/mysql/bin/mysqlbinlog /usr/sbin/
6.进入主、从1、从2的数据库
mysql -u root -p123456
CREATE USER 'myslave'@'192.168.233.%' IDENTIFIED WITH mysql_native_password BY '123456';
GRANT REPLICATION SLAVE ON *.* TO 'myslave'@'192.168.233.%';
CREATE USER 'mha'@'192.168.233.%' IDENTIFIED WITH mysql_native_password BY 'manager';
GRANT ALL PRIVILEGES ON *.* TO 'mha'@'192.168.233.%' WITH GRANT OPTION;
CREATE USER 'mha'@'master' IDENTIFIED WITH mysql_native_password BY 'manager';
GRANT ALL PRIVILEGES ON *.* TO 'mha'@'master';
CREATE USER 'mha'@'slave1' IDENTIFIED WITH mysql_native_password BY 'manager';
GRANT ALL PRIVILEGES ON *.* TO 'mha'@'slave1';
CREATE USER 'mha'@'slave2' IDENTIFIED WITH mysql_native_password BY 'manager';
GRANT ALL PRIVILEGES ON *.* TO 'mha'@'slave2';
FLUSH PRIVILEGES;
查看主

在两个从数据库
CHANGE master to master_host='192.168.233.70',master_user='myslave',master_password='123456',master_log_file=master-bin.000001',master_log_pos=157;
start slave;
show slave status\G;
7.主、从1、从2、管理节点服务器都安装 (以下操作四台同步做)

管理节点服务器安装

yum install epel-release --nogpgcheck -y
yum install -y perl-DBD-MySQL \
perl-Config-Tiny \
perl-Log-Dispatch \
perl-Parallel-ForkManager \
perl-ExtUtils-CBuilder \
perl-ExtUtils-MakeMaker \
perl-CPAN
tar -xf mha4mysql-node-0.57.tar.gz
cd mha4mysql-node-0.57/
perl Makefile.PL
make && make install
然后在管理节点服务器回到/opt目录下
tar -xf mha4mysql-manager-0.57.tar.gz
cd mha4mysql-manager-0.57/
perl Makefile.PL
make && make install

了解下面文件
masterha_check_ssh
所有的数据库节点和管理节点通过shh来进行互相通信,检查集群的ssh配置
masterha_check_repl
检查mysql的复制情况 数据同步
masterha_manager
manager文件的启动脚本
masterha_check_status
检查MHA集群状态的文件
masterha_master_switch
控制故障转移
masterha_stop
关闭manager服务
8.在管理节点服务器10操作
ssh-keygen -t rsa
然后一路回车
ssh-copy-id 192.168.233.70
ssh-copy-id 192.168.233.80
ssh-copy-id 192.168.233.90
9.在主70操作
ssh-keygen -t rsa
然后一路回车
ssh-copy-id 192.168.233.80
ssh-copy-id 192.168.233.90
10.在从80操作
ssh-keygen -t rsa
然后一路回车
ssh-copy-id 192.168.233.70
ssh-copy-id 192.168.233.90
11.在从90操作
ssh-keygen -t rsa
然后一路回车
ssh-copy-id 192.168.233.70
ssh-copy-id 192.168.233.80
12.回到管理节点服务器10
cd /opt/mha4mysql-manager-0.57/samples/scripts/

了解文件
master_ip_failover 自动故障切换时,vip的管理脚本
master_ip_online_change 在线故障切换时,vip的管理脚本
power_manager 故障发生后,关闭主机的脚本
send_report 故障切换后,发送报警的脚本
回到 cd /opt/mha4mysql-manager-0.57/samples
cp -rp scripts/ /usr/local/bin/
cd /opt/
cp /usr/local/bin/scripts/master_ip_failover /usr/local/bin/
cd /usr/local/bin/
vim master_ip_failover
然后把里面的脚本全部清空并添加下面的脚本
底行模式set paste 然后i进入模式复制粘贴不会出错
#!/usr/bin/env perl
use strict;
use warnings FATAL => 'all';
use Getopt::Long;
my (
$command, $ssh_user, $orig_master_host, $orig_master_ip,
$orig_master_port, $new_master_host, $new_master_ip, $new_master_port
);
my $vip = '192.168.233.100';
my $brdc = '192.168.233.255';
my $ifdev = 'ens33';
my $key = '1';
my $ssh_start_vip = "/sbin/ifconfig ens33:$key $vip";
my $ssh_stop_vip = "/sbin/ifconfig ens33:$key down";
my $exit_code = 0;
GetOptions(
'command=s' => \$command,
'ssh_user=s' => \$ssh_user,
'orig_master_host=s' => \$orig_master_host,
'orig_master_ip=s' => \$orig_master_ip,
'orig_master_port=i' => \$orig_master_port,
'new_master_host=s' => \$new_master_host,
'new_master_ip=s' => \$new_master_ip,
'new_master_port=i' => \$new_master_port,
);
exit &main();
sub main {
print "\n\nIN SCRIPT TEST====$ssh_stop_vip==$ssh_start_vip===\n\n";
if ( $command eq "stop" || $command eq "stopssh" ) {
my $exit_code = 1;
eval {
print "Disabling the VIP on old master: $orig_master_host \n";
&stop_vip();
$exit_code = 0;
};
if ($@) {
warn "Got Error: $@\n";
exit $exit_code;
}
exit $exit_code;
}
elsif ( $command eq "start" ) {
my $exit_code = 10;
eval {
print "Enabling the VIP - $vip on the new master - $new_master_host \n";
&start_vip();
$exit_code = 0;
};
if ($@) {
warn $@;
exit $exit_code;
}
exit $exit_code;
}
elsif ( $command eq "status" ) {
print "Checking the Status of the script.. OK \n";
exit 0;
}
else {
&usage();
exit 1;
}
}
sub start_vip() {
`ssh $ssh_user\@$new_master_host \" $ssh_start_vip \"`;
}
### A simple system call that disable the VIP on the old_master
sub stop_vip() {
`ssh $ssh_user\@$orig_master_host \" $ssh_stop_vip \"`;
}
sub usage {
print
"Usage: master_ip_failover --command=start|stop|stopssh|status --orig_master_host=host --orig_master_ip=ip --orig_master_port=port --new_master_host=host --new_master_ip=ip --new_master_port=port\n";
}
然后创建文件
mkdir /etc/masterha
cd /opt/mha4mysql-manager-0.57/samples/conf/
cp app1.cnf /etc/masterha/
cd /etc/masterha/
vim app1.cnf
删除里面的内容并添加下面的脚本
[server default]
manager_log=/var/log/masterha/app1/manager.log
#主日志文件,报错就看这个文件
manager_workdir=/var/log/masterha/app1
#manager的工作目录
master_binlog_dir=/usr/local/mysql/data
#mysql主服务器的binlog二进制文件的保存目录
master_ip_failover_script=/usr/local/bin/master_ip_failover
#自动切换
master_ip_online_change_script=/usr/local/bin/master_ip_online_change
#在线切换
password=manager
ping_interval=1
#ping主库的时间间隔,默认间隔是3秒,会ping3次,三次不通就会自动切换
remote_workdir=/tmp
repl_password=123456
repl_user=myslave
secondary_check_script=/usr/local/bin/masterha_secondary_check -s 192.168.233.80 -s 192.168.233.90
#从对主监听
shutdown_script=""
ssh_user=root
user=mha
[server1]
hostname=192.168.233.70
#主服务器
port=3306
[server2]
candidate_master=1
#设置成备用的master
check_repl_delay=0
#默认是选择一个slave,这个slave和master的数据是最一致的。如果slave的同步数据落后主100M,MHA永远也不会选择该服务器做为备主,设置为0,是不考虑主从之间延迟的问题,强制的指定slave为备服务器
hostname=192.168.233.80
#备用主服务器
port=3306
[server3]
hostname=192.168.233.90
#从服务器2
port=3306
在主70上添加虚拟网卡
cd /opt/
ifconfig ens33:1 192.168.233.100/24
实验结果
回到管理节点服务器10
检查ssh通信是否正常
masterha_check_ssh -conf=/etc/masterha/app1.cnf

检查节点是否健康,检查集群是否健康
masterha_check_repl -conf=/etc/masterha/app1.cnf

启动manager的脚本
nohup masterha_manager --conf=/etc/masterha/app1.cnf --remove_dead_master_conf --ignore_last_failover < /dev/null > /var/log/masterha/app1/manager.log 2>&1 &
检查master状态
masterha_check_status --conf=/etc/masterha/app1.cnf

另一种检测方法
cat /var/log/masterha/app1/manager.log | grep "current master"

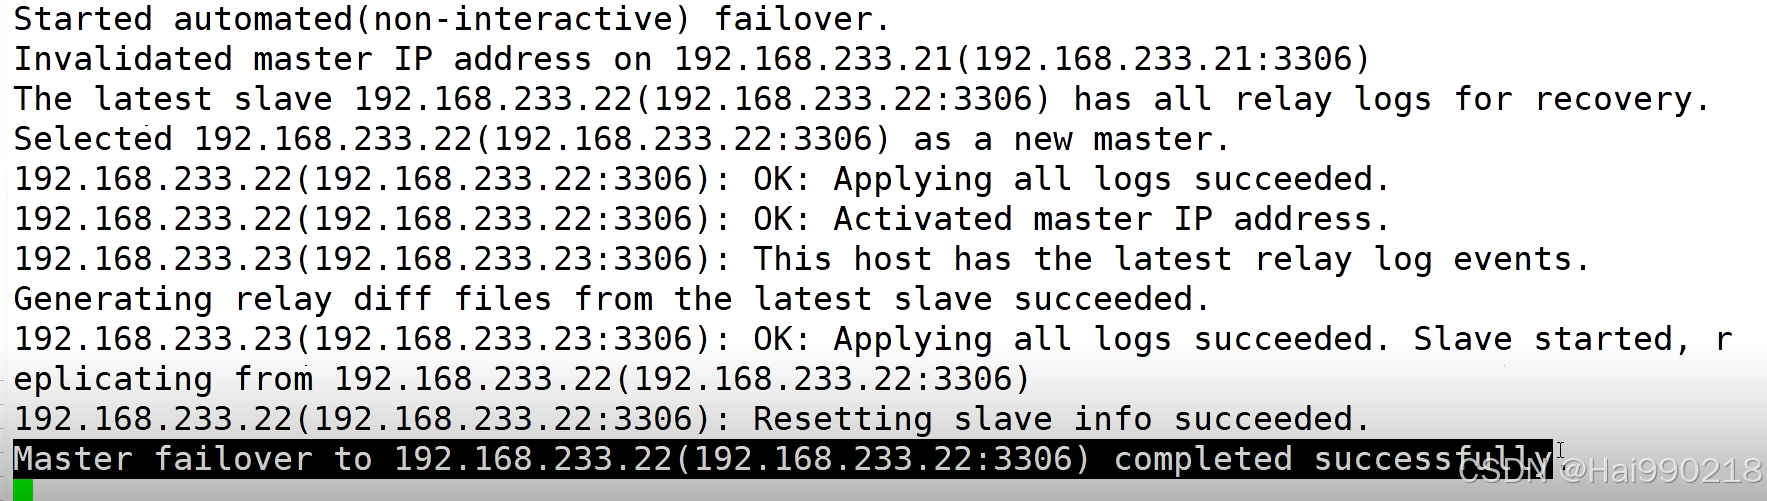
实验:故障切换
在管理节点服务器10查看日志
tail -f /var/log/masterha/app1/manager.log
然后关闭主70的数据库,从80变为主
实验:故障恢复
在管理节点服务器10
关闭
masterha_stop --conf=/etc/masterha/app1.cnf
vim /etc/masterha/app1.cnf


在原来的主服务器70上
vim /etc/my.cnf
systemctl restart mysqld
在原来的从1服务器80进入数据库
关闭只读模式
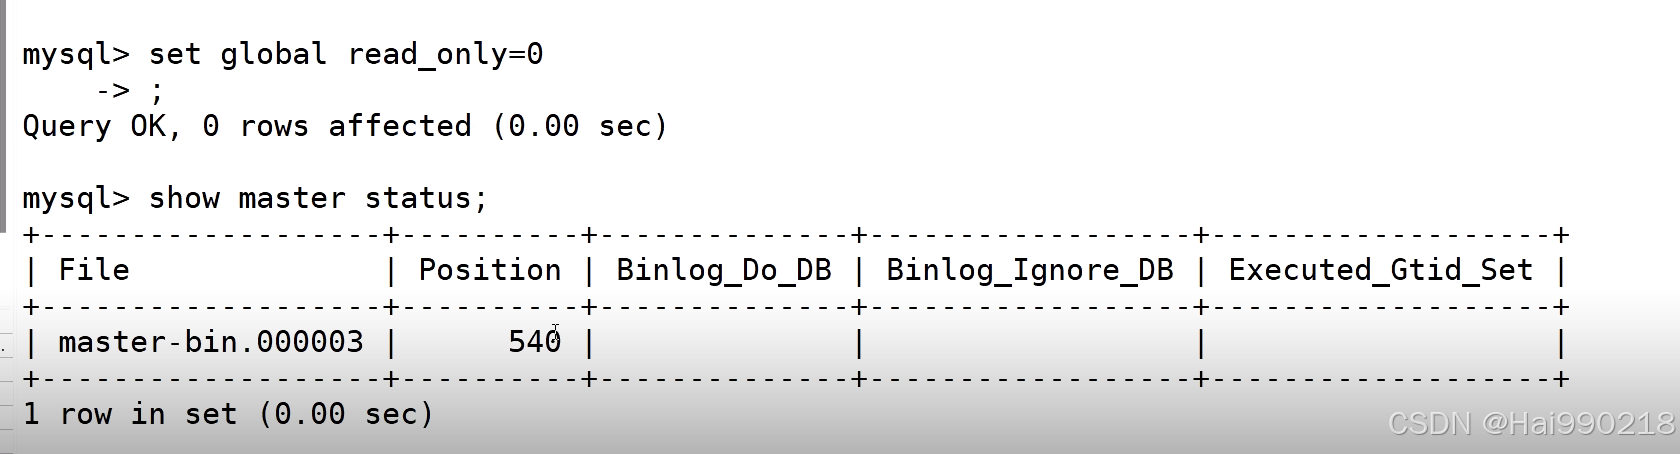
在原来的主服务器70进入数据库
开启只读模式
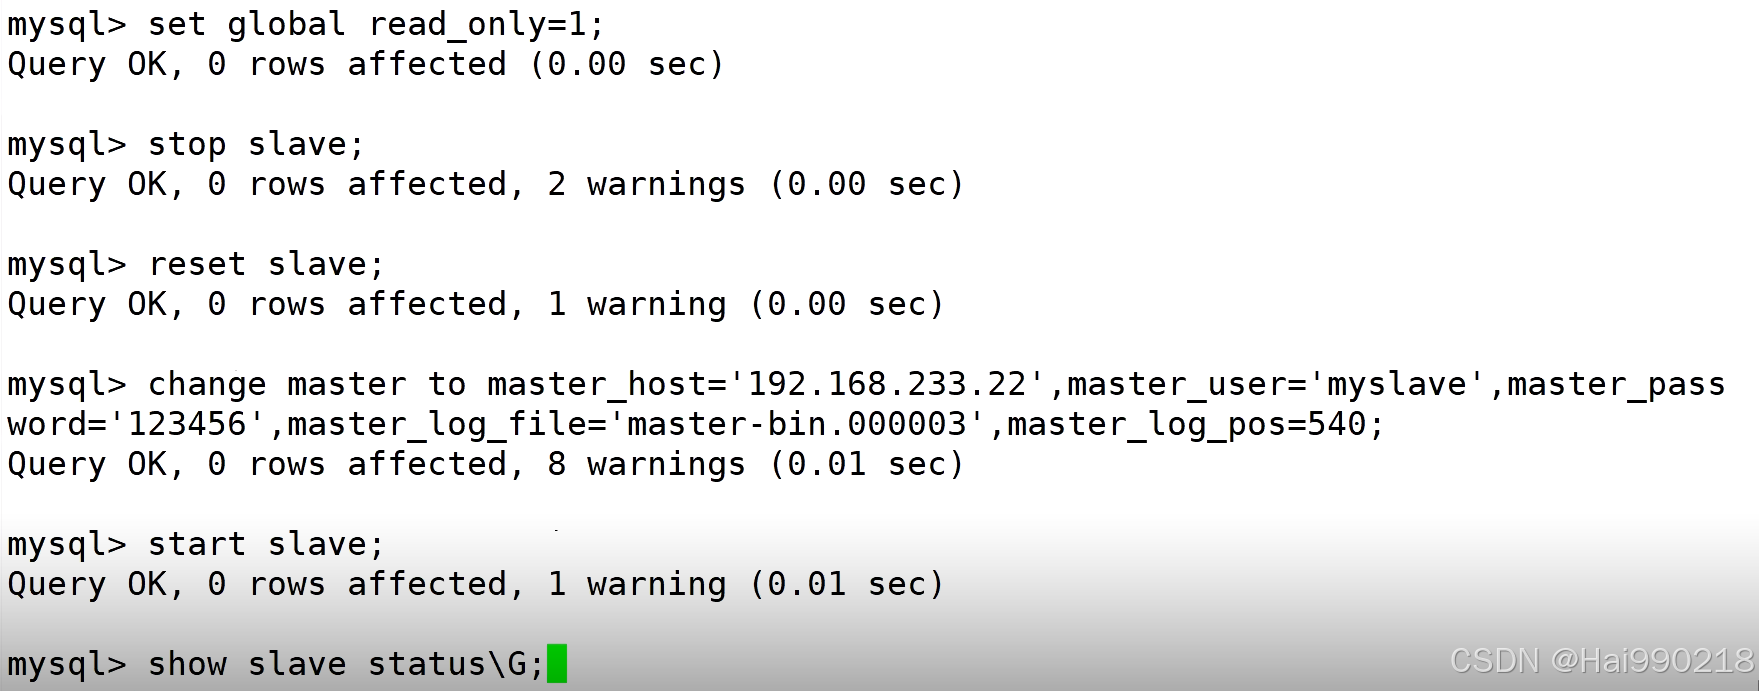
CHANGE master to master_host='192.168.233.22',master_user='myslave',master_password='123456',master_log_file=master-bin.000003',master_log_pos=540;
在管理节点服务器10上
启动manager的脚本
nohup masterha_manager --conf=/etc/masterha/app1.cnf --remove_dead_master_conf --ignore_last_failover < /dev/null > /var/log/masterha/app1/manager.log 2>&1 &
检查master状态
masterha_check_status --conf=/etc/masterha/app1.cnf