uni-app及uniCloud开发
uniCloud后台
7、uniCloud云函数的入参
'use strict';
const db = uniCloud.database();
exports.main = async (event, context) => {

   //post 的参数在body里
   let data = event.body;
   let is_undefined = typeof(data) == 'undefined' ;
   let is_null = !data && typeof(data) !== 'undefined' && data != 0
   let is_success = false ;
   if(!(is_undefined || is_null)){
   	data = JSON.parse(data);
   	const collection = db.collection(data.colName || 'other');
   	let res = await collection.add(data.data) ;
   	if(res.id||res.ids){
   		is_success = true ;
   	}

   }

   return {
   	success : is_success ,
   }
}
1、插入数据
user
"id":1,
"nickname":'昵称',
"gender":'性别或未知',
"language": "语言",
"city": "城市",
"province": "省份",
"country": "国家",
"avatarUrl": "头像",
"openId": "用户唯一标识",
"people": "666"
"time":"2021-06-30 00:22:22"
options
"id":1,
"content":"请假",
"is_other":1,
"id_user":1,
"time":"2021-06-30 00:22:22"
"id":2,
"content":"报名",
"is_other":1,
"id_user":1,
"time":"2021-06-30 00:22:22"
"id":3,
"content":"会晚10分钟到",
"is_other":1,
"id_user":1,
"time":"2021-06-30 00:22:22"
notify_options
"id_notify":1,
"id_options":1,
"time":"2021-06-30 00:22:22"
notify
"id":1,
"title":'标题',
"content":"文章内容,有以下选项",
"people":1,
"id_user":1,
"time":"2021-06-30 00:22:22"
participate
"id":1,
"id_user":1,
"id_options":1,
"id_notify":1,
"participants":'参与者',
"time":"2021-06-30 00:22:22"
notify_temp
"id":1,
"title":'标题',
"content":"文章内容,有以下选项",

"time":"2021-06-30 00:22:22"
2、uniCloud插入数据
2.1新建云函数add
'use strict';
const db = uniCloud.database();
exports.main = async (event, context) => {
  // 获取 `user` 集合的引用
  const collection = db.collection('user');
  const res = await collection.add(event) ;
  return res
};
2.2 选中云函数,右键,上传并运行
2.3 前端页面调用, list是前端数据
addFun(){
  		let that = this ;
  		let data = that.list ;
  		uniCloud.callFunction({
  			name:'add',
  			data:data ,
  		})
  	},
3、uniCloud读取数据
3.1 带参
3.1.1新建云函数get
'use strict';
const db = uniCloud.database();
exports.main = async (event, context) => {
  // 获取 `user` 集合的引用
  const collection = db.collection('user');
  const res = await collection.orderBy('_id','asc').get() ;
  return res;
};
3.1.2 选中云函数,右键,上传并运行
3.1.3 前端页面调用, list是前端数据
getFun(){
   		let that = this ;
   		uniCloud.callFunction({
   			name:'get',
   		}).then((res)=>{
   			that.list  = res.result.data ;
   		})
   	},
先不做分页
不带参
4、uniCloud删除数据
4.1新建云函数remove
'use strict';
const db = uniCloud.database();
exports.main = async (event, context) => {
  db.collection('user').where({_id:event.id}).remove()
};
4.2 选中云函数,右键,上传并运行
4.3 前端页面调用, id是list带的前端数据
removeFun(id){
  		let that = this ;
  		uniCloud.callFunction({
  			name:'remove',
  			data:id ,
  		}).then((res)=>{
  			that.getFun() ;//刷新页面
  		})
  	},
5、uniCloud修改数据
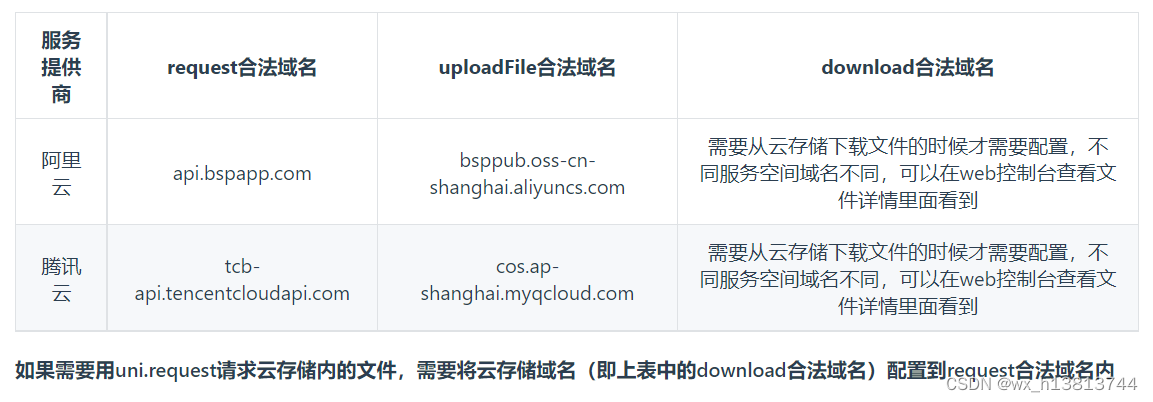
6、配置白名单
解决uniCloud测试环境能调云函数,正式环境不行的问题
api.bspapp.com
bsppub.oss-cn-shanghai.aliyuncs.com
tcb-api.tencentcloudapi.com
cos.ap-shanghai.myqcloud.com
有疑问
微信小程序联系客服,及时沟通
扫描公众号,了解更多实例与资源免费分享:
参考
前辈传授及官方指南摸索所得
参考1


