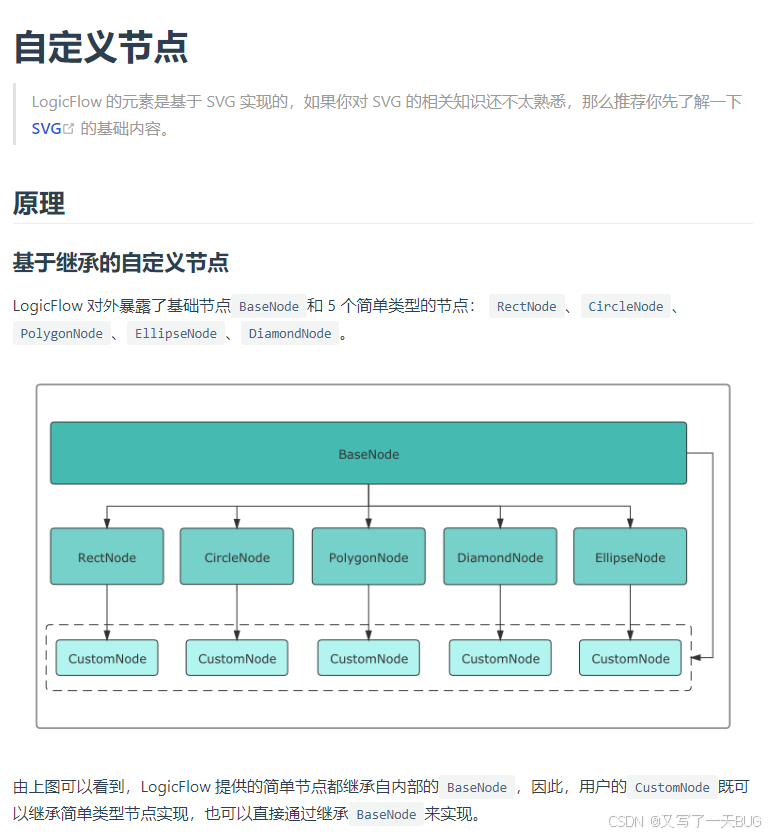
主要参考LogicFlow官方文档
在基础流程图搭建起来后,我们想要构建自己的需求风格,例如:
那么该如何对节点进行自定义设定呢?
文档当中有着详细的解释,本文以实际需求为例大体介绍:
import { RectNode, RectNodeModel, h } from "@logicflow/core";

class CustomNodeView extends RectNode {
  getShape() {
    // 获取XxxNodeModel中定义的形状属性
    const { model } = this.props;
    const { x, y, width, height, radius } = model;
    // 获取XxxNodeModel中定义的样式属性
    const style = model.getNodeStyle();

    return h('g', {}, [
        h('rect', {
            ...style,
            x: x - width / 2,
            y: y - height / 2,
            width,
            height,
            rx: radius,
            ry: radius,
        }),
        h('svg', {
            x: x - width / 2 + 5,
            y: y - height / 2 + 5,
            width: 35,
            height: 35,
            viewBox: "0 0 1028 1024",
        }, [
            h('path', {
                fill: '#fff',
                d: ''//节点的svg数据-可以在iconfont上自行查找喜欢的图标
                })
            ])

        ]);
    }
}


class CustomNodeModel extends RectNodeModel {
    getNodeStyle() {
        const style = super.getNodeStyle();
        style.stroke = '#8e8e8e';
        style.fill = '#cd4050';
        return style;
      }
      initNodeData(data) {
        super.initNodeData(data);
        this.width = 200;
        this.height = 50;
        this.radius = 10;
      }
}

export default {
    type: "PdfNode",
    view: CustomNodeView,
    model: CustomNodeModel,
}
这样,我们一个自定义的节点就配置好了,接下来就是要将他注册到我们的左侧工具栏中:
<template>
    <div class="box" ref="box"></div>
</template>

<script>

import {LogicFlow, RectNode, RectNodeModel } from '@logicflow/core';
import { DndPanel, SelectionSelect, Control, NodeResize, Menu, InsertNodeInPolyline  } from '@logicflow/extension';
import '@logicflow/extension/lib/style/index.css';
import '@logicflow/core/dist/style/index.css';
import CustomNode from "./node-red/node/CustomNode";
import FlowNode from "./node-red/node/FlowNode";
import PdfNode from "./node-red/node/PdfNode";

NodeResize.step = 4;
LogicFlow.use(Control);
LogicFlow.use(NodeResize);
LogicFlow.use(DndPanel);
LogicFlow.use(SelectionSelect);
LogicFlow.use(Menu);
LogicFlow.use(InsertNodeInPolyline);


export default {
        props:["flowData",'ruleList'],
        data(){
            return{
                //编辑器内容数据
                editData: null,
                // LogicFlow对象
                lf: '',
                // 左侧工具栏数据
                patternItems: [
                    {
                      type: 'CustomNode',
                      text: '开始',
                      label: '开始节点',
                      icon: require('@/assets/images/flowStart.png'),
                    },
                    {
                      type: 'CustomNode',
                      text: '结束',
                      label: '结束节点',
                      icon: require('@/assets/images/flowStart.png'),
                    },
                    {
                      type: 'PdfNode',//刚刚自定义的节点内容
                      label: '生成pdf',
                      text: '生成pdf',
                      icon: require('@/assets/images/flowPdf.png'),
                    },
                ]
          }
        },

methods:{
            initEdit(){
                this.editData = this.flowData
                this.ruleList.forEach(item=>{
                  this.patternItems.push({
                      type: 'FlowNode',
                      label: item.name,
                      text: item.name,
                      icon: require('@/assets/images/flowFunction.png'),
                  })
                })
                this.lf = new LogicFlow({
                   container: this.$refs.box,
                    grid: true,
                    // 工具配置
                    textEdit: true,
                    isSilentMode: false,
                    edgeType: 'polyline',
                    snapline: true,
                    keyboard: {
                        enabled: true
                    },
                    style: {
                        outline: {
                            stroke: '#000000',
                            strokeWidth: 1,
                            strokeDasharray: '3,3',
                        },
                        controlPoint: {
                            width: 15,
                            height: 7,
                            fill: '#FFFFFF',
                            stroke: '#000000',
                        },
                    },
                });
                this.lf.setTheme({
                nodeText: { // 节点文本样式
                  fontSize: 18,
                  color: '#000'
                },
              });
            },
             renderEdit(){
                this.lf.extension.dndPanel.setPatternItems(this.patternItems);
                this.lf.register(CustomNode);
                this.lf.register(FlowNode);
                this.lf.register(PdfNode);
                this.lf.render(this.editData);
            }
        },
        mounted(){
            this.initEdit()
            this.renderEdit()
        },
记得给你的box,以及菜单栏一个样式
<style lang="scss" scoped>
.box{
    width: 100%;
    height: 80vh;
    overflow: auto;
}

::v-deep .lf-dndpanel{
  width: 11vw;
  height: 33vw;
  margin-top: 5vh;
  overflow-y: auto;
}
::v-deep .lf-dnd-item{
    margin-top: 10px;
}
::v-deep .lf-dnd-shape{
  width: 10vw;
  height: 2vw;
  background-size: 50%;
}
</style>
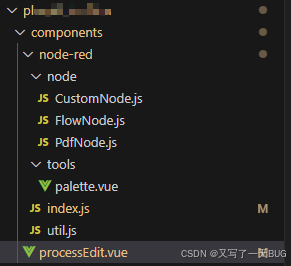
目录结构:
我也是参考了官方文档,以及两位老师的博客来解决的,有需要可以查看


