概述
本文档指导和帮助KunlunBase用户评测和验证KunlunBase的各项重要功能。用户遵循本文档操作即可安装好KunlunBase集群并且体验和使用到KunlunBase的各主要功能,把本文档作为使用KunlunBase 的快速入门手册。KunlunBase的完整的文档请访问 doc.kunlunbase.com
用户也可根据本文档来评测和验证KunlunBase各项功能工作正常。KunlunBase团队在进行KunlunBase产品研发过程中,会持续对其各项功能开发测试程序,并且使用自动化测试系统每天运行所有测试程序,以便及时发现和解决问题,确保KunlunBase各项功能工作正常。同时,我们会使用mysql和PostgreSQL 的测试集来针对 KunlunBase的存储节点和计算节点进行功能测试。关于KunlunBase的自动化测试系统的日常测试结果,请访问www.kunlunbase.com 查看。
KunlunBase 集群架构
KunlunBase 是一个分布式关系数据库管理系统,面向TB和PB级别海量数据处理,支持高吞吐量和低延时的极致性能来处理海量数据的高并发读写请求。它支持水平弹性扩容,提供健壮的事务ACID保障,高效易用的分布式查询处理,高可扩展性,高可用性和透明的分库分表数据处理功能,业务层和终端用户无感知的水平扩展能力,是典型的 NewSQL分布式数据库系统。
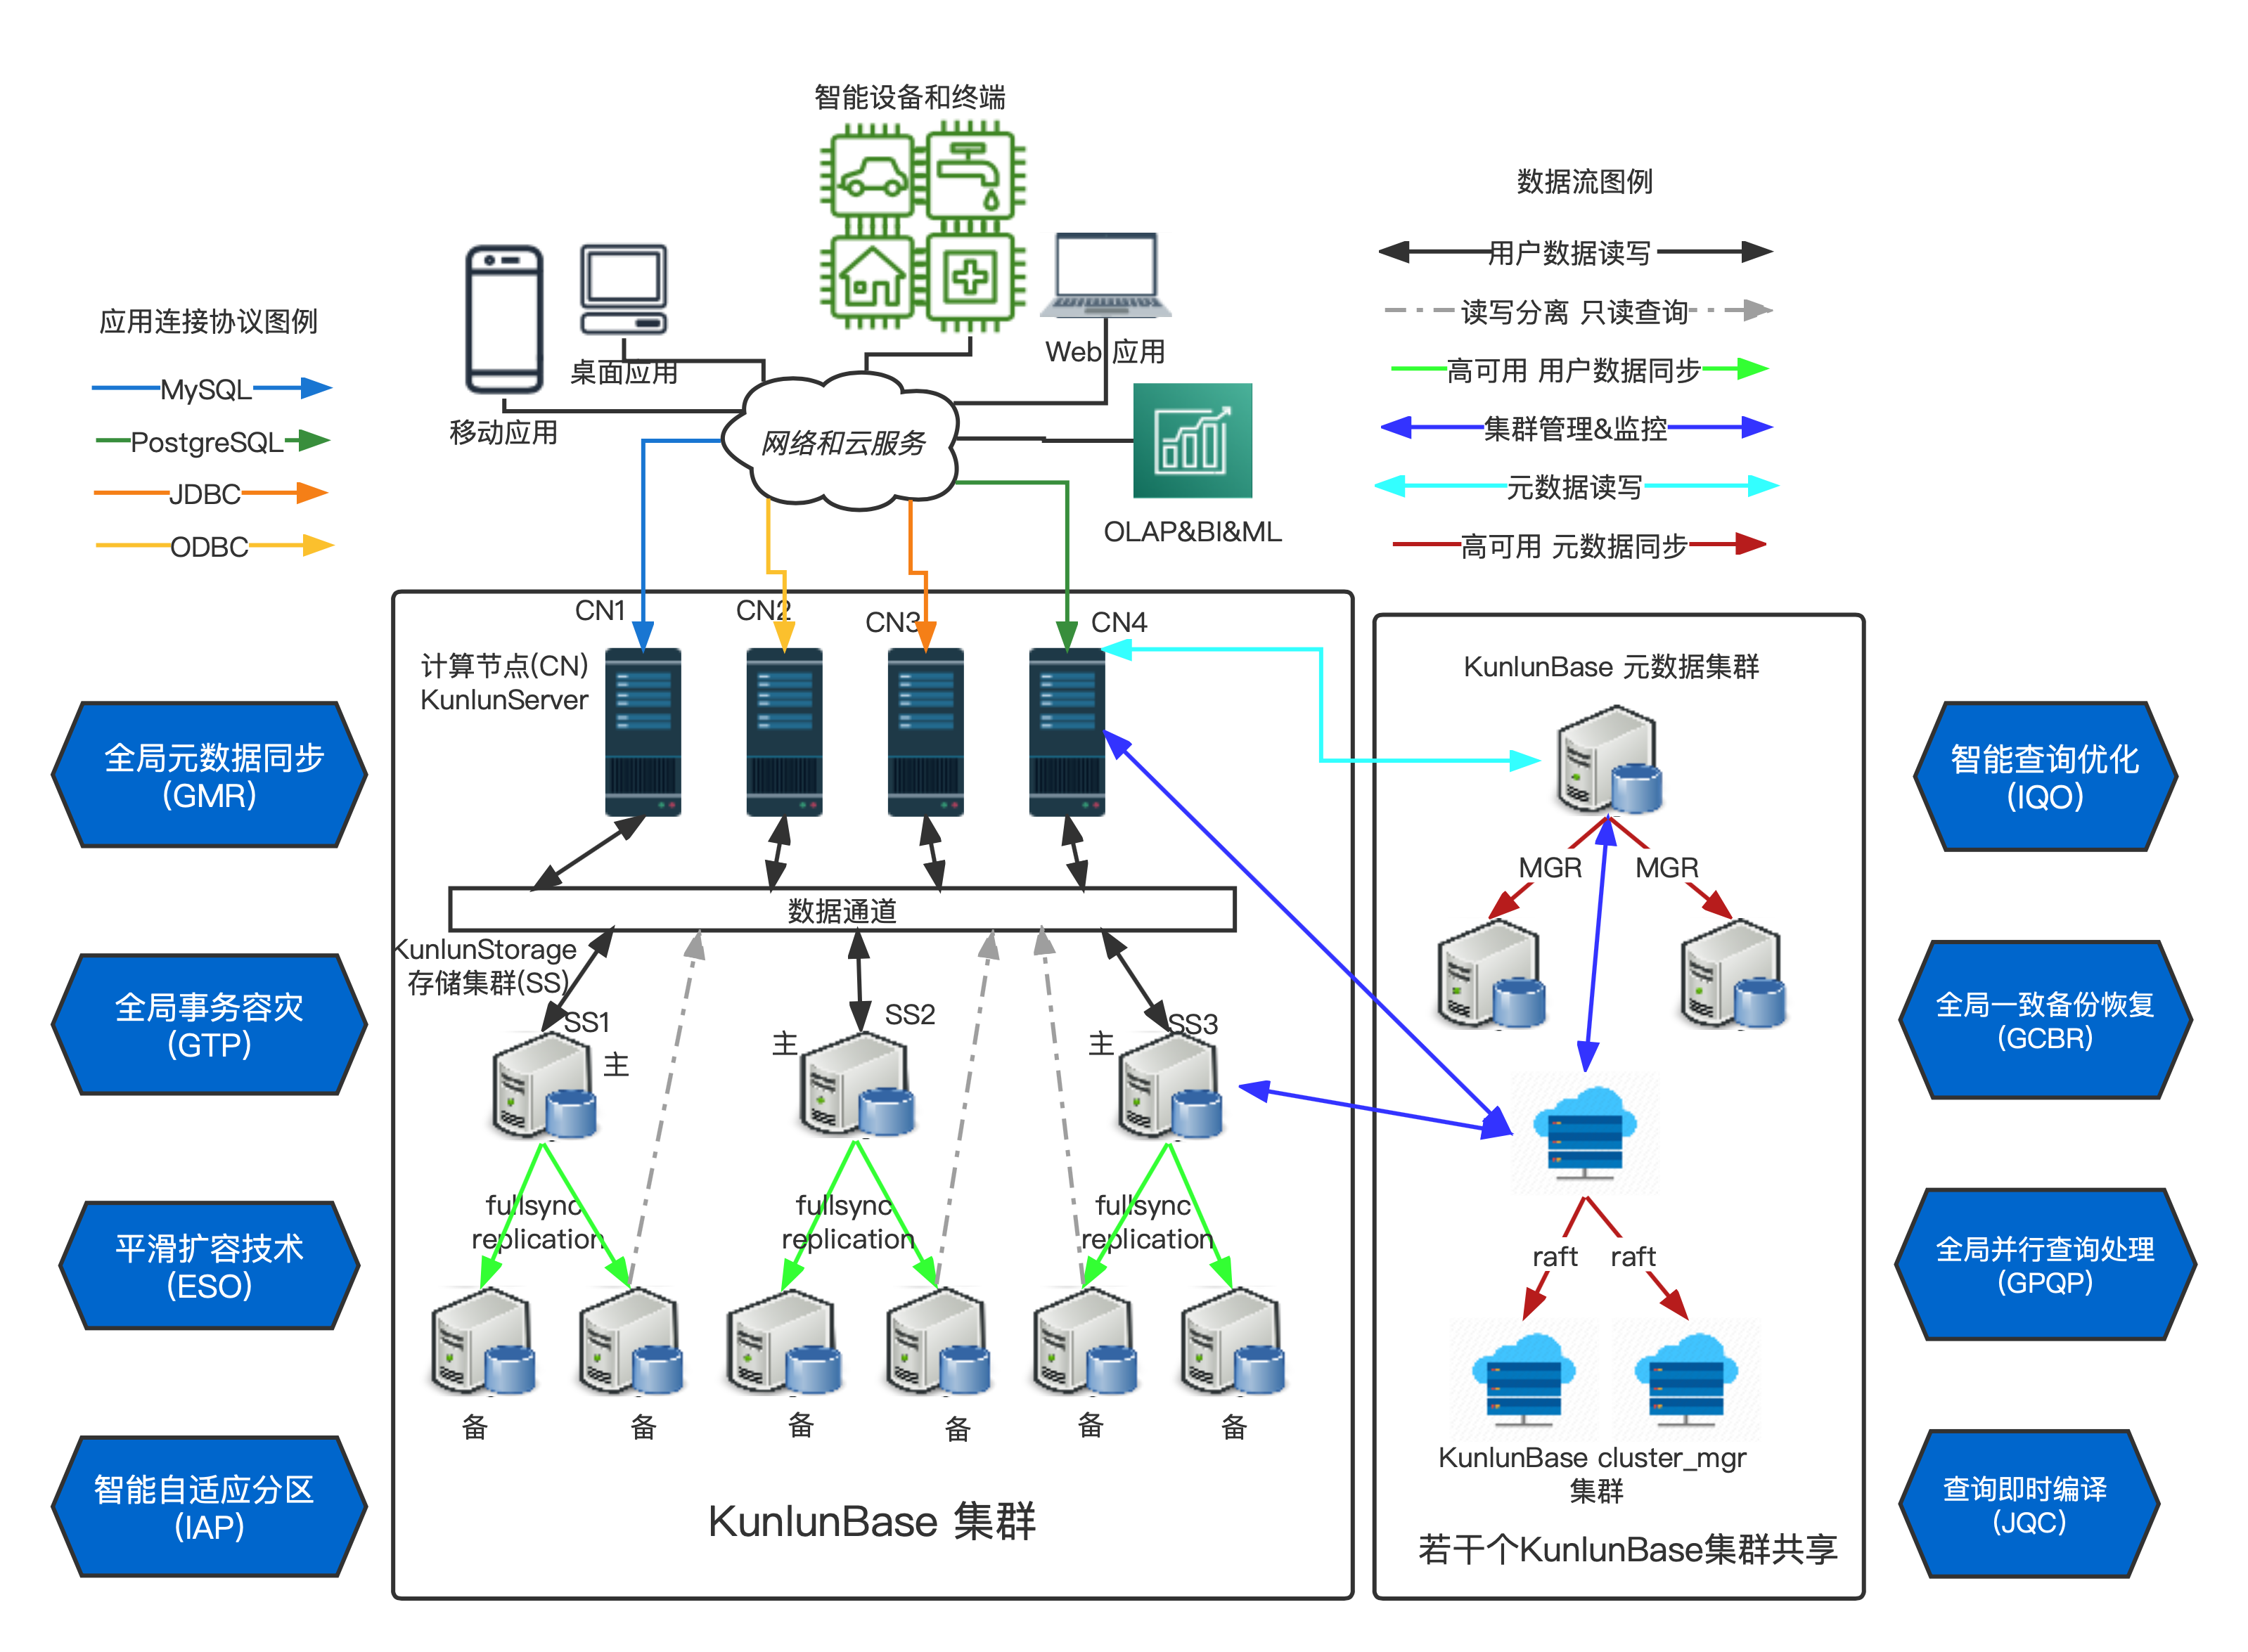
KunlunBase的上述技术能力确保用户可以在业务持续增长时,随时不停服增加服务器节点来扩大数据存储和处理&计算能力,并且在服务器节点发生故障或者断电时,不丢失数据,并且不停止数据读写服务。确保用户业务持续以最高质量运行。
应用软件开发者只需要按照使用单节点关系数据库相同的方法使用昆仑数据库,就可以得到所有上述NewSQL数据库的优点,完全不需要考虑数据的存储和管理的任何细节。用户可以使用PostgreSQL和MySQL两种连接协议连接到KunlunBase集群的计算节点并执行DDL和DML SQL语句。KunlunBase支持标准SQL,PostgreSQL的DDL 语法,以及PostgreSQL和MySQL 的私有DML 语法。因此,原本使用PostgreSQL和MySQL的应用程序不需要修改就可以使用KunlunBase。
KunlunBase支持 所有SQL 数据分析功能,可以执行TPC-H 和TPC-DS的所有 OLAP 分析SQL语句,因此,用户可以把各类业务系统中的数据持续流入KunlunBase集群,并且使用KunlunBase 集群对这些持续更新的数据做OLAP 分析和数据挖掘,以便迅速发现变化和趋势,抓住转瞬即逝的商机,及时应对突发状况,获得巨大的竞争优势。
即使用户的数据量只有若干GB,也可以使用KunlunBase而获益。KunlunBase的fullsync功能比MySQL 自带的semisync(半同步)和group replication具有更高的可靠性 — 这两种技术如果主备节点同时断电那么用户数据可能丢失或者不一致,而fullsync 确保这种情况下不会丢失用户数据。此时只部署一个存储集群(例如 一主两备)即可。当用户数据和业务负载持续上升时,可以随时按需增加更多的存储集群和计算节点,从而扩大数据存储和查询能力。
同时,用户可以通过读写分离扩展KunlunBase的处理能力。通过使用读写分离技术从备机查询数据,并安排专属的计算节点用于OLAP分析查询,可以确保OLAP分析任务完全不会影响OLTP 业务的性能。
使用KunlunBase
为KunlunBase 初始化服务器(BootStrap)
经过初始化(bootstrap)的服务器才可以安装KunlunBase集群。初始化服务器完成后,用户就可以使用XPanel集群管理工具安装KunlunBase集群。
本节介绍如何初始化计算机服务器。
使用脚本初始化服务器
-
下载脚本
git clone https://gitee.com/zettadb/cloudnative.git
cd cloudnative/cluster -
填写配置文件,详细参数说明参考http://www.kunlunbase.com:8181/docs/kunlundb/install_by_scripts
-
填写完配置文件后,开始初始化服务器
 python setup_cluster_manager.py --config=cluster_and_node_mgr.json --action=install
        bash -e clustermgr/install.sh
创建KunlunBase集群
以下操作皆需要在初始化服务器后进行
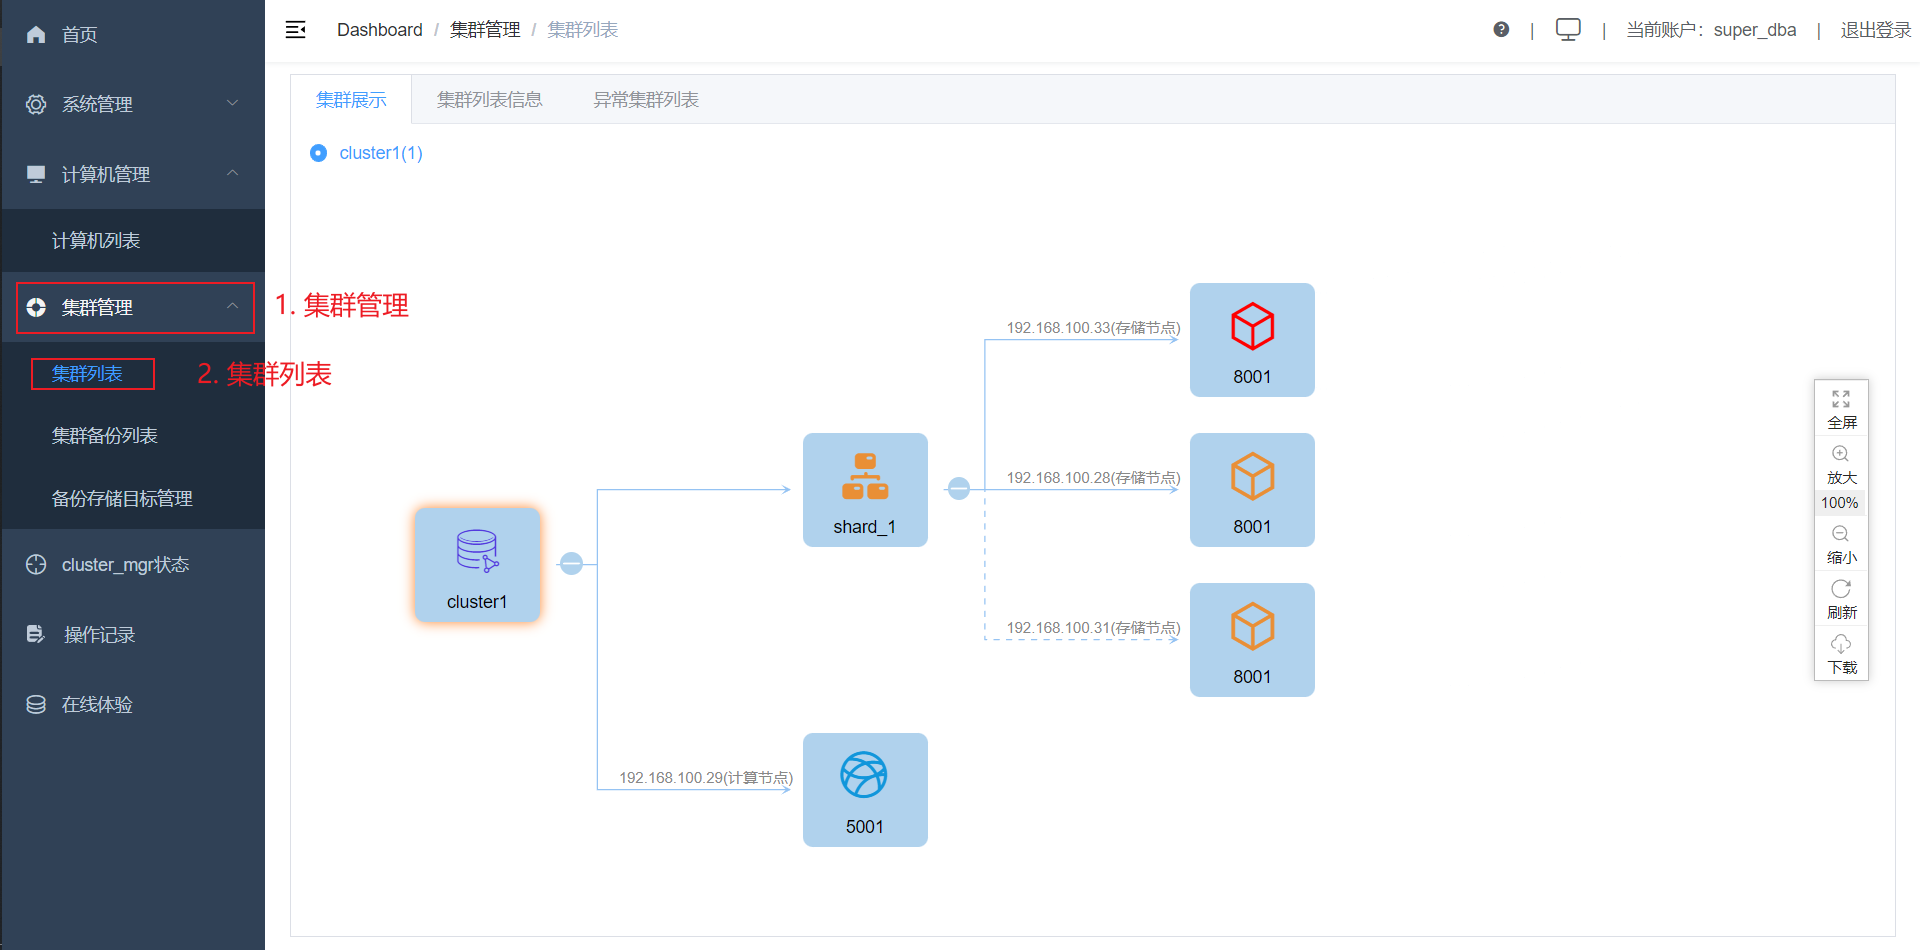
XPanel
-
进入xpanel web端:http://host:17000/KunlunXPanel
a. host就是下载docker镜像并运行的服务器对应ip,可以通过ifconfig查看
b. 示例中的17000就是在运行docker镜像时映射的商品
-
首次进入,账号和密码都是super_dba, 元数据节点用主的ip和端口就行

- 随后会需要修改密码,修改完密码后,进入到xpanel主界面

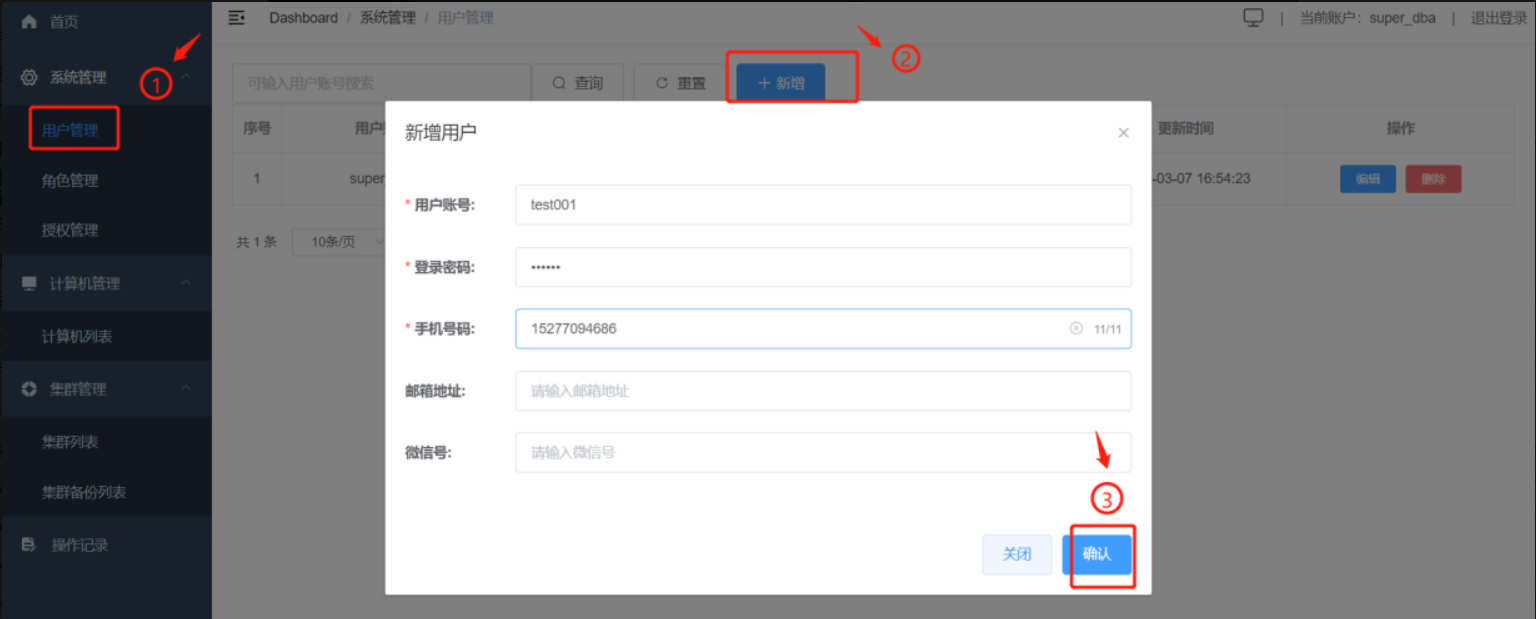
- 增加计算机列表
a. 检查需要增加的计算机是否存在列表中,不存在则进行该步骤,存在则跳过
b. 目前只能一个一个添加,该列表里的对应的服务器必须安装有node_mgr,且配置正确
c. 系统管理 – 用户管理 – 新增 – 填写对应的参数 – 确认
-
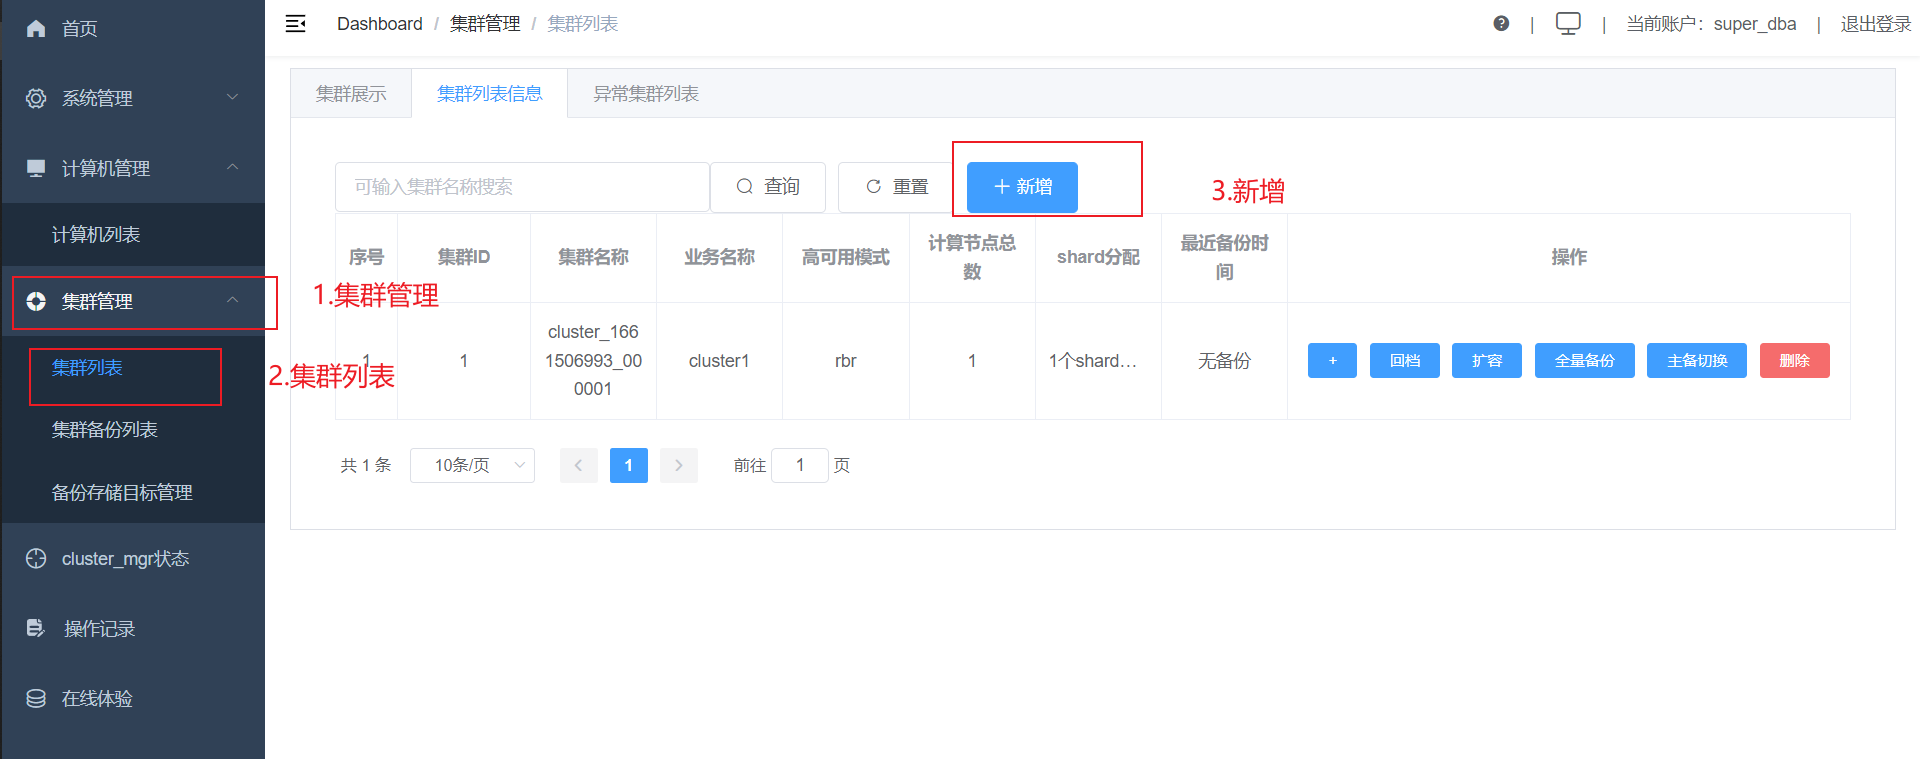
在新增完计算机后,就可以创建集群了
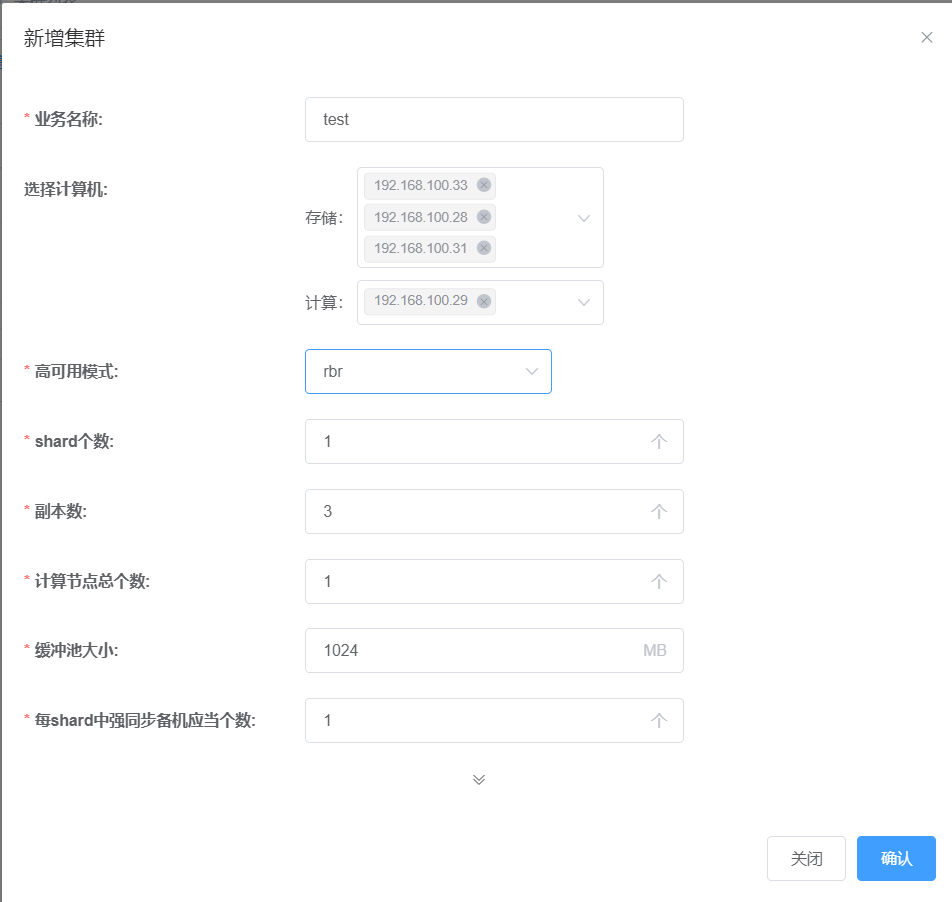
a. 集群管理 – 集群列表 – 新增
b. 根据需求填写对应的参数值
c. 等集群安装好后,可以在 集群展示 界面查看对应的节点信息和主备关系
集群管理 – 集群列表 – 点击对应的集群
使用KunlunBase做数据读写
各编程语言准备使用KunlunBase
当前 KunlunBase 同时支持 postgres 和 mysql 协议。
计算节点 mysql 协议端口号可以通过进入计算节点 pg 端口,使用show mysql_port; 查看
命令行连接
-
连接 Kunlunbase pg协议,可以通过tcp和url的方式进行连接
-
Tcp:psql -h host -p port -U username -d databaseName
-
url: psql postgres://userName:passwd@host:port/databaseName
-
连接KunlunBase mysql协议,可以通过tcp和socket的方式进行连接
-
TCP:mysql -h host -P port -ppassword -u userName-
注意:-p和密码之间不能有空格
-
各语言connector下载方式
- go 和 rust 都可以直接通过自带的包管理器下载所需依赖,不需要额外安装
- go推荐1.17.5版本或者更高版本
- rust推荐1.59.0版本或者更高版本
java
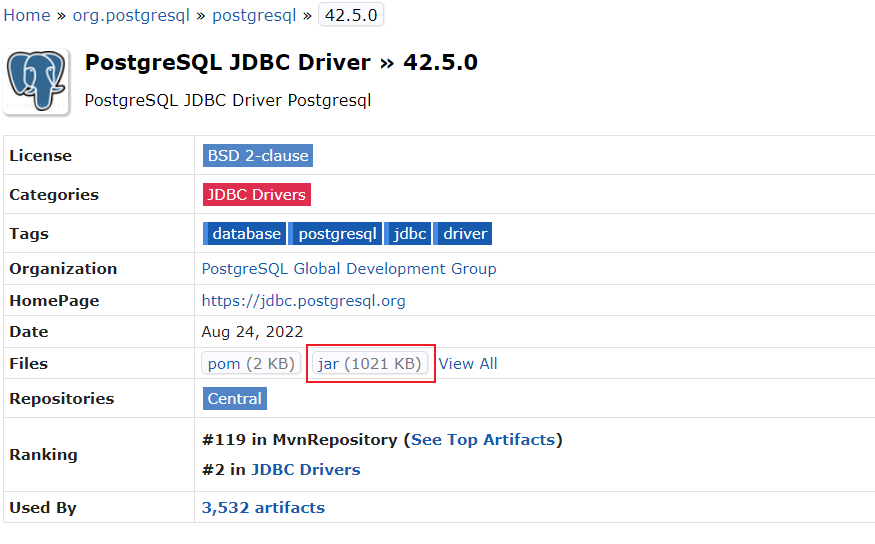
在maven仓库选择好对应的jar包版本后,点击 jar 就可以下载对应jar包
-
mysql connector/j
- https://dev.mysql.com/downloads/connector/j/ mysql官网下载
- https://mvnrepository.com/artifact/mysql/mysql-connector-java maven仓库
-
Postgresql JDBC Driver
- https://mvnrepository.com/artifact/org.postgresql/postgresql maven仓库
-
mariadb connector/j - 3.x版本
- https://mariadb.org/connector-java/all-releases/ mariadb官网,官网只有最新的3.x版本
- https://mvnrepository.com/artifact/org.mariadb.jdbc/mariadb-java-client maven仓库
-
mariadb connector/j - 2.x版本
- http://zettatech.tpddns.cn:14000/thirdparty/ 泽拓科技官网
- 因为官方2.0版本在连接计算节点会有一些bug,所以不建议直接使用mariadb官网的2.x版本connector
python
-
Psycopg2
- pip install psycopg2 通过pip安装
- pip install psycopg2==$version 通过pip安装
- https://github.com/psycopg/psycopg2 通过setup.pg build
-
mysql-connector/python
- https://downloads.mysql.com/archives/c-python/ mysql官网
- pip install mysql-connector-python 通过pip安装8.x版本mysql connector/python
- https://github.com/mysql/mysql-connector-python 通过setup.pg build
-
pymysql
- pip install pymysql 通过pip安装
- https://github.com/PyMySQL/PyMySQL 通过setup.pg build
nodejs
-
pg
- npm install pg 通过npm工具安装pg connector
-
mysql
- npm install mysql 通过npm工具安装mysql connector
- https://downloads.mysql.com/archives/c-nodejs/ mysql官网下载
php
- mysql
- https://downloads.mysql.com/archives/c-php/ mysql官网下载
c
-
postgresql
- sudo apt-get install libpq+±dev -y ubuntu安装pg依赖
-
mysql
- sudo apt-get install libmysql+±dev -y ubuntu安装mysql依赖
c#
- postgresql
- dotnet add package Npgsql
- mysql
- dotnet add package MySql.Data
c++
- postgresql
sudo apt install libpq-dev
git clone https://github.com/jtv/libpqxx.git
cd libpqxx
./configure
make
sudo make install
- mysql
- sudo apt-get install libmysqlclient-dev 安装c++连接mysql的依赖
- https://downloads.mysql.com/archives/c-cpp/ mysql官方connector下载
使用各编程语言对KunlunBase 执行增删改查DML语句
以下所有示例可以在https://gitee.com/zettadb/cloudnative这里下载
- pg相关示例在cloudnative/smoke目录下
- mysql相关示例在cloudnative/smoke/somkeTest-mysql目录下
java
- Postgresql-JDBC-Driver
package kunlun.test;

/*
 * Copyright (c) 2019 ZettaDB inc. All rights reserved.
 * This source code is licensed under Apache 2.0 License,
 * combined with Common Clause Condition 1.0, as detailed in the NOTICE file.
 */

import java.io.BufferedReader;
import java.io.FileReader;
import java.sql.Connection;
import java.sql.DriverManager;
import java.sql.PreparedStatement;
import java.sql.ResultSet;
import java.sql.Statement;
import java.util.ArrayList;
import java.util.LinkedList;
import java.util.List;
import java.util.Properties;

public class SmokeTest {


    static {

        try {

            Class.forName("org.postgresql.Driver");
            //Class.forName("com.mysql.cj.jdbc.Driver");
        } catch (Exception ex) {

        }
    }

    public static Connection getConnection(String user,
                                           String password,
                                           String host,
                                           int port,
                                           String dbname) {

        String proto = "postgresql";
        Properties props = new Properties();
        props.setProperty("user", user);
        props.setProperty("password", password);
        String url = "jdbc:" + proto+"://" + host + ":" + port + "/" + dbname;
        try {

            return DriverManager.getConnection(url, props);
        } catch (Exception ex) {

            ex.printStackTrace();
            return null;
        }
    }

    public static void smokeTest(Connection conn) throws Exception{

        boolean autocommit = conn.getAutoCommit();
        System.out.println("default autocommit: " + autocommit);
        conn.setAutoCommit(true);
        Statement st =conn.createStatement();
        st.execute("SET client_min_messages TO 'warning';");
        st.execute("drop table if exists t1;");
        st.execute("RESET client_min_messages;");
        String createSql = "create table t1(id integer primary key, " +
                           "info text, wt integer);";
        st.execute(createSql);
        st.execute("insert into t1(id,info,wt) values(1, 'record1', 1);");
        st.execute("insert into t1(id,info,wt) values(2, 'record2', 2);");
        st.execute("update t1 set wt = 12 where id = 1;");
        ResultSet res1 = st.executeQuery("select * from t1;");
        System.out.printf("res1:%s%n", showResults(res1).toString());
        res1.close();
        st.close();

        String pstr = "select * from t1 where id=?";
        PreparedStatement ps = conn.prepareStatement(pstr);
        ps.setInt(1, 1);
        ResultSet pres = ps.executeQuery();
        System.out.printf("pres1:%s%n", showResults(pres).toString());
        ps.setInt(1, 2);
        pres = ps.executeQuery();
        System.out.printf("pres2:%s%n", showResults(pres).toString());
        ps.close();

        pstr = "update t1 set info=? , wt=? where id=?";
        ps = conn.prepareStatement(pstr);
        ps.setString(1, "Rec1");
        ps.setInt(2, 2);
        ps.setInt(3, 1);
        ps.execute();
        ps.setString(1, "Rec2");
        ps.setInt(2, 3);
        ps.setInt(3, 2);
        ps.execute();
        ps.close();

        st =conn.createStatement();
        ResultSet res2 = st.executeQuery("select * from t1;");
        System.out.printf("res2:%s%n", showResults(res2).toString());
        res2.close();
        st.execute("delete from t1 where id = 1;");
        ResultSet res3 = st.executeQuery("select * from t1;");
        System.out.printf("res3:%s%n", showResults(res3).toString());
        res3.close();
        st.execute("drop table t1;");
        st.close();
        conn.setAutoCommit(autocommit);
    }

    /*
     * We do the following actions:
     * 1 Create the able
     * 2 Insert two records
     * 3 Update the first record.
     * 4 Query the records(res1).
     * 5 Delete the second record.
     * 6 Query the records again(res2).
     * 7 Drop the table.
     */
    public static void smokeTestFile(Connection conn, String cmdfile) throws Exception{

        boolean autocommit = conn.getAutoCommit();
        System.out.println("default autocommit: " + autocommit);
        conn.setAutoCommit(true);
        Statement st =conn.createStatement();
        BufferedReader br = new BufferedReader(new FileReader(cmdfile));
        String cmd = null;
        do {

            cmd = br.readLine();
            if (cmd == null) {

                break;
            }
            if (cmd.toUpperCase().startsWith("SELECT")) {

                ResultSet res = st.executeQuery(cmd);
                System.out.printf("sql:%s, res:%s%n", cmd,
                                  showResults(res).toString());
                res.close();
            } else {

                st.execute(cmd);
            }
        } while (cmd != null);
        br.close();
        st.close();
        conn.setAutoCommit(autocommit);
    }

    private static List<List<String>> showResults(ResultSet res)
        throws Exception {

        LinkedList<List<String>> results = new LinkedList<>();
        int cols = res.getMetaData().getColumnCount();
        while (res.next()) {

            List<String> row = new ArrayList<>(cols);
            for (int i = 0; i < cols; i++) {

                row.add(res.getString(i + 1));
            }
            results.addLast(row);
        }
        return results;
    }

    public static void test1(String[] args) throws Exception{

        String host = args[0];
        int port = Integer.valueOf(args[1]);
        String user = "abc";
        String password = "abc";
        String database = "postgres";
        Connection conn = getConnection(user, password, host, port, database);
        smokeTest(conn);
        conn.close();
    }

    public static void main(String[] args) throws Exception {

        test1(args);
    }
}
-
mysql connector/j
- 编译:javac test.java
- 运行:java -cp .:./mysql-connector-java-$version.jar test
import java.sql.DriverManager;
import java.util.ArrayList;
import java.sql.*;
import java.util.*;

public class mysql {

    // MySQL 8.0 以下版本 - JDBC 驱动名及数据库 URL
    static final String JDBC_DRIVER = "com.mysql.jdbc.Driver";
    // MySQL 8.0 以上版本 - JDBC 驱动名及数据库 URL
    //static final String JDBC_DRIVER = "com.mysql.cj.jdbc.Driver";
    // 数据库的用户名与密码,需要根据自己的设置
    static final String USER = "user";
    static final String PASS = "pwd";

    public static void main(String[] args) {

        Connection conn = null;
        Statement stmt = null;

        //处理传入的参数
        String host = Arrays.toString(args);
        String urls1 = "jdbc:mysql://" + host + "/postgres";
        String urls2 = urls1.replace("[","");
        String urls = urls2.replace("]","");

        try{

            // 注册 JDBC 驱动
            Class.forName(JDBC_DRIVER);

            // 打开链接
            System.out.println("连接数据库" + host + "...");
            conn = DriverManager.getConnection(urls,USER,PASS);

            // 执行查询
            System.out.println(" 实例化Statement对象...");
            stmt = conn.createStatement();
            ArrayList sqls = new ArrayList();
            sqls.add("drop table if exists myjdbc_sm;");
            sqls.add("create table myjdbc_sm(a int primary key, b text);");
            sqls.add("insert into myjdbc_sm values(1, 'abc'),(2, 'bcd'),(3, 'cde');");
            sqls.add("select * from myjdbc_sm;");
            sqls.add("update myjdbc_sm set b = 'def' where a = 1;");
            sqls.add("select * from myjdbc_sm;");
            sqls.add("delete from myjdbc_sm where a = 3;");
            sqls.add("select * from myjdbc_sm;");

            for (int i = 0; i <= 7; ++i){

                String sql = (String) sqls.get(i);
                System.out.println(sql);

                if (sql == "select * from myjdbc_sm;"){

                    ResultSet rs = stmt.executeQuery(sql);
                    while(rs.next()) {

                        int a = rs.getInt("a");
                        String b = rs.getString("b");
                        System.out.print(" a: " + a + " b: " + b + "\n");
                    }
                    rs.close();
                }
                else {

                    stmt.execute(sql);
                }
            }

            stmt.close();
            conn.close();
        }catch(SQLException se){

            // 处理 JDBC 错误
            se.printStackTrace();
        }catch(Exception e){

            // 处理 Class.forName 错误
            e.printStackTrace();
        }finally{

            // 关闭资源
            try{

                if(stmt!=null) stmt.close();
            }catch(SQLException se2){

            }// 什么都不做
            try{

                if(conn!=null) conn.close();
            }catch(SQLException se){

                se.printStackTrace();
            }
        }
        System.out.println("Goodbye!");
    }
}
python
- Psycopg2
import psycopg2
import sys

def test(hoststr, portstr):
        intport = int(portstr)
        conn = psycopg2.connect(host=hoststr, port=intport, user='abc', password='abc', database='postgres')
        conn.autocommit = True
        cur = conn.cursor()
        sqls=["SET client_min_messages TO 'warning';",
                "drop table if exists t1111",
                "RESET client_min_messages;",
                "create table t1111(id int primary key, info text, wt int)",
                "insert into t1111(id,info,wt) values(1, 'record1', 1)",
                "insert into t1111(id,info,wt) values(2, 'record2', 2)",
                "update t1111 set wt = 12 where id = 1", "select * from t1111",
                "delete from t1111 where id = 1", "select * from t1111",
                "prepare q1(int) as select*from t1111 where id=$1",
                "begin",
                "execute q1(1)",
                "execute q1(2)",
                "prepare q2(text,int, int) as update t1111 set info=$1 , wt=$2 where id=$3",
                "execute q2('Rec1',2,1)",
                "commit",
                "execute q2('Rec2',3,2)",
                "drop table t1111"]
        for sql in sqls:
                res = cur.execute(sql+";")
                print "command:%s, res:%s" % (sql, str(res))

if __name__ == '__main__':
        test(sys.argv[1], sys.argv[2])
- mysql connector/python
import argparse
from time import sleep
from mysql import connector
def test(sql, host, port, user, pwd, db):
    conn = connector.connect(buffered=True, host=host, port=port, user=user, passwd=pwd, database=db, ssl_disabled=True)
    cur = conn.cursor()

    print(sql)
    if sql == 'select * from mysql_connector_python;':
        cur.execute(sql)
        rs = cur.fetchall()
        srs = str(rs)
        srs = srs.replace('[(', '')
        srs = srs.replace(')]', '')
        srs = srs.replace('), (', '\n------\n')
        srs = srs.replace(',', ' |')
        srs = srs.replace('\'', '')
        print('--------\na | b\n------\n' + srs + '\n--------')
    else:
        cur.execute(sql)

    conn.commit()
    cur.close()
    conn.close()

def execSql(host, port, user, pwd, db):
    sql = ['drop table if exists mysql_connector_python;',
            'create table mysql_connector_python(a int primary key, b text);',
            "insert into mysql_connector_python values(1,'a'),(2,'b'),(3,'c');",
            'select * from mysql_connector_python;',
            "update mysql_connector_python set b = 'abc' where a = 3;",
            'select * from mysql_connector_python;',
            'delete from mysql_connector_python where a = 3;',
            'select * from mysql_connector_python;']
    for sqls in sql:
        test(sqls, host, port, user, pwd, db)

if __name__ == '__main__':
    parser = argparse.ArgumentParser(description = 'this script is use to test ddl replication!')
    parser.add_argument('--host', help='host')
    parser.add_argument('--port', default=3306, help='port')
    parser.add_argument('--db', default='mysql', help='database name')
    parser.add_argument('--pwd', default='root', help='password')
    parser.add_argument('--user', default='root', help='user name')
    args = parser.parse_args()
    host = args.host
    port = args.port
    db   = args.db
    pwd  = args.pwd
    user = args.user

    print(host, str(port))
    execSql(host, port, user, pwd, db)
nodejs
- postgresql
const {
    findSourceMap } = require('module');
const {
    CLIENT_RENEG_LIMIT } = require('tls');
const pg=require('./node_modules/pg');

var arguments = process.argv.splice(2);
console.log('host:', arguments[0], 'port: ', arguments[1]);

var conString = ('postgres://abc:abc@'+arguments[0]+':'+arguments[1]+'/postgres');
var client = new pg.Client(conString);


client.connect(function(err){

    if(err){

        return console.error('数据库连接出错',err);
    }

    console.log("")
    console.log("=========== JS Driver ==============");
    client.query('drop table if exists smoketesttable_js;',function(err,data){

        if(err){

            return console.error('step 1 : droped table failed!',err);

        }else{

            console.log('step 1 : drop table success!')
        }
    })
  client.query('drop table if exists smoketesttable_js1;');//再运行一次的原因是因为如果失败了就只有一个failed!提示,没有报错信息。所以再运行一次让这个报错信息显示出来

    client.query('create table smoketesttable_js(id int primary key,name text,gender text);',function(err,data){

        if(err){

            return console.error('step 2 : create failed!',err);
        }else{

            console.log('step 2 : create table success!')
        }
    })
  client.query('create table smoketesttable_js1(id int primary key,name text,gender text);')

    client.query("insert into smoketesttable_js values(1,'name1','male'),(2,'name2','female'),(3,'name3','male');",function(err,data){

        if(err){

            return console.error('step 3 : insert failed!',err);
        }else{

            console.log('step 3 : insert data success!')
        }
    })
  client.query("insert into smoketesttable_js1 values(1,'name1','male'),(2,'name2','female'),(3,'name3','male');")

    client.query("delete from smoketesttable_js where id = 1;",function(err){

        if(err){

            return console.error('step 4 : delete failed!')
        }else{

            console.log("step 4 : delete data success!")
        }
    })
  client.query("delete from smoketesttable_js1 where id = 1;")

    client.query("update smoketesttable_js set gender = 'male' where id = 2;",function(err){

        if(err){

            return console.error("step 5 : update failed!")
        }else{

            console.log('step 5 : update gender success!')
        }
    })
  client.query("update smoketesttable_js1 set gender = 'male' where id = 2;")


    client.query("select * from smoketesttable_js;",function(err){

        if(err){

            return console.error("select failed!")
            client.query("step 6 : select * from smoktesttable_js;")
        }else{

            console.log('step 6 : select table success!')
        }
    })
    client.query("select * from smoketesttable_js1;")

    client.query("commit",function(err){

        if(err){

            return console.error("select failed!")
        }else{

            console.log('step 6 : commit success!')
        }
        client.end();
        console.log("====================================");
  console.log("")
    })


})
- mysql
// 使用process获取命令行传的参数
var arguments = process.argv.splice(2);
var hosts = arguments[0];
var ports  = arguments[1];

var mysql  = require('mysql');

var connection = mysql.createConnection({

    host     : hosts,
    user     : 'abc',
    password : 'abc',
    port: ports,
    database: 'postgres'
});
//console.log(connection)


connection.connect();

var sql1 = 'drop table if exists myjs_sm';
var sql2 = 'create table if not exists myjs_sm(a int primary key,b text);'
var sql3 = 'insert into myjs_sm values(1,"abc")';
var sqls = 'select * from myjs_sm';
var sql4 = 'update myjs_sm set b = "asd" where a = 1';
var sql5 = 'delete from myjs_sm where a = 1';

var  execsql=function(arg1){

//查
  connection.query(arg1, function (err, result) {

                if(err){

                console.log(err.message);
                return;
        }

        console.log('-----------------------[ "' + arg1 + '" ]');
        console.log(result);
        console.log('------------------------------------------------------------\n\n');
  });

  //connection.end();
}

execsql(sql1);
execsql(sql2);