前言
在上一篇文章中,我介绍了 ffmpeg-rockchip MPP 硬编解码的代码实现方式。在这篇文章,我将介绍 ffmpeg-rockchip RGA 的代码实现方式。
RGA 是一个用于图像缩放、旋转、bitBlt、alpha混合等常见的2D图形操作的硬件单元,它的应用场景很广泛,比如可以将 4k 视频缩小到 1080p,再比如可以用于 yolo 模型推理的预处理阶段,提高整个处理链路的效率。
本文不仅适用于 RK3588,还适用于 RK 家族系列的芯片,具体的细节可查看官方 RGA 文档。
前置条件
本文假设你了解或掌握如下内容:
- ffmpeg 的开发流程
- 了解 ffmpeg 的滤镜用途
使用 ffmpeg-rockchip 开发 RGA 功能的好处
传统的 2D 图形操作,要么使用软处理,要么使用 RGA 库提供的 api 进行处理。而现在有一个更高效的开发方案,就是使用 ffmpeg-rockchip 来调用 RGA 功能。ffmpeg-rockchip 在 ffmpeg 库的基础上,封装了 RGA 滤镜。我们只需掌握 ffmpeg 滤镜的使用,就可以使用 RGA。这大大降低了学习成本,提高开发效率。
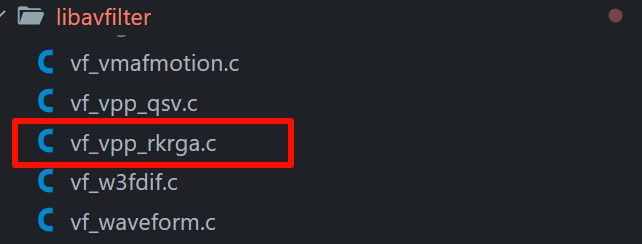
上图是 ffmpeg-rockchip 源码的 libavfilter 目录,这个目录存放各种滤镜,ffmpeg-rockchip 实现了 RGA 滤镜。
要查看你的开发板下 ffmpeg 是否拥有这些滤镜,可以输入如下命令:
ffmpeg -filters | grep rkrga
ffmpeg-rockchip 实现了三个 RGA 滤镜,分别是:
- overlay_rkrga:用于将两个视频合成一个;
- scale_rkrga:用于视频尺寸调整与格式转换;
- vpp_rkrga:用于视频后期处理(缩放/裁剪/转置);
如果不知道怎么编译 ffmpeg-rockchip,可以参考我这篇文章:《瑞芯微 RK 系列 RK3588 使用 ffmpeg-rockchip 实现 MPP 硬件编解码和 RGA 图形加速-命令版》
RGA 过滤器参数介绍
下面分别介绍 overlay_rkrga、scale_rkrga、vpp_rkrg 三个过滤器支持的参数:
overlay_rkrga
Filter overlay_rkrga
  Rockchip RGA (2D Raster Graphic Acceleration) video compositor
    Inputs:
       #0: main (video)
       #1: overlay (video)
    Outputs:
       #0: default (video)
rgaoverlay AVOptions:
   x                 <string>     ..FV....... Overlay x position (default "0")
   y                 <string>     ..FV....... Overlay y position (default "0")
   alpha             <int>        ..FV....... Overlay global alpha (from 0 to 255) (default 255)
   format            <pix_fmt>    ..FV....... Output video pixel format (default none)
   eof_action        <int>        ..FV....... Action to take when encountering EOF from secondary input  (from 0 to 2) (default repeat)
     repeat          0            ..FV....... Repeat the previous frame.
     endall          1            ..FV....... End both streams.
     pass            2            ..FV....... Pass through the main input.
   shortest          <boolean>    ..FV....... Force termination when the shortest input terminates (default false)
   repeatlast        <boolean>    ..FV....... Repeat overlay of the last overlay frame (default true)
   core              <flags>      ..FV....... Set multicore RGA scheduler core [use with caution] (default 0)
     default                      ..FV.......
     rga3_core0                   ..FV.......
     rga3_core1                   ..FV.......
     rga2_core0                   ..FV.......
     rga2_core1                   ..FV.......
   async_depth       <int>        ..FV....... Set the internal parallelization depth (from 0 to 4) (default 2)
   afbc              <boolean>    ..FV....... Enable AFBC (Arm Frame Buffer Compression) to save bandwidth (default false)

framesync AVOptions:
   eof_action        <int>        ..FV....... Action to take when encountering EOF from secondary input  (from 0 to 2) (default repeat)
     repeat          0            ..FV....... Repeat the previous frame.
     endall          1            ..FV....... End both streams.
     pass            2            ..FV....... Pass through the main input.
   shortest          <boolean>    ..FV....... force termination when the shortest input terminates (default false)
   repeatlast        <boolean>    ..FV....... extend last frame of secondary streams beyond EOF (default true)
   ts_sync_mode      <int>        ..FV....... How strictly to sync streams based on secondary input timestamps (from 0 to 1) (default default)
     default         0            ..FV....... Frame from secondary input with the nearest lower or equal timestamp to the primary input frame
     nearest         1            ..FV....... Frame from secondary input with the absolute nearest timestamp to the primary input frame
scale_rkrga
Filter scale_rkrga
  Rockchip RGA (2D Raster Graphic Acceleration) video resizer and format converter
    Inputs:
       #0: default (video)
    Outputs:
       #0: default (video)
rgascale AVOptions:
   w                 <string>     ..FV....... Output video width (default "iw")
   h                 <string>     ..FV....... Output video height (default "ih")
   format            <pix_fmt>    ..FV....... Output video pixel format (default none)
   force_original_aspect_ratio <int>        ..FV....... Decrease or increase w/h if necessary to keep the original AR (from 0 to 2) (default decrease)
     disable         0            ..FV.......
     decrease        1            ..FV.......
     increase        2            ..FV.......
   force_divisible_by <int>        ..FV....... Enforce that the output resolution is divisible by a defined integer when force_original_aspect_ratio is used (from 1 to 256) (default 2)
   force_yuv         <int>        ..FV....... Enforce planar YUV format output (from 0 to 3) (default disable)
     disable         0            ..FV.......
     auto            1            ..FV....... Match in/out bit depth
     8bit            2            ..FV....... 8-bit
     10bit           3            ..FV....... 10-bit uncompact/8-bit
   force_chroma      <int>        ..FV....... Enforce chroma of planar YUV format output (from 0 to 4) (default auto)
     auto            0            ..FV....... Match in/out chroma
     420sp           1            ..FV....... 4:2:0 semi-planar
     420p            2            ..FV....... 4:2:0 fully-planar
     422sp           3            ..FV....... 4:2:2 semi-planar
     422p            4            ..FV....... 4:2:2 fully-planar
   core              <flags>      ..FV....... Set multicore RGA scheduler core [use with caution] (default 0)
     default                      ..FV.......
     rga3_core0                   ..FV.......
     rga3_core1                   ..FV.......
     rga2_core0                   ..FV.......
     rga2_core1                   ..FV.......
   async_depth       <int>        ..FV....... Set the internal parallelization depth (from 0 to 4) (default 2)
   afbc              <boolean>    ..FV....... Enable AFBC (Arm Frame Buffer Compression) to save bandwidth (default false)
vpp_rkrg
Filter vpp_rkrga
  Rockchip RGA (2D Raster Graphic Acceleration) video post-process (scale/crop/transpose)
    Inputs:
       #0: default (video)
    Outputs:
       #0: default (video)
rgavpp AVOptions:
   w                 <string>     ..FV....... Output video width (default "cw")
   h                 <string>     ..FV....... Output video height (default "w*ch/cw")
   cw                <string>     ..FV....... Set the width crop area expression (default "iw")
   ch                <string>     ..FV....... Set the height crop area expression (default "ih")
   cx                <string>     ..FV....... Set the x crop area expression (default "(in_w-out_w)/2")
   cy                <string>     ..FV....... Set the y crop area expression (default "(in_h-out_h)/2")
   format            <pix_fmt>    ..FV....... Output video pixel format (default none)
   transpose         <int>        ..FV....... Set transpose direction (from -1 to 6) (default -1)
     cclock_hflip    0            ..FV....... Rotate counter-clockwise with horizontal flip
     clock           1            ..FV....... Rotate clockwise
     cclock          2            ..FV....... Rotate counter-clockwise
     clock_hflip     3            ..FV....... Rotate clockwise with horizontal flip
     reversal        4            ..FV....... Rotate by half-turn
     hflip           5            ..FV....... Flip horizontally
     vflip           6            ..FV....... Flip vertically
   force_yuv         <int>        ..FV....... Enforce planar YUV format output (from 0 to 3) (default disable)
     disable         0            ..FV.......
     auto            1            ..FV....... Match in/out bit depth
     8bit            2            ..FV....... 8-bit
     10bit           3            ..FV....... 10-bit uncompact/8-bit
   force_chroma      <int>        ..FV....... Enforce chroma of planar YUV format output (from 0 to 4) (default auto)
     auto            0            ..FV....... Match in/out chroma
     420sp           1            ..FV....... 4:2:0 semi-planar
     420p            2            ..FV....... 4:2:0 fully-planar
     422sp           3            ..FV....... 4:2:2 semi-planar
     422p            4            ..FV....... 4:2:2 fully-planar
   core              <flags>      ..FV....... Set multicore RGA scheduler core [use with caution] (default 0)
     default                      ..FV.......
     rga3_core0                   ..FV.......
     rga3_core1                   ..FV.......
     rga2_core0                   ..FV.......
     rga2_core1                   ..FV.......
   async_depth       <int>        ..FV....... Set the internal parallelization depth (from 0 to 4) (default 2)
   afbc              <boolean>    ..FV....... Enable AFBC (Arm Frame Buffer Compression) to save bandwidth (default false)
可以看到,除了每个滤镜特有的参数外,还有通用的 core 参数,传入该参数可以选择想要放在哪个核去运行。RK3588 有 4 个核,每款芯片型号的核心数都不一样,具体的请参考官方芯片文档,这个参数适用于需要大量并发场景。
滤镜的使用
可能有人之前没使用过 ffmpeg 的滤镜,这里简单介绍下。ffmpeg 的滤镜是以图 graph 和链 link 的形式存在,多个 link 组成一个 graph。给 frame 使用滤镜就相当于让它经过一个加工厂,经过一系列的加工处理后输出。
滤镜的初始化,支持以字符串的形式初始化滤镜图 filter graph,使用 avfilter_graph_parse_ptr 函数。因此我们没必要去创建每个滤镜,只需要创建好 buffer 和 buffersink 滤镜即可,可以把它们理解成入口和出口。
buffer是滤镜链的输入端,它将外部提供的 frame 包装成FFmpeg滤镜可以处理的格式,以便后续滤镜链中的其他滤镜进行处理。buffersink滤镜是滤镜链的输出端。它从滤镜链中提取经过处理的帧数据,供外部程序使用或进一步编码。
假设我们传入 hwupload,scale_rkrga=w=640:h=360:format=nv12,hwdownload 字符串给 avfilter_graph_parse_ptr 函数(每个逗号分隔代表一个滤镜,冒号表示滤镜参数,等号代表参数的值),那么我们将得到这样的一个滤镜图:
要使用 RGA 的滤镜,我们需要使用 hwupload 滤镜将帧上传到 RGA 中,处理之后使用 hwdownload 滤镜将帧下载到内存中。
编写思路
接下来我们将实现 “读取 mp4 文件,使用 scale_rkrga 滤镜将视频缩小到 640×360 并输出 nv12 的格式,编码后输出 output.hevc 文件” 的 demo。
思路如下:
- 初始化 format、codec、filter 上下文
- 解复用得到 stream
- 依次读取 packet,进行解码得到 frame
- 将 frame 传入 filter,得到过滤后的 filt_frame
- 将 filt_frame 编码得到 packet
- 写入文件
注意:创建完滤镜图之后,我们需要使用
avfilter_graph_get_filter函数从滤镜图中找到hwupload滤镜上下文,给它设置hw_device_ctx字段,这样hwupload滤镜才能知道要上传到哪个硬件中去。
下面给出 cpp 的代码示例:
#include <iostream>
#include <stdio.h>
#include <stdlib.h>
#include <unistd.h>

extern "C" {
#include <libavcodec/avcodec.h>
#include <libavfilter/avfilter.h>
#include <libavfilter/buffersink.h>
#include <libavfilter/buffersrc.h>
#include <libavformat/avformat.h>
#include <libavutil/hwcontext.h>
#include <libavutil/opt.h>
#include <libavutil/pixfmt.h>
}

#define ENCODER_NAME "hevc_rkmpp"

const char *filter_descr =
    "hwupload,scale_rkrga=w=640:h=360:format=nv12,hwdownload";

static AVFormatContext *fmt_ctx;
static AVCodecContext *decodec_ctx;
static AVCodecContext *encodec_ctx;
static int video_stream_index = -1;
static AVStream *video_stream;
static AVFilterContext *buffersink_ctx;
static AVFilterContext *buffersrc_ctx;
static AVFilterContext *hwupload_ctx;
static AVFilterGraph *filter_graph;
static const AVCodec *decodec;
static const AVCodec *encodec;

static int open_input_file(const char *filename) {
  int ret;

  if ((ret = avformat_open_input(&fmt_ctx, filename, NULL, NULL)) < 0) {
    av_log(NULL, AV_LOG_ERROR, "Cannot open input file\n");
    return ret;
  }

  if ((ret = avformat_find_stream_info(fmt_ctx, NULL)) < 0) {
    av_log(NULL, AV_LOG_ERROR, "Cannot find stream information\n");
    return ret;
  }

  ret = av_find_best_stream(fmt_ctx, AVMEDIA_TYPE_VIDEO, -1, -1, &decodec, 0);
  if (ret < 0) {
    av_log(NULL, AV_LOG_ERROR,
           "Cannot find a video stream in the input file\n");
    return ret;
  }

  video_stream_index = ret;
  video_stream = fmt_ctx->streams[video_stream_index];

  decodec_ctx = avcodec_alloc_context3(decodec);
  if (!decodec_ctx)
    return AVERROR(ENOMEM);
  avcodec_parameters_to_context(decodec_ctx, video_stream->codecpar);

  if ((ret = avcodec_open2(decodec_ctx, decodec, NULL)) < 0) {
    av_log(NULL, AV_LOG_ERROR, "Cannot open video decoder\n");
    return ret;
  }

  return 0;
}

static int init_filters(const char *filters_descr) {
  char args[512];
  int ret = 0;
  const AVFilter *buffersrc = avfilter_get_by_name("buffer");
  const AVFilter *buffersink = avfilter_get_by_name("buffersink");

  AVFilterInOut *outputs = avfilter_inout_alloc();
  AVFilterInOut *inputs = avfilter_inout_alloc();
  AVRational time_base = video_stream->time_base;
  enum AVPixelFormat pix_fmts[] = {AV_PIX_FMT_NV12, AV_PIX_FMT_NONE};

  if (!buffersrc) {
    std::cout << "buffersrc not found" << std::endl;
    return -1;
  }

  if (!buffersink) {
    std::cout << "buffersink not found" << std::endl;
    return -1;
  }

  // 创建 rkmpp 硬件上下文
  AVBufferRef *hw_device_ctx;
  if (av_hwdevice_ctx_create(&hw_device_ctx, AV_HWDEVICE_TYPE_RKMPP, "rkmpp",
                             NULL, 0) < 0) {
    std::cout << "Failed to create hardware frames context" << std::endl;
    return -1;
  }

  filter_graph = avfilter_graph_alloc();
  if (!outputs || !inputs || !filter_graph) {
    ret = AVERROR(ENOMEM);
    goto end;
  }

  // 给 buffer 滤镜设置参数
  snprintf(args, sizeof(args),
           "video_size=%dx%d:pix_fmt=%d:time_base=%d/%d:pixel_aspect=%d/%d",
           decodec_ctx->width, decodec_ctx->height, decodec_ctx->pix_fmt,
           time_base.num, time_base.den, decodec_ctx->sample_aspect_ratio.num,
           decodec_ctx->sample_aspect_ratio.den);

  std::cout << "args: " << args << std::endl;

  ret = avfilter_graph_create_filter(&buffersrc_ctx, buffersrc, "in", args,
                                     NULL, filter_graph);
  if (ret < 0) {
    av_log(NULL, AV_LOG_ERROR, "Cannot create buffer source\n");
    goto end;
  }

  ret = avfilter_graph_create_filter(&buffersink_ctx, buffersink, "out", NULL,
                                     NULL, filter_graph);
  if (ret < 0) {
    av_log(NULL, AV_LOG_ERROR, "Cannot create buffer sink\n");
    goto end;
  }

  // 设置 buffersink 滤镜要输出的格式
  ret = av_opt_set_int_list(buffersink_ctx, "pix_fmts", pix_fmts,
                            AV_PIX_FMT_NONE, AV_OPT_SEARCH_CHILDREN);
  if (ret < 0) {
    av_log(NULL, AV_LOG_ERROR, "Cannot set output pixel format\n");
    goto end;
  }

  outputs->name = av_strdup("in");
  outputs->filter_ctx = buffersrc_ctx;
  outputs->pad_idx = 0;
  outputs->next = NULL;

  inputs->name = av_strdup("out");
  inputs->filter_ctx = buffersink_ctx;
  inputs->pad_idx = 0;
  inputs->next = NULL;

  // 用于根据给定的字符串描述解析并构建一个滤镜图(filter graph)。
  // inputs 指向输入滤镜链表的指针。
  // outputs 指向输出滤镜链表的指针。
  // 优势就是它简化了滤镜图的构建过程。通过传入一个描述滤镜图的字符串,你不需要手动去分配每个滤镜并手动连接它们。这意味着你可以通过字符串形式的描述快速构建复杂的滤镜图。
  if ((ret = avfilter_graph_parse_ptr(filter_graph, filters_descr, &inputs,
                                      &outputs, NULL)) < 0) {
    std::cout << "avfilter_graph_parse_ptr failed" << std::endl;
    goto end;
  }

  std::cout << "avfilter_graph_parse_ptr success" << std::endl;

  avfilter_graph_set_auto_convert(filter_graph, AVFILTER_AUTO_CONVERT_ALL);

  hwupload_ctx = avfilter_graph_get_filter(filter_graph, "Parsed_hwupload_0");
  if (hwupload_ctx) {
    std::cout << "filter name: " << hwupload_ctx->name
              << ", type: " << hwupload_ctx->filter->name << std::endl;
    hwupload_ctx->hw_device_ctx = hw_device_ctx;
  }

  // 打印滤镜图有多少个滤镜
  std::cout << "nb_filters: " << filter_graph->nb_filters << std::endl;

  // 打印滤镜图
  std::cout << avfilter_graph_dump(filter_graph, NULL) << std::endl;

  // 用于检查和配置滤镜图的有效性及其连接和格式的函数。它主要用于在滤镜图创建和连接之后,验证图的合法性并最终配置滤镜图中的所有滤镜之间的连接和格式设置。
  if ((ret = avfilter_graph_config(filter_graph, NULL)) < 0) {
    std::cout << "avfilter_graph_config failed" << std::endl;
    goto end;
  }

end:
  avfilter_inout_free(&inputs);
  avfilter_inout_free(&outputs);

  return ret;
}

static void encode(AVCodecContext *enc_ctx, AVFrame *camera_frame,
                   AVPacket *hevc_pkt, FILE *outfile) {
  int ret;

  /* send the frame to the encoder */
  if (camera_frame)
    printf("Send frame %3" PRId64 "\n", camera_frame->pts);

  ret = avcodec_send_frame(enc_ctx, camera_frame);
  if (ret < 0) {
    char err_str[1024];
    av_strerror(ret, err_str, sizeof(err_str));
    std::cout << "Error sending a frame for encoding: " << err_str << std::endl;
    exit(1);
  }

  while (ret >= 0) {
    ret = avcodec_receive_packet(enc_ctx, hevc_pkt);
    if (ret == AVERROR(EAGAIN) || ret == AVERROR_EOF)
      return;
    else if (ret < 0) {
      fprintf(stderr, "Error during encoding\n");
      exit(1);
    }

    printf("Write packet %3" PRId64 " (size=%5d)\n", hevc_pkt->pts,
           hevc_pkt->size);

    fwrite(hevc_pkt->data, 1, hevc_pkt->size, outfile);

    av_packet_unref(hevc_pkt);
  }
}

int main(int argc, char **argv) {
  int ret;
  AVPacket *packet;
  AVFrame *frame;
  AVFrame *filt_frame;
  AVPacket *hevc_pkt;

  if (argc != 3) {
    fprintf(stderr, "Usage: %s input_file output_file\n", argv[0]);
    exit(1);
  }

  if ((ret = open_input_file(argv[1])) < 0) {
    std::cout << "open_input_file failed" << std::endl;
    return -1;
  }

  int i = 0;

  encodec = avcodec_find_encoder_by_name(ENCODER_NAME);
  if (!encodec) {
    std::cout << "avcodec_find_encoder_by_name failed" << std::endl;
    return -1;
  }

  encodec_ctx = avcodec_alloc_context3(encodec);
  if (!encodec_ctx) {
    std::cout << "avcodec_alloc_context3 failed" << std::endl;
    return -1;
  }

  if (avcodec_parameters_to_context(encodec_ctx, video_stream->codecpar) < 0) {
    std::cout << "avcodec_parameters_to_context failed" << std::endl;
    return -1;
  }

  encodec_ctx->width = 640;
  encodec_ctx->height = 360;
  encodec_ctx->pix_fmt = AV_PIX_FMT_NV12;
  encodec_ctx->time_base = video_stream->time_base;
  encodec_ctx->framerate = video_stream->r_frame_rate;

  if (avcodec_open2(encodec_ctx, encodec, NULL) < 0) {
    std::cout << "avcodec_open2 failed" << std::endl;
    return -1;
  }

  FILE *output_file = fopen(argv[2], "wb");
  if (!output_file) {
    std::cout << "fopen failed" << std::endl;
    return -1;
  }

  frame = av_frame_alloc();
  filt_frame = av_frame_alloc();
  packet = av_packet_alloc();
  hevc_pkt = av_packet_alloc();
  if (!frame || !filt_frame || !packet || !hevc_pkt) {
    fprintf(stderr, "Could not allocate frame or packet\n");
    exit(1);
  }

  if ((ret = init_filters(filter_descr)) < 0) {
    std::cout << "init_filters failed" << std::endl;
    return -1;
  }

  // 读取视频帧,依次进行解码 -> 滤镜处理 -> 编码 -> 写入文件
  while (1) {
    if ((ret = av_read_frame(fmt_ctx, packet)) < 0)
      break;

    if (packet->stream_index == video_stream_index) {
      ret = avcodec_send_packet(decodec_ctx, packet);
      if (ret < 0) {
        av_log(NULL, AV_LOG_ERROR,
               "Error while sending a packet to the decoder\n");
        break;
      }

      while (ret >= 0) {
        ret = avcodec_receive_frame(decodec_ctx, frame);
        if (ret == AVERROR(EAGAIN) || ret == AVERROR_EOF) {
          break;
        } else if (ret < 0) {
          av_log(NULL, AV_LOG_ERROR,
                 "Error while receiving a frame from the decoder\n");
          return -1;
        }

        frame->pts = frame->best_effort_timestamp;

        std::cout << "frame->pts: " << frame->pts << std::endl;

        /* 将解码后的帧推入滤镜图 */
        if (av_buffersrc_write_frame(buffersrc_ctx, frame) < 0) {
          av_log(NULL, AV_LOG_ERROR, "Error while feeding the filtergraph\n");
          break;
        }

        /* 从过滤图中提取过滤后的帧 */
        while (1) {
          ret = av_buffersink_get_frame(buffersink_ctx, filt_frame);
          if (ret == AVERROR(EAGAIN) || ret == AVERROR_EOF) {
            break;
          }

          if (ret < 0)
            return -1;

          filt_frame->pts = filt_frame->best_effort_timestamp;
          encode(encodec_ctx, filt_frame, hevc_pkt, output_file);
          av_frame_unref(filt_frame);
        }
        av_frame_unref(frame);
      }
    }
    av_packet_unref(packet);
  }

  return 0;
}
将上面的代码放入 main.cpp 中,将 test.mp4 文件放入当前目录,在开发板中运行如下命令编译并运行:
g++ -o main main.cpp -lavformat -lavcodec -lavutil -lavfilter

./main test.mp4 output.hevc
确保你的 rk 开发板环境中有 ffmpeg-rockchip 库,如果没有的可以参考我上篇文章的编译教程:《瑞芯微 RK 系列 RK3588 使用 ffmpeg-rockchip 实现 MPP 硬件编解码和 RGA 图形加速-命令版》
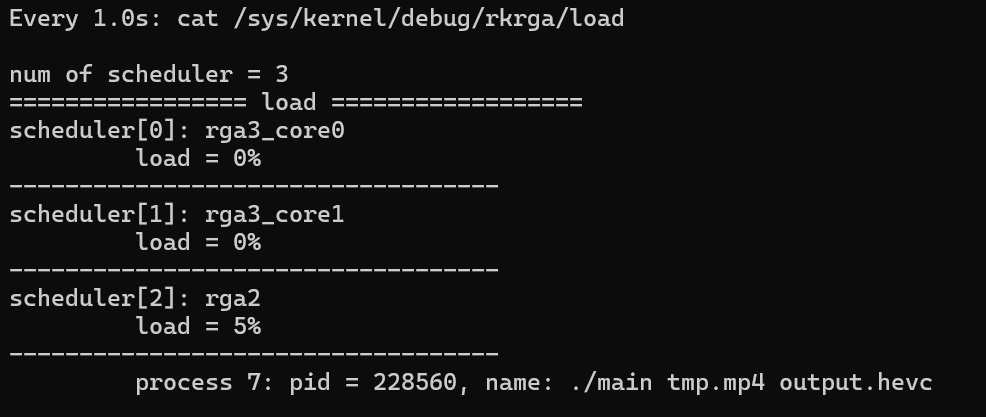
查看 RGA 的运行情况,如下说明成功使用了硬件编解码功能。如果不知道怎么查看 RGA 的运行情况,可以参考我这篇文章:《瑞芯微 RK 系列 RK3588 CPU、GPU、NPU、VPU、RGA、DDR 状态查看与操作》。
结语
本篇文章介绍了如何使用 ffmpeg-rockchip 使用 RGA 硬件编解码,学会使用 RGA 之后,我们就可以高效的对 2D 图形执行各种操作了。
如果觉得本文写得不错,请麻烦帮忙点赞、收藏、转发,你的支持是我继续写作的动力。我是 Leon_Chenl,我们下篇文章见~


