1、建立数据集
# 假数据
n_data = torch.ones(100, 2)         # 数据的基本形态
x0 = torch.normal(2*n_data, 1)      # 类型0 x data (tensor), shape=(100, 2)
y0 = torch.zeros(100)               # 类型0 y data (tensor), shape=(100, 1)
x1 = torch.normal(-2*n_data, 1)     # 类型1 x data (tensor), shape=(100, 2)
y1 = torch.ones(100)                # 类型1 y data (tensor), shape=(100, 1)

# 注意 x, y 数据的数据形式是一定要像下面一样 (torch.cat 是在合并数据)
x = torch.cat((x0, x1), 0).type(torch.FloatTensor)  # FloatTensor = 32-bit floating    Tensor[200,2]
y = torch.cat((y0, y1), ).type(torch.LongTensor)    # LongTensor = 64-bit integer      Tensor[200]

# plt.scatter(x.data.numpy()[:, 0], x.data.numpy()[:, 1], c=y.data.numpy())
# plt.show()
torch.cat(seq, dim=0, out=None) 在给定维度上对输入的张量序列 seq 进行连接操作。所有张量必须具有相同的形状(在cat维度中除外) 或为空。
torch.cat()可以看做是torch.split()和torch.chunk() 的逆操作.
Parameters:
seq (sequence of Tensors) – 可以是任何相同类型的 Tensor 的 Python 序列.
dim (int, optional) – tensors 级联的维数
out (Tensor, optional) – 输出参数
Example:
>>> x = torch.randn(2, 3)
>>> x

 0.5983 -0.0341  2.4918
 1.5981 -0.5265 -0.8735
[torch.FloatTensor of size 2x3]

>>> torch.cat((x, x, x), 0)

 0.5983 -0.0341  2.4918
 1.5981 -0.5265 -0.8735
 0.5983 -0.0341  2.4918
 1.5981 -0.5265 -0.8735
 0.5983 -0.0341  2.4918
 1.5981 -0.5265 -0.8735
[torch.FloatTensor of size 6x3]

>>> torch.cat((x, x, x), 1)

 0.5983 -0.0341  2.4918  0.5983 -0.0341  2.4918  0.5983 -0.0341  2.4918
 1.5981 -0.5265 -0.8735  1.5981 -0.5265 -0.8735  1.5981 -0.5265 -0.8735
[torch.FloatTensor of size 2x9]
2、建立神经网络
class Net(torch.nn.Module):     # 继承 torch 的 Module
    def __init__(self, n_feature, n_hidden, n_output):
        super(Net, self).__init__()     # 继承 __init__ 功能
        self.hidden = torch.nn.Linear(n_feature, n_hidden)   # 隐藏层线性输出
        self.out = torch.nn.Linear(n_hidden, n_output)       # 输出层线性输出

    def forward(self, x):
        # 正向传播输入值, 神经网络分析出输出值
        x = F.relu(self.hidden(x))      # 激励函数(隐藏层的线性值)
        x = self.out(x)                 # 输出值, 但是这个不是预测值, 预测值还需要再另外计算
        return x

net = Net(n_feature=2, n_hidden=10, n_output=2) # 几个类别就几个 output

print(net)  # net 的结构
"""
Net (
  (hidden): Linear (2 -> 10)
  (out): Linear (10 -> 2)
)
"""
Net(
(hidden): Linear(in_features=2, out_features=10, bias=True)
(out): Linear(in_features=10, out_features=2, bias=True)
)
3、训练网络
# optimizer 是训练的工具
optimizer = torch.optim.SGD(net.parameters(), lr=0.02)  # 传入 net 的所有参数, 学习率
# 算误差的时候, 注意真实值!不是! one-hot 形式的, 而是1D Tensor, (batch,)
# 但是预测值是2D tensor (batch, n_classes)
loss_func = torch.nn.CrossEntropyLoss()

plt.ion()   # 画图
plt.show()

for t in range(100):
    out = net(x)     # 喂给 net 训练数据 x, 输出分析值

    loss = loss_func(out, y)     # 计算两者的误差

    optimizer.zero_grad()   # 清空上一步的残余更新参数值
    loss.backward()         # 误差反向传播, 计算参数更新值
    optimizer.step()        # 将参数更新值施加到 net 的 parameters 上
     if t % 2 == 0:
        plt.cla()

        prediction = torch.max(out, 1)[1]
        pred_y = prediction.data.numpy().squeeze()
        target_y = y.data.numpy()
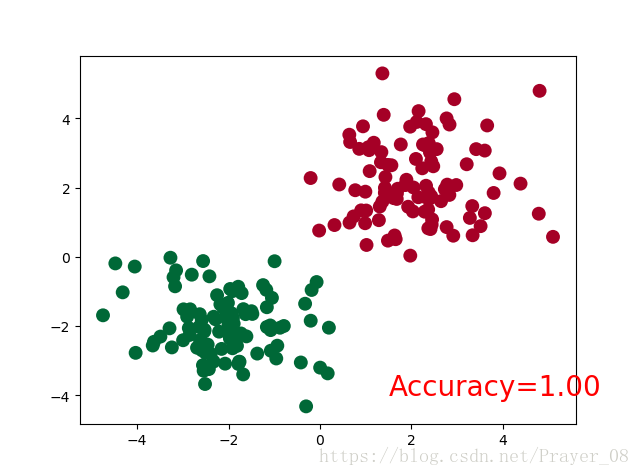
        plt.scatter(x.data.numpy()[:, 0], x.data.numpy()[:, 1], c=pred_y, s=100, lw=0, cmap='RdYlGn')
        accuracy = sum(pred_y == target_y)/200.  # 预测中有多少和真实值一样
        plt.text(1.5, -4, 'Accuracy=%.2f' % accuracy, fontdict={'size': 20, 'color':  'red'})
        plt.pause(0.1)

plt.ioff()  # 停止画图
plt.show()
plt.scatter(x, y, s=None, c=None, marker=None, cmap=None, norm=None, vmin=None, vmax=None, alpha=None, linewidths=None, verts=None, edgecolors=None, hold=None, data=None, **kwargs)Parameters:
x,y: 形如shape(n,)的数组,即数据位置
s:标量或形如shape(n,)的数组,可选择,即size
c:色彩,序列或颜色序列,默认为’b’
marker: MarkerStyle,默认为’o’
cmap:Colormap,可选择,默认为:None。仅当c是浮点数组时才使用cmap
norm: Normalize,可选择,默认为:None。数据亮度0~1
vmin,vmax:标量,可选择,默认为:None。亮度设置
alpha:标量,可选择,默认为:None。透明度,介于0(透明)~1(不透明)
linewidths:标量或数组,默认为:None。标记边缘的线宽。
verts:(x,y)的序列
edgecolors:颜色或颜色序列,可选择,默认为:'face'。标记的边缘颜色,取值:'face'、'none'、matplotib颜色
2018.08.26 整理于莫烦Python教程
https://morvanzhou.github.io/tutorials/machine-learning/torch/3-02-classification/

