第一章:链接
7. 消息转换器
作用: ①浏览器发送请求后页面的局部更新,而不是跳转页面;②浏览器和服务器互发消息,消息格式的转换,主要是json格式和java对象直接的转换。
- 自己理解的概念:
消息: ①浏览器给服务器发送的请求,包含请求行、请求头、请求体;②服务器给浏览器的响应,包含响应的状态行、响应头、响应体
转换器: 将浏览器发送到服务端的信息转换成需要的格式;将服务器返回给浏览器的消息转成需要的格式。
解决的问题:
- 请求体是json格式的字符串,服务器接收并转换为对象形式
- 响应体返回的数据是java对象,转成json格式发送
- 浏览器使用Ajax发送请求,使页面局部刷新
添加依赖:
<!--Jackson库,字符串和java对象互相转化-->
    <dependency>
      <groupId>com.fasterxml.jackson.core</groupId>
      <artifactId>jackson-databind</artifactId>
      <version>2.18.1</version>
    </dependency>
1. 使用response原生的方法返回字符串
- 方法不再是跳转页面了,使用ajax在当前页面显示返回的字符串
  @RequestMapping(value = "/user/1")
  public void user1(HttpServletResponse response) throws IOException {
    UserBean userBean = new UserBean("张三","123456","[email protected]");
    // 将对象转换为json字符串
    ObjectMapper objectMapper = new ObjectMapper();
    String jsonString = objectMapper.writeValueAsString(userBean);
    // 原生的方法返回字符串
    response.getWriter().print(jsonString);
  }
<body>
<button id="button1">使用response原生方法返回字符串</button>
<div id="show1"></div>
</body>
<script>
document.getElementById("button1").onclick = function () {
    alert("button被点击了")
    let xmlHttpRequest = new XMLHttpRequest();
    xmlHttpRequest.onreadystatechange = function () {
        if (xmlHttpRequest.readyState == 4 && xmlHttpRequest.status == 200){
            var text = xmlHttpRequest.responseText;//服务器返回的字符串
            document.getElementById("show1").innerText = text;
        }
    }
    // [[@{/}]]:thymeleaf语法,动态返回根目录
    xmlHttpRequest.open("GET",[[@{/}]] + "user/1",true);
    xmlHttpRequest.send();
}
</script>
2. @ResponseBody
作用: controller中的方法返回字符串或者json格式的字符串
- 添加jackson-databind依赖后,java对象和json格式自动转换
  @RequestMapping(value = "/user/2")
  @ResponseBody
  public UserBean user2() {
    UserBean userBean = new UserBean("张三","123456","[email protected]");
    // 直接返回java对象,依赖Jackson会自动将java对象转为json格式字符串
    return userBean ;	// 返回的是json格式的字符串,不是模板的文件名
  }
- 使用@ResponseBody注解,返回的汉字有乱码问题,解决方案:
  <mvc:annotation-driven />
  <!-- 这个问题是上面这个配置引起的,导致返回数据时编码格式为8895 -->


  <!-- 修改配置后,编码恢复 UTF-8-->
  <mvc:annotation-driven>
    <mvc:message-converters>
      <bean class="org.springframework.http.converter.StringHttpMessageConverter">
        <constructor-arg value="UTF-8" />
      </bean>
    </mvc:message-converters>
  </mvc:annotation-driven>
3. @RestController
@RestController 是 @Controller 和 @ResponseBody 的合体,用在类上面
4. @RequestBody
作用: ①浏览器发送的请求体是json格式字符串转成java对象;②浏览器发送的请求体是字符串,接收还是以字符串的格式接收
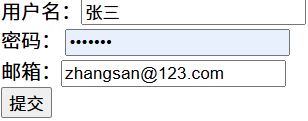
- html页面发送表单
<form th:action="@{/user/3}" method="post">
    用户名:<input type="text" name="name"/><br>
    密码:  <input type="password" name="password"/><br>
    邮箱:<input type="email" name="email"/><br>

    <input type="submit" value="提交"></input>
</form>
- 不使用
@RequestBody注解,表单提交post请求,转成对象- 自动封装为UserBean对象
  @PostMapping (value = "/user/3")
  public String user3( UserBean userBean) {
    // 请求体:UserBean{name='张三', password='123456', email='[email protected]'}
    System.out.println("请求体:" + userBean);
    return "ok";  // 跳转到ok页面
  }
- 使用
@RequestBody注解,提交post表单,请求体是字符串,接收到还是字符串- 这里的汉字转成url编码格式,暂时不知道怎么解决
  @PostMapping (value = "/user/3")
  public String user3(@RequestBody String body) {
    // 请求体:username=%E5%BC%A0%E4%B8%89&password=1111&email=zhangsan%40123.com
    System.out.println("请求体:" + body);
    return "ok";  // 跳转到ok页面
  }
- 使用
@RequestBody注解,ajax发送json格式字符串转成对象
let jsonObj = {
    "name":"张三",
    "password":"123456",
    "email":"[email protected]"
}
let jsonData = JSON.stringify(jsonObj);
// 创建XMLHttpRequest对象
let xhr = new XMLHttpRequest();
xhr.open('POST', [[@{/}]] + "user/4", true);
// 设置请求头,表明发送的数据是JSON格式
xhr.setRequestHeader('Content-Type', 'application/json');
xhr.send(jsonData);
  @PostMapping (value = "/user/4")
  @ResponseBody
  public String user4(@RequestBody UserBean userBean) {
    // 请求体:UserBean{name='张三', password='123456', email='[email protected]'}
    System.out.println("请求体:" + userBean);
    return "ok";  // 返回ok字符串
  }
5. RequestEntity:类
- RequestEntity:整个请求,从中可以获得请求中的一切,如果请求体是json,通过泛型可转为对象
- 发送get请求
<a th:href="@{/user/5(username='张三',password=123456)}">RequestEntity</a>
  @GetMapping (value = "/user/5")
  public void user4(RequestEntity requestEntity) {
    System.out.println(requestEntity.getMethod());  // GET
    System.out.println(requestEntity.getUrl()); // http://localhost:8080/spring/user/5?username=%E5%BC%A0%E4%B8%89&password=123456
  }
  System.out.println(requestEntity.getBody());	// null
- 通过Ajax,发送post请求,数据是json字符串,可使用RequestEntity的泛型接收该数据
- 添加jackson-databind依赖后,java对象和json格式自动转换
  @PostMapping (value = "/user/6")
  @ResponseBody
  public String user6(RequestEntity<UserBean> requestEntity) {
    System.out.println(requestEntity.getMethod());  // POST
    System.out.println(requestEntity.getUrl()); // http://localhost:8080/spring/user/6
    System.out.println(requestEntity.getBody()); // UserBean{name='张三', password='123456', email='[email protected]'}
    return "ok";
  }
6. ResponseEntity:类
- 用该类的实例可以封装响应协议,包括:状态行、响应头、响应体。也就是说:如果你想定制属于自己的响应协议,可以使用该类。
  @GetMapping("/users/{id}")
  public ResponseEntity<UserBean> getUserById(@PathVariable(name="id") int id) {
    UserBean userBean;
    if (id == 1){
      userBean = null;
    }else{
       userBean = new UserBean("张三","123456","[email protected]");
    }

    if (userBean == null) {
//      HttpStatus:枚举类型。这里的NOT_FOUND是404
      return ResponseEntity.status(HttpStatus.NOT_FOUND).body(null);
    } else {
    // 返回对象的json格式
      return ResponseEntity.ok(userBean);
    }
  }
8. 上传和下载
1. 上传
MultipartFile 是 Spring 框架中的一个接口,主要用于处理文件上传的功能。以下是关于 MultipartFile 的一些关键点:
- 用途:用于接收客户端上传的文件数据。
- 方法:
- String getOriginalFilename():获取文件的原始名称。
- String getContentType():获取文件的 MIME 类型。
- InputStream getInputStream():获取文件的输入流。
- void transferTo(File dest):将上传的文件保存到指定的目标文件。
- byte[] getBytes():将文件内容读取为字节数组。
- form表单上传文件
<!--文件上传表单-->
<form th:action="@{/file/upLoad1}" method="post" enctype="multipart/form-data">
    文件:<input type="file" name="fileName"/><br>
    <input type="submit" value="上传">
</form>
- transferTo的方法上传
  @PostMapping("/upLoad1")
  public String up1(@RequestParam( "fileName") MultipartFile multipartFile) throws IOException {
    if (multipartFile.isEmpty()) {
      return "error";
    }
    try {
      // 获取文件的原始名称
      String originalFilename = multipartFile.getOriginalFilename();
      // 将文件保存到指定路径
      multipartFile.transferTo(new File("/upload" + originalFilename));
      return "ok";
    } catch (IOException e) {
      e.printStackTrace();
      return "error";
    }
  }
- 数据流的方式上传文件(适合大文件,推荐方式)
  @PostMapping("/upLoad2")
  public String up2(@RequestParam( "fileName") MultipartFile multipartFile,
                   HttpServletRequest request) throws IOException {
    String name = multipartFile.getName();
    System.out.println(name);
    // 获取文件名
    String originalFilename = multipartFile.getOriginalFilename();
    System.out.println(originalFilename);
    // 将文件存储到服务器中
    // 获取输入流
    InputStream in = multipartFile.getInputStream();
    // 获取上传之后的存放目录
    File file = new File(request.getServletContext().getRealPath("/upload"));
    // 如果服务器目录不存在则新建
    if(!file.exists()){
      file.mkdirs();
    }
    // 开始写
    //BufferedOutputStream out = new BufferedOutputStream(new FileOutputStream(file.getAbsolutePath() + "/" + originalFilename));
    // 可以采用UUID来生成文件名,防止服务器上传文件时产生覆盖
    BufferedOutputStream out = new BufferedOutputStream(new FileOutputStream(file.getAbsolutePath() + "/" + UUID.randomUUID().toString() + originalFilename.substring(originalFilename.lastIndexOf("."))));
    byte[] bytes = new byte[1024 * 100];
    int readCount = 0;
    while((readCount = in.read(bytes)) != -1){
      out.write(bytes,0,readCount);
    }
    // 刷新缓冲流
    out.flush();
    // 关闭流
    in.close();
    out.close();

    return "ok";
  }
2. 下载
<h1>文件下载</h1>
<a th:href="@{/file/download1}">文件下载,第一种方式</a><br>
<a th:href="@{/file/download2}">文件下载,第二种方式</a><br>
- 第一种方式使用Resource ,大文件分段读取
@RequestMapping("/download1")
  public ResponseEntity<Resource> download1(HttpServletRequest request) {
    // 文件路径
    String filePath = request.getServletContext().getRealPath("/upload") + "/1.jpg"; // 替换为实际文件路径
    File file = new File(filePath);

    // 创建资源对象
    Resource resource = new FileSystemResource(file);

    // 设置响应头
    HttpHeaders headers = new HttpHeaders();
    headers.add(HttpHeaders.CONTENT_DISPOSITION, "attachment; filename=" + file.getName());

    // 返回 ResponseEntity
    return ResponseEntity.ok()	// 创建一个 ResponseEntity 对象,状态码为 200(OK)。
      .headers(headers)	// 设置响应头。
      .contentLength(file.length())	// 设置响应内容长度。
      .contentType(MediaType.APPLICATION_OCTET_STREAM)	// 设置响应内容类型为二进制流。
      .body(resource);	// 设置响应体为文件资源
  }
- 使用byte[],文件会一次性读取到内存,不适合大文件
  @RequestMapping("/download2")
  public ResponseEntity<byte[]> download2(HttpServletRequest request,
                                          HttpServletResponse response) throws IOException {
    File file = new File(request.getServletContext().getRealPath("/upload") + "/1.jpg");
    // 创建响应头对象
    HttpHeaders headers = new HttpHeaders();
    // 设置响应内容类型
    headers.setContentType(MediaType.APPLICATION_OCTET_STREAM);
    // 设置下载文件的名称
    headers.setContentDispositionFormData("attachment", file.getName());

    // 下载文件
    ResponseEntity<byte[]> entity = new ResponseEntity<byte[]>(Files.readAllBytes(file.toPath()), headers, HttpStatus.OK);
    return entity;
  }
9. 异常处理器
10. 拦截器
- 实现
HandlerInterceptor接口中的三个方法:
public class Interceptor1 implements HandlerInterceptor {

  @Override
  public boolean preHandle(HttpServletRequest request, HttpServletResponse response, Object handler) throws Exception {
    System.out.println("1号拦截器:controller方法执行之前");
     // 返回true则会继续执行,返回false则会中断执行,不会执行controller中的方法
    return true;
  }

  @Override
  public void postHandle(HttpServletRequest request, HttpServletResponse response, Object handler, ModelAndView modelAndView) throws Exception {
    System.out.println("1号拦截器:controller方法执行之后");
  }

  @Override
  public void afterCompletion(HttpServletRequest request, HttpServletResponse response, Object handler, Exception ex) throws Exception {
    System.out.println("1号拦截器:controller方法执行完成,并且渲染完成之后");
  }
}
- 在springmvc的配置文件中配置拦截器
<!--  配置拦截器,可配置多个拦截器,每个拦截器的路径可单独设置 -->
  <mvc:interceptors>
<!--    拦截器的执行顺序就时按照配置的顺序执行 -->
    <mvc:interceptor>
       <!--  拦截路径 -->
      <mvc:mapping path="/"/>
      <!--除 /test 路径之外-->
      <mvc:exclude-mapping path="/test"/>
      <bean class="org.example.springmvc.Interceptors.Interceptor1"/>
    </mvc:interceptor>
    <mvc:interceptor>
      <mvc:mapping path="/"/>
      <!-- 第二种引入方式:使用ref引入需要两个条件
        ①需要拦截器纳入spring管理,在类上加 @Component注解
        ②包扫描范围中
      -->
      <ref bean="interceptor2"/>
    </mvc:interceptor>
    <mvc:interceptor>
      <mvc:mapping path="/"/>
      <bean class="org.example.springmvc.Interceptors.Interceptor3"/>
    </mvc:interceptor>
  </mvc:interceptors>
- 执行结果
1号拦截器:controller方法执行之前
2号拦截器:controller方法执行之前
3号拦截器:controller方法执行之前
3号拦截器:controller方法执行之后
2号拦截器:controller方法执行之后
1号拦截器:controller方法执行之后
3号拦截器:controller方法执行完成,并且渲染完成之后
2号拦截器:controller方法执行完成,并且渲染完成之后
1号拦截器:controller方法执行完成,并且渲染完成之后
- 假设3号拦截器的
preHandle方法返回false
1号拦截器:controller方法执行之前
2号拦截器:controller方法执行之前
3号拦截器:controller方法执行之前
2号拦截器:controller方法执行完成,并且渲染完成之后
1号拦截器:controller方法执行完成,并且渲染完成之后
