发表日期:2023年6月23日
项目地址:https://github.com/cvg/LightGlue + https://github.com/cvg/glue-factory/
LightGlue是一个在精度上媲美Superglue,但在速度上比Superglue快一倍的模型。通过博主实测,LightGlue的配准效果比Superglue好,LightGlue配准后的结果错误点更少,同时提取的重叠区域更精准。
基于Superpoint+Superglue 提取重叠区域的代码可以参考 https://blog.csdn.net/a486259/article/details/129093084
1、lightglue与superglue的对比
lightglue与superglue相比在同样的精度下,速度要快3倍。
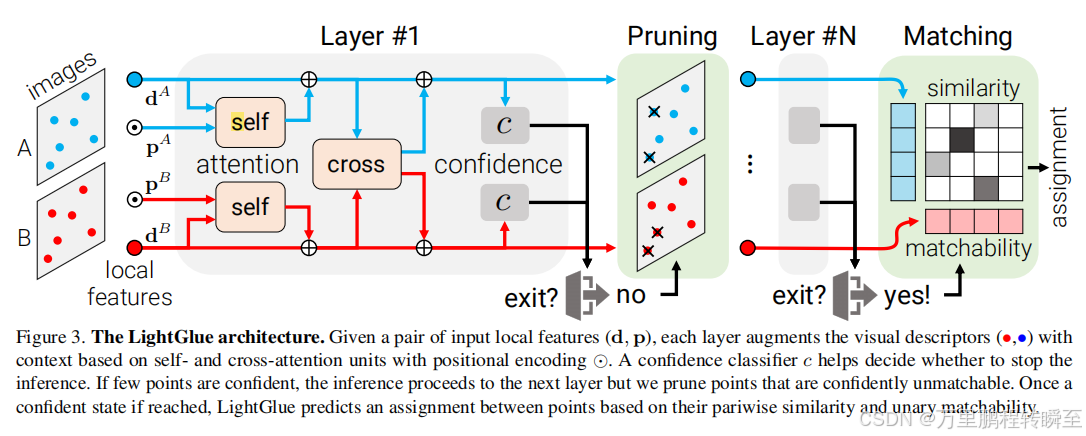
lightglue的结构设计如下,是通过组层移除低匹配度点的策略进行预测
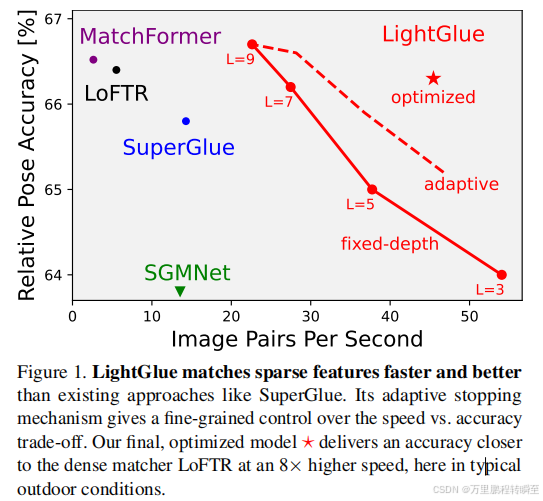
在多个任务中对比,可以发现lightglue比superglue略胜一筹,占微弱优势
但在速度上,明显可以看到Lightglue明显比superglue快不少,能减少50%的耗时。


2、lightglue使用效果
下载LightGlue项目
或者执行
git clone https://github.com/cvg/LightGlue.git && cd LightGlue
python -m pip install -e .
执行以下代码进行配准尝试
# If we are on colab: this clones the repo and installs the dependencies
from pathlib import Path
# if "LightGlue" not in Path.cwd().name :
# !git clone --quiet https://github.com/cvg/LightGlue/
# %cd LightGlue
# !pip install --progress-bar off --quiet -e .
from lightglue import LightGlue, SuperPoint, DISK
from lightglue.utils import load_image, rbd
from lightglue import viz2d
import torch
torch.set_grad_enabled(False)
images = Path("../assets")
device = torch.device("cuda" if torch.cuda.is_available() else "cpu") # 'mps', 'cpu'
#官方默认是2048个点
extractor = SuperPoint(max_num_keypoints=700).eval().to(device) # load the extractor
matcher = LightGlue(features="superpoint").eval().to(device)
image0 = load_image(images / "b1.png")
image1 = load_image(images / "b2.png")
feats0 = extractor.extract(image0.to(device))
feats1 = extractor.extract(image1.to(device))
matches01 = matcher({"image0": feats0, "image1": feats1})
feats0, feats1, matches01 = [
rbd(x) for x in [feats0, feats1, matches01]
] # remove batch dimension
kpts0, kpts1, matches = feats0["keypoints"], feats1["keypoints"], matches01["matches"]
m_kpts0, m_kpts1 = kpts0[matches[..., 0]], kpts1[matches[..., 1]]
axes = viz2d.plot_images([image0, image1])
viz2d.plot_matches(m_kpts0, m_kpts1, color="lime", lw=0.2)
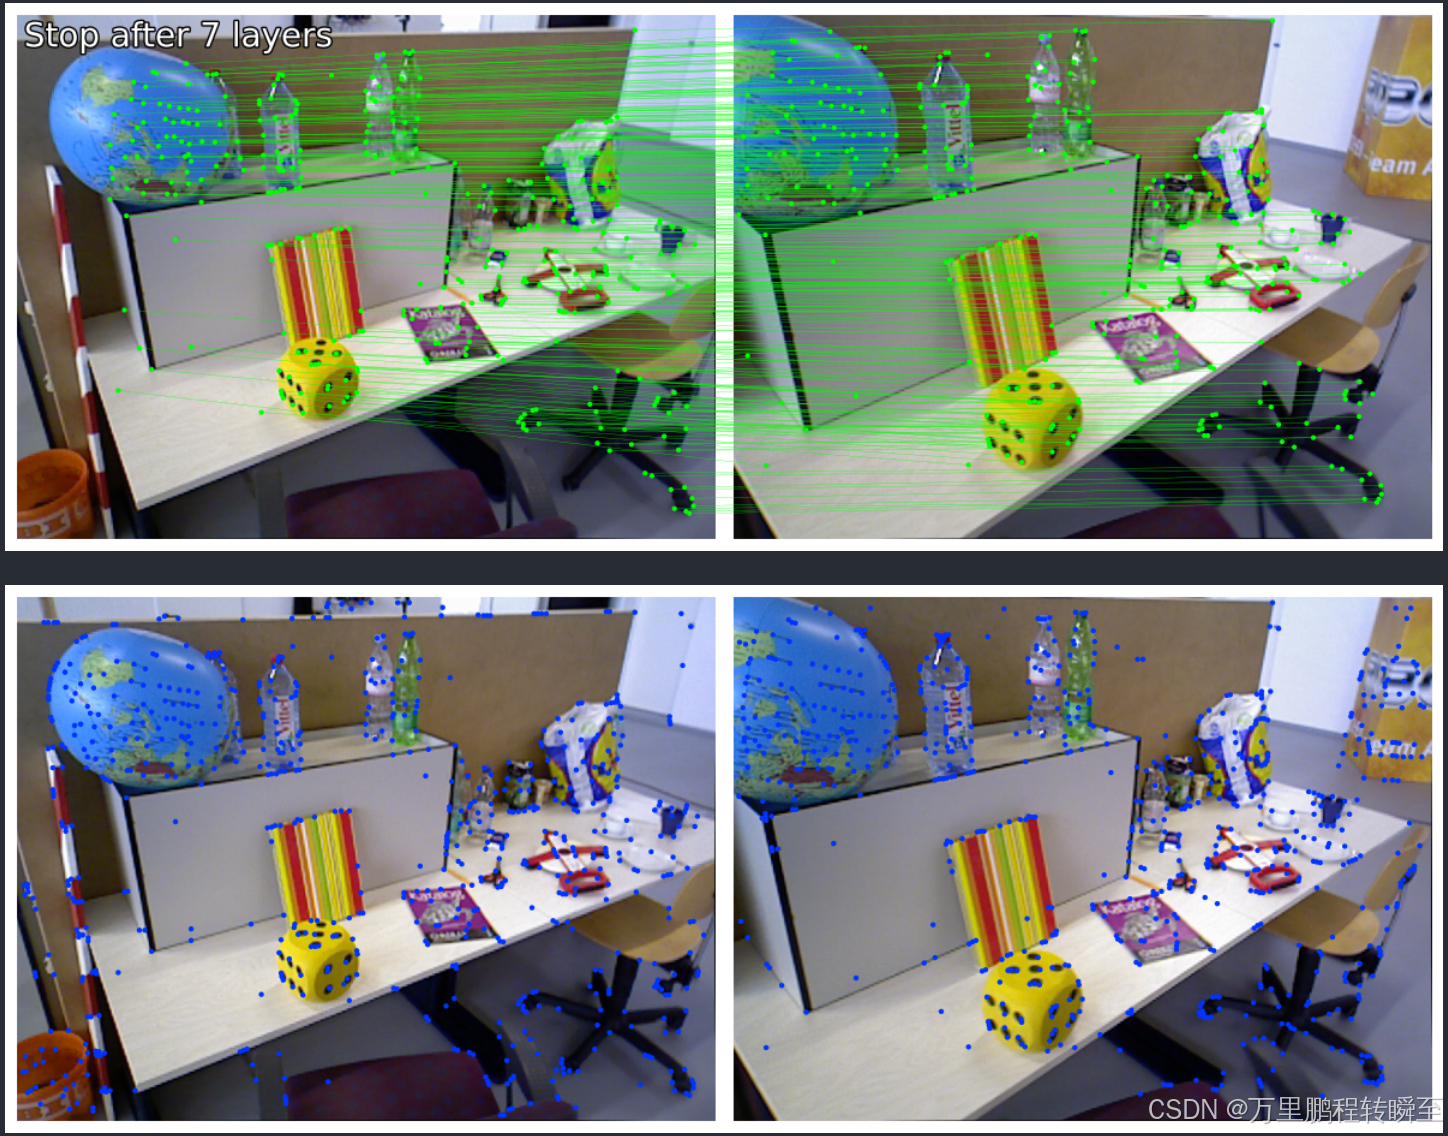
viz2d.add_text(0, f'Stop after {matches01["stop"]} layers', fs=20)
kpc0, kpc1 = viz2d.cm_prune(matches01["prune0"]), viz2d.cm_prune(matches01["prune1"])
viz2d.plot_images([image0, image1])
viz2d.plot_keypoints([kpts0, kpts1], colors=[kpc0, kpc1], ps=10)
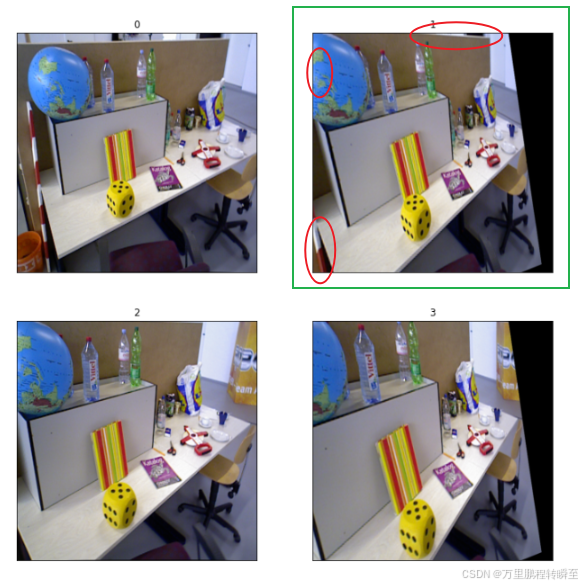
执行效果如下所示,比superglue要好很多,基本上看不到错误匹配的点。superglue配准具体细节可以查看链接
superglue的配置效果如下所示,存在不少错误的点。

3、提取重叠区域
在步骤二的结果中,基于以下代码可以实现重叠区域的提取
import cv2
import numpy as np
from imgutils import myimshowsCL,tensor2img
def getGoodMatchPoint(mkpts0, mkpts1, confidence, match_threshold:float=0.003):
n = min(mkpts0.size(0), mkpts1.size(0))
srcImage1_matchedKPs, srcImage2_matchedKPs=[],[]
if (match_threshold > 1 or match_threshold < 0):
print("match_threshold error!")
for i in range(n):
kp0 = mkpts0[i]
kp1 = mkpts1[i]
pt0=(kp0[0].item(),kp0[1].item());
pt1=(kp1[0].item(),kp1[1].item());
c = confidence[i].item();
if (c > match_threshold):
srcImage1_matchedKPs.append(pt0);
srcImage2_matchedKPs.append(pt1);
return np.array(srcImage1_matchedKPs),np.array(srcImage2_matchedKPs)
mkpts0, mkpts1 = m_kpts0, m_kpts1
confidence=matches01['scores']
im_dst,im_res=tensor2img(image0), tensor2img(image1)
pts_src, pts_dst=getGoodMatchPoint(mkpts0, mkpts1, confidence)
h1, status = cv2.findHomography(pts_src, pts_dst, cv2.RANSAC, 1)
im_out1 = cv2.warpPerspective(im_dst, h1, (im_dst.shape[1],im_dst.shape[0]))
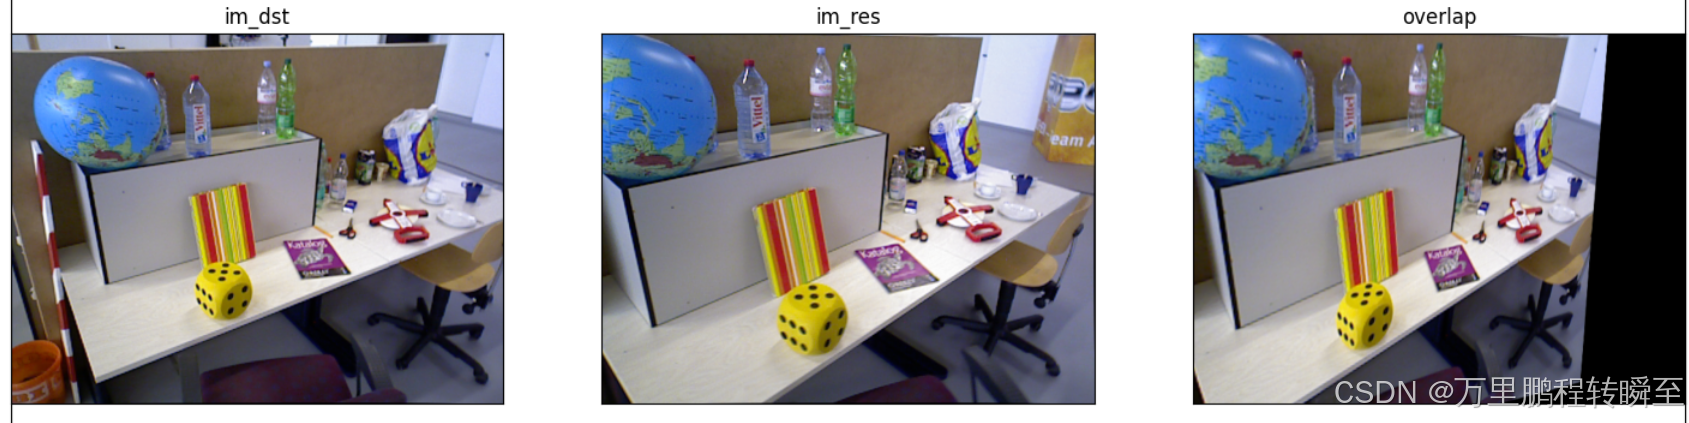
myimshowsCL([im_dst,im_res,im_out1],titles=["im_dst","im_res","overlap"],rows=1,cols=3, size=6)
其中myimshowsCL,tensor2img等函数代码来自于 https://hpg123.blog.csdn.net/article/details/129093084
提取的重叠区域如下所示
基于superglue配准后提取的重叠区域如图1所示,可以看到有3处不如LightGlue(关于地球仪上的误差,可能不算;但另两处特别明显)