微信小程序实战-第4章 邀请函项目
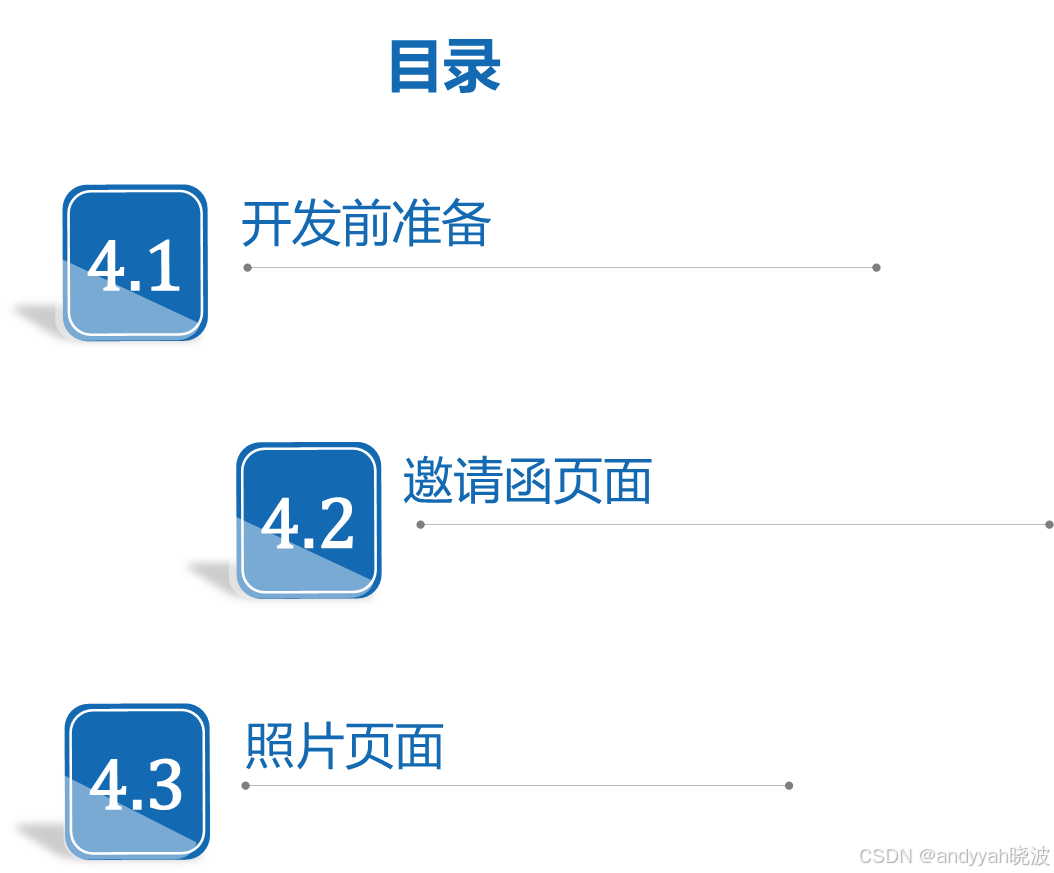
4.1 开发前准备
4.1.1项目展示
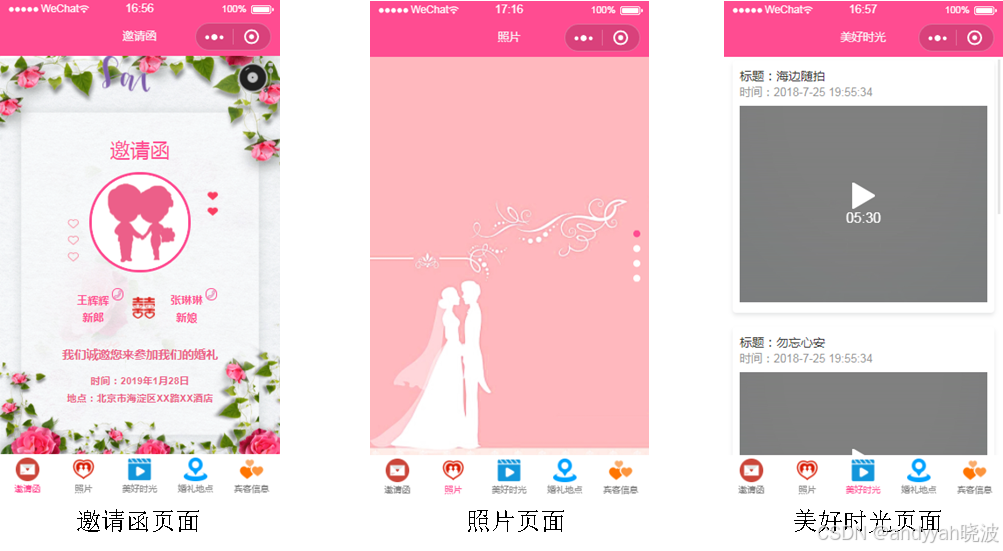
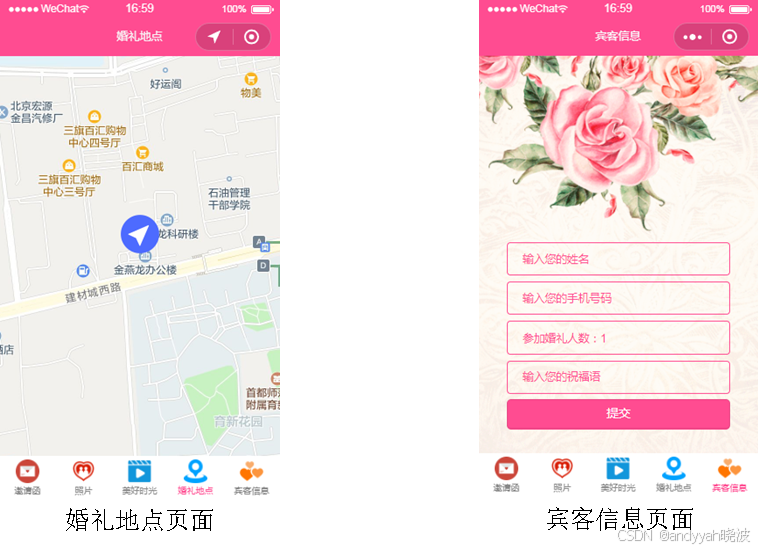
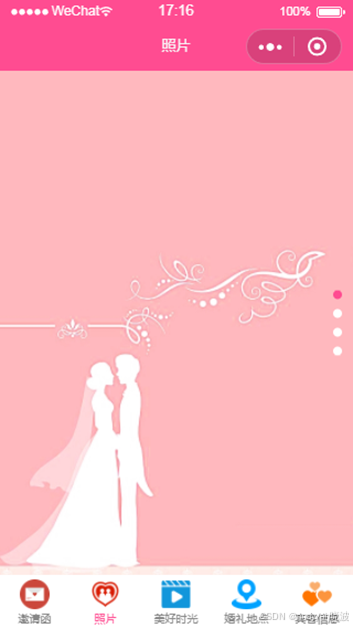
婚礼邀请函小程序由5个页面组成,分别是邀请函页面、照片页面、美好时光页面、婚礼地点页面、宾客信息页面。效果展示图如下:
下面针对5个页面的功能作简要介绍:
- 邀请函页面:新郎和新娘的电话、婚礼地点、婚礼时间。
- 照片页面:新郎和新娘的幸福照。
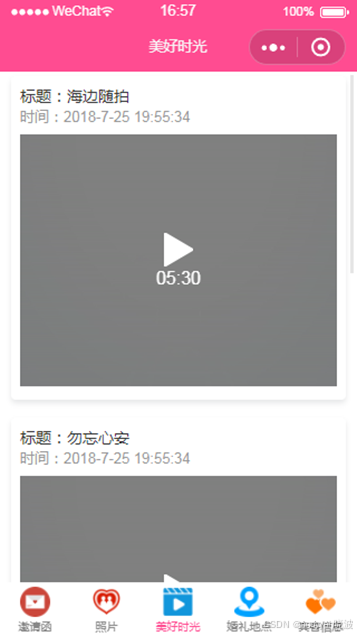
- 美好时光页面:采用视频的方式记录一对新人的相爱历程。
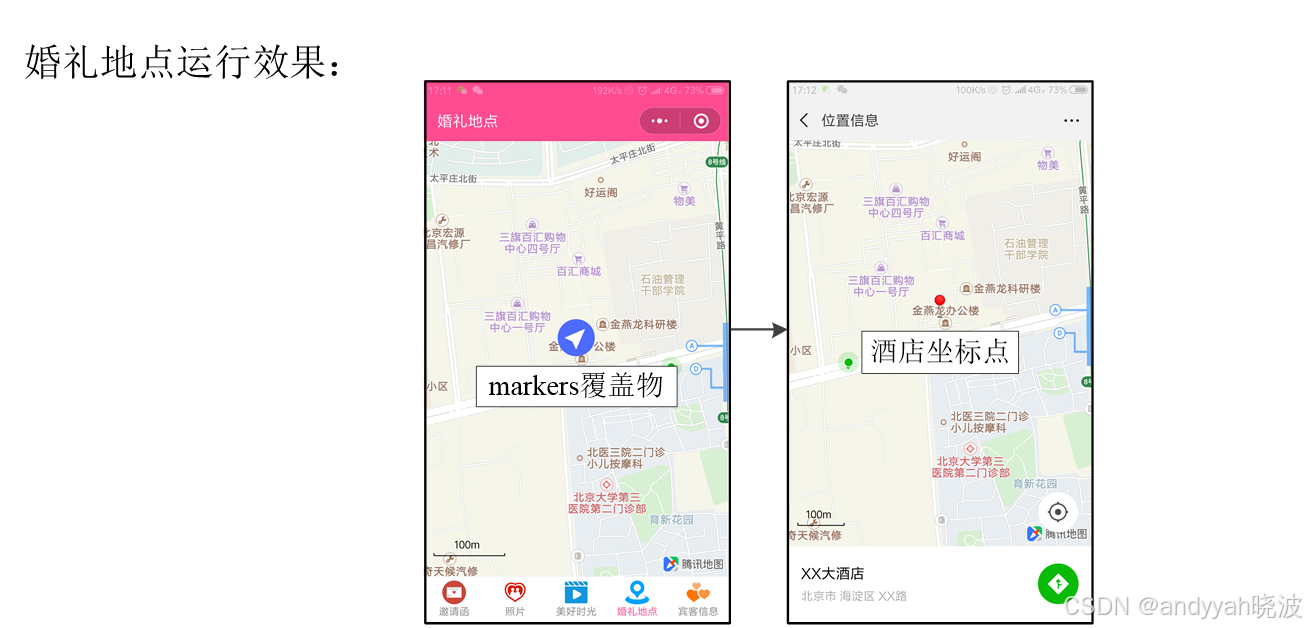
- 地图页面:通过导航查看婚礼地点的路线图。
- 宾客信息页面:参加婚礼的宾客填写个人信息,送一些祝福语等。
4.1.2项目分析
4.1.3项目初始化
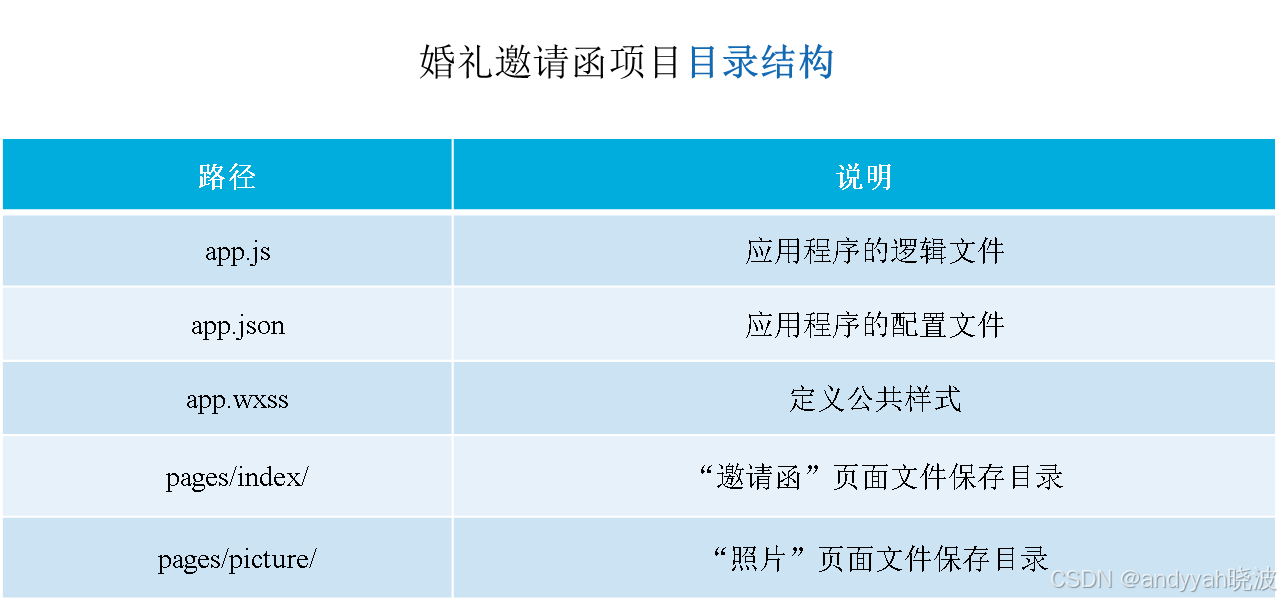
在微信开发者工具中创建一个空白项目。创建成功后,新建app.json文件,在该文件中定义本项目中的页面路径,代码如下:
 {"pages": [
    “pages/index/index”,   // 邀请函页面
        …
    “pages/guest/guest“   // 宾客信息页面
  ]}
在app.json文件中定义项目导航栏样式,代码如下:
"window": {
    "backgroundTextStyle": "light",
    "navigationBarBackgroundColor": "#ff4c91",
    "navigationBarTextStyle": "white",
    "enablePullDownRefresh": false
  }
在app.json文件中定义项目底部标签栏,代码示例如下:
"tabBar": {
"list": [
    {
      "pagePath": "pages/index/index",
      "iconPath": "images/invite.png",
      "selectedIconPath": "images/invite.png",
      "text": "邀请函"
    }…]
}
4.2 邀请函页面
4.2.1任务分析
邀请函页面的任务需求如下:
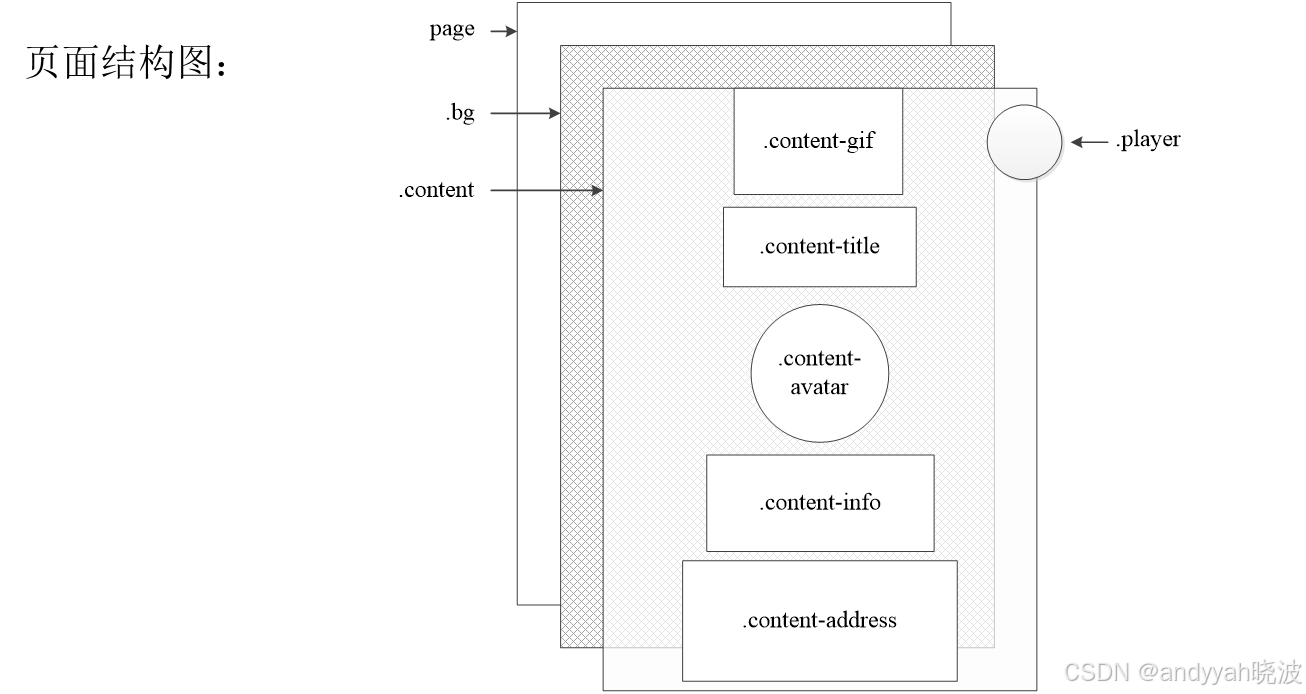
- 背景音乐播放:页面的右上角有一个背景音乐播放按钮,用于控制音乐播放状态,单击按钮播放音乐,再次单击按钮暂停音乐。
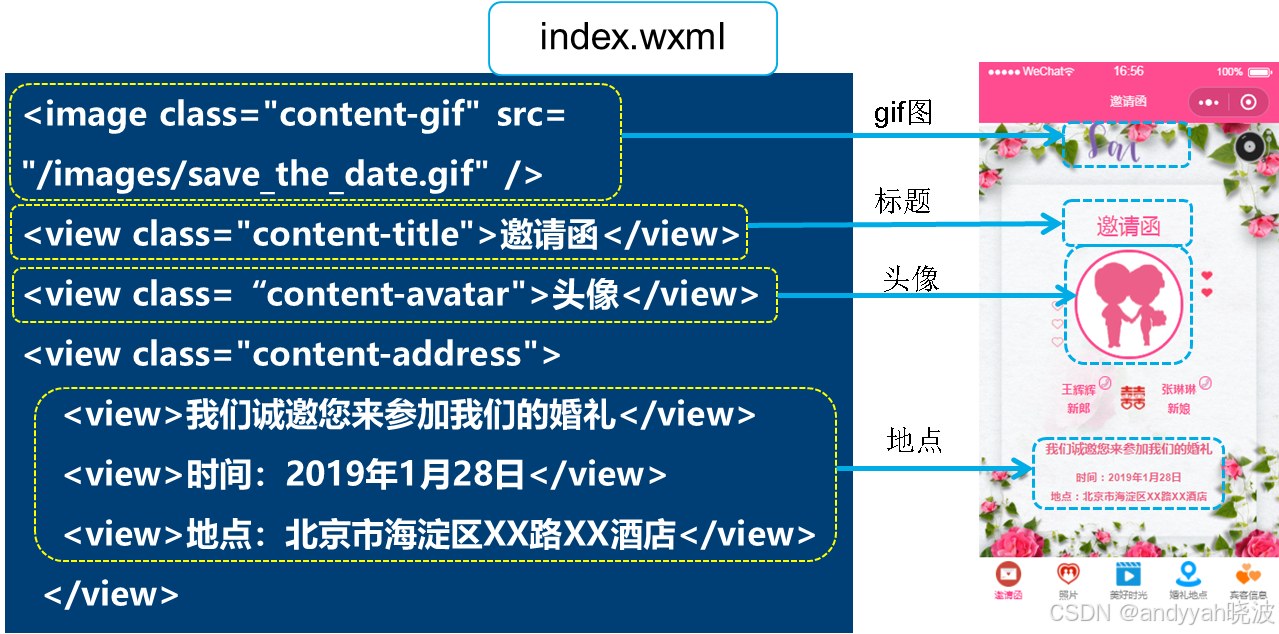
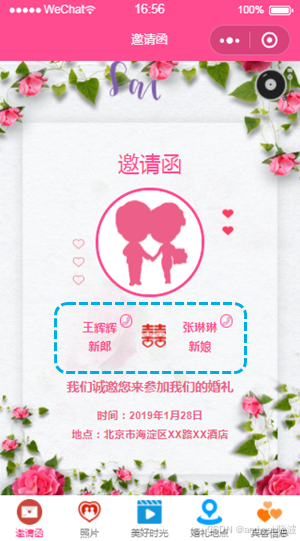
- 新人信息:页面中展示新娘和新郎的头像、姓名信息。
- 婚礼信息:页面展示婚礼时间及地点。
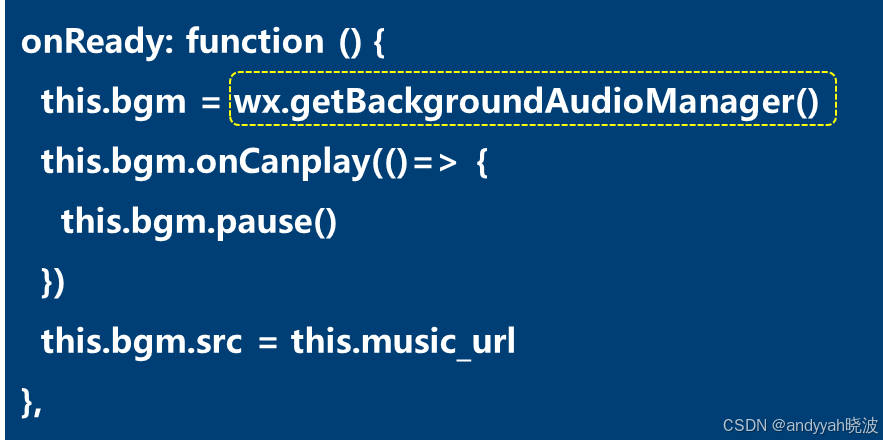
4.2.2背景音乐播放
index.wxml
 <view class="player player-{{isPlayingMusic ? 'play' : 'pause'}}"
bindtap="play">
  <image src="/images/music_icon.png" />
  <image src="/images/music_play.png"/>
</view>
index.js
index.js
play: function (e) {
  if (this.data.isPlayingMusic) {
    this.bgm.pause()
  } else { this.bgm.play() }
  this.setData({
isPlayingMusic:!this.data.isPlayingMusic })
},
4.2.3页面结构和样式
4.2.4一键拨打电话
index.wxml
 <view class="content-info">
  <view bindtap="callGroom">
  <view bindtap="callBride">
</view>
callGroom: function () {wx.makePhoneCall({})},
callBride: function () {wx.makePhoneCall({})}
4.3 照片页面
4.3.1任务分析
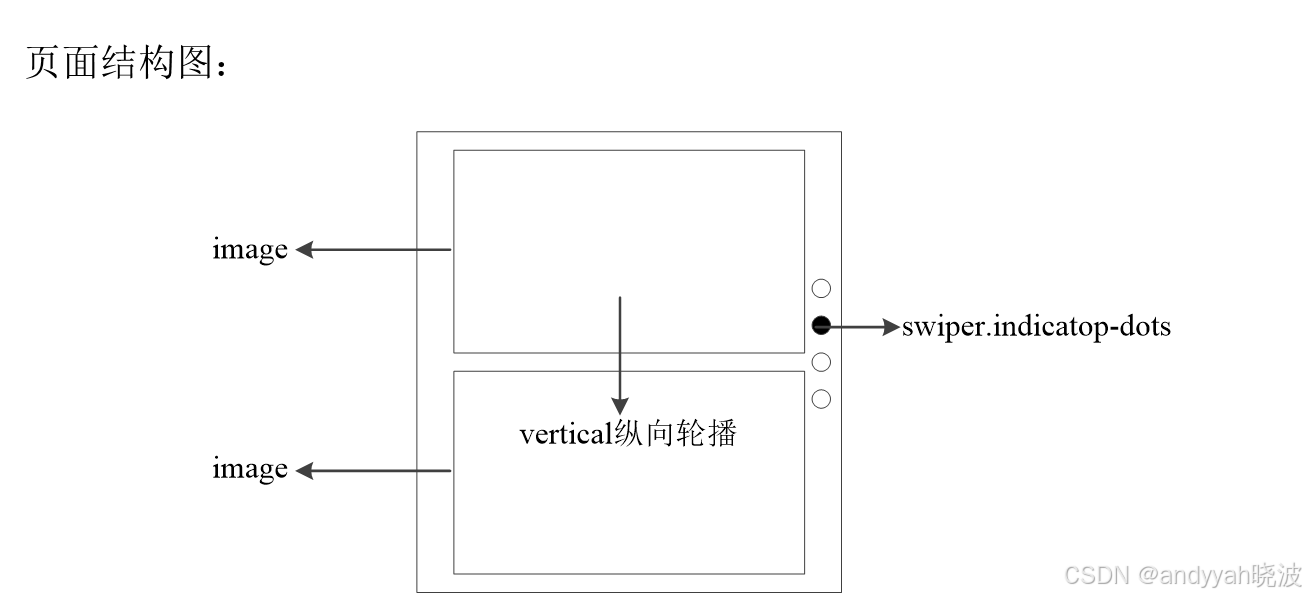
在本任务中,将会完成照片页面的开发,该页面采用纵向轮播的方式展示图片,可以通过单击指示面板的圆点切换到相对应的图片。
功能需求如下:
- 每一张轮播的图片都占满显示区域,滑动屏幕可以实现图片的纵向切换。
- 在右侧纵向显示指点面板,单击圆点可切换显示状态。
- 在用户无操作时,可以实现自动无缝轮播。
4.3.2实现纵向轮播图
picture.wxml
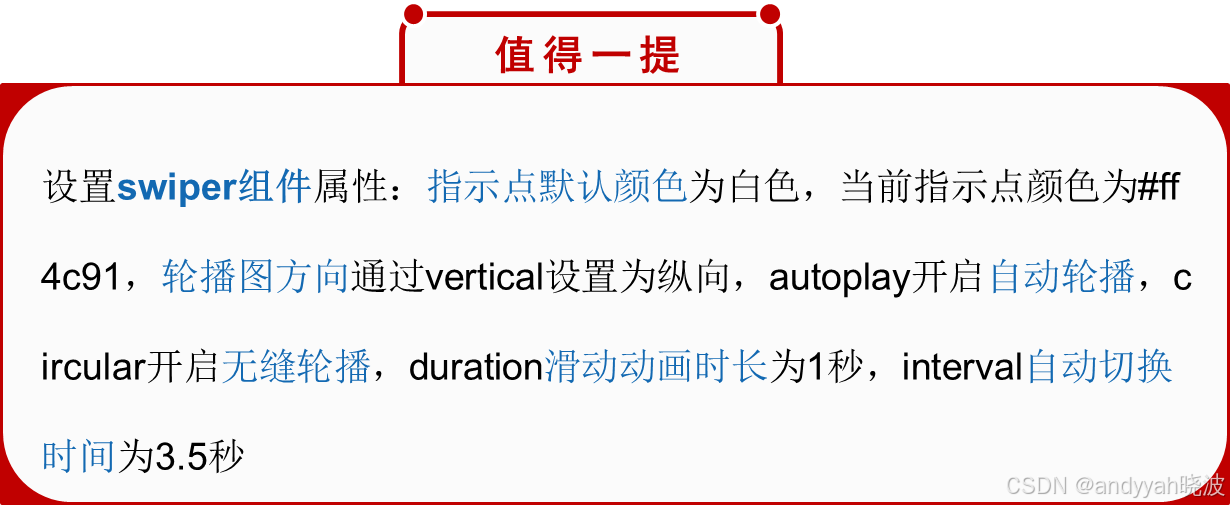
 <swiper indicator-color="white" indicator-active-color="#ff4c91"
indicator-dots autoplay interval="3500" duration="1000" vertical circular>
  <swiper-item wx:for="{{imgUrls}}" wx:key="*this">
    <image src="{{item}}" mode="aspectFill" />
  </swiper-item>
</swiper>
picture.wxss
swiper { height: 100vh; }
image { width: 100vw; height: 100vh; }
picture.js
data: {
    imgUrls: [
      '/images/timg1.jpg', '/images/timg2.jpg',
      '/images/timg3.jpg', '/images/timg4.jpg'
    ]
  }
4.4 美好时光页面
4.4.1任务分析
在本任务中,将会完成美好时光页面的开发,该页面采用视频的方式来记录一对新人的难忘时光。
任务需求如下:
- 使用video组件实现视频播放。
- 使用腾讯视频插件实现视频播放。
4.4.2前导知识
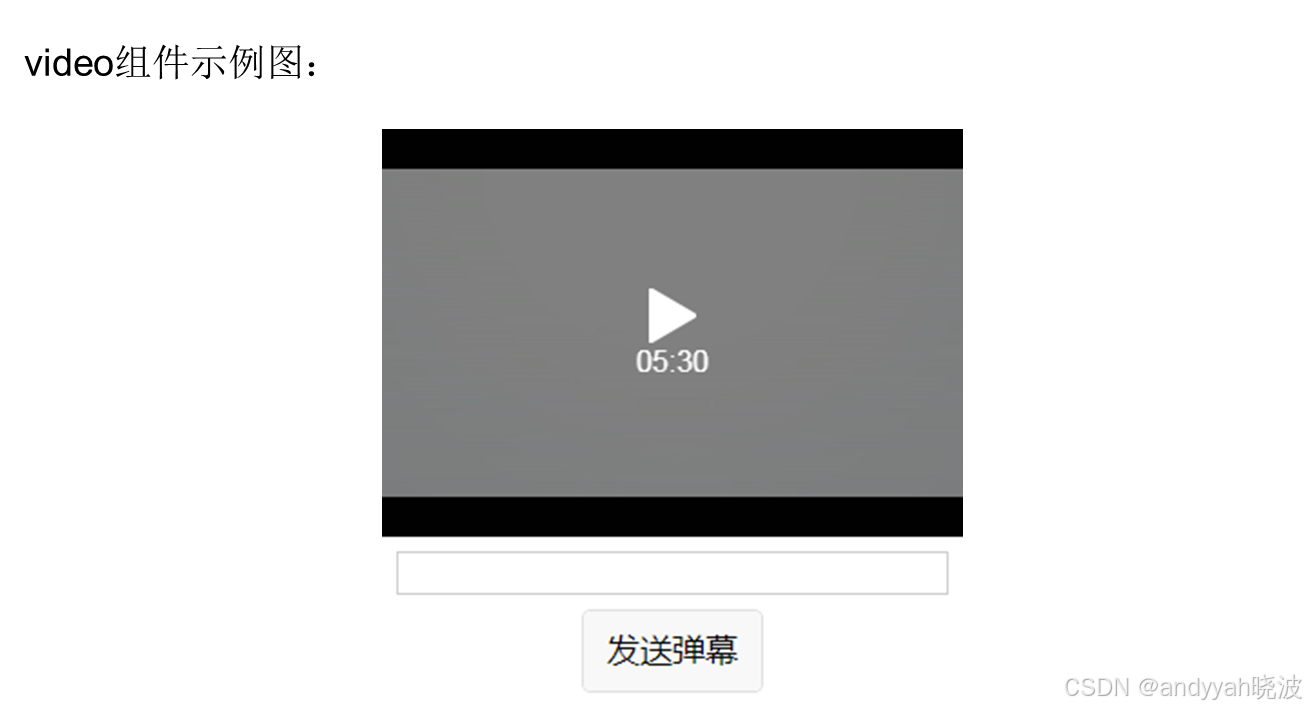
video.wxml
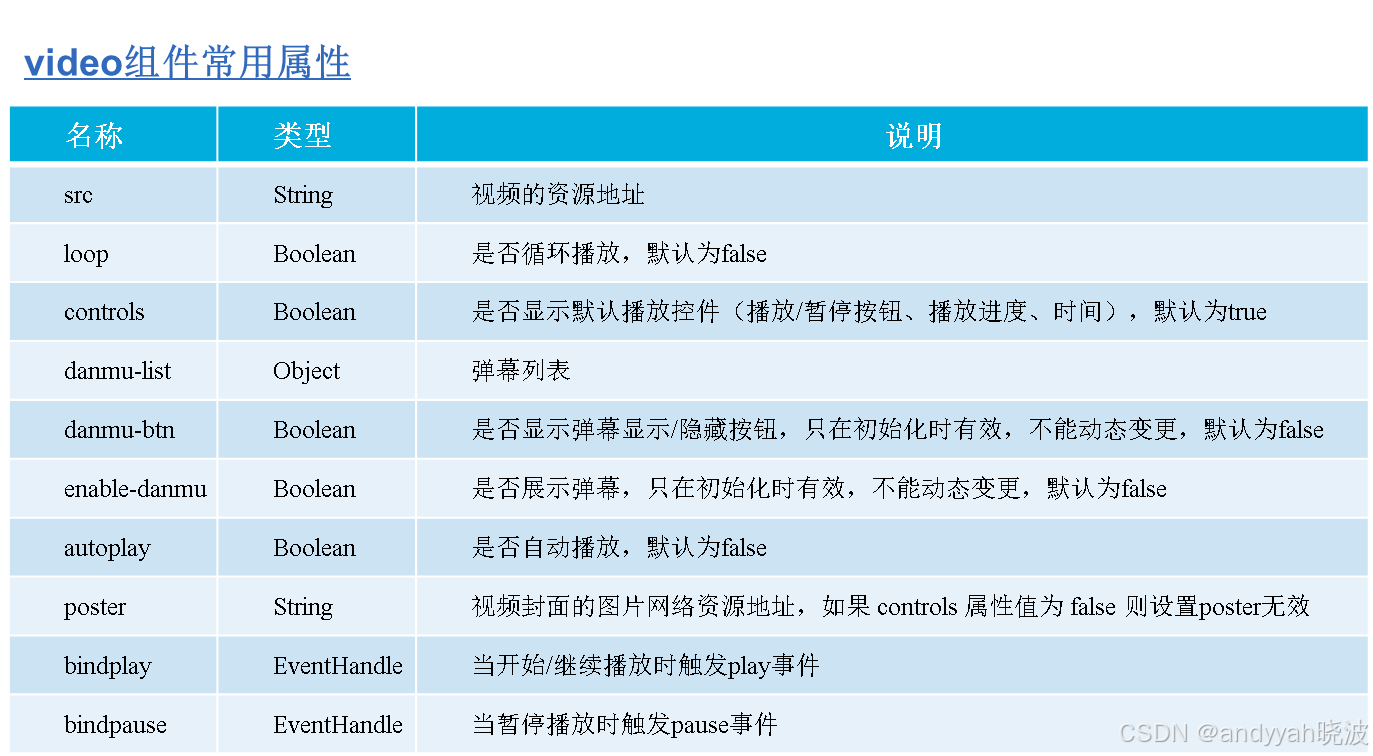
<video id="myVideo" src="{{src}}" danmu-list="{{danmuList}}"
enable-danmu danmu-btn controls></video>
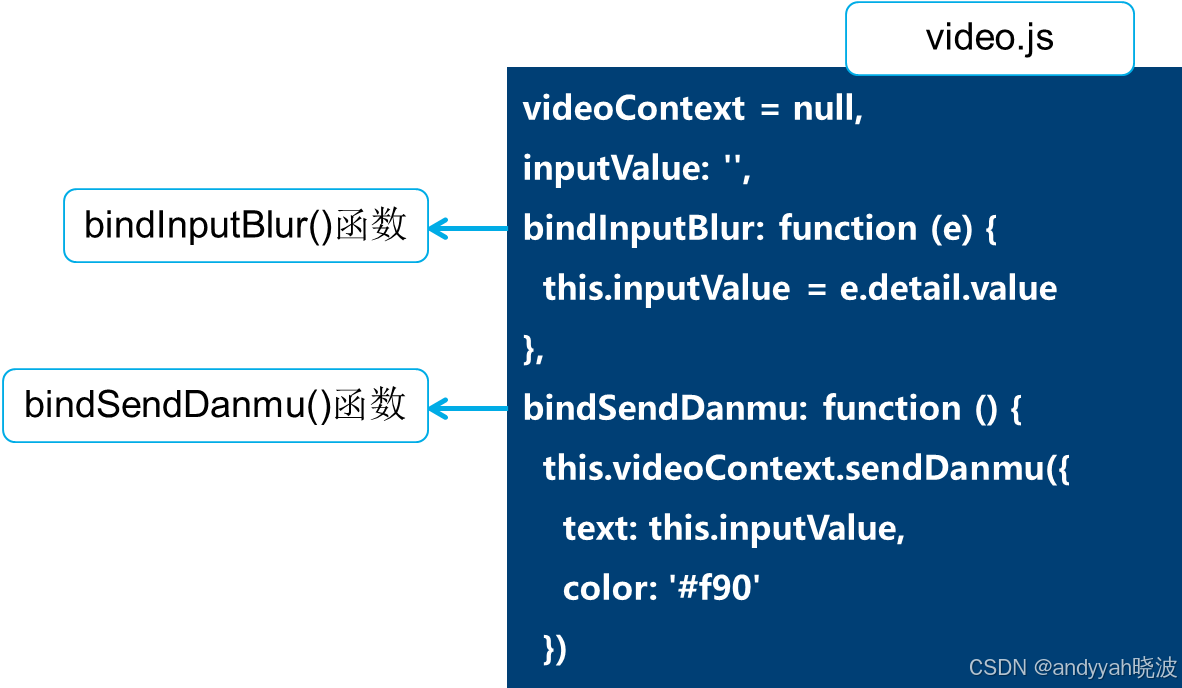
<input bindblur="bindInputBlur" />
<button bindtap="bindSendDanmu">发送弹幕</button>
video.js
data: {
  src: 'http://……/xxx.mp4',
  danmuList: [{ text: '第 1s 出现的弹幕', color: '#ff0000', time: 1 },
                       { text: '第 3s 出现的弹幕', color: '#ff00ff', time: 3 }] },
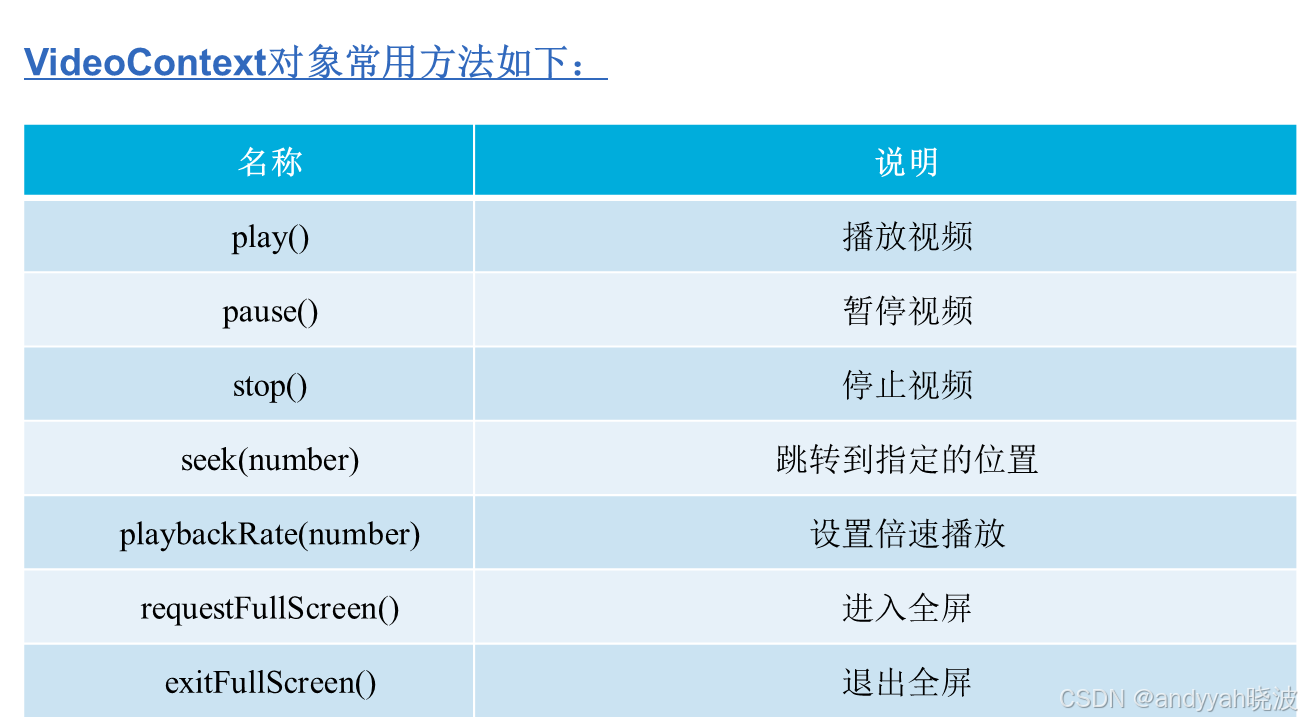
onReady: function () { this.videoContext = wx.createVideoContext('myVideo')}
bindButtonTap: function() {
  wx.chooseVideo({
    sourceType: ['album', 'camera'],	// 视频选择的来源,相册和相机
    maxDuration: 60,	// 拍摄视频最长拍摄时间(秒)
    camera: 'back',	// 默认拉起的是前置(front)或者后置(back)摄像头
    success: res => {// 成功时执行的回调函数
      this.setData({src: res.tempFilePath// 选定视频的临时文件路径}) }})
},
4.4.3编写页面结构和样式
video.wxml
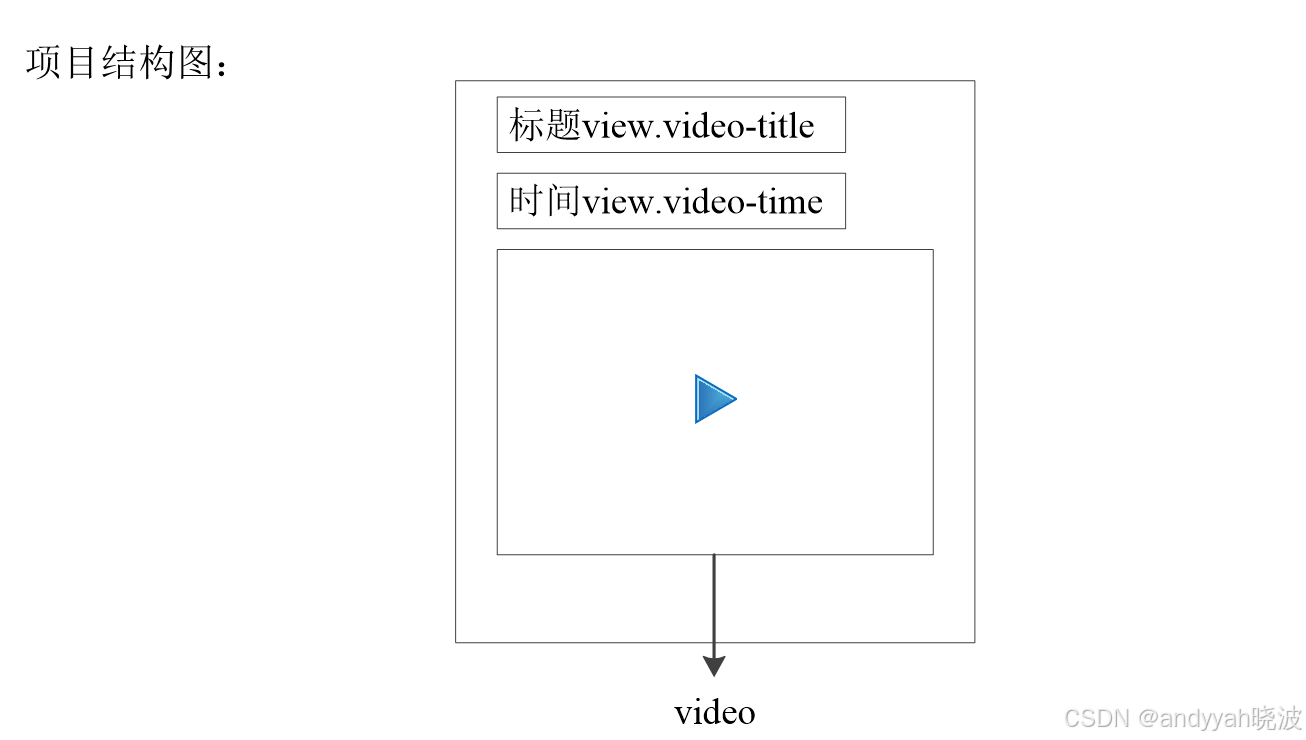
<view class="video-list" wx:for="{{movieList}}" wx:key="user">
  <view class="video-title">标题:{{item.title}}</view>
  <view class="video-time">时间:{{item.create_time}}</view>
  <video src="{{item.src}}" objectFit="fill"></video>
</view>
video.wxss
.video-list {
  box-shadow: 0 8rpx 17rpx 0 rgba(7, 17, 27, 0.1);
  margin: 10rpx 25rpx; padding: 20rpx; border-radius: 10rpx;
  margin-bottom: 30rpx; background: #fff;
}
video.js
data: {
  movieList: [{
    create_time: '2018-7-25 19:55:54', title: '海边随拍',
    src: 'http://……/xxx.mp4'
  }, {
    create_time: '2018-7-25 19:56:17', title: '勿忘心安',
    src: 'http://……/xxx.mp4'
  }] }
4.4.4编利用WXS增强页面功能
WXS应用场景举例:
- 页面中data数据来自服务器端,但可能不适合直接显示到页面中,需要对数据进行转换后才能显示。
- 例如接收到的时间字段为时间戳。
假设在本项目中,视频列表数据是从服务器获取的,服务器返回的create_time是一个时间戳,下面在pages/video/video.js文件中模拟这一情况,将create_time改为时间戳
video.js
create_time:1532519777690,
wxs脚本语言嵌入代码
<wxs module="formatData">
  module.exports = function(timestamp) {
    var date = getDate(timestamp)
    …
    var h = date.getHours()
    return y + '-' + m + '-' + d + ' ' + h}
</wxs>
4.5 婚礼地点页面
4.5.1任务分析
在本任务中,将会完成婚礼地点页面的开发,该页面会显示婚礼地点的地图,单击导航图标可以定位酒店位置,查看路线。
功能需求如下:
- 拾取到婚礼举办酒店的经纬度坐标。
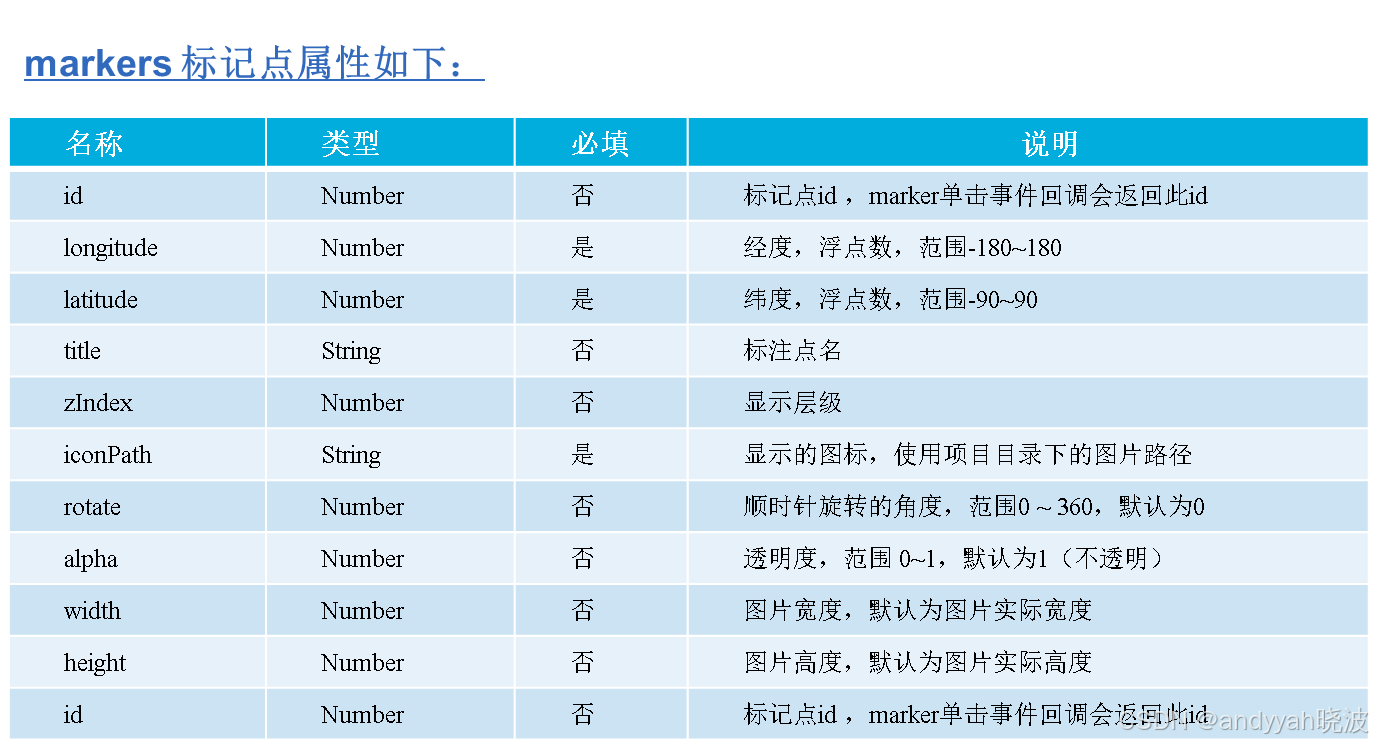
- 利用map组件显示地图,并在婚礼地点放置markers覆盖物标记。
- 单击蓝色图标的标记点,通过wx.openLocation()调用微信内置地图查看位置。
4.5.2前导知识
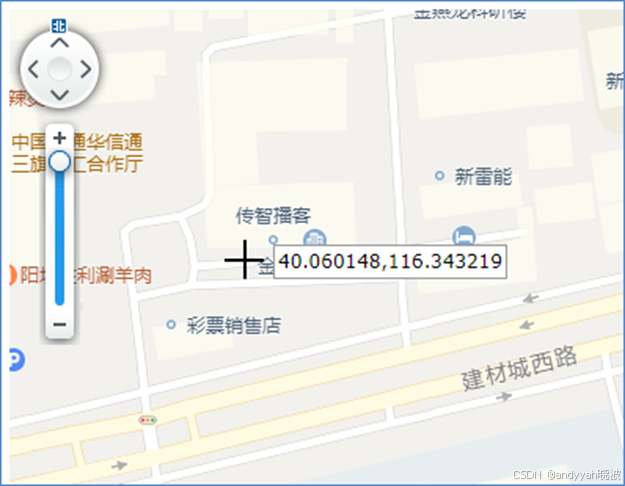
获取经纬度:map组件需要给定经纬度,下面通过腾讯位置服务网站提供的坐标拾取器(https://lbs.qq.com/tool/getpoint/)来获取,示例图如下:
map.wxml
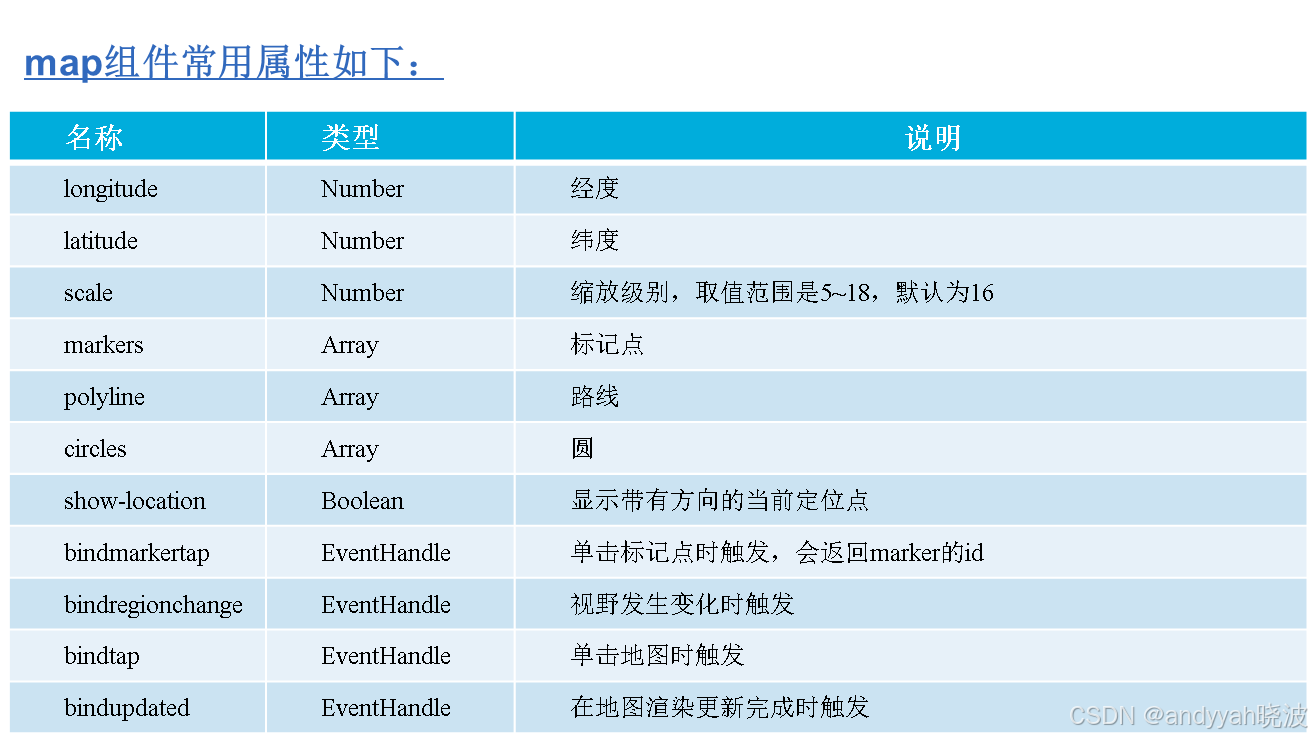
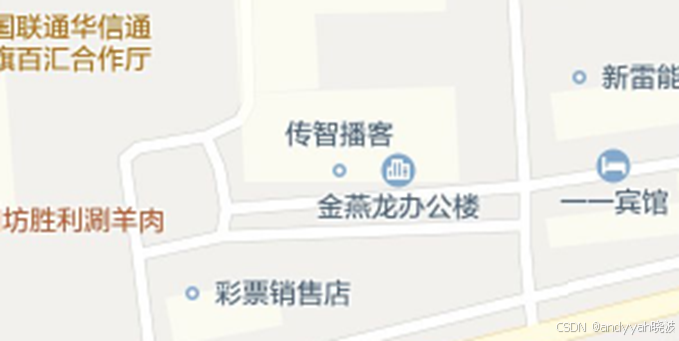
<map latitude="40.060148" longitude="116.343219" scale="18" />
保存代码,运行程序,得到效果图如下:
map.wxml
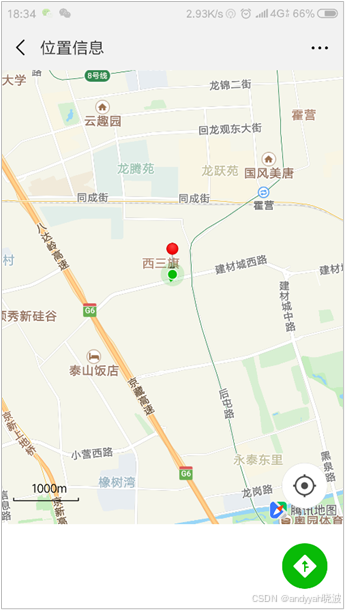
<button bindtap="buttonTap">查看我的位置</button>
map.js
buttonTap: function() {
  wx.getLocation({
    type: 'gcj02',
    success: function (res) {
      wx.openLocation({
        latitude: res.latitude,
        longitude: res.longitude }) }
}) }
保存上述代码,在手机中运行测试,单击按钮后,得到效果图如下:
4.5.3编写婚礼地点页面
map.wxml
<map latitude="{{latitude}}" longitude="{{longitude}}" markers="{{markers}}" bindmarkertap="markertap" />
map.wxss
map { width: 100vw; height: 100vh; }
map.js
data: {
  latitude: 40.06021, longitude: 116.3433,
  markers: [{
    iconPath: '/images/navi.png', id: 0,
    latitude: 40.06021, longitude: 116.3433, width: 50, height: 50
  }] },
markertap: function() {
  wx.openLocation({
    latitude: this.data.latitude, longitude: this.data.longitude,
}) }
4.6 宾客信息页面
4.6.1任务分析
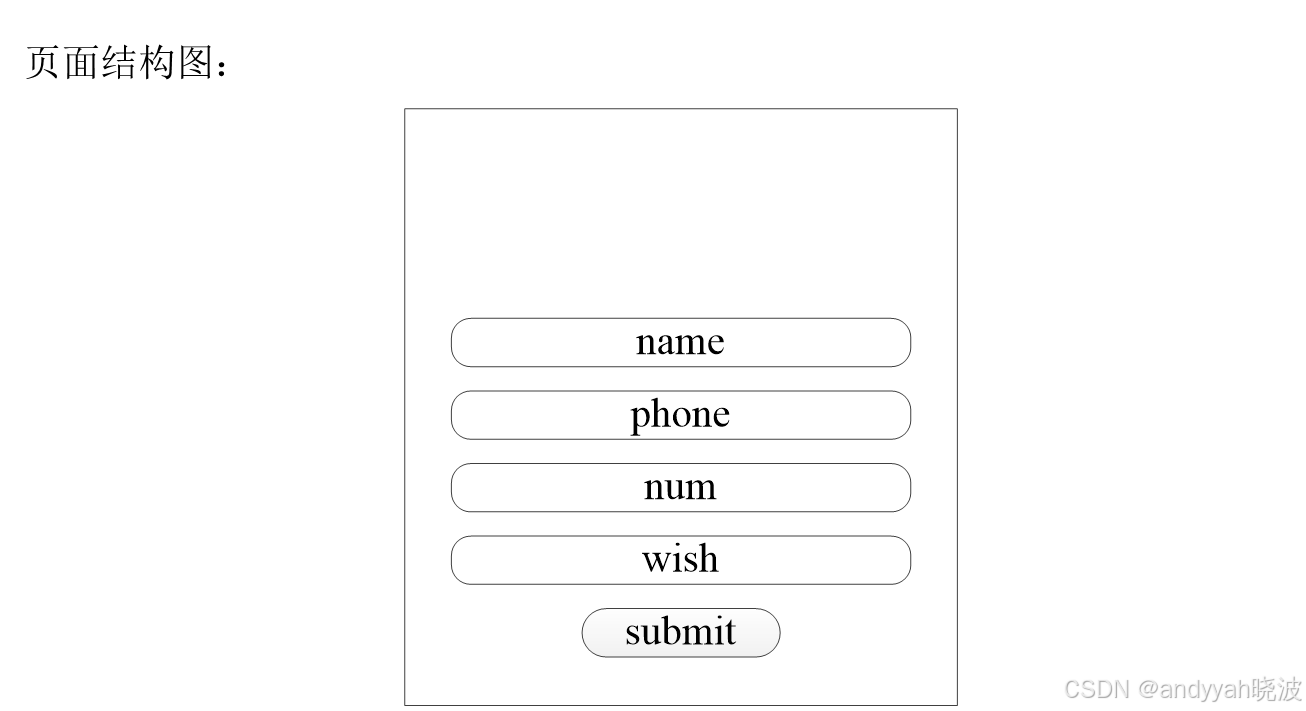
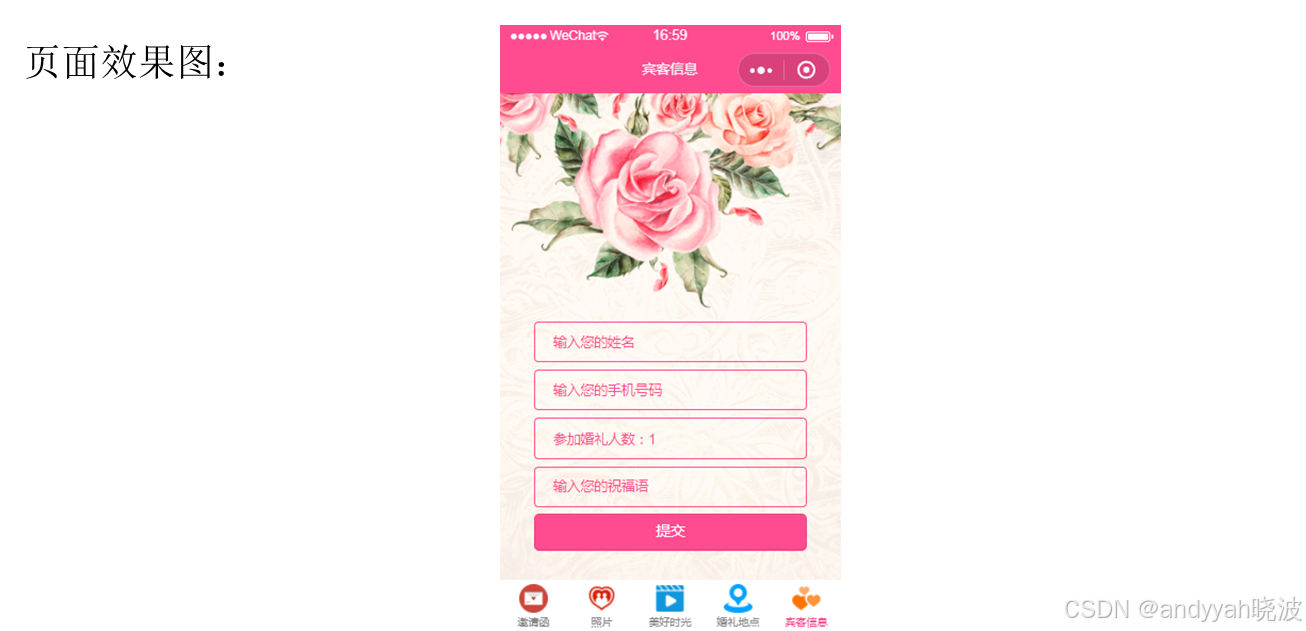
在本任务中,将会完成宾客信息页面的开发,该页面提供了一个表单,用于填写来宾的信息,包括姓名、手机号、参加婚礼人数、新人祝福语。
功能需求如下:
- 为页面添加背景图。
- 当姓名、手机号所在文本框失去焦点时,触发失去焦点事件bindblur,对文本内容进行正则表达式校验,格式错误会给出友好的提示信息。
- 单击num(参加婚礼的人数)时,从底部弹出一个选择器,选择参加婚礼人数。
- 单击submit提交按钮,获取form表单数据,提交成功后会给出“成功”提示。
- 利用小程序中的订阅消息机制,发送回复通知。
4.6.2前导知识
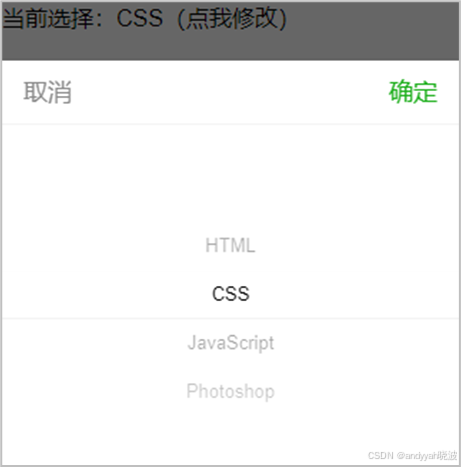
picker组件是从底部弹起的滚动选择器,目前支持5种选择器,通过mode属性来区分。
选择器类型如下:
- 默认:普通选择器(mode=“selector”) 。
- 多列选择器(mode=“multiSelector”)。
- 时间选择器(mode=“time”)。
- 日期选择器(mode=“date”)。
- 省市区选择器(mode=“region”)
guest.wxml
<picker range="{{array}}" value="{{index}}" bindchange="pickerChange">
  <view>当前选择:{{array[index]}}(点我修改)</view>
</picker>
guest.js
data: { array: ['HTML', 'CSS', 'JavaScript', 'Photoshop'],
 index: 1 },
pickerChange: function(e) {
  this.setData({ index: e.detail.value })
},
保存上述代码,运行程序测试,页面效果图如下:
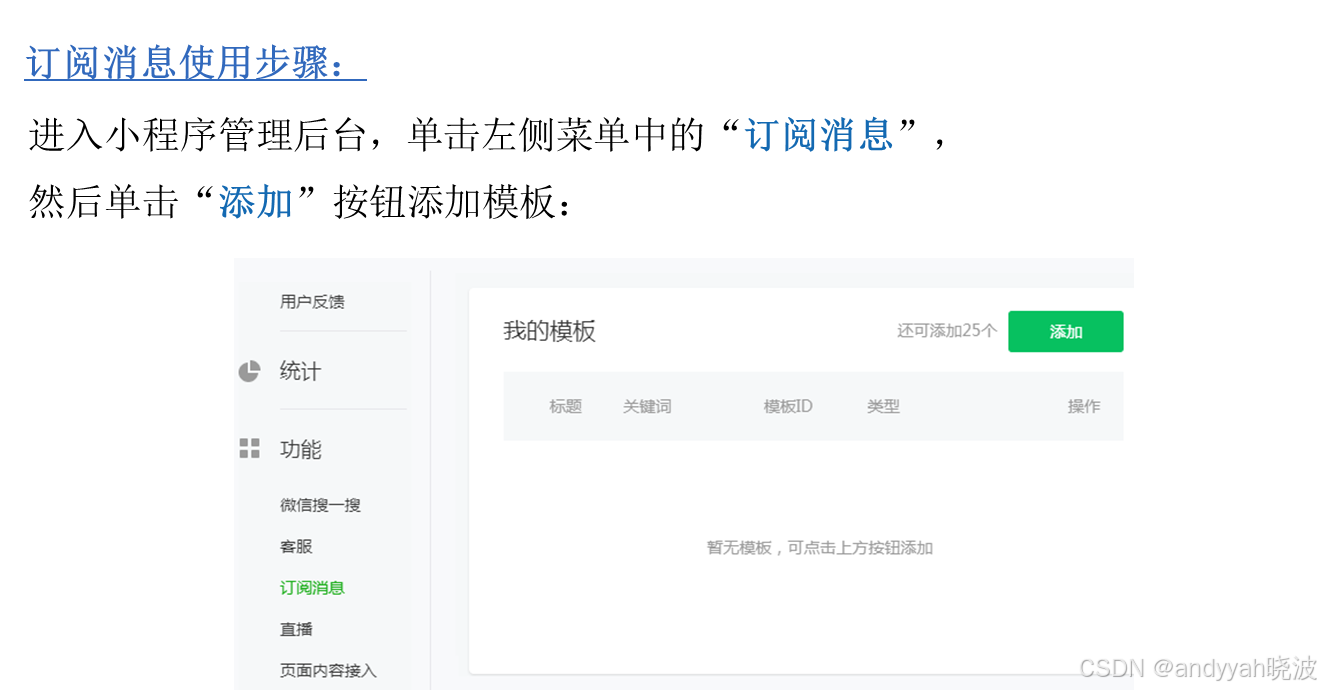
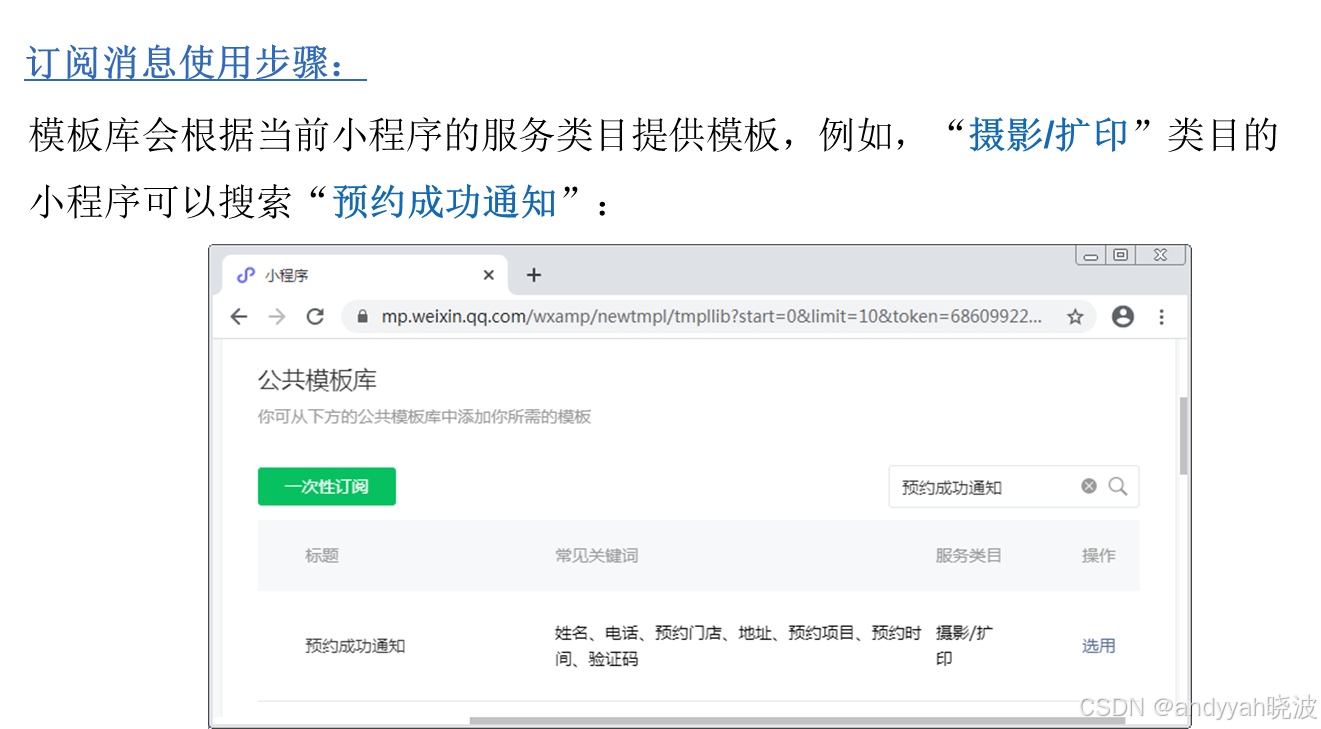
订阅消息是在小程序中向用户发送消息的一种方式,其特点是必须按照小程序提供的模板来给用户发送消息,而且小程序在审核时,会对消息的标题、关键字等进行审查,以免功能被恶意使用。
使用场景如下:
- 支付提醒:当支付成功时会推送给用户成功支付的信息,告知用户的订单详情。
- 到账提醒:红包退还到账提醒、收款到账提醒等。
- 广告推送:如订阅号推送、公众号推送等。
订阅消息使用注意事项:
- 实际开发中,订阅消息的发送一般是由服务器主动发送给曾经使用过这个小程序的用户。
- 小程序本身不具备接收消息的功能,是由微信中的服务通知功能将消息转达给用户。
如何证明用户使用过某个小程序?(必须满足以下其中一个条件):
- 支付:用户在小程序内完成过支付行为,可允许开发者向用户推送有限条数的订阅消息。
- 通过按钮允许订阅消息:当用户在小程序内发生过通过按钮允许订阅消息行为,可允许开发者向用户推送有限条数的订阅消息。
4.6.3编写页面结构
guest.wxml
<form bindsubmit="formSubmit" >
   <input name="name" placeholder="输入您的姓名" />
   <input name="phone" placeholder="输入您的手机号码" />
   <picker name="num" bindchange="pickerChange" value="{{picker.index}}" range="{{picker.arr}}">参加婚礼人数:{{picker.arr[picker.index]}}</picker>
   <input name="wish" placeholder="输入您的祝福语" />
   <button form-type="submit">提交</button>
</form>
guest.js
data: {
  picker: {
    arr: ['0', '1', '2', '3', '4', '5', '6'],
    index: 1
  } },
pickerChange: function (e) {
  this.setData({
    'picker.index': e.detail.value
  })
}
4.6.4表单验证
准备页面:pages/guest/guest.wxml,绑定blur事件,校验输入格式是否正确
<view>
  <input name="name" bindblur="nameChange"
   placeholder-class="phcolor" placeholder="输入您的姓名" />
</view>
<view>
   <input name="phone" bindblur="phoneChange"
    placeholder-class="phcolor" placeholder="输入您的手机号码" />
</view>
pages/guest/guest.js,编写check ()函数
check: function(data, reg, errMsg) {
  if (!reg.test(data)) {
    wx.showToast({title: errMsg, icon: 'none', duration: 1500})
    return false
  }
  return true
}
pages/guest/guest.js,编写checkName()函数、checkPhone()函数
checkName: function(data) {
  var reg = /^[\u4E00-\u9FA5A-Za-z]+$/;
  return this.check(data, reg, '姓名输入错误!')
},
checkPhone: function(data) {
  var reg = /^(((13)|(15)|(17)|(18))\d{9})$/
  return this.check(data, reg, '手机号码输入有误!')
},
pages/guest/guest.js,编写事件处理函数nameChange()、phoneChange()
nameChange: function (e) {
  this.checkName(e.detail.value)
},
phoneChange: function (e) {
  this.checkPhone(e.detail.value)
},
pages/guest/guest.js,编写提交表单事件formSubmit()函数,
formSubmit: function(e) {
  var name = e.detail.value.name
  var phone = e.detail.value.phone
  if (this.checkName(name) && this.checkPhone(phone)) {
    // 在此处可编写代码将e.detail.value提交到服务器
    wx.showToast({title: '提交成功', icon: 'success', duration: 1500})
  }
}
4.6.5发送婚礼请帖回复通知
发送订阅消息功能涉及到3个角色的参与,分别是小程序、服务器和微信接口,具体交互流程如下:
- 用户在小程序中填写表单,需要附加上code,提交给服务器。
- 服务器收到表单后,使用appid、secret和code请求微信接口,获openid。
- 服务器向用户发送订阅消息,先用自己的appid、secret请求微信接口,获取access_token,然后使用access_token和openid,以及模板的id和消息内容请求微信接口,发送订阅消息。
- 微信接口将订阅消息推送给用户,用户就会在微信的“服务通知”中看到消息。
在app.js中获取订阅消息权限
App({
  ...(原有代码)
  globalData:{
    hasSubscribeMessage:''
  }
})
在pages/guest/guest.js文件中,定义allowSubscribe()事件处理函数:
const app = new getApp();
Page({
  ...(原有代码)
  allowSubscribe: function() {
    if (!app.globalData.hasSubscribeMessage) {
      wx.requestSubscribeMessage({
        tmplIds: ['...'], // 在此处填写添加的模板id
        success(res) {
          console.log(res)
          app.globalData.hasSubscribeMessage = res.errMsg.split(':')[1]
        }
      })
    }
  }
})
打开pages/guest/guest.wxml文件,找到“输入您的姓名”文本框,绑定bindtap事件:
<input name="name" onchange="nameChange" placeholder-class="phcolor" placeholder="输入您的姓名" bindtap = "allowSubscribe"/>
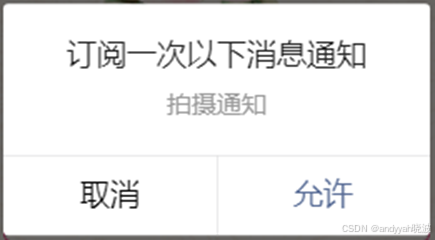
保存文件,单击“输入您的姓名”输入框后会出现:
服务器端代码:pages/guest/guest.js文件
在Page()函数后面编写server对象,用于模拟服务器,与微信接口进行交互:
var server = {
  appid: '',     secret: '',
  user: {openid: ''},  // 用于保存用户的openid
  // 用于接收表单,调用this.getOpenid()根据code换取openid
  post: function(data, success) {}, ...
}
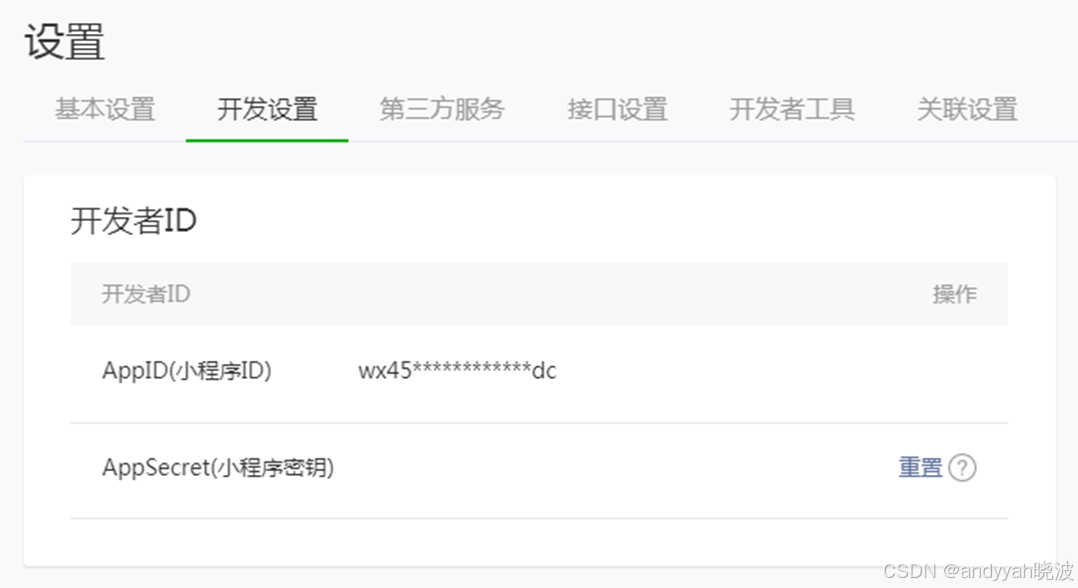
在小程序管理后台获取appid和secret ,appid对应AppId,secret对应AppSecret
服务器端代码: pages/guest/guest.js文件
在formSubmit()表单验证成功的if判断中,编写代码请求服务器。
if (this.checkName(name) && this.checkPhone(phone)) {
  wx.login({
    success: res => {  // 将表单提交给服务器,传入code
      server.post({ code: res.code }, ()=> {
        // 提交成功后,由服务器发送订阅消息
        wx.showToast({title: '提交成功!', icon: 'success', duration: 1500}) server.sendTemplateMessage(res => { console.log('消息发送结果:', res.data)})
      }) }
  }) }
在server对象中编写post()方法。
// 用于接收表单,调用this.getOpenid()根据code换取openid
post: function(data, success) {
  console.log('收到客户端提交的数据:', data)
this.getOpenid(data.code, res => {
    console.log('用户openid:' + res.data.openid)
    this.user.openid = res.data.openid
    success()
  })
},
在server对象中编写getOpenId()方法。
// 用于根据code获取openid
getOpenid: function(code, success) {
  wx.request({
    url: 'https://api.weixin.qq.com/sns/jscode2session',
    data: { appid: this.appid, secret: this.secret,
    grant_type: 'authorization_code', js_code: code },
    success: success
  })
},
在server对象中编写sendTemplateMessage()函数。
// 用于发送订阅消息
sendTemplateMessage: function(success) {
  var user = this.user
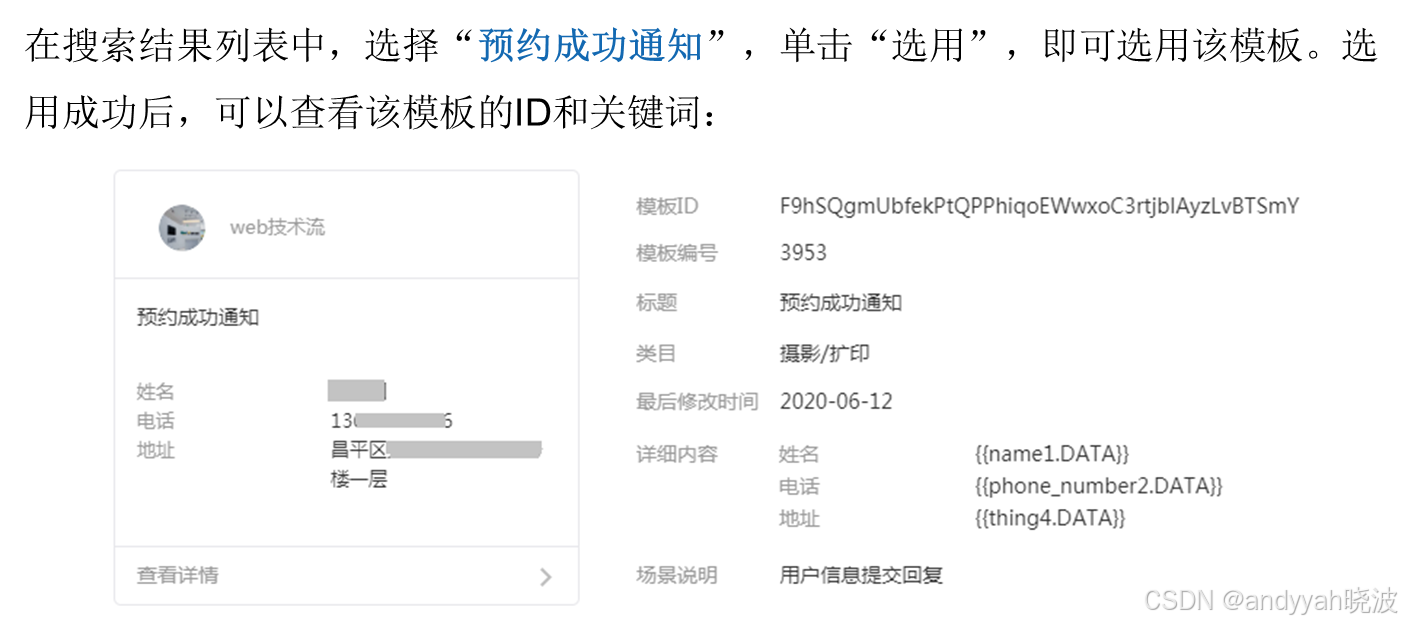
  var data = { touser: user.openid, page: 'index', template_id: 'F9hSQgmUbfekPtQPPhiqoEWwxoC3rtjblAyzLvBTSmY',
  data: { name1: { value: '王辉辉、张琳琳' },
               phone_number2: { value: '123456789' },
               thing4: { value: '北京市海淀区XX路XX酒店' }
            …}
}
在server对象中编写sendTemplateMessage()函数。
this.getAccessToken(res => {
    var token = res.data.access_token
    console.log('服务器access_token:' + token)
   var url = 'https://api.weixin.qq.com/cgi-bin/message/subscribe/send?access_token=' + token
    wx.request({ url: url, method: 'post',
    data: data, success: success })
  })
},
在server对象中编写getAccessToken()函数。
// 用于获取access_token
getAccessToken: function(success) {
  var url = 'https://api.weixin.qq.com/
  cgi-bin/token?
  grant_type=client_credential&appid=' + this.appid
  + '&secret=' + this.secret
  wx.request({ url: url, success: success })
}
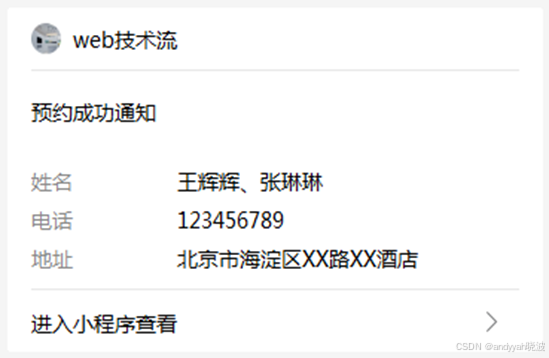
宾客信息页面提交表单后就会收到微信的提示信息“婚礼请帖回复通知”:
本章总结
本章通过一个婚礼邀请函的项目,讲解了小程序中的标签页切换、背景音乐API、拨打电话API、video组件、腾讯视频插件、map组件、地图定位API、WXS、picker组件,以及订阅消息的使用。通过本章学习,读者应能熟练在小程序中灵活使用各种组件完成具体功能,掌握音频播放、视频播放、地图定位、订阅消息等常见开发需求的实现。
需要该项目整体运行源代码,可私信我免费提供。
