前言
在上一篇 #软件开发中的架构设计 文章中,谈了为什么要有软件架构设计,软件架构设计并不是高高在上,看不见摸不着的东西。软件架构设计是为了制定规范和约束,达到程序的组织和管理,从而使软件开发和维护变得容易和高效(一切设计都围绕开发和维护展开)。设计的软件架构质量如何,日常开发主要关心的是一个总体情况:
是否解决了问题?
是否满足了用户需求?
是否完成了(产品和技术)指标?
是否达到了性能要求?
是否安全?
其它,比如:程序的整体组织结构是否清晰?是否明确定义了主要的模块?是否将用户界面模块化?等方面并不特别在意,因为手里的软件总在快速迭代,一个需求完成后又接着一个需求,所以只要软件架构能完成任务,那就没有什么大问题,那就可以继续开发和维护(往里堆代码)。只有达到瓶颈,开发和维护难以进行,才会着手详细设计。
为了适应软件快速迭代,又能保障开发和维护质量和稳步前进,项目中会直接采用 MVC → MVP → MVVM → MVI 软件架构模式,这些软件架构模式能够快被快速掌握,开袋即食。
鸿蒙作为新的平台,项目从 0 到 1,为了让软件快速上线,又能让开发和维护容易和高效,那么直接选择 MVI 软件架构模式进行开发。
MVI
在介绍鸿蒙开发中的 MVI 之前,先回顾一下 MVI。
MVI 基础概念
M-V-I 分别指的是:
Model:负责应用数据管理和业务逻辑处理,根据业务规则对数据进行创建,存储和更改。
View:负责界面展示,展示数据来源于 Model,以及响应数据变化;并接收用户操作,构建 Intent。
Intent:负责将用户操作或事件转换为状态变化。
MVI 工作流程
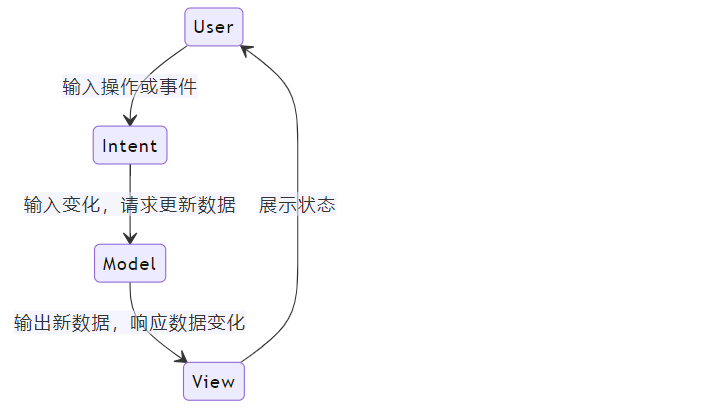
用户交互:用户在界面上进行操作,比如点击按钮、输入文字等。View 将这些操作转化为一个或多个 Intent 对象,Intent 对象主要描述用户想要执行的动作。
意图传递:View 将构建的 Intent 对象传递给 ViewModel,ViewModel 为 View 和 Model 之间的桥梁,负责处理 Intent。
数据更新:ViewModel 接收并处理 Intent 后,请求 Model 数据源更新数据。
数据响应:Model 输出数据结果,更新数据状态。
数据变化:View 订阅了数据的状态,当状态发生改变,View 自动刷新。
展示状态:呈现最新状态。
UserViewViewModelModel输入操作或事件输入意图请求数据更新输出数据响应数据变化展示状态UserViewViewModelModel
工作流程反映了 MVI 架构模式关键特点:
分离关注点:View, ViewModel, Model 职责明确,View 负责响应用户操作和响应状态变化,ViewModel 负责桥接 View 和 Model,并处理业务逻辑,Model 负责管理数据。这样组织和管理,有效降低了软件的复杂度。
数据驱动:View 并不会去修改数据,当 Model 更新完数据时,View 通过感知到订阅的数据发生状态改变,自动更新。
单一数据源:View 展示的数据,来源于订阅的某个不可变 State,State 的数据值表示某一刻的状态,每次要更新都是产生新的数据值。
单向数据流:数据从 View → ViewModel → Model → ViewModel → View,View 传递 Intent 到 ViewModel,ViewModel 请求 Model 更新数据,Model 更新完数据,更新 View 订阅的 State 的数据值,View 自动更新。
Android开发 MVI 核心组件
要使 MVI 架构模式在 Android 开发中运行起来,需要用到一些核心“组件”:
LifeCycle:感知 Activity 或 Fragment 的生命周期变化,方便业务针对生命周期变化做出相应管理和改变,也防止内存泄漏。
ViewModel:也可感知生命周期变化,在适当时候初始化和清理资源,如在 ViewModel 中启动和取消协程任务。
Kotlin Flow(冷流):响应式编程(协程+冷流一起工作),做异步事件处理,如在 Repository 中 请求网络数据,存储数据到文件等。
Kotlin Flow(热流):响应式编程(协程+热流一起工作),状态管理,如在 ViewModel 中管理 ViewState,View 订阅的 ViewState 改变后自动更新。
Kotlin Coroutine(协程):响应式编程(协程+冷热流一起工作),管理任务,如在 Activity 或 ViewModel 中启动和取消任务。
Compose:声明式构建 UI。
依赖注入(Hilt):管理对象的创建和依赖关系。
鸿蒙开发
鸿蒙开发 MVI 核心组件
首先,鸿蒙开发中有一些前置条件:
使用 ArkTS 语言(强制使用静态类型),基于 TypeScript 生态基础扩展,兼容 TS 和 JS。
声明式构建 UI
状态驱动 UI,状态数据改变,触发 UI 重新渲染。
要使 MVI 运行起来,需要核心组件:
rxjs:三方库,响应式编程,处理异步操作,如:网络请求,数据存储等。
promise:原生,处理异步操作。
状态管理:通过 @State,@Observed,@ObjectLink,@Prop,@Link,@Provide/@Consume,@ObjectLink 状态装饰器管理变量状态。当View订阅的状态数据改变,自动更新。
另外,关于生命周期管理:状态管理可以感知组件生命周期,但使用 rxjs 启动的异步任务需要手动管理生命周期。另外,基于 Axios 的网络请求目前暂不支持取消。
目前基于 rxjs 和 @State,@Observed, @Watch 装饰器,就可以在普通业务场景使用 MVI。
rxjs
rxjs 和 rxjava 同生于 ReactiveX,在没有 Kotlin 协程和 Flow(冷流和热流)之前,在 Android 开发中都是使用 rxjava 来做响应式编程,对于 rxjs 在鸿蒙开发中的效果,它和 rxjava 在 Android 开发中的效果一样。
状态管理
鸿蒙目前状态管理有 V1稳定版本 和 V2试用版本,这里选择 V1。
当前状态管理(V2试用版)仍在逐步开发中,相关功能尚未成熟,建议开发者尝鲜试用。
状态管理作用:实现数据和 UI 联动。可以理解为类似 Android 中的 LiveData 和 StateFlow 或 SharedFlow,达到数据驱动和单一数据源的效果。
状态管理分为:应用状态管理和组件状态管理。
应用状态管理:使用 @StorageLink/@LocalStorageLink 状态装饰器实现应用和组件状态的双向同步,通过 @StorageProp/@LocalStorageProp 状态装饰器实现应用和组件状态的单向同步
组件状态管理:
| @State | @State 装饰的变量拥有其所属组件的状态,可以作为其子组件单向和双向同步的数据源。当其改变时,会引起相关组件的渲染刷新。 |
| @Prop | @Prop 装饰的变量可以和父组件建立单向同步关系,@Prop 装饰的变量是可变的,但修改不会同步回父组件。 |
| @Link | @Link 装饰的变量可以和父组件建立双向同步关系,子组件中 @Link 装饰的变量的修改回同步给父组件中建立双向数据绑定的数据源,父组件的更新也会同步给 @Link 装饰的变量。 |
| @Provide/@Consume | @Provide/@Consume 装饰的变量用于跨组件层级(多层组件)同步状态变量,可以不需要通过参数命名机制传递,通过 alias(别名)或者属性绑定。 |
| @Observed | @Observed 装饰 class,需要观察多层嵌套场景的 class 需要被 @Observed 装饰。单独使用 @Observed 没有任何作用,需要和 @ObjectLink、 @Prop 联用。 |
| @ObjectLink | @ObjectLink 装饰的变量接收 @Observed 装饰的 class 的实例,应用于多层嵌套场景,和父组件的数据构建双向同步。 |
@Watch:用于监听状态变量的变化,当状态变量变化时,@Watch 设置的监听回调函数将被调用。
状态装饰器示例
这里只简单介绍 @State, @Observed, @Watch 相关使用。
@State
@State 装饰的变量是组件私有的,只能在组件内操作,变量的生命周期关联组件的生命周期。
@Entry
@Componet
struct ExamplePage{


@State count: number = 1
//Text 可以感知到 count 的变化,自动更新
this.count = 1


Text(this.count)


@State objectA: ObjectA | undefine = undefine
//showView() 和 hideView() 可以感知到 objectA 的变化
this.objectA = new ObjectA()


if(this.objectA){
  showView()
}else{
  hideView()
}


}
在实际的 MVI 中,View 只展示数据,不更改数据,所以 @State 的作用在 MVI 中主要用于感知状态数据改变。
@Observed
@Observed 装饰类,可以观察类属性的变化。如果类属性也是类对象,那么要观察该属性类对象的变化,该属性类也需要 @Observed 装饰。
@Observed
class ClassB{
  b: number = 0
}


@Observed
class ClassA{
  a: number = 0

  b: ClassB = new ClassB()
}


a: ClassA = new ClassA()


//可以观察到 对象 a 发生了变化
this.a.a = 1
//可以观察到 对象 a 发生了变化
this.a.b = new ClassB()
//对象 a 什么也没有发生
this.a.b.b = 1


b: ClassB = this.a.b
//可以观察到 对象 b 发生了变化
this.b.b = 1
@Watch
@Watch 装饰器用于对状态变量发生改变时,设置监听回调函数。类似 flow.collect{}, livedata.observe{}设置的监听回调函数。
@State @Watch('onCountChanged') count = 0


onCountChanged(){
}


//会触发 onCountChanged 回调
this.count = 1
//不会触发 onCountChanged 回调
this.count = 0
有了响应式编程,又有了数据驱动,那么就可以开始使用 MVI 了。
鸿蒙 MVI 示例
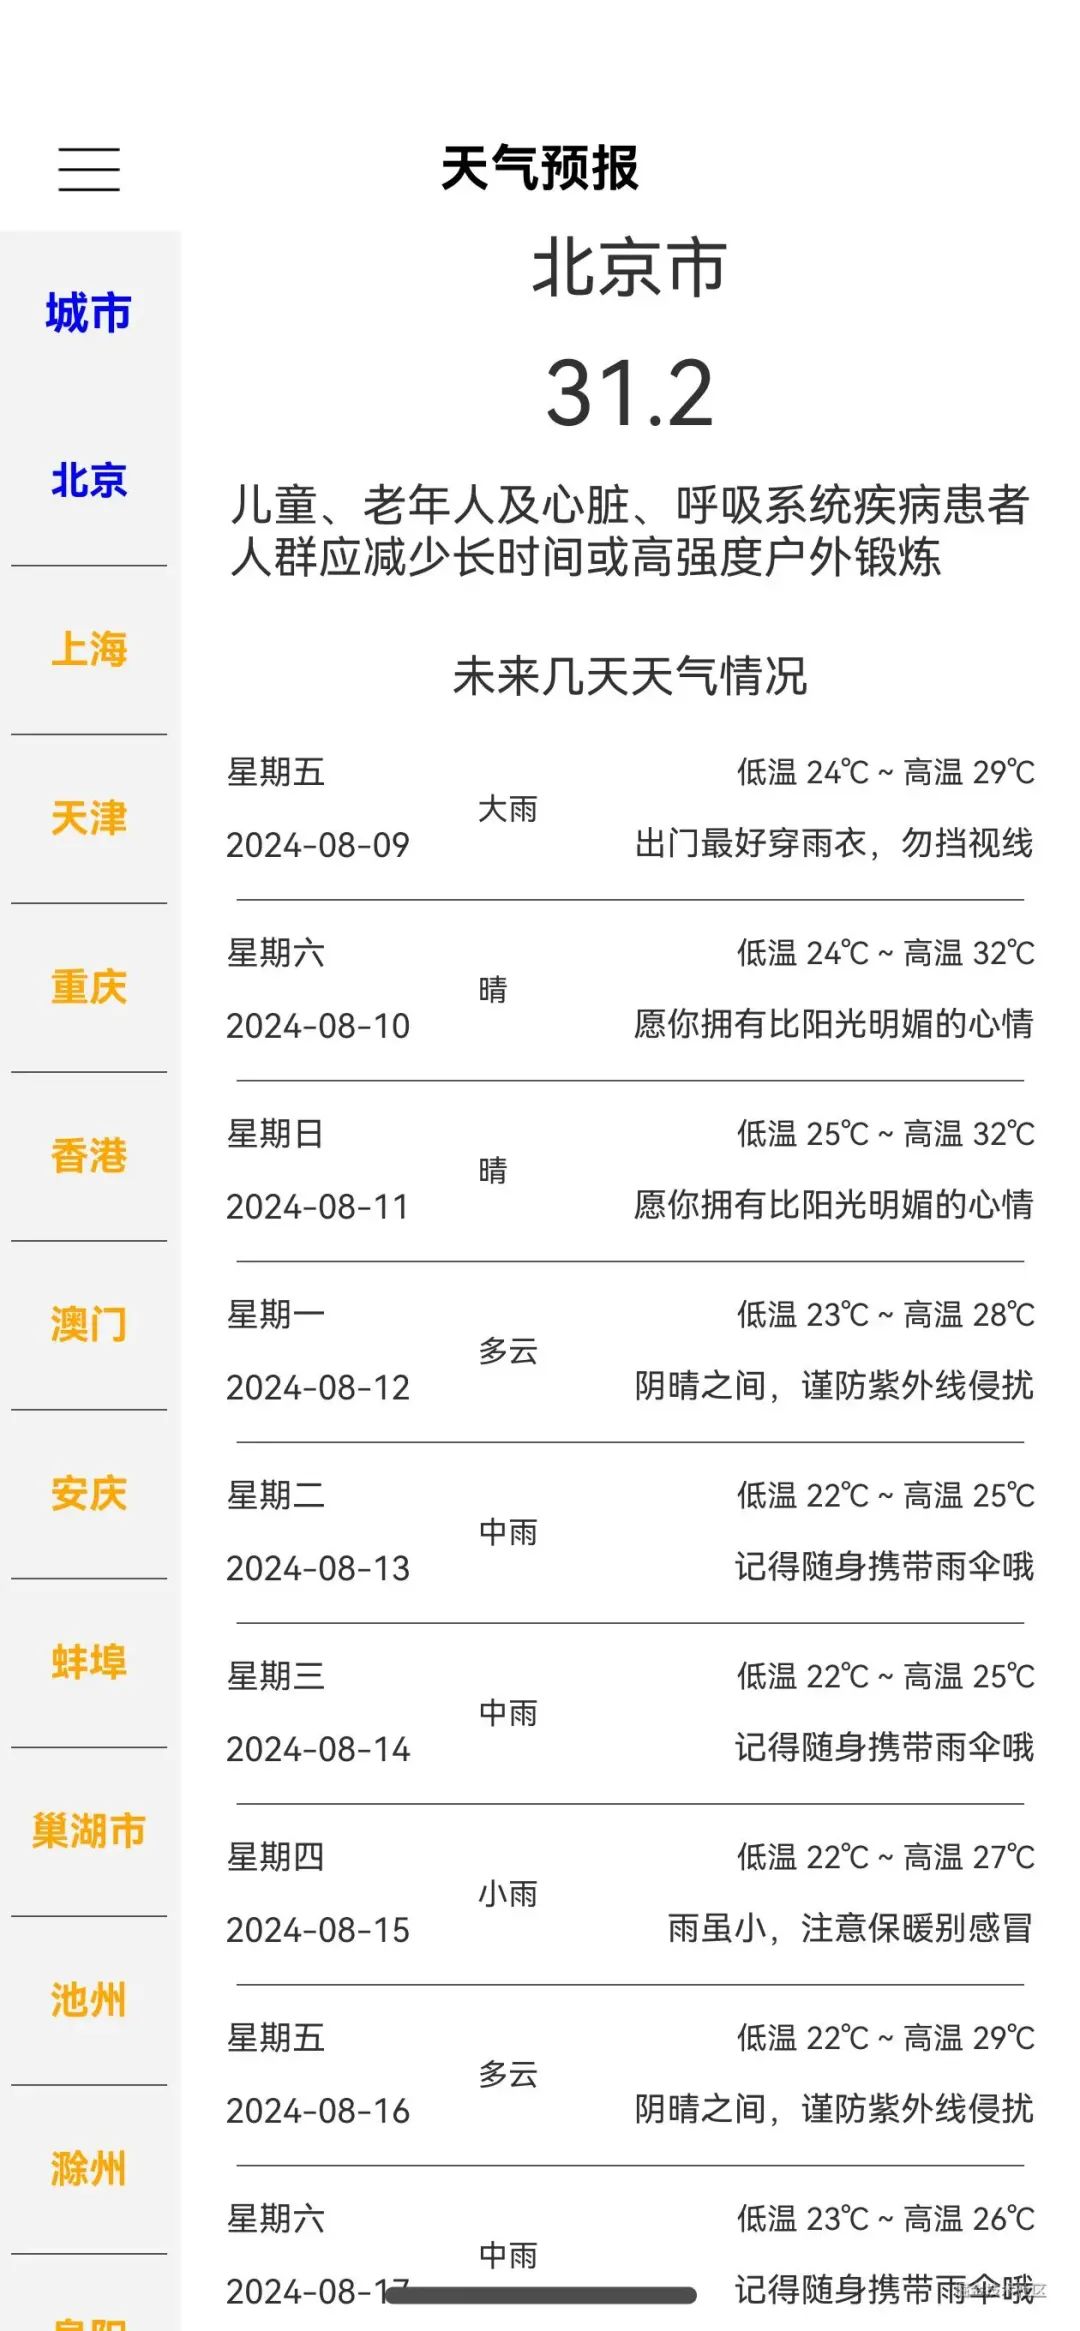
这里以显示城市天气为例子 :
环境
DevEco Studio NEXT Developer Beta2
Build #DS-233.14475.28.36.503502
Build Version: 5.0.3.502, built on July 28, 2024
Runtime version: 17.0.10+1-b1087.17 aarch64
VM: OpenJDK 64-Bit Server VM by JetBrains s.r.o.
macOS 14.3.1
GC: G1 Young Generation, G1 Old Generation
Memory: 2048M
Cores: 8
Registry:
  idea.plugins.compatible.build=IC-233.14475.28
准备
安装网络库 axios:
ohpm install @ohos/axios安装响应式编程库 rxjs:
ohpm install rxjs项目添加依赖,目录:项目路径/entry/oh-package.json5:
"dependencies": {
  "rxjs": "*"
}
rxjs 版本:[email protected]
天气数据来源:
城市码:city code json(https://github.com/baichengzhou/weather.api/blob/master/src/main/resources/citycode-2019-08-23.json),复制到:项目路径/entry/src/main/resources/rawfile/city_code.json 文件中。
天气城市 api: t.weather.sojson.com/api/weather…(http://t.weather.sojson.com/api/weather/city/%E5%9F%8E%E5%B8%82%E7%A0%81) (城市码在1 中的 json 文件中),api 返回的 json 数据例子:t.weather.sojson.com/api/weather… http://t.weather.sojson.com/api/weather/city/101010100(北京市)。
时序图:
UserViewViewModelModelfisrt showsend CityCodeInfoIntentloadCityCodeInforeturn Arrayupdate _cityCodeInfoViewStatedisplay city listfirst show or click city list itemsend CityWeatherIntentfetchWeatherreturn Weatherupdate _cityWeatherViewStatedisplay city weatherUserViewViewModelModel
开始
Model 层
封装网络请求
import axios, { AxiosInstance } from '@ohos/axios'


const BASE_URL = "http://t.weather.sojson.com/"
const TIMEOUT = 10 * 1000


export class AxiosHelper {
  private static INSTANCE: AxiosHelper = new AxiosHelper()
  private axiosInstance: AxiosInstance


  constructor() {
    this.axiosInstance = axios.create({ baseURL: BASE_URL, timeout: TIMEOUT })
  }


  static getAxiosInstance(): AxiosInstance {
    return AxiosHelper.INSTANCE.axiosInstance
  }
}
数据模型
根据天气城市码和天气api定义
/**
 * 天气信息
 */
export interface Weather {
  //服务端返回的数据不允许再次修改
  readonly message: string
  readonly status: number
  readonly date: string
  readonly time: string
  readonly cityInfo: CityInfo
  readonly data: Data
}


export interface CityInfo {
  //省略
}


export interface Data {
 //省略
}


export interface Forecast {
  //省略
}


/**
 * 城市码信息
 */
export interface CityCodeInfo {
  city_code: string
  city_name: string
}


/**
 * 限制 Model 层返回的数据类型,类似 Kotlin 中的 Sealed Class
 */
export type WeatherData = Array<CityCodeInfo> | Weather
利用 type限制 Model 层返回数据类型,type 类似 kotlin Sealed修饰符。
Model 业务逻辑
import { Observable } from 'rxjs'


export class WeatherRepository {
  /**
   * 缓存天气
   */
  private cachedWeather: Map<string, Weather> = new Map()


  private constructor() {
  }


  static newInstance(): WeatherRepository {
    return new WeatherRepository()
  }


  /**
   * 根据城市码请求城市天气
   * @param code 城市码
   * @returns 城市天气
   */
  fetchWeather(code: string): Observable<Weather> {
    return new Observable((subscribe) => {
      if (this.cachedWeather.has(code)) {
        subscribe.next(this.cachedWeather.get(code))
        subscribe.complete()
        return
      }
      AxiosHelper.getAxiosInstance().get(`api/weather/city/${code}`).then((resp: AxiosResponse<Weather>) => {
        if (resp.status === 200) {
          subscribe.next(resp.data)
          this.cachedWeather.set(code, resp.data)
          subscribe.complete()
        } else {
          subscribe.error(resp.statusText)
        }
      }).catch((e: Error) => {
        subscribe.error(e.message)
      })
    })
  }


  /**
   * 加载 raw 文件中城市码
   */
  loadCityCodeInfo(context: Context): Observable<Array<CityCodeInfo>> {
    return new Observable((subscribe) => {
      context.resourceManager.getRawFileContent('city_code.json').then((rawFile) => {
        const textDecoder = util.TextDecoder.create('utf-8', { ignoreBOM: true })
        const rawFileString = textDecoder.decodeWithStream(rawFile, { stream: false })
        const data: Array<CityCodeInfo> = JSON.parse(rawFileString)
        subscribe.next(data.filter((value) => value.city_code.length > 0))
        subscribe.complete()
      }).catch((e: Error) => {
        subscribe.error(e.message)
      })
    })
  }
}
ViewModel 层
定义 Intent
export class ViewIntent {
}


/**
 * 城市码 Intent
 */
export class CityCodeInfoIntent extends ViewIntent {
  readonly context: Context


  constructor(context: Context) {
    super()
    this.context = context;
  }
}


/**
 * 城市天气 Intent
 */
export class CityWeatherIntent extends ViewIntent {
  readonly cityCode: string


  constructor(cityCode: string) {
    super()
    this.cityCode = cityCode
  }
}


/*限制 Intent 类型*/
export type WeatherViewIntent = CityCodeInfoIntent | CityWeatherIntent
定义 ViewState
@Observed
export class ViewState<T> {
  readonly data: T | undefined


  constructor(data: T | undefined = undefined) {
    this.data = data
  }
}


@Observed
export class Init extends ViewState<WeatherData> {
}


@Observed
export class Loading extends ViewState<WeatherData> {
}


@Observed
export class Success extends ViewState<WeatherData> {
  constructor(data: WeatherData) {
    super(data)
  }
}


@Observed
export class Failure extends ViewState<WeatherData> {
  readonly code: number
  readonly message: string


  constructor(code: number, message: string) {
    super()
    this.code = code
    this.message = message
  }
}


/*限制 ViewState 类型*/
export type WeatherViewState = Success | Failure | Init | LoadingViewState的定义遵循两个原则:每次状态变化,都是产生新的值:new ViewState
ViewState 需要 @Observed 装饰,表示可观察
定义可观察的 State:
ObservedData<T>
export abstract class ObservedData<T> {
  /*View 只有读取 ViewModel 返回的状态权限*/
  private _value: T


  protected constructor(value: T) {
    this._value = value;
  }


  /*提供给 View 可读状态*/
  get value(): T {
    return this._value
  }


  /*只能 ViewModel 内部更改状态*/
  protected updateValue(value: T) {
    this._value = value
  }
}


/**
 * 可观察的天气状态
 */
@Observed
class WeatherObservedData extends ObservedData<WeatherViewState> {
  constructor(value: WeatherViewState) {
    super(value)
  }


  public updateValue(value: WeatherViewState): void {
    super.updateValue(value);
  }
}
鸿蒙中没有 LiveData 和 Flow,利用状态装饰器 @Obvsered 构建可观察状态。这里 ObservedData 的定义遵循两个原则:
状态只允许 ViewModel 写
状态只允许 View 读
ViewModel 业务逻辑
export class WeatherViewModel {
  private readonly weatherRepository = WeatherRepository.newInstance()

  /*城市码状态,ViewModel 写状态*/
  private readonly _cityCodeInfoViewState: WeatherObservedData = new WeatherObservedData(new Init())
  /*城市码状态,View 读状态*/
  readonly cityCodeInfoViewState: ObservedData<WeatherViewState> = this._cityCodeInfoViewState


  /*城市天气状态,ViewModel 写状态*/
  private readonly _cityWeatherViewState: WeatherObservedData = new WeatherObservedData(new Init())
  /*城市天气状态,View 读状态*/
  readonly cityWeatherViewState: ObservedData<WeatherViewState> = this._cityWeatherViewState


  sendUIIntent(intent: WeatherViewIntent) {
    if (intent instanceof CityCodeInfoIntent) {
      this.handleCityCodeInfoIntent(intent)
    } else if (intent instanceof CityWeatherIntent) {
      this.handleCityWeatherIntent(intent)
    }
  }


  private handleCityCodeInfoIntent(intent: CityCodeInfoIntent) {
    this._cityCodeInfoViewState.updateValue(new Loading())
    this.weatherRepository.loadCityCodeInfo(intent.context).subscribe({
      next: (value) => {
        this._cityCodeInfoViewState.updateValue(new Success(value))
      }, error: (msg: string) => {
        this._cityCodeInfoViewState.updateValue(new Failure(0, msg))
      }
    })
  }


  private handleCityWeatherIntent(intent: CityWeatherIntent) {
    //这里需要注意,如果没有这一行代码,上一次返回 Success,下一次也返回 Success 时,View 会认为 cityWeatherViewState 并未改变
    this._cityWeatherViewState.updateValue(new Loading())
    this.weatherRepository.fetchWeather(intent.cityCode).subscribe({
      next: (value) => {
        this._cityWeatherViewState.updateValue(new Success(value))
      }, error: (msg: string) => {
        this._cityWeatherViewState.updateValue(new Failure(0, msg))
      }
    })
  }
}
Model 返回数据后,ViewModel 通过 _cityCodeInfoViewState 或 _cityWeatherViewState 更改状态,View 感知 cityCodeInfoViewState 或 cityWeatherViewState 状态改变,自动更新 UI。类似 Android 中的:
private val _cityCodeInfoViewState: MutableStateFlow<ViewState<List<CityCodeInfo>>> =
    MutableStateFlow(ViewState.Init())

val cityCodeInfoViewState: StateFlow<ViewState<List<CityCodeInfo>>> = _cityCodeInfoViewState
另外,这里需要注意,如果没有下面这一行代码,上一次返回 Success,下一次也返回 Success 时,View 会认为 cityWeatherViewState 并未改变:this._cityWeatherViewState.updateValue(new Loading())当然这与 View 中观察的状态有关。
因为 WeatherViewModel 无法感知生命周期,所以必要时需手动管理生命周期:
private cityCodeInfoSubscription: Subscription | undefined = undefined


private handleCityCodeInfoIntent(intent: CityCodeInfoIntent) {
  this.cityCodeInfoSubscription = this.weatherRepository.loadCityCodeInfo(intent.context).subscribe()
}


onCleared(){
  this.cityCodeInfoSubscription?.unsubscribe()
}
View 层
@Entry({ routeName: ROUTE_NAME_MVI })
@Component
struct Index {
  private weatherViewModel: WeatherViewModel = new WeatherViewModel()
  //观察城市码状态
  @State @Watch("onCityCodeInfo") cityCodeInfoViewState: ObservedData<WeatherViewState> =
    this.weatherViewModel.cityCodeInfoViewState
   //观察城市天气状态
  @State cityWeatherViewState: ObservedData<WeatherViewState> =
    this.weatherViewModel.cityWeatherViewState


  aboutToAppear(): void {
    this.weatherViewModel.sendUIIntent(new CityCodeInfoIntent(getContext()))
  }

  aboutToDisappear(): void {
    //手动管理 ViewModel 生命周期
    this.weatherViewModel.onCleared()
  }


  /*城市码状态改变监听回调函数*/
  onCityCodeInfo() {
    //当城市码返回成功后,自动加载第一个城市天气
    const value = this.cityCodeInfoViewState.value
    if (value instanceof Success) {
      const data = (value as Success).data as Array<CityCodeInfo>
      if (data.length > 0) {
        this.weatherViewModel.sendUIIntent(new CityWeatherIntent(data[0].city_code))
      }
    }
  }


  build() {
    Column() {
      this.titleBar()
      this.contentView()
    }
  }


  @Builder
  titleBar() {
    //省略
  }


  @Builder
  contentView() {
    if (this.cityCodeInfoViewState.value instanceof Success) {
      SideBarContainer(SideBarContainerType.Embed) {
        this.cityCodeInfoView((this.cityCodeInfoViewState.value as Success).data as Array<CityCodeInfo>)
        if (this.cityWeatherViewState.value instanceof Success) {
          this.weatherDetailView((this.cityWeatherViewState.value as Success).data as Weather)
        } else if (this.cityWeatherViewState.value instanceof Failure) {
          this.errorView((this.cityWeatherViewState.value as Failure).message)
        } else {
          this.loadingView()
        }
      }
      //省略
    } else if (this.cityCodeInfoViewState.value instanceof Failure) {
      this.errorView((this.cityCodeInfoViewState.value as Failure).message)
    } else {
      this.loadingView()
    }
  }


  @Builder
  errorView(error: string) {
    //省略
  }


  @Builder
  loadingView() {
    //省略
  }


  @Builder
  cityCodeInfoView(info: Array<CityCodeInfo>) {
    Column() {
      //省略
      List() {
        ForEach(info,
          (item: CityCodeInfo, index: number) => {
            ListItem() {
              Text(item.city_name)
                   //省略
                })
            }
          }, (item: CityCodeInfo) => item.city_code)
      }
    }
  }


  @Builder
  weatherDetailView(weather: Weather) {
   //省略
  }
}
当观察的 cityCodeInfoViewState 发生改变时,下面逻辑会自动执行,触发UI重新渲染。
if (this.cityCodeInfoViewState.value instanceof Success) {


} else if (this.cityCodeInfoViewState.value instanceof Failure) {
  this.errorView((this.cityCodeInfoViewState.value as Failure).message)
} else {
  this.loadingView()
}同时onCityCodeInfo()也会被调用。同理 this.cityWeatherViewState也一样。
如果页面是父子组件结构,需要将 ViewModel 在父子组件中共享,可以使用 @Provide/@Consume 装饰:
//父组件
@Provide weatherViewModel: WeatherViewModel = new WeatherViewModel()


//子组件
@Consume weatherViewModel: WeatherViewModel
@State @Watch("onCityCodeInfo") cityCodeInfoViewState: ObservedData<WeatherViewState> =
  this.weatherViewModel.cityCodeInfoViewState
@State cityWeatherViewState: ObservedData<WeatherViewState> =
  this.weatherViewModel.cityWeatherViewState


onCityCodeInfo() {

}
在子组件中,也能感知到 cityCodeInfoViewState 和 cityWeatherViewState 状态的改变。
示例效果
总结
软件架构设计是为了制定规范和约束,达到程序的组织和管理,从而使软件开发和维护变得容易和高效。
MVI 架构模式作为 Android 推崇架构模式,它带来的主要好处是:
方便开发和维护,开发:简单易于理解的设计(最小复杂度),维护:能轻易入手该设计。
新手和老手都能快速上手,在项目中,所有人达成共识,形成一致性,从而短时间内提高开发效率。
程序从开始到结束,整个生命周期范围内,都在明确定义的流程里执行,这可以方便排查问题,以及保障质量和稳定。
在鸿蒙开发中,通过响应式编 rxjs 和 状态管理@State, @Observed, @Watch 装饰器即可实现简单的 MVI 架构模式。
在鸿蒙开发中,使用 MVI,能够顺利进行大量的常规需求快速开发,能够让其他开发人员快速参与进来,并能够保障项目的线上质量和稳定。
作者:划水健儿
链接:https://juejin.cn/post/7401464779128586280
关注我获取更多知识或者投稿


