前言
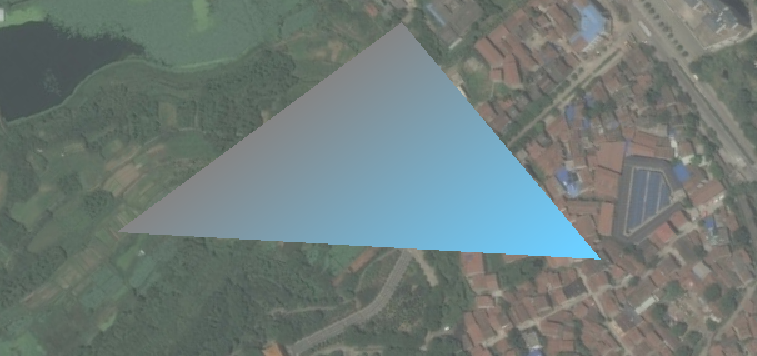
我们在 Cesium 自定义几何体一般有两种方式,一种是通过直接使用 Primitive 来实现,另外一种就是 DrawCommand 来扩展;下面代码是通过 Primitive 来实现一个三角形:
const viewer = new Cesium.Viewer('cesiumContainer');
viewer.scene.globe.depthTestAgainstTerrain = true
// original sample begins here
const mypositions = Cesium.Cartesian3.fromDegreesArrayHeights([
114.4864783553646, 30.604215790554694, 30,
114.48382898892015, 30.60431560806962, 30,
114.48353342631442, 30.601700422371984, 30
]);
// unroll 'mypositions' into a flat array here
const numPositions = mypositions.length;
const pos = new Float64Array(numPositions * 3);
for (let i = 0; i < numPositions; ++i) {
pos[i * 3] = mypositions[i].x;
pos[i * 3 + 1] = mypositions[i].y;
pos[i * 3 + 2] = mypositions[i].z;
}
const colors = [
0.4, 0.8, 1.0, 1.0,
0.5, 0.5, 0.5, 1.0,
0.5, 0.5, 0.5, 1.0
]
const normal = [0.0, 0.0, 1.0, 0.0, 0.0, 1.0, 0.0, 0.0, 1.0]
const geometry = new Cesium.Geometry({
attributes: {
position: new Cesium.GeometryAttribute({
componentDatatype: Cesium.ComponentDatatype.DOUBLE, // not FLOAT
componentsPerAttribute: 3,
values: pos
}),
color: new Cesium.GeometryAttribute({
componentDatatype: Cesium.ComponentDatatype.FLOAT,
componentsPerAttribute: 4,
values: new Float64Array(colors)
}),
normal: new Cesium.GeometryAttribute({
componentDatatype: Cesium.ComponentDatatype.FLOAT,
componentsPerAttribute: 3,
values: new Float32Array(normal)
})
},
indices: new Uint32Array([0, 1, 2]),
primitiveType: Cesium.PrimitiveType.TRIANGLES,
boundingSphere: Cesium.BoundingSphere.fromVertices(pos)
});
const trangleInstance = new Cesium.GeometryInstance({
geometry,
show: new Cesium.ShowGeometryInstanceAttribute(true)
});
const fragmentShaderSource = `
varying vec3 v_positionEC;
varying vec3 v_normalEC;
varying vec4 v_color;
void main()
{
vec3 positionToEyeEC = -v_positionEC;
vec3 normalEC = normalize(v_normalEC);
#ifdef FACE_FORWARD
normalEC = faceforward(normalEC, vec3(0.0, 0.0, 1.0), -normalEC);
#endif
vec4 color = czm_gammaCorrect(v_color);
czm_materialInput materialInput;
materialInput.normalEC = normalEC;
materialInput.positionToEyeEC = positionToEyeEC;
czm_material material = czm_getDefaultMaterial(materialInput);
material.diffuse = color.rgb;
material.alpha = color.a;
gl_FragColor = czm_phong(normalize(positionToEyeEC), material, czm_lightDirectionEC);
}
`
const vertexShaderSource = `
attribute vec3 position3DHigh;
attribute vec3 position3DLow;
attribute vec3 normal;
attribute vec4 color;
attribute float batchId;
varying vec3 v_positionEC;
varying vec3 v_normalEC;
varying vec4 v_color;
void main()
{
vec4 p = czm_computePosition();
v_positionEC = (czm_modelViewRelativeToEye * p).xyz; // position in eye coordinates
v_normalEC = czm_normal * normal; // normal in eye coordinates
v_color = color;
gl_Position = czm_modelViewProjectionRelativeToEye * p;
}
`
const primitive = new Cesium.Primitive({
geometryInstances: trangleInstance,
asynchronous: false,
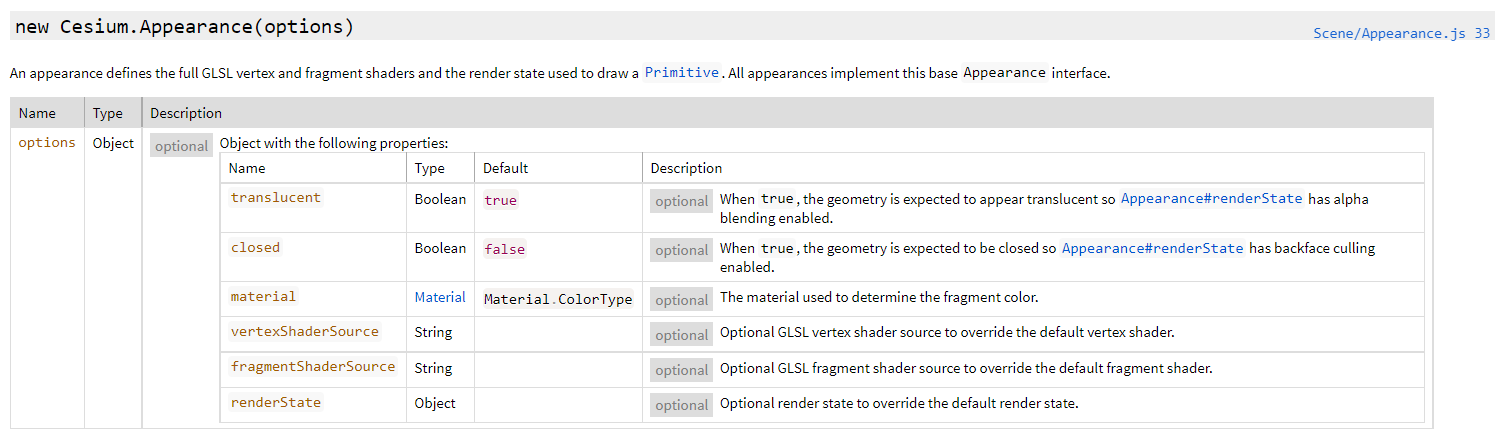
appearance: new Cesium.PerInstanceColorAppearance({
closed: true,
translucent: false,
vertexShaderSource,
fragmentShaderSource,
})
});
viewer.scene.primitives.add(primitive);
viewer.camera.flyTo({
destination: Cesium.Cartesian3.fromDegrees(114.4864783553646, 30.604215790554694, 500),
duration: 2
})
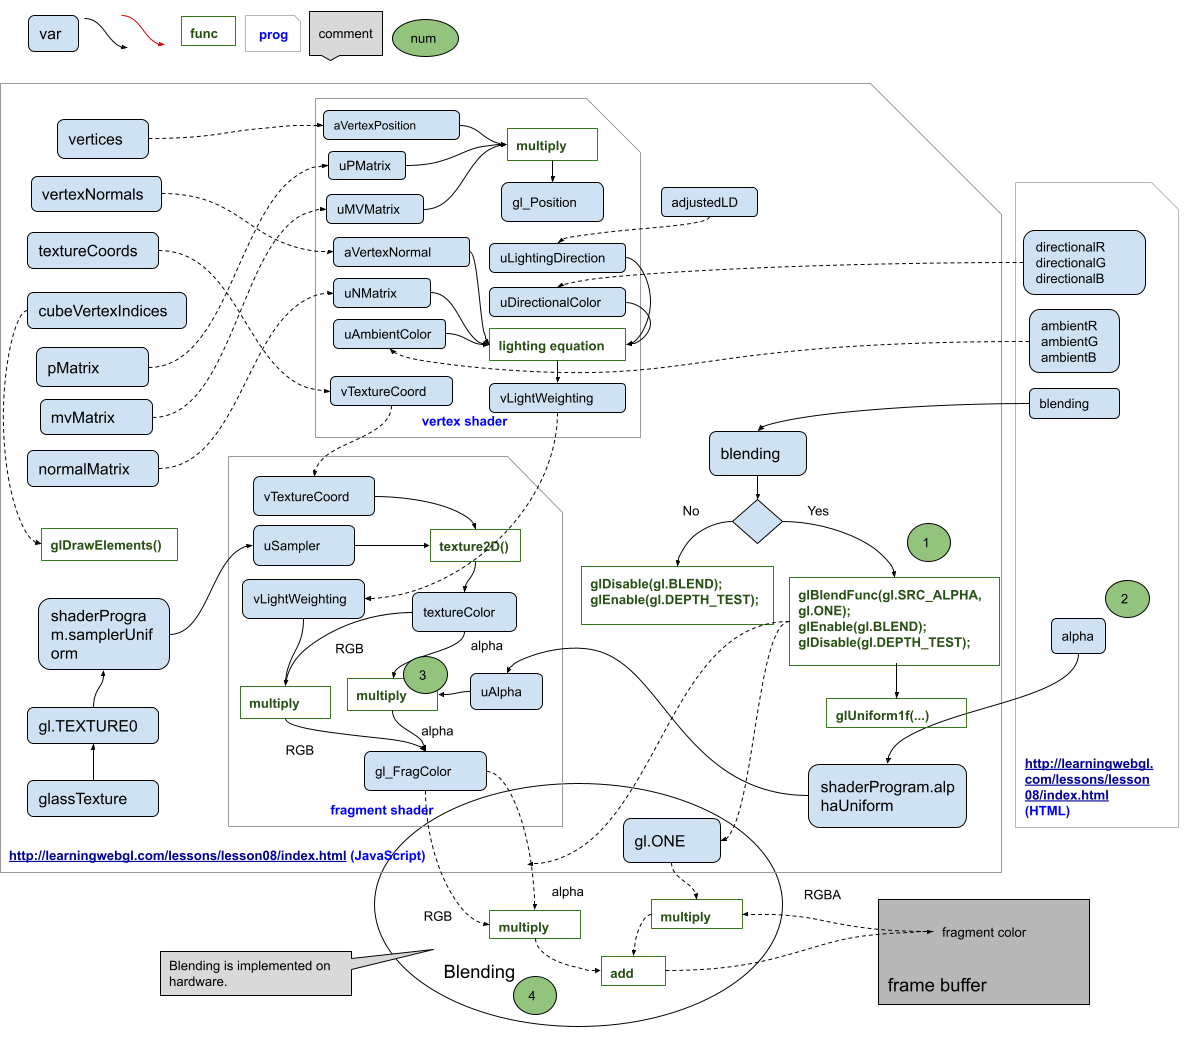
一个简单的需求,如果我们想通过 uniform 传入 time 来不断的改变每个顶点的颜色;虽然说 Primitive 定义集合体的方式可以通过自定义 Appearance 来修改着色器,但是 API 并不支持自定义传入 uniform 值等;而通过 DrawCommand 进行扩展就可以通过 uniformMap 来传递参数实现 JavaScript -> WebGl 的交互;
DrawCommand 是什么
Primitive API 是公开的 API 的最底层了,它面向的场景是高性能、可自定义材质着色器(Appearance API + FabricMaterial Specification)、静态三维物体。
尽管如此,Primitive API 仍然封装了大量几何体类、材质类、WebWorker,而且目前开放自定义着色器 API 的只有三维模型类的新架构,还没下放到 Primitive API。
如果 API 包袱不想那么重,又希望可以使用自己的模型格式(必须是三角面),那么私有的 DrawCommand + VertexArray 接口就非常合适了,它的风格已经是最接近 CesiumJS WebGL 底层的一类 API 了。
DrawCommand,是 Cesium 封装 WebGL 的一个优秀设计,是 Cesium 渲染器的核心类,一个 cesium 用来绘制渲染的底层的命令;常用的接口 Entity、Primitive、Cesium3DTileSet,以及地形和影像的渲染等等,底层都是一个个 DrawCommand 完成的。它把绘图数据(VertexArray)和绘图行为(ShaderProgram)作为一个对象,待时机合适,也就是 Scene 执行 executeCommand 函数时,帧状态对象上所有的指令对象就会使用 WebGL 函数执行,要什么就 bind 什么,做到了在绘图时的用法一致,上层应用接口只需生成指令对象。
下面是 Primitive.js 模块中的 createCommands 函数,它就是负责把 Primitive 对象的参数化数据或 WebWorker 计算来的数据合并生成 DrawCommand 的地方:
// Primitives 绘制
commandFunc(
	this,
  appearance,
  material,
  translucent,
  twoPasses,
  this._colorCommands,
  this._pickCommands,
  frameState
 );

function createCommands(
  primitive,
  appearance,
  material,
  translucent,
  twoPasses,
  colorCommands,
  pickCommands,
  frameState
) {
  var uniforms = getUniforms(primitive, appearance, material, frameState);

  var depthFailUniforms;
  if (defined(primitive._depthFailAppearance)) {
    depthFailUniforms = getUniforms(
      primitive,
      primitive._depthFailAppearance,
      primitive._depthFailAppearance.material,
      frameState
    );
  }

  var pass = translucent ? Pass.TRANSLUCENT : Pass.OPAQUE;

  var multiplier = twoPasses ? 2 : 1;
  multiplier *= defined(primitive._depthFailAppearance) ? 2 : 1;
  colorCommands.length = primitive._va.length * multiplier;

  var length = colorCommands.length;
  var vaIndex = 0;
  for (var i = 0; i < length; ++i) {
    var colorCommand;

    if (twoPasses) {
      colorCommand = colorCommands[i];
      if (!defined(colorCommand)) {
        colorCommand = colorCommands[i] = new DrawCommand({
          owner: primitive,
          primitiveType: primitive._primitiveType,
        });
      }
      colorCommand.vertexArray = primitive._va[vaIndex];
      colorCommand.renderState = primitive._backFaceRS;
      colorCommand.shaderProgram = primitive._sp;
      colorCommand.uniformMap = uniforms;
      colorCommand.pass = pass;

      ++i;
    }

    colorCommand = colorCommands[i];
    if (!defined(colorCommand)) {
      colorCommand = colorCommands[i] = new DrawCommand({
        owner: primitive,
        primitiveType: primitive._primitiveType,
      });
    }
    colorCommand.vertexArray = primitive._va[vaIndex];
    colorCommand.renderState = primitive._frontFaceRS;
    colorCommand.shaderProgram = primitive._sp;
    colorCommand.uniformMap = uniforms;
    colorCommand.pass = pass;

    if (defined(primitive._depthFailAppearance)) {
      if (twoPasses) {
        ++i;

        colorCommand = colorCommands[i];
        if (!defined(colorCommand)) {
          colorCommand = colorCommands[i] = new DrawCommand({
            owner: primitive,
            primitiveType: primitive._primitiveType,
          });
        }
        colorCommand.vertexArray = primitive._va[vaIndex];
        colorCommand.renderState = primitive._backFaceDepthFailRS;
        colorCommand.shaderProgram = primitive._spDepthFail;
        colorCommand.uniformMap = depthFailUniforms;
        colorCommand.pass = pass;
      }

      ++i;

      colorCommand = colorCommands[i];
      if (!defined(colorCommand)) {
        colorCommand = colorCommands[i] = new DrawCommand({
          owner: primitive,
          primitiveType: primitive._primitiveType,
        });
      }
      colorCommand.vertexArray = primitive._va[vaIndex];
      colorCommand.renderState = primitive._frontFaceDepthFailRS;
      colorCommand.shaderProgram = primitive._spDepthFail;
      colorCommand.uniformMap = depthFailUniforms;
      colorCommand.pass = pass;
    }

    ++vaIndex;
  }
}
在进行扩展开发、视觉特效提升、性能优化、渲染到纹理(RTT),甚至基于 Cesium 封装自己的开发框架,定义独家数据格式等等,都需要开发人员对 DrawCommand 熟练掌握。而这部分接口,Cesium 官方文档没有公开,网上的相关资料也比较少,学习起来比较困难;
创建 DrawCommand
首先创建一个 DrawCommand 对象:
var drawCommand = new Cesium.DrawCommand({
    modelMatrix: modelMatrix,
    vertexArray: va,
    shaderProgram: shaderProgram,
    uniformMap: uniformMap,
    renderState: renderState,
    pass: Cesium.Pass.OPAQUE
})
创建 DrawCommand 对象必须包含以下属性:
- vertexArray:顶点数组,向 GPU 传递构造物体的顶点属性、索引(可选的)数组等几何信息;
- shaderProgram:着色器程序对象,负责编译、连接顶点着色器(vertexShader)、片元着色器(fragmentShader);
- pass:渲染通道,在着色器中可以通过 czm_pass 开头判断其渲染通道,在 WebGL 中先渲染不透明物体,然后半透明物体;Cesium 提供的常用渲染通道有:
- ENVIRONMENT:环境,如天空盒(星空背景)
- COMPUTE :用于并行加速计算
- GLOBE :地形瓦片等
- TERRAIN_CLASSIFICATION :地形分类
- CESIUM_3D_TILE :3D Tiles 瓦片
- CESIUM_3D_TILE_CLASSIFICATION :3D Tiles 分类(单体化)
- OPAQUE :不透明物体
- TRANSLUCENT :半透明物体
不是必须但是很常用的属性:
- modelMatrix:模型变换矩阵,用于指定所绘制物体的参考系,包括平移、旋转、缩放三方面参数。如果不设置,则参考系为世界坐标系,原点在地球球心;
- uniformMap:用于传递 uniform 具体的值,是一个回调函数字典对象,key 是 uniform 变量名,value 是回调函数,回调函数的返回值可以是:
- number :数字类型,或者数字数组;
- boolean :布尔类型,true 或者 false,或者数组;
- Cartesian2 :二维向量;
- Cartesian3 :三维向量;
- Cartesian4 :四维向量;
- Color :颜色,本身也是四维向量;
- Matrix2 :2x2 矩阵;
- Matrix3 :3x3 矩阵,一般可以传法线矩阵(normalMatrix);
- Matrix4 :4x4 矩阵,如 modelMatrix、viewMatrix、projectionMatrix 等等都是这个类型;
- Texture :二维贴图;
- CubeMap :立方体贴图。
- renderState:渲染状态对象,封装如深度测试(depthTest)、剔除(cull)、混合(blending)、frontFace 、polygonOffset、lineWidth 等绘制状态类型的参数设置;
- cull/occlude: 视锥剔除 + 地平线剔除组合技,Boolean;
- orientedBoundingBox/boundingVolume: 范围框;
- count: number,WebGL 绘制时要画多少个点;
- offset: number,WebGL 绘制时从多少偏移量开始用顶点数据;
- instanceCount: number,实例绘制有关;
- castShadows/receiveShadows: Boolean,阴影相关;
- pickId: string,若没定义,在 Pick 通道的绘制中将使用深度数据;若定义了将在 GLSL 中转化为 pick id;
下面介绍一下上面的这些属性如何创建;
相关 API 介绍
modelMatrix:模型变换矩阵
4*4 的模型变换矩阵,主要用来将模型坐标系转换到世界坐标系。
将 Matrix4 类型的变量在创建 DrawCommand 时传递进去,它最终会传递到 CesiumJS 的内部统一值:czm_model(模型矩阵)上,而无需你在 uniform 中指定,你可以在顶点着色器中使用它来对 VertexArray 中的顶点进行模型矩阵变换。
如下示例代码:
var origin = Cesium.Cartesian3.fromDegrees(-95.0, 40.0, 200000.0);
p.modelMatrix = Cesium.Transforms.eastNorthUpToFixedFrame(origin);
vertexArray:VAO
它主要构造模型的顶点数据,主要用来绘制图形,Cesium 把 WebGL 的顶点缓冲和索引缓冲包装成了 Buffer,然后为了方便,将这些顶点相关的缓冲绑定在了一个对象里,叫做 VertexArray,内部会启用 WebGL 的 VAO 功能。
顶点数组的创建有多种方法,通常可以将几何数据用 Cesium.Geometry 来表达,然后用Cesium.VertexArray.fromGeometry 可以用更少代码量完成创建。关键参数:
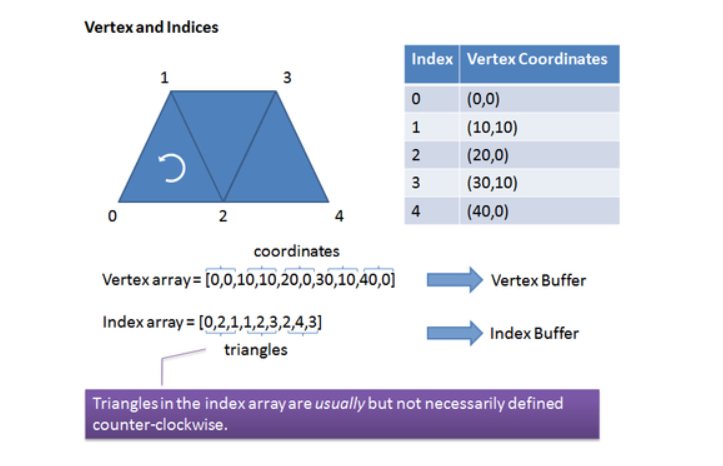
- attributeLocations :顶点属性索引,key 为属性名称,value 为顶点属性缓冲区在同一个着色器程序中的索引,相当于将 js 中的顶点数组,传递到 shader 中的 attribute 变量。在后面创建shaderProgram时还需要用到;
- context:从Primitive.update方法的frameState参数中获取;
- geometry:Cesium.Geometry,Cesium 自带的几何类型都提供一个静态方法 createGeometry 来生成这个类型的几何对象。
// 创建/组织几何数据
var box = new Cesium.BoxGeometry({
    vertexFormat: Cesium.VertexFormat.POSITION_ONLY,
    maximum: new Cesium.Cartesian3(250000.0, 250000.0, 250000.0),
    minimum: new Cesium.Cartesian3(-250000.0, -250000.0, -250000.0)
});
var geometry = Cesium.BoxGeometry.createGeometry(box);

// 创建顶点属性索引,key 为属性名称,value 为顶点属性缓冲区在同一个着色器程序中的索引。
// 相当于将 js 中的顶点数组,传递到 shader 中的 attribute 变量
var attributeLocations = Cesium.GeometryPipeline.createAttributeLocations(geometry)

// 创建顶点数组对象
var va = Cesium.VertexArray.fromGeometry({
    context: frameState.context,
    geometry: geometry,
    attributeLocations: attributeLocations
});
function createVertexArray(primitive, frameState) {
  var attributeLocations = primitive._attributeLocations;
  var geometries = primitive._geometries;
  var scene3DOnly = frameState.scene3DOnly;
  var context = frameState.context;

  var va = [];
  var length = geometries.length;
  for (var i = 0; i < length; ++i) {
    var geometry = geometries[i];

    va.push(
      VertexArray.fromGeometry({
        context: context,
        geometry: geometry,
        attributeLocations: attributeLocations,
        bufferUsage: BufferUsage.STATIC_DRAW,
        interleave: primitive._interleave,
      })
    );

    if (defined(primitive._createBoundingVolumeFunction)) {
      primitive._createBoundingVolumeFunction(frameState, geometry);
    } else {
      primitive._boundingSpheres.push(
        BoundingSphere.clone(geometry.boundingSphere)
      );
      primitive._boundingSphereWC.push(new BoundingSphere());

      if (!scene3DOnly) {
        var center = geometry.boundingSphereCV.center;
        var x = center.x;
        var y = center.y;
        var z = center.z;
        center.x = z;
        center.y = x;
        center.z = y;

        primitive._boundingSphereCV.push(
          BoundingSphere.clone(geometry.boundingSphereCV)
        );
        primitive._boundingSphere2D.push(new BoundingSphere());
        primitive._boundingSphereMorph.push(new BoundingSphere());
      }
    }
  }

  primitive._va = va;
  primitive._primitiveType = geometries[0].primitiveType;

  if (primitive.releaseGeometryInstances) {
    primitive.geometryInstances = undefined;
  }

  primitive._geometries = undefined;
  setReady(primitive, frameState, PrimitiveState.COMPLETE, undefined);
}
其他在 Cesium 源码中也给出了示例,比较接近原生的 webgl 的写法了,index 为顶点属性的存放索引。如下:
// Example 1. Create a vertex array with vertices made up of three floating point
// values, e.g., a position, from a single vertex buffer.  No index buffer is used.
// 单个顶点的数据,不使用索引缓冲区 - 先创建 Buffer
// 创建内置了 WebGLBuffer 的顶点缓冲对象 positionBuffer
var positionBuffer = Buffer.createVertexBuffer({
  context: context,
  typedArray : new Float32Array([0, 0, 0]),
  usage: BufferUsage.STATIC_DRAW
});

// 顶点属性 attributes
var attributes = [
  {
    index: 0,
    enabled: true,
    // 缓冲区中写入数据
    vertexBuffer: positionBuffer,
    componentsPerAttribute: 3,
    componentDatatype: ComponentDatatype.FLOAT,
    normalize: false,
    offsetInBytes: 0,
    strideInBytes: 0, // 紧密组合在一起,没有 byteStride
    instanceDivisor: 0 // 不实例化绘制
  }
];

var va = new VertexArray({
  context: context,
  attributes: attributes
});

// Example 2. Create a vertex array with vertices from two different vertex buffers.
// Each vertex has a three-component position and three-component normal.
// 每个顶点都含有三个分量的一个位置属性以及法向量;
// 坐标缓冲和法线缓冲分开存到两个对象里
var positionBuffer = Buffer.createVertexBuffer({
  context: context,
  sizeInBytes: 12,
  usage: BufferUsage.STATIC_DRAW
});
var normalBuffer = Buffer.createVertexBuffer({
  context: context,
  sizeInBytes: 12,
  usage: BufferUsage.STATIC_DRAW
});
var attributes = [
  {
    index: 0,
    vertexBuffer: positionBuffer,
    componentsPerAttribute: 3,
    componentDatatype: ComponentDatatype.FLOAT
  },
  {
    index: 1,
    vertexBuffer: normalBuffer,
    componentsPerAttribute: 3,
    componentDatatype: ComponentDatatype.FLOAT
  }
];
var va = new VertexArray({
  context: context,
  attributes: attributes
});

// Example 3. Creates the same vertex layout as Example 2 using a single
// vertex buffer, instead of two.
// 两个顶点缓冲区数据
var buffer = Buffer.createVertexBuffer({
  context: context,
  sizeInBytes: 24,
  usage: BufferUsage.STATIC_DRAW
});
var attributes = [
  {
    vertexBuffer: buffer,
    componentsPerAttribute: 3,
    componentDatatype: ComponentDatatype.FLOAT,
    offsetInBytes: 0,
    strideInBytes: 24
  },
  {
    vertexBuffer: buffer,
    componentsPerAttribute: 3,
    componentDatatype: ComponentDatatype.FLOAT,
    normalize: true,
    offsetInBytes: 12,
    strideInBytes: 24
  }
];
var va = new VertexArray({
  context: context,
  attributes: attributes
});
上面方式创建的 Buffer,顶点坐标是直角坐标系下的,是最原始的坐标值,除非在着色器里做矩阵变换,或者这些直角坐标就在世界坐标系的地表附近。它是一堆没有具体语义的、纯粹数学几何的坐标,与渲染管线无关。所以,对于地表某处的坐标点,通常要配合 ENU 转换矩阵 + 内置的 MVP 转换矩阵来使用。
顶点数组对象(Vertex Array Object,统称 VAO)是 WebGL(1.0)的一个扩展,通过它可以简化缓冲区的绑定过程,即可以减少代码的调用次数,也提升了 WebGL 状态切换的效率。VAO 的作用:负责记录 bindBuffer 和 vertexAttribPointer 的调用状态。
Pass:绘制的通道类型
CesiumJS 不是粗暴地把帧状态对象上的 Command 遍历一遍就绘制了的,在 Scene 的渲染过程中,除了生成三大 Command(computeList、overlayList、commandList),还有一步要对 Command 进行通道排序。
通道,是一个枚举类型,保存在 Pass.js 模块中。不同通道有不同的优先级,在着色器中可以通过 czm_pass 开头判断其渲染通道。
比如下面代码,判断当前物体渲染模式是否为透明,剔除不透明几何体的绘制;
   if ((czm_pass == czm_passTranslucent) && isOpaque())
   {
     gl_Position *= 0.0; // Cull opaque geometry in the translucent pass
   }
primitiveType:绘制的图元类型
即指定 VertexArray 中顶点的拓扑格式,在 WebGL 中是通过 drawArrays 指定的:
gl.drawArrays(gl.TRIANGLES, 0, 3)
这个 gl.TRIANGLES 就是图元类型,是一个常数。Cesium 全部封装在 PrimitiveType.js 模块导出的枚举中了:
console.log(PrimitiveType.TRIANGLES) // 4
DrawCommand 中 primitiveType 默认就是 PrimitiveType.TRIANGLES;
Framebuffer:离屏绘制容器
CesiumJS 支持把结果画到 Renderbuffer,也就是 RTR(Render to RenderBuffer) 离屏绘制。绘制到渲染缓冲,是需要帧缓冲容器的,CesiumJS 把 WebGL 1/2 中帧缓冲相关的 API 都封装好了(严格来说,把 WebGL 中的 API 基本都封装了一遍)。
// 创建带有颜色和深度纹理的帧缓冲区
var width = context.canvas.clientWidth;
var height = context.canvas.clientHeight;
var framebuffer = new Framebuffer({
  context : context,
  colorTextures : [new Texture({
    context : context,
    width : width,
    height : height,
    pixelFormat : PixelFormat.RGBA
  })],
  depthTexture : new Texture({
    context : context,
    width : width,
    height : height,
    pixelFormat : PixelFormat.DEPTH_COMPONENT,
    pixelDatatype : PixelDatatype.UNSIGNED_SHORT
  })
});
shaderProgram:着色器程序
这个类是 cesium 封装的一个 program 类,核心功能其实就是简化 shader 与 program 的绑定、shader 的编译,并使用大量正则等手段做了着色器源码匹配、解析、管理,同时做了一些缓存处理。
着色器代码由 ShaderSource 管理,ShaderProgram 则管理起多个着色器源码,也就是着色器本身。使用 ShaderCache 作为着色器程序的缓存容器。它们的层级关系如下:
Context
  ┖ ShaderCache
    ┖ ShaderProgram
      ┖ ShaderSource
使用 ShaderProgram.fromCache 静态方法会自动帮你把着色器缓存到 ShaderCache 容器中。
const vs = `
  attribute vec3 position;
  void main(){
      gl_Position = czm_projection  * czm_modelView * vec4( position , 1. );
  }
`;
const fs = `
  uniform vec3 color;
  void main(){
      gl_FragColor=vec4( color , 1. );
  }
`;
const shaderProgram = Cesium.ShaderProgram.fromCache({
  context: context,
  vertexShaderSource: vs,
  fragmentShaderSource: fs,
  // attributeLocations 就是写入缓冲区数据的位置;也就是当前创建的物体的缓冲区;
  attributeLocations: attributeLocations
})
这里需要注意的是:
- attributeLocations 属性是构造 geometry 的点的属性和定义图元的可选索引数据,包括 position、color、normal、st 等等;也就是 Cesium.GeometryAttributes 对应的相关属性,就是一个普通的对象;
{
  "position": 0,
  "normal": 1,
  "st": 2,
  "bitangent": 3,
  "tangent": 4,
  "color": 5
}
- 在写着色器代码时候,Cesium 内部封装了很多内置的 uniform变量,都是以 czm_ 开头,比如常见的 czm_projection、czm_modelView(投影矩阵、模型矩阵)等,内置 uniform 变量无需在我们的 shader 代码中声明,直接使用即可。如果我们需要自己声明变量,可以通过构造 DrawCommand 的 uniformMap 传入;
cesium 着色器内置变量:https://github.com/CesiumGS/cesium/blob/main/Source/Renderer/AutomaticUniforms.js
uniformMap:uniform 变量
用于传递自定义 uniform 变量的值,是一个回调函数,key 是 uniform 变量名,value 是回调函数,回调函数的返回值可以是:
- number :数字类型,在 shader 中类型为 float;
- boolean :布尔类型,true 或者 false,在 shader 中类型为 bool;
- Cesium.Cartesian2 :二维向量,在 shader 中类型为 vec2;
- Cesium.Cartesian3 :三维向量,在 shader 中类型为 vec3;
- Cesium.Cartesian4 :四维向量,在 shader 中类型为 vec4;
- Cesium.Color :颜色,本身也是四维向量,在 shader 中类型为 vec4;
- []:元素为上述类型的数组
- Cesium.Matrix2 :2x2 矩阵,在 shader 中类型为 mat2;
- Cesium.Matrix3 :3x3 矩阵,一般可以传法线矩阵(normalMatrix),在 shader 中类型为 mat3;
- Cesium.Matrix4 :4x4 矩阵,如 modelMatrix、viewMatrix、projectionMatrix 等等都是这个类型,在 shader 中类型为 mat4;
- Cesium.Texture :二维贴图,在 shader 中类型为 sampler2D;
- Cesium.CubeMap :立方体贴图,在 shader 中类型为 samplerCube;
- {}:结构体。
// 传入 color 变量
const uniformMap = {
  color() {
    return Cesium.Color.GRAY
  }
}

// 在片段着色器中使用
const fs = `
	uniform vec3 color;
	void main(){
		gl_FragColor=vec4(color , 1.);
	}
`;
这个 uniforms 对象最终会在 Context 执行绘制时,与系统的自动统一值(AutomaticUniforms)合并。
Context.prototype.draw = function (/*...*/) {
  // ...
  continueDraw(this, drawCommand, shaderProgram, uniformMap);
  // ...
}
renderState:渲染状态对象
渲染状态对象,它传递渲染数据之外一切参与 WebGL 渲染的状态值,封装如深度测试(depthTest)、剔除(cull)、混合(blending)、frontFace 、polygonOffset、lineWidth 等绘制状态类型的参数设置。下面代码是 Cesium 源码中给出的示例:
var defaults = {
  frontFace: Cesium.WindingOrder.COUNTER_CLOCKWISE,
  cull: {
    enabled: false,
    face: Cesium.CullFace.BACK
  },
  lineWidth: 1,
  polygonOffset: {
    enabled: false,
    factor: 0,
    units: 0
  },
  scissorTest: {
    enabled: false,
    rectangle: {
      x: 0,
      y: 0,
      width: 0,
      height: 0
    }
  },
  depthRange: {
    near: 0,
    far: 1
  },
  depthTest: {
    enabled: false,
    func: Cesium.DepthFunction.LESS
  },
  colorMask: {
    red: true,
    green: true,
    blue: true,
    alpha: true
  },
  depthMask: true,
  stencilMask: ~0,
  blending: {
    enabled: false,
    color: {
      red: 0.0,
      green: 0.0,
      blue: 0.0,
      alpha: 0.0
    },
    equationRgb: Cesium.BlendEquation.ADD,
    equationAlpha: Cesium.BlendEquation.ADD,
    functionSourceRgb: Cesium.BlendFunction.ONE,
    functionSourceAlpha: Cesium.BlendFunction.ONE,
    functionDestinationRgb: Cesium.BlendFunction.ZERO,
    functionDestinationAlpha: Cesium.BlendFunction.ZERO
  },
  stencilTest: {
    enabled: false,
    frontFunction: Cesium.StencilFunction.ALWAYS,
    backFunction: Cesium.StencilFunction.ALWAYS,
    reference: 0,
    mask: ~0,
    frontOperation: {
      fail: Cesium.StencilOperation.KEEP,
      zFail: Cesium.StencilOperation.KEEP,
      zPass: Cesium.StencilOperation.KEEP
    },
    backOperation: {
      fail: Cesium.StencilOperation.KEEP,
      zFail: Cesium.StencilOperation.KEEP,
      zPass: Cesium.StencilOperation.KEEP
    }
  },
  sampleCoverage: {
    enabled: false,
    value: 1.0,
    invert: false
  }
};

var renderState = Cesium.RenderState.fromCache(defaults)
DrawCommand 使用以及渲染流程
使用 DrawCommand
DrawCommand 的使用需要通过实现 Primitive 接口来完成, 如下代码,实现一个简单三角形绘制,点击例子可查看结果;
class StaticTrianglePrimitive {
  /**
   * @param {Matrix4} modelMatrix matrix to WorldCoordinateSystem
   */
  constructor(modelMatrix) {
    this.modelMatrix = modelMatrix || Cesium.Matrix4.IDENTITY.clone()
    this.drawCommand = null;
    this.num = 0;
  }

  /**
   * 创建 DrawCommand
   * @param {Cesium.Context} context
   */
  createCommand(context) {
    const attributeLocations = {
      "position": 0,
    }
    const uniformMap = {
      u_color() {
        return Cesium.Color.HONEYDEW
      },
      u_time() {
        return new Date().getTime();
      }
    }

    const positionBuffer = Cesium.Buffer.createVertexBuffer({
      usage: Cesium.BufferUsage.STATIC_DRAW,
      typedArray: new Float32Array([
        10000, 50000, 5000,
        -20000, -10000, 5000,
        50000, -30000, 5000,
      ]),
      context: context,
    })

    const vertexArray = new Cesium.VertexArray({
      context: context,
      attributes: [{
        index: 0, // 等于 attributeLocations['position']
        vertexBuffer: positionBuffer,
        componentsPerAttribute: 3,
        componentDatatype: Cesium.ComponentDatatype.FLOAT
      }]
    })

    const vertexShaderText = `
    attribute vec3 position;
    void main() {
      gl_Position = czm_projection * czm_view * czm_model * vec4(position, 1.0);
    }`
    const fragmentShaderText = `
    uniform vec3 u_color;
    uniform float u_time;
    void main(){
      // float time = sin(czm_frameNumber / 60.0);
      float time = sin(u_time / 60.0);
      float x_color = fract(u_color.x * time);
      gl_FragColor = vec4(x_color, u_color.yz, 1.0);
    }`

    const program = Cesium.ShaderProgram.fromCache({
      context: context,
      vertexShaderSource: vertexShaderText,
      fragmentShaderSource: fragmentShaderText,
      attributeLocations: attributeLocations,
    })

    const renderState = Cesium.RenderState.fromCache({
      depthTest: {
        enabled: true
      }
    })

    this.drawCommand = new Cesium.DrawCommand({
      modelMatrix: this.modelMatrix,
      vertexArray: vertexArray,
      shaderProgram: program,
      uniformMap: uniformMap,
      renderState: renderState,
      pass: Cesium.Pass.OPAQUE,
    })
  }

  /**
   * 实现 Primitive 接口,供 Cesium 内部在每一帧中调用
   * @param {Cesium.FrameState} frameState
   */
   update(frameState) {
    this.num++
    // console.log(this.drawCommand, 'this.drawCommand');
    if (!this.drawCommand) {
      this.createCommand(frameState.context)
    }
    this.drawCommand.uniformMap.u_time = () => this.num
    frameState.commandList.push(this.drawCommand)
  }
}

const viewer = new Cesium.Viewer('cesiumContainer', {
  contextOptions: {
    requestWebgl2: true
  }
})

const modelCenter = Cesium.Cartesian3.fromDegrees(112, 23, 0)
const modelMatrix = Cesium.Transforms.eastNorthUpToFixedFrame(modelCenter)

viewer.scene.globe.depthTestAgainstTerrain = true
viewer.scene.primitives.add(new StaticTrianglePrimitive(modelMatrix))
DrawCommand 渲染流程
创建完的 DrawCommand 会通过 update 函数,加载到 frameState 的 commandlist 队列中,比如 Primitive 中 update 加载 drawcommand 的伪代码:
Primitive.prototype.update = function(frameState) {
    var commandList = frameState.commandList;
    var passes = frameState.passes;
    if (passes.render) {

        var colorCommand = colorCommands[j];
        commandList.push(colorCommand);
    }

    if (passes.pick) {
        var pickLength = pickCommands.length;
        var pickCommand = pickCommands[k];
        commandList.push(pickCommand);
    }
}
进入队列后就开始听从安排,随时准备上前线(渲染)。Scene 会先对所有的 commandlist 会排序,Pass 值越小优先渲染,通过 Pass 的枚举可以看到最后渲染的是透明的和 overlay:
function createPotentiallyVisibleSet(scene) {
    for (var i = 0; i < length; ++i) {
        var command = commandList[i];
        var pass = command.pass;

        // 优先 computecommand,通过 GPU 计算
        if (pass === Pass.COMPUTE) {
            computeList.push(command);
        }
        // overlay 最后渲染
        else if (pass === Pass.OVERLAY) {
            overlayList.push(command);
        }
        // 其他 command
        else {
            var frustumCommandsList = scene._frustumCommandsList;
            var length = frustumCommandsList.length;

            for (var i = 0; i < length; ++i) {
                var frustumCommands = frustumCommandsList[i];
                frustumCommands.commands[pass][index] = command;
            }
        }
    }
}
Pass.OVERLAY 包括 billboard、shadowmap 的等等。Pass.COMPUTE 主要是 ImageryLayer 中对墨卡托影像切片动态投影以及 sun 等绘制通道(动态计算);frustumCommandList 就包含受离相机的近距离和远距离的约束定义命令列表。
根据渲染优先级排序后,会先渲染环境相关的 command,比如 skybox,大气层等,接着,开始渲染其他command:
function executeCommands(scene, passState) {
    // 地球
    var commands = frustumCommands.commands[Pass.GLOBE];
    var length = frustumCommands.indices[Pass.GLOBE];
    for (var j = 0; j < length; ++j) {
        executeCommand(commands[j], scene, context, passState);
    }

    // 球面
    us.updatePass(Pass.GROUND);
    commands = frustumCommands.commands[Pass.GROUND];
    length = frustumCommands.indices[Pass.GROUND];
    for (j = 0; j < length; ++j) {
        executeCommand(commands[j], scene, context, passState);
    }

    // 其他非透明的
    var startPass = Pass.GROUND + 1;
    var endPass = Pass.TRANSLUCENT;
    for (var pass = startPass; pass < endPass; ++pass) {
        us.updatePass(pass);
        commands = frustumCommands.commands[pass];
        length = frustumCommands.indices[pass];
        for (j = 0; j < length; ++j) {
            executeCommand(commands[j], scene, context, passState);
        }
    }

    // 透明的
    us.updatePass(Pass.TRANSLUCENT);
    commands = frustumCommands.commands[Pass.TRANSLUCENT];
    commands.length = frustumCommands.indices[Pass.TRANSLUCENT];
    executeTranslucentCommands(scene, executeCommand, passState, commands);

    // 后面在渲染Overlay
}
接着就是渲染的过程,也就是把之前VAO,Texture 等等渲染到 FBO 的过程:
DrawCommand.prototype.execute = function(context, passState) {
    // Contex开始渲染
    context.draw(this, passState);
};

Context.prototype.draw = function(drawCommand, passState) {
    passState = defaultValue(passState, this._defaultPassState);
    var framebuffer = defaultValue(drawCommand._framebuffer, passState.framebuffer);

    // 准备工作
    beginDraw(this, framebuffer, drawCommand, passState);
    // 开始渲染
    continueDraw(this, drawCommand);
};

function beginDraw(context, framebuffer, drawCommand, passState) {
    var rs = defaultValue(drawCommand._renderState, context._defaultRenderState);
    // 绑定FBO
    bindFramebuffer(context, framebuffer);
    // 设置渲染状态
    applyRenderState(context, rs, passState, false);

    // 设置ShaderProgram
    var sp = drawCommand._shaderProgram;
    sp._bind();
}

function continueDraw(context, drawCommand) {
    // 渲染参数
    var primitiveType = drawCommand._primitiveType;
    var va = drawCommand._vertexArray;
    var offset = drawCommand._offset;
    var count = drawCommand._count;
    var instanceCount = drawCommand.instanceCount;

    // 设置Shader中的参数
    drawCommand._shaderProgram._setUniforms(drawCommand._uniformMap, context._us, context.validateShaderProgram);

    // 绑定VAO数据
    va._bind();
    var indexBuffer = va.indexBuffer;

    // 渲染
    if (defined(indexBuffer)) {
        offset = offset * indexBuffer.bytesPerIndex; // offset in vertices to offset in bytes
        count = defaultValue(count, indexBuffer.numberOfIndices);
        if (instanceCount === 0) {
            context._gl.drawElements(primitiveType, count, indexBuffer.indexDatatype, offset);
        } else {
            context.glDrawElementsInstanced(primitiveType, count, indexBuffer.indexDatatype, offset, instanceCount);
        }
    }

    va._unBind();
}
其他
其他有关 Command 的比如 ClearCommand、ComputeCommand;
- ComputeCommand 需要配合 ComputeEngine 一起使用,可以认为是一个特殊的 DrawCommand,它不是为了渲染,而是通过渲染机制,实现 GPU 的计算,通过 Shader 计算结果保存到纹理传出的一个过程,实现在 Web 前端高效的处理大量的数值计算,下面,我们通过学习之前 ImageryLayer 中对墨卡托影像切片动态投影的过程来了解该过程。
- ClearCommand 用于清空缓冲区的内容,包括颜色,深度和模板。用户在创建的时候,指定清空的颜色值等属性;
案例:实现四棱锥绘制
import * as Cesium from 'cesium';

class MyPrimitive {

  constructor(modelMatrix) {
    this.modelMatrix = modelMatrix || Cesium.Matrix4.IDENTITY.clone()
    this.drawCommand = null;
    this._texture = null;
  }

  createAnPyramidGeometry() {
    // 处理顶点数据
    const positions = []
    const st = [
      0.5, 0.5,
      0.0, 1.0,
      1.0, 1.0,
      0.0, 0.0,
      1.0, 0.0
    ]

    const _height = 300000
    const center = [116.138641, 23.814026]
    const point1 = vector2Add(center, [-2.0, 2.0])
    const point2 = vector2Add(center, [2.0, 2.0])
    const point3 = vector2Add(center, [-2.0, -2.0])
    const point4 = vector2Add(center, [2.0, -2.0])

    this.rotateLine = {
      v1: new Cesium.Cartesian3(...transformPos(center, 0)),
      v2: new Cesium.Cartesian3(...transformPos(center, _height)),
    }
    /*
        1 ******************** 2
          * *                *
          *    *          *  *
          *      *      *    *
          *         * 0      *
          *       *    *     *
          *    *          *  *
          * *                *
        3 ******************** 4
    */
    positions.push(
      ...transformPos(center, 0),
      ...transformPos(point1, _height),
      ...transformPos(point2, _height),
      ...transformPos(point3, _height),
      ...transformPos(point4, _height)
    )

    const indices = [
      0, 2, 1,
      0, 1, 3,
      0, 3, 4,
      0, 4, 2,
      1, 3, 2,
      2, 3, 4
    ]

    const normal = [
      0, 0.5, 0,
      -0.5, 0, 0,
      0, -0.5, 0,
      0.5, 0, 0,
      0, 0, 1,
    ]

    function vector2Add(vec1, vec2) {
      return [vec1[0] + vec2[0], vec1[1] + vec2[1]]
    }

    function transformPos(lonlat, height) {
      let pos = Cesium.Cartesian3.fromDegrees(lonlat[0], lonlat[1], height)
      return [pos.x, pos.y, pos.z]
    }

    let geometry = new Cesium.Geometry({
      attributes: {
        position: new Cesium.GeometryAttribute({
          componentDatatype: Cesium.ComponentDatatype.FLOAT,
          componentsPerAttribute: 3,
          values: new Float32Array(positions)
        }),
        st: new Cesium.GeometryAttribute({
          componentDatatype: Cesium.ComponentDatatype.FLOAT,
          componentsPerAttribute: 2,
          values: new Float32Array(st)
        }),
        normal: new Cesium.GeometryAttribute({
          componentDatatype: Cesium.ComponentDatatype.FLOAT,
          componentsPerAttribute: 3,
          values: new Float32Array(normal)
        }),
      },
      indices: indices,
      boundingSphere: Cesium.BoundingSphere.fromVertices(positions)
    })

    return geometry
  }
  /**
   * 创建 DrawCommand
   * @param {Cesium.Context} context
   */
  createCommand(context) {
    let geometry = this.createAnPyramidGeometry()
    const attributeLocations = Cesium.GeometryPipeline.createAttributeLocations(geometry)

    let vertexArray = Cesium.VertexArray.fromGeometry({
      context: context,
      geometry: geometry,
      attributeLocations,
    });

    const vertexShaderText = `
    attribute vec3 position;
    attribute vec2 st;
    varying vec2 v_st;
    uniform vec3 v1;
    uniform vec3 v2;

    mat4 RodriguesRotation(vec3 v1, vec3 v2, float theta) {
      vec3 _p = v2 - v1;
      vec3 p = normalize(_p);

      float x = p.x;
      float y = p.y;
      float z = p.z;

      float xy = x * y;
      float xx = x * x;
      float xz = x * z;
      float yy = y * y;
      float yz = y * z;
      float zz = z * z;

      float sintheta = sin(radians(theta));
      float costhta = cos(radians(theta));
      float _m00 = costhta + xx * (1.0 - costhta);
      float _m01 = z * sintheta + xy * (1.0 - costhta);
      float _m02 = -y * sintheta + xz * (1.0 - costhta);
      float _m03 = 0.0;

      float _m10 = -z * sintheta + xy * (1.0 - costhta);
      float _m11 = costhta + yy * (1.0 - costhta);
      float _m12 = x * sintheta + yz * (1.0 - costhta);
      float _m13 = 0.0;

      float _m20 = y * sintheta + xz * (1.0 - costhta);
      float _m21 = -x * sintheta + yz * (1.0 - costhta);
      float _m22 = costhta + zz * (1.0 - costhta);
      float _m23 = 0.0;

      return mat4(_m00, _m01, _m02, _m03, _m10, _m11, _m12, _m13, _m20, _m21, _m22, _m23,0, 0, 0, 1.0);
    }
    void main() {
      float upLimit = 0.3;
      float ty = abs(cos(czm_frameNumber * 0.03)) * upLimit;
      mat4 translateY = mat4(1, 0, 0, 0, 0, 1, 0, ty, 0, 0, 1, 0, 0, 0, 0, 1);
      mat4 rotateAxis = RodriguesRotation(v1, v2, czm_frameNumber);
      vec4 rotateVec = rotateAxis * vec4(position, 1.0);

      v_st = st;
      gl_Position = czm_projection * czm_view * czm_model * rotateVec * translateY;
    }
    `
    const fragmentShaderText = `
    varying vec2 v_st; // 纹理坐标 一般是从顶点着色器中传递过来
    uniform sampler2D texture_map; // 声明 sampler2D 的纹理数据常量

    void main() {
      gl_FragColor = texture2D(texture_map, v_st);
    }`
    let shaderProgram = Cesium.ShaderProgram.fromCache({
      context: context,
      vertexShaderSource: vertexShaderText,
      fragmentShaderSource: fragmentShaderText,
      attributeLocations,
    })

    const uniformMap = {
      u_color() {
        return Cesium.Color.HONEYDEW
      },
      texture_map: () => {
        if(Cesium.defined(this._texture)){
          return this._texture;
        } else {
          return context.defaultTexture;
        }
      },
      v1: () => {
        return this.rotateLine.v1
      },
      v2: () => {
        return this.rotateLine.v2
      }
    }


    let renderState = Cesium.RenderState.fromCache({
      cull: {
        enabled: false,
        face : Cesium.CullFace.BACK
      },
      depthTest: {
        enabled: false
      }
    })

    this.drawCommand = new Cesium.DrawCommand({
      vertexArray: vertexArray,
      shaderProgram: shaderProgram,
      uniformMap: uniformMap,
      renderState: renderState,
      pass: Cesium.Pass.OPAQUE
    })

  }
  //创建纹理
  createTexture(context) {
    if (!this._image) {
      this._image = new Image()
      this._image.src = `http://localhost:5173/src/js/fY6uRrz.png`
      let that = this
      this._image.onload = () => {
        let vTexture = new Cesium.Texture({
          context: context,
          source: this._image,
          // width: 64,
          // height: 64,
          // sampler: new Cesium.Sampler({
          //   wrapS: Cesium.TextureWrap.MIRRORED_REPEAT
          // })
        });
        that._texture = vTexture
      }
    }
  }
  /**
   * 实现Primitive接口,供Cesium内部在每一帧中调用
   * @param {Cesium.FrameState} frameState
   */
  update(frameState) {
    if (!this.drawCommand) {
      this.createCommand(frameState.context)
    }

    if (this._texture === null) {
      this._texture = this.createTexture(frameState.context)
    }
    frameState.commandList.push(this.drawCommand)
  }
}

export default MyPrimitive;

总结
DrawCommand 就是 Cesium 一个更底层的渲染指令。就是原型链上具备 update 方法的类,且 update 方法接受一个 FrameState 对象,并在执行过程中向这个帧状态对象添加 DrawCommand 的,就能添加至 scene.primitives 这个 PrimitiveCollection 中;
优点就是能精确控制 DrawCommand,就可以在 Cesium 场景中做你想做的绘图。
参考
- Cesium DrawCommand;
- 透明物体绘制;
- VAO/VBO 相关:
- 自定义几何体;
- Cesium 相关源码