SpringMVC的数据响应
SpringMVC的数据响应格式
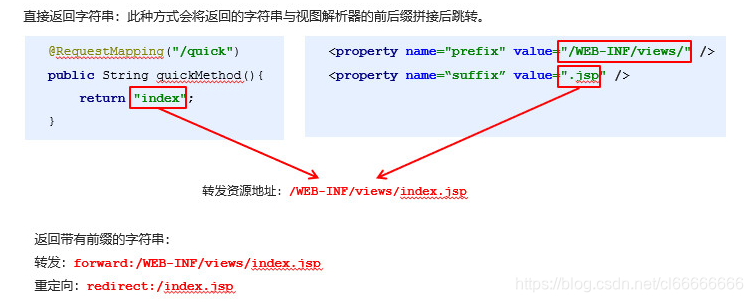
SpringMVC的数据响应-页面跳转-返回字符串形式
SpringMVC的数据响应-页面跳转-返回ModelAndView形式1
在Controller中方法返回ModelAndView对象,并且设置视图名称
spring-mvc.xml
<?xml version="1.0" encoding="UTF-8"?>
<beans xmlns="http://www.springframework.org/schema/beans"
       xmlns:xsi="http://www.w3.org/2001/XMLSchema-instance"
       xmlns:context="http://www.springframework.org/schema/context"
       xsi:schemaLocation="
       http://www.springframework.org/schema/beans http://www.springframework.org/schema/beans/spring-beans.xsd
       http://www.springframework.org/schema/context http://www.springframework.org/schema/context/spring-context.xsd">

    <!--Controller的组件扫描-->
    <context:component-scan base-package="com.itheima.controller"/>

    <!--配置内部资源视图解析器-->
    <bean class="org.springframework.web.servlet.view.InternalResourceViewResolver">
        <property name="prefix" value="/"></property>
        <property name="suffix" value=".jsp"></property>
    </bean>

</beans>
success.jsp
<%--
  Created by IntelliJ IDEA.
  User: auas
  Date: 2021/1/7
  Time: 11:30
  To change this template use File | Settings | File Templates.
--%>
<%@ page contentType="text/html;charset=UTF-8" language="java" %>
<html>
<head>
    <title>Title</title>
</head>
<body>
    <h1>Success!${username}</h1>
</body>
</html>
package com.itheima.controller;

import org.springframework.stereotype.Controller;
import org.springframework.web.bind.annotation.RequestMapping;
import org.springframework.web.bind.annotation.RequestMethod;
import org.springframework.web.servlet.ModelAndView;

@Controller
@RequestMapping("/user")
public class UserController {

    @RequestMapping(value = "/quick2")
    public ModelAndView save2(){
        /**
         * Model 封装数据
         * View 展示数据
         */
        ModelAndView modelAndView = new ModelAndView();
        //设置模型数据
        modelAndView.addObject("username","itcasr");
        //设置视图名称
        modelAndView.setViewName("success");
        return modelAndView;
    }

    //请求地址 http://localhost:8080/itheima_spring_mvc_war_exploded/user/quick?username=111
    @RequestMapping(value = "/quick",method = RequestMethod.GET,params = {"username"})
    public String save(){
        System.out.println("Controller save running.....");
        return "/success";
    }
}
请求地址
http://localhost:8080/itheima_spring_mvc_war_exploded/user/quick2

SpringMVC的数据响应-页面跳转-返回ModelAndView形式2
在Controller中方法形参上直接声明ModelAndView,无需在方法中自己创建,在方法中直接使用该对象设置视图,同样可以跳转页面
    @RequestMapping(value = "/quick3")
    public ModelAndView save3(ModelAndView modelAndView ){
        //设置模型数据
        modelAndView.addObject("username","itheima");
        //设置视图名称
        modelAndView.setViewName("success");
        return modelAndView;
    }
请求地址
http://localhost:8080/itheima_spring_mvc_war_exploded/user/quick3

    @RequestMapping(value = "/quick4")
    public String save4(Model modelm ){
        //设置模型数据
        modelm.addAttribute("username","博学谷");
        //设置视图名称
        return "success";
    }
请求地址
http://localhost:8080/itheima_spring_mvc_war_exploded/user/quick4

SpringMVC的数据响应-页面跳转-返回ModelAndView形式3
在Controller方法的形参上可以直接使用原生的HttpServeltRequest对象,只需声明即可
非框架内,不常用
    @RequestMapping(value = "/quick5")
    public String save5(HttpServletRequest request){
        //设置模型数据
        request.setAttribute("username","酷丁鱼");
        //设置视图名称
        return "success";
    }
SpringMVC的数据响应-回写数据-直接回写字符串 @ResponseBody
通过SpringMVC框架注入的response对象,使用response.getWriter().print(“hello world”) 回写数据,此时不需要视图跳转,业务方法返回值为void
    @RequestMapping(value = "/quick6")
    public void save6(HttpServletResponse response) throws IOException {
        response.getWriter().print("hello itcast");

    }
将需要回写的字符串直接返回,但此时需要通过@ResponseBody注解告知SpringMVC框架,方法返回的字符串不是跳转是直接在http响应体中返回
    @RequestMapping(value = "/quick7")
    @ResponseBody              //告知springmvc框架,该页面不进行视图跳转 直接进行数据响应
    public String  save7() throws IOException {
        return "hello itcast";
    }
http://localhost:8080/itheima_spring_mvc_war_exploded/user/quick7
SpringMVC的数据响应-回写数据-直接回写json格式字符串
json格式坐标
pom.xml
        <!--json格式-->
        <dependency>
            <groupId>com.fasterxml.jackson.core</groupId>
            <artifactId>jackson-core</artifactId>
            <version>2.9.0</version>
        </dependency>
        <dependency>
            <groupId>com.fasterxml.jackson.core</groupId>
            <artifactId>jackson-databind</artifactId>
            <version>2.9.0</version>
        </dependency>
        <dependency>
            <groupId>com.fasterxml.jackson.core</groupId>
            <artifactId>jackson-annotations</artifactId>
            <version>2.9.0</version>
        </dependency>
注意:
javax.servlet.ServletException: Servlet.init() for servlet [mvc-dispatcher] threw exception。。。
5.0.x.RELEAS版本的Spring框架 与 2.8.x版本的Jackson Databind不兼容,
https://blog.csdn.net/khxu666/article/details/79854746
手动拼接json格式字符串的方式
    @RequestMapping(value = "/quick8")
    @ResponseBody
    public String save8() throws IOException {
        return "{\"username\":\"zhangsan\",\"password\":\"123456\"}";
    }
手动拼接json格式字符串的方式很麻烦,开发中往往要将复杂的java对象转换成json格式的字符串,我们可以使用web阶段学习过的json转换工具jackson进行转换,通过jackson转换json格式字符串,回写字符串
    @RequestMapping(value = "/quick9")
    @ResponseBody
    public String save9() throws IOException {
        User user = new User();
        user.setUsername("lisi");
        user.setAge(30);
        //使用json的转换工具将对象转换成json格式字符串返回
        ObjectMapper objectMapper = new ObjectMapper();
        String json = objectMapper.writeValueAsString(user);
        return json;
    }

SpringMVC的数据响应-回写数据-返回对象或集合
通过SpringMVC帮助我们对对象或集合进行json字符串的转换并回写,为处理器适配器配置消息转换参数,指定使用jackson进行对象或集合的转换,因此需要在spring-mvc.xml中进行如下配置:
spring-mvc.xml
    <!--配置处理器映射器-->
    <bean class="org.springframework.web.servlet.mvc.method.annotation.RequestMappingHandlerAdapter">
        <property name="messageConverters">
            <list>
                <bean class="org.springframework.http.converter.json.MappingJackson2HttpMessageConverter"/>
            </list>
        </property>
    </bean>
    //期望SpringMVC自动将User转换成json格式的字符串
    @RequestMapping(value = "/quick10")
    @ResponseBody
    public User save10() throws IOException {
        User user = new User();
        user.setUsername("lisi2");
        user.setAge(32);
        return user;
    }

SpringMVC的数据响应-回写数据-返回对象或集合 *
在方法上添加@ResponseBody就可以返回json格式的字符串,但是这样配置比较麻烦,配置的代码比较多,因此,我们可以使用mvc的注解驱动代替上述配置(推荐使用)
spring-mvc.xml
<?xml version="1.0" encoding="UTF-8"?>
<beans xmlns="http://www.springframework.org/schema/beans"
       xmlns:xsi="http://www.w3.org/2001/XMLSchema-instance"
       xmlns:context="http://www.springframework.org/schema/context"
       xmlns:mvc="http://www.springframework.org/schema/mvc"

       xsi:schemaLocation="
       http://www.springframework.org/schema/beans http://www.springframework.org/schema/beans/spring-beans.xsd
       http://www.springframework.org/schema/mvc http://www.springframework.org/schema/mvc/spring-mvc.xsd
       http://www.springframework.org/schema/context http://www.springframework.org/schema/context/spring-context.xsd">

    <!--Controller的组件扫描-->
    <context:component-scan base-package="com.itheima.controller"/>

	<!--mvc的注解驱动-- !!!代替上面 配置处理器映射器 >
    <mvc:annotation-driven/>

</beans>
在 SpringMVC 的各个组件中,处理器映射器、处理器适配器、视图解析器称为 SpringMVC 的三大组件。
使用<mvc:annotation-driven />自动加载 RequestMappingHandlerMapping(处理映射器)和
RequestMappingHandlerAdapter( 处 理 适 配 器 ),可用在Spring-xml.xml配置文件中使用
<mvc:annotation-driven />替代注解处理器和适配器的配置。
同时使用<mvc:annotation-driven />
默认底层就会集成jackson进行对象或集合的json格式字符串的转换
SpringMVC 获取请求数据
获得基本类型参数
Controller中的业务方法的参数名称要与请求参数的name一致,参数值会自动映射匹配。并且能自动做类型转换;
自动的类型转换是指从String向其他类型的转换
    @RequestMapping(value = "/quick11")
    @ResponseBody
    public void save11(String username,int age) throws IOException {
        System.out.println(username);
        System.out.println(age);
    }
http://localhost:8080/itheima_spring_mvc_war_exploded/user/quick11?username=zhangsan&age=18
控制台打印
zhangsan
18
获得POJO类型参数
Controller中的业务方法的POJO参数的属性名与请求参数的name一致,参数值会自动映射匹配
    @RequestMapping(value = "/quick12")
    @ResponseBody
    public void save12(User user) throws IOException {
        System.out.println(user);
    }
http://localhost:8080/itheima_spring_mvc_war_exploded/user/quick12?username=zhangsan&age=18
控制台打印
User{username=‘zhangsan’, age=18}
获得数组类型参数
Controller中的业务方法数组名称与请求参数的name一致,参数值会自动映射匹配。
@RequestMapping(value="/quick13")
    @ResponseBody
    public void save13(String[] strs) throws IOException {
        System.out.println(Arrays.asList(strs));
    }
http://localhost:8080/itheima_spring_mvc_war_exploded/user/quick13?strs=aaa&strs=bbb&strs=ccc
控制台打印
[aaa, bbb, ccc]
获得集合类型参数
获得集合参数时,要将集合参数包装到一个POJO中才可以。
from.jsp
<%--
  Created by IntelliJ IDEA.
  User: auas
  Date: 2021/1/7
  Time: 16:16
  To change this template use File | Settings | File Templates.
--%>
<%@ page contentType="text/html;charset=UTF-8" language="java" %>
<html>
<head>
    <title>Title</title>
</head>
<body>
<form action="${pageContext.request.contextPath}/user/quick14" method="post">
    <!--表明是第一个User对象的username,age-->
    <input type="text" name="userList[0].username"><br/>
    <input type="text" name="userList[0].age"><br/>
    <!--表明是第2个User对象的username,age-->
    <input type="text" name="userList[1].username"><br/>
    <input type="text" name="userList[1].age"><br/>
    <input type="submit" value="提交">

</form>

</body>
</html>
vo
package com.itheima.domain;

import java.util.List;

public class VO {
    private List<User> userList;

    public List<User> getUserList() {
        return userList;
    }

    public void setUserList(List<User> userList) {
        this.userList = userList;
    }

    @Override
    public String toString() {
        return "VO{" +
                "userList=" + userList +
                '}';
    }
}
    @RequestMapping(value = "/quick14")
    @ResponseBody
    public void save14(VO vo) throws IOException {
        System.out.println(vo);
    }
http://localhost:8080/itheima_spring_mvc_war_exploded/from.jsp
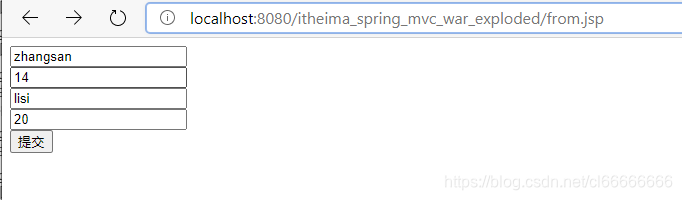
控制台输出:
VO{userList=[User{username=‘zhangsan’, age=14}, User{username=‘lisi’, age=20}]}
获得集合类型参数2
当使用ajax提交时,可以指定contentType为json形式,那么在方法参数位置使用@RequestBody可以直接接收集合数据而无需使用POJO进行包装
spring-mvc.xml配置文件中指定放行的资源
<mvc:resources mapping="/js/**"location="/js/"/>
ajax.jsp
<script src="${pageContext.request.contextPath}/js/jquery-3.3.1.js"></script>
    <script>
        var userList = new Array();
        userList.push({username:"zhangsan",age:18});
        userList.push({username:"lisi",age:28});

        $.ajax({
            type:"POST",
            url:"${pageContext.request.contextPath}/user/quick15",
            data:JSON.stringify(userList),
            contentType:"application/json;charset=utf-8"
        });

    </script>
@RequestMapping(value="/quick15")
    @ResponseBody
    public void save15(@RequestBody List<User> userList) throws IOException {  //请求体内容封到集合中
        System.out.println(userList);
    }
静态资源访问的开启
当有静态资源需要加载时,比如jquery文件,通过谷歌开发者工具抓包发现,没有加载到jquery文件,原因是SpringMVC的前端控制器DispatcherServlet的url-pattern配置的是/,代表对所有的资源都进行过滤操作,我们可以通过以下两种方式指定放行静态资源:
•在spring-mvc.xml配置文件中指定放行的资源
`<mvc:resources mapping="/js/**"location="/js/"/> `
•使用<mvc:default-servlet-handler/>标签
<!--开发资源的访问-->
	<!-- 每种资源都要配置-->
    <!--<mvc:resources mapping="/js/**" location="/js/"/>
    <mvc:resources mapping="/img/**" location="/img/"/>-->

    <mvc:default-servlet-handler/>    <!--或 使用 tomcat访问-->
配置全局乱码过滤器
当post请求时,数据会出现乱码,我们可以设置一个过滤器来进行编码的过滤。
web.xml
<!--配置全局过滤的filter-->
    <filter>
        <filter-name>CharacterEncodingFilter</filter-name>
        <filter-class>org.springframework.web.filter.CharacterEncodingFilter</filter-class>
        <init-param>
            <param-name>encoding</param-name>
            <param-value>UTF-8</param-value>
        </init-param>
    </filter>
    <filter-mapping>
        <filter-name>CharacterEncodingFilter</filter-name>
        <url-pattern>/*</url-pattern>
    </filter-mapping>
参数绑定注解
当请求的参数名称与Controller的业务方法参数名称不一致时,就需要通过@RequestParam注解显示的绑定
<form action="${pageContext.request.contextPath}/quick16" method="post">
    <input type="text" name="name"><br>
    <input type="submit" value="提交"><br>
</form>
@RequestMapping(value="/quick16")
    @ResponseBody
    public void save16(@RequestParam(value="name",required = false,defaultValue = "itcast") String username) throws IOException {
        System.out.println(username);
    }
http://localhost:8080/itheima_spring_mvc_war_exploded/user/quick16?name=zhangsan
控制台输出
zhangsan
注:若参数名称为其他,则显示为null
Restful风格的参数的获取
Restful是一种软件架构风格、设计风格,而不是标准,只是提供了一组设计原则和约束条件。主要用于客户端和服务器交互类的软件,基于这个风格设计的软件可以更简洁,更有层次,更易于实现缓存机制等。
Restful风格的请求是使用“url+请求方式”表示一次请求目的的,HTTP 协议里面四个表示操作方式的动词如下:
GET:用于获取资源
POST:用于新建资源
PUT:用于更新资源
DELETE:用于删除资源
例如:
/user/1 GET : 得到 id = 1 的 user
/user/1 DELETE: 删除 id = 1 的 user
/user/1 PUT: 更新 id = 1 的 user
/user POST: 新增 user
上述url地址/user/1中的1就是要获得的请求参数,在SpringMVC中可以使用占位符进行参数绑定。地址/user/1可以写成/user/{id},占位符{id}对应的就是1的值。在业务方法中我们可以使用@PathVariable注解进行占位符的匹配获取工作
    @RequestMapping(value = "/quick17/{username}")
    @ResponseBody
    public void save17(@PathVariable(value = "username") String username) throws IOException {
        System.out.println(username);
    }
http://localhost:8080/itheima_spring_mvc_war_exploded/user/quick17/zhansgsan
控制台输出
zhangsan
自定义类型转换器
SpringMVC 默认已经提供了一些常用的类型转换器,例如客户端提交的字符串转换成int型进行参数设置。
但是不是所有的数据类型都提供了转换器,没有提供的就需要自定义转换器,例如:日期类型的数据就需要自定义转换器。
package com.itheima.converter;

import org.springframework.core.convert.converter.Converter;

import java.text.ParseException;
import java.text.SimpleDateFormat;
import java.util.Date;

public class DateConverter implements Converter<String,Date> {

    @Override
    public Date convert(String dateStr) {
        //将日期字符串转换为日期对象 返回
        SimpleDateFormat format = new SimpleDateFormat("yyyy-MM-dd");
        Date date =null;
        try {
             date = format.parse(dateStr);
        } catch (ParseException e) {
            e.printStackTrace();
        }
        return date;
    }
}
spring-mvc.xml
    <!--声明日期转换器-->
    <bean id="conversionService" class="org.springframework.context.support.ConversionServiceFactoryBean">
        <property name="converters">
            <list>
                <bean class="com.itheima.converter.DateConverter"></bean>
            </list>
        </property>
    </bean>

    <!--mvc的注解驱动-->
    <mvc:annotation-driven conversion-service="conversionService"/>
    @RequestMapping(value = "/quick18")
    @ResponseBody
    public void save18(Date date) throws IOException {
        System.out.println(date);
    }
http://localhost:8080/itheima_spring_mvc_war_exploded/user/quick18?date=2018-11-11
控制台输出
Sun Nov 11 00:00:00 CST 2018
获得Servlet相关API
SpringMVC支持使用原始ServletAPI对象作为控制器方法的参数进行注入,常用的对象如下:
    @RequestMapping(value="/quick19")
    @ResponseBody
    public void save19(HttpServletRequest request, HttpServletResponse response, HttpSession session) throws IOException {
        System.out.println(request);
        System.out.println(response);
        System.out.println(session);
    }
http://localhost:8080/itheima_spring_mvc_war_exploded/user/quick19
返回数据
org.apache.catalina.connector.RequestFacade@51fc891
org.apache.catalina.connector.ResponseFacade@95c2659
org.apache.catalina.session.StandardSessionFacade@2a90562d
获得请求头信息
- 获取请求头值
使用@RequestHeader可以获得请求头信息,相当于web阶段学习的request.getHeader(name)
@RequestHeader注解的属性如下:
value:请求头的名称
required:是否必须携带此请求头
@RequestMapping(value="/quick20")
    @ResponseBody
    public void save20(@RequestHeader(value = "User-Agent",required = false) String user_agent) throws IOException {
        System.out.println(user_agent);
    }
http://localhost:8080/itheima_spring_mvc_war_exploded/user/quick20
返回数据
Mozilla/5.0 (Windows NT 10.0; Win64; x64) AppleWebKit/537.36 (KHTML, like Gecko) Chrome/87.0.4280.88 Safari/537.36 Edg/87.0.664.66
- 获取cookies值
使用@CookieValue可以获得指定Cookie的值
@CookieValue注解的属性如下:
value:指定cookie的名称
required:是否必须携带此cookie
 @RequestMapping(value="/quick21")
    @ResponseBody
    public void save21(@CookieValue(value = "JSESSIONID") String jsessionId) throws IOException {
        System.out.println(jsessionId);
    }
http://localhost:8080/itheima_spring_mvc_war_exploded/user/quick21
返回数据
73999F68B3F3A98395178805C40DB744