前言:认识 Spring Cloud 及应用现状
Spring Cloud 是什么?
在学习本课程之前,读者有必要先了解一下 Spring Cloud。
Spring Cloud 是一系列框架的有序集合,它利用 Spring Boot 的开发便利性简化了分布式系统的开发,比如服务发现、服务网关、服务路由、链路追踪等。Spring Cloud 并不重复造轮子,而是将市面上开发得比较好的模块集成进去,进行封装,从而减少了各模块的开发成本。换句话说:Spring Cloud 提供了构建分布式系统所需的“全家桶”。
Spring Cloud 现状
目前,国内使用 Spring Cloud 技术的公司并不多见,不是因为 Spring Cloud 不好,主要原因有以下几点:
- Spring Cloud 中文文档较少,出现问题网上没有太多的解决方案。
- 国内创业型公司技术老大大多是阿里系员工,而阿里系多采用 Dubbo 来构建微服务架构。
- 大型公司基本都有自己的分布式解决方案,而中小型公司的架构很多用不上微服务,所以没有采用 Spring Cloud 的必要性。
但是,微服务架构是一个趋势,而 Spring Cloud 是微服务解决方案的佼佼者,这也是作者写本系列课程的意义所在。
Spring Cloud 优缺点
其主要优点有:
- 集大成者,Spring Cloud 包含了微服务架构的方方面面。
- 约定优于配置,基于注解,没有配置文件。
- 轻量级组件,Spring Cloud 整合的组件大多比较轻量级,且都是各自领域的佼佼者。
- 开发简便,Spring Cloud 对各个组件进行了大量的封装,从而简化了开发。
- 开发灵活,Spring Cloud 的组件都是解耦的,开发人员可以灵活按需选择组件。
接下来,我们看下它的缺点:
- 项目结构复杂,每一个组件或者每一个服务都需要创建一个项目。
- 部署门槛高,项目部署需要配合 Docker 等容器技术进行集群部署,而要想深入了解 Docker,学习成本高。
Spring Cloud 的优势是显而易见的。因此对于想研究微服务架构的同学来说,学习 Spring Cloud 是一个不错的选择。
Spring Cloud 和 Dubbo 对比
Dubbo 只是实现了服务治理,而 Spring Cloud 实现了微服务架构的方方面面,服务治理只是其中的一个方面。下面通过一张图对其进行比较:
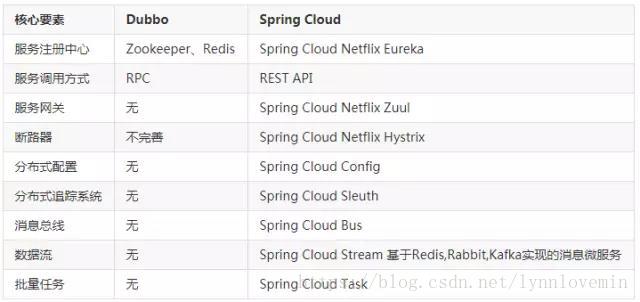
可以看出,Spring Cloud 比较全面,而 Dubbo 由于只实现了服务治理,需要集成其他模块,需要单独引入,增加了学习成本和集成成本。
Spring Cloud 学习
Spring Cloud 基于 Spring Boot,因此在研究 Spring Cloud 之前,本课程会首先介绍 Spring Boot 的用法,方便后续 Spring Cloud 的学习。
本课程不会讲解 SpringMVC 的用法,因此学习本课程需要读者对 Spring 及 SpringMVC 有过研究。
本课程共分为四个部分:
-
第一部分初识 Spring Boot,掌握 Spring Boot 基础知识,为后续入门 Spring Cloud 打好基础 。
-
第二部分 Spring Cloud 入门篇,主要介绍 Spring Cloud 常用模块,包括服务发现、服务注册、配置中心、链路追踪、异常处理等。
-
第三部分 Spring Cloud 进阶篇,介绍大型分布式系统中事务处理、线程安全等问题,并以一个实例项目手把手教大家搭建完整的微服务系统。
-
第四部分 Spring Cloud 高级篇,解析 Spring Cloud 源码,并讲解如何部署基于 Spring Cloud 的大型分布式系统。
第01课:Spring Boot 入门
什么是 Spring Boot
Spring Boot 是由 Pivotal 团队提供的基于 Spring 的全新框架,其设计目的是为了简化 Spring 应用的搭建和开发过程。该框架遵循“约定大于配置”原则,采用特定的方式进行配置,从而使开发者无需定义大量的 XML 配置。通过这种方式,Spring Boot 致力于在蓬勃发展的快速应用开发领域成为领导者。
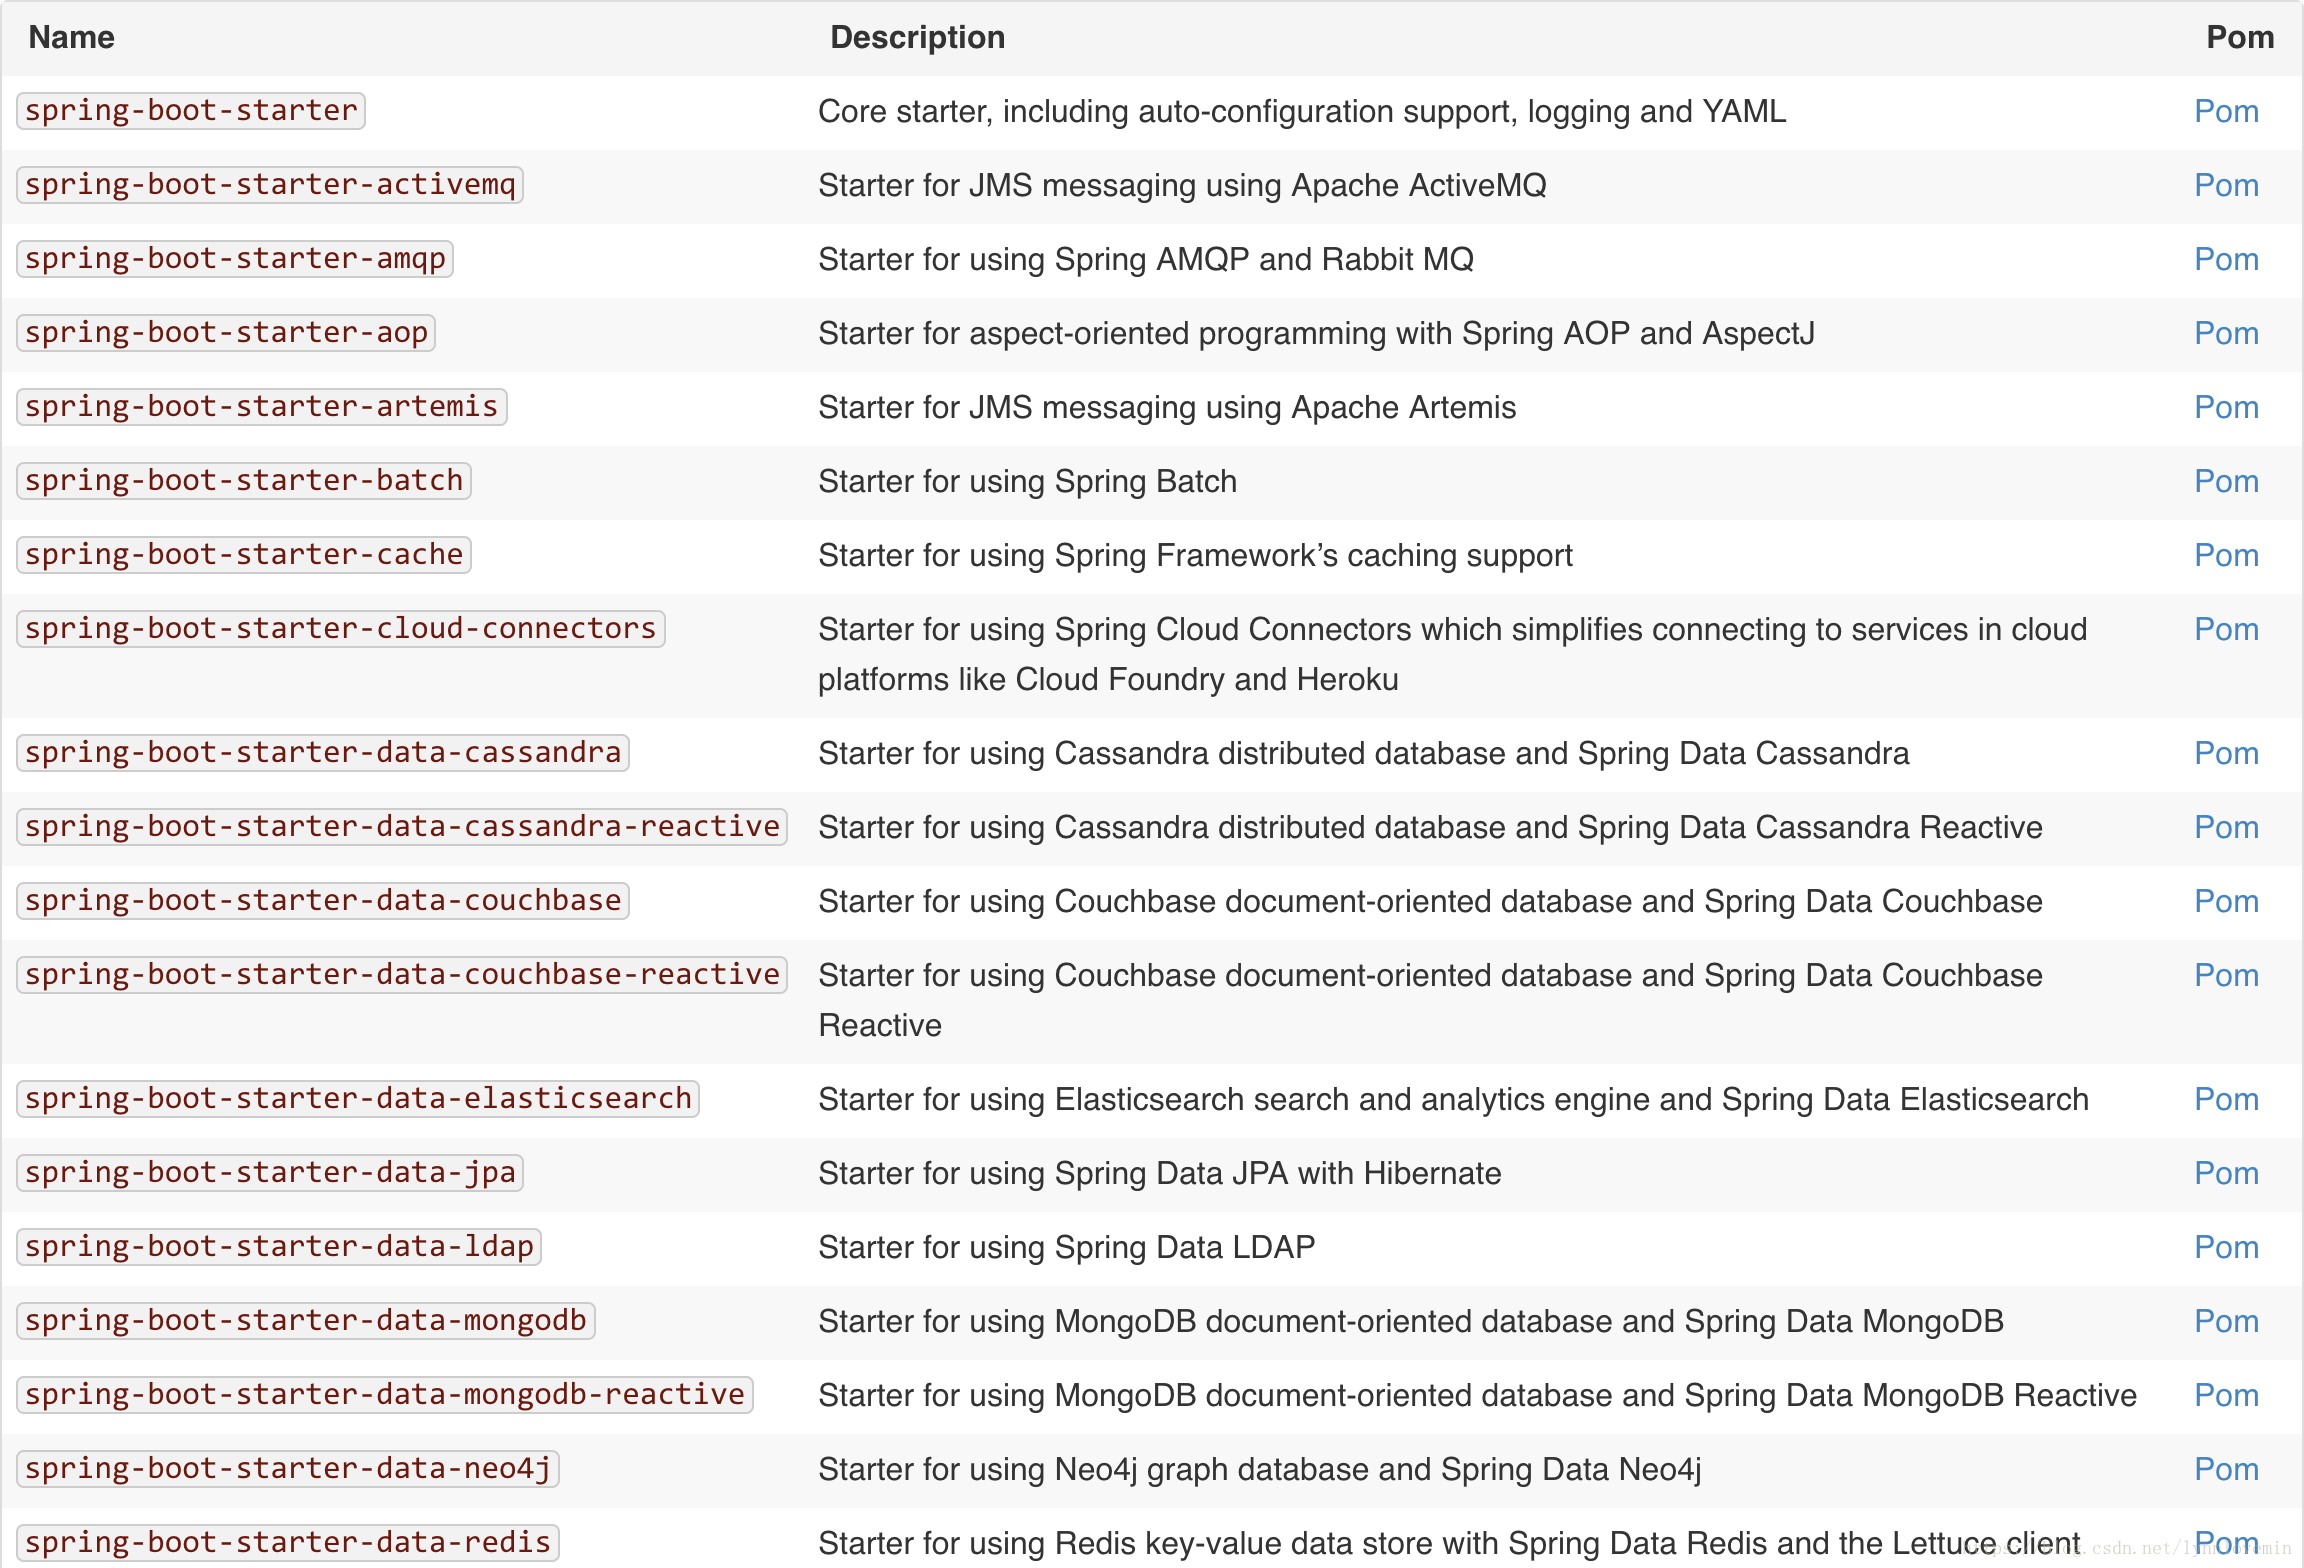
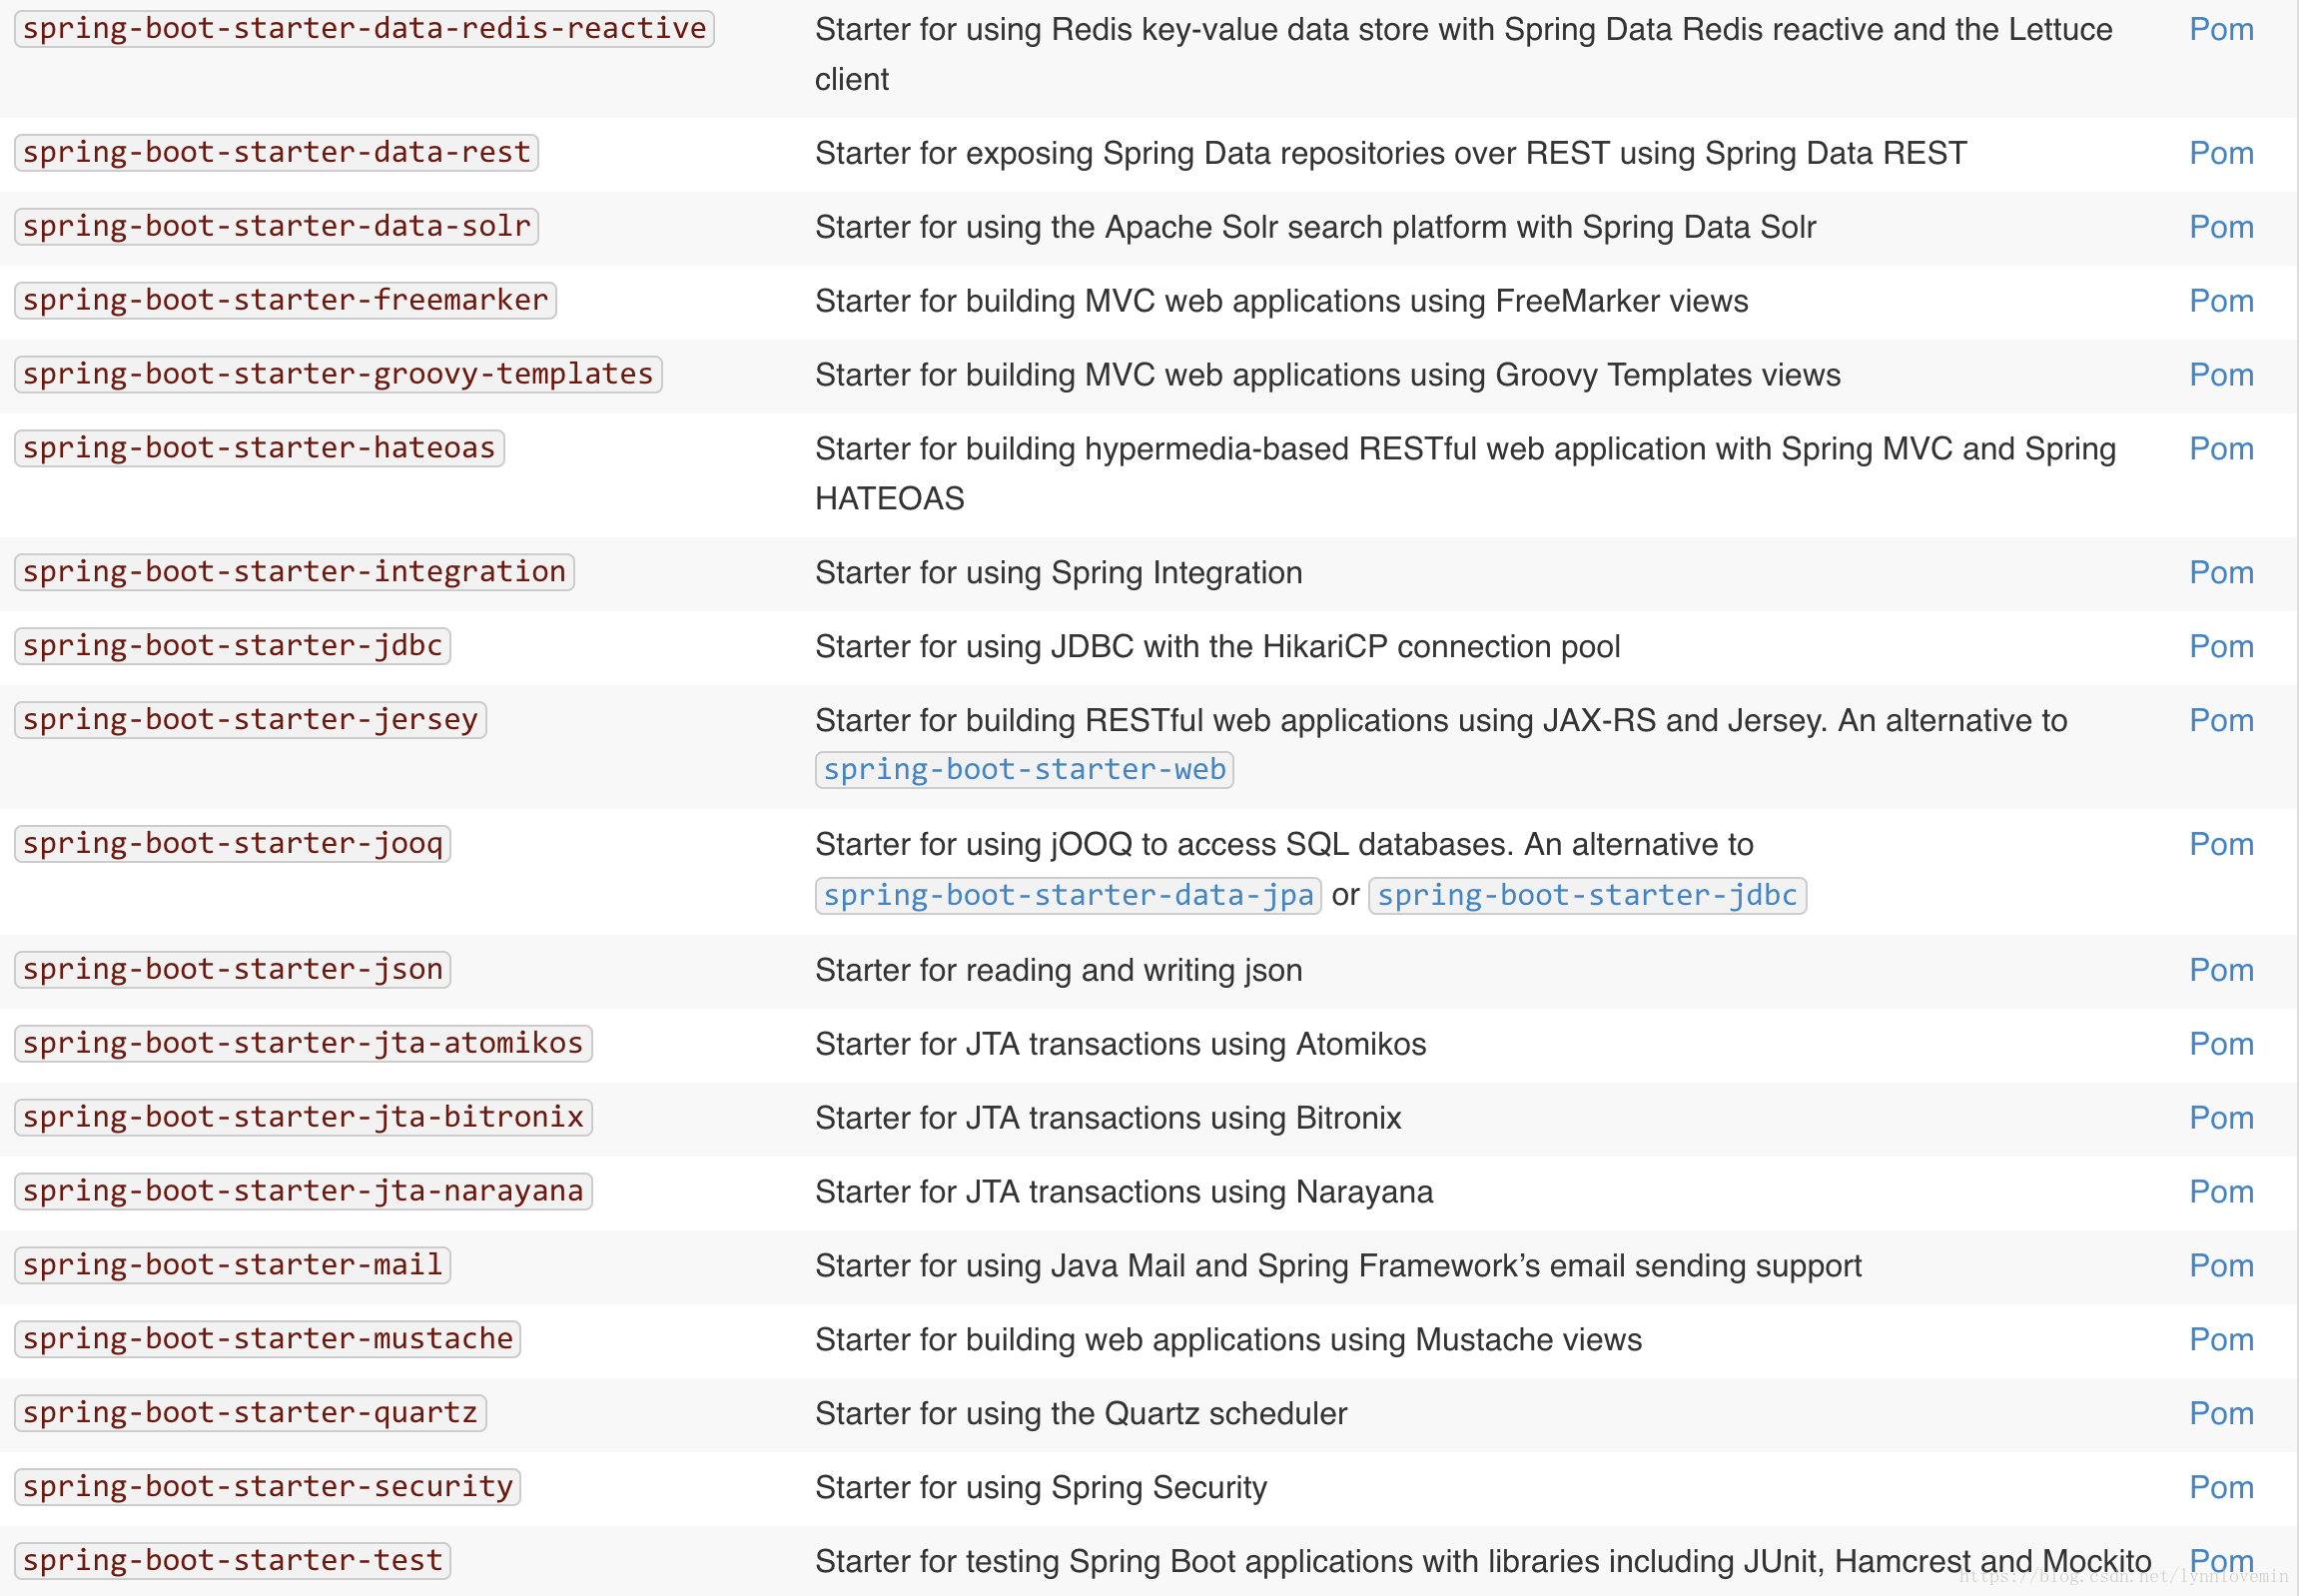
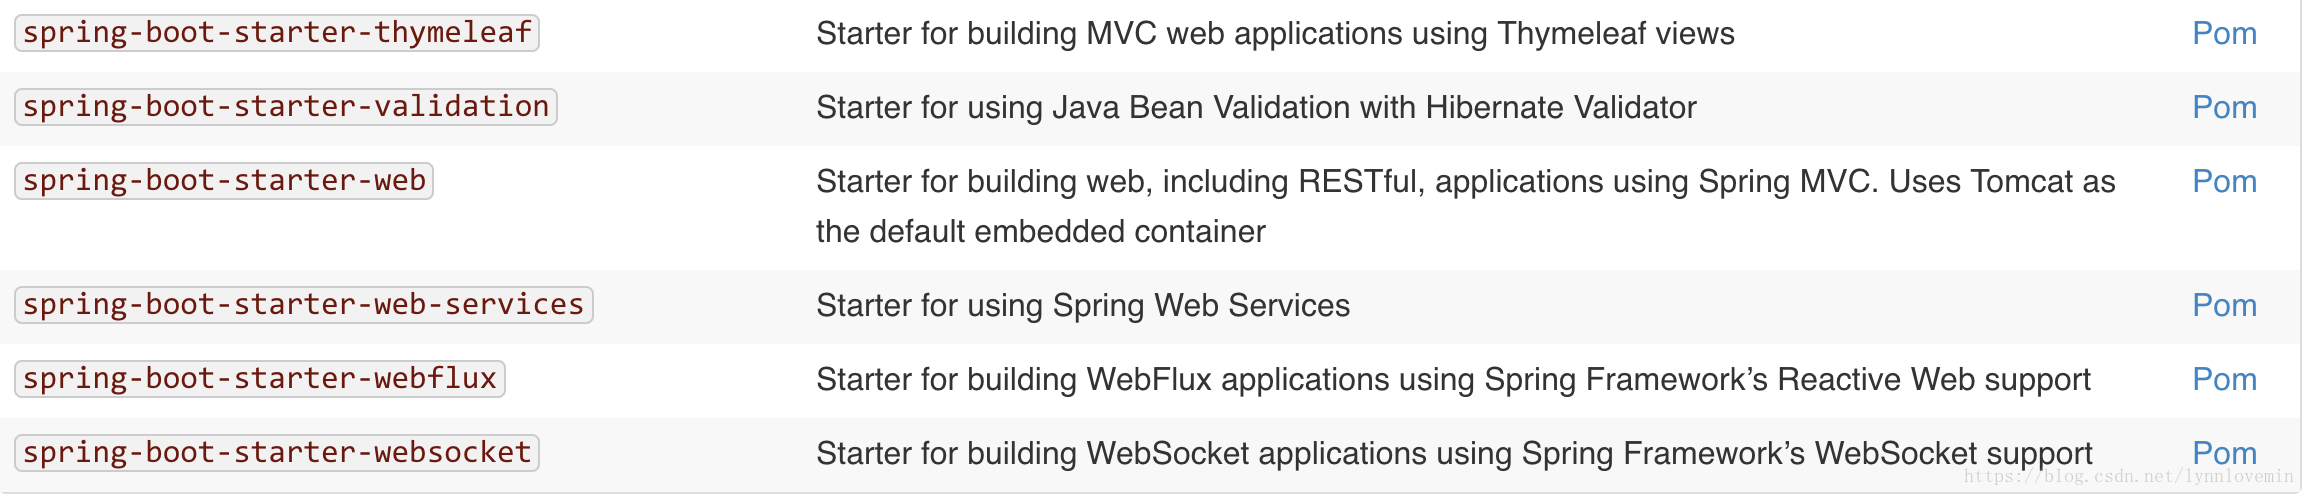
Spring Boot 并不重复造轮子,而且在原有 Spring 的框架基础上封装了一层,并且它集成了一些类库,用于简化开发。换句话说,Spring Boot 就是一个大容器。
下面几张图展示了官网上提供的 Spring Boot 所集成的所有类库:
Spring Boot 官方推荐使用 Maven 或 Gradle 来构建项目,本教程采用 Maven。
第一个 Spring Boot 项目
大多数教程都是以 Hello World 入门,本教程也不例外,接下来,我们就来搭建一个最简单的 Spring Boot 项目。
首先创建一个 Maven 工程,请看下图:
然后在 pom.xml 加入 Spring Boot 依赖:
<parent>
<groupId>org.springframework.boot</groupId>
<artifactId>spring-boot-starter-parent</artifactId>
<version>2.0.1.RELEASE</version>
</parent>
<dependencies>
<dependency>
<groupId>org.springframework.boot</groupId>
<artifactId>spring-boot-starter-web</artifactId>
</dependency>
</dependencies>
创建一个 Controller 类 HelloController:
import org.springframework.boot.SpringApplication;
import org.springframework.boot.autoconfigure.SpringBootApplication;
import org.springframework.web.bind.annotation.RequestMapping;
import org.springframework.web.bind.annotation.RestController;

@RestController
@SpringBootApplication
public class HelloController {

@RequestMapping("hello")
String hello() {
return "Hello World!";
}

public static void main(String[] args) {
SpringApplication.run(HelloController.class, args);
}
}
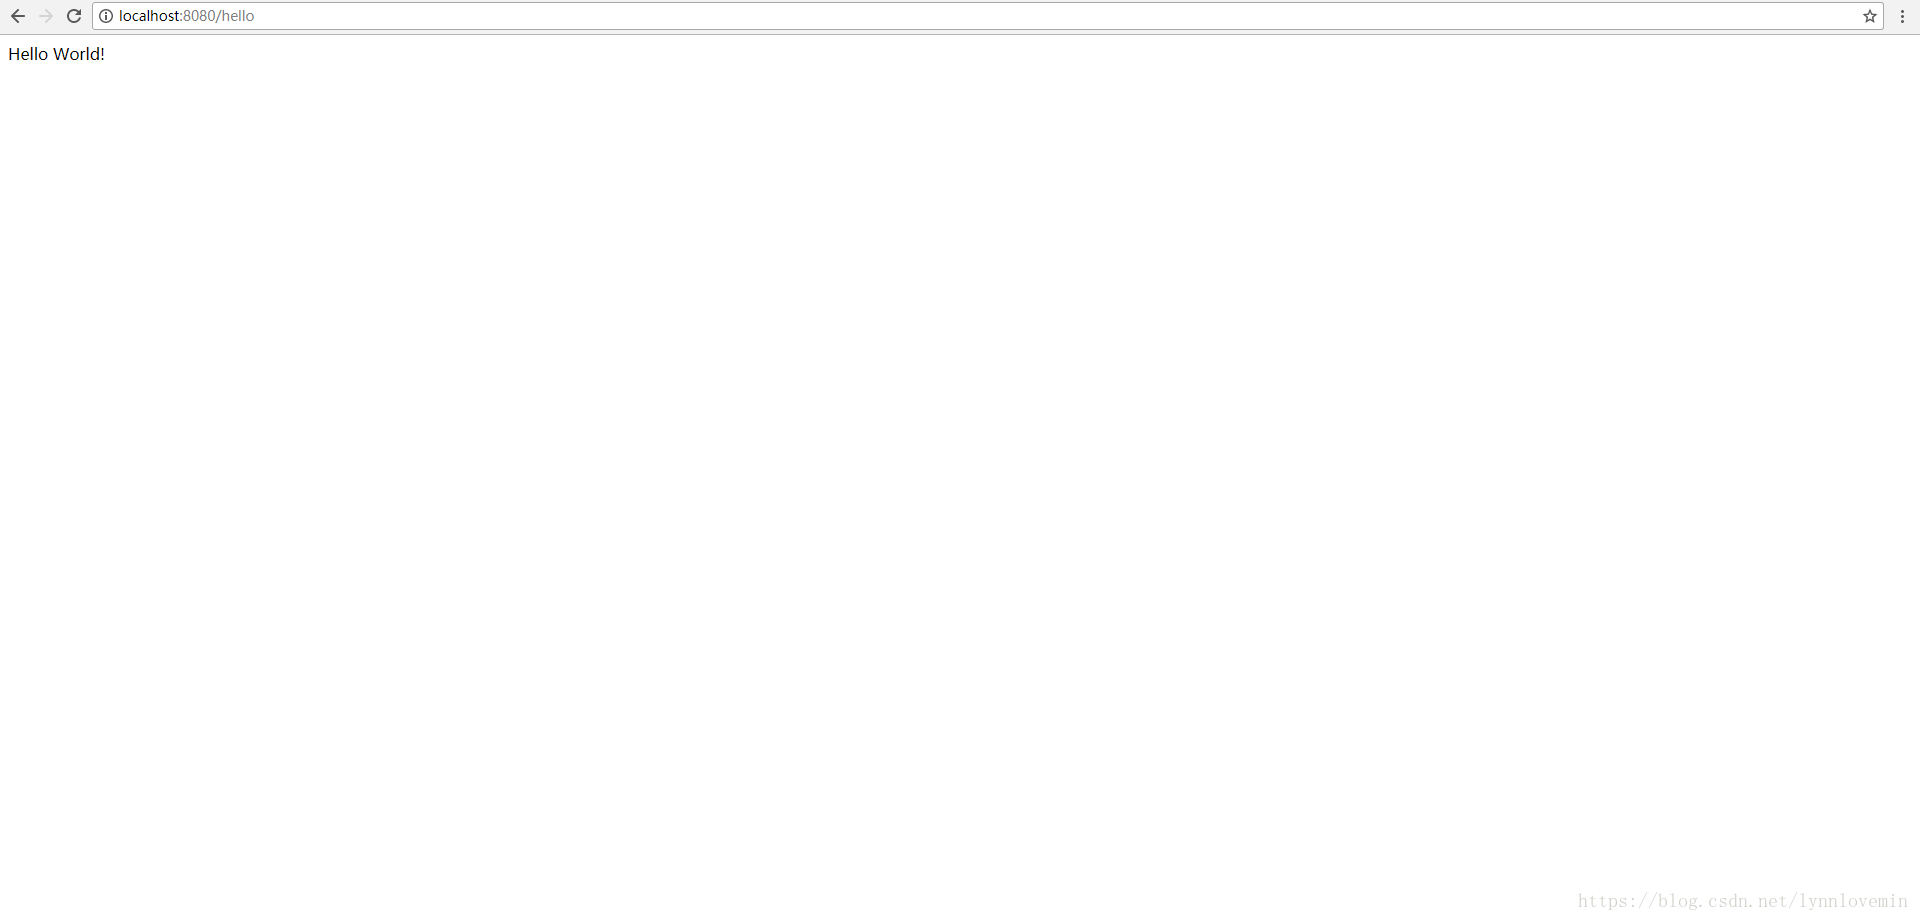
运行 main 方法,Spring Boot 默认会启动自带的 Tomcat 容器,启动成功后,浏览器访问:http://localhost:8080/hello,则会看到下图:
我们可以注意到,没有写任何的配置文件,更没有显示的使用任何容器,它是如何启动程序的呢,具体原理我将在第3课中具体分析。
这里我们可以初步分析出,Spring Boot 提供了默认的配置,在启动类里加入 @SpringBootApplication 注解,则这个类就是整个应用程序的启动类。
properties 和 yaml
Spring Boot 整个应用程序只有一个配置文件,那就是 .properties 或 .yml 文件。但是,在前面的示例代码中,我们并没有看到该配置文件,那是因为 Spring Boot 对每个配置项都有默认值。当然,我们也可以添加配置文件,用以覆盖其默认值,这里以 .properties 文件为例,首先在 resources 下新建一个名为 application.properties(注意:文件名必须是 application)的文件,键入内容为:
server.port=8081
server.servlet.context-path=/api
并且启动 main 方法,这时程序请求地址则变成了:http://localhost:8081/api/hello。
Spring Boot 支持 properties 和 yaml 两种格式的文件,文件名分别对应 application.properties 和 application.yml,下面贴出 yaml 文件格式供大家参考:
server:
    port: 8080
    servlet:
        context-path: /api
可以看出 properties 是以逗号隔开,而 yaml 则换行+ tab 隔开,这里需要注意的是冒号后面必须空格,否则会报错。yaml 文件格式更清晰,更易读,这里作者建议大家都采用 yaml 文件来配置。
本教程的所有配置均采用 yaml 文件。
打包、运行
Spring Boot 打包分为 war 和 jar两个格式,下面将分别演示如何构建这两种格式的启动包。
在 pom.xml 加入如下配置:
<packaging>war</packaging>
<build>
<finalName>index</finalName>
<resources>
<resource>
<directory>src/main/resources</directory>
<filtering>true</filtering>
</resource>
</resources>
<plugins>
<plugin>
<groupId>org.springframework.boot</groupId>
<artifactId>spring-boot-maven-plugin</artifactId>
</plugin>
<plugin>
<artifactId>maven-resources-plugin</artifactId>
<version>2.5</version>
<configuration>
<encoding>UTF-8</encoding>
</configuration>
</plugin>
<plugin>
<groupId>org.apache.maven.plugins</groupId>
<artifactId>maven-surefire-plugin</artifactId>
<version>2.18.1</version>
<configuration>
<skipTests>true</skipTests>
</configuration>
</plugin>
</plugins>
</build>
这个时候运行 mvn package 就会生成 war 包,然后放到 Tomcat 当中就能启动,但是我们单纯这样配置在 Tomcat 是不能成功运行的,会报错,需要通过编码指定 Tomcat 容器启动,修改 HelloController 类:
@RestController
@SpringBootApplication
public class HelloController extends SpringBootServletInitializer{

@RequestMapping("hello")
String hello() {
return "Hello World!";
}

public static void main(String[] args) {
SpringApplication.run(HelloController.class, args);
}
@Override
protected SpringApplicationBuilder configure(SpringApplicationBuilder application) {
return application.sources(Application.class);
}

}
这时再打包放到 Tomcat,启动就不会报错了。
接下来我们继续看如果达成 jar 包,在 pom.xml 加入如下配置:
<packaging>jar</packaging>
<build>
<finalName>api</finalName>
<resources>
<resource>
<directory>src/main/resources</directory>
<filtering>true</filtering>
</resource>
</resources>
<plugins>
<plugin>
<groupId>org.springframework.boot</groupId>
<artifactId>spring-boot-maven-plugin</artifactId>
<configuration>
<fork>true</fork>
<mainClass>com.lynn.yiyi.Application</mainClass>
</configuration>
<executions>
<execution>
<goals>
<goal>repackage</goal>
</goals>
</execution>
</executions>
</plugin>
<plugin>
<artifactId>maven-resources-plugin</artifactId>
<version>2.5</version>
<configuration>
<encoding>UTF-8</encoding>
<useDefaultDelimiters>true</useDefaultDelimiters>
</configuration>
</plugin>
<plugin>
<groupId>org.apache.maven.plugins</groupId>
<artifactId>maven-surefire-plugin</artifactId>
<version>2.18.1</version>
<configuration>
<skipTests>true</skipTests>
</configuration>
</plugin>
<plugin>
<groupId>org.apache.maven.plugins</groupId>
<artifactId>maven-compiler-plugin</artifactId>
<version>2.3.2</version>
<configuration>
<source>1.8</source>
<target>1.8</target>
</configuration>
</plugin>
</plugins>
</build>
然后通过 mvn package 打包,最后通过 java 命令启动:
java -jar api.jar
这样,最简单的 Spring Boot 就完成了,但是对于一个大型项目,这是远远不够的,Spring Boot 的详细操作可以参照官网。
下面展示一个最基础的企业级 Spring Boot 项目的结构:
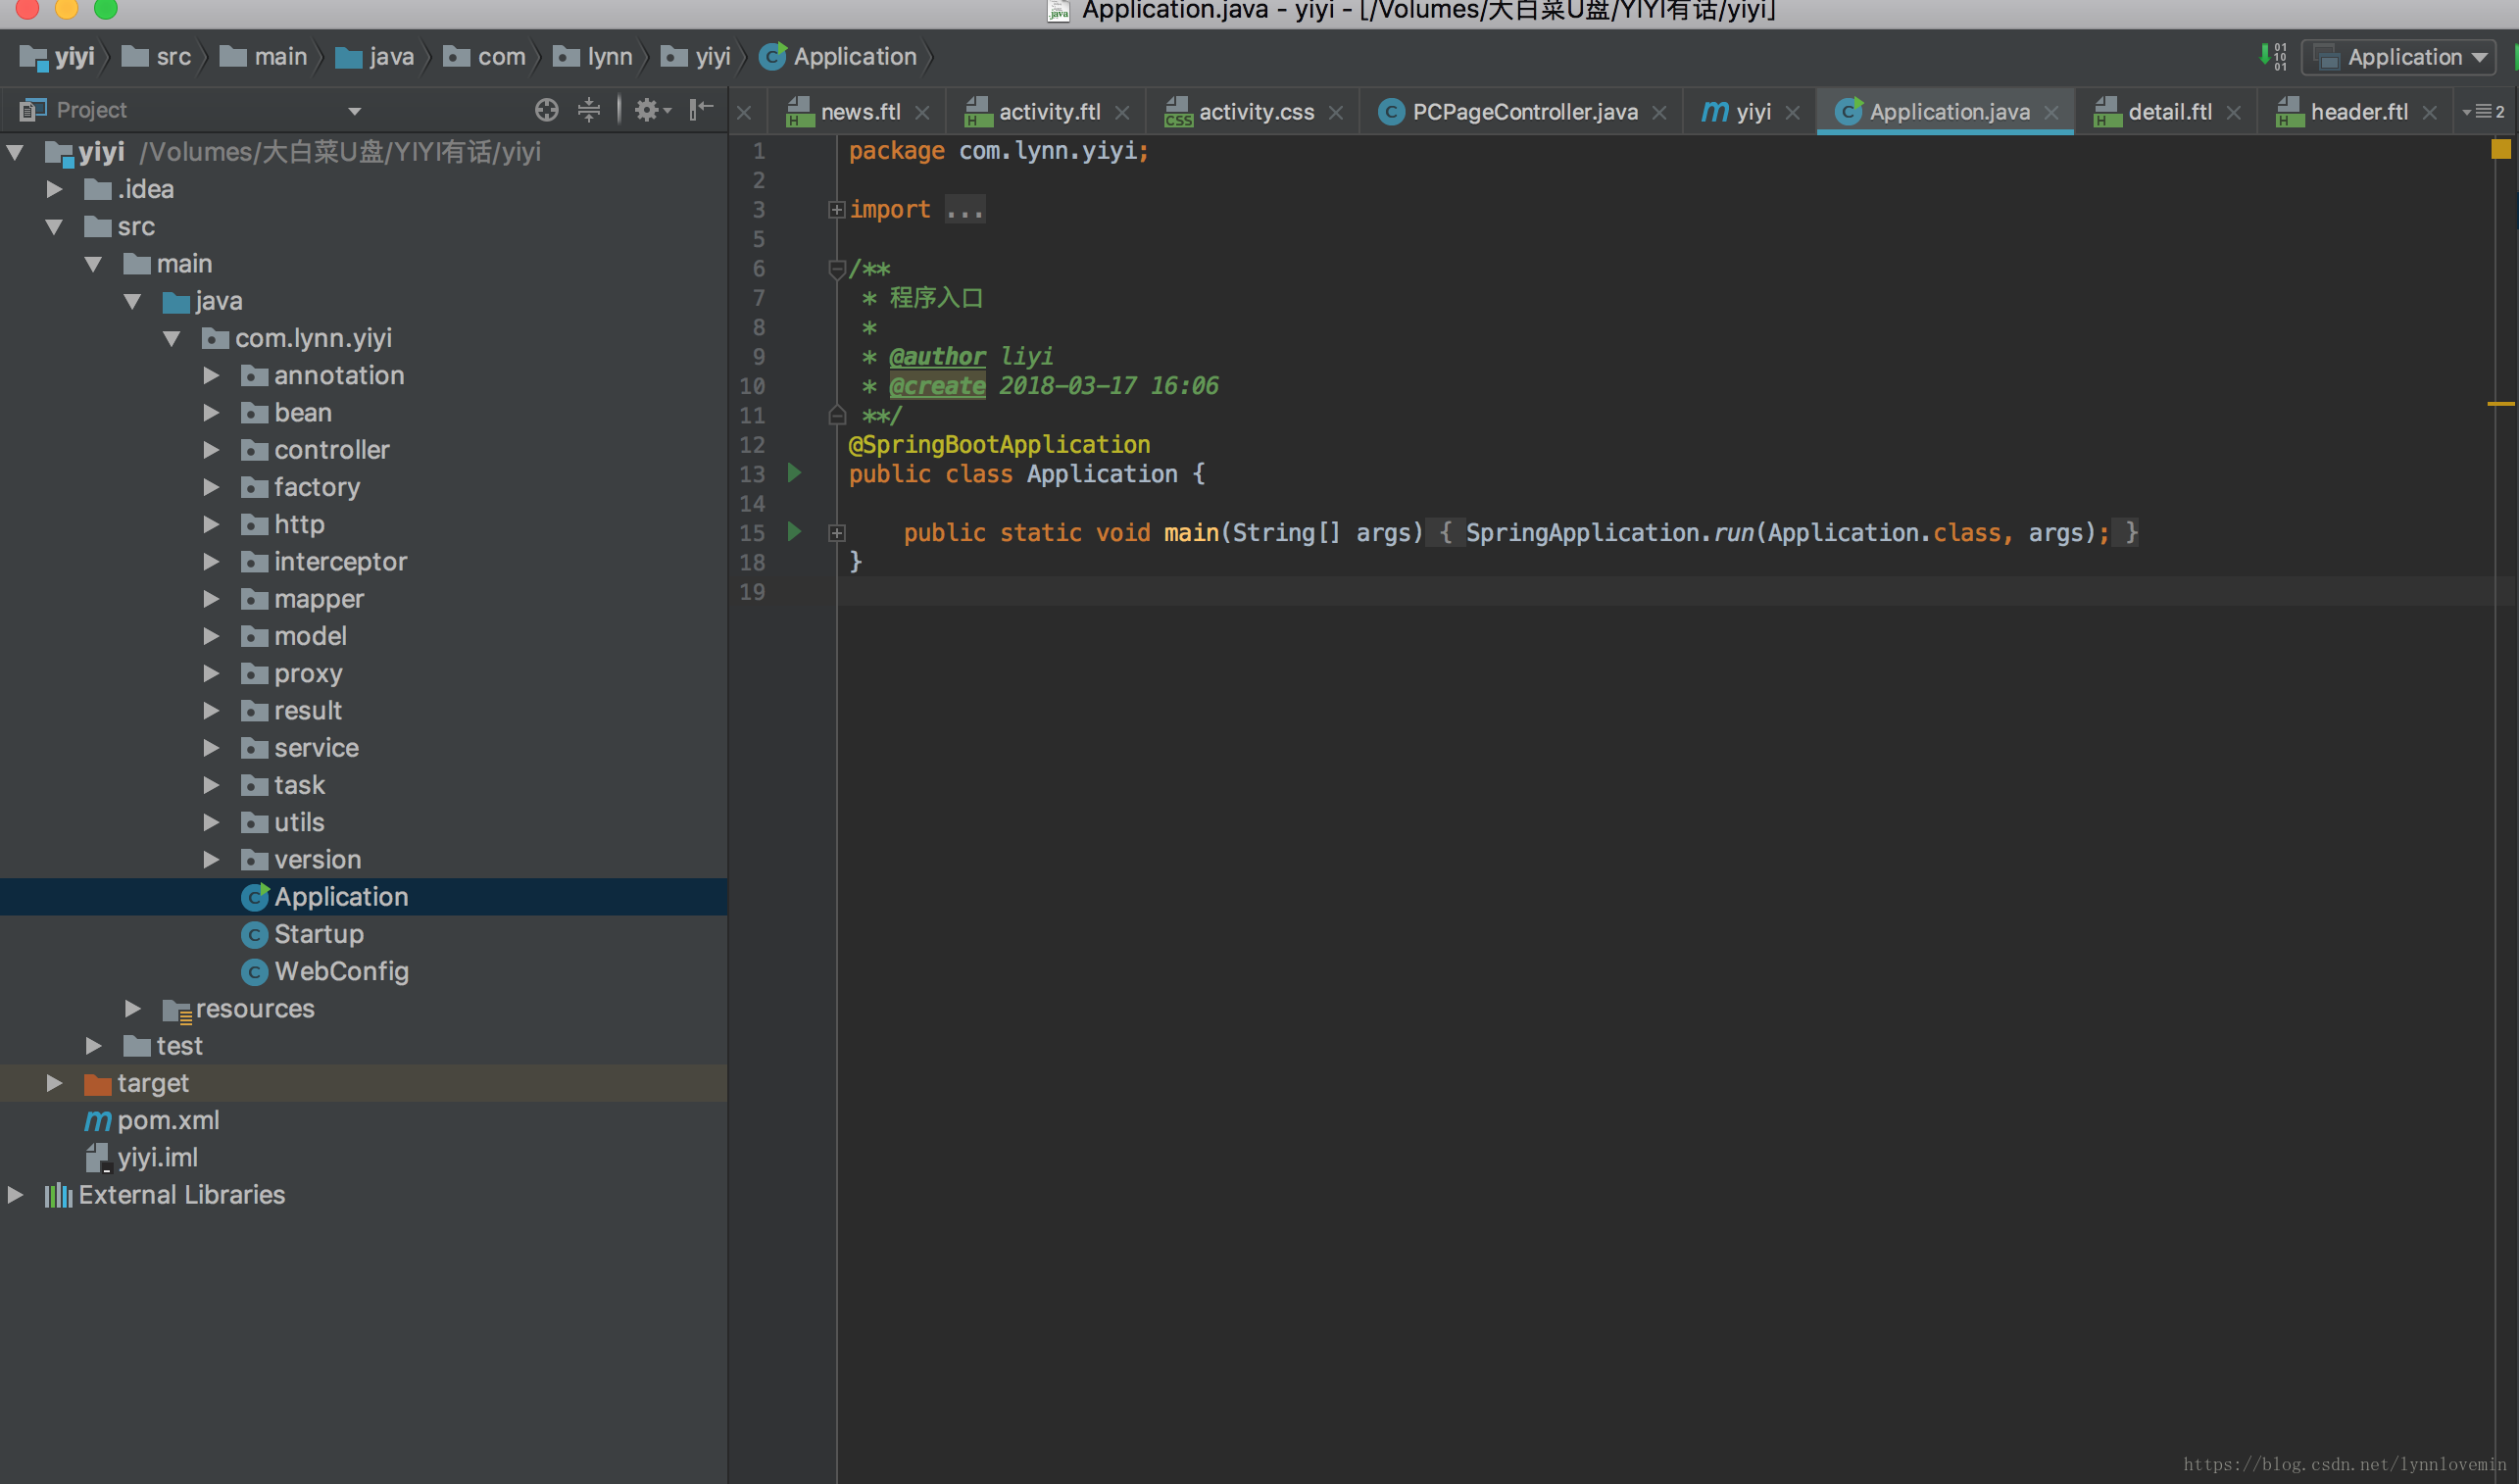
其中,Application.java 是程序的启动类,Startup.java 是程序启动完成前执行的类,WebConfig.java 是配置类,所有 bean 注入、配置、拦截器注入等都放在这个类里面。
第02课:Spring Boot 进阶
上一篇带领大家初步了解了如何使用 Spring Boot 搭建框架,通过 Spring Boot 和传统的 SpringMVC 架构的对比,我们清晰地发现 Spring Boot 的好处,它使我们的代码更加简单,结构更加清晰。
从这一篇开始,我将带领大家更加深入的认识 Spring Boot,将 Spring Boot 涉及到东西进行拆解,从而了解 Spring Boot 的方方面面。学完本文后,读者可以基于 Spring Boot 搭建更加复杂的系统框架。
我们知道,Spring Boot 是一个大容器,它将很多第三方框架都进行了集成,我们在实际项目中用到哪个模块,再引入哪个模块。比如我们项目中的持久化框架用 MyBatis,则在 pom.xml 添加如下依赖:
<dependency>
            <groupId>org.mybatis.spring.boot</groupId>
            <artifactId>mybatis-spring-boot-starter</artifactId>
            <version>1.1.1</version>
        </dependency>
        <dependency>
            <groupId>mysql</groupId>
            <artifactId>mysql-connector-java</artifactId>
            <version>5.1.40</version>
        </dependency>
yaml/properties 文件
我们知道整个 Spring Boot 项目只有一个配置文件,那就是 application.yml,Spring Boot 在启动时,就会从 application.yml 中读取配置信息,并加载到内存中。上一篇我们只是粗略的列举了几个配置项,其实 Spring Boot 的配置项是很多的,本文我们将学习在实际项目中常用的配置项(注:为了方便说明,配置项均以 properties 文件的格式写出,后续的实际配置都会写成 yaml 格式)。
| 配置项 | 说明 | 举例 |
|---|---|---|
| server.port | 应用程序启动端口 | server.port=8080,定义应用程序启动端口为8080 |
| server.context-path | 应用程序上下文 | server.port=/api,则访问地址为:http://ip:port/api |
| spring.http.multipart.maxFileSize | 最大文件上传大小,-1为不限制 | spring.http.multipart.maxFileSize=-1 |
| spring.jpa.database | 数据库类型 | spring.jpa.database=MYSQL,指定数据库为mysql |
| spring.jpa.properties.hibernate.dialect | hql方言 | spring.jpa.properties.hibernate.dialect=org.hibernate.dialect.MySQL5Dialect |
| spring.datasource.url | 数据库连接字符串 | spring.datasource.url=jdbc:mysql://localhost:3306/database?useUnicode=true&characterEncoding=UTF-8&useSSL=true |
| spring.datasource.username | 数据库用户名 | spring.datasource.username=root |
| spring.datasource.password | 数据库密码 | spring.datasource.password=root |
| spring.datasource.driverClassName | 数据库驱动 | spring.datasource.driverClassName=com.mysql.jdbc.Driver |
| spring.jpa.showSql | 控制台是否打印sql语句 | spring.jpa.showSql=true |
下面是我参与的某个项目的 application.yml 配置文件内容:
server:
  port: 8080
  context-path: /api
  tomcat:
    max-threads: 1000
    min-spare-threads: 50
  connection-timeout: 5000
spring:
  profiles:
    active: dev
  http:
    multipart:
      maxFileSize: -1
  datasource:
    url: jdbc:mysql://localhost:3306/database?useUnicode=true&characterEncoding=UTF-8&useSSL=true
    username: root
    password: root
    driverClassName: com.mysql.jdbc.Driver
  jpa:
    database: MYSQL
    showSql: true
    hibernate:
      namingStrategy: org.hibernate.cfg.ImprovedNamingStrategy
    properties:
      hibernate:
        dialect: org.hibernate.dialect.MySQL5Dialect
mybatis:
  configuration:
     #配置项:开启下划线到驼峰的自动转换. 作用:将数据库字段根据驼峰规则自动注入到对象属性。
     map-underscore-to-camel-case: true
以上列举了常用的配置项,所有配置项信息都可以在官网中找到,本课程就不一一列举了。
多环境配置
在一个企业级系统中,我们可能会遇到这样一个问题:开发时使用开发环境,测试时使用测试环境,上线时使用生产环境。每个环境的配置都可能不一样,比如开发环境的数据库是本地地址,而测试环境的数据库是测试地址。那我们在打包的时候如何生成不同环境的包呢?
这里的解决方案有很多:
- 每次编译之前手动把所有配置信息修改成当前运行的环境信息。这种方式导致每次都需要修改,相当麻烦,也容易出错。
- 利用 Maven,在 pom.xml 里配置多个环境,每次编译之前将 settings.xml 里面修改成当前要编译的环境 ID。这种方式会事先设置好所有环境,缺点就是每次也需要手动指定环境,如果环境指定错误,发布时是不知道的。
- 第三种方案就是本文重点介绍的,也是作者强烈推荐的方式。
首先,创建 application.yml 文件,在里面添加如下内容:
spring:
  profiles:
    active: dev
含义是指定当前项目的默认环境为 dev,即项目启动时如果不指定任何环境,Spring Boot 会自动从 dev 环境文件中读取配置信息。我们可以将不同环境都共同的配置信息写到这个文件中。
然后创建多环境配置文件,文件名的格式为:application-{profile}.yml,其中,{profile} 替换为环境名字,如 application-dev.yml,我们可以在其中添加当前环境的配置信息,如添加数据源:
spring:
  datasource:
    url: jdbc:mysql://localhost:3306/database?useUnicode=true&characterEncoding=UTF-8&useSSL=true
    username: root
    password: root
    driverClassName: com.mysql.jdbc.Driver
这样,我们就实现了多环境的配置,每次编译打包我们无需修改任何东西,编译为 jar 文件后,运行命令:
java -jar api.jar --spring.profiles.active=dev
其中 --spring.profiles.active 就是我们要指定的环境。
常用注解
我们知道,Spring Boot 主要采用注解的方式,在上一篇的入门实例中,我们也用到了一些注解。
本文,我将详细介绍在实际项目中常用的注解。
@SpringBootApplication
我们可以注意到 Spring Boot 支持 main 方法启动,在我们需要启动的主类中加入此注解,告诉 Spring Boot,这个类是程序的入口。如:
@SpringBootApplication
public class Application {

    public static void main(String[] args) {
        SpringApplication.run(Application.class, args);
    }
}
如果不加这个注解,程序是无法启动的。
我们查看下 SpringBootApplication 的源码,源码如下:
@Target(ElementType.TYPE)
@Retention(RetentionPolicy.RUNTIME)
@Documented
@Inherited
@SpringBootConfiguration
@EnableAutoConfiguration
@ComponentScan(excludeFilters = {
        @Filter(type = FilterType.CUSTOM, classes = TypeExcludeFilter.class),
        @Filter(type = FilterType.CUSTOM, classes = AutoConfigurationExcludeFilter.class) })
public @interface SpringBootApplication {

    /**
     * Exclude specific auto-configuration classes such that they will never be applied.
     * @return the classes to exclude
     */
    @AliasFor(annotation = EnableAutoConfiguration.class, attribute = "exclude")
    Class<?>[] exclude() default {};

    /**
     * Exclude specific auto-configuration class names such that they will never be
     * applied.
     * @return the class names to exclude
     * @since 1.3.0
     */
    @AliasFor(annotation = EnableAutoConfiguration.class, attribute = "excludeName")
    String[] excludeName() default {};

    /**
     * Base packages to scan for annotated components. Use {@link #scanBasePackageClasses}
     * for a type-safe alternative to String-based package names.
     * @return base packages to scan
     * @since 1.3.0
     */
    @AliasFor(annotation = ComponentScan.class, attribute = "basePackages")
    String[] scanBasePackages() default {};

    /**
     * Type-safe alternative to {@link #scanBasePackages} for specifying the packages to
     * scan for annotated components. The package of each class specified will be scanned.
     * <p>
     * Consider creating a special no-op marker class or interface in each package that
     * serves no purpose other than being referenced by this attribute.
     * @return base packages to scan
     * @since 1.3.0
     */
    @AliasFor(annotation = ComponentScan.class, attribute = "basePackageClasses")
    Class<?>[] scanBasePackageClasses() default {};

}
在这个注解类上有3个注解,如下:
@SpringBootConfiguration
@EnableAutoConfiguration
@ComponentScan(excludeFilters = {
        @Filter(type = FilterType.CUSTOM, classes = TypeExcludeFilter.class),
        @Filter(type = FilterType.CUSTOM, classes = AutoConfigurationExcludeFilter.class) })
因此,我们可以用这三个注解代替 SpringBootApplication,如:
@SpringBootConfiguration
@EnableAutoConfiguration
@ComponentScan
public class Application {

    public static void main(String[] args) {
        SpringApplication.run(Application.class, args);
    }
}
其中,SpringBootConfiguration 表示 Spring Boot 的配置注解,EnableAutoConfiguration 表示自动配置,ComponentScan 表示 Spring Boot 扫描 Bean 的规则,比如扫描哪些包。
@Configuration
加入了这个注解的类被认为是 Spring Boot 的配置类,我们知道可以在 application.yml 设置一些配置,也可以通过代码设置配置。
如果我们要通过代码设置配置,就必须在这个类上标注 Configuration 注解。如下代码:
@Configuration
public class WebConfig extends WebMvcConfigurationSupport{

    @Override
    protected void addInterceptors(InterceptorRegistry registry) {
        super.addInterceptors(registry);
        registry.addInterceptor(new ApiInterceptor());
    }
}
不过 Spring Boot 官方推荐 Spring Boot 项目用 SpringBootConfiguration 来代替 Configuration。
@Bean
这个注解是方法级别上的注解,主要添加在 @Configuration 或 @SpringBootConfiguration 注解的类,有时也可以添加在 @Component 注解的类。它的作用是定义一个Bean。
请看下面代码:
    @Bean
    public ApiInterceptor interceptor(){
        return new ApiInterceptor();
    }
那么,我们可以在 ApiInterceptor 里面注入其他 Bean,也可以在其他 Bean 注入这个类。
@Value
通常情况下,我们需要定义一些全局变量,都会想到的方法是定义一个 public static 变量,在需要时调用,是否有其他更好的方案呢?答案是肯定的。下面请看代码:
    @Value("${server.port}")
    String port;
    @RequestMapping("/hello")
    public String home(String name) {
        return "hi "+name+",i am from port:" +port;
    }
其中,server.port 就是我们在 application.yml 里面定义的属性,我们可以自定义任意属性名,通过 @Value 注解就可以将其取出来。
它的好处不言而喻:
- 定义在配置文件里,变量发生变化,无需修改代码。
- 变量交给Spring来管理,性能更好。
注: 本课程默认针对于对 SpringMVC 有所了解的读者,Spring Boot 本身基于 Spring 开发的,因此,本文不再讲解其他 Spring 的注解。
注入任何类
本节通过一个实际的例子来讲解如何注入一个普通类,并且说明这样做的好处。
假设一个需求是这样的:项目要求使用阿里云的 OSS 进行文件上传。
我们知道,一个项目一般会分为开发环境、测试环境和生产环境。OSS 文件上传一般有如下几个参数:appKey、appSecret、bucket、endpoint 等。不同环境的参数都可能不一样,这样便于区分。按照传统的做法,我们在代码里设置这些参数,这样做的话,每次发布不同的环境包都需要手动修改代码。
这个时候,我们就可以考虑将这些参数定义到配置文件里面,通过前面提到的 @Value 注解取出来,再通过 @Bean 将其定义为一个 Bean,这时我们只需要在需要使用的地方注入该 Bean 即可。
首先在 application.yml 加入如下内容:
appKey: 1
appSecret: 1
bucket: lynn
endPoint: https://www.aliyun.com
其次创建一个普通类:
public class Aliyun {

    private String appKey;

    private String appSecret;

    private String bucket;

    private String endPoint;

    public static class Builder{

        private String appKey;

        private String appSecret;

        private String bucket;

        private String endPoint;

        public Builder setAppKey(String appKey){
            this.appKey = appKey;
            return this;
        }

        public Builder setAppSecret(String appSecret){
            this.appSecret = appSecret;
            return this;
        }

        public Builder setBucket(String bucket){
            this.bucket = bucket;
            return this;
        }

        public Builder setEndPoint(String endPoint){
            this.endPoint = endPoint;
            return this;
        }

        public Aliyun build(){
            return new Aliyun(this);
        }
    }

    public static Builder options(){
        return new Aliyun.Builder();
    }

    private Aliyun(Builder builder){
        this.appKey = builder.appKey;
        this.appSecret = builder.appSecret;
        this.bucket = builder.bucket;
        this.endPoint = builder.endPoint;
    }

    public String getAppKey() {
        return appKey;
    }

    public String getAppSecret() {
        return appSecret;
    }

    public String getBucket() {
        return bucket;
    }

    public String getEndPoint() {
        return endPoint;
    }
}
然后在 @SpringBootConfiguration 注解的类添加如下代码:
@Value("${appKey}")
    private String appKey;
    @Value("${appSecret}")
    private String appSecret;
    @Value("${bucket}")
    private String bucket;
    @Value("${endPoint}")
    private String endPoint;

    @Bean
    public Aliyun aliyun(){
        return Aliyun.options()
                .setAppKey(appKey)
                .setAppSecret(appSecret)
                .setBucket(bucket)
                .setEndPoint(endPoint)
                .build();
    }
最后在需要的地方注入这个 Bean 即可:
    @Autowired
    private Aliyun aliyun;
拦截器
我们在提供 API 的时候,经常需要对 API 进行统一的拦截,比如进行接口的安全性校验。
本节,我会讲解 Spring Boot 是如何进行拦截器设置的,请看接下来的代码。
创建一个拦截器类:ApiInterceptor,并实现 HandlerInterceptor 接口:
public class ApiInterceptor implements HandlerInterceptor {
    //请求之前
    @Override
    public boolean preHandle(HttpServletRequest httpServletRequest, HttpServletResponse httpServletResponse, Object o) throws Exception {
        System.out.println("进入拦截器");
        return true;
    }
    //请求时
    @Override
    public void postHandle(HttpServletRequest httpServletRequest, HttpServletResponse httpServletResponse, Object o, ModelAndView modelAndView) throws Exception {

    }
    //请求完成
    @Override
    public void afterCompletion(HttpServletRequest httpServletRequest, HttpServletResponse httpServletResponse, Object o, Exception e) throws Exception {

    }
}
@SpringBootConfiguration 注解的类继承 WebMvcConfigurationSupport 类,并重写 addInterceptors 方法,将 ApiInterceptor 拦截器类添加进去,代码如下:
@SpringBootConfiguration
public class WebConfig extends WebMvcConfigurationSupport{

    @Override
    protected void addInterceptors(InterceptorRegistry registry) {
        super.addInterceptors(registry);
        registry.addInterceptor(new ApiInterceptor());
    }
}
异常处理
我们在 Controller 里提供接口,通常需要捕捉异常,并进行友好提示,否则一旦出错,界面上就会显示报错信息,给用户一种不好的体验。最简单的做法就是每个方法都使用 try catch 进行捕捉,报错后,则在 catch 里面设置友好的报错提示。如果方法很多,每个都需要 try catch,代码会显得臃肿,写起来也比较麻烦。
我们可不可以提供一个公共的入口进行统一的异常处理呢?当然可以。方法很多,这里我们通过 Spring 的 AOP 特性就可以很方便的实现异常的统一处理。
@Aspect
@Component
public class WebExceptionAspect {

    private static final Logger logger = LoggerFactory.getLogger(WebExceptionAspect.class);

//凡是注解了RequestMapping的方法都被拦截   @Pointcut("@annotation(org.springframework.web.bind.annotation.RequestMapping)")
    private void webPointcut() {
    }

    /**
     * 拦截web层异常,记录异常日志,并返回友好信息到前端 目前只拦截Exception,是否要拦截Error需再做考虑
     *
     * @param e
     *            异常对象
     */
    @AfterThrowing(pointcut = "webPointcut()", throwing = "e")
    public void handleThrowing(Exception e) {
        e.printStackTrace();
        logger.error("发现异常!" + e.getMessage());
        logger.error(JSON.toJSONString(e.getStackTrace()));
        //这里输入友好性信息
        writeContent("出现异常");
    }

    /**
     * 将内容输出到浏览器
     *
     * @param content
     *            输出内容
     */
    private void writeContent(String content) {
        HttpServletResponse response = ((ServletRequestAttributes) RequestContextHolder.getRequestAttributes())
                .getResponse();
        response.reset();
        response.setCharacterEncoding("UTF-8");
        response.setHeader("Content-Type", "text/plain;charset=UTF-8");
        response.setHeader("icop-content-type", "exception");
        PrintWriter writer = null;
        try {
            writer = response.getWriter();
        } catch (IOException e) {
            e.printStackTrace();
        }
        writer.print(content);
        writer.flush();
        writer.close();
    }
}
这样,我们无需每个方法都添加 try catch,一旦报错,则会执行 handleThrowing 方法。
优雅的输入合法性校验
为了接口的健壮性,我们通常除了客户端进行输入合法性校验外,在 Controller 的方法里,我们也需要对参数进行合法性校验,传统的做法是每个方法的参数都做一遍判断,这种方式和上一节讲的异常处理一个道理,不太优雅,也不易维护。
其实,SpringMVC 提供了验证接口,下面请看代码:
@GetMapping("authorize")
public void authorize(@Valid AuthorizeIn authorize, BindingResult ret){
    if(result.hasFieldErrors()){
            List<FieldError> errorList = result.getFieldErrors();
            //通过断言抛出参数不合法的异常
            errorList.stream().forEach(item -> Assert.isTrue(false,item.getDefaultMessage()));
        }
}
public class AuthorizeIn extends BaseModel{

    @NotBlank(message = "缺少response_type参数")
    private String responseType;
    @NotBlank(message = "缺少client_id参数")
    private String ClientId;

    private String state;

    @NotBlank(message = "缺少redirect_uri参数")
    private String redirectUri;

    public String getResponseType() {
        return responseType;
    }

    public void setResponseType(String responseType) {
        this.responseType = responseType;
    }

    public String getClientId() {
        return ClientId;
    }

    public void setClientId(String clientId) {
        ClientId = clientId;
    }

    public String getState() {
        return state;
    }

    public void setState(String state) {
        this.state = state;
    }

    public String getRedirectUri() {
        return redirectUri;
    }

    public void setRedirectUri(String redirectUri) {
        this.redirectUri = redirectUri;
    }
}
在 controller 的方法需要校验的参数后面必须跟 BindingResult,否则无法进行校验。但是这样会抛出异常,对用户而言不太友好!
那怎么办呢?
很简单,我们可以利用上一节讲的异常处理,对报错进行拦截:
@Component
@Aspect
public class WebExceptionAspect implements ThrowsAdvice{

    public static final Logger logger = LoggerFactory.getLogger(WebExceptionAspect.class);

//拦截被GetMapping注解的方法    @Pointcut("@annotation(org.springframework.web.bind.annotation.GetMapping)")
    private void webPointcut() {
    }

    @AfterThrowing(pointcut = "webPointcut()",throwing = "e")
    public void afterThrowing(Exception e) throws Throwable {
        logger.debug("exception 来了!");
        if(StringUtils.isNotBlank(e.getMessage())){
                           writeContent(e.getMessage());
        }else{
            writeContent("参数错误!");
        }

    }

    /**
     * 将内容输出到浏览器
     *
     * @param content
     *            输出内容
     */
    private void writeContent(String content) {
        HttpServletResponse response = ((ServletRequestAttributes) RequestContextHolder.getRequestAttributes())
                .getResponse();
        response.reset();
        response.setCharacterEncoding("UTF-8");
        response.setHeader("Content-Type", "text/plain;charset=UTF-8");
        response.setHeader("icop-content-type", "exception");
        PrintWriter writer = null;
        try {
            writer = response.getWriter();

            writer.print((content == null) ? "" : content);
            writer.flush();
            writer.close();
        } catch (IOException e) {
            e.printStackTrace();
        }
    }
}
这样当我们传入不合法的参数时就会进入 WebExceptionAspect 类,从而输出友好参数。
我们再把验证的代码单独封装成方法:
protected void validate(BindingResult result){
        if(result.hasFieldErrors()){
            List<FieldError> errorList = result.getFieldErrors();
            errorList.stream().forEach(item -> Assert.isTrue(false,item.getDefaultMessage()));
        }
    }
这样每次参数校验只需要调用 validate 方法就行了,我们可以看到代码的可读性也大大的提高了。
接口版本控制
一个系统上线后会不断迭代更新,需求也会不断变化,有可能接口的参数也会发生变化,如果在原有的参数上直接修改,可能会影响线上系统的正常运行,这时我们就需要设置不同的版本,这样即使参数发生变化,由于老版本没有变化,因此不会影响上线系统的运行。
一般我们可以在地址上带上版本号,也可以在参数上带上版本号,还可以再 header 里带上版本号,这里我们在地址上带上版本号,大致的地址如:http://api.example.com/v1/test,其中,v1 即代表的是版本号。具体做法请看代码:
@Target({ElementType.METHOD,ElementType.TYPE})
@Retention(RetentionPolicy.RUNTIME)
@Documented
@Mapping
public @interface ApiVersion {

    /**
     * 标识版本号
     * @return
     */
    int value();
}
public class ApiVersionCondition implements RequestCondition<ApiVersionCondition> {

    // 路径中版本的前缀, 这里用 /v[1-9]/的形式
    private final static Pattern VERSION_PREFIX_PATTERN = Pattern.compile("v(\\d+)/");

    private int apiVersion;

    public ApiVersionCondition(int apiVersion){
        this.apiVersion = apiVersion;
    }

    @Override
    public ApiVersionCondition combine(ApiVersionCondition other) {
        // 采用最后定义优先原则,则方法上的定义覆盖类上面的定义
        return new ApiVersionCondition(other.getApiVersion());
    }

    @Override
    public ApiVersionCondition getMatchingCondition(HttpServletRequest request) {
        Matcher m = VERSION_PREFIX_PATTERN.matcher(request.getRequestURI());
        if(m.find()){
            Integer version = Integer.valueOf(m.group(1));
            if(version >= this.apiVersion)
            {
                return this;
            }
        }
        return null;
    }

    @Override
    public int compareTo(ApiVersionCondition other, HttpServletRequest request) {
        // 优先匹配最新的版本号
        return other.getApiVersion() - this.apiVersion;
    }

    public int getApiVersion() {
        return apiVersion;
    }
}
public class CustomRequestMappingHandlerMapping extends
        RequestMappingHandlerMapping {

    @Override
    protected RequestCondition<ApiVersionCondition> getCustomTypeCondition(Class<?> handlerType) {
        ApiVersion apiVersion = AnnotationUtils.findAnnotation(handlerType, ApiVersion.class);
        return createCondition(apiVersion);
    }

    @Override
    protected RequestCondition<ApiVersionCondition> getCustomMethodCondition(Method method) {
        ApiVersion apiVersion = AnnotationUtils.findAnnotation(method, ApiVersion.class);
        return createCondition(apiVersion);
    }

    private RequestCondition<ApiVersionCondition> createCondition(ApiVersion apiVersion) {
        return apiVersion == null ? null : new ApiVersionCondition(apiVersion.value());
    }
}
@SpringBootConfiguration
public class WebConfig extends WebMvcConfigurationSupport {

    @Bean
    public AuthInterceptor interceptor(){
        return new AuthInterceptor();
    }

    @Override
    public void addInterceptors(InterceptorRegistry registry) {
        registry.addInterceptor(new AuthInterceptor());
    }

    @Override
    @Bean
    public RequestMappingHandlerMapping requestMappingHandlerMapping() {
        RequestMappingHandlerMapping handlerMapping = new CustomRequestMappingHandlerMapping();
        handlerMapping.setOrder(0);
        handlerMapping.setInterceptors(getInterceptors());
        return handlerMapping;
    }
}
Controller 类的接口定义如下:
@ApiVersion(1)
@RequestMapping("{version}/dd")
public class HelloController{}
这样我们就实现了版本控制,如果增加了一个版本,则创建一个新的 Controller,方法名一致,ApiVersion 设置为2,则地址中 v1 会找到 ApiVersion 为1的方法,v2 会找到 ApiVersion 为2的方法。
自定义 JSON 解析
Spring Boot 中 RestController 返回的字符串默认使用 Jackson 引擎,它也提供了工厂类,我们可以自定义 JSON 引擎,本节实例我们将 JSON 引擎替换为 fastJSON,首先需要引入 fastJSON:
<dependency>
            <groupId>com.alibaba</groupId>
            <artifactId>fastjson</artifactId>
            <version>${fastjson.version}</version>
        </dependency>
其次,在 WebConfig 类重写 configureMessageConverters 方法:
@Override
    public void configureMessageConverters(List<HttpMessageConverter<?>> converters) {
        super.configureMessageConverters(converters);
        /*
        1.需要先定义一个convert转换消息的对象;
        2.添加fastjson的配置信息,比如是否要格式化返回的json数据
        3.在convert中添加配置信息
        4.将convert添加到converters中
         */
        //1.定义一个convert转换消息对象
        FastJsonHttpMessageConverter fastConverter=new FastJsonHttpMessageConverter();
        //2.添加fastjson的配置信息,比如:是否要格式化返回json数据
        FastJsonConfig fastJsonConfig=new FastJsonConfig();
        fastJsonConfig.setSerializerFeatures(
                SerializerFeature.PrettyFormat
        );
        fastConverter.setFastJsonConfig(fastJsonConfig);
        converters.add(fastConverter);
    }
单元测试
Spring Boot 的单元测试很简单,直接看代码:
@SpringBootTest(classes = Application.class)
@RunWith(SpringJUnit4ClassRunner.class)
public class TestDB {

    @Test
    public void test(){
    }
}
模板引擎
在传统的 SpringMVC 架构中,我们一般将 JSP、HTML 页面放到 webapps 目录下面,但是 Spring Boot 没有 webapps,更没有 web.xml,如果我们要写界面的话,该如何做呢?
Spring Boot 官方提供了几种模板引擎:FreeMarker、Velocity、Thymeleaf、Groovy、mustache、JSP。
这里以 FreeMarker 为例讲解 Spring Boot 的使用。
首先引入 FreeMarker 依赖:
    <dependency>
        <groupId>org.springframework.boot</groupId>
        <artifactId>spring-boot-starter-freemarker</artifactId>
    </dependency>
在 resources 下面建立两个目录:static 和 templates,如图所示:

其中 static 目录用于存放静态资源,譬如:CSS、JS、HTML 等,templates 目录存放模板引擎文件,我们可以在 templates 下面创建一个文件:index.ftl(freemarker 默认后缀为 .ftl),并添加内容:
<!DOCTYPE html>
<html>
    <head>

    </head>
    <body>
        <h1>Hello World!</h1>
    </body>
</html>
然后创建 PageController 并添加内容:
@Controller
public class PageController {

    @RequestMapping("index.html")
    public String index(){
        return "index";
    }
}
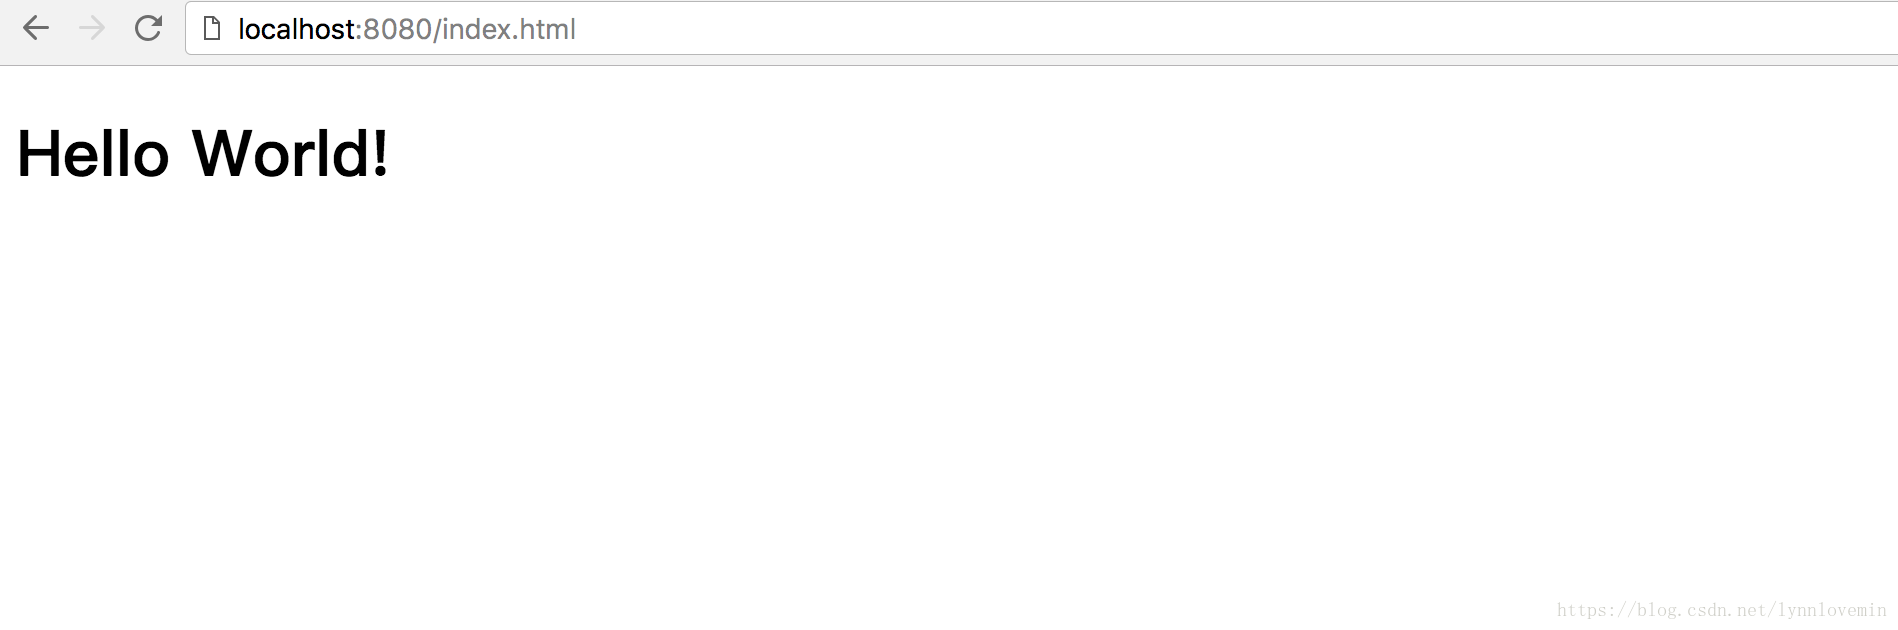
启动 Application.java,访问:http://localhost:8080/index.html,就可以看到如图所示:
第03课:Spring Boot 启动原理
引言
Spring Boot 大大简化了我们的开发配置,节省了大量的时间,确实比较方便。但是对于新手来说,如果不了解个中原理,难免会遇到坑。
本文作者将带领大家走近神秘的 Spring Boot,一步步破开它的神秘面纱,探索 Spring Boot 的启动原理。
开发任何基于 Spring Boot 的项目,我们都会使用以下的启动类:
import org.springframework.boot.SpringApplication;
import org.springframework.boot.autoconfigure.SpringBootApplication;

@SpringBootApplication
public class Application {

    public static void main(String[] args) {
        SpringApplication.run(Application.class, args);
    }
}
可以看到,Application 类中定义了注解 @SpringBootApplication,main 方法里通过 SpringApplication.run 来启动整个应用程序。因此要研究 Spring Boot 的启动原理,我们就需要从这两个地方入手。
强大的 SpringBootApplication
首先,我们先来看看 SpringBootApplication 源码是怎么定义这个注解的:
/**
 * Indicates a {@link Configuration configuration} class that declares one or more
 * {@link Bean @Bean} methods and also triggers {@link EnableAutoConfiguration
 * auto-configuration} and {@link ComponentScan component scanning}. This is a convenience
 * annotation that is equivalent to declaring {@code @Configuration},
 * {@code @EnableAutoConfiguration} and {@code @ComponentScan}.
 *
 * @author Phillip Webb
 * @author Stephane Nicoll
 * @since 1.2.0
 */
@Target(ElementType.TYPE)
@Retention(RetentionPolicy.RUNTIME)
@Documented
@Inherited
@SpringBootConfiguration
@EnableAutoConfiguration
@ComponentScan(excludeFilters = {
        @Filter(type = FilterType.CUSTOM, classes = TypeExcludeFilter.class),
        @Filter(type = FilterType.CUSTOM, classes = AutoConfigurationExcludeFilter.class) })
public @interface SpringBootApplication {

    /**
     * Exclude specific auto-configuration classes such that they will never be applied.
     * @return the classes to exclude
     */
    @AliasFor(annotation = EnableAutoConfiguration.class, attribute = "exclude")
    Class<?>[] exclude() default {};

    /**
     * Exclude specific auto-configuration class names such that they will never be
     * applied.
     * @return the class names to exclude
     * @since 1.3.0
     */
    @AliasFor(annotation = EnableAutoConfiguration.class, attribute = "excludeName")
    String[] excludeName() default {};

    /**
     * Base packages to scan for annotated components. Use {@link #scanBasePackageClasses}
     * for a type-safe alternative to String-based package names.
     * @return base packages to scan
     * @since 1.3.0
     */
    @AliasFor(annotation = ComponentScan.class, attribute = "basePackages")
    String[] scanBasePackages() default {};

    /**
     * Type-safe alternative to {@link #scanBasePackages} for specifying the packages to
     * scan for annotated components. The package of each class specified will be scanned.
     * <p>
     * Consider creating a special no-op marker class or interface in each package that
     * serves no purpose other than being referenced by this attribute.
     * @return base packages to scan
     * @since 1.3.0
     */
    @AliasFor(annotation = ComponentScan.class, attribute = "basePackageClasses")
    Class<?>[] scanBasePackageClasses() default {};

}
可以看到,除了最基础的注解外,还增加了三个 @SpringBootConfiguration、@EnableAutoConfiguration、@ComponentScan。因此,正如上一篇所讲的一样,我们将 SpringBootApplication 替换成这三个注解也是相同的效果:
import org.springframework.boot.SpringApplication;
import org.springframework.boot.SpringBootConfiguration;
import org.springframework.boot.autoconfigure.EnableAutoConfiguration;
import org.springframework.context.annotation.ComponentScan;

@SpringBootConfiguration
@EnableAutoConfiguration
@ComponentScan
public class Application {

    public static void main(String[] args) {
        SpringApplication.run(Application.class, args);
    }
}
每次我们都写这三个注解比较麻烦,因此我们只写 @SpringBootApplication 就行了。
下面,我们分别来介绍这三个注解。
SpringBootConfiguration
我们先来看看它的源码:
import java.lang.annotation.Documented;
import java.lang.annotation.ElementType;
import java.lang.annotation.Retention;
import java.lang.annotation.RetentionPolicy;
import java.lang.annotation.Target;
import org.springframework.context.annotation.Configuration;

@Target({ElementType.TYPE})
@Retention(RetentionPolicy.RUNTIME)
@Documented
@Configuration
public @interface SpringBootConfiguration {
}
它其实就是一个 Configuration,但是 Spring Boot 推荐用 SpringBootConfiguration 来代替 Configuration。
Spring Boot 社区推荐使用 JavaConfig 配置,所以要用到 @Configuration。
我们先来看看 SpringMVC 基于 XML 是如何配置的:
<?xml version="1.0" encoding="UTF-8"?>
<beans xmlns="http://www.springframework.org/schema/beans"
       xmlns:xsi="http://www.w3.org/2001/XMLSchema-instance"
       xsi:schemaLocation="http://www.springframework.org/schema/beans http://www.springframework.org/schema/beans/spring-beans-3.0.xsd"
       default-lazy-init="true">
    <!--bean定义-->
</beans>
而 JavaConfig 的配置是这样的:
import org.springframework.boot.SpringBootConfiguration;

@SpringBootConfiguration
public class WebConfig {
    //bean定义
}
任何标注了 SpringBootConfiguration 或 Configuration 的类都是一个 JavaConfig。
我们再来看看基于 XML 的 Bean 是如何定义的:
<bean id="service" class="ServiceImpl">

</bean>
而 JavaConfig 的配置是这样的:
import org.springframework.boot.SpringBootConfiguration;

@SpringBootConfiguration
public class WebConfig {
    //bean定义
    @Bean
    public Service service(){
        return new ServiceImpl();
    }
}
任何标注了 Bean 的方法都被定义为一个 Bean,我们可以在任何 Spring 的 IoC 容器中注入进去。
EnableAutoConfiguration
这个注解尤为重要,它的作用是自动将 JavaConfig 中的 Bean 装载到 IoC 容器中。
ComponentScan
这个注解的作用是自动扫描并加载符合条件的组件(如:Component、Bean 等),我们可以通过 basePakcages 来指定其扫描的范围,如果不指定,则默认从标注了 @ComponentScan 注解的类所在包开始扫描。如下代码:
@ComponentScan(basePackages = "com.lynn")
因此,Spring Boot 的启动类最好放在 root package 下面,因为默认不指定 basePackages,这样能保证扫描到所有包。
以上只是从表面来研究 Spring Boot 的启动原理,那么,为什么通过 SpringBootApplication 和 SpringApplication.run() 就能启动一个应用程序,它的底层到底是怎么实现的呢?别急,我们马上来一探究竟。
源码解析
我们知道,启动类先调用了 SpringApplication 的静态方法 run,跟踪进去后发现,它会先实例化 SpringApplication,然后调用 run 方法。
/**
     * Static helper that can be used to run a {@link SpringApplication} from the
     * specified sources using default settings and user supplied arguments.
     * @param sources the sources to load
     * @param args the application arguments (usually passed from a Java main method)
     * @return the running {@link ApplicationContext}
     */
    public static ConfigurableApplicationContext run(Object[] sources, String[] args) {
        return new SpringApplication(sources).run(args);
    }
所以,要分析它的启动源码,首先要分析 SpringApplicaiton 的构造过程。
SpringApplication 构造器
在 SpringApplication 构造函数内部,它会调用内部的一个定义为 private 的方法 initialize:
public SpringApplication(Object... sources) {
    initialize(sources);
}

private void initialize(Object[] sources) {
        if (sources != null && sources.length > 0) {
            this.sources.addAll(Arrays.asList(sources));
        }
        this.webEnvironment = deduceWebEnvironment();
        setInitializers((Collection) getSpringFactoriesInstances(
                ApplicationContextInitializer.class));
        setListeners((Collection) getSpringFactoriesInstances(ApplicationListener.class));
        this.mainApplicationClass = deduceMainApplicationClass();
    }
通过上述代码,我们分析到 SpringApplication 实例化时有以下几个步骤:
1.将所有 sources 加入到全局 sources 中,目前只有一个 Application。
2.判断是否为 Web 程序(javax.servlet.Servlet、org.springframework.web.context.ConfigurableWebApplicationContext 这两个类必须存在于类加载器中)。
判断过程可以参看以下源码:
private static final String[] WEB_ENVIRONMENT_CLASSES = new String[]{"javax.servlet.Servlet", "org.springframework.web.context.ConfigurableWebApplicationContext"};
private boolean deduceWebEnvironment() {
        for (String className : WEB_ENVIRONMENT_CLASSES) {
            if (!ClassUtils.isPresent(className, null)) {
                return false;
            }
        }
        return true;
    }
3.设置应用程序初始化器 ApplicationContextInitializer,做一些初始化的工作。
4.设置应用程序事件监听器 ApplicationListener。
5.找出启动类,设置到 mainApplicationClass 中。
SpringApplication 的执行流程
SpringApplication 构造完成后,就会调用 run 方法,这时才真正的开始应用程序的执行。
先来看看源码:
public ConfigurableApplicationContext run(String... args) {
        StopWatch stopWatch = new StopWatch();
        stopWatch.start();
        ConfigurableApplicationContext context = null;
        FailureAnalyzers analyzers = null;
        configureHeadlessProperty();
        SpringApplicationRunListeners listeners = getRunListeners(args);
        listeners.starting();
        try {
            ApplicationArguments applicationArguments = new DefaultApplicationArguments(
                    args);
            ConfigurableEnvironment environment = prepareEnvironment(listeners,
                    applicationArguments);
            Banner printedBanner = printBanner(environment);
            context = createApplicationContext();
            analyzers = new FailureAnalyzers(context);
            prepareContext(context, environment, listeners, applicationArguments,
                    printedBanner);
            refreshContext(context);
            afterRefresh(context, applicationArguments);
            listeners.finished(context, null);
            stopWatch.stop();
            if (this.logStartupInfo) {
                new StartupInfoLogger(this.mainApplicationClass)
                        .logStarted(getApplicationLog(), stopWatch);
            }
            return context;
        }
        catch (Throwable ex) {
            handleRunFailure(context, listeners, analyzers, ex);
            throw new IllegalStateException(ex);
        }
    }
通过上述源码,将执行流程分解如下:
- 初始化 StopWatch,调用其 start 方法开始计时。
- 调用 configureHeadlessProperty 设置系统属性 java.awt.headless,这里设置为 true,表示运行在服务器端,在没有显示器和鼠标键盘的模式下工作,模拟输入输出设备功能。
- 遍历 SpringApplicationRunListeners 并调用 starting 方法。
- 创建一个 DefaultApplicationArguments 对象,它持有 args 参数,就是 main 函数传进来的参数调用 prepareEnvironment 方法。
- 打印 banner。
- 创建 Spring Boot 上下文。
- 初始化 FailureAnalyzers。
- 调用 prepareContext。
- 调用 AbstractApplicationContext 的 refresh 方法,并注册钩子。
- 在容器完成刷新后,依次调用注册的 Runners。
- 调用 SpringApplicationRunListeners 的 finished 方法。
- 启动完成并停止计时。
- 初始化过程中出现异常时调用 handleRunFailure 进行处理,然后抛出 IllegalStateException 异常。
第04课:初识 Spring Cloud
Spring Cloud 基于 Spring Boot,因此在前几篇,我们系统地学习了 Spring Boot 的基础知识,为深入研究Spring Cloud打下扎实的基础。
从本章开始,我们将正式进入探索Spring Cloud秘密的旅程中。学习完本课程后,读者将从中学习到如何搭建一个完整的分布式架构,从而向架构师方向靠近。
微服务概述
根据百度百科的描述,微服务架构是一项在云中部署应用和服务的新技术。大部分围绕微服务的争论都集中在容器或其他技术是否能很好的实施微服务,而红帽说 API 应该是重点。
微服务可以在“自己的程序”中运行,并通过“轻量级设备与 HTTP 型 API 进行沟通”。关键在于该服务可以在自己的程序中运行。通过这一点我们就可以将服务公开与微服务架构(在现有系统中分布一个 API)区分开来。在服务公开中,许多服务都可以被内部独立进程所限制。如果其中任何一个服务需要增加某种功能,那么就必须缩小进程范围。在微服务架构中,只需要在特定的某种服务中增加所需功能,而不影响整体进程。
微服务的核心是 API,在一个大型系统中,我们可以将其拆分为一个个的子模块,每一个模块就可以是一个服务,各服务之间通过 API 进行通信。
什么是 Spring Cloud
Spring Cloud是微服务架构思想的一个具体实现,它为开发人员提供了快速构建分布式系统中一些常见模式的工具(例如配置管理、服务发、断路器,智能路由、微代理、控制总线等)。
Spring Cloud 基于 Spring Boot 框架,它不重复造轮子,而是将第三方实现的微服务应用的一些模块集成进去。准确的说,Spring Cloud 是一个容器。
最简单的 Spring Cloud 项目
学习任何一门语言和框架,从 Hello World 入门是最合适的,Spring Cloud 也不例外,接下来,我们就来实现一个最简单的 Spring Cloud 项目。
最简单的 Spring Cloud 微服务架构包括服务发现和服务提供者(即一个大型系统拆分出来的子模块),最极端的微服务可以做到一个方法就是一个服务,一个方法就是一个项目。在一个系统中,服务怎么拆分,要具体问题具体分析,也取决于系统的并发性、高可用性等因素。
闲话少说,请看代码。
首先是服务发现,这里我们采用 Eureka。
pom.xml 文件添加如下内容:
<parent>
        <groupId>org.springframework.boot</groupId>
        <artifactId>spring-boot-starter-parent</artifactId>
        <version>1.5.9.RELEASE</version>
        <relativePath/> <!-- lookup parent from repository -->
    </parent>
<dependencies>
        <dependency>
            <groupId>org.springframework.cloud</groupId>
            <artifactId>spring-cloud-starter-eureka-server</artifactId>
        </dependency>
        <dependency>
            <groupId>org.springframework.cloud</groupId>
            <artifactId>spring-cloud-starter-eureka</artifactId>
        </dependency>
        <dependency>
            <groupId>org.springframework.boot</groupId>
            <artifactId>spring-boot-starter-web</artifactId>
        </dependency>
    </dependencies>
    <dependencyManagement>
        <dependencies>
            <dependency>
                <groupId>org.springframework.cloud</groupId>
                <artifactId>spring-cloud-dependencies</artifactId>
                <version>Dalston.SR5</version>
                <type>pom</type>
                <scope>import</scope>
                <exclusions>
                </exclusions>
            </dependency>
        </dependencies>
    </dependencyManagement>
增加 application.yml 文件,添加如下内容:
server:
  port: 8761
spring:
  profiles:
    active: dev
eureka:
  server:
    enable-self-preservation: false
  instance:
    preferIpAddress: true
    hostname: ${spring.cloud.client.ipAddress}
    instanceId: ${spring.cloud.client.ipAddress}:${server.port}
  client:
    registerWithEureka: false
    fetchRegistry: false
    serviceUrl:
      defaultZone: http://${eureka.instance.hostname}:${server.port}/eureka/
添加一个启动类 Application.java:
@SpringBootApplication
@EnableEurekaServer
public class Application {

    public static void main(String[] args) {
        SpringApplication.run(Application.class, args);
    }
}
然后再创建一个项目,实现服务提供者,在 pom.xml 添加如下内容:
<parent>
        <groupId>org.springframework.boot</groupId>
        <artifactId>spring-boot-starter-parent</artifactId>
        <version>1.5.9.RELEASE</version>
        <relativePath/> <!-- lookup parent from repository -->
    </parent>
<dependencies>
        <dependency>
            <groupId>org.springframework.cloud</groupId>
            <artifactId>spring-cloud-starter-eureka</artifactId>
        </dependency>
        <dependency>
            <groupId>org.springframework.boot</groupId>
            <artifactId>spring-boot-starter-web</artifactId>
        </dependency>
    </dependencies>
    <dependencyManagement>
        <dependencies>
            <dependency>
                <groupId>org.springframework.cloud</groupId>
                <artifactId>spring-cloud-dependencies</artifactId>
                <version>Dalston.SR5</version>
                <type>pom</type>
                <scope>import</scope>
                <exclusions>
                </exclusions>
            </dependency>
        </dependencies>
    </dependencyManagement>
增加 application.yml,并增加如下内容:
eureka:
  client:
    serviceUrl:
      defaultZone: http://localhost:8761/eureka/
server:
  port: 8762
spring:
  application:
    name: hello
增加一个启动类:
@SpringBootApplication
@EnableEurekaClient
@RestController
public class HelloController {

    public static void main(String[] args) {
        SpringApplication.run(HelloController.class, args);
    }

    @Value("${server.port}")
    String port;
    @RequestMapping("/hello")
    public String home(String name) {
        return "hi "+name+",i am from port:" +port;
    }

}
这时,分别启动服务发现和服务提供者,浏览器输入:http://localhost:8761,即服务发现的地址:
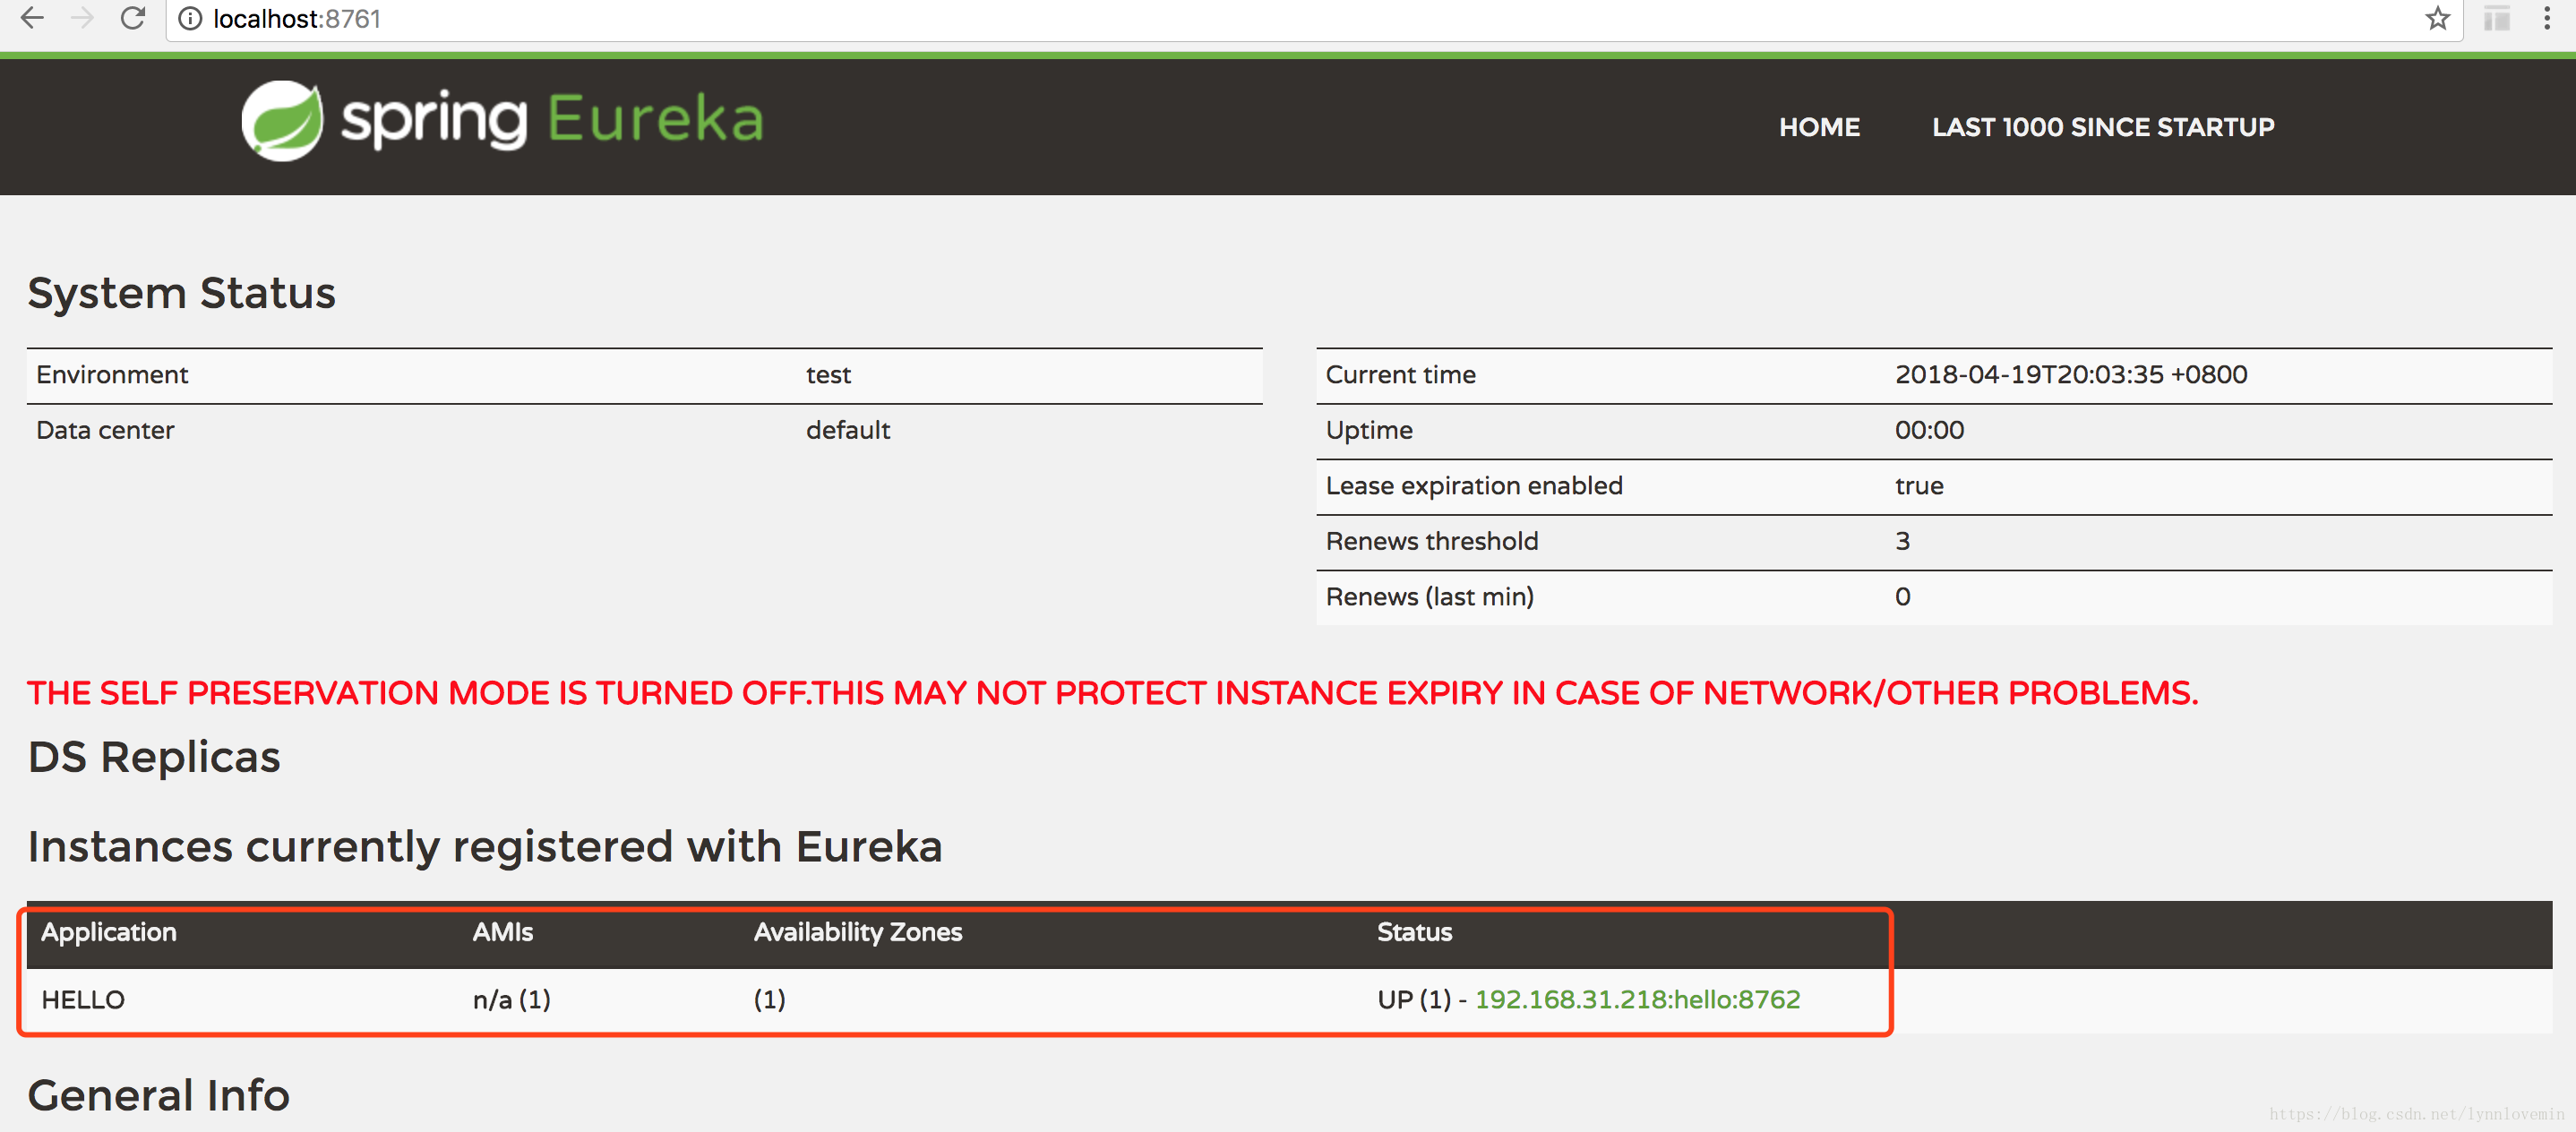
可以发现,服务提供者 Hello 已经注册到服务发现中了,然后我们请求 hello 接口地址:http://localhost:8762/hello?name=lynn,即可以看到下面返回数据:

以上只是 Spring Cloud 的入门实例,是为了给大家展示什么是 Spring Cloud,如果要深入研究它,就必须学习本文之后的课程。在后面的课程中,我将各个模块逐步拆解,一个一个给大家详细讲解。
第05课:服务注册与发现
我们知道,微服务是一个架构思想,而 Spring Cloud 集成了用以实现微服务架构的方方面面。从本文开始,我将带领大家逐个击破 Spring Cloud 的各个模块。
本文,我们先来学习服务的注册与发现,Spring Cloud Netflix 的 Eureka 组件是服务于发现模块,下面我们将学习它。
服务注册与发现模块分为服务注册中心和服务提供者,接下来,我将一一讲解。
服务注册中心
首先,创建一个 Maven 主工程,主工程的 pom.xml 添加如下内容:
<parent>
        <groupId>org.springframework.boot</groupId>
        <artifactId>spring-boot-starter-parent</artifactId>
        <version>1.5.9.RELEASE</version>
        <relativePath/> <!-- lookup parent from repository -->
    </parent>
    <dependencyManagement>
        <dependencies>
            <dependency>
                <groupId>org.springframework.cloud</groupId>
                <artifactId>spring-cloud-dependencies</artifactId>
                <version>Dalston.SR5</version>
                <type>pom</type>
                <scope>import</scope>
                <exclusions>
                </exclusions>
            </dependency>
        </dependencies>
    </dependencyManagement>
接着,在主工程基础上创建两个 module:一个 module 为服务注册中心,一个 module 为服务提供者(即客户端)。
下面将详细演示如何创建服务注册中心。
1.右键工程 -> New -> Module,如下图所示:

2.选择 next,输入 moudle 名,如下图所示:

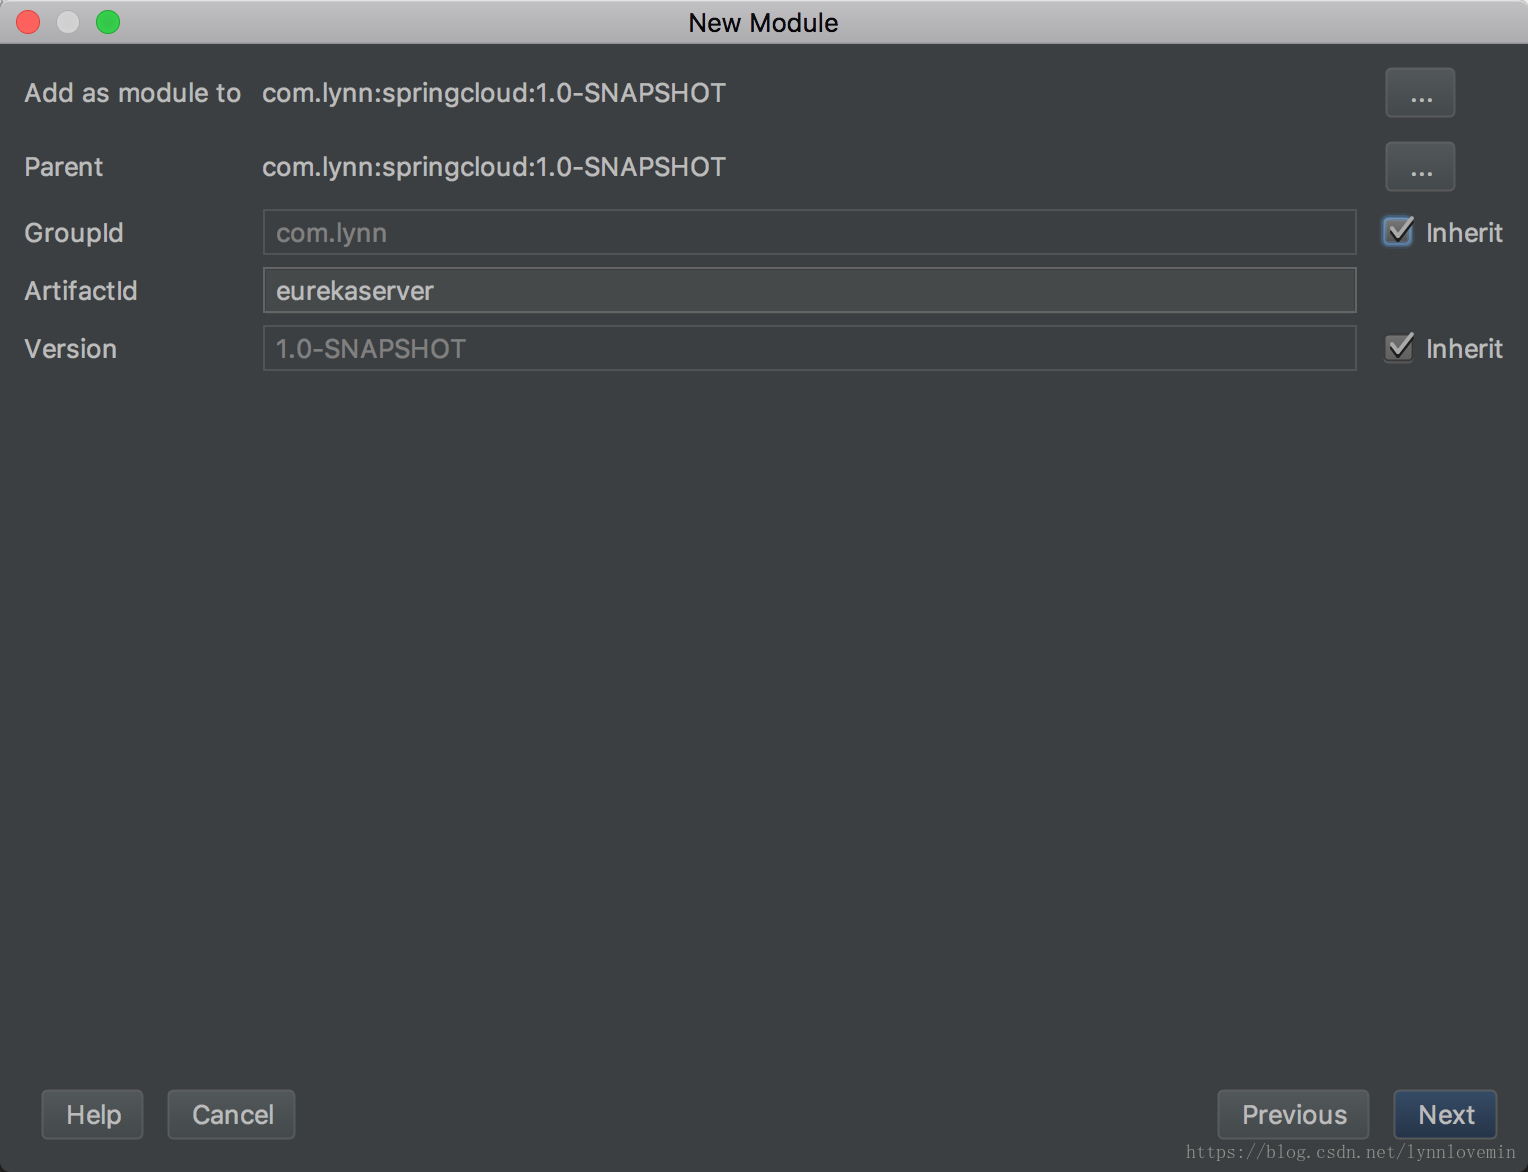
3.点击 next -> finish,如下图所示:
4.然后在 pom.xml 添加依赖:
<dependencies>
        <dependency>
            <groupId>org.springframework.cloud</groupId>
            <artifactId>spring-cloud-starter-eureka-server</artifactId>
        </dependency>
    </dependencies>
创建启动类 Application.java:
@SpringBootApplication
@EnableEurekaServer
public class Application {

    public static void main(String[] args) {
        SpringApplication.run(Application.class, args);
    }
}
这里,我们注意到除了前面提到的 @SpringBootApplication外,这个类还增加了一个注解:EnableEurekaServer,这个注解的作用就是标注该应用程序是一个注册中心,只是添加这个注解还不够,还需要增加配置。
在 resources 下面创建 application.yml 并添加如下内容:
server:
  port: 8761
eureka:
  server:
    enable-self-preservation: false
  instance:
    preferIpAddress: true
    hostname: ${spring.cloud.client.ipAddress}
    instanceId: ${spring.cloud.client.ipAddress}:${server.port}
  client:
    registerWithEureka: false
    fetchRegistry: false
    serviceUrl:
      defaultZone: http://${eureka.instance.hostname}:${server.port}/eureka/
启动该应用程序,打开浏览器并访问:http://localhost:8761。如果看到如下界面,说明注册中心已经启动起来了:
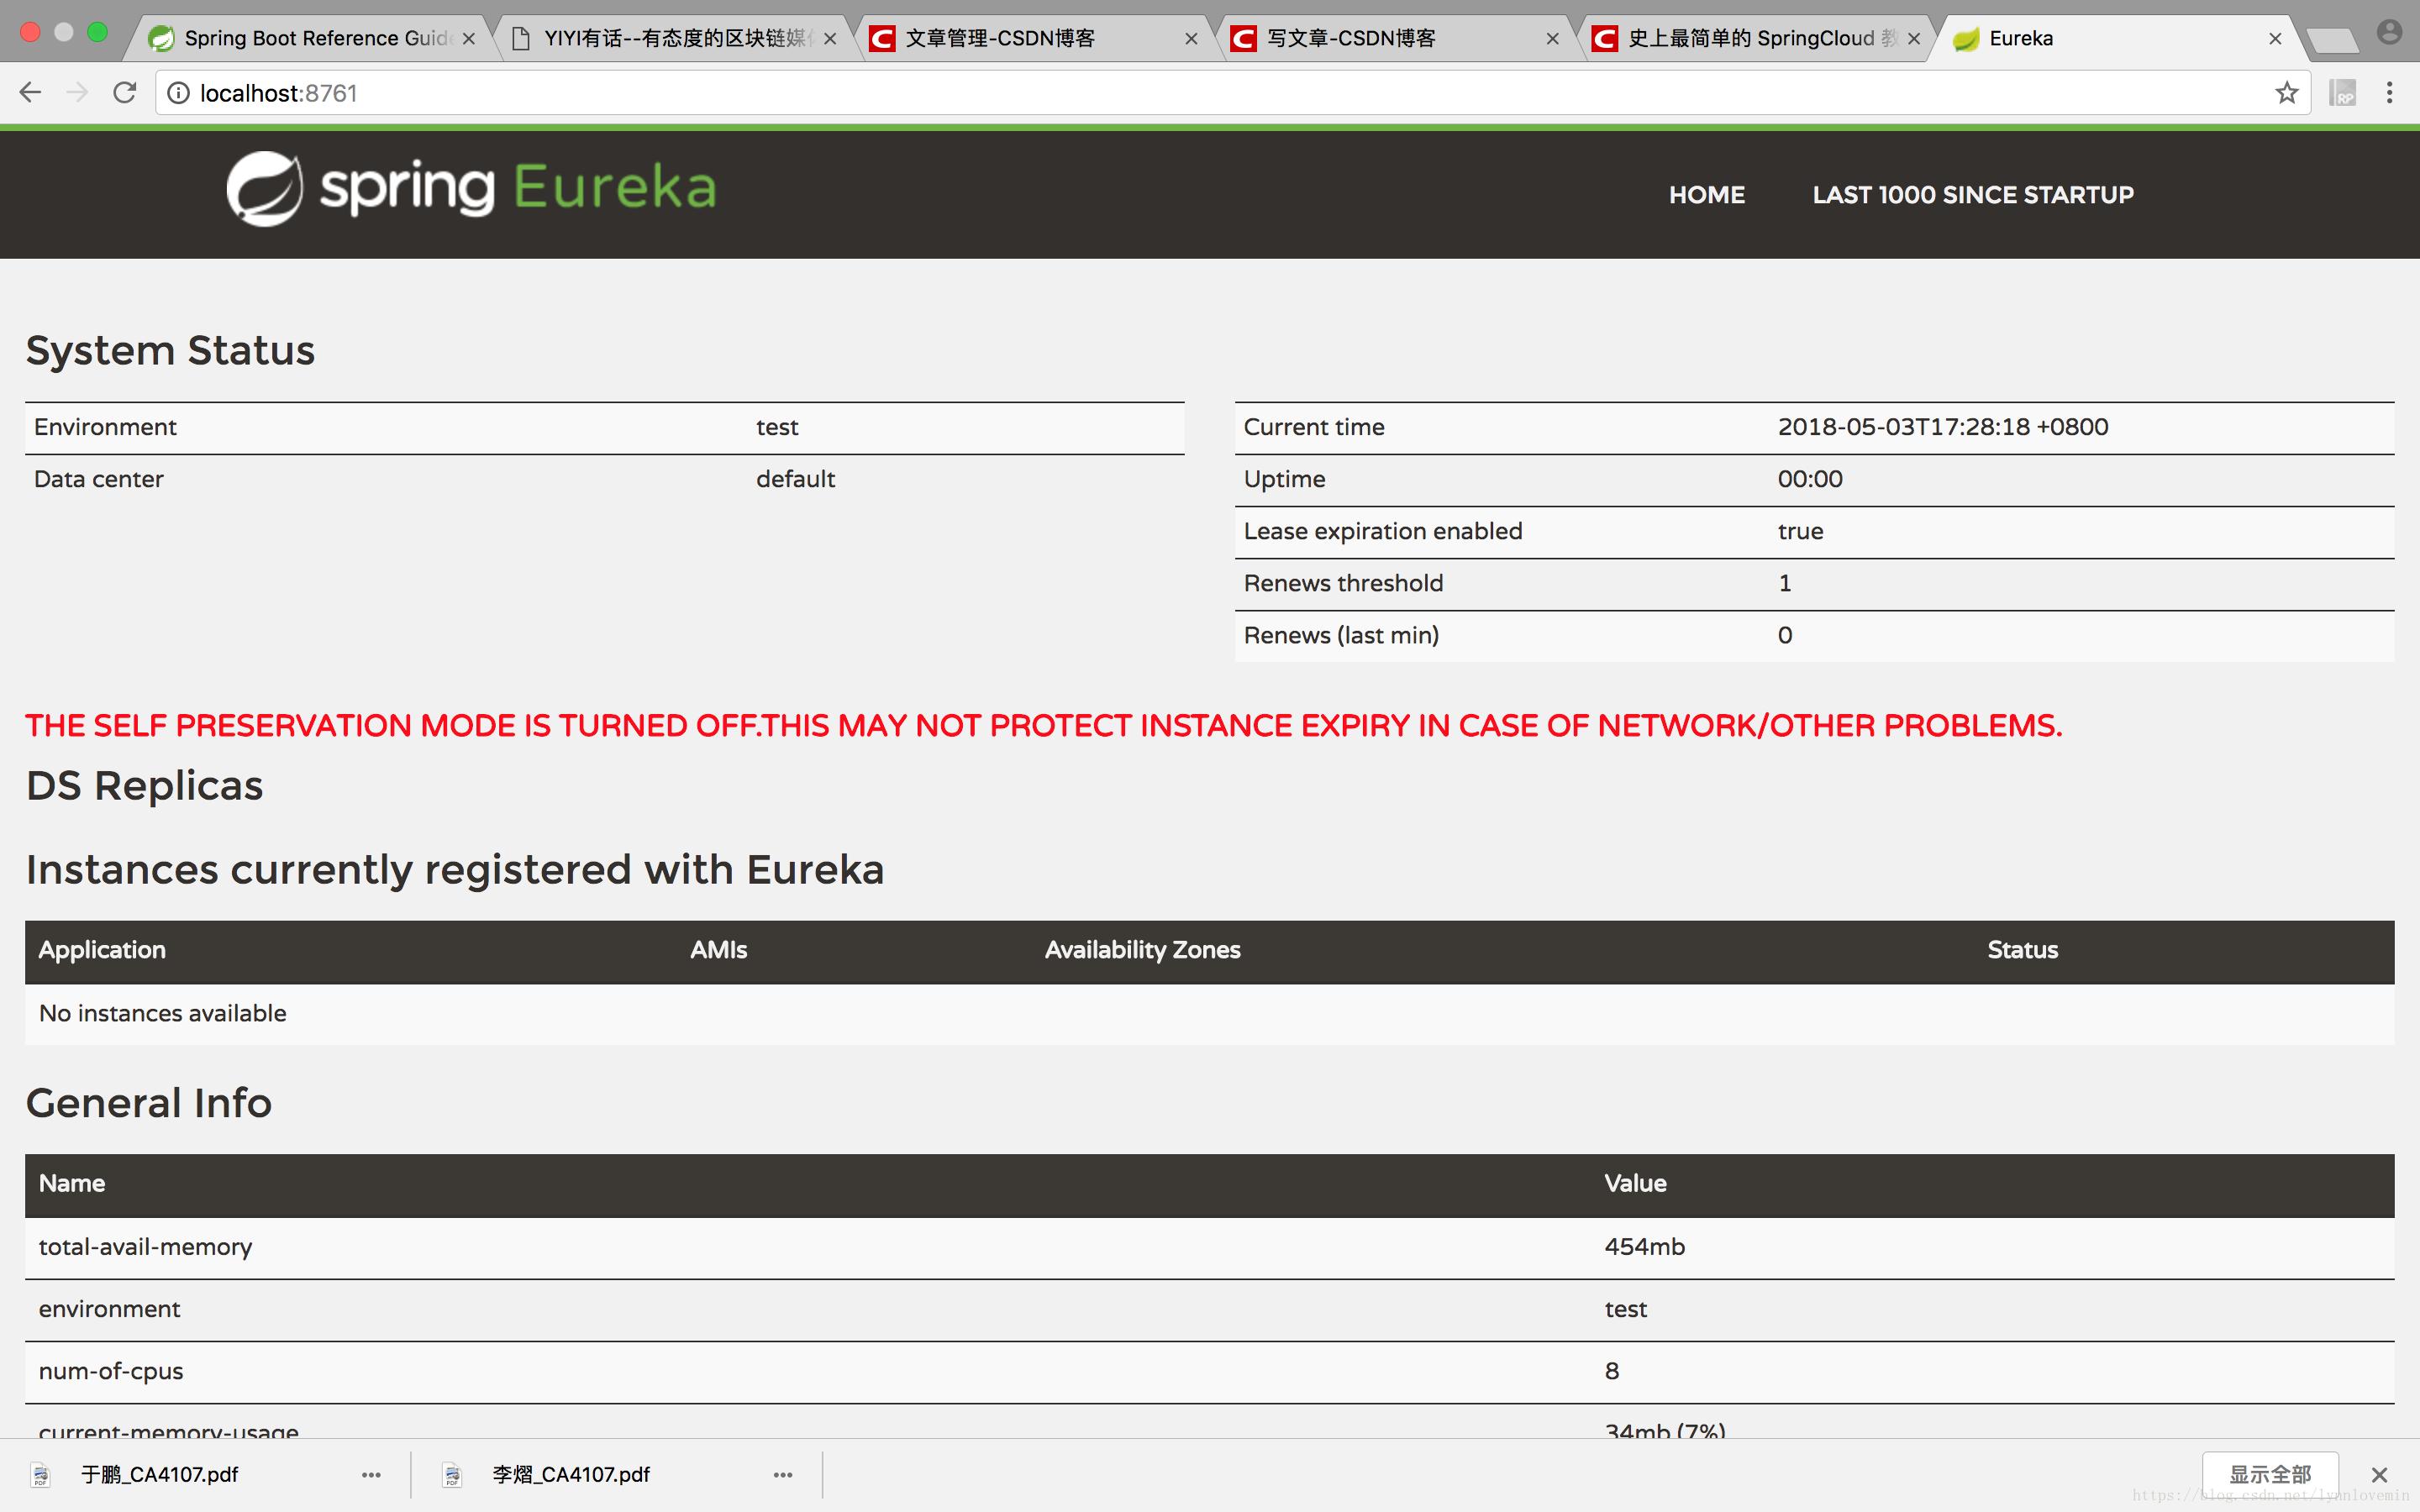
下面说明一下注册中心各个配置项的含义:
eureka.server.enable-self-preservation:是否开启自我保护,默认为 true,在开启自我保护的情况下,注册中心在丢失客户端时,会进入自动保护模式,注册中心并不会将该服务从注册中心删除掉。这里我设置为 false,即关闭自我保护。根据我的经验,如果设置为 true,在负载均衡条件下,一个服务挂掉后,注册中心并没有删掉该服务,会导致客户端请求的时候可能会请求到该服务,导致系统无法访问,所以我推荐将这个属性设置为 false。eureka.instance.preferIpAddress:是否以 IP 注册到注册中心,Eureka 默认是以 hostname 来注册的。client.serviceUrl.defaultZone:注册中心默认地址。
建议读者按照以上的配置项写就行了。
服务提供者
我们有了注册中心,那么就可以创建一个服务提供者(即客户端)注册到注册中心去了。
同样地,按照注册中心的创建方式,创建一个 module,并且在 pom.xml 添加如下内容:
<dependencies>
        <dependency>
            <groupId>org.springframework.cloud</groupId>
            <artifactId>spring-cloud-starter-eureka</artifactId>
        </dependency>
    </dependencies>
然后创建 Application.java:
@SpringBootApplication
@EnableEurekaClient
public class Application {

    public static void main(String[] args) {
        SpringApplication.run(Application.class, args);
    }
}
这里用到了一个注解:EnableEurekaClient,标注了此注解,说明该项目是一个服务提供者。
然后创建配置文件 application.yml:
eureka:
  client:
    serviceUrl:
      defaultZone: http://localhost:8761/eureka/
server:
  port: 8762
spring:
  application:
    name: eurekaclient
其中,spring.application.name 为该服务的名字,eureka.client.serviceUrl.defaultZone 的作用是指定注册中心的地址。
然后启动该工程,重新访问:http://localhost:8761,即可看到如下界面:
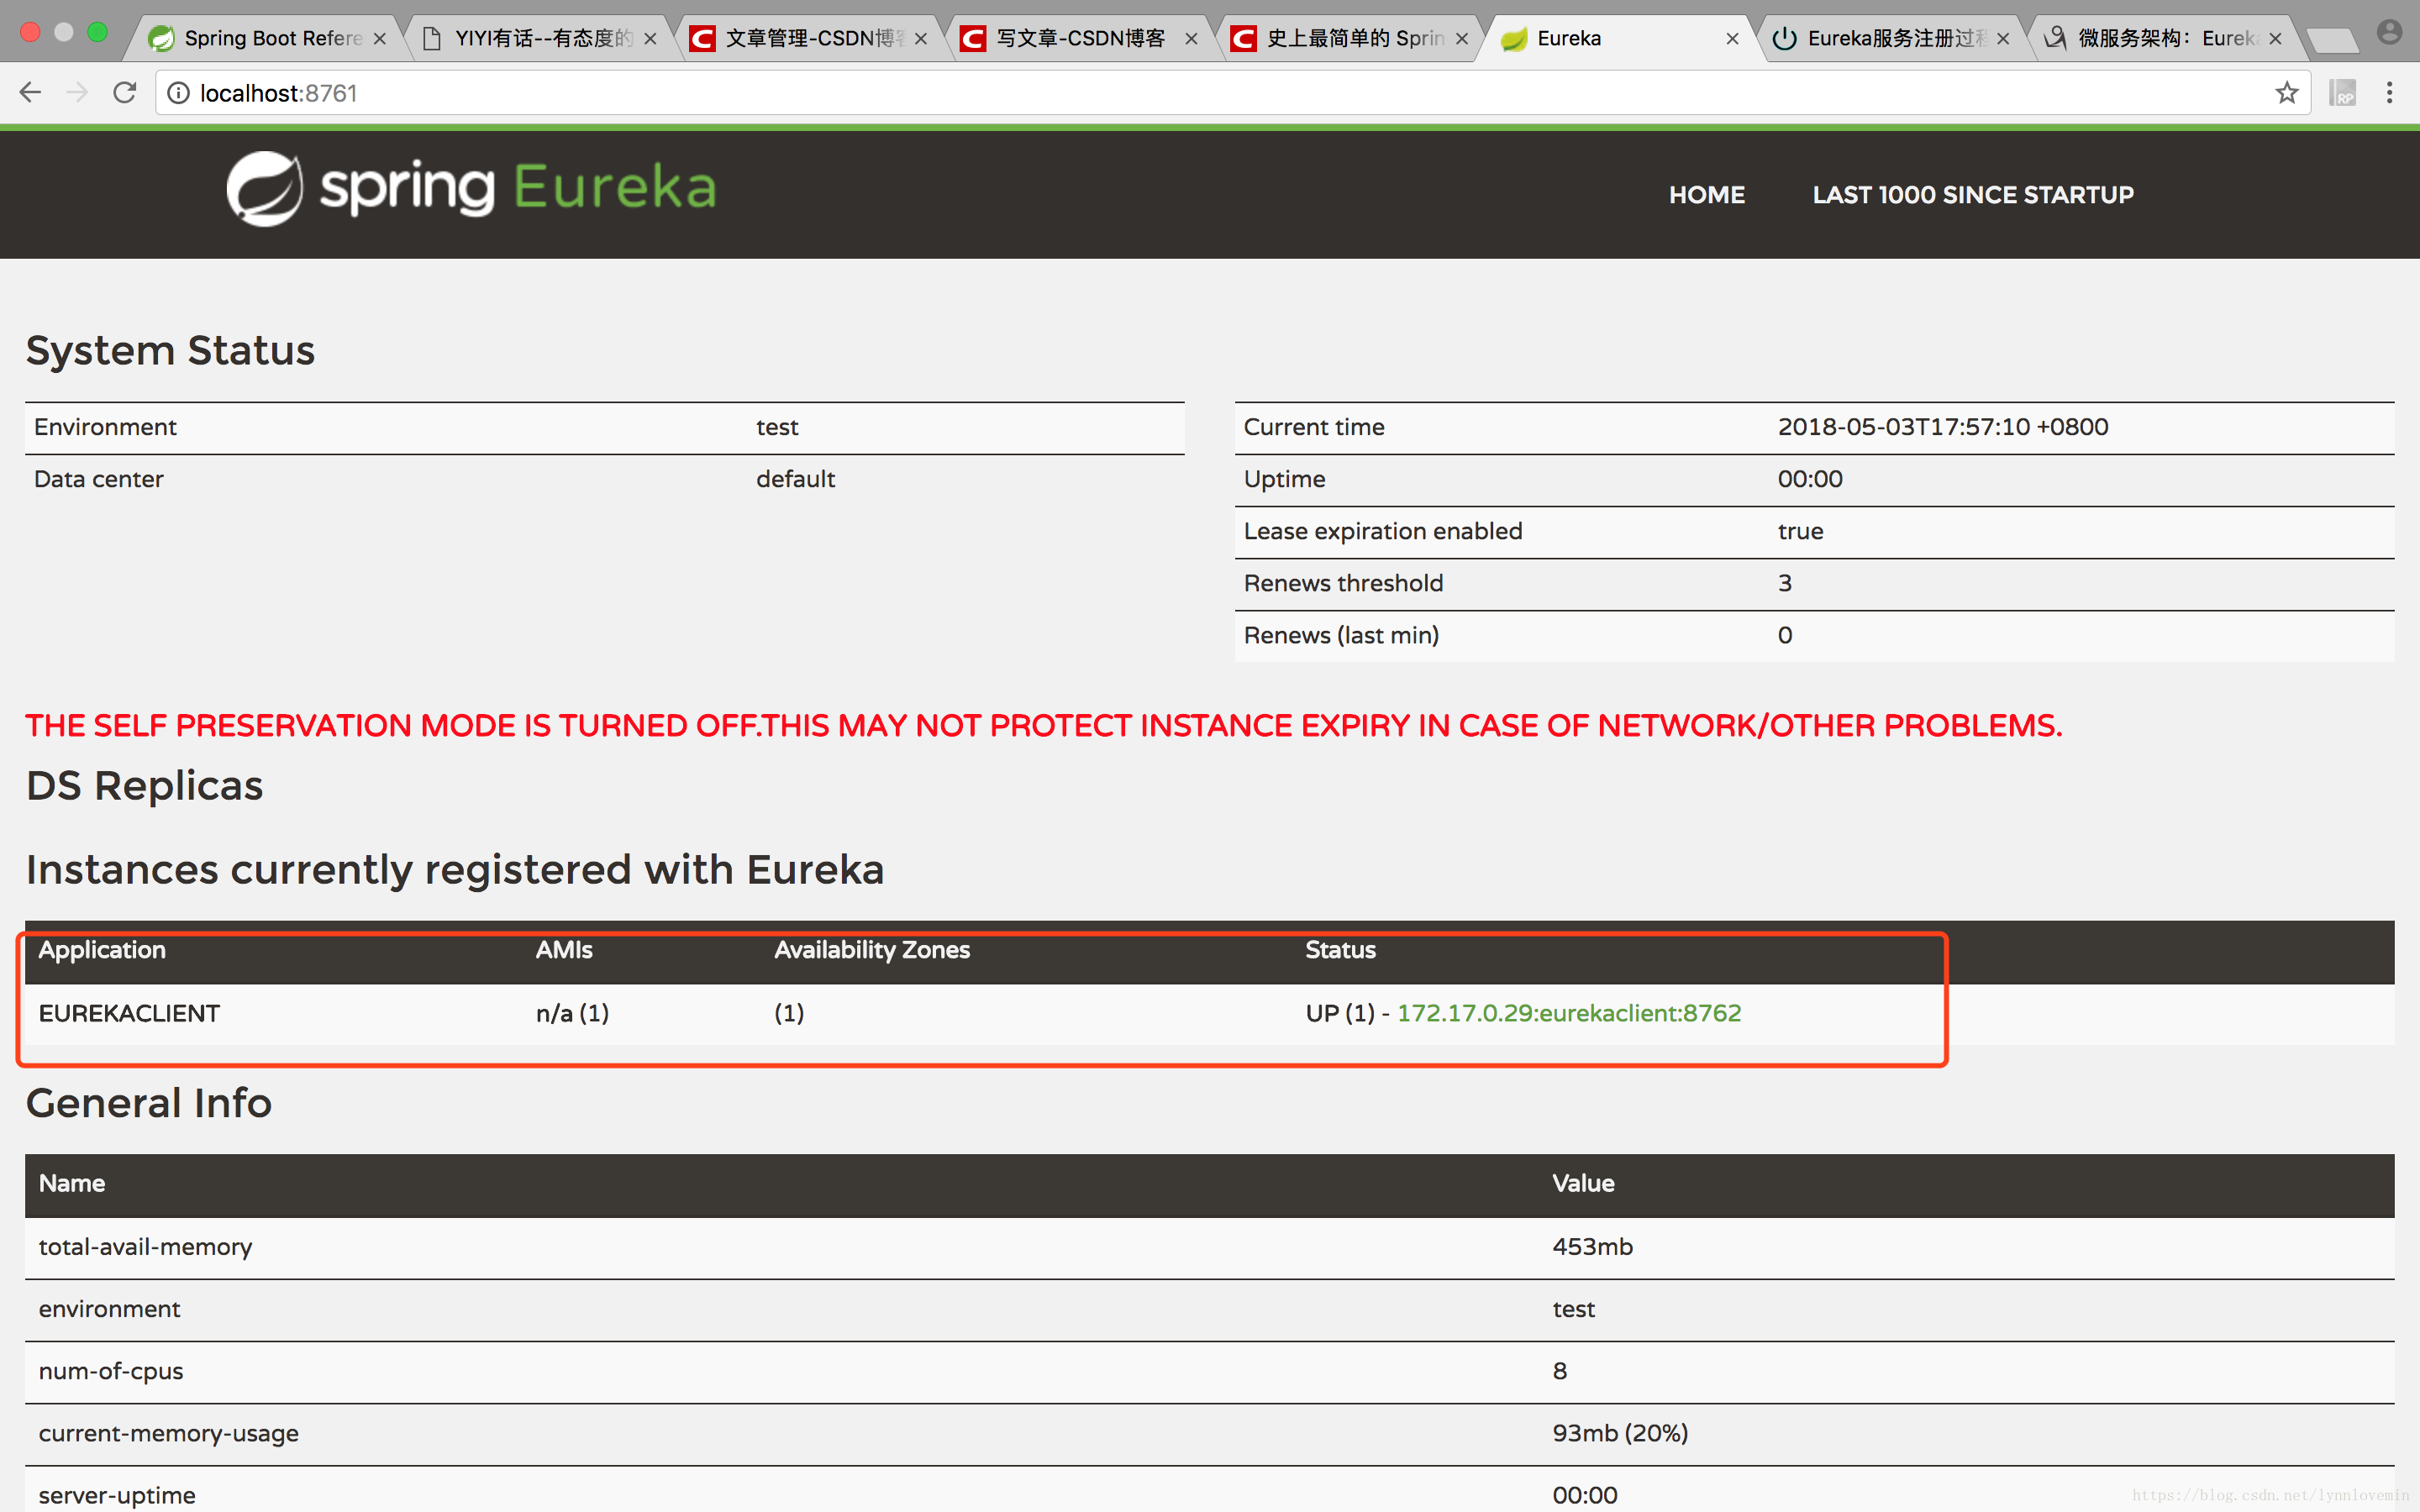
我们可以看到,刚刚创建的服务提供者 eurekaclient 已经被注册到注册中心了。
第06课:服务网关
本文,我们将学习 Spring Cloud的另一个组件:zuul,它提供微服务的网关功能,即中转站,通过它提供的接口,可以转发不同的服务。在学习 zuul 之前,我们先接着上一篇的代码,来看看服务提供者是如何提供服务的。
在服务提供者的 module 下创建 HelloController 类,添加内容如下:
@RestController
public class HelloController {

    @RequestMapping("index")
    public String index(){
        return "Hello World!";
    }
}
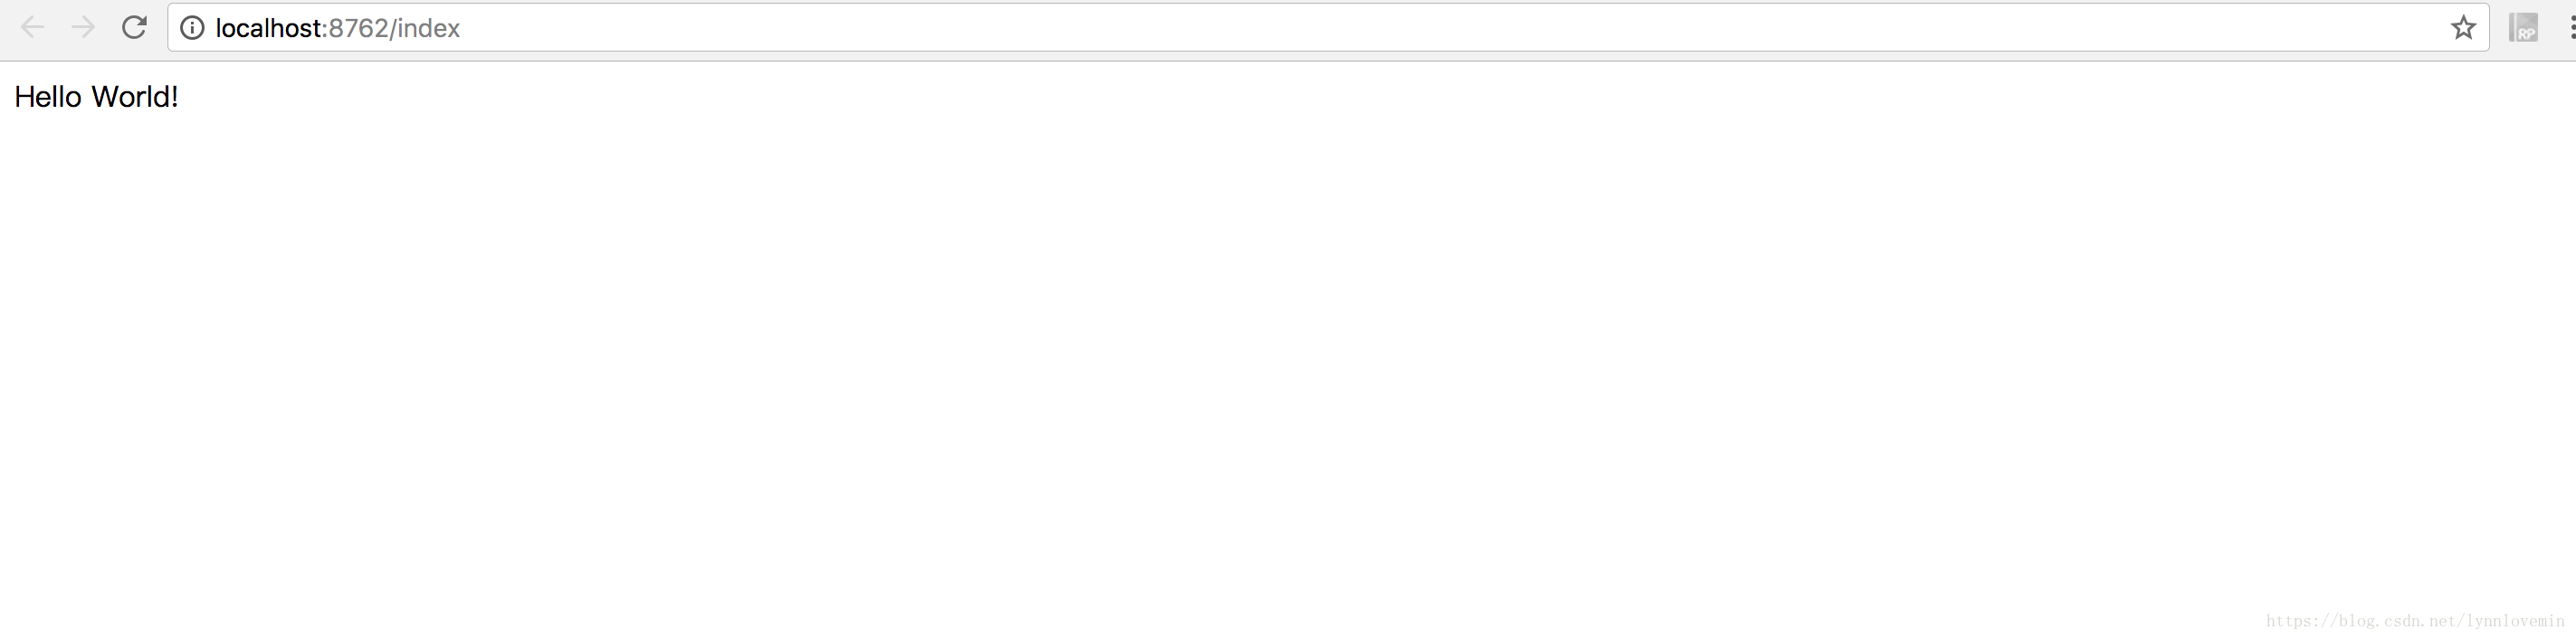
然后分别启动服务注册中心和服务提供者,浏览器输入:http://localhost:8762/index,即可看见如下画面:
在实际的项目中,一个项目可能会包含很多个服务,每个服务的端口和 IP 都可能不一样。那么,如果我们以这种形式提供接口给外部调用,代价是非常大的。从安全性上考虑,系统对外提供的接口应该进行合法性校验,防止非法请求,如果按照这种形式,那每个服务都要写一遍校验规则,维护起来也很麻烦。
这个时候,我们需要统一的入口,接口地址全部由该入口进入,而服务只部署在局域网内供这个统一的入口调用,这个入口就是我们通常说的服务网关。
Spring Cloud 给我们提供了这样一个解决方案,那就是 zuul,它的作用就是进行路由转发、异常处理和过滤拦截。下面,我将演示如果使用 zuul 创建一个服务网关。
创建 gateway 工程
在父项目上右键 -> New -> Module,创建一个名为 gateway 的工程,在其 pom.xml 中,加入如下依赖:
<dependencies>
        <dependency>
            <groupId>org.springframework.cloud</groupId>
            <artifactId>spring-cloud-starter-eureka</artifactId>
        </dependency>
        <dependency>
            <groupId>org.springframework.cloud</groupId>
            <artifactId>spring-cloud-starter-zuul</artifactId>
        </dependency>
    </dependencies>
创建 Application 启动类,并增加 @EnableZuulProxy 注解:
@SpringBootApplication
@EnableEurekaClient
@EnableZuulProxy
public class Application {

    public static void main(String[] args) {
        SpringApplication.run(Application.class, args);
    }
}
最后添加 application.yml 配置文件,内容如下:
eureka:
  client:
    serviceUrl:
      defaultZone: http://localhost:8761/eureka/
server:
  port: 8080
spring:
  application:
    name: gateway
zuul:
  routes:
    api:
      path: /api/**
      serviceId: eurekaclient
我们可以看到,服务网关的配置多了几项,具体含义如下。
-
zuul.routes.api.path:指定请求基础地址,其中 API 可以是任何字符。
-
serviceId:转发到的服务 ID,也就是指定服务的 application.name,上述实例的含义表示只要包含
/api/的地址,都自动转发到 eurekaclient 的服务去。
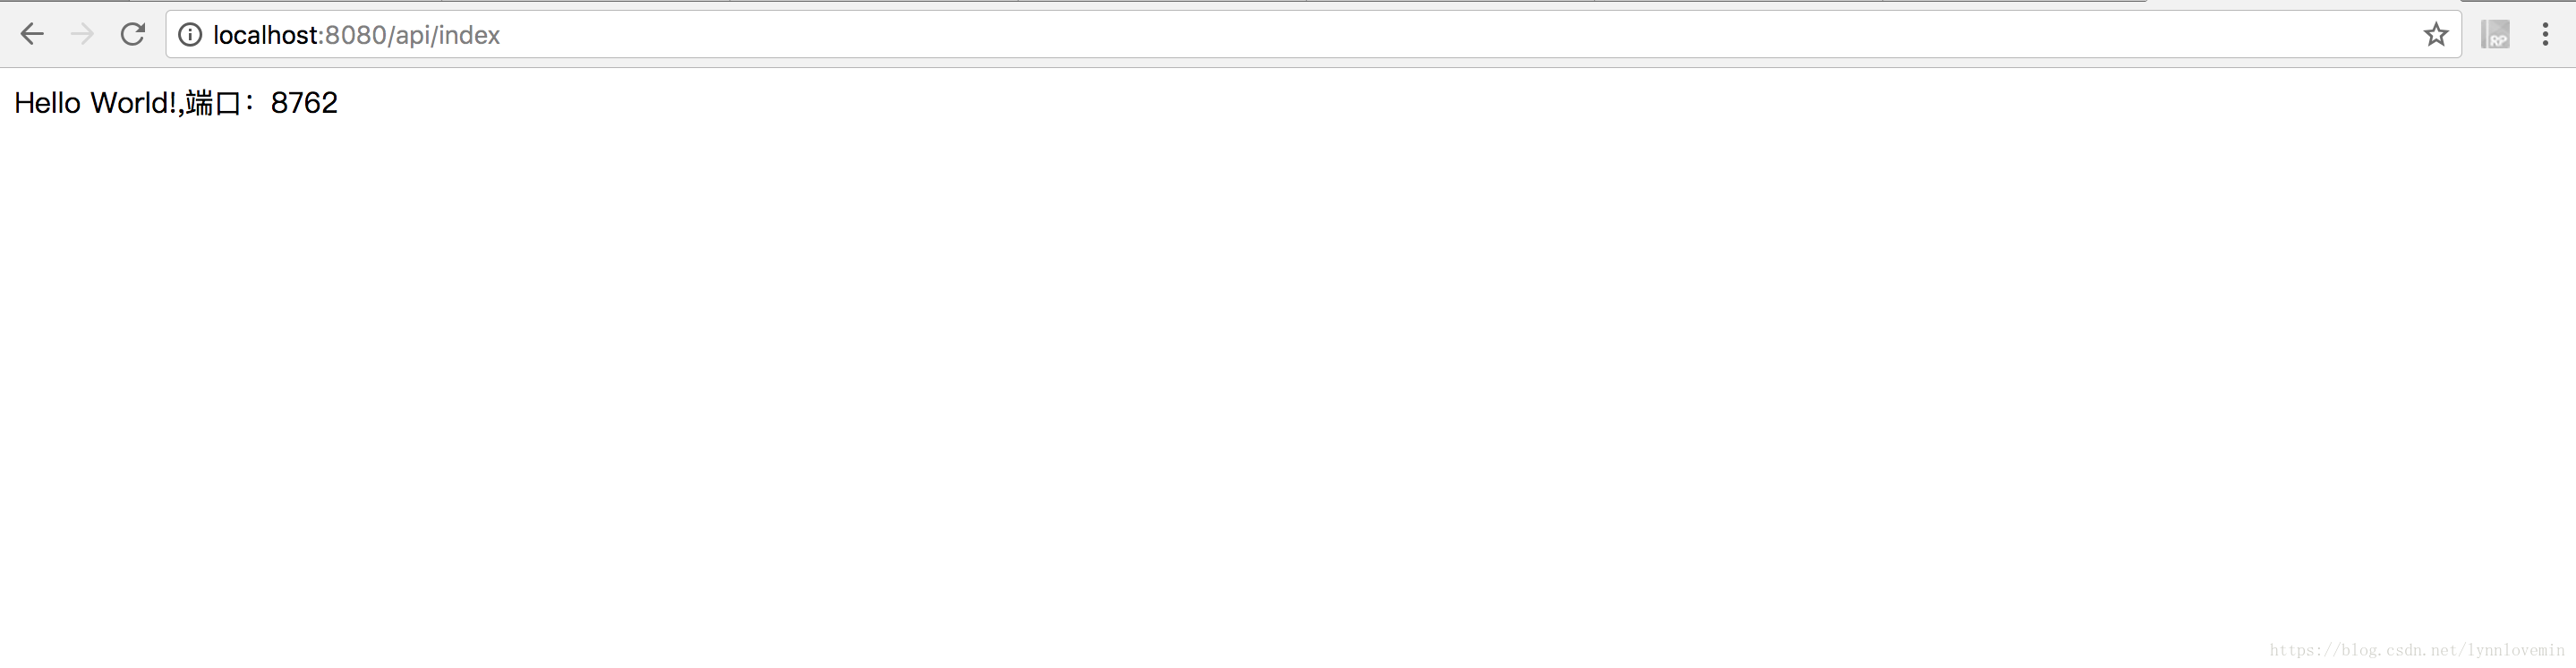
然后我们启动服务注册中心、服务提供者、服务网关,访问地址:http://localhost:8080/api/index,我们可以看到和之前的界面完全一样。其实只要引入了 zuul,它就会自动帮我们实现反向代理和负载均衡。配置文件中的地址转发其实就是一个反向代理,那它如何实现负载均衡呢?
我们修改服务提供者的 Controller 如下:
RestController
public class HelloController {
@Value("${server.port}")
private int port;
@RequestMapping("index")
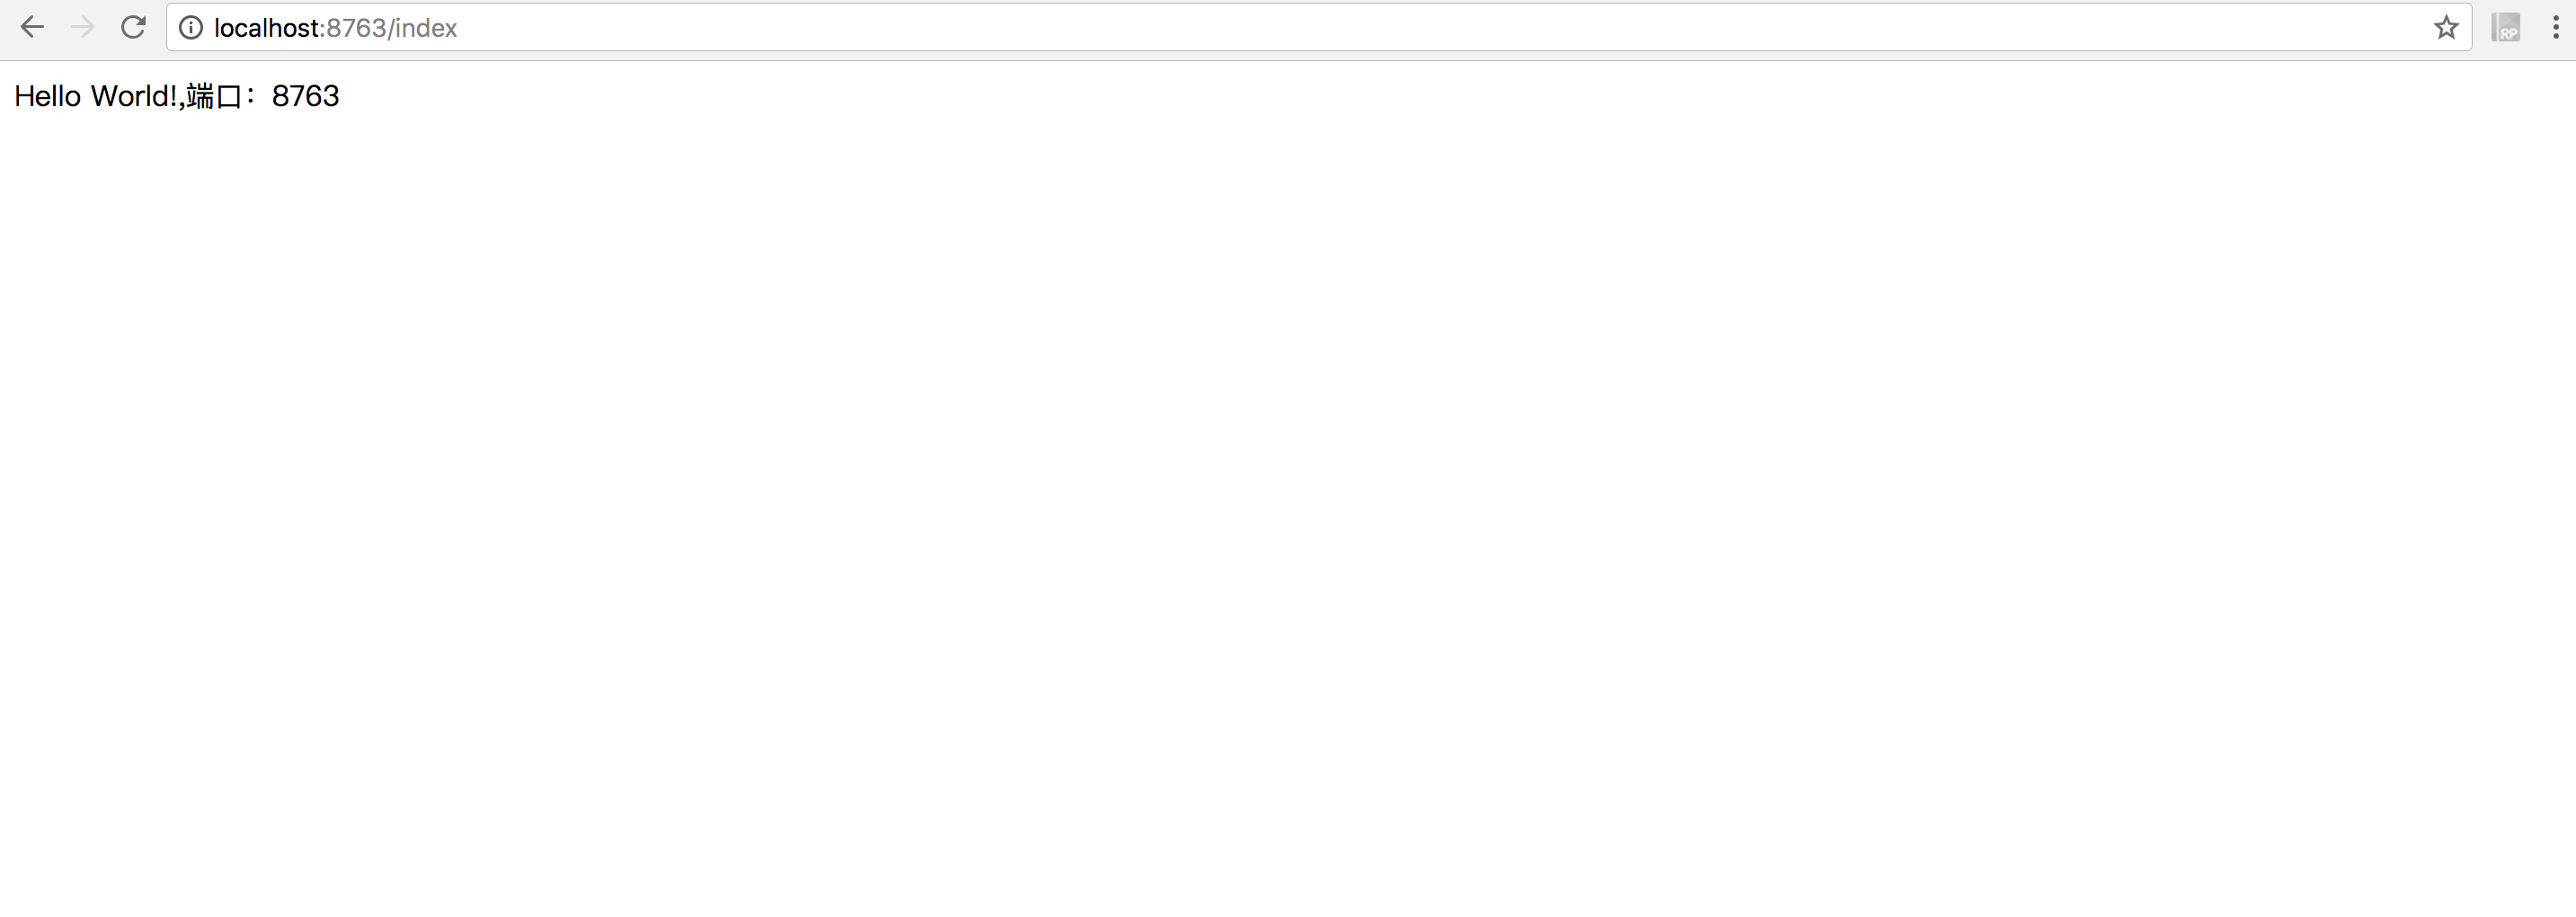
public String index(){
return "Hello World!,端口:"+port;
}
}
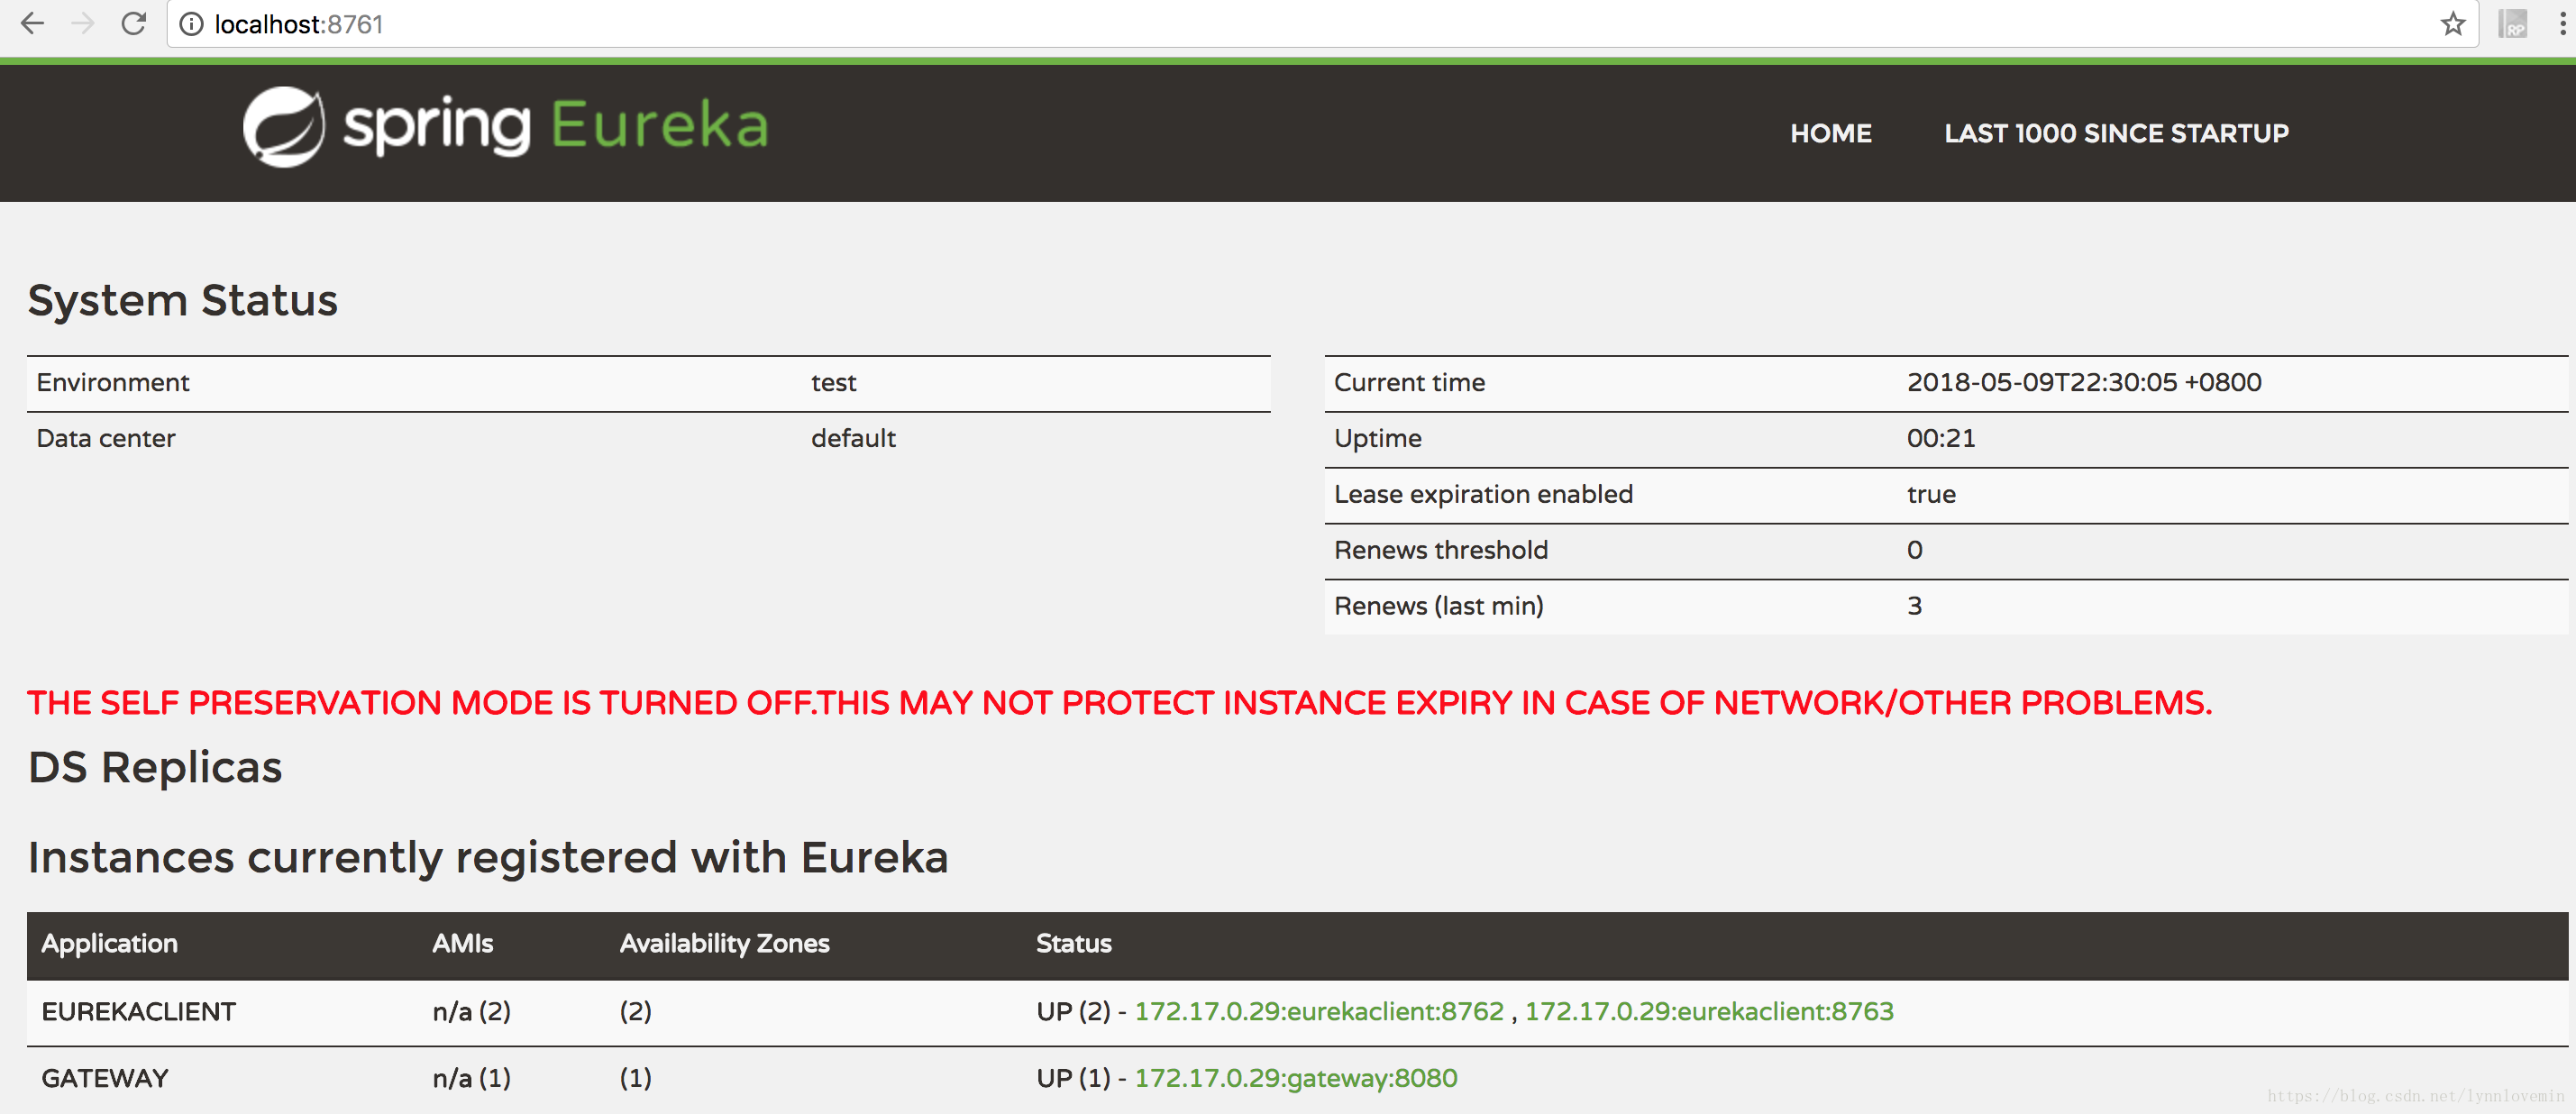
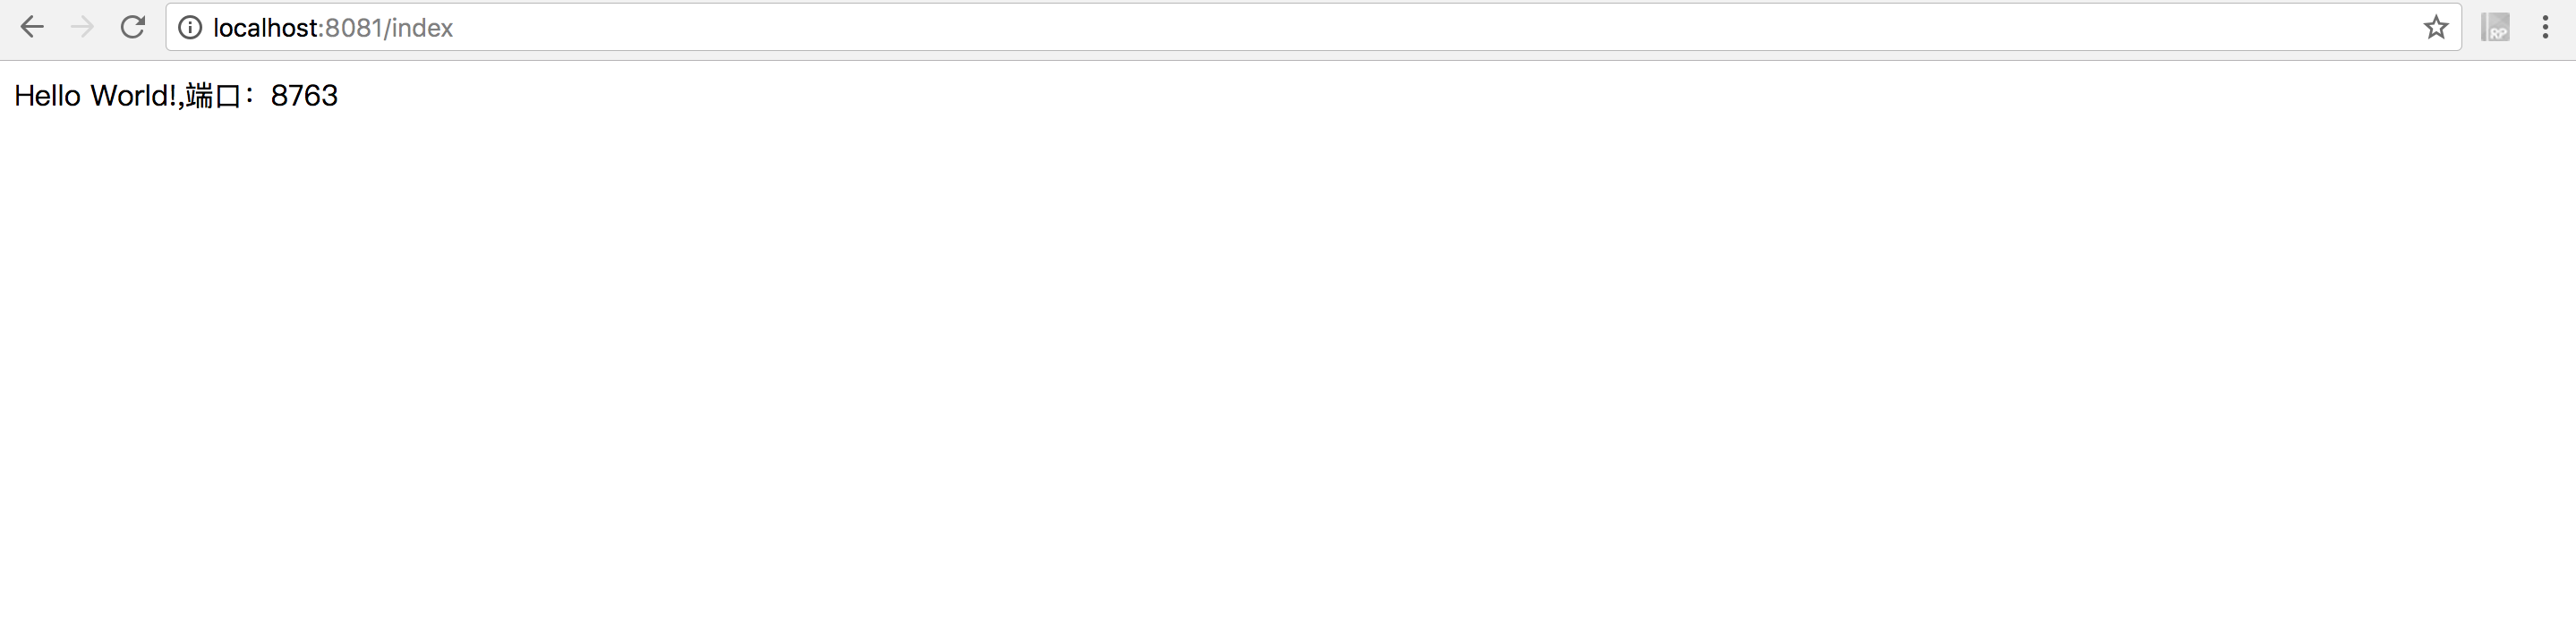
重新启动。然后再修改服务提供者的端口为8673,再次启动它(切记:原先启动的不要停止),访问地址:http://localhost:8761,我们可以看到 eurekaclient 服务有两个地址:
再不断访问地址:http://localhost:8080/api/index,可以看到交替出现以下界面:
由此可以得出,当一个服务启动多个端口时,zuul 服务网关会依次请求不同端口,以达到负载均衡的目的。
服务拦截
前面我们提到,服务网关还有个作用就是接口的安全性校验,这个时候我们就需要通过 zuul 进行统一拦截,zuul 通过继承过滤器 ZuulFilter 进行处理,下面请看具体用法。
新建一个类 ApiFilter 并继承 ZuulFilter:
@Component
public class ApiFilter extends ZuulFilter {

    @Override
    public String filterType() {
        return "pre";
    }

    @Override
    public int filterOrder() {
        return 0;
    }

    @Override
    public boolean shouldFilter() {
        return true;
    }

    @Override
    public Object run() {
        //这里写校验代码
        return null;
    }
}
其中:
- filterType 为过滤类型,可选值有 pre(路由之前)、routing(路由之时)、post(路由之后)、error(发生错误时调用)。
- filterOrdery 为过滤的顺序,如果有多个过滤器,则数字越小越先执行
- shouldFilter 表示是否过滤,这里可以做逻辑判断,true 为过滤,false 不过滤
- run 为过滤器执行的具体逻辑,在这里可以做很多事情,比如:权限判断、合法性校验等。
下面,我们来做一个简单的安全验证:
@Override
public Object run() {
//这里写校验代码
RequestContext context = RequestContext.getCurrentContext();
HttpServletRequest request = context.getRequest();
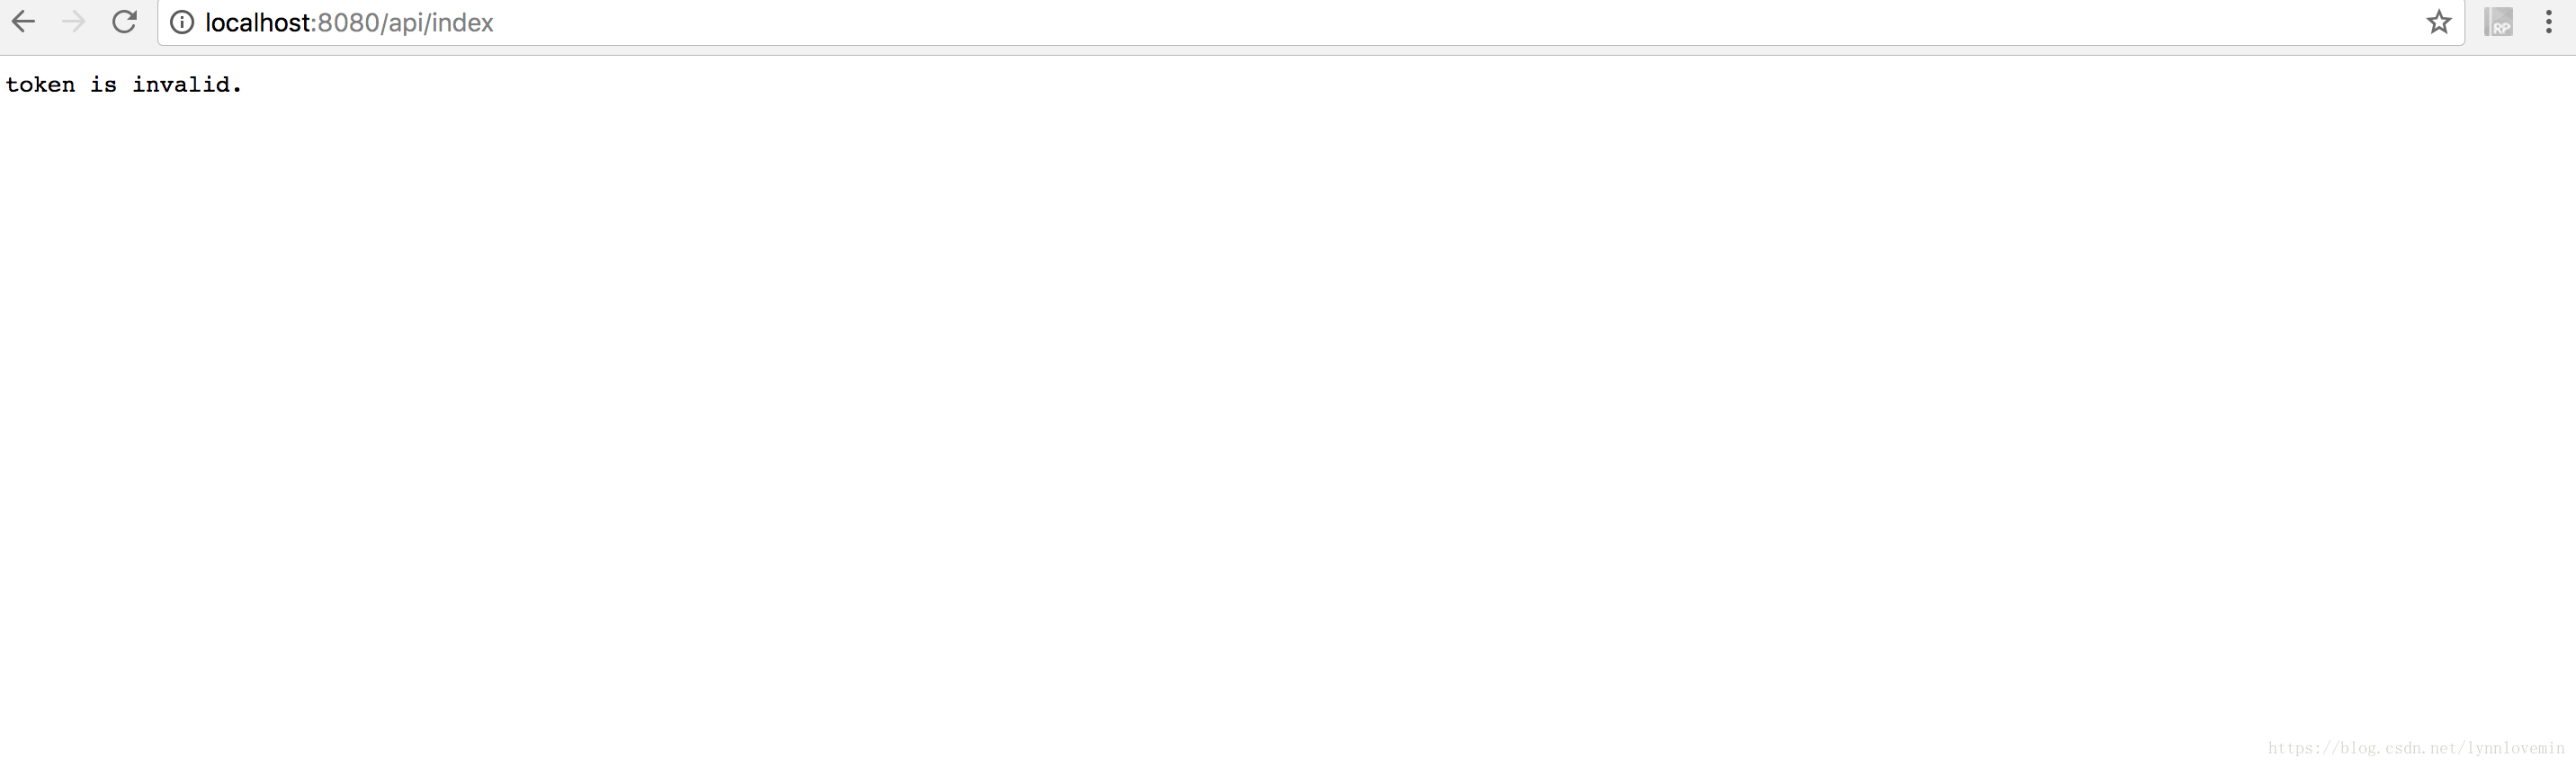
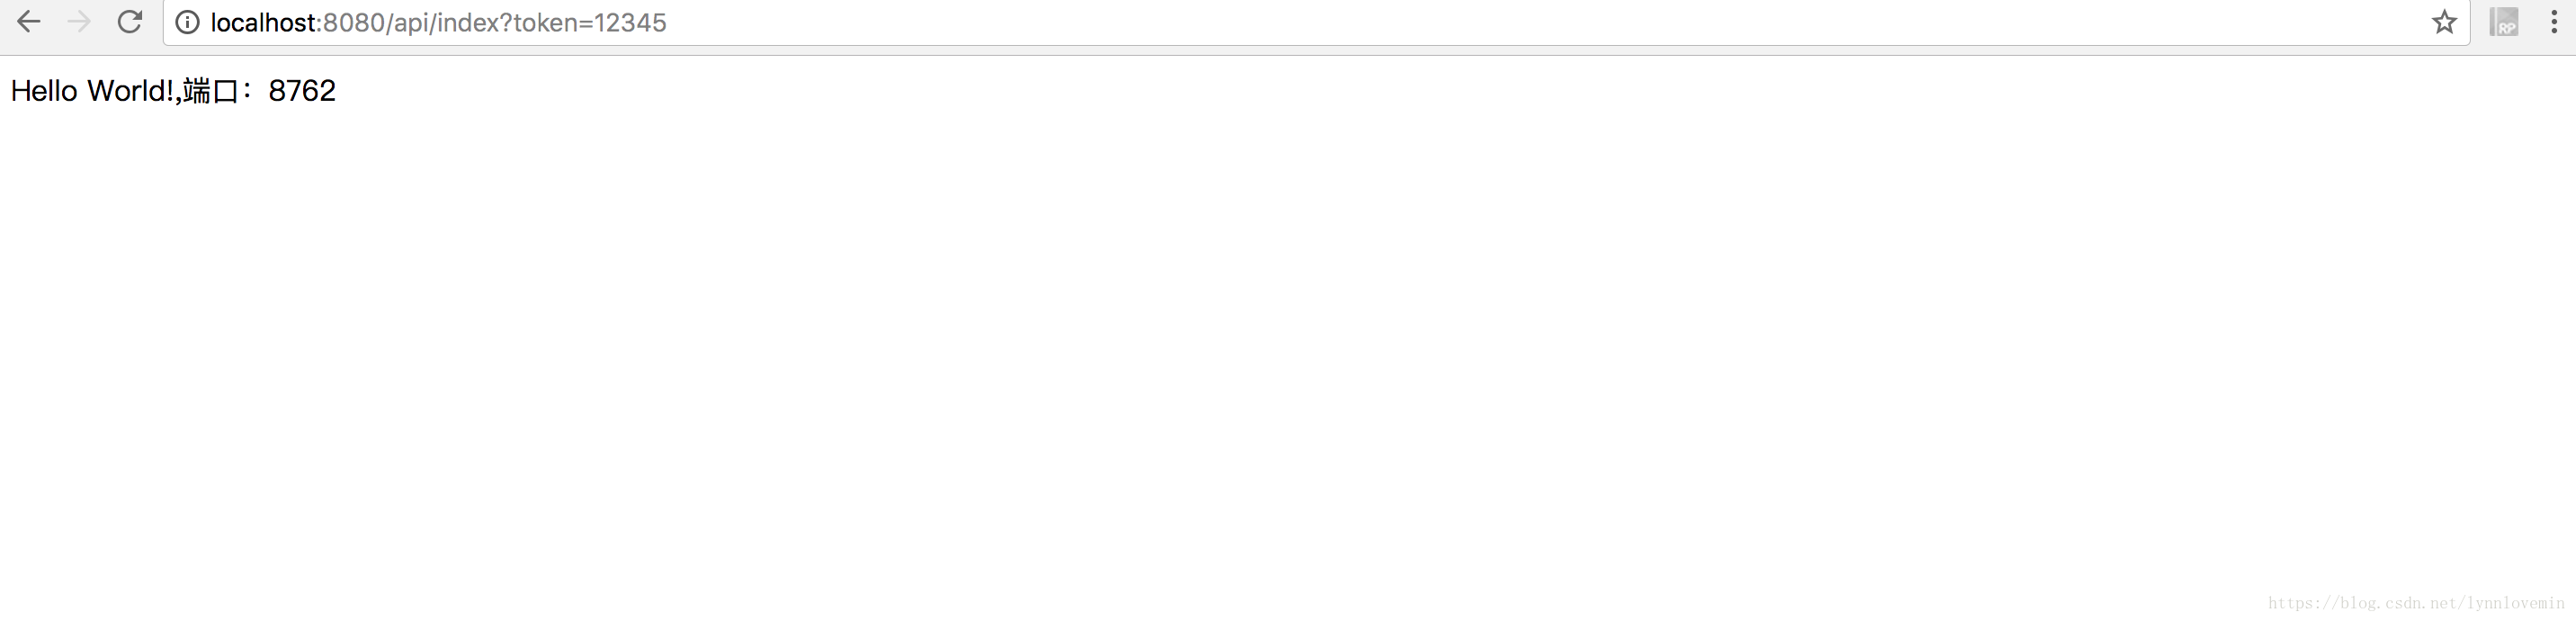
String token = request.getParameter("token");
if(!"12345".equals(token)){
context.setSendZuulResponse(false);
context.setResponseStatusCode(401);
try {
context.getResponse().getWriter().write("token is invalid.");
}catch (Exception e){}
}
return null;
}
启动 gateway,在浏览器输入地址:http://localhost:8080/api/index,可以看到以下界面:
再通过浏览器输入地址:http://localhost:8080/api/index?token=12345,可以看到以下界面:
错误拦截
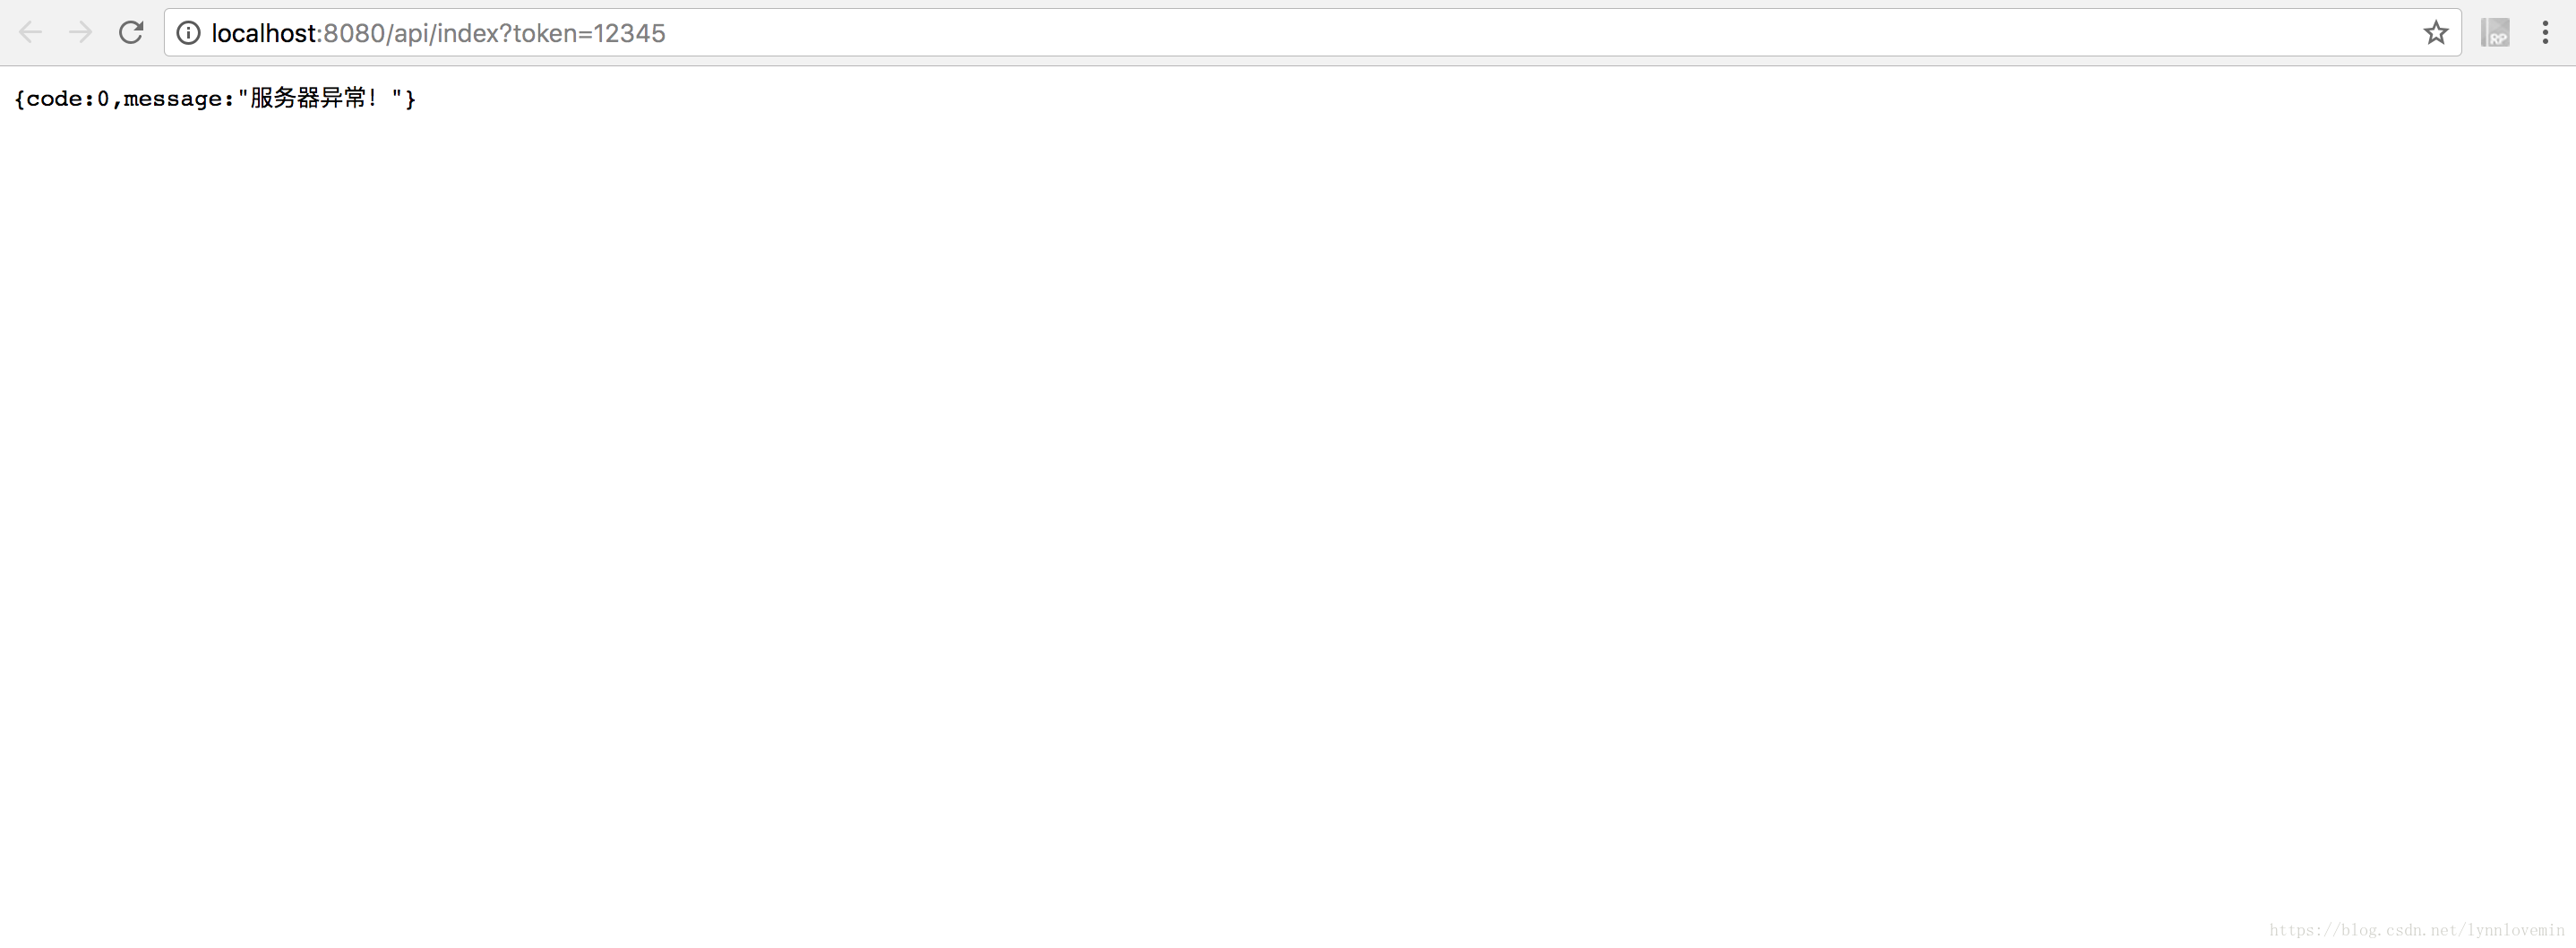
在一个大型系统中,服务是部署在不同的服务器下面的,我们难免会遇到某一个服务挂掉或者请求不到的时候,如果不做任何处理,服务网关请求不到会抛出500错误,对用户是不友好的。
我们为了提供用户的友好性,需要返回友好性提示,zuul 为我们提供了一个名叫 ZuulFallbackProvider 的接口,通过它我们就可以对这些请求不到的服务进行错误处理。
新建一个类 ApiFallbackProvider 并且实现 ZuulFallbackProvider 接口:
Component
public class ApiFallbackProvider implements ZuulFallbackProvider{

    @Override
    public String getRoute() {
        return "eurekaclient";
    }

    @Override
    public ClientHttpResponse fallbackResponse() {
        return new ClientHttpResponse() {
            @Override
            public HttpStatus getStatusCode() throws IOException {
                return HttpStatus.OK;
            }

            @Override
            public int getRawStatusCode() throws IOException {
                return 200;
            }

            @Override
            public String getStatusText() throws IOException {
                return "{code:0,message:\"服务器异常!\"}";
            }

            @Override
            public void close() {

            }

            @Override
            public InputStream getBody() throws IOException {
                return new ByteArrayInputStream(getStatusText().getBytes());
            }

            @Override
            public HttpHeaders getHeaders() {
                HttpHeaders headers = new HttpHeaders();
                headers.setContentType(MediaType.APPLICATION_JSON);
                return headers;
            }
        };
    }
其中,getRoute 方法返回要处理错误的服务名,fallbackResponse 方法返回错误的处理规则。
现在开始测试这部分代码,首先停掉服务提供者 eurekaclient,再重启 gateway,请求地址:http://localhost:8080/api/index?token=12345,即可出现以下界面:
第07课:服务消费者
前面我们提到,对外提供接口通过 zuul 服务网关实现。一个大型的系统由多个微服务模块组成,各模块之间不可避免需要进行通信,一般我们可以通过内部接口调用的形式,服务 A 提供一个接口,服务 B 通过 HTTP 请求调用服务 A 的接口,为了简化开发,Spring Cloud 提供了一个基础组件方便不同服务之间的 HTTP 调用,那就是 Feign。
什么是 Feign
Feign 是一个声明式的 HTTP 客户端,它简化了 HTTP 客户端的开发。使用 Feign,只需要创建一个接口并注解,就能很轻松的调用各服务提供的 HTTP 接口。Feign 默认集成了 Ribbon,默认实现了负载均衡。
创建 Feign 服务
在根项目上创建一个 module,命名为 feign,然后在 pom.xml 添加如下内容:
<dependencies>
        <dependency>
            <groupId>org.springframework.cloud</groupId>
            <artifactId>spring-cloud-starter-eureka</artifactId>
        </dependency>
        <dependency>
            <groupId>org.springframework.cloud</groupId>
            <artifactId>spring-cloud-starter-feign</artifactId>
        </dependency>
    </dependencies>
创建 application.yml,内容如下:
eureka:
  client:
    serviceUrl:
      defaultZone: http://localhost:8761/eureka/
server:
  port: 8081
spring:
  application:
    name: feign
最后创建一个启动类 Application:
@SpringBootApplication
@EnableEurekaClient
@EnableFeignClients
public class Application {

    public static void main(String[] args) {
        SpringApplication.run(Application.class, args);
    }

}
我们可以看到启动类增加了一个新的注解:@EnableFeignClients,如果我们要使用 Feign 声明式 HTTP 客户端,必须要在启动类加入这个注解,以开启 Feign。
这样,我们的 Feign 就已经集成完成了,那么如何通过 Feign 去调用之前我们写的 HTTP 接口呢?请看下面的做法。
首先创建一个接口 ApiService,并且通过注解配置要调用的服务地址:
@FeignClient(value = "eurekaclient")
public interface ApiService {

    @RequestMapping(value = "/index",method = RequestMethod.GET)
    String index();
}
分别启动注册中心 EurekaServer、服务提供者EurekaClient(这里服务提供者启动两次,端口分别为8762、8763,以观察 Feign 的负载均衡效果)。
然后在 Feign 里面通过单元测试来查看效果。
1.添加单元测试依赖。
<dependency>
            <groupId>org.springframework.boot</groupId>
            <artifactId>spring-boot-starter-test</artifactId>
            <scope>test</scope>
        </dependency>
2.添加测试代码。
@SpringBootTest(classes = Application.class)
@RunWith(SpringJUnit4ClassRunner.class)
public class TestDB {

    @Autowired
    private ApiService apiService;

    @Test
    public void test(){
        try {
            System.out.println(apiService.index());
        }catch (Exception e){
            e.printStackTrace();
        }
    }
}
最后分别启动两次单元测试类,我们可以发现控制台分别打印如下信息:
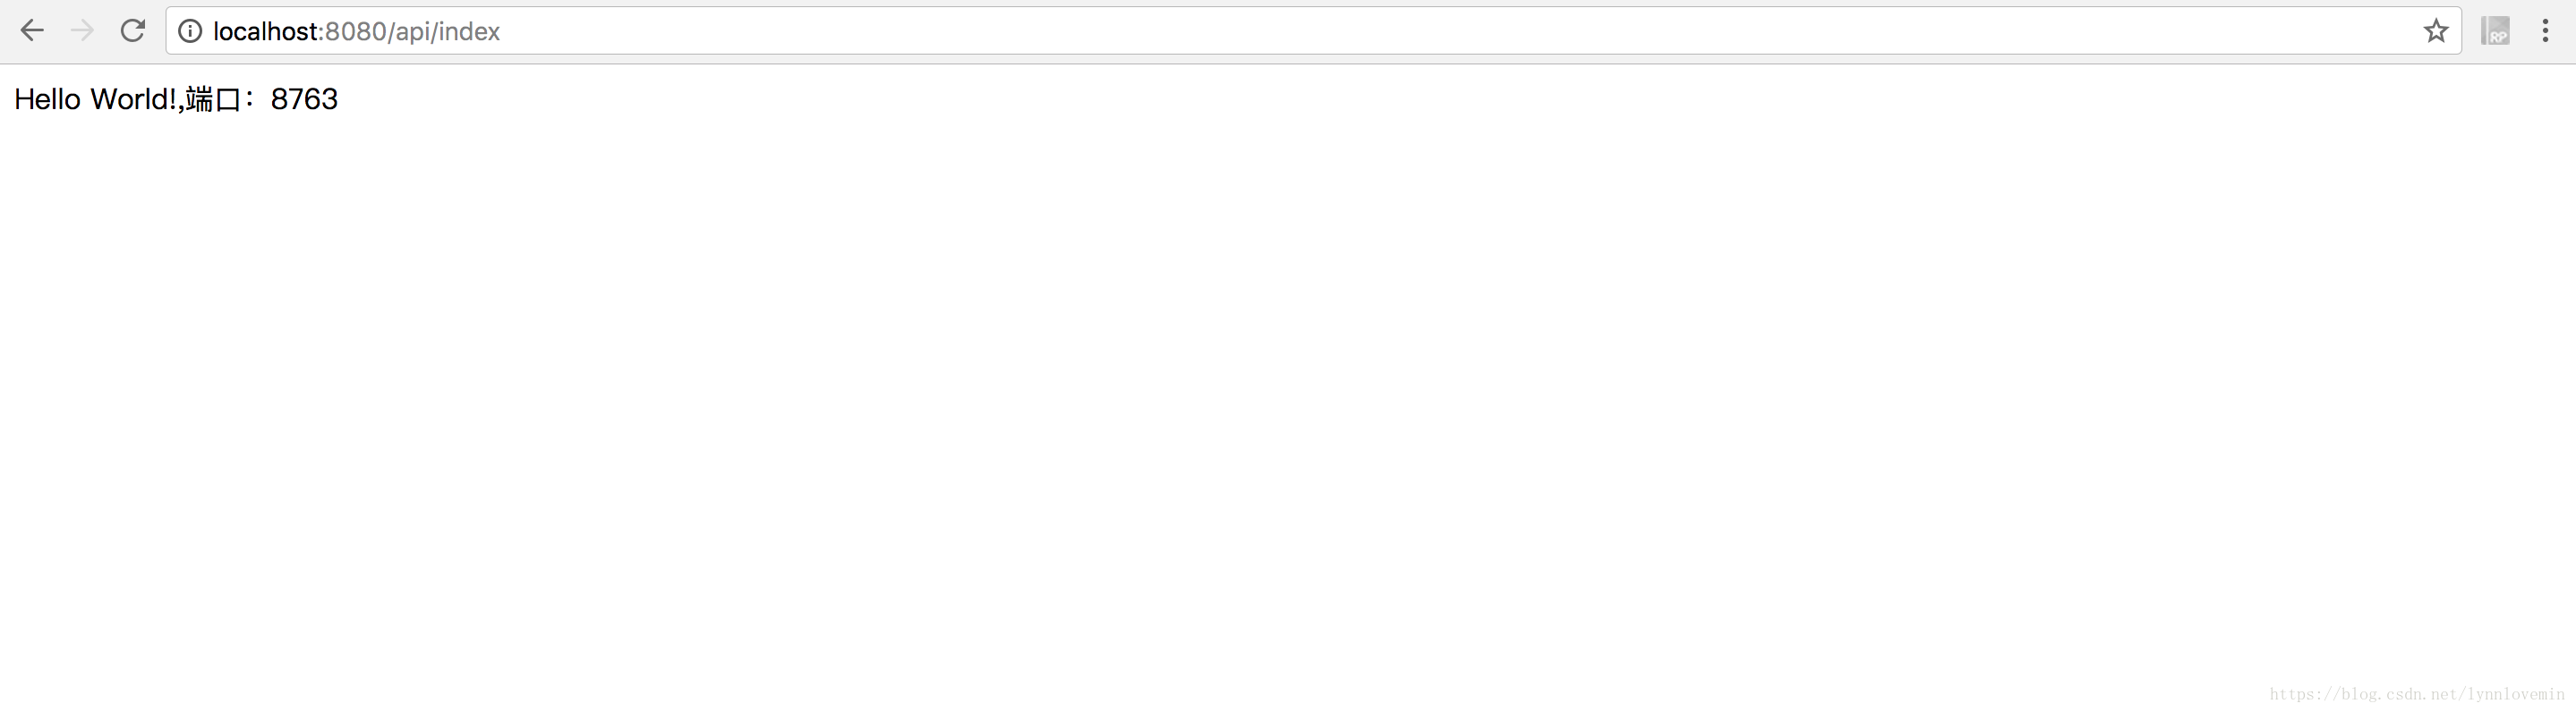
Hello World!,端口:8762
Hello World!,端口:8763
由此可见,我们成功调用了服务提供者提供的接口,并且循环调用不同的接口,说明它自带了负载均衡效果。
第08课:服务异常处理
上一篇,我们讲了服务之间的相互通信,利用 Feign 的声明式 HTTP 客户端,通过注解的形式很容易做到不同服务之间的相互调用。
我们的服务最终是部署在服务器上,因为各种原因,服务难免会发生故障,那么其他服务去调用这个服务就会调不到,甚至会一直卡在那里,导致用户体验不好。针对这个问题,我们就需要对服务接口做错误处理,一旦发现无法访问服务,则立即返回并报错,我们捕捉到这个异常就可以以可读化的字符串返回到前端。
为了解决这个问题,业界提出了熔断器模型。
Hystrix 组件
SpringCloud 集成了 Netflix 开源的 Hystrix 组件,该组件实现了熔断器模型,它使得我们很方便地实现熔断器。
在实际项目中,一个请求调用多个服务是比较常见的,如果较底层的服务发生故障将会发生连锁反应。这对于一个大型项目是灾难性的。因此,我们需要利用 Hystrix 组件,当特定的服务不可用达到一个阈值(Hystrix 默认5秒20次),将打开熔断器,即可避免发生连锁反应。
代码实现
紧接上一篇的代码,Feign 是默认自带熔断器的,在 D 版本 SpringCloud 中是默认关闭的,我们可以在 application.yml 中开启它:
eureka:
  client:
    serviceUrl:
      defaultZone: http://localhost:8761/eureka/
server:
  port: 8081
spring:
  application:
    name: feign
#开启熔断器
feign:
  hystrix:
    enabled: true
新建一个类 ApiServiceError.java 并实现 ApiService:
@Component
public class ApiServiceError implements ApiService {

    @Override
    public String index() {
        return "服务发生故障!";
    }
}
然后在 ApiService 的注解中指定 fallback:
@FeignClient(value = "eurekaclient",fallback = ApiServiceError.class)
public interface ApiService {

    @RequestMapping(value = "/index",method = RequestMethod.GET)
    String index();
}
再创建 Controller 类:ApiController,加入如下代码:
@RestController
public class ApiController {

    @Autowired
    private ApiService apiService;

    @RequestMapping("index")
    public String index(){
        return apiService.index();
    }
}
测试熔断器
分别启动注册中心 EurekaServer、服务提供者 EurekaClient 和服务消费者 Feign,然后访问:http://localhost:8081/index,可以看到顺利请求到接口:

熔断器监控
Hystrix 给我们提供了一个强大的功能,那就是 Dashboard。Dashboard 是一个 Web 界面,它可以让我们监控 Hystrix Command 的响应时间、请求成功率等数据。
下面我们开始改造 Feign 工程,在 Feign 工程的 pom.xml 下加入依赖:
<dependency>
            <groupId>org.springframework.cloud</groupId>
            <artifactId>spring-cloud-starter-hystrix</artifactId>
        </dependency>
        <dependency>
            <groupId>org.springframework.cloud</groupId>
            <artifactId>spring-cloud-starter-hystrix-dashboard</artifactId>
        </dependency>
        <dependency>
            <groupId>org.springframework.boot</groupId>
            <artifactId>spring-boot-starter-actuator</artifactId>
        </dependency>
这三个依赖缺一不可,否则会有意想不到的事情发生。
然后在启动类 Application.java 中加入 @EnableHystrixDashboard、@EnableCircuitBreaker 注解:
@SpringBootApplication
@EnableEurekaClient
@EnableFeignClients
@EnableHystrixDashboard
@EnableCircuitBreaker
public class Application {

    public static void main(String[] args) {
        SpringApplication.run(Application.class, args);
    }

}
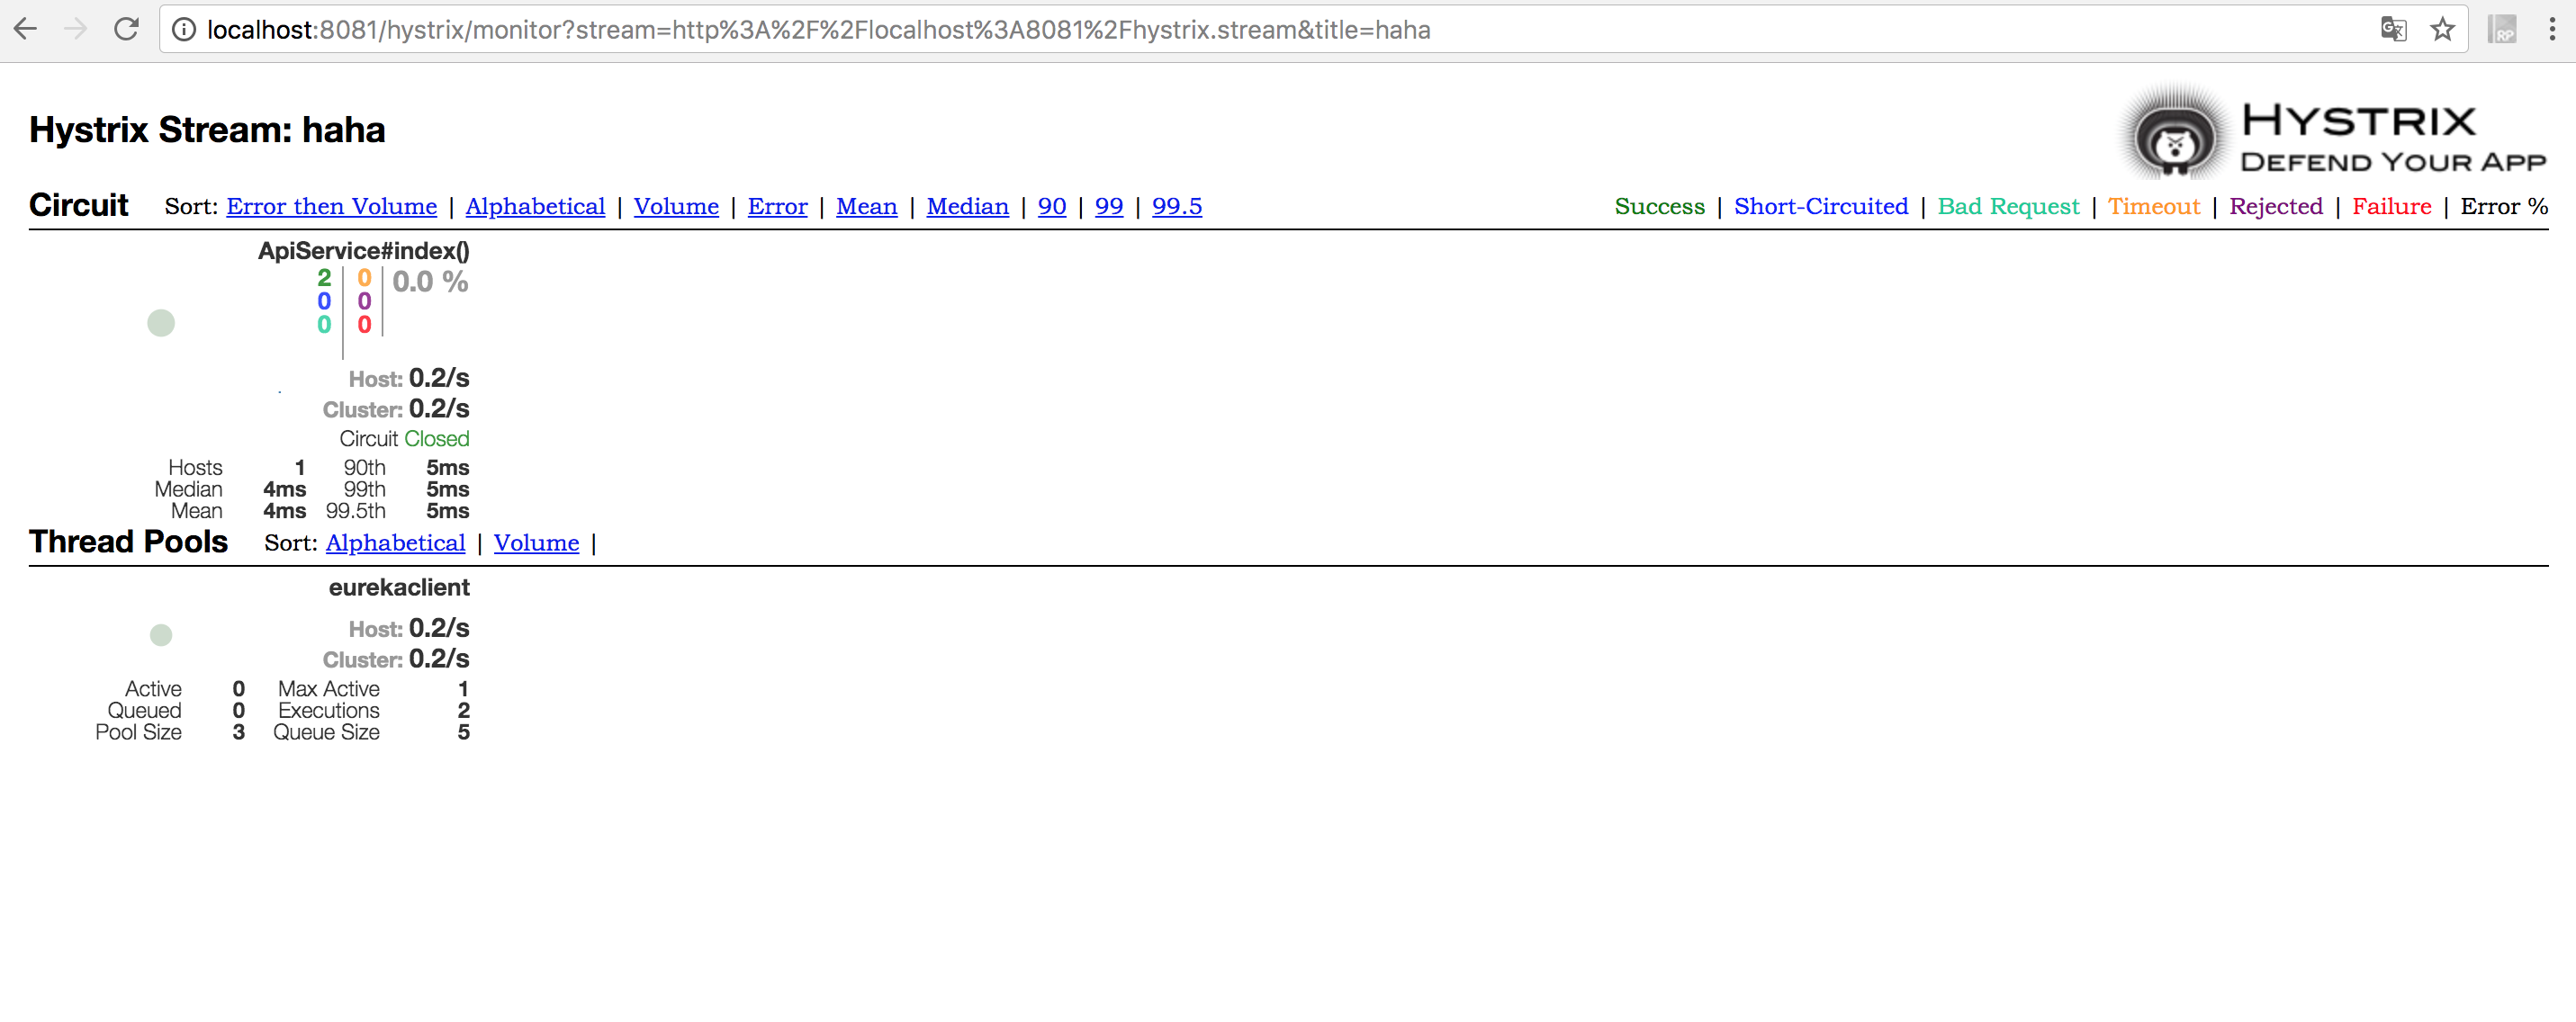
然后分别启动 EurekaServer、EurekaClient 和 Feign 并访问:http://localhost:8081/hystrix,可以看到如下画面:
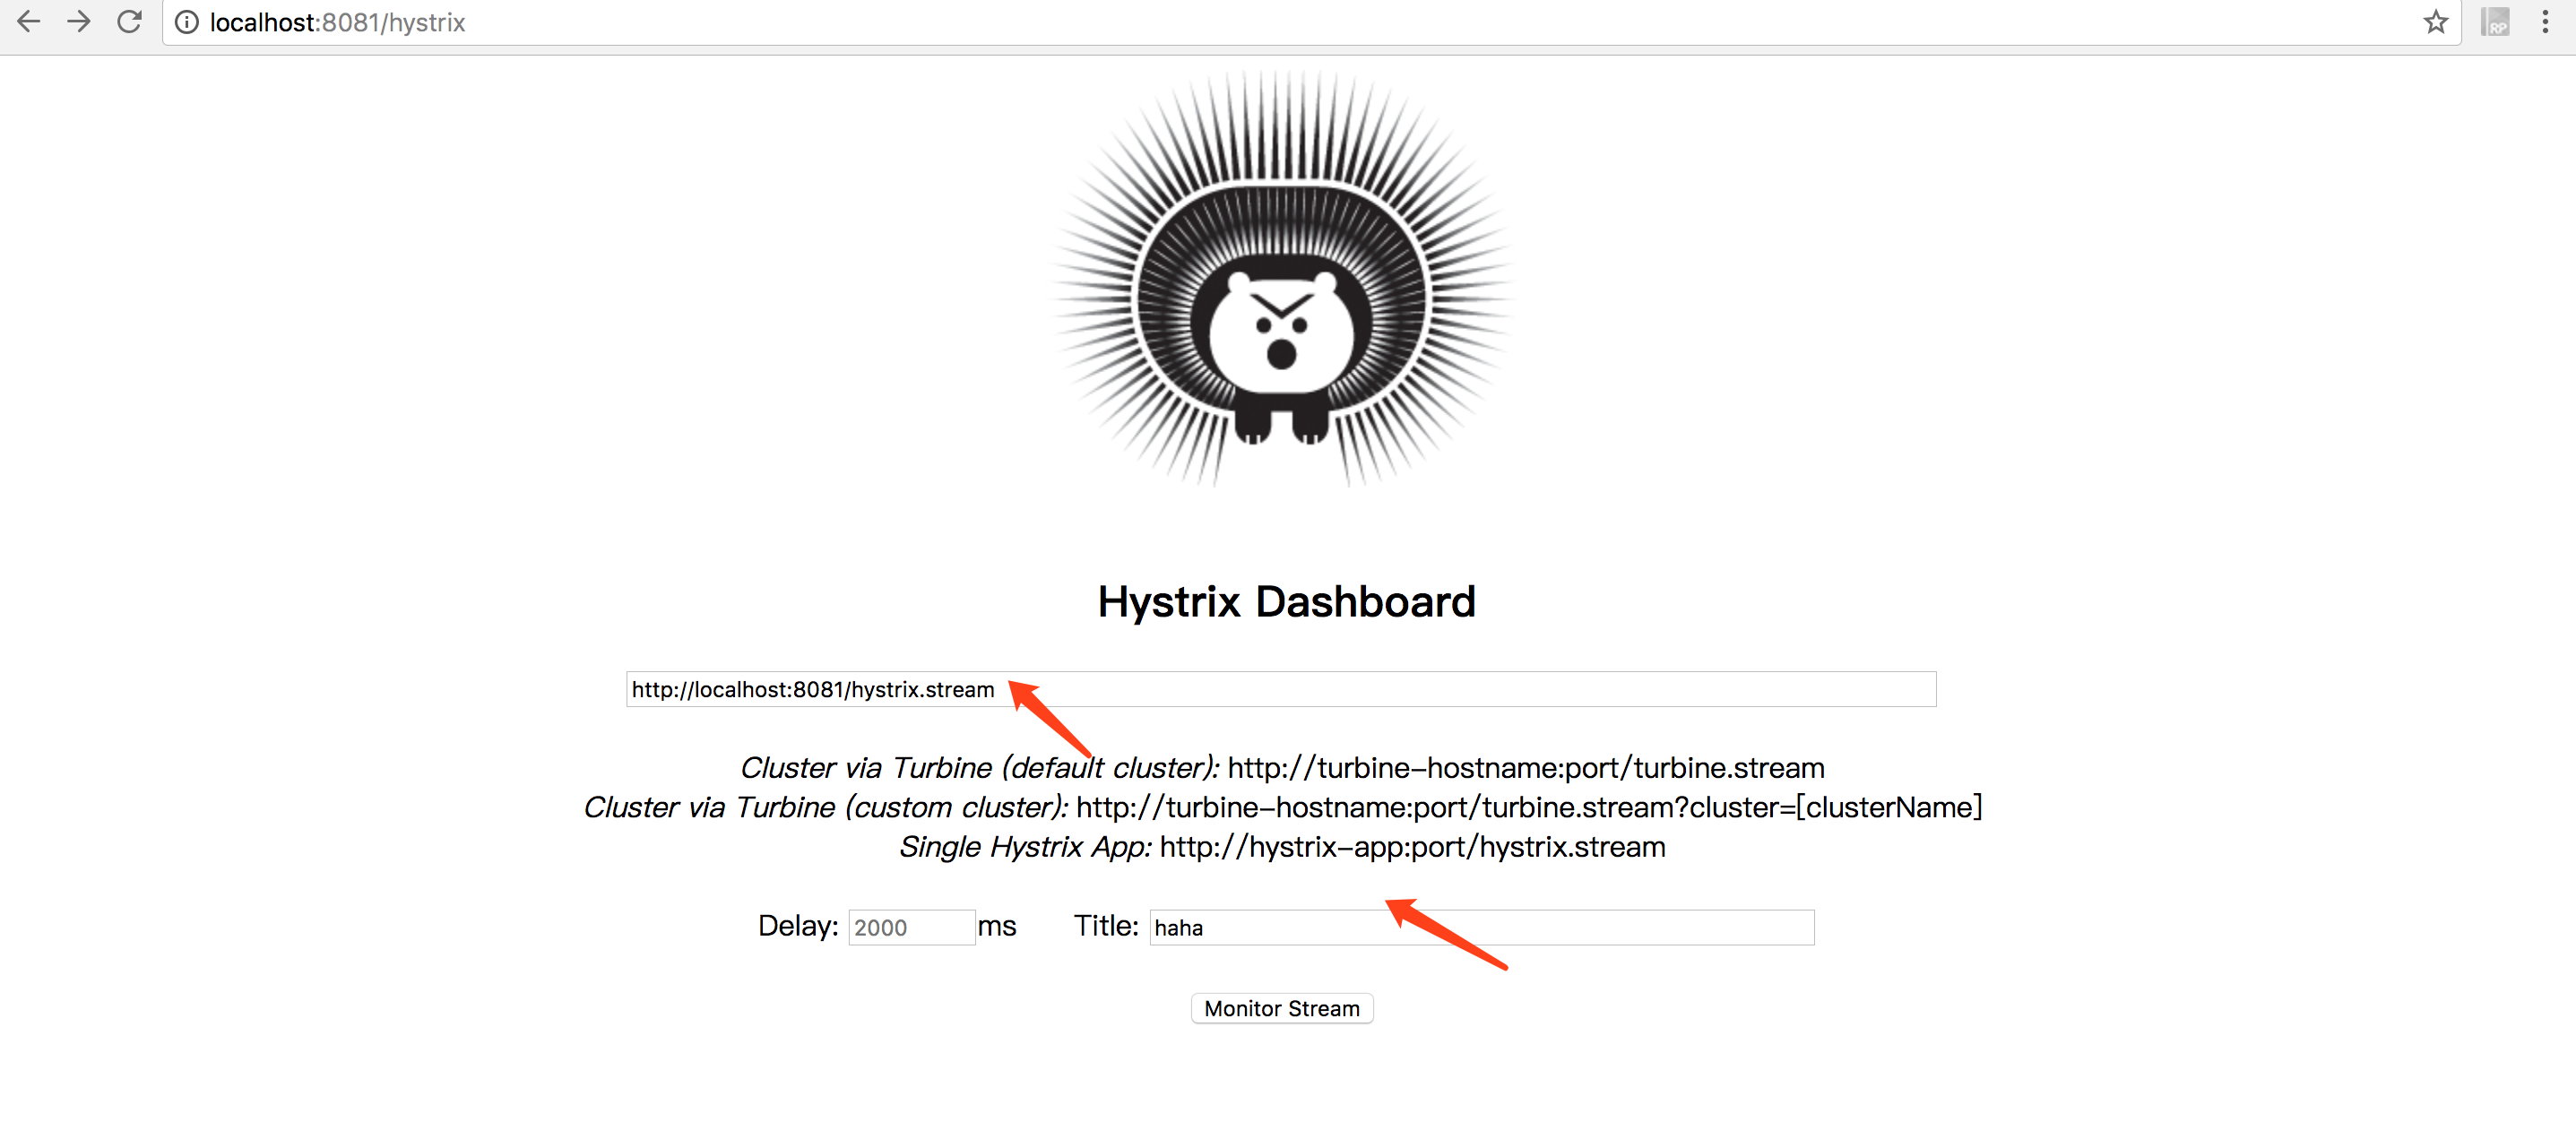
按照上图箭头所示,输入相关信息后,点击 Monitor Stream 按钮进入下一界面,打开新窗口访问:http://localhost:8081/index,在 Dashboard 界面即可看到 Hystrix 监控界面:
Hystrix 熔断器的基本用法就介绍到这里。前面我们创建了注册中心、服务提供者、服务消费者、服务网关和熔断器,每个工程都有配置文件,而且有些配置是想通的,按照这个方式进行应用程序的配置,维护性较差,扩展性也较差,比如很多个服务都会配置数据源,而数据源只有一个,那么如果我们的数据源地址发生变化,所有地方都需要改,如何改进这个问题呢?下一篇所讲解的配置中心就是为解决这个问题而生的,敬请期待。
第09课:配置中心
通过前面章节,我们已经学习了 SpringCloud 的很多组件,每个组件都创建了一个工程,而每个工程都会有一个配置文件,并且有些配置是一样的。例如:在实际项目中,我们创建了用户和订单两个服务,这两个服务是同一个数据库,那么我们在这两个服务的配置文件都会配置相同的数据源,一旦我们的数据库地址发生改变(只是一种情况),用户和订单两个服务的配置文件都需要改,这还是只是两个服务,在一个大型系统(比如淘宝),将会有成千上万个服务,按照这种方式代价无疑是巨大的。
不过无需担心,正所谓上有政策,下有对策,既然有这个问题,就一定会有解决方案,那就是创建一个配置中心,专门用于管理系统的所有配置,也就是我们将所有配置文件放到统一的地方进行管理。
我们知道,SpringCloud 就是为了简化开发而生的,因此 SpringCloud 为我们集成了配置中心——Spring Cloud Config 组件。
Spring Cloud Config 简介
Spring Cloud Config 是一个高可用的分布式配置中心,它支持将配置存放到内存(本地),也支持将其放到 Git 仓库进行统一管理(本文主要探讨和 Git 的融合)。
创建配置中心
创建配置中心一般分为以下几个步骤:
1.创建 Git 仓库。
本文为了演示实例,已经创建好了用于存放配置文件的 Git 仓库,点击这里访问。
2.创建配置中心。
在原有工程创建一个 moudle,命名为 config,在 pom.xml 加入配置中心的依赖:
<dependency>
            <groupId>org.springframework.cloud</groupId>
            <artifactId>spring-cloud-starter-eureka</artifactId>
        </dependency>
        <dependency>
            <groupId>org.springframework.cloud</groupId>
            <artifactId>spring-cloud-config-server</artifactId>
        </dependency>
创建启动类 Application.java:
@SpringBootApplication
@EnableEurekaClient
@EnableConfigServer
public class Application {

    public static void main(String[] args) {
        SpringApplication.run(Application.class,args);
    }
}
注意,要加入
@EnableConfigServer注解,否则配置中心是无法开启的。
创建 application.yml 并增加如下内容:
server:
  port: 8888
spring:
  application:
    name: config
  profiles:
    active: dev
  cloud:
    config:
      server:
        git:
          uri: https://github.com/lynnlovemin/SpringCloudLesson.git #配置git仓库地址
          searchPaths: 第09课/config #配置仓库路径
          username: ****** #访问git仓库的用户名
          password: ****** #访问git仓库的用户密码
      label: master #配置仓库的分支
eureka:
  instance:
    hostname: ${spring.cloud.client.ipAddress}
    instanceId: ${spring.cloud.client.ipAddress}:${server.port}
  client:
    serviceUrl:
      defaultZone: http://localhost:8761/eureka/
注意这里出现了前面课程没有出现过的新配置: eureka.instance.hostname 和 eureka.instance.instanceId,我们可以通过一个测试来看这两个配置的作用。
首先分别启动注册中心 eurekaserver 和配置中心 config,浏览器访问:http://localhost:8761,我们可以看到如下界面:
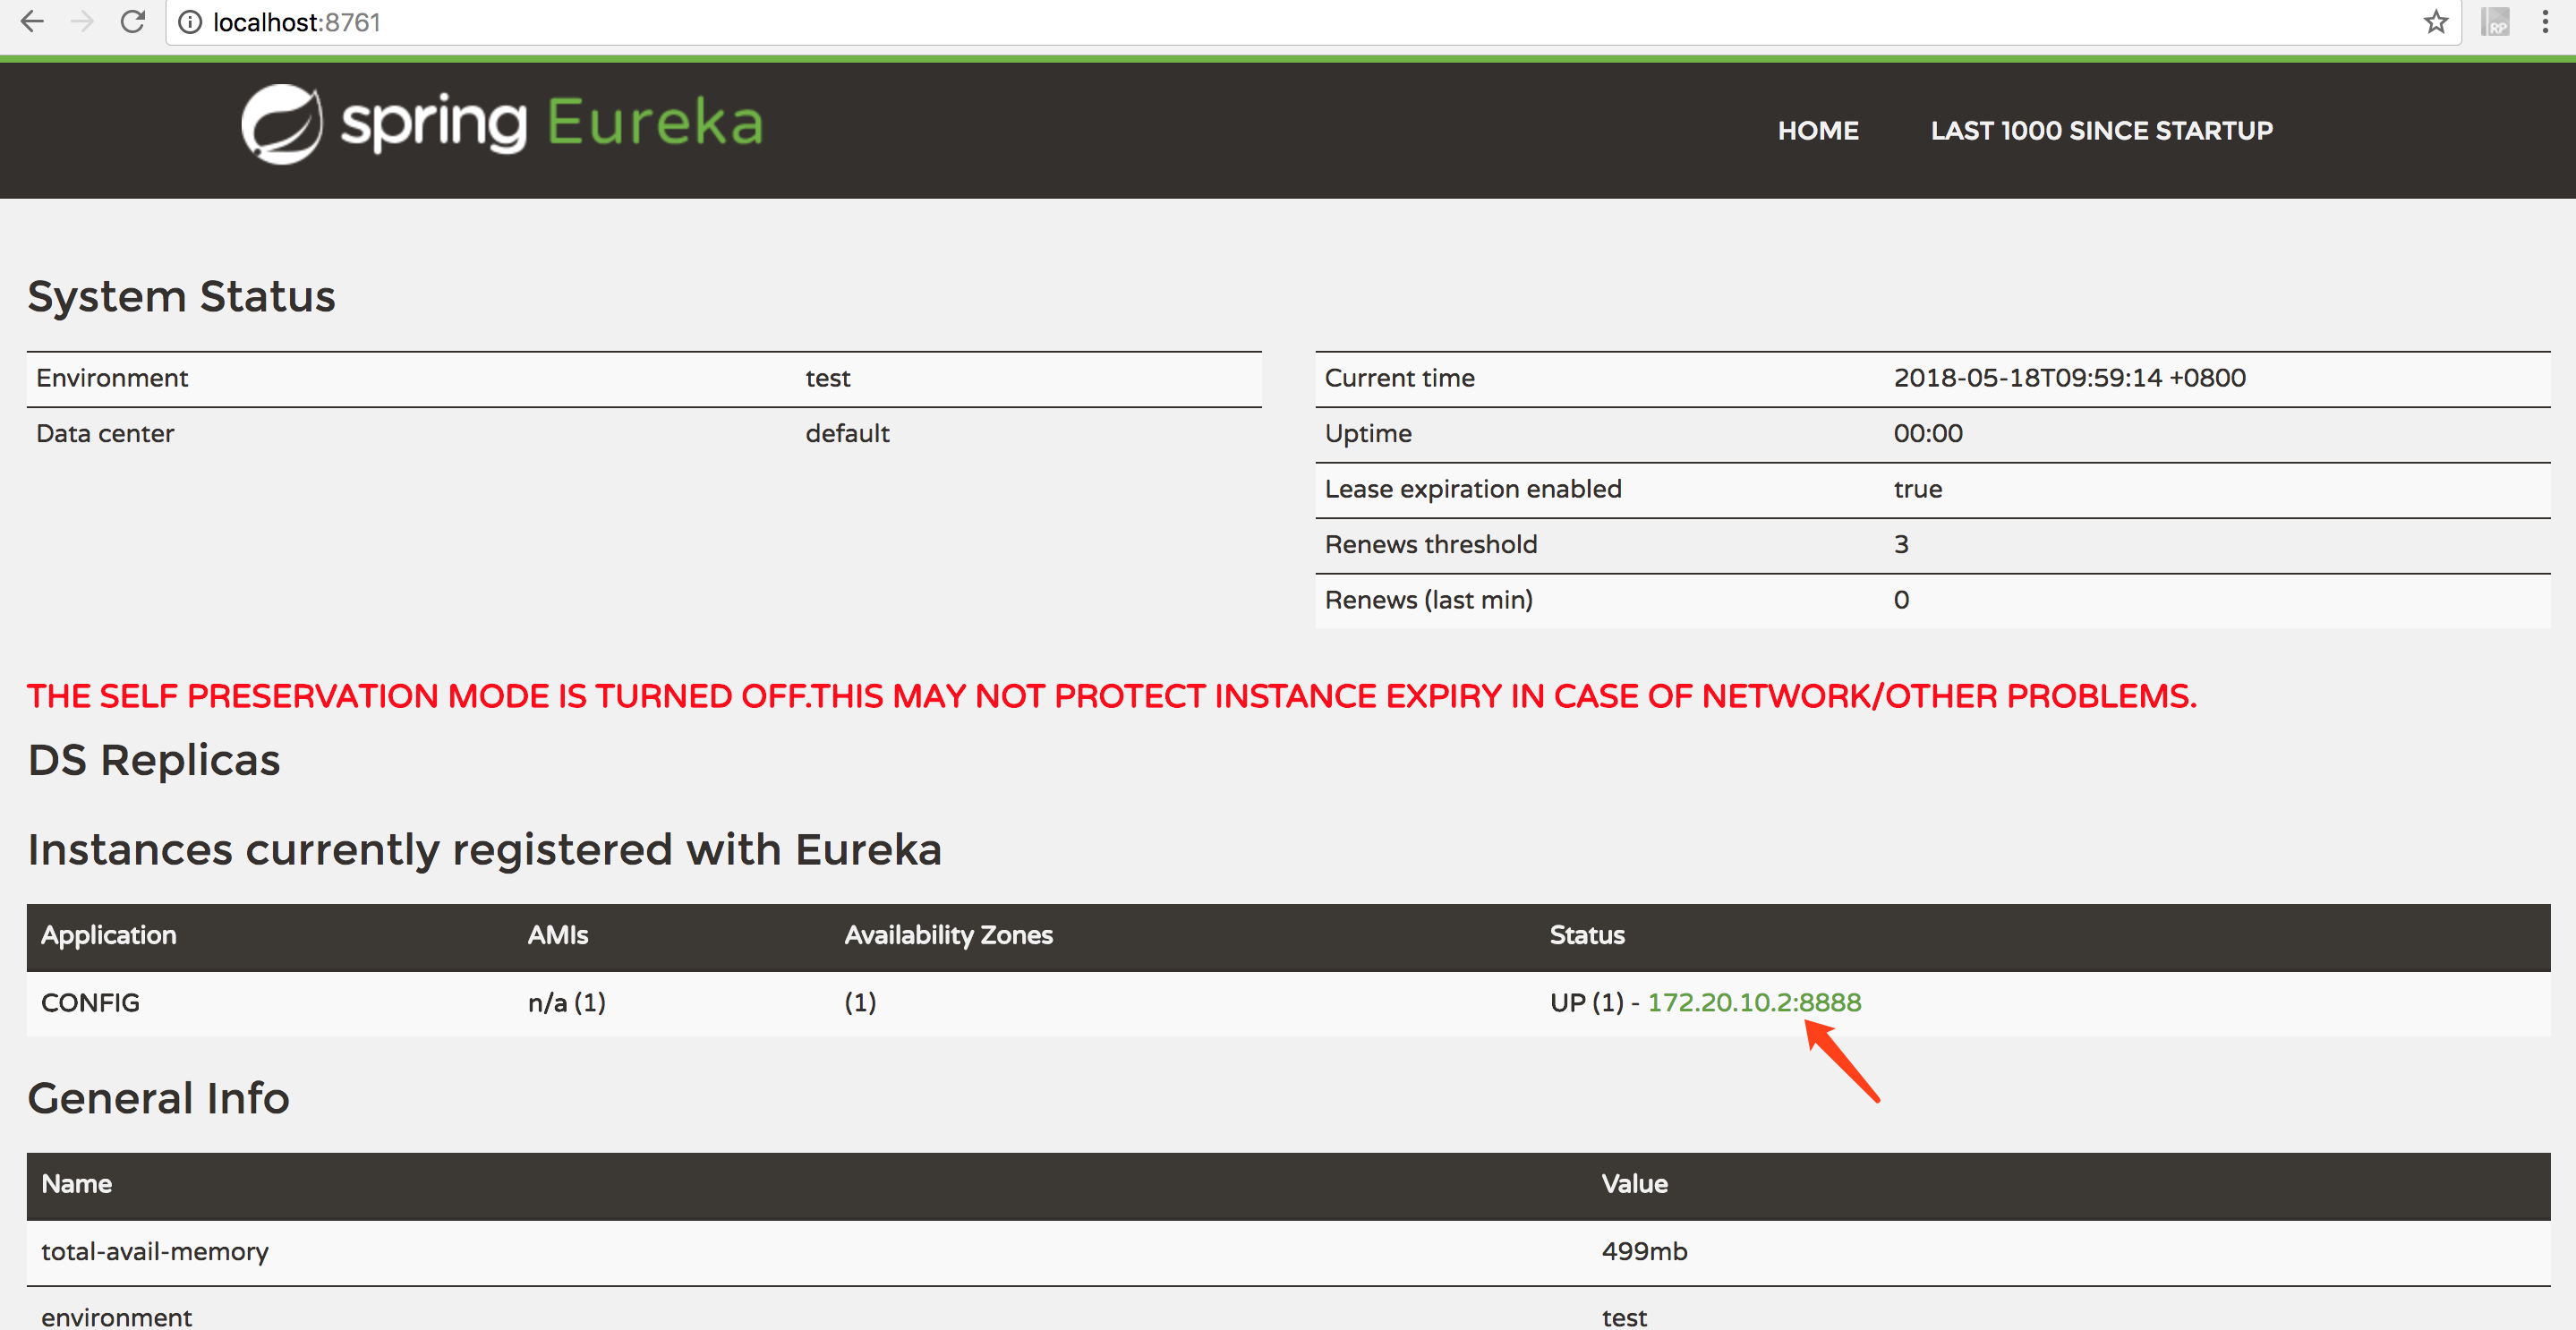
可以看到箭头所指向的位置是以 IP:端口形式呈现的,现在我们去掉这两个配置重新启动配置中心 config,再次访问:http://localhost:8761,可以看到:
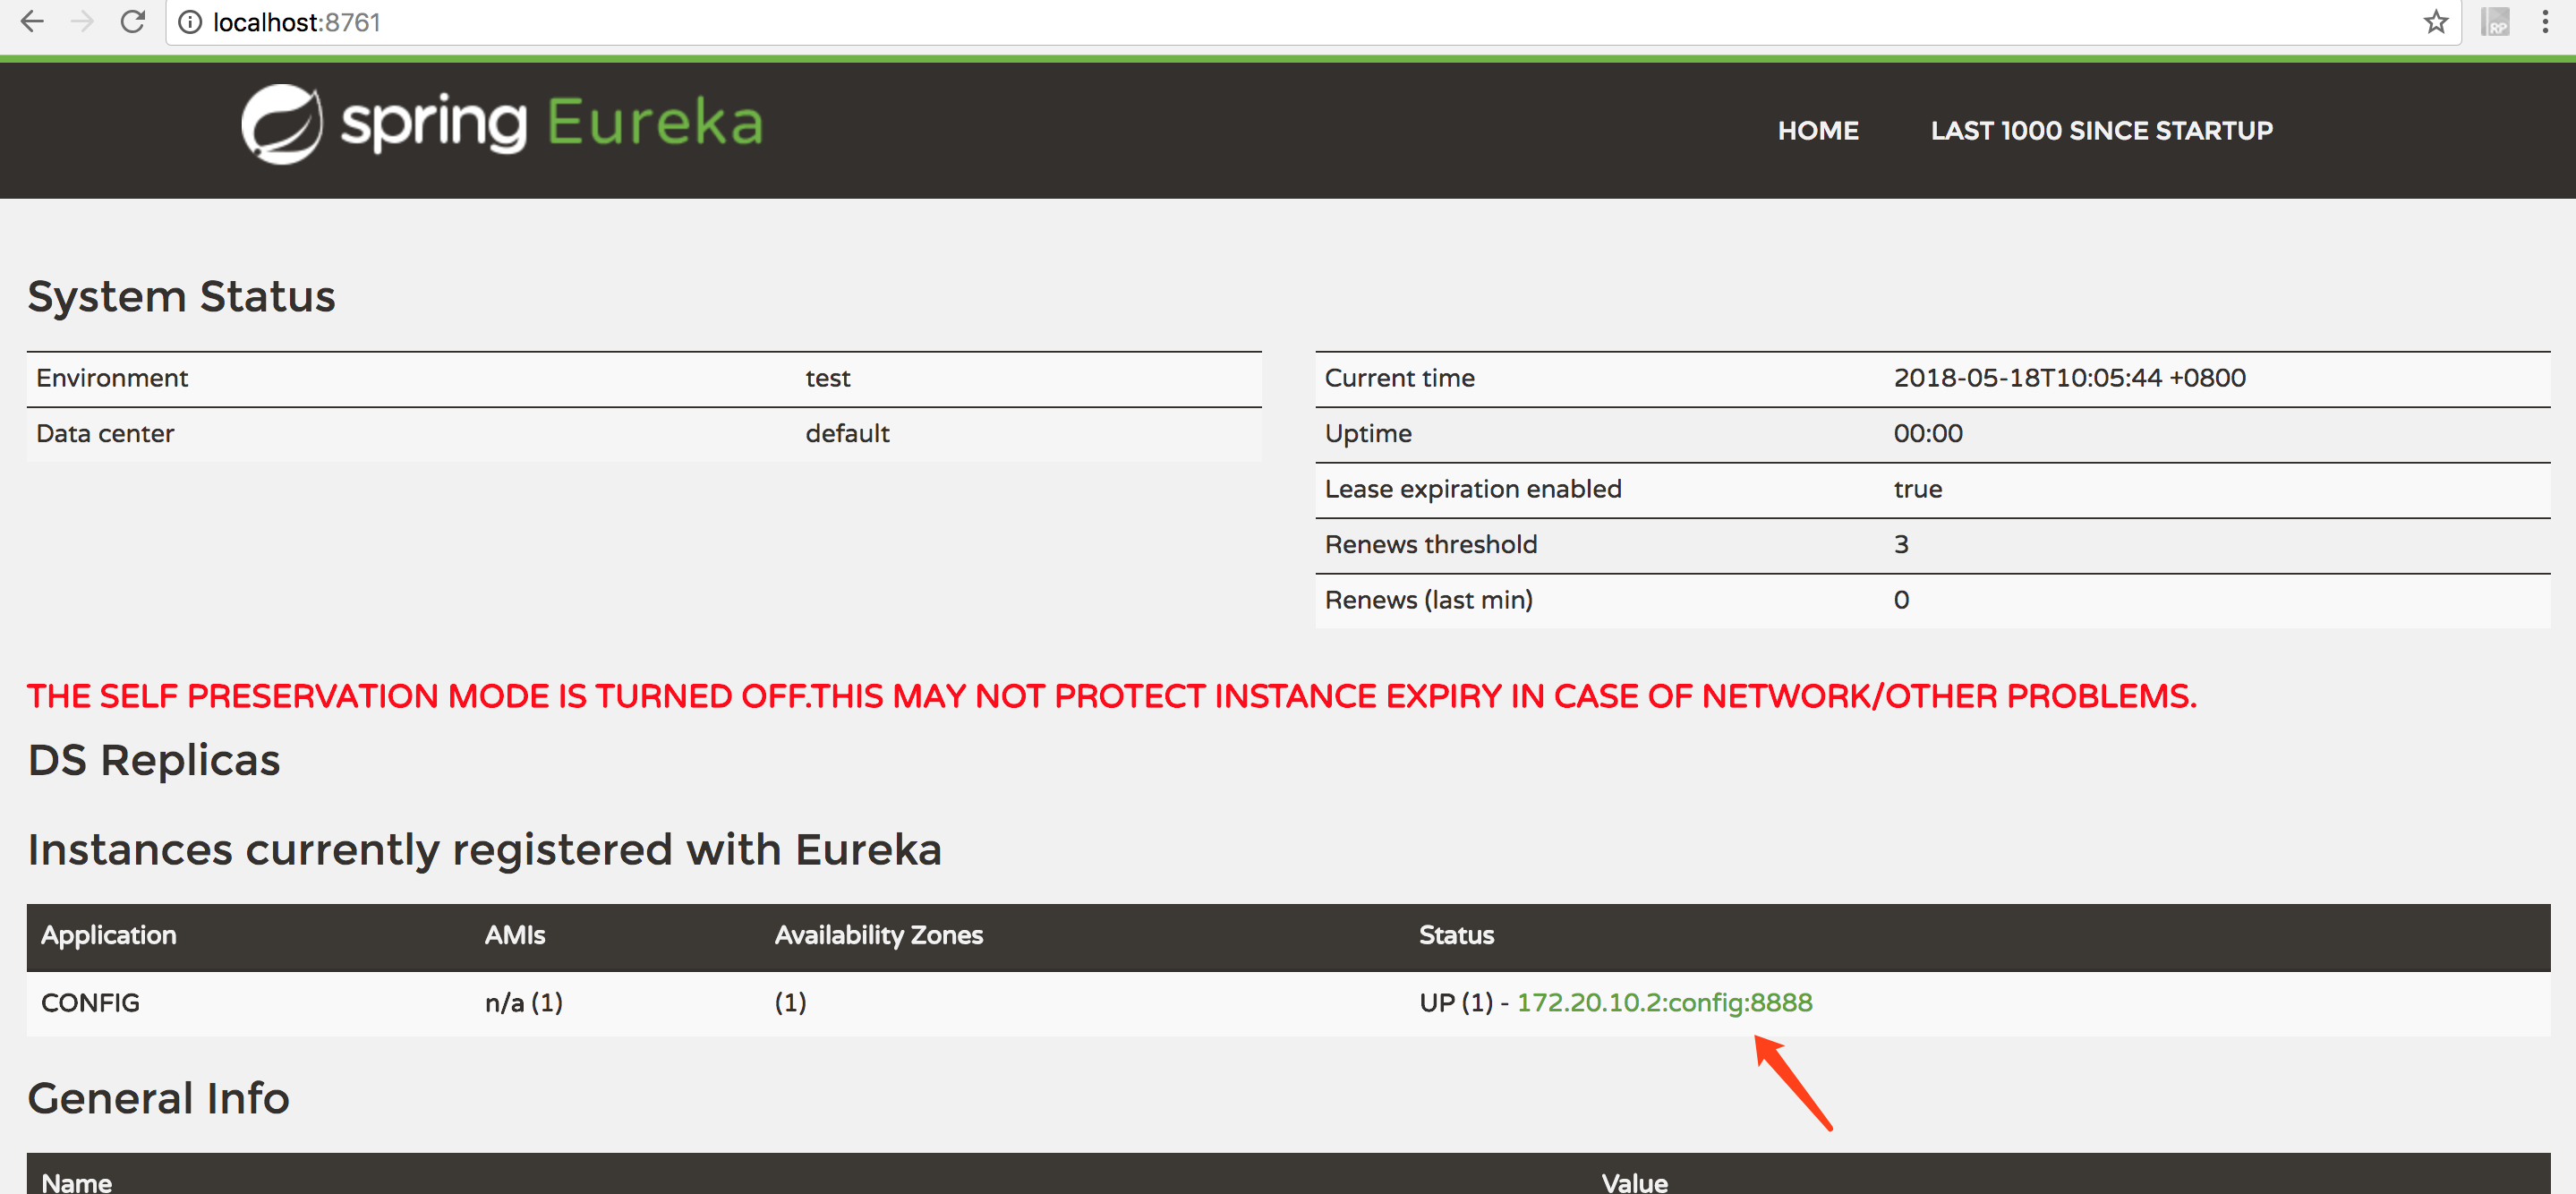
由此可见,它默认是以 ip:application_name:端口呈现的。
在实际项目中,建议大家都写成上述配置,否则如果通过 K8S 或 Docker 部署系统,可能会出现问题,具体原因将在第16课提到。
通过上述过程,配置服务中心已经创建完成,启动它并且访问地址:http://localhost:8888/config/dev,即可看到:

3.修改各个服务配置。
我们创建配置中心的目的就是为了方便其他服务进行统一的配置管理,因此,还需要修改各个服务。
以服务提供者 eurekaclient 为例,按照以下步骤进行操作。
在 pom.xml 加入配置中心依赖:
<dependency>
            <groupId>org.springframework.cloud</groupId>
            <artifactId>spring-cloud-starter-config</artifactId>
        </dependency>
在 resources 下新建 bootstrap.yml 并删除 application.yml(注意:这里不是 application.yml,而是 bootstrap.yml):
spring:
  application:
    name: eurekaclient
  profiles:
    active: dev
  cloud:
    config:
      profile: dev #指定配置环境,配置文件如果是多环境则取名类似:config-dev.yml
      name: eurekaclient #指定配置文件名字(多个配置文件以英文逗号隔开)
      label: master #git仓库分支名
      discovery:
        enabled: true
        serviceId: config #连接的配置中心名字(applicaiton.name)
eureka:
  client:
    serviceUrl:
      defaultZone: http://localhost:8761/eureka/
在配置中心配置的 Git 仓库相应路径下创建配置文件 eurekaclient.yml(本实例为第09课/config):
eureka:
  client:
    serviceUrl:
      defaultZone: http://localhost:8761/eureka/
server:
  port: 8763
spring:
  application:
    name: eurekaclient
我们依次启动注册中心、配置中心和服务提供者 eurekaclient,可以看到 eurekaclient 的监听端口为8763,然后修改 eurekaclient.yml 的 server.port 为8764,重新启动 eurekaclient,可以看到其监听端口为8764,说明 eurekaclient 成功从 Git 上拉取了配置。
配置自动刷新
我们注意到,每次修改配置都需要重新启动服务,配置才会生效,这种做法也比较麻烦,因此我们需要一个机制,每次修改了配置文件,各个服务配置自动生效,Spring Cloud 给我们提供了解决方案。
手动刷新配置
我们先来看看如何通过手动方式刷新配置。
1.在 eurekaclient 工程的 pom.xml 添加依赖:
<dependency>
            <groupId>org.springframework.boot</groupId>
            <artifactId>spring-boot-starter-actuator</artifactId>
        </dependency>
2.修改远程 Git 仓库的配置文件 eurekaclient.yml:
eureka:
  client:
    serviceUrl:
      defaultZone: http://localhost:8761/eureka/
server:
  port: 8764
spring:
  application:
    name: eurekaclient
management:
  security:
    #关闭安全验证,否则访问refresh端点时会提示权限不足
    enabled: false
3.在 HelloController 类加入 @RefeshScope 依赖:
@RestController
@RefreshScope
public class HelloController {

    @Value("${server.port}")
    private int port;

    @RequestMapping("index")
    public String index(){
        return "Hello World!,端口:"+port;
    }
}
以上步骤就集成了手动刷新配置。下面开始进行测试。
- 依次启动注册中心,配置中心,客户端;
- 访问地址:http://localhost:8763/index,即可看到:
- 修改 Git 仓库远程配置文件 eurekaclient.yml 的端口为8764;
- 重新访问2的地址,我们发现端口未发生改变;
- POST 方式请求地址:http://localhost:8763/refresh,如:
curl -X POST http://localhost:8763/refresh,可以的客户端控制台看到如下日志信息:说明 refresh 端点已请求配置中心刷新配置。 6.再次访问2的地址,可以看到:
我们发现端口已发生改变,说明刷新成功!
自动刷新配置
前面我们讲了通过 /refresh 端点手动刷新配置,如果每个微服务的配置都需要我们手动刷新,代价无疑是巨大的。不仅如此,随着系统的不断扩张,维护也越来越麻烦。因此,我们有必要实现自动刷新配置。
自动刷新配置原理
- 利用 Git 仓库的 WebHook,可以设置当有内容 Push 上去后,则通过 HTTP 的 POST 远程请求指定地址。
- 利用消息队列如 RabbitMQ、Kafka 等自动通知到每个微服务(本文以 RabbitMQ 为例讲解)。
实现步骤
下面我们就来实现自动刷新配置。 1.安装 RabbitMQ(安装步骤省略,请自行百度) 2.在 eurekaclient 加入如下依赖:
<dependency>
            <groupId>org.springframework.cloud</groupId>
            <artifactId>spring-cloud-starter-bus-amqp</artifactId>
        </dependency>
3.在 bootstrap.yml 添加以下内容:
spring:
    rabbitmq:
        host: localhost
        port: 5672
        username: guest
        password: guest
4.启动注册中心、配置中心和客户端;
5.POST 方式请求:http://localhost:8763/bus/refresh,可以看到配置已被刷新,实际项目中,我们会单独创建一个工程用以刷新配置,请求这个地址后,可以发现所有加入了 RefreshScope 和 actuator 依赖的工程都会被刷新配置。
6.利用 Git 的 WebHook,实现自动刷新,如图:
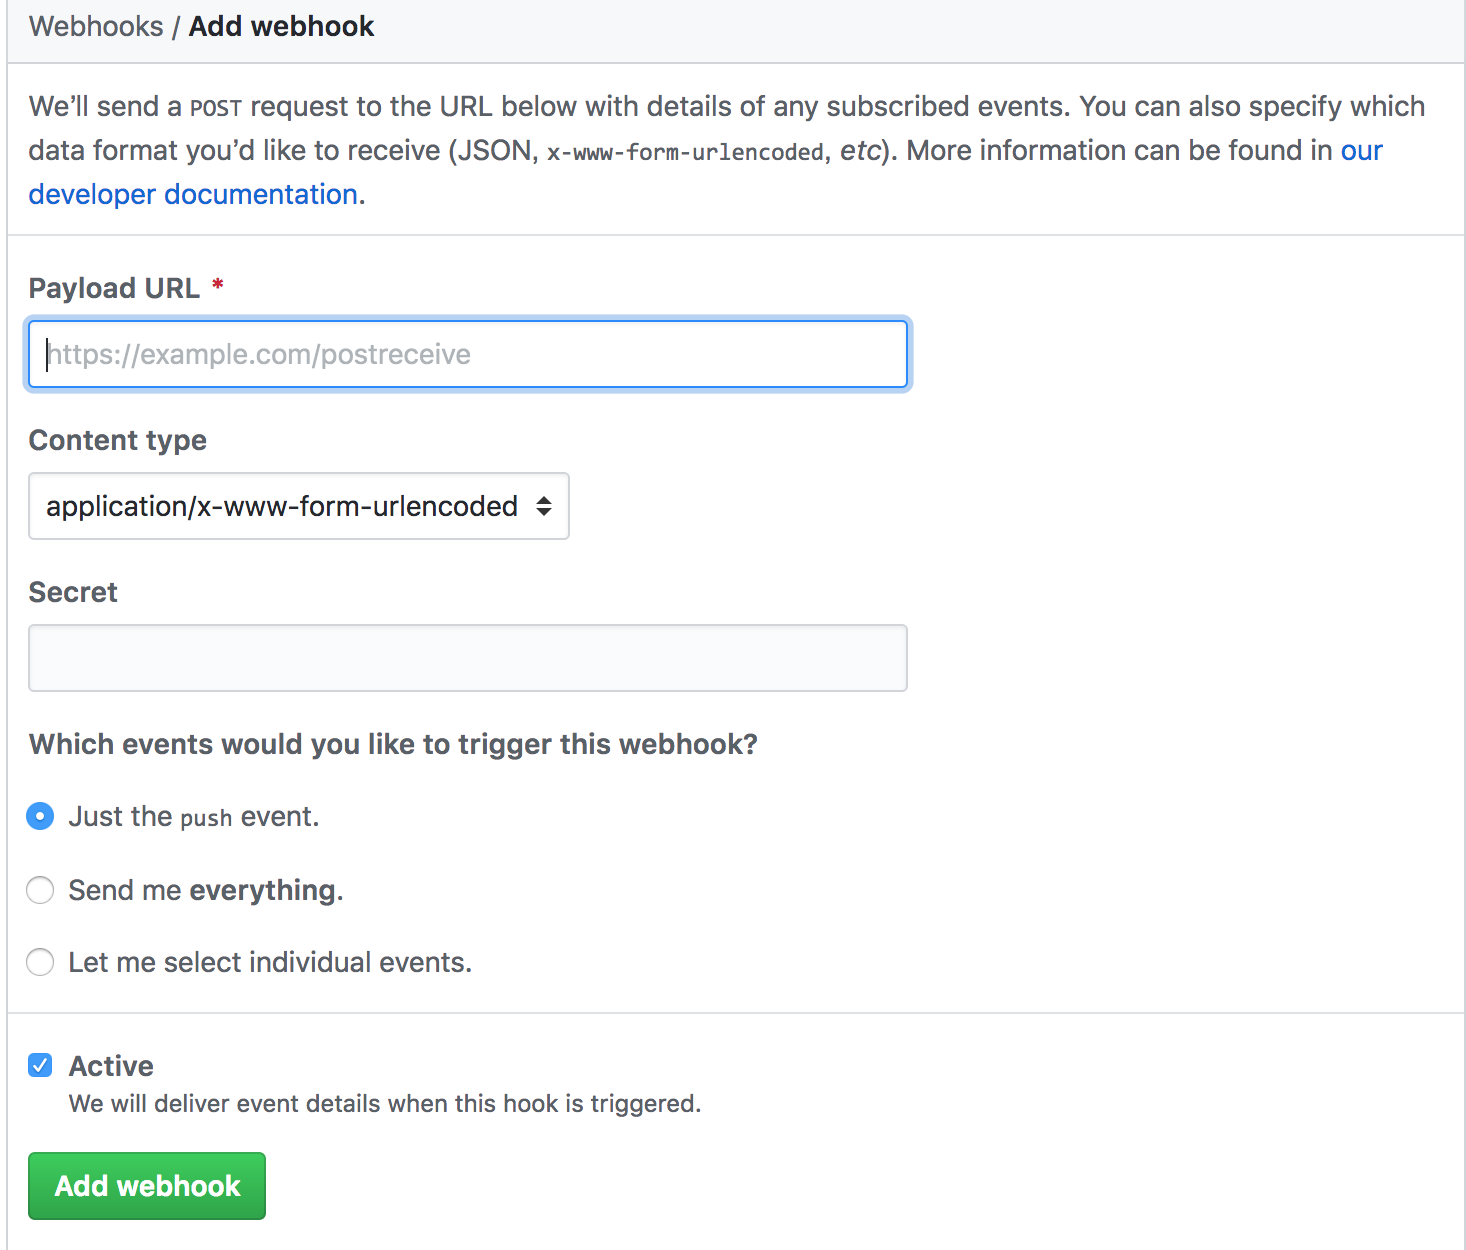
设置好刷新 URL 后,点击提交。以后每次有新的内容被提交后,会自动请求该 URL 实现配置的自动刷新。
第10课:消息总线
其实在上一课我们已经接触过了消息总线,那就是 Spring Cloud Bus,这一课我们将继续深入研究 Spring Cloud Bus 的一些特性。
局部刷新
Spring Cloud Bus 用于实现在集群中传播一些状态变化(例如:配置变化),它常常与 Spring Cloud Config 联合实现热部署。上一课我们体验了配置的自动刷新,但每次都会刷新所有微服务,有些时候我们只想刷新部分微服务的配置,这时就需要通过 /bus/refresh 断点的 destination 参数来定位要刷新的应用程序。
它的基本用法如下:
/bus/refresh?destination=application:port
其中,application 为各微服务指定的名字,port 为端口,如果我们要刷新所有指定微服务名字下的配置,则 destination 可以设置为 application:例如:/bus/refresh/destination=eurekaclient:,代表刷新所有名字为 EurekaClient 的微服务配置。
改进架构
在前面的示例中,我们是通过某一个微服务的 /bus/refesh 断点来实现配置刷新,但是这种方式并不优雅,它有以下弊端:
- 破坏了微服务的单一职责原则,微服务客户端理论上应只关注自身业务,而不应该负责配置刷新。
- 破坏了微服务各节点的对等性。
- 有一定的局限性。在微服务迁移时,网络地址时常会发生改变,这时若想自动刷新配置,就不得不修改 Git 仓库的 WebHook 配置。
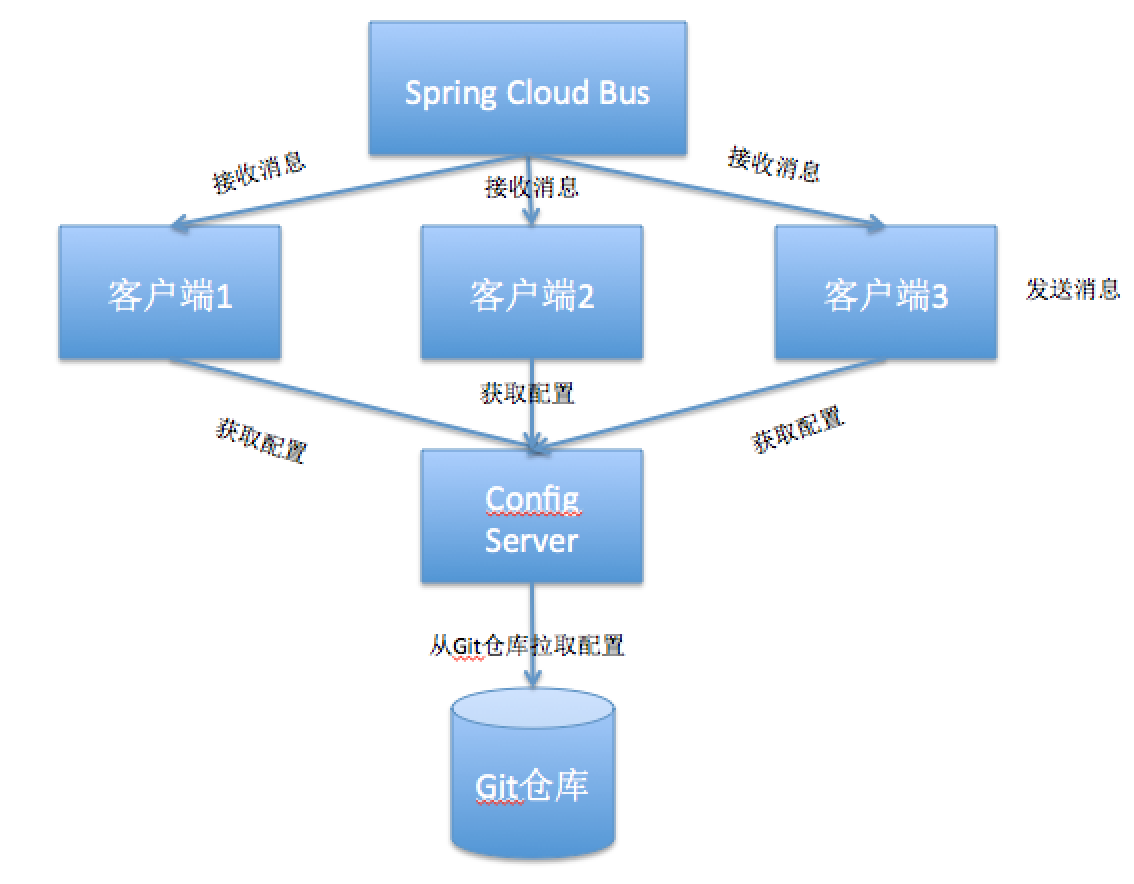
因此,我们应考虑改进架构,将 ConfigServer 也加入到消息总线来,将其 /bus/refresh 用于实现配置的自动刷新。这样,各个微服务节点就只需关注自身业务,无需再承担配置自动刷新的任务(具体代码已上传到 Github 上,此时不再列举)。
我们来看看此时的架构图:
注意: 所有需要刷新配置的服务都需要添加以下依赖。
<dependency>
            <groupId>org.springframework.cloud</groupId>
            <artifactId>spring-cloud-starter-bus-amqp</artifactId>
        </dependency>
并且需要在配置文件设置 rabbitmq 信息:
 spring:
    rabbitmq:
        host: localhost
        port: 5672
        username: guest
        password: guest
消息总线事件
在某些场景下,我们需要知道 Spring Cloud Bus 的事件传播细节,这时就需要跟踪消息总线事件。
要实现跟踪消息总线事件是一件很容易的事情,只需要修改配置文件,如下所示:
server:
  port: 8888
spring:
  application:
    name: config
  profiles:
    active: dev
  cloud:
    bus:
      trace:
        enable: true
    config:
      server:
        git:
          uri: https://github.com/lynnlovemin/SpringCloudLesson.git #配置git仓库地址
          searchPaths: 第09课/config #配置仓库路径
          username: lynnlovemin #访问git仓库的用户名
          password: liyi880301 #访问git仓库的用户密码
      label: master #配置仓库的分支
  rabbitmq:
    host: localhost
    port: 5672
    username: guest
    password: guest
eureka:
  instance:
    hostname: ${spring.cloud.client.ipAddress}
    instanceId: ${spring.cloud.client.ipAddress}:${server.port}
  client:
    serviceUrl:
      defaultZone: http://localhost:8761/eureka/
management:
  security:
    enabled: false
我们将 spring.cloud.trace.enabled 设置为 true 即可,这样我们在 POST 请求 /bus/refresh 后,浏览器访问访问 /trace 端点即可看到如下数据:
[{
    "timestamp": 1527299528556,
    "info": {
        "method": "GET",
        "path": "/eurekaclient/dev/master",
        "headers": {
            "request": {
                "accept": "application/json, application/*+json",
                "user-agent": "Java/1.8.0_40",
                "host": "192.168.31.218:8888",
                "connection": "keep-alive"
            },
            "response": {
                "X-Application-Context": "config:dev:8888",
                "Content-Type": "application/json;charset=UTF-8",
                "Transfer-Encoding": "chunked",
                "Date": "Sat, 26 May 2018 01:52:08 GMT",
                "status": "200"
            }
        },
        "timeTaken": "4200"
    }
}, {
    "timestamp": 1527299524802,
    "info": {
        "method": "POST",
        "path": "/bus/refresh",
        "headers": {
            "request": {
                "host": "localhost:8888",
                "user-agent": "curl/7.54.0",
                "accept": "*/*"
            },
            "response": {
                "X-Application-Context": "config:dev:8888",
                "status": "200"
            }
        },
        "timeTaken": "1081"
    }
}, {
    "timestamp": 1527299497470,
    "info": {
        "method": "GET",
        "path": "/eurekaclient/dev/master",
        "headers": {
            "request": {
                "accept": "application/json, application/*+json",
                "user-agent": "Java/1.8.0_40",
                "host": "192.168.31.218:8888",
                "connection": "keep-alive"
            },
            "response": {
                "X-Application-Context": "config:dev:8888",
                "Content-Type": "application/json;charset=UTF-8",
                "Transfer-Encoding": "chunked",
                "Date": "Sat, 26 May 2018 01:51:37 GMT",
                "status": "200"
            }
        },
        "timeTaken": "2103"
    }
}, {
    "timestamp": 1527299490374,
    "info": {
        "method": "GET",
        "path": "/eurekaclient/dev/master",
        "headers": {
            "request": {
                "accept": "application/json, application/*+json",
                "user-agent": "Java/1.8.0_40",
                "host": "192.168.31.218:8888",
                "connection": "keep-alive"
            },
            "response": {
                "X-Application-Context": "config:dev:8888",
                "Content-Type": "application/json;charset=UTF-8",
                "Transfer-Encoding": "chunked",
                "Date": "Sat, 26 May 2018 01:51:30 GMT",
                "status": "200"
            }
        },
        "timeTaken": "6691"
    }
}]
这样就可以清晰的看到传播细节了。
第11课:服务链路追踪
在前面的课程中,我们已经学习了使用 Actuator 监控微服务,使用 Hystrix 监控 Hystrix Command。本文,我们来研究微服务链路追踪。
我们知道,微服务之间通过网络进行通信。在我们提供服务的同时,我们不能保证网络一定是畅通的,相反,网络是很脆弱的,网络资源也有限。因此,我们有必要追踪每个网络请求,了解其经过了哪些微服务,延迟多少,每个请求所耗费的时间等。只有这样,我们才能更好的分析系统拼劲,解决系统问题。
本文,我们主要探讨服务追踪组件 Zipkin,SpringCloudSleuth 集成了 Zipkin。
Zipkin 简介
Zipkin 是 Twitter 开源的分布式跟踪系统,基于 Dapper 的论文设计而来。它的主要功能是收集系统的时序数据,从而追踪微服务架构的系统延时等问题。Zipkin 还提供了一个非常友好的界面,便于我们分析追踪数据。
SpringCloudSleuth 简介
通过 SpringCloud 来构建微服务架构,我们可以通过 SpringCloudSleuth 实现分布式追踪,它集成了 Zipkin。
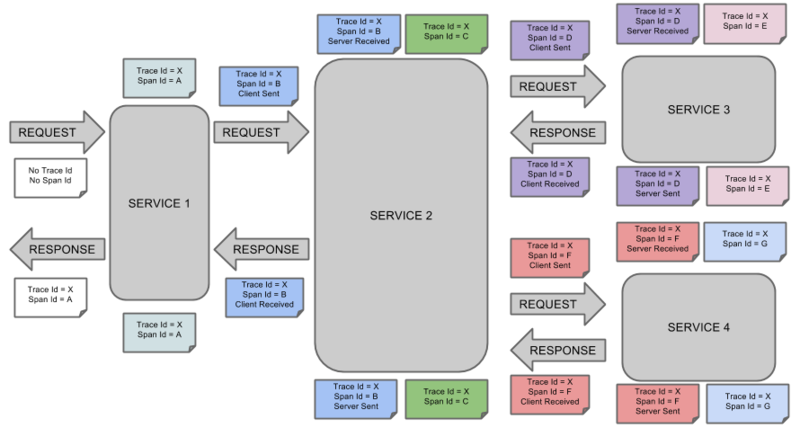
Sleuth 术语
- span(跨度):基本工作单元。例如,在一个新建的 span 中发送一个 RPC 等同于发送一个回应请求给 RPC,span 通过一个64位 ID 唯一标识,trace 以另一个64位 ID 表示,span 还有其他数据信息,比如摘要、时间戳事件、关键值注释(tags)、span 的 ID,以及进度 ID(通常是 IP 地址)。span 在不断的启动和停止,同时记录了时间信息,当你创建了一个 span,你必须在未来的某个时刻停止它。
- trace(追踪):一组共享“root span”的 span 组成的树状结构成为 trace。trace 也用一个64位的 ID 唯一标识,trace中的所有 span 都共享该 trace 的 ID。
- annotation(标注):用来及时记录一个事件的存在,一些核心 annotations 用来定义一个请求的开始和结束。
- cs,即 Client Sent,客户端发起一个请求,这个 annotion 描述了这个 span 的开始。
- sr,即 Server Received,服务端获得请求并准备开始处理它,如果将其 sr 减去 cs 时间戳便可得到网络延迟。
- ss,即 Server Sent,注解表明请求处理的完成(当请求返回客户端),如果 ss 减去 sr 时间戳便可得到服务端需要的处理请求时间。
- cr,即 Client Received,表明 span 的结束,客户端成功接收到服务端的回复,如果 cr 减去 cs 时间戳便可得到客户端从服务端获取回复的所有所需时间。
下图演示了请求依次经过 SERVICE1 -> SERVICE2 -> SERVICE3 -> SERVICE4 时,span、trace、annotation 的变化:
简单的链路追踪实现
(1)在 parent 工程上创建一个子工程:zipkin,在 pom.xml 加入以下依赖:
<dependencies>
        <dependency>
            <groupId>io.zipkin.java</groupId>
            <artifactId>zipkin-autoconfigure-ui</artifactId>
        </dependency>
        <dependency>
            <groupId>io.zipkin.java</groupId>
            <artifactId>zipkin-server</artifactId>
        </dependency>
    </dependencies>
(2)编写启动类 Application.java:
@SpringBootApplication
@EnableZipkinServer
public class Application {

    public static void main(String[] args) {
        SpringApplication.run(Application.class,args);
    }
}
(3)编写配置文件 application.yml:
server:
  port: 9411
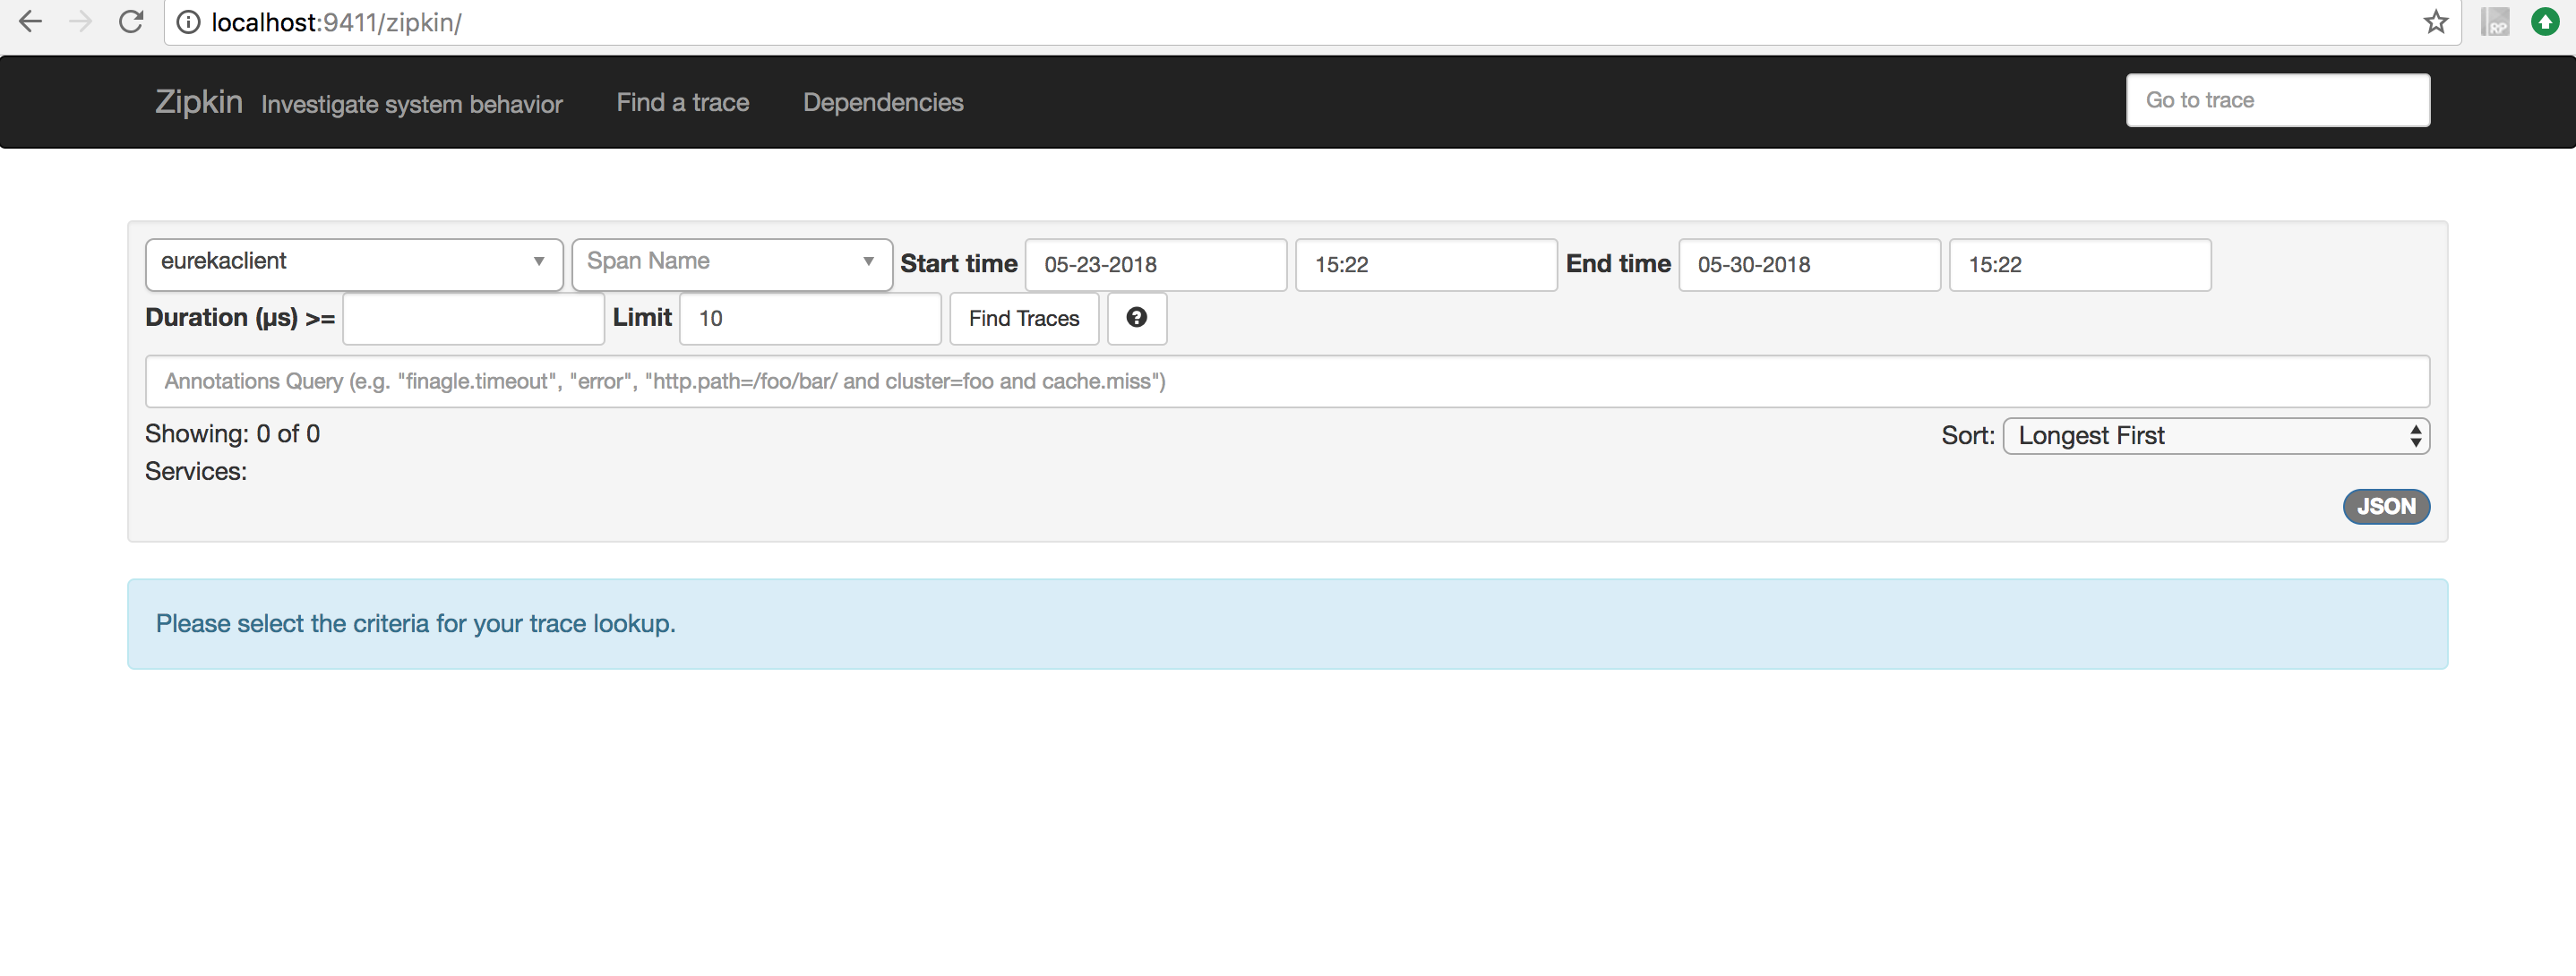
(4)启动 Application.java,并访问地址:http://localhost:9411,即可看到如下界面:
单纯集成 zipkinServer 还达不到追踪的目的,我们还必须使我们的微服务客户端集成 Zipkin 才能跟踪微服务,下面是集成步骤。
(1)在 EurekaClient 工程的 pom 文件中添加以下依赖:
<dependency>
            <groupId>org.springframework.cloud</groupId>
            <artifactId>spring-cloud-sleuth-zipkin</artifactId>
        </dependency>
(2)在 Git 仓库的配置文件 eurekaclient.yml 中添加以下内容:
spring:
    zipkin:
        base-url: http://localhost:9411
    sleuth:
        sampler:
            percentage: 1.0
其中,spring.zipkin.base-url 用来指定 zipkinServer 的地址。spring.sleutch.sampler.percentage 用来指定采样请求的百分比(默认为0.1,即10%)。
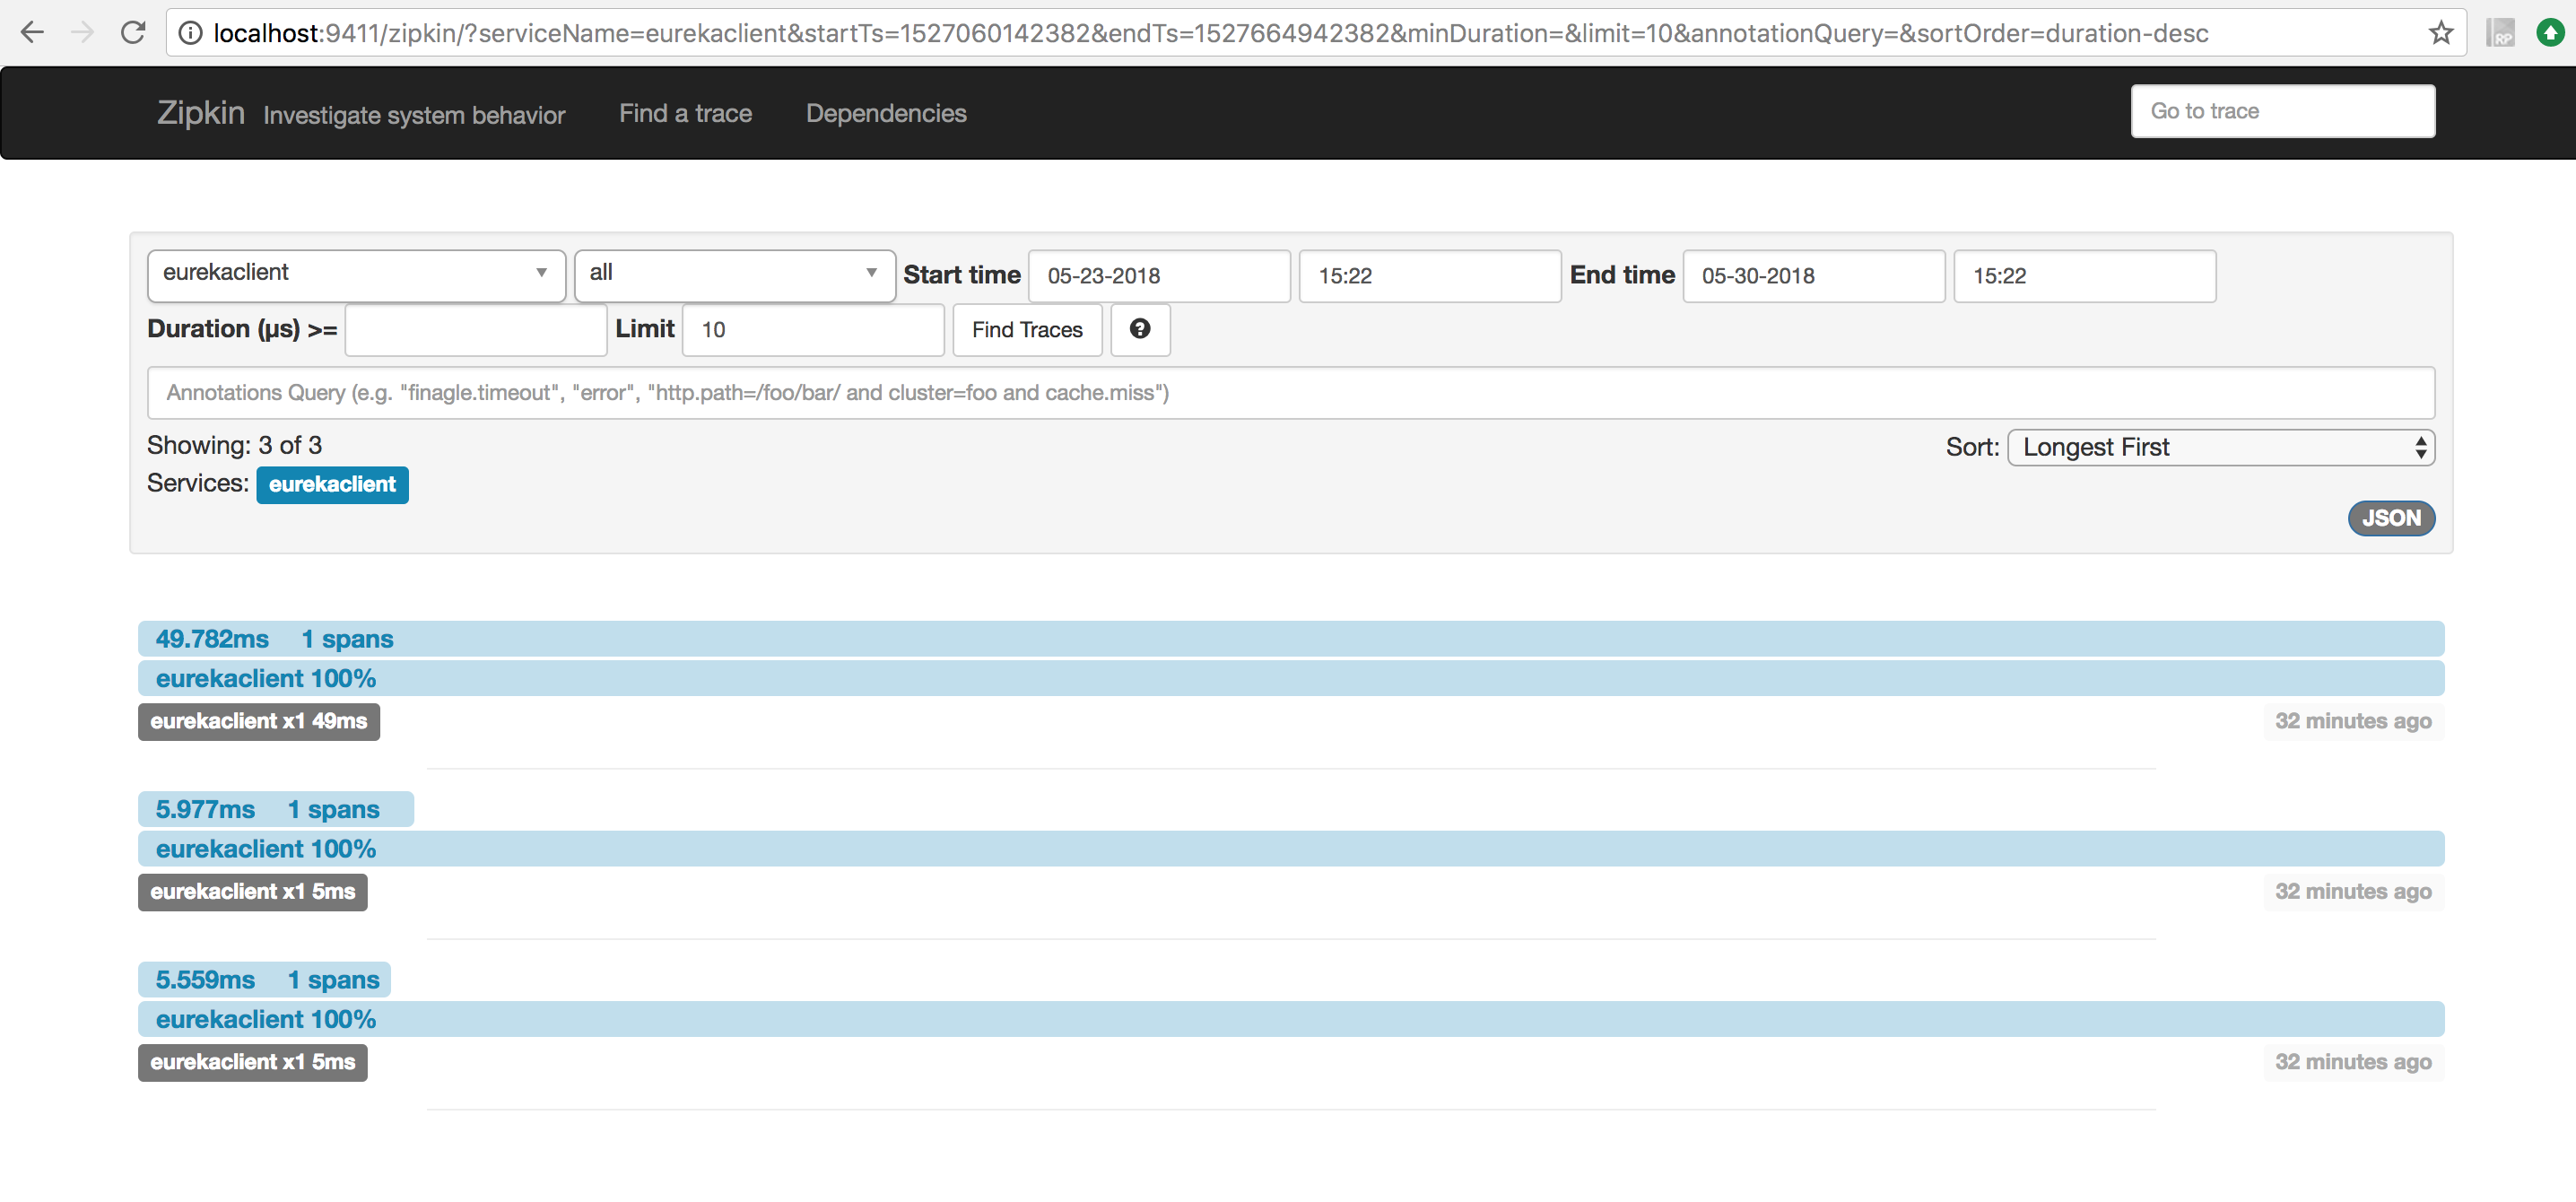
(3)依次启动注册中心、配置中心、Zipkin、eurekaclient,依次访问 http://localhost:8763/index,http://localhost:9411,进入 Zipkin 界面后,点击 Find a trace 按钮,可以看到 trace 列表:
通过消息中间件实现链路追踪
在之前的实例中,我们使用 HTTP 来收集数据,如果 zipkinServer 的网络地址发生了变化,每个微服务的 base-url 都需要改变,因此,我们还可以通过消息队列来收集追踪数据。
我以 RabbitMQ 作为消息中间件进行演示。
(1)改造 Zipkin 工程,将 pom.xml 依赖修改为:
<dependencies>
        <dependency>
            <groupId>io.zipkin.java</groupId>
            <artifactId>zipkin-autoconfigure-ui</artifactId>
        </dependency>
        <dependency>
            <groupId>org.springframework.cloud</groupId>
            <artifactId>spring-cloud-sleuth-zipkin-stream</artifactId>
        </dependency>
        <dependency>
            <groupId>org.springframework.cloud</groupId>
            <artifactId>spring-cloud-starter-sleuth</artifactId>
        </dependency>
        <dependency>
            <groupId>org.springframework.cloud</groupId>
            <artifactId>spring-cloud-stream-binder-rabbit</artifactId>
        </dependency>
    </dependencies>
(2)配置文件加入 RabbitMQ 相关:
pring:
  rabbitmq:
    host: localhost
    port: 5672
    username: guest
    password: guest
(3)改造 EurekaClient,将 pom.xml 依赖改为如下内容:
 <dependencies>
        <dependency>
            <groupId>org.springframework.cloud</groupId>
            <artifactId>spring-cloud-starter-eureka</artifactId>
        </dependency>
        <dependency>
            <groupId>org.springframework.cloud</groupId>
            <artifactId>spring-cloud-starter-config</artifactId>
        </dependency>
        <dependency>
            <groupId>org.springframework.cloud</groupId>
            <artifactId>spring-cloud-starter-bus-amqp</artifactId>
        </dependency>
        <dependency>
            <groupId>org.springframework.cloud</groupId>
            <artifactId>spring-cloud-sleuth-stream</artifactId>
        </dependency>
        <dependency>
            <groupId>org.springframework.cloud</groupId>
            <artifactId>spring-cloud-starter-sleuth</artifactId>
        </dependency>
        <dependency>
            <groupId>org.springframework.cloud</groupId>
            <artifactId>spring-cloud-stream-binder-rabbit</artifactId>
        </dependency>
    </dependencies>
(4)Git 仓库的配置文件 EurekaClient 去掉 spring.zipkin.base-url 配置,并添加如下内容:
spring:
  rabbitmq:
    host: localhost
    port: 5672
    username: guest
(5)依次启动相应工程,我们发现依然可以正常跟踪微服务。
存储追踪数据
前面的示例中,ZipkinServer 是默认将数据存储在内存中,一旦 ZipkinServer 重启或发生故障,将会导致历史数据丢失,因此我们需要将跟踪数据保存到硬盘中。
ZipkinServer 支持多种后端数据存储,比如:MySQL、ElasticSearch、Cassandra 等。
我以 MySQL 为例来演示如何将历史数据存储在 MySQL 中。
(1)首先创建一个名为 Zipkin 的数据库,并执行以下脚本:
CREATE TABLE IF NOT EXISTS zipkin_spans (
  `trace_id_high` BIGINT NOT NULL DEFAULT 0 COMMENT 'If non zero, this means the trace uses 128 bit traceIds instead of 64 bit',
  `trace_id` BIGINT NOT NULL,
  `id` BIGINT NOT NULL,
  `name` VARCHAR(255) NOT NULL,
  `parent_id` BIGINT,
  `debug` BIT(1),
  `start_ts` BIGINT COMMENT 'Span.timestamp(): epoch micros used for endTs query and to implement TTL',
  `duration` BIGINT COMMENT 'Span.duration(): micros used for minDuration and maxDuration query'
) ENGINE=InnoDB ROW_FORMAT=COMPRESSED CHARACTER SET=utf8 COLLATE utf8_general_ci;

ALTER TABLE zipkin_spans ADD UNIQUE KEY(`trace_id_high`, `trace_id`, `id`) COMMENT 'ignore insert on duplicate';
ALTER TABLE zipkin_spans ADD INDEX(`trace_id_high`, `trace_id`, `id`) COMMENT 'for joining with zipkin_annotations';
ALTER TABLE zipkin_spans ADD INDEX(`trace_id_high`, `trace_id`) COMMENT 'for getTracesByIds';
ALTER TABLE zipkin_spans ADD INDEX(`name`) COMMENT 'for getTraces and getSpanNames';
ALTER TABLE zipkin_spans ADD INDEX(`start_ts`) COMMENT 'for getTraces ordering and range';

CREATE TABLE IF NOT EXISTS zipkin_annotations (
  `trace_id_high` BIGINT NOT NULL DEFAULT 0 COMMENT 'If non zero, this means the trace uses 128 bit traceIds instead of 64 bit',
  `trace_id` BIGINT NOT NULL COMMENT 'coincides with zipkin_spans.trace_id',
  `span_id` BIGINT NOT NULL COMMENT 'coincides with zipkin_spans.id',
  `a_key` VARCHAR(255) NOT NULL COMMENT 'BinaryAnnotation.key or Annotation.value if type == -1',
  `a_value` BLOB COMMENT 'BinaryAnnotation.value(), which must be smaller than 64KB',
  `a_type` INT NOT NULL COMMENT 'BinaryAnnotation.type() or -1 if Annotation',
  `a_timestamp` BIGINT COMMENT 'Used to implement TTL; Annotation.timestamp or zipkin_spans.timestamp',
  `endpoint_ipv4` INT COMMENT 'Null when Binary/Annotation.endpoint is null',
  `endpoint_ipv6` BINARY(16) COMMENT 'Null when Binary/Annotation.endpoint is null, or no IPv6 address',
  `endpoint_port` SMALLINT COMMENT 'Null when Binary/Annotation.endpoint is null',
  `endpoint_service_name` VARCHAR(255) COMMENT 'Null when Binary/Annotation.endpoint is null'
) ENGINE=InnoDB ROW_FORMAT=COMPRESSED CHARACTER SET=utf8 COLLATE utf8_general_ci;

ALTER TABLE zipkin_annotations ADD UNIQUE KEY(`trace_id_high`, `trace_id`, `span_id`, `a_key`, `a_timestamp`) COMMENT 'Ignore insert on duplicate';
ALTER TABLE zipkin_annotations ADD INDEX(`trace_id_high`, `trace_id`, `span_id`) COMMENT 'for joining with zipkin_spans';
ALTER TABLE zipkin_annotations ADD INDEX(`trace_id_high`, `trace_id`) COMMENT 'for getTraces/ByIds';
ALTER TABLE zipkin_annotations ADD INDEX(`endpoint_service_name`) COMMENT 'for getTraces and getServiceNames';
ALTER TABLE zipkin_annotations ADD INDEX(`a_type`) COMMENT 'for getTraces';
ALTER TABLE zipkin_annotations ADD INDEX(`a_key`) COMMENT 'for getTraces';

CREATE TABLE IF NOT EXISTS zipkin_dependencies (
  `day` DATE NOT NULL,
  `parent` VARCHAR(255) NOT NULL,
  `child` VARCHAR(255) NOT NULL,
  `call_count` BIGINT
) ENGINE=InnoDB ROW_FORMAT=COMPRESSED CHARACTER SET=utf8 COLLATE utf8_general_ci;

ALTER TABLE zipkin_dependencies ADD UNIQUE KEY(`day`, `parent`, `child`);
(2)改造 Zipkin 工程并添加以下依赖:
<dependency>
            <groupId>io.zipkin.java</groupId>
            <artifactId>zipkin-storage-mysql</artifactId>
            <version>2.4.9</version>
        </dependency>
        <dependency>
            <groupId>org.springframework.boot</groupId>
            <artifactId>spring-boot-starter-jdbc</artifactId>
        </dependency>
        <dependency>
            <groupId>mysql</groupId>
            <artifactId>mysql-connector-java</artifactId>
        </dependency>
(3)在 application.yaml 增加如下配置:
zipkin:
  storage:
    type: mysql
spring:
  datasource:
    url: jdbc:mysql://localhost:3306/zipkin?autoReconnect=true
    username: root
    password: ******
    driverClassName: com.mysql.jdbc.Driver
(4)修改 Application.java:
@SpringBootApplication
@EnableZipkinStreamServer
public class Application {

    public static void main(String[] args) {
        SpringApplication.run(Application.class,args);
    }

    @Bean
    @Primary
    public MySQLStorage mySQLStorage(DataSource datasource) {
        return MySQLStorage.builder().datasource(datasource).executor(Runnable::run).build();
    }
}
(5)启动测试,查看 Zipkin 数据库,发现已经生成了数据,并重启 Zipkin 工程,继续查询,发现仍可查询历史数据。
第12课:分布式锁
本达人课讲述的是基于 Spring Cloud 的分布式架构,那么也带来了线程安全问题,比如一个商城系统,下单过程可能由不同的微服务协作完成,在高并发的情况下如果不加锁就会有问题,而传统的加锁方式只针对单一架构,对于分布式架构是不适合的,这时就需要用到分布式锁。
实现分布式锁的方式有很多,本文结合我的实际项目和目前的技术趋势,通过实例实现几种较为流行的分布式锁方案,最后会对不同的方案进行比较。
基于 Redis 的分布式锁
利用 SETNX 和 SETEX
基本命令主要有:
- SETNX(SET If Not Exists):当且仅当 Key 不存在时,则可以设置,否则不做任何动作。
- SETEX:可以设置超时时间
其原理为:通过 SETNX 设置 Key-Value 来获得锁,随即进入死循环,每次循环判断,如果存在 Key 则继续循环,如果不存在 Key,则跳出循环,当前任务执行完成后,删除 Key 以释放锁。
这种方式可能会导致死锁,为了避免这种情况,需要设置超时时间。
下面,请看具体的实现步骤。
1.创建一个 Maven 工程并在 pom.xml 加入以下依赖:
<parent>
        <groupId>org.springframework.boot</groupId>
        <artifactId>spring-boot-starter-parent</artifactId>
        <version>2.0.2.RELEASE</version>
        <relativePath/> <!-- lookup parent from repository -->
    </parent>

    <properties>
        <project.build.sourceEncoding>UTF-8</project.build.sourceEncoding>
        <project.reporting.outputEncoding>UTF-8</project.reporting.outputEncoding>
        <java.version>1.8</java.version>
    </properties>

    <dependencies>
        <dependency>
        <groupId>org.springframework.boot</groupId>
        <artifactId>spring-boot-starter-test</artifactId>
        <scope>test</scope>
        </dependency>

        <!-- 开启web-->
        <dependency>
            <groupId>org.springframework.boot</groupId>
            <artifactId>spring-boot-starter-web</artifactId>
        </dependency>

        <!-- redis-->
        <dependency>
            <groupId>org.springframework.boot</groupId>
            <artifactId>spring-boot-starter-data-redis</artifactId>
        </dependency>
    </dependencies>
2.创建启动类 Application.java:
@SpringBootApplication
public class Application {

    public static void main(String[] args) {
        SpringApplication.run(Application.class,args);
    }

}
3.添加配置文件 application.yml:
server:
  port: 8080
spring:
  redis:
    host: localhost
    port: 6379
4.创建全局锁类 Lock.java:
/**
 * 全局锁,包括锁的名称
 */
public class Lock {
    private String name;
    private String value;

    public Lock(String name, String value) {
        this.name = name;
        this.value = value;
    }

    public String getName() {
        return name;
    }

    public String getValue() {
        return value;
    }

}
5.创建分布式锁类 DistributedLockHandler.java:
@Component
public class DistributedLockHandler {

    private static final Logger logger = LoggerFactory.getLogger(DistributedLockHandler.class);
    private final static long LOCK_EXPIRE = 30 * 1000L;//单个业务持有锁的时间30s,防止死锁
    private final static long LOCK_TRY_INTERVAL = 30L;//默认30ms尝试一次
    private final static long LOCK_TRY_TIMEOUT = 20 * 1000L;//默认尝试20s

    @Autowired
    private StringRedisTemplate template;

    /**
     * 尝试获取全局锁
     *
     * @param lock 锁的名称
     * @return true 获取成功,false获取失败
     */
    public boolean tryLock(Lock lock) {
        return getLock(lock, LOCK_TRY_TIMEOUT, LOCK_TRY_INTERVAL, LOCK_EXPIRE);
    }

    /**
     * 尝试获取全局锁
     *
     * @param lock    锁的名称
     * @param timeout 获取超时时间 单位ms
     * @return true 获取成功,false获取失败
     */
    public boolean tryLock(Lock lock, long timeout) {
        return getLock(lock, timeout, LOCK_TRY_INTERVAL, LOCK_EXPIRE);
    }

    /**
     * 尝试获取全局锁
     *
     * @param lock        锁的名称
     * @param timeout     获取锁的超时时间
     * @param tryInterval 多少毫秒尝试获取一次
     * @return true 获取成功,false获取失败
     */
    public boolean tryLock(Lock lock, long timeout, long tryInterval) {
        return getLock(lock, timeout, tryInterval, LOCK_EXPIRE);
    }

    /**
     * 尝试获取全局锁
     *
     * @param lock           锁的名称
     * @param timeout        获取锁的超时时间
     * @param tryInterval    多少毫秒尝试获取一次
     * @param lockExpireTime 锁的过期
     * @return true 获取成功,false获取失败
     */
    public boolean tryLock(Lock lock, long timeout, long tryInterval, long lockExpireTime) {
        return getLock(lock, timeout, tryInterval, lockExpireTime);
    }


    /**
     * 操作redis获取全局锁
     *
     * @param lock           锁的名称
     * @param timeout        获取的超时时间
     * @param tryInterval    多少ms尝试一次
     * @param lockExpireTime 获取成功后锁的过期时间
     * @return true 获取成功,false获取失败
     */
    public boolean getLock(Lock lock, long timeout, long tryInterval, long lockExpireTime) {
        try {
            if (StringUtils.isEmpty(lock.getName()) || StringUtils.isEmpty(lock.getValue())) {
                return false;
            }
            long startTime = System.currentTimeMillis();
            do{
                if (!template.hasKey(lock.getName())) {
                    ValueOperations<String, String> ops = template.opsForValue();
                    ops.set(lock.getName(), lock.getValue(), lockExpireTime, TimeUnit.MILLISECONDS);
                    return true;
                } else {//存在锁
                    logger.debug("lock is exist!!!");
                }
                if (System.currentTimeMillis() - startTime > timeout) {//尝试超过了设定值之后直接跳出循环
                    return false;
                }
                Thread.sleep(tryInterval);
            }
            while (template.hasKey(lock.getName())) ;
        } catch (InterruptedException e) {
            logger.error(e.getMessage());
            return false;
        }
        return false;
    }

    /**
     * 释放锁
     */
    public void releaseLock(Lock lock) {
        if (!StringUtils.isEmpty(lock.getName())) {
            template.delete(lock.getName());
        }
    }

}
6.最后创建 HelloController 来测试分布式锁。
@RestController
public class HelloController {

    @Autowired
    private DistributedLockHandler distributedLockHandler;

    @RequestMapping("index")
    public String index(){
        Lock lock=new Lock("lynn","min");
        if(distributedLockHandler.tryLock(lock)){
            try {
                //为了演示锁的效果,这里睡眠5000毫秒
                System.out.println("执行方法");
                Thread.sleep(5000);
            }catch (Exception e){
                e.printStackTrace();
            }
            distributedLockHandler.releaseLock(lock);
        }
        return "hello world!";
    }
}
7.测试。
启动 Application.java,连续访问两次浏览器:http://localhost:8080/index,控制台可以发现先打印了一次“执行方法”,说明后面一个线程被锁住了,5秒后又再次打印了“执行方法”,说明锁被成功释放。
通过这种方式创建的分布式锁存在以下问题:
- 高并发的情况下,如果两个线程同时进入循环,可能导致加锁失败。
- SETNX 是一个耗时操作,因为它需要判断 Key 是否存在,因为会存在性能问题。
因此,Redis 官方推荐 Redlock 来实现分布式锁。
利用 Redlock
通过 Redlock 实现分布式锁比其他算法更加可靠,继续改造上一例的代码。
1.pom.xml 增加以下依赖:
<dependency>
            <groupId>org.redisson</groupId>
            <artifactId>redisson</artifactId>
            <version>3.7.0</version>
        </dependency>
2.增加以下几个类:
/**
 * 获取锁后需要处理的逻辑
 */
public interface AquiredLockWorker<T> {
    T invokeAfterLockAquire() throws Exception;
}
/**
 * 获取锁管理类
 */
public interface DistributedLocker {

    /**
     * 获取锁
     * @param resourceName  锁的名称
     * @param worker 获取锁后的处理类
     * @param <T>
     * @return 处理完具体的业务逻辑要返回的数据
     * @throws UnableToAquireLockException
     * @throws Exception
     */
    <T> T lock(String resourceName, AquiredLockWorker<T> worker) throws UnableToAquireLockException, Exception;

    <T> T lock(String resourceName, AquiredLockWorker<T> worker, int lockTime) throws UnableToAquireLockException, Exception;

}
/**
 * 异常类
 */
public class UnableToAquireLockException extends RuntimeException {

    public UnableToAquireLockException() {
    }

    public UnableToAquireLockException(String message) {
        super(message);
    }

    public UnableToAquireLockException(String message, Throwable cause) {
        super(message, cause);
    }
}
/**
 * 获取RedissonClient连接类
 */
@Component
public class RedissonConnector {
    RedissonClient redisson;
    @PostConstruct
    public void init(){
        redisson = Redisson.create();
    }

    public RedissonClient getClient(){
        return redisson;
    }

}
@Component
public class RedisLocker  implements DistributedLocker{

    private final static String LOCKER_PREFIX = "lock:";

    @Autowired
    RedissonConnector redissonConnector;
    @Override
    public <T> T lock(String resourceName, AquiredLockWorker<T> worker) throws InterruptedException, UnableToAquireLockException, Exception {

        return lock(resourceName, worker, 100);
    }

    @Override
    public <T> T lock(String resourceName, AquiredLockWorker<T> worker, int lockTime) throws UnableToAquireLockException, Exception {
        RedissonClient redisson= redissonConnector.getClient();
        RLock lock = redisson.getLock(LOCKER_PREFIX + resourceName);
        // Wait for 100 seconds seconds and automatically unlock it after lockTime seconds
        boolean success = lock.tryLock(100, lockTime, TimeUnit.SECONDS);
        if (success) {
            try {
                return worker.invokeAfterLockAquire();
            } finally {
                lock.unlock();
            }
        }
        throw new UnableToAquireLockException();
    }
}
3.修改 HelloController:
@RestController
public class HelloController {

    @Autowired
    private DistributedLocker distributedLocker;

    @RequestMapping("index")
    public String index()throws Exception{
        distributedLocker.lock("test",new AquiredLockWorker<Object>() {

            @Override
            public Object invokeAfterLockAquire() {
                try {
                    System.out.println("执行方法!");
                    Thread.sleep(5000);
                }catch (Exception e){
                    e.printStackTrace();
                }
                return null;
            }

        });
        return "hello world!";
    }
}
4.按照上节的测试方法进行测试,我们发现分布式锁也生效了。
Redlock 是 Redis 官方推荐的一种方案,因此可靠性比较高。
基于数据库的分布式锁
基于数据库表
它的基本原理和 Redis 的 SETNX 类似,其实就是创建一个分布式锁表,加锁后,我们就在表增加一条记录,释放锁即把该数据删掉,具体实现,我这里就不再一一举出。
它同样存在一些问题:
- 没有失效时间,容易导致死锁;
- 依赖数据库的可用性,一旦数据库挂掉,锁就马上不可用;
- 这把锁只能是非阻塞的,因为数据的 insert 操作,一旦插入失败就会直接报错。没有获得锁的线程并不会进入排队队列,要想再次获得锁就要再次触发获得锁操作;
- 这把锁是非重入的,同一个线程在没有释放锁之前无法再次获得该锁。因为数据库中数据已经存在了。
乐观锁
基本原理为:乐观锁一般通过 version 来实现,也就是在数据库表创建一个 version 字段,每次更新成功,则 version+1,读取数据时,我们将 version 字段一并读出,每次更新时将会对版本号进行比较,如果一致则执行此操作,否则更新失败!
悲观锁(排他锁)
实现步骤见下面说明。
1.创建一张数据库表:
CREATE TABLE `methodLock` (
  `id` int(11) NOT NULL AUTO_INCREMENT COMMENT '主键',
  `method_name` varchar(64) NOT NULL DEFAULT '' COMMENT '锁定的方法名',
  `desc` varchar(1024) NOT NULL DEFAULT '备注信息',
  `update_time` timestamp NOT NULL DEFAULT CURRENT_TIMESTAMP ON UPDATE CURRENT_TIMESTAMP COMMENT '保存数据时间,自动生成',
  PRIMARY KEY (`id`),
  UNIQUE KEY `uidx_method_name` (`method_name `) USING BTREE
) ENGINE=InnoDB DEFAULT CHARSET=utf8 COMMENT='锁定中的方法';
2.通过数据库的排他锁来实现分布式锁。
基于 MySQL 的 InnoDB 引擎,可以使用以下方法来实现加锁操作:
public boolean lock(){
    connection.setAutoCommit(false)
    while(true){
        try{
            result = select * from methodLock where method_name=xxx for update;
            if(result==null){
                return true;
            }
        }catch(Exception e){

        }
        sleep(1000);
    }
    return false;
}
3.我们可以认为获得排它锁的线程即可获得分布式锁,当获取到锁之后,可以执行方法的业务逻辑,执行完方法之后,再通过以下方法解锁:
public void unlock(){
    connection.commit();
}
基于 Zookeeper 的分布式锁
ZooKeeper 简介
ZooKeeper 是一个分布式的,开放源码的分布式应用程序协调服务,是 Google Chubby 的一个开源实现,是 Hadoop 和 Hbase 的重要组件。它是一个为分布式应用提供一致性服务的软件,提供的功能包括:配置维护、域名服务、分布式同步、组服务等。
分布式锁实现原理
实现原理为:
- 建立一个节点,假如名为 lock 。节点类型为持久节点(Persistent)
- 每当进程需要访问共享资源时,会调用分布式锁的 lock() 或 tryLock() 方法获得锁,这个时候会在第一步创建的 lock 节点下建立相应的顺序子节点,节点类型为临时顺序节点(
EPHEMERAL_SEQUENTIAL),通过组成特定的名字 name+lock+顺序号。 - 在建立子节点后,对 lock 下面的所有以 name 开头的子节点进行排序,判断刚刚建立的子节点顺序号是否是最小的节点,假如是最小节点,则获得该锁对资源进行访问。
- 假如不是该节点,就获得该节点的上一顺序节点,并监测该节点是否存在注册监听事件。同时在这里阻塞。等待监听事件的发生,获得锁控制权。
- 当调用完共享资源后,调用 unlock() 方法,关闭 ZooKeeper,进而可以引发监听事件,释放该锁。
实现的分布式锁是严格的按照顺序访问的并发锁。
代码实现
我们继续改造本文的工程。
1.创建 DistributedLock 类:
public class DistributedLock implements Lock, Watcher{
    private ZooKeeper zk;
    private String root = "/locks";//根
    private String lockName;//竞争资源的标志
    private String waitNode;//等待前一个锁
    private String myZnode;//当前锁
    private CountDownLatch latch;//计数器
    private CountDownLatch connectedSignal=new CountDownLatch(1);
    private int sessionTimeout = 30000;
    /**
     * 创建分布式锁,使用前请确认config配置的zookeeper服务可用
     * @param config localhost:2181
     * @param lockName 竞争资源标志,lockName中不能包含单词_lock_
     */
    public DistributedLock(String config, String lockName){
        this.lockName = lockName;
        // 创建一个与服务器的连接
        try {
            zk = new ZooKeeper(config, sessionTimeout, this);
            connectedSignal.await();
            Stat stat = zk.exists(root, false);//此去不执行 Watcher
            if(stat == null){
                // 创建根节点
                zk.create(root, new byte[0], ZooDefs.Ids.OPEN_ACL_UNSAFE, CreateMode.PERSISTENT);
            }
        } catch (IOException e) {
            throw new LockException(e);
        } catch (KeeperException e) {
            throw new LockException(e);
        } catch (InterruptedException e) {
            throw new LockException(e);
        }
    }
    /**
     * zookeeper节点的监视器
     */
    public void process(WatchedEvent event) {
        //建立连接用
        if(event.getState()== Event.KeeperState.SyncConnected){
            connectedSignal.countDown();
            return;
        }
        //其他线程放弃锁的标志
        if(this.latch != null) {
            this.latch.countDown();
        }
    }

    public void lock() {
        try {
            if(this.tryLock()){
                System.out.println("Thread " + Thread.currentThread().getId() + " " +myZnode + " get lock true");
                return;
            }
            else{
                waitForLock(waitNode, sessionTimeout);//等待锁
            }
        } catch (KeeperException e) {
            throw new LockException(e);
        } catch (InterruptedException e) {
            throw new LockException(e);
        }
    }
    public boolean tryLock() {
        try {
            String splitStr = "_lock_";
            if(lockName.contains(splitStr))
                throw new LockException("lockName can not contains \\u000B");
            //创建临时子节点
            myZnode = zk.create(root + "/" + lockName + splitStr, new byte[0], ZooDefs.Ids.OPEN_ACL_UNSAFE,CreateMode.EPHEMERAL_SEQUENTIAL);
            System.out.println(myZnode + " is created ");
            //取出所有子节点
            List<String> subNodes = zk.getChildren(root, false);
            //取出所有lockName的锁
            List<String> lockObjNodes = new ArrayList<String>();
            for (String node : subNodes) {
                String _node = node.split(splitStr)[0];
                if(_node.equals(lockName)){
                    lockObjNodes.add(node);
                }
            }
            Collections.sort(lockObjNodes);

            if(myZnode.equals(root+"/"+lockObjNodes.get(0))){
                //如果是最小的节点,则表示取得锁
                System.out.println(myZnode + "==" + lockObjNodes.get(0));
                return true;
            }
            //如果不是最小的节点,找到比自己小1的节点
            String subMyZnode = myZnode.substring(myZnode.lastIndexOf("/") + 1);
            waitNode = lockObjNodes.get(Collections.binarySearch(lockObjNodes, subMyZnode) - 1);//找到前一个子节点
        } catch (KeeperException e) {
            throw new LockException(e);
        } catch (InterruptedException e) {
            throw new LockException(e);
        }
        return false;
    }
    public boolean tryLock(long time, TimeUnit unit) {
        try {
            if(this.tryLock()){
                return true;
            }
            return waitForLock(waitNode,time);
        } catch (Exception e) {
            e.printStackTrace();
        }
        return false;
    }
    private boolean waitForLock(String lower, long waitTime) throws InterruptedException, KeeperException {
        Stat stat = zk.exists(root + "/" + lower,true);//同时注册监听。
        //判断比自己小一个数的节点是否存在,如果不存在则无需等待锁,同时注册监听
        if(stat != null){
            System.out.println("Thread " + Thread.currentThread().getId() + " waiting for " + root + "/" + lower);
            this.latch = new CountDownLatch(1);
            this.latch.await(waitTime, TimeUnit.MILLISECONDS);//等待,这里应该一直等待其他线程释放锁
            this.latch = null;
        }
        return true;
    }
    public void unlock() {
        try {
            System.out.println("unlock " + myZnode);
            zk.delete(myZnode,-1);
            myZnode = null;
            zk.close();
        } catch (InterruptedException e) {
            e.printStackTrace();
        } catch (KeeperException e) {
            e.printStackTrace();
        }
    }
    public void lockInterruptibly() throws InterruptedException {
        this.lock();
    }
    public Condition newCondition() {
        return null;
    }

    public class LockException extends RuntimeException {
        private static final long serialVersionUID = 1L;
        public LockException(String e){
            super(e);
        }
        public LockException(Exception e){
            super(e);
        }
    }
}
2.改造 HelloController.java:
@RestController
public class HelloController {

    @RequestMapping("index")
    public String index()throws Exception{
        DistributedLock lock   = new DistributedLock("localhost:2181","lock");
        lock.lock();
        //共享资源
        if(lock != null){
            System.out.println("执行方法");
            Thread.sleep(5000);
            lock.unlock();
        }
        return "hello world!";
    }
}
3.按照本文 Redis 分布式锁的方法测试,我们发现同样成功加锁了。
总结
通过以上的实例可以得出以下结论:
- 通过数据库实现分布式锁是最不可靠的一种方式,对数据库依赖较大,性能较低,不利于处理高并发的场景。
- 通过 Redis 的 Redlock 和 ZooKeeper 来加锁,性能有了比较大的提升。
- 针对 Redlock,曾经有位大神对其实现的分布式锁提出了质疑,但是 Redis 官方却不认可其说法,所谓公说公有理婆说婆有理,对于分布式锁的解决方案,没有最好,只有最适合的,根据不同的项目采取不同方案才是最合理的。
第13课:分布式事务
首先我们应知道,事务是为了保证数据的一致性而产生的。那么分布式事务,顾名思义,就是我们要保证分布在不同数据库、不同服务器、不同应用之间的数据一致性。
为什么需要分布式事务?
最传统的架构是单一架构,数据是存放在一个数据库上的,采用数据库的事务就能满足我们的要求。随着业务的不断扩张,数据的不断增加,单一数据库已经到达了一个瓶颈,因此我们需要对数据库进行分库分表。为了保证数据的一致性,可能需要不同的数据库之间的数据要么同时成功,要么同时失败,否则可能导致产生一些脏数据,也可能滋生 Bug。
在这种情况下,分布式事务思想应运而生。
应用场景
分布式事务的应用场景很广,我也无法一一举例,本文列举出比较常见的场景,以便于读者在实际项目中,在用到了一些场景时即可考虑分布式事务。
支付
最经典的场景就是支付了,一笔支付,是对买家账户进行扣款,同时对卖家账户进行加钱,这些操作必须在一个事务里执行,要么全部成功,要么全部失败。而对于买家账户属于买家中心,对应的是买家数据库,而卖家账户属于卖家中心,对应的是卖家数据库,对不同数据库的操作必然需要引入分布式事务。
在线下单
买家在电商平台下单,往往会涉及到两个动作,一个是扣库存,第二个是更新订单状态,库存和订单一般属于不同的数据库,需要使用分布式事务保证数据一致性。
银行转账
账户 A 转账到账户 B,实际操作是账户 A 减去相应金额,账户 B 增加相应金额,在分库分表的前提下,账户 A 和账户 B 可能分别存储在不同的数据库中,这时需要使用分布式事务保证数据库一致性。否则可能导致的后果是 A 扣了钱 B 却没有增加钱,或者 B 增加了钱 A 却没有扣钱。
SpringBoot 集成 Atomikos 实现分布式事务
Atomikos 简介
Atomikos 是一个为 Java 平台提供增值服务的开源类事务管理器。
以下是包括在这个开源版本中的一些功能:
- 全面崩溃 / 重启恢复;
- 兼容标准的 SUN 公司 JTA API;
- 嵌套事务;
- 为 XA 和非 XA 提供内置的 JDBC 适配器。
注释:XA 协议由 Tuxedo 首先提出的,并交给 X/Open 组织,作为资源管理器(数据库)与事务管理器的接口标准。目前,Oracle、Informix、DB2 和 Sybase 等各大数据库厂家都提供对 XA 的支持。XA 协议采用两阶段提交方式来管理分布式事务。XA 接口提供资源管理器与事务管理器之间进行通信的标准接口。XA 协议包括两套函数,以
xa_开头的及以ax_开头的。
具体实现
1.在本地创建两个数据库:test01,test02,并且创建相同的数据库表:
2.改造上篇的工程,在 pom.xml 增加以下依赖:
<dependency>
            <groupId>org.springframework.boot</groupId>
            <artifactId>spring-boot-starter-jta-atomikos</artifactId>
        </dependency>

        <dependency>
            <groupId>org.mybatis.spring.boot</groupId>
            <artifactId>mybatis-spring-boot-starter</artifactId>
            <version>1.1.1</version>
        </dependency>
        <dependency>
            <groupId>mysql</groupId>
            <artifactId>mysql-connector-java</artifactId>
            <version>5.1.40</version>
        </dependency>
3.修改配置文件 application.yml 如下:
server:
  port: 8080
spring:
  redis:
    host: localhost
    port: 6379
mysql:
  datasource:
    test1:
      url: jdbc:mysql://localhost:3306/test01?useUnicode=true&characterEncoding=utf-8
      username: root
      password: 1qaz2wsx
      minPoolSize: 3
      maxPoolSize: 25
      maxLifetime: 20000
      borrowConnectionTimeout: 30
      loginTimeout: 30
      maintenanceInterval: 60
      maxIdleTime: 60
      testQuery: select 1
    test2:
      url: jdbc:mysql://localhost:3306/test02?useUnicode=true&characterEncoding=utf-8
      username: root
      password: 1qaz2wsx
      minPoolSize: 3
      maxPoolSize: 25
      maxLifetime: 20000
      borrowConnectionTimeout: 30
      loginTimeout: 30
      maintenanceInterval: 60
      maxIdleTime: 60
      testQuery: select 1
4.创建以下类:
@ConfigurationProperties(prefix = "mysql.datasource.test1")
@SpringBootConfiguration
public class DBConfig1 {

    private String url;
    private String username;
    private String password;
    private int minPoolSize;
    private int maxPoolSize;
    private int maxLifetime;
    private int borrowConnectionTimeout;
    private int loginTimeout;
    private int maintenanceInterval;
    private int maxIdleTime;
    private String testQuery;
    public String getUrl() {
        return url;
    }
    public void setUrl(String url) {
        this.url = url;
    }
    public String getUsername() {
        return username;
    }
    public void setUsername(String username) {
        this.username = username;
    }
    public String getPassword() {
        return password;
    }
    public void setPassword(String password) {
        this.password = password;
    }
    public int getMinPoolSize() {
        return minPoolSize;
    }
    public void setMinPoolSize(int minPoolSize) {
        this.minPoolSize = minPoolSize;
    }
    public int getMaxPoolSize() {
        return maxPoolSize;
    }
    public void setMaxPoolSize(int maxPoolSize) {
        this.maxPoolSize = maxPoolSize;
    }
    public int getMaxLifetime() {
        return maxLifetime;
    }
    public void setMaxLifetime(int maxLifetime) {
        this.maxLifetime = maxLifetime;
    }
    public int getBorrowConnectionTimeout() {
        return borrowConnectionTimeout;
    }
    public void setBorrowConnectionTimeout(int borrowConnectionTimeout) {
        this.borrowConnectionTimeout = borrowConnectionTimeout;
    }
    public int getLoginTimeout() {
        return loginTimeout;
    }
    public void setLoginTimeout(int loginTimeout) {
        this.loginTimeout = loginTimeout;
    }
    public int getMaintenanceInterval() {
        return maintenanceInterval;
    }
    public void setMaintenanceInterval(int maintenanceInterval) {
        this.maintenanceInterval = maintenanceInterval;
    }
    public int getMaxIdleTime() {
        return maxIdleTime;
    }
    public void setMaxIdleTime(int maxIdleTime) {
        this.maxIdleTime = maxIdleTime;
    }
    public String getTestQuery() {
        return testQuery;
    }
    public void setTestQuery(String testQuery) {
        this.testQuery = testQuery;
    }

}
@ConfigurationProperties(prefix = "mysql.datasource.test2")
@SpringBootConfiguration
public class DBConfig2 {

    private String url;
    private String username;
    private String password;
    private int minPoolSize;
    private int maxPoolSize;
    private int maxLifetime;
    private int borrowConnectionTimeout;
    private int loginTimeout;
    private int maintenanceInterval;
    private int maxIdleTime;
    private String testQuery;
    public String getUrl() {
        return url;
    }
    public void setUrl(String url) {
        this.url = url;
    }
    public String getUsername() {
        return username;
    }
    public void setUsername(String username) {
        this.username = username;
    }
    public String getPassword() {
        return password;
    }
    public void setPassword(String password) {
        this.password = password;
    }
    public int getMinPoolSize() {
        return minPoolSize;
    }
    public void setMinPoolSize(int minPoolSize) {
        this.minPoolSize = minPoolSize;
    }
    public int getMaxPoolSize() {
        return maxPoolSize;
    }
    public void setMaxPoolSize(int maxPoolSize) {
        this.maxPoolSize = maxPoolSize;
    }
    public int getMaxLifetime() {
        return maxLifetime;
    }
    public void setMaxLifetime(int maxLifetime) {
        this.maxLifetime = maxLifetime;
    }
    public int getBorrowConnectionTimeout() {
        return borrowConnectionTimeout;
    }
    public void setBorrowConnectionTimeout(int borrowConnectionTimeout) {
        this.borrowConnectionTimeout = borrowConnectionTimeout;
    }
    public int getLoginTimeout() {
        return loginTimeout;
    }
    public void setLoginTimeout(int loginTimeout) {
        this.loginTimeout = loginTimeout;
    }
    public int getMaintenanceInterval() {
        return maintenanceInterval;
    }
    public void setMaintenanceInterval(int maintenanceInterval) {
        this.maintenanceInterval = maintenanceInterval;
    }
    public int getMaxIdleTime() {
        return maxIdleTime;
    }
    public void setMaxIdleTime(int maxIdleTime) {
        this.maxIdleTime = maxIdleTime;
    }
    public String getTestQuery() {
        return testQuery;
    }
    public void setTestQuery(String testQuery) {
        this.testQuery = testQuery;
    }

}
@SpringBootConfiguration
@MapperScan(basePackages = "com.lynn.demo.test01", sqlSessionTemplateRef = "sqlSessionTemplate")
public class MyBatisConfig1 {

    // 配置数据源
    @Primary
    @Bean(name = "dataSource")
    public DataSource dataSource(DBConfig1 config) throws SQLException {
        MysqlXADataSource mysqlXaDataSource = new MysqlXADataSource();
        mysqlXaDataSource.setUrl(config.getUrl());
        mysqlXaDataSource.setPinGlobalTxToPhysicalConnection(true);
        mysqlXaDataSource.setPassword(config.getPassword());
        mysqlXaDataSource.setUser(config.getUsername());
        mysqlXaDataSource.setPinGlobalTxToPhysicalConnection(true);

        AtomikosDataSourceBean xaDataSource = new AtomikosDataSourceBean();
        xaDataSource.setXaDataSource(mysqlXaDataSource);
        xaDataSource.setUniqueResourceName("dataSource");

        xaDataSource.setMinPoolSize(config.getMinPoolSize());
        xaDataSource.setMaxPoolSize(config.getMaxPoolSize());
        xaDataSource.setMaxLifetime(config.getMaxLifetime());
        xaDataSource.setBorrowConnectionTimeout(config.getBorrowConnectionTimeout());
        xaDataSource.setLoginTimeout(config.getLoginTimeout());
        xaDataSource.setMaintenanceInterval(config.getMaintenanceInterval());
        xaDataSource.setMaxIdleTime(config.getMaxIdleTime());
        xaDataSource.setTestQuery(config.getTestQuery());
        return xaDataSource;
    }
    @Primary
    @Bean(name = "sqlSessionFactory")
    public SqlSessionFactory sqlSessionFactory(@Qualifier("dataSource") DataSource dataSource)
            throws Exception {
        SqlSessionFactoryBean bean = new SqlSessionFactoryBean();
        bean.setDataSource(dataSource);
        return bean.getObject();
    }

    @Primary
    @Bean(name = "sqlSessionTemplate")
    public SqlSessionTemplate sqlSessionTemplate(
            @Qualifier("sqlSessionFactory") SqlSessionFactory sqlSessionFactory) throws Exception {
        return new SqlSessionTemplate(sqlSessionFactory);
    }
}
@SpringBootConfiguration
//basePackages 最好分开配置 如果放在同一个文件夹可能会报错
@MapperScan(basePackages = "com.lynn.demo.test02", sqlSessionTemplateRef = "sqlSessionTemplate2")
public class MyBatisConfig2 {

    // 配置数据源
    @Bean(name = "dataSource2")
    public DataSource dataSource(DBConfig2 config) throws SQLException {
        MysqlXADataSource mysqlXaDataSource = new MysqlXADataSource();
        mysqlXaDataSource.setUrl(config.getUrl());
        mysqlXaDataSource.setPinGlobalTxToPhysicalConnection(true);
        mysqlXaDataSource.setPassword(config.getPassword());
        mysqlXaDataSource.setUser(config.getUsername());
        mysqlXaDataSource.setPinGlobalTxToPhysicalConnection(true);

        AtomikosDataSourceBean xaDataSource = new AtomikosDataSourceBean();
        xaDataSource.setXaDataSource(mysqlXaDataSource);
        xaDataSource.setUniqueResourceName("dataSource2");

        xaDataSource.setMinPoolSize(config.getMinPoolSize());
        xaDataSource.setMaxPoolSize(config.getMaxPoolSize());
        xaDataSource.setMaxLifetime(config.getMaxLifetime());
        xaDataSource.setBorrowConnectionTimeout(config.getBorrowConnectionTimeout());
        xaDataSource.setLoginTimeout(config.getLoginTimeout());
        xaDataSource.setMaintenanceInterval(config.getMaintenanceInterval());
        xaDataSource.setMaxIdleTime(config.getMaxIdleTime());
        xaDataSource.setTestQuery(config.getTestQuery());
        return xaDataSource;
    }

    @Bean(name = "sqlSessionFactory2")
    public SqlSessionFactory sqlSessionFactory(@Qualifier("dataSource2") DataSource dataSource)
            throws Exception {
        SqlSessionFactoryBean bean = new SqlSessionFactoryBean();
        bean.setDataSource(dataSource);
        return bean.getObject();
    }

    @Bean(name = "sqlSessionTemplate2")
    public SqlSessionTemplate sqlSessionTemplate(
            @Qualifier("sqlSessionFactory2") SqlSessionFactory sqlSessionFactory) throws Exception {
        return new SqlSessionTemplate(sqlSessionFactory);
    }
}
在 com.lynn.demo.test01 和 com.lynn.demo.test02 中分别创建以下 mapper:
@Mapper
public interface UserMapper1 {

    @Insert("insert into test_user(name,age) values(#{name},#{age})")
    void addUser(@Param("name")String name,@Param("age") int age);
}
@Mapper
public interface UserMapper2 {

    @Insert("insert into test_user(name,age) values(#{name},#{age})")
    void addUser(@Param("name") String name,@Param("age") int age);
}
创建 service 类:
@Service
public class UserService {

    @Autowired
    private UserMapper1 userMapper1;
    @Autowired
    private UserMapper2 userMapper2;

    @Transactional
    public void addUser(User user)throws Exception{
        userMapper1.addUser(user.getName(),user.getAge());
        userMapper2.addUser(user.getName(),user.getAge());
    }
}
5.创建单元测试类进行测试:
@RunWith(SpringJUnit4ClassRunner.class)
@SpringBootTest(classes = Application.class)
public class TestDB {

    @Autowired
    private UserService userService;

    @Test
    public void test(){
        User user = new User();
        user.setName("lynn");
        user.setAge(10);
        try {
            userService.addUser(user);
        }catch (Exception e){
            e.printStackTrace();
        }
    }
}
经过测试,如果没有报错,则数据被分别添加到两个数据库表中,如果有报错,则数据不会增加。
第14课:Spring Cloud 实例详解——基础框架搭建(一)
通过前面基础组件的学习,我们已经可以利用这些组件搭建一个比较完整的微服务架构,为了巩固我们前面学习的知识,从本文开始,将以一个实际的案例带领大家构建一个完整的微服务架构(本文代码已放在 Github 上)。
需求分析
本文要实现的一个产品是新闻门户网站,首先我们需要对其进行需求分析,本新闻门户网站包括的功能大概有以下几个:
- 注册登录
- 新闻列表
- 用户评论
产品设计
根据需求分析,就可以进行产品设计,主要是原型设计,我们先看看大致的原型设计图。
首页原型设计图
文章列表页原型设计图
文章详情页原型设计图
个人中心页原型设计图
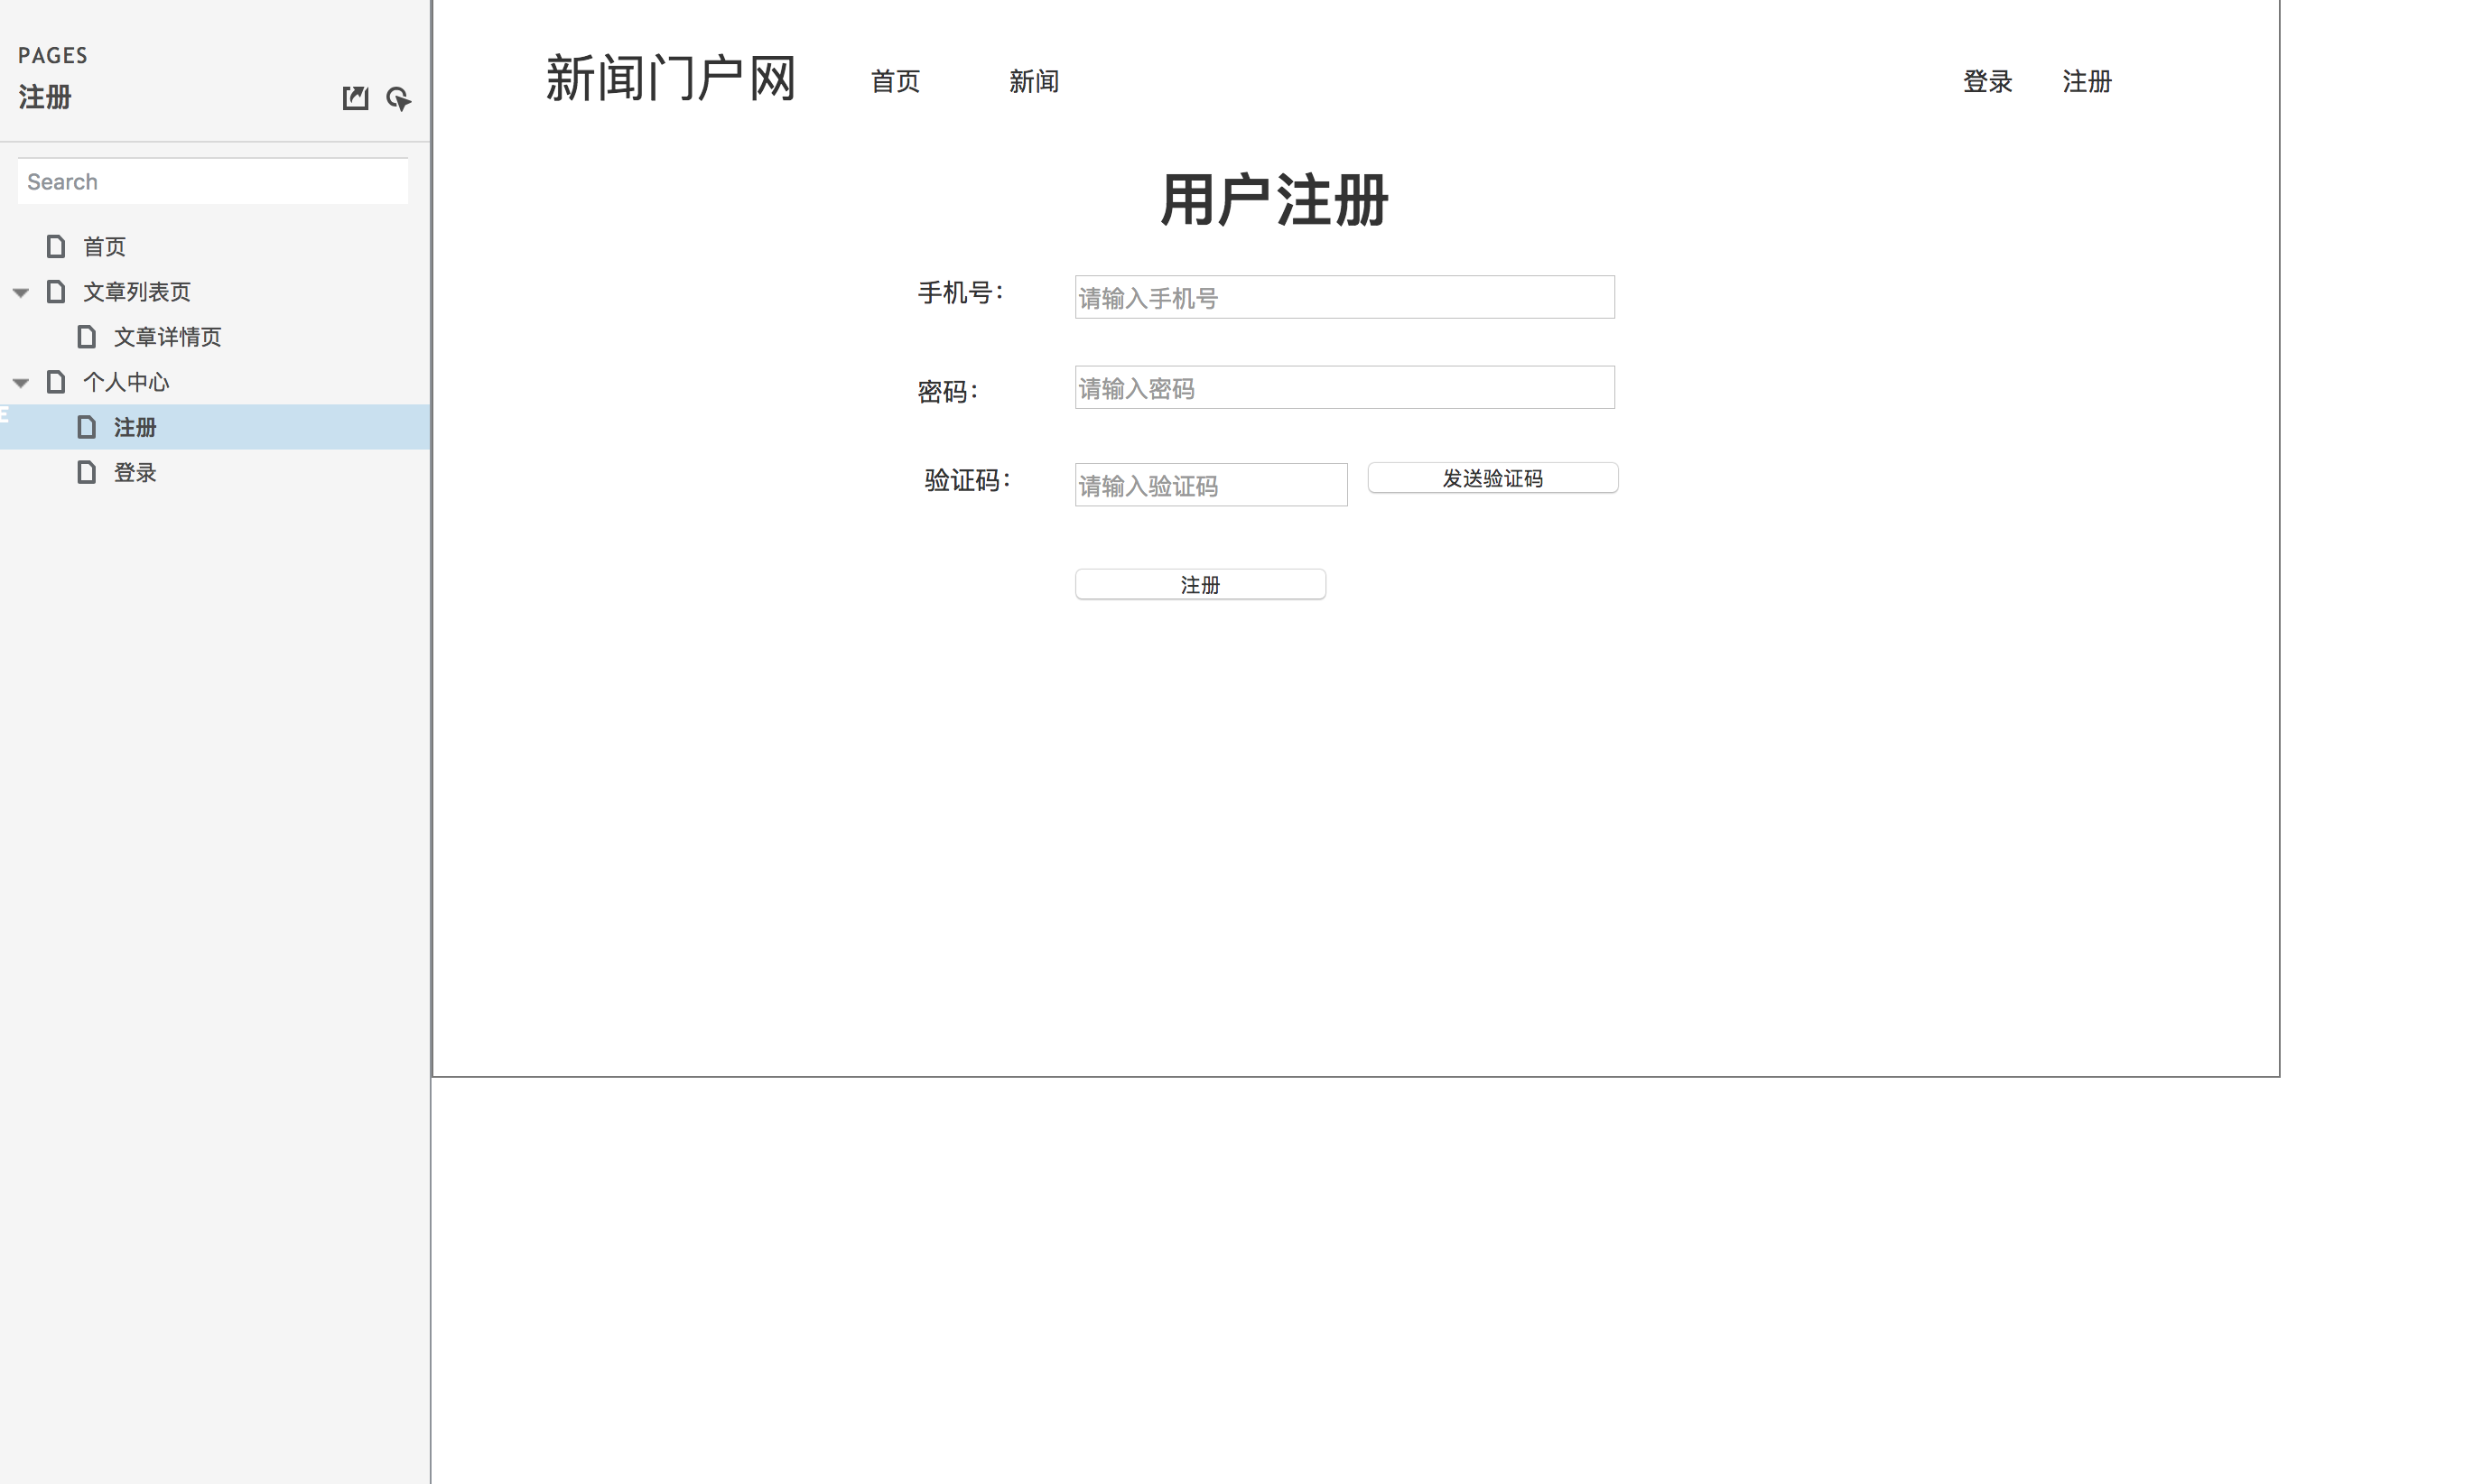
用户注册页原型设计图
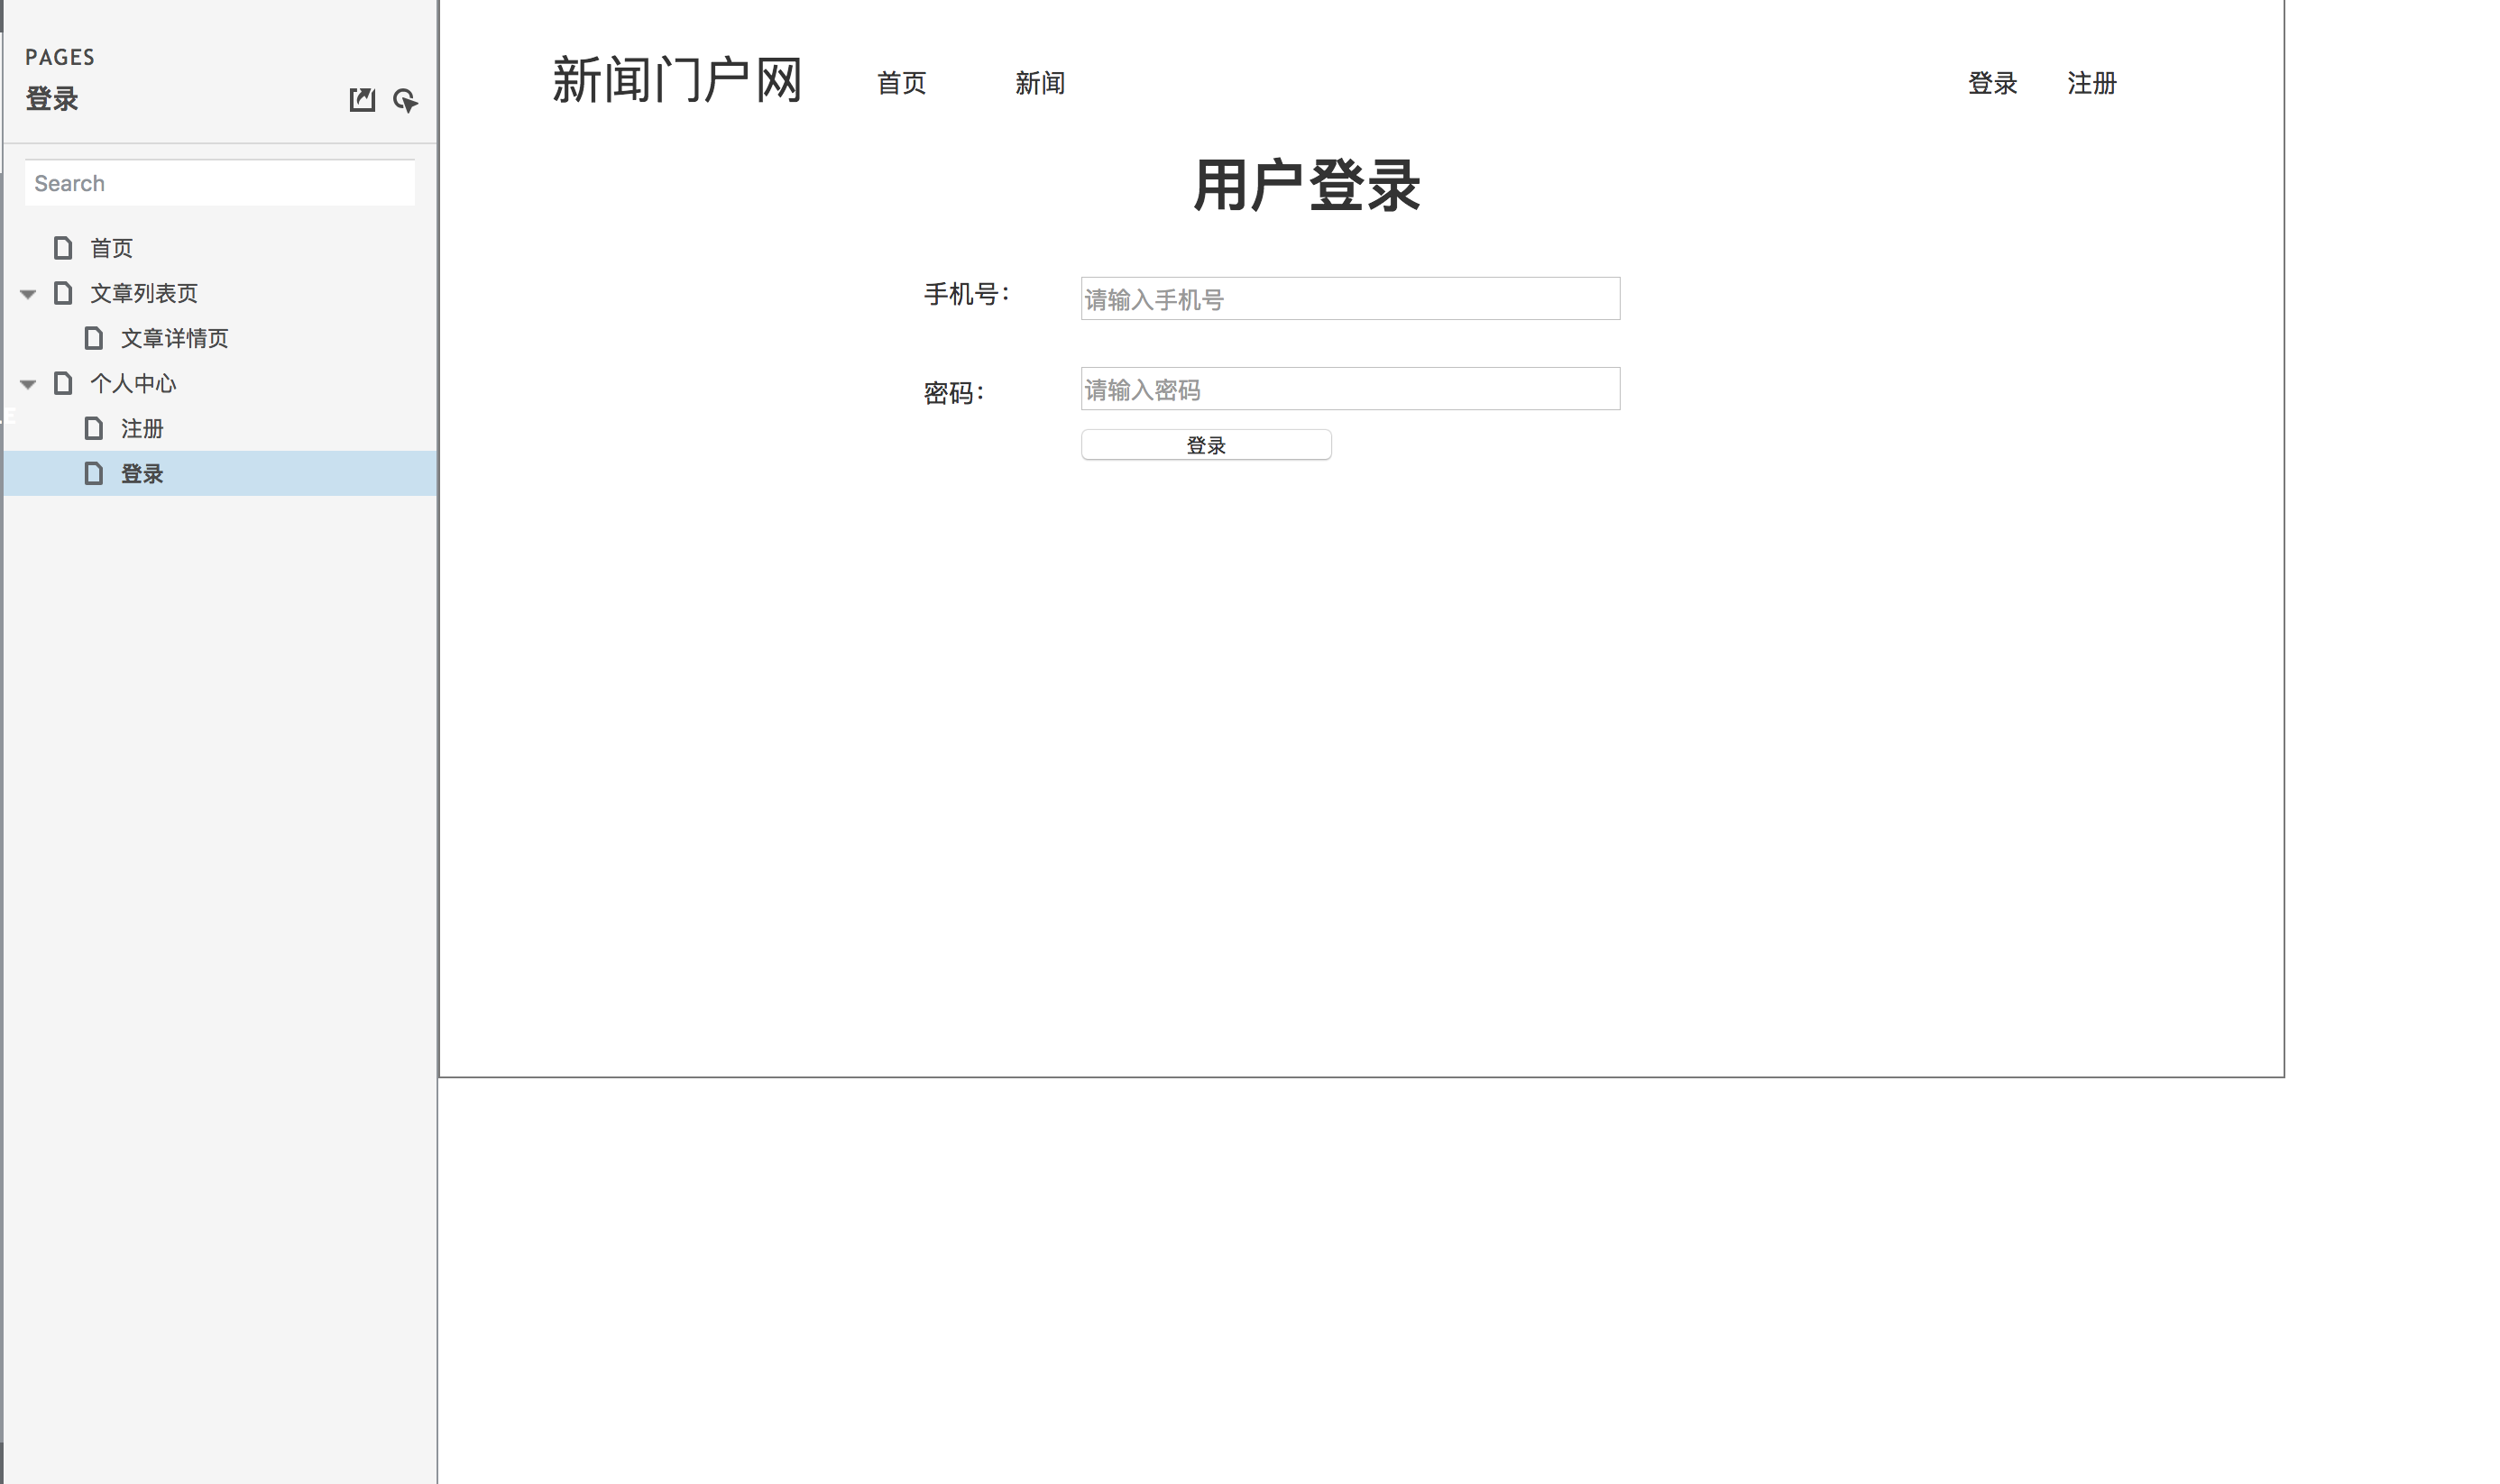
用户登录页原型设计图
数据库设计
根据原型设计图,我们可以分析出数据结构,从而设计数据库:
/*
 Navicat Premium Data Transfer

 Source Server         : 本地
 Source Server Type    : MySQL
 Source Server Version : 50709
 Source Host           : localhost:3306
 Source Schema         : news_db

 Target Server Type    : MySQL
 Target Server Version : 50709
 File Encoding         : 65001

 Date: 07/06/2018 21:15:58
*/

SET NAMES utf8mb4;
SET FOREIGN_KEY_CHECKS = 0;

-- ----------------------------
-- Table structure for news_article
-- ----------------------------
DROP TABLE IF EXISTS `news_article`;
CREATE TABLE `news_article` (
  `id` bigint(16) NOT NULL AUTO_INCREMENT COMMENT '自增ID',
  `gmt_create` datetime DEFAULT NULL COMMENT '创建时间',
  `gmt_modified` datetime DEFAULT NULL COMMENT '修改时间',
  `title` varchar(64) DEFAULT NULL COMMENT '标题',
  `summary` varchar(256) DEFAULT NULL COMMENT '摘要',
  `pic_url` varchar(256) DEFAULT NULL COMMENT '图片',
  `view_count` int(8) DEFAULT NULL COMMENT '浏览数',
  `source` varchar(32) DEFAULT NULL COMMENT '来源',
  `content` text COMMENT '文章内容',
  `category_id` bigint(16) DEFAULT NULL COMMENT '分类ID',
  `is_recommend` tinyint(1) DEFAULT '0' COMMENT '是否推荐',
  PRIMARY KEY (`id`)
) ENGINE=InnoDB DEFAULT CHARSET=utf8mb4;

-- ----------------------------
-- Table structure for news_captcha
-- ----------------------------
DROP TABLE IF EXISTS `news_captcha`;
CREATE TABLE `news_captcha` (
  `id` bigint(16) NOT NULL AUTO_INCREMENT COMMENT '自增ID',
  `gmt_create` datetime DEFAULT CURRENT_TIMESTAMP COMMENT '创建时间',
  `gmt_modified` datetime DEFAULT CURRENT_TIMESTAMP ON UPDATE CURRENT_TIMESTAMP COMMENT '修改时间',
  `mobile` varchar(16) DEFAULT NULL COMMENT '手机号',
  `code` varchar(8) DEFAULT NULL COMMENT '验证码',
  PRIMARY KEY (`id`)
) ENGINE=InnoDB DEFAULT CHARSET=utf8mb4;

-- ----------------------------
-- Table structure for news_category
-- ----------------------------
DROP TABLE IF EXISTS `news_category`;
CREATE TABLE `news_category` (
  `id` bigint(16) NOT NULL AUTO_INCREMENT COMMENT '自增ID',
  `gmt_create` datetime DEFAULT CURRENT_TIMESTAMP COMMENT '创建时间',
  `gmt_modified` datetime DEFAULT CURRENT_TIMESTAMP ON UPDATE CURRENT_TIMESTAMP COMMENT '修改时间',
  `name` varchar(16) DEFAULT NULL COMMENT '分类名',
  `parent_id` bigint(16) NOT NULL DEFAULT '0' COMMENT '上级分类ID(0为顶级分类)',
  PRIMARY KEY (`id`)
) ENGINE=InnoDB DEFAULT CHARSET=utf8mb4;

-- ----------------------------
-- Table structure for news_comment
-- ----------------------------
DROP TABLE IF EXISTS `news_comment`;
CREATE TABLE `news_comment` (
  `id` bigint(16) NOT NULL AUTO_INCREMENT COMMENT '自增ID',
  `gmt_create` datetime DEFAULT CURRENT_TIMESTAMP COMMENT '创建时间',
  `gmt_modified` datetime DEFAULT CURRENT_TIMESTAMP ON UPDATE CURRENT_TIMESTAMP COMMENT '修改时间',
  `article_id` bigint(16) DEFAULT NULL COMMENT '文章ID',
  `content` varchar(256) DEFAULT NULL COMMENT '评论内容',
  `parent_id` bigint(16) NOT NULL DEFAULT '0' COMMENT '上级评论ID(0为顶级评论)',
  PRIMARY KEY (`id`)
) ENGINE=InnoDB DEFAULT CHARSET=utf8mb4;

-- ----------------------------
-- Table structure for news_user
-- ----------------------------
DROP TABLE IF EXISTS `news_user`;
CREATE TABLE `news_user` (
  `id` bigint(16) NOT NULL AUTO_INCREMENT COMMENT '自增ID',
  `gmt_create` datetime DEFAULT CURRENT_TIMESTAMP COMMENT '创建时间',
  `gmt_modified` datetime DEFAULT CURRENT_TIMESTAMP ON UPDATE CURRENT_TIMESTAMP COMMENT '修改时间',
  `mobile` varchar(16) DEFAULT NULL COMMENT '手机号',
  `password` varchar(64) DEFAULT NULL COMMENT '密码(SHA1加密)',
  PRIMARY KEY (`id`)
) ENGINE=InnoDB DEFAULT CHARSET=utf8mb4;

SET FOREIGN_KEY_CHECKS = 1;
架构图设计
对于现代微服务架构来说,我们在搭建项目之前最好先设计架构图,因为微服务工程较多,关系比较复杂,有了架构图,更有利于我们进行架构设计,下面请看本实例的架构图:
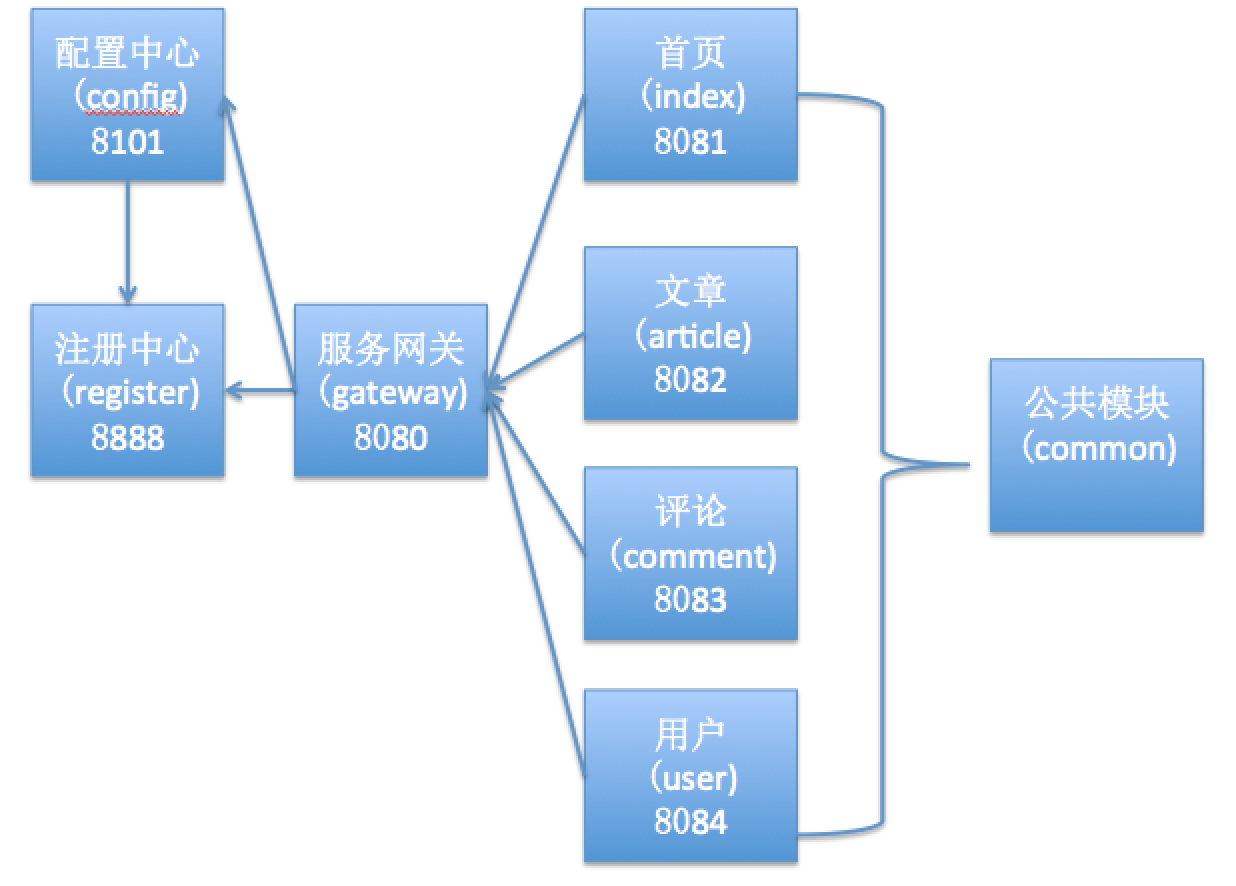
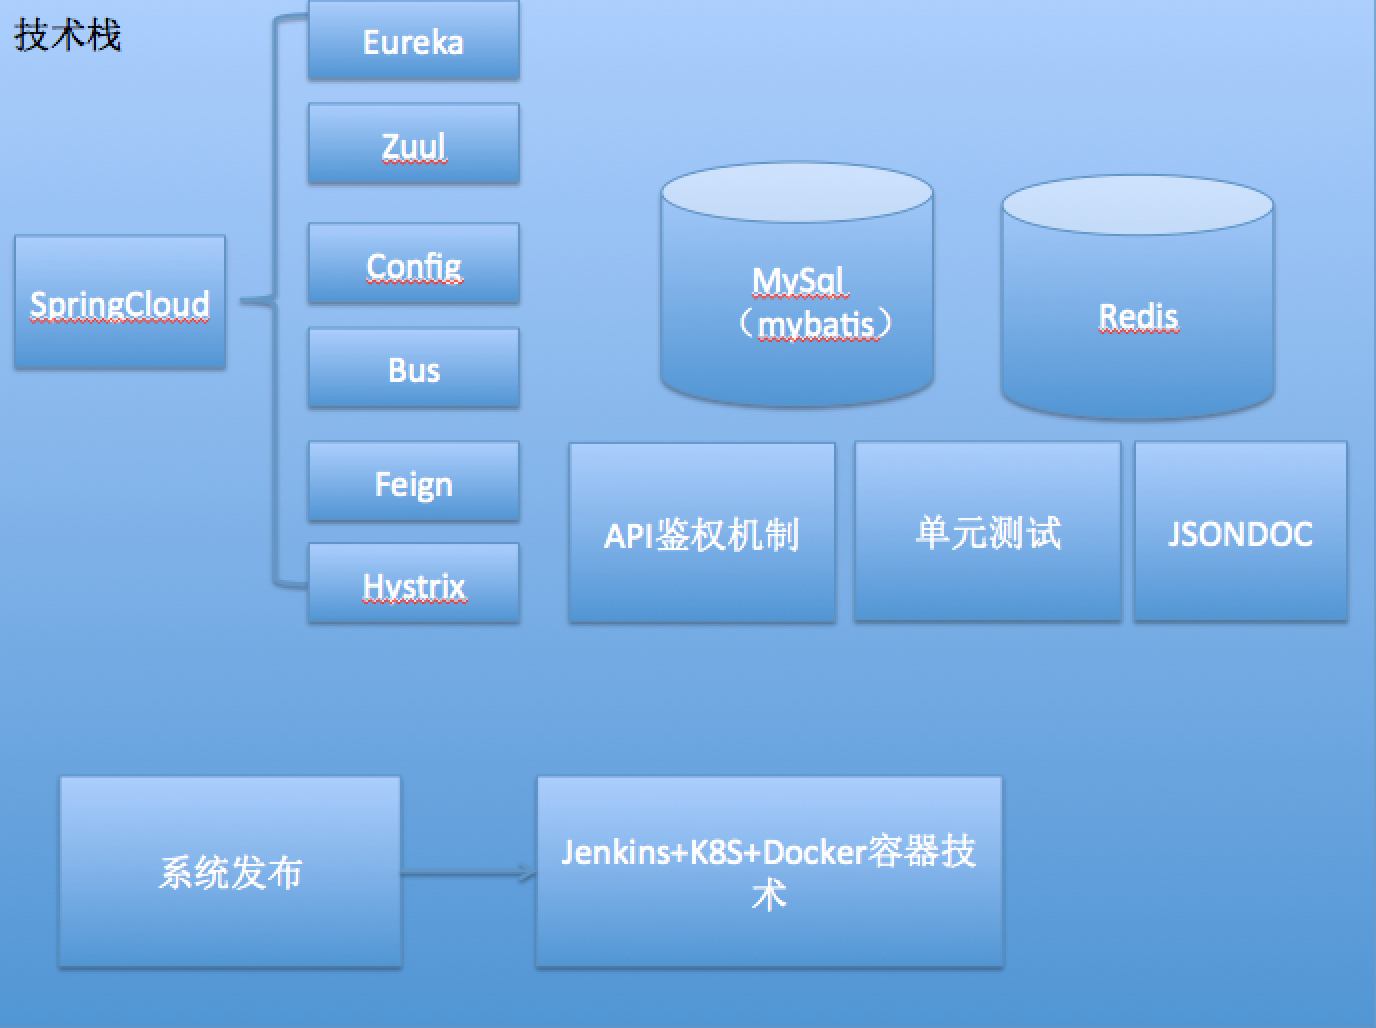
框架搭建
根据架构图,我们就可以开始搭建框架,首先要进行技术选型,也就是需要集成什么技术,本实例,我们将能够看到注册中心、配置中心、服务网关、Redis、MySQL、API 鉴权等技术,下面请看具体代码。
架构图截图:

我们知道,微服务架构其实是由多个工程组成的,根据架构图,我们就可以先把所有工程创建好:
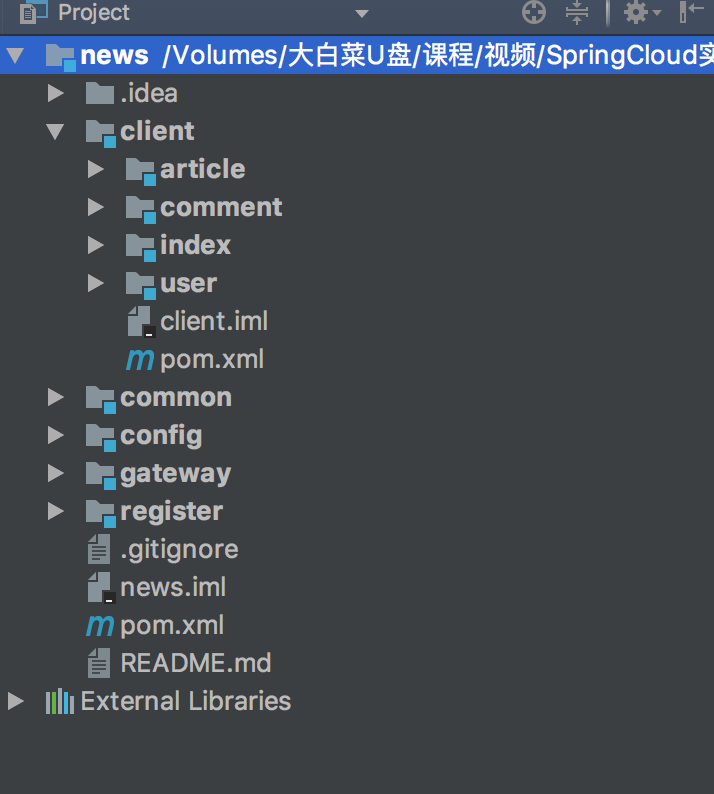
其中,common 不是一个项目工程,而是公共类库,所有项目都依赖它,我们可以把公共代码放在 common 下,比如字符串的处理、日期处理、Redis 处理、JSON 处理等。
client 包括客户端工程,config 为配置中心,gateway 为服务网关,register 为注册中心。
本文我们先来搭建注册中心、配置中心和服务网关。
1.注册中心
首先创建启动类:
package com.lynn.register;

import org.springframework.boot.SpringApplication;
import org.springframework.boot.autoconfigure.SpringBootApplication;
import org.springframework.cloud.netflix.eureka.server.EnableEurekaServer;

@EnableEurekaServer
@SpringBootApplication
public class Application {

    public static void main(String[] args) {
        SpringApplication.run(Application.class,args);
    }
}
然后创建 YAML 配置文件:
server:
  port: 8888
spring:
  application:
    name: register
  profiles:
    active: dev
eureka:
  server:
    #开启自我保护
    enable-self-preservation: true
  instance:
    #以IP地址注册
    preferIpAddress: true
    hostname: ${spring.cloud.client.ipAddress}
    instanceId: ${spring.cloud.client.ipAddress}:${server.port}
  client:
    registerWithEureka: false
    fetchRegistry: false
    serviceUrl:
      defaultZone: http://${eureka.instance.hostname}:${server.port}/eureka/
2.配置中心
创建启动类:
package com.lynn.config;

import org.springframework.boot.SpringApplication;
import org.springframework.boot.autoconfigure.SpringBootApplication;
import org.springframework.cloud.config.server.EnableConfigServer;
import org.springframework.cloud.netflix.eureka.EnableEurekaClient;

@SpringBootApplication
@EnableEurekaClient
@EnableConfigServer
public class Application {

    public static void main(String[] args) {
        SpringApplication.run(Application.class,args);
    }
}
创建 YAML 配置文件:
server:
  port: 8101
spring:
  application:
    name: config
  profiles:
    active: dev
  cloud:
    config:
      server:
        git:
          uri: https://github.com/springcloudlynn/springcloudinactivity #配置git仓库地址
          searchPaths: repo #配置仓库路径
          username: springcloudlynn #访问git仓库的用户名
          password: ly123456 #访问git仓库的用户密码
      label: master #配置仓库的分支
eureka:
  instance:
    hostname: ${spring.cloud.client.ipAddress}
    instanceId: ${spring.cloud.client.ipAddress}:${server.port}
  client:
    serviceUrl:
      defaultZone: http://localhost:8888/eureka/
3.服务网关
我们继续编写服务网关。
首先是启动类:
package com.lynn.gateway;

import org.springframework.boot.SpringApplication;
import org.springframework.boot.autoconfigure.SpringBootApplication;
import org.springframework.cloud.netflix.eureka.EnableEurekaClient;
import org.springframework.cloud.netflix.zuul.EnableZuulProxy;

@EnableEurekaClient
@SpringBootApplication
@EnableZuulProxy
public class Application {
    public static void main(String[] args) {
        SpringApplication.run(Application.class,args);
    }
}
服务网关的配置可以通过配置中心拉下来,下面是配置文件代码,此时配置文件名字为 bootstrap.yml:
spring:
  application:
    name: gateway
  profiles:
    active: dev
  cloud:
    config:
      name: gateway,eureka,key
      label: master
      discovery:
        enabled: true
        serviceId: config
eureka:
  client:
    serviceUrl:
      defaultZone: http://localhost:8888/eureka/
本文的基础框架就搭建到这里,后面将继续搭建基础框架。
第15课:Spring Cloud 实例详解——基础框架搭建(二)
接着上一篇,我们继续来搭建基础框架,本文我们将搭建客户端基础模块,集成熔断器,集成持久层框架 Mybatis。
在上一篇我们已经构建好了配置中心,因此,此后搭建的所有工程都是将配置文件放到 Git 上(点击这里获取本课程配置文件的 Git 仓库地址),通过配置中心将配置文件从 Git 仓库上拉取下来。
客户端基础模块
为了便于应用的可读性,我们在顶级工程下,先创建一个 packaging 为 pom 的工程,命名为 client,然后在 client 下创建我们的客户端模块,如图所示:
client 的 pom 内容如下:
<?xml version="1.0" encoding="UTF-8"?>
<project xmlns="http://maven.apache.org/POM/4.0.0"
         xmlns:xsi="http://www.w3.org/2001/XMLSchema-instance"
         xsi:schemaLocation="http://maven.apache.org/POM/4.0.0 http://maven.apache.org/xsd/maven-4.0.0.xsd">
    <parent>
        <artifactId>news</artifactId>
        <groupId>com.lynn</groupId>
        <version>1.0-SNAPSHOT</version>
    </parent>
    <modelVersion>4.0.0</modelVersion>
    <artifactId>client</artifactId>
    <description>客户端</description>
    <modules>
        <module>index</module>
        <module>article</module>
        <module>comment</module>
        <module>user</module>
    </modules>
    <packaging>pom</packaging>
    <dependencies>
        <dependency>
            <groupId>com.lynn</groupId>
            <artifactId>common</artifactId>
            <version>1.0-SNAPSHOT</version>
        </dependency>
    </dependencies>
</project>
接着继续创建客户端工程:index(首页)、article(文章)、comment(评论)、user(用户)。
我们首先在Git仓库下创建一些公有的 yaml 文件:eureka.yml,代码如下:
eureka:
  instance:
    hostname: ${spring.cloud.client.ipAddress}
    instanceId: ${spring.cloud.client.ipAddress}:${server.port}
然后在每个客户端模块创建启动类,添加以下内容:
@SpringBootApplication
@EnableEurekaClient
public class Application {

    public static void main(String[] args) {
        SpringApplication.run(Application.class,args);
    }
}
最后在每个客户端工程下创建 bootstrap.yml 配置文件,在 Git 仓库创建每个客户端模块自己的配置项,并添加相应的内容。接下来,我们具体看下每个客户端下需要添加的代码内容。
- 首页
首页客户端下 bootstrap.yml 配置文件的代码如下:
spring:
  cloud:
    config:
      name: index,eureka
      label: master
      discovery:
        enabled: true
        serviceId: config
eureka:
  client:
    serviceUrl:
      defaultZone: http://localhost:8888/eureka/
首页配置项 index.yml 中添加如下代码:
server:
  port: 8081
spring:
  application:
    name: index
  profiles:
    active: dev
- 文章
文章客户端下 bootstrap.yml 配置文件的代码如下:
spring:
  cloud:
    config:
      name: article,eureka
      label: master
      discovery:
        enabled: true
        serviceId: config
eureka:
  client:
    serviceUrl:
      defaultZone: http://localhost:8888/eureka/
文章配置项 article.yml 中添加如下代码:
server:
  port: 8082
spring:
  application:
    name: article
  profiles:
    active: dev
- 评论
评论客户端下 bootstrap.yml 配置文件的代码如下:
spring:
  cloud:
    config:
      name: comment,eureka
      label: master
      discovery:
        enabled: true
        serviceId: config
eureka:
  client:
    serviceUrl:
      defaultZone: http://localhost:8888/eureka/
评论配置项 comment.yml 中添加如下代码:
server:
  port: 8083
spring:
  application:
    name: comment
  profiles:
    active: dev
- 用户
用户客户端下 bootstrap.yml 配置文件的代码如下:
spring:
  cloud:
    config:
      name: user,eureka
      label: master
      discovery:
        enabled: true
        serviceId: config
eureka:
  client:
    serviceUrl:
      defaultZone: http://localhost:8888/eureka/
用户配置项 user.yml 中添加如下代码:
server:
  port: 8084
spring:
  application:
    name: user
  profiles:
    active: dev
熔断器
熔断机制可以有效提升应用的健壮性,通过 Hystrix Dashboard 也可以监控 Feign 调用,便于我们随时观察服务的稳定性,因此集成熔断器是很有必要的,本实例将集成 Feign 和 Hystrix 框架。
首先,在 client 的 pom 中加入依赖(因为所有客户端都需要依赖它,所以在 client 中依赖即可),代码如下:
<dependency>
            <groupId>org.springframework.cloud</groupId>
            <artifactId>spring-cloud-starter-feign</artifactId>
        </dependency>
        <dependency>
            <groupId>org.springframework.cloud</groupId>
            <artifactId>spring-cloud-starter-hystrix</artifactId>
        </dependency>
        <dependency>
            <groupId>org.springframework.cloud</groupId>
            <artifactId>spring-cloud-starter-hystrix-dashboard</artifactId>
        </dependency>
        <dependency>
            <groupId>org.springframework.boot</groupId>
            <artifactId>spring-boot-starter-actuator</artifactId>
        </dependency>
接着,在每个客户端模块的启动类中加入注解,代码如下:
@SpringBootApplication
@EnableEurekaClient
@EnableFeignClients
@EnableHystrixDashboard
@EnableCircuitBreaker
public class Application {

    public static void main(String[] args) {
        SpringApplication.run(Application.class,args);
    }
}
我们随便启动一个客户端来看看效果。
依次启动 register、config 和 index,访问地址:http://localhost:8081/hystrix,即可看到如下图所示界面:
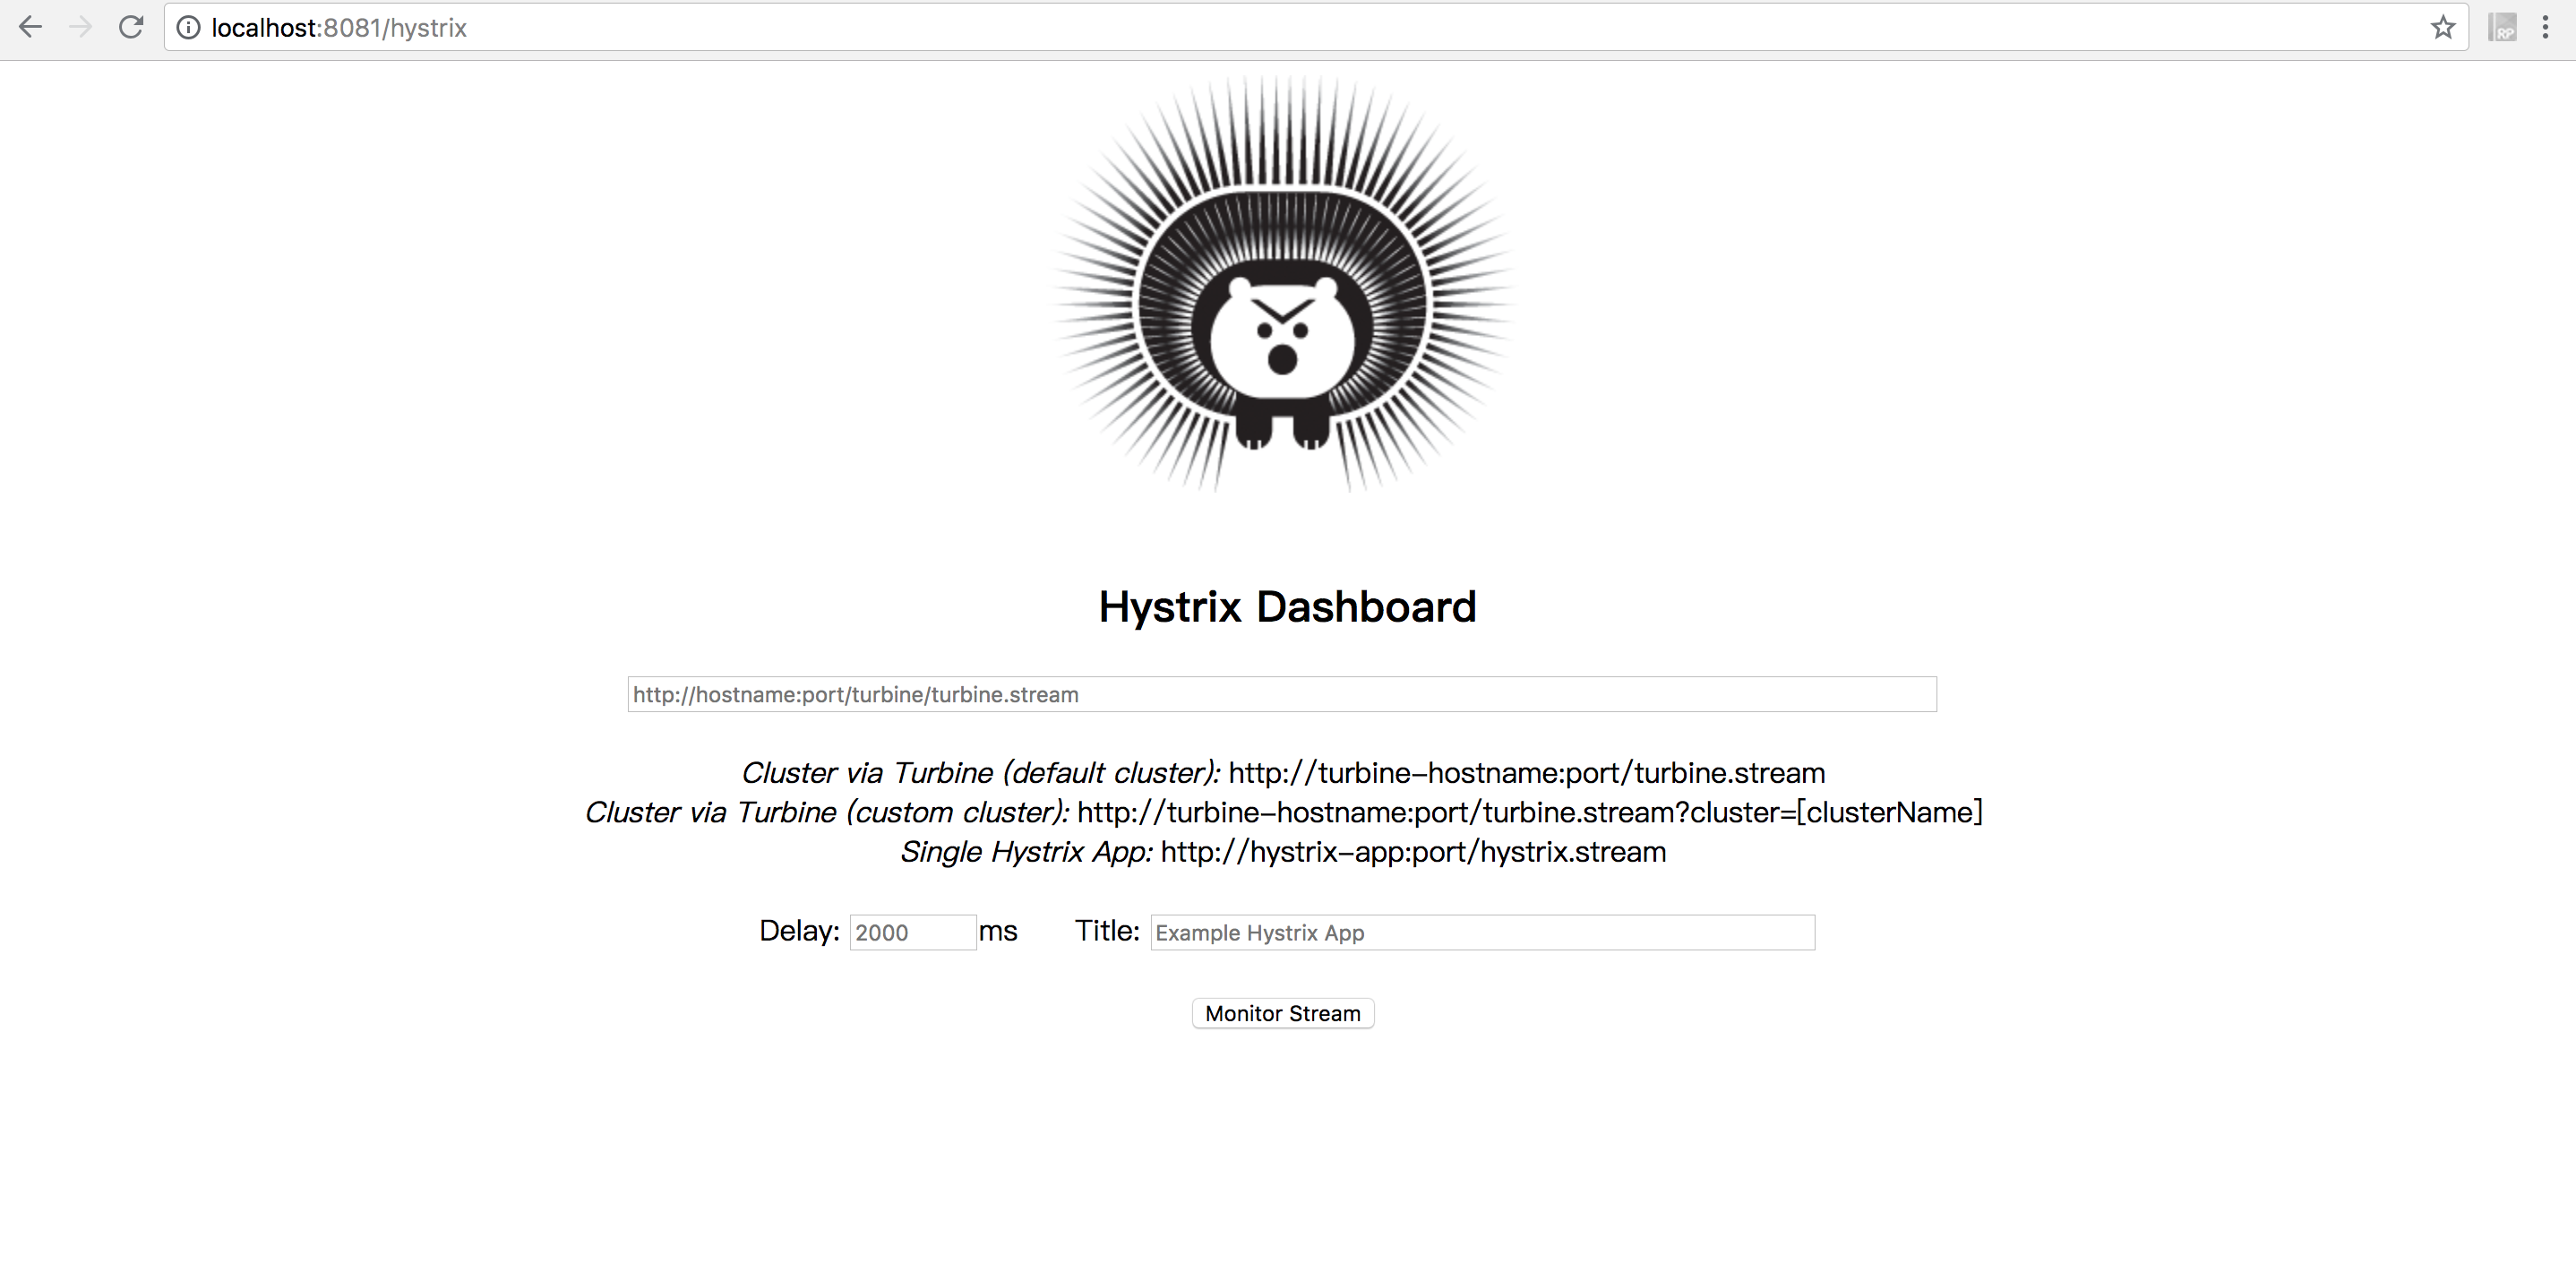
说明我们成功集成了 Hystrix Dashboard。
持久层框架 Mybatis
一个 Web 应用免不了数据库的操作,因此我们继续来集成数据库框架,本应用采取 Mybatis 框架,连接池使用阿里巴巴的 Druid 框架。
首先在 client 下加入依赖:
<dependency>
            <groupId>org.mybatis.spring.boot</groupId>
            <artifactId>mybatis-spring-boot-starter</artifactId>
            <version>1.1.1</version>
        </dependency>
        <dependency>
            <groupId>mysql</groupId>
            <artifactId>mysql-connector-java</artifactId>
            <version>5.1.40</version>
        </dependency>
        <dependency>
            <groupId>com.alibaba</groupId>
            <artifactId>druid-spring-boot-starter</artifactId>
            <version>1.1.10</version>
        </dependency>
然后在 Git 仓库创建配置文件 database.yml:
spring:
  datasource:
    url: jdbc:mysql://localhost:3306/news_db?useUnicode=true&characterEncoding=UTF-8&useSSL=true
    username: root
    password: ******
    type: com.alibaba.druid.pool.DruidDataSource
    druid:
      initial-size: 5
      max-active: 20
      min-idle: 5
      max-wait: 60000
      pool-prepared-statements: true
      max-pool-prepared-statement-per-connection-size: 100
      max-open-prepared-statements: 20
      validation-query: SELECT 1 FROM DUAL
      validation-query-timeout: 30
      test-on-borrow: false
      test-on-return: false
      test-while-idle: true
      time-between-eviction-runs-millis: 60000
      min-evictable-idle-time-millis: 300000
      filters: stat,wall,log4j
      filter:
        stat:
          log-slow-sql: true
          slow-sql-millis: 2000
      web-stat-filter:
        enable: true
      stat-view-servlet:
        enabled: true
        #druid控制台的用户名和密码
        login-username: druid_admin
        login-password: 123456
依次启动 register、config 和 index,然后访问:http://localhost:8081/druid,输入配置文件设置的用户名和密码,即可进入如下界面:
第16课:Spring Cloud 实例详解——基础框架搭建(三)
本文我们将集成 Redis,实现 API 鉴权机制。
Redis 的集成
Spring Boot 集成 Redis 相当简单,只需要在 pom 里加入如下依赖即可:
<dependency>
            <groupId>org.springframework.boot</groupId>
            <artifactId>spring-boot-starter-data-redis</artifactId>
        </dependency>
由于每个模块都可能用到 Redis,因此我们可以考虑将 Redis 的依赖放到 common 工程下:
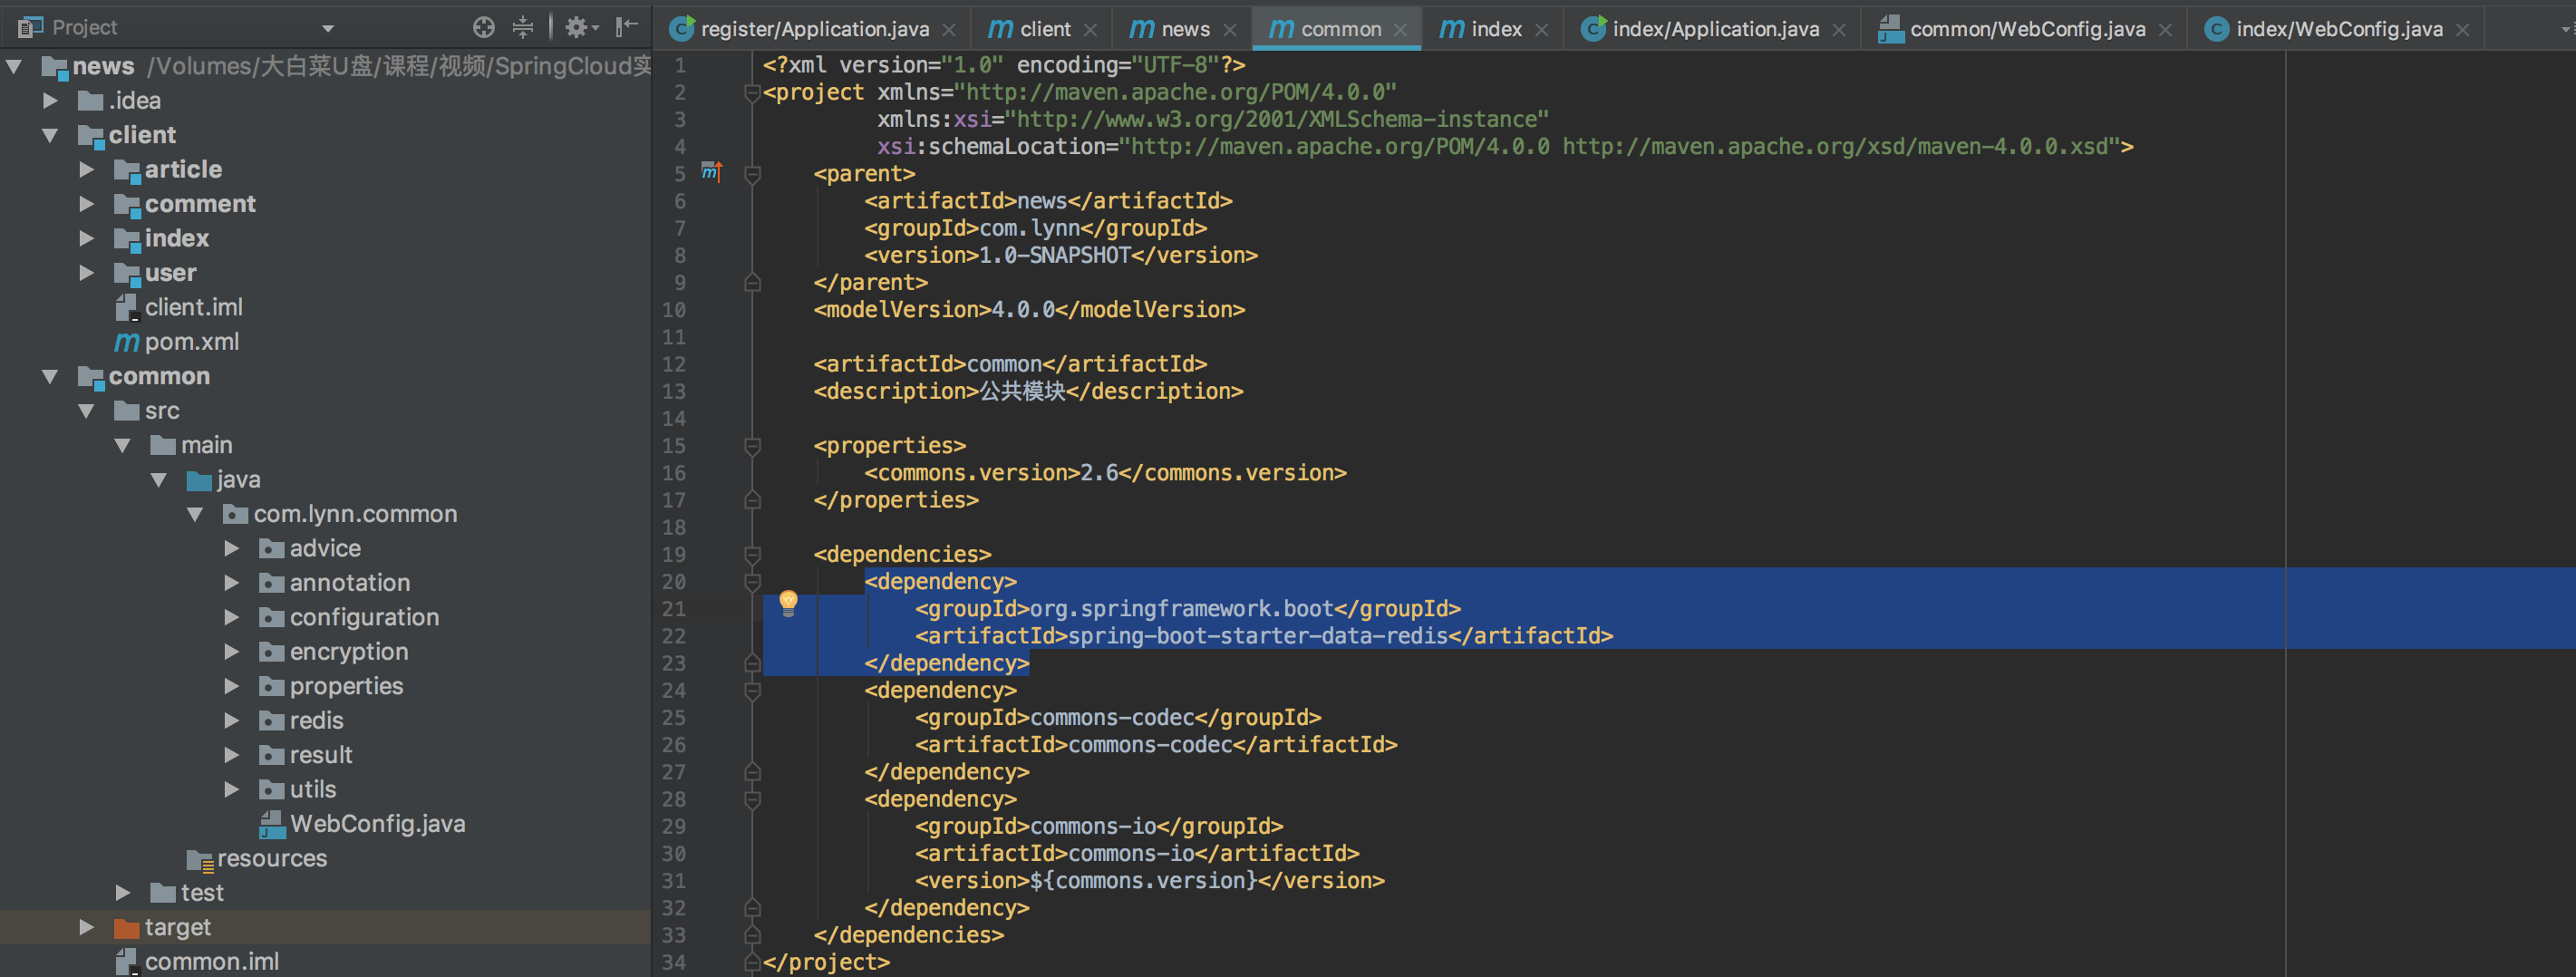
然后创建一个类实现基本的 Redis 操作:
@Component
public class Redis {

    @Autowired
    private StringRedisTemplate template;

    /**
     * expire为过期时间,秒为单位
     *
     * @param key
     * @param value
     * @param expire
     */
    public void set(String key, String value, long expire) {
        template.opsForValue().set(key, value, expire, TimeUnit.SECONDS);
    }

    public void set(String key, String value) {
        template.opsForValue().set(key, value);
    }

    public Object get(String key) {
        return template.opsForValue().get(key);
    }

    public void delete(String key) {
        template.delete(key);
    }
}
如果具体的模块需要操作 Redis 还需要在配置文件配置 Redis 的连接信息,这里我们在 Git 仓库创建一个 yaml 文件 redis.yaml,并加入以下内容:
spring:
  redis:
    host: localhost
    port: 6379
    password:
最后在需要操作 Redis 的工程的 bootstrap.yml 文件中加上 Redis 配置文件名即可,如下:
spring:
  cloud:
    config:
      #这里加入redis
      name: user,eureka,feign,database,redis,key
      label: master
      discovery:
        enabled: true
        serviceId: config
eureka:
  client:
    serviceUrl:
      defaultZone: http://localhost:8888/eureka/
这样在工程想操作 Redis 的地方注入 Redis 类:
@Autowired
    private Redis redis;
但这样启动工程会报错,原因是 CommonScan 默认从工程根目录开始扫描,我们工程的根包名是:com.lynn.xxx(其中 xxx 为工程名),而 Redis 类在 com.lynn.common 下,因此我们需要手动指定开始扫描的包名,我们发现二者都有 com.lynn,所以指定为 comm.lynn 即可。
在每个工程的 Application 类加入如下注解:
@SpringBootApplication
@EnableEurekaClient
@EnableFeignClients
@EnableHystrixDashboard
@EnableCircuitBreaker
@ComponentScan(basePackages = "com.lynn")
public class Application {

    public static void main(String[] args) {
        SpringApplication.run(Application.class,args);
    }
}
API 鉴权
互联网发展至今,已由传统的前后端统一架构演变为如今的前后端分离架构,最初的前端网页大多由 JSP、ASP、PHP 等动态网页技术生成,前后端十分耦合,也不利于扩展。现在的前端分支很多,如 Web 前端、Android 端、iOS 端,甚至还有物联网等。前后端分离的好处就是后端只需要实现一套界面,所有前端即可通用。
前后端的传输通过 HTTP 进行传输,也带来了一些安全问题,如果抓包、模拟请求、洪水攻击、参数劫持、网络爬虫等等。如何对非法请求进行有效拦截,保护合法请求的权益是这篇文章需要讨论的。
我依据多年互联网后端开发经验,总结出了以下提升网络安全的方式:
- 采用 HTTPS 协议;
- 密钥存储到服务端而非客户端,客户端应从服务端动态获取密钥;
- 请求隐私接口,利用 Token 机制校验其合法性;
- 对请求参数进行合法性校验;
- 对请求参数进行签名认证,防止参数被篡改;
- 对输入输出参数进行加密,客户端加密输入参数,服务端加密输出参数。
接下来,将对以上方式展开做详细说明。
HTTP VS HTTPS
普通的 HTTP 协议是以明文形式进行传输,不提供任何方式的数据加密,很容易解读传输报文。而 HTTPS 协议在 HTTP 基础上加入了 SSL 层,而 SSL 层通过证书来验证服务器的身份,并为浏览器和服务器之间的通信加密,保护了传输过程中的数据安全。
动态密钥的获取
对于可逆加密算法,是需要通过密钥进行加解密,如果直接放到客户端,那么很容易反编译后拿到密钥,这是相当不安全的做法,因此考虑将密钥放到服务端,由服务端提供接口,让客户端动态获取密钥,具体做法如下:
- 客户端先通过 RSA 算法生成一套客户端的公私钥对(clientPublicKey 和 clientPrivateKey);
- 调用 getRSA 接口,服务端会返回 serverPublicKey;
- 客户端拿到 serverPublicKey 后,用 serverPublicKey 作为公钥,clientPublicKey 作为明文对 clientPublicKey 进行 RSA 加密,调用 getKey 接口,将加密后的 clientPublicKey 传给服务端,服务端接收到请求后会传给客户端 RSA 加密后的密钥;
- 客户端拿到后以 clientPrivateKey 为私钥对其解密,得到最终的密钥,此流程结束。
注: 上述提到数据均不能保存到文件里,必须保存到内存中,因为只有保存到内存中,黑客才拿不到这些核心数据,所以每次使用获取的密钥前先判断内存中的密钥是否存在,不存在,则需要获取。
为了便于理解,我画了一个简单的流程图:

那么具体是如何实现的呢,请看下面的代码(同样地,我们将这些公用方法放到 common 类库下)。
全局密钥配置,故加密算法统一密钥
api:
  encrypt:
    key: d7b85c6e414dbcda
此配置的公司钥信息为测试数据,不能直接使用,请自行重新生成公私钥。
rsa:
  publicKey: MIGfMA0GCSqGSIb3DQEBAQUAA4GNADCBiQKBgQCcZlkHaSN0fw3CWGgzcuPeOKPdNKHdc2nR6KLXazhhzFhe78NqMrhsyNTf3651acS2lADK3CzASzH4T0bT+GnJ77joDOP+0SqubHKwAIv850lT0QxS+deuUHg2+uHYhdhIw5NCmZ0SkNalw8igP1yS+2TEIYan3lakPBvZISqRswIDAQAB
  privateKey: MIICeAIBADANBgkqhkiG9w0BAQeFAcSCAmIwggJeAgEAAoGBAJxmWQdpI3R/DcJYaDNy4944o900od1zadHootdrOGHMWF7vw2oyuGzI1N/frmxoVLaUAMrcLMBLMfhPRtP4acnvuOgM4/7RKq5scrAAi/znSVPRDFL5165QeDb64diF2EjDk0KZnRKQ1qXDyKA/XJL7ZMQhhqfeVqQ8G9khKpGzAgMBAAECgYEAj+5AkGlZj6Q9bVUez/ozahaF9tSxAbNs9xg4hDbQNHByAyxzkhALWVGZVk3rnyiEjWG3OPlW1cBdxD5w2DIMZ6oeyNPA4nehYrf42duk6AI//vd3GsdJa6Dtf2has1R+0uFrq9MRhfRunAf0w6Z9zNbiPNSd9VzKjjSvcX7OTsECQQD20kekMToC6LZaZPr1p05TLUTzXHvTcCllSeXWLsjVyn0AAME17FJRcL9VXQuSUK7PQ5Lf5+OpjrCRYsIvuZg9AkEAojdC6k3SqGnbtftLfGHMDn1fe0nTJmL05emwXgJvwToUBdytvgbTtqs0MsnuaOxMIMrBtpbhS6JiB5Idb7GArwJAfKTkmP5jFWT/8dZdBgFfhJGv6FakEjrqLMSM1QT7VzvStFWtPNYDHC2b8jfyyAkGvpSZb4ljZxUwBbuh5QgM4QJBAJDrV7+lOP62W9APqdd8M2X6gbPON3JC09EW3jaObLKupTa7eQicZsX5249IMdLQ0A43tanez3XXo0ZqNhwT8wcCQQDUubpNLwgAwN2X7kW1btQtvZW47o9CbCv+zFKJYms5WLrVpotjkrCgPeuloDAjxeHNARX8ZTVDxls6KrjLH3lT
 <dependency>
            <groupId>commons-codec</groupId>
            <artifactId>commons-codec</artifactId>
        </dependency>
        <dependency>
            <groupId>commons-io</groupId>
            <artifactId>commons-io</artifactId>
            <version>2.6</version>
        </dependency>
public class AesEncryptUtils {

    private static final String KEY = "d7585fde114abcda";
    private static final String ALGORITHMSTR = "AES/CBC/NoPadding";    public static String base64Encode(byte[] bytes) {        return Base64.encodeBase64String(bytes);
    }    public static byte[] base64Decode(String base64Code) throws Exception {        return Base64.decodeBase64(base64Code);
    }    public static byte[] aesEncryptToBytes(String content, String encryptKey) throws Exception {
        KeyGenerator kgen = KeyGenerator.getInstance("AES");
        kgen.init(128);
        Cipher cipher = Cipher.getInstance(ALGORITHMSTR);
        cipher.init(Cipher.ENCRYPT_MODE, new SecretKeySpec(encryptKey.getBytes(), "AES"));        return cipher.doFinal(content.getBytes("utf-8"));
    }    public static String aesEncrypt(String content, String encryptKey) throws Exception {        return base64Encode(aesEncryptToBytes(content, encryptKey));
    }    public static String aesDecryptByBytes(byte[] encryptBytes, String decryptKey) throws Exception {
        KeyGenerator kgen = KeyGenerator.getInstance("AES");
        kgen.init(128);
        Cipher cipher = Cipher.getInstance(ALGORITHMSTR);
        cipher.init(Cipher.DECRYPT_MODE, new SecretKeySpec(decryptKey.getBytes(), "AES"));        byte[] decryptBytes = cipher.doFinal(encryptBytes);        return new String(decryptBytes);
    }    public static String aesDecrypt(String encryptStr, String decryptKey) throws Exception {        return aesDecryptByBytes(base64Decode(encryptStr), decryptKey);
    }    public static void main(String[] args) throws Exception {
        String content = "{name:\"lynn\",id:1}";
        System.out.println("加密前:" + content);

        String encrypt = aesEncrypt(content, KEY);
        System.out.println(encrypt.length() + ":加密后:" + encrypt);

        String decrypt = aesDecrypt("H9pGuDMV+iJoS8YSfJ2Vx0NYN7v7YR0tMm1ze5zp0WvNEFXQPM7K0k3IDUbYr5ZIckTkTHcIX5Va/cstIPrYEK3KjfCwtOG19l82u+x6soa9FzAtdL4EW5HAFMmpVJVyG3wz/XUysIRCwvoJ20ruEwk07RB3ojc1Vtns8t4kKZE=", "d7b85f6e214abcda");
        System.out.println("解密后:" + decrypt);
    }
}public class RSAUtils {

    public static final String CHARSET = "UTF-8";    public static final String RSA_ALGORITHM = "RSA";    public static Map<String, String> createKeys(int keySize){        //为RSA算法创建一个KeyPairGenerator对象
        KeyPairGenerator kpg;        try{
            kpg = KeyPairGenerator.getInstance(RSA_ALGORITHM);
        }catch(NoSuchAlgorithmException e){            throw new IllegalArgumentException("No such algorithm-->[" + RSA_ALGORITHM + "]");
        }        //初始化KeyPairGenerator对象,密钥长度
        kpg.initialize(keySize);        //生成密匙对
        KeyPair keyPair = kpg.generateKeyPair();        //得到公钥
        Key publicKey = keyPair.getPublic();
        String publicKeyStr = Base64.encodeBase64String(publicKey.getEncoded());        //得到私钥
        Key privateKey = keyPair.getPrivate();
        String privateKeyStr = Base64.encodeBase64String(privateKey.getEncoded());
        Map<String, String> keyPairMap = new HashMap<>(2);
        keyPairMap.put("publicKey", publicKeyStr);
        keyPairMap.put("privateKey", privateKeyStr);        return keyPairMap;
    }    /**
     * 得到公钥
     * @param publicKey 密钥字符串(经过base64编码)
     * @throws Exception
     */
    public static RSAPublicKey getPublicKey(String publicKey) throws NoSuchAlgorithmException, InvalidKeySpecException {        //通过X509编码的Key指令获得公钥对象
        KeyFactory keyFactory = KeyFactory.getInstance(RSA_ALGORITHM);
        X509EncodedKeySpec x509KeySpec = new X509EncodedKeySpec(Base64.decodeBase64(publicKey));
        RSAPublicKey key = (RSAPublicKey) keyFactory.generatePublic(x509KeySpec);        return key;
    }    /**
     * 得到私钥
     * @param privateKey 密钥字符串(经过base64编码)
     * @throws Exception
     */
    public static RSAPrivateKey getPrivateKey(String privateKey) throws NoSuchAlgorithmException, InvalidKeySpecException {        //通过PKCS#8编码的Key指令获得私钥对象
        KeyFactory keyFactory = KeyFactory.getInstance(RSA_ALGORITHM);
        PKCS8EncodedKeySpec pkcs8KeySpec = new PKCS8EncodedKeySpec(Base64.decodeBase64(privateKey));
        RSAPrivateKey key = (RSAPrivateKey) keyFactory.generatePrivate(pkcs8KeySpec);        return key;
    }    /**
     * 公钥加密
     * @param data
     * @param publicKey
     * @return
     */
    public static String publicEncrypt(String data, RSAPublicKey publicKey){        try{
            Cipher cipher = Cipher.getInstance(RSA_ALGORITHM);
            cipher.init(Cipher.ENCRYPT_MODE, publicKey);            return Base64.encodeBase64String(rsaSplitCodec(cipher, Cipher.ENCRYPT_MODE, data.getBytes(CHARSET), publicKey.getModulus().bitLength()));
        }catch(Exception e){            throw new RuntimeException("加密字符串[" + data + "]时遇到异常", e);
        }
    }    /**
     * 私钥解密
     * @param data
     * @param privateKey
     * @return
     */

    public static String privateDecrypt(String data, RSAPrivateKey privateKey){        try{
            Cipher cipher = Cipher.getInstance(RSA_ALGORITHM);
            cipher.init(Cipher.DECRYPT_MODE, privateKey);            return new String(rsaSplitCodec(cipher, Cipher.DECRYPT_MODE, Base64.decodeBase64(data), privateKey.getModulus().bitLength()), CHARSET);
        }catch(Exception e){            throw new RuntimeException("解密字符串[" + data + "]时遇到异常", e);
        }
    }    /**
     * 私钥加密
     * @param data
     * @param privateKey
     * @return
     */

    public static String privateEncrypt(String data, RSAPrivateKey privateKey){        try{
            Cipher cipher = Cipher.getInstance(RSA_ALGORITHM);
            cipher.init(Cipher.ENCRYPT_MODE, privateKey);            return Base64.encodeBase64String(rsaSplitCodec(cipher, Cipher.ENCRYPT_MODE, data.getBytes(CHARSET), privateKey.getModulus().bitLength()));
        }catch(Exception e){            throw new RuntimeException("加密字符串[" + data + "]时遇到异常", e);
        }
    }    /**
     * 公钥解密
     * @param data
     * @param publicKey
     * @return
     */

    public static String publicDecrypt(String data, RSAPublicKey publicKey){        try{
            Cipher cipher = Cipher.getInstance(RSA_ALGORITHM);
            cipher.init(Cipher.DECRYPT_MODE, publicKey);            return new String(rsaSplitCodec(cipher, Cipher.DECRYPT_MODE, Base64.decodeBase64(data), publicKey.getModulus().bitLength()), CHARSET);
        }catch(Exception e){            throw new RuntimeException("解密字符串[" + data + "]时遇到异常", e);
        }
    }    private static byte[] rsaSplitCodec(Cipher cipher, int opmode, byte[] datas, int keySize){        int maxBlock = 0;        if(opmode == Cipher.DECRYPT_MODE){
            maxBlock = keySize / 8;
        }else{
            maxBlock = keySize / 8 - 11;
        }
        ByteArrayOutputStream out = new ByteArrayOutputStream();        int offSet = 0;        byte[] buff;        int i = 0;        try{            while(datas.length > offSet){                if(datas.length-offSet > maxBlock){
                    buff = cipher.doFinal(datas, offSet, maxBlock);
                }else{
                    buff = cipher.doFinal(datas, offSet, datas.length-offSet);
                }
                out.write(buff, 0, buff.length);
                i++;
                offSet = i * maxBlock;
            }
        }catch(Exception e){            throw new RuntimeException("加解密阀值为["+maxBlock+"]的数据时发生异常", e);
        }        byte[] resultDatas = out.toByteArray();
        IOUtils.closeQuietly(out);        return resultDatas;
    }    public static void main(String[] args) throws Exception{
        Map<String, String> keyMap = RSAUtils.createKeys(1024);
        String  publicKey = keyMap.get("publicKey");
        String  privateKey = "MIICeAIBADANBgkqhkiG9w0BAQEFAASCAmIwggJeAgEAAoGBAJxmWQdpI3R/DcJYaDNy4944o900od1zadHootdrOGHMWF7vw2oyuGzI1N/frmxoVLaUAMrcLMBLMfhPRtP4acnvuOgM4/7RKq5scrAAi/znSVPRDFL5165QeDb64diF2EjDk0KZnRKQ1qXDyKA/XJL7ZMQhhqfeVqQ8G9khKpGzAgMBAAECgYEAj+5AkGlZj6Q9bVUez/ozahaF9tSxAbNs9xg4hDbQNHByAyxzkhALWVGZVk3rnyiEjWG3OPlW1cBdxD5w2DIMZ6oeyNPA4nehYrf42duk6AI//vd3GsdJa6Dtf2has1R+0uFrq9MRhfRunAf0w6Z9zNbiPNSd9VzKjjSvcX7OTsECQQD20kekMToC6LZaZPr1p05TLUTzXHvTcCllSeXWLsjVyn0AAME17FJRcL9VXQuSUK7PQ5Lf5+OpjrCRYsIvuZg9AkEAojdC6k3SqGnbtftLfGHMDn1fe0nTJmL05emwXgJvwToUBdytvgbTtqs0MsnuaOxMIMrBtpbhS6JiB5Idb7GArwJAfKTkmP5jFWT/8dZdBgFfhJGv6FYkEjrqLMSM1QT7VzvStFWtPNYDHC2b8jfyyAkGvpSZb4ljZxUwBbuh5QgM4QJBAJDrV7+lOP62W9APqdd8M2X6gbPON3JC09EW3jaObLKupTa7eQicZsX5249IMdLQ0A43tanez3XXo0ZqNhwT8wcCQQDUubpNLwgAwN2X7kW1btQtvZW47o9CbCv+zFKJYms5WLrVpotjkrCgPeuloDAjxeHNARX8ZTVDxls6KrjLH3lT";
        System.out.println("公钥: \n\r" + publicKey);
        System.out.println("私钥: \n\r" + privateKey);

        System.out.println("公钥加密——私钥解密");
        String str = "站在大明门前守卫的禁卫军,事先没有接到\n" +                "有关的命令,但看到大批盛装的官员来临,也就\n" +                "以为确系举行大典,因而未加询问。进大明门即\n" +                "为皇城。文武百官看到端门午门之前气氛平静,\n" +                "城楼上下也无朝会的迹象,既无几案,站队点名\n" +                "的御史和御前侍卫“大汉将军”也不见踪影,不免\n" +                "心中揣测,互相询问:所谓午朝是否讹传?";
        System.out.println("\r明文:\r\n" + str);
        System.out.println("\r明文大小:\r\n" + str.getBytes().length);
        String encodedData = RSAUtils.publicEncrypt(str, RSAUtils.getPublicKey(publicKey));
        System.out.println("密文:\r\n" + encodedData);
        String decodedData = RSAUtils.privateDecrypt("X4hHPa9NjPd5QJGPus+4+hWmOzbWg7oCJ1+Vc+7dHW81nEhkYnJpFyV5xcDkg70N2Mym+YAJ1PvYY9sQWf9/EkUE61TpUKBmDaGWLjEr3A1f9cKIelqLKLsJGdXEOr7Z55k4vYFvA7N3Vf5KQo3NrouvIT4wR+SjH4tDQ8tNh3JH8BvXLtXqGa2TCK2z1AzHNgYzcLCrqDasd7UDHRPZPiW4thktM/whjBn0tU9B/kKjAjLuYttKLEmy5nT7v7u16aZ6ehkk+kzvuCXF%2B3RsqraISDPbsTki2agJyqsycRx3w7CvKRyUbZhFaNcWigOwmcbZVoiom+ldh7Vh6HYqDA==", RSAUtils.getPrivateKey(privateKey));
        System.out.println("解密后文字: \r\n" + decodedData);

    }
}/**
 * 私钥输入参数(其实就是客户端通过服务端返回的公钥加密后的客户端自己生成的公钥)
 */public class KeyRequest {

    /**
     * 客户端自己生成的加密后公钥
     */
    @NotNull
    private String clientEncryptPublicKey;    public String getClientEncryptPublicKey() {        return clientEncryptPublicKey;
    }    public void setClientEncryptPublicKey(String clientEncryptPublicKey) {        this.clientEncryptPublicKey = clientEncryptPublicKey;
    }
}/**
 * RSA生成的公私钥输出参数
 */public class RSAResponse extends BaseResponse{

    private String serverPublicKey;    private String serverPrivateKey;    public static class Builder{
        private String serverPublicKey;        private String serverPrivateKey;        public Builder setServerPublicKey(String serverPublicKey){            this.serverPublicKey = serverPublicKey;            return this;
        }        public Builder setServerPrivateKey(String serverPrivateKey){            this.serverPrivateKey = serverPrivateKey;            return this;
        }        public RSAResponse build(){            return new RSAResponse(this);
        }

    }    public static Builder options(){        return new Builder();
    }    public RSAResponse(Builder builder){        this.serverPrivateKey = builder.serverPrivateKey;        this.serverPublicKey = builder.serverPublicKey;
    }    public String getServerPrivateKey() {        return serverPrivateKey;
    }    public String getServerPublicKey() {        return serverPublicKey;
    }
}/**
 * 私钥输出参数
 */public class KeyResponse extends BaseResponse{

    /**
     * 整个系统所有加密算法共用的密钥
     */
    private String key;    public static class Builder{
        private String key;        public Builder setKey(String key){            this.key = key;            return this;
        }        public KeyResponse build(){            return new KeyResponse(this);
        }
    }    public static Builder options(){        return new Builder();
    }    private KeyResponse(Builder builder){        this.key = builder.key;
    }    public String getKey() {        return key;
    }

}/**
 * API传输加解密相关接口
 */public interface EncryptOpenService {

    /**
     * 生成RSA公私钥
     * @return
     */
    SingleResult<RSAResponse> getRSA();    /**
     * 获得加解密用的密钥
     * @param request
     * @return
     */
    SingleResult<KeyResponse> getKey(KeyRequest request) throws Exception;
}
@Servicepublic class EncryptOpenServiceImpl implements EncryptOpenService{

    @Value("${rsa.publicKey}")    private String publicKey;    @Value("${rsa.privateKey}")    private String privateKey;    @Value("${api.encrypt.key}")    private String key;    @Override
    public SingleResult<RSAResponse> getRSA() {
        RSAResponse response = RSAResponse.options()
                .setServerPublicKey(publicKey)
                .build();        return SingleResult.buildSuccess(response);
    }    @Override
    public SingleResult<KeyResponse> getKey(KeyRequest request)throws Exception {
        String clientPublicKey = RSAUtils.privateDecrypt(request.getClientEncryptPublicKey(), RSAUtils.getPrivateKey(privateKey));
        String encryptKey = RSAUtils.publicEncrypt(key,RSAUtils.getPublicKey(clientPublicKey));
        KeyResponse response = KeyResponse.options()
                .setKey(encryptKey)
                .build();        return SingleResult.buildSuccess(response);
    }
}
@RestController
@RequestMapping("open/encrypt")
public class EncryptController {

    @Autowired
    private EncryptOpenService encryptOpenService;
    @RequestMapping(value = "getRSA",method = RequestMethod.POST)    //@DisabledEncrypt
    public SingleResult<RSAResponse> getRSA(){
        return encryptOpenService.getRSA();
    }
    @RequestMapping(value = "getKey",method = RequestMethod.POST)    //@DisabledEncrypt
    public SingleResult<KeyResponse> getKey(@Valid @RequestBody KeyRequest request)throws Exception{
        return encryptOpenService.getKey(request);
    }
}
接口请求的合法性校验
对于一些隐私接口(即必须要登录才能调用的接口),我们需要校验其合法性,即只有登录用户才能成功调用,具体思路如下:
- 调用登录或注册接口成功后,服务端会返回 Token(设置较短有效时间)和 refreshToken(设定较长有效时间);
- 隐私接口每次请求接口在请求头带上 Token,如 header(“token”,token),若服务端 返回403错误,则调用 refreshToken 接口获取新的 Token 重新调用接口,若 refreshToken 接口继续返回403,则跳转到登录界面。
这种算法较为简单,这里就不写出具体实现了。
输入参数的合法性校验
一般情况下,客户端会进行参数的合法性校验,这个只是为了减轻服务端的压力,针对于普通用户做的校验,如果黑客通过直接调用接口地址,就可绕过客户端的校验,这时要求我们服务端也应该做同样的校验。
SpringMVC 提供了专门用于校验的注解,我们通过 AOP 即可实现统一的参数校验,下面请看代码:
<dependency>
            <groupId>org.springframework.boot</groupId>
            <artifactId>spring-boot-starter-aop</artifactId>
        </dependency>
@Aspect
@Component
public class WebExceptionAspect {

    private static final Logger logger = LoggerFactory.getLogger(WebExceptionAspect.class);    //凡是注解了RequestMapping的方法都被拦截
    @Pointcut("@annotation(org.springframework.web.bind.annotation.RequestMapping)")    private void webPointcut() {
    }    /**
     * 拦截web层异常,记录异常日志,并返回友好信息到前端 目前只拦截Exception,是否要拦截Error需再做考虑
     *
     * @param e
     *            异常对象
     */
    @AfterThrowing(pointcut = "webPointcut()", throwing = "e")    public void handleThrowing(Exception e) {
        e.printStackTrace();
        logger.error("发现异常!" + e.getMessage());
        logger.error(JSON.toJSONString(e.getStackTrace()));        try {            if(StringUtils.isEmpty(e.getMessage())){
                writeContent(JSON.toJSONString(SingleResult.buildFailure()));
            }else {
                writeContent(JSON.toJSONString(SingleResult.buildFailure(Code.ERROR,e.getMessage())));
            }
        }catch (Exception ex){
            ex.printStackTrace();
        }
    }    /**
     * 将内容输出到浏览器
     *
     * @param content
     *            输出内容
     */
    private void writeContent(String content)throws Exception {
        HttpServletResponse response = ((ServletRequestAttributes) RequestContextHolder.getRequestAttributes())
                .getResponse();
        response.reset();
        response.setCharacterEncoding("UTF-8");
        response.setHeader("Content-Type", "text/plain;charset=UTF-8");
        response.setHeader("icop-content-type", "exception");
        response.getWriter().print(content);
        response.getWriter().close();
    }
}
在controller提供共有方法:

protected void validate(BindingResult result){
        if(result.hasFieldErrors()){
            List<FieldError> errorList = result.getFieldErrors();
            errorList.stream().forEach(item -> Assert.isTrue(false,item.getDefaultMessage()));
        }
    }
每个接口的输入参数都需要加上 @Valid 注解,并且在参数后面加上 BindResult 类:
@RequestMapping(value = "/hello",method = RequestMethod.POST)
public SingleResult<String> hello(@Valid @RequestBody TestRequest request, BindingResult result){
        validate(result);        r
        eturn "name="+name;

public class TestRequest{

    @NotNull(message = "name不能为空")    private String name;    public String getName() {        return name;
    }    public void setName(String name) {        this.name = name;
    }
}
输入参数签名认证
我们请求的接口是通过 HTTP/HTTPS 传输的,一旦参数被拦截,很有可能被黑客篡改,并传回给服务端,为了防止这种情况发生,我们需要对参数进行签名认证,保证传回的参数是合法性,具体思路如下。
请求接口前,将 Token、Timstamp 和接口需要的参数按照 ASCII 升序排列,拼接成 url=key1=value1&key2=value2,如 name=xxx×tamp=xxx&token=xxx,进行 MD5(url+salt),得到 Signature,将 Token、Signature、Timestamp 放到请求头传给服务端,如 header(“token”,token)、header(“timestamp”,timestamp),header(“signature”,signature)。
注: salt 即为动态获取的密钥。
下面请看具体的实现,应该在拦截器里统一处理:
public class ApiInterceptor implements HandlerInterceptor {

    private static final Logger logger = LoggerFactory.getLogger(ApiInterceptor.class);    private String salt="ed4ffcd453efab32";    @Override
    public boolean preHandle(HttpServletRequest request, HttpServletResponse response, Object o) throws Exception {
        logger.info("进入拦截器");
        request.setCharacterEncoding("UTF-8");
        response.setCharacterEncoding("UTF-8");
        response.setHeader("Content-Type", "application/json;charset=utf8");
        StringBuilder urlBuilder = getUrlAuthenticationApi(request);        //这里是MD5加密算法
        String sign = MD5(urlBuilder.toString() + salt);
        String signature = request.getHeader("signature");
        logger.info("加密前传入的签名" + signature);
        logger.info("后端加密后的签名" + sign);        if(sign.equals(signature)){            return true;
        }else {            //签名错误
          response.getWriter().print("签名错误");
            response.getWriter().close();            return false;
        }
    }    private StringBuilder getUrlAuthenticationApi(HttpServletRequest request) {
        Enumeration<String> paramesNames = request.getParameterNames();
        List<String> nameList = new ArrayList<>();
        nameList.add("token");
        nameList.add("timestamp");        while (paramesNames.hasMoreElements()){
            nameList.add(paramesNames.nextElement());
        }
        StringBuilder urlBuilder = new StringBuilder();
        nameList.stream().sorted().forEach(name -> {            if ("token".equals(name) || "timestamp".equals(name)){                if("token".equals(name) && null ==request.getHeader(name)){                    return;
                }
                urlBuilder.append('&');
                urlBuilder.append(name).append('=').append(request.getHeader(name));
            }            else {
                urlBuilder.append('&');
                urlBuilder.append(name).append('=').append(request.getParameter(name));
            }
        });
        urlBuilder.deleteCharAt(0);
        logger.info("url : " + urlBuilder.toString());        return urlBuilder;
    }    @Override
    public void postHandle(HttpServletRequest httpServletRequest, HttpServletResponse httpServletResponse, Object o, ModelAndView modelAndView) throws Exception {

    }    @Override
    public void afterCompletion(HttpServletRequest httpServletRequest, HttpServletResponse httpServletResponse, Object o, Exception e) throws Exception {

    }
}
输入输出参数加密
为了保护数据,比如说防爬虫,需要对输入输出参数进行加密,客户端加密输入参数传回服务端,服务端解密输入参数执行请求;服务端返回数据时对其加密,客户端拿到数据后解密数据,获取最终的数据。这样,即便别人知道了参数地址,也无法模拟请求数据。
至此,基础框架就已经搭建完成,下篇我们将开始实现具体的需求。
第17课:Spring Cloud 实例详解——业务代码实现
本文开始,我们将实现具体的业务,由于篇幅问题,本文将贴出部分实例代码,其余会提供一般思路。
公共模块
我们的接口会分别放在不同的工程下,其中会有公共代码,在此我们考虑将公共代码抽象出来放到公共模块 common 下。
Bean
我们提供的接口分为输入参数(request)和输出参数(response),输入参数为客户端请求时传入,输出参数为后端接口返回的数据。我们在定义接口时最好将输入参数和输出参数放到 request 和 response 包下,在定义的 Bean 下抽象出 Base 类来,如下代码:
package com.lynn.common.model;

public abstract class BaseModel {

    private Long id;

    public Long getId() {
        return id;
    }

    public void setId(Long id) {
        this.id = id;
    }
}
package com.lynn.common.model.response;

import com.lynn.common.model.BaseModel;

public abstract class BaseResponse extends BaseModel{

}
package com.lynn.common.model.request;

public abstract class BaseRequest {
}
Service和Controller
同样地,我们也可以定义出 BaseService 和 BaseController,在 BaseService 中实现公共方法:
package com.lynn.common.service;

import com.lynn.common.encryption.Algorithm;
import com.lynn.common.encryption.MessageDigestUtils;

public abstract class BaseService {

    /**
     * 密码加密算法
     * @param password
     * @return
     */
    protected String encryptPassword(String password){
        return MessageDigestUtils.encrypt(password, Algorithm.SHA1);
    }

    /**
     * 生成API鉴权的Token
     * @param mobile
     * @param password
     * @return
     */
    protected String getToken(String mobile,String password){
        return MessageDigestUtils.encrypt(mobile+password, Algorithm.SHA1);
    }
}
我们也可以在 BaseController 里写公共方法:
package com.lynn.common.controller;

import org.springframework.util.Assert;
import org.springframework.validation.BindingResult;
import org.springframework.validation.FieldError;

import java.util.List;

public abstract class BaseController {

    /**
     * 接口输入参数合法性校验
     *
     * @param result
     */
    protected void validate(BindingResult result){
        if(result.hasFieldErrors()){
            List<FieldError> errorList = result.getFieldErrors();
            errorList.stream().forEach(item -> Assert.isTrue(false,item.getDefaultMessage()));
        }
    }
}
接下来,我们就可以来实现具体的业务了。
用户模块
根据第14课提供的原型设计图,我们可以分析出,用户模块大概有如下几个接口:
- 登录
- 注册
- 获得用户评论
接下来我们来实现具体的业务(以登录为例),首先是 Bean:
package com.lynn.user.model.bean;

import com.lynn.common.model.BaseModel;

public class UserBean extends BaseModel{

    private String mobile;

    private String password;

    public String getMobile() {
        return mobile;
    }

    public void setMobile(String mobile) {
        this.mobile = mobile;
    }

    public String getPassword() {
        return password;
    }

    public void setPassword(String password) {
        this.password = password;
    }
}
package com.lynn.user.model.request;

import org.hibernate.validator.constraints.NotEmpty;

public class LoginRequest {

    @NotEmpty
    private String mobile;

    @NotEmpty
    private String password;

    public String getMobile() {
        return mobile;
    }

    public void setMobile(String mobile) {
        this.mobile = mobile;
    }

    public String getPassword() {
        return password;
    }

    public void setPassword(String password) {
        this.password = password;
    }
}
其次是 Mapper(框架采用 Mybatis 的注解方式):
package com.lynn.user.mapper;

import com.lynn.user.model.bean.UserBean;
import org.apache.ibatis.annotations.Mapper;
import org.apache.ibatis.annotations.Select;

import java.util.List;

@Mapper
public interface UserMapper {

    @Select("select id,mobile,password from news_user where mobile = #{mobile} and password = #{password}")
    List<UserBean> selectUser(String mobile,String password);
}
然后是 Service(具体的业务实现):
package com.lynn.user.service;

import com.lynn.common.result.Code;
import com.lynn.common.result.SingleResult;
import com.lynn.common.service.BaseService;
import com.lynn.user.mapper.UserMapper;
import com.lynn.user.model.bean.UserBean;
import com.lynn.user.model.request.LoginRequest;
import com.lynn.user.model.response.TokenResponse;
import org.springframework.beans.factory.annotation.Autowired;
import org.springframework.stereotype.Service;
import org.springframework.transaction.annotation.Transactional;

import java.util.List;

@Transactional(rollbackFor = Exception.class)
@Service
public class UserService extends BaseService{

    @Autowired
    private UserMapper userMapper;

    public SingleResult<TokenResponse> login(LoginRequest request){
        List<UserBean> userList = userMapper.selectUser(request.getMobile(),request.getPassword());
        if(null != userList && userList.size() > 0){
            String token = getToken(request.getMobile(),request.getPassword());
            TokenResponse response = new TokenResponse();
            response.setToken(token);
            return SingleResult.buildSuccess(response);
        }else {
            return SingleResult.buildFailure(Code.ERROR,"手机号或密码输入不正确!");
        }
    }
我们写的接口要提供给客户端调用,因此最后还需要添加 Controller:
package com.lynn.user.controller;

import com.lynn.common.controller.BaseController;
import com.lynn.common.result.SingleResult;
import com.lynn.user.model.request.LoginRequest;
import com.lynn.user.model.response.TokenResponse;
import com.lynn.user.service.UserService;
import org.springframework.beans.factory.annotation.Autowired;
import org.springframework.validation.BindingResult;
import org.springframework.web.bind.annotation.RequestBody;
import org.springframework.web.bind.annotation.RequestMapping;
import org.springframework.web.bind.annotation.RestController;

import javax.validation.Valid;

@RequestMapping("user")
@RestController
public class UserController extends BaseController {

    @Autowired
    private UserService userService;

    @RequestMapping("login")
    public SingleResult<TokenResponse> login(@Valid @RequestBody LoginRequest request, BindingResult result){
        //必须要调用validate方法才能实现输入参数的合法性校验
        validate(result);
        return userService.login(request);
    }
}
这样一个完整的登录接口就写完了。
为了校验我们写的接口是否有问题可以通过 JUnit 来进行单元测试:
package com.lynn.user.test;

import com.lynn.user.Application;
import com.lynn.user.model.request.LoginRequest;
import com.lynn.user.service.UserService;
import org.junit.Test;
import org.junit.runner.RunWith;
import org.springframework.beans.factory.annotation.Autowired;
import org.springframework.boot.test.context.SpringBootTest;
import org.springframework.test.context.junit4.SpringJUnit4ClassRunner;

@RunWith(SpringJUnit4ClassRunner.class)
@SpringBootTest(classes = Application.class)
public class TestDB {

    @Autowired
    private UserService userService;

    @Test
    public void test(){
        try {
            LoginRequest request = new LoginRequest();
            request.setMobile("13800138000");
            request.setPassword("1");
            System.out.println(userService.login(request));
        }catch (Exception e){
            e.printStackTrace();
        }
    }
}
总结
在定义接口之前首先应该分析该接口的输入参数和输出参数,分别定义到 request 和 response 里,在 request 里添加校验的注解,如 NotNull(不能为 null)、NotEmpty(不能为空)等等。
在定义具体的接口,参数为对应的 request,返回值为 SingleResult<Response> 或 MultiResult<Response>,根据具体的业务实现具体的逻辑。
最后添加 Controller,就是调用 Service 的代码,方法参数需要加上 @Valid,这样参数校验才会生效,在调 Service 之前调用 validate(BindResult) 方法会抛出参数不合法的异常。最后,我们通过 JUnit 进行单元测试。
第18课:Spring Cloud 实例详解——系统发布
接口开发完成并且测试通过后,就可以进行发布,系统发布可以有很多方式,本文将目前主要的发布方式一一列举出来,供大家参考。
Java 命令行启动
这种方式比较简单,由于 Spring Boot 默认内置了 Tomcat,我们只需要打包成 Jar,即可通过 Java 命令启动 Jar 包,即我们的应用程序。
首先,news 下面的每个子工程都加上(Client 除外):
<packaging>jar</packaging>
此表示我们打包成 Jar 包。
其次,我们在每个 Jar 工程(除去 Commmon)的 pom.xml 中都加入以下内容:
<build>
        <!-- jar包名字,一般和我们的工程名相同 -->
        <finalName>user</finalName>
        <sourceDirectory>${project.basedir}/src/main/java</sourceDirectory>
        <testSourceDirectory>${project.basedir}/src/test/java</testSourceDirectory>
        <resources>
            <resource>
                <directory>src/main/resources</directory>
                <filtering>true</filtering>
            </resource>
        </resources>
        <plugins>
            <plugin>
                <groupId>org.springframework.boot</groupId>
                <artifactId>spring-boot-maven-plugin</artifactId>
                <configuration>
                    <fork>true</fork>
                    <mainClass>com.lynn.${project.build.finalName}.Application</mainClass>
                </configuration>
                <executions>
                    <execution>
                        <goals>
                            <goal>repackage</goal>
                        </goals>
                    </execution>
                </executions>
            </plugin>
            <plugin>
                <artifactId>maven-resources-plugin</artifactId>
                <version>2.5</version>
                <configuration>
                    <encoding>UTF-8</encoding>
                    <useDefaultDelimiters>true</useDefaultDelimiters>
                </configuration>
            </plugin>
            <plugin>
                <groupId>org.apache.maven.plugins</groupId>
                <artifactId>maven-surefire-plugin</artifactId>
                <version>2.18.1</version>
                <configuration>
                    <skipTests>true</skipTests>
                </configuration>
            </plugin>
            <plugin>
                <groupId>org.apache.maven.plugins</groupId>
                <artifactId>maven-compiler-plugin</artifactId>
                <configuration>
                    <source>1.8</source>
                    <target>1.8</target>
                </configuration>
                <executions>
                    <!-- 替换会被 maven 特别处理的 default-compile -->
                    <execution>
                        <id>default-compile</id>
                        <phase>none</phase>
                    </execution>
                    <!-- 替换会被 maven 特别处理的 default-testCompile -->
                    <execution>
                        <id>default-testCompile</id>
                        <phase>none</phase>
                    </execution>
                    <execution>
                        <id>java-compile</id>
                        <phase>compile</phase>
                        <goals> <goal>compile</goal> </goals>
                    </execution>
                    <execution>
                        <id>java-test-compile</id>
                        <phase>test-compile</phase>
                        <goals> <goal>testCompile</goal> </goals>
                    </execution>
                </executions>
            </plugin>
        </plugins>
    </build>
然后执行 maven clean package 命名打包:

第一次运行可能需要花点时间,因为需要从 Maven 仓库下载所有依赖包,以后打包就会比较快,等一段时间后,打包完成:
最后,我们将 Jar 包上传到服务器,依次启动 register.jar、config.jar、gateway.jar、article.jar、comment.jar、index.jar、user.jar 即可,启动命令是:
nohup java -server -jar xxx.jar &
用 nohup 命令启动 Jar 才能使 Jar 在后台运行,否则 shell 界面退出后,程序会自动退出。
Tomcat 启动
除了 Spring Boot 自带的 Tomcat,我们同样可以自己安装 Tomcat 来部署。
首先改造工程,将所有 <packaging>jar</packaging> 改为 <packaging>war</packaging>,去掉内置的 Tomcat:
<dependency>
            <groupId>org.springframework.boot</groupId>
            <artifactId>spring-boot-starter-tomcat</artifactId>
            <scope>provided</scope>
        </dependency>
修改 build:
<build>
        <!-- 文件名 -->
        <finalName>register</finalName>
        <resources>
            <resource>
                <directory>src/main/resources</directory>
                <filtering>true</filtering>
            </resource>
        </resources>
        <plugins>
            <plugin>
                <groupId>org.springframework.boot</groupId>
                <artifactId>spring-boot-maven-plugin</artifactId>
            </plugin>
            <plugin>
                <artifactId>maven-resources-plugin</artifactId>
                <version>2.5</version>
                <configuration>
                    <encoding>UTF-8</encoding>
                </configuration>
            </plugin>
            <plugin>
                <groupId>org.apache.maven.plugins</groupId>
                <artifactId>maven-surefire-plugin</artifactId>
                <version>2.18.1</version>
                <configuration>
                    <skipTests>true</skipTests>
                </configuration>
            </plugin>
        </plugins>
    </build>
然后修改启动类 Application.java:
public class Application extends SpringBootServletInitializer{

    public static void main(String[] args) {
        SpringApplication.run(Application.class,args);
    }

    @Override
    protected SpringApplicationBuilder configure(SpringApplicationBuilder application) {
        return application.sources(Application.class);
    }
}
这样打包后就会生成 War 包,打包方式同上。
我们将 War 上传到服务器的 Tomcat 上即可通过 Tomcat 启动项目。
Jenkins 自动化部署
我们搭建的是一套微服务架构,真实环境可能有成百上千个工程,如果都这样手动打包、上传、发布,工作量无疑是巨大的。这时,我们就需要考虑自动化部署了。
Jenkins 走进了我们的视野,它是一个开源软件项目,是基于 Java 开发的一种持续集成工具,用于监控持续重复的工作,旨在提供一个开放易用的软件平台,使软件的持续集成变成可能。
下面,我们就来看看如果通过 Jenkins 实现系统的自动化部署。
安装
Jenkins 的安装方式请自行百度,本文不做详细说明。
注: 安装好后,至少需要安装 Maven、SSH、Git、SVN 插件。
创建任务
安装好后,访问 Jenkins,登录后,即可看到如下界面:
(1)点击系统管理 -> 系统设置,添加服务器 SSH 信息:

(2)点击系统管理 -> 全局工具配置,配置好 JDK 和 Maven:
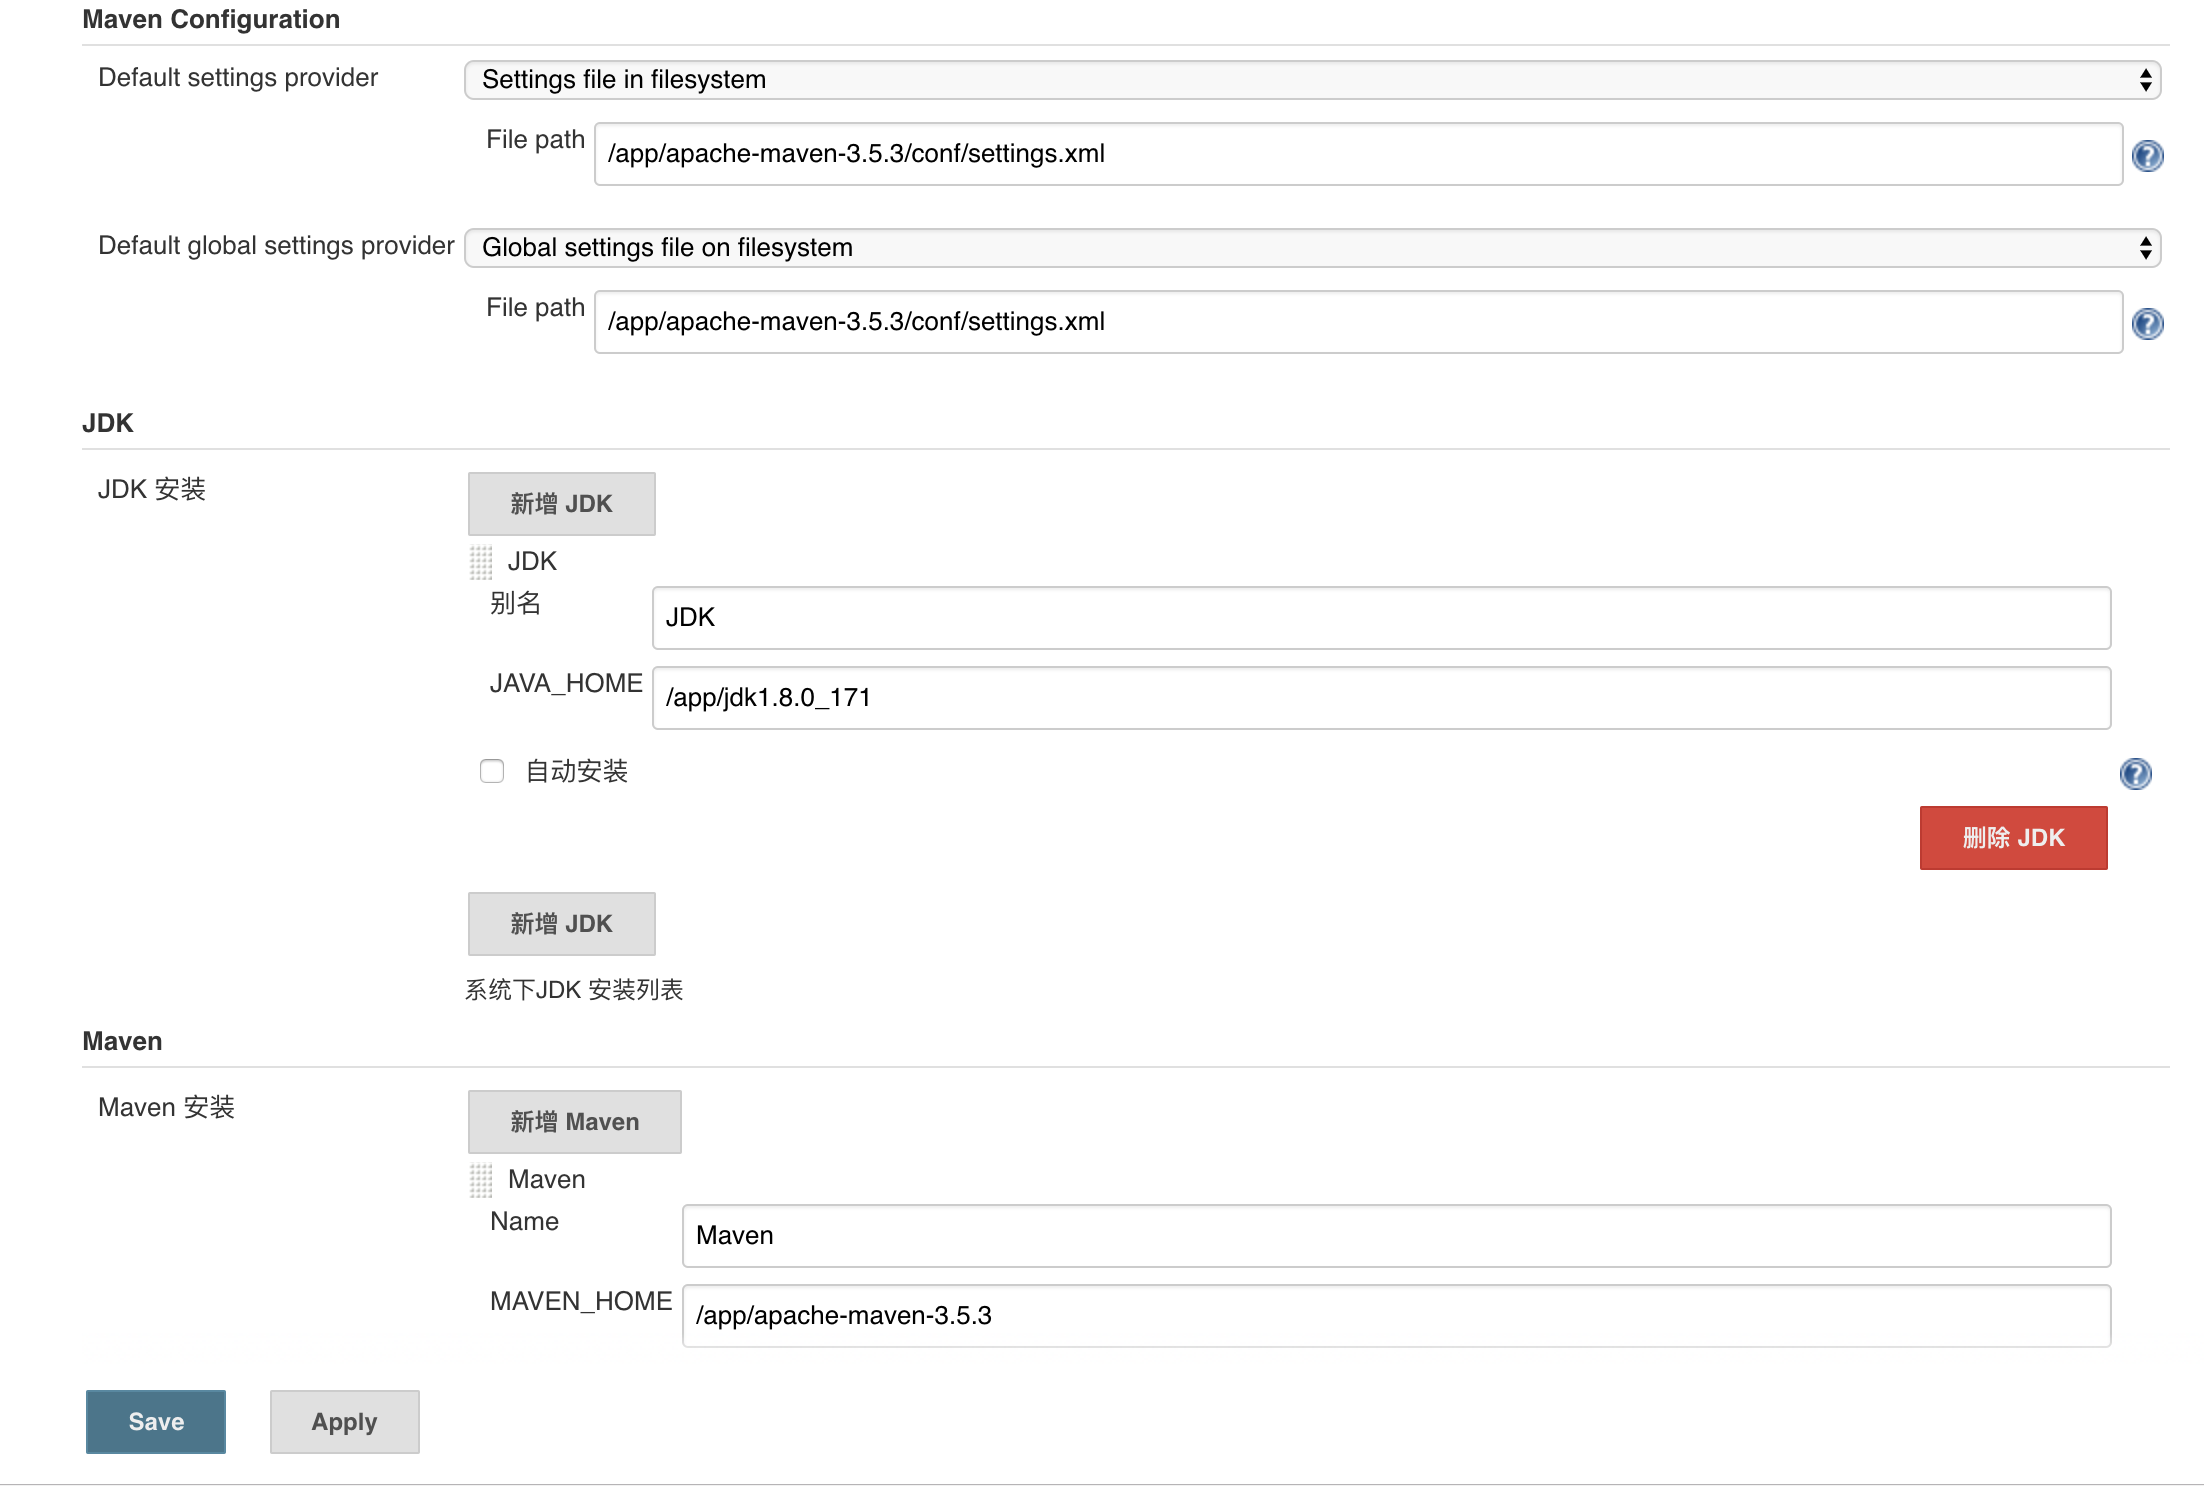
(3)点击新建任务,输入任务名,选择构建一个 Maven 风格的软件:
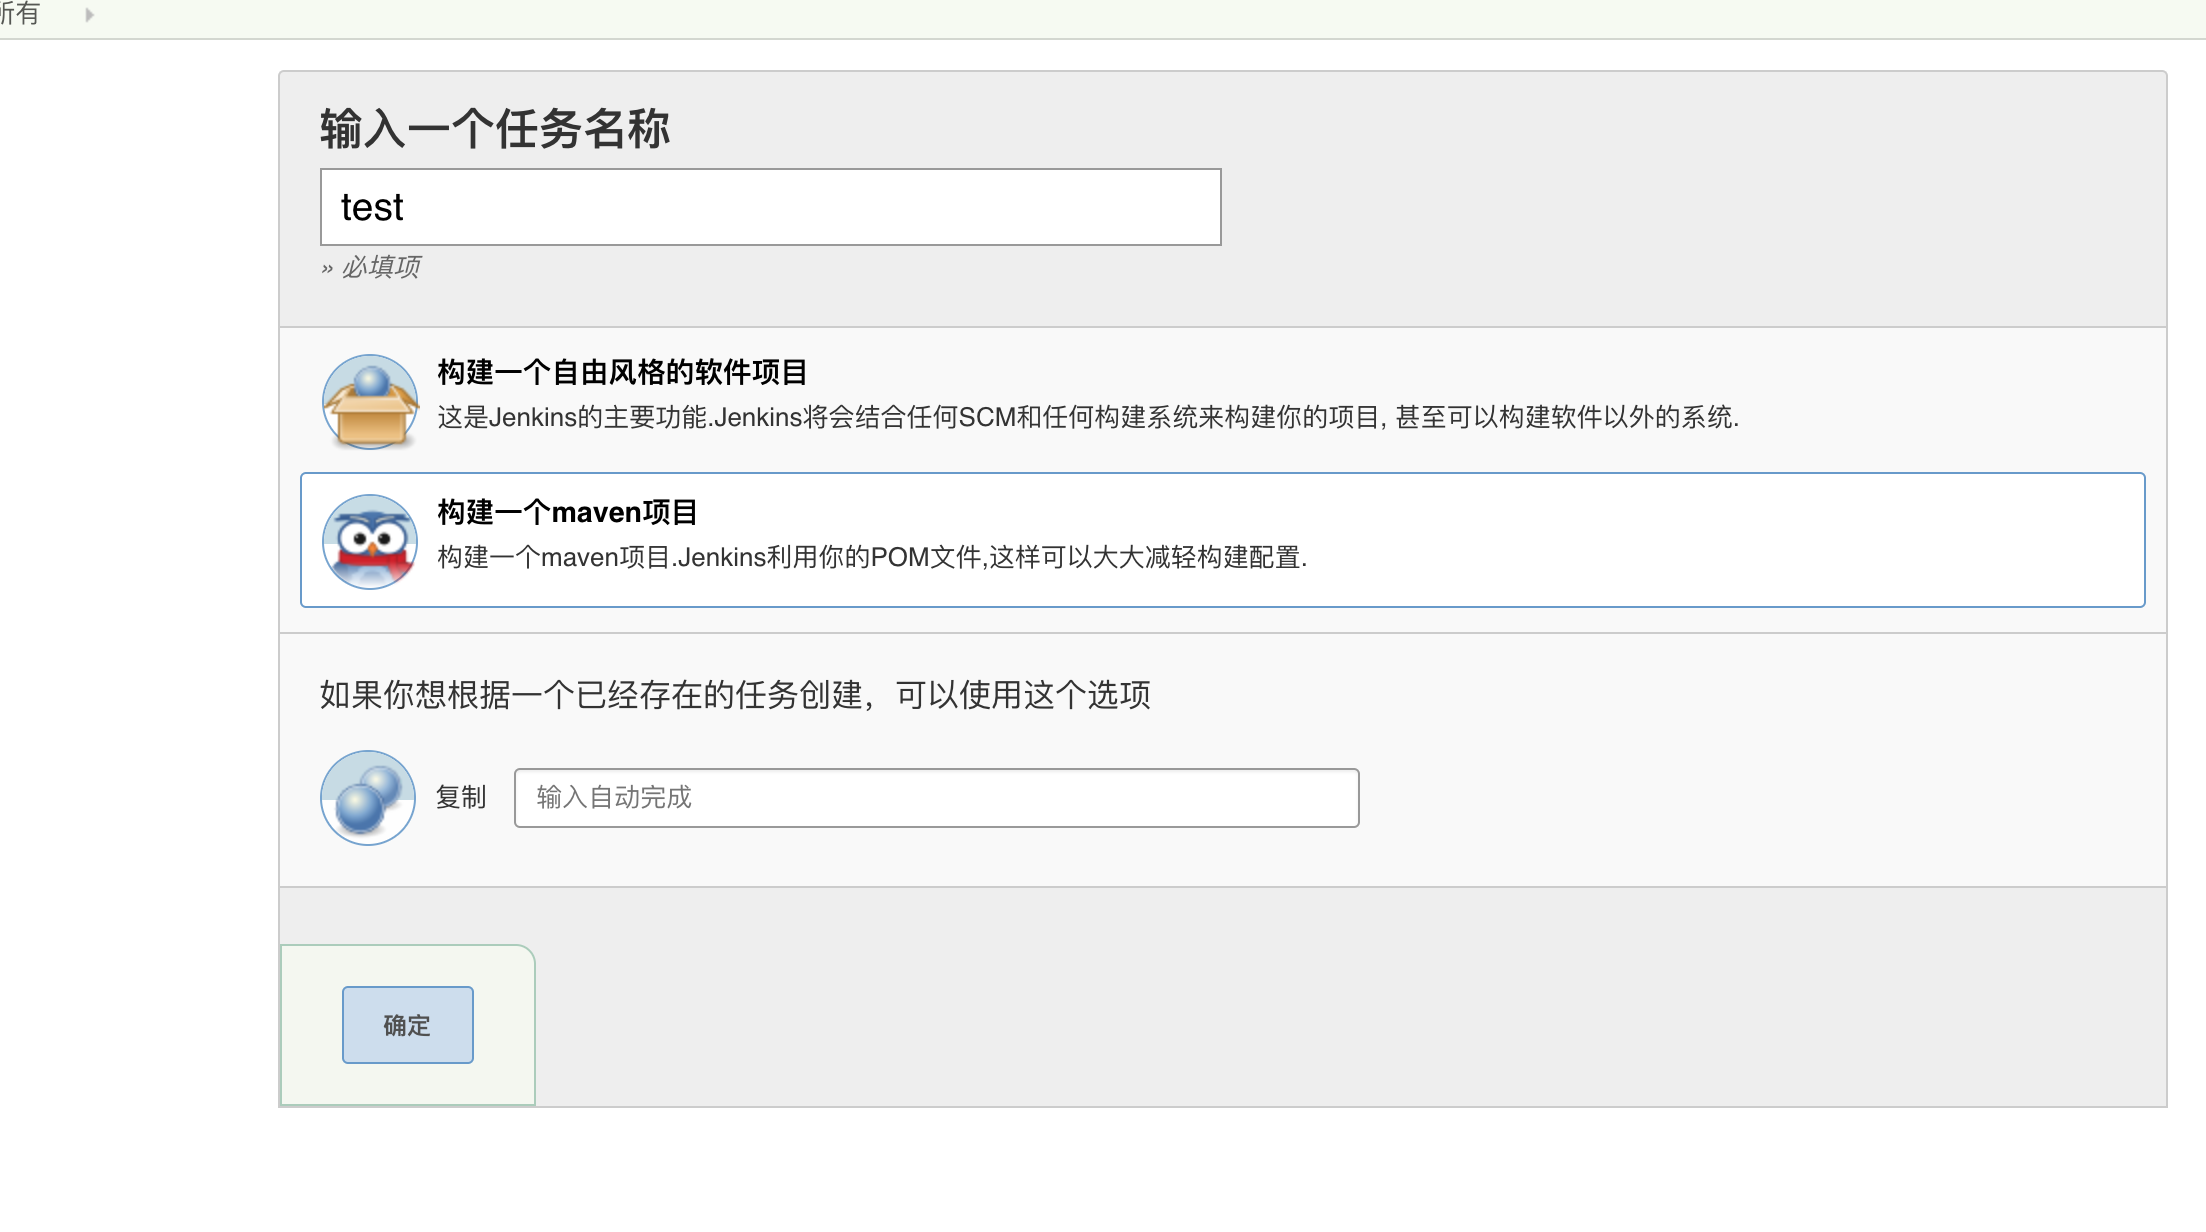
(4)点击确定,进入下一步:
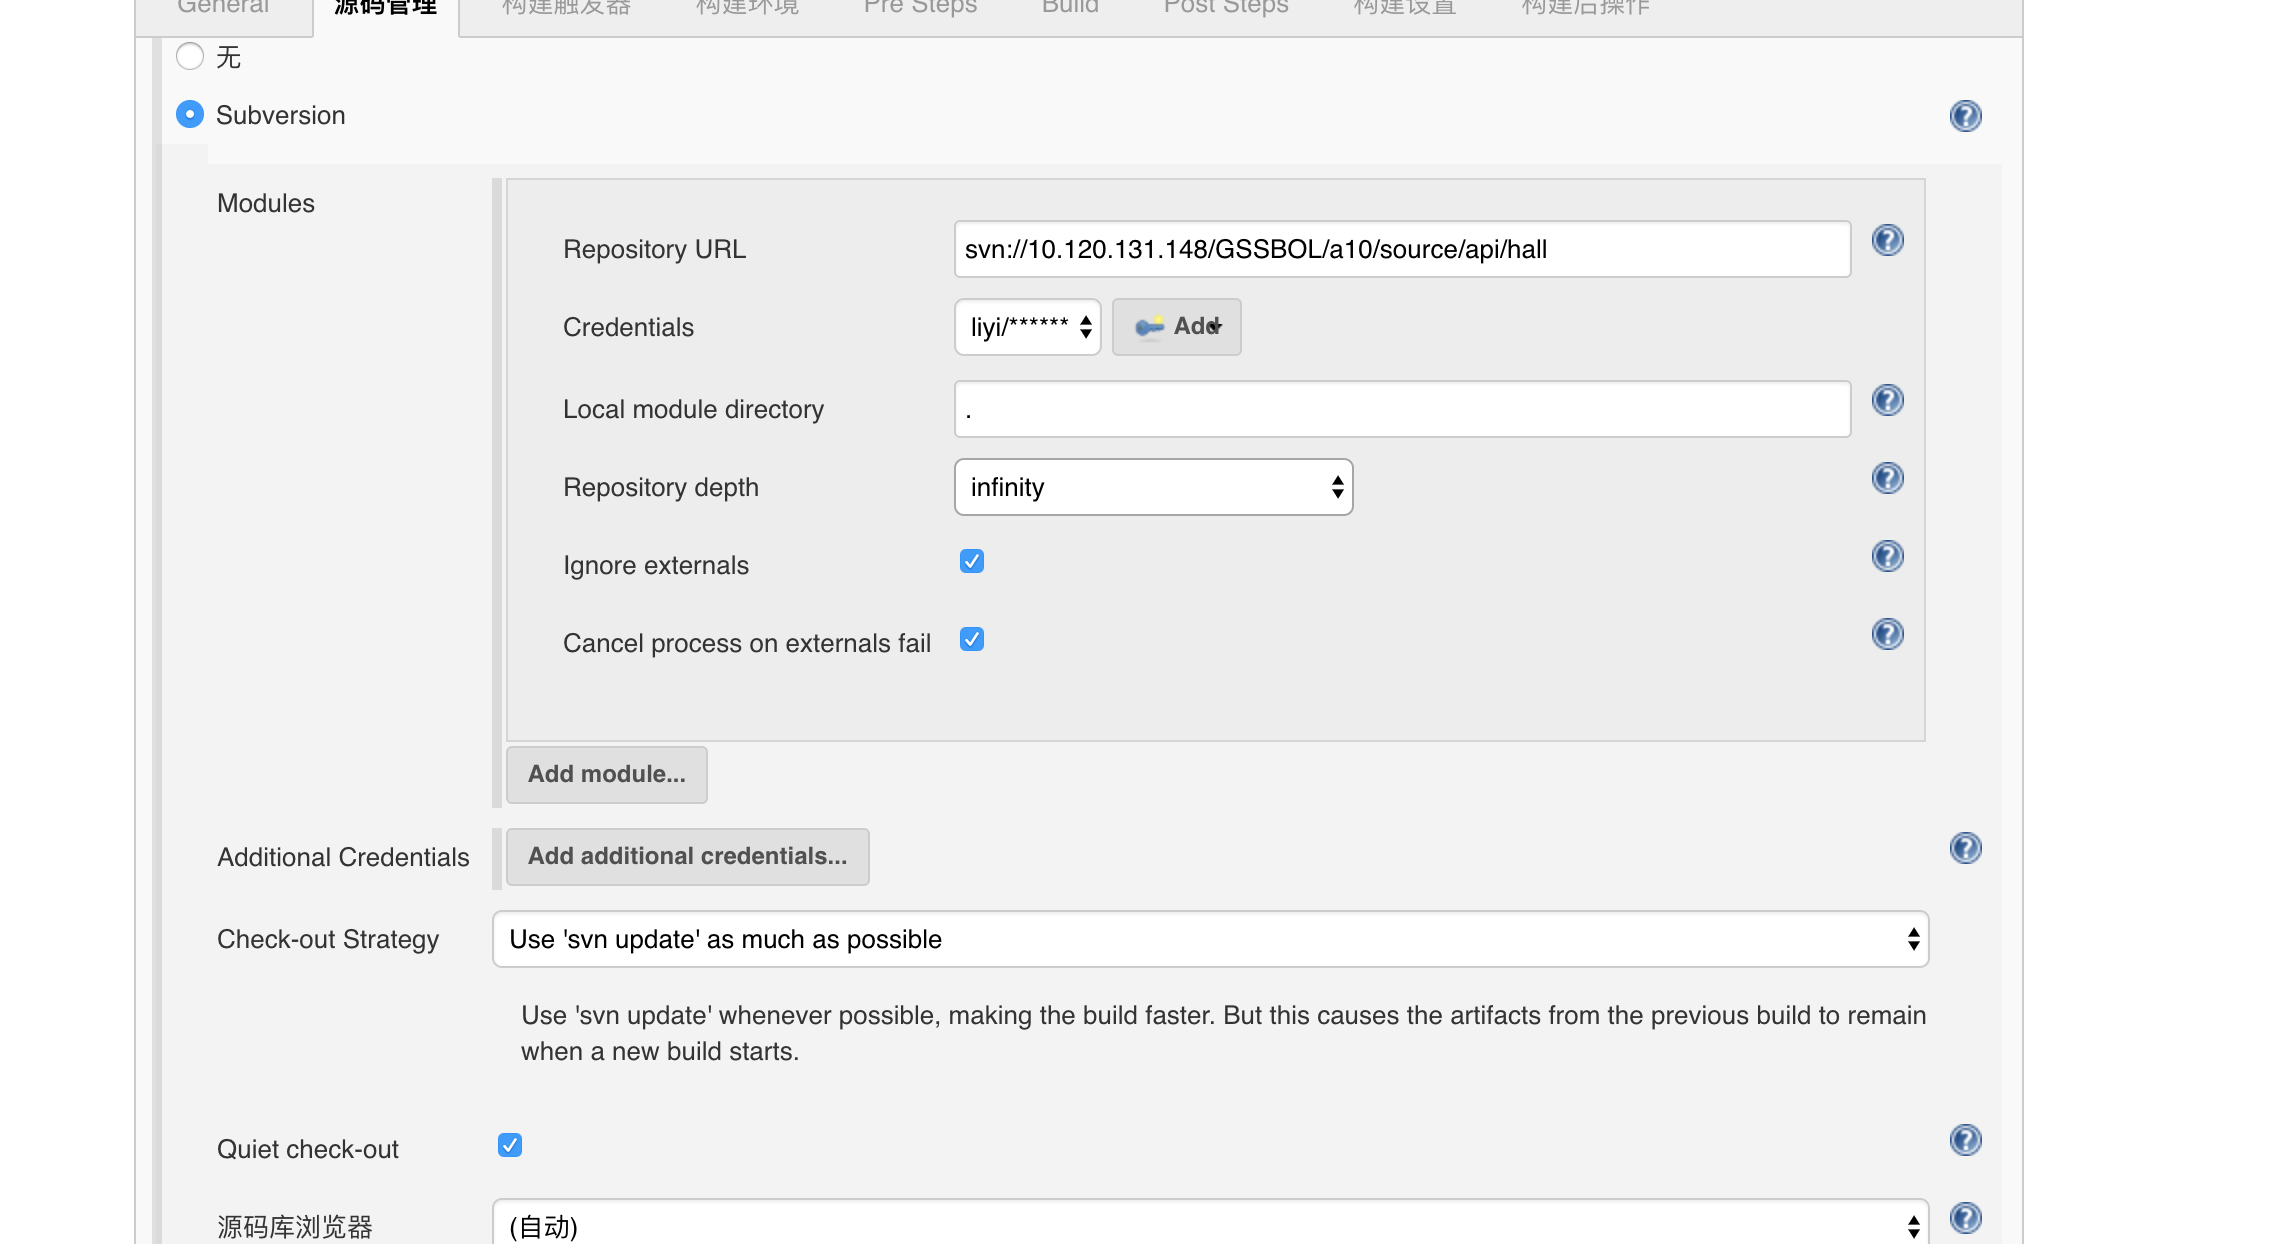
这里以 SVN 为例说明(如果代码在 Git上,操作类似),将源码的 SVN 地址、SVN 账号信息依次填入文本框。
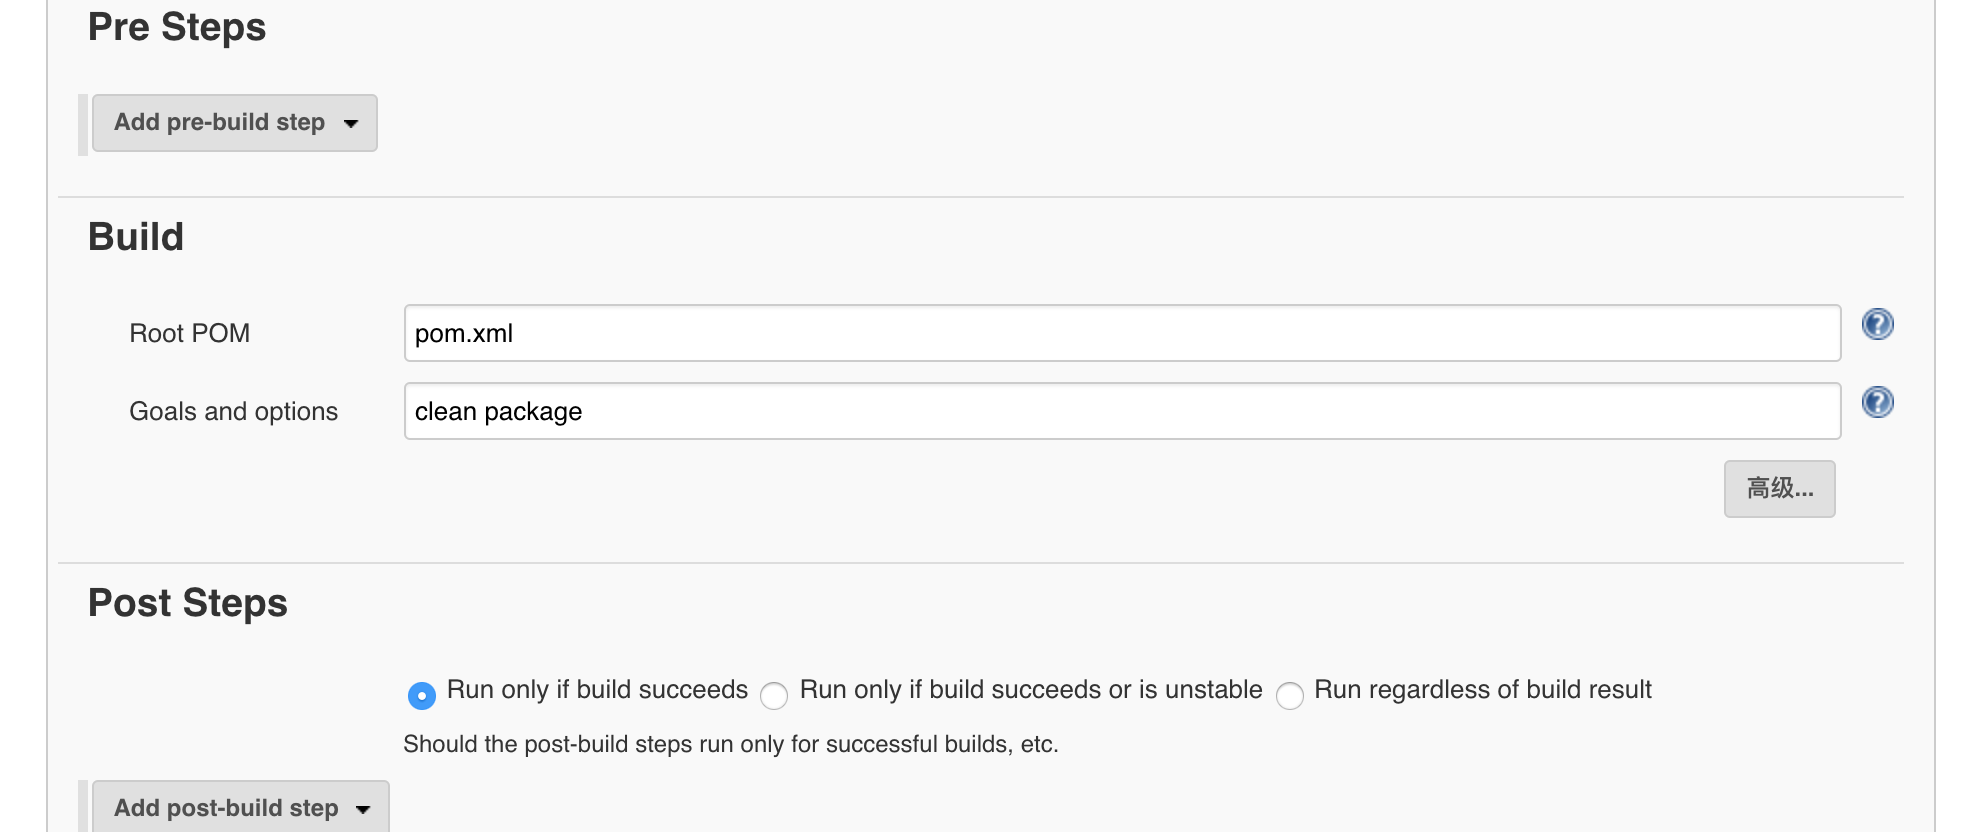
Build 下面填入 Maven 的构建命令。
在“构建后操作”里按要求填入如图所示内容:
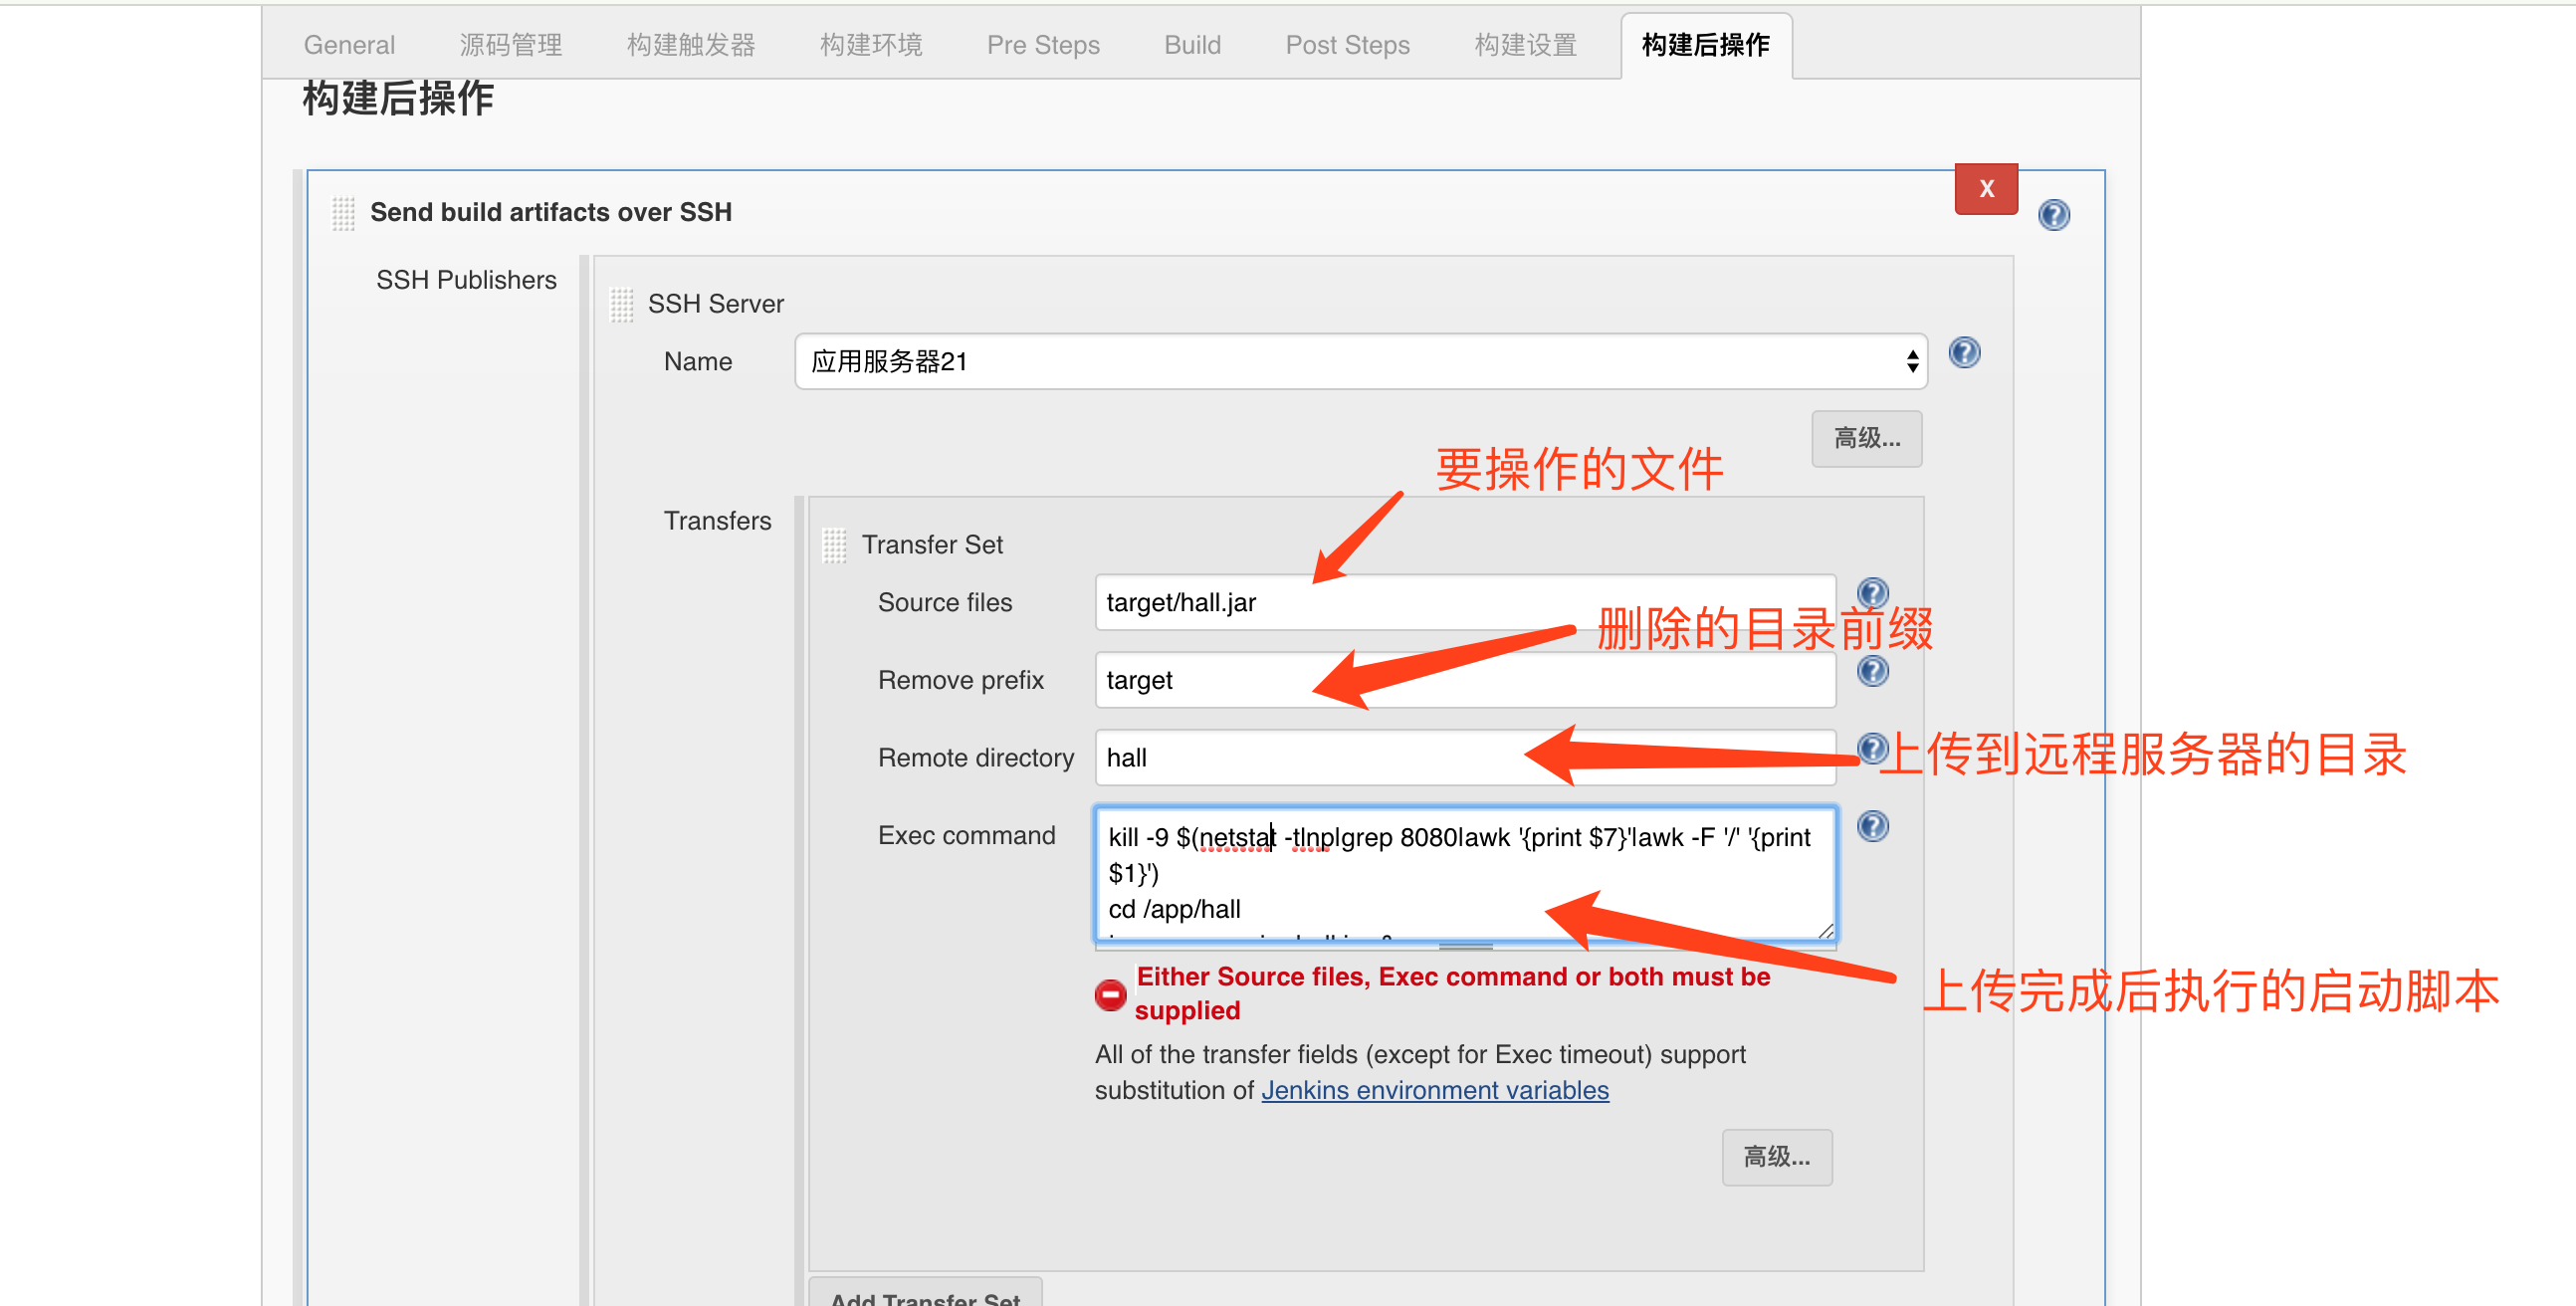
其中,启动脚本示例如下:
kill -9 $(netstat -tlnp|grep 8080|awk '{print $7}'|awk -F '/' '{print $1}')
cd /app/hall
java -server -jar hall.jar &
点击保存。
手动构建
任务创建好后,点击“立即构建”即可自动构建并启动我们的应用程序,并且能够实时看到构建日志:
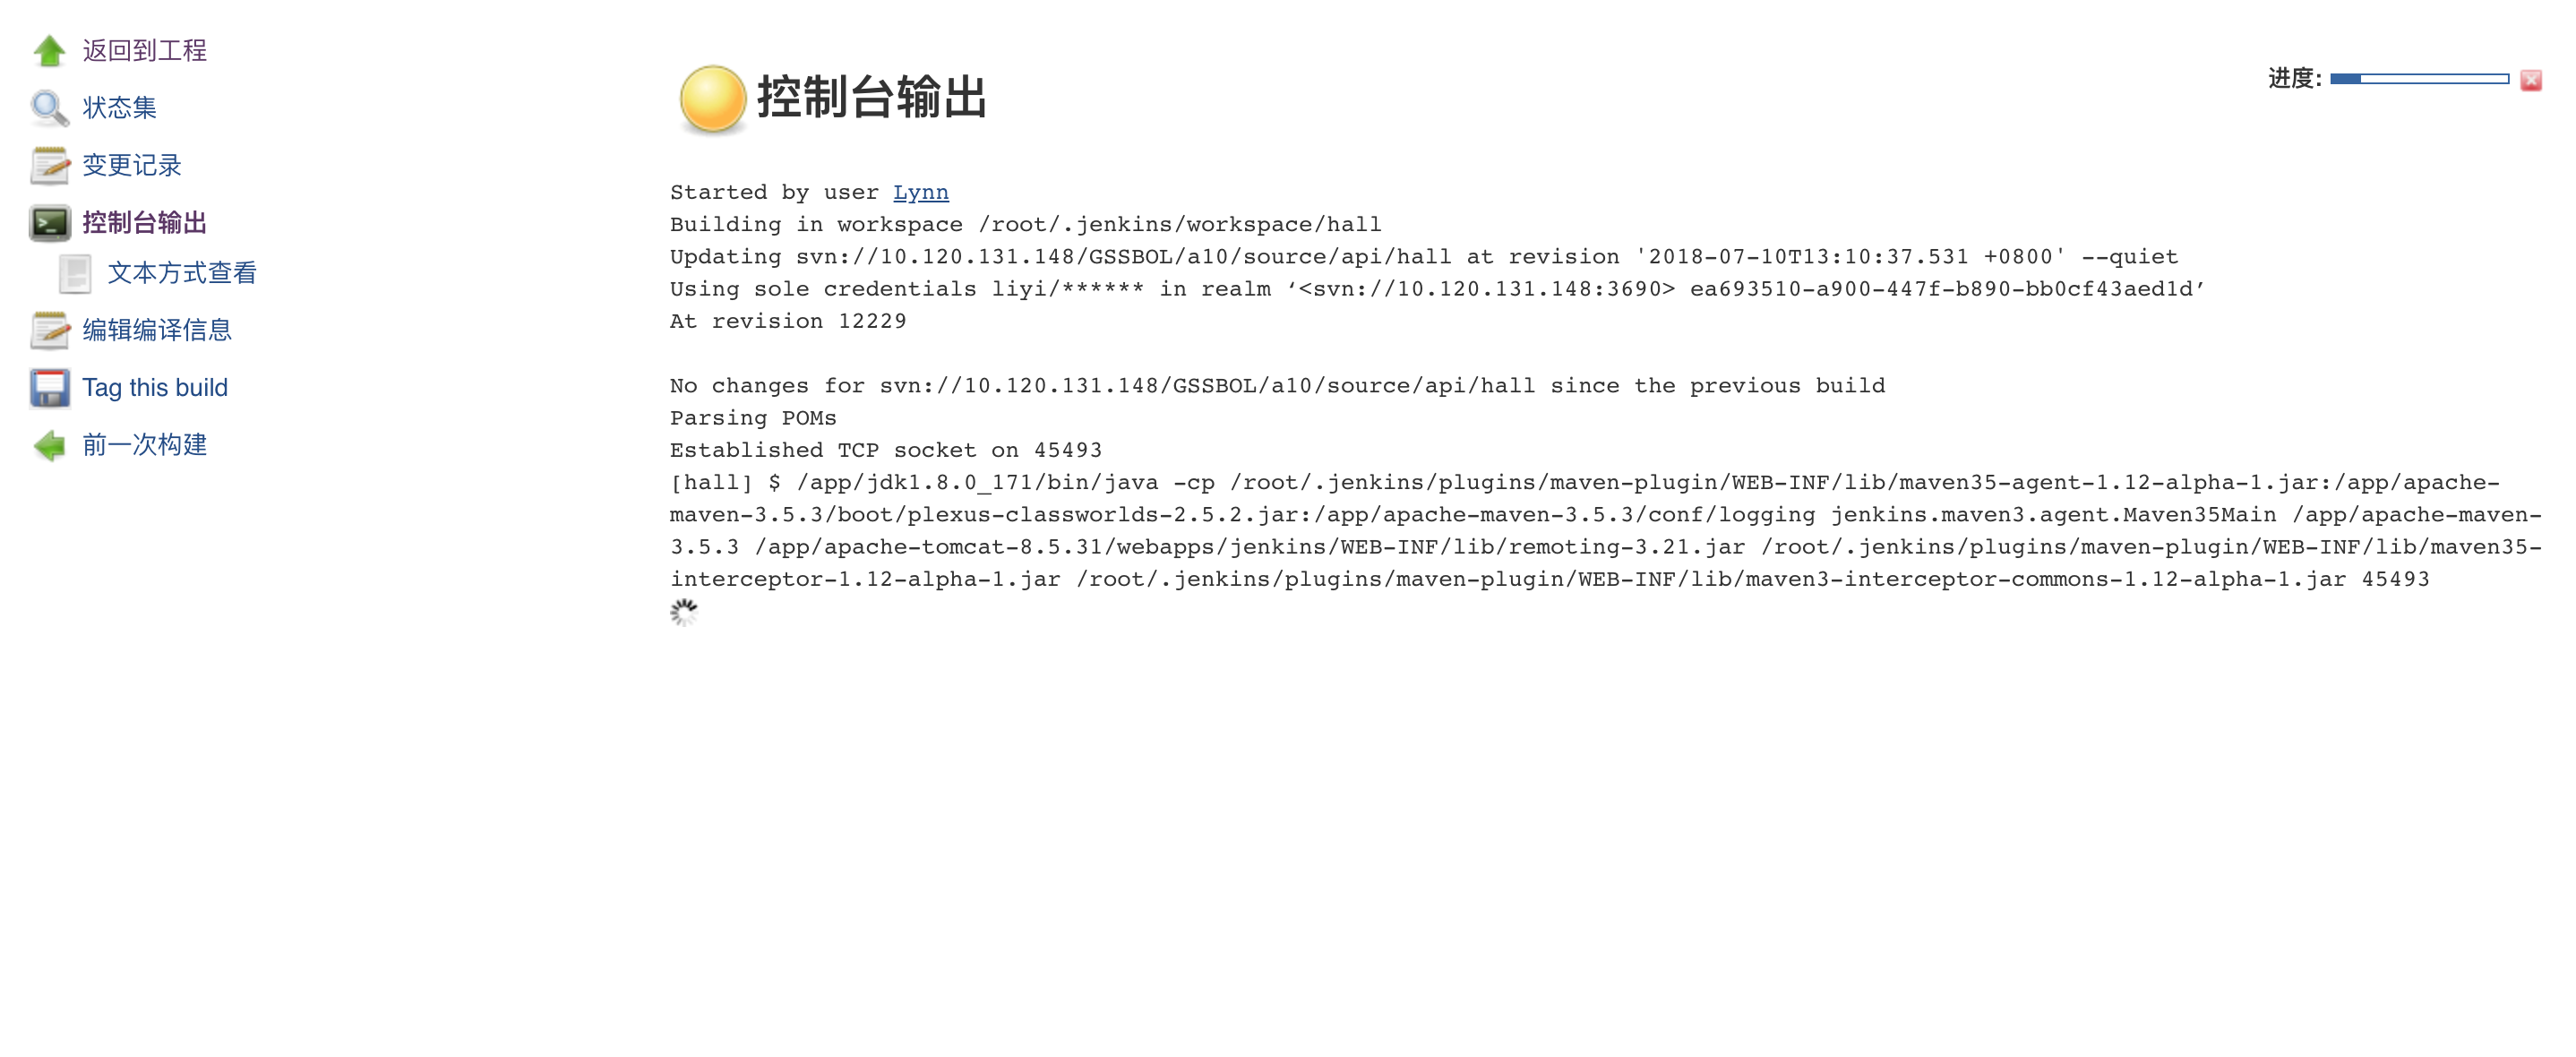
自动构建
我们每次都手动点击“立即构建”也挺麻烦,程序猿的最高进阶是看谁更懒,我都不想点那个按钮了,就想我提交了代码能自动构建,怎么做呢?很简单,进入任务配置界面,找到构建触发器选项:
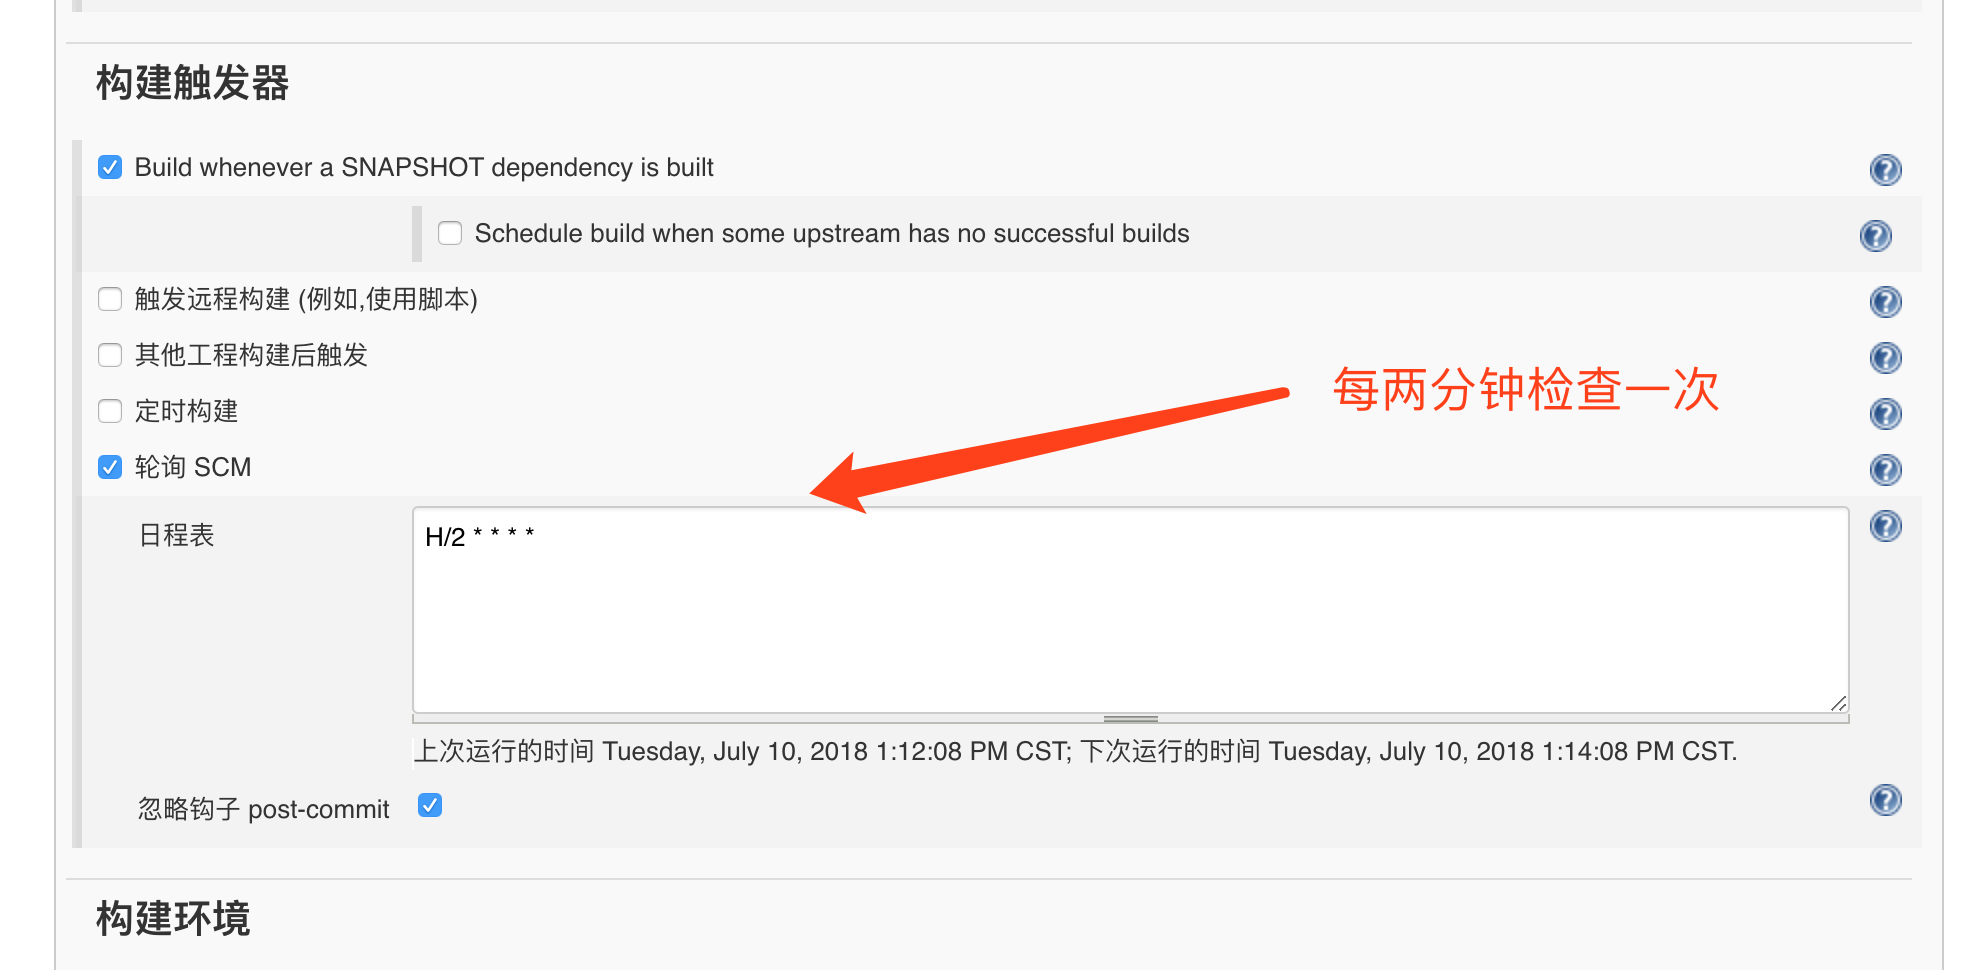
保存后,Jenkins 会每隔两分钟对比一下 SVN,如果有改动,则自动构建。
总结
系统发布方式很多,我们可以根据自身项目特点选择适合自己的方式,当然还有很多方式,比如 K8S、Docker 等等,这里就不再赘述了 ,关于 K8S+Docker 的方式,我会在第20课讲解。
第19课:Spring Cloud 源码解析
Spring Cloud 集成了很多第三方框架,把它的全部源码拿出来解析几本书都讲不完,也不太现实,本文带领读者分析其中一小部分源码(其余源码读者有兴趣可以继续跟进),包括 Eureka-Server、Config、Zuul 的 starter 部分,分析其启动原理。
如果我们开发出一套框架,要和 Spring Boot 集成,就需要放到它的 starter 里。因此我们分析启动原理,直接从每个框架的 starter 开始分析即可。
Eureka-Server 源码解析
我们知道,要实现注册与发现,需要在启动类加上 @EnableEurekaServer 注解,我们进入其源码:
@EnableDiscoveryClient//表示eurekaserver也是一个客户端服务
@Target(ElementType.TYPE)
@Retention(RetentionPolicy.RUNTIME)
@Documented
@Import(EurekaServerMarkerConfiguration.class)
public @interface EnableEurekaServer {

}
注意看 @Import 注解,这个注解导入了 EurekaServerMarkerConfiguration 类,继续跟进这个类:
/**
 * Responsible for adding in a marker bean to activate
 * {@link EurekaServerAutoConfiguration}
 *
 * @author Biju Kunjummen
 */
@Configuration
public class EurekaServerMarkerConfiguration {

    @Bean
    public Marker eurekaServerMarkerBean() {
        return new Marker();
    }

    class Marker {
    }
}
通过上面的注释,我们继续查看 EurekaServerAutoConfiguration 类的源码:
@Configuration
@Import(EurekaServerInitializerConfiguration.class)
@ConditionalOnBean(EurekaServerMarkerConfiguration.Marker.class)
@EnableConfigurationProperties({ EurekaDashboardProperties.class,
        InstanceRegistryProperties.class })
@PropertySource("classpath:/eureka/server.properties")
public class EurekaServerAutoConfiguration extends WebMvcConfigurerAdapter {
    /**
     * List of packages containing Jersey resources required by the Eureka server
     */
    private static String[] EUREKA_PACKAGES = new String[] { "com.netflix.discovery",
            "com.netflix.eureka" };

    @Autowired
    private ApplicationInfoManager applicationInfoManager;

    @Autowired
    private EurekaServerConfig eurekaServerConfig;

    @Autowired
    private EurekaClientConfig eurekaClientConfig;

    @Autowired
    private EurekaClient eurekaClient;

    @Autowired
    private InstanceRegistryProperties instanceRegistryProperties;

    public static final CloudJacksonJson JACKSON_JSON = new CloudJacksonJson();

    @Bean
    public HasFeatures eurekaServerFeature() {
        return HasFeatures.namedFeature("Eureka Server",
                EurekaServerAutoConfiguration.class);
    }

    //如果eureka.client.registerWithEureka=true,则把自己注册进去
    @Configuration
    protected static class EurekaServerConfigBeanConfiguration {
        @Bean
        @ConditionalOnMissingBean
        public EurekaServerConfig eurekaServerConfig(EurekaClientConfig clientConfig) {
            EurekaServerConfigBean server = new EurekaServerConfigBean();
            if (clientConfig.shouldRegisterWithEureka()) {
                // Set a sensible default if we are supposed to replicate
                server.setRegistrySyncRetries(5);
            }
            return server;
        }
    }

    //实例化eureka-server的界面
    @Bean
    @ConditionalOnProperty(prefix = "eureka.dashboard", name = "enabled", matchIfMissing = true)
    public EurekaController eurekaController() {
        return new EurekaController(this.applicationInfoManager);
    }

    static {
        CodecWrappers.registerWrapper(JACKSON_JSON);
        EurekaJacksonCodec.setInstance(JACKSON_JSON.getCodec());
    }

    @Bean
    public ServerCodecs serverCodecs() {
        return new CloudServerCodecs(this.eurekaServerConfig);
    }

    private static CodecWrapper getFullJson(EurekaServerConfig serverConfig) {
        CodecWrapper codec = CodecWrappers.getCodec(serverConfig.getJsonCodecName());
        return codec == null ? CodecWrappers.getCodec(JACKSON_JSON.codecName()) : codec;
    }

    private static CodecWrapper getFullXml(EurekaServerConfig serverConfig) {
        CodecWrapper codec = CodecWrappers.getCodec(serverConfig.getXmlCodecName());
        return codec == null ? CodecWrappers.getCodec(CodecWrappers.XStreamXml.class)
                : codec;
    }

    class CloudServerCodecs extends DefaultServerCodecs {

        public CloudServerCodecs(EurekaServerConfig serverConfig) {
            super(getFullJson(serverConfig),
                    CodecWrappers.getCodec(CodecWrappers.JacksonJsonMini.class),
                    getFullXml(serverConfig),
                    CodecWrappers.getCodec(CodecWrappers.JacksonXmlMini.class));
        }
    }

    @Bean
    public PeerAwareInstanceRegistry peerAwareInstanceRegistry(
            ServerCodecs serverCodecs) {
        this.eurekaClient.getApplications(); // force initialization
        return new InstanceRegistry(this.eurekaServerConfig, this.eurekaClientConfig,
                serverCodecs, this.eurekaClient,
                this.instanceRegistryProperties.getExpectedNumberOfRenewsPerMin(),
                this.instanceRegistryProperties.getDefaultOpenForTrafficCount());
    }

    @Bean
    @ConditionalOnMissingBean
    public PeerEurekaNodes peerEurekaNodes(PeerAwareInstanceRegistry registry,
            ServerCodecs serverCodecs) {
        return new PeerEurekaNodes(registry, this.eurekaServerConfig,
                this.eurekaClientConfig, serverCodecs, this.applicationInfoManager);
    }

    @Bean
    public EurekaServerContext eurekaServerContext(ServerCodecs serverCodecs,
            PeerAwareInstanceRegistry registry, PeerEurekaNodes peerEurekaNodes) {
        return new DefaultEurekaServerContext(this.eurekaServerConfig, serverCodecs,
                registry, peerEurekaNodes, this.applicationInfoManager);
    }

    @Bean
    public EurekaServerBootstrap eurekaServerBootstrap(PeerAwareInstanceRegistry registry,
            EurekaServerContext serverContext) {
        return new EurekaServerBootstrap(this.applicationInfoManager,
                this.eurekaClientConfig, this.eurekaServerConfig, registry,
                serverContext);
    }

    /**
     * Register the Jersey filter
     */
    @Bean
    public FilterRegistrationBean jerseyFilterRegistration(
            javax.ws.rs.core.Application eurekaJerseyApp) {
        FilterRegistrationBean bean = new FilterRegistrationBean();
        bean.setFilter(new ServletContainer(eurekaJerseyApp));
        bean.setOrder(Ordered.LOWEST_PRECEDENCE);
        bean.setUrlPatterns(
                Collections.singletonList(EurekaConstants.DEFAULT_PREFIX + "/*"));

        return bean;
    }

    /**
     * Construct a Jersey {@link javax.ws.rs.core.Application} with all the resources
     * required by the Eureka server.
     */
    @Bean
    public javax.ws.rs.core.Application jerseyApplication(Environment environment,
            ResourceLoader resourceLoader) {

        ClassPathScanningCandidateComponentProvider provider = new ClassPathScanningCandidateComponentProvider(
                false, environment);

        // Filter to include only classes that have a particular annotation.
        //
        provider.addIncludeFilter(new AnnotationTypeFilter(Path.class));
        provider.addIncludeFilter(new AnnotationTypeFilter(Provider.class));

        // Find classes in Eureka packages (or subpackages)
        //
        Set<Class<?>> classes = new HashSet<Class<?>>();
        for (String basePackage : EUREKA_PACKAGES) {
            Set<BeanDefinition> beans = provider.findCandidateComponents(basePackage);
            for (BeanDefinition bd : beans) {
                Class<?> cls = ClassUtils.resolveClassName(bd.getBeanClassName(),
                        resourceLoader.getClassLoader());
                classes.add(cls);
            }
        }

        // Construct the Jersey ResourceConfig
        //
        Map<String, Object> propsAndFeatures = new HashMap<String, Object>();
        propsAndFeatures.put(
                // Skip static content used by the webapp
                ServletContainer.PROPERTY_WEB_PAGE_CONTENT_REGEX,
                EurekaConstants.DEFAULT_PREFIX + "/(fonts|images|css|js)/.*");

        DefaultResourceConfig rc = new DefaultResourceConfig(classes);
        rc.setPropertiesAndFeatures(propsAndFeatures);

        return rc;
    }

    @Bean
    public FilterRegistrationBean traceFilterRegistration(
            @Qualifier("webRequestLoggingFilter") Filter filter) {
        FilterRegistrationBean bean = new FilterRegistrationBean();
        bean.setFilter(filter);
        bean.setOrder(Ordered.LOWEST_PRECEDENCE - 10);
        return bean;
    }
}
这个类上有一个注解:@ConditionalOnBean(EurekaServerMarkerConfiguration.Marker.class),这后面指定的类就是刚才那个类,而 @ConditionalOnBean 这个注解的作用是:仅仅在当前上下文中存在某个对象时,才会实例化一个 Bean。
因此,启动时就会实例化 EurekaServerAutoConfiguration 这个类。
@EnableConfigurationProperties({ EurekaDashboardProperties.class,
        InstanceRegistryProperties.class })
这个注解就是定义了一些 Eureka 的配置项。
Config 源码解析
通过上面的方法,我们找到了 ConfigServerAutoConfiguration 类:
@Configuration
@ConditionalOnBean(ConfigServerConfiguration.Marker.class)
@EnableConfigurationProperties(ConfigServerProperties.class)
@Import({ EnvironmentRepositoryConfiguration.class, CompositeConfiguration.class, ResourceRepositoryConfiguration.class,
        ConfigServerEncryptionConfiguration.class, ConfigServerMvcConfiguration.class, TransportConfiguration.class })
public class ConfigServerAutoConfiguration {

}
可以发现这个类是空的,只是多了几个注解, @EnableConfigurationProperties(ConfigServerProperties.class) 表示开启 Config 配置属性。
最核心的注解是:@Import,它将其他一些配置类导入这个类,其中, EnvironmentRepositoryConfiguration 为环境配置类,内置了以下几种环境配置。
1. Native
@Configuration
    @Profile("native")
    protected static class NativeRepositoryConfiguration {

        @Autowired
        private ConfigurableEnvironment environment;

        @Bean
        public NativeEnvironmentRepository nativeEnvironmentRepository() {
            return new NativeEnvironmentRepository(this.environment);
        }
    }
2. git
@Configuration
    @Profile("git")
    protected static class GitRepositoryConfiguration extends DefaultRepositoryConfiguration {}
3. subversion
@Configuration
    @Profile("subversion")
    protected static class SvnRepositoryConfiguration {
        @Autowired
        private ConfigurableEnvironment environment;

        @Autowired
        private ConfigServerProperties server;

        @Bean
        public SvnKitEnvironmentRepository svnKitEnvironmentRepository() {
            SvnKitEnvironmentRepository repository = new SvnKitEnvironmentRepository(this.environment);
            if (this.server.getDefaultLabel()!=null) {
                repository.setDefaultLabel(this.server.getDefaultLabel());
            }
            return repository;
        }
    }
4.vault
@Configuration
    @Profile("subversion")
    protected static class SvnRepositoryConfiguration {
        @Autowired
        private ConfigurableEnvironment environment;

        @Autowired
        private ConfigServerProperties server;

        @Bean
        public SvnKitEnvironmentRepository svnKitEnvironmentRepository() {
            SvnKitEnvironmentRepository repository = new SvnKitEnvironmentRepository(this.environment);
            if (this.server.getDefaultLabel()!=null) {
                repository.setDefaultLabel(this.server.getDefaultLabel());
            }
            return repository;
    }
    }
从代码可以看到 Git 是配置中心默认环境。
@Bean
        public MultipleJGitEnvironmentRepository defaultEnvironmentRepository() {
            MultipleJGitEnvironmentRepository repository = new MultipleJGitEnvironmentRepository(this.environment);
            repository.setTransportConfigCallback(this.transportConfigCallback);
            if (this.server.getDefaultLabel()!=null) {
                repository.setDefaultLabel(this.server.getDefaultLabel());
            }
            return repository;
        }
我们进入 MultipleJGitEnvironmentRepository 类:
@ConfigurationProperties("spring.cloud.config.server.git")
public class MultipleJGitEnvironmentRepository extends JGitEnvironmentRepository {
}
这个类表示可以支持配置多个 Git 仓库,它继承自 JGitEnvironmentRepository 类:
public class JGitEnvironmentRepository extends AbstractScmEnvironmentRepository
        implements EnvironmentRepository, SearchPathLocator, InitializingBean {
/**
     * Get the working directory ready.
     */
    public String refresh(String label) {
        Git git = null;
        try {
            git = createGitClient();
            if (shouldPull(git)) {
                fetch(git, label);
                // checkout after fetch so we can get any new branches, tags,
                // ect.
                checkout(git, label);
                if (isBranch(git, label)) {
                    // merge results from fetch
                    merge(git, label);
                    if (!isClean(git)) {
                        logger.warn("The local repository is dirty. Resetting it to origin/" + label + ".");
                        resetHard(git, label, "refs/remotes/origin/" + label);
                    }
                }
            } else {
                // nothing to update so just checkout
                checkout(git, label);
            }
            // always return what is currently HEAD as the version
            return git.getRepository().getRef("HEAD").getObjectId().getName();
        } catch (RefNotFoundException e) {
            throw new NoSuchLabelException("No such label: " + label, e);
        } catch (NoRemoteRepositoryException e) {
            throw new NoSuchRepositoryException("No such repository: " + getUri(), e);
        } catch (GitAPIException e) {
            throw new NoSuchRepositoryException("Cannot clone or checkout repository: " + getUri(), e);
        } catch (Exception e) {
            throw new IllegalStateException("Cannot load environment", e);
        } finally {
            try {
                if (git != null) {
                    git.close();
                }
            } catch (Exception e) {
                this.logger.warn("Could not close git repository", e);
            }
        }
    }
}
refresh 方法的作用就是 ConfigServer 会从我们配置的 Git 仓库拉取配置下来。
Zuul 源码解析
同理,我们找到 Zuul 的配置类 ZuulProxyAutoConfiguration:
@Configuration
@Import({ RibbonCommandFactoryConfiguration.RestClientRibbonConfiguration.class,
RibbonCommandFactoryConfiguration.OkHttpRibbonConfiguration.class,
RibbonCommandFactoryConfiguration.HttpClientRibbonConfiguration.class })
@ConditionalOnBean(ZuulProxyMarkerConfiguration.Marker.class)
public class ZuulProxyAutoConfiguration extends ZuulServerAutoConfiguration {
@SuppressWarnings("rawtypes")
@Autowired(required = false)
private List<RibbonRequestCustomizer> requestCustomizers = Collections.emptyList();
@Autowired
private DiscoveryClient discovery;
@Autowired
private ServiceRouteMapper serviceRouteMapper;
@Override
public HasFeatures zuulFeature() {
return HasFeatures.namedFeature("Zuul (Discovery)", ZuulProxyAutoConfiguration.class);
}
@Bean
@ConditionalOnMissingBean(DiscoveryClientRouteLocator.class)
public DiscoveryClientRouteLocator discoveryRouteLocator() {
return new DiscoveryClientRouteLocator(this.server.getServletPrefix(), this.discovery, this.zuulProperties,
this.serviceRouteMapper);
}
//以下是过滤器,也就是之前zuul提到的实现的ZuulFilter接口
// pre filters
//路由之前
@Bean
public PreDecorationFilter preDecorationFilter(RouteLocator routeLocator, ProxyRequestHelper proxyRequestHelper) {
return new PreDecorationFilter(routeLocator, this.server.getServletPrefix(), this.zuulProperties,
proxyRequestHelper);
}
// route filters
// 路由时
@Bean
public RibbonRoutingFilter ribbonRoutingFilter(ProxyRequestHelper helper,
RibbonCommandFactory<?> ribbonCommandFactory) {
RibbonRoutingFilter filter = new RibbonRoutingFilter(helper, ribbonCommandFactory, this.requestCustomizers);
return filter;
}
@Bean
@ConditionalOnMissingBean(SimpleHostRoutingFilter.class)
public SimpleHostRoutingFilter simpleHostRoutingFilter(ProxyRequestHelper helper, ZuulProperties zuulProperties) {
return new SimpleHostRoutingFilter(helper, zuulProperties);
}
@Bean
public ApplicationListener<ApplicationEvent> zuulDiscoveryRefreshRoutesListener() {
return new ZuulDiscoveryRefreshListener();
}
@Bean
@ConditionalOnMissingBean(ServiceRouteMapper.class)
public ServiceRouteMapper serviceRouteMapper() {
return new SimpleServiceRouteMapper();
}
@Configuration
@ConditionalOnMissingClass("org.springframework.boot.actuate.endpoint.Endpoint")
protected static class NoActuatorConfiguration {
@Bean
public ProxyRequestHelper proxyRequestHelper(ZuulProperties zuulProperties) {
ProxyRequestHelper helper = new ProxyRequestHelper();
helper.setIgnoredHeaders(zuulProperties.getIgnoredHeaders());
helper.setTraceRequestBody(zuulProperties.isTraceRequestBody());
return helper;
}
}
@Configuration
@ConditionalOnClass(Endpoint.class)
protected static class RoutesEndpointConfiguration {
@Autowired(required = false)
private TraceRepository traces;
@Bean
public RoutesEndpoint zuulEndpoint(RouteLocator routeLocator) {
return new RoutesEndpoint(routeLocator);
}
@Bean
public RoutesMvcEndpoint zuulMvcEndpoint(RouteLocator routeLocator, RoutesEndpoint endpoint) {
return new RoutesMvcEndpoint(endpoint, routeLocator);
}
@Bean
public ProxyRequestHelper proxyRequestHelper(ZuulProperties zuulProperties) {
TraceProxyRequestHelper helper = new TraceProxyRequestHelper();
if (this.traces != null) {
helper.setTraces(this.traces);
}
helper.setIgnoredHeaders(zuulProperties.getIgnoredHeaders());
helper.setTraceRequestBody(zuulProperties.isTraceRequestBody());
return helper;
}
}
private static class ZuulDiscoveryRefreshListener implements ApplicationListener<ApplicationEvent> {
private HeartbeatMonitor monitor = new HeartbeatMonitor();
@Autowired
private ZuulHandlerMapping zuulHandlerMapping;
@Override
public void onApplicationEvent(ApplicationEvent event) {
if (event instanceof InstanceRegisteredEvent) {
reset();
}
else if (event instanceof ParentHeartbeatEvent) {
ParentHeartbeatEvent e = (ParentHeartbeatEvent) event;
resetIfNeeded(e.getValue());
}
else if (event instanceof HeartbeatEvent) {
HeartbeatEvent e = (HeartbeatEvent) event;
resetIfNeeded(e.getValue());
}
}
private void resetIfNeeded(Object value) {
if (this.monitor.update(value)) {
reset();
}
}
private void reset() {
this.zuulHandlerMapping.setDirty(true);
}
}
}
通过 @Import 注解可以找到几个类:
- RibbonCommandFactoryConfiguration.RestClientRibbonConfiguration
- RibbonCommandFactoryConfiguration.OkHttpRibbonConfiguration
- RibbonCommandFactoryConfiguration.HttpClientRibbonConfiguration
我们知道 Zuul 提供网关能力,通过上面这几个类就能分析到,它内部其实也是通过接口请求,找到每个服务提供的接口地址。
进入 RibbonCommandFactoryConfiguration 类:
public class RibbonCommandFactoryConfiguration {
//以下提供了3个不同的请求模式
@Configuration
@ConditionalOnRibbonRestClient
protected static class RestClientRibbonConfiguration {
@Autowired(required = false)
private Set<ZuulFallbackProvider> zuulFallbackProviders = Collections.emptySet();
@Bean
@ConditionalOnMissingBean
public RibbonCommandFactory<?> ribbonCommandFactory(
SpringClientFactory clientFactory, ZuulProperties zuulProperties) {
return new RestClientRibbonCommandFactory(clientFactory, zuulProperties,
zuulFallbackProviders);
}
}
@Configuration
@ConditionalOnRibbonOkHttpClient
@ConditionalOnClass(name = "okhttp3.OkHttpClient")
protected static class OkHttpRibbonConfiguration {
@Autowired(required = false)
private Set<ZuulFallbackProvider> zuulFallbackProviders = Collections.emptySet();
@Bean
@ConditionalOnMissingBean
public RibbonCommandFactory<?> ribbonCommandFactory(
SpringClientFactory clientFactory, ZuulProperties zuulProperties) {
return new OkHttpRibbonCommandFactory(clientFactory, zuulProperties,
zuulFallbackProviders);
}
}
@Configuration
@ConditionalOnRibbonHttpClient
protected static class HttpClientRibbonConfiguration {
@Autowired(required = false)
private Set<ZuulFallbackProvider> zuulFallbackProviders = Collections.emptySet();
@Bean
@ConditionalOnMissingBean
public RibbonCommandFactory<?> ribbonCommandFactory(
SpringClientFactory clientFactory, ZuulProperties zuulProperties) {
return new HttpClientRibbonCommandFactory(clientFactory, zuulProperties, zuulFallbackProviders);
}
}
@Target({ ElementType.TYPE, ElementType.METHOD })
@Retention(RetentionPolicy.RUNTIME)
@Documented
@Conditional(OnRibbonHttpClientCondition.class)
@interface ConditionalOnRibbonHttpClient { }
private static class OnRibbonHttpClientCondition extends AnyNestedCondition {
public OnRibbonHttpClientCondition() {
super(ConfigurationPhase.PARSE_CONFIGURATION);
}
@Deprecated //remove in Edgware"
@ConditionalOnProperty(name = "zuul.ribbon.httpclient.enabled", matchIfMissing = true)
static class ZuulProperty {}
@ConditionalOnProperty(name = "ribbon.httpclient.enabled", matchIfMissing = true)
static class RibbonProperty {}
}
@Target({ ElementType.TYPE, ElementType.METHOD })
@Retention(RetentionPolicy.RUNTIME)
@Documented
@Conditional(OnRibbonOkHttpClientCondition.class)
@interface ConditionalOnRibbonOkHttpClient { }
private static class OnRibbonOkHttpClientCondition extends AnyNestedCondition {
public OnRibbonOkHttpClientCondition() {
super(ConfigurationPhase.PARSE_CONFIGURATION);
}
@Deprecated //remove in Edgware"
@ConditionalOnProperty("zuul.ribbon.okhttp.enabled")
static class ZuulProperty {}
@ConditionalOnProperty("ribbon.okhttp.enabled")
static class RibbonProperty {}
}
@Target({ ElementType.TYPE, ElementType.METHOD })
@Retention(RetentionPolicy.RUNTIME)
@Documented
@Conditional(OnRibbonRestClientCondition.class)
@interface ConditionalOnRibbonRestClient { }
private static class OnRibbonRestClientCondition extends AnyNestedCondition {
public OnRibbonRestClientCondition() {
super(ConfigurationPhase.PARSE_CONFIGURATION);
}
@Deprecated //remove in Edgware"
@ConditionalOnProperty("zuul.ribbon.restclient.enabled")
static class ZuulProperty {}
@ConditionalOnProperty("ribbon.restclient.enabled")
static class RibbonProperty {}
}
}
总结
前面带领大家分析了一小段源码,Spring Cloud 很庞大,不可能一一分析,本文的主要目的就是教大家如何分析源码,从何处下手,以便大家可以按照这种思路继续跟踪下去。
第20课:K8S+Docker 部署 Spring Cloud 集群
在一个实际的大型系统中,微服务架构可能由成百上千个服务组成,我们发布一个系统如果都单纯的通过打包上传,再发布,工作量无疑是巨大的,也是不可取的,前面我们知道了可以通过 Jenkins 帮我们自动化完成发布任务。
但是,我们知道一个 Java 应用其实是比较占用资源的,每个服务都发布到物理宿主机上面,资源开销也是巨大的,而且每扩展一台服务器,都需要重复部署相同的软件,这种方式显然是不可取的。
容器技术的出现带给了我们新的思路,我们将服务打包成镜像,放到容器中,通过容器来运行我们的服务,这样我们可以很方便进行分布式的管理,同样的服务也可以很方便进行水平扩展。
Docker 是容器技术方便的佼佼者,它是一个开源容器。而 Kubernetes(以下简称 K8S),是一个分布式集群方案的平台,它天生就是和 Docker 一对,通过 K8S 和 Docker 的配合,我们很容易搭建分布式集群环境。
下面,我们就来看看 K8S 和 Docker 的吸引之处。
集群环境搭建
本文用一台虚拟机模拟集群环境。
操作系统:CentOS7 64位
配置:内存2GB,硬盘40GB。
注:真正的分布式环境搭建方案类似,可以参考博文:Kubernetes学习2——集群部署与搭建》。
下面开始搭建集群环境。
1. 关闭防火墙:
systemctl disable firewalld
systemctl stop firewalld
iptables -P FORWARD ACCEPT
2. 安装 etcd:
yum install -y etcd
安装完成后启动 etcd:
systemctl start etcd
systemctl enable etcd
启动后,我们可以检查 etcd 健康状况:
etcdctl -C http://localhost:2379 cluster-health
出现下面信息说明 etcd 目前是稳定的:
member 8e9e05c52164694d is healthy: got healthy result from http://localhost:2379
cluster is healthy
3. 安装 Docker:
yum install docker -y
完成后启动 Docker:
chkconfig docker on
service docker start
4. 安装 Kubernetes:
yum install kubernetes -y
安装完成后修改配置文件 /etc/kubernetes/apiserver:
vi /etc/kubernetes/apiserver
把 KUBE_ADMISSION_CONTROL 后面的 ServiceAccount 删掉,如:
KUBE_ADMISSION_CONTROL="--admission-control=NamespaceLifecycle,NamespaceExists,LimitRanger,SecurityContextDeny,ResourceQuota"
然后依次启动 kubernetes-server:
systemctl enable kube-apiserver
systemctl start kube-apiserver
systemctl enable kube-controller-manager
systemctl start kube-controller-manager
systemctl enable kube-scheduler
systemctl start kube-scheduler
再依次启动 kubernetes-client:
systemctl enable kubelet
systemctl start kubelet
systemctl enable kube-proxy
systemctl start kube-proxy
我们查看集群状态:
kubectl get no
可以看到以下信息:
NAME STATUS AGE
127.0.0.1 Ready 1h
至此,我们基于 K8S 的集群环境就搭建完成了,但是我们发布到 Docker 去外部是无法访问的,还要安装 Flannel 以覆盖网络。
执行以下命令安装 Flannel:
yum install flannel -y
安装完成后修改配置文件 /etc/sysconfig/flanneld:
vim /etc/sysconfig/flanneld
内容如下:
# Flanneld configuration options
# etcd url location. Point this to the server where etcd runs
FLANNEL_ETCD_ENDPOINTS="http://127.0.0.1:2379"
# etcd config key. This is the configuration key that flannel queries
# For address range assignment
FLANNEL_ETCD_PREFIX="/atomic.io/network"
# Any additional options that you want to pass
FLANNEL_OPTIONS="--logtostderr=false --log_dir=/var/log/k8s/flannel/ --etcd-prefix=/atomic.io/network --etcd-endpoints=http://localhost:2379 --iface=enp0s3"
其中,enp0s3 为网卡名字,通过 ifconfig 可以查看。
然后配置 etcd 中关于 Flannel 的 key:
etcdctl mk /atomic.io/network/config '{ "Network": "10.0.0.0/16" }'
其中 /atomic.io/network 要和配置文件中配置的一致。
最后启动 Flannel 并重启 Kubernetes:
systemctl enable flanneld
systemctl start flanneld
systemctl enable flanneld
service docker restart
systemctl restart kube-apiserver
systemctl restart kube-controller-manager
systemctl restart kube-scheduler
systemctl restart kubelet
systemctl restart kube-proxy
这样,一个完整的基于 K8S+Docker 的集群环境搭建完成了,后面我们就可以在这上面部署分布式系统。
本文只是做演示,不会真正的发布一套系统,因此我们以注册中心 register 为例,演示如何发布一套分布式系统。
创建 Docker 镜像
我们首先将 register 本地打包成 Jar 上传到虚拟机上,然后通过 Dockerfile 来创建 register 的镜像,Dockerfile 内容如下:
#下载java8的镜像
FROM java:8
#将本地文件挂到到/tmp目录
VOLUME /tmp
#复制文件到容器
ADD register.jar /registar.jar
#暴露8888端口
EXPOSE 8888
#配置启动容器后执行的命令
ENTRYPOINT ["java","-jar","/register.jar"]
通过 docker build 构建镜像:
docker build -t register.jar:0.0.1 .
执行该命令后,会打印以下信息:
Sending build context to Docker daemon 48.72 MB
Step 1/6 : FROM java:8
Trying to pull repository docker.io/library/java ...
apiVersion: v1
8: Pulling from docker.io/library/java
5040bd298390: Pull complete
fce5728aad85: Pull complete
76610ec20bf5: Pull complete
60170fec2151: Pull complete
e98f73de8f0d: Pull complete
11f7af24ed9c: Pull complete
49e2d6393f32: Pull complete
bb9cdec9c7f3: Pull complete
Digest: sha256:c1ff613e8ba25833d2e1940da0940c3824f03f802c449f3d1815a66b7f8c0e9d
Status: Downloaded newer image for docker.io/java:8
---> d23bdf5b1b1b
Step 2/6 : VOLUME /tmp
---> Running in f6f284cf34f2
---> bf70efe7bea0
Removing intermediate container f6f284cf34f2
Step 3/6 : ADD register.jar registar.jar
---> 91d6f5aa9db3
Removing intermediate container e4dd67f5acc2
Step 4/6 : RUN bash -c 'touch /register.jar'
---> Running in 3b6d5f4ed216
---> 70381c5e0b5d
Removing intermediate container 3b6d5f4ed216
Step 5/6 : EXPOSE 8888
---> Running in b87b788ff362
---> 912e4f8e3004
Removing intermediate container b87b788ff362
Step 6/6 : ENTRYPOINT java -Djava.security.egd=file:/dev/./urandom jar /register.jar
---> Running in 1bc65e0bfbea
---> 1aec9d5e9c70
Removing intermediate container 1bc65e0bfbea
Successfully built 1aec9d5e9c70
这时通过 docker images 命令就可以看到我们刚构建的镜像:
[root@localhost ~]# docker images
REPOSITORY TAG IMAGE ID CREATED SIZE
register.jar 0.0.1 1aec9d5e9c70 2 minutes ago 692 MB
docker.io/registry 2 b2b03e9146e1 5 days ago 33.3 MB
docker.io/java 8 d23bdf5b1b1b 18 months ago 643 MB
系统发布
我们本地虚拟机有了镜像就可以通过 K8S 发布了。
1. 创建 register-rc.yaml:
apiVersion: v1
kind: ReplicationController
metadata:
name: register
spec:
replicas: 1
selector:
app: register
template:
metadata:
labels:
app: register
spec:
containers:
- name: register
#镜像名
image: register
#本地有镜像就不会去仓库拉取
imagePullPolicy: IfNotPresent
ports:
- containerPort: 8888
执行命令:
[root@localhost ~]# kubectl create -f register-rc.yaml
replicationcontroller "register" created
提示创建成功后,我们可以查看 pod:
[root@localhost ~]# kubectl get po
NAME READY STATUS RESTARTS AGE
register-4l088 1/1 Running 0 10s
如果 STATUS 显示为 Running,说明运行成功,否则可以通过以下命令来查看日志:
kubectl describe po register-4l088
然后我们通过 docker ps 命令来查看当前运行的容器:
[root@localhost ~]# docker ps
CONTAINER ID IMAGE COMMAND CREATED STATUS PORTS NAMES
dd8c05ae4432 register "java -jar /app.jar" 8 minutes ago Up 8 minutes k8s_register.892502b2_register-4l088_default_4580c447-8640-11e8-bba0-080027607861_5bf71ba9
3b5ae8575079 registry.access.redhat.com/rhel7/pod-infrastructure:latest "/usr/bin/pod" 8 minutes ago Up 8 minutes k8s_POD.43570bb9_register-4l088_default_4580c447-8640-11e8-bba0-080027607861_1f38e064
可以看到容器已经在运行了,但是这样外部还是无法访问,因为 K8S 分配的是虚拟 IP,要通过宿主机访问,还需要创建 Service。
编写 register-svc.yaml:
apiVersion: v1
kind: Service
metadata:
name: register
spec:
type: NodePort
ports:
- port: 8888
targetPort: 8888
节点暴露给外部的端口(范围必须为30000-32767)
nodePort: 30001
selector:
app: register
然后执行命令:
[root@localhost ~]# kubectl create -f register-svc.yaml
service "register" created
我们可以查看创建的 Service:
[root@localhost ~]# kubectl get svc
NAME CLUSTER-IP EXTERNAL-IP PORT(S) AGE
kubernetes 10.254.0.1 <none> 443/TCP 20h
register 10.254.228.248 <nodes> 8888:30001/TCP 37s
这时就可以通过 IP:30001 访问 register 了,如果访问不了需要先运行命令:
iptables -P FORWARD ACCEPT
访问 http://172.20.10.13:30001,如图:
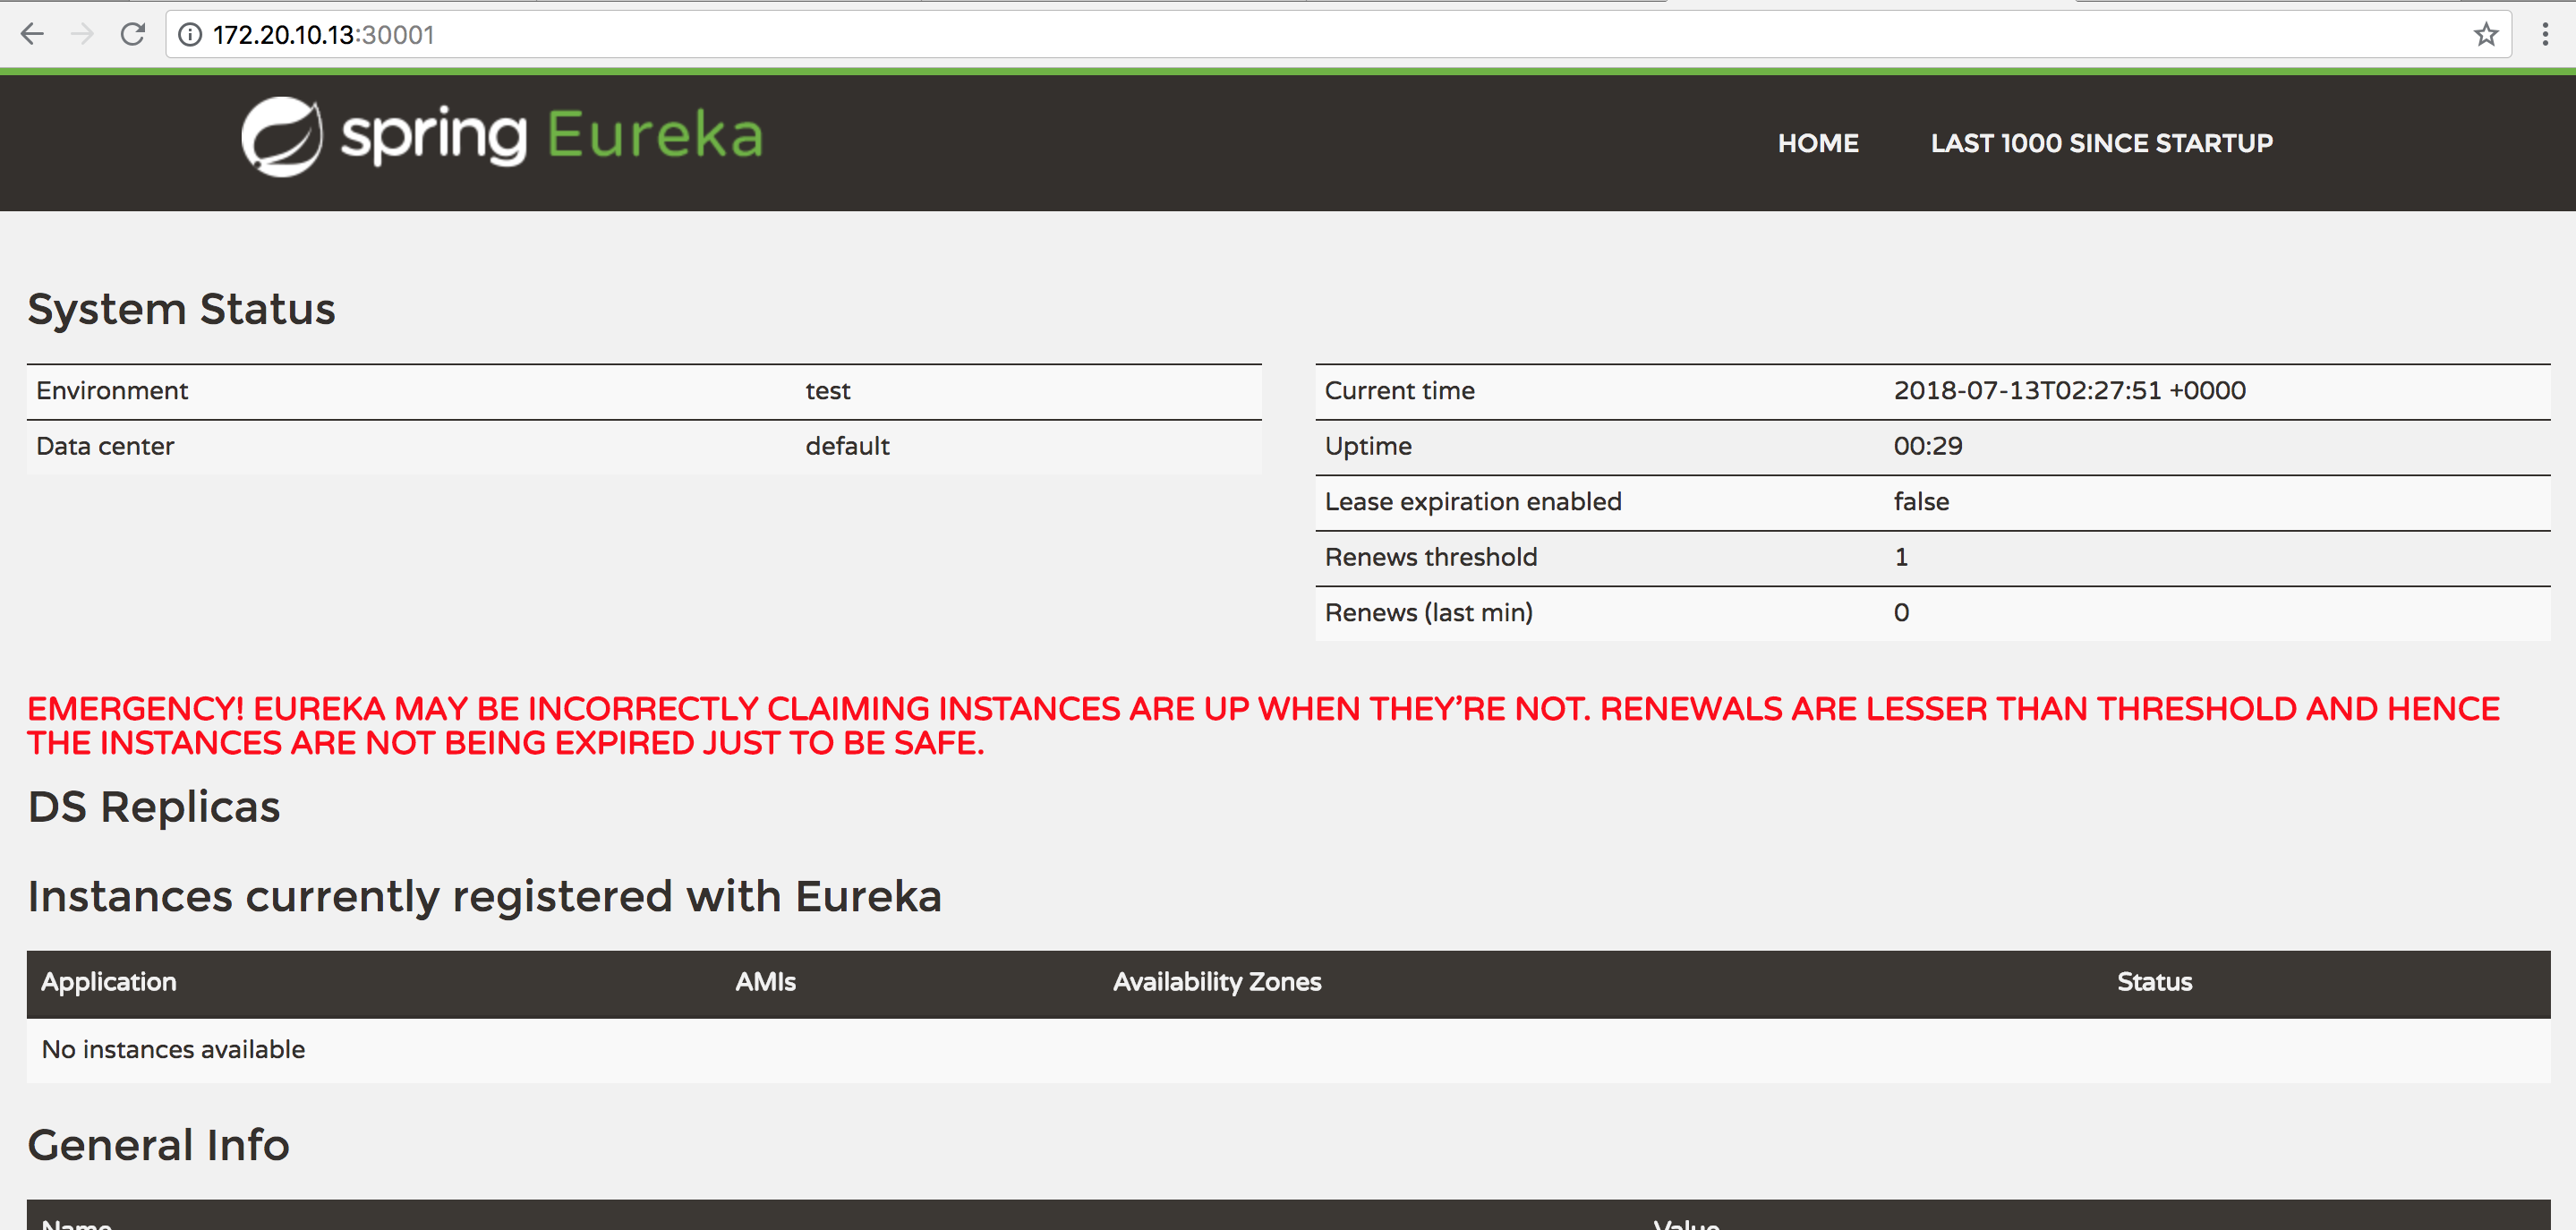
至此,我们的注册中心就可以通过 K8S 部署了,现在看起来比较麻烦,但是在一个大的集群环境中是很爽的,我们可以在结合前面提到的 Jenkins,把刚才一系列手动的操作交给 Jenkins 做。