英文版文档:https://fastapi.tiangolo.com/
中文版文档:https://fastapi.tiangolo.com/zh/
FastAPI教程:用户、高级指南:https://www.w3cschool.cn/fastapi/fastapi-tutorial.html
都在吹捧的Sanic框架为何敢号称最强?:https://zhuanlan.zhihu.com/p/360513398
web 框架排名:https://github.com/the-benchmarker/web-frameworks
1、FastAPI 教程
简 介
FastAPI 和 Sanic 类似,都是 Python 中的异步 web 框架。相比 Sanic,FastAPI 更加的成熟、社区也更加的活跃。
FastAPI 站在巨人的肩膀上?
很大程度上来说,这个巨人就是指 Flask 框架。
FastAPI 从语法上和 Flask 非常的相似,有异曲同工之妙。
其实不仅仅是 FastAPI ,就连 Sanic 也是基于 Flask 快速开发的 Web API 框架。
FastAPI 是一个用于构建 API 的现代、快速(高性能)的 web 框架,使用 Python 3.6+ 并基于标准的 Python 类型提示。
它具有如下这些优点:
- 快速:可与 NodeJS 和 Go 比肩的极高性能(归功于 Starlette 和 Pydantic)。
Starlette 用于路由匹配,Pydantic 用于数据验证 - 高效编码:提高功能开发速度约 200% 至 300%
- 更少 bug:减少约 40% 的人为(开发者)导致错误。
- 智能:极佳的编辑器支持。处处皆可自动补全,减少调试时间
- 简单:设计的易于使用和学习,阅读文档的时间更短
- 简短:使代码重复最小化。通过不同的参数声明实现丰富功能。bug 更少
- 健壮:生产可用级别的代码。还有自动生成的交互式文档
- 标准化:基于(并完全兼容)API 的相关开放标准:OpenAPI (以前被称为 Swagger) 和 JSON Schema。
FastAPI 最大的特点就是它使用了 Python 的类型注解,使用 FastAPI 需要 Python 版本大于等于 3.6。
安装 FastAPI
pip install fastapi,会自动安装 Starlette 和 Pydantic;然后还要 pip install uvicorn,因为 uvicorn 是运行相关应用程序的服务器。或者一步到胃:pip install fastapi[all],会将所有依赖全部安装。
教 程
Python 高性能 web 框架 - FastApi 全面指南:https://zhuanlan.zhihu.com/p/397029492
最受欢迎的异步框架:https://www.cnblogs.com/traditional/p/14733610.html
官网教程:https://fastapi.tiangolo.com/zh/tutorial/
- 第一步
- 路径参数
- 查询参数
- 请求体
- 查询参数和字符串校验
- 路径参数和数值校验
- 请求体 - 多个参数
- 请求体 - 字段
- 请求体 - 嵌套模型
- 模式的额外信息 - 例子
- 额外数据类型
- Cookie 参数
- Header 参数
- 响应模型
- 额外的模型
- 响应状态码
- 表单数据
- 请求文件
- 请求表单与文件
- 处理错误
- 路径操作配置
- JSON 兼容编码器
- 请求体 - 更新数据
- 中间件
- CORS(跨域资源共享)
- SQL (关系型) 数据库
- 更大的应用 - 多个文件
- 后台任务
- 元数据和文档 URL
- 静态文件
- 测试
- 调试
高级用户指南:https://fastapi.tiangolo.com/zh/advanced/
- 路径操作的高级配置
- 额外的状态码
- 直接返回响应
- 自定义响应 - HTML,流,文件和其他
- 附加额外的 Responses
- 响应Cookies
- 响应头
- 响应 - 更改状态码
- 高级依赖
- 直接使用请求
- 使用 Dataclasses
- 高级中间件
- SQL(关系)数据库与Peewee
- 异步SQL(关系)数据库
- NoSQL(分布式/大数据)数据库
- 子应用 - 挂载
- 代理
- 模板
- GraphQL
- WebSockets
- 生命周期事件
- 自定义 Request、APIRoute 类
- 测试 WebSockets
- 测试事件:启动-关闭
- 测试依赖
- 测试 Database
- 异步 测试
- 设置和环境变量
- Conditional OpenAPI
- 扩展 OpenAPI
- OpenAPI 回调
- OpenAPI Webhooks
- 包含 WSGI - Flask,Django,其它
- 生成 Clients
并发、部署、生成项目模板
Python 类型提示简介
:https://fastapi.tiangolo.com/zh/python-types/
Python类型注解,你需要知道的都在这里:https://zhuanlan.zhihu.com/p/419955374
对象注解属性的最佳实践:https://docs.python.org/zh-cn/3/howto/annotations.html
2、FastAPI 使用
简单使用示例
示例:同步 代码
from typing import Optional
from fastapi import FastAPI

app = FastAPI()


@app.get("/")
def read_root():
    return {"Hello": "World"}


@app.get("/items/{item_id}")
def read_item(item_id: int, q: Optional[str] = None):
    return {"item_id": item_id, "q": q}
示例:异步 代码
新建一个 main.py 文件
import os
import uvicorn
from pathlib import Path
from fastapi import FastAPI

app = FastAPI()


@app.get("/")
async def root():
    return {"message": "Hello World"}


if __name__ == '__main__':
    # os.system('uvicorn main_test:app --reload')
    uvicorn.run(f'{Path(__file__).stem}:app', host="0.0.0.0", port=5555)
    pass
FastAPI 推荐使用 uvicorn 来运行服务,Uvicorn 是基于uvloop 和 httptools 构建的闪电般快速的 ASGI 服务器。
uvicorn main:app 命令含义如下:
- main:main.py 文件(一个 Python「模块」)。
- app:在 main.py 文件中通过 app = FastAPI() 创建的对象。
- --reload:让服务器在更新代码后重新启动。仅在开发时使用该选项。
访问 http://127.0.0.1:5555 可以看到 JSON 格式的响应:{"message": "Hello World"}
请求 查询 参数
「请求路径」也通常被称为「端点」或「路由」。
import uvicorn
from pathlib import Path
from fastapi import FastAPI

app = FastAPI()  # 创建 api 对象


fake_items_db = [{"item_name": "Foo"}, {"item_name": "Bar"}, {"item_name": "Baz"}]


@app.get("/items/")
async def read_item(skip: int = 0, limit: int = 10):
    return fake_items_db[skip: skip + limit]


@app.get("/")  # 根路由。「请求路径」也通常被称为「端点」或「路由」。
async def root():
    return {"name": "king", 'age': 100}


@app.get("/say/{data}")
async def say(data: str, q: int = None):
    return {"data": data, "q": q}


if __name__ == '__main__':
    # os.system('uvicorn main_test:app --reload')
    uvicorn.run(f'{Path(__file__).stem}:app', host="127.0.0.1", port=5555)
    pass
浏览器访问
http://127.0.0.1:5555/
http://127.0.0.1:5555/say/test
http://127.0.0.1:5555/items/?skip=0&limit=10
该查询是 ? URL中位于关键字之后的一组键值对,以&字符分隔。
在 url 中进行查询:
skip:查询的起始参数
limit:查询的结束参数
关于 @app.get()、@router.get() 区别
都用于定义 HTTP GET 请求的处理程序,但存在一些区别。
- @app.get(): 这个方法是在 FastAPI 应用程序实例上直接定义路由的一种简写方式。
from fastapi import FastAPI

app = FastAPI()

@app.get("/")
async def root():
return {"message": "Hello, World!"}- @router.get(): 这个方法是在 FastAPI 路由器对象(Router)上定义路由的一种方式。你可以创建一个独立的路由器对象,然后使用 @router.get() 来定义特定路径的路由。
from fastapi import FastAPI, APIRouter

router = APIRouter()

@router.get("/items")
async def read_items():
    return {"message": "Read all items"}
上面示例创建一个名为 router 的路由器对象,并使用 router.get() 定义了 "/items" 路径的 GET 请求处理程序。需要注意的是,如果你使用了多个路由器对象,最终需要将它们添加到 FastAPI 应用程序实例中,才能生效。
# 通过 app.include_router() 方法,将路由器对象添加到 FastAPI 应用程序实例中,这样它的定义的路由才会被正确处理。
app.include_router(router)
总结:app.get() 用于在应用程序实例上定义路由,而 router.get() 是在路由器对象上定义路由。两者的区别在于定义位置和应用方式,但它们都可以用于处理 HTTP GET 请求。
总 结
- 导入
FastAPI。 - 创建一个
app实例。 - 编写一个路径操作装饰器(如
@app.get("/"))。 - 编写一个路径操作函数(如上面的
def root(): ...)。 - 运行开发服务器(如
uvicorn main:app --reload)。
请求的 "路径 参数"
路径参数是必须要体现在参数中。
「请求路径」也通常被称为「端点」或「路由」。
FastAPI 编写一个简单的应用程序:
import os
import uvicorn
from pathlib import Path
from fastapi import FastAPI

# 类似于 app = Flask(__name__)
app = FastAPI()


# 绑定路由和视图函数
@app.get("/")
async def root():
    return {"message": "Hello World"}


# 在 Windows 中必须加上 if __name__ == "__main__",
# 否则会抛出 RuntimeError: This event loop is already running
if __name__ == '__main__':
    # 启动服务,因为我们这个文件叫做 main_test.py,所以需要启动 main_test.py 里面的 app
    # os.system('uvicorn main_test:app --reload')
    # uvicorn.run("main_test:app", host="0.0.0.0", port=8000)
    uvicorn.run(f'{Path(__file__).stem}:app', host="0.0.0.0", port=5555)
    pass
在浏览器中输入 "localhost:5555" 就会显示相应的输出,我们看到在视图函数中可以直接返回一个字典。当然除了字典,其它的数据类型也是可以的。
# -*- coding:utf-8 -*-
from fastapi import FastAPI
import uvicorn

app = FastAPI()


@app.get("/int")
async def index1():
    return 666


@app.get("/str")
async def index2():
    return "佛祖保佑,佛祖保佑"


@app.get("/bytes")
async def index3():
    return b"satori"


@app.get("/tuple")
async def index4():
    temp_tuple = ("佛祖保佑", "佛祖保佑")
    return temp_tuple


@app.get("/list")
async def index5():
    return [{"name": "擒贼先擒王", "age": 18}, {"name": "捉奸先捉双", "age": 16}]


if __name__ == "__main__":
    uvicorn.run("main:app", host="0.0.0.0", port=5555)
直接使用 requests 发送请求
import requests
print(requests.get("http://localhost:5555/int").text)
print(requests.get("http://localhost:5555/str").text)
print(requests.get("http://localhost:5555/bytes").text)
print(requests.get("http://localhost:5555/tuple").text)
print(requests.get("http://localhost:5555/list").text)
不过元组自动转成列表返回了。这里我们在路由中指定了路径,可以看到 FastAPI 中的路径形式和其它框架并无二致,只不过目前的路径是写死的,如果我们想动态声明路径参数该怎么做呢?
路径 参数
可以使用与 Python 格式化字符串相同的语法 来声明路径 "参数" 或 "变量",FastAPI 足以辨别 路径参数 和 查询参数。
from fastapi import FastAPI
app = FastAPI()
@app.get("/items/{item_id}")
async def read_item(item_id):
return {"item_id": item_id}
路径参数 item_id 的值将作为参数 item_id 传递给你的函数。运行并访问 http://127.0.0.1:5555/items/foo 将会看到响应:{"item_id":"foo"}
示例:
from fastapi import FastAPI

app = FastAPI()


@app.get("/items/{item_id}")
async def read_item(item_id: str, q: str = None, short: bool = False):
    item = {"item_id": item_id}
    if q:
        item.update({"q": q})
    if not short:
        item.update(
            {"description": "This is an amazing item that has a long description"}
        )
    return item
路径参数 item_id 的值将作为参数 item_id 传递给你的函数。声明不属于路径参数的其他函数参数时,它们将被自动解释为 "查询字符串" 参数:
看看其访问路径,执行以下的任何一种 url 访问方式
http://127.0.0.1:8000/items/老王睡隔壁?short=1
http://127.0.0.1:8000/items/老王睡隔壁?short=True
http://127.0.0.1:8000/items/老王睡隔壁?short=true
http://127.0.0.1:8000/items/老王睡隔壁?short=on
http://127.0.0.1:8000/items/老王睡隔壁?short=yes
可以发现任何大小写的字母等都会被转换成 bool 值的参数 True,这就是所谓模糊验证参数,对于开发者来说是个好消息。注意:如果 short 参数没有默认值,则必须传参,否则 FastAPI 将报错。
{
"detail": [
{
"loc": [
"query",
"needy"
],
"msg": "field required",
"type": "value_error.missing"
}
]
}
示例:
from fastapi import FastAPI

app = FastAPI()

fake_items_db = [{"item_name": "Foo"}, {"item_name": "Bar"}, {"item_name": "Baz"}]


@app.get("/items/")
async def read_item(skip: int = 0, limit: int = 10):
    return fake_items_db[skip : skip + limit]
查询字符串是键值对的集合,这些键值对位于 URL 的 ? 之后,并以 &符号 分隔。
可以使用 Query 对查询进行额外的校验:
from typing import Optional

from fastapi import FastAPI, Query

app = FastAPI()

@app.get("/items/")
async def read_items(q: Optional[str] = Query(None, max_length=50)):
    results = {"items": [{"item_id": "Foo"}, {"item_id": "Bar"}]}
    if q:
        results.update({"q": q})
    return results
Query 有如下这些字段校验:
- min_length 最小长度
- max_length 最大长度
- regex 正则匹配
- Query 第一个参数为默认值,
...表示是必需的
Path 和 Query 用法一样,也能对查询字段进行校验。
而且你还可以声明数值校验:
from fastapi import FastAPI, Path, Query

app = FastAPI()


@app.get("/items/{item_id}")
async def read_items(
        *,
        item_id: int = Path(..., title="The ID of the item to get", ge=0, le=1000),
        q: str,
        size: float = Query(..., gt=0, lt=10.5)
):
    results = {"item_id": item_id}
    if q:
        results.update({"q": q})
    return results
gt:大于ge:大于等于lt:小于le:小于等于
类似的还有 Cookie:
from typing import Optional

from fastapi import Cookie, FastAPI

app = FastAPI()


@app.get("/items/")
async def read_items(ads_id: Optional[str] = Cookie(None)):
    return {"ads_id": ads_id}
以及 Header:
from typing import Optional

from fastapi import FastAPI, Header

app = FastAPI()


@app.get("/items/")
async def read_items(user_agent: Optional[str] = Header(None)):
    return {"User-Agent": user_agent}
请求主体+路径+查询参数,在请求主体的基础上加入 url 动态路径参数 和 查询参数
from fastapi import FastAPI
from pydantic import BaseModel


class Item(BaseModel):
    name: str
    description: str = None
    price: float
    tax: float = None


app = FastAPI()


@app.put("/items/{item_id}")
async def create_item(item_id: int, item: Item, q: str = None):
    result = {"item_id": item_id, **item.dict()}
    if q:
        result.update({"q": q})
    return result
关于模板引擎
FastAPI 不像 Flask 那样自带 模板引擎(Jinja2),也就是说没有默认的模板引擎,从另一个角度上说,FastAPI 在模板引擎的选择上变得更加灵活,极度舒适。
以 Jinja2 模板为例,安装依赖
pip install jinja2
pip install aiofiles # 用于 fastapi 的异步静态文件
# -*- coding:utf-8 -*-
from fastapi import FastAPI, Request
from fastapi.staticfiles import StaticFiles
from fastapi.templating import Jinja2Templates
import uvicorn

app = FastAPI()

app.mount("/static", StaticFiles(directory="static"), name="static")  # 挂载静态文件,指定目录

templates = Jinja2Templates(directory="templates")  # 模板目录


@app.get("/data/{data}")
async def read_data(request: Request, data: str):
    return templates.TemplateResponse("index.html", {"request": request, "data": data})


if __name__ == '__main__':
    uvicorn.run(app, host="127.0.0.1", port=8000)
html 文件渲染
<html>
<head>
<title>士可杀不可辱(you can kill me, but you can't fuck me)</title>
</head>
<body>
<h1>高呼: {{ data }}</h1>
</body>
</html>
在浏览器键入 http://127.0.0.1:8000/data/士可杀不可辱
值得注意的是,在返回的 TemplateRespone 响应时,必须带上 request 的上下文对象,传入参数放在同一字典。这样一来,又可以像 Flask 一样的使用 Jinja2。
为路径设置 tags 标签进行分组:
from typing import Optional, Set
from fastapi import FastAPI
from pydantic import BaseModel

app = FastAPI()


class Item(BaseModel):
    name: str
    description: Optional[str] = None
    price: float
    tax: Optional[float] = None
    tags: Set[str] = []


@app.post("/items/", response_model=Item, tags=["items"])
async def create_item(item: Item):
    return item


@app.get("/items/", tags=["items"])
async def read_items():
    return [{"name": "Foo", "price": 42}]


@app.get("/users/", tags=["users"])
async def read_users():
    return [{"username": "johndoe"}]
还可以设置 summary 和 description:
from typing import Optional, Set
from fastapi import FastAPI
from pydantic import BaseModel

app = FastAPI()


class Item(BaseModel):
    name: str
    description: Optional[str] = None
    price: float
    tax: Optional[float] = None
    tags: Set[str] = []


@app.post(
    "/items/",
    response_model=Item,
    summary="Create an item",
    description="Create an item with all the information, name, description, price, tax and a set of unique tags",
)
async def create_item(item: Item):
    return item
多行注释:
from typing import Optional, Set
from fastapi import FastAPI
from pydantic import BaseModel

app = FastAPI()


class Item(BaseModel):
    name: str
    description: Optional[str] = None
    price: float
    tax: Optional[float] = None
    tags: Set[str] = []


@app.post("/items/", response_model=Item, summary="Create an item")
async def create_item(item: Item):

    """
    Create an item with all the information:
    - **name**: each item must have a name
    - **description**: a long description
    - **price**: required
    - **tax**: if the item doesn't have tax, you can omit this
    - **tags**: a set of unique tag strings for this item
    """
return item废弃路由:
from fastapi import FastAPI

app = FastAPI()


@app.get("/items/", tags=["items"])
async def read_items():
    return [{"name": "Foo", "price": 42}]


@app.get("/users/", tags=["users"])
async def read_users():
    return [{"username": "johndoe"}]


@app.get("/elements/", tags=["items"], deprecated=True)
async def read_elements():
    return [{"item_id": "Foo"}]
有类型的路径参数
可以使用标准的 Python 类型标注为函数中的路径参数声明类型。
from fastapi import FastAPI
app = FastAPI()
@app.get("/items/{item_id}")
async def read_item(item_id: int):
return {"item_id": item_id}
在这个例子中,item_id 被声明为 int 类型。
运行示例,并打开浏览器访问 http://127.0.0.1:5555/items/3
将得到如下响应:{"item_id":3}
注意函数接收(并返回)的值为 3,是一个 Python int 值,而不是字符串 "3"。
所以,FastAPI 通过上面的类型声明提供了对请求的自动"解析"。
# -*- coding:utf-8 -*-

from fastapi import FastAPI
import uvicorn

app = FastAPI()


@app.get("/apple/{item_id}")
async def get_item(item_id: int):
    """
        Flask 定义类型是在路由当中,也就是在 <> 里面,变量和类型通过 : 分隔
        FastAPI 是使用类型注解的方式,此时的 item_id 要求一个整型(准确的说是一个能够转成整型的字符串)
    """
    return {"item_id": item_id}

if __name__ == "__main__":
    uvicorn.run("main:app", host="0.0.0.0", port=5555)
顺序很重要
由于路径操作是按顺序依次运行的,所以在定义路由的时候需要注意一下顺序
from fastapi import FastAPI
app = FastAPI()
@app.get("/users/me")
async def read_user_me():
return {"user_id": "the current user"}
@app.get("/users/{user_id}")
async def read_user(user_id: str):
return {"user_id": user_id}
因为路径操作是按照顺序进行的,所以这里要保证 /users/me 在 /users/{user_id} 的前面,否则的话只会匹配到 /users/{user_id},此时如果访问 /users/me,那么会返回一个解析错误,因为字符串 "me" 无法解析成整型。
预设值 ( 枚举 )
可以将某个路径参数通过类型注解的方式声明为指定的类型( 准确的说是可以转成指定的类型,因为默认都是字符串 ),但如果我们希望它只能是我们规定的几个值之一该怎么做呢?
这时可以使用标准的 Python Enum 类型。导入 Enum 并创建一个继承自 str 和 Enum 的子类。通过从 str 继承,API 文档将能够知道这些值必须为 string 类型并且能够正确地展示出来。然后创建具有固定值的类属性,这些固定值将是可用的有效值:
from enum import Enum

from fastapi import FastAPI


class ModelName(str, Enum):
    alexnet = "alexnet"
    resnet = "resnet"
    lenet = "lenet"


app = FastAPI()


@app.get("/models/{model_name}")
async def get_model(model_name: ModelName):
    if model_name is ModelName.alexnet:
        return {"model_name": model_name, "message": "Deep Learning FTW!"}

    if model_name.value == "lenet":
        return {"model_name": model_name, "message": "LeCNN all the images"}

    return {"model_name": model_name, "message": "Have some residuals"}
路径中包含 /
假设有这样一个路由:/files/{file_path},而用户传递的 file_path 中显然是可以带 / 的,假设 file_path 是 /root/test.py,那么路由就变成了 /files//root/test.py,显然这是有问题的。
OpenAPI 不支持任何方式去声明路径参数以在其内部包含路径,因为这可能会导致难以测试和定义的情况出现。不过,仍然可以通过 Starlette 的一个内部工具在 FastAPI 中实现它。
可以使用直接来自 Starlette 的选项来声明一个包含路径的路径参数:/files/{file_path:path}
在这种情况下,参数的名称为 file_path,结尾部分的 :path 说明该参数应匹配任意的路径。
因此,你可以这样使用它:
from fastapi import FastAPI
app = FastAPI()
@app.get("/files/{file_path:path}")
async def read_file(file_path: str):
return {"file_path": file_path}
你可能会需要参数包含 /home/johndoe/myfile.txt,以斜杠(/)开头。
在这种情况下,URL 将会是 /files//home/johndoe/myfile.txt,在files 和 home 之间有一个双斜杠(//)。
from fastapi import FastAPI
import uvicorn

app = FastAPI()


# 声明 file_path 的类型为 path,这样它会被当成一个整体
@app.get("/files/{file_path:path}")
async def get_file(file_path: str):
    return {"file_path": file_path}


if __name__ == "__main__":
    uvicorn.run("main:app", host="0.0.0.0", port=5555)
设置 127.0.0.1:8000/docs
至于 "127.0.0.1:8000/docs" 页面本身,也是可以进行设置的:
from fastapi import FastAPI
import uvicorn

app = FastAPI(
    title="测试文档",
    description="这是一个简单的 demo",
    docs_url="/my_docs",
    openapi_url="/my_openapi"
)


@app.get("/apple/{item_id}")
async def get_item(item_id: int):
    return {"item_id": item_id}


if __name__ == "__main__":
    uvicorn.run("main:app", host="0.0.0.0", port=5555)
路径参数、数据校验
查询参数数据校验使用的是 Query,路径参数数据校验使用的是 Path,两者的使用方式一模一样,没有任何区别
from fastapi import FastAPI, Path
import uvicorn

app = FastAPI()

@app.get("/items/{item-id}")
async def read_items(item_id: int = Path(..., alias="item-id")):
    return {"item_id": item_id}

if __name__ == "__main__":
    uvicorn.run("main:app", host="0.0.0.0", port=5555)
因为路径参数是必须的,它是路径的一部分,所以我们应该使用 ... 将其标记为必传参数。当然即使不这么做也无所谓,因为指定了默认值也用不上,因为路径参数不指定压根就匹配不到相应的路由。至于一些其它的校验,和查询参数一模一样,所以这里不再赘述了。
不过我们之前说过,路径参数应该在查询参数的前面,尽管 FastAPI 没有这个要求,但是这样写明显更舒服一些。但是问题来了,如果路径参数需要指定别名,但是某一个查询参数不需要,这个时候就会出现问题:
@app.get("/items/{item-id}")
async def read_items(q: str,
                     item_id: int = Path(..., alias="item-id")):

    return {"item_id": item_id, "q": q}
显然此时 Python 的语法就决定了 item_id 就必须放在 q 的后面,当然这么做是完全没有问题的,FastAPI 对参数的先后顺序没有任何要求,因为它是通过参数的名称、类型和默认值声明来检测参数,而不在乎参数的顺序。但此时我们就要让 item_id 在 q 的前面要怎么做呢?
@app.get("/items/{item-id}")
async def read_items(*, item_id: int = Path(..., alias="item-id"),
                     q: str):

    return {"item_id": item_id, "q": q}
此时就没有问题了,通过将第一个参数设置为 *,使得 item_id 和 q 都必须通过关键字传递,所以此时默认参数在非默认参数之前也是允许的。当然我们也不需要担心 FastAPI 传参的问题,你可以认为它所有的参数都是通过关键字参数的方式传递的。
请求的 "查询 参数"
- 查询参数在 FastAPI 中可以通过类型注解的方式进行声明,查询参数也可以不写,那么请求相关的所有信息都会进入到这个 Request 对象中
- 如果函数中定义了不属于路径参数的参数时,那么它们将会被自动解释会查询参数。
示例:
from fastapi import FastAPI
app = FastAPI()
fake_items_db = [{"item_name": "Foo"}, {"item_name": "Bar"}, {"item_name": "Baz"}]
@app.get("/items/")
async def read_item(skip: int = 0, limit: int = 10):
return fake_items_db[skip : skip + limit]
查询字符串是键值对的集合,这些键值对位于 URL 的 ? 之后,并以 & 符号分隔。
例如,在以下 url 中:http://127.0.0.1:5555/items/?skip=0&limit=10
查询参数为:
skip:对应的值为0limit:对应的值为10
示例:
from fastapi import FastAPI
import uvicorn

app = FastAPI()


@app.get("/user/{user_id}")
async def get_user(user_id: str, name: str, age: int):
    """
        函数中参数定义了 user_id、name、age 三个参数
        显然 user_id 和 路径参数中的 user_id 对应,
        然后 name 和 age 会被解释成查询参数
        这三个参数的顺序没有要求,但是一般都是路径参数在前,查询参数在后
    """
    return {"user_id": user_id, "name": name, "age": age}


if __name__ == "__main__":
    uvicorn.run("main:app", host="0.0.0.0", port=5555)
可选参数、必需参数
- 当 非路径参数 默认值设置为 None,则参数是可选的
- 当 非路径参数 没有默认值 时,则参数是必需传递的
将它们的默认值设置为 None 来声明可选查询参数:
from typing import Union
from fastapi import FastAPI
app = FastAPI()
@app.get("/items/{item_id}")
async def read_item(item_id: str, q: Union[str, None] = None):
if q:
return {"item_id": item_id, "q": q}
return {"item_id": item_id}
在这个例子中,函数参数 q 默认值为 None,所以q可选的。FastAPI 能够分辨出参数 item_id 是路径参数而 q 不是,因此 q 是一个查询参数。
多类型 参数 ( Union )
指定多个类型。比如 user_id 按照整型解析、解析不成功退化为字符串。
from typing import Union, Optional
from fastapi import FastAPI
import uvicorn

app = FastAPI()


@app.get("/user/{user_id}")
async def get_user(user_id: Union[int, str], name: Optional[str] = None):
    """
        通过 Union 来声明一个混合类型,int 在前、str 在后。会先按照 int 解析,解析失败再变成 str
        然后是 name,它表示字符串类型、但默认值为 None(不是字符串),那么应该声明为 Optional[str]
    """
    return {"user_id": user_id, "name": name}


if __name__ == "__main__":
    uvicorn.run("main:app", host="0.0.0.0", port=5555)
所以 FastAPI 的设计还是非常不错的,通过 Python 的类型注解来实现参数类型的限定可以说是非常巧妙的,因此这也需要我们熟练掌握 Python 的类型注解。
bool 类型自动转换
对于布尔类型,FastAPI 支持自动转换
from fastapi import FastAPI
import uvicorn

app = FastAPI()


@app.get("/{flag}")
async def get_flag(flag: bool):
    return {"flag": flag}


if __name__ == "__main__":
    uvicorn.run("main:app", host="0.0.0.0", port=5555)
测试
print(requests.get("http://localhost:5555/1").json())
print(requests.get("http://localhost:5555/True").json())
print(requests.get("http://localhost:5555/true").json())
print(requests.get("http://localhost:5555/False").json())
print(requests.get("http://localhost:5555/false").json())
print(requests.get("http://localhost:5555/on").json())
print(requests.get("http://localhost:5555/yes").json())
print(requests.get("http://localhost:5555/off").json())
print(requests.get("http://localhost:5555/no").json())
多个路径、查询参数
可以同时声明多个路径参数和查询参数,FastAPI 能够识别它们。而且你不需要以任何特定的顺序来声明。它们将通过名称被检测到:
from typing import Union
from fastapi import FastAPI
app = FastAPI()
@app.get("/users/{user_id}/items/{item_id}")
async def read_user_item(
user_id: int, item_id: str, q: Union[str, None] = None, short: bool = False
):
item = {"item_id": item_id, "owner_id": user_id}
if q:
item.update({"q": q})
if not short:
item.update(
{"description": "This is an amazing item that has a long description"}
)
return item
FastAPI 可以定义任意个路径参数,只要动态的路径参数在函数的参数中都出现即可。当然查询参数也可以是任意个,FastAPI 可以处理的很好。
from typing import Optional
from fastapi import FastAPI
import uvicorn

app = FastAPI()


@app.get("/postgres/{schema}/v1/{table}")
async def get_data(
        schema: str,
        table: str,
        select: str = "*",
        where: Optional[str] = None,
        limit: Optional[int] = None,
        offset: Optional[int] = None):
    """
    标准格式是:路径参数按照顺序在前,查询参数在后
    但其实对顺序是没有什么要求的
    """
    query = f"select {select} from {schema}.{table}"
    if where:
        query += f" where {where}"
    if limit:
        query += f" limit {limit}"
    if offset:
        query += f" offset {offset}"
    return {"query": query}


if __name__ == "__main__":
    uvicorn.run("main:app", host="0.0.0.0", port=5555)
http://localhost:5555/postgres/ods/v1/staff
http://localhost:5555/postgres/ods/v1/staff?select=id, name&where=id > 3&limit=100
Depends ( 依赖注入 )
from typing import Optional
import uvicorn
from fastapi import Depends, FastAPI

app = FastAPI()


async def common_parameters(q: Optional[str] = None, skip: int = 0, limit: int = 100):
    return {"q": q, "skip": skip, "limit": limit}


@app.get("/items/")
async def read_items(commons: dict = Depends(common_parameters)):
    # common_parameters 接收三个参数:q、skip、limit
    # 然后在解析请求的时候,会将 q、skip、limit 传递到 common_parameters 中,然后将返回值赋值给 commons
    # 但如果解析不到某个参数时,那么会判断函数中参数是否有默认值,没有的话就会返回错误,而不是传递一个 None 进去
    return commons


@app.get("/users/")
async def read_users(commons: dict = Depends(common_parameters)):
    return commons


if __name__ == "__main__":
    uvicorn.run("main:app", host="0.0.0.0", port=5555)
测试
requests.get("http://localhost:5555/items").json()
{q': None,'skip':@,limit': 100}
requests.get("http://localhost:5555/items?g=id,name").json()
{g':id, name',skip': 0,limit': 100}
所以 Depends 能够很好的实现依赖注入,而且我们特意写了两个路由,就是想表示它们是彼此独立的。因此当有共享的逻辑、或者共享的数据库连接、增强安全性、身份验证、角色权限等等,会非常的实用。
FastAPI 提供了简单易用,但功能强大的依赖注入系统,可以让开发人员轻松地把组件集成至FastAPI。
什么是「依赖注入」?
依赖注入是一种消除类之间依赖关系的设计模式。把有依赖关系的类放到容器中,解析出这些类的实例,就是依赖注入。目的是实现类的解耦。
示例:
from typing import Optional
from fastapi import Depends, FastAPI

app = FastAPI()


async def common_parameters(q: Optional[str] = None, skip: int = 0, limit: int = 100):
    return {"q": q, "skip": skip, "limit": limit}


@app.get("/items/")
async def read_items(commons: dict = Depends(common_parameters)):
    return commons


@app.get("/users/")
async def read_users(commons: dict = Depends(common_parameters)):
    return commons
本例中的依赖项预期接收如下参数:
- 类型为
str的可选查询参数q - 类型为
int的可选查询参数skip,默认值是0 - 类型为
int的可选查询参数limit,默认值是100
然后,依赖项函数返回包含这些值的 dict。
使用Class作为依赖:
from typing import Optional
from fastapi import Depends, FastAPI

app = FastAPI()

fake_items_db = [{"item_name": "Foo"}, {"item_name": "Bar"}, {"item_name": "Baz"}]


class CommonQueryParams:
    def __init__(self, q: Optional[str] = None, skip: int = 0, limit: int = 100):
        self.q = q
        self.skip = skip
        self.limit = limit


@app.get("/items/")
async def read_items(commons: CommonQueryParams = Depends(CommonQueryParams)):
    response = {}
    if commons.q:
        response.update({"q": commons.q})
    items = fake_items_db[commons.skip: commons.skip + commons.limit]
    response.update({"items": items})
    return response
使用嵌套子依赖:
from typing import Optional
from fastapi import Cookie, Depends, FastAPI

app = FastAPI()


def query_extractor(q: Optional[str] = None):
    return q


def query_or_cookie_extractor(
        q: str = Depends(query_extractor), last_query: Optional[str] = Cookie(None)
):
    if not q:
        return last_query
    return q


@app.get("/items/")
async def read_query(query_or_default: str = Depends(query_or_cookie_extractor)):
    return {"q_or_cookie": query_or_default}
在路径中使用依赖:
from fastapi import Depends, FastAPI, Header, HTTPException

app = FastAPI()


async def verify_token(x_token: str = Header(...)):
    if x_token != "fake-super-secret-token":
        raise HTTPException(status_code=400, detail="X-Token header invalid")


async def verify_key(x_key: str = Header(...)):
    if x_key != "fake-super-secret-key":
        raise HTTPException(status_code=400, detail="X-Key header invalid")
    return x_key


@app.get("/items/", dependencies=[Depends(verify_token), Depends(verify_key)])
async def read_items():
    return [{"item": "Foo"}, {"item": "Bar"}]
全局依赖项,可以为所有路径操作应用该依赖项:
from fastapi import Depends, FastAPI, Header, HTTPException


async def verify_token(x_token: str = Header(...)):
    if x_token != "fake-super-secret-token":
        raise HTTPException(status_code=400, detail="X-Token header invalid")


async def verify_key(x_key: str = Header(...)):
    if x_key != "fake-super-secret-key":
        raise HTTPException(status_code=400, detail="X-Key header invalid")
    return x_key


app = FastAPI(dependencies=[Depends(verify_token), Depends(verify_key)])


@app.get("/items/")
async def read_items():
    return [{"item": "Portal Gun"}, {"item": "Plumbus"}]


@app.get("/users/")
async def read_users():
    return [{"username": "Rick"}, {"username": "Morty"}]
查询参数、数据校验
FastAPI 支持我们进行更加智能的数据校验,比如一个字符串,我们希望用户在传递的时候只能传递长度为 6 到 15 的字符串该怎么做呢?
from typing import Optional
from fastapi import FastAPI, Query
import uvicorn

app = FastAPI()


@app.get("/user")
async def check_length(
        # 默认值为 None,应该声明为 Optional[str],当然声明 str 也是可以的。只不过声明为 str,那么默认值应该也是 str
        # 所以如果一个类型允许为空,那么更规范的做法应该是声明为 Optional[类型]。
        password: Optional[str] = Query(None, min_length=6, max_length=15)
):
    return {"password": password}


if __name__ == "__main__":
    uvicorn.run("main:app", host="0.0.0.0", port=5555)
password 是可选的,但是一旦传递则必须传递字符串、而且还是长度在 6 到 15 之间的字符串。所以如果传递的是 None,那么在声明默认值的时候 None 和 Query(None) 是等价的,只不过 Query 还支持其它的参数来对参数进行限制。
requests.get("http://localhost:5555/user?password=12345").json()
requests.get("http://localhost:5555/user?password=123456").json()
Query 里面除了限制最小长度和最大长度,还有其它的功能
查询参数和字符串校验
from fastapi import FastAPI
app = FastAPI()
@app.get("/items/")
async def read_items(q: str | None = None):
results = {"items": [{"item_id": "Foo"}, {"item_id": "Bar"}]}
if q:
results.update({"q": q})
return results
查询参数 q 的类型为 str,默认值为 None,因此它是可选的。
额外的校验
添加约束条件:即使 q 是可选的,但只要提供了该参数,则该参数值不能超过50个字符的长度。
从 fastapi 导入 Query:
from typing import Union
from fastapi import FastAPI, Query
app = FastAPI()
@app.get("/items/")
async def read_items(q: Union[str, None] = Query(default=None, max_length=50)):
results = {"items": [{"item_id": "Foo"}, {"item_id": "Bar"}]}
if q:
results.update({"q": q})
return results
添加更多校验
还可以添加 min_length 参数:
from typing import Union
from fastapi import FastAPI, Query
app = FastAPI()
@app.get("/items/")
async def read_items(
q: Union[str, None] = Query(default=None, min_length=3, max_length=50)
):
results = {"items": [{"item_id": "Foo"}, {"item_id": "Bar"}]}
if q:
results.update({"q": q})
return results
添加正则表达式
可以定义一个参数值必须匹配的正则表达式:
from typing import Union
from fastapi import FastAPI, Query
app = FastAPI()
@app.get("/items/")
async def read_items(
q: Union[str, None] = Query(
default=None, min_length=3, max_length=50, pattern="^fixedquery$"
)
):
results = {"items": [{"item_id": "Foo"}, {"item_id": "Bar"}]}
if q:
results.update({"q": q})
return results
声明为必须参数
... 是 Python 中的一个特殊的对象,通过它可以实现该参数是必传参数。
from fastapi import FastAPI, Query
import uvicorn

app = FastAPI()


@app.get("/user")
async def check_length(password: str = Query(..., min_length=6)):
    """将第一个参数换成 ... 即可实现该参数是必传参数
    """
    return {"password": password}


if __name__ == "__main__":
    uvicorn.run("main:app", host="0.0.0.0", port=5555)
查询参数变成一个列表
如果我们指定了 a=1&a=2,那么我们在获取 a 的时候如何才能得到一个列表呢?
from typing import Optional, List
from fastapi import FastAPI, Query
import uvicorn

app = FastAPI()


@app.get("/items")
async def read_items(
        a1: str = Query(...),
        a2: List[str] = Query(...),
        b: List[str] = Query(...)
):
    return {"a1": a1, "a2": a2, "b": b}


if __name__ == "__main__":
    uvicorn.run("main:app", host="0.0.0.0", port=5555)
首先 "a2" 和 "b" 都是对应列表,然后 "a1" 只获取了最后一个值。另外可能有人觉得我们这样有点啰嗦,在函数声明中可不可以这样写呢?
@app.get("/items")
async def read_items(
        a1: str,
        a2: List[str],
        b: List[str]
):
    return {"a1": a1, "a2": a2, "b": b}
对于 a1 是可以的,但是 a2 和 b 不行。对于类型为 list 的查询参数,无论有没有默认值,你都必须要显式的加上 Query 来表示必传参数。如果允许为 None(或者有默认值)的话,那么应该这么写:
from typing import Optional, List
from fastapi import FastAPI, Query
import uvicorn

app = FastAPI()


@app.get("/items")
async def read_items(
        a1: str,
        a2: Optional[List[str]] = Query(None),
        b: List[str] = Query(["1", "嘿嘿"])
):
    return {"a1": a1, "a2": a2, "b": b}


if __name__ == "__main__":
    uvicorn.run("main:app", host="0.0.0.0", port=5555)
给参数起别名
假设我们定义的查询参数名叫 item-query,那么由于它要体现在函数参数中、而这显然不符合 Python 变量的命名规范,这个时候要怎么做呢?答案是起一个别名。
from typing import Optional, List
from fastapi import FastAPI, Query
import uvicorn

app = FastAPI()


@app.get("/items")
async def read_items(
        # 通过 url 的时候使用别名即可
        item1: Optional[str] = Query(None, alias="item-query"),
        item2: str = Query("哈哈", alias="@@@@"),
        item3: str = Query(..., alias="$$$$")  # item3 是必传的
):
    return {"item1": item1, "item2": item2, "item3": item3}


if __name__ == "__main__":
    uvicorn.run("main:app", host="0.0.0.0", port=5555)
数值检测
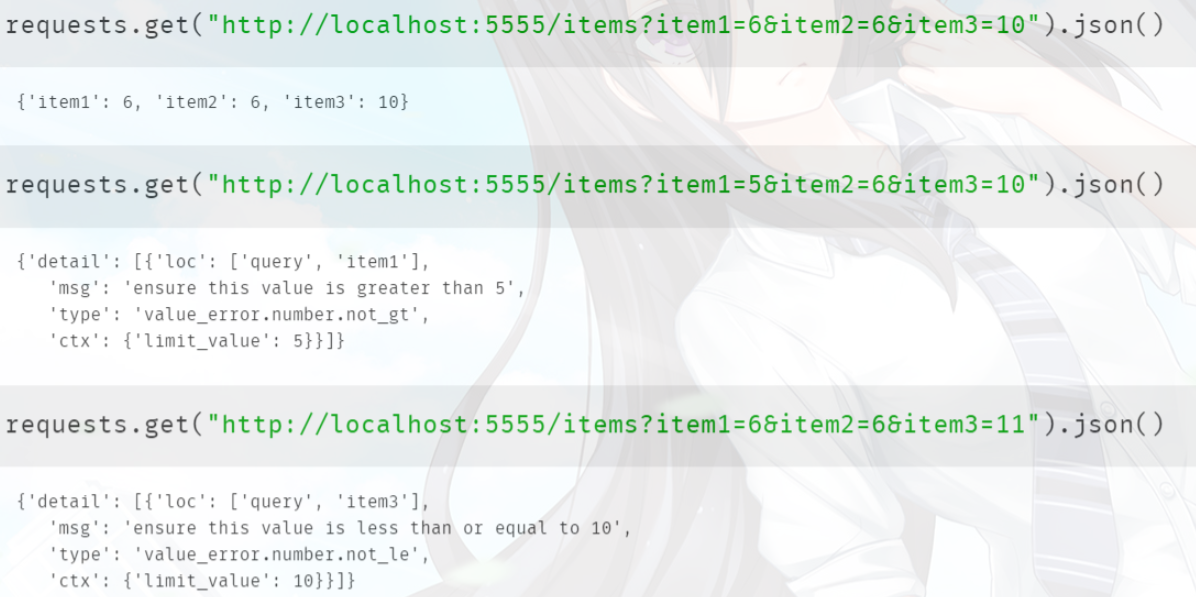
Query 不仅仅支持对字符串的校验,还支持对数值的校验,里面可以传递 gt、ge、lt、le 这几个参数,相信这几个参数不用说你也知道是干什么的,我们举例说明:
from fastapi import FastAPI, Query
import uvicorn

app = FastAPI()


@app.get("/items")
async def read_items(
        # item1 必须大于 5
        item1: int = Query(..., gt=5),
        # item2 必须小于等于 7
        item2: int = Query(..., le=7),
        # item3 必须必须等于 10
        item3: int = Query(..., ge=10, le=10)
):
    return {"item1": item1, "item2": item2, "item3": item3}


if __name__ == "__main__":
    uvicorn.run("main:app", host="0.0.0.0", port=5555)
测试
Request 对象
Request 是什么?首先我们知道任何一个请求都对应一个 Request 对象,请求的所有信息都在这个 Request 对象中,FastAPI 也不例外。
路径参数是必须要体现在参数中,但是查询参数可以不写了 因为我们定义了 request: Request,那么请求相关的所有信息都会进入到这个 Request 对象中
from fastapi import FastAPI, Request
import uvicorn

app = FastAPI()


@app.get("/girl/{user_id}")
async def read_girl(user_id: str,
                    request: Request):
    """路径参数是必须要体现在参数中,但是查询参数可以不写了
       因为我们定义了 request: Request,那么请求相关的所有信息都会进入到这个 Request 对象中"""
    header = request.headers  # 请求头
    method = request.method  # 请求方法
    cookies = request.cookies  # cookies
    query_params = request.query_params  # 查询参数
    return {"name": query_params.get("name"), "age": query_params.get("age"), "hobby": query_params.getlist("hobby")}


if __name__ == "__main__":
    uvicorn.run("main:app", host="0.0.0.0", port=5555)
通过 Request 对象可以获取所有请求相关的信息,我们之前当参数传递不对的时候,FastAPI 会自动帮我们返回错误信息,但通过 Request 我们就可以自己进行解析、自己指定返回的错误信息了。
Response 对象
既然有 Request,那么必然会有 Response,尽管我们可以直接返回一个字典,但 FastAPI 实际上会帮我们转成一个 Response 对象。
Response 内部接收如下参数:
content:返回的数据status_code:状态码headers:返回的请求头media_type:响应类型(就是 HTML 中 Content-Type,只不过这里换了个名字)background:接收一个任务,Response 在返回之后会自动异步执行
示例
from fastapi import FastAPI, Request, Response
import uvicorn
import orjson

app = FastAPI()


@app.get("/girl/{user_id}")
async def read_girl(user_id: str, request: Request):
    query_params = request.query_params  # 查询参数
    data = {
        "name": query_params.get("name"),
        "age": query_params.get("age"),
        "hobby": query_params.getlist("hobby")
    }
    # 实例化一个 Response 对象
    response = Response(
        # content,我们需要手动转成 json 字符串,如果直接返回字典的话,那么在包装成 Response 对象的时候会自动帮你转
        orjson.dumps(data),
        # status_code,状态码
        201,
        # headers,响应头
        {"Token": "xxx"},
        # media_type,就是 HTML 中的 Content-Type
        "application/json",
    )
    # 如果想设置 cookie 的话,那么通过 response.set_cookie 即可
    # 删除 cookie 则是 response.delete_cookie
    return response


if __name__ == "__main__":
    uvicorn.run("main:app", host="0.0.0.0", port=5555)
通过 Response 我们可以实现请求头、状态码、cookie 等自定义。
另外除了 Response 之外还有很多其它类型的响应,它们都在 fastapi.responses 中,比如:FileResponse、HTMLResponse、PlainTextResponse 等等。它们都继承了 Response,只不过会自动帮你设置响应类型,举个栗子:
from fastapi import FastAPI
from fastapi.responses import Response, HTMLResponse
import uvicorn

app = FastAPI()


@app.get("/index")
async def index():
    response1 = HTMLResponse("<h1>你好呀</h1>")
    response2 = Response("<h1>你好呀</h1>", media_type="text/html")
    # 以上两者是等价的,在 HTMLResponse 中会自动将 media_type 设置成 text/html
    return response1


if __name__ == "__main__":
    uvicorn.run("main:app", host="0.0.0.0", port=5555)
使用 response_model参数来声明用于响应的模型:
from typing import List, Optional
from fastapi import FastAPI
from pydantic import BaseModel

app = FastAPI()


class Item(BaseModel):
    name: str
    description: Optional[str] = None
    price: float
    tax: Optional[float] = None
    tags: List[str] = []


@app.post("/items/", response_model=Item)
async def create_item(item: Item):
    return item
response_model_exclude_unset=True:响应中将不会包含那些默认值,而是仅有实际设置的值response_model_include包含哪些属性response_model_exclude省略某些属性
status_code参数来声明用于响应的 HTTP 状态码:
from fastapi import FastAPI

app = FastAPI()


@app.post("/items/", status_code=201)
async def create_item(name: str):
    return {"name": name}
表单字段时,要使用Form:
from fastapi import FastAPI, Form

app = FastAPI()


@app.post("/login/")
async def login(username: str = Form(...), password: str = Form(...)):
    return {"username": username}
File用于定义客户端的上传文件(接收上传文件,要预先安装python-multipart
from fastapi import FastAPI, File, UploadFile

app = FastAPI()


@app.post("/files/")
async def create_file(file: bytes = File(...)):
    return {"file_size": len(file)}


@app.post("/uploadfile/")
async def create_upload_file(file: UploadFile = File(...)):
    return {"filename": file.filename}
向客户端返回 HTTP 错误响应,可以使用HTTPException。
from fastapi import FastAPI, HTTPException

app = FastAPI()

items = {"foo": "The Foo Wrestlers"}


@app.get("/items/{item_id}")
async def read_item(item_id: str):
    if item_id not in items:
        raise HTTPException(status_code=404, detail="Item not found")
    return {"item": items[item_id]}
使用response_description设置响应描述:
from typing import Optional, Set

from fastapi import FastAPI
from pydantic import BaseModel

app = FastAPI()


class Item(BaseModel):
    name: str
    description: Optional[str] = None
    price: float
    tax: Optional[float] = None
    tags: Set[str] = []


@app.post(
    "/items/",
    response_model=Item,
    summary="Create an item",
    response_description="The created item",
)
async def create_item(item: Item):
    """
    Create an item with all the information:
    - **name**: each item must have a name
    - **description**: a long description
    - **price**: required
    - **tax**: if the item doesn't have tax, you can omit this
    - **tags**: a set of unique tag strings for this item
    """
    return item
请求体
当你需要将数据从客户端(例如浏览器)发送给 API 时,你将其作为「请求体」发送。
请求体 是客户端发送给 API 的数据。响应体 是 API 发送给客户端的数据。
你的 API 几乎总是要发送响应体。但是客户端并不总是需要发送请求体。
可以使用 Pydantic 模型来声明请求体,并能够获得它们所具有的所有能力和优点。不能使用 GET 操作(HTTP 方法)发送请求体。要发送数据,必须使用下列方法之一:POST(较常见)、PUT、DELETE 或 PATCH。
显然对应 POST、PUT 等类型的请求,我们必须要能够解析出请求体,并且能够构造出响应体。
Model
在 FastAPI 中,请求体和响应体都对应一个 Model
from typing import Optional, List
from fastapi import FastAPI, Request, Response
from pydantic import BaseModel
import uvicorn

app = FastAPI()


class Girl(BaseModel):
    """数据验证是通过 pydantic 实现的,我们需要从中导入 BaseModel,然后继承它"""
    name: str
    age: Optional[str] = None
    length: float
    hobby: List[str]  # 对于 Model 中的 List[str] 我们不需要指定 Query(准确的说是 Field)


@app.post("/girl")
async def read_girl(girl: Girl):
    # girl 就是我们接收的请求体,它需要通过 json 来传递,并且这个 json 要有上面的四个字段(age 可以没有)
    # 通过 girl.xxx 的方式我们可以获取和修改内部的所有属性
    return dict(girl)  # 直接返回 Model 对象也是可以的


if __name__ == "__main__":
    uvicorn.run("main:app", host="0.0.0.0", port=5555)
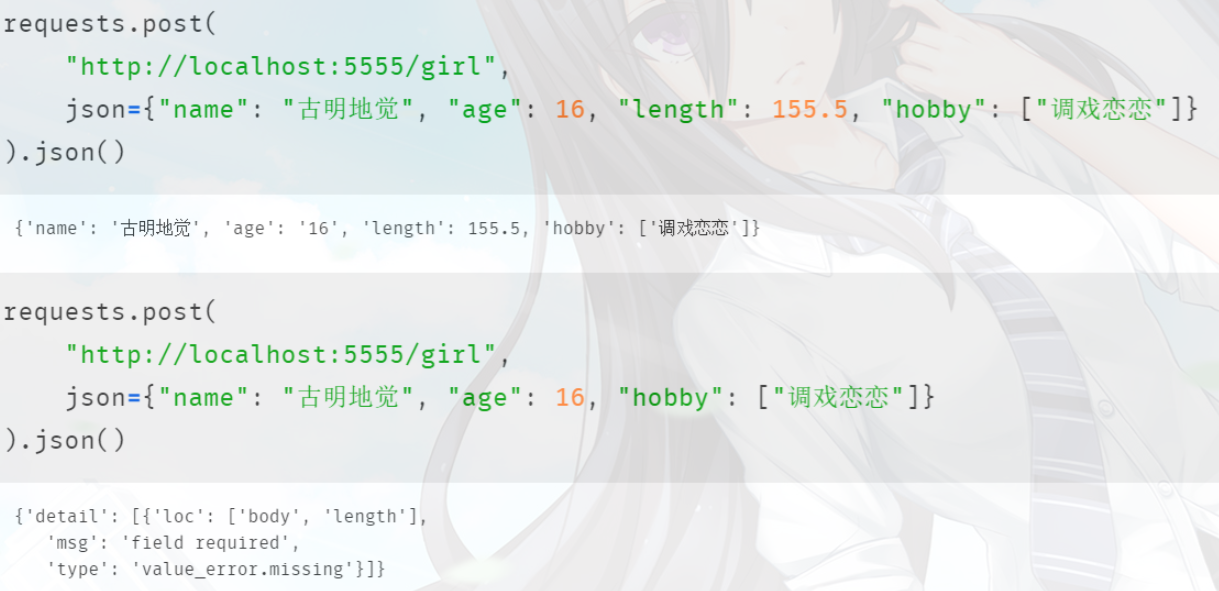
测试
示例:
from fastapi import FastAPI
from pydantic import BaseModel
class Item(BaseModel):
name: str
description: str | None = None
price: float
tax: float | None = None
app = FastAPI()
@app.post("/items/")
async def create_item(item: Item):
item_dict = item.dict()
if item.tax:
price_with_tax = item.price + item.tax
item_dict.update({"price_with_tax": price_with_tax})
return item_dict
和声明查询参数时一样,当一个模型属性具有默认值时,它不是必需的。否则它是一个必需属性。将默认值设为 None 可使其成为可选属性。
使用 Request 对象 传递 body
如果你不想使用 Pydantic 模型,你还可以使用 Body 参数。请参阅文档 请求体 - 多个参数:请求体中的单一值。
from fastapi import FastAPI, Request
import uvicorn

app = FastAPI()


@app.post("/girl")
async def read_girl(request: Request):
    # 是一个协程,所以需要 await
    data = await request.body()
    print(data)


if __name__ == "__main__":
    uvicorn.run("main:app", host="0.0.0.0", port=5555)
使用 requests 模块发送 post 请求的时候可以通过 data 参数传递、也可以通过 json 参数。
- 当通过 json={"name": "satori", "age": 16, "length": 155.5} 传递的时候,会将其转成 json 字符串进行传输,程序中的 print 打印如下:b'{"name": "satori", "age": 16, "length": 155.5}'
- 如果用 data 参数发请求的话(值不变),那么会将其拼接成 k1=v1&k2=v2 的形式再进行传输(相当于表单提交,后面说),程序中打印如下:b'name=satori&age=16&length=155.5'
所以我们看到 await request.body() 得到的就是最原始的字节流,而除了 await request.body() 之外还有一个 await request.json(),只是后者在内部在调用了前者拿到字节流之后、自动帮你 loads 成了字典。因此使用 await request.json() 也侧面要求我们必须在发送请求的时候必须使用 json 参数传递(传递的是字典转成的 json、所以也能解析成字典),否则使用 await request.json() 是无法正确解析的。
请求体参数:pydantic类、Body
pydantic类
from pydantic import BaseModel
from typing import Optional

class AAA(BaseModel):
    name: Optional[str]
    age: Optional[int] = None  # int只能用Optional 设置为非必传
body
@app.post('/index/pp')
async def index_post(request: Request, aaa: AAA = Body(..., )):
    print(aaa.name)
    return {'name': 000}
可以不使用Body,默认是JSON格式传输进来的,如果使用了pydantic校验类,默认就是请求体
路径参数、查询参数、请求体
- 如果在 路径 中也声明了该参数,它将被用作路径参数。
- 如果参数属于 单一类型(比如
int、float、str、bool等)它将被解释为 查询 参数。 - 如果参数的类型被声明为一个 Pydantic 模型,它将被解释为 请求体。
# -*- coding:utf-8 -*-
# @Author: komeiji satori
from typing import Optional, List
from fastapi import FastAPI, Request, Response
from pydantic import BaseModel
import uvicorn

app = FastAPI()


class Girl(BaseModel):
    name: str
    age: Optional[str] = None
    length: float
    hobby: List[str]


@app.post("/girl/{user_id}")
async def read_girl(user_id, q: str, girl: Girl):
    return {"user_id": user_id, "q": q, **dict(girl)}


if __name__ == "__main__":
    uvicorn.run("main:app", host="0.0.0.0", port=5555)
测试
指定了路径参数、查询参数和请求体,FastAPI 依然是可以正确区分的,当然我们也可以使用 Request 对象。
from typing import Optional, List, Dict
from fastapi import FastAPI, Request, Response
from pydantic import BaseModel
import uvicorn

app = FastAPI()


@app.post("/girl/{user_id}")
async def read_girl(user_id, request: Request):
    q = request.query_params.get("q")
    data: Dict = await request.json()
    data.update({"user_id": user_id, "q": q})
    return data


if __name__ == "__main__":
    uvicorn.run("main:app", host="0.0.0.0", port=5555)
嵌入 单个请求体 参数
假设你只有一个来自 Pydantic 模型 Item 的请求体参数 item。默认情况下,FastAPI 将直接期望这样的请求体。但是,如果你希望它期望一个拥有 item 键并在值中包含模型内容的 JSON,就像在声明额外的请求体参数时所做的那样,则可以使用一个特殊的 Body 参数 embed:item: Item = Body(embed=True)
from typing import Annotated
from fastapi import Body, FastAPI
from pydantic import BaseModelapp = FastAPI()
class Item(BaseModel):
name: str
description: str | None = None
price: float
tax: float | None = None
@app.put("/items/{item_id}")
async def update_item(item_id: int, item: Annotated[Item, Body(embed=True)]):
results = {"item_id": item_id, "item": item}
return results
在这种情况下,FastAPI 将期望像这样的请求体:
{
"item": {
"name": "Foo",
"description": "The pretender",
"price": 42.0,
"tax": 3.2
}
}
而不是:
{
"name": "Foo",
"description": "The pretender",
"price": 42.0,
"tax": 3.2
}
可以添加多个请求体参数到路径操作函数中,即使一个请求只能有一个请求体。
还可以声明将作为请求体的一部分所接收的单一值。
还可以指示 FastAPI 在仅声明了一个请求体参数的情况下,将原本的请求体嵌入到一个键中。
多个请求体参数
# -*- coding:utf-8 -*-
# @Author: komeiji satori
from typing import Optional, List
from fastapi import FastAPI, Request, Response
from pydantic import BaseModel
import uvicorn

app = FastAPI()


class Girl(BaseModel):
    name: str
    age: Optional[str] = None


class Boy(BaseModel):
    name: str
    age: int


@app.post("/boy_and_girl")
async def read_boy_and_girl(girl: Girl, boy: Boy):
    return {"girl": dict(girl), "boy": dict(boy)}


if __name__ == "__main__":
    uvicorn.run("main:app", host="0.0.0.0", port=5555)
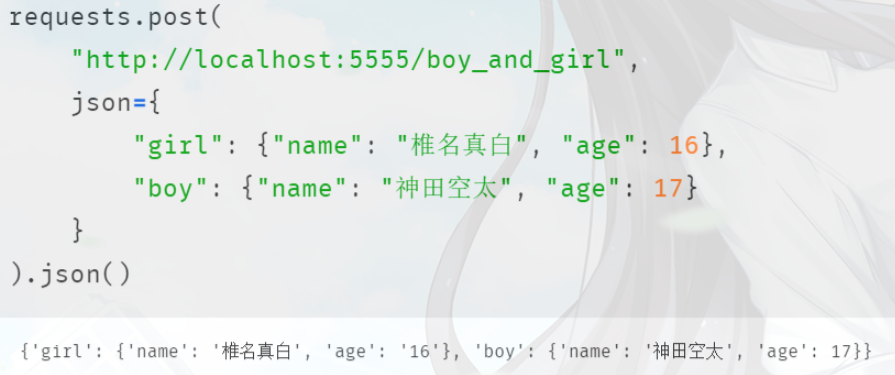
此时在传递的时候,应该按照如下方式传递:
应该将两个 json 嵌套在一起,组成一个更大的 json,至于 key 就是我们的函数参数名。因此这种方式其实就等价于:
# -*- coding:utf-8 -*-
# @Author: komeiji satori
from typing import Optional, List, Dict
from fastapi import FastAPI, Request, Response
from pydantic import BaseModel
import uvicorn

app = FastAPI()


class BoyAndGirl(BaseModel):
    girl: Dict
    boy: Dict


@app.post("/boy_and_girl")
async def read_boy_and_girl(boy_and_girl: BoyAndGirl):
    return dict(boy_and_girl)


if __name__ == "__main__":
    uvicorn.run("main:app", host="0.0.0.0", port=5555)
这种方式也是可以实现的,只不过就字典内部的字典的不可进行限制了。当然啦,我们仍然可以使用 Request 对象,得到字典之后自己再进行判断,因为对于 json 而言,内部的字段可能是会变的,而且最关键的是字段可能非常多。这个时候,我个人更倾向于使用 Request 对象。
混合使用 Path、Query 和请求体参数
可以随意地混合使用 Path、Query 和请求体参数声明,FastAPI 会知道该如何处理。
from typing import Annotated
from fastapi import FastAPI, Path
from pydantic import BaseModelapp = FastAPI()
class Item(BaseModel):
name: str
description: str | None = None
price: float
tax: float | None = None
@app.put("/items/{item_id}")
async def update_item(
item_id: Annotated[int, Path(title="The ID of the item to get", ge=0, le=1000)],
q: str | None = None,
item: Item | None = None,
):
results = {"item_id": item_id}
if q:
results.update({"q": q})
if item:
results.update({"item": item})
return results
请注意,在这种情况下,将从请求体获取的 item 是可选的。因为它的默认值为 None。
多个 请求体 参数
from fastapi import FastAPI
from pydantic import BaseModelapp = FastAPI()
class Item(BaseModel):
name: str
description: str | None = None
price: float
tax: float | None = None
class User(BaseModel):
username: str
full_name: str | None = None
@app.put("/items/{item_id}")
async def update_item(item_id: int, item: Item, user: User):
results = {"item_id": item_id, "item": item, "user": user}
return results
请求体
{
"item": {
"name": "Foo",
"description": "The pretender",
"price": 42.0,
"tax": 3.2
},
"user": {
"username": "dave",
"full_name": "Dave Grohl"
}
}
请求体中的单一值
from typing import Annotated
from fastapi import Body, FastAPI
from pydantic import BaseModelapp = FastAPI()
class Item(BaseModel):
name: str
description: str | None = None
price: float
tax: float | None = None
class User(BaseModel):
username: str
full_name: str | None = None
@app.put("/items/{item_id}")
async def update_item(
item_id: int, item: Item, user: User, importance: Annotated[int, Body()]
):
results = {"item_id": item_id, "item": item, "user": user, "importance": importance}
return results
请求体:
{
"item": {
"name": "Foo",
"description": "The pretender",
"price": 42.0,
"tax": 3.2
},
"user": {
"username": "dave",
"full_name": "Dave Grohl"
},
"importance": 5
}
多个 请求体参数 和 查询参数
默认情况下单一值被解释为查询参数,因此你不必显式地添加 Query
from typing import Annotated
from fastapi import Body, FastAPI
from pydantic import BaseModelapp = FastAPI()
class Item(BaseModel):
name: str
description: str | None = None
price: float
tax: float | None = None
class User(BaseModel):
username: str
full_name: str | None = None
@app.put("/items/{item_id}")
async def update_item(
*,
item_id: int,
item: Item,
user: User,
importance: Annotated[int, Body(gt=0)],
q: str | None = None,
):
results = {"item_id": item_id, "item": item, "user": user, "importance": importance}
if q:
results.update({"q": q})
return results
fastapi-utils (基于类的视图)
文档:https://fastapi-utils.davidmontague.xyz/user-guide/class-based-views/
源码:https://github.com/dmontagu/fastapi-utils
fastapi 本身是没有 类视图 的概念,需要借助第三方包。
Form 表单
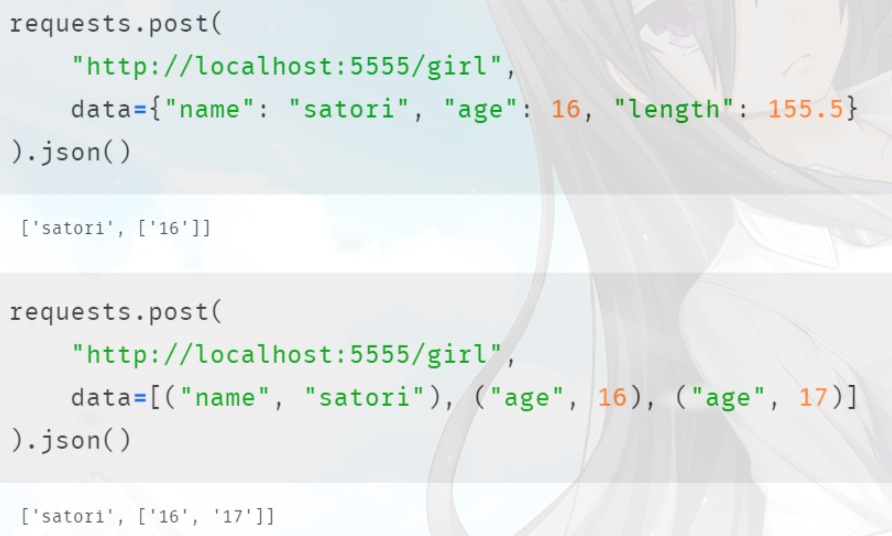
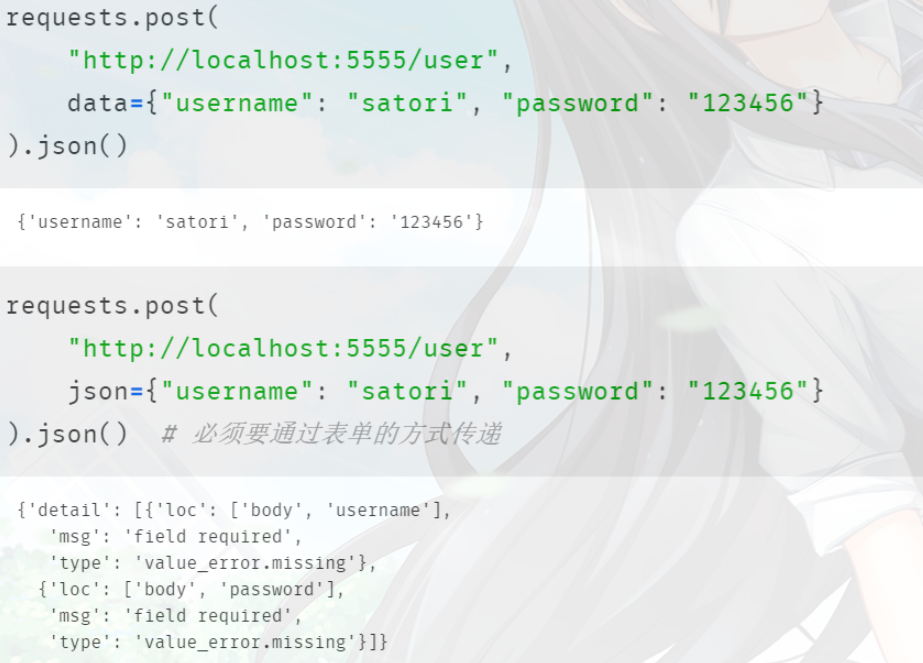
调用 requests.post,如果参数通过 data 传递的话,则相当于提交了一个 form 表单,那么在 FastAPI 中可以通过 await request.form() 进行获取,注意:内部同样是先调用 await request.body()。
from fastapi import FastAPI, Request, Response
import uvicorn

app = FastAPI()


@app.post("/girl")
async def girl(request: Request):
    # 此时 await request.json() 报错,因为是通过 data 参数传递的,相当于 form 表单提交
    # 如果是通过 json 参数传递,那么 await request.form() 会得到一个空表单
    form = await request.form()
    return [form.get("name"), form.getlist("age")]


if __name__ == "__main__":
    uvicorn.run("main:app", host="0.0.0.0", port=5555)
测试
也可以通过其它方式:
# -*- coding:utf-8 -*-
# @Author: komeiji satori
from fastapi import FastAPI, Form
import uvicorn

app = FastAPI()


@app.post("/user")
async def get_user(username: str = Form(...),
                   password: str = Form(...)):
    return {"username": username, "password": password}


if __name__ == "__main__":
    uvicorn.run("main:app", host="0.0.0.0", port=5555)
测试
像 Form 表单,查询参数、路径参数等等,都可以和 Request 对象一起使用,像上面的例子,如果我们多定义一个 request: Request,那么我们仍然可以通过 await request.form() 拿到相关的表单信息。所以如果你觉得某个参数不适合类型注解,那么你可以单独通过 Request 对象进行解析。
文件上传
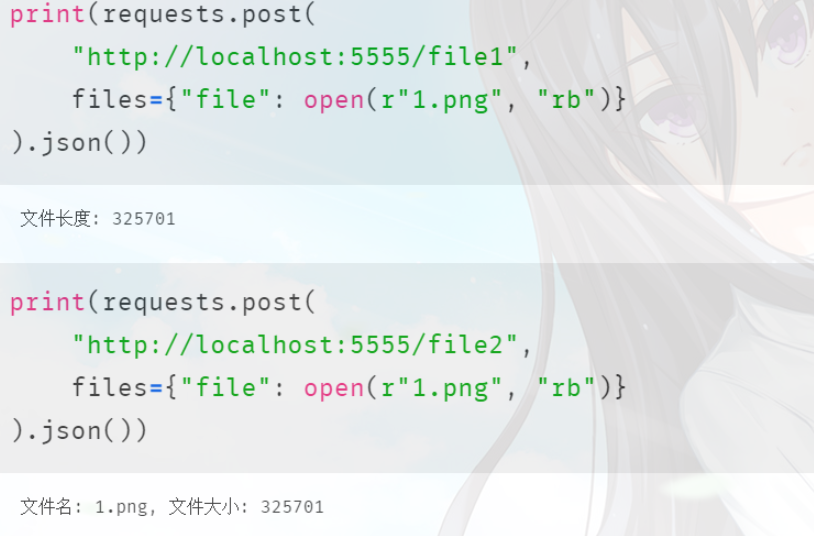
FastAPI 如何接收用户的文件上传呢?首先如果想使用文件上传功能,那么你必须要安装一个包 python-multipart,直接 pip install python-multipart 即可。
from fastapi import FastAPI, File, UploadFile
import uvicorn

app = FastAPI()


@app.post("/file1")
async def file1(file: bytes = File(...)):
    return f"文件长度: {len(file)}"


@app.post("/file2")
async def file1(file: UploadFile = File(...)):
    return f"文件名: {file.filename}, 文件大小: {len(await file.read())}"


if __name__ == "__main__":
    uvicorn.run("main:app", host="0.0.0.0", port=5555)
测试
我们看到一个直接获取字节流,另一个是获取类似于文件句柄的对象。如果是多个文件上传要怎么做呢?
from typing import List
from fastapi import FastAPI, UploadFile, File
import uvicorn

app = FastAPI()


@app.post("/file")
async def file(files: List[UploadFile] = File(...)):
    """指定类型为列表即可"""
    for idx, f in enumerate(files):
        files[idx] = f"文件名: {f.filename}, 文件大小: {len(await f.read())}"
    return files


if __name__ == "__main__":
    uvicorn.run("main:app", host="0.0.0.0", port=5555)
测试
此时就实现了 FastAPI 文件上传,当然文件上传并不影响我们处理表单,可以自己试一下同时处理文件和表单。
返回静态资源
需要安装 aiofiles,直接 pip 安装即可。
from fastapi import FastAPI
from fastapi.staticfiles import StaticFiles
import uvicorn

app = FastAPI()

# name 参数只是起一个名字,FastAPI 内部使用
app.mount("/static", StaticFiles(directory=r"C:\Users\satori\Desktop\bg"), name="static")

if __name__ == "__main__":
    uvicorn.run("main:app", host="0.0.0.0", port=5555)
浏览器输入:localhost:5555/static/1.png,那么会返回 C:\Users\satori\Desktop\bg 下的 1.png 文件。
子应用
如果你有2个独立的FastAPI的应用,你可以设置一个为主应用,另外一个为子应用:
from fastapi import FastAPI

app = FastAPI()


@app.get("/app")
def read_main():
    return {"message": "Hello World from main app"}


subapi = FastAPI()


@subapi.get("/sub")
def read_sub():
    return {"message": "Hello World from sub API"}


app.mount("/subapi", subapi)
代理
可以使用root_path来设置代理。
使用命令行:uvicorn main:app --root-path /api/v1
或者在代码中设置:
from fastapi import FastAPI, Request

app = FastAPI(root_path="/api/v1")


@app.get("/app")
def read_main(request: Request):
    return {"message": "Hello World", "root_path": request.scope.get("root_path")}
使用模板
你可以在FastAPI中使用任何模板,常用的选择是Jinja2。安装:pip install jinja2
使用:
from fastapi import FastAPI, Request
from fastapi.responses import HTMLResponse
from fastapi.staticfiles import StaticFiles

from fastapi.templating import Jinja2Templates

app = FastAPI()

app.mount("/static", StaticFiles(directory="static"), name="static")

templates = Jinja2Templates(directory="templates")


@app.get("/items/{id}", response_class=HTMLResponse)
async def read_item(request: Request, id: str):
    return templates.TemplateResponse("item.html", {"request": request, "id": id})
模板文件templates/item.html:
<html>
<head>
<title>Item Details</title>
<link href="{{ url_for('static', path='/styles.css') }}" rel="stylesheet">
</head>
<body><h1>Item ID: {{ id }}</h1>
</body>
</html>
错误处理
from fastapi import FastAPI, HTTPException
import uvicorn

app = FastAPI()


@app.get("/items/{item_id}")
async def read_item(item_id: str):
    if item_id != "foo":
        # 里面还可以传入 headers 设置响应头
        raise HTTPException(status_code=404, detail="item 没有发现")
    return {"item": "bar"}


if __name__ == "__main__":
    uvicorn.run("main:app", host="0.0.0.0", port=5555)
测试
HTTPException 是一个普通的 Python 异常类(继承了 Exception),它携带了 API 的相关信息,既然是异常,那么我们不能 return、而是要 raise。这种方式返回错误,因为它能够携带的信息太少了。
自定义异常
FastAPI 内部提供了一个 HTTPException,但是我们也可以自定义,但是注意:我们自定义完异常之后,还要定义一个 handler,将异常和 handler 绑定在一起,然后引发该异常的时候就会触发相应的 handler。
from fastapi import FastAPI, Request
from fastapi.responses import ORJSONResponse
import uvicorn

app = FastAPI()


class ASCIIException(Exception):
    """"""
    pass


# 通过装饰器的方式,将 ASCIIException 和 ascii_exception_handler 绑定在一起
@app.exception_handler(ASCIIException)
async def ascii_exception_handler(request: Request, exc: ASCIIException):
    """当引发 ASCIIException 的时候,会触发 ascii_exception_handler 的执行
       同时会将 request 和 exception 传过去"""
    return ORJSONResponse(status_code=404, content={"code": 404, "message": "你必须传递 ascii 字符串"})


@app.get("/items/{item_id}")
async def read_item(item_id: str):
    if not item_id.isascii():
        raise ASCIIException
    return {"item": f"get {item_id}"}


if __name__ == "__main__":
    uvicorn.run("main:app", host="0.0.0.0", port=5555)
测试
关于 Request、Response,我们除了可以通过 fastapi 进行导入,还可以通过 starlette 进行导入,因为 fastapi 的路由映射是通过 starlette 来实现的。
自定义 404
当访问一个不存在的 URL,我们应该提示用户,比如:您要找到页面去火星了。
from fastapi import FastAPI
from fastapi.responses import ORJSONResponse
from fastapi.exceptions import StarletteHTTPException
import uvicorn

app = FastAPI()


@app.exception_handler(StarletteHTTPException)
async def not_found(request, exc):
    return ORJSONResponse({"code": 404, "message": "您要找的页面去火星了。。。"})


if __name__ == "__main__":
    uvicorn.run("main:app", host="0.0.0.0", port=5555)
此时当我们访问一个不存在的 URL 时,就会返回我们自定义的 JSON 字符串。
Background Tasks ( 后台任务 )
background tasks 就是在返回响应之后立即运行的任务。
如果一个请求耗时特别久,那么我们可以将其放在后台执行,而 FastAPI 已经帮我们做好了这一步。我们来看一下:
import time
from fastapi import FastAPI, BackgroundTasks
from starlette.background import BackgroundTask
from fastapi import Response, Request
import uvicorn
import orjson


app = FastAPI()


def send_email(email: str, message: str = ""):
    """发送邮件,假设耗时三秒"""
    time.sleep(3)
    print(f"三秒之后邮件发送给 {email!r}, 邮件信息: {message!r}")


@app.get("/user/{email}")
async def order(email: str, bg_tasks: BackgroundTasks):
    """这里需要多定义一个参数
       此时任务就被添加到后台,当 Response 对象返回之后触发"""
    bg_tasks.add_task(send_email, email, message="这是一封邮件")
    # 我们在之前介绍 Response 的时候说过,里面有一个参数 background
    # 所以我们也可以将任务放在那里面
    # 因此我们还可以:
    # return Response(
    #     orjson.dumps({"message": "邮件发送成功"}),
    #     background=BackgroundTask(send_email, email, message="这是一封邮件")
    # )
    return {"message": "邮件发送成功"}


if __name__ == "__main__":
    uvicorn.run("main:app", host="0.0.0.0", port=5555)
测试
APIRouter
APIRouter 类似于 Flask 中的蓝图,可以更好的组织大型项目,举个栗子:
在我当前的工程目录中有一个 app 目录和一个 main.py,其中 app 目录中有一个 app01.py,然后我们看看它们是如何组织的。
app/app01.py
# app/app01.py
from fastapi import APIRouter

router = APIRouter(prefix="/router")


# 以后访问的时候要通过 /router/v1 来访问
@router.get("/v1")
async def v1():
    return {"message": "hello world"}
main.py
# main.py
from fastapi import FastAPI
from app.app01 import router
import uvicorn

app = FastAPI()

# 将 router 注册到 app 中,相当于 Flask 中的 register_blueprint
app.include_router(router)

if __name__ == "__main__":
    uvicorn.run("main:app", host="0.0.0.0", port=5555)
然后可以在外界通过 /router/v1 的方式来访问。
示例:
from fastapi import APIRouter

router = APIRouter()


@router.get("/users/", tags=["users"])
async def read_users():
    return [{"username": "Rick"}, {"username": "Morty"}]


@router.get("/users/me", tags=["users"])
async def read_user_me():
    return {"username": "fakecurrentuser"}


@router.get("/users/{username}", tags=["users"])
async def read_user(username: str):
    return {"username": username}
为所有路径进行同样的操作:
from fastapi import APIRouter, Depends, HTTPException

from ..dependencies import get_token_header

router = APIRouter(
    prefix="/items",
    tags=["items"],
    dependencies=[Depends(get_token_header)],
    responses={404: {"description": "Not found"}},
)

fake_items_db = {"plumbus": {"name": "Plumbus"}, "gun": {"name": "Portal Gun"}}


@router.get("/")
async def read_items():
    return fake_items_db


@router.get("/{item_id}")
async def read_item(item_id: str):
    if item_id not in fake_items_db:
        raise HTTPException(status_code=404, detail="Item not found")
    return {"name": fake_items_db[item_id]["name"], "item_id": item_id}


@router.put(
    "/{item_id}",
    tags=["custom"],
    responses={403: {"description": "Operation forbidden"}},
)
async def update_item(item_id: str):
    if item_id != "plumbus":
        raise HTTPException(
            status_code=403, detail="You can only update the item: plumbus"
        )
    return {"item_id": item_id, "name": "The great Plumbus"}
该示例,就为所有的路径添加了前缀,标签、依赖和返回,而不用在每个路径上单独声明,简化了代码。
中间件
中间件在 web 开发中可以说是非常常见了,说白了中间件就是一个函数或者一个类。在请求进入视图函数之前,会先经过中间件(被称为请求中间件),而在中间件里面,我们可以对请求进行一些预处理,或者实现一个拦截器等等;同理当视图函数返回响应之后,也会经过中间件(被称为响应中间件),在中间件里面,我们也可以对响应进行一些润色。
自定义中间件
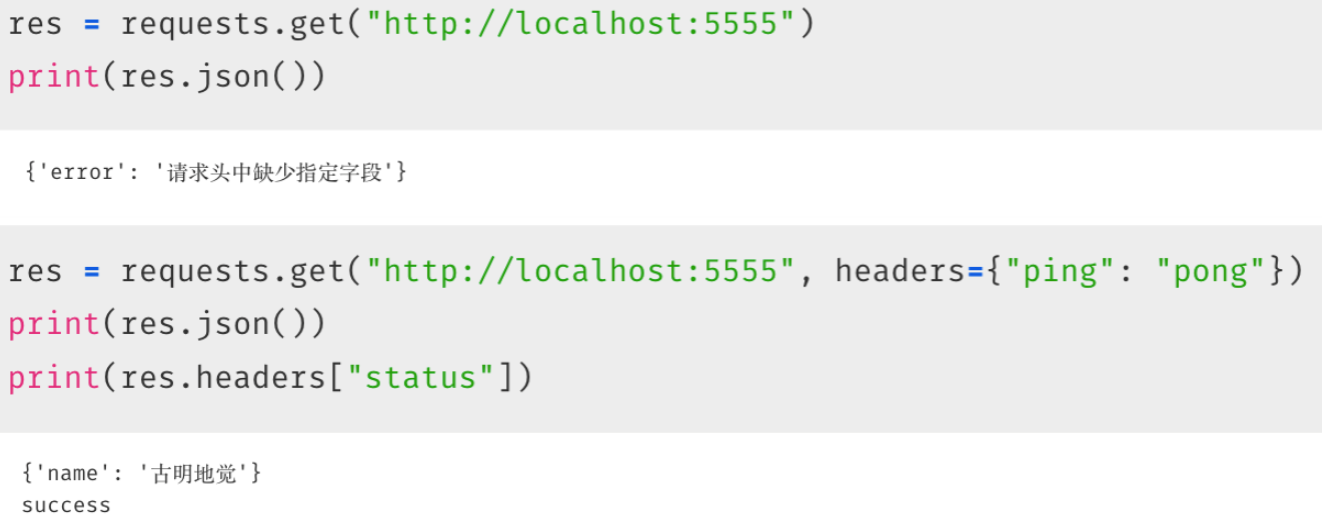
在 FastAPI 里面也支持像 Flask 一样自定义中间件,但是 Flask 里面有请求中间件和响应中间件,但是在 FastAPI 里面这两者合二为一了,我们看一下用法。
from fastapi import FastAPI, Request, Response
import uvicorn
import orjson

app = FastAPI()


@app.get("/")
async def view_func(request: Request):
    return {"name": "古明地觉"}


@app.middleware("http")
async def middleware(request: Request, call_next):
    """
    定义一个协程函数,然后使用 @app.middleware("http") 装饰,即可得到中间件
    """
    # 请求到来时会先经过这里的中间件
    if request.headers.get("ping", "") != "pong":
        response = Response(content=orjson.dumps({"error": "请求头中缺少指定字段"}),
                            media_type="application/json",
                            status_code=404)
        # 当请求头中缺少 "ping": "pong",在中间件这一步就直接返回了,就不会再往下走了
        # 所以此时就相当于实现了一个拦截器
        return response
    # 然后,如果条件满足,则执行 await call_next(request),关键是这里的 call_next
    # 如果该中间件后面还有中间件,那么 call_next 就是下一个中间件;如果没有,那么 call_next 就是对应的视图函数
    # 这里显然是视图函数,因此执行之后会拿到视图函数返回的 Response 对象
    # 所以我们看到在 FastAPI 中,请求中间件和响应中间件合在一起了
    response: Response = await call_next(request)
    # 这里我们在设置一个响应头
    response.headers["status"] = "success"
    return response


if __name__ == "__main__":
    uvicorn.run("main:app", host="0.0.0.0", port=5555)
测试
内置的中间件
通过自定义中间件,我们可以在不修改视图函数的情况下,实现功能的扩展。但是除了自定义中间件之外,FastAPI 还提供了很多内置的中间件。
from fastapi import FastAPI

app = FastAPI()

# 要求请求协议必须是 https 或者 wss,如果不是,则自动跳转
from starlette.middleware.httpsredirect import HTTPSRedirectMiddleware
app.add_middleware(HTTPSRedirectMiddleware)

# 请求中必须包含 Host 字段,为防止 HTTP 主机报头攻击,并且添加中间件的时候,还可以指定一个 allowed_hosts,那么它是干什么的呢?
# 假设我们有服务 a.example.com, b.example.com, c.example.com
# 但我们不希望用户访问 c.example.com,就可以像下面这么设置,如果指定为 ["*"],或者不指定 allow_hosts,则表示无限制
from starlette.middleware.trustedhost import TrustedHostMiddleware
app.add_middleware(TrustedHostMiddleware, allowed_hosts=["a.example.com", "b.example.com"])

# 如果用户的请求头的 Accept-Encoding 字段包含 gzip,那么 FastAPI 会使用 GZip 算法压缩
# minimum_size=1000 表示当大小不超过 1000 字节的时候就不压缩了
from starlette.middleware.gzip import GZipMiddleware
app.add_middleware(GZipMiddleware, minimum_size=1000)
除了这些,还有其它的一些内置的中间件,可以自己查看一下,不过不是很常用。
CORS ( 跨域设置 )
CORS 过于重要,我们需要单独拿出来说。
CORS(跨域资源共享)是指浏览器中运行的前端里面拥有和后端通信的 JavaScript 代码,而前端和后端处于不同源的情况。源:协议(http、https)、域(baidu.com、app.com、localhost)以及端口(80、443、8000),只要有一个不同,那么就是不同源。比如下面都是不同的源:
http://localhosthttps://localhosthttp://localhost:8080
即使它们都是 localhost,但是它们使用了不同的协议或端口,所以它们是不同的源。假设你的前端运行在 localhost:8080,并且尝试与 localhost:5555 进行通信;然后浏览器会向后端发送一个 HTTP OPTIONS 请求,后端会发送适当的 headers 来对这个源进行授权;所以后端必须有一个 "允许的源" 列表,如果前端对应的源是被允许的,浏览器才会允许前端向后端发请求,否则就会出现跨域失败。
而默认情况下,前后端必须是在同一个源,如果不同源那么前端就会请求失败。而前后端分离早已成为了主流,因此跨域问题是必须要解决的。
from fastapi import FastAPI
from fastapi.middleware.cors import CORSMiddleware
import uvicorn

app = FastAPI()
app.add_middleware(
    CORSMiddleware,
    # 允许跨域的源列表,例如 ["http://www.example.org"] 等等,["*"] 表示允许任何源
    allow_origins=["*"],
    # 跨域请求是否支持 cookie,默认是 False,如果为 True,allow_origins 必须为具体的源,不可以是 ["*"]
    allow_credentials=False,
    # 允许跨域请求的 HTTP 方法列表,默认是 ["GET"]
    allow_methods=["*"],
    # 允许跨域请求的 HTTP 请求头列表,默认是 [],可以使用 ["*"] 表示允许所有的请求头
    # 当然 Accept、Accept-Language、Content-Language 以及 Content-Type 总之被允许的
    allow_headers=["*"],
    # 可以被浏览器访问的响应头, 默认是 [],一般很少指定
    # expose_headers=["*"]
    # 设定浏览器缓存 CORS 响应的最长时间,单位是秒。默认为 600,一般也很少指定
    # max_age=1000
)

if __name__ == "__main__":
    uvicorn.run("main:app", host="0.0.0.0", port=5555)
以上即可解决跨域问题。
使用CORSMiddleware来配置跨域:
from fastapi import FastAPI
from fastapi.middleware.cors import CORSMiddleware

app = FastAPI()

origins = [
    "http://localhost.tiangolo.com",
    "https://localhost.tiangolo.com",
    "http://localhost",
    "http://localhost:8080",

]

app.add_middleware(
    CORSMiddleware,
    allow_origins=origins,
    allow_credentials=True,
    allow_methods=["*"],
    allow_headers=["*"],

)


@app.get("/")
async def main():
    return {"message": "Hello World"}
它支持以下参数:
allow_origins- 一个允许跨域请求的源列表。例如['https://example.org', 'https://www.example.org']。你可以使用['*']允许任何源。allow_origin_regex- 一个正则表达式字符串,匹配的源允许跨域请求。例如'https://.*\.example\.org'。allow_methods- 一个允许跨域请求的 HTTP 方法列表。默认为['GET']。你可以使用['*']来允许所有标准方法。allow_headers- 一个允许跨域请求的 HTTP 请求头列表。默认为[]。你可以使用['*']允许所有的请求头。Accept、Accept-Language、Content-Language以及Content-Type请求头总是允许 CORS 请求。allow_credentials- 指示跨域请求支持 cookies。默认是False。另外,允许凭证时allow_origins不能设定为['*'],必须指定源。expose_headers- 指示可以被浏览器访问的响应头。默认为[]。max_age- 设定浏览器缓存 CORS 响应的最长时间,单位是秒。默认为600。
高阶操作
看一些 FastAPI 的高阶操作,这些操作有的不一定能用上,但用上了确实会方便许多。
其它的响应
返回 json 数据可以是:JSONResponse、UJSONResponse、ORJSONResponse,Content-Type 是 application/json;返回 html 是 HTMLResponse,Content-Type 是 text/html;返回 PlainTextResponse,Content-Type 是 text/plain。但是我们还可以有三种响应,分别是返回重定向、字节流、文件。
重定向
from fastapi import FastAPI
from fastapi.responses import RedirectResponse
import uvicorn

app = FastAPI()


@app.get("/index")
async def index():
    return RedirectResponse("https://www.bilibili.com")


if __name__ == "__main__":
    uvicorn.run("main:app", host="0.0.0.0", port=5555)
页面中访问 /index 会跳转到 bilibili。
字节流
返回字节流需要使用异步生成器的方式:
from fastapi import FastAPI
from fastapi.responses import StreamingResponse
import uvicorn

app = FastAPI()


async def some_video():
    for i in range(5):
        yield f"video {i} bytes ".encode("utf-8")


@app.get("/index")
async def index():
    return StreamingResponse(some_video())


if __name__ == "__main__":
    uvicorn.run("main:app", host="0.0.0.0", port=5555)
测试
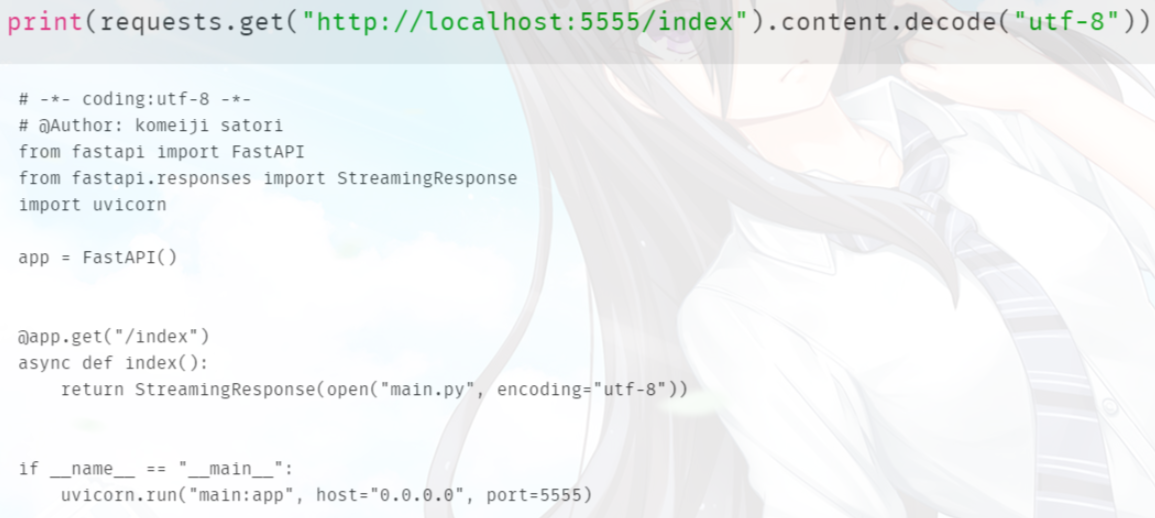
如果有文件对象,那么也是可以直接返回的。
from fastapi import FastAPI
from fastapi.responses import StreamingResponse
import uvicorn

app = FastAPI()


@app.get("/index")
async def index():
    return StreamingResponse(open("main.py", encoding="utf-8"))


if __name__ == "__main__":
    uvicorn.run("main:app", host="0.0.0.0", port=5555)
测试
文件
返回文件的话,还可以通过 FileResponse:
from fastapi import FastAPI
from fastapi.responses import FileResponse
import uvicorn

app = FastAPI()


@app.get("/index")
async def index():
    # filename 如果给出,它将包含在响应的 Content-Disposition 中。
    return FileResponse("main.py", filename="这不是main.py")


if __name__ == "__main__":
    uvicorn.run("main:app", host="0.0.0.0", port=5555)
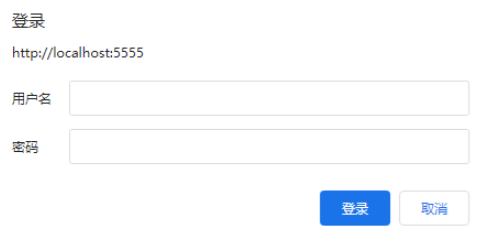
HTTP 验证
如果当用户访问某个请求的时候,我们希望其输入用户名和密码来确认身份的话该怎么做呢?
from fastapi import FastAPI, Depends
from fastapi.security import HTTPBasic, HTTPBasicCredentials
import uvicorn

app = FastAPI()

security = HTTPBasic()


@app.get("/index")
async def index(credentials: HTTPBasicCredentials = Depends(security)):
    return {"username": credentials.username, "password": credentials.password}


if __name__ == "__main__":
    uvicorn.run("main:app", host="0.0.0.0", port=5555)
测试
输入完毕之后,信息会保存在 credentials,我们可以获取出来进行验证。
websocket
FastAPI 如何实现 websocket:
from fastapi import FastAPI
from fastapi.websockets import WebSocket
import uvicorn

app = FastAPI()


@app.websocket("/ws")
async def ws(websocket: WebSocket):
    await websocket.accept()
    while True:
        # websocket.receive_bytes()
        # websocket.receive_json()
        data = await websocket.receive_text()
        await websocket.send_text(f"收到来自客户端的回复: {data}")


if __name__ == "__main__":
    uvicorn.run("main:app", host="0.0.0.0", port=5555)
然后我们通过浏览器进行通信:
<!DOCTYPE html>
<html lang="en">
<head>
    <meta charset="UTF-8">
    <title>Title</title>
</head>
<body>
    <script>
        ws = new WebSocket("ws://localhost:5555/ws");

        //如果连接成功, 会打印下面这句话, 否则不会打印
        ws.onopen = function () {
            console.log('连接成功')
        };

        //接收数据, 服务端有数据过来, 会执行
        ws.onmessage = function (event) {
            console.log(event)
        };

        //服务端主动断开连接, 会执行.
        //客户端主动断开的话, 不执行
        ws.onclose = function () {  }

    </script>
</body>
</html>
测试
示例:
from fastapi import FastAPI, WebSocket

from fastapi.responses import HTMLResponse

app = FastAPI()

html = """
<!DOCTYPE html>
<html>
    <head>
        <title>Chat</title>
    </head>
    <body>
        <h1>WebSocket Chat</h1>
        <form action="" onsubmit="sendMessage(event)">
            <input type="text" id="messageText" autocomplete="off"/>
            <button>Send</button>
        </form>
        <ul id='messages'>
        </ul>
        <script>
            var ws = new WebSocket("ws://localhost:8000/ws");
            ws.onmessage = function(event) {
                var messages = document.getElementById('messages')
                var message = document.createElement('li')
                var content = document.createTextNode(event.data)
                message.appendChild(content)
                messages.appendChild(message)
            };
            function sendMessage(event) {
                var input = document.getElementById("messageText")
                ws.send(input.value)
                input.value = ''
                event.preventDefault()
            }
        </script>
    </body>
</html>
"""


@app.get("/")
async def get():
    return HTMLResponse(html)


@app.websocket("/ws")
async def websocket_endpoint(websocket: WebSocket):
    await websocket.accept()
    while True:
        data = await websocket.receive_text()
        await websocket.send_text(f"Message text was: {data}")
FastAPI 服务的部署
使用异步框架,最重要的是要搭配一个异步驱动去访问数据库,因为 web 服务的瓶颈都是在数据库上面。
上面介绍了 FastAPI 的绝大部分内容,然后我们来看看 FastAPI 服务的部署,其实部署很简单,直接 uvicorn.run 即可。但是这里面有很多的参数,我们主要是想要介绍这些参数。
def run(app, **kwargs):
    config = Config(app, **kwargs)
    server = Server(config=config)
    ...
    ...
看到 app 和 **kwargs 都传递给了 Config,所以我们只需要看 Config 里面都有哪些参数即可。这里选出一部分:
app:第一个参数,不需要解释host:监听的ipport:监听的端口uds:绑定的 unix domain socket,一般不用fd:从指定的文件描述符中绑定 socketloop:事件循环实现,可选项为 auto|asyncio|uvloop|iocphttp:HTTP 协议实现,可选项为 auto|h11|httptoolsws:websocket 协议实现,可选项为 auto|none|websockets|wsprotolifespan:lifespan 实现,可选项为 auto|on|offenv_file:环境变量配置文件log_config:日志配置文件log_level:日志等级access_log:是否记录日志use_colors:是否带颜色输出日志信息interface:应用接口,可选 auto|asgi3|asgi2|wsgidebug:是否开启 debug 模式reload:是否自动重启reload_dirs:要自动重启的目录reload_delay:多少秒后自动重启workers:工作进程数limit_concurrency:并发的最大数量limit_max_requests:能 hold 住的最大请求数
多进程 部署
FastAPI 本身并不直接管理多进程,而是依赖于 ASGI(Asynchronous Server Gateway Interface)服务器来处理并发。FastAPI 应用程序可以使用 ASGI 服务器(如 Uvicorn 或 Hypercorn)运行,而这些服务器可以配置为运行多个进程。
当使用 ASGI 服务器以多进程方式运行 FastAPI 应用时,每个进程负责处理一部分传入的请求。这通常是为了利用多核处理器,提高应用程序的性能和可伸缩性。
- ASGI 服务器配置:可以配置 ASGI 服务器以指定数量的工作进程运行。例如,对于 Uvicorn,你可以使用 --workers 选项指定工作进程的数量。uvicorn myapp:app --host 0.0.0.0 --port 8000 --workers 4
- 工作进程:每个工作进程是 FastAPI 应用程序的一个独立实例。当请求到达时,ASGI 服务器将其转发到其中一个工作进程。
- 并行处理:由于每个工作进程都运行独立,可以同时处理多个请求,从而实现并行处理。这对于处理大量并发连接并提高应用程序的整体响应性非常有用。
FastAPI 本身并不直接管理多进程,但可以与支持多工作进程的 ASGI 服务器一起部署。ASGI 服务器负责在这些进程之间分发传入的请求,从而实现并行执行和提高性能。
FastAPI 是一个基于 Starlette 框架的高性能 Web 框架,它可以利用 uvicorn 作为服务器来运行应用程序。在多进程模式下,FastAPI 可以通过启动多个进程来处理并发请求。
实现 FastAPI 的多进程原理如下:
-
使用 uvicorn 启动应用程序:FastAPI 使用 uvicorn 作为默认的应用服务器。uvicorn 是基于 asyncio 和 uvloop 的高性能 ASGI(异步服务器网关接口)服务器。当我们使用命令
uvicorn main:app执行时,uvicorn 会创建一个主进程,并监听指定的主机和端口。 -
创建子进程:在多进程模式下,uvicorn 可以通过创建多个子进程来处理并发请求。每个子进程都是独立的进程,具有自己的事件循环和资源。这样可以充分利用多核 CPU 并行处理请求,提高应用程序的并发性能。
-
进程间通信:主进程负责监听请求,将请求分发给空闲的子进程进行处理。子进程处理完请求后,将响应结果返回给主进程。这种进程间通信方式可以通过操作系统提供的一些机制来实现,比如管道、套接字等。
-
负载均衡:在多进程模式下,可以使用负载均衡器来分发请求到不同的子进程。负载均衡器可以根据不同的算法将请求平均地分发给不同的子进程,以实现负载均衡和高可用性。
需要注意的是,在多进程模式下,每个子进程都会复制一份应用程序的代码和状态,因此在启动子进程之前,需要确保应用程序的状态已经初始化,并且不会在运行过程中发生变化。
总结起来,FastAPI 的多进程原理是通过使用 uvicorn 创建子进程来处理并发请求,并通过进程间通信机制来实现请求的分发和结果的返回。这种方式可以提高应用程序的并发性能和可扩展性。
3、示例:fastapi 开发接口 ( 只是api接口,不带web渲染 )
示例:豆瓣电影top250
import requests
from scrapy.http import HtmlResponse
import uvicorn
from pathlib import Path
from fastapi import FastAPI

app = FastAPI()

headers = {
    "User-Agent": "Mozilla/5.0 (Windows NT 10.0; Win64; x64) AppleWebKit/537.36 "
                  "(KHTML, like Gecko) Chrome/111.0.0.0 Safari/537.36 Edg/111.0.1661.62",
}


def douban_movie_top250(page_num: int):
    index = (page_num - 1) * 25
    # https://movie.douban.com/top250?start=50&filter=
    url = f"https://movie.douban.com/top250?start={index}&filter="
    __resp = requests.get(url, headers=headers)
    if 200 == __resp.status_code:
        resp = HtmlResponse(url, body=__resp.content, encoding='utf-8')
        movie_name_list = resp.xpath('//div[@class="item"]//div[@class="hd"]/a/span[1]/text()').extract()
        movie_url_list = resp.xpath('//div[@class="item"]//div[@class="hd"]/a/@href').extract()
        movie_info_list = list(zip(movie_name_list, movie_url_list))
        return movie_info_list
    else:
        return {'请求失败': f" status_code ---> {__resp.status_code}"}


@app.get("/douban/movie_top250")
async def get_item(page_num):
    """和 Flask 不同,Flask 是使用 <>,而 FastAPI 使用 {}"""
    try:
        page_num_int = int(page_num)
    except BaseException as be:
        return {"错误信息": "页码必须是数字"}
    data = douban_movie_top250(page_num_int)
    return {"data": data}


if __name__ == '__main__':
    '''
    http://127.0.0.1:5555/douban/movie_top250?page_num=1
    '''
    print(f'{Path(__file__).stem}:app')
    uvicorn.run(f'{Path(__file__).stem}:app', host="0.0.0.0", port=5555)
    pass
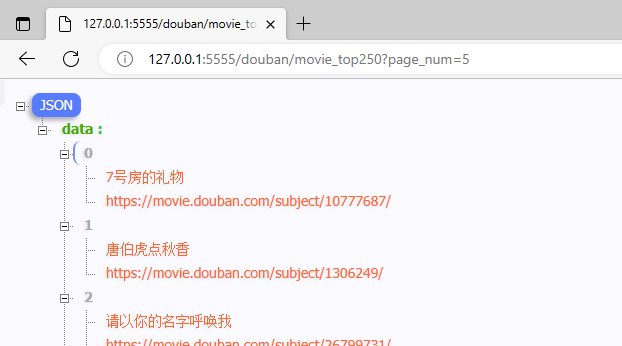
访问:http://127.0.0.1:5555/douban/movie_top250?page_num=5
示例:B 站视频 字幕 获取
import uvicorn
from pathlib import Path
from fastapi import FastAPI
import requests
import json
from scrapy.http import HtmlResponse

app = FastAPI()


headers = {
    'accept-language': 'zh-CN,zh;q=0.9,en;q=0.8,en-GB;q=0.7,en-US;q=0.6',
    'cookie': 'buvid3=31D606A5-C08F-CF7F-6345-DFE18CDF1FCA25535infoc; b_nut=1681180325; CURRENT_FNVAL=4048; _uuid=FA2D2910A-1F4C-9ED10-24FB-710C228FE726630982infoc; buvid_fp=dd9cac90362a92030f254a522e274486; buvid4=F13E840C-6245-40B7-9B63-5FDD1992821229542-023041110-0bxmZkxc4Ip6QXGeEfs0Og%3D%3D; CURRENT_PID=130742c0-d811-11ed-ac38-37fb01852f74; rpdid=|(JYYkY~RRYu0J\'uY)uk~lJY|; i-wanna-go-back=-1; header_theme_version=CLOSE; home_feed_column=5; is-2022-channel=1; nostalgia_conf=-1; DedeUserID=384760568; DedeUserID__ckMd5=8fd50449771672ee; b_ut=5; FEED_LIVE_VERSION=V_NO_BANNER_1; bsource=search_bing; browser_resolution=1863-969; bp_video_offset_384760568=787947892852654100; b_lsid=C105138DE_187B25E90A6; SESSDATA=d3f7b6a0%2C1697876752%2C413d0%2A42; bili_jct=e41d9dfdbd372b0cb95222cfa0d33199; sid=59e50ddx; innersign=1; PVID=1; innersign=1'
}


def get_subtitle(video_id=None):
    if video_id:
        url = f'https://www.bilibili.com/video/{video_id}/'
        resp = requests.get(url, headers=headers)
        if 200 == resp.status_code:
            scrapy_resp = HtmlResponse(url, body=resp.content, encoding='utf-8')
            try:
                temp = scrapy_resp.css('html').re('"subtitle_url":"(.*?)"')[0]
            except BaseException as be:
                return {'请求失败': str(be)}
            subtitle_url = temp.replace(r'\u002F', '/')
            print(subtitle_url)
            r = requests.get(subtitle_url)
            if 200 == r.status_code:
                return r.json()
            else:
                return {'请求失败, 失败状态码': resp.status_code}
        else:
            return {'请求失败, 失败状态码': resp.status_code}
    else:
        return {"请求失败": '视频 id 错误'}


@app.get("/bilibili/{video_id}")
async def get_item(video_id):
    """和 Flask 不同,Flask 是使用 <>,而 FastAPI 使用 {}"""
    data = get_subtitle(video_id)
    return {"data": data}


if __name__ == '__main__':
    '''
    http://127.0.0.1:5555/bilibili/BV1bW411n7fY
    '''
    print(f'{Path(__file__).stem}:app')
    uvicorn.run(f'{Path(__file__).stem}:app', host="0.0.0.0", port=5555)
    pass
4、示例:fastapi 开发 web 渲染 网站
FastAPI 这个 Python Web 框架并没有带 "渲染网页的模板引擎",但是也正因为如此,它可以使用任何网页模板。官方例子是 jinjia2 。
模板是全栈 Web 开发的重要组成部分。使用 Jinja,您可以构建丰富的模板,为 Python Web 应用程序的前端提供支持。
Jinja 是一个用 Python 编写的模板引擎,旨在帮助 API 响应的渲染过程。在每种模板语言中,都有变量被替换为实际传递给它们的值,当模板被渲染时,有控制模板逻辑的标签。
安装 jinja2
安装:pip install jinja2 aiofiles
Jinja 模板只是一个文本文件。 Jinja 可以生成任何基于文本的格式(HTML、XML、CSV、LaTeX 等)。 Jinja 模板不需要有特定的扩展名:.html、.xml 或任何其他扩展名都可以。
关于模版的扩展名:任何文件都可以作为模板加载,无论文件扩展名如何。添加 .jinja 扩展名,如 user.html.jinja 可能会使某些 IDE 或编辑器插件更容易,但这不是必需的。自动转义可以基于文件扩展名应用,因此在这种情况下您需要考虑额外的后缀。
识别模板的另一个很好的启发式方法是它们位于模板 templates 文件夹中,而不管扩展名是什么。这是项目的常见布局。
Jinja 模板引擎使用花括号 {} 来区分其表达式和语法,以及与常规 HTML、文本和模板文件中的任何其他变量。{{}} 语法称为变量块。{% %} 语法包含控制结构,如 if/else 、循环和宏。Jinja 模板语言中使用的三种常见语法块包括以下内容:
- {% ... %}:这种语法用于控制结构等语句。
- {{ todo.item }}:这个语法用于打印出传递给它的表达式的值。
- {# Test #}: 这种语法在写评论时使用,不在网页上显示。
Jinja2 是一种流行的模板语言,被 Flask、Bottle、Pelican 使用,也可被 Django 使用。
渲染第一个 Jinja 模板
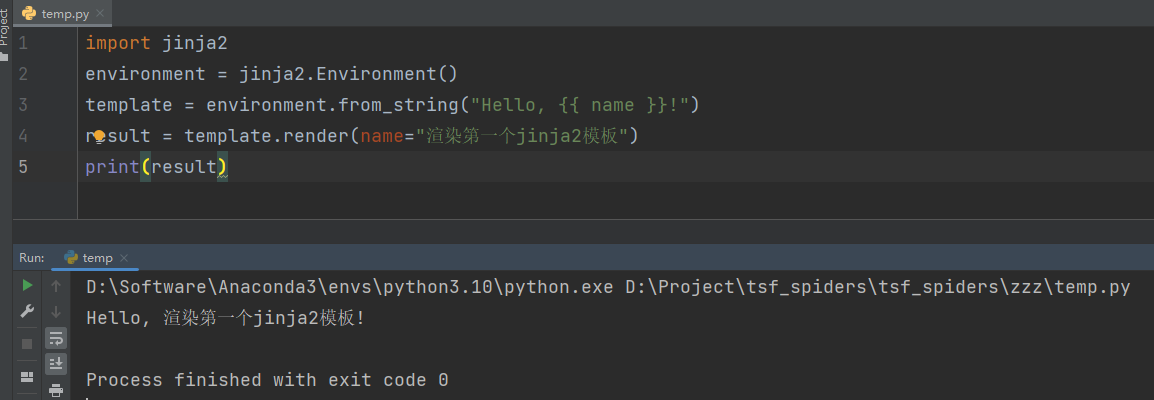
代码:
import jinja2
environment = jinja2.Environment()
template = environment.from_string("Hello, {{ name }}!")
result = template.render(name="渲染第一个jinja2模板")
print(result)
Jinja 的核心组件是 Environment() 类。在此示例中,创建了一个不带任何参数的 Jinja 环境。然后通过environment.from_string 来自定义环境。这里是创建一个普通环境,并在其中加载字符串 Hello, {{ name }}! 作为模板。
这个例子显示了在使用 Jinja 时通常会执行的两个重要步骤:
- 加载模板:加载包含占位符变量的源。默认情况下,它们包含在一对大括号 {{ }} 中。
- 渲染模板:用内容填充占位符。您可以提供字典或关键字参数作为上下文。
执行结果如下:
使用外部文件作为模板
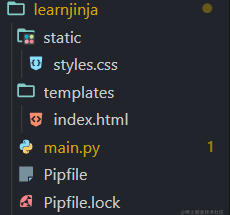
与上述方式同理,我们可以使用外部文件作为我们的模版来源,在我们的项目中创建一个新文件夹。在工作目录中,创建一个名为 templates/ 的文件夹。
然后,您可以在 template 目录中创建 index.html 模板文件,并使用 Jinja2 语法来呈现它们。例如,在template/index.html 中写入如下内容:
<!DOCTYPE html>
<html>
<head>
<title>Welcome</title>
<link href="{{ url_for('static', path='/styles.css') }}" rel="stylesheet">
</head>
<body>
<h1>Hello, {{ name }}</h1>
</body>
</html>
回到 main.py 中:
from fastapi import FastAPI, Request
from fastapi.responses import HTMLResponse
from fastapi.staticfiles import StaticFiles
from fastapi.templating import Jinja2Templates

app = FastAPI()
app.mount("/static", StaticFiles(directory="static"), name="static")
templates = Jinja2Templates(directory="templates")


@app.get("/{name}")
async def home(request: Request, name: str):
    return templates.TemplateResponse("index.html", {
        "request": request,
        "name": name
    })

if __name__ == '__main__':
    pass
整个文件的目录结构如下:
启动 FastAPI 服务:uvicorn main:app --reload --port 8888
然后另外打开一个终端,执行 curl 127.0.0.1:8888/Yuzhou1su 命令,可以看到如下 name 被渲染出来的结果:
通过浏览器访问这个 http://127.0.0.1:8888/Yuzhou1su 就能看到 css 渲染的颜色:
Jinja 模板变量可以是任何 Python 类型或对象,只要它们可以转换为字符串。可以将模型、列表或字典类型传递到模板中,并通过将这些属性放置在先前列出的第二个块中来显示其属性。在下一节中,我们将看一下过滤器。过滤器是每个模板引擎的重要组成部分,在 Jinja 中,过滤器使我们能够执行某些函数,例如从列表中连接值和检索对象的长度,等等。Jinja 中常用的功能:变量、过滤器、if 语句、循环、宏和模板继承。
变量
模板变量由传递给模板的上下文字典定义。
在模板中,只要应用程序传递了变量,您就可以随意操作这些变量。变量可能还具有您可以访问的属性或元素。变量具有哪些属性取决于提供该变量的应用程序。
除了标准的 Python __getitem__ “下标”语法( [] )之外,您还可以使用点(. )来访问变量的属性。
以下行执行相同的操作:
{{ foo.bar }}
{{ foo['bar'] }}
Filters
尽管 Python 和 Jinja 的语法非常相似,但是像连接字符串、将字符串的第一个字符设置为大写等修改操作不能使用Python 的语法在 Jinja 中完成。因此,为了执行这样的修改操作,我们在 Jinja 中使用过滤器。
变量可以被过滤器修改。过滤器与变量用管道符号(|)分隔,并且可以在括号中包含可选参数。可以链接多个过滤器。一个过滤器的输出应用于下一个。过滤器的定义格式如下:
{{ variable | filter_name(*args) }}不加参数的过滤器:
{{ variable | filter_name }}
{{ name|striptags|title }}
default 过滤器: 如果该值未定义,它将返回传递的默认值,否则返回变量的值:
{{ my_variable | default('my_variable is not defined') }}escape 过滤器: 这个过滤器用于渲染原始 HTML 输出:将字符串 s 中的字符 & < > ' ” 转换为 HTML 安全序列。如果您需要在 HTML 中显示可能包含此类字符的文本,请使用此选项。将返回值标记为标记字符串。
{{ "<title>Todo Application</title>" | escape }}
<title>Todo Application</title>类型转换过滤器: 这些过滤器包括 int 和 float 过滤器,用于从一种数据类型转换到另一种数据类型:
{{ 3.142 | int }}
3
{{ 20 | float }}
20.0
join 过滤器:join(*value*, *d=u''* , *attribute=None*)返回一个字符串,它是序列中字符串的串联。元素之间的分隔符默认为空字符串,您可以使用可选参数定义它:
{{ [1, 2, 3] | join('|') }}
 -> 1|2|3
{{ [1, 2, 3] | join }}
 -> 123
也可以连接对象的某些属性:
{{ users|join(', ', attribute='username') }}长度 filter: 这个过滤器返回一个序列或集合的长度,它的作用与 Python 中 len() 函数的作用相同:
Todo count: {{ todos | length }}
Todo count: 4
if 条件
Jinja 中 if 语句的用法与 Python 中的用法类似。在 {% %} 控制块中使用。让我们看一个例子:
{% if todos %}
<ul>
{% for todo in todos %}
 <li>{{ todo.name|e }}</li>
{% endfor %}
</ul>
{% endif %}
Loop 条件
我们也可以在Jinja中对变量进行迭代。这可以是一个列表或一个一般的函数、 比如说下面这个,例如
{% for todo in todos %}
 <li>{{ todo.name|e }}</li>
{% endfor %}
你可以在 for 循环中访问特殊的变量,比如 loop.index ,它给出了当前迭代的索引。
宏
宏可与常规编程语言中的函数相媲美。它们有助于将常用的习语放入可重用的函数中,以免重复自己(“DRY” 原则)。
{% macro input(name, value='', type='text', size=20) %}
 <div class="form">
 <input type="{{ type }}" name="{{ name }}"
            value="{{ value|escape }}" size="{{ size }}">
 </div>
{% endmacro %}
现在,为了在你的表单中快速创建一个输入,调用了这个宏:
{{ input('item') }}渲染完成后,将会返回:
 <div class="form">
 <input type="text" name="item" value="" size="20" />
 </div>
FastAPI 中的 Jinja
FastAPI 实际上是为构建 API 和微服务而设计的。它可用于构建使用 Jinja 提供 HTML 服务的 Web 应用程序,但这并不是它真正优化的目的。
如果您想构建一个在服务器上呈现大量 HTML 的大型网站,Django 可能是更好的选择。
但是,如果您正在使用 React、Angular 或 Vue 等前端框架构建现代网站,那么从 FastAPI 获取数据是一个不错的选择。
5、FastAPI、vue 开发 web 网站
5.1 关于 FastAPI 与 Vue3 的通信
:https://zhuanlan.zhihu.com/p/632387477
基于Vue3和FastAPI对数据库进行操作:https://zhuanlan.zhihu.com/p/632393099
5.2 连接 Vue.js 作为前端,Fastapi 作为后端
:https://www.cnblogs.com/hahaha111122222/p/15904405.html
目录结构
├── main.py
└── templates
└── home.html
后端 fastapi
pip install fastapi[all]
pip install jinja2
main.py
- 我们在 / 中服务于我们的前端,并在该路径中呈现我们的home.html。
- 我们使用templates文件夹保存我们的HTML并将其传递给Jinja。
- 另外,我们将从我们的front-end向/add发送一个请求。
from fastapi import FastAPI, Request
from fastapi.templating import Jinja2Templates
from pydantic import BaseModel

templates = Jinja2Templates(directory="templates")

app = FastAPI()


class TextArea(BaseModel):
    content: str

@app.post("/add")
async def post_textarea(data: TextArea):
    print(data.dict())
    return {**data.dict()}

@app.get("/")
async def serve_home(request: Request):
    return templates.TemplateResponse("home.html", {"request": request})
前端 - home.html
- 让我们创建一个有文本区域和按钮的虚拟应用程序。
- 我们正在使用Axios将请求发送到后端。
- 因为它们在同一个端口上运行,所以我们可以直接将/add传递给Axios。
<html>
<title></title>
<script src="https://cdn.jsdelivr.net/npm/vue/dist/vue.js"></script>
<script src="https://unpkg.com/axios/dist/axios.min.js"></script>

<body>
    <div id="app">
        <textarea name="" id="content" cols="30" rows="10" v-model="content"></textarea>
        <button @click="addText" id="add-textarea">click me</button>
    </div>

    <script>
        new Vue({
            el: "#app",
            data: {
                title: '',
                content: ''
            },
            methods: {
                addText() {
                    return axios.post("/add", {
                        content: this.content
                    }, {
                        headers: {
                            'Content-type': 'application/json',
                        }
                    }).then((response) => {
                        console.log("content: " + this.content);
                    });
                }
            }
        });
    </script>
</body>

</html>
运行,访问测试
命令:uvicorn main:app --reload
最后,你会有一个可怕的文本区和一个按钮。但它会帮助你更好地理解事情。
5.3 FastApi+Vue+LayUI实现简单的前后端分离 demo
实际使用中,通常建议前后端项目分离。下面使用FastApi+Vue+LayUI做一个前后端分离的Demo。
后端
后端采用 FastApi,代码 test.py
from fastapi import FastAPI, Request
from fastapi.templating import Jinja2Templates
from fastapi.responses import JSONResponse
from pathlib import Path
import uvicorn
import subprocess

app = FastAPI()
templates = Jinja2Templates(directory="templates")


@app.get('/info')
async def user_list():
    # vue的响应数据
    ret_list = [
        {'id': '1', 'value': 'one'},
        {'id': '2', 'value': 'two'},
        {'id': '3', 'value': 'three'},
    ]
    return JSONResponse(content=ret_list)


@app.get("/check")
async def home(request: Request):
    return templates.TemplateResponse("index.html", {"request": request})


if __name__ == '__main__':
    '''
        http://127.0.0.1:5555/check
    '''
    # print(f'{Path(__file__).stem}:app')
    uvicorn.run(f'{Path(__file__).stem}:app', host="0.0.0.0", port=5555)
    pass
前端
前端直接导入Vue、LayUI、Axios 的 JS 和 CSS 的 CDN 资源,在 Vue 实例的 mount 阶段,使用axios 调用后端接口拿到数据,使用 LayUI 的样式对 table 元素进行美化。
代码
<!DOCTYPE html>
<html lang="en">
<head>
    <meta charset="UTF-8">
    <meta http-equiv="X-UA-Compatible" content="IE=edge">
    <meta name="viewport" content="width=device-width, initial-scale=1.0">
    <script src="https://unpkg.com/vue@3/dist/vue.global.js"></script>
    <script src="https://unpkg.com/axios/dist/axios.min.js"></script>
    <!-- 引入 layui.css -->
    <link rel="stylesheet" href="https://www.layuicdn.com/layui/css/layui.css"/>
    <!-- 引入 layui.js -->
    <script src="https://www.layuicdn.com/layui/layui.js" type="text/javascript" charset="utf-8"></script>
    <title>Home</title>
</head>
<body>
<div id="app">
    <table class="layui-table">
        <tr v-for="fo in info_list">
            <td> [[ fo.id ]] </td>
            <td> [[ fo.value ]] </td>
        </tr>

    </table>
</div>
<table id="test" class="layui-table"></table>

<script>
    const {createApp, ref} = Vue
    const vue_app = createApp({
        data() {
            return {
                info_list: [{id: 1, name: '默认值'}],
                // info: "hello vue..."
            }
        },
        mounted() {
            this.showinfo();
        },
        methods: {
            showinfo() {
                axios.get('/info').then(response => {
                    this.info_list = response.data;
                    // console.log(response);
                    console.log(`this.info_list ---> ${this.info_list.toString()}`);
                }, err => {
                    console.log(err);
                })
            }
        }
    });
    // vue_app.config.delimiters = ['[[', ']]'];
    vue_app.config.compilerOptions.delimiters = ['[[', ']]']
    vue_app.mount('#app');
</script>
</body>
</html>
vue 和 jinja2 默认都使用 "{{内容}}" 在前端进行显示变量的值,所以会造成冲突。
可以修改 vue 显示值得方式,即修改 "插值符":
vue 2 方式:
<script>
const vue = new Vue({
el:"#app",
delimiters: ["[[", "]]"],
data:{
selects:['enu','cha'],
userData:[]
}
</script>
vue 3 方式:
在 Vue 3 中,默认的差值符号是双大括号({{ }})用于渲染动态数据到模板中。然而,如果你希望修改默认的差值符号,Vue 3 提供了一种简单的方式来实现。
可以在创建 Vue 应用程序实例之前,使用 createApp 函数的 config 方法来配置全局的差值符号:
import { createApp } from 'vue';
const app = createApp({});
//app.config.delimiters = ['${', '}'];app.config.compilerOptions.delimiters = ['${', '}'];
app.mount('#app');
上述代码中,我们通过 app.config.delimiters 来修改差值符号为 ${ }。
修改之后,你可以在模板中使用新的差值符号来显示动态数据:
<template>
<div>
<p>${ message }</p>
</div>
</template><script>
export default {
data() {
return {
message: "Hello, world!"
};
}
};
</script>
在上述示例中,我们使用 ${ } 差值符号来显示 message 数据。
需要注意的是,修改差值符号后,你需要确保新的差值符号与模板中的变量名不会发生冲突。同时,修改差值符号只在当前应用程序实例范围内有效,不会影响其他应用程序实例。
运行项目
启动 FastApi 后端服务器,访问 /test/check 接口。
使用 axios 发送 get 和 post 请求详解
:https://blog.csdn.net/grand_brol/article/details/108167088
Q&A
Q:为什么在请求/info 接口总会出现一个Temporary Redirect 重定向呢?
A:原因是因为我们在 FastApi 接口定义的时候,uri 的格式不规范导致,uri 的结尾不需要/,如果你接口增加了/,我们使用浏览器访问 uri,浏览器会忽略结尾的/,FastApi 会在内部进行查重定向,将浏览器不带/的请求重定向到我们定义的带/的视图函数上。
5.4 使用 python fastapi+vue 快速搭建网站
:https://www.elprup.com/2020/09/19/fastapi_vue/
传统网站由一个 web 框架完全承担,例如基于 nodejs 的 express,koa,基于 python 的 django,tornado。新型网站演变为用 vue 开发前端系统,使用 api 框架开发后端 api 请求接口的模式。
5.5 用 FastAPI 和 Vue.js 开发一个单页应用程序
原文地址:https://testdriven.io/blog/developing-a-single-page-app-with-fastapi-and-vuejs/
源码地址:https://github.com/testdrivenio/fastapi-vue


