个人笔记,个人理解,不建议参考,如有错误希望多多指教
lego-loam简介
lego-loam是一种轻量级的、基于地面的激光里程计和建图方法,输入的是雷达的三维点云数据,输出的是6自由度估计,本文先利用点云分割来去除噪声,然后进行特征提取获得独特的平面特征和边缘特征,进而通过两段式LM方法利用平面和边缘特征再雷达的连续扫描中求解6自由度变换的不同分量
雷达:水平角分辨率0.2 垂直角分辨率2
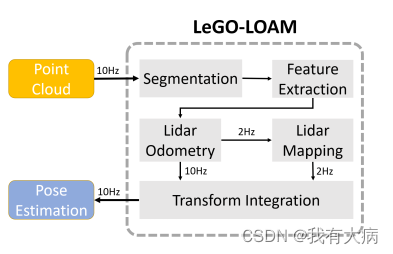
系统架构:如下图所示,一共5个模块:点云分割、特征提取、雷达里程计、建图、特征融合模块
点云分割
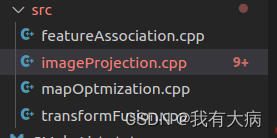
该部分代码主要集中在ImageProjection中
下面将从理论到源码解析该部分的实现
理论部分
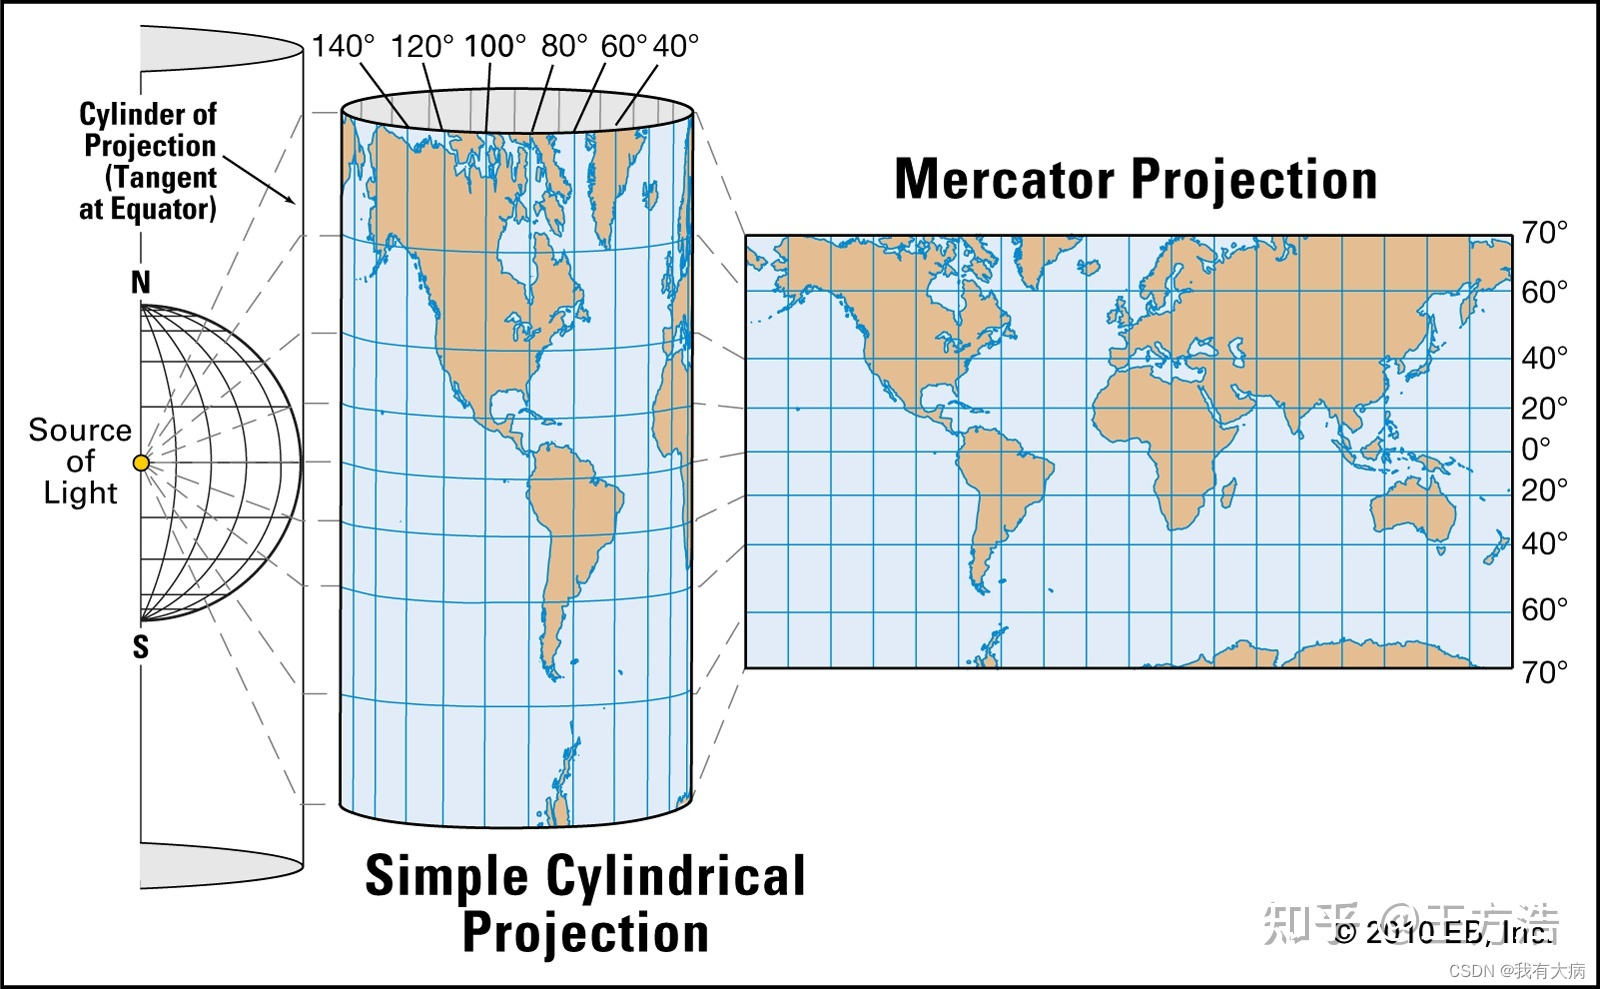
16线雷达获取的点云数据为球状结构,可以想象激光雷达射线是一个半圆面(因为有16线,有效距离是100m,即半径100m),那么这个半圆面随着激光雷达的转动会形成一个球体,然后把球体上每一线的数据投影到圆柱面上,将圆柱面展开我们就得到了一幅16*1800分辨率的深度图。如下引自
LeGO-LOAM分析之点云分割(一) - 知乎
有了深度图像下一步就是分割了。
考虑到路面不平整的情况,作者把【-15,1】之间的点先验的认为是路面区域,在该区域标记路面点。
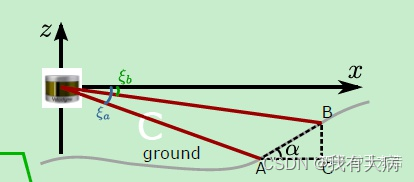
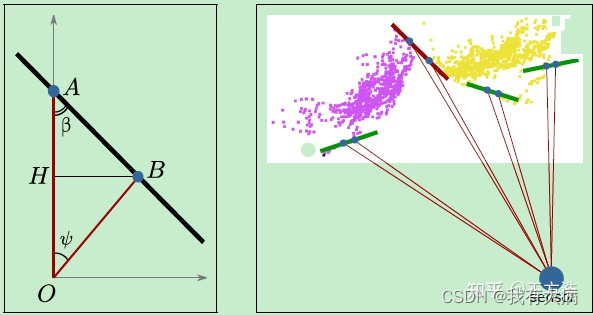
判断是否为地面点:在深度图中A、B(这两点同一时刻上:同一水平角度,不同线束上的点:不同垂直角度)之间的夹角是否足够小,足够小就判定为地面点。作者的阈值为10,如下图中的角度a,
在去除地面之后,对接下来的点进行分割。这里通过BFS(深度优先遍历)递归进行查找,从[0,0]点开始,遍历它前、后、左、右的4个点,分别进行对比,如果相对角度大于60°,则认为是同一个点云集群。最后分割出来的点云数量大于30个则认为分割有效(实际上大于5个可能也行)。
原理如下图所示,A和B是Lidar扫描的连续2个点云,如果A和B的夹角β比较小,例如下图中红色的线(代码中为60°)那么证明这2个点不属于同一个物体,反之,如果这2个点的夹角β比较大,例如下图中绿色的线,则可以认为是同一个物体,通过这个方法对点云进行分割。
需要注意的是这个角度是较远点旁边的夹角,即图中OA>OB,
源码解析
打开ImageProjection.cpp,找到main函数,我们看到函数只实例化了一个对象,创建了该对象接着就会到这个类中构造各种函数
int main(int argc, char** argv){

    ros::init(argc, argv, "lego_loam");

    ImageProjection IP;

    ROS_INFO("\033[1;32m---->\033[0m Image Projection Started.");

    ros::spin();
    return 0;
}
在我们看该类的构造函数之前,我们先查看一下ImageProjection的私有对象,即定义的一些变量
可参考ImageProjection类的私有对象,ImageProjection类的构造函数
第三第四小节内容。
然后去看 ImageProjection 包括那些功能
 ImageProjection() : nh("~")
    {
		// 订阅原始的激光点云
        subLaserCloud = nh.subscribe<sensor_msgs::PointCloud2>(pointCloudTopic, 1, &ImageProjection::cloudHandler, this);

        // 转换成图片的点云
        pubFullCloud = nh.advertise<sensor_msgs::PointCloud2>("/full_cloud_projected", 1);
         // 转换成图片的并带有距离信息的点云
        pubFullInfoCloud = nh.advertise<sensor_msgs::PointCloud2>("/full_cloud_info", 1);
        // 发布提取的地面特征
        pubGroundCloud = nh.advertise<sensor_msgs::PointCloud2>("/ground_cloud", 1)
        // 发布已经分割的点云
        pubSegmentedCloud = nh.advertise<sensor_msgs::PointCloud2>("/segmented_cloud", 1);
         // 具有几何信息的分割点云
        pubSegmentedCloudPure = nh.advertise<sensor_msgs::PointCloud2>("/segmented_cloud_pure", 1);
        pubSegmentedCloudInfo = nh.advertise<cloud_msgs::cloud_info>("/segmented_cloud_info", 1);

         // 含有异常信息的点云
        pubOutlierCloud = nh.advertise<sensor_msgs::PointCloud2>("/outlier_cloud", 1);

        nanPoint.x = std::numeric_limits<float>::quiet_NaN();
        nanPoint.y = std::numeric_limits<float>::quiet_NaN();
        nanPoint.z = std::numeric_limits<float>::quiet_NaN();
        nanPoint.intensity = -1;

        allocateMemory();
        resetParameters();
    }
看到在接受原始的点云时调用了ImageProjection::cloudHandler 函数对点云进行一系列的处理
void cloudHandler(const sensor_msgs::PointCloud2ConstPtr& laserCloudMsg){

        copyPointCloud(laserCloudMsg);//将ros点云转换为pcl点云
        findStartEndAngle();//找到开始结束时刻的方向角以及角度差
        projectPointCloud();//将点云信息投影到16*1800的图像中
        groundRemoval();//判断是否为地面
        cloudSegmentation();//点云分割,先聚类,在分块储存
        publishCloud();//发布各个类型点云
        resetParameters();//重启
    }
1、将点云数据转化为pcl点云
我还不理解pcl点云,就放个代码吧
void copyPointCloud(const sensor_msgs::PointCloud2ConstPtr& laserCloudMsg){

        //获取该帧点云的时间戳
        cloudHeader = laserCloudMsg->header;
        // cloudHeader.stamp = ros::Time::now(); // Ouster lidar users may need to uncomment this line
        //将ROS中的sensor_msgs::PointCloud2ConstPtr类型转换到pcl点云库指针
        pcl::fromROSMsg(*laserCloudMsg, *laserCloudIn);
        // 使用pcl库中的removeNaNFromPointCloud函数去除无效点
        std::vector<int> indices;
        pcl::removeNaNFromPointCloud(*laserCloudIn, *laserCloudIn, indices);
        // have "ring" channel in the cloud
        //如果点云有"ring"通过,则保存为laserCloudInRing
        if (useCloudRing == true){
            pcl::fromROSMsg(*laserCloudMsg, *laserCloudInRing);
            if (laserCloudInRing->is_dense == false) {
                ROS_ERROR("Point cloud is not in dense format, please remove NaN points first!");
                ros::shutdown();
            }
        }
    }
    }
2、寻找一帧的起始方向角。
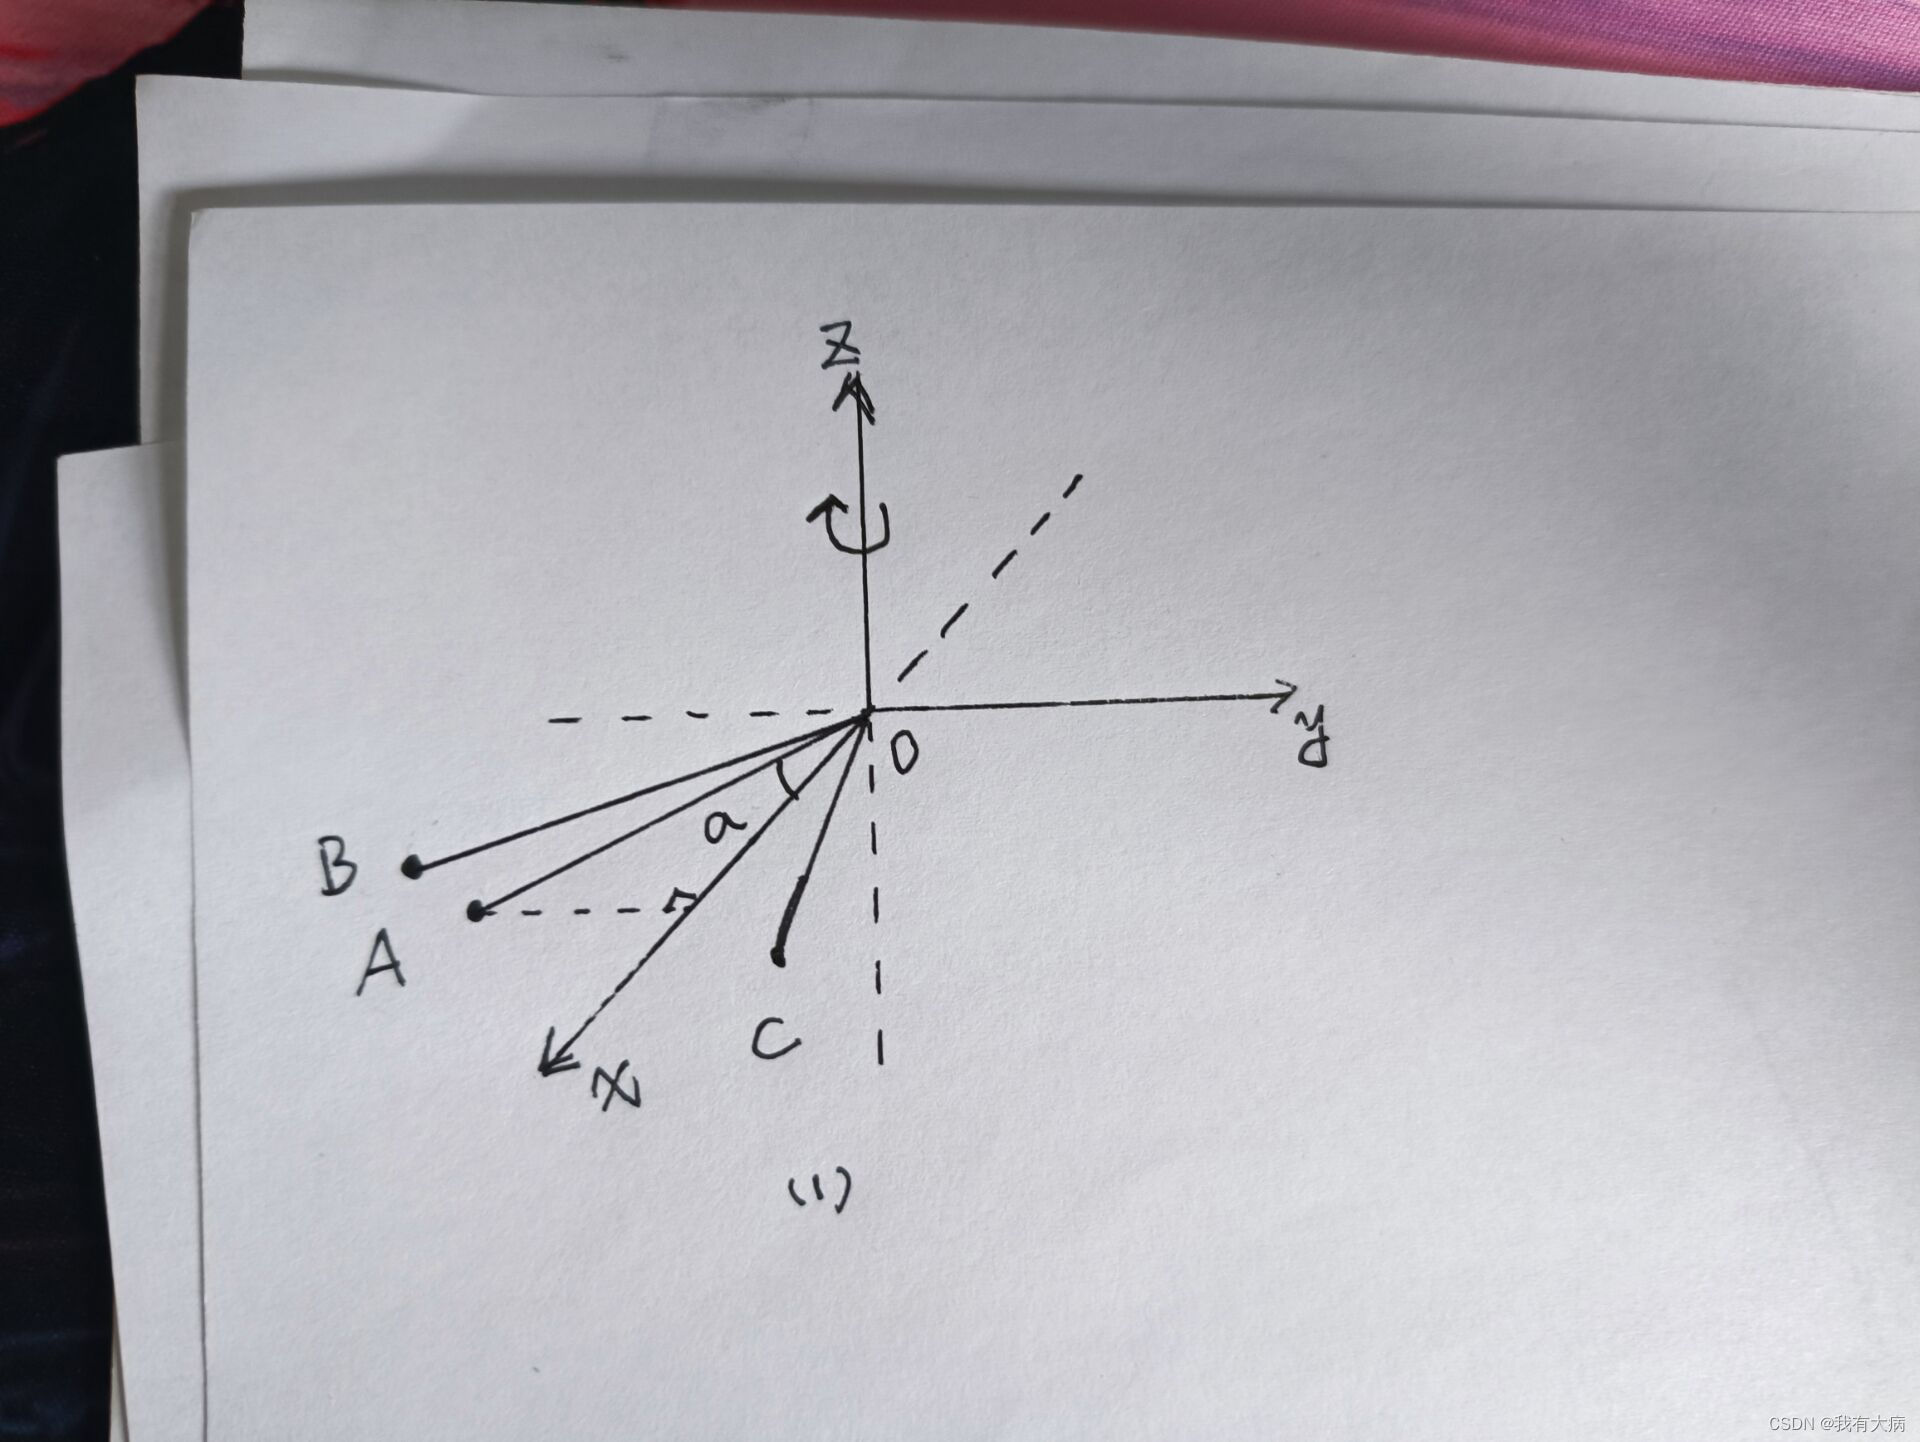
这里需要注意的是,对于雷达旋转一圈,不是从0度旋转到360度,而是有一定偏差,一般情况下旋转一圈的角度要比360度稍微多几度,所以我们要找到点云的起始角和结束角。这里是以x轴为基准,采用的办法是使用收到的第一个点云点和结束的点云点的角度作为该帧点云的起始角和结束角(前提应该是雷达数据顺序储存)
void findStartEndAngle(){
        // 雷达坐标系:右->X,前->Y,上->Z
        // 雷达内部旋转扫描方向:Z轴俯视下来,顺时针方向(Z轴右手定则反向)
        // atan2(y,x)函数的返回值范围(-PI,PI],表示与复数x+yi的幅角
        // segMsg.startOrientation范围为(-PI,PI]
        // segMsg.endOrientation范围为(PI,3PI]
        // 因为内部雷达旋转方向原因,所以atan2(..)函数前面需要加一个负号
        segMsg.startOrientation = -atan2(laserCloudIn->points[0].y, laserCloudIn->points[0].x);
        segMsg.endOrientation   = -atan2(laserCloudIn->points[laserCloudIn->points.size() - 1].y,
                                                     laserCloudIn->points[laserCloudIn->points.size() - 1].x) + 2 * M_PI;
		// 开始和结束的角度差一般是多少?
		// 一个velodyne 雷达数据包转过的角度多大?
        // 雷达一般包含的是一圈的数据,所以角度差一般是2*PI,一个数据包转过360度

		// segMsg.endOrientation - segMsg.startOrientation范围为(0,4PI)
        // 如果角度差大于3Pi或小于Pi,说明角度差有问题,进行调整。
        if (segMsg.endOrientation - segMsg.startOrientation > 3 * M_PI) {
            segMsg.endOrientation -= 2 * M_PI;
        } else if (segMsg.endOrientation - segMsg.startOrientation < M_PI)
            segMsg.endOrientation += 2 * M_PI;
		// segMsg.orientationDiff的范围为(PI,3PI),一圈大小为2PI,应该在2PI左右
        segMsg.orientationDiff = segMsg.endOrientation - segMsg.startOrientation;
    }
首先atan2前面加了个负号,atan2相关知识汇总
这是因为激光雷达的旋转方向和右手坐标系方向刚好相反,如下图(手残勿怪)
A是xoy平面上的激光雷达检测到的点,a就是我们要求解的角度,因为y<0,x>0 所以atan2(y,x)是负数,就是因为激光雷达的旋转方向和右手坐标系方向刚好相反,所以我们要取相反数。
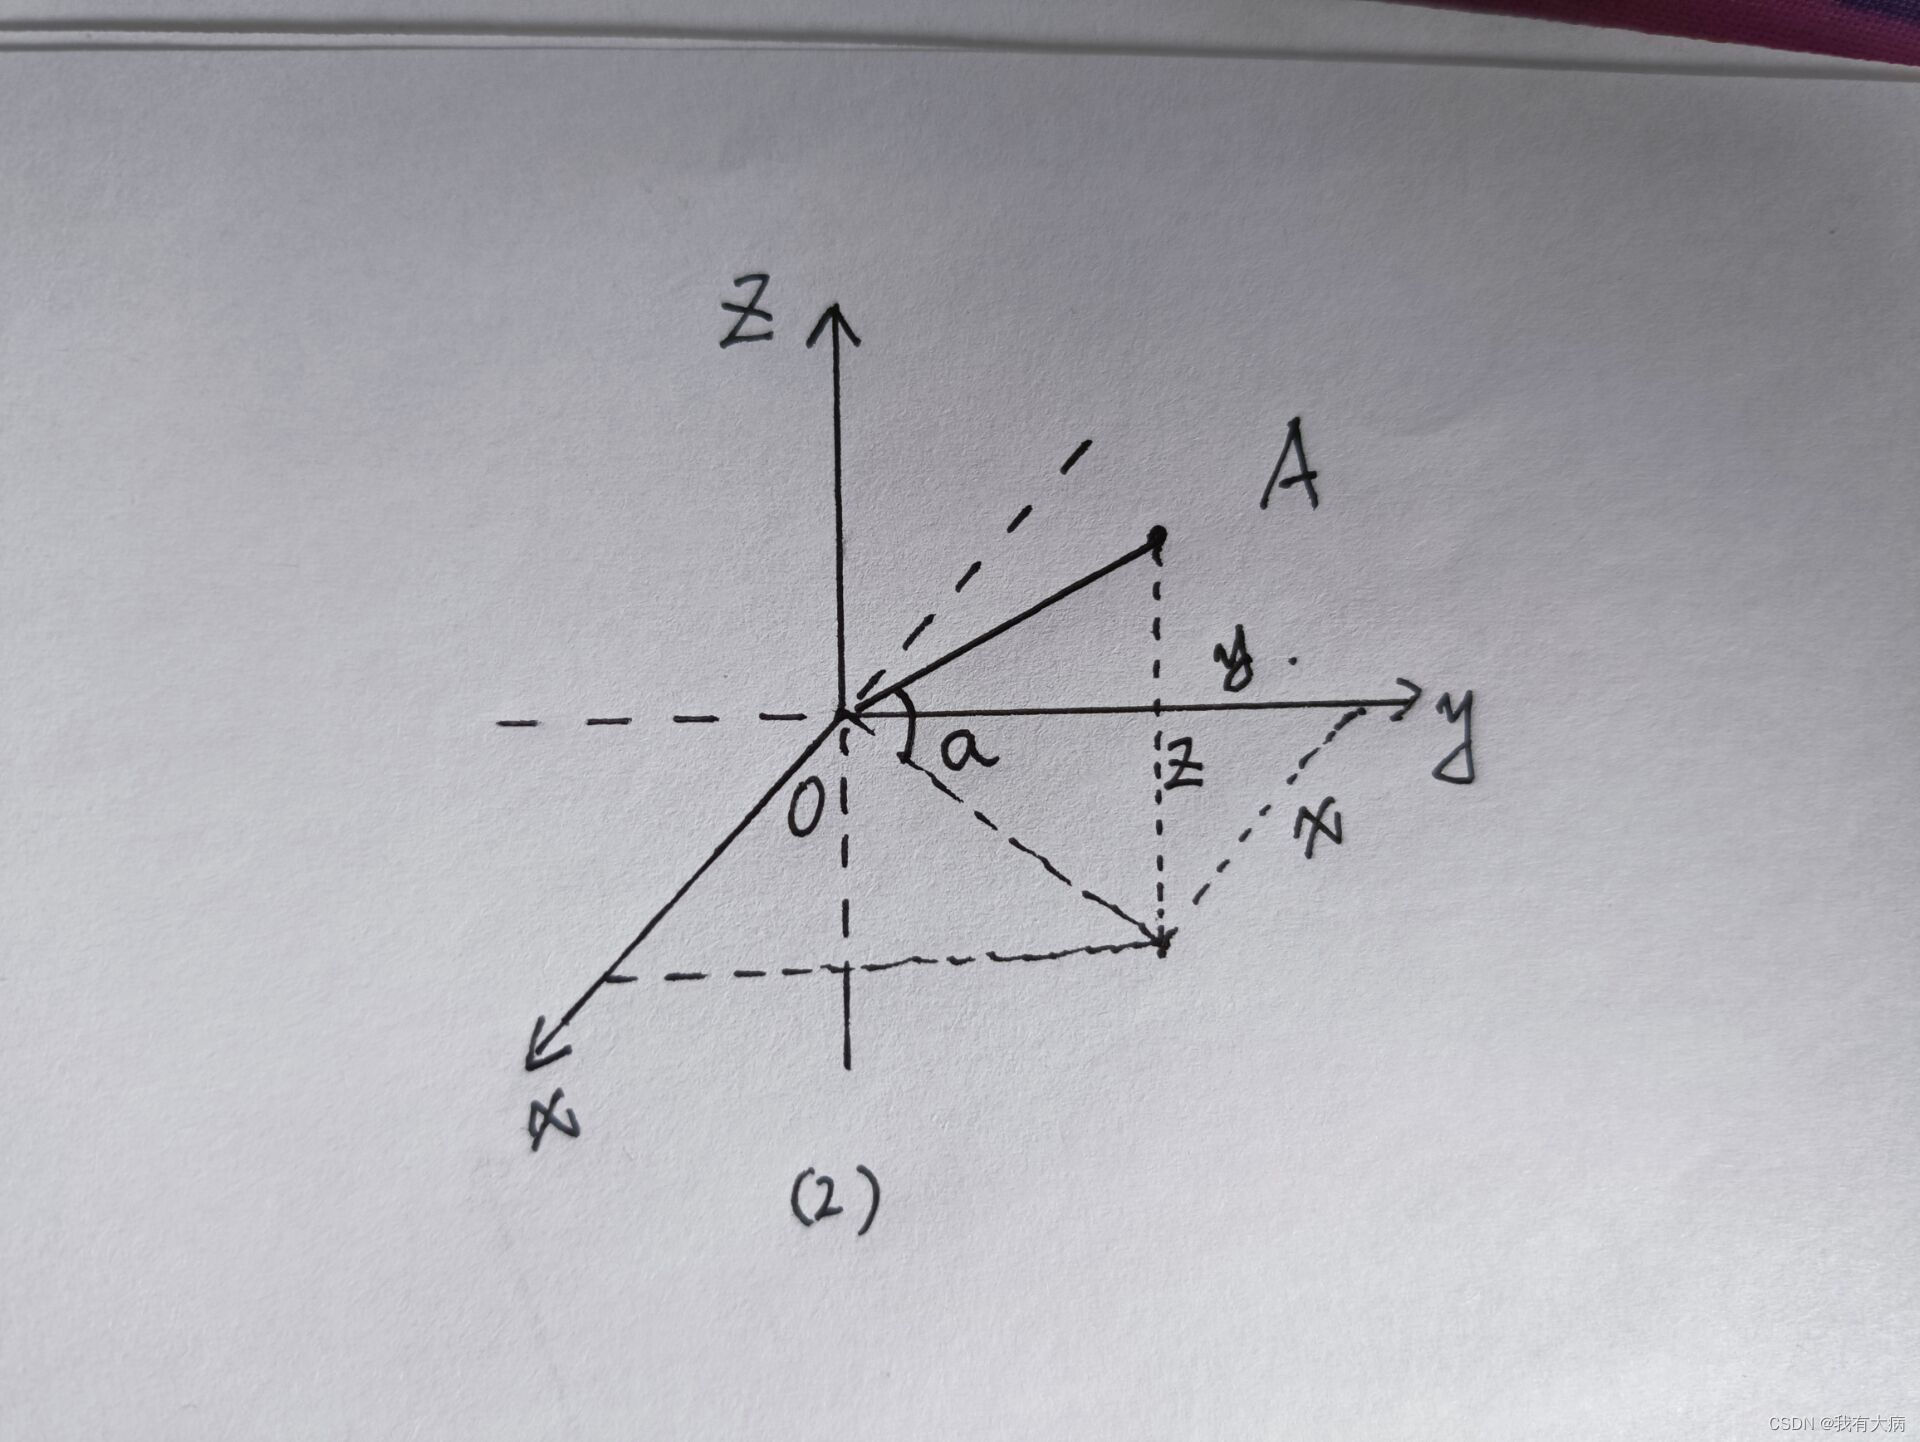
这个时候有会有人问,为什么结束的角度要加上360度,原因就是雷达旋转一次的度数要大于360度,所以加上360进行矫正
如下图:若A是开始点B是结束点,假设经过atan2()计算A的角度是20,B的角度是30,那么角度差明显不对,B的角度加上360后变成390,此时的角度差在370,是符合实际情况的。若A是开始点C是结束点,假设经过atan2()计算A的角度是20,C的角度是340,C的角度加上360后变成700,此时的角度差在680,是不符合实际情况的,所以后面代码进行判断后减去360后,角度差变为320,符合实际情况。也就是说角度差要在360附近,否则说明前面将结束角加上360是不正确的,要再次进行校准。

3、将激光点云转化为深度图
void projectPointCloud(){
float verticalAngle, horizonAngle, range;
size_t rowIdn, columnIdn, index, cloudSize;
PointType thisPoint;
cloudSize = laserCloudIn->points.size();
for (size_t i = 0; i < cloudSize; ++i){
thisPoint.x = laserCloudIn->points[i].x;
thisPoint.y = laserCloudIn->points[i].y;
thisPoint.z = laserCloudIn->points[i].z;
// 计算竖直方向上的角度(雷达的第几线)
verticalAngle = atan2(thisPoint.z, sqrt(thisPoint.x * thisPoint.x + thisPoint.y * thisPoint.y)) * 180 / M_PI;
// rowIdn计算出该点激光雷达是竖直方向上第几线的
// 从下往上计数,-15度记为初始线,第0线,一共16线(N_SCAN=16)
rowIdn = (verticalAngle + ang_bottom) / ang_res_y;
if (rowIdn < 0 || rowIdn >= N_SCAN)
continue;
// atan2(y,x)函数的返回值范围(-PI,PI],表示与复数x+yi的幅角
// 下方角度atan2(..)交换了x和y的位置,计算的是与y轴正方向的夹角大小(关于y=x做对称变换)
// 这里是在雷达坐标系,所以是与正前方的夹角大小
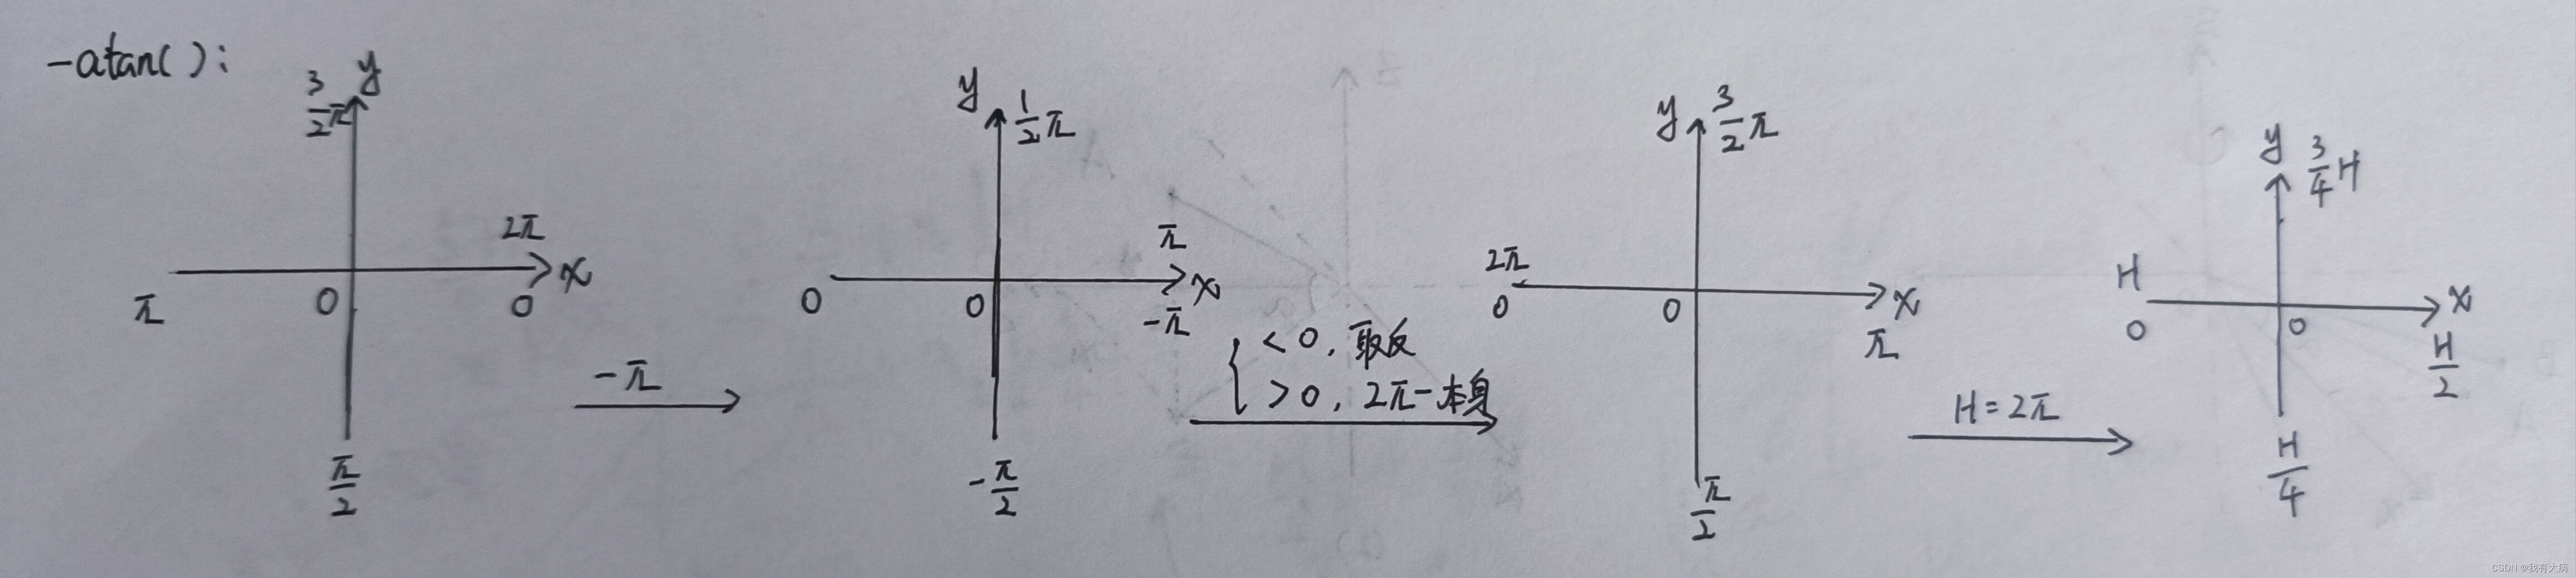
horizonAngle = atan2(thisPoint.x, thisPoint.y) * 180 / M_PI;
// round函数进行四舍五入取整
// 这边确定不是减去180度??? 不是
// 雷达水平方向上某个角度和水平第几线的关联关系???关系如下:
// horizonAngle:(-PI,PI],columnIdn:[H/4,5H/4]-->[0,H] (H:Horizon_SCAN)
// 下面是把坐标系绕z轴旋转,对columnIdn进行线性变换
// x+==>Horizon_SCAN/2,x-==>Horizon_SCAN
// y+==>Horizon_SCAN*3/4,y-==>Horizon_SCAN*5/4,Horizon_SCAN/4
columnIdn = -round((horizonAngle-90.0)/ang_res_x) + Horizon_SCAN/2;
if (columnIdn >= Horizon_SCAN)
columnIdn -= Horizon_SCAN;
if (columnIdn < 0 || columnIdn >= Horizon_SCAN)
continue;
range = sqrt(thisPoint.x * thisPoint.x + thisPoint.y * thisPoint.y + thisPoint.z * thisPoint.z);
rangeMat.at<float>(rowIdn, columnIdn) = range;
// columnIdn:[0,H] (H:Horizon_SCAN)==>[0,1800]
thisPoint.intensity = (float)rowIdn + (float)columnIdn / 10000.0;
index = columnIdn + rowIdn * Horizon_SCAN;
fullCloud->points[index] = thisPoint;
fullInfoCloud->points[index].intensity = range;
}
}
首先计算各个点在图像上的行列数,因为是16线激光雷达,所以一共有16行,水平角分辨率为0.2,所以有列数:360/0.2=1800。
只要知道垂直方向上的角度便能得到是第几线光束(从下往上数),ang_bottom=15.0.紧接着计算列数。
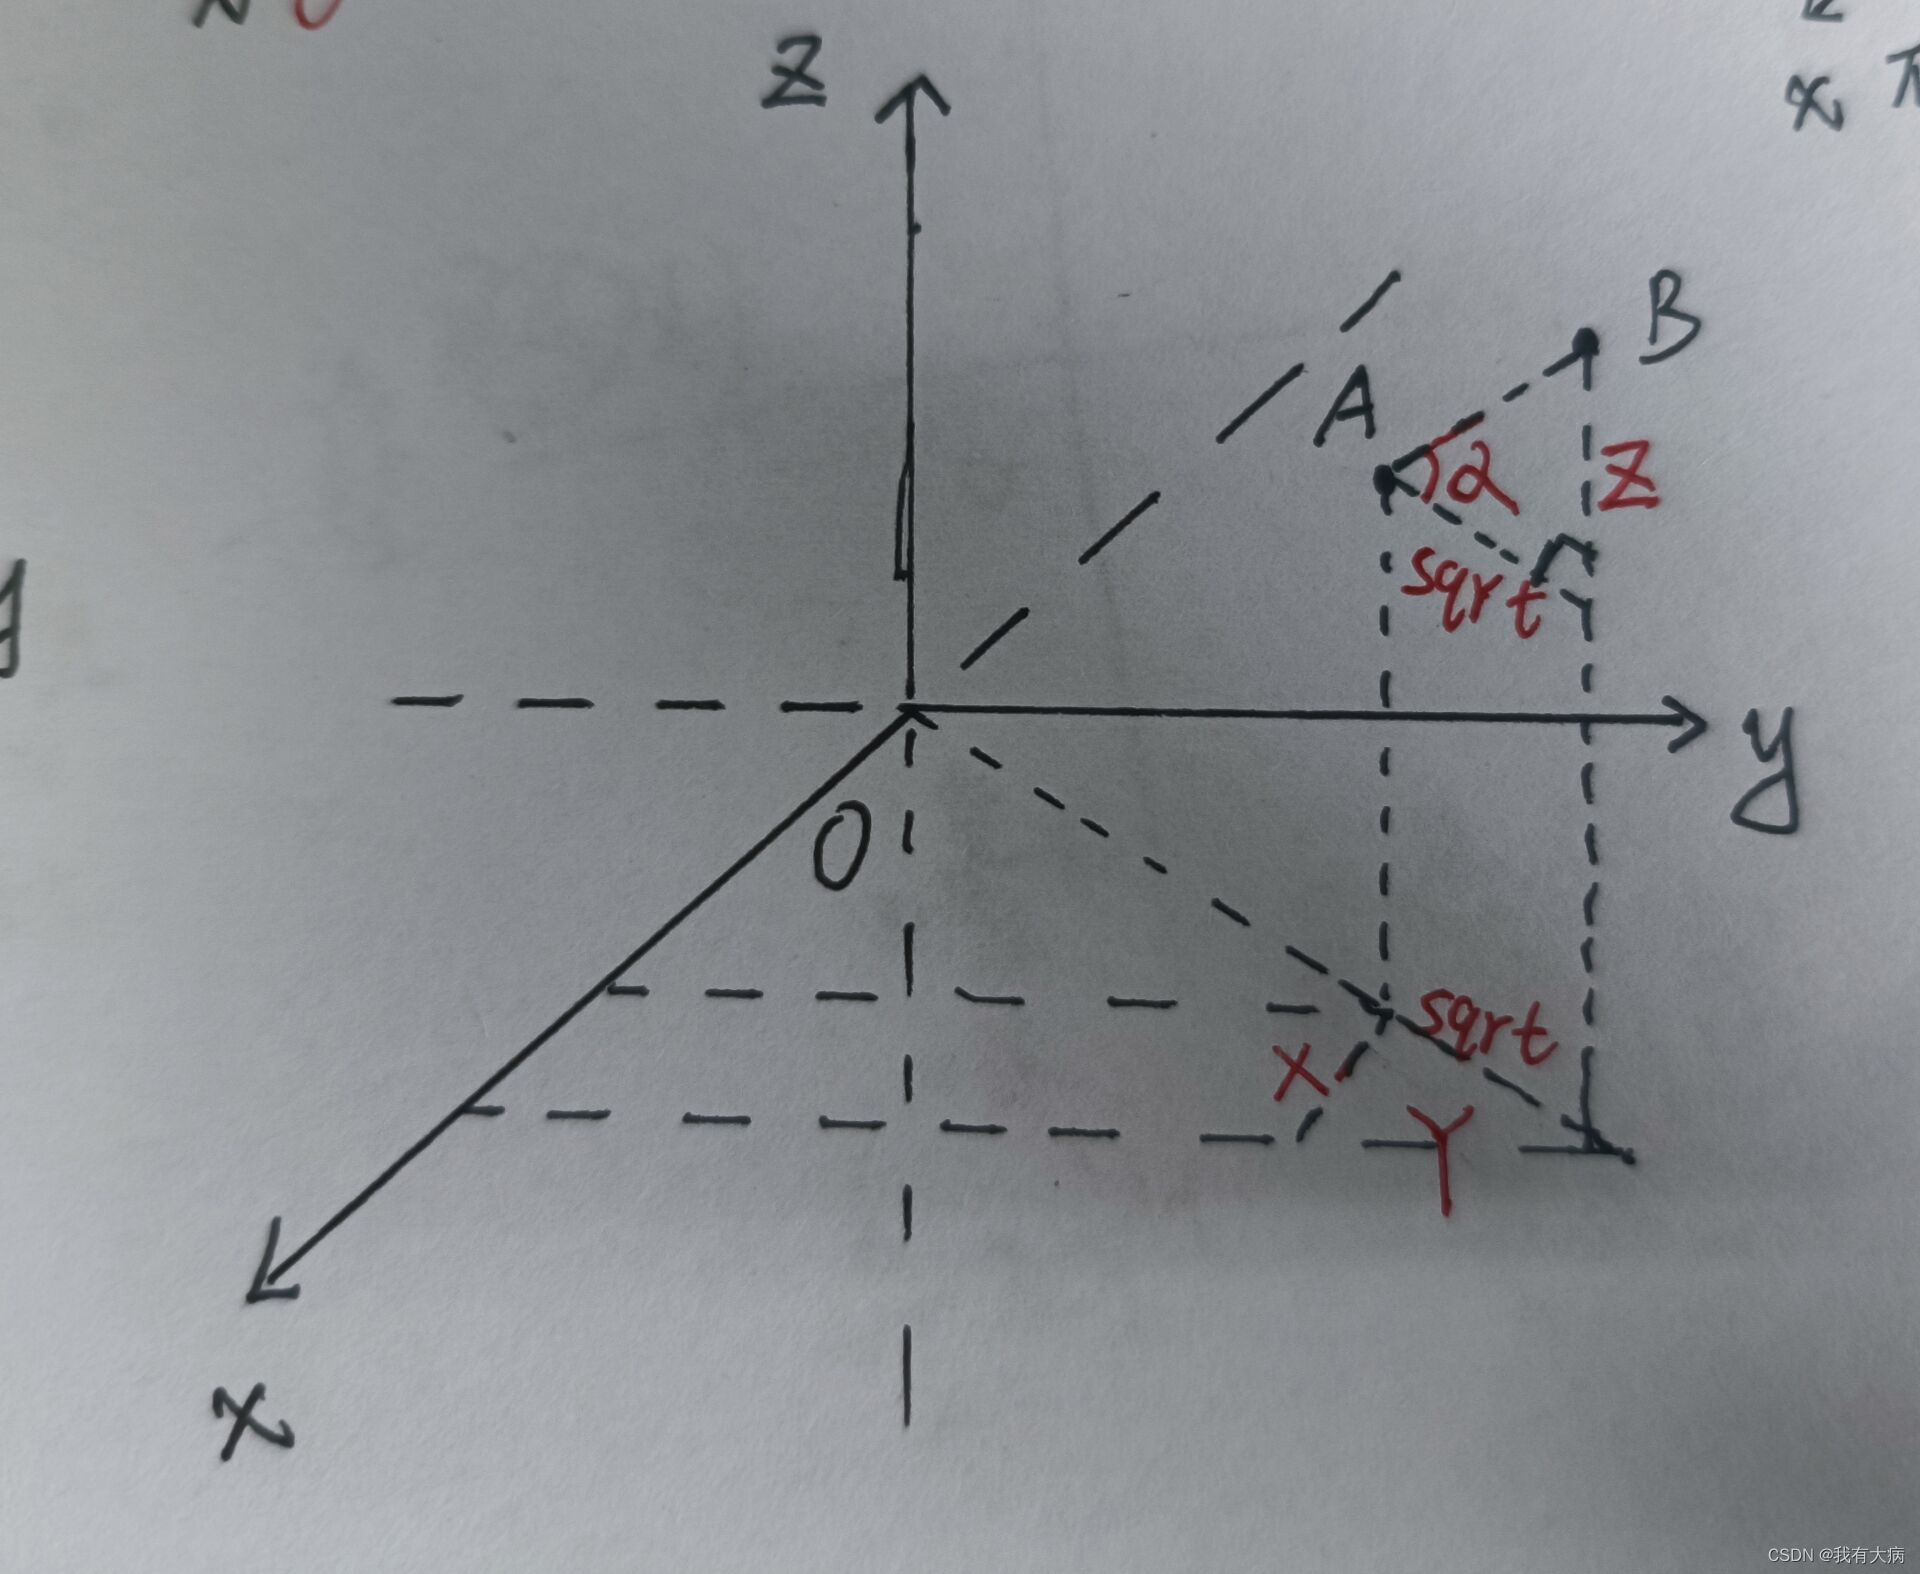
最终的深度图激光传感器x轴应该在图的中心,所以最终要以x轴为基准来计算列数(y轴方向就是机器人的视角方向)。开始先以y轴为基准计算角度(atan2(x,y))。然后变换到以x轴负方向为起点计算列数,此时的列数就是深度u中的列数。过程如下图:

我认为也可以以x轴为基准及计算角度,思路差不多,不过会稍微麻烦点!简单解释下,如下图:
接着计算深度,即激光点到传感器的距离,其中fullCloud保留了点的行列信息,fullInfoCloud保留了深度信息,这是两者的区别。
4、过滤地面点
关于groundMat的说明:
=-1:无效值,表示无法判断是否为地面点;
=0: 代表初始值,不是地面点;
=1: 表示是地面点。
关于labelMat的说明:
=-1:无效值,不进行点云分割;
=0: 初始值;
=labelCount: 平面点;
=999999: 舍弃点。
关于rangeMat的说明:
FLT_MAX: 初始化值;
range: 点云的深度值。
for (size_t j = 0; j < Horizon_SCAN; ++j){
            // groundScanInd 是在 utility.h 文件中声明的线数,groundScanInd=7
            for (size_t i = 0; i < groundScanInd; ++i){

                lowerInd = j + ( i )*Horizon_SCAN;
                upperInd = j + (i+1)*Horizon_SCAN;

                // 初始化的时候用nanPoint.intensity = -1 填充
                // 都是-1 证明是空点nanPoint
                if (fullCloud->points[lowerInd].intensity == -1 ||
                    fullCloud->points[upperInd].intensity == -1){
                    groundMat.at<int8_t>(i,j) = -1;
                    continue;
                }
				// 由上下两线之间点的XYZ位置得到两线之间的俯仰角
				// 如果俯仰角在10度以内,则判定(i,j)为地面点,groundMat[i][j]=1
				// 否则,则不是地面点,进行后续操作
                diffX = fullCloud->points[upperInd].x - fullCloud->points[lowerInd].x;
                diffY = fullCloud->points[upperInd].y - fullCloud->points[lowerInd].y;
                diffZ = fullCloud->points[upperInd].z - fullCloud->points[lowerInd].z;

                angle = atan2(diffZ, sqrt(diffX*diffX + diffY*diffY) ) * 180 / M_PI;

                if (abs(angle - sensorMountAngle) <= 10){
                    groundMat.at<int8_t>(i,j) = 1;
                    groundMat.at<int8_t>(i+1,j) = 1;
                }
            }
        }
首先遍历地面点(第0线到第7线),遍历每一列相邻上下两点,空点去除,计算两点的俯仰角,解释如下图:满足条件的标记为地面点
// 找到所有点中的地面点或者距离为FLT_MAX(rangeMat的初始值)的点,并将他们labelMat标记为-1
		// rangeMat[i][j]==FLT_MAX,代表的含义是什么? 无效点
        for (size_t i = 0; i < N_SCAN; ++i){
            for (size_t j = 0; j < Horizon_SCAN; ++j){
                if (groundMat.at<int8_t>(i,j) == 1 || rangeMat.at<float>(i,j) == FLT_MAX){
                    labelMat.at<int>(i,j) = -1;
                }
            }
        }

		// 如果有节点订阅groundCloud,那么就需要把地面点发布出来
		// 具体实现过程:把点放到groundCloud队列中去
        if (pubGroundCloud.getNumSubscribers() != 0){
            for (size_t i = 0; i <= groundScanInd; ++i){
                for (size_t j = 0; j < Horizon_SCAN; ++j){
                    if (groundMat.at<int8_t>(i,j) == 1)
                        groundCloud->push_back(fullCloud->points[j + i*Horizon_SCAN]);
                }
            }
        }
将地面点和无限点(空点)在labelMat标记为-1,表示后续不对其进行分割。
发布地面点云信息
5、点云分割
在cloudSegmentation 函数中,首先对所有点云进行聚类:
for (size_t i = 0; i < N_SCAN; ++i)
            for (size_t j = 0; j < Horizon_SCAN; ++j)
				// 如果labelMat[i][j]=0,表示没有对该点进行过分类
				// 需要对该点进行聚类
                if (labelMat.at<int>(i,j) == 0)
                    labelComponents(i, j);
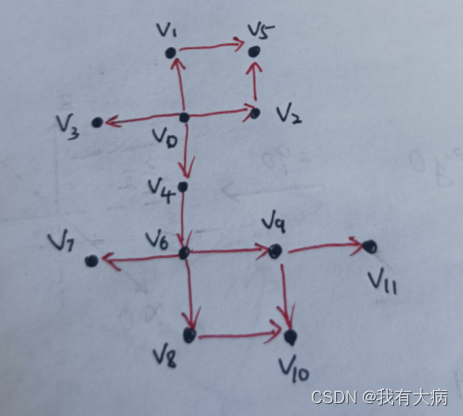
labelComponents 是聚类函数,判断当前点与周围四个点是否属于同一平面,采用BFS,直至没有点属于这个平面。如下图,假设v0是传入函数的第一个点,首先判断它的邻域点v1,v2,v3,v4是否和v0属于同一平面,若属于同一平面,紧接着在判断v1,v2,v3,v4的邻域点v5,v6是否属于同一平面,直到没有点加入到该平面。
BFS指针赋值:
void labelComponents(int row, int col){
        float d1, d2, alpha, angle;
        int fromIndX, fromIndY, thisIndX, thisIndY;
        bool lineCountFlag[N_SCAN] = {false};

        queueIndX[0] = row;
        queueIndY[0] = col;
        int queueSize = 1;
        int queueStartInd = 0;
        int queueEndInd = 1;

        allPushedIndX[0] = row;
        allPushedIndY[0] = col;
        int allPushedIndSize = 1;
将从当前点设置搜索:
while(queueSize > 0){
            fromIndX = queueIndX[queueStartInd];
            fromIndY = queueIndY[queueStartInd];
            --queueSize;
            ++queueStartInd;
			// labelCount的初始值为1,后面会递增
            labelMat.at<int>(fromIndX, fromIndY) = labelCount;
搜索当前点的邻域点:
for (auto iter = neighborIterator.begin(); iter != neighborIterator.end(); ++iter)
neighbor的定义如下:即上下左右四个点
std::pair<int8_t, int8_t> neighbor;
        neighbor.first = -1; neighbor.second =  0; neighborIterator.push_back(neighbor);
        neighbor.first =  0; neighbor.second =  1; neighborIterator.push_back(neighbor);
        neighbor.first =  0; neighbor.second = -1; neighborIterator.push_back(neighbor);
        neighbor.first =  1; neighbor.second =  0; neighborIterator.push_back(neighbor);
判断邻域点是否越界,注意的是雷达水平方向上转动一圈,所以左右连通
thisIndX = fromIndX + (*iter).first;
                thisIndY = fromIndY + (*iter).second;

                if (thisIndX < 0 || thisIndX >= N_SCAN)
                    continue;
                    // 是个环状的图片,左右连通
                if (thisIndY < 0)
                    thisIndY = Horizon_SCAN - 1;
                if (thisIndY >= Horizon_SCAN)
                    thisIndY = 0;
判断邻域点是否需要聚类:
// 如果点[thisIndX,thisIndY]已经标记过
				// labelMat中,-1代表无效点,0代表未进行标记过,其余为其他的标记
				// 如果当前的邻点已经标记过,则跳过该点。
				// 如果labelMat已经标记为正整数,则已经聚类完成,不需要再次对该点聚类
                if (labelMat.at<int>(thisIndX, thisIndY) != 0)
                    continue;
计算两点到传感器的最大最小距离:
                d1 = std::max(rangeMat.at<float>(fromIndX, fromIndY),
                              rangeMat.at<float>(thisIndX, thisIndY));
                d2 = std::min(rangeMat.at<float>(fromIndX, fromIndY),
                              rangeMat.at<float>(thisIndX, thisIndY));
上下两点用垂直分辨率,左右两点用水平分辨率:
          // alpha代表角度分辨率,
				// X方向上角度分辨率是segmentAlphaX(rad)
				// Y方向上角度分辨率是segmentAlphaY(rad)
                if ((*iter).first == 0)
                    alpha = segmentAlphaX;
                else
                    alpha = segmentAlphaY;
计算角度:
         // 通过下面的公式计算这两点之间是否有平面特征
				// atan2(y,x)的值越大,d1,d2之间的差距越小,越平坦
                angle = atan2(d2*sin(alpha), (d1 -d2*cos(alpha)));
下图解释angle的求解原理:
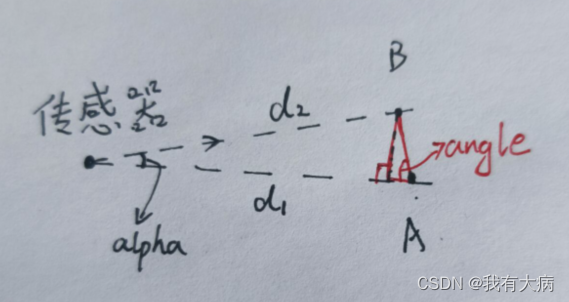
如果满足大于60,将该点加入到平面队列当中,并做相应的标记:
               if (angle > segmentTheta){
					// segmentTheta=1.0472<==>60度
					// 如果算出角度大于60度,则假设这是个平面
                    queueIndX[queueEndInd] = thisIndX;
                    queueIndY[queueEndInd] = thisIndY;
                    ++queueSize;
                    ++queueEndInd;

                    labelMat.at<int>(thisIndX, thisIndY) = labelCount;
                    lineCountFlag[thisIndX] = true;

                    allPushedIndX[allPushedIndSize] = thisIndX;
                    allPushedIndY[allPushedIndSize] = thisIndY;
                    ++allPushedIndSize;
回到cloudSegmentation 判断该平面是否是可用聚类,
        bool feasibleSegment = false;

		// 如果聚类超过30个点,直接标记为一个可用聚类,labelCount需要递增
        if (allPushedIndSize >= 30)
            feasibleSegment = true;
        else if (allPushedIndSize >= segmentValidPointNum){
			// 如果聚类点数小于30大于等于5,统计竖直方向上的聚类点数
            int lineCount = 0;
            for (size_t i = 0; i < N_SCAN; ++i)
                if (lineCountFlag[i] == true)
                    ++lineCount;

			// 竖直方向上超过3个也将它标记为有效聚类
            if (lineCount >= segmentValidLineNum)
                feasibleSegment = true;
        }
如果是有效聚类,将聚类标签加一,否则将这些点标记为舍弃点,后续不对这些点进行处理:
        if (feasibleSegment == true){
            ++labelCount;
        }else{
            for (size_t i = 0; i < allPushedIndSize; ++i){
				// 标记为999999的是需要舍弃的聚类的点,因为他们的数量小于30个
                labelMat.at<int>(allPushedIndX[i], allPushedIndY[i]) = 999999;
            }
        }
    }
去除每个线束的前五个点:
        int sizeOfSegCloud = 0;
        for (size_t i = 0; i < N_SCAN; ++i) {

			// segMsg.startRingIndex[i]
			// segMsg.endRingIndex[i]
			// 表示第i线的点云起始序列和终止序列
			// 以开始线后的第6线为开始,以结束线前的第6线为结束
            segMsg.startRingIndex[i] = sizeOfSegCloud-1 + 5;
找到可用的特征点或者地面点,如果是被舍弃的点,并且列数为5的被数,不是地面点(i>7)的点可以放入异常点云中,其他舍弃点直接跳过:
            for (size_t j = 0; j < Horizon_SCAN; ++j) {
				// 找到可用的特征点或者地面点(不选择labelMat[i][j]=0的点)
                if (labelMat.at<int>(i,j) > 0 || groundMat.at<int8_t>(i,j) == 1){
					// labelMat数值为999999表示这个点是因为聚类数量不够30而被舍弃的点
					// 需要舍弃的点直接continue跳过本次循环,
					// 当列数为5的倍数,并且行数较大,可以认为非地面点的,将它保存进异常点云(界外点云)中
					// 然后再跳过本次循环
                    if (labelMat.at<int>(i,j) == 999999){
                        if (i > groundScanInd && j % 5 == 0){
                            outlierCloud->push_back(fullCloud->points[j + i*Horizon_SCAN]);
                            continue;
                        }else{
                            continue;
                        }
                    }
如果是地面点,对于列数不为5的倍数的,直接跳过不处理,为什么非要是5的倍数呢,因为要每几个点取个特征点,不然的话特征点太多了。
                    if (groundMat.at<int8_t>(i,j) == 1){
                        if (j%5!=0 && j>5 && j<Horizon_SCAN-5)
                            continue;
                    }
保存分割后的点云:
					// 上面多个if语句已经去掉了不符合条件的点,这部分直接进行信息的拷贝和保存操作
					// 保存完毕后sizeOfSegCloud递增
                    //是否为地面点
                    segMsg.segmentedCloudGroundFlag[sizeOfSegCloud] = (groundMat.at<int8_t>(i,j) == 1);
                    //点云列索引
                    segMsg.segmentedCloudColInd[sizeOfSegCloud] = j;
                    //深度信息
                    segMsg.segmentedCloudRange[sizeOfSegCloud]  = rangeMat.at<float>(i,j);
                    //点云点
                    segmentedCloud->push_back(fullCloud->points[j + i*Horizon_SCAN]);
                    ++sizeOfSegCloud;
以结束线前的第5线为结束,为什么要保证前后有5个点的距离呢,我还不清楚。
            // 以结束线前的第5线为结束
            segMsg.endRingIndex[i] = sizeOfSegCloud-1 - 5;
分割点云segmentedCloudPure被订阅, 赋值
		// 如果有节点订阅SegmentedCloudPure,
		// 那么把点云数据保存到segmentedCloudPure中去
        if (pubSegmentedCloudPure.getNumSubscribers() != 0){
            for (size_t i = 0; i < N_SCAN; ++i){
                for (size_t j = 0; j < Horizon_SCAN; ++j){
					// 需要选择不是地面点(labelMat[i][j]!=-1)和没被舍弃的点
                    if (labelMat.at<int>(i,j) > 0 && labelMat.at<int>(i,j) != 999999){
                        segmentedCloudPure->push_back(fullCloud->points[j + i*Horizon_SCAN]);
                        segmentedCloudPure->points.back().intensity = labelMat.at<int>(i,j);
                    }
                }
            }
        }
6、发布各类行点云
   void publishCloud(){
    	// 发布cloud_msgs::cloud_info消息
        segMsg.header = cloudHeader;
        pubSegmentedCloudInfo.publish(segMsg);

        sensor_msgs::PointCloud2 laserCloudTemp;

		// pubOutlierCloud发布界外点云
        pcl::toROSMsg(*outlierCloud, laserCloudTemp);
        laserCloudTemp.header.stamp = cloudHeader.stamp;
        laserCloudTemp.header.frame_id = "base_link";
        pubOutlierCloud.publish(laserCloudTemp);

		// pubSegmentedCloud发布分块点云,包括分割点云和地面点云
        pcl::toROSMsg(*segmentedCloud, laserCloudTemp);
        laserCloudTemp.header.stamp = cloudHeader.stamp;
        laserCloudTemp.header.frame_id = "base_link";
        pubSegmentedCloud.publish(laserCloudTemp);
//发布FullCloud点云,有深度
        if (pubFullCloud.getNumSubscribers() != 0){
            pcl::toROSMsg(*fullCloud, laserCloudTemp);
            laserCloudTemp.header.stamp = cloudHeader.stamp;
            laserCloudTemp.header.frame_id = "base_link";
            pubFullCloud.publish(laserCloudTemp);
        }
     //发布地面点云
        if (pubGroundCloud.getNumSubscribers() != 0){
            pcl::toROSMsg(*groundCloud, laserCloudTemp);
            laserCloudTemp.header.stamp = cloudHeader.stamp;
            laserCloudTemp.header.frame_id = "base_link";
            pubGroundCloud.publish(laserCloudTemp);
        }
       //发布分割点云
        if (pubSegmentedCloudPure.getNumSubscribers() != 0){
            pcl::toROSMsg(*segmentedCloudPure, laserCloudTemp);
            laserCloudTemp.header.stamp = cloudHeader.stamp;
            laserCloudTemp.header.frame_id = "base_link";
            pubSegmentedCloudPure.publish(laserCloudTemp);
        }
      //发布FullInfoCloud点云,有深度
        if (pubFullInfoCloud.getNumSubscribers() != 0){
            pcl::toROSMsg(*fullInfoCloud, laserCloudTemp);
            laserCloudTemp.header.stamp = cloudHeader.stamp;
            laserCloudTemp.header.frame_id = "base_link";
            pubFullInfoCloud.publish(laserCloudTemp);
        }
    }
FullCloud点云和FullInfoCloud点云中的深度信息不一样,具体在第三小节说了:
在主函数mageProjection中所有点云发布完成后,顺序执行执行以下步骤:
/初始化各类参数以及分配内存
    void allocateMemory(){

        laserCloudIn.reset(new pcl::PointCloud<PointType>());

        fullCloud.reset(new pcl::PointCloud<PointType>());
        fullInfoCloud.reset(new pcl::PointCloud<PointType>());

        groundCloud.reset(new pcl::PointCloud<PointType>());
        segmentedCloud.reset(new pcl::PointCloud<PointType>());
        segmentedCloudPure.reset(new pcl::PointCloud<PointType>());
        outlierCloud.reset(new pcl::PointCloud<PointType>());

        fullCloud->points.resize(N_SCAN*Horizon_SCAN);
        fullInfoCloud->points.resize(N_SCAN*Horizon_SCAN);

        segMsg.startRingIndex.assign(N_SCAN, 0);
        segMsg.endRingIndex.assign(N_SCAN, 0);

        segMsg.segmentedCloudGroundFlag.assign(N_SCAN*Horizon_SCAN, false);
        segMsg.segmentedCloudColInd.assign(N_SCAN*Horizon_SCAN, 0);
        segMsg.segmentedCloudRange.assign(N_SCAN*Horizon_SCAN, 0);

		// labelComponents函数中用到了这个矩阵
		// 该矩阵用于求某个点的上下左右4个邻接点
        std::pair<int8_t, int8_t> neighbor;
        neighbor.first = -1; neighbor.second =  0; neighborIterator.push_back(neighbor);
        neighbor.first =  0; neighbor.second =  1; neighborIterator.push_back(neighbor);
        neighbor.first =  0; neighbor.second = -1; neighborIterator.push_back(neighbor);
        neighbor.first =  1; neighbor.second =  0; neighborIterator.push_back(neighbor);

        allPushedIndX = new uint16_t[N_SCAN*Horizon_SCAN];
        allPushedIndY = new uint16_t[N_SCAN*Horizon_SCAN];

        queueIndX = new uint16_t[N_SCAN*Horizon_SCAN];
        queueIndY = new uint16_t[N_SCAN*Horizon_SCAN];
    }
初始化/重置各类参数内容
    void resetParameters(){
        laserCloudIn->clear();
        groundCloud->clear();
        segmentedCloud->clear();
        segmentedCloudPure->clear();
        outlierCloud->clear();

        rangeMat = cv::Mat(N_SCAN, Horizon_SCAN, CV_32F, cv::Scalar::all(FLT_MAX));
        groundMat = cv::Mat(N_SCAN, Horizon_SCAN, CV_8S, cv::Scalar::all(0));
        labelMat = cv::Mat(N_SCAN, Horizon_SCAN, CV_32S, cv::Scalar::all(0));
        labelCount = 1;

        std::fill(fullCloud->points.begin(), fullCloud->points.end(), nanPoint);
        std::fill(fullInfoCloud->points.begin(), fullInfoCloud->points.end(), nanPoint);
    }
也就是说清空了各类参数以及内容,等待处理下一帧的点云数据
点云分割到此结束,下一篇将分享特征提取部分,如有错误,欢迎批评指正
参考链接:
LeGO-LOAM 源码阅读笔记(imageProjecion.cpp)
无人驾驶学习笔记-LeGO-LOAM 算法源码学习总结
LeGO-LOAM分析之点云分割(一)
LeGO-LOAM源码解析