- 操作系统:ubuntu22.04
- OpenCV版本:OpenCV4.9
- IDE:Visual Studio Code
- 编程语言:C++11
算法描述
转换图像以补偿镜头畸变。
该函数通过变换图像来补偿径向和切向镜头畸变。
此函数仅仅是 initUndistortRectifyMap(使用单位矩阵 R)和 remap(使用双线性插值)的组合。有关执行的具体变换详情,请参阅前者函数。
对于在源图像中没有对应像素的目的图像中的像素,将用零(黑色)填充。
可以通过 newCameraMatrix 来调节源图像中哪些特定子集将在校正后的图像中可见。你可以使用 getOptimalNewCameraMatrix 来根据你的需求计算适当的 newCameraMatrix。
相机矩阵和畸变参数可以使用 calibrateCamera 确定。如果图像的分辨率与标定阶段使用的分辨率不同,则需要相应地缩放 fx, fy, cx 和 cy,而畸变系数保持不变。
cv::undistort 是 OpenCV 库中的一个函数,用于校正图像的畸变。它根据提供的相机内参矩阵 (cameraMatrix) 和畸变系数 (distCoeffs) 来移除图像中的径向和切向畸变。如果提供了新的相机矩阵 (newCameraMatrix),则还可以对图像进行重新映射以适应不同的视角或裁剪区域。
函数原型
void cv::undistort
(
	InputArray 	src,
	OutputArray 	dst,
	InputArray 	cameraMatrix,
	InputArray 	distCoeffs,
	InputArray 	newCameraMatrix = noArray()
)
参数
src:输入(畸变)图像。
dst:输出(校正)图像,该图像具有与 src 相同的尺寸和类型。
cameraMatrix:输入相机矩阵
A
=
[
f
x
0
c
x
0
f
y
c
y
0
0
1
]
A = \begin{bmatrix} f_x & 0 & c_x \\ 0 & f_y & c_y \\ 0 & 0 & 1 \end{bmatrix}
A=
fx000fy0cxcy1
distCoeffs:输入的畸变系数向量,包含 4、5、8、12 或 14 个元素,具体为 (k1, k2, p1, p2 [,k3 [,k4, k5, k6 [,s1, s2, s3, s4 [,τx, τy]]]])。如果该向量为 NULL 或空,则假定畸变系数为零。
newCameraMatrix:畸变图像的相机矩阵。默认情况下,它与 cameraMatrix 相同,但你可以通过使用不同的矩阵来额外缩放和平移结果。
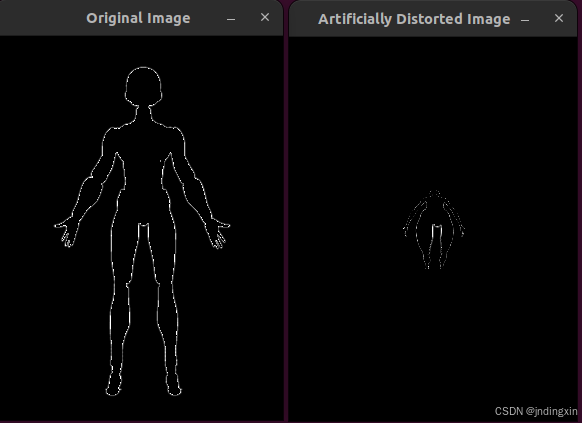
代码示例
#include <iostream>
#include <opencv2/opencv.hpp>

using namespace cv;
using namespace std;

void addRadialDistortion( const Mat& src, Mat& dst, double k1 = 0.001 )
{
    Mat map_x( src.size(), CV_32FC1 );
    Mat map_y( src.size(), CV_32FC1 );

    // 获取中心点
    Point2f center( src.cols / 2.0, src.rows / 2.0 );

    for ( int y = 0; y < src.rows; ++y )
    {
        for ( int x = 0; x < src.cols; ++x )
        {
            // 计算从中心点的距离
            float dx = x - center.x;
            float dy = y - center.y;
            float r2 = dx * dx + dy * dy;

            // 应用径向畸变公式
            float factor              = 1 + k1 * r2;
            map_x.at< float >( y, x ) = factor * dx + center.x;
            map_y.at< float >( y, x ) = factor * dy + center.y;
        }
    }

    // 应用映射
    remap( src, dst, map_x, map_y, INTER_LINEAR );
}

int main()
{
    // 读取原始图像(确保路径正确)
    Mat src = imread( "/media/dingxin/data/projects/ir/bin/shape.png" );
    if ( src.empty() )
    {
        cerr << "Error: Could not open or find the image!" << endl;
        return -1;
    }

    // 创建带有人工畸变的图像
    Mat distorted;
    addRadialDistortion( src, distorted, 0.002 );  // 调整k1值来控制畸变强度

    // 显示结果
    imshow( "Original Image", src );
    imshow( "Artificially Distorted Image", distorted );

    waitKey( 0 );  // 等待按键关闭窗口

    // 保存畸变图像以便后续使用
    imwrite( "distorted_image.png", distorted );

    return 0;
}
运行结果
`
