这里写自定义目录标题
版本说明
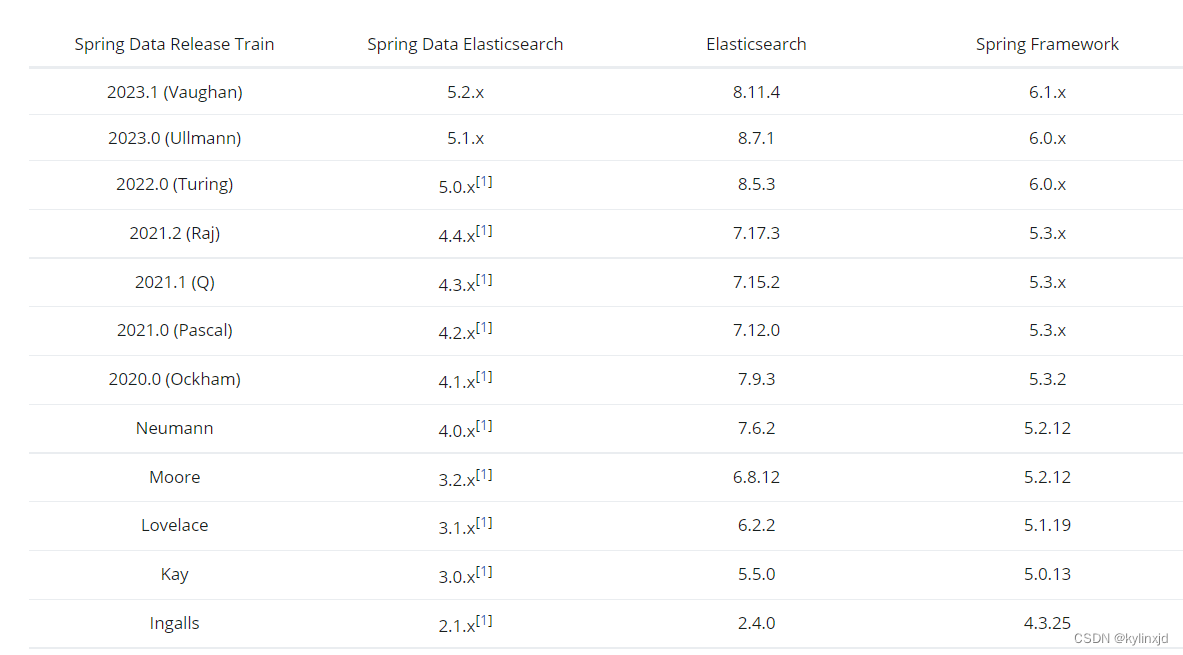
官网说明
本文使用最新的版本
springboot: 3.2.3
spring-data elasticsearch: 5.2.3
elasticsearch: 8.11.4
elasticsearch下载链接:https://www.elastic.co/cn/downloads/past-releases#elasticsearch
最新版可能不兼容,以spring官网为准
spring boot POM依赖
<?xml version="1.0" encoding="UTF-8"?>
<project xmlns="http://maven.apache.org/POM/4.0.0" xmlns:xsi="http://www.w3.org/2001/XMLSchema-instance"
         xsi:schemaLocation="http://maven.apache.org/POM/4.0.0 https://maven.apache.org/xsd/maven-4.0.0.xsd">
    <modelVersion>4.0.0</modelVersion>
    <parent>
        <groupId>org.springframework.boot</groupId>
        <artifactId>spring-boot-starter-parent</artifactId>
        <version>3.2.3</version>
        <relativePath/> <!-- lookup parent from repository -->
    </parent>
    <groupId>com.example</groupId>
    <artifactId>demo-es</artifactId>
    <version>0.0.1-SNAPSHOT</version>
    <name>demo-es</name>
    <description>demo-es</description>
    <properties>
        <java.version>17</java.version>
    </properties>
    <dependencies>
        <dependency>
            <groupId>org.springframework.boot</groupId>
            <artifactId>spring-boot-starter-data-elasticsearch</artifactId>
        </dependency>
        <dependency>
            <groupId>org.springframework.boot</groupId>
            <artifactId>spring-boot-starter-web</artifactId>
        </dependency>

        <dependency>
            <groupId>org.projectlombok</groupId>
            <artifactId>lombok</artifactId>
            <optional>true</optional>
        </dependency>
        <dependency>
            <groupId>org.springframework.boot</groupId>
            <artifactId>spring-boot-starter-test</artifactId>
            <scope>test</scope>
        </dependency>
    </dependencies>

    <build>
        <plugins>
            <plugin>
                <groupId>org.springframework.boot</groupId>
                <artifactId>spring-boot-maven-plugin</artifactId>
                <configuration>
                    <excludes>
                        <exclude>
                            <groupId>org.projectlombok</groupId>
                            <artifactId>lombok</artifactId>
                        </exclude>
                    </excludes>
                </configuration>
            </plugin>
        </plugins>
    </build>
</project>
application.yml配置
使用https必须配置username 和 password
spring:
  elasticsearch:
    uris: https://localhost:9200
    username: elastic
    password: 123456
新建模型映射
package com.example.demoes.es.model;

import lombok.AllArgsConstructor;
import lombok.Data;
import lombok.NoArgsConstructor;
import org.springframework.data.annotation.Id;
import org.springframework.data.elasticsearch.annotations.Document;
import org.springframework.data.elasticsearch.annotations.Field;
import org.springframework.data.elasticsearch.annotations.FieldType;

@Data
@AllArgsConstructor
@NoArgsConstructor
@Document(indexName = "user") // user 是elasticsearch的索引名称(新版本的elasticsearch没有了type的概念)
public class UserModel {  // 每一个UserModel对应一个elasticsearch的文档

    @Id
    @Field(name = "id", type = FieldType.Integer)
    Integer id;

    // FieldType.Keyword 不可分词
    @Field(name = "name", type = FieldType.Keyword)
    String name;

    // index = false 不建立索引
    @Field(name = "age", type = FieldType.Integer, index = false)
    Integer age;

    // FieldType.Text 可分词,ik_smart,ik_max_word 是ik分词器,对中文分词友好,需要另外安装
    @Field(name = "address", type = FieldType.Text, searchAnalyzer = "ik_smart", analyzer = "ik_max_word")
    String address;

}
Repository
spring data的repository方便操作,类似jpa的操作
继承ElasticsearchRepository自带一些基础的操作方法
package com.example.demoes.es.repo;

import com.example.demoes.es.model.UserModel;
import org.springframework.data.elasticsearch.repository.ElasticsearchRepository;

// UserModel 模型映射   Integer ID的类型
public interface ESUserRepository extends ElasticsearchRepository<UserModel, Integer> {

}
简单测试
package com.example.demoes;

import com.example.demoes.es.model.UserModel;
import com.example.demoes.es.repo.ESUserRepository;
import org.junit.jupiter.api.Test;
import org.springframework.beans.factory.annotation.Autowired;
import org.springframework.boot.test.context.SpringBootTest;
import org.springframework.data.elasticsearch.core.*;
import org.springframework.data.elasticsearch.core.mapping.IndexCoordinates;
import org.springframework.data.elasticsearch.core.query.Criteria;
import org.springframework.data.elasticsearch.core.query.CriteriaQuery;


@SpringBootTest
class DemoEsApplicationTests {

    @Autowired
    ESUserRepository esUserRepository;

    // 以下三个是 spring-boot-starter-data-elasticsearch 自动配置的 elasticsearch 操作 Bean
    // 1. DocumentOperations 文档操作
    @Autowired
    DocumentOperations documentOperations;

    // 2. SearchOperations 查询操作
    @Autowired
    SearchOperations searchOperations;

    // 3. ElasticsearchOperations elasticsearch 通用的操作,包括DocumentOperations和SearchOperations
    @Autowired
    ElasticsearchOperations elasticsearchOperations;

    @Test
    void contextLoads() {
    }

    @Test
    public void testIndex() {
        // 获取索引操作
        IndexOperations indexOperations = elasticsearchOperations.indexOps(UserModel.class);
        // 查看索引映射关系
        System.out.println(indexOperations.getMapping());
        // 输出索引名称
        System.out.println(indexOperations.getIndexCoordinates().getIndexName());

    }

    /**
     * 添加文档
     */
    @Test
    public void testAdd() {
        esUserRepository.save(new UserModel(1, "张三", 18, "北京朝阳"));
        esUserRepository.save(new UserModel(2, "李四", 19, "北京朝阳"));
        esUserRepository.save(new UserModel(3, "王五", 20, "北京朝阳"));
        esUserRepository.save(new UserModel(4, "赵六", 21, "北京朝阳"));
        esUserRepository.save(new UserModel(5, "马六", 22, "北京朝阳"));
        esUserRepository.save(new UserModel(6, "孙七", 23, "北京朝阳"));
        esUserRepository.save(new UserModel(7, "吴八", 24, "北京朝阳"));
        esUserRepository.save(new UserModel(8, "郑九", 25, "北京朝阳"));

        // 查询所有
        esUserRepository.findAll().forEach(System.out::println);
    }

    /**
     * 更新文档
     */
    @Test
    public void testUpdate() {
        // 按id更新
        IndexCoordinates indexCoordinates = elasticsearchOperations.indexOps(UserModel.class).getIndexCoordinates();
        documentOperations.update(new UserModel(1, "张三", 60, "北京朝阳"), indexCoordinates);
    }

    /**
     * 删除文档
     */
    @Test
    public void testDelete() {
        documentOperations.delete(String.valueOf(8), UserModel.class);
    }

    /**
     * 查询文档
     */
    @Test
    public void testSearch() {
        CriteriaQuery query = new CriteriaQuery(new Criteria("id").is(2));
        SearchHits<UserModel> searchHits = searchOperations.search(query, UserModel.class);
        for (SearchHit searchHit : searchHits.getSearchHits()){
            UserModel user = (UserModel) searchHit.getContent();
            System.out.println(user);
        }
    }

}
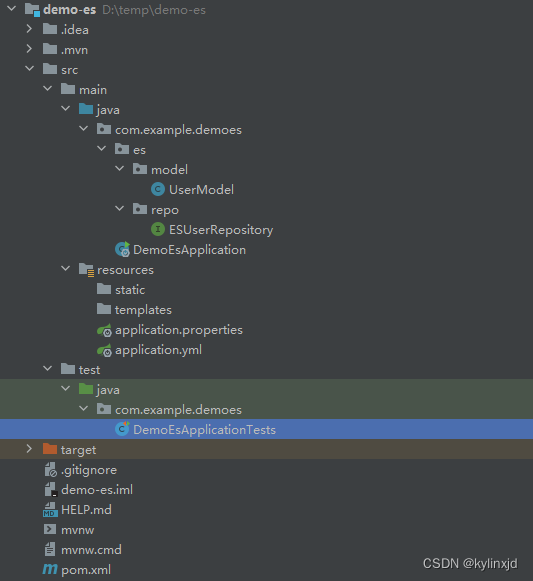
完整项目文件目录结构
windows下elasticsearch安装配置
直接解压修改配置文件解压目录/config/elasticsearch.yml
# 集群名称
cluster.name: el-cluster
#
# ------------------------------------ Node ------------------------------------
#
# Use a descriptive name for the node:
#
#node.name: node-1
# 节点名称
node.name: el-node-1

#  数据和日志存储路径,默认安装位置

path.data: D:/module/elasticsearch-8.11.4/data

path.logs: D:/module/elasticsearch-8.11.4/logs

# 访问限制,0.0.0.0代表所有IP都可以访问,localhost也可以
network.host: 0.0.0.0
# 访问端口 默认9200
http.port: 9200


# 安全配置,以下的配置第一次启动时自动生成,也可以不配置
#----------------------- BEGIN SECURITY AUTO CONFIGURATION -----------------------
#
# The following settings, TLS certificates, and keys have been automatically
# generated to configure Elasticsearch security features on 21-03-2024 01:32:15
#
# --------------------------------------------------------------------------------

# Enable security features 不使用https时设为false
xpack.security.enabled: true

xpack.security.enrollment.enabled: true

# Enable encryption for HTTP API client connections, such as Kibana, Logstash, and Agents 不使用https时设为false
xpack.security.http.ssl:
  enabled: true
  keystore.path: certs/http.p12

# Enable encryption and mutual authentication between cluster nodes
xpack.security.transport.ssl:
  enabled: true
  verification_mode: certificate
  keystore.path: certs/transport.p12
  truststore.path: certs/transport.p12
# Create a new cluster with the current node only
# Additional nodes can still join the cluster later
cluster.initial_master_nodes: ["el-node-1"]

#----------------------- END SECURITY AUTO CONFIGURATION -------------------------
第一次启动会在控制台打印密码,用户名默认elastic
修改密码的话不要关闭控制台,另外开启一个控制台,进入elastic search安装目录下的bin目录,使用以下命令修改
-i 是交互式的意思,没有的话会随机生成密码,无法自定义。
输入命令回车然后输入两次密码就行了
elasticsearch-reset-password --username elastic -i
使用keytool工具将ca证书导入到jdk。
keytool是jdk自带的工具,使用以下命令
keytool -importcert -cacerts -alias "es_http_ca" -file "elasticsearch安装路径\config\certs\http_ca.crt"
es_http_ca 是证书别名

