课程介绍
- docker 安装 mysql
- docker-compose 安装 mysql (推荐)
一、docker 安装 mysql
Stage 1:下载镜像文件
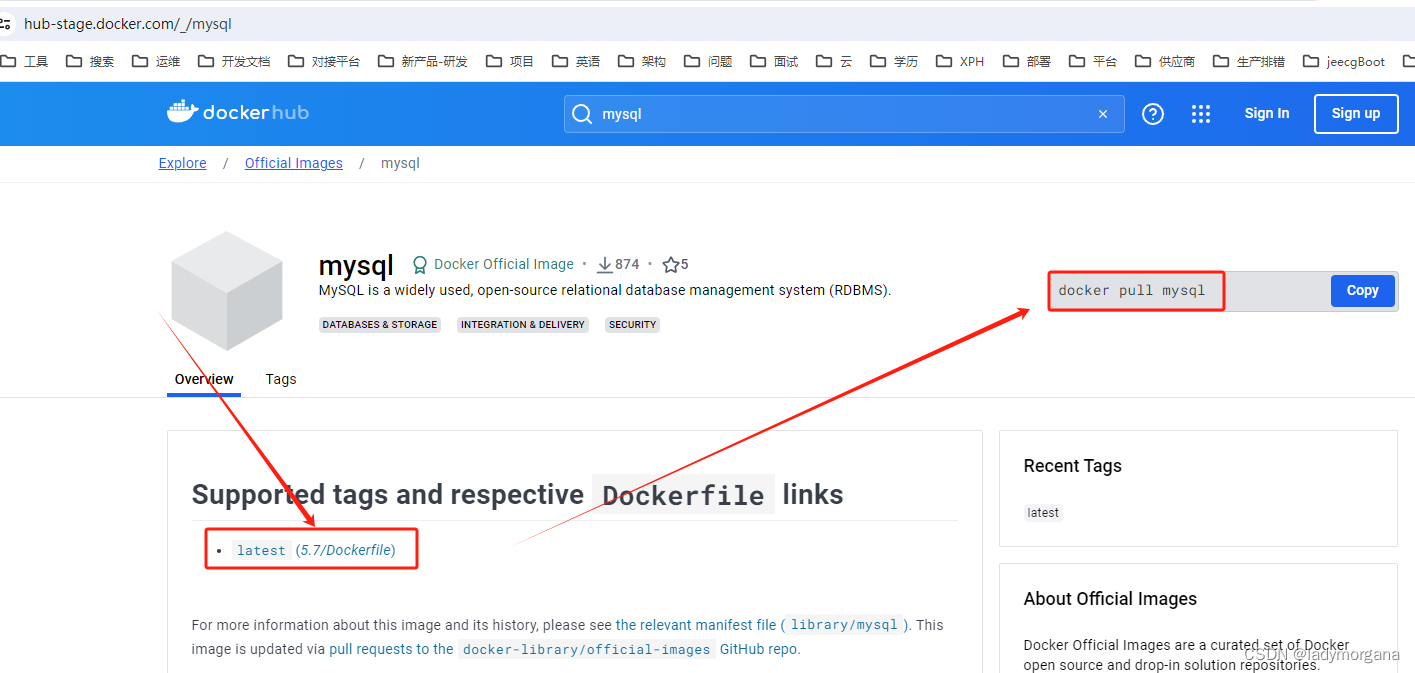
Stage 1-1:打开官网查看镜像
-
吐槽:这里 mysql 官网镜像最新也只有5.7 ,没有 8.0以上版本,然而 8.0 比5.7快一倍
-
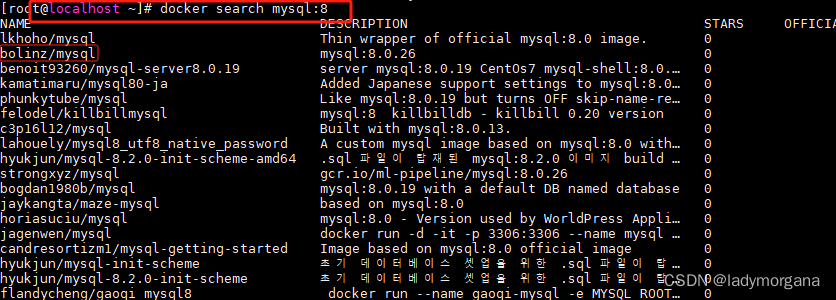
小技巧一:使用 docker search mysql:8 查找镜像,这里镜像名为:
lkhoho/mysql -
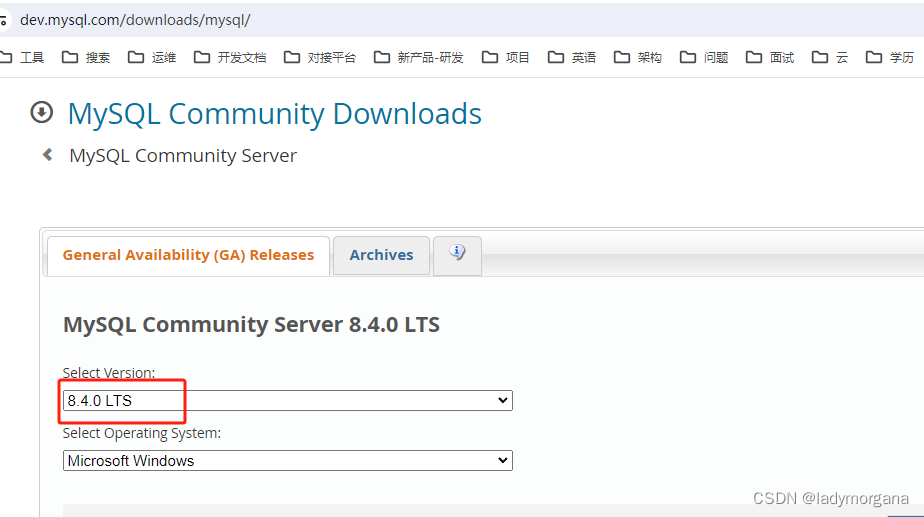
小技巧二:尝试拉取官网最新长期维护的稳定版:
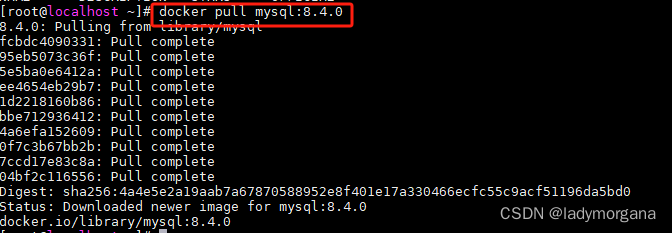
docker pull mysql:8.4.0【推荐】
Stage 1-2:拉取镜像
目前最新的长期维护版-mysql:8.4.0
# 方式一:拉取官网这里指的是官网最新的镜像,5.7 同指令 docker pull mysql:latest
docker pull mysql
# 方式二:拉取查找镜像,mysql:8.0
docker pull lkhoho/mysql
# 方式三:官网找到最新的长期维护版 - mysql:8.4.0(极力推荐)
docker pull mysql:8.4.0
Stage 1-3:查看拉取的镜像
docker images
Stage 2:创建实例并启动
A:mysql(5.7版)
docker run -p 3306:3306 --name mysql \
-v /mydata/mysql5.7/log:/var/log/mysql \
-v /mydata/mysql5.7/data:/var/lib/mysql \
-v /mydata/mysql5.7/conf:/etc/mysql \
-e MYSQL_ROOT_PASSWORD=123456 \
-d mysql:5.7
参数说明
-p 3306:3306:将容器的 3306 端口映射到主机的 3306 端口--name mysql:容器名mysql-v /mydata/mysql5.7/conf:/etc/mysql:将配置文件夹挂载到主机-v /mydata/mysql5.7/log:/var/log/mysql:将日志文件夹挂载到主机-v /mydata/mysql5.7/data:/var/lib/mysql/:将数据文件夹挂载到主机-e MYSQL_ROOT_PASSWORD=123456:初始化 root 用户的密码为123456-d mysql:5.7:使用mysql:5.7 镜像创建容器
B:mysql(8.0以上版)
docker run -p 3306:3306 --name mysql \
-v /mydata/mysql8.0/data:/var/lib/mysql \
-v /mydata/mysql8.0/conf:/etc/mysql/conf.d \
-e MYSQL_ROOT_PASSWORD=12345678 \
-d mysql:8.4.0
参数说明
-p 3306:3306:将容器的 3306 端口映射到主机的 3306 端口--name mysql:容器名mysql-v /mydata/mysql8.0/conf:/etc/mysql/conf.d:将配置文件夹挂载到主机-v /mydata/mysql8.0/data:/var/lib/mysql/:将数据文件夹挂载到主机-e MYSQL_ROOT_PASSWORD=12345678:初始化 root 用户的密码为12345678-d mysql:8.4.0:使用mysql:8.4.0镜像创建容器
Stage 3:修改配置文件
A:my.cnf(5.7版)
- 进入目录
/mydata/mysql5.7/conf/ - 新建
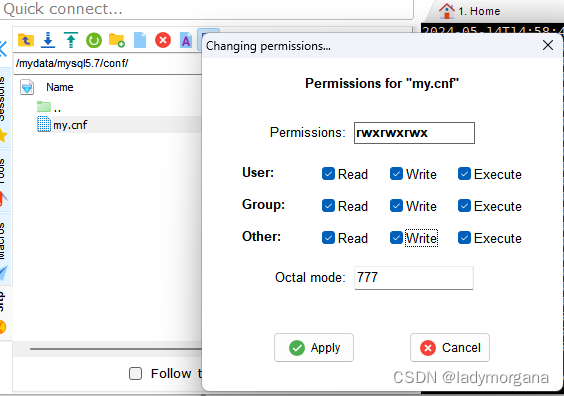
my.cnf,修改文件权限
- 添加如下内容
[client]
default-character-set=utf8

[mysql]
default-character-set=utf8

[mysqld]
character-set-server=utf8
collation-server=utf8_unicode_ci
skip-character-set-client-handshake
skip-name-resolve
注意:解决 MySQL 连接慢的问题(解释:跳过域名解析)
在配置文件中加入如下,并重启 mysql
[mysqld]
skip-name-resolve
B:my.cnf(8.0 + 版)
- 进入目录
/mydata/mysql8.0/conf/ - 新建
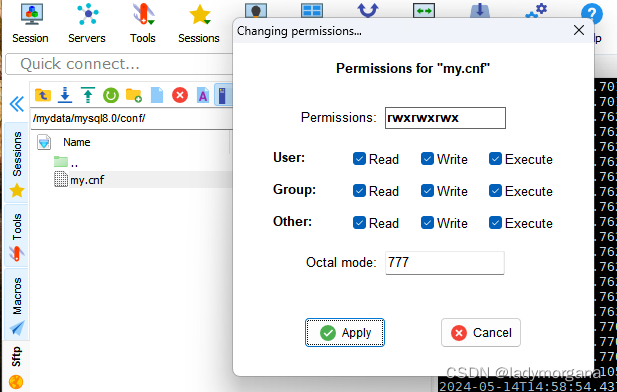
my.cnf,修改文件权限
- 添加如下内容
[mysqld]
## 同一局域网内注意要唯一
#server-id=100
## 开启二进制日志功能,可以随便取(关键)
#log-bin=mysql-bin
max_connections=500
Stage 4:重启mysql,使配置生效
docker restart mysql
二、 docker-compose 安装 mysql (推荐)
Stage 1:创建 docker-compose.yaml 文件
- 这里测试两个版本,为了区分所以使用名为
docker-compose-8.0.30.yaml
version: '3.1'

services:
  mysql:
    image: mysql:8.0.30
    container_name: mysql
    ports:
      - 3306:3306
    restart: always
    privileged: true
    environment:
      TZ: Asia/Shanghai
      MYSQL_ROOT_PASSWORD: root
    command:
      --character-set-server=utf8mb4
      --collation-server=utf8mb4_general_ci
      --default-authentication-plugin=mysql_native_password
    volumes:
      - ./8.0.30/conf:/etc/mysql/conf.d
      - ./8.0.30/data:/var/lib/mysql
    deploy:
      resources:
        limits:
          memory: 2G
        reservations:
          memory: 1G
networks:
  default:
    external:
      name: xph_network
docker-compose-8.4.0.yaml
version: '3.1'

services:
  mysql:
    image: mysql:8.4.0
    container_name: mysql
    ports:
      - 3306:3306
    restart: always
    privileged: true
    environment:
      TZ: Asia/Shanghai
      MYSQL_ROOT_PASSWORD: root
    command:
      --character-set-server=utf8mb4
      --collation-server=utf8mb4_general_ci
    volumes:
      - ./8.4.0/conf:/etc/mysql/conf.d
      - ./8.4.0/data:/var/lib/mysql
    deploy:
      resources:
        limits:
          memory: 2G
        reservations:
          memory: 1G
networks:
  default:
    external:
      name: xph_network
Stage 2:创建配置文件
-
docker-compose-8.4.0.yaml 放在
/mnt/docker/mysql/下 -
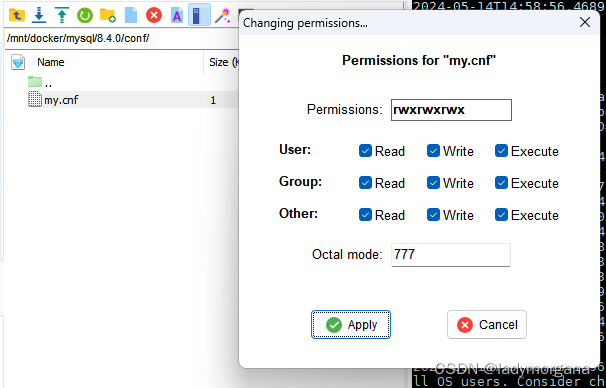
/mnt/docker/mysql/8.4.0/conf下创建文件如下 新建my.cnf,修改文件权限
-
添加如下内容
[mysqld]
## 同一局域网内注意要唯一
#server-id=100
## 开启二进制日志功能,可以随便取(关键)
#log-bin=mysql-bin
max_connections=500
Stage 3:创建容器
docker-compose -f docker-compose-8.4.0.yaml up -d --build
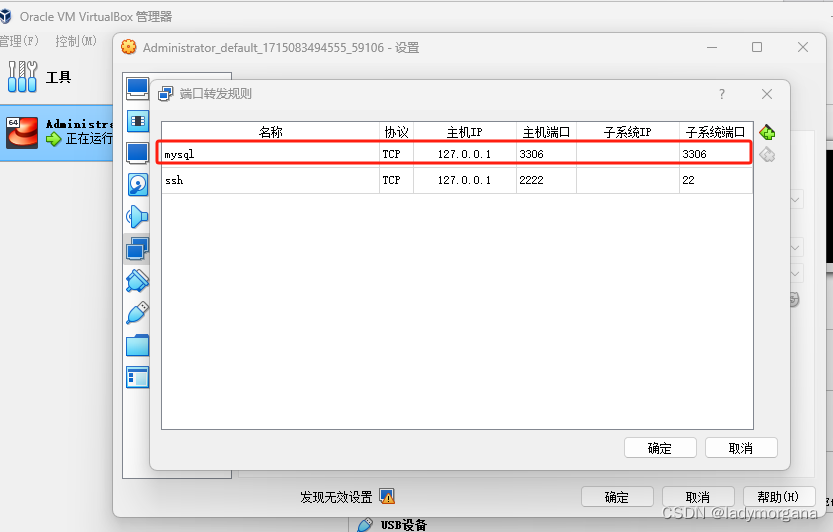
Stage 4:VirtualBox端口映射
- 这里很奇怪,第7章节 说不用映射
- 后面如果知道原因再补充笔记
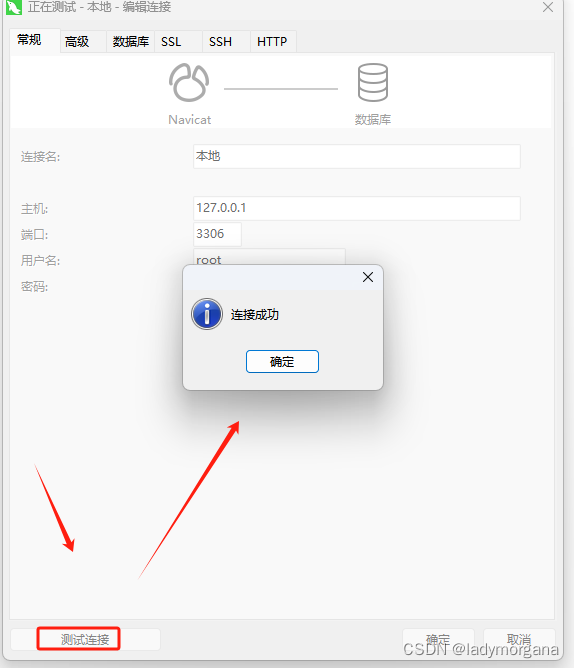
Stage 5:navcat 测试连接
三、 日常问题
3.1 mysql 修改密码
方式1:使用Navicat(推荐)
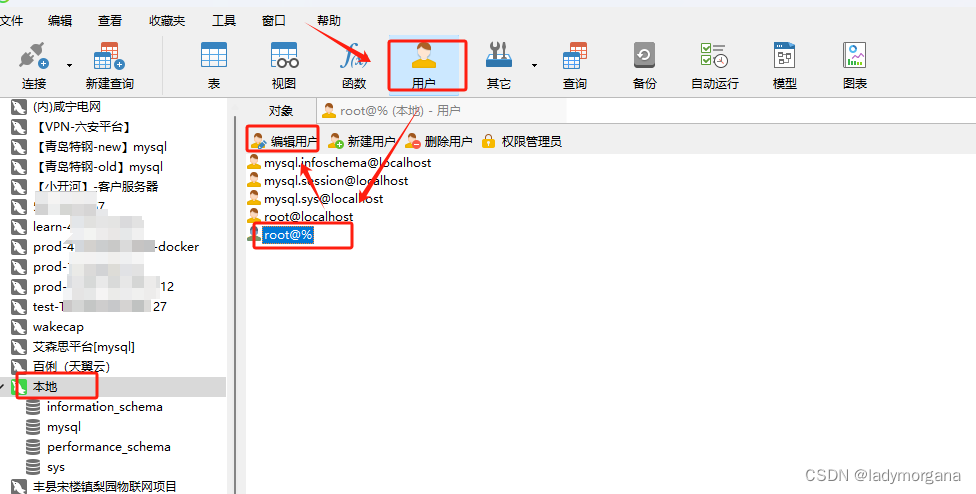
Stage 1: Navicat 连接数据库-----点用户-----root@%-----编辑用户
- 说明:
root@%表示root用户允许任意主机访问
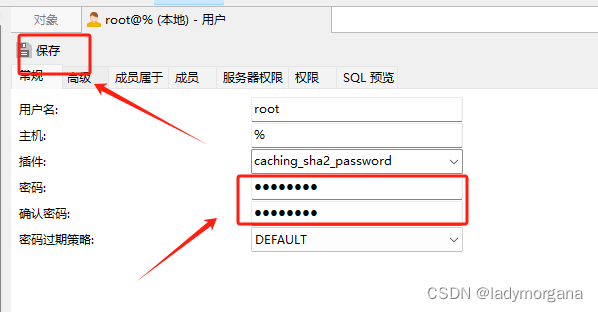
Stage 2: 将 密码 和 确认密码 输入框中的密码都改成想设置的密码,然后点击 保存 即可
- 说明:密码修改后navicat自动更新密码,不用编辑连接
方式1:方式2:使用sql命令
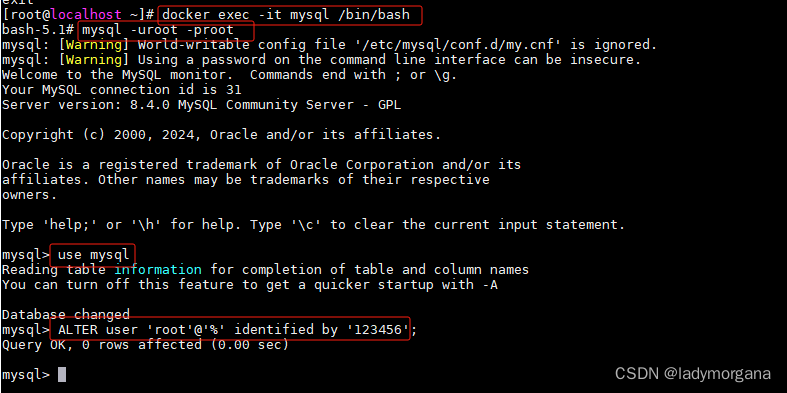
Stage 1: 进如mysql容器(不是容器可以省略)
docker exec -it mysql /bin/bash
Stage 2: 使用命令 mysql -uroot -p你的密码 连接到mysql管理工具
mysql -uroot -proot
Stage 3: 使用命令 use mysql 连接到mysql数据库
use mysql
Stage 4: 修改root的本地登录和远程登录密码
ALTER user 'root'@'%' identified by '123456';
四、 附录
my.cnf 配置文件【8.0以上版本】
# Example MySQL config file for small systems.
#
# This is for a system with little memory (<= 64M) where MySQL is only used
# from time to time and it's important that the mysqld daemon
# doesn't use much resources.
#
# MySQL programs look for option files in a set of
# locations which depend on the deployment platform.
# You can copy this option file to one of those
# locations. For information about these locations, see:
# http://dev.mysql.com/doc/mysql/en/option-files.html
#
# In this file, you can use all long options that a program supports.
# If you want to know which options a program supports, run the program
# with the "--help" option.
# The following options will be passed to all MySQL clients
[client]
default-character-set=utf8
#password = your_password
port        = 3336
socket      = /tmp/mysql.sock
# Here follows entries for some specific programs
# The MySQL server
[mysqld]
default-storage-engine=INNODB
character-set-server=utf8
collation-server=utf8_general_ci
port        = 13306        # 我修改了默认端口
socket      = /tmp/mysql.sock
lower_case_table_names = 1    # 是否对sql语句大小写敏感,1表示不敏感,即不区分大小写
skip-external-locking
key_buffer_size = 16K
max_allowed_packet = 1M
table_open_cache = 4
sort_buffer_size = 64K
read_buffer_size = 256K
read_rnd_buffer_size = 256K
net_buffer_length = 2K
thread_stack = 256K   # 该字段根据需要修改,默认是128K,我的是因为启动报了这个字段的错导致启动失败,所以我改成256K了

# Don't listen on a TCP/IP port at all. This can be a security enhancement,
# if all processes that need to connect to mysqld run on the same host.
# All interaction with mysqld must be made via Unix sockets or named pipes.
# Note that using this option without enabling named pipes on Windows
# (using the "enable-named-pipe" option) will render mysqld useless!
#
#skip-networking
server-id   = 1
# Uncomment the following if you want to log updates
#log-bin=mysql-bin
# binary logging format - mixed recommended
#binlog_format=mixed
# Causes updates to non-transactional engines using statement format to be
# written directly to binary log. Before using this option make sure that
# there are no dependencies between transactional and non-transactional
# tables such as in the statement INSERT INTO t_myisam SELECT * FROM
# t_innodb; otherwise, slaves may diverge from the master.
#binlog_direct_non_transactional_updates=TRUE
# Uncomment the following if you are using InnoDB tables
#innodb_data_home_dir = /usr/local/mysql/data
#innodb_data_file_path = ibdata1:10M:autoextend
#innodb_log_group_home_dir = /usr/local/mysql/data
# You can set .._buffer_pool_size up to 50 - 80 %
# of RAM but beware of setting memory usage too high
#innodb_buffer_pool_size = 16M
#innodb_additional_mem_pool_size = 2M
# Set .._log_file_size to 25 % of buffer pool size
#innodb_log_file_size = 5M
#innodb_log_buffer_size = 8M
#innodb_flush_log_at_trx_commit = 1
#innodb_lock_wait_timeout = 50
[mysqldump]
quick
max_allowed_packet = 16M
[mysql]
no-auto-rehash
# Remove the next comment character if you are not familiar with SQL
#safe-updates
[myisamchk]
key_buffer_size = 8M
sort_buffer_size = 8M
[mysqlhotcopy]
interactive-timeout
