文章目录
本文章基于 RocketMQ 4.9.3
1. 前言
RocketMQ 存储部分系列文章:
2. recover 退出恢复服务
当 DefaultMessageStore 启动加载的时候,会在 load 方法中恢复 ConsumeQueue 和 CommitLog 文件的数据。但是 Broker 退出的时候可不一定是正常退出,也有可能是因为某些原因异常退出。
this.recover(lastExitOK);
上面就是 DefaultMessageStore 的恢复方法,下面来看下里面的逻辑。
/**
 * 恢复 CommitLog 和 ConsumeQueue 中的数据到内存中
 * @param lastExitOK
 */
private void recover(final boolean lastExitOK) {
    // 恢复所有 ConsumeQueue 文件,返回的是 ConsumeQueue 中存储的最大有效 CommitLog 偏移量
    long maxPhyOffsetOfConsumeQueue = this.recoverConsumeQueue();

    // 上一次 Broker 退出是正常退出还是异常退出
    if (lastExitOK) {
        // 这里就是正常退出,所以正常恢复 CommitLog
        this.commitLog.recoverNormally(maxPhyOffsetOfConsumeQueue);
    } else {
        // 这里就是异常退出,所以异常恢复 CommitLog
        this.commitLog.recoverAbnormally(maxPhyOffsetOfConsumeQueue);
    }
    // 最后恢复 topicQueueTable
    this.recoverTopicQueueTable();
}
在里面其实就是分为正常恢复和异常恢复,如果上一次 Broker 退出是正常退出,那么就会调用 recoverNormally 进行恢复,那么怎么才能算正常恢复呢?RocketMQ 启动的时候会创建一个大小为 0 的文件。
- 当服务正常关闭(destory、shutdown),就会调用删除方法把这个临时文件删掉。
- 如果是异常关闭那么就不会删掉这个文件,这样一来只需要根据这个文件就能判断服务是不是正常关闭的。
创建这个文件的方法在 DefaultMessageStore#start 方法,在里面会通过 this.createTempFile() 创建临时文件。
/**
 * @throws Exception
 */
public void start() throws Exception {
	...
	this.createTempFile();
	...
}

/**
* 创建临时文件
* @throws IOException
*/
private void createTempFile() throws IOException {
   // 获取临时文件的位置: ${home}/store/abort
   String fileName = StorePathConfigHelper.getAbortFile(this.messageStoreConfig.getStorePathRootDir());
   File file = new File(fileName);
   // 确保文件夹被创建了
   MappedFile.ensureDirOK(file.getParent());
   // 创建文件
   boolean result = file.createNewFile();
   log.info(fileName + (result ? " create OK" : " already exists"));
}
当 broker 正常退出,比如调用 DefaultMessageStore 的 shutdown 方法,在里面就会删除这个临时文件,当然在删除文件的时候需要判断如果当前 broker 是可写的并且重放服务重放的偏移量已经到达 CommitLog 的最大偏移量了,也就是全部被重放了,这时候才会去删掉这个文件。
if (this.runningFlags.isWriteable() && dispatchBehindBytes() == 0) {
       this.deleteFile(StorePathConfigHelper.getAbortFile(this.messageStoreConfig.getStorePathRootDir()));
       shutDownNormal = true;
   } else {
       log.warn("the store may be wrong, so shutdown abnormally, and keep abort file.");
   }
那么为什么要这么判断,这种情况下就得看看正常恢复和异常恢复的逻辑了, 这篇文章先说正常恢复的逻辑。
3. recoverNormally
recoverNormally 就是正常退出的恢复逻辑,下面来看下里面的具体代码。
/**
 * 正常退出的恢复逻辑
 */
public void recoverNormally(long maxPhyOffsetOfConsumeQueue) {
    // 是否需要启用 CRC32 校验文件,就是确保消息在数据传输和文件存储过程中没有出现问题,如位翻转、数据损坏等
    // 由于 CRC32 校验需要计算校验和,因此会对性能产生一定的影响
    boolean checkCRCOnRecover = this.defaultMessageStore.getMessageStoreConfig().isCheckCRCOnRecover();
    // 获取所有的 MappedFile
    final List<MappedFile> mappedFiles = this.mappedFileQueue.getMappedFiles();
    if (!mappedFiles.isEmpty()) {
        // 这里也是最多恢复最后 3 个 MappedFile 文件
        int index = mappedFiles.size() - 3;
        if (index < 0)
            index = 0;

        // 获取 MappedFile
        MappedFile mappedFile = mappedFiles.get(index);
        // 文件 ByteBuffer 视图
        ByteBuffer byteBuffer = mappedFile.sliceByteBuffer();
        // MappedFile 文件的起始偏移量,也就是文件名
        long processOffset = mappedFile.getFileFromOffset();
        // 这里就是合法的消息偏移量总长度
        long mappedFileOffset = 0;
        while (true) {
            // 校验消息是否合法
            DispatchRequest dispatchRequest = this.checkMessageAndReturnSize(byteBuffer, checkCRCOnRecover);
            // 获取消息大小
            int size = dispatchRequest.getMsgSize();
            // 消息合法的情况
            if (dispatchRequest.isSuccess() && size > 0) {
                // mappedFileOffset 值加上消息大小
                mappedFileOffset += size;
            }
            // Come the end of the file, switch to the next file Since the
            // return 0 representatives met last hole,
            // this can not be included in truncate offset
            else if (dispatchRequest.isSuccess() && size == 0) {
                // 这里就是恢复到文件尾部了,开始恢复下一个文件
                index++;
                if (index >= mappedFiles.size()) {
                    // 所有文件都恢复完成了
                    // Current branch can not happen
                    log.info("recover last 3 physics file over, last mapped file " + mappedFile.getFileName());
                    break;
                } else {
                    // 这里就是还没有恢复完所有文件,继续下一个
                    mappedFile = mappedFiles.get(index);
                    byteBuffer = mappedFile.sliceByteBuffer();
                    processOffset = mappedFile.getFileFromOffset();
                    mappedFileOffset = 0;
                    log.info("recover next physics file, " + mappedFile.getFileName());
                }
            }
            // Intermediate file read error
            // 消息校验异常,直接退出
            else if (!dispatchRequest.isSuccess()) {
                log.info("recover physics file end, " + mappedFile.getFileName());
                break;
            }
        }

        // 校验进度
        processOffset += mappedFileOffset;
        // 设置当前 mappedFileQueue 的刷新位置
        this.mappedFileQueue.setFlushedWhere(processOffset);
        // 设置当前 mappedFileQueue 的提交位置
        this.mappedFileQueue.setCommittedWhere(processOffset);
        // 删掉无效的文件
        this.mappedFileQueue.truncateDirtyFiles(processOffset);

        // 上面清除了 CommitLog 中的无效数据,下面就要清除 ConsumeQueue 中的无效数据
        if (maxPhyOffsetOfConsumeQueue >= processOffset) {
            log.warn("maxPhyOffsetOfConsumeQueue({}) >= processOffset({}), truncate dirty logic files", maxPhyOffsetOfConsumeQueue, processOffset);
            // 清除 ConsumeQueue 中的无效数据
            this.defaultMessageStore.truncateDirtyLogicFiles(processOffset);
        }
    } else {
        // 这里意思是没有文件了
        log.warn("The commitlog files are deleted, and delete the consume queue files");
        // 下面最新刷新位置、提交位置都重制,然后销毁所有的 ConsumeQueue 索引文件
        this.mappedFileQueue.setFlushedWhere(0);
        this.mappedFileQueue.setCommittedWhere(0);
        // 销毁所有 ConsumeQueue 文件
        this.defaultMessageStore.destroyLogics();
    }
}
文件恢复只会对最多 3 个文件进行恢复,就是最后 3 个 MappedFile 文件。校验消息合法首先会通过 checkMessageAndReturnSize 方法获取一条消息出来,这个方法之前在间接消息重放的时候也说过 【RocketMQ 存储】消息重放服务-ReputMessageService,返回的 DispatchRequest 里面如果 size < 0 就表示消息校验不合法,有可能是因为 CRC 校验不通过,又或者是计算出来的消息长度和实际存储的消息长度不一样等等。
所以获取到 dispatchRequest 之后,需要判断不同的情况,如果是合法的,那么让消息偏移量加上 size,这里意思是已经校验的合法的消息大小。
if (dispatchRequest.isSuccess() && size > 0) {
    // mappedFileOffset 值加上消息大小
    mappedFileOffset += size;
}
如果是已经到文件尾部了,那么继续下一个文件或者说全部文件都恢复完了,这种情况下就直接退出。
else if (dispatchRequest.isSuccess() && size == 0) {
    // 这里就是恢复到文件尾部了,开始恢复下一个文件
    index++;
    if (index >= mappedFiles.size()) {
        // 所有文件都恢复完成了
        // Current branch can not happen
        log.info("recover last 3 physics file over, last mapped file " + mappedFile.getFileName());
        break;
    } else {
        // 这里就是还没有恢复完所有文件,继续下一个
        mappedFile = mappedFiles.get(index);
        byteBuffer = mappedFile.sliceByteBuffer();
        processOffset = mappedFile.getFileFromOffset();
        mappedFileOffset = 0;
        log.info("recover next physics file, " + mappedFile.getFileName());
    }
}
最后就是消息校验异常了,这种情况下后面的消息也不需要看了,直接退出 while 循环。
else if (!dispatchRequest.isSuccess()) {
    log.info("recover physics file end, " + mappedFile.getFileName());
    break;
}
上面的过程是在 while 循环中执行的,意思就是从倒数第三个文件开始不断检查每一条消息记录,如果发现有一条是错的,那么就 break 退出,下面从这个偏移量开始往后开始截断。
可以说在 processOffset 之前的消息都是合法经过校验的,所以在截断非法数据之前需要先设置下 MappedFileQueue 里面的几个位置:flushWhere、committedWhere,因为 processOffset 是校验到的最大的合法位置,所以不管后面的消息还有没有合法的,从这个位置开始都得截断,这里就是得确保整个文件的都是合法数据。
接着下面就开始传入 processOffset 来截断无效的文件,同时判断下 ConsumeQueue 中是否也需要截断无效文件,判断的方法就是 maxPhyOffsetOfConsumeQueue >= processOffset,这个 maxPhyOffsetOfConsumeQueue 是外层传入的 ConsumeQueue 中的最大物理偏移量,是在 recoverConsumeQueue 中求得的,在这个方法中会去删除无效的 ConsumeQueue 文件,同时不断记录最大物理偏移量。
/**
 * 恢复所有的 ConsumeQueue 文件,返回在 ConsumeQueue 中存储的最大条目在 CommitLog 中的偏移量
 * @return
 */
private long recoverConsumeQueue() {
    long maxPhysicOffset = -1;
    // 遍历所有的 ConsumeQueue
    for (ConcurrentMap<Integer, ConsumeQueue> maps : this.consumeQueueTable.values()) {
        for (ConsumeQueue logic : maps.values()) {
            // 指向恢复方法,同时在里面删除无效的 ConsumeQueue 文件
            logic.recover();
            // 如果 maxPhysicOffset 可以更新
            if (logic.getMaxPhysicOffset() > maxPhysicOffset) {
                // 那么就更新最大额 CommitLog 偏移量
                maxPhysicOffset = logic.getMaxPhysicOffset();
            }
        }
    }

    return maxPhysicOffset;
}
上面就是正常恢复的大体逻辑,下面我们来看下 CommitLog 是如何删除无效数据的。
4. MappedFileQueue#truncateDirtyFiles
还是一样,我们先给出全部代码,offset 就是我们求出来的最大物理偏移量。
/**
  * 删除无效的文件
  * @param offset 最大有效偏移量
  */
 public void truncateDirtyFiles(long offset) {
     // 要删除的文件集合
     List<MappedFile> willRemoveFiles = new ArrayList<MappedFile>();

     // 遍历所有 MappedFile 文件
     for (MappedFile file : this.mappedFiles) {
         // 获取这个 MappedFile 的最大偏移量,这里的最大偏移量是指文件的起始偏移量 + 文件大小,而不是文件里面存储的消息的最大偏移量
         long fileTailOffset = file.getFileFromOffset() + this.mappedFileSize;
         // 如果最大偏移量大于 offset,就说明这个文件里面有一部分数据是不合法的
         if (fileTailOffset > offset) {
             // 如果 offset >= 文件的起始偏移量,说明 (offset, fileTailOffset) 这段范围的数据都是无效的
             if (offset >= file.getFileFromOffset()) {
                 // 设置下面三个文件的写入、提交、刷盘位置指针为当前有效的最大偏移量
                 // 后面写入就从 offset 位置开始写入
                 file.setWrotePosition((int) (offset % this.mappedFileSize));
                 file.setCommittedPosition((int) (offset % this.mappedFileSize));
                 file.setFlushedPosition((int) (offset % this.mappedFileSize));
             } else {
                 // 这里意思就是整个文件都是无效的,所以需要删除该文件,就是 MappedFile 的销毁方法
                 file.destroy(1000);
                 // 然后这里是需要删除的文件
                 willRemoveFiles.add(file);
             }
         }
     }

     // 将待删除的文件从 MappedFile 列表中删除
     this.deleteExpiredFile(willRemoveFiles);
 }
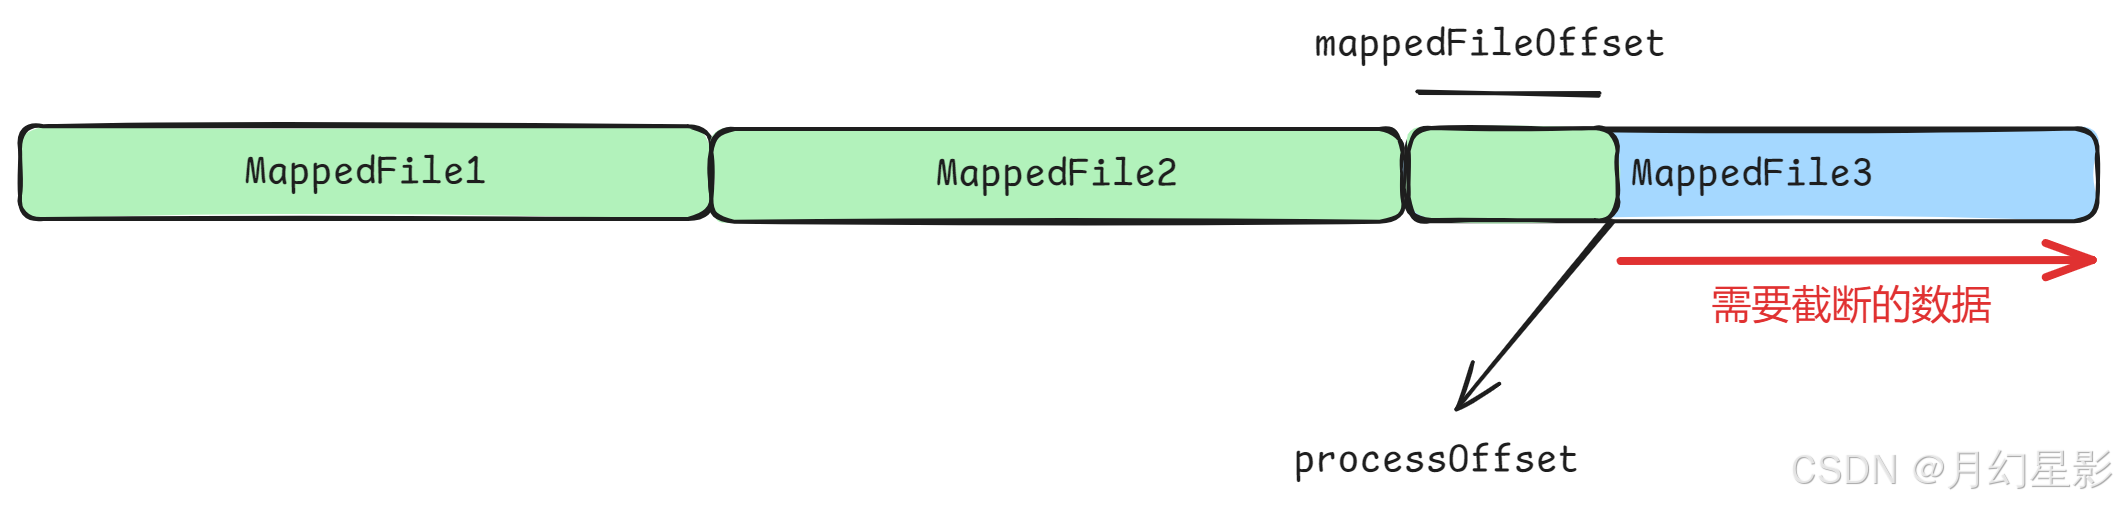
这里面的逻辑就是遍历所有 MappedFile 文件,求出这个文件的尾部偏移量 fileTailOffset = file.getFileFromOffset() + this.mappedFileSize,如果说这个文件的尾部偏移量大于最大偏移量,那么说明这个文件里面最少有一部分数据是不合法的,比如下面的图。

MappedFile3 中 processOffset 之前的消息都是合法的,但是后面的就是不合法的。由于恢复是从倒数第三个文件开始恢复,所以 MappedFile3 后面的 MappedFile4 … 都是不合法的。
我们也说了,如果 fileTailOffset > offset 说明至少有一部分不合法,不代表全部不合法,所以还需要继续判断,如果 offset >= file.getFileFromOffset() 就说明这个文件就是一部分合法一部分不合法,比如上图的 MappedFile3,否则就是说明这个文件全部都不合法,比如 MappedFile3 后面的 MappedFile4。
针对上面两种情况有不同的处理逻辑,第一种既然文件中还有部分数据是有效的,就干脆只设置下文件的几个位置:wrotePosition 写指针位置、committedPosition 提交指针位置、flushedPosition 刷盘指针位置,后续接着往下写入。而第二种情况既然整个文件都是无效了,那么就添加到 willRemoveFiles 文件集合中,并进行 destroy 销毁,后续进行删除。
if (offset >= file.getFileFromOffset()) {
    // 设置下面三个文件的写入、提交、刷盘位置指针为当前有效的最大偏移量
    // 后面写入就从 offset 位置开始写入
    file.setWrotePosition((int) (offset % this.mappedFileSize));
    file.setCommittedPosition((int) (offset % this.mappedFileSize));
    file.setFlushedPosition((int) (offset % this.mappedFileSize));
} else {
    // 这里意思就是整个文件都是无效的,所以需要删除该文件,就是 MappedFile 的销毁方法
    file.destroy(1000);
    // 然后这里是需要删除的文件
    willRemoveFiles.add(file);
}
destroy 这个方法我们已经说过很多次了,前面文章都有详细讲解,不过大家要注意的是由于这里是 broker 启动时候调用,所以 destory 一般都可以直接成功销毁,不需要等待其他线程归还当前 MappedFile 的引用,最后来看下删除文件的方法。
由于 destroy 方法将文件物理删除了,所以下面的 deleteExpiredFile 就简单将 MappedFile 从 MappedFile 集合中删除即可。
/**
 * 删除无效文件
 * @param files 无效文件列表
 */
void deleteExpiredFile(List<MappedFile> files) {

    if (!files.isEmpty()) {

        // 迭代器删除
        Iterator<MappedFile> iterator = files.iterator();
        while (iterator.hasNext()) {
            MappedFile cur = iterator.next();
            if (!this.mappedFiles.contains(cur)) {
                iterator.remove();
                log.info("This mappedFile {} is not contained by mappedFiles, so skip it.", cur.getFileName());
            }
        }

        try {
            // 如果没有删除成功,记录失败日志
            if (!this.mappedFiles.removeAll(files)) {
                log.error("deleteExpiredFile remove failed.");
            }
        } catch (Exception e) {
            log.error("deleteExpiredFile has exception.", e);
        }
    }
}
5. DefaultMessageStore#recoverConsumeQueue
在讲解 ConsumeQueue 的截断之前,我们先来讲解下 recoverConsumeQueue 这个方法,这个方法其实也是恢复方法,当恢复结束后会返回 ConsumeQueue 中的消息的最大物理偏移量 maxPhyOffsetOfConsumeQueue,这个偏移量就是用于判断是否要截断 ConsumeQueue。
/**
 * 恢复所有的 ConsumeQueue 文件,返回在 ConsumeQueue 中存储的最大条目在 CommitLog 中的偏移量
 * @return
 */
private long recoverConsumeQueue() {
    long maxPhysicOffset = -1;
    // 遍历所有的 ConsumeQueue
    for (ConcurrentMap<Integer, ConsumeQueue> maps : this.consumeQueueTable.values()) {
        for (ConsumeQueue logic : maps.values()) {
            // 指向恢复方法,同时在里面删除无效的 ConsumeQueue 文件
            logic.recover();
            // 如果 maxPhysicOffset 可以更新
            if (logic.getMaxPhysicOffset() > maxPhysicOffset) {
                // 那么就更新最大额 CommitLog 偏移量
                maxPhysicOffset = logic.getMaxPhysicOffset();
            }
        }
    }

    return maxPhysicOffset;
}
里面的方法不复杂,首先是外层的方法,其实就是遍历所有的 ConsumeQueue,一个一个进行恢复,恢复完之后再记录最大物理偏移量。
5.1 ConsumeQueue#recover
这里面的逻辑我就不细说了,和上面 CommitLog 的恢复基本一模一样,下面直接看代码注释就行了。
/**
* ConsumeQueue 的 recover 方法,恢复每一个 ConsumeQueue 对象,ConsumeQueue 下的文件一个为 5.72M,所以
* 一个 ConsumeQueue 可能会有多个文件,而这些文件的表现形式就是 MappedFile 列表
*/
public void recover() {
   // 获取 ConsumeQueue 中的所有文件
   final List<MappedFile> mappedFiles = this.mappedFileQueue.getMappedFiles();
   if (!mappedFiles.isEmpty()) {

       // 从倒数第三个服务开始恢复
       int index = mappedFiles.size() - 3;
       // 如果没有 3 个文件,那么下标从 0 开始
       if (index < 0)
           index = 0;

       // MappedFile 文件大小
       int mappedFileSizeLogics = this.mappedFileSize;
       // 获取对应下标的 MappedFile
       MappedFile mappedFile = mappedFiles.get(index);
       // 获取 ByteBuffer 视图
       ByteBuffer byteBuffer = mappedFile.sliceByteBuffer();
       // 获取文件的起始偏移量,就是文件名
       long processOffset = mappedFile.getFileFromOffset();
       long mappedFileOffset = 0;
       long maxExtAddr = 1;
       while (true) {
           // 一条索引条目 20B,CQ_STORE_UNIT_SIZE 是每隔条目大小,默认是 20B
           for (int i = 0; i < mappedFileSizeLogics; i += CQ_STORE_UNIT_SIZE) {
               // 获取该索引条目对应在 CommitLog 中的物理偏移量
               long offset = byteBuffer.getLong();
               // 获取该索引条目对应的消息的大小
               int size = byteBuffer.getInt();
               // 获取该索引条目对应的消息的 tag 的 hashCode
               long tagsCode = byteBuffer.getLong();

               // 如果这两个大于 0,就说明是一条合法有效的索引消息
               if (offset >= 0 && size > 0) {
                   // 更新当前 MappedFile 的有效数据偏移量
                   mappedFileOffset = i + CQ_STORE_UNIT_SIZE;
                   // 设置当前 MappedFile 的最大有效物理偏移量
                   this.maxPhysicOffset = offset + size;
                   if (isExtAddr(tagsCode)) {
                       maxExtAddr = tagsCode;
                   }
               } else {
                   // 这里遍历到无效条目了,可以退出了
                   log.info("recover current consume queue file over,  " + mappedFile.getFileName() + " "
                       + offset + " " + size + " " + tagsCode);
                   break;
               }
           }

           // 如果当前 ConsumeQueue 文件中的有效数据偏移量和文件大小一样,说明这个 ConsumeQueue 文件的所有条目都是有效的
           if (mappedFileOffset == mappedFileSizeLogics) {
               // 继续遍历下一个文件
               index++;
               if (index >= mappedFiles.size()) {
                   // 这里就是遍历完文件了,退出
                   log.info("recover last consume queue file over, last mapped file "
                       + mappedFile.getFileName());
                   break;
               } else {
                   // 下一个文件
                   mappedFile = mappedFiles.get(index);
                   // 下一个文件的 ByteBuffer
                   byteBuffer = mappedFile.sliceByteBuffer();
                   // 下一个文件的起始偏移量
                   processOffset = mappedFile.getFileFromOffset();
                   mappedFileOffset = 0;
                   log.info("recover next consume queue file, " + mappedFile.getFileName());
               }
           } else {
               // 如果不相等,则表示当前 ConsumeQueue 有部分无效数据,那么后面的文件不需要处理了
               log.info("recover current consume queue queue over " + mappedFile.getFileName() + " "
                   + (processOffset + mappedFileOffset));
               break;
           }
       }

       // 已经修复的物理偏移量总量
       processOffset += mappedFileOffset;
       // 设置 MappedFile 列表的 flushedWhere、committedWhere 属性
       this.mappedFileQueue.setFlushedWhere(processOffset);
       this.mappedFileQueue.setCommittedWhere(processOffset);
       // 删除这个文件最大有效偏移量后面的文件
       this.mappedFileQueue.truncateDirtyFiles(processOffset);

       if (isExtReadEnable()) {
           // 这里是恢复 ConsumeQueue 的扩展信息
           this.consumeQueueExt.recover();
           log.info("Truncate consume queue extend file by max {}", maxExtAddr);
           this.consumeQueueExt.truncateByMaxAddress(maxExtAddr);
       }
   }
}
truncateDirtyFiles 是 CommitLog 和 ConsumeQueue 都会调用的一个方法。
6. DefaultMessageStore#truncateDirtyLogicFiles
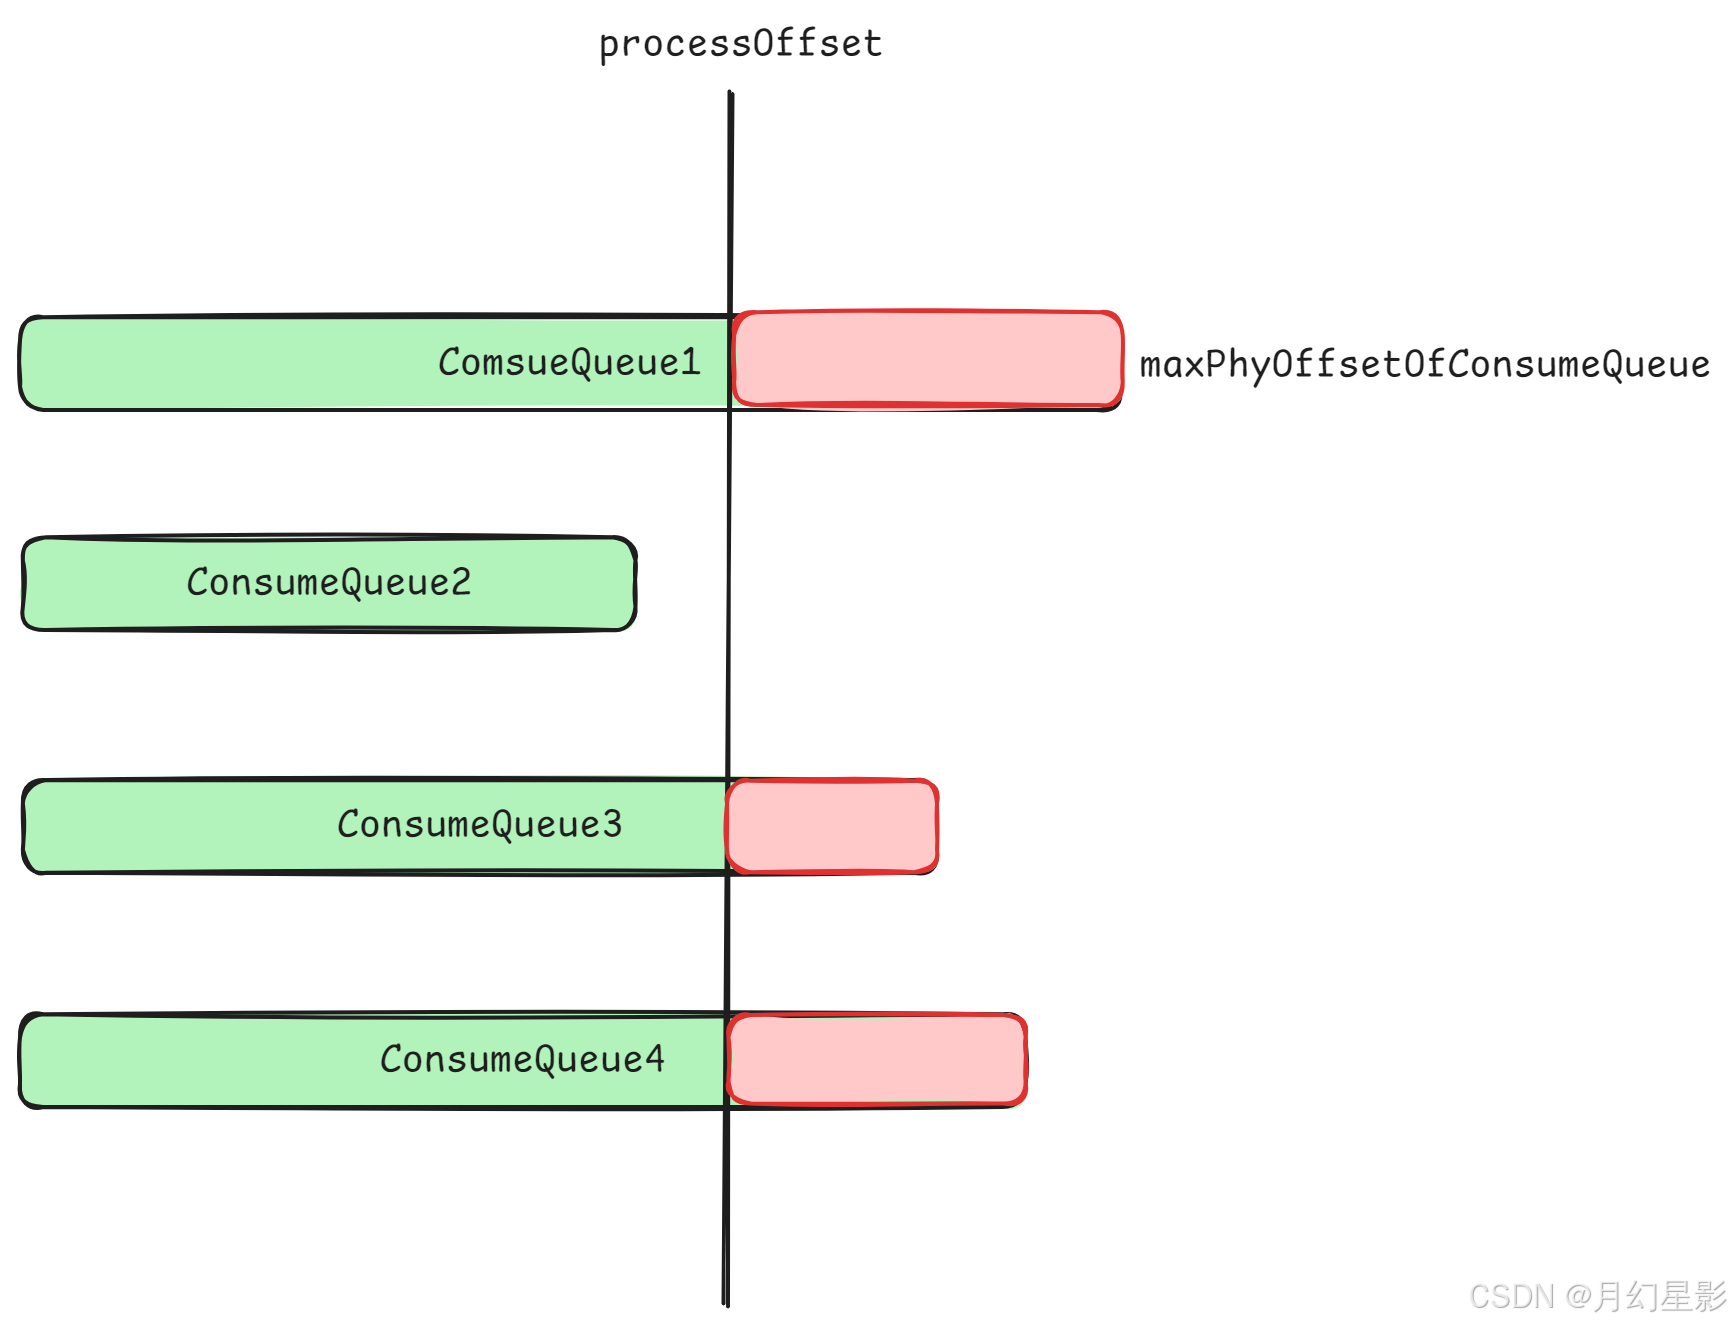
这个方法就是 ConsumeQueue 的截断方法,用于清除 ConsumeQueue 中的无效数据,当 truncateDirtyFiles 方法中求出最大物理偏移量 processOffset 之后,同时也通过上面的 recover 求出所有的 ConsumeQueue 的最大物理偏移量 maxPhyOffsetOfConsumeQueue,如果发现 maxPhyOffsetOfConsumeQueue >= processOffset,那么就说明所有的 ConsumeQueue 中最少有一部分是包含脏数据的,所以这种情况下就需要进行清除,下图中的红色位置就是代表 “脏” 消息,注意这里画的 ConsumeQueue 长度不一样不是说文件大小不一样,而是说记录的索引数量不一样。
下面就来看下里面的逻辑。
/**
 * 销毁无效文件
 * @param phyOffset 最大有效 CommitLog 偏移量
 */
public void truncateDirtyLogicFiles(long phyOffset) {
    // ConsumeQueue 集合,topic -> (queueId, ConsumeQueue)
    ConcurrentMap<String, ConcurrentMap<Integer, ConsumeQueue>> tables = DefaultMessageStore.this.consumeQueueTable;

    // 遍历所有 ConsumeQueue
    for (ConcurrentMap<Integer, ConsumeQueue> maps : tables.values()) {
        for (ConsumeQueue logic : maps.values()) {
            // 对 ConsumeQueue 中的每一个条目进行判断并且删除无效的文件
            logic.truncateDirtyLogicFiles(phyOffset);
        }
    }
}
里面依然是遍历每一个 ConsumeQueue 进行遍历,调用 truncateDirtyLogicFiles 方法针对 ConsumeQueue 中的每一个条目进行判断并且删除无效的文件。
6.1 ConsumeQueue#truncateDirtyLogicFiles
这个方法就是删除 ConsumeQueue 中的无效文件,里面的逻辑会从最后一个文件开始检查起,如果发现文件全部都是脏数据,那么直接删除这个文件,否则就从头一个一个条目进行检查,同时更新 ConsumeQueue 中的最大物理偏移量 maxPhysicOffset 和 ConsumeQueue 中的几个指针:wrotePosition、committedPosition、flushedPosition,不过要注意如果一个文件里面有一部分索引是无效的,一部分索引是有效的,那么是不会删除这个文件,只会更新上面几个值,因为后续写入的时候可以将无效的索引覆盖掉。
/**
 * 删除 ConsumeQueue 中的脏文件
 * @param phyOffet 最大有效 CommitLog 偏移量
 */
public void truncateDirtyLogicFiles(long phyOffet) {

    // ConsumeQueue 中一个 MappedFile 的大小,约 5.72M
    int logicFileSize = this.mappedFileSize;

    // 最大物理偏移量
    this.maxPhysicOffset = phyOffet;
    long maxExtAddr = 1;
    while (true) {
        // 获取最后一个文件
        MappedFile mappedFile = this.mappedFileQueue.getLastMappedFile();
        if (mappedFile != null) {
            // 获取文件视图
            ByteBuffer byteBuffer = mappedFile.sliceByteBuffer();

            // 设置文件的三个指针位置为 0
            mappedFile.setWrotePosition(0);
            mappedFile.setCommittedPosition(0);
            mappedFile.setFlushedPosition(0);

            // 从头开始一条一条检查
            for (int i = 0; i < logicFileSize; i += CQ_STORE_UNIT_SIZE) {
                // 获取 ConsumeQueue 索引的物理偏移量
                long offset = byteBuffer.getLong();
                // 获取消息大小
                int size = byteBuffer.getInt();
                // 获取消息 tagsCode
                long tagsCode = byteBuffer.getLong();

                // 第一条消息
                if (0 == i) {
                    if (offset >= phyOffet) {
                        // 如果第一条消息的物理偏移量比最大物理偏移量要大,说明整个文件都是有问题的,直接把这个文件删掉
                        this.mappedFileQueue.deleteLastMappedFile();
                        // 删掉这个文件后退出 for 循环,继续遍历处理倒数第二个文件
                        break;
                    } else {
                        // 否则就说明这条索引是合法的,还在 phyOffet 的范围内
                        // 设置最新的指针位置,就是 i + 20B
                        int pos = i + CQ_STORE_UNIT_SIZE;
                        mappedFile.setWrotePosition(pos);
                        mappedFile.setCommittedPosition(pos);
                        mappedFile.setFlushedPosition(pos);
                        // 设置当前 ConsumeQueue 最大的物理偏移量
                        this.maxPhysicOffset = offset + size;
                        // This maybe not take effect, when not every consume queue has extend file.
                        if (isExtAddr(tagsCode)) {
                            maxExtAddr = tagsCode;
                        }
                    }
                } else {

                    // 这里就不是第一条消息
                    if (offset >= 0 && size > 0) {

                        if (offset >= phyOffet) {
                            // 如果说这条消息的物理偏移量比传入的最大物理偏移量要大,这种情况就直接返回
                            // 因为这种情况意味者这个文件中有一部分索引是合法,一部分不合法,所以这里就直接返回就行了,不需要删除
                            // 因为下面在不断更新三个指针位置,所以这里返回之后后续如果还要写入 ConsumeQueue,就会顺着最新的位置继续写入进行覆盖
                            return;
                        }

                        // 否则就更新下面三个指针
                        int pos = i + CQ_STORE_UNIT_SIZE;
                        // 更新写指针位置
                        mappedFile.setWrotePosition(pos);
                        // 更新提交指针的位置
                        mappedFile.setCommittedPosition(pos);
                        // 更新刷盘指针的位置
                        mappedFile.setFlushedPosition(pos);
                        // 更新最大物理偏移量
                        this.maxPhysicOffset = offset + size;
                        if (isExtAddr(tagsCode)) {
                            maxExtAddr = tagsCode;
                        }

                        if (pos == logicFileSize) {
                            return;
                        }
                    } else {
                        return;
                    }
                }
            }
        } else {
            break;
        }
    }

    if (isExtReadEnable()) {
        this.consumeQueueExt.truncateByMaxAddress(maxExtAddr);
    }
}
下面就不详细解释了,直接看注释就行,注意判断一个文件是不是全都是脏数据,只需要看第一条索引的物理偏移量是不是比传入的最大物理偏移量都要大即可。
7. 小结
好了,这里我们就讲述完消息正常退出恢复逻辑,里面涉及到 ConsumeQueue 和 CommitLog 的文件校验和文件截断逻辑,那么下一篇文章就继续讲述异常退出的恢复。
如有错误,欢迎指出!!!