acwing-Django项目
文章目录
前言
本文来自acwing上付费的Django项目,在写的时候mark一下做一个梳理总结
ip地址:8.134.129.207
通过django打开需要在cd acapp,
python3 manage.py runserver 0.0.0.0:8000
通过acwing分配的域名打开需要cd acapp
uwsgi --ini scripts/uwsgi.ini
启动django_channels
daphne -b 0.0.0.0 -p 5015 acapp.asgi:application
启动Thrift服务,cd acapp/match_system/src/,
./main.py
可以在django项目的根目录也就是cd acapp中,python3 manage.py shell打开交互式python环境
from django.core.cache import cache可以导入缓存模块
from django.contrib.auth.models import User, 导入User模块,使用 User 模型来查询数据库中的用户信息了
然后,https://app4189.acapp.acwing.com.cn
或者是 在acwing的网址点到我的应用
5. 创建账号系统
5.1用户名密码登录
cd acapp, python3 manage.py createsuperuser
我创建的炒鸡用户是ljh, 密码是Ljh
在网址后面/admin就能登录了
在models里创建新的数据库的表
cd acapp/game/models,
因为有很多表要创,所以mkdir player, 在python里创建文件夹一定要在里面整一个__init__.py
然后vim player.py,用来储存player表的信息
路径 : acapp/game/models/player/player.py
[
(如果忘记想加入的django关键字)
cd acapp,
python3 manage.py shell
from django.db import models
可以去试
]
重要:
数据库里的表table, 对应django里的class
数据库里的每一条数据, 对应class里的每一条对象
from django.db import models
from django.contrib.auth.models import User

class Player(models.Model):
    user = models.OneToOneField(User, on_delete=models.CASCADE)   #和每个用户一一对应
    photo = models.URLField(max_length=256, blank=True)      #头像,是用户的一个属性,如果以后相加别的属性照猫画虎

    def __str__(self):
        return str(self.user)
要让自己定义的表出现在后台管理页面的话,需要让他注册过来
cd acapp/game, vim admin.py
  1 from django.contrib import admin
  2 from game.models.player.player import Player
  3
  4 # Register your models here.
  5
  6 admin.site.register(player)
每次定义完表更新完数据库之后,需要执行 cd acapp,
python3 manage.py makemigrations
python3 manage.py migrate
这样的话后台就会出现一个新的表Players,这样的话后台就写好了
每写一个函数需要这三个东西
views——实现具体的调用数据库的逻辑
urls——实现一个路由
js里面实现一个调用
前后端分离,需要让后台知道是哪个端
cd acapp/game/static/js/src, vim zbase.js
加了一个acwingos, 这个参数会有一些接口,在网站上就没这个参数,拿这个条件就知道前端在哪执行的
cd acapp/game/views/settings , 用户的信息以后都放在settings里
vim getinfo.py
from django.http import JsonResponse
from game.models.player.player import Player

def getinfo_acapp(request):
    player = Player.objects.all()[0]
    return JsonResponse({
        'result': "success",
        'username': player.user.username,
        'photo': player.photo,
    })

def getinfo_web(request):
    player = Player.objects.all()[0]
    return JsonResponse({
        'result': "success",
        'username': player.user.username,
        'photo': player.photo,
    })

def getinfo(request):
    platform = request.GET.get('platform')
    if platform == "ACAPP":
        return getinfo_acapp(request)
    elif platform == "WEB":
        return getinfo_web(request)
写完之后写一下路由,cd acapp/game/urls, cd settings
vim index.py
from django.urls import path
from game.views.settings.getinfo import getinfo

urlpatterns = [
    path("getinfo/", getinfo, name="settings_getinfo"),

]
这样的话, views和urls就写完了,然后要写js
我们需要在menu之前设置一个登录界面,判断用户是否登录
cd acapp/game/static/js/src, mkdir settings, 然后在settings里创建一个类,vim zbase.js
class Settings {
    constructor(root) {
        this.root = root;
        this.platform = "WEB"; // 默认是web端
        if (this.root.AcWingOS) this.platform = "ACAPP";

        this.start();
    }

    start() {//在创建的时候执行
        this.getinfo();
    }

    register() { //打开注册界面
    }

    login() {//打开登录界面
    }

    getinfo() {//从服务器获取用户信息
        let outer = this;

        $.ajax({
            url: "https://app4189.acapp.acwing.com.cn/settings/getinfo/",
            type: "GET",
            data: {
                platform: outer.platform,
            },
            success: function(resp) {
                console.log(resp);
                if (resp.result === "success") {
                    outer.hide();
                    outer.root.menu.show();
                } else {//否则要登录
                    outer.login();
                }
            }
        });
    }

    hide() {
    }

    show() {
    }
}
执行流程,首先这个js文件是在前端执行的,会先执行settings的构造函数,在构造函数里面会去执行start()函数,在start函数中会去执行getinfo()函数,getinfo函数会向后端发一个请求,在请求发送之后路由会告诉他应该找views里的getinfo函数,它就会路由到views里的getinfo函数,我们会发现它的platform是web,所以它就会路由到web, 在getinfo_web里它就会返回用户名和头像,返回到我们的resp里
然后下一步在 player里的render()函数中把头像给加进去
class Player extends AcGameObject {
    constructor (playground, x, y, radius, color, speed, is_me) {
        super();
        this.playground = playground;
        this.ctx = this.playground.game_map.ctx;
        this.x = x;
        this.y = y;
        this.vx = 0;
        this.vy = 0;
        this.damage_x = 0;
        this.damage_y = 0;
        this.damage_speed = 0;
        this.move_length = 0;
        this.radius = radius;
        this.color = color;
        this.speed = speed;
        this.is_me = is_me;
        this.eps = 0.1;
        this.friction = 0.9;
        this.spent_time = 0;

        this.cur_skill = null;

        if (this.is_me) {//如果是用户自己,把头像传过来
            this.img = new Image();
            this.img.src = this.playground.root.settings.photo;
        }


    }

    start() {
        if (this.is_me) {//如果是自己的话,调用监听事件
            this.add_listening_events();
        } else {//如果不是自己
            let tx = Math.random() * this.playground.width;
            let ty = Math.random() * this.playground.height;
            this.move_to(tx, ty);
        }
    }

    add_listening_events() {//监听事件,鼠标点击,按键盘
        let outer = this;
        this.playground.game_map.$canvas.on("contextmenu", function(){ //取消右键的菜单
            return false;
        });
        this.playground.game_map.$canvas.mousedown(function(e) { //获取右键点击的坐标
            const rect = outer.ctx.canvas.getBoundingClientRect(); //这个接口用来获得鼠标点击的相对坐标
            if (e.which === 3) {
                outer.move_to(e.clientX - rect.left, e.clientY - rect.top);

            } else if(e.which === 1) {//点的是鼠标左键的话
                if (outer.cur_skill === "fireball") {//如果当前技能是火球的话
                    outer.shoot_fireball(e.clientX - rect.left, e.clientY - rect.top);//朝tx,ty坐标发火球
                }
                outer.cur_skill = null;//左键点完发完火球之后,这个状态清空
            }

        });

        $(window).keydown(function(e) {//获取键盘信息
            if (e.which === 81) {//百度keycode,js键盘按钮81代表q键
                outer.cur_skill = "fireball";

                return false;//代表后续不处理了
            }

        });
    }

    shoot_fireball(tx, ty) {
        let x = this.x;
        let y = this.y;
        let radius = this.playground.height * 0.01;
        let angle = Math.atan2(ty - this.y, tx - this.x);
        let vx = Math.cos(angle), vy = Math.sin(angle);
        let color = "orange";
        let speed = this.playground.height * 0.5;
        let move_length = this.playground.height * 1;
        new FireBall(this.playground, this, x, y, radius, vx, vy, color, speed, move_length, this.playground.height * 0.01);
    }

    get_dist(x1, y1, x2, y2) {
        let dx = x1 - x2;
        let dy = y1 - y2;
        return Math.sqrt(dx * dx + dy * dy);

    }

    move_to(tx, ty) {
        this.move_length = this.get_dist(this.x, this.y, tx, ty); //移动的模长
        let angle = Math.atan2(ty - this.y, tx - this.x); //求移动向量的角度
        this.vx = Math.cos(angle); //表示速度,其实是1*cos(angle)
        this.vy = Math.sin(angle);

    }

    is_attacked(angle, damage) {
        for (let i = 0; i < 10 + Math.random() * 5; i ++) {//被击打之后的粒子效果,随机出现一些粒子
            let x = this.x, y = this.y;
            let radius = this.radius * Math.random() * 0.1;
            let angle = Math.PI * 2 * Math.random();
            let vx = Math.cos(angle), vy = Math.sin(angle);
            let color = this.color;
            let speed = this.speed * 10;
            let move_length = this.radius * Math.random() * 5;
            new Particle(this.playground, x, y, radius, vx, vy, color, speed, move_length);
        }
        this.radius -= damage;
        if (this.radius < 10) {
            this.destroy();
            return false;
        }
        this.damage_x = Math.cos(angle);
        this.damage_y = Math.sin(angle);
        this.damage_speed = damage * 100;
    }

    update() {
        this.spent_time += this.timedelta / 1000;
        if (! this.is_me && this.spent_time > 5 && Math.random() < 1 / 300.0) {
            let player = this.playground.players[Math.floor(Math.random() * this.playground.players.length)];
            let tx = player.x + player.speed * this.vx * this.timedelta / 1000 * 0.5;
            let ty = player.y + player.speed * this.vy * this.timedelta / 1000 * 0.5;
            this.shoot_fireball(tx, ty);
        }

        if (this.damage_speed > 10) {
            this.vx = this.vy = 0;
            this.move_length = 0;
            this.x += this.damage_x * this.damage_speed * this.timedelta / 1000;
            this.y += this.damage_y * this.damage_speed * this.timedelta / 1000;
            this.damage_speed *= this.friction;
        } else {
            if (this.move_length < this.eps) {
                this.move_length = 0;
                this.vx = this.vy = 0;
                if (!this.is_me) {//对于robots,不能停,循环着随机移动
                    let tx = Math.random() * this.playground.width;
                    let ty = Math.random() * this.playground.height;
                    this.move_to(tx, ty);
                }
            } else {
                let moved = Math.min(this.move_length, this.speed * this.timedelta / 1000); //不能移出界,moved表示的是每秒真实移动的距离
                this.x += this.vx * moved;
                this.y += this.vy * moved;
                this.move_length -= moved;
            }
        }
        this.render();
    }

    render() {// 渲染
        if (this.is_me) {//如果是自己的话渲染一个头像
            this.ctx.save();
            this.ctx.beginPath();
            this.ctx.arc(this.x, this.y, this.radius, 0, Math.PI * 2, false);
            this.ctx.stroke();
            this.ctx.clip();
            this.ctx.drawImage(this.img, this.x - this.radius, this.y - this.radius, this.radius * 2, this.radius * 2);
            this.ctx.restore();
        } else {//如果不是自己的话随机一个圆
            this.ctx.beginPath();
            this.ctx.arc(this.x, this.y, this.radius, 0, Math.PI * 2, false);
            this.ctx.fillStyle = this.color;
            this.ctx.fill();
        }
    }

    on_destroy() {
        for (let i = 0; i < this.playground.players.length; i ++) {
            if (this.playground.players[i] === this) {
                this.playground.players.splice(i, 1);
            }
        }
    }

}
写登录界面
cd acapp/game/static/js/src/settings, vim zbase.js
cd acapp/game/static/css, vim game.css
把ac_game_settings加到css文件
背景就有了
cd acapp/game/static/js/src/settings, vim zbase.js
然后写输入框里的东西,用户名,密码 登录按钮
cd acapp/game/static/css, vim game.css
然后把登录界面的东西写到css文件,css文件是描述js那些类的具体形状
这样写完之后,登录界面的雏形就完成了
写注册界面
cd acapp/game/static/js/src/settings, vim zbase.js
复制登录界面改一改就可以
然后监听事件函数,在login界面点击注册和在register界面点击登录
写动作 实现三个函数 register login logout
和后端交互的老三样,
views是处理数据的
urls 路由
js 前端怎么调用
首先写views
cd acapp/game/views/settings, 每一个操作创建一个新的文件,方便调试
vim login.py, vim logout.py, vim register.py(用户默认头像在这里定义)
然后写路由
cd acapp/game/urls/settings, vim index.py
把路由写好
然后写js, 前端怎么调用,有login_on_remote, register_on_remote, 这些 函数,
5.2 Web端acapp一键登录
在django中集成redis(准备工作)
首先 pip install django_redis
配置一下缓存
在cd acapp/acapp vim settings.py
复制到
CACHES = {
    'default': {
        'BACKEND': 'django_redis.cache.RedisCache',
        'LOCATION': 'redis://127.0.0.1:6379/1',
        "OPTIONS": {
            "CLIENT_CLASS": "django_redis.client.DefaultClient",
        },
    },
}
USER_AGENTS_CACHE = 'default'
启动redis-server
直接在 cd acapp, 执行sudo redis-server /etc/redis/redis.conf 就可以了
redis在django中怎么来操作
cd acapp, python3 manage.py shell
from django.core.cache import cache
cache.set('ljh', 1, None) #第三个参数是多少时间过期,单位是秒
cache.keys('*')           #查所有的数据
cache.keys('l*')          #查所有以l开头的,redis支持正则表达式
cache.has_key('ljh')      #返回true,判断有无
cache.get('ljh')          #查一下ljh的值
cache.delete('ljh')       #删除
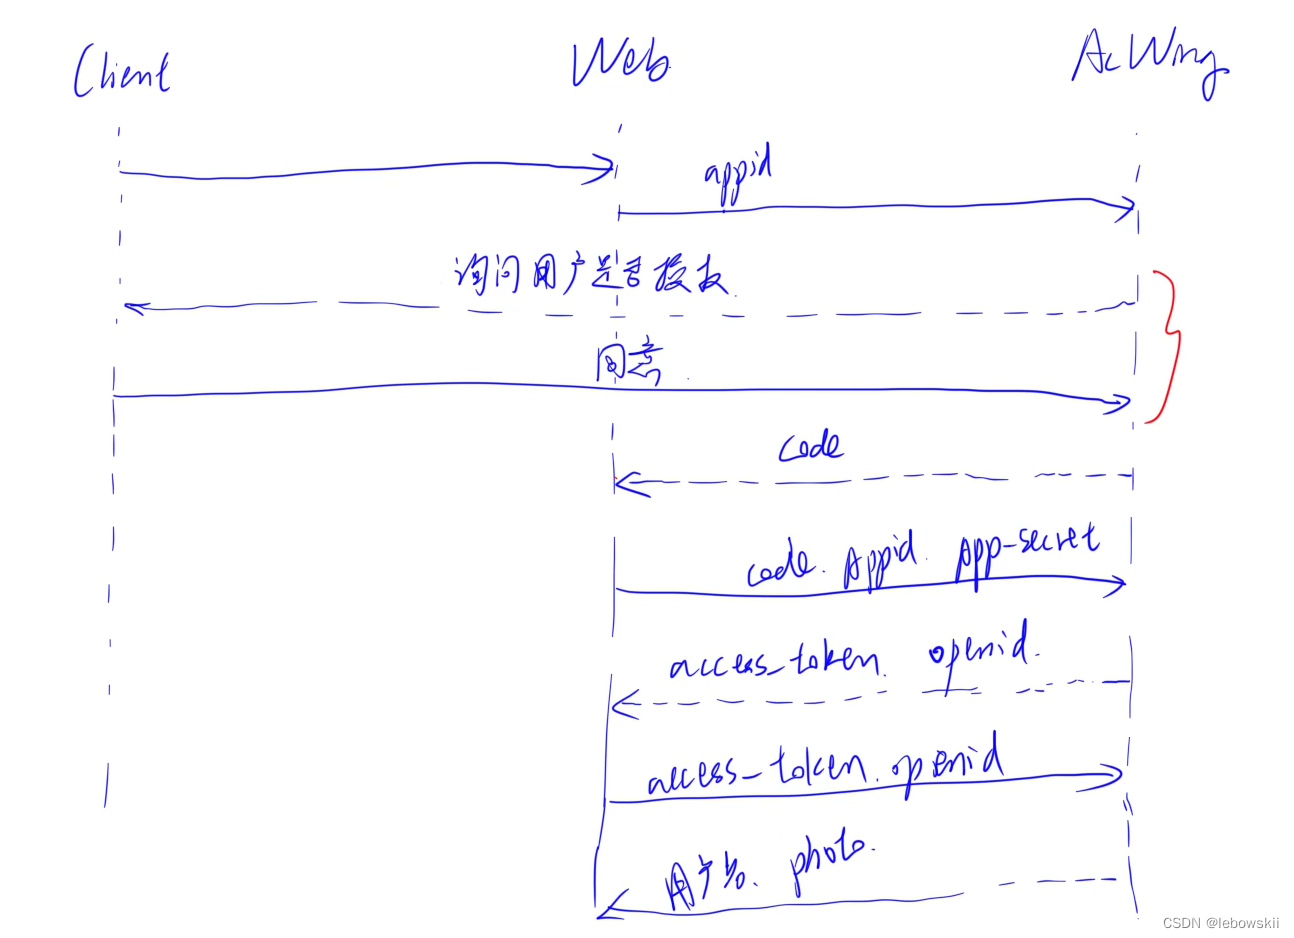
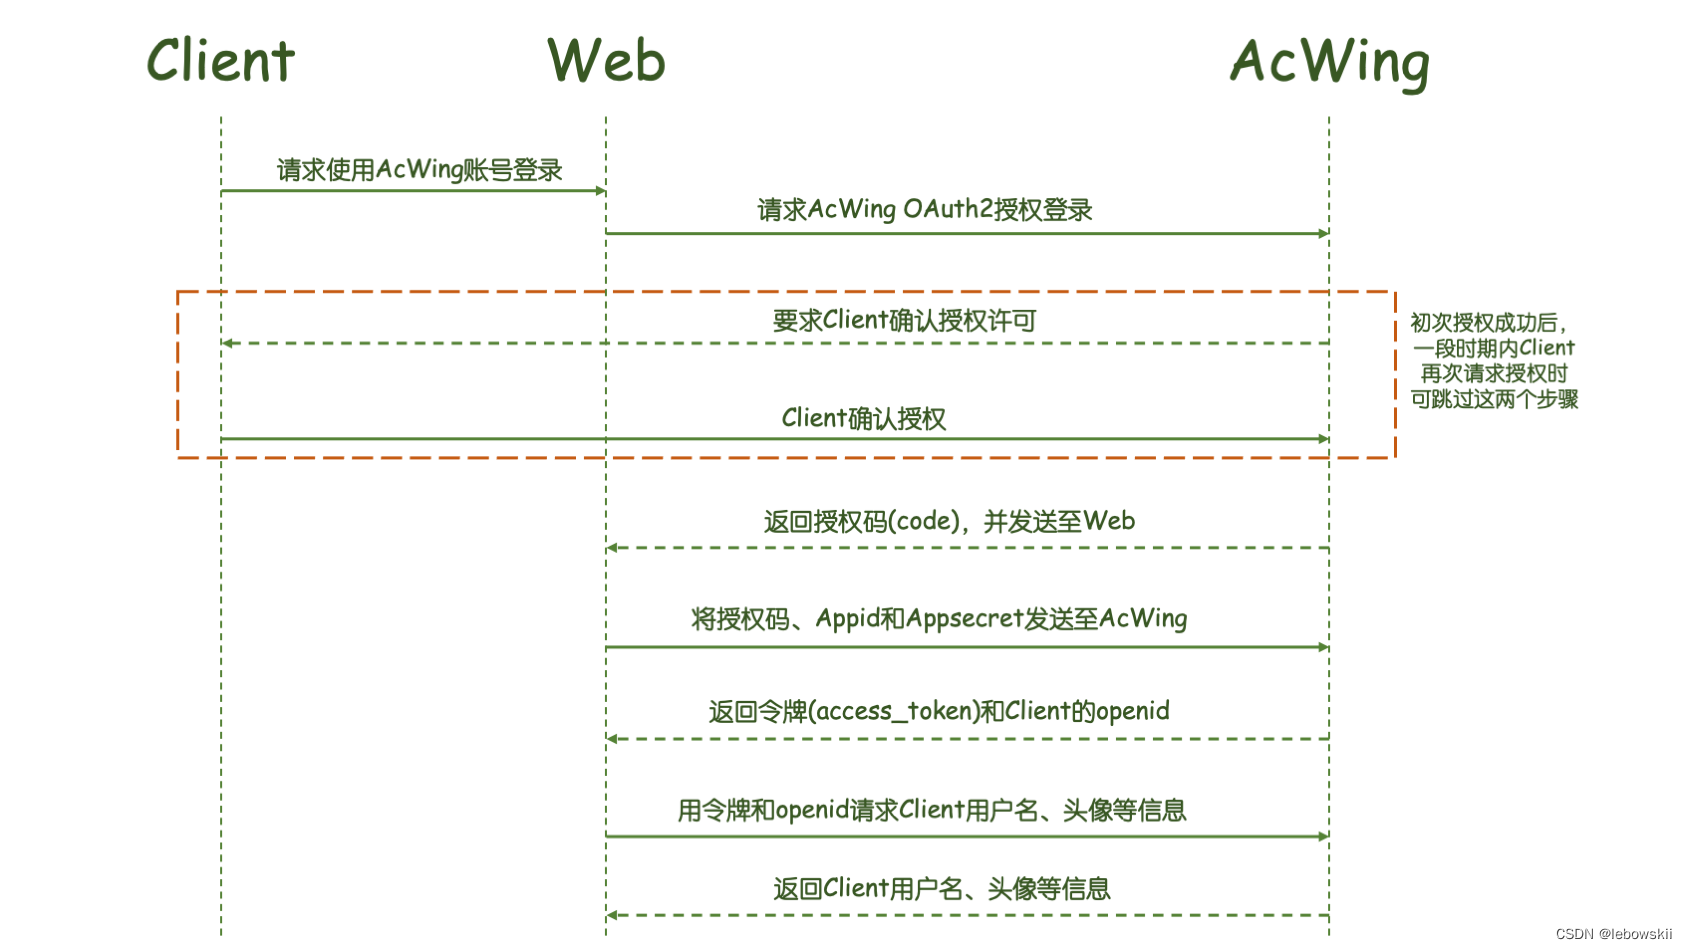
第三方授权登录的流程
用户点完第三方登录按钮,就像web发送了一个申请,说我要用第三方的账号去登录;然后web就把appid报给第三方,第三方会给用户一个页面询问是否要把信息授权给刚刚这个网站。
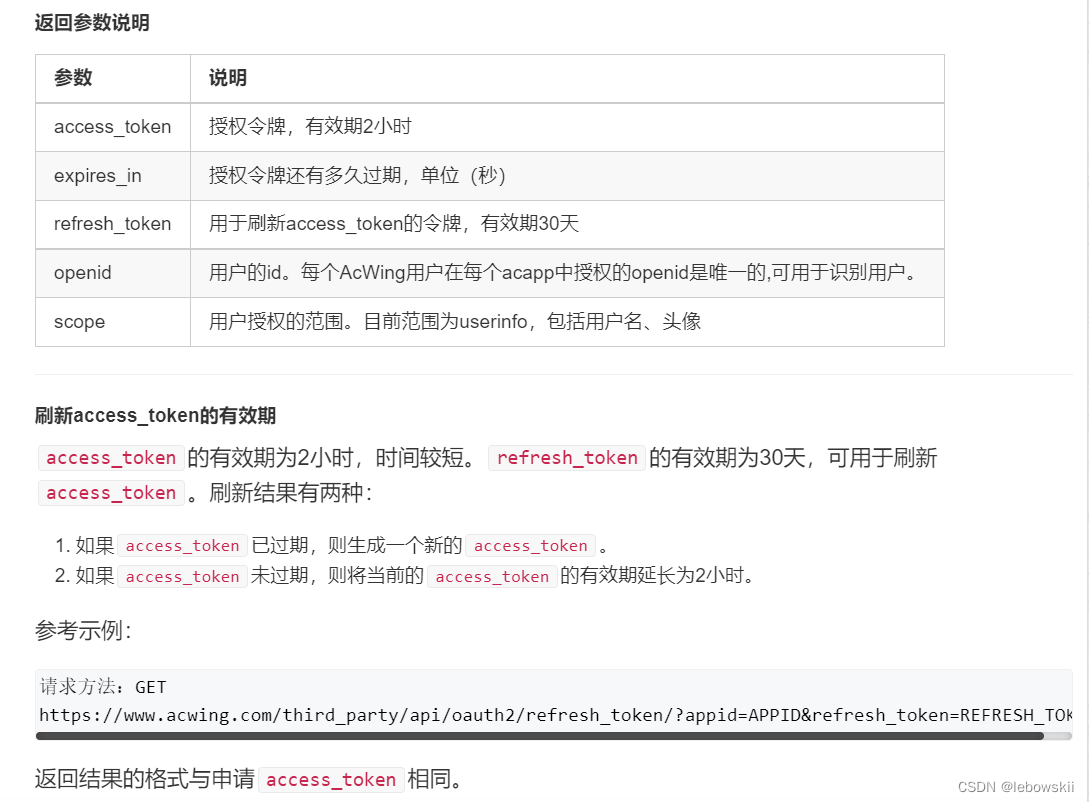
如果用户同意的话,表明我要把信息授权给刚刚那个网站,acwing接受到同意的信息,会把一个授权码发给网站;网站收到授权码之后再把它加上自己的身份信息appid, app-secret,再向acwing申请一个授权令牌access-token和用户的id openid(用来识别用户的东西);网站拿到这两个东西之后就能向第三方申请用户的信息了。这里是一个用户名和一个头像。
在数据库增加一个openid
cd acapp/game/models/player, vim player.py
改一下数据库,加一个openid是一个字符串
两句话更新一下数据库
cd acapp
python3 manage.py makemigrations
python3 manage.py migrate
接下来就要实现这个流程
cd acapp/game/views/settings, mkdir acwing创建一个文件夹acwing表示授权登录
今天搞的是web端,所以再mkdir web, acapp
第一步申请授权码code
cd acapp/game/views/settings/acwing/web,
vim apply_code.py
vim receive_code.py 写一下这两个文件
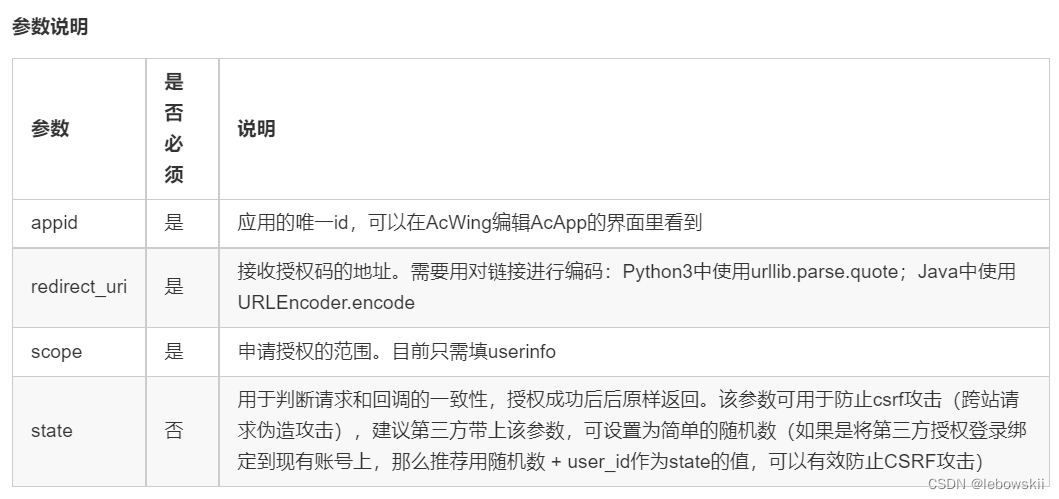
请求地址:https://www.acwing.com/third_party/api/oauth2/web/authorize/
请求方法:GET
https://www.acwing.com/third_party/api/oauth2/web/authorize/?appid=APPID&redirect_uri=REDIRECT_URI&scope=SCOPE&state=STATE
cd acapp/game/urls/settings/, mkdir acwing, vim index.py写一下acwing的路由,再返回上一级把路由include一下
后端写差不多,cd acapp/game/static/src, vim zbase.js 写一下前端
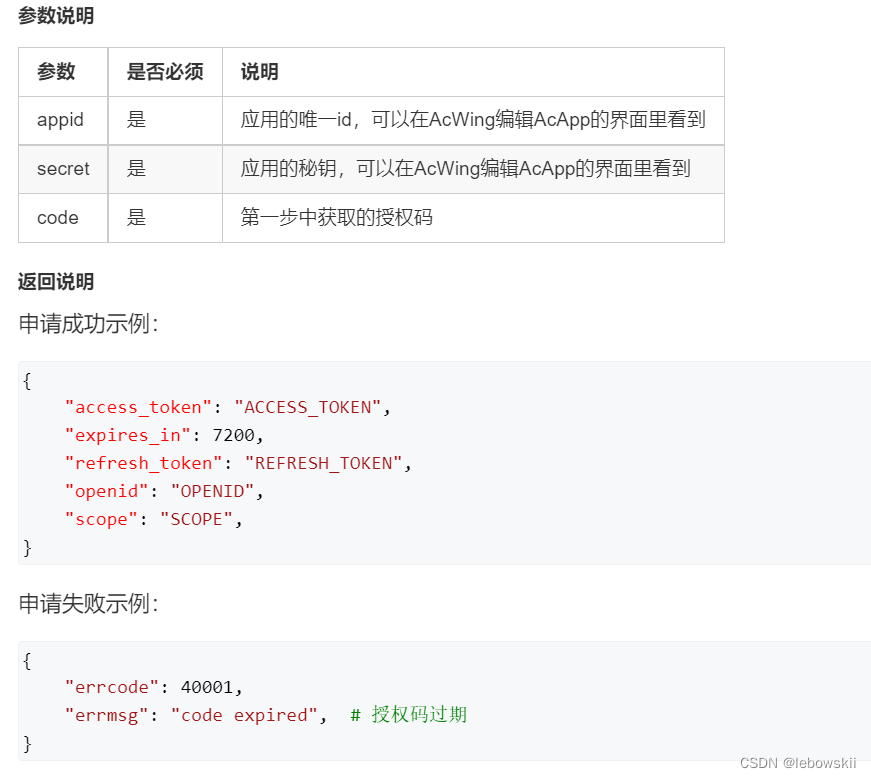
第二步申请授权令牌access_token和用户的openid
cd acapp/game/views/settings/acwing/web, vim receive_code.py
请求方法:GET
https://www.acwing.com/third_party/api/oauth2/access_token/?appid=APPID&secret=APPSECRET&code=CODE
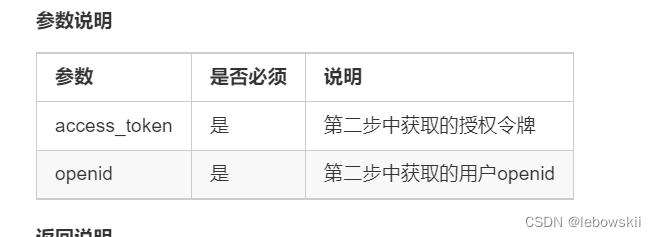
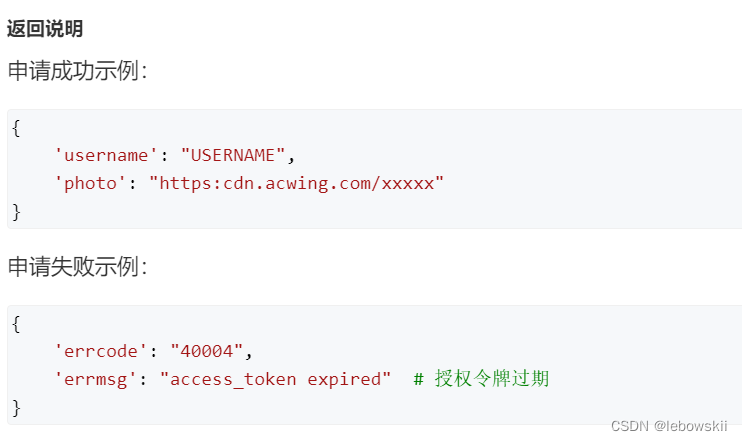
第三步申请用户身份信息
请求地址:https://www.acwing.com/third_party/api/meta/identity/getinfo/
请求方法:GET
https://www.acwing.com/third_party/api/meta/identity/getinfo/?access_token=ACCESS_TOKEN&openid=OPENID
apply_code.py如下
from django.http import JsonResponse
from urllib.parse import quote
from random import randint
from django.core.cache import cache


def get_state():
    res = ""
    for i in range(8):
        res += str(randint(0, 9))
    return res


def apply_code(request):
    appid = "4189"
    redirect_uri = quote("https://app4189.acapp.acwing.com.cn/settings/acwing/web/receive_code/")
    scope = "userinfo"
    state = get_state()

    cache.set(state, True, 7200)   # 有效期2小时

    apply_code_url = "https://www.acwing.com/third_party/api/oauth2/web/authorize/"
    return JsonResponse({
        'result': "success",
        'apply_code_url': apply_code_url + "?appid=%s&redirect_uri=%s&scope=%s&state=%s" % (appid, redirect_uri, scope, state)
    })
receive_code.py如下
from django.shortcuts import redirect
from django.core.cache import cache
import requests
from django.contrib.auth.models import User
from game.models.player.player import Player
from django.contrib.auth import login
from random import randint


def receive_code(request):
    data = request.GET
    code = data.get('code')
    state = data.get('state')

    if not cache.has_key(state):
        return redirect("index")
    cache.delete(state)

    apply_access_token_url = "https://www.acwing.com/third_party/api/oauth2/access_token/"
    params = {
        'appid': "4189",
        'secret': "2a79c385f35e4533ab803031fab68e3d",
        'code': code
    }

    access_token_res = requests.get(apply_access_token_url, params=params).json()

    access_token = access_token_res['access_token']
    openid = access_token_res['openid']

    players = Player.objects.filter(openid=openid)
    if players.exists():  # 如果该用户已存在,则无需重新获取信息,直接登录即可
        login(request, players[0].user)
        return redirect("index")

    get_userinfo_url = "https://www.acwing.com/third_party/api/meta/identity/getinfo/"
    params = {
        "access_token": access_token,
        "openid": openid
    }
    userinfo_res = requests.get(get_userinfo_url, params=params).json()
    username = userinfo_res['username']
    photo = userinfo_res['photo']

    while User.objects.filter(username=username).exists():  # 找到一个新用户名
        username += str(randint(0, 9))

    user = User.objects.create(username=username)
    player = Player.objects.create(user=user, photo=photo, openid=openid)

    login(request, user)

    return redirect("index")
5.3 acapp端实现一键授权登录
在views settings acwing acapp实现上节课相似的两个后端函数
cd acapp/game/views/settings/acwing/acapp, vim apply_code.py
from django.http import JsonResponse
from urllib.parse import quote
from random import randint
from django.core.cache import cache


def get_state():
    res = ""
    for i in range(8):
        res += str(randint(0, 9))
    return res


def apply_code(request):
    appid = "4189"
    redirect_uri = quote("https://app4189.acapp.acwing.com.cn/settings/acwing/acapp/receive_code/")
    scope = "userinfo"
    state = get_state()

    cache.set(state, True, 7200)   # 有效期2小时

    return JsonResponse({
        'result': "success",
        'appid': appid,
        'redirect_uri': redirect_uri,
        'scope': scope,
        'state': state,
    })
写一个方法写一个路由,cd acapp/game/urls/settings/acwing, vim index.py
from django.urls import path
from game.views.settings.acwing.web.apply_code import apply_code as web_apply_code
from game.views.settings.acwing.web.receive_code import receive_code as web_receive_code
from game.views.settings.acwing.acapp.apply_code import apply_code as acapp_apply_code
from game.views.settings.acwing.acapp.receive_code import receive_code as acapp_receive_code


urlpatterns = [
    path("web/apply_code/", web_apply_code, name="settings_acwing_web_apply_code"),
    path("web/receive_code/", web_receive_code, name="settings_acwing_web_receive_code"),
    path("acapp/apply_code/", acapp_apply_code, name="settings_acwing_acapp_apply_code"),
    path("acapp/receive_code/", acapp_receive_code, name="settings_acwing_acapp_receive_code"),
]
然后写前端 cd acapp/game/static/js/src/settings, vim zbase.js
在这里插入代码片
然后写 cd acapp/game/views/settings/acwing/acapp, vim receive_code.py
from django.http import JsonResponse
from django.core.cache import cache
import requests
from django.contrib.auth.models import User
from game.models.player.player import Player
from random import randint


def receive_code(request):
    data = request.GET

    if "errcode" in data:
        return JsonResponse({
            'result': "apply failed",
            'errcode': data['errcode'],
            'errmsg': data['errmsg'],
        })

    code = data.get('code')
    state = data.get('state')

    if not cache.has_key(state):
        return JsonResponse({
            'result': "state not exist"
        })
    cache.delete(state)

    apply_access_token_url = "https://www.acwing.com/third_party/api/oauth2/access_token/"
    params = {
        'appid': "4189",
        'secret': "2a79c385f35e4533ab803031fab68e3d",
        'code': code
    }

    access_token_res = requests.get(apply_access_token_url, params=params).json()

    access_token = access_token_res['access_token']
    openid = access_token_res['openid']

    players = Player.objects.filter(openid=openid)
    if players.exists():  # 如果该用户已存在,则无需重新获取信息,直接登录即可
        player = players[0]
        return JsonResponse({
            'result': "success",
            'username': player.user.username,
            'photo': player.photo,
        })


    get_userinfo_url = "https://www.acwing.com/third_party/api/meta/identity/getinfo/"
    params = {
        "access_token": access_token,
        "openid": openid
    }
    userinfo_res = requests.get(get_userinfo_url, params=params).json()
    username = userinfo_res['username']
    photo = userinfo_res['photo']

    while User.objects.filter(username=username).exists():  # 找到一个新用户名
        username += str(randint(0, 9))

    user = User.objects.create(username=username)
    player = Player.objects.create(user=user, photo=photo, openid=openid)

    return JsonResponse({
        'result': "success",
        'username': player.user.username,
        'photo': player.photo,
    })
6. 实现联机对战
统一长度单位
统一长宽比
cd acapp/game/static/js/src/playground, vim zbase.js
增加一个自动调节长宽比的resize()函数
在这里插入代码片
然后让resize函数影响到真实的黑框大小
cd acapp/game/static/js/src/playground/game_map, vim zbase.js
增加一个resize()函数
在这里插入代码片
然后出现这两个问题
1.地图没有居中, 这个可以调整Css文件 .ac-game-playground
2.滑动窗口的时候地图边缘会先变白
cd acapp/game/static/css, vim zbase.css
在这里插入代码片
cd acapp/game/static/js/src/playground/game_map, vim zbase.js
在resize()函数中,涂一层不渐变的蒙版
在这里插入代码片
接着把地图中的所有元素的大小变成相对大小,地图里有三种角色,particle, player, skill
cd acapp/game/static/js/src/playground,vim zbase.js, 首先要从初始化的时候来改
然后进到player里去改,cd player
然后去改子弹,cd acapp/game/static/js/src/playground/skill/fireball
然后进到粒子里,cd particle
增加联机对战模式
cd acapp/game/static/js/src/menu, vim zbase.js 更改一下点击多人模式按钮的逻辑
cd acapp/game/static/js/src/playground, vim zbase.js 在打开playground界面做一下模式的分离
cd …/player, vim zbase.js , 变一下character参数(me robot enemy)所有is_me都改一下
配置django_channels
django_channels是负责客户端和server双向通信的
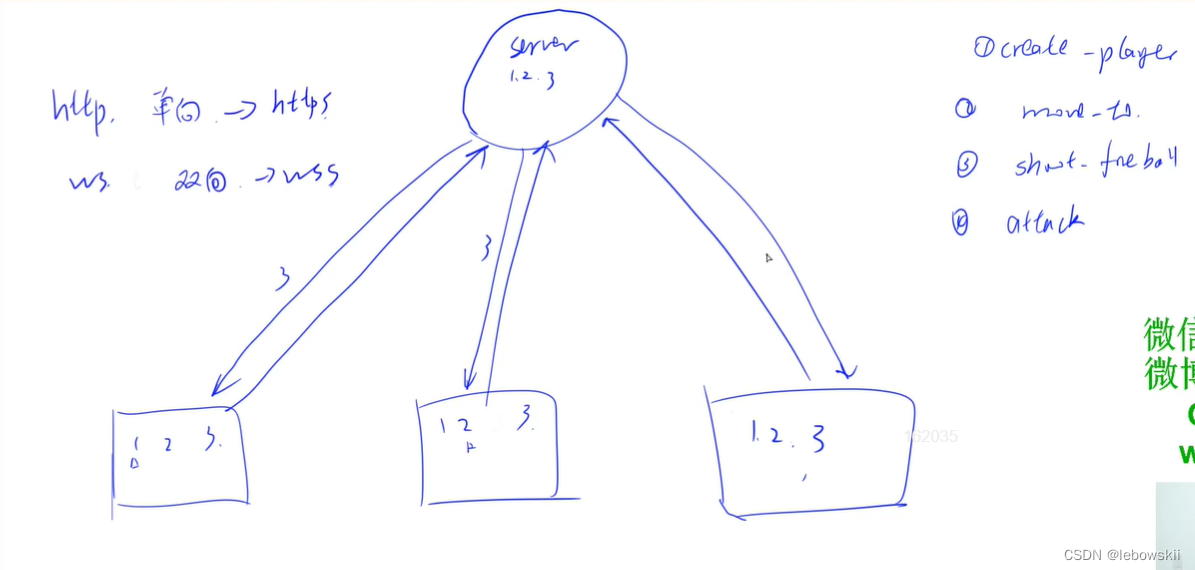
我们要同步四个事件:
create_player, move_to, shoot_fireball,
和
attack; 因为网络有延迟,所以fps游戏是否击中的判断都是在本地
attack是把自己击中别人的信息广播到所有玩家
在这里可以说是没有同步每一时刻的坐标而是同步操作;同步坐标的话服务器压力会更大
http协议是一个单向协议,我们只能向服务器请求信息,如果我们没有向服务器请求,服务器是不能主动向客户端发送信息的;
但在这里我们同步的事件,比如1号玩家在客户端动了一下,信息传到服务器,服务器要把信息同步给其它玩家;
所以我们使用websocket协议 ws,这个协议是双向的;支持客户端向服务器发请求也支持服务器向客户端发请求。
http 有 加密的协议 https; ws 也有加密的版本wss; django_channel就是让我们的django支持wss协议
玩家的血量等信息需要动态的通信维护,需要做到实时所以对读写效率要求很高,需要用内存数据库redis来存;django本身也要存一下信息存到redis的话效率更高
配置过程
- 安装channels_redis:
pip install channels_redis
- 配置acapp/asgi.py,cd acapp/acapp
import os

from channels.auth import AuthMiddlewareStack
from channels.routing import ProtocolTypeRouter, URLRouter
from django.core.asgi import get_asgi_application
from game.routing import websocket_urlpatterns

os.environ.setdefault('DJANGO_SETTINGS_MODULE', 'acapp.settings')

application = ProtocolTypeRouter({
    "http": get_asgi_application(),
    "websocket": AuthMiddlewareStack(URLRouter(websocket_urlpatterns))
})
- 配置acapp/settings.py
在INSTALLED_APPS中添加channels,添加后如下所示:
INSTALLED_APPS = [
    'channels',
    'game.apps.GameConfig',
    'django.contrib.admin',
    'django.contrib.auth',
    'django.contrib.contenttypes',
    'django.contrib.sessions',
    'django.contrib.messages',
    'django.contrib.staticfiles',
]
然后在文件末尾添加:
ASGI_APPLICATION = 'acapp.asgi.application'
CHANNEL_LAYERS = {
    "default": {
        "BACKEND": "channels_redis.core.RedisChannelLayer",
        "CONFIG": {
            "hosts": [("127.0.0.1", 6379)],
        },
    },
}
- 配置game/routing.py, cd acapp/game, vim routing.py
这一部分的作用相当于http的urls。
内容如下:
from django.urls import path

websocket_urlpatterns = [
]
- 编写game/consumers
这一部分的作用相当于http的views。
cd acapp/game/consumers/multiplayer, vim index.py
参考示例:
from channels.generic.websocket import AsyncWebsocketConsumer
import json

class MultiPlayer(AsyncWebsocketConsumer):
    async def connect(self):
        await self.accept()
        print('accept')

        self.room_name = "room"
        await self.channel_layer.group_add(self.room_name, self.channel_name)

    async def disconnect(self, close_code):
        print('disconnect')
        await self.channel_layer.group_discard(self.room_name, self.channel_name)


    async def receive(self, text_data):
        data = json.loads(text_data)
        print(data)
- 启动django_channels
在~/acapp目录下执行:
daphne -b 0.0.0.0 -p 5015 acapp.asgi:application
前端和后端的连接
写一下路由:
cd acapp/game, vim routing.py
写一下前端的调用
cd acapp/game/static/js/src/playground/socket/multiplayer, vim zbase.js
编写同步函数(核心)
为了给每个对象一个身份证,因为在不同窗口中需要区别对象的身份, 需要在不同的窗口中知道谁是谁,需要给每个对象创建一个uuid来同步这些对象在所有窗口中的身份编号;
这个是一个八位的随机数,重复的概率非常低可以不计。
每一个对象创建出来之后都有一个对应的uuid
cd acapp/game/static/js/src/playground/ac_game_object, vim zbase.js
同步第一个事件,create_player
在不同的窗口都能同步创建玩家;我们在redis存所有玩家的信息
引入room概念每个房间有个上限人数
cd acapp/acapp, vim settings.py
ROOM_CAPACITY = 3
改一下后端的函数,这个是相当于http中views的东西
有一套创建房间建立连接然后向本地返回玩家信息等一系列逻辑
cd acapp/game/consumers/multiplayer, vim index.py
然后我们有一个单独的事件表示创建玩家,
在cd acapp/game/static/js/src/playground/, vim zbase.js
class AcGamePlayground {
    constructor(root) {
        this.root = root;
        this.$playground = $(`<div class="ac-game-playground"></div>`);

        this.hide();
        this.root.$ac_game.append(this.$playground);

        this.start();
    }

    get_random_color() {
        let colors = ["blue", "red", "pink", "grey", "green"];
        return colors[Math.floor(Math.random() * 5)];
    }

    start() {
        let outer = this;
        $(window).resize(function() {
            outer.resize();
        });
    }

    resize() {
        this.width = this.$playground.width();
        this.height = this.$playground.height();
        let unit = Math.min(this.width / 16, this.height / 9);
        this.width = unit * 16;
        this.height = unit * 9;
        this.scale = this.height;

        if (this.game_map) this.game_map.resize();
    }

    show(mode) {  // 打开playground界面
        let outer = this;
        this.$playground.show();

        this.width = this.$playground.width();
        this.height = this.$playground.height();
        this.game_map = new GameMap(this);

        this.resize();

        this.players = [];
        this.players.push(new Player(this, this.width / 2 / this.scale, 0.5, 0.05, "white", 0.15, "me", this.root.settings.username, this.root.settings.photo));

        if (mode === "single mode") {
            for (let i = 0; i < 5; i ++ ) {
                this.players.push(new Player(this, this.width / 2 / this.scale, 0.5, 0.05, this.get_random_color(), 0.15, "robot"));
            }
        } else if (mode === "multi mode") {
            this.mps = new MultiPlayerSocket(this);
            this.mps.uuid = this.players[0].uuid;

            this.mps.ws.onopen = function() {
                outer.mps.send_create_player(outer.root.settings.username, outer.root.settings.photo);
            };
        }

    }

    hide() {  // 关闭playground界面
        this.$playground.hide();
    }
}
cd acapp/game/static/js/src/playground/socket/multiplayer, vim zbase.js
把send_create_player写好,这样我们就会向后台发送一个请求
写一下后端的逻辑
向后台发送一个请求之后,会传过来一个字典create_player
cd acapp/game/consumers/multiplayer, vim index.py
我们根据event做一个路由, 也需要定义一下create_player和接收群发消息的地方
from channels.generic.websocket import AsyncWebsocketConsumer
import json
from django.conf import settings
from django.core.cache import cache

class MultiPlayer(AsyncWebsocketConsumer):
    async def connect(self):
        self.room_name = None

        for i in range(1000):   #枚举一下房间
            name = "room-%d" % (i)   #当前的房间名就是room-i
            if not cache.has_key(name) or len(cache.get(name)) < settings.ROOM_CAPACITY: #如果说房间为空或者没满
                self.room_name = name
                break

        if not self.room_name: #房间不够了 请排队
            return

        await self.accept() #接受这个请求,加入房间

        if not cache.has_key(self.room_name): #如果没有这个房间
            cache.set(self.room_name, [], 3600)  # 有效期1小时

        for player in cache.get(self.room_name):
            await self.send(text_data=json.dumps({ #建立完连接之后,向本地发送玩家信息, .dumps()是把字典变成字符串

                'event': "create_player",
                'uuid': player['uuid'],
                'username': player['username'],
                'photo': player['photo'],
            }))

        await self.channel_layer.group_add(self.room_name, self.channel_name)

    async def disconnect(self, close_code):
        print('disconnect')
        await self.channel_layer.group_discard(self.room_name, self.channel_name);


    async def create_player(self, data):
        players = cache.get(self.room_name)
        players.append({
            'uuid': data['uuid'],
            'username': data['username'],
            'photo': data['photo']
        })
        cache.set(self.room_name, players, 3600)  #当最后一个玩家创建完之后,整个对局会保存一个小时
        await self.channel_layer.group_send(# 群发消息
            self.room_name,
            {
                'type': "group_create_player",  #type里的关键字为什么重要,是把create_player这个函数发给组内的所有人
                'event': "create_player",
                'uuid': data['uuid'],
                'username': data['username'],
                'photo': data['photo'],
            }
        )

    async def group_create_player(self, data): #群发的消息要有一个接受的地方,type的关键字是什么,这里函数名就是什么
        await self.send(text_data=json.dumps(data))

    async def receive(self, text_data):
        data = json.loads(text_data)
        event = data['event']
        if event == "create_player":  #如果说当前事件是create_player的话, 我们就执行一下create_player
            await self.create_player(data)
我们后端有的东西,前端也应该要有
cd acapp/game/static/js/src/playground/socket/multiplayer, vim zbase.js
class MultiPlayerSocket {
    constructor(playground) {
        this.playground = playground;

        this.ws = new WebSocket("wss://app4189.acapp.acwing.com.cn/wss/multiplayer/");

        this.start();
    }

    start() {
        this.receive();
    }

    receive () {
        let outer = this;

        this.ws.onmessage = function(e) {
            let data = JSON.parse(e.data);
            let uuid = data.uuid;
            if (uuid === outer.uuid) return false;

            let event = data.event;
            if (event === "create_player") {
                outer.receive_create_player(uuid, data.username, data.photo);
            }
        };
    }

    send_create_player(username, photo) {
        let outer = this;
        this.ws.send(JSON.stringify({
            'event': "create_player",
            'uuid': outer.uuid,
            'username': username,
            'photo': photo,
        }));
    }

    receive_create_player(uuid, username, photo) {
        let player = new Player(
            this.playground,
            this.playground.width / 2 / this.playground.scale,
            0.5,
            0.05,
            "white",
            0.15,
            "enemy",
            username,
            photo,
        );

        player.uuid = uuid;
        this.playground.players.push(player);
    }
}
同步第二个事件move_to()
通信的部分,前端和后端
cd acapp/game/static/js/src/playground/socket/multiplayer, vim zbase.js
cd acapp/game/consumers/multiplayer, vim index.py
然后调用部分
cd acapp/game/static/js/src/playground/player, vim zbase.js
cd acapp/game/static/js/src/playground/, vim zbase.js
理一下整个过程:
我在多人模式里点击鼠标,监听事件知道我这个行为,我自己因为调用本窗口的move_to()函数可以在窗口内移动;别人怎么知道我移动呢?
如果是多人模式,会通过写的send_move_to()函数向服务器发送信息。send_move_to()通过web_socket向服务器发送一个事件。服务器里的话,会有一个receive()函数接受到信息,发现事件是move_to()会调用后端写的move_to()函数。在这个move_to()函数里会向所有的channel.layer群发,群发我们这个uuid玩家移动的消息。每一个窗口都会在前端接收到信息,路由到前端的receive_move_to()函数,然后在这里,每个玩家就会在各自的窗口里调用各自的move_to()函数了
1 前端通过写的send_move_to()函数向服务器发送信息
add_listening_events() {
        let outer = this;
        this.playground.game_map.$canvas.on("contextmenu", function() {
            return false;
        });
        this.playground.game_map.$canvas.mousedown(function(e) {
            if (outer.playground.state !== "fighting")
                return false;

            const rect = outer.ctx.canvas.getBoundingClientRect();
            if (e.which === 3) {
                let tx = (e.clientX - rect.left) / outer.playground.scale;
                let ty = (e.clientY - rect.top) / outer.playground.scale;
                outer.move_to(tx, ty);

                if (outer.playground.mode === "multi mode") {
                    outer.playground.mps.send_move_to(tx, ty);
                }
2 send_move_to()通过web_socket向服务器发送一个事件
send_move_to(tx, ty) {
        let outer = this;
        this.ws.send(JSON.stringify({
            'event': "move_to",
            'uuid': outer.uuid,
            'tx': tx,
            'ty': ty,
        }));
    }
3 服务器里的话,会有一个receive()函数接受到信息,发现事件是move_to()会调用后端写的move_to()函数。在这个move_to()函数里会向所有的channel.layer群发,广播我们这个uuid玩家移动的消息。(self.channel_layer.group_send)
async def receive(self, text_data):
        data = json.loads(text_data)
        event = data['event']
        if event == "create_player":
            await self.create_player(data)
        elif event == "move_to":
            await self.move_to(data)


async def move_to(self, data):
        await self.channel_layer.group_send(
            self.room_name,
            {
                'type': "group_send_event",
                'event': "move_to",
                'uuid': data['uuid'],
                'tx': data['tx'],
                'ty': data['ty'],
            }
        )
4 每一个窗口都会在前端接收到这个操作的信息,路由到前端的receive_move_to()函数,然后在这里,每个玩家就会在各自的窗口里调用各自的move_to()函数了
receive () {
        let outer = this;

        this.ws.onmessage = function(e) {
            let data = JSON.parse(e.data);
            let uuid = data.uuid;
            if (uuid === outer.uuid) return false;

            let event = data.event;
            if (event === "create_player") {
                outer.receive_create_player(uuid, data.username, data.photo);
            } else if (event === "move_to") {
                outer.receive_move_to(uuid, data.tx, data.ty);
            } else if (event === "shoot_fireball") {
                outer.receive_shoot_fireball(uuid, data.tx, data.ty, data.ball_uuid);
            } else if (event === "attack") {
                outer.receive_attack(uuid, data.attackee_uuid, data.x, data.y, data.angle, data.damage, data.ball_uuid);
            } else if (event === "blink") {
                outer.receive_blink(uuid, data.tx, data.ty);
            }
        };
    }


receive_move_to(uuid, tx, ty) {
        let player = this.get_player(uuid);

        if (player) {
            player.move_to(tx, ty);
        }
    }
同步第三个事件shoot_fireball()
同步第四个事件attack
在某一个窗口发生击中,attacker -> attackee, 从前端传到后端广播这个击中的事件
判断碰撞只有在炮弹发出者所在窗口里判断
因为只同步事件,在子弹碰撞的时候由于网络延迟等导致三角函数计算会出现误差;我们在子弹击中的时候,同步一下attackee的位置,做一个补偿
我击中了你,你在我窗口的位置将会被同步给所有窗口
计分板
渲染一个题头
我们在playground里定义三个阶段,waiting(等人凑够三个),fighting(可以操作),over(挂了)
技能cd
在player里
实现一个技能冷却cd , coldtime, 只有自己会有
实现一个图标在右下角,并且创建一个蒙版随着技能的coldtime画圆
同步第五个事件 blink 闪现技能
知道距离(斜边),先求角度(用函数搞出来),然后用三角函数求位置的偏移量,原坐标加偏移量就是闪现之后的坐标
闪现之后停下来
然后再把这个闪现blink函数同步给所有窗口
7. 实现聊天系统
前端渲染出来这个聊天框
cd /acapp/game/static/js/src/playground/chat_field, vim zbase.js
这个聊天框就是html里面的元素不用通过canvas画出来,其中包含两个部分,history 和 input
构造一系列函数然后在playground里调用
广播这个聊天系统的逻辑和上一节同步各种操作的逻辑是一样的
cd acapp/game/static/js/src/playground/socket/multiplayer, vim zbase.js
在这里实现send() 和 receive()函数
然后是写后端
cd acapp/game/consumers/multiplayer, vim index.py
在这里写广播的逻辑,也就是self.channel_layer.group_send()
 async def message(self, data):
        await self.channel_layer.group_send(
            self.room_name,
            {
                'type': "group_send_event",
                'event': "message",
                'uuid': data['uuid'],
                'username': data['username'],
                'text': data['text'],
            }
        )
然后在playground里调用一下就行了
8. 实现匹配系统
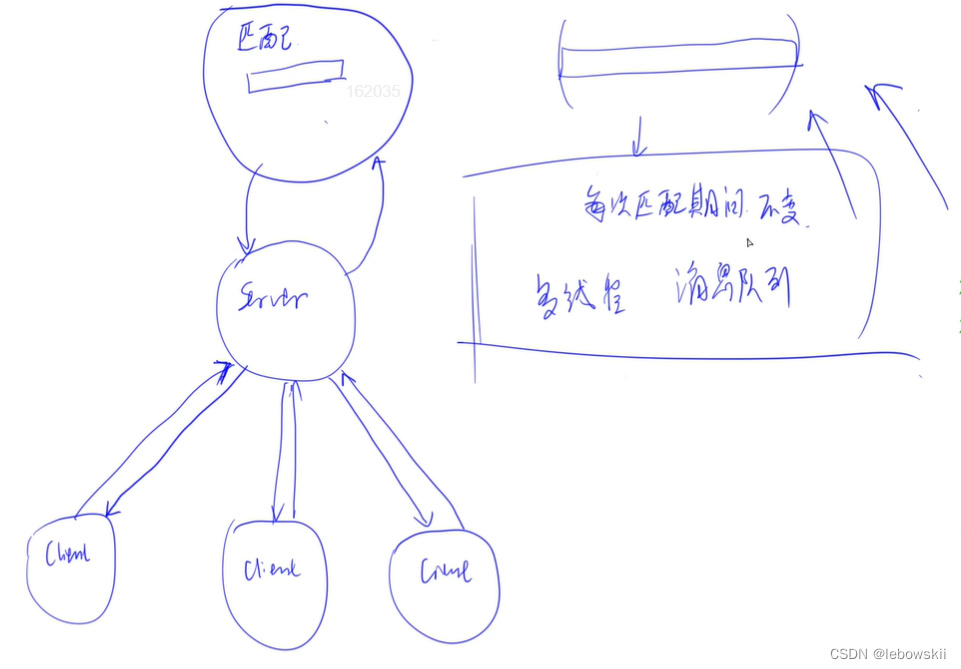
需要额外的进程来做匹配,进程之间的通信,可以用Thrift; 通过ip 和 端口号来通信
我们的服务器通过Trift服务,向另外一个专门做匹配的进程,请求信息
为什么用Trift,如果某个工作具有延时性,如果计算量很大的话,对系统资源是一种浪费;因此要用另一个进程去做
cd acapp, mkdir match_system - 把match_system放到和game同级的目录下
cd acapp/match_system/, mkdir thrift - 放一些配置文件
cd acapp/match_system/, mkdir src - 实现具体逻辑
cd cd acapp/match_system/thrift/, vim match.thrift
就实现一个add_player函数
namespace py match_service


service Match {
    i32 add_player(1: i32 score, 2: string uuid, 3: string username, 4: string photo, 5: string channel_name),
}
# 对channel_name的解释,django_channels可以通过知道channel_name实现外部进程的消息通知;
#channel_name主要用来匹配成功之后来通知我们的server
cd acapp/match_system/src/ ,
thrift --gen py match.thrift 基于thrift文件创建想要语言版本的代码
就是在cd acapp/match_system/src下,产生了一个gen-py的文件夹,
把它改名称 match_server, 其实就是产生了一个包,可以将它import
然后vim main.py
#! /usr/bin/env python3

import glob
import sys
sys.path.insert(0, glob.glob('../../')[0])

from match_server.match_service import Match

from thrift.transport import TSocket
from thrift.transport import TTransport
from thrift.protocol import TBinaryProtocol
from thrift.server import TServer

from queue import Queue
from time import sleep
from threading import Thread

from acapp.asgi import channel_layer
from asgiref.sync import async_to_sync
from django.core.cache import cache

queue = Queue()  # 消息队列

class Player:
    def __init__(self, score, uuid, username, photo, channel_name):
        self.score = score
        self.uuid = uuid
        self.username = username
        self.photo = photo
        self.channel_name = channel_name
        self.waiting_time = 0  # 等待时间


class Pool:
    def __init__(self):
        self.players = []

    def add_player(self, player):
        self.players.append(player)

    def check_match(self, a, b):
        dt = abs(a.score - b.score)    #分差
        a_max_dif = a.waiting_time * 50   #a的阈值,当前的容忍和我们的分差是多少,每过一秒钟我们条件降低五十
        b_max_dif = b.waiting_time * 50
        return dt <= a_max_dif and dt <= b_max_dif  #就是一开始我们希望找到和自己分差差不多的,后来分差差的大一点也能容忍

    def match_success(self, ps):
        print("Match Success: %s %s %s" % (ps[0].username, ps[1].username, ps[2].username))
        room_name = "room-%s-%s-%s" % (ps[0].uuid, ps[1].uuid, ps[2].uuid)
        players = []
        for p in ps:
            async_to_sync(channel_layer.group_add)(room_name, p.channel_name)  #把他们加到一个组里
            players.append({
                'uuid': p.uuid,
                'username': p.username,
                'photo': p.photo,
                'hp': 100,        #血条,记录在服务器端
            })
        cache.set(room_name, players, 3600)  # 有效时间:1小时
        for p in ps:
            async_to_sync(channel_layer.group_send)(
                room_name,
                {
                    'type': "group_send_event",
                    'event': "create_player",
                    'uuid': p.uuid,
                    'username': p.username,
                    'photo': p.photo,
                }
            )

    def increase_waiting_time(self):
        for player in self.players:
            player.waiting_time += 1

    def match(self):
        while len(self.players) >= 3:
            self.players = sorted(self.players, key=lambda p: p.score)
            flag = False
            for i in range(len(self.players) - 2):
                a, b, c = self.players[i], self.players[i + 1], self.players[i + 2]
                if self.check_match(a, b) and self.check_match(a, c) and self.check_match(b, c):
                    self.match_success([a, b, c])
                    self.players = self.players[:i] + self.players[i + 3:]
                    flag = True
                    break
            if not flag:
                break

        self.increase_waiting_time()


class MatchHandler:
    def add_player(self, score, uuid, username, photo, channel_name):
        print("Add Player: %s %d" % (username, score))
        player = Player(score, uuid, username, photo, channel_name)
        queue.put(player)         #把玩家加进消息队列
        return 0


def get_player_from_queue():   #从消息队列中取玩家
    try:
        return queue.get_nowait()  #如果有元素就返回元素
    except:
        return None       #返回None就证明里面有元素


def worker():  #生产者消费者模型中的consumer,需要一个worker线程来不断把player加到线程池匹配
    pool = Pool()
    while True:
        player = get_player_from_queue()
        if player:
            pool.add_player(player)    #如果有元素的话,就不sleep, 直接把它加到匹配池,没有阻塞
        else:
            pool.match()       #如果说没有元素,就匹配一下
            sleep(1)              #然后歇一秒


if __name__ == '__main__':
    handler = MatchHandler()
    processor = Match.Processor(handler)
    transport = TSocket.TServerSocket(host='127.0.0.1', port=9090)
    tfactory = TTransport.TBufferedTransportFactory()
    pfactory = TBinaryProtocol.TBinaryProtocolFactory()

    server = TServer.TThreadedServer(
        processor, transport, tfactory, pfactory)

    Thread(target=worker, daemon=True).start()  #daemon=True 在关掉主线程的时候它这个线程也会关掉

    print('Starting the server...')
    server.serve()
    print('done.')
8.2项目收尾
- 加密、压缩js代码
安装terser:
sudo apt-get update
sudo apt-get install npm
sudo npm install terser -g
terser不仅支持文件输入,也支持标准输入。结果会输出到标准输出中。
使用方式:
terser xxx.js -c -m
- 清理监听函数
在AcAPP关闭之前触发的事件可以通过如下api添加:
AcWingOS.api.window.on_close(func);
注意:
同一个页面中,多个acapp引入的js代码只会加载一次,因此AC_GAME_OBJECTS等全局变量是同一个页面、同一个acapp的所有窗口共用的。
各自创建的局部变量是独立的,比如new AcGame()创建出的对象各个窗口是独立的。
- 编写每局游戏的结束界面
- 更新战绩
- 添加favicon.ico
cd acapp/game/templates/multiends/
9. Rest Framework与JWT身份验证
之前的代码是通过 cookie session id验证的,即在浏览器的cookie里,然后发给服务器去在服务器的数据库去查表,确定用户的身份
如果存在session里,不方便做跨域
为了解决这个问题,使用JWT框架,这个可以把信息存在内存或者local storage, 方便js去传
JWT- Jason Web Tokens
有两个token, 一个access一个refresh(刷新我们的令牌)
