文章目录
前言
本文主要参考冈萨雷斯的数字图像处理 (第4版),介绍图片中一些常见的噪声形式和常用的去噪方法,并且给出相应滤波方法的实现代码。
如果要使用本文代码,建议在Jupyter Notebook环境下运行。
一、噪声分类
1、高斯噪声
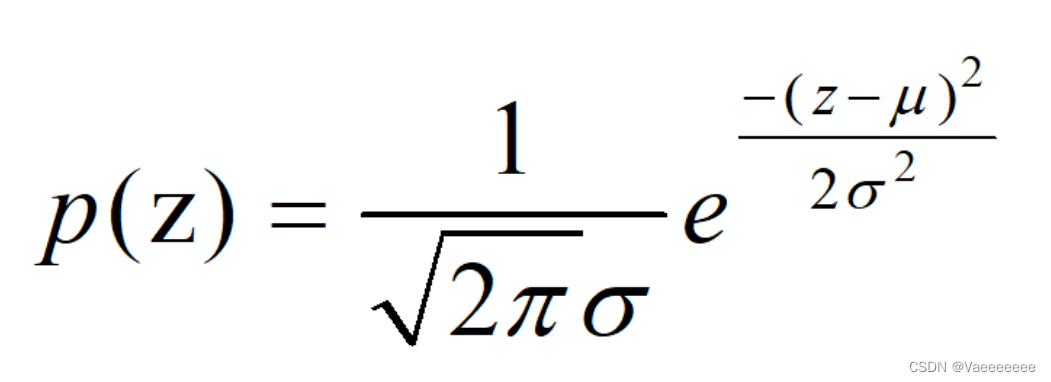
指服从高斯分布(正态分布)的一类噪声,其产生的主要原因是由于相机在拍摄时视场较暗且亮度不均匀造成的,同时相机长时间工作使得温度过高也会引起高斯噪声,另外电路元器件白身噪声和互相影响也是造成高斯噪声的重要原因之一。
概率密度函数(PDF)如下:
初始图片:
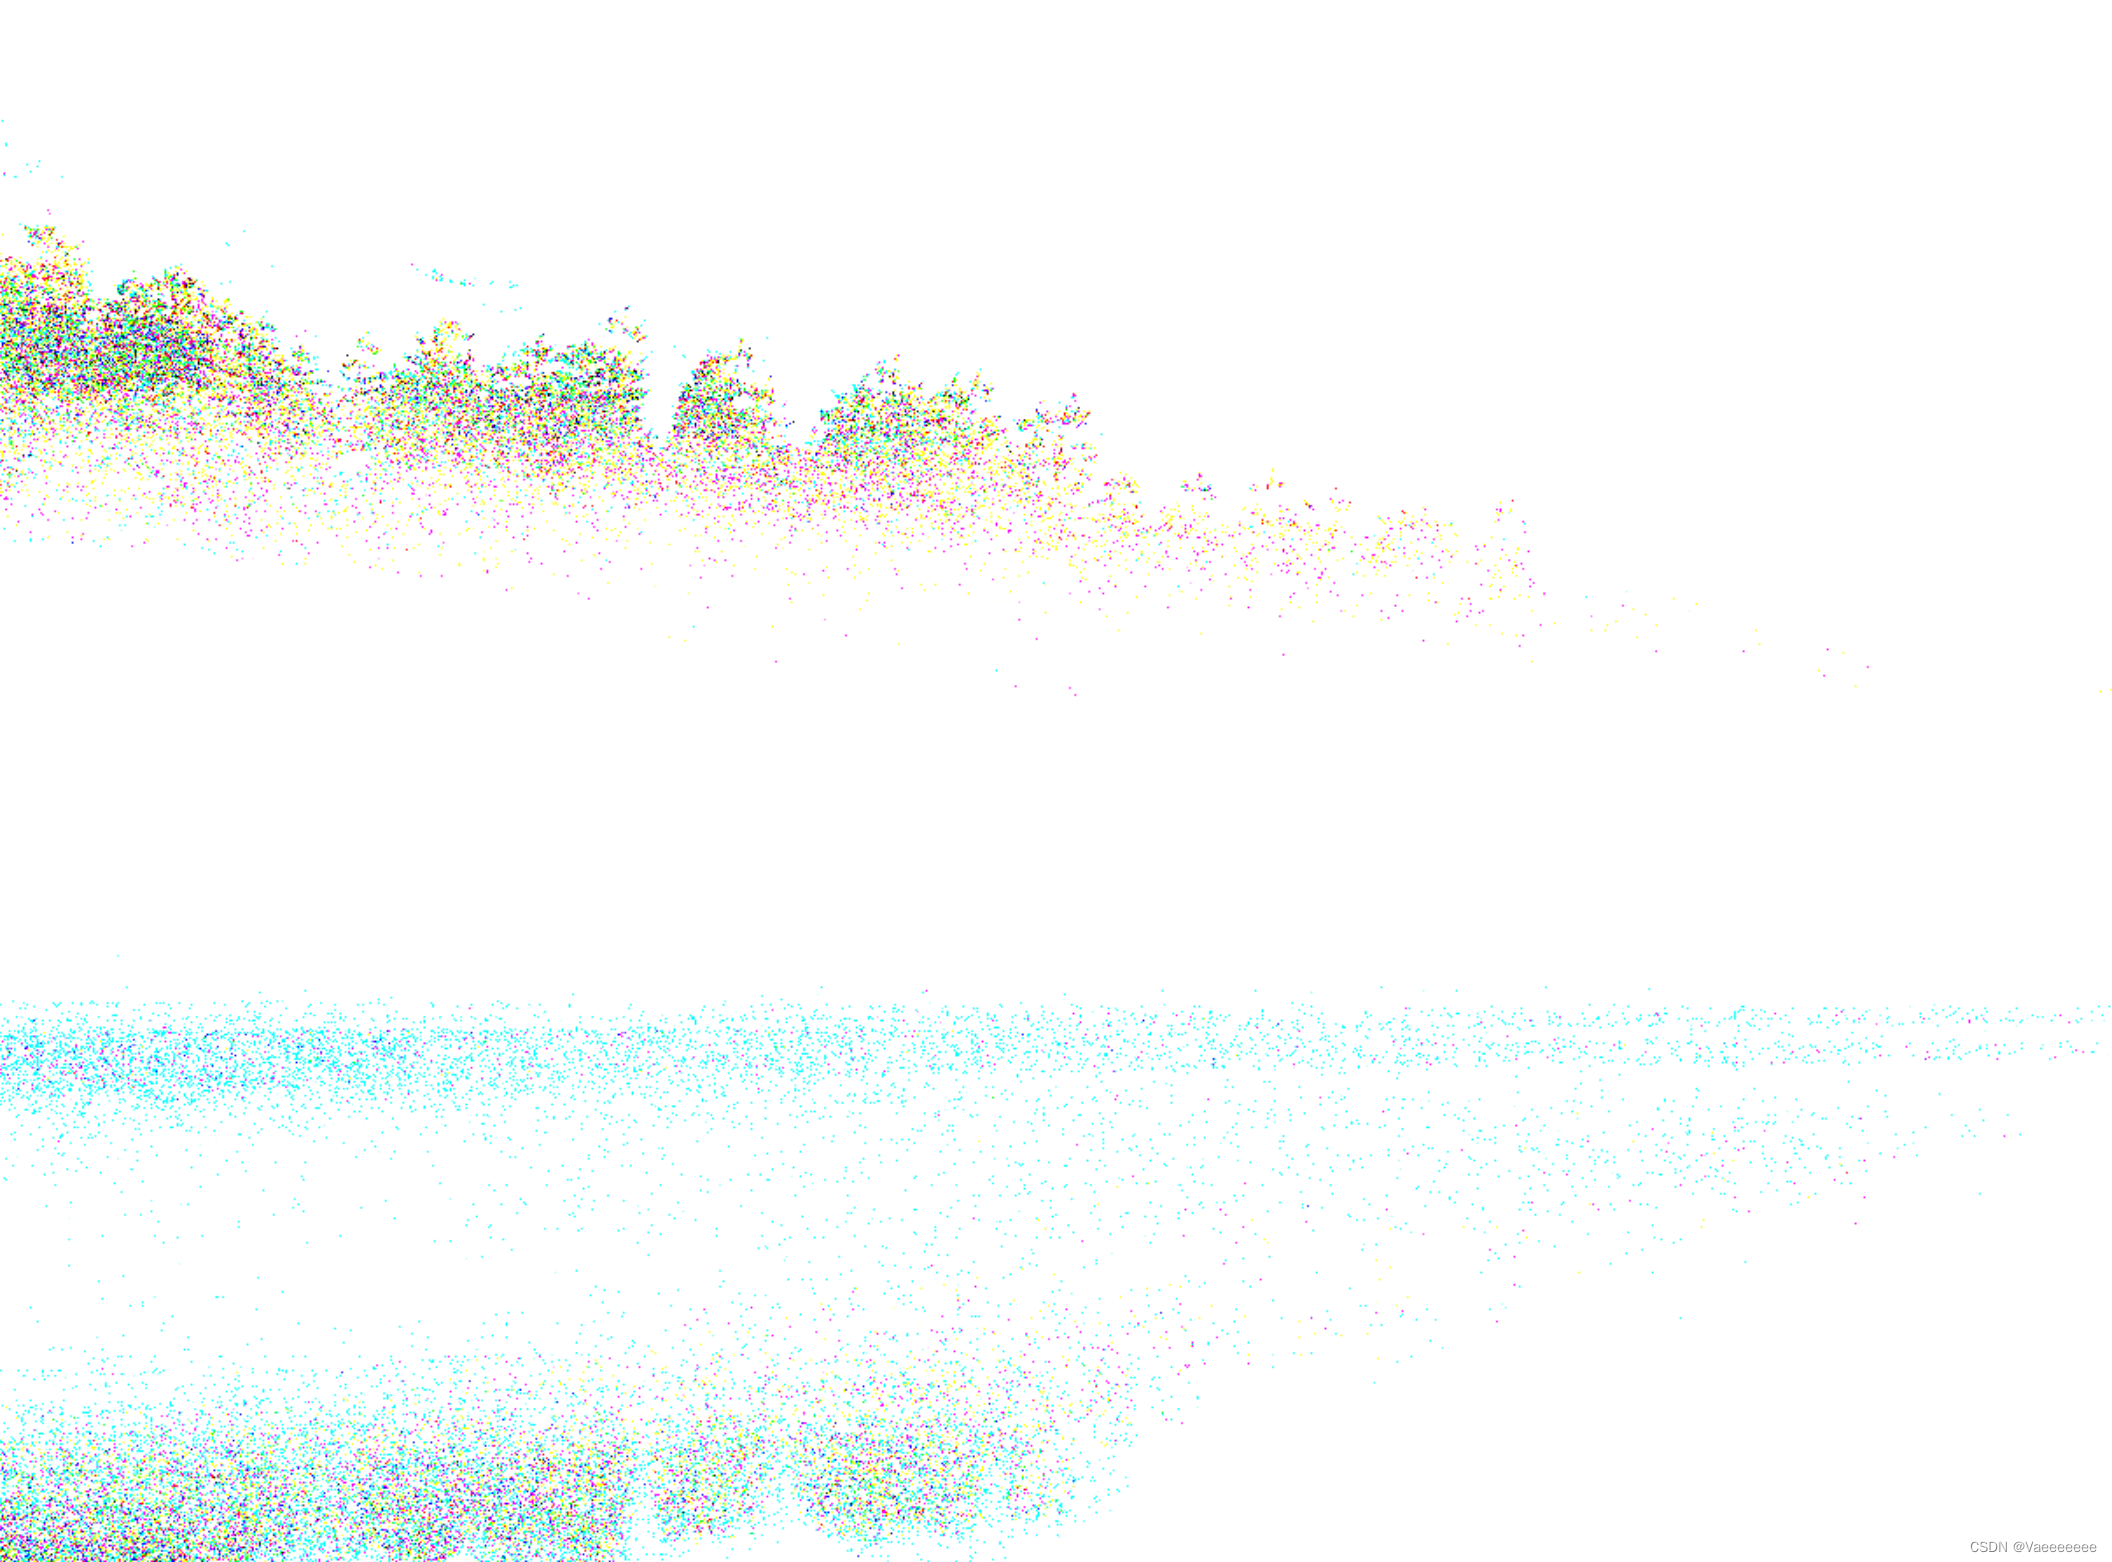
注意加噪声时,不能直接将 noise+img,不然最终出来的是一片空白和零星几个噪点,原因在于cv2.imshow输入要求是 0-1 float 或者 0-255 int。
(1)错误显示:
(2)正确显示:
import cv2
import random
import numpy as np
img = cv2.imread('A.png')

# 产生高斯随机数
noise = np.random.normal(0,50,size=img.size).reshape(img.shape[0],img.shape[1],img.shape[2])
# 加上噪声
img = img + noise
img = np.clip(img,0,255)
img = img/255

cv2.imshow('Gauss noise',img)
cv2.waitKey(0)
(3)高斯滤波
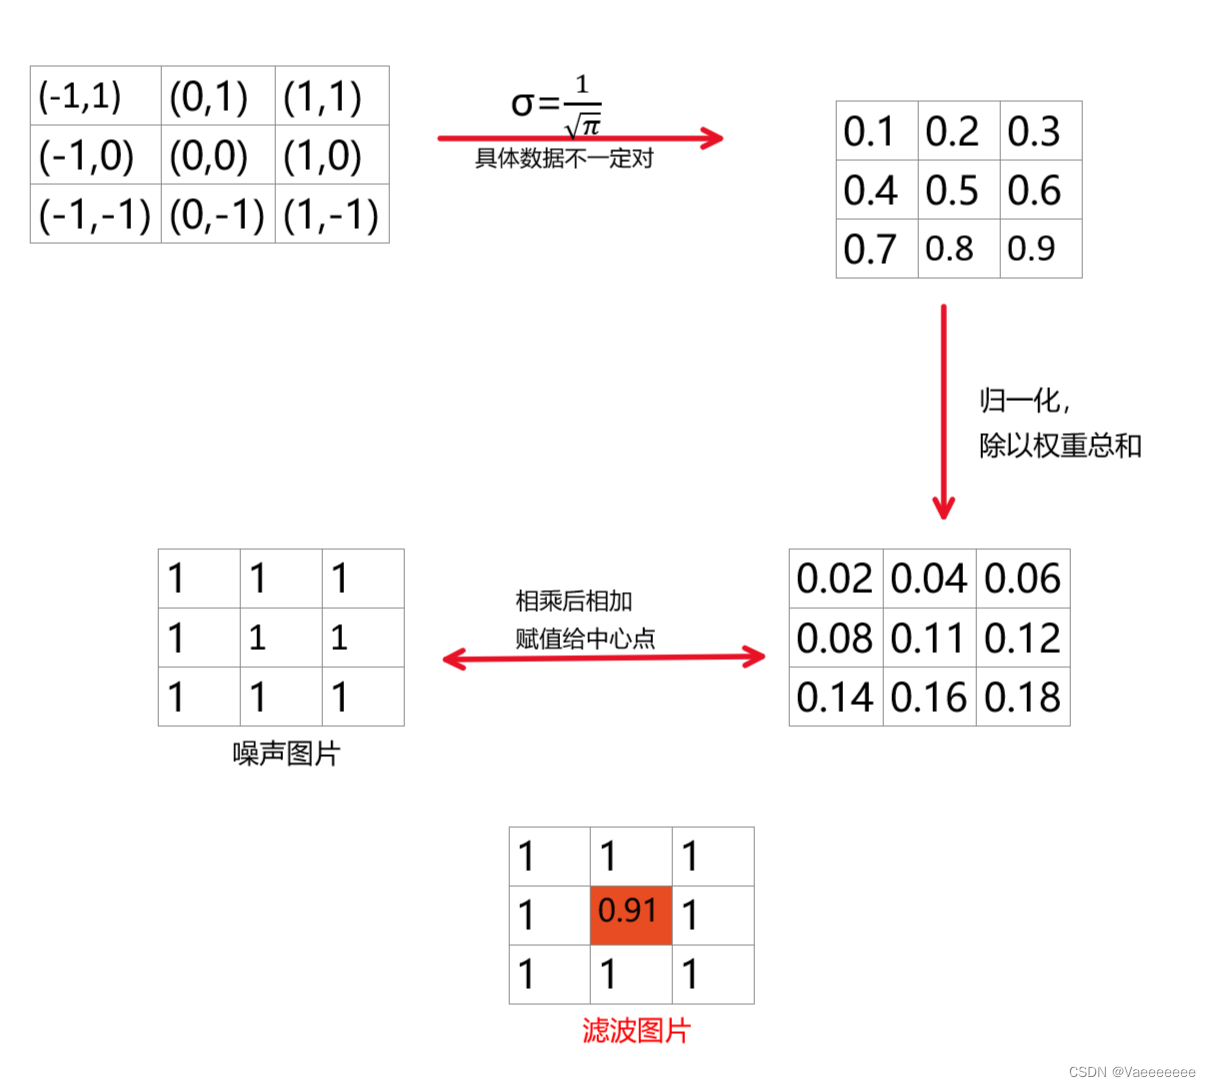
高斯滤波是一种线性平滑滤波,一般用于消除高斯噪声。对于每一个像素点的值,是由其本身和邻域内的其他像素值经过加权平均后得到。
二维高斯函数:
具体过程:
代码:使用cv2.GaussianBlur()函数
注意高斯模糊半径不能为偶数
滤波结果:
2、泊松噪声
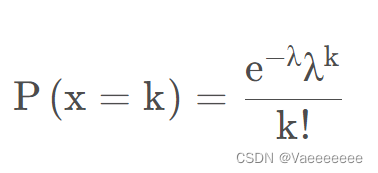
简言之就是符合泊松分布的噪声模型,又称散粒噪声。
使用**np.random.poisson()**函数
import cv2
import random
import numpy as np
img = cv2.imread('A.png')

# 产生泊松噪声
noise = np.random.poisson(lam=20,size=img.shape).astype('uint8')

# 加上噪声
img = img + noise
np.clip(img,0,255)
img = img/255

cv2.imshow('Poisson noise',img)
cv2.waitKey(0)
λ值越大,噪声程度越深。
3、椒盐噪声
椒盐噪声又称为脉冲噪声,是在图像上随机出现黑色白色的像素,顾名思义就是椒盐噪声 = 椒噪声(值为0,黑色) + 盐噪声(值为255,白色)
直接上代码:
import cv2
import random
import numpy as np
img = cv2.imread('A.png')

# 转化成向量
x = img.reshape(1,-1)
# 设置信噪比
SNR = 0.85
# 得到要加噪的像素数目
noise_num = x.size * (1-SNR)
# 得到需要加噪的像素值的位置
list = random.sample(range(0,x.size),int(noise_num))

for i in list:
    if random.random() >= 0.5:
        x[0][i] = 0
    else:
        x[0][i] = 255
img1 = x.reshape(img.shape)

cv2.imshow('salt&pepper noise',img1)
cv2.waitKey(0)
SNR越小,噪声越大。
4、瑞利噪声
一般是由由信道不理想引起的,它与信号的关系是相乘,信号在它在,信号不在他也就不在。
瑞利密度对倾斜形状直方图的建模非常有用。
概率密度函数(PDF)如下:
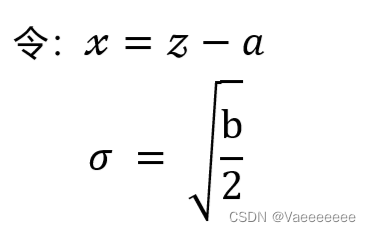
很多地方给出的瑞利分布是下面这个公式:
这两个公式其实是同一个公式,只需要做如下变量替换就得到和第一个公式相同的形式了。
在生成瑞利噪声的时候,其实采用的是**np.random.rayleigh()** 方法生成,而这个方法就是根据第二个公式来的,所以只需要指定1个参数,得到的分布和第一个公式相比本质是相同的。
代码:
import cv2
import random
import numpy as np
img = cv2.imread('A.png')

# 产生瑞利噪声
sigma = 70.0
noise = np.random.rayleigh(sigma, size=img.shape)
# 可以试试下面这个效果
# noise = np.random.rayleigh(img, size=img.shape)

# 加上噪声
img = img + noise
np.clip(img,0,255)
img = img/255

cv2.imshow('Rayleigh noise',img)
cv2.waitKey(0)
print(img.shape)
5、爱尔兰(伽马)噪声
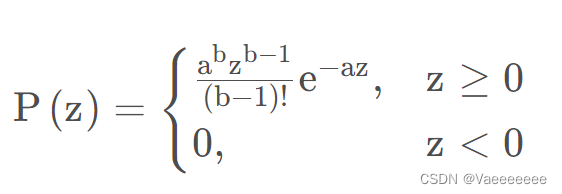
概率密度函数(PDF)如下:(b是一个正整数)
指数分布和卡方分布其实可以看成是伽马分布的特殊形式。
b = 1时:指数分布;
b =n/2,a = 1/2时:卡方分布。
代码:
noise = np.random.gamma(shape=10.0,scale=10.0,size=img.shape)
#其他部分同上
6、均匀噪声
概率密度函数(PDF)如下:
代码:
noise = np.random.uniform(50,100,img.shape)
#其他部分同上
二、去噪方法
1、均值滤波
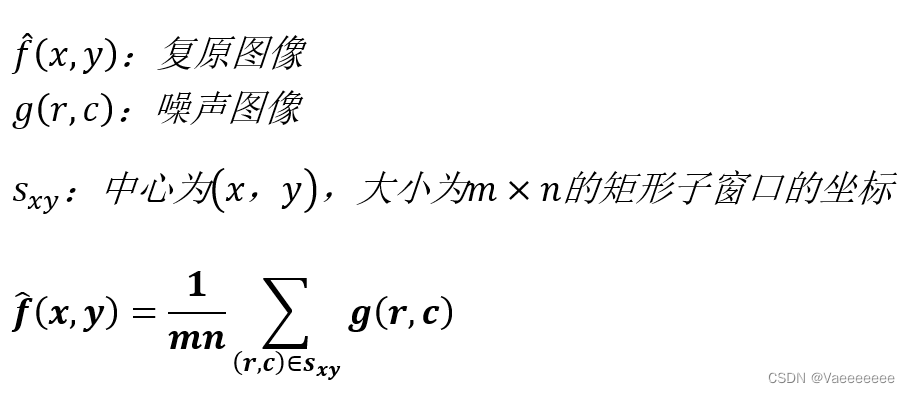
1.1 算术平均滤波
import cv2
import random
import numpy as np
img = cv2.imread('A.png')

# 产生高斯随机数
noise = np.random.normal(0,50,size=img.size).reshape(img.shape[0],img.shape[1],img.shape[2])
# 加上噪声
img = img + noise
img = np.clip(img,0,255)
img = img/255

# 算术平均滤波
img1 = np.transpose(img,(2,0,1))  #转换成[channel,H,W]形式
m = 3   #定义滤波核大小
n = 3
rec_img = np.zeros((img1.shape[0],img1.shape[1]-m+1,img1.shape[2]-n+1))
for channel in range(rec_img.shape[0]):
    for i in range(rec_img[channel].shape[0]):
        for j in range(rec_img[channel].shape[1]):
            rec_img[channel][i,j] = img1[channel][i:i+m,j:j+n].sum()/(m*n)
rec_img = np.transpose(rec_img,(1,2,0))

cv2.imshow('average',rec_img)
cv2.waitKey(0)
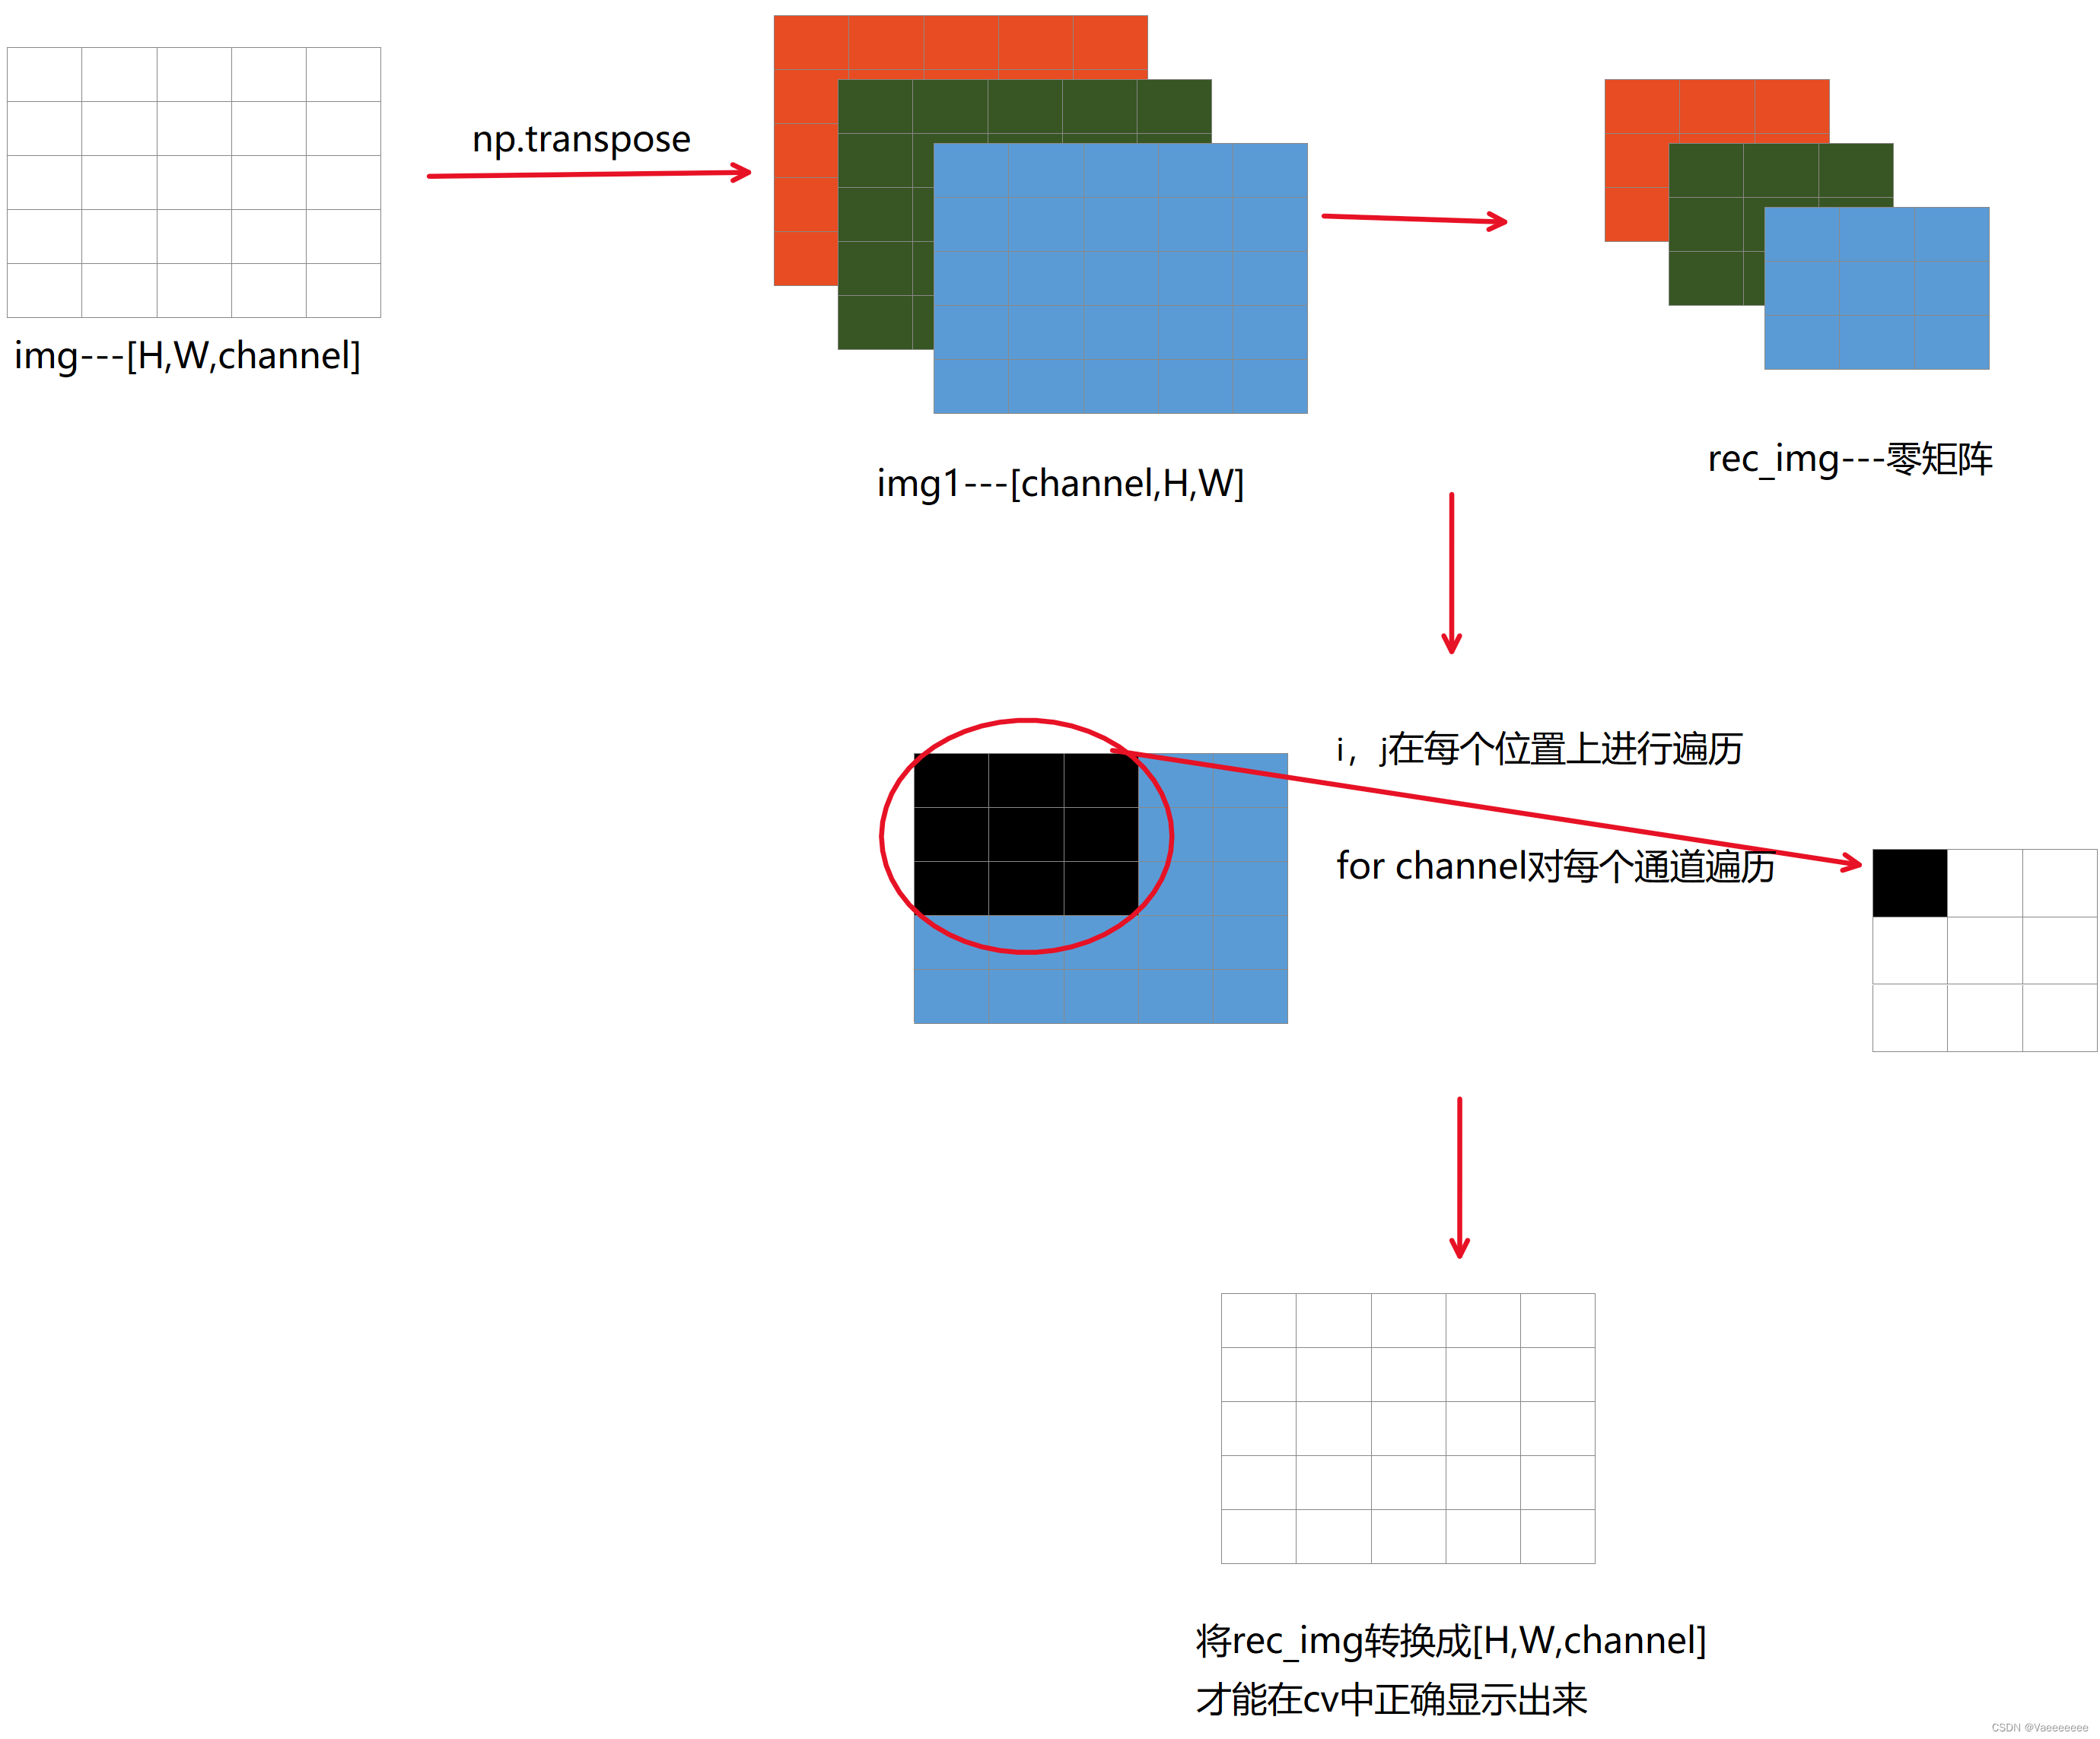
具体过程可以配合下图理解
去噪效果:
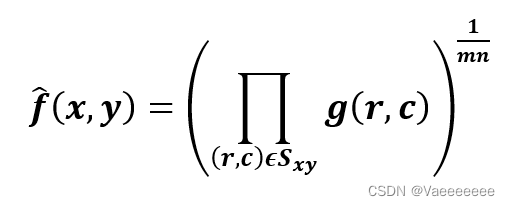
1.2 几何均值滤波
import cv2
import random
import numpy as np
img = cv2.imread('A.png')

# 产生高斯随机数
noise = np.random.normal(0,50,size=img.size).reshape(img.shape[0],img.shape[1],img.shape[2])
# 加上噪声
img = img + noise
img = np.clip(img,0,255)
img = img/255

# 几何均值滤波
img1 = np.transpose(img,(2,0,1))  #转换成[channel,H,W]形式
m = 3   #定义滤波核大小
n = 3
rec_img = np.zeros((img1.shape[0],img1.shape[1]-m+1,img1.shape[2]-n+1))
for channel in range(rec_img.shape[0]):
    for i in range(rec_img[channel].shape[0]):
        for j in range(rec_img[channel].shape[1]):
            rec_img[channel][i,j] = np.power(np.prod(img1[channel][i:i+m,j:j+n]),1/(m*n))
rec_img = np.transpose(rec_img,(1,2,0))

cv2.imshow('average',rec_img)
cv2.waitKey(0)
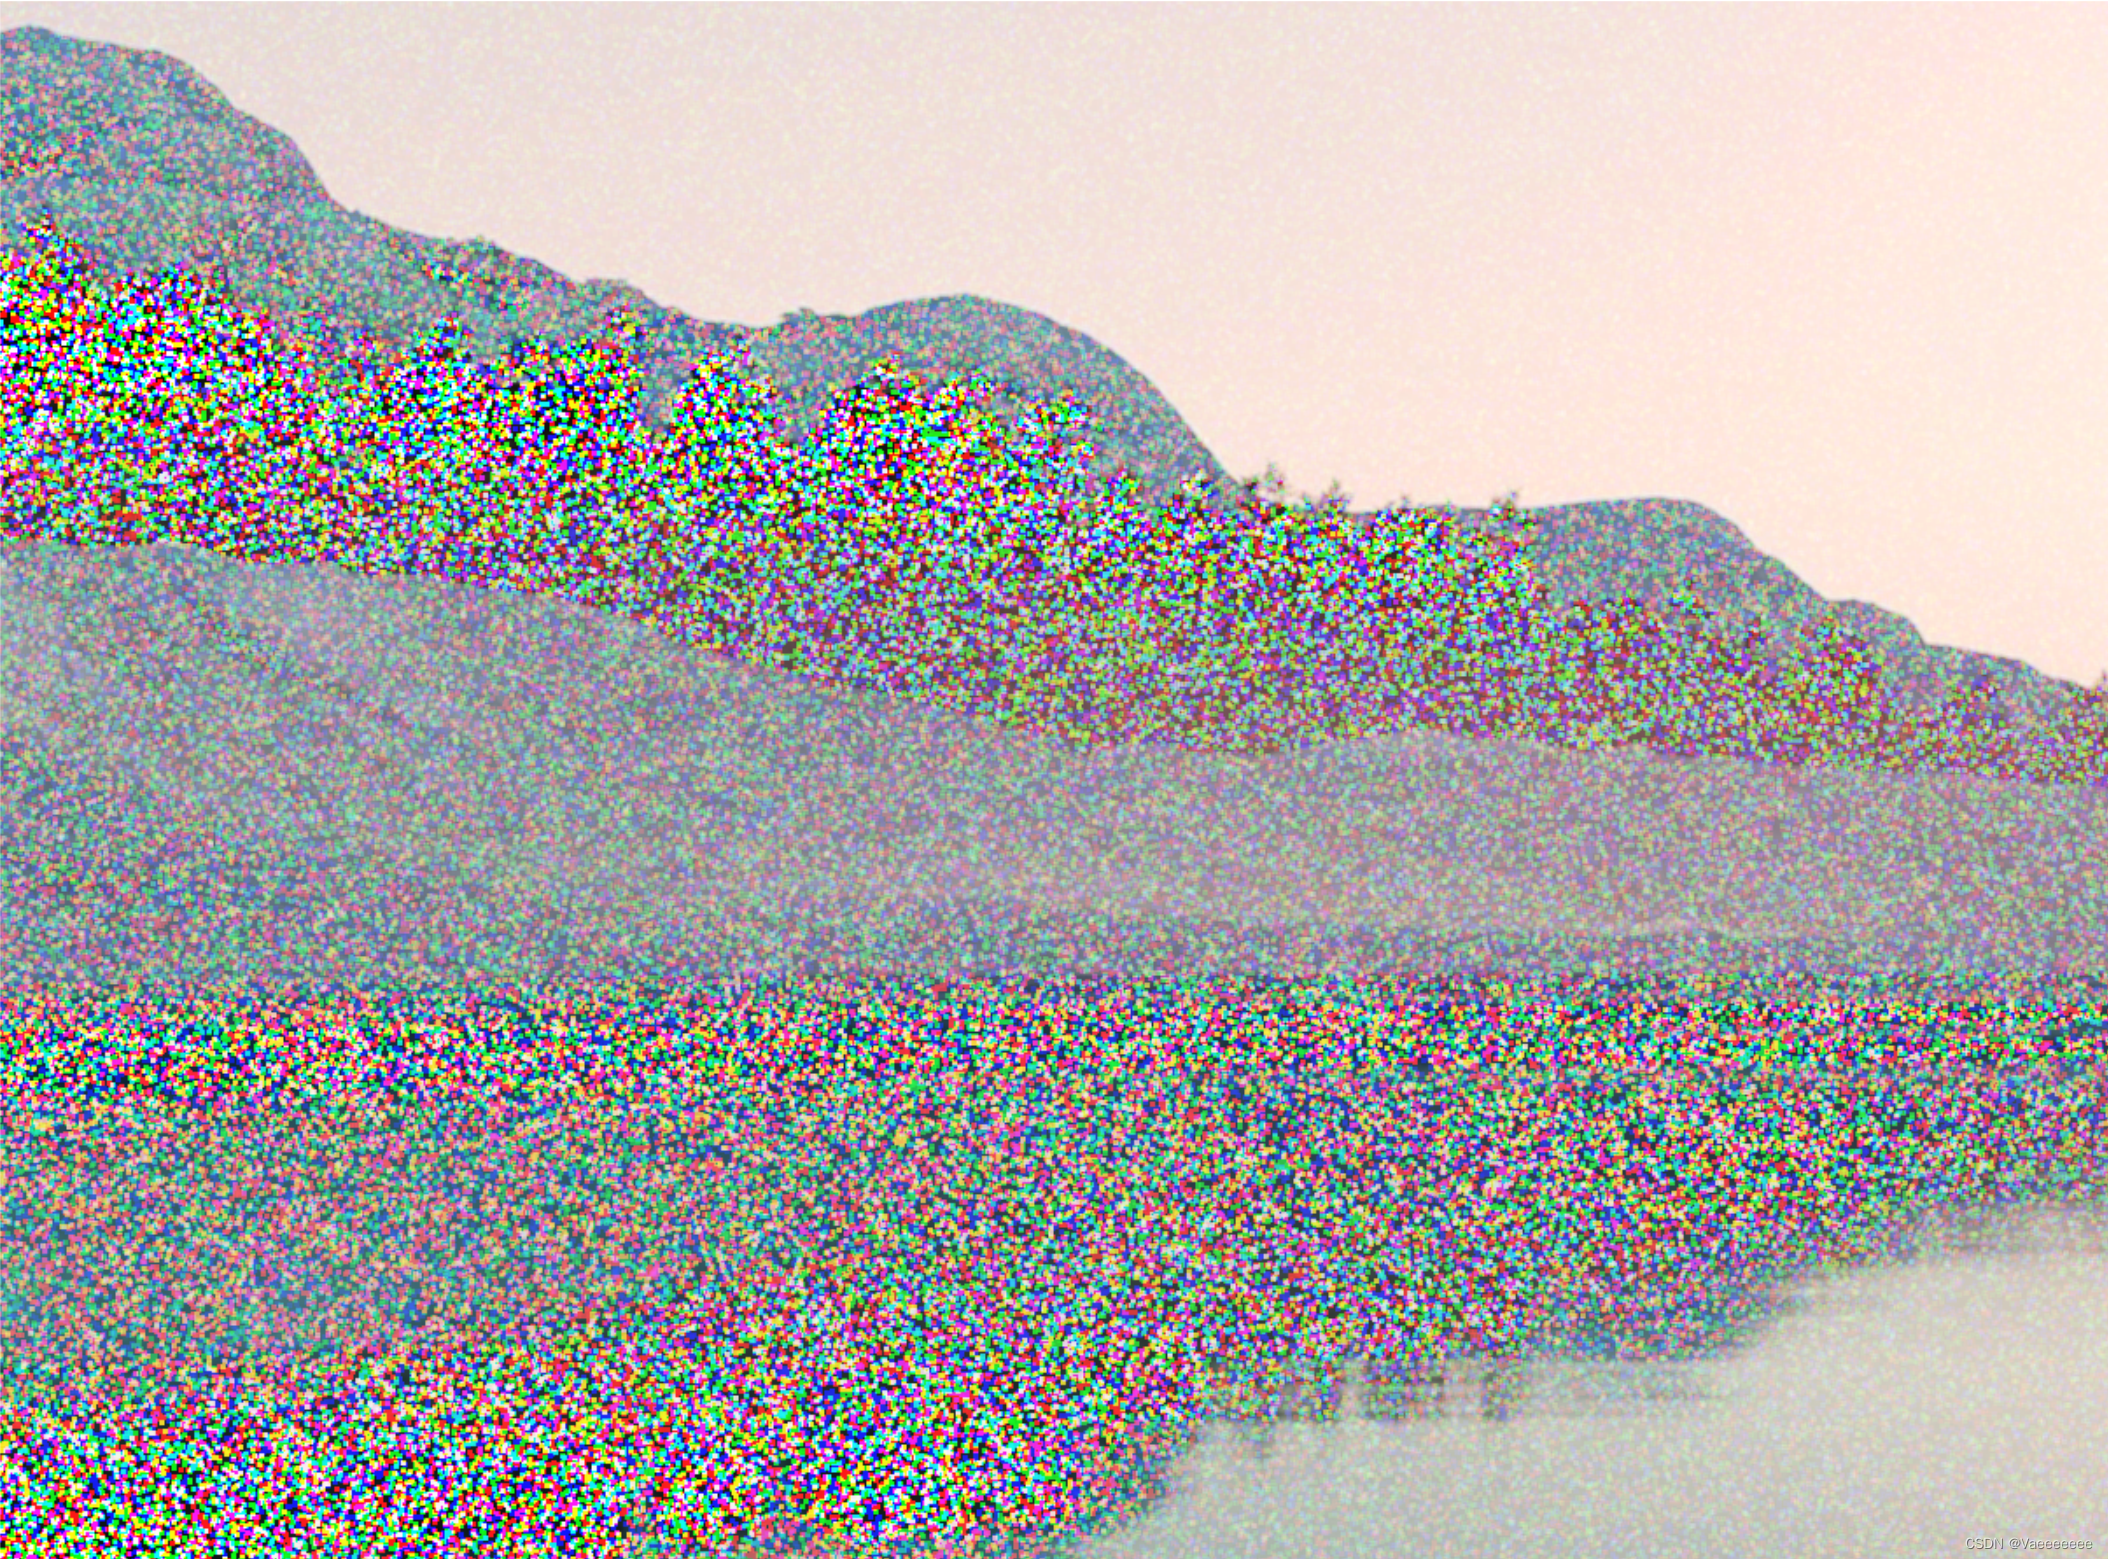
去噪效果:
几何均值滤波对0值是非常敏感,缺陷也很明显,那就是当窗口内像素只要有一个值为0,则其计算得到的值就是0。
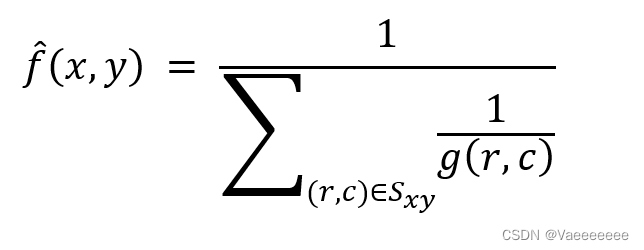
1.3 谐波平均滤波
rec_img[channel][i,j] = 1/(np.power(img1[channel][i:i+m,j:j+n],-1).sum())*(m*n)
# 其余部分同上
该方法既能处理盐粒噪声,又能处理类似于于高斯噪声的其他噪声,但是不能处理胡椒噪声。
### 1.4 ·
Q:滤波器的阶数。适用于降低或消除椒盐噪声。
注意:Q=0时。简化成算术平均滤波;Q=1,简化为谐波平均滤波。
代码:
import cv2
import random
import numpy as np
img = cv2.imread('A.png')

#---------椒盐噪声----------
# 转化成向量
x = img.reshape(1,-1)
# 设置信噪比
SNR = 0.85
# 得到要加噪的像素数目
noise_num = x.size * (1-SNR)
# 得到需要加噪的像素值的位置
list = random.sample(range(0,x.size),int(noise_num))

for i in list:
    if random.random() >= 0.5:
        x[0][i] = 0
    else:
        x[0][i] = 255
img = x.reshape(img.shape)
img = img/255
#--------------------------

# 反谐波平均滤波
img1 = np.transpose(img,(2,0,1))  #转换成[channel,H,W]形式
m = 3   #定义滤波核大小
n = 3
Q = 0.1
rec_img = np.zeros((img1.shape[0],img1.shape[1]-m+1,img1.shape[2]-n+1))
for channel in range(rec_img.shape[0]):
    for i in range(rec_img[channel].shape[0]):
        for j in range(rec_img[channel].shape[1]):
            rec_img[channel][i,j] = ((np.power(img1[channel][i:i+m,j:j+n],Q+1)).sum())/((np.power(img1[channel][i:i+m,j:j+n],Q)).sum())
rec_img = np.transpose(rec_img,(1,2,0))

cv2.imshow('average',rec_img)
cv2.waitKey(0)
加噪图:
去噪效果:
注意:Q的值不要过大,否则就会变成下图(Q=2时):
2、统计排序滤波
2.1 中值滤波
我们非常熟悉的一种去噪方法,它是用像素邻域中的灰度中值来代替像素的值。
代码:
import cv2
import random
import numpy as np
img = cv2.imread('A.png')

# 产生高斯随机数
noise = np.random.normal(0,50,size=img.size).reshape(img.shape[0],img.shape[1],img.shape[2])
# 加上噪声
img = img + noise
img = np.clip(img,0,255)
img = img/255

# 中值滤波
img1 = np.transpose(img,(2,0,1))  #转换成[channel,H,W]形式
m = 3   #定义滤波核大小
n = 3
rec_img = np.zeros((img1.shape[0],img1.shape[1]-m+1,img1.shape[2]-n+1))
for channel in range(rec_img.shape[0]):
    for i in range(rec_img[channel].shape[0]):
        for j in range(rec_img[channel].shape[1]):
            rec_img[channel][i,j] = np.median(img1[channel][i:i+m,j:j+n])
rec_img = np.transpose(rec_img,(1,2,0))

cv2.imshow('median',rec_img)
cv2.waitKey(0)
去噪效果:
或者直接使用cv2.medianBlur()函数
import cv2
import random
import numpy as np
img = cv2.imread('A.png')

# 产生高斯随机数
noise = np.random.normal(0,50,size=img.size).reshape(img.shape[0],img.shape[1],img.shape[2])
# 加上噪声
img = img + noise
img = np.clip(img,0,255)
img = np.uint8(img)

# 中值滤波
rec_img = cv2.medianBlur(img,3)

cv2.imshow('median',rec_img)
cv2.waitKey(0)
2.2 最大值和最小值滤波
主要使用到:np.amax() 和 np.amin()两个函数
2.3 中点滤波
代码:
rec_img[channel][i,j] = (np.amax(img1[channel][i:i+m,j:j+n]) + np.amin(img1[channel][i:i+m,j:j+n]))/2
对高斯噪声处理的滤波效果:
2.4 修正阿尔法均值滤波
处理方法:在邻域 S x y S_{xy} Sxy 内删除 d / 2 d/2 d/2个最低灰度值和 d / 2 d/2 d/2个最高灰度值。 g R ( r , c ) g_{R}(r,c) gR(r,c)表示 S x y S_{xy} Sxy 中剩下的 m n − d mn-d mn−d个像素。
d
=
0
d=0
d=0: 变成算术平均滤波
d
=
m
n
−
1
d=mn-1
d=mn−1:中值滤波
代码:
import cv2
import random
import numpy as np
img = cv2.imread('A.png')

# 产生高斯随机数
noise = np.random.normal(0,50,size=img.size).reshape(img.shape[0],img.shape[1],img.shape[2])
# 加上噪声
img = img + noise
img = np.clip(img,0,255)
img = img/255

# 修正阿尔法均值滤波
img1 = np.transpose(img,(2,0,1))  #转换成[channel,H,W]形式
m = 3  #定义滤波核大小
n = 3
d = 4    #d取偶数
rec_img = np.zeros((img1.shape[0],img1.shape[1]-m+1,img1.shape[2]-n+1))
for channel in range(rec_img.shape[0]):
    for i in range(rec_img[channel].shape[0]):
        for j in range(rec_img[channel].shape[1]):
            img2 = np.sort(np.ravel(img1[channel][i:i+m,j:j+n]))  #np.ravel():多维数组变成一维数组
            rec_img[channel][i,j] = (img2[int(d/2):-int(d/2)].sum())*(1/(m*n-d))
rec_img = np.transpose(rec_img,(1,2,0))

cv2.imshow('alpha average',rec_img)
cv2.waitKey(0)
去噪效果:
总结
介绍的主要是一些非常基础的滤波器,滤波功能只能针对某一类噪声有作用,其滤波效果总的来说并不是很好,对于真实环境中纷繁复杂的噪声类型,需要采用更合适、更好的滤波方法,但是这些方法或多或少都是基于这些基本方法去不断优化和改善的。后面有时间再更新一些更强的去噪方法。
有些地方可能存在问题和不足,欢迎大家一起交流!
参考文献:
[1] 阮秋琦,阮宇智译;(美)拉斐尔·C.冈萨雷斯,理查德·E.伍兹.国外电子书与通信教材系列 数字图像处理 第4版[M].北京:电子工业出版社,2020
