- 谷粒商城-分布式基础篇【环境准备】
- 谷粒商城-分布式基础【业务编写】
- 谷粒商城-分布式高级篇【业务编写】持续更新
- 谷粒商城-分布式高级篇-ElasticSearch
- 谷粒商城-分布式高级篇-分布式锁与缓存
- 项目托管于gitee
一、环境搭建
1.1、项目创建
1、创建
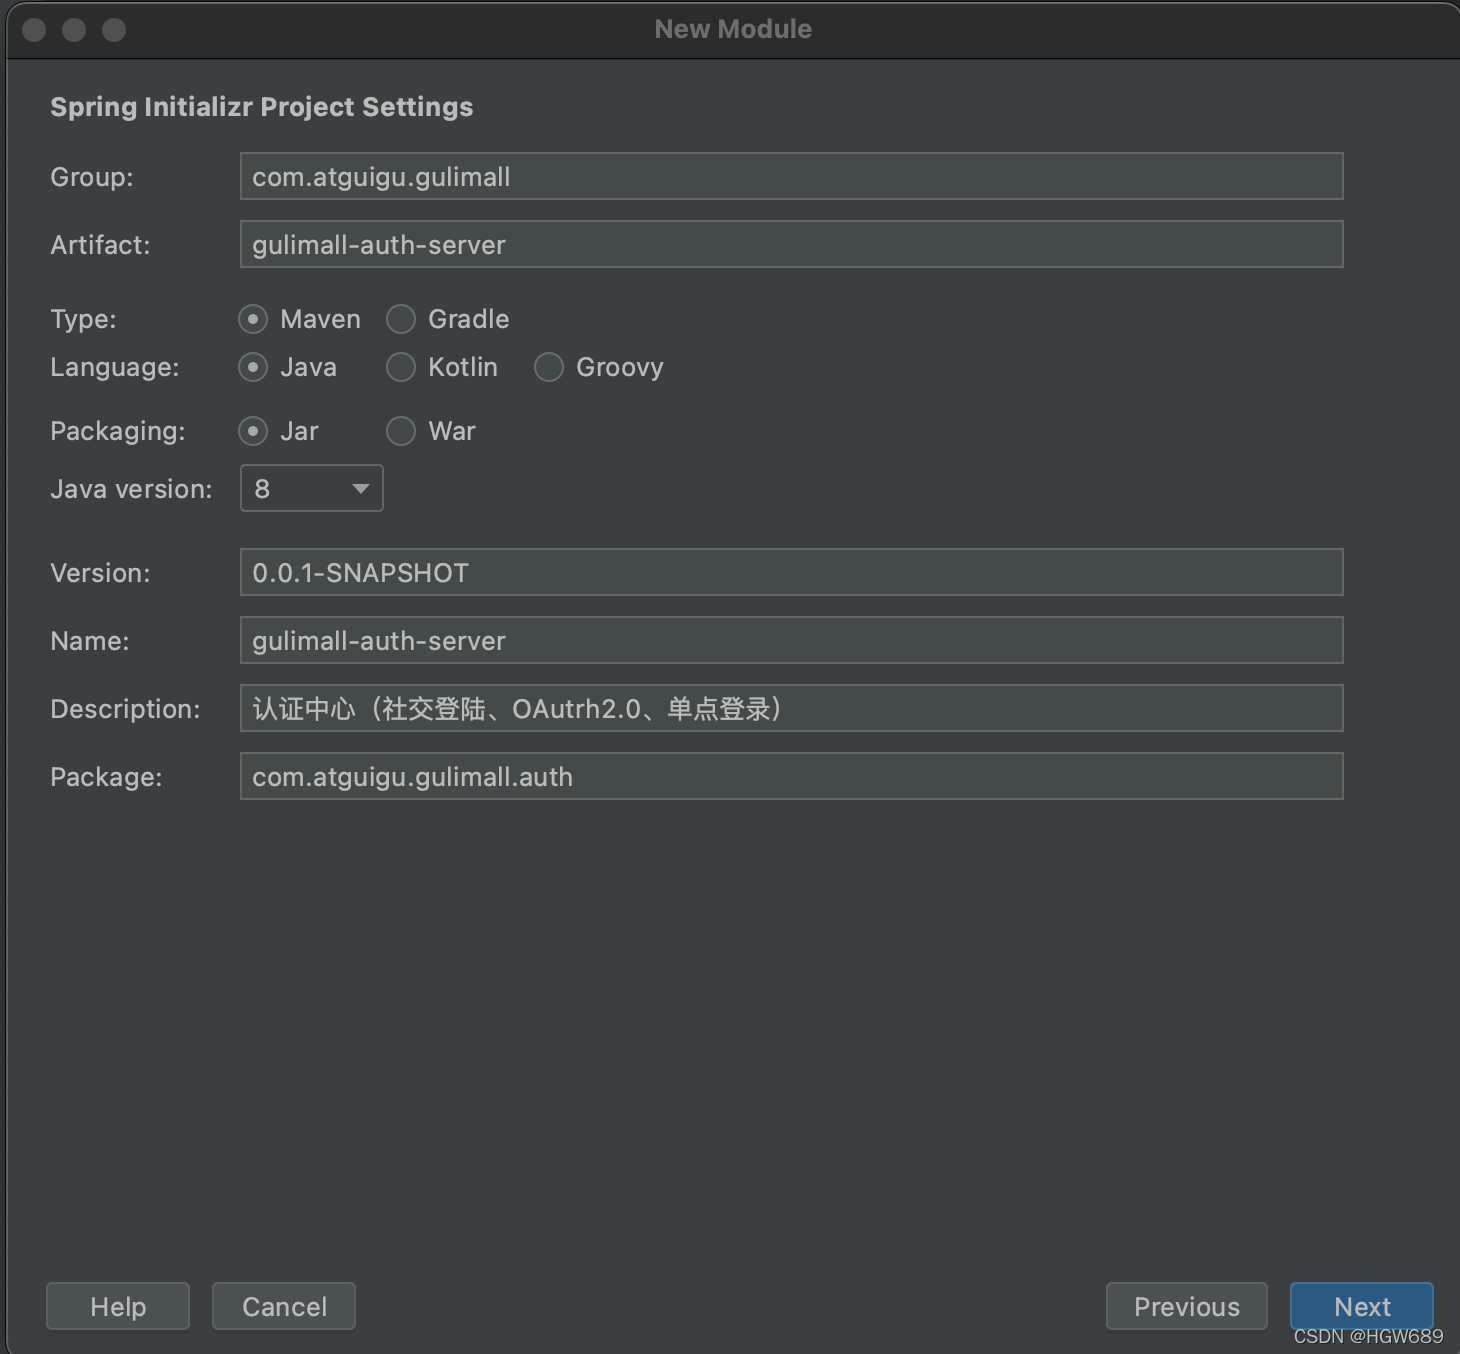
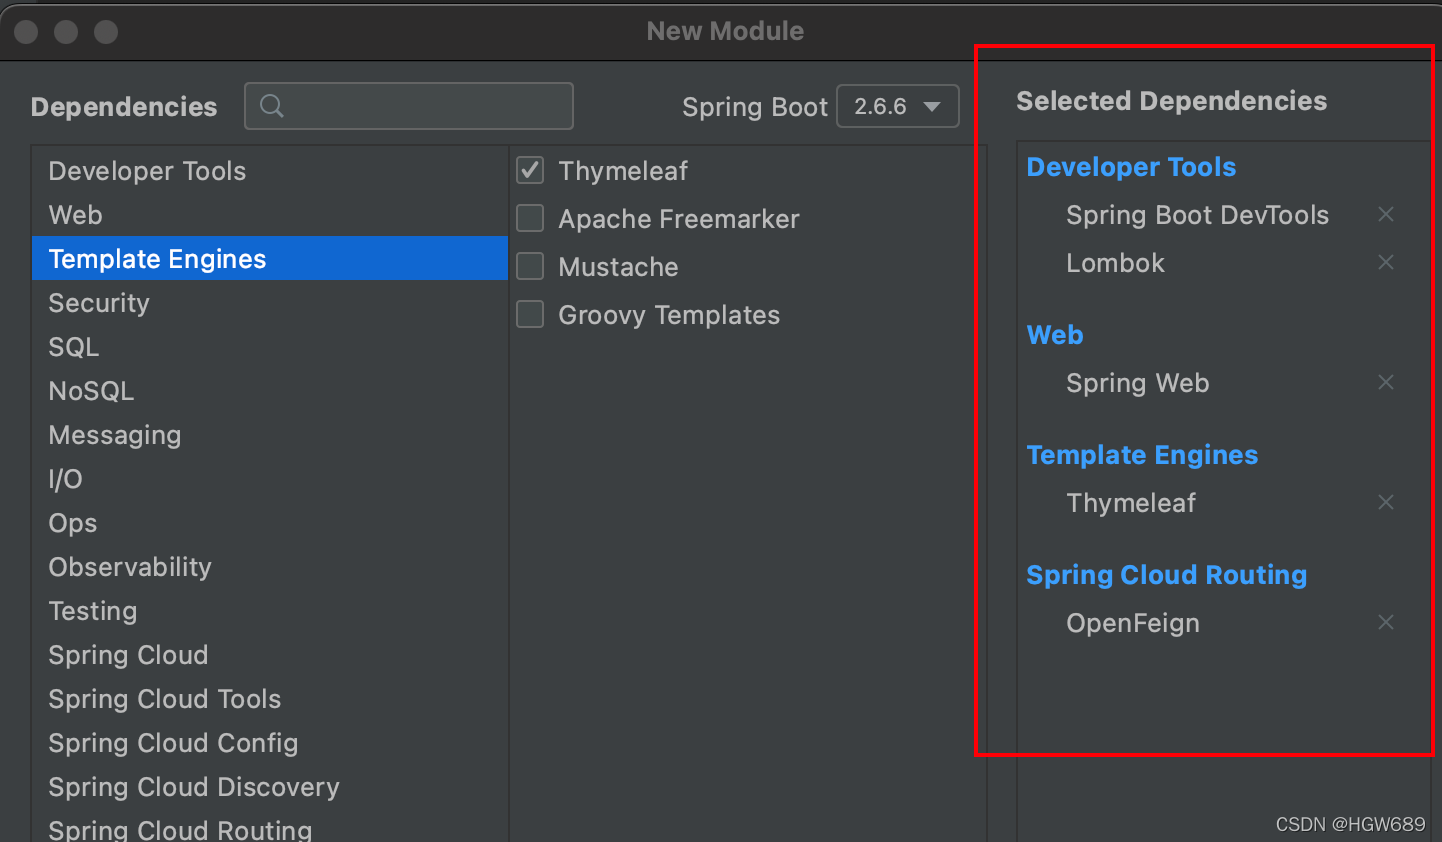
gulimall-auth-server模块 并进行降版本处理
<version>2.1.8.RELEASE</version>

<spring-cloud.version>Greenwich.SR3</spring-cloud.version>
2、添加依赖
<dependency>
    <groupId>com.atguigu.gulimall</groupId>
    <artifactId>gulimall-common</artifactId>
    <version>0.0.1-SNAPSHOT</version>
    <exclusions>
        <exclusion>
            <groupId>com.baomidou</groupId>
            <artifactId>mybatis-plus-boot-starter</artifactId>
        </exclusion>
    </exclusions>
</dependency>
3、配置服务注册中心
- 在主启动类上添加启动注解:
@EnableFeignClients
@EnableDiscoveryClient
@SpringBootApplication
public class GulimallAuthServerApplication {

    public static void main(String[] args) {
        SpringApplication.run(GulimallAuthServerApplication.class, args);
    }

}
- 在 application.properties 文件中编写注册中心的配置信息
spring.application.name=gulimall-auth-server
spring.cloud.nacos.discovery.server-addr=127.0.0.1:8848
server.port=20000
1.2、动静资源配置
1.2.1、配置Nginx和网关
配置Nginx和网关
1、修改域名 vim /etc/hosts
# Gulimall Host Start
127.0.0.1 gulimall.cn
127.0.0.1 search.gulimall.cn
127.0.0.1 item.gulimall.cn
127.0.0.1 auth.gulimall.cn
# Gulimall Host End
2、配置网关
在 gulimall-gateway 服务下的 application.yml 文件下增加以下路由信息
- id: gulimall_auth_route
  uri: lb://gulimall-auth-server
  predicates:
    - Host=auth.gulimall.cn
1.2.2、动静资源配置
静态资源配置
1、将登陆页面放入项目
将 /Users/hgw/Documents/Data/Project/谷粒商城/2.分布式高级篇/代码/html/登录页面路径下的登录页面文件index.html 复制进gulimall-auth-server服务中的 gulimall-auth-server/src/main/resources/templates路径下,并重新命名为 login.html
2、将注册页面放进项目
将 /Users/hgw/Documents/Data/Project/谷粒商城/2.分布式高级篇/代码/html/注册页面路径下的注册页面文件index.html 复制进gulimall-auth-server服务中的 gulimall-auth-server/src/main/resources/templates路径下,并重新命名为 reg.html
动态资源配置
1、在服务器的nginx容器数据卷下创建 login、reg文件夹
2、将注册的静态资源和登录的静态资源分别复制进去
hgw@HGWdeAir static % ll
total 0
drwxr-xr-x  5 hgw  staff   160B  3 29 20:45 index
drwxr-xr-x  7 hgw  staff   224B  4  5 10:19 item
drwxr-xr-x  5 hgw  staff   160B  4  6 15:51 login
drwxr-xr-x  8 hgw  staff   256B  4  6 15:51 reg
drwxr-xr-x  8 hgw  staff   256B  4  2 14:09 search
hgw@HGWdeAir static % cd reg
hgw@HGWdeAir reg % ll
total 0
drwxrwxr-x@  3 hgw  staff    96B 12 18  2019 bootStrap
drwxrwxr-x@  3 hgw  staff    96B  3 22  2020 css
drwxrwxr-x@ 21 hgw  staff   672B  3 22  2020 img
drwxrwxr-x@  5 hgw  staff   160B  3 22  2020 js
drwxrwxr-x@  3 hgw  staff    96B  3 22  2020 libs
drwxrwxr-x@  5 hgw  staff   160B  3 22  2020 sass
hgw@HGWdeAir reg % cd ../login
hgw@HGWdeAir login % ll
total 0
drwxrwxr-x@ 25 hgw  staff   800B  3 22  2020 JD_img
drwxrwxr-x@  4 hgw  staff   128B  3 22  2020 JD_js
drwxrwxr-x@  5 hgw  staff   160B  3 22  2020 JD_sass
3、修改html的引用路径(Command+R)
-
Login.hteml
src=" --> src="/static/login/ href=" --> href="/static/login/ -
reg.html
src="		-->		src="static/reg/
href="	-->		href="static/reg/
测试: http://auth.gulimall.cn/
先把login.html名字改为login.html,接着启动认证中心和网关服务
1.3、优化页面的跳转环境
1.3.1、修改点击登录页和注册页的谷粒商城logo可以跳到首页
点击登录页和注册页的谷粒商城logo可以跳到首页
1、先关闭缓存
spring.thymeleaf.cache=false
2、修改login.html、reg.html 链接地址
<header>
   <a href="http://gulimall.cn"><img src="/static/login/JD_img/logo.jpg" /></a>
   <p>欢迎登录</p>
   <div class="top-1">
      <img src="/static/login/JD_img/4de5019d2404d347897dee637895d02b_06.png" /><span>登录页面,调查问卷</span>
   </div>
</header>
1.3.2、在首页点击登录和注册可以跳转到登录页面和注册页面
在首页点击登录可以跳转到登录页面
1、修改 gulimall-product 服务中的index.html 首页资源
<ul>
  <li>
    <a href="http://auth.gulimall.cn/login.html">你好,请登录</a>
  </li>
  <li>
    <a href="http://auth.gulimall.cn/reg.html" class="li_2">免费注册</a>
  </li>
  <span>|</span>
  <li>
    <a href="/static/#">我的订单</a>
  </li>
</ul>
2、在 gulimall-autu-server 服务中编写 Controller方法
package com.atguigu.gulimall.auth.Controller;

@Controller
public class LoginController {

    @GetMapping("/login.html")
    public String loginPage(){
        return "login";
    }

    @GetMapping("/reg.html")
    public String regPage(){
        return "reg";
    }
}
发送一个请求直接跳转到一个页面并不赋值,我们原先是在controller里创建一个跳转页面的空方法。现在我们使用 SpringMVC viewController:将请求html页面映射过来;不需写空方法:
编写 GulimallWebConfig 类,代码如下:(并注释掉上面的LoginController类方法)
package com.atguigu.gulimall.auth.config;

@Configuration
public class GulimallWebConfig implements WebMvcConfigurer {

    /**
     * 视图映射
     * @param registry
     */
    @Override
    public void addViewControllers(ViewControllerRegistry registry) {

        /**
         *  @GetMapping("/login.html")
         *     public String loginPage(){
         *         return "login";
         *     }
         */
        registry.addViewController("/login.html").setViewName("login");
        registry.addViewController("/reg.html").setViewName("reg");
    }

}
3、修改登录页面的立即注册链接地址
修改 login.html
<h5 class="rig">
   <img src="/static/login/JD_img/4de5019d2404d347897dee637895d02b_25.png" />
   <span><a href="http://auth.gulimall.cn/reg.html">立即注册</a></span>
</h5>
4、修改注册页面的请登录链接地址
修改 reg.html
<div class="dfg">
  	<span>已有账号?</span>
  	<a href="http://auth.gulimall.cn/login.html">请登录</a>
</div>
二、注册功能
2.1、验证码倒计时
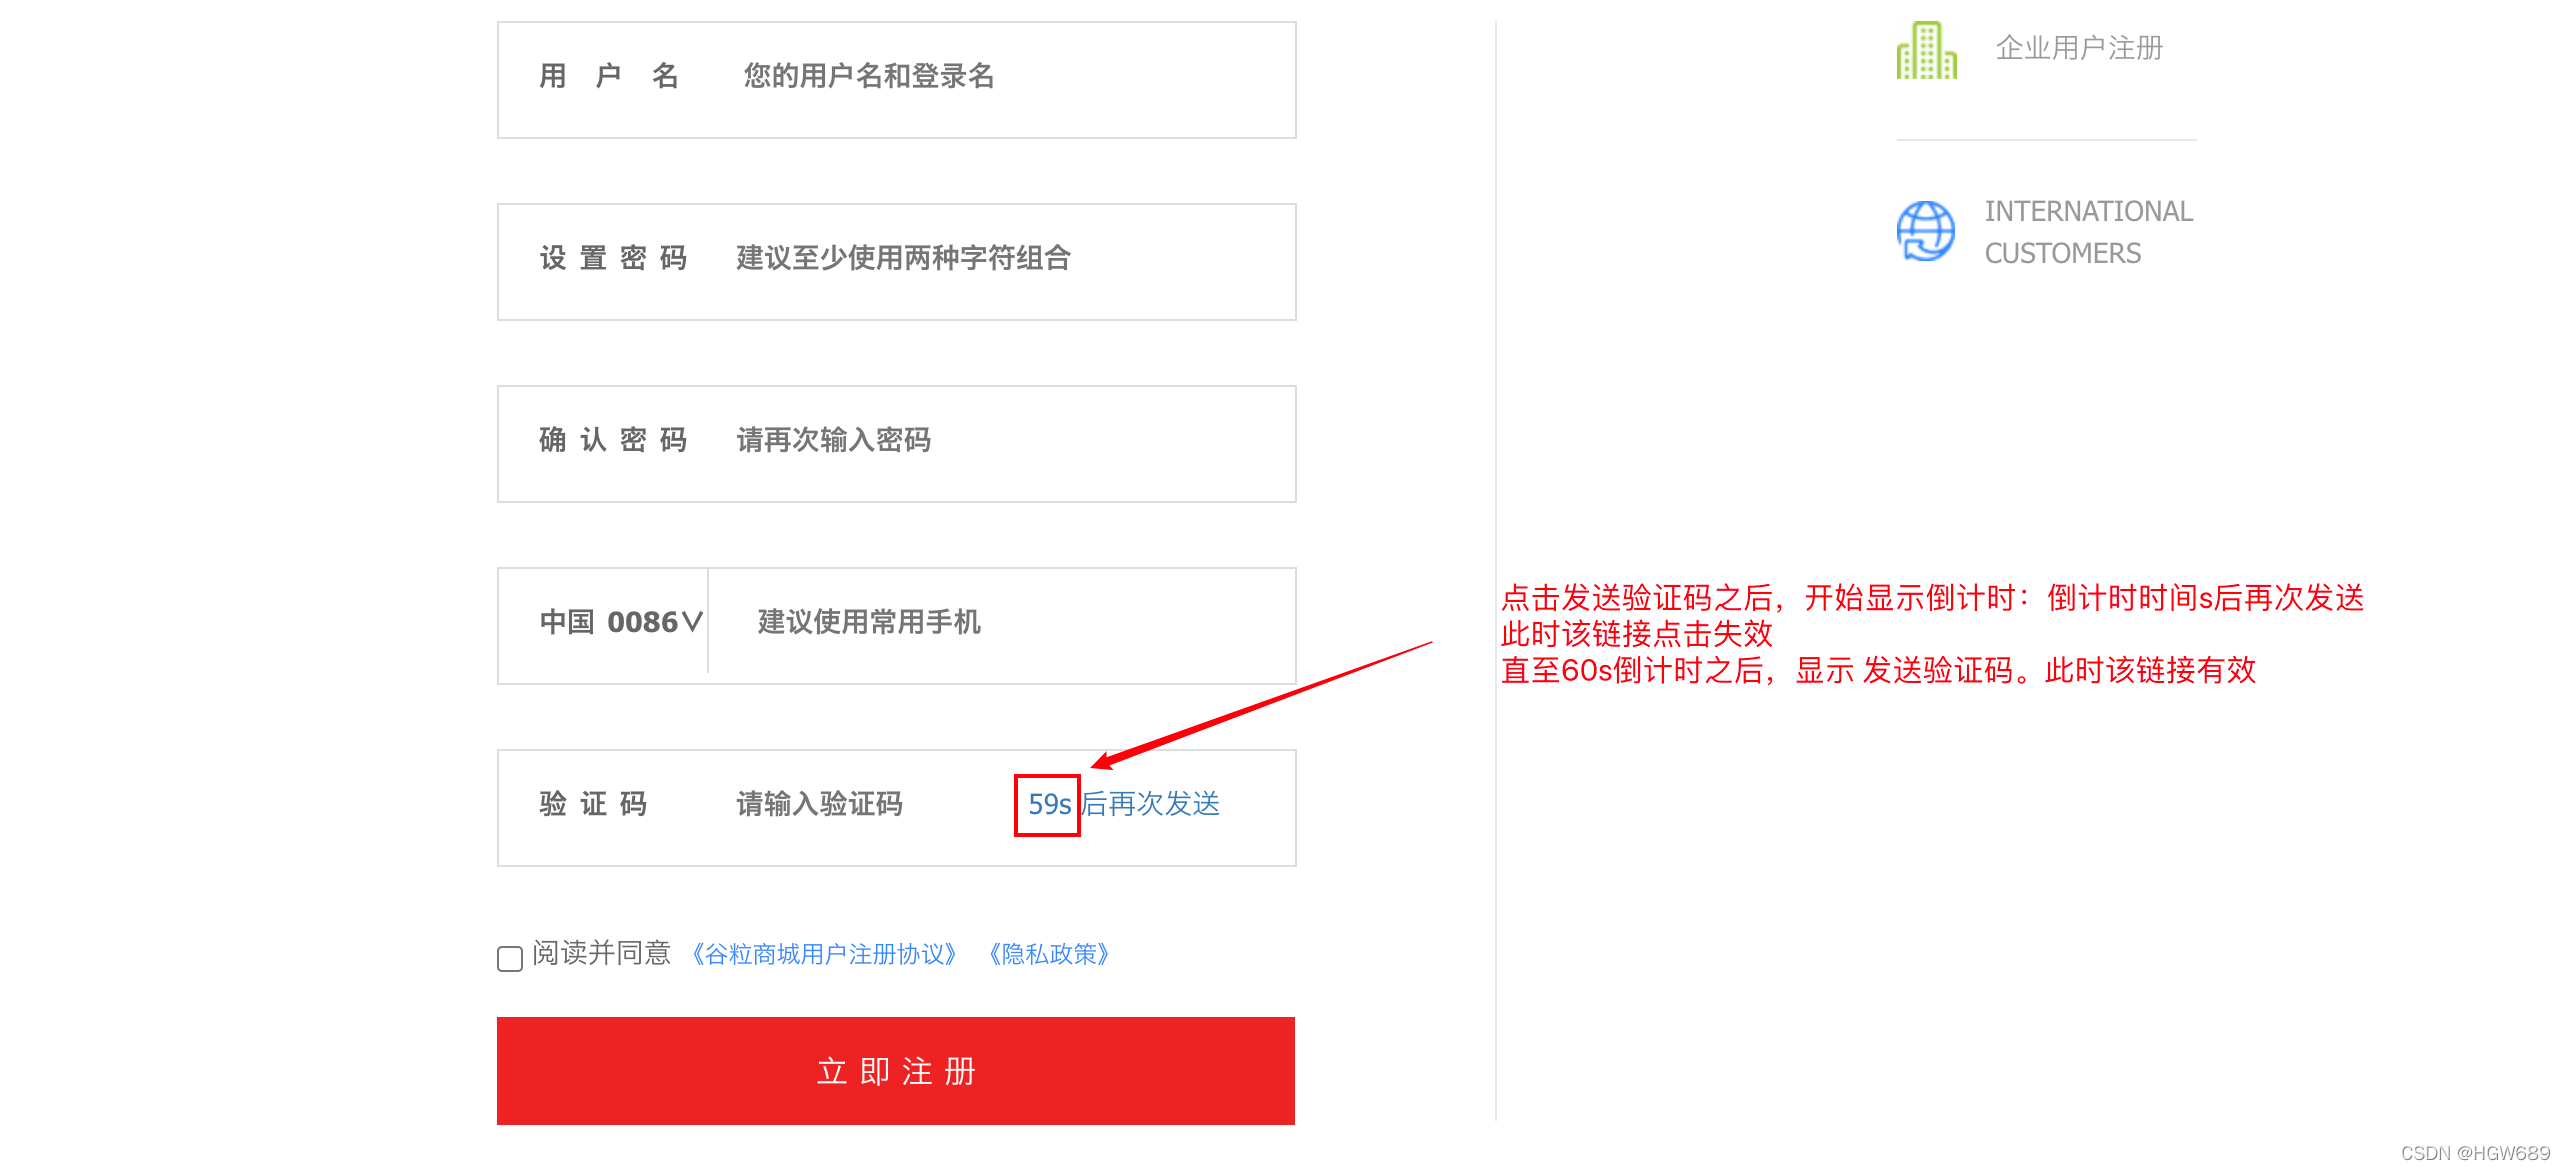
需求:点击发送验证码开始倒计时功能
<a id="sendCode">发送验证码 </a>
$(function () {
   $("#sendCode").click(function () {

      // 2、进入倒计时效果
      if($(this).hasClass("disabled")){

      } else {
         // 1、给指定手机号发送验证码
         timeoutChangeStyle();
      }

   });
});
var num = 60;
function timeoutChangeStyle() {
   $("#sendCode").attr("class","disabled");
   if (num == 0) {
      $("#sendCode").text("发送验证码");
      num = 60;
      $("#sendCode").attr("class","");
   } else {
      var str = num+"s 后再次发送";
      $("#sendCode").text(str);
      setTimeout("timeoutChangeStyle()",1000);
   }
   num--;
}
2.2、整合短信验证码
需求:点击发送验证码 并 开始倒计时功能
我们将短信验证码放在第三方服务中: gulimall-third-party
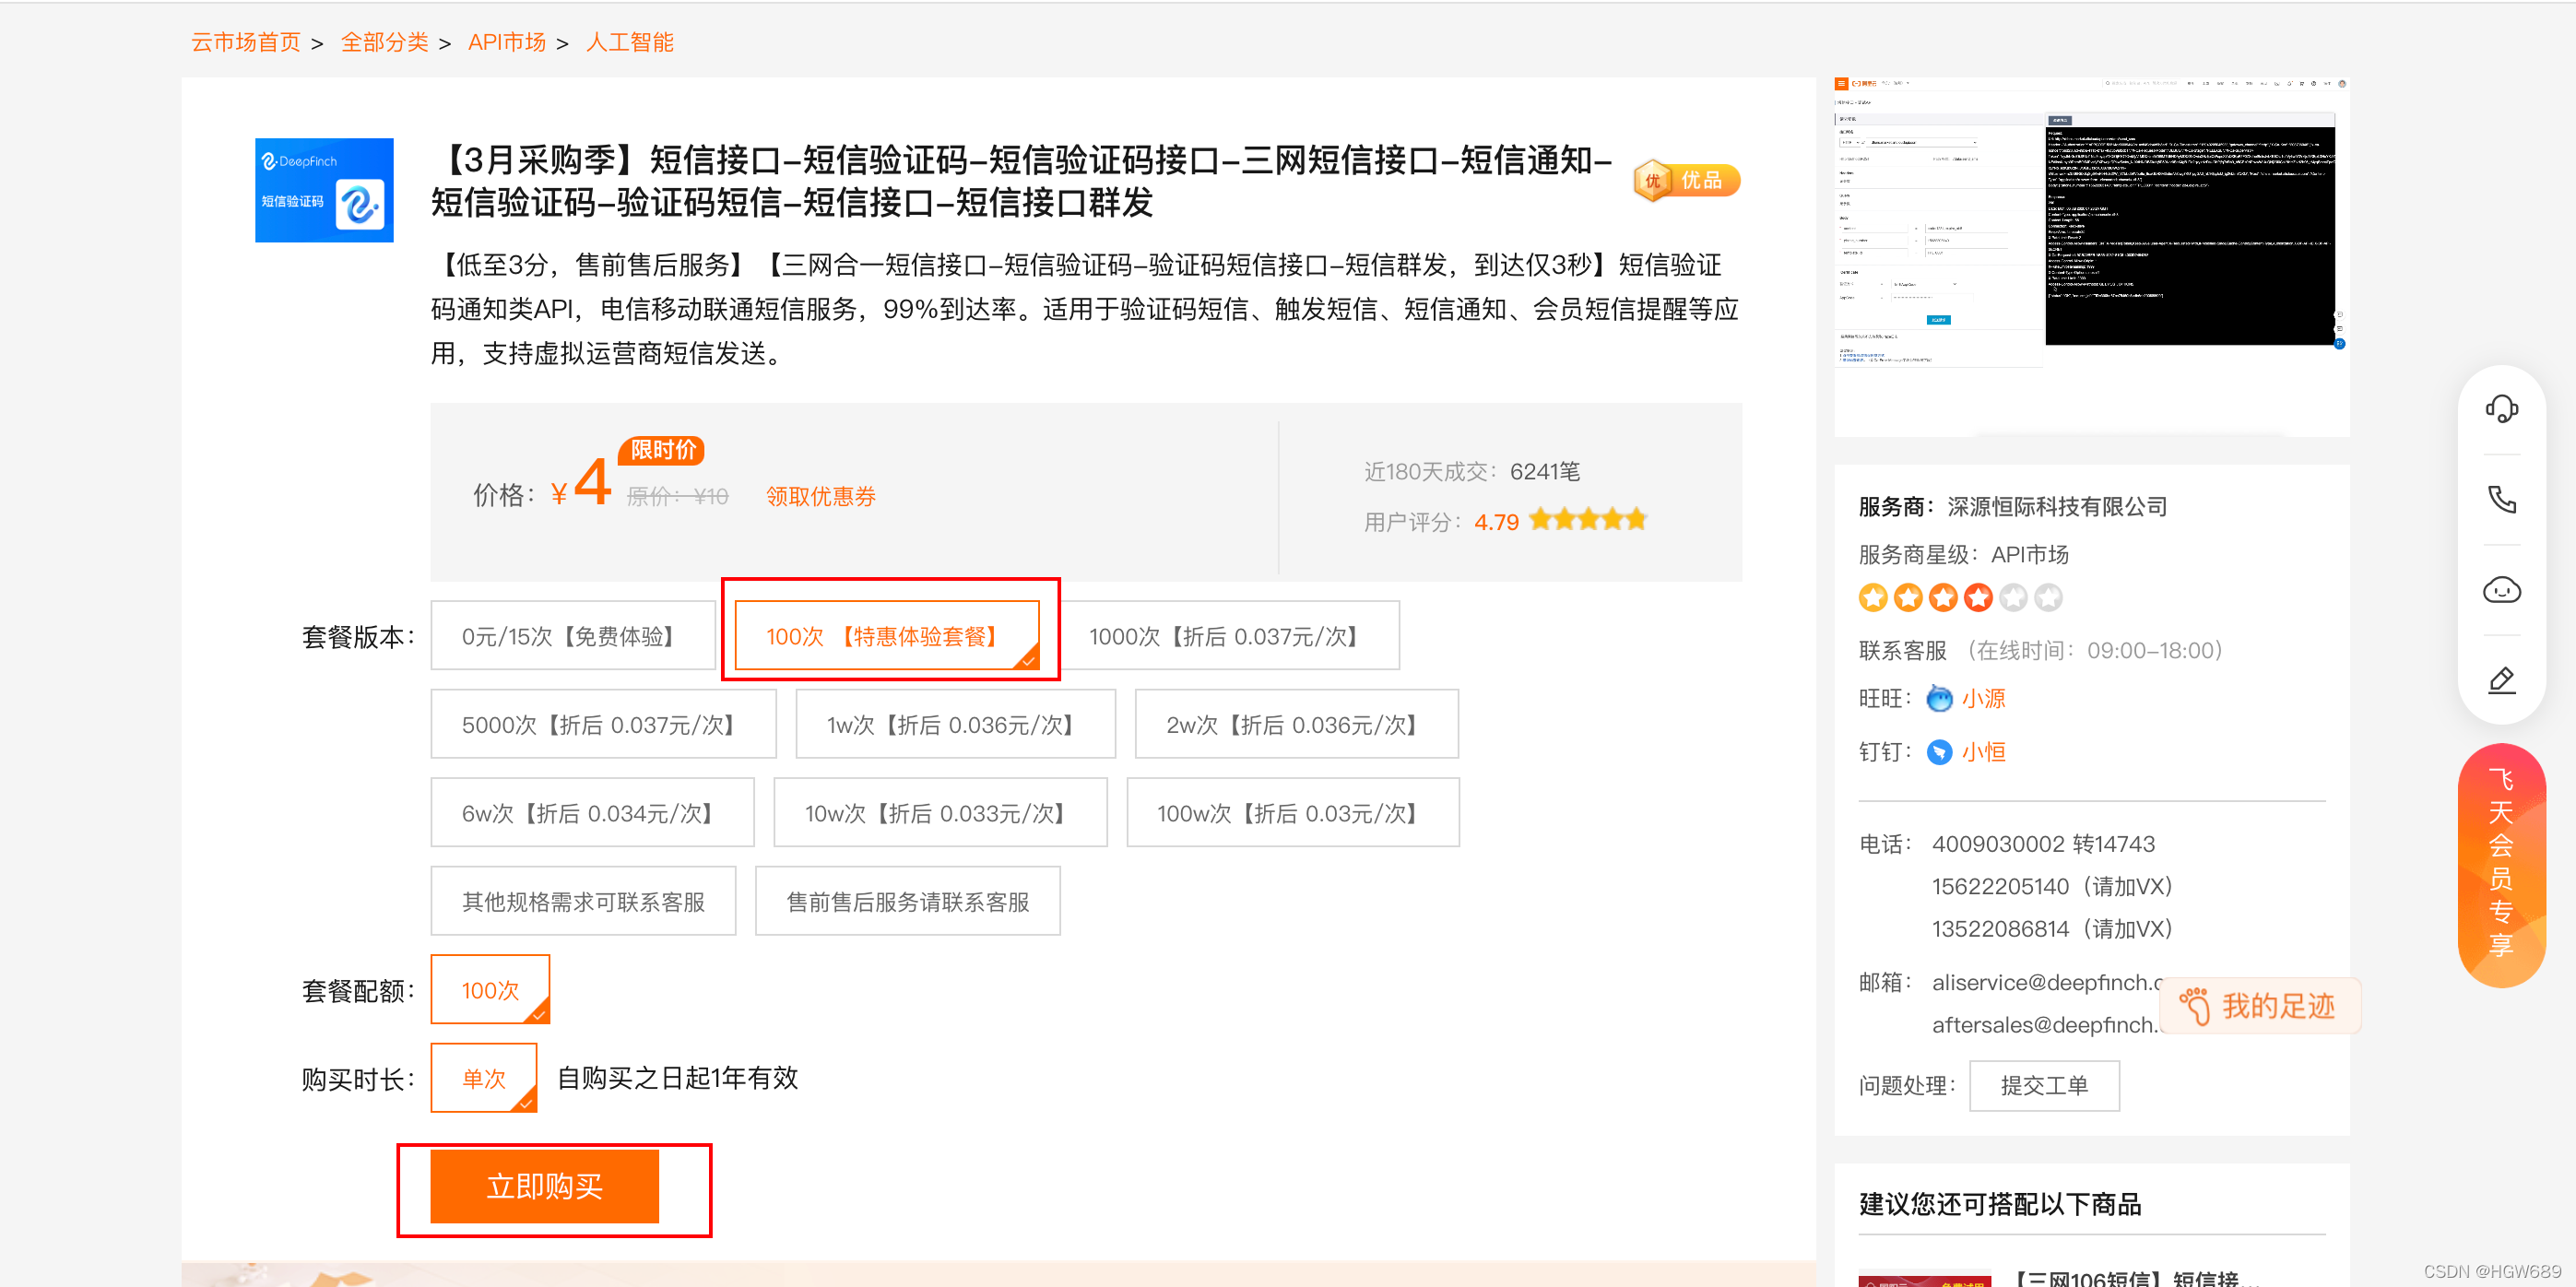
1、在阿里云云市场购买试用的短信服务
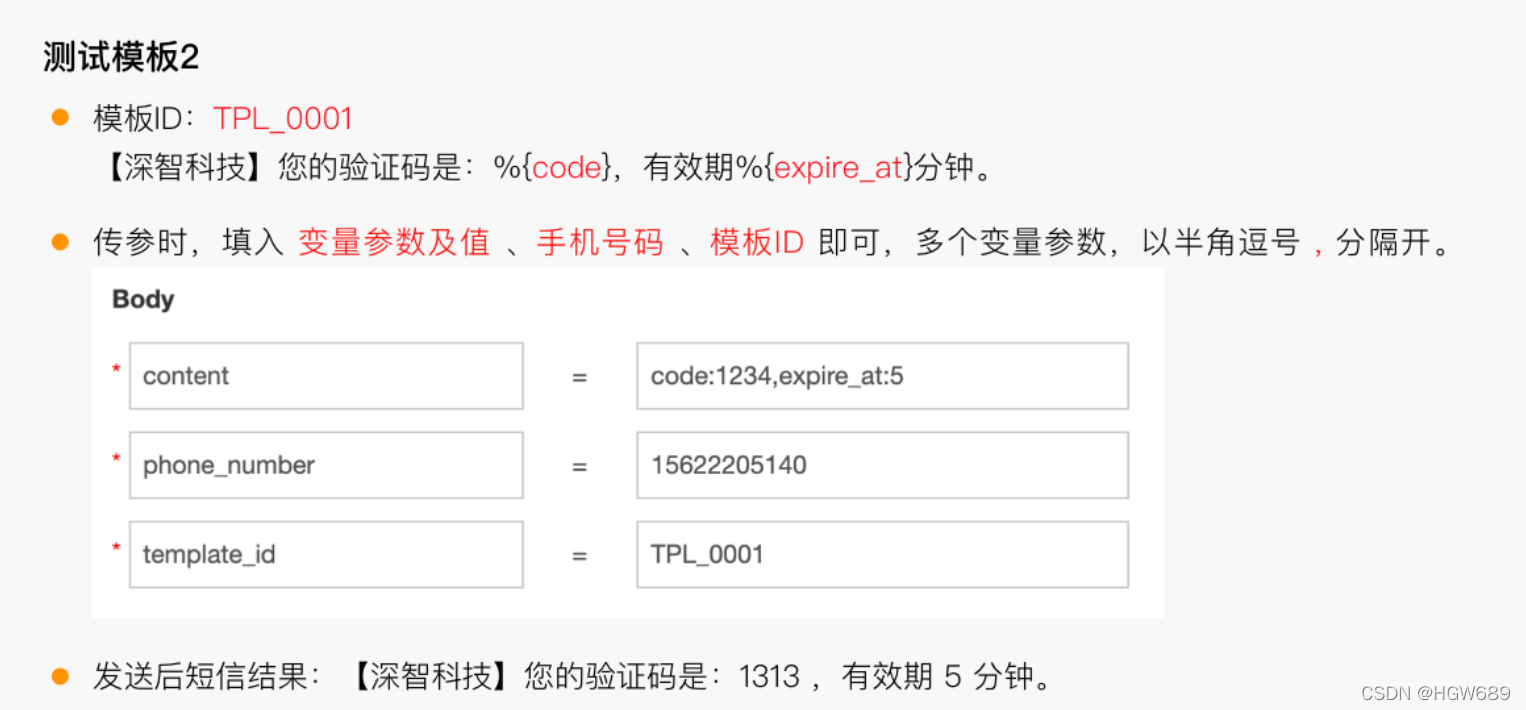
视频中讲解的现在需要企业认证,本人使用以下商品:短信服务
自此我们使用测试模版2
2、提供复制其 HttpUtils HttpUtils
package com.atguigu.gulimall.thirdparty.util;
public class HttpUtils {

    /**
     * get
     *
     * @param host
     * @param path
     * @param method
     * @param headers
     * @param querys
     * @return
     * @throws Exception
     */
    public static HttpResponse doGet(String host, String path, String method,
                                     Map<String, String> headers,
                                     Map<String, String> querys)
            throws Exception {
        HttpClient httpClient = wrapClient(host);

        HttpGet request = new HttpGet(buildUrl(host, path, querys));
        for (Map.Entry<String, String> e : headers.entrySet()) {
            request.addHeader(e.getKey(), e.getValue());
        }

        return httpClient.execute(request);
    }

    /**
     * post form
     *
     * @param host
     * @param path
     * @param method
     * @param headers
     * @param querys
     * @param bodys
     * @return
     * @throws Exception
     */
    public static HttpResponse doPost(String host, String path, String method,
                                      Map<String, String> headers,
                                      Map<String, String> querys,
                                      Map<String, String> bodys)
            throws Exception {
        HttpClient httpClient = wrapClient(host);

        HttpPost request = new HttpPost(buildUrl(host, path, querys));
        for (Map.Entry<String, String> e : headers.entrySet()) {
            request.addHeader(e.getKey(), e.getValue());
        }

        if (bodys != null) {
            List<NameValuePair> nameValuePairList = new ArrayList<NameValuePair>();

            for (String key : bodys.keySet()) {
                nameValuePairList.add(new BasicNameValuePair(key, bodys.get(key)));
            }
            UrlEncodedFormEntity formEntity = new UrlEncodedFormEntity(nameValuePairList, "utf-8");
            formEntity.setContentType("application/x-www-form-urlencoded; charset=UTF-8");
            request.setEntity(formEntity);
        }

        return httpClient.execute(request);
    }

    /**
     * Post String
     *
     * @param host
     * @param path
     * @param method
     * @param headers
     * @param querys
     * @param body
     * @return
     * @throws Exception
     */
    public static HttpResponse doPost(String host, String path, String method,
                                      Map<String, String> headers,
                                      Map<String, String> querys,
                                      String body)
            throws Exception {
        HttpClient httpClient = wrapClient(host);

        HttpPost request = new HttpPost(buildUrl(host, path, querys));
        for (Map.Entry<String, String> e : headers.entrySet()) {
            request.addHeader(e.getKey(), e.getValue());
        }

        if (StringUtils.isNotBlank(body)) {
            request.setEntity(new StringEntity(body, "utf-8"));
        }

        return httpClient.execute(request);
    }

    /**
     * Post stream
     *
     * @param host
     * @param path
     * @param method
     * @param headers
     * @param querys
     * @param body
     * @return
     * @throws Exception
     */
    public static HttpResponse doPost(String host, String path, String method,
                                      Map<String, String> headers,
                                      Map<String, String> querys,
                                      byte[] body)
            throws Exception {
        HttpClient httpClient = wrapClient(host);

        HttpPost request = new HttpPost(buildUrl(host, path, querys));
        for (Map.Entry<String, String> e : headers.entrySet()) {
            request.addHeader(e.getKey(), e.getValue());
        }

        if (body != null) {
            request.setEntity(new ByteArrayEntity(body));
        }

        return httpClient.execute(request);
    }

    /**
     * Put String
     *
     * @param host
     * @param path
     * @param method
     * @param headers
     * @param querys
     * @param body
     * @return
     * @throws Exception
     */
    public static HttpResponse doPut(String host, String path, String method,
                                     Map<String, String> headers,
                                     Map<String, String> querys,
                                     String body)
            throws Exception {
        HttpClient httpClient = wrapClient(host);

        HttpPut request = new HttpPut(buildUrl(host, path, querys));
        for (Map.Entry<String, String> e : headers.entrySet()) {
            request.addHeader(e.getKey(), e.getValue());
        }

        if (StringUtils.isNotBlank(body)) {
            request.setEntity(new StringEntity(body, "utf-8"));
        }

        return httpClient.execute(request);
    }

    /**
     * Put stream
     *
     * @param host
     * @param path
     * @param method
     * @param headers
     * @param querys
     * @param body
     * @return
     * @throws Exception
     */
    public static HttpResponse doPut(String host, String path, String method,
                                     Map<String, String> headers,
                                     Map<String, String> querys,
                                     byte[] body)
            throws Exception {
        HttpClient httpClient = wrapClient(host);

        HttpPut request = new HttpPut(buildUrl(host, path, querys));
        for (Map.Entry<String, String> e : headers.entrySet()) {
            request.addHeader(e.getKey(), e.getValue());
        }

        if (body != null) {
            request.setEntity(new ByteArrayEntity(body));
        }

        return httpClient.execute(request);
    }

    /**
     * Delete
     *
     * @param host
     * @param path
     * @param method
     * @param headers
     * @param querys
     * @return
     * @throws Exception
     */
    public static HttpResponse doDelete(String host, String path, String method,
                                        Map<String, String> headers,
                                        Map<String, String> querys)
            throws Exception {
        HttpClient httpClient = wrapClient(host);

        HttpDelete request = new HttpDelete(buildUrl(host, path, querys));
        for (Map.Entry<String, String> e : headers.entrySet()) {
            request.addHeader(e.getKey(), e.getValue());
        }

        return httpClient.execute(request);
    }

    private static String buildUrl(String host, String path, Map<String, String> querys) throws UnsupportedEncodingException {
        StringBuilder sbUrl = new StringBuilder();
        sbUrl.append(host);
        if (!StringUtils.isBlank(path)) {
            sbUrl.append(path);
        }
        if (null != querys) {
            StringBuilder sbQuery = new StringBuilder();
            for (Map.Entry<String, String> query : querys.entrySet()) {
                if (0 < sbQuery.length()) {
                    sbQuery.append("&");
                }
                if (StringUtils.isBlank(query.getKey()) && !StringUtils.isBlank(query.getValue())) {
                    sbQuery.append(query.getValue());
                }
                if (!StringUtils.isBlank(query.getKey())) {
                    sbQuery.append(query.getKey());
                    if (!StringUtils.isBlank(query.getValue())) {
                        sbQuery.append("=");
                        sbQuery.append(URLEncoder.encode(query.getValue(), "utf-8"));
                    }
                }
            }
            if (0 < sbQuery.length()) {
                sbUrl.append("?").append(sbQuery);
            }
        }

        return sbUrl.toString();
    }

    private static HttpClient wrapClient(String host) {
        HttpClient httpClient = new DefaultHttpClient();
        if (host.startsWith("https://")) {
            sslClient(httpClient);
        }

        return httpClient;
    }

    private static void sslClient(HttpClient httpClient) {
        try {
            SSLContext ctx = SSLContext.getInstance("TLS");
            X509TrustManager tm = new X509TrustManager() {
                public X509Certificate[] getAcceptedIssuers() {
                    return null;
                }

                public void checkClientTrusted(X509Certificate[] xcs, String str) {

                }

                public void checkServerTrusted(X509Certificate[] xcs, String str) {

                }
            };
            ctx.init(null, new TrustManager[]{tm}, null);
            SSLSocketFactory ssf = new SSLSocketFactory(ctx);
            ssf.setHostnameVerifier(SSLSocketFactory.ALLOW_ALL_HOSTNAME_VERIFIER);
            ClientConnectionManager ccm = httpClient.getConnectionManager();
            SchemeRegistry registry = ccm.getSchemeRegistry();
            registry.register(new Scheme("https", 443, ssf));
        } catch (KeyManagementException ex) {
            throw new RuntimeException(ex);
        } catch (NoSuchAlgorithmException ex) {
            throw new RuntimeException(ex);
        }
    }
}
3、编写组件
在 gulimall-third-party 服务中编写组件类 SmsComponent
package com.atguigu.gulimall.thirdparty.component;

@ConfigurationProperties(prefix = "spring.cloud.alicloud.sms")
@Data
@Component
public class SmsComponent {
    private String host;
    private String path;
    private String appcode;


    public void sendSmsCode(String phone,String code) {
        String method = "POST";
        Map<String, String> headers = new HashMap<String, String>();
        //最后在header中的格式(中间是英文空格)为Authorization:APPCODE 83359fd73fe94948385f570e3c139105
        headers.put("Authorization", "APPCODE " + appcode);
        //根据API的要求,定义相对应的Content-Type
        headers.put("Content-Type", "application/x-www-form-urlencoded; charset=UTF-8");
        Map<String, String> querys = new HashMap<String, String>();
        Map<String, String> bodys = new HashMap<String, String>();
        bodys.put("content", "code:"+code+",expire_at:2");
        bodys.put("phone_number", phone);
        bodys.put("template_id", "TPL_0001");


        try {
            HttpResponse response = HttpUtils.doPost(host, path, method, headers, querys, bodys);
            System.out.println(response.toString());
            //获取response的body
            //System.out.println(EntityUtils.toString(response.getEntity()));
        } catch (Exception e) {
            e.printStackTrace();
        }
    }
}
4、编写配置
在 gulimall-third-party 服务中加入以下配置:
spring:
  cloud:
    alicloud:
      sms:
        host: https://dfsns.market.alicloudapi.com
        path: /data/send_sms
        appcode: 你的appcode
5、编写Controller,提供远程调用接口
package com.atguigu.gulimall.thirdparty.controller;

@RestController
@RequestMapping("/sms")
public class SmsSendController {

    @Autowired
    SmsComponent smsComponent;

    /**
     * 提供给别的服务进行调用
     * @param phone     手机号码
     * @param code      验证码
     * @return
     */
    @GetMapping
    public R sendCode(@RequestParam("phone") String phone, @RequestParam("code")  String code) {
        smsComponent.sendSmsCode(phone,code);
        return R.ok();
    }

}
2.3、gulimall-auth-server 服务中进行远程调用短信验证码服务,并且页面渲染
1、编写 远程调用接口
package com.atguigu.gulimall.auth.feign;

@FeignClient("gulimall-third-party")
public interface ThirdPartFeignService {

    @GetMapping("/sms/sendcode")
    public R sendCode(@RequestParam("phone") String phone, @RequestParam("code")  String code);

}
2、Controller层提供短信发送接口
@Controller
public class LoginController {

    @Autowired
    ThirdPartFeignService thirdPartFeignService;

    @ResponseBody
    @GetMapping("/sms/sendcode")
    public R sendCode(@RequestParam("phone") String phone) {
        String code = UUID.randomUUID().toString().substring(0, 5);

        thirdPartFeignService.sendCode(phone,code);
        return R.ok();
    }

}
3、前端渲染
$(function () {
   $("#sendCode").click(function () {

      // 2、进入倒计时效果
      if($(this).hasClass("disabled")){
         // 正在倒计时
      } else {
         // 1、给指定手机号发送验证码
         $.get("/sms/sendcode?phone="+$("#phoneNum").val())
         timeoutChangeStyle();
      }

   });
});
2.4、验证码放刷 以及 校验
- 验证码进行校验
- 接口防刷
由于发送验证码的接口暴露,为了防止恶意攻击,我们不能随意让接口被调用。
- 在redis中以phone-code将电话号码和验证码进行存储并将当前时间与code一起存储
- 如果调用时以当前phone取出的v不为空且当前时间在存储时间的60s以内,说明60s内该号码已经调用过,返回错误信息
- 60s以后再次调用,需要删除之前存储的phone-code
- code存在一个过期时间,我们设置为5min,5min内验证该验证码有效在 gulimall-auth-server 服务中:
2.4.1、验证码进行校验(将其存入redis)
第一步、导入reds依赖
<dependency>
    <groupId>org.springframework.boot</groupId>
    <artifactId>spring-boot-starter-data-redis</artifactId>
</dependency>
第二步、配置redis
# 配置redis
spring.redis.host=124.222.223.222
spring.redis.port=6379
第三步、增加异常常量
package com.atguigu.common.exception;

public enum BizCodeEnume {
    UNKNOW_EXCEPTION(10000,"系统未知异常"),
    VAILD_EXCEPTION(10001,"参数格式校验失败"),
    SMS_CODE_EXCEPTION(10002,"验证码获取频率太高,稍后再试"),
    PRODUCT_UP_EXCEPTION(11000,"商品上架异常");

    private int code;
    private String msg;
    BizCodeEnume(int code,String msg){
        this.code = code;
        this.msg = msg;
    }

    public int getCode() {
        return code;
    }

    public String getMsg() {
        return msg;
    }
}
第四步、Controler层修改
@Controller
public class LoginController {

    @Autowired
    ThirdPartFeignService thirdPartFeignService;

    @Autowired
    StringRedisTemplate redisTemplate;

    @ResponseBody
    @GetMapping("/sms/sendcode")
    public R sendCode(@RequestParam("phone") String phone) {

        // TODO 1、接口防刷

        // 2、验证码的再次校验。redis。 存: key:phone,value:code;   sms:code:手机号 -> 验证码 并设置过期时间,防止同一个phone在60秒内再次发送验证码
        String redisCode = redisTemplate.opsForValue().get(AuthServerConstant.SMS_CODE_CACHE_PREFIX + phone);
        if (!StringUtils.isEmpty(redisCode)) {
            long l = Long.parseLong(redisCode.split("_")[1]);
            if (System.currentTimeMillis() - l < 60000) {
                System.out.println("发送失败");
                // 60秒内不能再发
                return R.error(BizCodeEnume.SMS_CODE_EXCEPTION.getCode(),BizCodeEnume.SMS_CODE_EXCEPTION.getMsg());
            }
        }

        String code = UUID.randomUUID().toString().substring(0, 5);
        String codeToRedis = code +"_"+System.currentTimeMillis();
        // redis 缓存验证码,
        redisTemplate.opsForValue().set(AuthServerConstant.SMS_CODE_CACHE_PREFIX+phone,codeToRedis,5, TimeUnit.MINUTES);

        thirdPartFeignService.sendCode(phone,code);
        return R.ok();
    }

}
第六步、前端页面修改
$(function () {
   $("#sendCode").click(function () {

      // 2、进入倒计时效果
      if($(this).hasClass("disabled")){
         // 正在倒计时
      } else {
         // 1、给指定手机号发送验证码
         $.get("/sms/sendcode?phone="+$("#phoneNum").val(),function (data) {
            if(data.code != 0) {
               alert(data.msg);
            }
         })
         timeoutChangeStyle();
      }

   });
});
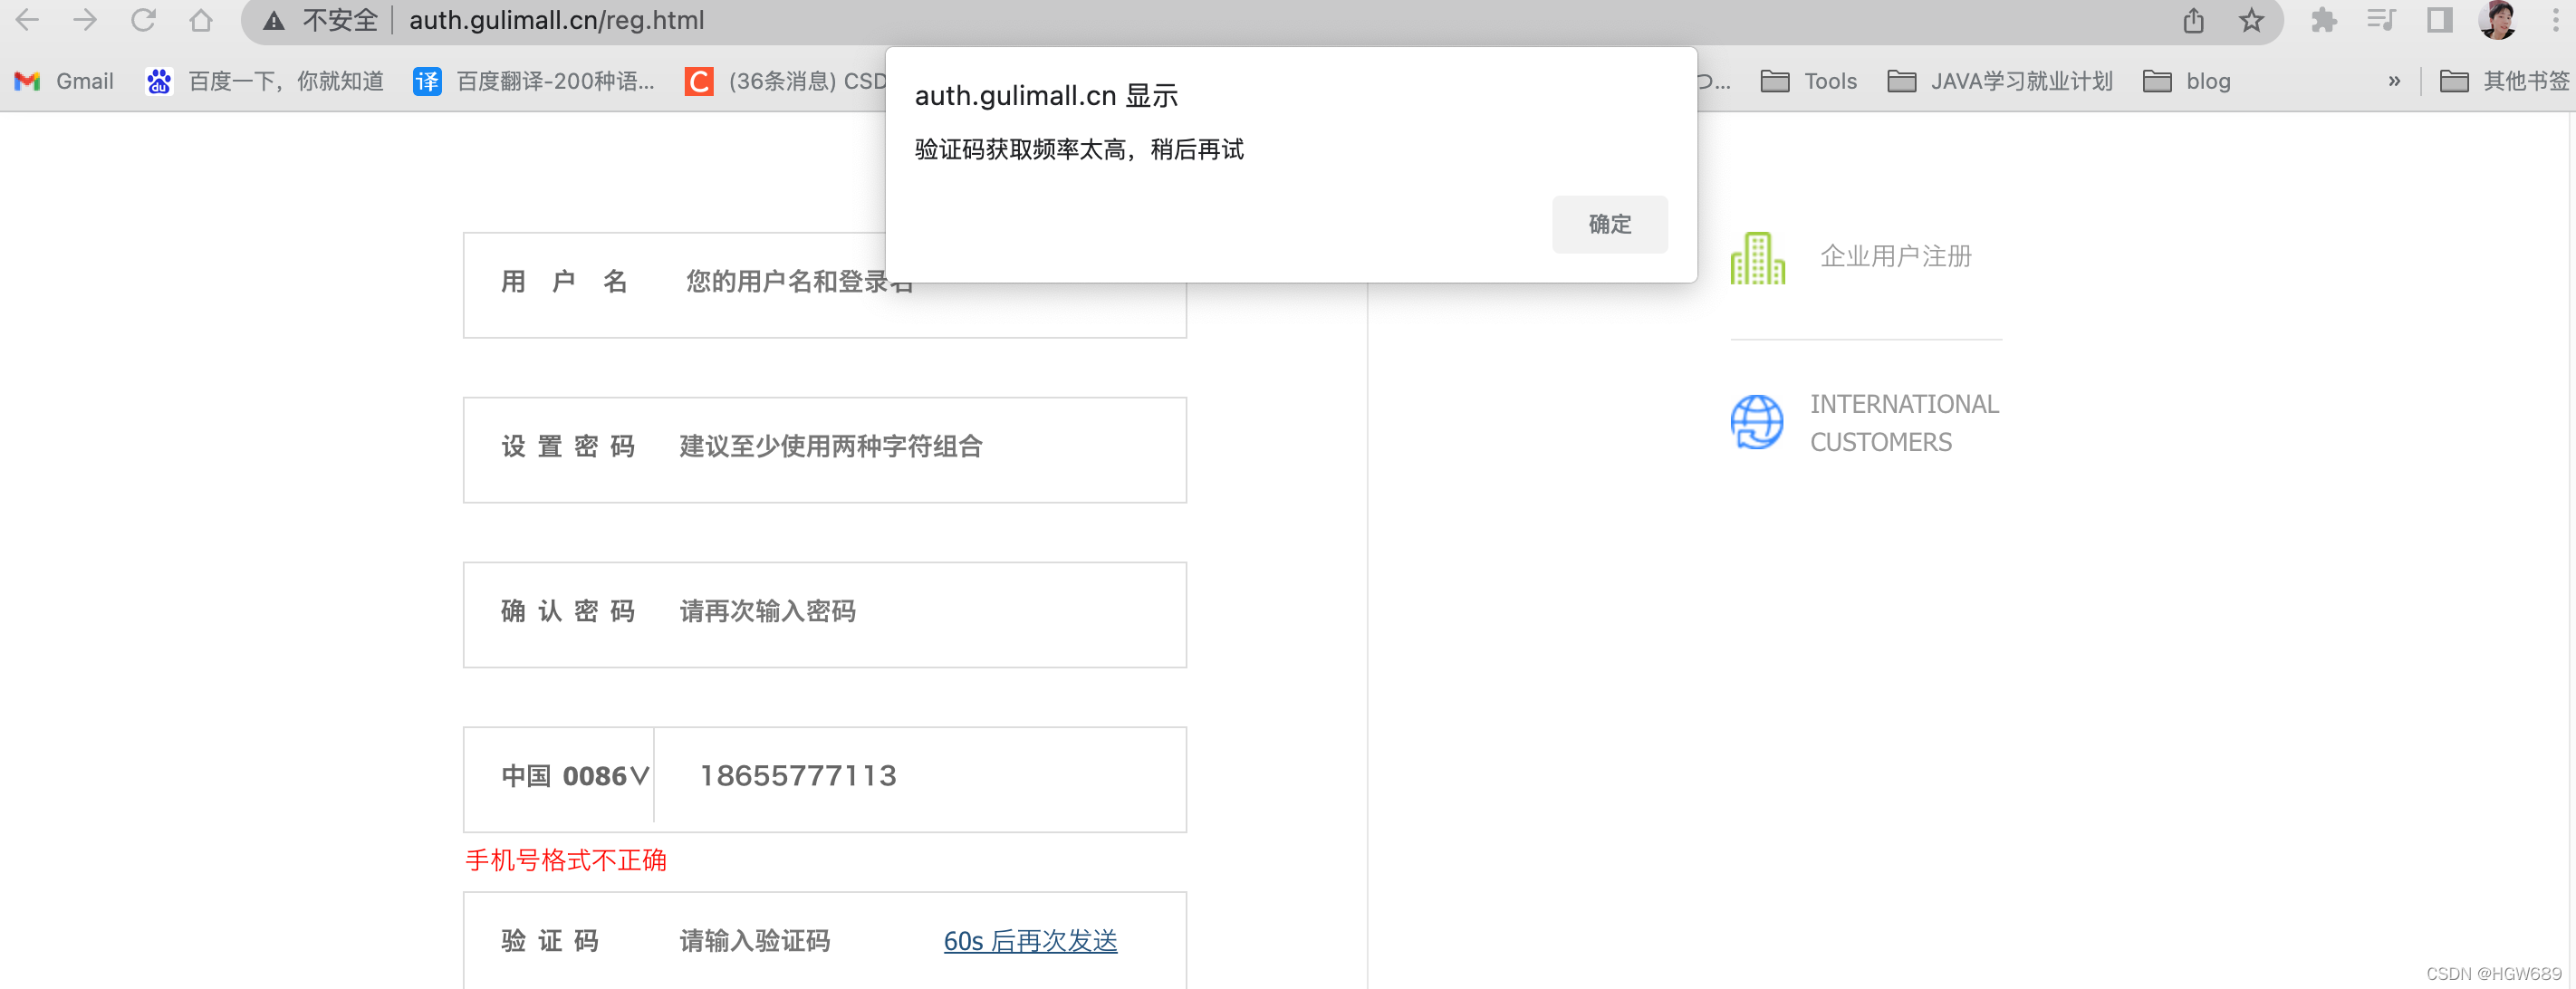
测试在60秒内刷新进行验证码再次发送,结果达到预期:
2.5、注册接口编写
2.5.1、封装请求体Vo
封装请求体Vo
在gulimall-auth-server服务中编写注册的主体逻辑
- 若JSR303校验未通过,则通过
BindingResult封装错误信息,并转重定向注册页面 - 若通过JSR303校验,则需要从
redis中取值判断验证码是否正确,正确的话通过会员服务注册 - 会员服务调用成功则重定向至登录页,否则封装远程服务返回的错误信息返回至注册页面
1、使用JSR303校验要导入validation依赖
<dependency>
    <groupId>org.springframework.boot</groupId>
    <artifactId>spring-boot-starter-validation</artifactId>
</dependency>
2、添加“com.atguigu.gulimall.auth.vo.UserRegistVo”类,代码如下:
@Data
public class UserRegistVo {

    @NotEmpty(message = "用户名必须提交")
    @Length(min = 6,max = 18,message = "用户名必须是6-18位字符")
    private String userName;

    @NotEmpty(message = "密码必须填写")
    @Length(min = 6,max = 18,message = "密码必须是6-18位字符")
    private String passWord;

    @NotEmpty(message = "手机号必须填写")
    @Pattern(regexp = "^[1]([3-9])[0-9]{9}$",message = "手机号格式不正确")
    private String phone;

    @NotEmpty(message = "验证码必须填写")
    private String code;

}
2.5.2、前端页面封装
修改 reg.html
<form action="/regist" method="post" class="one">
  <div class="register-box">
    <label class="username_label">用 户 名
      <input name="userName" maxlength="20" type="text" placeholder="您的用户名和登录名">
    </label>
    <div class="tips" th:text="${errors!=null?errors.userName:''}">

    </div>
  </div>
  <div class="register-box">
    <label class="other_label">设 置 密 码
      <input name="passWord" maxlength="20" type="password" placeholder="建议至少使用两种字符组合">
    </label>
    <div class="tips" th:text="${errors!=null?errors.passWord:''}">

    </div>
  </div>
  <div class="register-box">
    <label class="other_label">确 认 密 码
      <input name="code" maxlength="20" type="password" placeholder="请再次输入密码">
    </label>
    <div class="tips">

    </div>
  </div>
  <div class="register-box">
    <label class="other_label">
      <span>中国 0086∨</span>
      <input name="phone" class="phone" id="phoneNum" maxlength="20" type="text" placeholder="建议使用常用手机">
    </label>
    <div class="tips" th:text="${errors!=null?errors.phone:''}">

    </div>
  </div>
  <div class="register-box">
    <label class="other_label">验 证 码
      <input name="code" maxlength="20" type="text" placeholder="请输入验证码" class="caa">
    </label>
    <a id="sendCode">发送验证码 </a>
    <div class="tips" th:text="${errors!=null?errors.code:''}">

    </div>
  </div>
  <div class="arguement">
    <input type="checkbox" id="xieyi"> 阅读并同意
    <a href="static/reg/#">《谷粒商城用户注册协议》</a>
    <a href="static/reg/#">《隐私政策》</a>
    <div class="tips">

    </div>
    <br/>
    <div class="submit_btn">
      <button type="submit" id="submit_btn">立 即 注 册</button>
    </div>
  </div>

</form>
注: RedirectAttributes可以通过session保存信息并在重定向的时候携带过去
2.5.3、远程会员服务中注册会员接口编写
远程会员服务中注册会员接口编写
2.5.3.1、在 gulimal-member 服务中编写VO
package com.atguigu.gulimall.member.vo;

@Data
public class MemberRegistVo {
    private String userName;

    private String passWord;

    private String phone;
}
2.5.3.2、Controller 层接口编写
com.atguigu.gulimall.member.controller路径下的:MemberController 类
@PostMapping("/regist")
public R regist(@RequestBody MemberRegistVo vo) {
  try {
    memberService.regist(vo);
  } catch (PhoneExistException e) {
    return R.error(BizCodeEnume.PHONE_EXIST_EXCEPTION.getCode(),BizCodeEnume.PHONE_EXIST_EXCEPTION.getMsg());
  } catch (UserNameExistException e) {
    return R.error(BizCodeEnume.USER_EXIST_EXCEPTION.getCode(),BizCodeEnume.USER_EXIST_EXCEPTION.getMsg());
  }
  return R.ok();
}
2.5.3.3、Service 层实现类编写
通过查看数据库表我们需要保存一些基本信息:
- 会员等级:默认的会员等级我们需要通过查询 ums_member_level 表 获得
- 设置用户名和手机号:因为手机号用用户名是用来登录的,所以我们必须得保证它两都是唯一的才能进行注册。为了让Controller感知到手机号和用户名不唯一,我们采用异常机制。
- 密码加密存储
MemberServiceImpl实现类注册会员方法代码:
/**
 * 注册会员
 * @param vo
 */
@Override
public void regist(MemberRegistVo vo) {
    MemberDao memberDao = this.baseMapper;
    MemberEntity entity = new MemberEntity();

    // 1、设置默认等级
    MemberLevelEntity levelEntity = memberLevelDao.getDefaultLevel();
    entity.setLevelId(levelEntity.getId());

    // 2、 检查用户名和手机号是否唯一,为了让Controller感知异常,我们采用异常机制
    checkPhoneUnique(vo.getPhone());
    checkUserNameUnique(vo.getUserName());
    // 唯一之后执行
    entity.setMobile(vo.getPhone());
    entity.setUsername(vo.getUserName());

    // 3、密码要进行加密存储
    BCryptPasswordEncoder bCryptPasswordEncoder = new BCryptPasswordEncoder();
    String encode = bCryptPasswordEncoder.encode(vo.getPassWord());
    entity.setPassword(encode);

    // 其他的默认信息

    // 保存
    memberDao.insert(entity);
}
2.5.3.3.1、会员等级查询
会员等级查询
// 1、设置默认等级
MemberLevelEntity levelEntity = memberLevelDao.getDefaultLevel();
entity.setLevelId(levelEntity.getId());
gulimall-member/src/main/resources/mapper/member/路径下:MemberLevelDao.xml
<select id="getDefaultLevel" resultType="com.atguigu.gulimall.member.entity.MemberLevelEntity">
    SELECT * FROM ums_member_level WHERE default_status=1;
</select>
2.5.3.3.2、异常机制(检查用户名和手机号是否唯一)
异常机制(检查用户名和手机号是否唯一)
1、分别自定义用户名不唯一、手机号不唯一异常
在 gulimall-member 服务中创建 exception 包:
package com.atguigu.gulimall.member.exception;
public class UserNameExistException extends RuntimeException{
    public UserNameExistException() {
        super("用户名已存在");
    }
}
package com.atguigu.gulimall.member.exception;
public class PhoneExistException extends RuntimeException {
    public PhoneExistException() {
        super("该手机号已被注册");
    }
}
2、在Service接口层中增加判断 用户名不唯一、手机号不唯一的方法
public interface MemberService extends IService<MemberEntity> {

    PageUtils queryPage(Map<String, Object> params);

    void regist(MemberRegistVo vo);

    void checkPhoneUnique(String phone) throws PhoneExistException;

    void checkUserNameUnique(String userName) throws UserNameExistException;
}
3、在Service层实现类 MemberServiceImpl 中编写业务代码
/**
 * 检查用手机号是否唯一
 * @param phone 手机号;
 * 有异常则不唯一,没抛出异常则正常进行
 */
@Override
public void checkPhoneUnique(String phone) throws PhoneExistException {
    MemberDao memberDao = this.baseMapper;
    Integer count = memberDao.selectCount(new QueryWrapper<MemberEntity>().eq("mobile", phone));
    if (count > 0){
        throw  new PhoneExistException();
    }
}

/**
 * 检查用用户名是否唯一
 * @param userName 手机号;
 * 有异常则不唯一,没抛出异常则正常进行
 */
@Override
public void checkUserNameUnique(String userName) throws UserNameExistException{
    MemberDao memberDao = this.baseMapper;
    Integer count = memberDao.selectCount(new QueryWrapper<MemberEntity>().eq("username", userName));
    if (count>0) {
        throw new UserNameExistException();
    }
}
4、注册方法中进行调用
// 检查用户名和手机号是否唯一,为了让Controller感知异常,我们采用异常机制
checkPhoneUnique(vo.getPhone());
checkUserNameUnique(vo.getUserName());
5、在gulimall-common 服务中增加错误码列表
package com.atguigu.common.exception;

public enum BizCodeEnume {
    UNKNOW_EXCEPTION(10000,"系统未知异常"),
    VAILD_EXCEPTION(10001,"参数格式校验失败"),
    SMS_CODE_EXCEPTION(10002,"验证码获取频率太高,稍后再试"),
    PRODUCT_UP_EXCEPTION(11000,"商品上架异常"),
    USER_EXIST_EXCEPTION(15001,"用户名已存在"),
    PHONE_EXIST_EXCEPTION(15002,"手机号已被注册");

    private int code;
    private String msg;
    BizCodeEnume(int code,String msg){
        this.code = code;
        this.msg = msg;
    }

    public int getCode() {
        return code;
    }

    public String getMsg() {
        return msg;
    }
}
6、Controller层 MemberController 类进行异常处理
@PostMapping("/regist")
public R regist(@RequestBody MemberRegistVo vo) {
    try {
        memberService.regist(vo);
    } catch (PhoneExistException e) {
        return R.error(BizCodeEnume.PHONE_EXIST_EXCEPTION.getCode(),BizCodeEnume.PHONE_EXIST_EXCEPTION.getMsg());
    } catch (UserNameExistException e) {
        return R.error(BizCodeEnume.USER_EXIST_EXCEPTION.getCode(),BizCodeEnume.USER_EXIST_EXCEPTION.getMsg());
    }
    return R.ok();
}
2.5.3.3.3、密码加密(MD5&MD5盐值加密&Bcrypt)
- 铭文加密
- 可逆:得到密文 通过指定的加密算法可以得到 铭文
- 不可逆:得到密文 通过指定的加密算法可以不能得到 铭文
-
MD5,Message Digest algorithm 5,信息摘要算法
- 压缩性:任意长度的数据,算出的MD5值长度都是固定的
- 容易计算:从原数据计算出MD5值很容易
- 抗修改性:对原数据进行任何改动,哪怕只修改1个字节,所得到的MD5值都有很大区别
- 强抗碰撞:想找到两个不同的数据,使它们具有相同的MD5值,是非常困难的
-
加盐
- 通过生成随机数和MD5生成字符串进行组合
- 数据库同时存储MD5值与salt值。验证正确性时使用salt进行MD5即可
-
Bcrypt简介: bcrypt是一种跨平台的文件加密工具。
-
由它加密的文件可在所有支持的操作系统和处理器上进行转移。它的口令必须是8至56个字符,并将在内部被转化为448位的密钥。
-
Bcrypt就是一款加密工具,可以比较方便地实现数据的加密工作。你也可以简单理解为它内部自己实现了随机加盐处理
-
例如,我们使用MD5加密,每次加密后的密文其实都是一样的,这样就方便了MD5通过大数据de的方式进行破解。
-
Bcrypt生成的密文是60位的。而MD5的是32位的。
-
Spring Security提供了BCryptPasswordEncoder类,实现Spring的PasswordEncoder接口使用BCrypt强哈希方法来加密。
BCrypt强哈希方法,每次加密结果都不一样。
String encode(CharSequence rawPassword):传入铭文进行加密并返回boolean matches(CharSequence rawPassword, String encodedPassword):
传入铭文和密文进行判断是否一致!
-
// 3、密码要进行加密存储
BCryptPasswordEncoder bCryptPasswordEncoder = new BCryptPasswordEncoder();
String encode = bCryptPasswordEncoder.encode(vo.getPassWord());
entity.setPassword(encode);
2.5.4、在 gulimall-auth-server 服务中调用远程注册接口
1、编写feign远程调用注册接口
package com.atguigu.gulimall.auth.feign;

@FeignClient("gulimall-member")
public interface MemberFeignService {

    @PostMapping("/member/member/regist")
    public R regist(@RequestBody UserRegistVo vo);

}
2、Controller层 LoginController 注册会员接口编写
@PostMapping("/regist")
public String regist(@Valid UserRegistVo vo, BindingResult result, RedirectAttributes redirectAttributes) {
  if (result.hasErrors()) {
    Map<String, String> errors
      = result.getFieldErrors().stream().collect(Collectors.toMap(FieldError::getField, FieldError::getDefaultMessage));
    redirectAttributes.addFlashAttribute("errors", errors);
    // 如果校验错误,转发到注册页
    return "redirect:http://auth.gulimall.cn/reg.html";
  }


  // 1、校验验证码
  String code = vo.getCode();
  String s = redisTemplate.opsForValue().get(AuthServerConstant.SMS_CODE_CACHE_PREFIX + vo.getPhone());
  if (!StringUtils.isEmpty(s)) {
    if (code.equals(s.split("_")[0])){
      // 删除验证码;令牌机制
      redisTemplate.delete(AuthServerConstant.SMS_CODE_CACHE_PREFIX + vo.getPhone());
      // 验证码通过。真正注册。调用远程服务进行注册
      R r = memberFeignService.regist(vo);
      if (r.getCode() == 0) {
        // 注册成功回到登录页
        return "redirect:http://auth.gulimall.cn/login.html";
      } else {
        Map<String,String> errors = new HashMap<>();
        errors.put("msg",r.getData("msg", new TypeReference<String >(){}));
        redirectAttributes.addFlashAttribute("errors", errors);
        return "redirect:http://auth.gulimall.cn/reg.html";
      }
    } else {
      // 验证码出错
      Map<String, String> errors = new HashMap<>();
      errors.put("code", "验证码错误");
      redirectAttributes.addFlashAttribute("errors", errors);
      // 如果校验错误,转发到注册页
      return "redirect:http://auth.gulimall.cn/reg.html";
    }
  } else {
    // 验证码出错
    Map<String, String> errors = new HashMap<>();
    errors.put("code", "验证码错误");
    redirectAttributes.addFlashAttribute("errors", errors);
    // 如果校验错误,转发到注册页
    return "redirect:http://auth.gulimall.cn/reg.html";
  }
}
三、用户密码登录
在gulimall-auth-server模块中的主体逻辑
- 通过会员服务远程调用登录接口
- 通过 手机号 或者 用户名查询记录
- 进行密码匹配
- 如果调用成功,重定向至首页
- 如果调用失败,则封装错误信息并携带错误信息重定向至登录页
3.1、封装账号密码登录vo
@Data
public class UserLoginVo {

    private String loginacct;
    private String password;
}
3.2、前端页面login.html 提交登录数据
<form action="/login" method="post">
<ul>
<li class="top_1">
<img src="/static/login/JD_img/user_03.png" class="err_img1" />
<input type="text" name="loginacct" placeholder=" 邮箱/用户名/已验证手机" class="user" />
</li>
<li>
<img src="/static/login/JD_img/user_06.png" class="err_img2" />
<input type="password" name="password" placeholder=" 密码" class="password" />
</li>
<li class="bri">
<a href="static/login/index.html">忘记密码</a>
</li>
<li class="ent"><button class="btn2" type="submit"><a >登 录</a></button></li>
</ul>
</form>
3.3、编写远程登录接口(gulimall-member)
1、编写VO类 用来接收传递过来的JSON数据
package com.atguigu.gulimall.member.vo;

@Data
public class MemberLoginVo {
    private String loginacct;
    private String password;
}
2、Service层 MemberServiceImpl实现类 登录方法编写
package com.atguigu.gulimall.member.service.impl;

/**
* 用户密码登录
* @param vo    用户 和 密码
* @return  如果为null,则失败。返回当前记录,则为真
*/
@Override
public MemberEntity login(MemberLoginVo vo) {
  String loginacct = vo.getLoginacct();
  String password = vo.getPassword();

  // 1、去数据库查询对应的记录
  MemberDao memberDao = this.baseMapper;
  // 只要手机号和密码任何一个匹配都查出来
  MemberEntity entity = memberDao.selectOne(new QueryWrapper<MemberEntity>().eq("username", loginacct).or().eq("mobile", loginacct));
  if (entity == null) {
    // 登录失败
    return null;
  } else {
    // 2、获取到数据库的password
    String passworDb = entity.getPassword();
    BCryptPasswordEncoder passwordEncoder = new BCryptPasswordEncoder();
    // 3、密码匹配
    boolean matches = passwordEncoder.matches(password, passworDb);
    if (matches) {
      return entity;
    }else {
      return null;
    }
  }
}
3、在 gulimall-common 服务中添加错误码信息
package com.atguigu.common.exception;
public enum BizCodeEnume {
    UNKNOW_EXCEPTION(10000,"系统未知异常"),
    VAILD_EXCEPTION(10001,"参数格式校验失败"),
    SMS_CODE_EXCEPTION(10002,"验证码获取频率太高,稍后再试"),
    PRODUCT_UP_EXCEPTION(11000,"商品上架异常"),
    USER_EXIST_EXCEPTION(15001,"用户名已存在"),
    PHONE_EXIST_EXCEPTION(15002,"手机号已被注册"),
    LOGINACCT_PASSWORD_INVAILD_EXCEPTION(15003,"账号或密码错误");

    private int code;
    private String msg;
    BizCodeEnume(int code,String msg){
        this.code = code;
        this.msg = msg;
    }

    public int getCode() {
        return code;
    }

    public String getMsg() {
        return msg;
    }
}
4、Controller接口 MemberController 方法进行调用
com.atguigu.gulimall.member.controller路径下的 MemberController 类
/**
 * 账号密码登录
 * @return
 */
@PostMapping("/login")
public R login(@RequestBody MemberLoginVo vo) {
    MemberEntity entity = memberService.login(vo);
    if (entity != null) {
        return R.ok();
    } else {
        return R.error(BizCodeEnume.LOGINACCT_PASSWORD_INVAILD_EXCEPTION.getCode(),BizCodeEnume.LOGINACCT_PASSWORD_INVAILD_EXCEPTION.getMsg());
    }
}
3.4、在 gulimall-auth-server 服务中调用远程登录接口
1、编写feign远程调用注册接口
package com.atguigu.gulimall.auth.feign;

@FeignClient("gulimall-member")
public interface MemberFeignService {

    @PostMapping("/member/member/regist")
    R regist(@RequestBody UserRegistVo vo);

    @PostMapping("/member/member/login")
    R login(@RequestBody UserLoginVo vo);

}
2、编写Controller层 LoginController 类中进行调用
@PostMapping("/login")
public String login(UserLoginVo vo,RedirectAttributes redirectAttributes) {
    // 远处登录
    R login = memberFeignService.login(vo);
    if(login.getCode()==0) {
        // TODO 登录成功处理
        return "redirect:http://gulimall.cn";
    } else {
        // 验证码出错
        Map<String, String> errors = new HashMap<>();
        errors.put("msg", login.getData("msg",new TypeReference<String>(){}));
        redirectAttributes.addFlashAttribute("errors", errors);
        // 如果校验错误,转发到注册页
        return "redirect:http://auth.gulimall.cn/login.html";
    }
}
四、社交登录
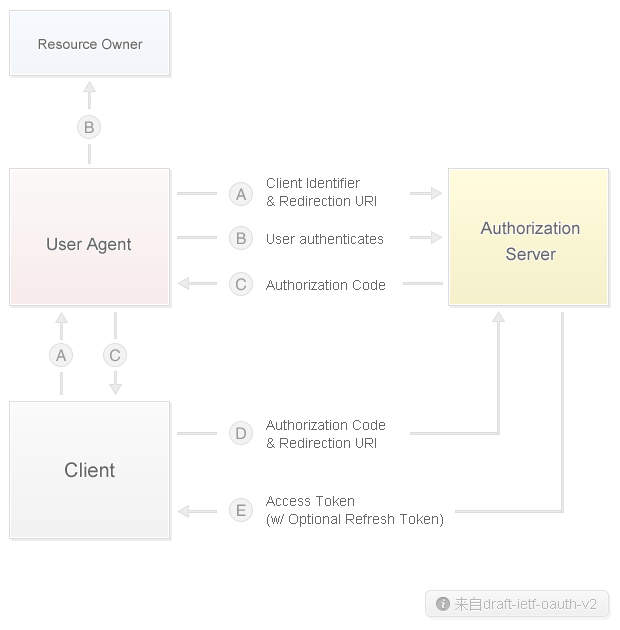
4.1、OAuth2.0
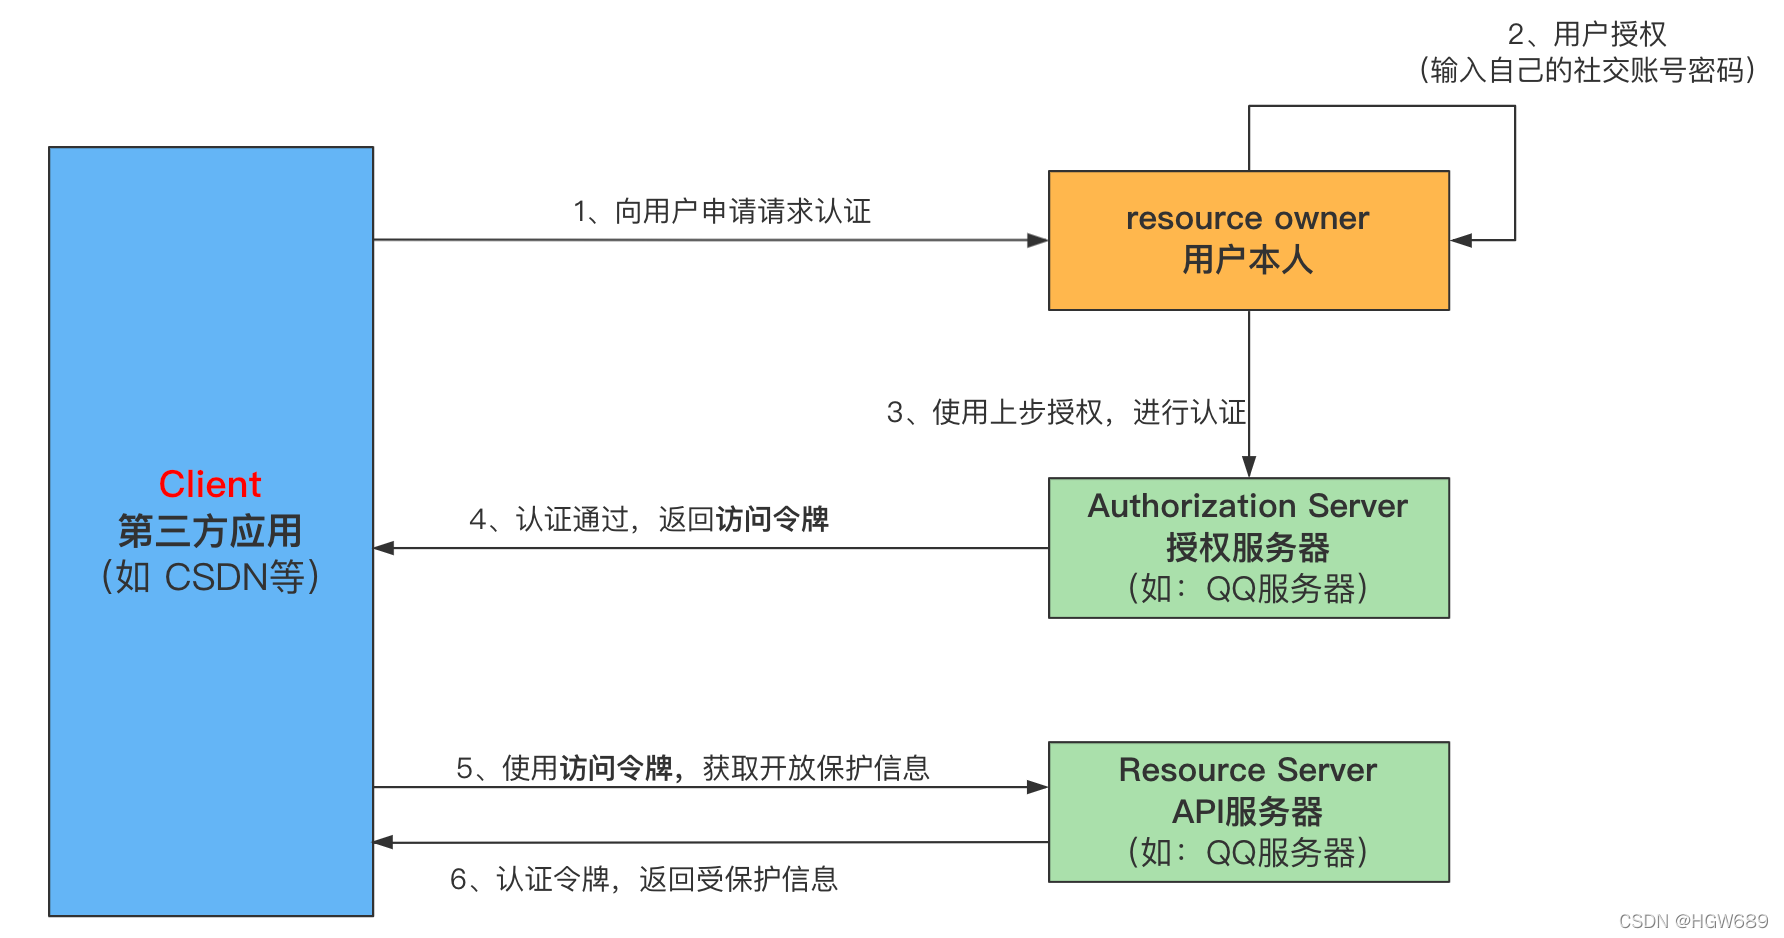
- OAuth:OAuth(开放授权)是一个开放标准,允许用户授权第三方网站访问他们存储在另外的服务提供者上的信息,而不需要将用户名和密码提供给第三方网站或分享他们数据的所有内容。
- OAuth2.0:对于用户相关的 OpenAPI(例如获取用户信息、动态同步、照片、日志、分享等),为了保护用户数据的安全和隐私,第三方网站访问用户数据前都需要显示的向用户征求授权。
- Client :指第三方应用
- Resource Owner :指用户
- Authorization Server:是指我们的授权服务器
- Resource Server :API服务器
4.2、微博登录(准备)
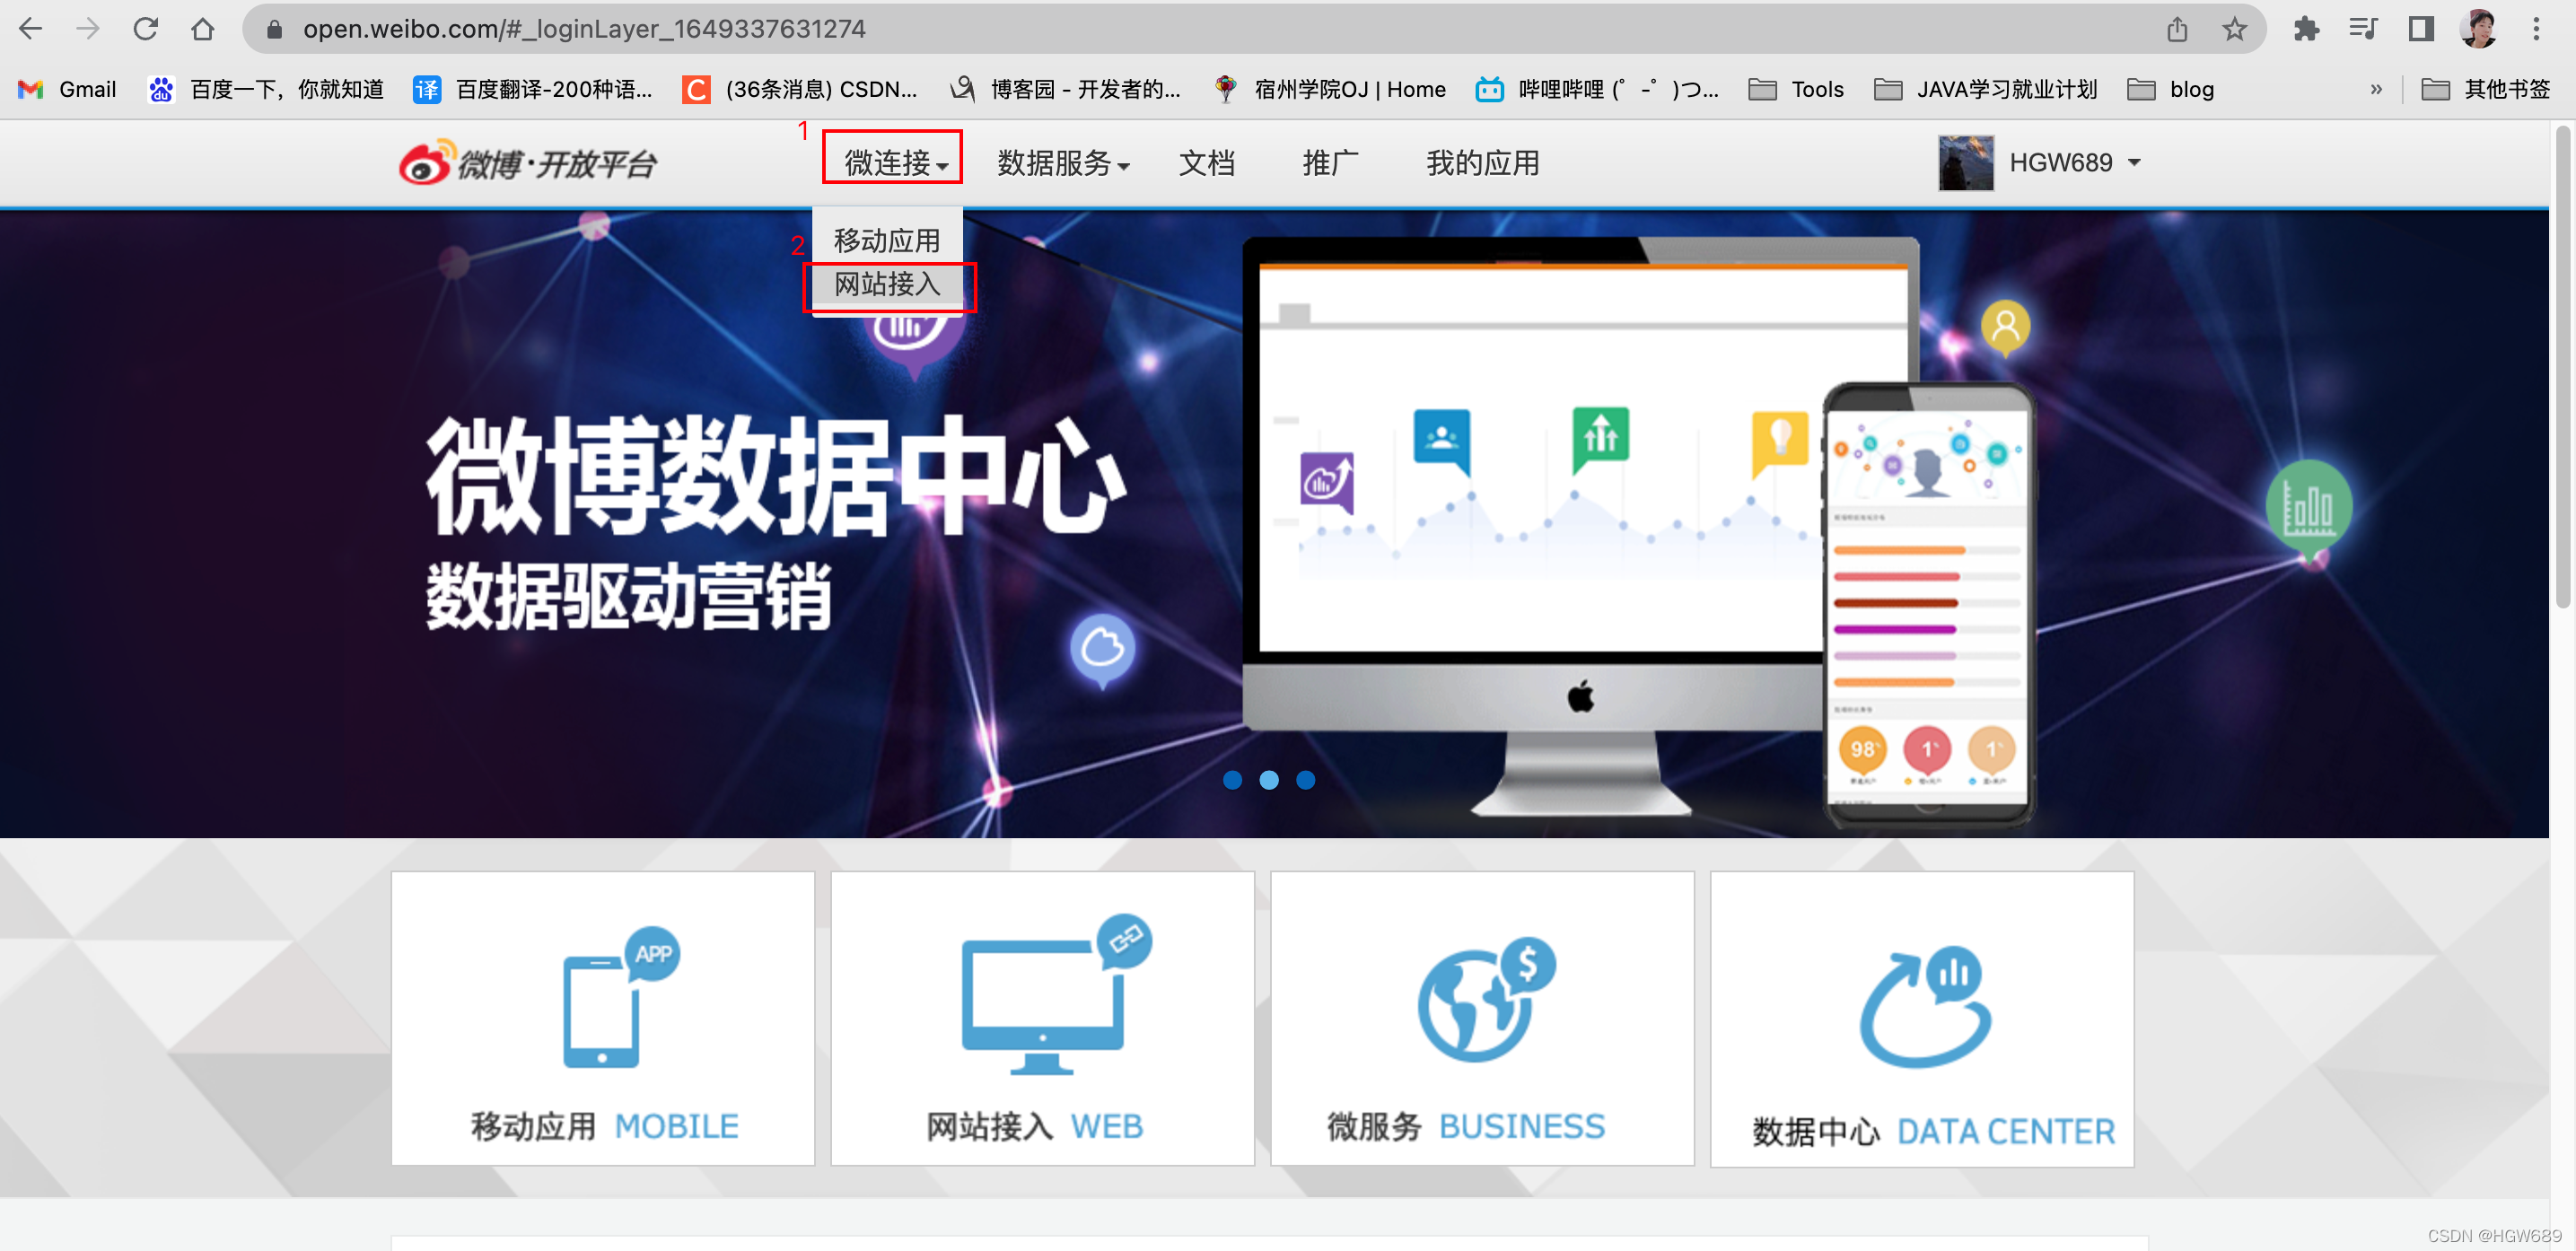
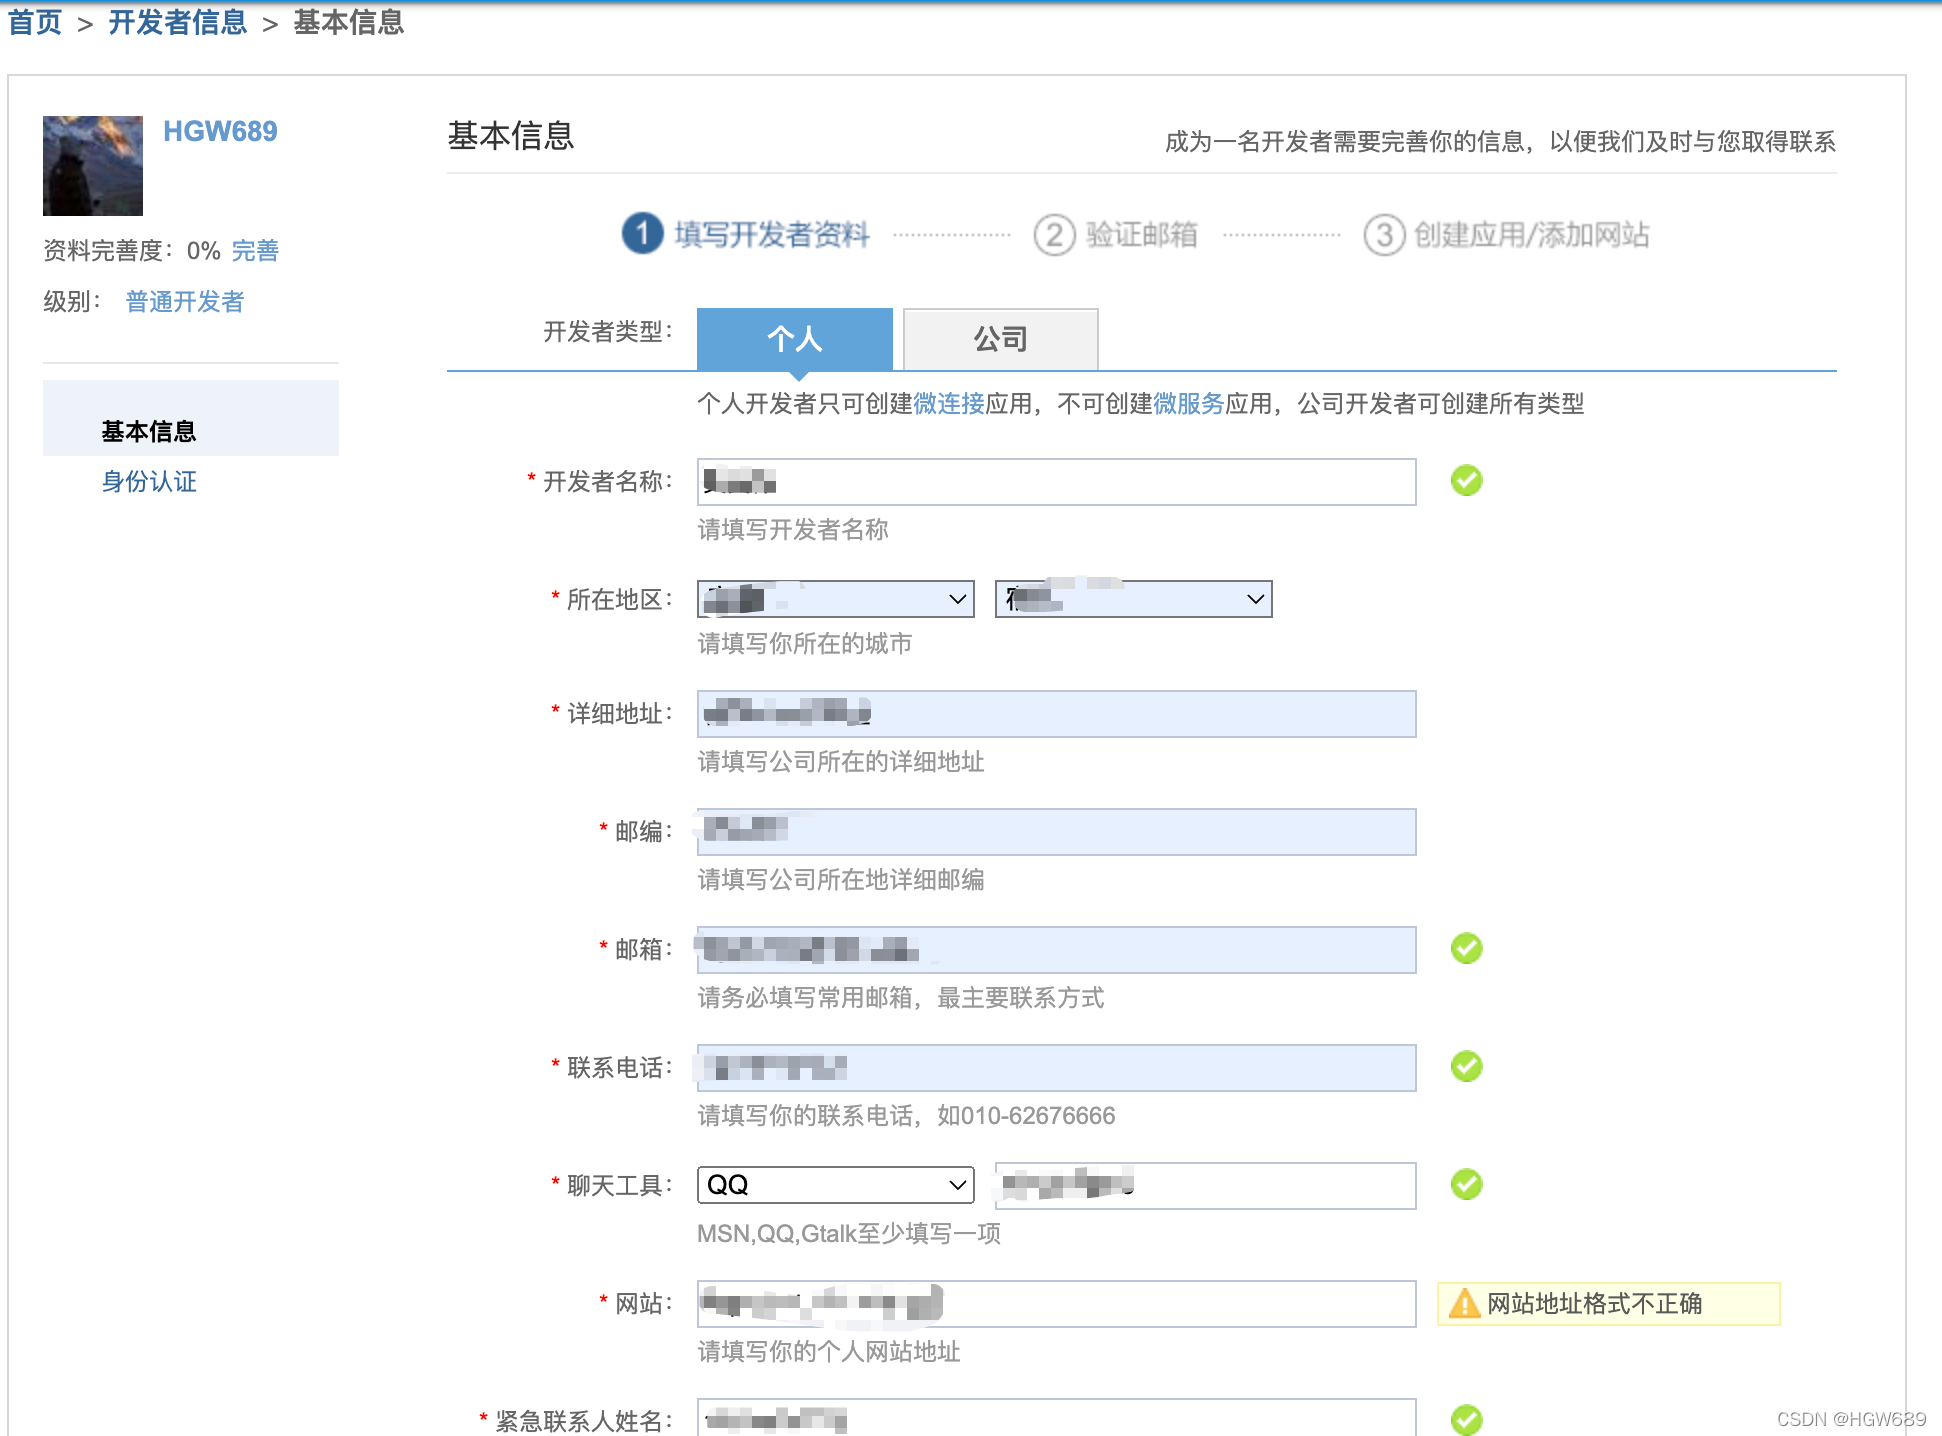
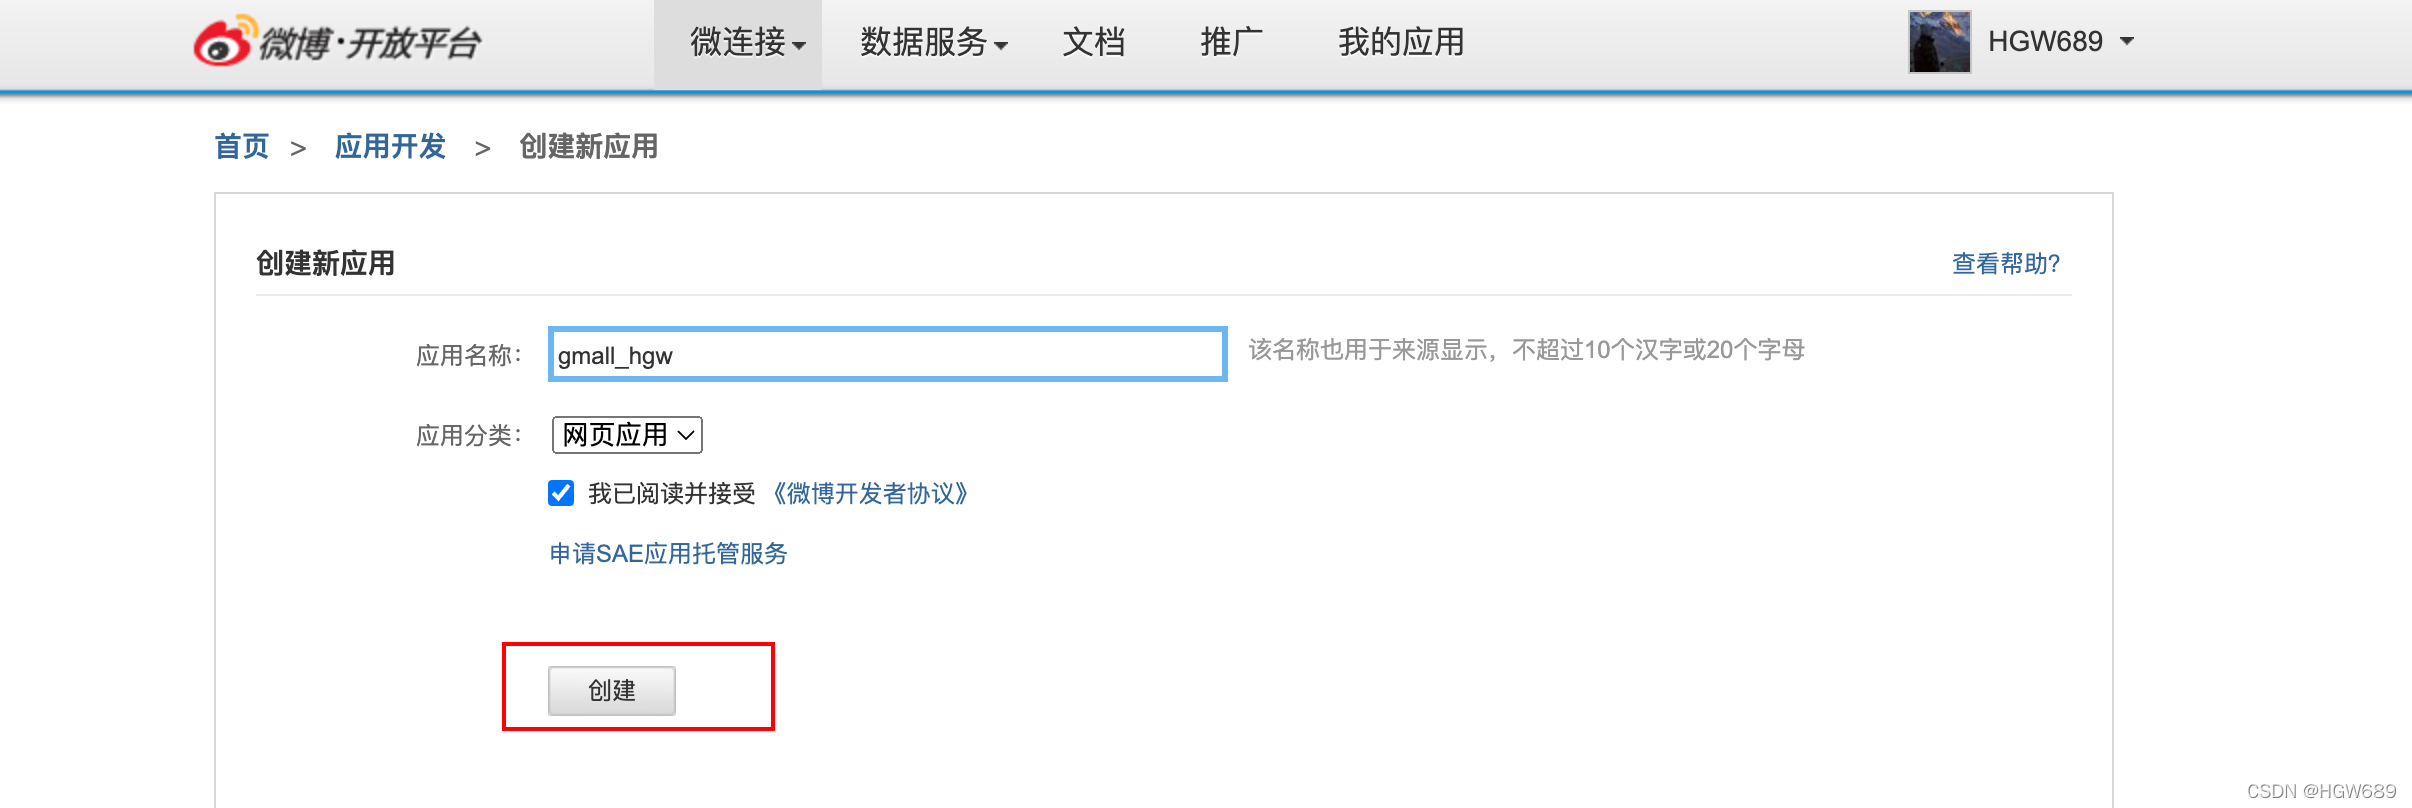
4.2.1、在微博开放平台创建应用
1、创建应用
这里需要得到认证,本人是当日的下午21:33分申请,次日的15:05分通过!
2、设置回调页面
4.2.2、在登录页引导用户至授权页
发送Get请求:
https://api.weibo.com/oauth2/authorize?client_id=YOUR_CLIENT_ID&response_type=code&redirect_uri=YOUR_REGISTERED_REDIRECT_URI
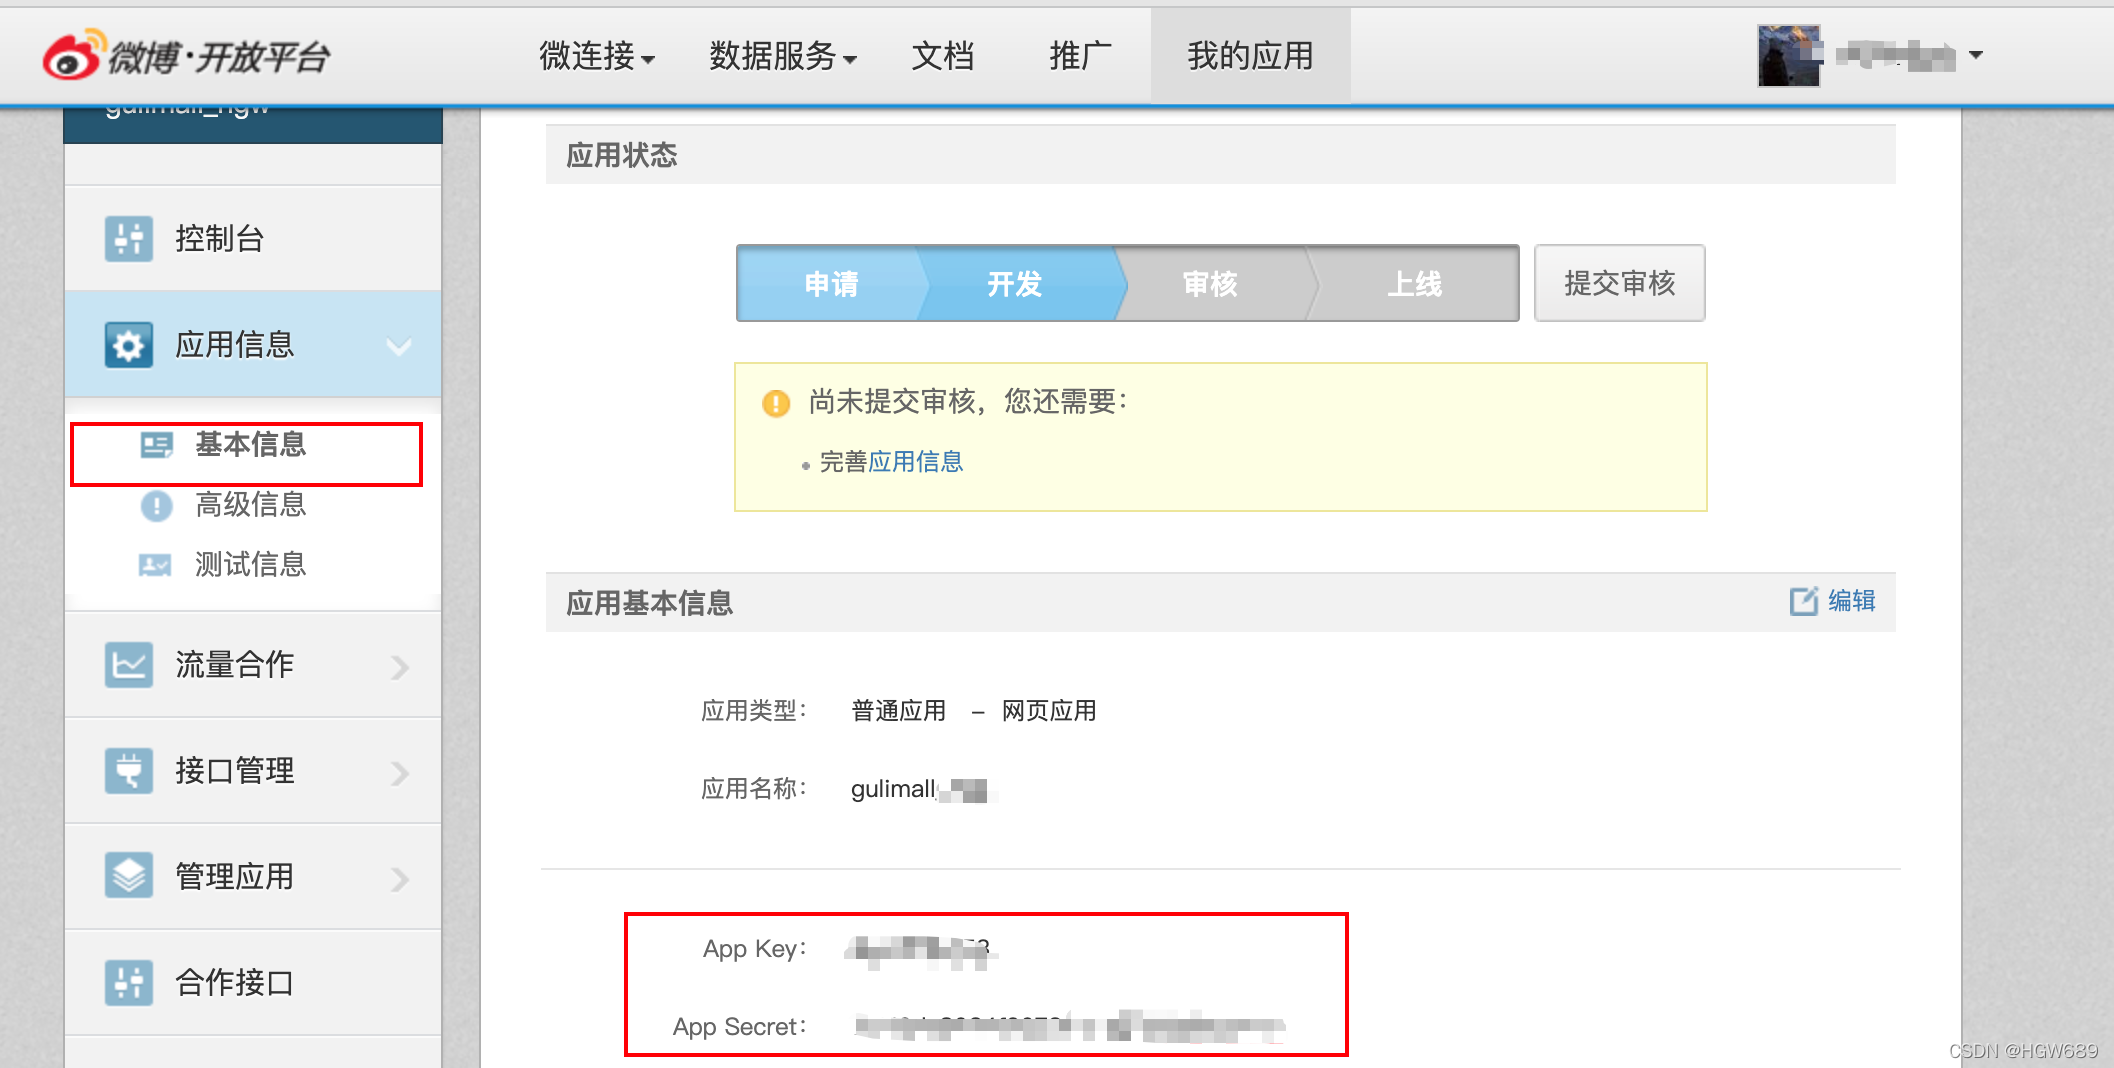
- YOUR_CLIENT_ID :基本信息中的 App Key
- YOUR_REGISTERED_REDIRECT_URI:高级信息中的授权回调页
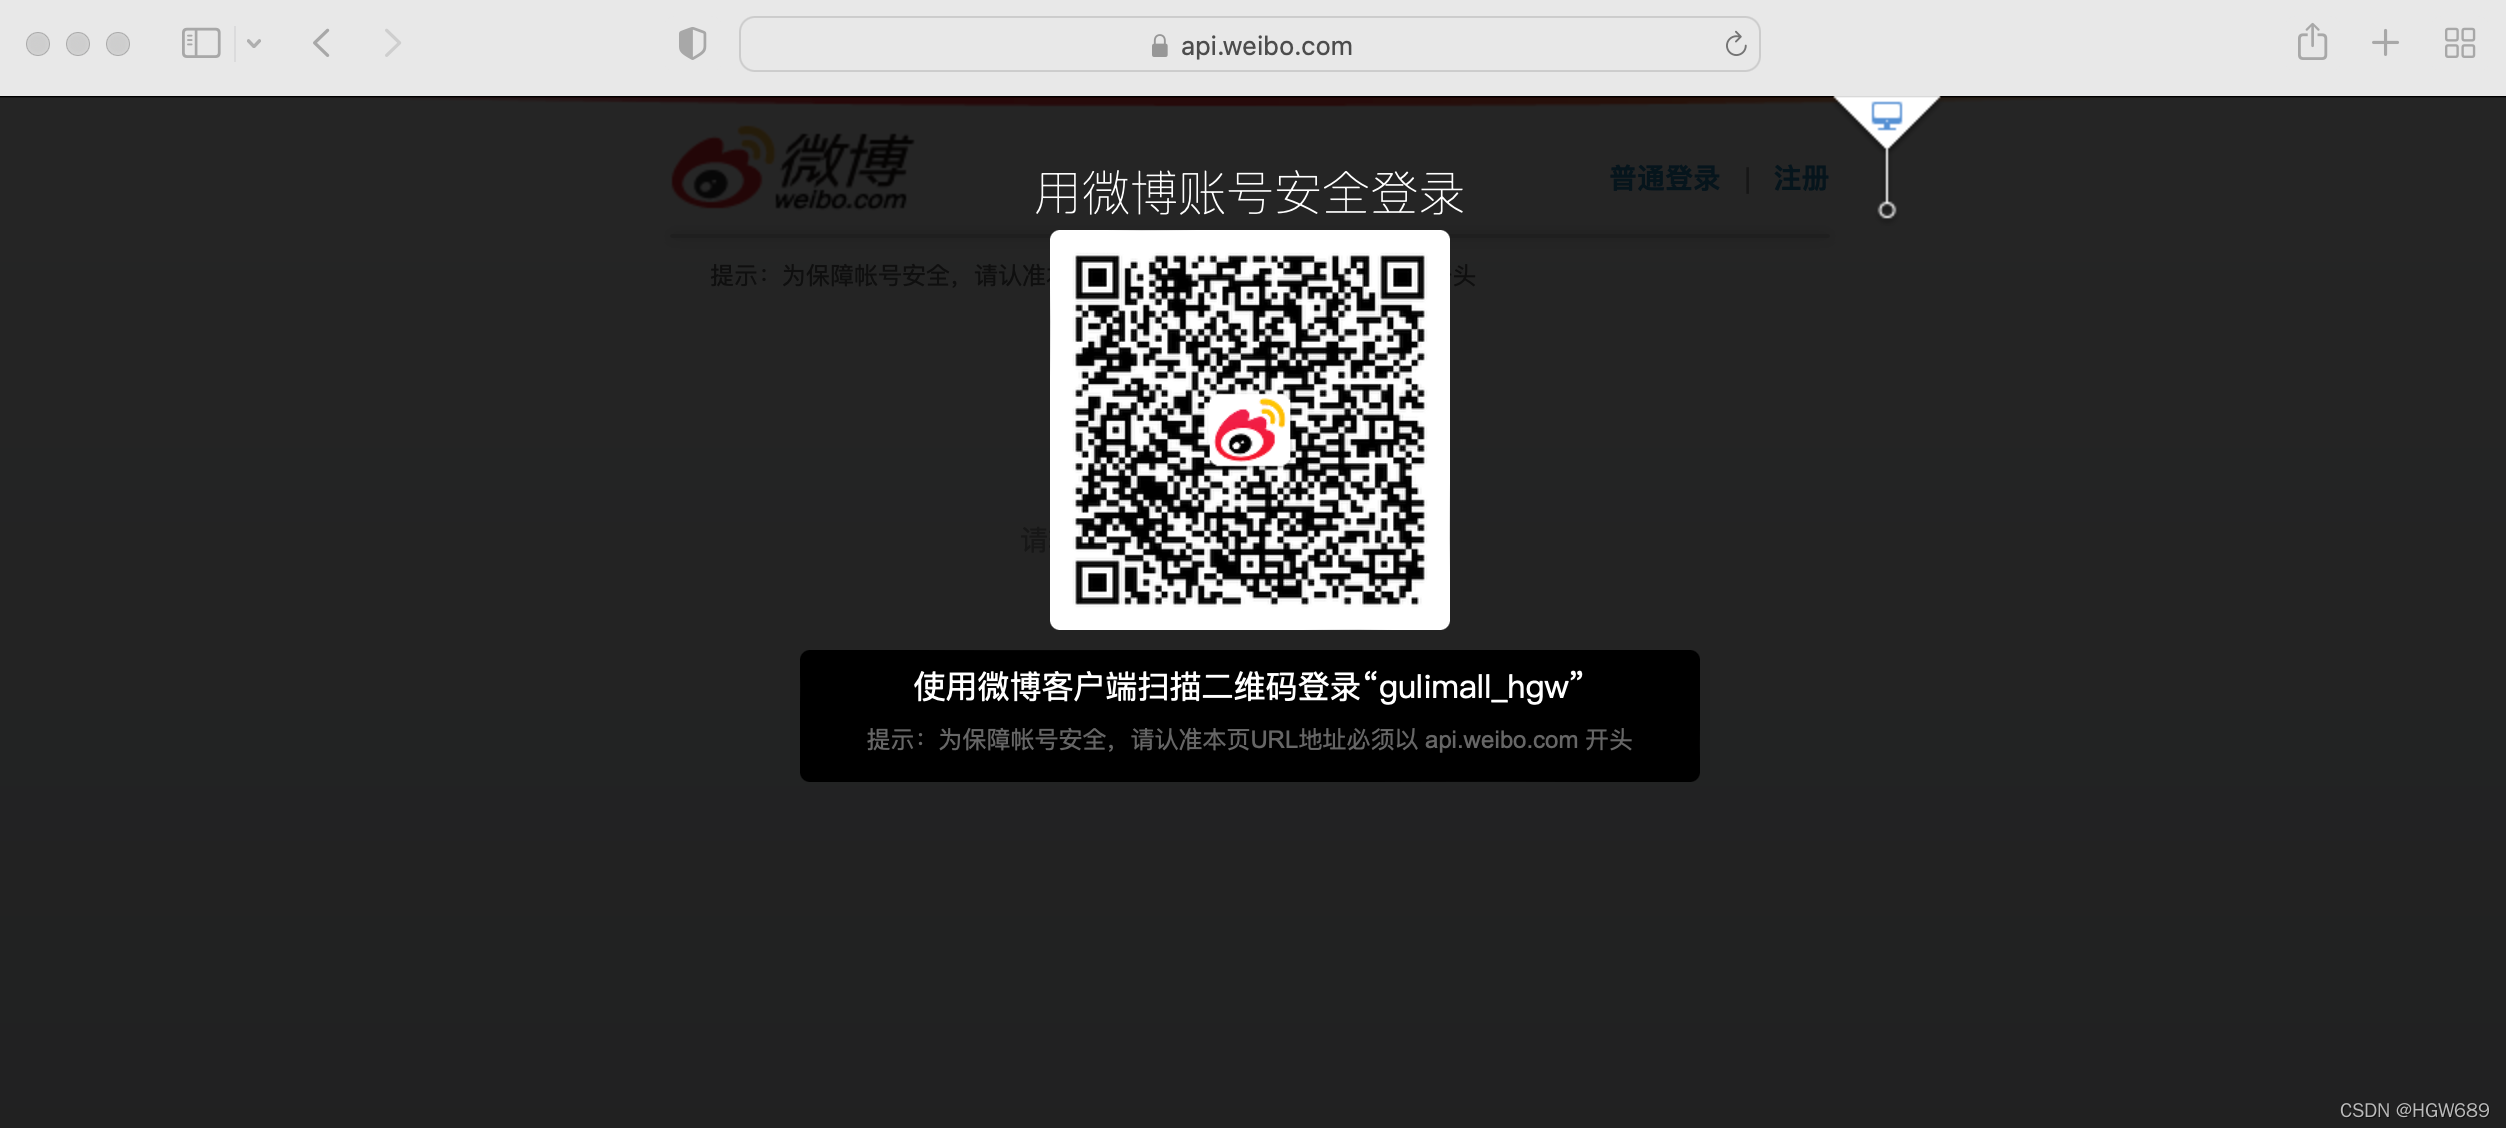
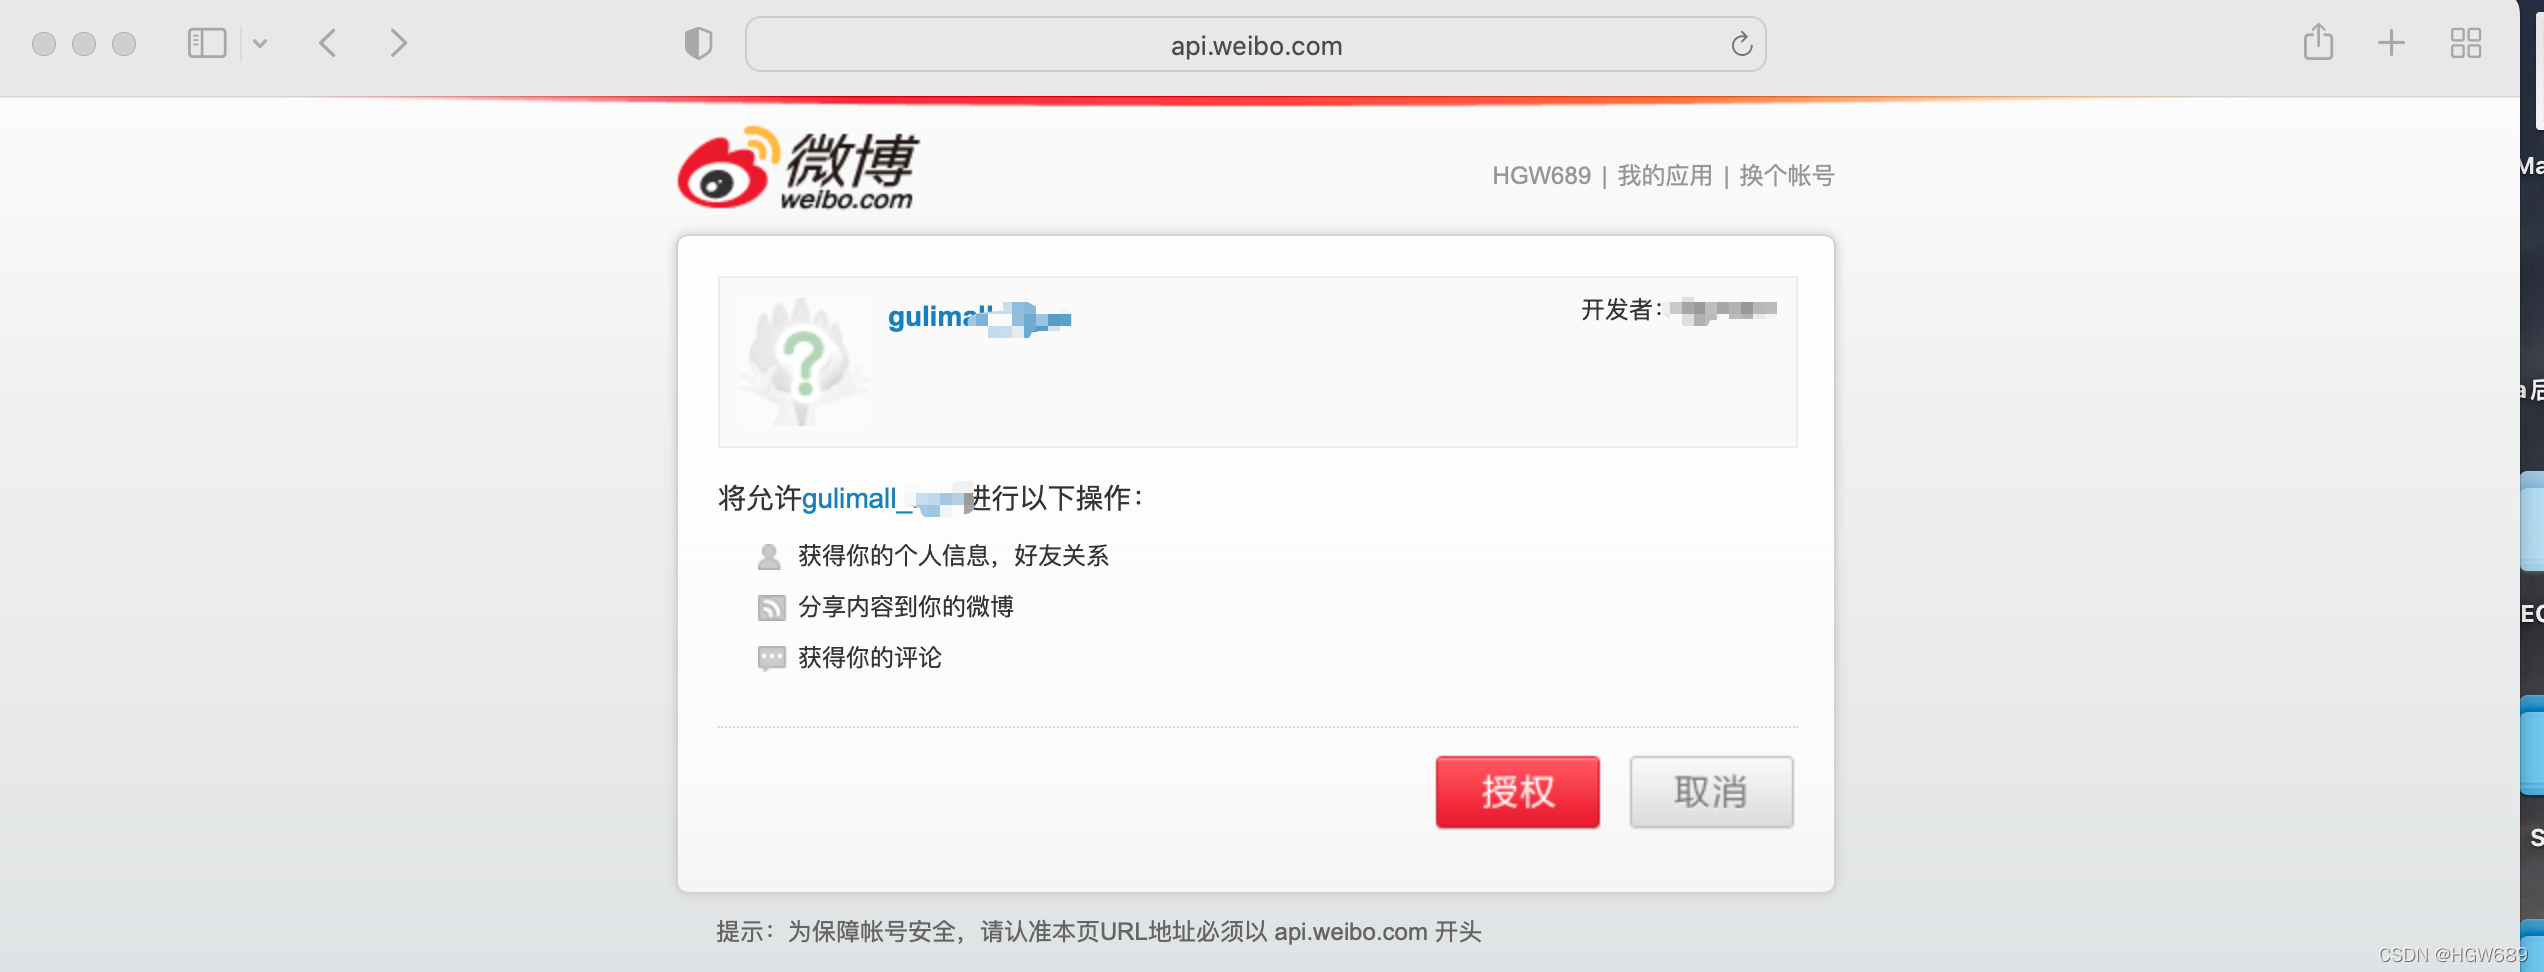
测试点击登录页上的微博图标,自动跳转到授权页面
<li>
  <a href="https://api.weibo.com/oauth2/authorize?client_id=1643498253&response_type=code&redirect_uri=http://auth.gulimall.cn/oauth2.0/weibo/success">
    <img style="height: 16px;width: 43px" src="/static/login/JD_img/weibo.png" />
  </a>
</li>
此时如果用户同意授权,页面跳转至 YOUR_REGISTERED_REDIRECT_URI/?code=CODE
code是我们用来换取令牌的参数,使用code 换取 access_token只能换取一次!
4.2.3、换取token
POST请求:
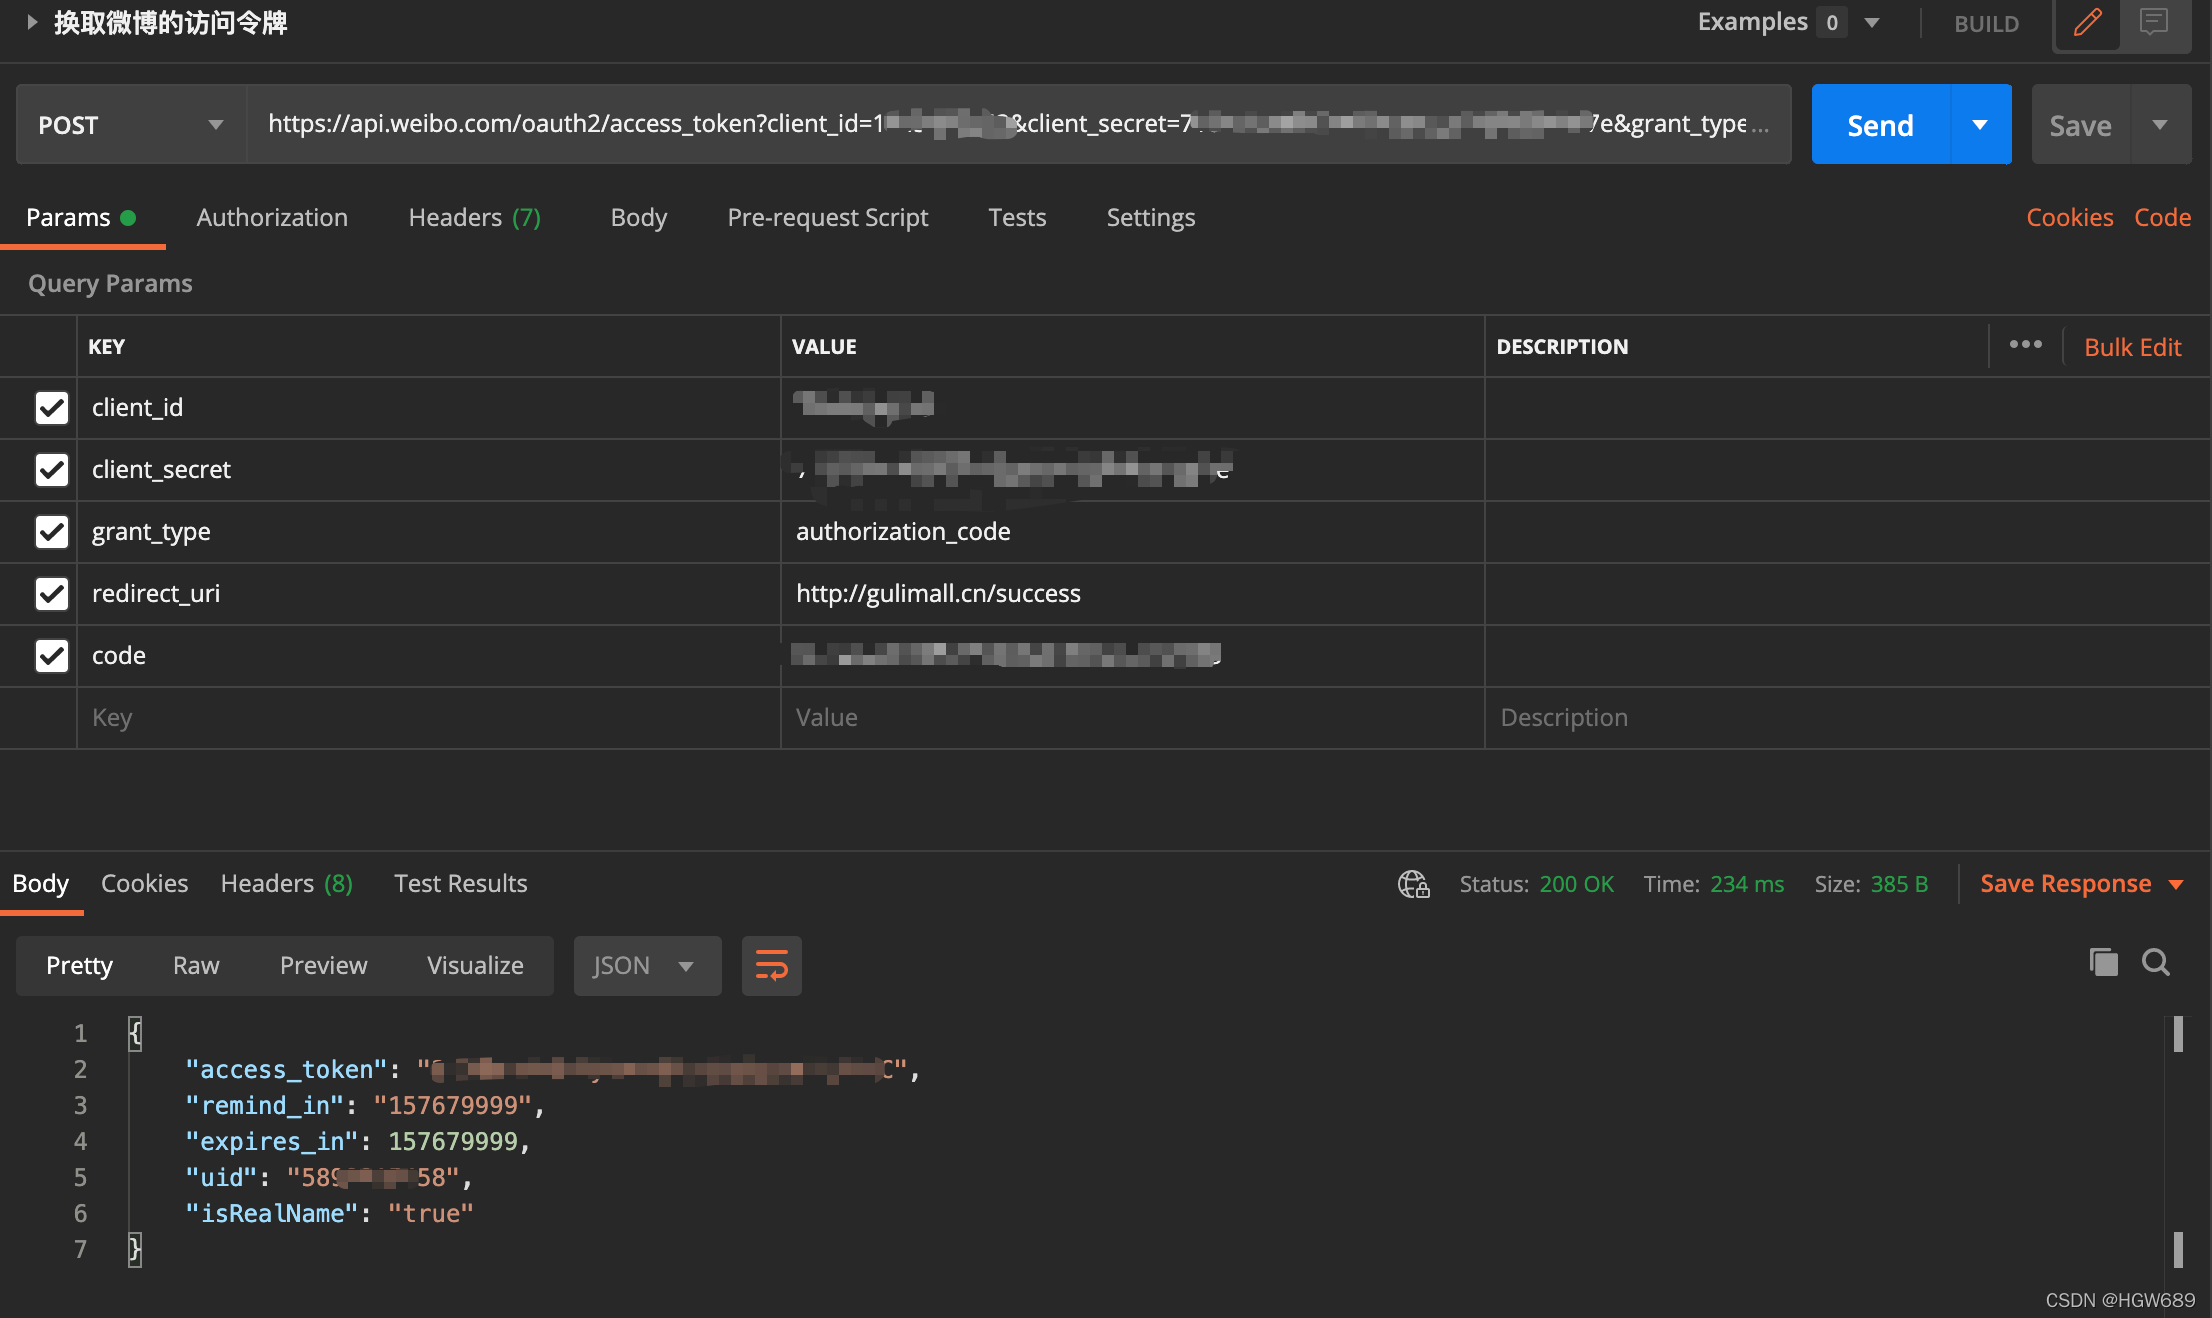
https://api.weibo.com/oauth2/access_token?client_id=YOUR_CLIENT_ID&client_secret=YOUR_CLIENT_SECRET&grant_type=authorization_code&redirect_uri=YOUR_REGISTERED_REDIRECT_URI&code=CODE
- client_id :创建网站应用时的
app key - client_secret :创建网站应用时的
app secret - YOUR_REGISTERED_REDIRECT_URI :认证完成后的跳转链接(需要和平台高级设置一致)
- code :换取令牌的认证码
使用postman进行测试换取token:
接下来,我们就可以获取openApi
4.2.4、获取用户信息
users/show
-
根据用户ID获取用户信息
-
URL:https://api.weibo.com/2/users/show.json
必选 类型及范围 说明 access_token true string 采用OAuth授权方式为必填参数,OAuth授权后获得。 uid false int64 需要查询的用户ID。 screen_name false string 需要查询的用户昵称。 -
返回结果: JSON
{
    "id": 1404376560,
    "screen_name": "zaku",
    "name": "zaku",
    "province": "11",
    "city": "5",
    "location": "北京 朝阳区",
    "description": "人生五十年,乃如梦如幻;有生斯有死,壮士复何憾。",
    "url": "http://blog.sina.com.cn/zaku",
    "profile_image_url": "http://tp1.sinaimg.cn/1404376560/50/0/1",
  	/....
}
4.3、社交登陆-整合项目
因为安全问题,成功跳转页面至后台处理,不在前台处理:http://gulimall.cn/oauth2.0/weibo/success
<li>
   <a href="https://api.weibo.com/oauth2/authorize?client_id=你的&response_type=code&redirect_uri=http://gulimall.cn/oauth2.0/weibo/success">
      <img style="height: 16px;width: 43px" src="/static/login/JD_img/weibo.png" />
   </a>
</li>
认证接口
- 通过
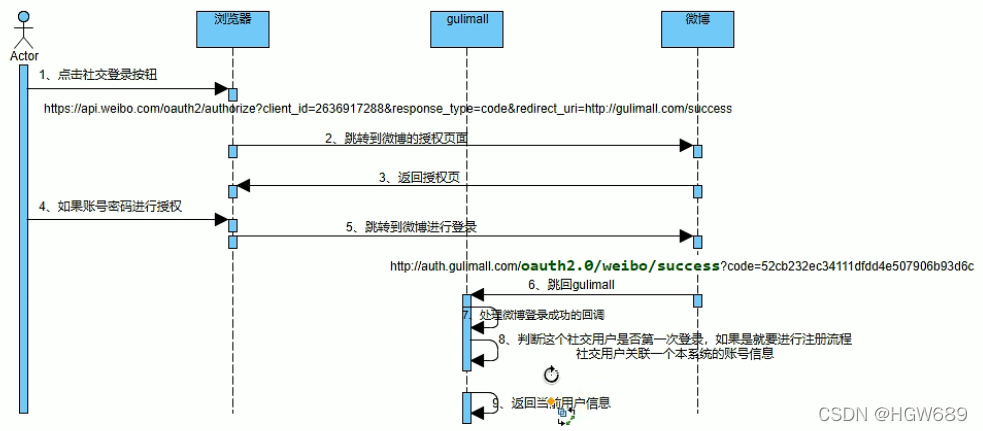
HttpUtils发送请求获取token,并将token等信息交给member服务进行社交登录- 当前用户如果是第一次登录,则自动注册进来(为当前社交用户生成一个会员信息,以后这个社交账号就对应指定的会员)
- 当前用户如果不是第一次登录,则进行登录
- 若获取
token失败或远程调用服务失败,则封装错误信息重新转回登录页
4.3.1、认证接口编写
认证接口编写
@Slf4j
@Controller
public class OAuth2Controller {

    @Autowired
    MemberFeignService memberFeignService;

    /**
     * 社交登陆回调
     * @param code
     * @return
     * @throws Exception
     */
    @GetMapping("/oauth2.0/weibo/success")
    public String weibo(@RequestParam("code") String code) throws Exception {
        Map<String,String> header = new HashMap<>();
        Map<String,String> query = new HashMap<>();

        // 1、根据code换取accessToken
        HashMap<String, String> map = new HashMap<>();
        map.put("client_id", "1643498253");
        map.put("client_secret", "71010dc8034f9073abe422d89337087e");
        map.put("grant_type", "authorization_code");
        map.put("redirect_uri", "http://auth.gulimall.cn/oauth2.0/weibo/success");
        map.put("code", code);
        HttpResponse response = HttpUtils.doPost("https://api.weibo.com", "/oauth2/access_token", "post", header, query, map);

        // 2、处理
        if (response.getStatusLine().getStatusCode()==200) {
            // 获取到了accessToken
            String json = EntityUtils.toString(response.getEntity());
            SocialUser socialUser = JSON.parseObject(json, SocialUser.class);
            // 知道当前是哪个社交用户
            // 1)、当前用户如果是第一次登录,则自动注册进来(为当前社交用户生成一个会员信息,以后这个社交账号就对应指定的会员)
            // 登录或者注册
            R oauth2Login = memberFeignService.oauth2Login(socialUser);
            if (oauth2Login.getCode() == 0) {
                // 3、登录成功提取信息并跳回首页
                MemberRespVo data = oauth2Login.getData("data", new TypeReference<MemberRespVo>() {
                });
                log.info("登录成功:用户:{}",data.toString());
                return "redirect:http://gulimall.cn";
            } else {
                return "redirect:http://auth.gulimall.cn/login.html";
            }
        } else {
            return "redirect:http://auth.gulimall.cn/login.html";
        }
    }
}
4.3.2、将HttpUtils类复制进 gulimall-common 服务下
使用之前第三方服务中封装的HttpUtils类进行发送请求。
1、为gulimall-common导入HttpUtils需要的依赖
<!--HttpUtils工具类需要使用的依赖-->
<dependency>
    <groupId>com.alibaba</groupId>
    <artifactId>fastjson</artifactId>
    <version>1.2.12</version>
</dependency>
<dependency>
    <groupId>org.apache.httpcomponents</groupId>
    <artifactId>httpclient</artifactId>
    <version>4.2.1</version>
</dependency>
<dependency>
    <groupId>org.apache.httpcomponents</groupId>
    <artifactId>httpcore</artifactId>
    <version>4.2.1</version>
</dependency>
<dependency>
    <groupId>commons-lang</groupId>
    <artifactId>commons-lang</artifactId>
    <version>2.6</version>
</dependency>
<dependency>
    <groupId>org.eclipse.jetty</groupId>
    <artifactId>jetty-util</artifactId>
    <version>9.3.7.v20160115</version>
</dependency>
2、将gulimall-third-party服务中的 HttpUtils类复制进 gulimall-common 服务下
public class HttpUtils {
    public static HttpResponse doGet(String host, String path, String method,
                                     Map<String, String> headers,
                                     Map<String, String> querys)
      //....
    }
		//...
}
4.3.3、远程 gulimall-member 社交登录接口编写
第一步、编写SocialUserVo
package com.atguigu.gulimall.member.vo;
@Data
public class MemberSocialUser {
    private String access_token;
    private String remind_in;
    private long expires_in;
    private String uid;
    private String isRealName;

}
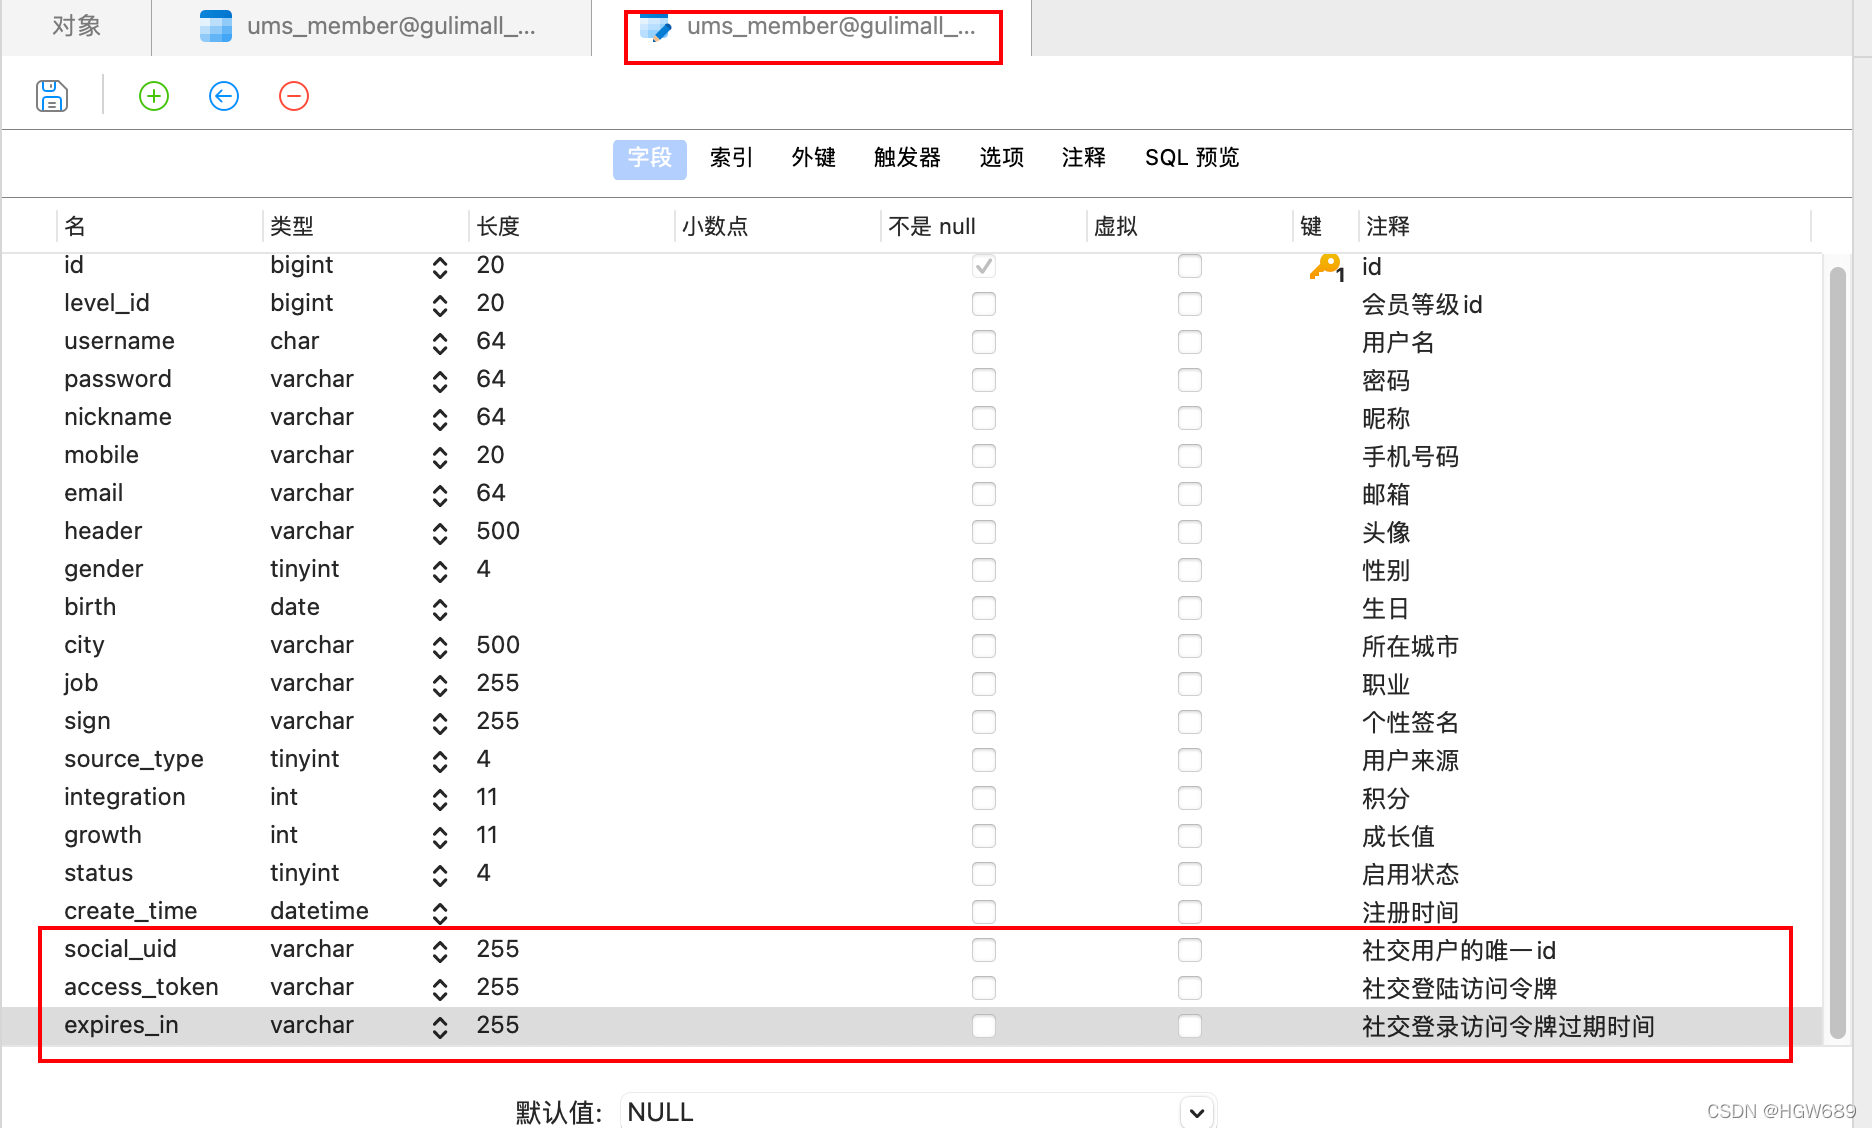
第二步、修改 'ums_member’表结构,并修改实体类
添加三个以下3个属性
- social_uid :社交用户的唯一id
- access_token :社交登陆访问令牌
- expires_in :社交登陆访问令牌的过期时间
为 MemberEntity 类添加上对应的属性:
package com.atguigu.gulimall.member.entity;

@Data
@TableName("ums_member")
public class MemberEntity implements Serializable {
  //前面本该有的属性省略...

   /**
   * 社交用户的唯一id
   */
  private String socialUid;
  /**
   * 社交登陆访问令牌
   */
  private String accessToken;
  /**
   * 社交登陆访问令牌的过期时间
   */
  private Long expiresIn;

}
第三步、编写Service层实现类 MemberServiceImpl 社交登录方法
/**
 * 社交登陆
 * 第一次登录则是:注册+登录
 * 非第一次登录即:登录
 * @param socialUser
 * @return
 */
@Override
public MemberEntity login(MemberSocialUser socialUser) throws Exception {
    String uid = socialUser.getUid();
    // 1、判断当前社交用户是否已经登录过系统
    MemberDao memberDao = this.baseMapper;
    MemberEntity memberEntity = memberDao.selectOne(new QueryWrapper<MemberEntity>().eq("social_uid", uid));
    if (memberEntity != null) {
        // 2、这个用户已经注册过
        MemberEntity update = new MemberEntity();
        update.setId(memberEntity.getId());
        update.setAccessToken(socialUser.getAccess_token());
        update.setExpiresIn(socialUser.getExpires_in());

        // 需要修改 登录令牌 和 登录令牌的过期时间
        memberDao.updateById(update);

        memberEntity.setAccessToken(socialUser.getAccess_token());
        memberEntity.setExpiresIn(socialUser.getExpires_in());
        return memberEntity;
    } else {
        // 2、没有查到当前社交用户对应的记录,我们需要注册一个
        MemberEntity regist = new MemberEntity();
        try{
            // 3、查询当前社交用户的社交账号信息(昵称,性别等)
            Map<String,String> query = new HashMap<>();
            query.put("access_token",socialUser.getAccess_token());
            query.put("uid",socialUser.getUid());
            HttpResponse response = HttpUtils.doGet("https://api.weibo.com", "/2/users/show.json", "get", new HashMap<String, String>(), query);
            if (response.getStatusLine().getStatusCode() == 200) {
                // 查询成功
                String json = EntityUtils.toString(response.getEntity());
                JSONObject jsonObject = JSON.parseObject(json);
                // 当前社交账号的信息
                String name = jsonObject.getString("name");
                String gender = jsonObject.getString("gender");
                String profile_image_url = jsonObject.getString("profile_image_url");
                regist.setNickname(name);
                regist.setGender("m".equals(gender)?1:0);
                regist.setHeader(profile_image_url);
            }
        }catch (Exception e){

        }
        regist.setSocialUid(socialUser.getUid());
        regist.setAccessToken(socialUser.getAccess_token());
        regist.setExpiresIn(socialUser.getExpires_in());
        memberDao.insert(regist);
        // 设置默认等级
        MemberLevelEntity levelEntity = memberLevelDao.getDefaultLevel();
        regist.setLevelId(levelEntity.getId());
        return regist;
    }
}
第四步、Controller层 MemberController类 实现方法编写
/**
 * 社交登录
 * @return
 */
@PostMapping("/oauth2/login")
public R oauth2Login(@RequestBody MemberSocialUser socialUser) throws Exception {
  MemberEntity entity = memberService.login(socialUser);
  if (entity != null) {
    return R.ok().setData(entity);
  } else {
    return R.error(BizCodeEnume.LOGINACCT_PASSWORD_INVAILD_EXCEPTION.getCode(),BizCodeEnume.LOGINACCT_PASSWORD_INVAILD_EXCEPTION.getMsg());
  }
}
第五步、gulimall-auth-server 服务编写feigin调用接口
package com.atguigu.gulimall.auth.feign;

@FeignClient("gulimall-member")
public interface MemberFeignService {

    // ...

    @PostMapping("/member/member/oauth2/login")
    public R oauth2Login(@RequestBody SocialUser socialUser) throws Exception;

}
五、SpringSession
5.1、分布式 Session 不共享不同步问题
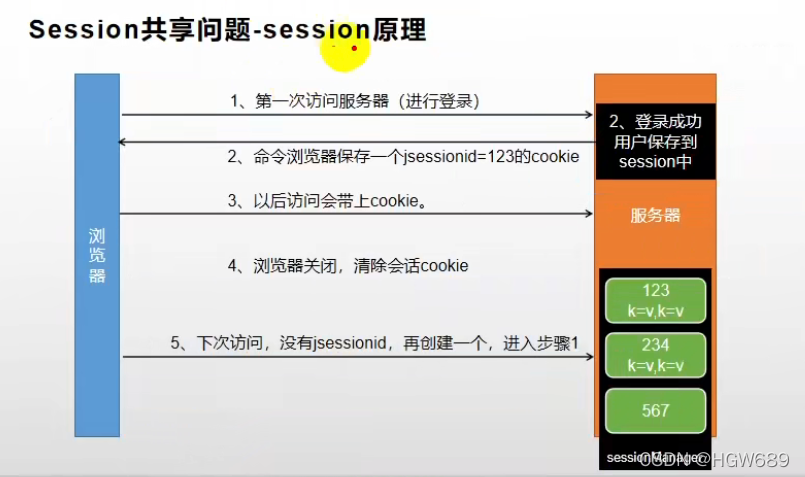
首先我们先来分析一下Session的工作原理
cookie 相当于一张银行卡,存在服务器的session相当于存储的现金,每次通过cookie 取出保存的数据:
5.1.1、提出问题
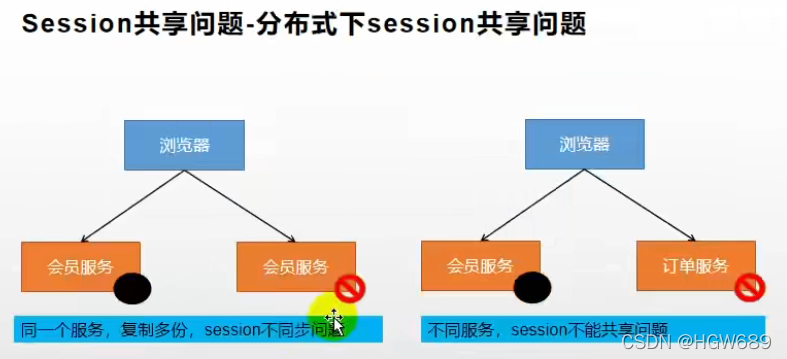
问题:
- 分布式的情况下,Session不同步(好比:早些年同一银行跨省办理行不通)
- 不同服务,Session不能共享问题(好比:拿着工商卡去农行取钱)
5.1.2、解决问题
5.1.2.1、解决 分布式的情况下,Session不同步
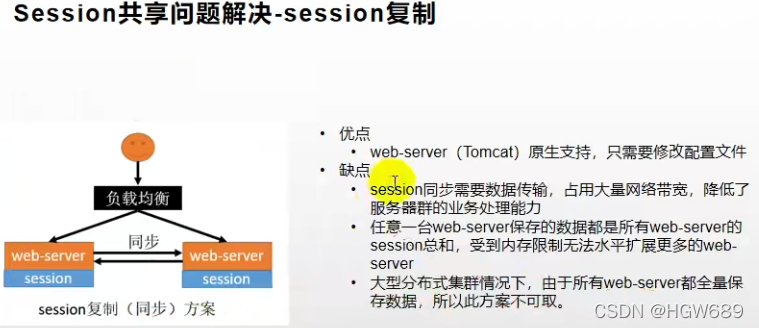
Session复制
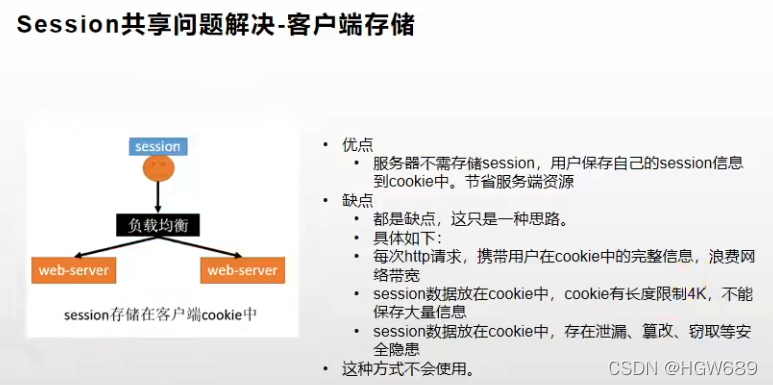
客户端存储
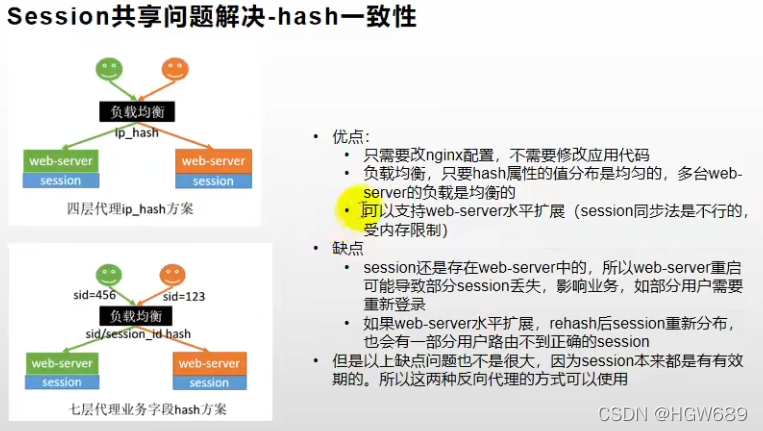
Hash 一致性
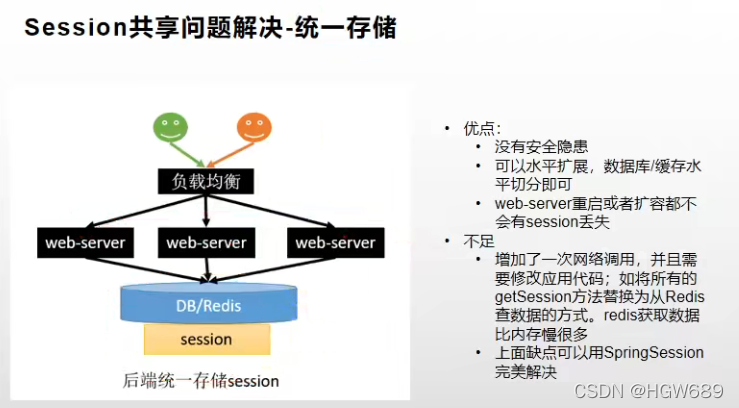
统一存储【本项目使用】
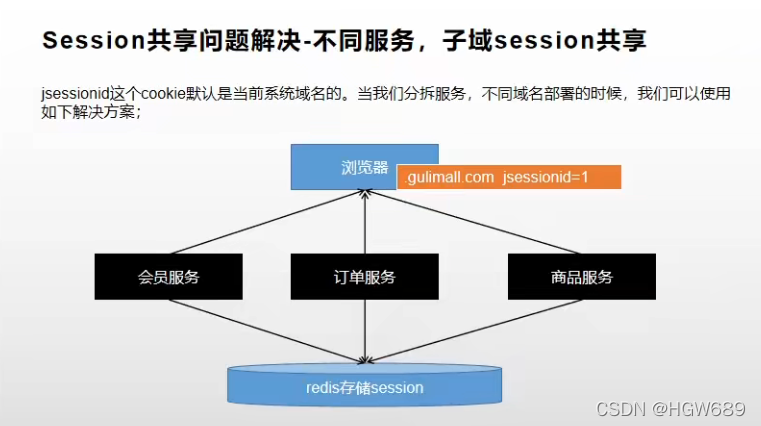
5.1.2.2、解决 不同服务,Session不能共享问题
第一次使用Sesssion的时候,分配cookie的时候扩大域(指定域名为父域名)。
5.1.3、本项目解决方案
本项目解决方案:
- 后端统一存储,会员服务登录之后将Session存储进Redis。
- 前端一个卡统一去用,会员服务给浏览器发卡的时候,指定cookie的指定域为父域
5.2、SpringSession 整合
5.2.1、SpringSession 整合 redis
后端统一存储,会员服务登录之后将Session存储进Redis。
给 gulimall-product、gulimall-auth-server 两个服务
- 导入依赖(gulimall-product、gulimall-auth-server)
<!-- 整合SpringSession完成Session共享问题-->
<dependency>
    <groupId>org.springframework.session</groupId>
    <artifactId>spring-session-data-redis</artifactId>
</dependency>
- 修改配置(gulimall-product、gulimall-auth-server)
# 配置SpringSession
spring.session.store-type=redis
- 主配置类添加注解
@EnableRedisHttpSession(gulimall-product、gulimall-auth-server)
@EnableRedisHttpSession
@EnableFeignClients
@EnableDiscoveryClient
@SpringBootApplication
public class GulimallAuthServerApplication {

    public static void main(String[] args) {
        SpringApplication.run(GulimallAuthServerApplication.class, args);
    }

}
- 响应类进行序列化
implements Serializable,并移动到gulimall-common服务中
package com.atguigu.common.vo;

@ToString
@Data
public class MemberRespVo implements Serializable {
    /**
     * id
     */
    private Long id;
    /**
     * 会员等级id
     */
   //......
}
- 在 OAuth2Controller 类中将数据放入Session
session.setAttribute("loginUser",data);
- 在gulimall-product 服务的index.html首页中从session中拿去数据
<li>
  <a href="http://auth.gulimall.cn/login.html">你好,请登录:[[${session.loginUser==null?'':session.loginUser.nickname}]]</a>
  </li>
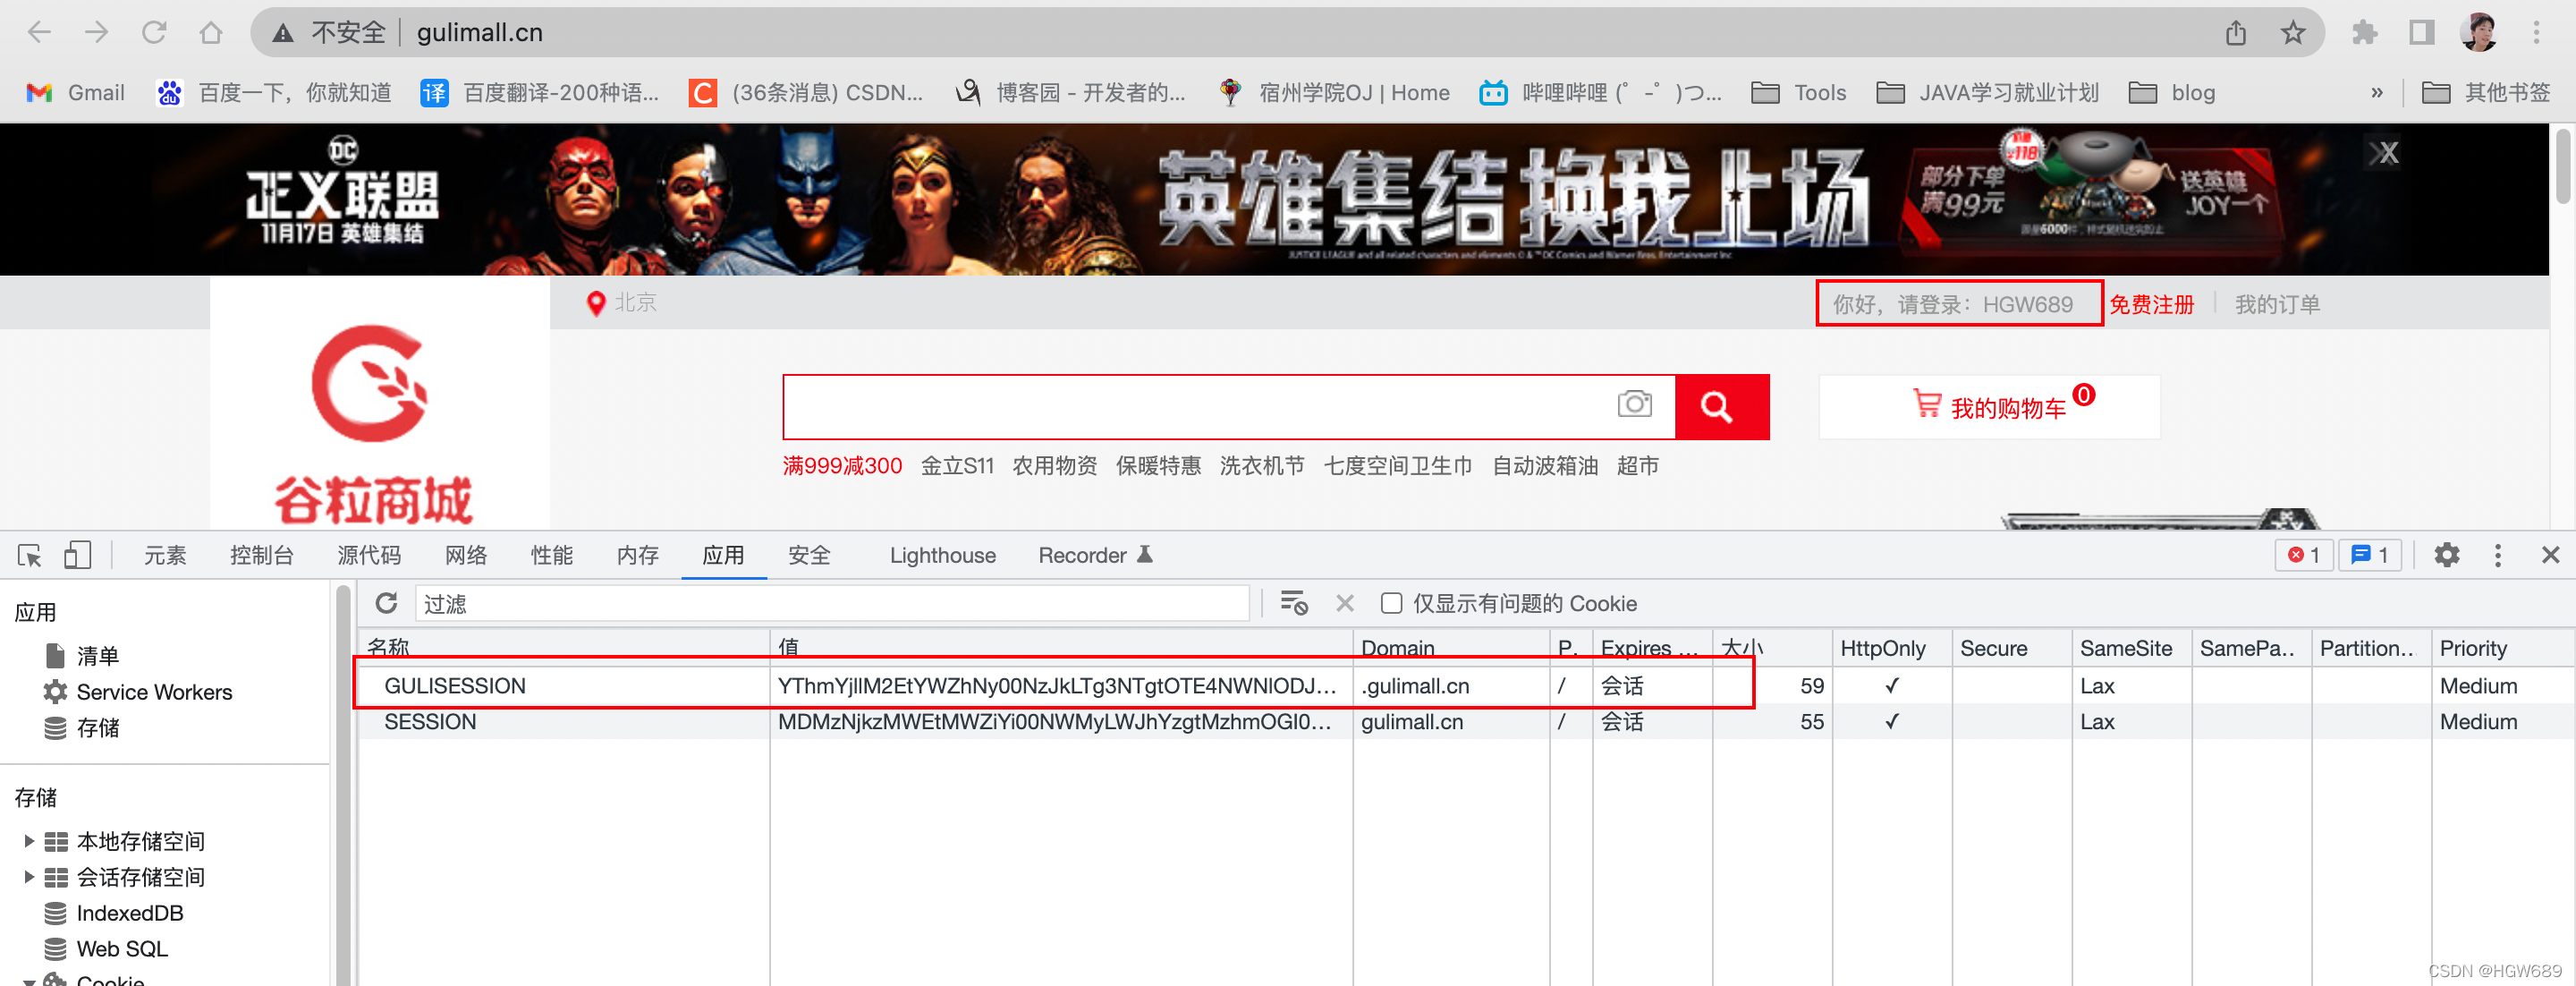
7、测试:手动将Session的域设置为父域,在gulimall.cn首页成功获取到session数据
5.2.2、自定义SpringSession完成子域共享
前面我们已经整合了 将Session放到Redis,并手动修改了Session的子域,这里我们来实现自定义SpringSession的子域。
- 由于默认使用jdk进行序列化,通过导入
RedisSerializer修改为json序列化 - 并且通过修改
CookieSerializer扩大session的作用域至**.gulimall.com
自定义配置
在 gulimall-product、gulimall-auth-server 服务中编写 GulimallSessionConfig 自定义配置类
/**
 * Data time:2022/4/9 10:19
 * StudentID:2019112118
 * Author:hgw
 * Description: 自定义Session 配置
 */
@Configuration
public class GulimallSessionConfig {

    @Bean
    public CookieSerializer cookieSerializer() {
        DefaultCookieSerializer cookieSerializer = new DefaultCookieSerializer();
        cookieSerializer.setDomainName("gulimall.cn");
        cookieSerializer.setCookieName("GULISESSION");


        return cookieSerializer;
    }

    @Bean
    public RedisSerializer<Object> springSessionDefaultRedisSerializer() {
        return new GenericJackson2JsonRedisSerializer();
    }
}
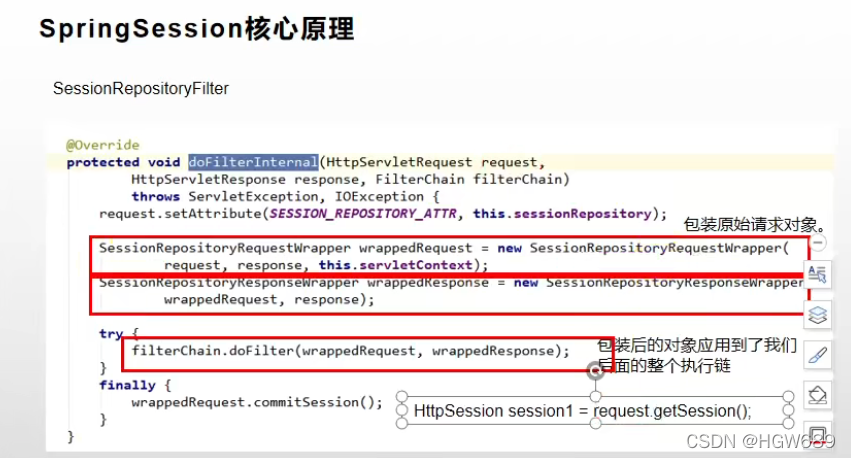
5.2.3、SpringSession核心原理分析-装饰者模式
- 原生的获取
session时是通过HttpServletRequest获取的
- 这里对request进行包装,并且重写了包装request的
getSession()方法
@EnableRedisHttpSession 导入 RedisHttpSessionConfiguration
  1、给容器中添加了一个组件
  + SessionRepository=》》》【RedisOperationsSessionRepository】==》 :redis操作session,session的增删改查封装类
2、SessionRepositoryFilter==》Filter:session 存储过滤器,每个请求过来都必须经过Filter + 1、创建的时候,就自动从容器中获取到了 SessionRepository + 2、原始的 request、response都被包装。SessionRepositoryRequestWrapper,SessionRepositoryResponseWrapper + 3、以后获取session。SessionRepositoryRequestWrapper中获取,它重写了.getSession()方法,从Redis中获取。(原生:request.getSession()) + 4、wrappedRequest.getSession();===》 SessionRepository 中获取
@Override
protected void doFilterInternal(HttpServletRequest request,
      HttpServletResponse response, FilterChain filterChain)
      throws ServletException, IOException {
   request.setAttribute(SESSION_REPOSITORY_ATTR, this.sessionRepository);

    //对原生的request、response进行包装
   SessionRepositoryRequestWrapper wrappedRequest = new SessionRepositoryRequestWrapper(
         request, response, this.servletContext);
   SessionRepositoryResponseWrapper wrappedResponse = new SessionRepositoryResponseWrapper(
         wrappedRequest, response);

   try {
      filterChain.doFilter(wrappedRequest, wrappedResponse);
   }
   finally {
      wrappedRequest.commitSession();
   }
}
5.3、页面效果完成
- 只要登录成功,缓存有用户数据,再点击登录链接,直接调转到首页;
把GulimallWebConfig登录页的映射注释掉 - 只要登录成功,所有页面都有数据信息
在 Controller层 LoginController 类中编写登录页面跳转代码:
@GetMapping("/login.html")
public String loginPage(HttpSession session) {
    Object attribute = session.getAttribute(AuthServerConstant.LOGIN_USER);
    if (attribute == null) {
        // 没登录,跳转到登录页
        return "login";
    } else {
        // 登录过,重定向到首页
        return "redirect:http://gulimall.cn";
    }
}
前面是社交登录,这里我们将按照账号密码登录登录成功也放入Session中!
1、账号密码登录成功之后,往Session中放入:session.setAttribute(AuthServerConstant.LOGIN_USER, data);
@PostMapping("/login")
public String login(UserLoginVo vo, RedirectAttributes redirectAttributes, HttpSession session) {
    // 远处登录
    R login = memberFeignService.login(vo);
    if(login.getCode()==0) {
        MemberRespVo data = login.getData("data", new TypeReference<MemberRespVo>() {
        });
        // 登录成功放到Session中
        session.setAttribute(AuthServerConstant.LOGIN_USER, data);
        return "redirect:http://gulimall.cn";
    } else {
        // 验证码出错
        Map<String, String> errors = new HashMap<>();
        errors.put("msg", login.getData("msg",new TypeReference<String>(){}));
        redirectAttributes.addFlashAttribute("errors", errors);
        // 如果校验错误,转发到注册页
        return "redirect:http://auth.gulimall.cn/login.html";
    }
}
package com.atguigu.common.constant;
public class AuthServerConstant {

    public static final String SMS_CODE_CACHE_PREFIX = "sms:code:";
    public static final String LOGIN_USER = "loginUser";
}
2、MemberController 类中登录成功之后返回 MemberEntity
/**
 * 账号密码登录
 * @return
 */
@PostMapping("/login")
public R login(@RequestBody MemberLoginVo vo) {
    MemberEntity entity = memberService.login(vo);
    if (entity != null) {
        return R.ok().setData(entity);
    } else {
        return R.error(BizCodeEnume.LOGINACCT_PASSWORD_INVAILD_EXCEPTION.getCode(),BizCodeEnume.LOGINACCT_PASSWORD_INVAILD_EXCEPTION.getMsg());
    }
}
3、修改所有前端页面
<ul>
  <li>
    <a th:if="${session.loginUser!=null}" >Hi,[[${session.loginUser.nickname}]]</a>
    <a href="http://auth.gulimall.cn/login.html" th:if="${session.loginUser==null}" >你好,请登录</a>
  </li>
  <li>
    <a th:if="${session.loginUser==null}" href="http://auth.gulimall.cn/reg.html" class="li_2">免费注册</a>
  </li>
  <span>|</span>
  <li>
    <a href="/static/#">我的订单</a>
  </li>
</ul>
六、单点登录
6.1、单点登录简介
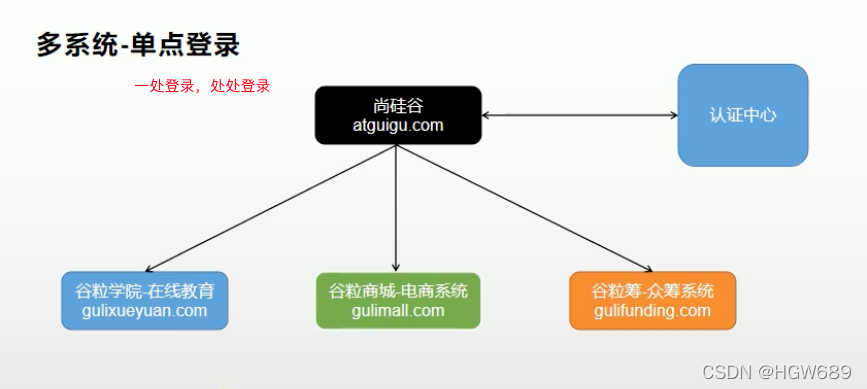
单点登录英文全称 Single Sign On,简称就是SSO。它的解释是:在多个应用系统中,只需要登录一次,就可以访问其他相互信任的应用系统。
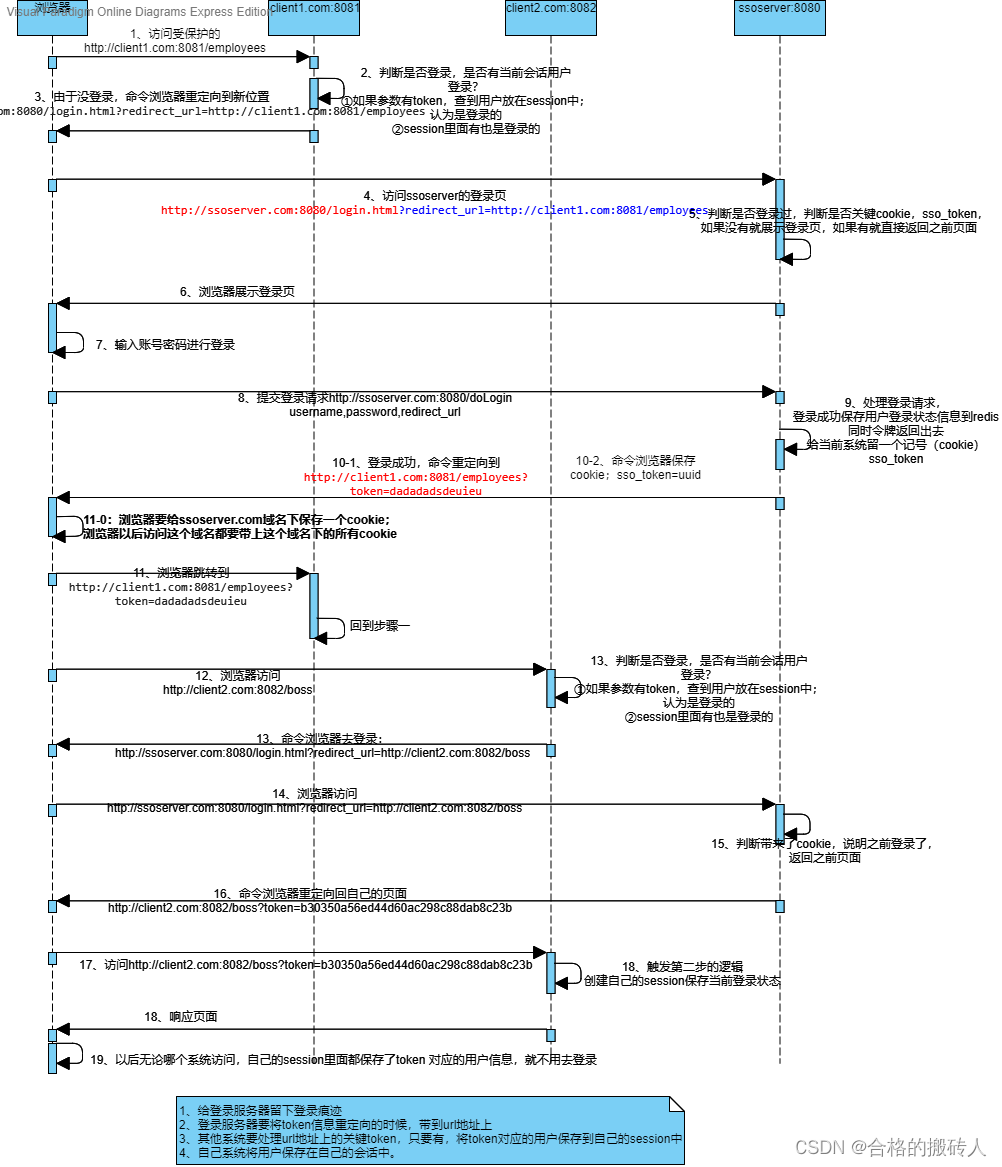
6.2、单点登录流程
-
客户端访问受保护的资源的时候
- 判断Session中是否有LoginUser
- 判断请求路径中是否有访问令牌token
- 如果上述都没有的情况,跳转到登录服务器SSOServer+redirectUrl地址(带上当前网址,为了后面登录后跳转)
return "redirect:"+ssoServer+"?redirect_url=http://client2.com:8082/employees";
-
SSOServer 登录服务器
-
首先判断cookie中是否有登录记录,如果cookie中有记录取出cookie对应的token值,带上访问令牌重新定向到 redirect_url
-
没有cookie则跳转到login.html等路页面输入登录信息
-
登录页面发送表单post请求登录,验证登录信息成功后
3.1 传一个UID作为key,value作为userId 将该键值队放入认证服务器等Cookie中在认证系统中记录登 录标记
Cookie sso_token = new Cookie("sso_token",token);
3.2 重定向到回调地址+访问令牌
return "redirect:"+url+"?token="+token;
-
