- 1. 概述
- 2. 引入 Spring Security OAuth2 依赖
- 3. 配置资源服务器
- 4. 配置授权服务器
- 4.1 授权码模式
- Spring Security Setting
- 4.2 密码模式
- 4.3 简化模式
- 4.4 客户端模式
- 4.5 如何选择?
- 4.6 为什么有 Client 编号和密码
- 5. 刷新令牌
- 5.1 获取刷新令牌
- 5.2 “刷新”访问令牌
- 5.3 为什么需要有刷新令牌
- 6. 删除令牌
- 6.1 删除访问令牌
- 6.2 删除刷新令牌
- 6.3 RFC7009 - OAuth2 Token Revocation
- 7. 令牌元数据
- 666. 彩蛋
1. 概述
本文,我们来入门 Spring Security OAuth2.0 的使用。通过本文,希望你对 OAuth2.0 有一次身临其境的感受。
另外,这是一篇入门的文章,所以实际场景下,需要做一些微调。当然,需要微调的地方,笔者会在示例中说明,以免误导。
如果你是 OAuth2.0 的萌新,建议先通读阮一峰大神的 《理解OAuth 2.0》。因为,本文不会去阐述 OAuth2.0 概念部分的内容。或者,也可以看看 《OAuth 2.0最简向导》 ,比较生动形象。
阅读完本文后,你想要更加深入的理解 OAuth2.0 ,可以阅读如下两本书籍:
- 《OAuth2 in Action》 重原理
- 《OAuth2 2.0 Cookbook》 重实践,基于 Spring Security OAuth2 。
阅读完本文后,你想要了解源码,可以阅读老徐的两篇文章:
- 《Re:从零开始的Spring Security OAuth2(二)》
- 《Re:从零开始的Spring Security OAuth2(三)》
OK,一波安利之后,我们来一起进入正文。对于 Spring Security OAuth2 的配置,大体来说,就是两步:
- 配置授权服务器( AuthorizationServer )
- 配置资源服务器( ResourceServer )
2. 引入 Spring Security OAuth2 依赖
在 pom.xml 文件中,引入如下:
<parent>
 <groupId>org.springframework.boot</groupId>
 <artifactId>spring-boot-starter-parent</artifactId>
 <version>1.5.16.RELEASE</version>
 <relativePath /> <!-- lookup parent from repository -->
</parent>
<dependencies>
 <!-- for Spring MVC -->
 <dependency>
 <groupId>org.springframework.boot</groupId>
 <artifactId>spring-boot-starter-web</artifactId>
 </dependency>
 <!-- for Spring Security -->
 <dependency>
 <groupId>org.springframework.boot</groupId>
 <artifactId>spring-boot-starter-security</artifactId>
 </dependency>
 <!-- for OAuth 2.0 -->
 <dependency>
 <groupId>org.springframework.security.oauth</groupId>
 <artifactId>spring-security-oauth2</artifactId>
 </dependency>
</dependencies>
因为,我们使用的是 SpringBoot 的版本为 1.5.16.RELEASE ,所以使用的 Spring Security 的版本为 4.2.8.RELEASE ,Spring Security OAuth2 的版本为 2.2.0.15.RELEASE 。
3. 配置资源服务器
一般情况下,资源服务器指的是,我们提供 API 的应用或服务。例如,订单服务、商品服务。考虑到让整个示例更加简单,本文先将它和授权服务器放在一个 Maven 项目中。
① 创建一个 Controller 类
/**
 * 示例模块 Controller
 */
@RestController
@RequestMapping("/api/example")
public class ExampleController {
 @RequestMapping("/hello")
 public String hello() {
 return "world";
 }
}
- 非常简单,这是一个示例模块的 Controller ,提供 /api/example/hello 接口。
② 配置资源服务器
// 资源服务配置
@Configuration
@EnableResourceServer
public class OAuth2ResourceServer extends ResourceServerConfigurerAdapter {
 @Override
 public void configure(HttpSecurity http) throws Exception {
 http.authorizeRequests()
 // 对 "/api/**" 开启认证
 .anyRequest()
 .authenticated()
 .and()
 .requestMatchers()
 .antMatchers("/api/**");
 }
}
- @Configuration 注解,保证 OAuth2ResourceServer 能够被 SpringBoot 扫描到配置。
- @EnableResourceServer 注解,开启资源服务器。
- 继承( extends ) ResourceServerConfigurerAdapter 类,并覆写 #configure(HttpSecurity http) 方法,配置对 HTTP 请求中,匹配 /api/**" 路径,开启认证的验证。
4. 配置授权服务器
在 OAuth2.0 中,定义了四种授权模式:
- 授权码模式( authorization code )
- 密码模式( resource owner password credentials )
- 简化模式( implicit )
- 客户端模式( client credentials )
所以,笔者在 SpringBoot-Labs/lab-02 目录下,每一种方式,都提供了一个 Maven 项目示例。
4.1 授权码模式
Maven 项目结构如下:
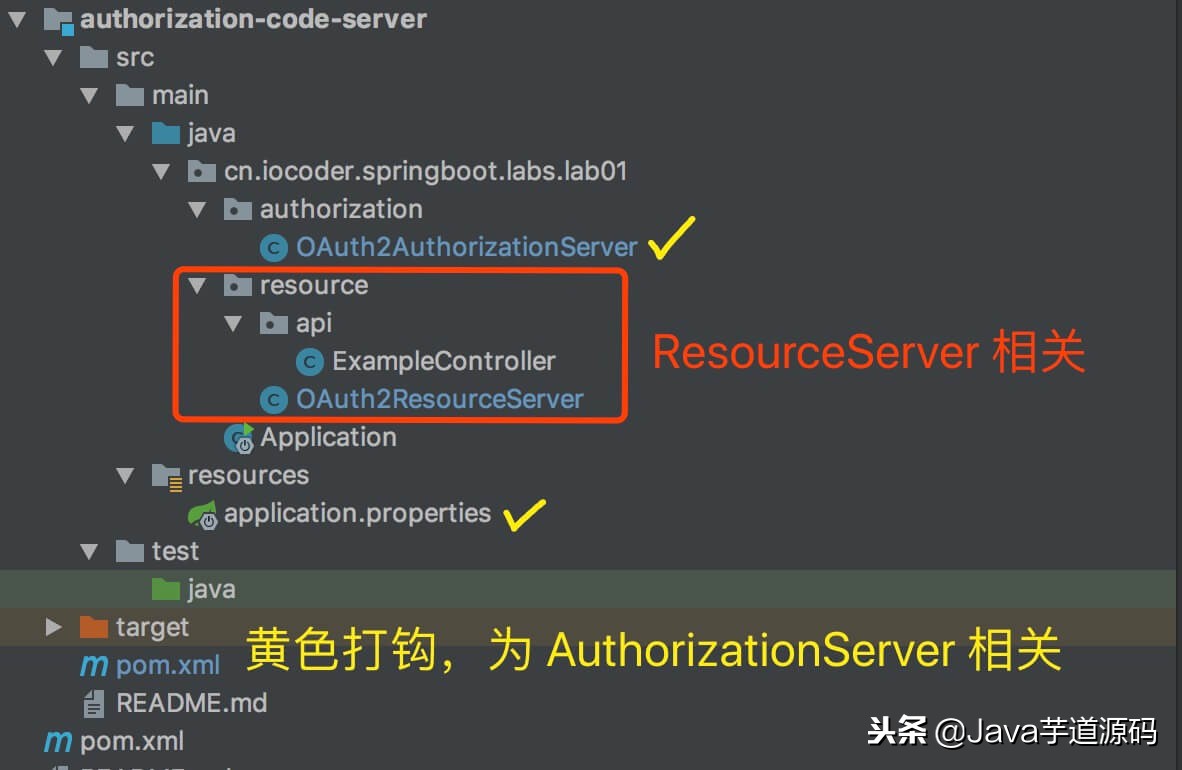
Maven 项目结构
对应 GitHub 地址:
https://github.com/YunaiV/SpringBoot-Labs/tree/master/lab-02/authorization-code-server
① 配置授权服务器
// 授权服务器配置
@Configuration
@EnableAuthorizationServer
public class OAuth2AuthorizationServer extends AuthorizationServerConfigurerAdapter {
 @Override
 public void configure(ClientDetailsServiceConfigurer clients) throws Exception {
 clients.inMemory() // <1>
 // <2> begin ...
 .withClient("clientapp").secret("112233") // Client 账号、密码。
 .redirectUris("http://localhost:9001/callback") // 配置回调地址,选填。
 .authorizedGrantTypes("authorization_code") // 授权码模式
 .scopes("read_userinfo", "read_contacts") // 可授权的 Scope
 // <2> end ...
// .and().withClient() // 可以继续配置新的 Client // <3>
 ;
 }
}
- @Configuration 注解,保证 OAuth2AuthorizationServer 能够被 SpringBoot 扫描到配置。
- @EnableAuthorizationServer 注解,开启授权服务器。
- <1> 处,基于内存,为了方便测试。实际情况下,最好放入数据库中,方便管理。
- <2> 处,创建一个 Client 配置。
- <3> 处,可以使用 #and() 方法,继续添加另外的 Client 配置。
② 配置登陆账号
创建 application.properties 文件,并配置如下:
# Spring Security Setting
security.user.name=yunai
security.user.password=1024
- 这里配置了一个账号为 "yunai" ,密码为 "1024" 的登陆账户。
- 实际生产环境下,登陆账号的数据,肯定是放在数据库中。
③ 启动项目
@SpringBootApplication
public class Application {
 public static void main(String[] args) {
 SpringApplication.run(Application.class, args);
 }
}
启动项目
④ 获取授权码
4.1 浏览器打开
http://localhost:8080/oauth/authorize?client_id=clientapp&redirect_uri=http://localhost:9001/callback&response_type=code&scope=read_userinfo
- client_id 参数,必传,为我