前言
系列专栏:【深度学习:算法项目实战】✨︎
涉及医疗健康、财经金融、商业零售、食品饮料、运动健身、交通运输、环境科学、社交媒体以及文本和图像处理等诸多领域,讨论了各种复杂的深度神经网络思想,如卷积神经网络、循环神经网络、生成对抗网络、门控循环单元、长短期记忆、自然语言处理、深度强化学习、大型语言模型和迁移学习。
在当今能源需求不断增长与环境保护意识日益增强的时代,风力发电作为一种清洁、可再生的能源形式,正发挥着越来越重要的作用。准确预测风力涡轮机的发电量对于优化电力系统的运行、提高能源利用效率以及保障电网的稳定性至关重要。
传统的风力涡轮机发电量预测方法在面对复杂的多变量时间序列数据时,往往存在一定的局限性。随着深度学习技术的飞速发展,卷积神经网络(CNN)和门控循环单元(GRU)等神经网络架构为解决这一难题提供了新的思路和强大的工具。
本文聚焦于基于 CNN+BiGRU 的风力涡轮机发电量多变量时序预测方法,并采用 PyTorch 深度学习框架进行实现。通过将 CNN 强大的特征提取能力与 BiGRU 对时间序列数据的良好建模能力相结合,我们旨在构建一个更加准确、高效的发电量预测模型。我们将从数据预处理开始,逐步引导读者理解模型的架构设计、参数调整以及性能评估等关键环节。同时,我们还将通过实际案例和实验分析,展示该模型在风力涡轮机发电量预测中的卓越表现。
基于CNN+BiGRU实现风力涡轮机发电量时序预测
1. 数据集介绍
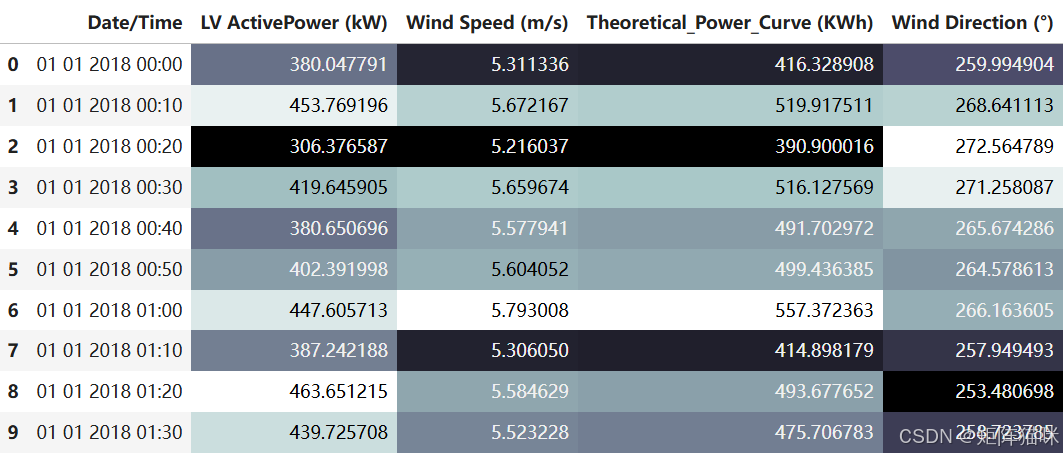
在风力涡轮机中,Scada 系统测量并保存风速、风向、发电量等数据,时间间隔为 10 分钟。该文件取自土耳其一台正在发电的风力涡轮机的 scada 系统。原数据英文及解释如下:
- Date/Time (for 10 minutes intervals)
- LV ActivePower (kW): The power generated by the turbine for that moment
- Wind Speed (m/s): The wind speed at the hub height of the turbine (the wind speed that turbine use for electricity generation)
- Theoretical_Power_Curve (KWh): The theoretical power values that the turbine generates with that wind speed which is given by the turbine manufacturer
- Wind Direction (°): The wind direction at the hub height of the turbine (wind turbines turn to this direction automaticly)
import numpy as np
import pandas as pd
import matplotlib.pyplot as plt
import seaborn as sns

from sklearn.preprocessing import StandardScaler
from sklearn.model_selection import train_test_split
from sklearn.metrics import mean_absolute_error, \
                            mean_absolute_percentage_error, \
                            mean_squared_error, root_mean_squared_error, \
                            r2_score

import torch
import torch.nn as nn
import torch.nn.functional as F
from torch.utils.data import TensorDataset, DataLoader, Dataset
from torchinfo import summary

np.random.seed(0)
data = pd.read_csv("T1.csv")
data.head(10).style.background_gradient(cmap='bone')
2. 数据预处理
现在,我们使用 pandas.to_datetime 函数,将日期解析为时间数据类型
print(type(data['LV ActivePower (kW)'].iloc[0]),type(data['Date/Time'].iloc[0]))

# Let's convert the data type of timestamp column to datatime format
data['Date/Time'] = pd.to_datetime(data['Date/Time'],format='%d %m %Y %H:%M')
print(type(data['LV ActivePower (kW)'].iloc[0]),type(data['Date/Time'].iloc[0]))

cond_1 = data['Date/Time'] >= '2018-01-01 00:00:00'
cond_2 = data['Date/Time'] <= '2018-01-07 23:59:59'
data = data[cond_1 & cond_2]
print(data.shape)
<class 'numpy.float64'> <class 'str'>
<class 'numpy.float64'> <class 'pandas._libs.tslibs.timestamps.Timestamp'>
(987, 5)
3. 数据可视化
3.1 数据相关性
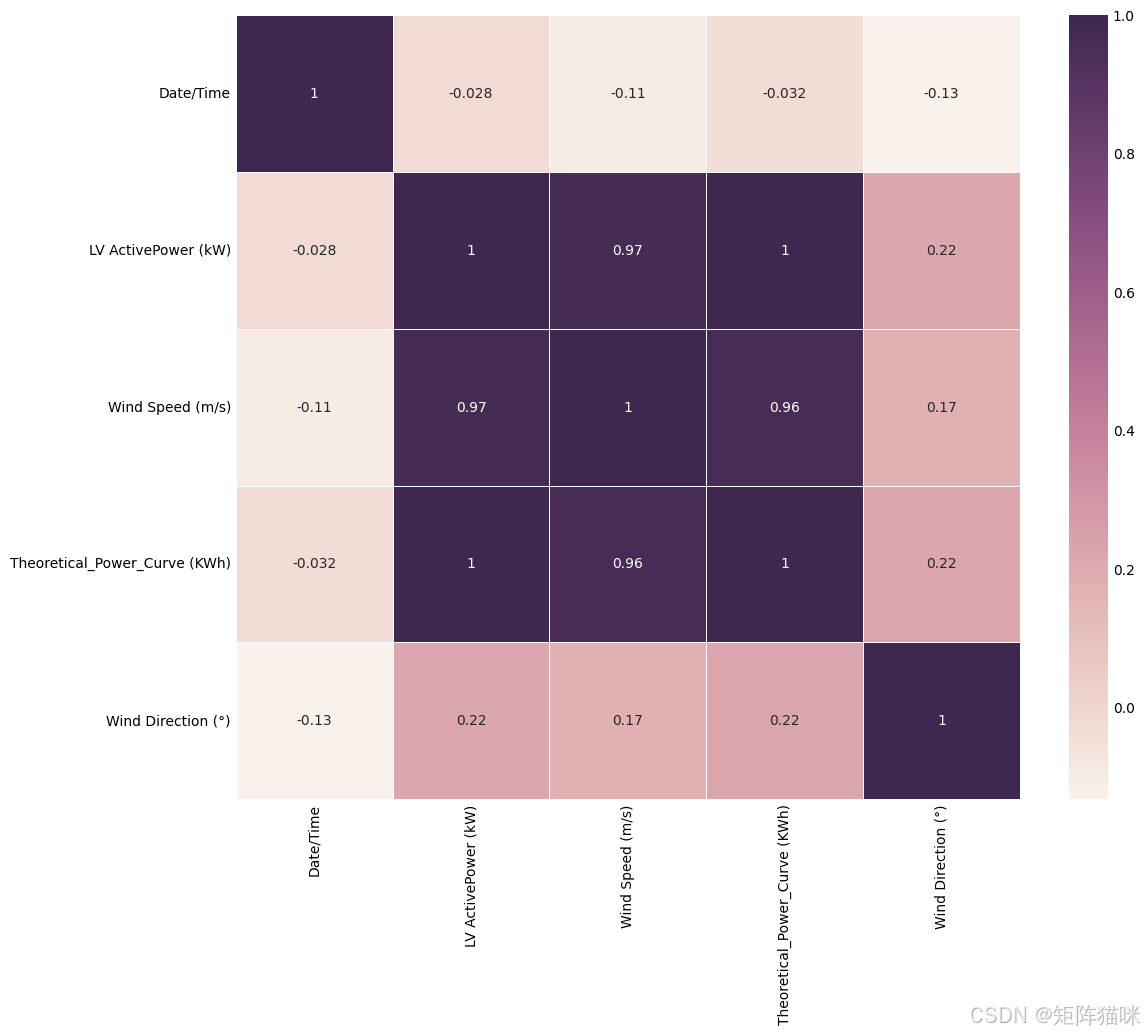
使用 pandas.DataFrame.corr 计算列的成对相关性,不包括 NA 空值,并绘制相关系数矩阵
correlation = data.corr()
print(correlation['LV ActivePower (kW)'].sort_values(ascending=False))
LV ActivePower (kW)              1.000000
Theoretical_Power_Curve (KWh)    0.996930
Wind Speed (m/s)                 0.965048
Wind Direction (°)               0.217183
Date/Time                       -0.028100
Name: LV ActivePower (kW), dtype: float64
plt.figure(figsize=(10, 8))  # 设置图片大小
sns.heatmap(correlation, annot=True, cmap=sns.cubehelix_palette(dark=.20, light=.95, as_cmap=True), linewidths=0.5)
plt.show()
很明显,LV ActivePower (kW) 与 Theoretical_Power_Curve (KWh)、Wind Speed (m/s) 存在强相关性
4. 特征工程
4.1 特征缩放(归一化)
在机器学习中 StandardScaler() 函数将数据的特征值转换为符合正态分布的形式,它将数据缩放到均值为0,标准差为1的区间。常用于不同尺度特征数据的标准化,以提高模型的泛化能力。fit_transform() 方法首先计算特征数据 features 的均值和方差,然后对数据进行标准化,使其具有零均值和单位方差。
# 使用选定的特征来训练模型
features = data.drop('Date/Time', axis=1)
target = data['LV ActivePower (kW)'].values.reshape(-1, 1)
# 创建 StandardScaler实例,对特征进行拟合和变换,生成NumPy数组
scaler = StandardScaler()
features_scaled = scaler.fit_transform(features)
target_scaled = scaler.fit_transform(target)
print(features_scaled.shape, target_scaled.shape)
4.2 构建时间序列数据
我们创建一个时间序列数据,时间步 time_steps 假设设置为10
time_steps = 10
X_list = []
y_list = []

for i in range(len(features_scaled) - time_steps):
    X_list.append(features_scaled[i:i+time_steps])
    y_list.append(target_scaled[i+time_steps])

X = np.array(X_list) # [samples, time_steps, num_features]
y = np.array(y_list) # [target]
上述代码的目的是进行时间序列数据的预处理,将原始的时间序列数据转换为适合机器学习模型输入的格式。具体来说,它通过滑动窗口的方式将时间序列数据分割成多个样本,每个样本包含一定数量的时间步 time_steps 的特征数据以及对应的一个目标值。time_steps:表示每个样本中包含的时间步数。它决定了模型在预测时考虑的历史数据长度。X_list:用于存储分割后的特征数据样本的列表。y_list:用于存储每个特征数据样本对应的目标值的列表。
X_list.append(features_scaled[i:i + time_steps]):将从当前位置 i 开始,长度为 time_steps 的特征数据切片添加到 X_list 中。这样就得到了一系列连续的时间步的特征数据样本。
y_list.append(target_scaled[i + time_steps]):将当前位置 i + time_steps 的目标值添加到 y_list 中。这个目标值对应于当前特征数据样本之后的一个时间步的目标值。
samples, time_steps, num_features = X.shape
4.3 数据集划分
train_test_split 函数将数组或矩阵随机分成训练子集和测试子集。
X_train, X_valid,\
    y_train, y_valid = train_test_split(X, y,
                                        test_size=0.2,
                                        random_state=45,
                                        shuffle=False)
print(X_train.shape, X_valid.shape, y_train.shape, y_valid.shape)
以上代码中 random_state=45 设置了随机种子,以确保每次运行代码时分割结果的一致性。shuffle=False 表示在分割数据时不进行随机打乱。如果设置为True(默认值),则会在分割之前对数据进行随机打乱,这样可以增加数据的随机性,但时间序列数据具有连续性,所以设置为False。
4.4 数据集张量
# 将 NumPy数组转换为 tensor张量
X_train_tensor = torch.from_numpy(X_train).type(torch.Tensor)
X_valid_tensor = torch.from_numpy(X_valid).type(torch.Tensor)
y_train_tensor = torch.from_numpy(y_train).type(torch.Tensor).view(-1, 1)
y_valid_tensor = torch.from_numpy(y_valid).type(torch.Tensor).view(-1, 1)

print(X_train_tensor.shape, X_valid_tensor.shape, y_train_tensor.shape, y_valid_tensor.shape)
以上代码通过 train_test_split 划分得到的训练集和验证集中的特征数据 X_train、X_valid 以及标签数据 y_train、y_valid 从 numpy 数组转换为 PyTorch 的张量(tensor)类型。.type(torch.Tensor) 确保张量的数据类型为标准的 torch.Tensor 类型,.view(-1, 1) 对张量进行维度调整
class DataHandler(Dataset):
    def __init__(self, X_train_tensor, y_train_tensor, X_valid_tensor, y_valid_tensor):
        self.X_train_tensor = X_train_tensor
        self.y_train_tensor = y_train_tensor
        self.X_valid_tensor = X_valid_tensor
        self.y_valid_tensor = y_valid_tensor

    def __len__(self):
        return len(self.X_train_tensor)

    def __getitem__(self, idx):
        sample = self.X_train_tensor[idx]
        labels = self.y_train_tensor[idx]
        return sample, labels

    def train_loader(self):
        train_dataset = TensorDataset(self.X_train_tensor, self.y_train_tensor)
        return DataLoader(train_dataset, batch_size=32, shuffle=True)

    def valid_loader(self):
        valid_dataset = TensorDataset(self.X_valid_tensor, self.y_valid_tensor)
        return DataLoader(valid_dataset, batch_size=32, shuffle=False)
在上述代码中,定义了一个名为 DataHandler 的类,它继承自 torch.utils.data.Dataset
__init__ 方法用于接收数据和标签。__len__ 方法返回数据集的长度。__getitem__ 方法根据给定的索引 idx 返回相应的数据样本和标签。
data_handler = DataHandler(X_train_tensor, y_train_tensor, X_valid_tensor, y_valid_tensor)
train_loader = data_handler.train_loader()
valid_loader = data_handler.valid_loader()
5. 构建时序模型(TSF)
5.1 构建CNN+BiGRU模型
class CNN_BiGRU(nn.Module):
    def __init__(self,
                 in_channels, # 输入特征维度 input_dim
                 out_channels, # CNN卷积产生的通道数量用作 GRU的输入
                 hidden_dim,
                 num_layers,
                 output_dim,
                ):
        super(CNN_BiGRU, self).__init__()
        self.conv = nn.Conv1d(in_channels, out_channels, kernel_size=3, stride=1, padding=1)
        self.pool = nn.MaxPool1d(kernel_size=2, stride=1)
        self.hidden_dim = hidden_dim
        self.num_layers = num_layers
        self.bigru = nn.GRU(
            out_channels,
            hidden_dim,
            num_layers=num_layers,
            batch_first=True,
            bidirectional=True)
        self.dropout = nn.Dropout(p=0.5)
        self.fc = nn.Linear(hidden_dim*2, output_dim)

    def forward(self, x): # x: [batch_size, seq_len, input_dim]
        # CNN层
        x = x.permute(0, 2, 1)  # 调整维度为 [batch_size, input_dim, seq_len]
        x = F.relu(self.conv(x))
        x = self.pool(x)
        x = x.permute(0, 2, 1)  # 调整维度为 [batch_size, seq_len, input_dim]
        # GRU层
        out, _ = self.bigru(x)
        drop_gruout = self.dropout(out)
        output = drop_gruout[:, -1, :]
        # 全连接层
        out = self.fc(output)
        return out
5.2 定义模型、损失函数与优化器
model = CNN_BiGRU(in_channels = num_features, # 输入特征维度 input_dim
                  out_channels = 8, # CNN卷积产生的通道数量用作 GRU的输入
                  hidden_dim = 32,
                  num_layers = 2,
                  output_dim = 1)
criterion_mse = nn.MSELoss()  # 定义均方误差损失函数
criterion_mae = nn.L1Loss()  # 定义平均绝对误差损失
optimizer = torch.optim.Adam(model.parameters(), lr=1e-04) # 定义优化器
PyTorch中,损失函数 nn.MSELoss() 用于计算模型预测值和真实值之间的均方误差(Mean Squared Error, MSE),nn.L1Loss() 用于计算模型预测值和真实值之间的平均绝对误差(Mean Absolute Error, MAE)
5.3 模型概要
# batch_size, seq_len(time_steps), input_size(in_channels)
summary(model, (32, time_steps, num_features))
==========================================================================================
Layer (type:depth-idx)                   Output Shape              Param #
==========================================================================================
CNN_BiGRU                                [32, 1]                   --
├─Conv1d: 1-1                            [32, 8, 10]               104
├─MaxPool1d: 1-2                         [32, 8, 9]                --
├─GRU: 1-3                               [32, 9, 64]               26,880
├─Dropout: 1-4                           [32, 9, 64]               --
├─Linear: 1-5                            [32, 1]                   65
==========================================================================================
Total params: 27,049
Trainable params: 27,049
Non-trainable params: 0
Total mult-adds (Units.MEGABYTES): 7.78
==========================================================================================
Input size (MB): 0.01
Forward/backward pass size (MB): 0.17
Params size (MB): 0.11
Estimated Total Size (MB): 0.28
==========================================================================================
6. 模型训练与可视化
6.1 定义训练与评估函数
在模型训练之前,我们需先定义 train 函数来执行模型训练过程
def train(model, iterator, optimizer):
    epoch_loss_mse = 0
    epoch_loss_mae = 0

    model.train()  # 确保模型处于训练模式
    for batch in iterator:
        optimizer.zero_grad()  # 清空梯度
        inputs, targets = batch  # 获取输入和目标值
        outputs = model(inputs)  # 前向传播

        loss_mse = criterion_mse(outputs, targets)  # 计算损失
        loss_mae = criterion_mae(outputs, targets)

        combined_loss = loss_mse + loss_mae  # 可以根据需要调整两者的权重

        combined_loss.backward()
        optimizer.step()

        epoch_loss_mse += loss_mse.item()  # 累计损失
        epoch_loss_mae += loss_mae.item()

    average_loss_mse = epoch_loss_mse / len(iterator)  # 计算平均损失
    average_loss_mae = epoch_loss_mae / len(iterator)

    return average_loss_mse, average_loss_mae
上述代码定义了一个名为 train 的函数,用于训练给定的模型。它接收模型、数据迭代器、优化器作为参数,并返回训练过程中的平均损失。
def evaluate(model, iterator):
    epoch_loss_mse = 0
    epoch_loss_mae = 0

    model.eval()  # 将模型设置为评估模式,例如关闭 Dropout 等
    with torch.no_grad():  # 不需要计算梯度
        for batch in iterator:
            inputs, targets = batch
            outputs = model(inputs)  # 前向传播

            loss_mse = criterion_mse(outputs, targets)  # 计算损失
            loss_mae = criterion_mae(outputs, targets)

            epoch_loss_mse += loss_mse.item()  # 累计损失
            epoch_loss_mae += loss_mae.item()

    return epoch_loss_mse / len(iterator), epoch_loss_mae / len(iterator)
上述代码定义了一个名为 evaluate 的函数,用于评估给定模型在给定数据迭代器上的性能。它接收模型、数据迭代器作为参数,并返回评估过程中的平均损失。这个函数通常在模型训练的过程中定期被调用,以监控模型在验证集或测试集上的性能。通过评估模型的性能,可以了解模型的泛化能力和训练的进展情况。
epoch = 500
train_mselosses = []
valid_mselosses = []
train_maelosses = []
valid_maelosses = []

for epoch in range(epoch):
    train_loss_mse, train_loss_mae = train(model, train_loader, optimizer)
    valid_loss_mse, valid_loss_mae = evaluate(model, valid_loader)

    train_mselosses.append(train_loss_mse)
    valid_mselosses.append(valid_loss_mse)
    train_maelosses.append(train_loss_mae)
    valid_maelosses.append(valid_loss_mae)

    print(f'Epoch: {epoch+1:02}, Train MSELoss: {train_loss_mse:.5f}, Train MAELoss: {train_loss_mae:.3f}, Val. MSELoss: {valid_loss_mse:.5f}, Val. MAELoss: {valid_loss_mae:.3f}')
Epoch: 01, Train MSELoss: 0.84399, Train MAELoss: 0.828, Val. MSELoss: 1.32501, Val. MAELoss: 1.103
Epoch: 02, Train MSELoss: 0.75728, Train MAELoss: 0.776, Val. MSELoss: 1.28691, Val. MAELoss: 1.084
Epoch: 03, Train MSELoss: 0.66252, Train MAELoss: 0.715, Val. MSELoss: 1.22470, Val. MAELoss: 1.054
Epoch: 04, Train MSELoss: 0.55315, Train MAELoss: 0.636, Val. MSELoss: 1.08545, Val. MAELoss: 0.985
Epoch: 05, Train MSELoss: 0.41953, Train MAELoss: 0.530, Val. MSELoss: 0.85902, Val. MAELoss: 0.865
******
Epoch: 496, Train MSELoss: 0.03617, Train MAELoss: 0.144, Val. MSELoss: 0.03242, Val. MAELoss: 0.119
Epoch: 497, Train MSELoss: 0.03610, Train MAELoss: 0.142, Val. MSELoss: 0.03192, Val. MAELoss: 0.116
Epoch: 498, Train MSELoss: 0.03768, Train MAELoss: 0.145, Val. MSELoss: 0.03176, Val. MAELoss: 0.118
Epoch: 499, Train MSELoss: 0.03656, Train MAELoss: 0.142, Val. MSELoss: 0.03154, Val. MAELoss: 0.116
Epoch: 500, Train MSELoss: 0.03670, Train MAELoss: 0.144, Val. MSELoss: 0.03448, Val. MAELoss: 0.126
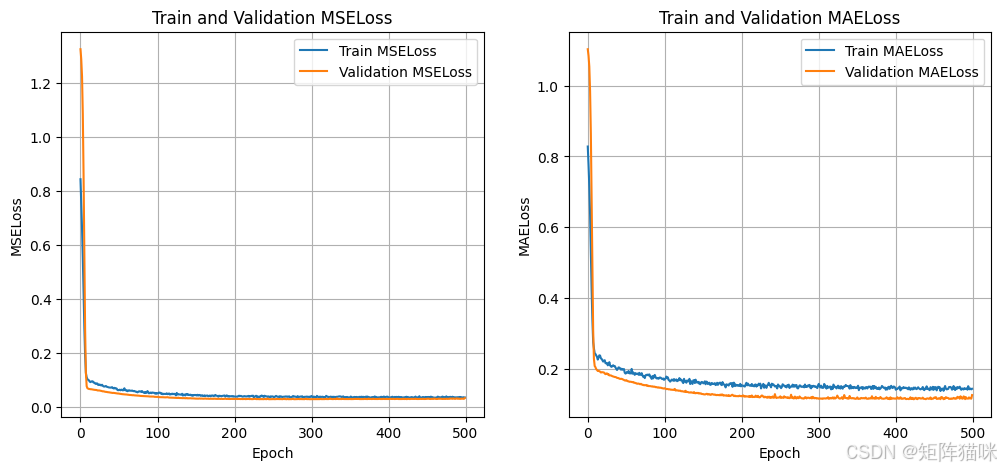
6.2 绘制训练与验证损失曲线
# 绘制 MSE损失图
plt.figure(figsize=(12, 5))
plt.subplot(1, 2, 1)
plt.plot(train_mselosses, label='Train MSELoss')
plt.plot(valid_mselosses, label='Validation MSELoss')
plt.xlabel('Epoch')
plt.ylabel('MSELoss')
plt.title('Train and Validation MSELoss')
plt.legend()
plt.grid(True)

# 绘制 MAE损失图
plt.subplot(1, 2, 2)
plt.plot(train_maelosses, label='Train MAELoss')
plt.plot(valid_maelosses, label='Validation MAELoss')
plt.xlabel('Epoch')
plt.ylabel('MAELoss')
plt.title('Train and Validation MAELoss')
plt.legend()
plt.grid(True)

plt.show()
7. 模型评估与可视化
7.1 构建预测函数
定义预测函数prediction 方便调用
# 定义 prediction函数
def prediction(model, iterator):
    all_targets = []
    all_predictions = []

    model.eval()
    with torch.no_grad():
        for batch in iterator:
            inputs, targets = batch
            predictions = model(inputs)

            all_targets.extend(targets.numpy())
            all_predictions.extend(predictions.numpy())
    return all_targets, all_predictions
这段代码定义了一个名为 prediction 的函数,其主要目的是使用给定的模型对输入数据进行预测,并收集所有的目标值和预测值。
7.2 验证集预测
# 模型预测
targets, predictions = prediction(model, valid_loader)
denormalized_targets = scaler.inverse_transform(targets)
denormalized_predictions = scaler.inverse_transform(predictions)
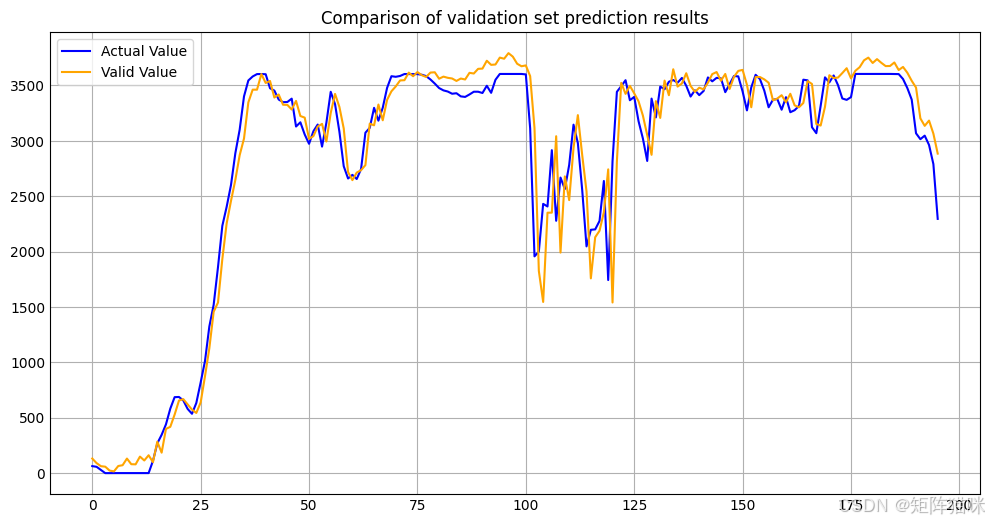
targets 是经过标准化处理后的目标值数组,predictions 是经过标准化处理后的预测值数组。scaler 是StandardScaler() 标准化类的实例,inverse_transform 方法会将标准化后的数组还原为原始数据的尺度,即对预测值进行反标准化操作。
# Visualize the data
plt.figure(figsize=(12,6))
plt.style.use('_mpl-gallery')
plt.title('Comparison of validation set prediction results')
plt.plot(denormalized_targets, color='blue',label='Actual Value')
plt.plot(denormalized_predictions, color='orange', label='Valid Value')
plt.legend()
plt.show()
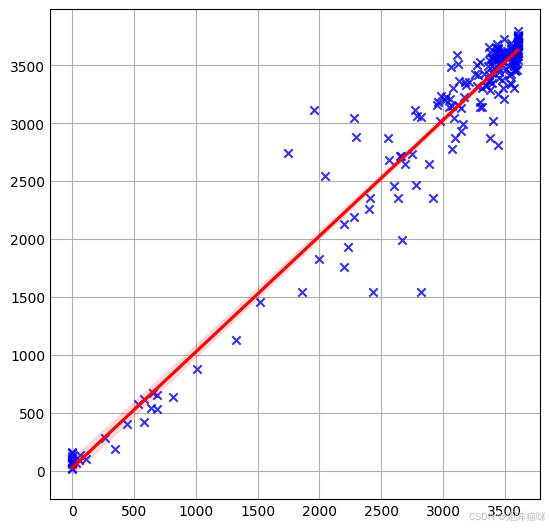
7.3 回归拟合图
使用 regplot() 函数绘制数据图并拟合线性回归模型。
plt.figure(figsize=(5, 5), dpi=100)
sns.regplot(x=denormalized_targets, y=denormalized_predictions, scatter=True, marker="x", color='blue',line_kws={'color': 'red'})
plt.show()
7.4 评估指标
以下代码使用了一些常见的评估指标:平均绝对误差(MAE)、平均绝对百分比误差(MAPE)、均方误差(MSE)、均方根误差(RMSE)和决定系数(R²)来衡量模型预测的性能。这里我们将通过调用 sklearn.metrics 模块中的 mean_absolute_error mean_absolute_percentage_error mean_squared_error root_mean_squared_error r2_score 函数来对模型的预测效果进行评估。
mae = mean_absolute_error(targets, predictions)
print(f"MAE: {mae:.4f}")

mape = mean_absolute_percentage_error(targets, predictions)
print(f"MAPE: {mape * 100:.4f}%")

mse = mean_squared_error(targets, predictions)
print(f"MSE: {mse:.4f}")

rmse = root_mean_squared_error(targets, predictions)
print(f"RMSE: {rmse:.4f}")

r2 = r2_score(targets, predictions)
print(f"R²: {r2:.4f}")
MAE: 0.1141
MAPE: 27.5542%
MSE: 0.0307
RMSE: 0.1752
R²: 0.9511

