搭建集群后的SpringBoot配置
rocketmq:
  name-server: 192.168.106.129:9876;192.168.106.131:9876
  producer:
    group: springBootProducerGroup
1、机器环境
准备2台虚拟机
192.168.106.129
192.168.106.131
2、安装前置
- 每个虚拟机关闭防火墙
systemctl stop firewalld
systemctl disable firewalld
- 每个虚拟机安装好java
- 每个虚拟机安装好RocketMQ
#java
export JAVA_HOME=/usr/local/java/jdk1.8.0_361
#RocketMQ
export ROCKETMQ_HOME=/usr/local/rocketmq/rocketmq-all-4.9.4-bin-release
export PATH=$PATH:$JAVA_HOME/bin:$ROCKETMQ_HOME/bin:/usr/local/mysql/bin
- 每个虚拟机创建好RocketMQ数据存储目录
#创建
mkdir -p /app/rocketmq/store
mkdir -p /app/rocketmq/storeSlave
#加执行权限
chmod -R +x /usr/local/rocketmq/rocketmq-all-4.9.4-bin-release/bin
3、配置RocketMQ集群
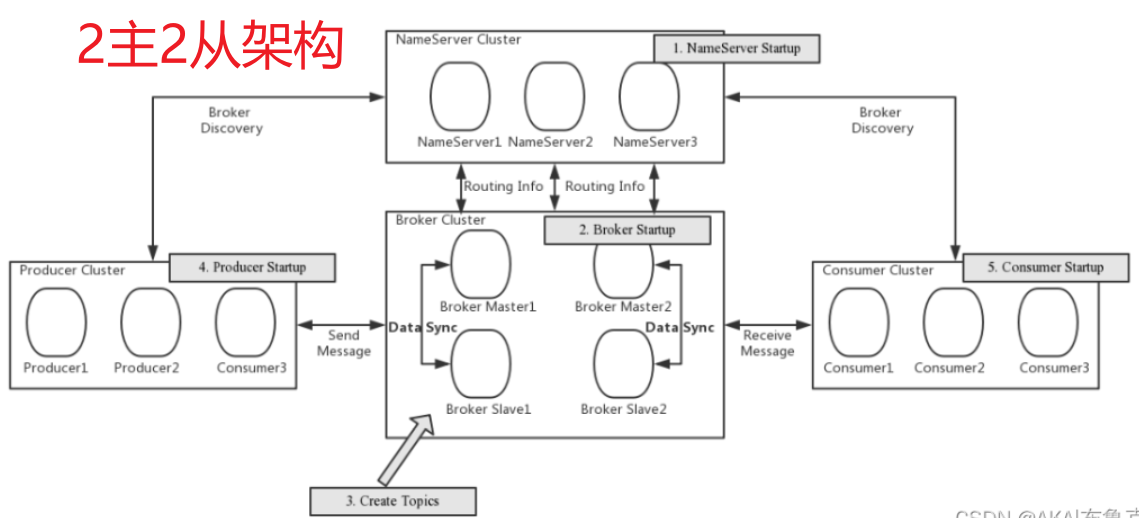
本次搭建一个2主2从异步刷盘的集群,所以我们会使用conf/2m-2s-async下的配 置文件。预备设计的集群情况如下:
| 机器 | nemaeServer节点部署 | broker节点部署 |
| 192.168.106.129 | nameserver | broker-a, broker-b-s |
| 192.168.106.131 | nameserver | broker-b,broker-a-s |
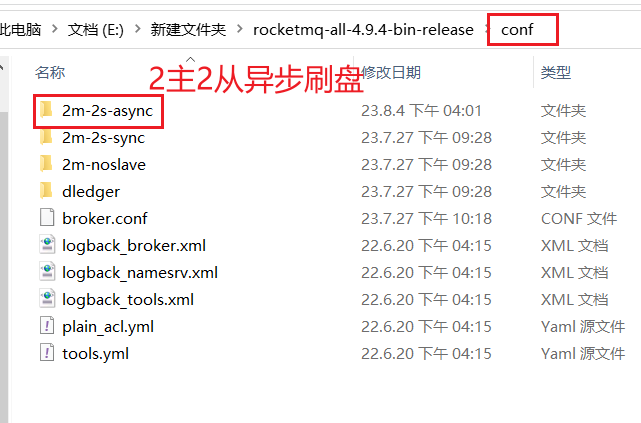
所以修改的配置文件是进入rocketmq的conf目录下修改2m-2s-async的配置文件。
在rocketmq的conf目录下可以看到rocketmq建议的各种配置方式:
- 2m-2s-async: 2主2从异步刷盘(吞吐量较大,但是消息可能丢失),
- 2m-2s-sync:2主2从同步刷盘(吞吐量会下降,但是消息更安全),
- 2m-noslave:2主无从。
我们这次采用2m-2s-async的方式搭建集群。
1、配置第一组broker-a
在192.168.106.129上先配置borker-a的master节点。先配置2m-2s-async/broker-a.properties
注意:rocketmq默认commitLog 存储路径位于(默认当前用户下$HOME\store\)
#所属集群名字,名字一样的节点就在同一个集群内
brokerClusterName=rocketmq-cluster
#broker名字,名字一样的节点就是一组主从节点。
brokerName=broker-a
#brokerid,0就表示是Master,>0的都是表示 Slave
brokerId=0
#nameServer地址,分号分割
namesrvAddr=192.168.106.129:9876;192.168.106.131:9876
#在发送消息时,自动创建服务器不存在的topic,默认创建的队列数
defaultTopicQueueNums=8
#是否允许 Broker 自动创建Topic,建议线下开启,线上关闭
autoCreateTopicEnable=true
#是否允许 Broker 自动创建订阅组,建议线下开启,线上关闭
autoCreateSubscriptionGroup=true
#Broker 对外服务的监听端口
listenPort=10911
#删除文件时间点,默认凌晨 4点
deleteWhen=04
#文件保留时间,默认 48 小时
fileReservedTime=120
#commitLog每个文件的大小默认1G
mapedFileSizeCommitLog=1073741824
#ConsumeQueue每个文件默认存30W条,根据业务情况调整
mapedFileSizeConsumeQueue=300000
#destroyMapedFileIntervalForcibly=120000
#redeleteHangedFileInterval=120000
#检测物理文件磁盘空间
diskMaxUsedSpaceRatio=88
#存储路径
storePathRootDir=/app/rocketmq/store
#commitLog 存储路径
#注意:rocketmq默认commitLog 存储路径位于(默认当前用户下$HOME\store\)
storePathCommitLog=/app/rocketmq/store/commitlog
#消费队列存储路径存储路径
storePathConsumeQueue=/app/rocketmq/store/consumequeue
#消息索引存储路径
storePathIndex=/app/rocketmq/store/index
#checkpoint 文件存储路径
storeCheckpoint=/app/rocketmq/store/checkpoint
#abort 文件存储路径
abortFile=/app/rocketmq/store/abort
#限制的消息大小
maxMessageSize=65536
#flushCommitLogLeastPages=4
#flushConsumeQueueLeastPages=2
#flushCommitLogThoroughInterval=10000
#flushConsumeQueueThoroughInterval=60000
#主从同步方式
#- ASYNC_MASTER 异步复制Master
#- SYNC_MASTER 同步双写Master
#- SLAVE
brokerRole=ASYNC_MASTER
#刷盘方式
#- SYNC_FLUSH 同步刷盘
#- ASYNC_FLUSH 异步刷盘
flushDiskType=ASYNC_FLUSH
#checkTransactionMessageEnable=false
#发消息线程池数量
#sendMessageThreadPoolNums=128
#拉消息线程池数量
#pullMessageThreadPoolNums=128
该节点对应的从节点在192.168.106.131上。需要修改2m-2s-async/broker-a-s.properties如下内容:
- brokerId
- listenPort
- storePathRootDir
- brokerRole
#所属集群名字,名字一样的节点就在同一个集群内
brokerClusterName=rocketmq-cluster
#broker名字,名字一样的节点就是一组主从节点。
brokerName=broker-a
#brokerid,0就表示是Master,>0的都是表示 Slave
brokerId=1
#nameServer地址,分号分割
namesrvAddr=192.168.106.129:9876;192.168.106.131:9876
#在发送消息时,自动创建服务器不存在的topic,默认创建的队列数
defaultTopicQueueNums=8
#是否允许 Broker 自动创建Topic,建议线下开启,线上关闭
autoCreateTopicEnable=true
#是否允许 Broker 自动创建订阅组,建议线下开启,线上关闭
autoCreateSubscriptionGroup=true
#Broker 对外服务的监听端口
listenPort=11011
#删除文件时间点,默认凌晨 4点
deleteWhen=04
#文件保留时间,默认 48 小时
fileReservedTime=120
#commitLog每个文件的大小默认1G
mapedFileSizeCommitLog=1073741824
#ConsumeQueue每个文件默认存30W条,根据业务情况调整
mapedFileSizeConsumeQueue=300000
#destroyMapedFileIntervalForcibly=120000
#redeleteHangedFileInterval=120000
#检测物理文件磁盘空间
diskMaxUsedSpaceRatio=88
#存储路径
storePathRootDir=/app/rocketmq/storeSlave
#commitLog 存储路径
storePathCommitLog=/app/rocketmq/storeSlave/commitlog
#消费队列存储路径存储路径
storePathConsumeQueue=/app/rocketmq/storeSlave/consumequeue
#消息索引存储路径
storePathIndex=/app/rocketmq/storeSlave/index
#checkpoint 文件存储路径
storeCheckpoint=/app/rocketmq/storeSlave/checkpoint
#abort 文件存储路径
abortFile=/app/rocketmq/storeSlave/abort
#限制的消息大小
maxMessageSize=65536
#flushCommitLogLeastPages=4
#flushConsumeQueueLeastPages=2
#flushCommitLogThoroughInterval=10000
#flushConsumeQueueThoroughInterval=60000
#Broker 的角色
#- ASYNC_MASTER 异步复制Master
#- SYNC_MASTER 同步双写Master
#- SLAVE
brokerRole=SLAVE
#刷盘方式
#- SYNC_FLUSH 同步刷盘
#- ASYNC_FLUSH 异步刷盘
flushDiskType=ASYNC_FLUSH
#checkTransactionMessageEnable=false
#发消息线程池数量
#sendMessageThreadPoolNums=128
#拉消息线程池数量
#pullMessageThreadPoolNums=128
2、配置第二组Broker-b
这一组broker的主节点在192.168.106.131上,所以需要配置worker3上的conf/2m-2s-async/broker-b.properties
#所属集群名字,名字一样的节点就在同一个集群内
brokerClusterName=rocketmq-cluster
#broker名字,名字一样的节点就是一组主从节点。
brokerName=broker-b
#brokerid,0就表示是Master,>0的都是表示 Slave
brokerId=0
#nameServer地址,分号分割
namesrvAddr=192.168.106.129:9876;192.168.106.131:9876
#在发送消息时,自动创建服务器不存在的topic,默认创建的队列数
defaultTopicQueueNums=8
#是否允许 Broker 自动创建Topic,建议线下开启,线上关闭
autoCreateTopicEnable=true
#是否允许 Broker 自动创建订阅组,建议线下开启,线上关闭
autoCreateSubscriptionGroup=true
#Broker 对外服务的监听端口
listenPort=10911
#删除文件时间点,默认凌晨 4点
deleteWhen=04
#文件保留时间,默认 48 小时
fileReservedTime=120
#commitLog每个文件的大小默认1G
mapedFileSizeCommitLog=1073741824
#ConsumeQueue每个文件默认存30W条,根据业务情况调整
mapedFileSizeConsumeQueue=300000
#destroyMapedFileIntervalForcibly=120000
#redeleteHangedFileInterval=120000
#检测物理文件磁盘空间
diskMaxUsedSpaceRatio=88
#存储路径
storePathRootDir=/app/rocketmq/store
#commitLog 存储路径
storePathCommitLog=/app/rocketmq/store/commitlog
#消费队列存储路径存储路径
storePathConsumeQueue=/app/rocketmq/store/consumequeue
#消息索引存储路径
storePathIndex=/app/rocketmq/store/index
#checkpoint 文件存储路径
storeCheckpoint=/app/rocketmq/store/checkpoint
#abort 文件存储路径
abortFile=/app/rocketmq/store/abort
#限制的消息大小
maxMessageSize=65536
#flushCommitLogLeastPages=4
#flushConsumeQueueLeastPages=2
#flushCommitLogThoroughInterval=10000
#flushConsumeQueueThoroughInterval=60000
#主从同步方式
#- ASYNC_MASTER 异步复制Master
#- SYNC_MASTER 同步双写Master
#- SLAVE
brokerRole=ASYNC_MASTER
#刷盘方式
#- SYNC_FLUSH 同步刷盘
#- ASYNC_FLUSH 异步刷盘
flushDiskType=ASYNC_FLUSH
#checkTransactionMessageEnable=false
#发消息线程池数量
#sendMessageThreadPoolNums=128
#拉消息线程池数量
#pullMessageThreadPoolNums=128
然后他对应的slave在192.168.106.129上,修改work2上的 conf/2m-2s-async/broker-b-s.properties
#所属集群名字,名字一样的节点就在同一个集群内
brokerClusterName=rocketmq-cluster
#broker名字,名字一样的节点就是一组主从节点。
brokerName=broker-b
#brokerid,0就表示是Master,>0的都是表示 Slave
brokerId=1
#nameServer地址,分号分割
namesrvAddr=192.168.106.129:9876;192.168.106.131:9876
#在发送消息时,自动创建服务器不存在的topic,默认创建的队列数
defaultTopicQueueNums=8
#是否允许 Broker 自动创建Topic,建议线下开启,线上关闭
autoCreateTopicEnable=true
#是否允许 Broker 自动创建订阅组,建议线下开启,线上关闭
autoCreateSubscriptionGroup=true
#Broker 对外服务的监听端口
listenPort=11011
#删除文件时间点,默认凌晨 4点
deleteWhen=04
#文件保留时间,默认 48 小时
fileReservedTime=120
#commitLog每个文件的大小默认1G
mapedFileSizeCommitLog=1073741824
#ConsumeQueue每个文件默认存30W条,根据业务情况调整
mapedFileSizeConsumeQueue=300000
#destroyMapedFileIntervalForcibly=120000
#redeleteHangedFileInterval=120000
#检测物理文件磁盘空间
diskMaxUsedSpaceRatio=88
#存储路径
storePathRootDir=/app/rocketmq/storeSlave
#commitLog 存储路径
storePathCommitLog=/app/rocketmq/storeSlave/commitlog
#消费队列存储路径存储路径
storePathConsumeQueue=/app/rocketmq/storeSlave/consumequeue
#消息索引存储路径
storePathIndex=/app/rocketmq/storeSlave/index
#checkpoint 文件存储路径
storeCheckpoint=/app/rocketmq/storeSlave/checkpoint
#abort 文件存储路径
abortFile=/app/rocketmq/storeSlave/abort
#限制的消息大小
maxMessageSize=65536
#flushCommitLogLeastPages=4
#flushConsumeQueueLeastPages=2
#flushCommitLogThoroughInterval=10000
#flushConsumeQueueThoroughInterval=60000
#Broker 的角色
#- ASYNC_MASTER 异步复制Master
#- SYNC_MASTER 同步双写Master
#- SLAVE
brokerRole=SLAVE
#刷盘方式
#- SYNC_FLUSH 同步刷盘
#- ASYNC_FLUSH 异步刷盘
flushDiskType=ASYNC_FLUSH
#checkTransactionMessageEnable=false
#发消息线程池数量
#sendMessageThreadPoolNums=128
#拉消息线程池数量
#pullMessageThreadPoolNums=128
这样broker就配置完成了。
需要注意的配置项:
1、同一机器上两个实例的store目录不能相同,否则会报错 Lock failed,MQ already started
2、同一机器上两个实例的listenPort也不能相同。否则会报端口占用的错
3、nameserver不需要进行配置,直接启动就行。
4、启动RocketMQ
启动就比较简单了,直接调用bin目录下的脚本就行。只是启动之前要注意看下他们的JVM内存配置,默认的配置都比较高。
1、先启动nameServer
修改2个节点上的bin/runserver.sh,调整里面的jvm内存配置。找到下面这一行调整下内存
JAVA_OPT="${JAVA_OPT} -server -Xms512m -Xmx512m -Xmn256m -XX:MetaspaceSize=128m -XX:MaxMetaspaceSize=320m"直接在2个节点上启动nameServer。
nohup mqnamesrv &

#查看NamesrvStartup进程
jps
启动完成后,在nohup.out里看到这一条关键日志就是启动成功了。
Java HotSpot(TM) 64-Bit Server VM warning: Using the DefNew young collector with the CMS collector is deprecated and will likely be removed in a future release
Java HotSpot(TM) 64-Bit Server VM warning: UseCMSCompactAtFullCollection is deprecated and will likely be removed in a future release.
The Name Server boot success. serializeType=JSON
使用jps指令可以看到一个NamesrvStartup进程。
2、再启动broker
注意:
也要调整下broker的内存大小
之前提到过,在runserver.sh中需要定制nameserver的内存大小,在runbroker.sh中需要定制broker
的内存大小。这些默认的配置可以认为都是经过检验的最优化配置,但是在实际情况中都还需要根据服
务器的实际情况进行调整
启动broker是使用的mqbroker指令,只是注意启动broker时需要通过-c 指定对应的配置文件。
在192.168.106.129上启动broker-a的master节点和broker-b的slave节点
注意:这里启动没有指定nameServer是因为在配置文件已经指定

nohup mqbroker -c /usr/local/rocketmq/rocketmq-all-4.9.4-bin-release/conf/2m-2s-async/broker-a.properties &

nohup mqbroker -c /usr/local/rocketmq/rocketmq-all-4.9.4-bin-release/conf/2m-2s-async//broker-b-s.properties &
在192.168.106.131上启动broker-b的master节点和broker-a的slave节点
nohup mqbroker -c /usr/local/rocketmq/rocketmq-all-4.9.4-bin-release/conf/2m-2s-async/broker-b.properties &

nohup mqbroker -c /usr/local/rocketmq/rocketmq-all-4.9.4-bin-release/conf/2m-2s-async/broker-a-s.properties &
启动slave时,如果遇到报错 Lock failed,MQ already started ,那是因为有多个实例共用了同一个storePath造成的,这时就需要调整store的路径。
3、启动状态检查
使用jps指令,能看到一个NameSrvStartup进程和两个BrokerStartup进程。
nohup.out中也有启动成功的日志。
4、测试
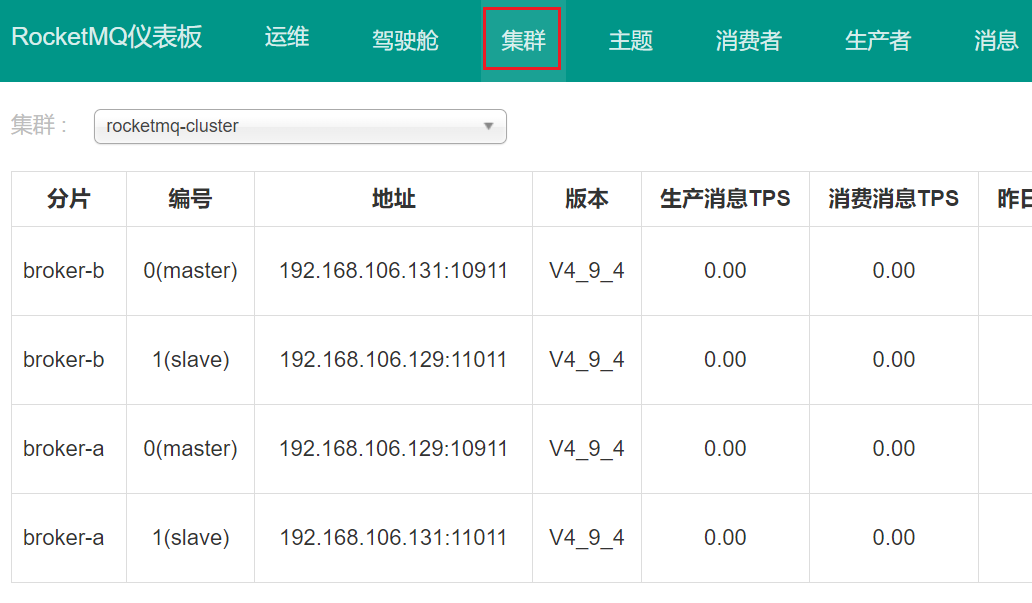
生产者发送消息结果,可以看到消息发送到了2个borker
SendResult [sendStatus=SEND_OK, msgId=7F000001151418B4AAC214847CED0000, offsetMsgId=C0A86A8300002A9F0000000000004C5A, messageQueue=MessageQueue [topic=helloworld, brokerName=broker-b, queueId=4], queueOffset=0]
SendResult [sendStatus=SEND_OK, msgId=7F000001151418B4AAC214847CF60001, offsetMsgId=C0A86A8300002A9F0000000000004D1B, messageQueue=MessageQueue [topic=helloworld, brokerName=broker-b, queueId=5], queueOffset=0]
SendResult [sendStatus=SEND_OK, msgId=7F000001151418B4AAC214847CF70002, offsetMsgId=C0A86A8300002A9F0000000000004DDC, messageQueue=MessageQueue [topic=helloworld, brokerName=broker-b, queueId=6], queueOffset=0]
SendResult [sendStatus=SEND_OK, msgId=7F000001151418B4AAC214847CFB0003, offsetMsgId=C0A86A8300002A9F0000000000004E9D, messageQueue=MessageQueue [topic=helloworld, brokerName=broker-b, queueId=7], queueOffset=0]
SendResult [sendStatus=SEND_OK, msgId=7F000001151418B4AAC214847CFE0004, offsetMsgId=C0A86A8100002A9F0000000000004C58, messageQueue=MessageQueue [topic=helloworld, brokerName=broker-a, queueId=0], queueOffset=0]
SendResult [sendStatus=SEND_OK, msgId=7F000001151418B4AAC214847D070005, offsetMsgId=C0A86A8100002A9F0000000000004D19, messageQueue=MessageQueue [topic=helloworld, brokerName=broker-a, queueId=1], queueOffset=0]
SendResult [sendStatus=SEND_OK, msgId=7F000001151418B4AAC214847D090006, offsetMsgId=C0A86A8100002A9F0000000000004DDA, messageQueue=MessageQueue [topic=helloworld, brokerName=broker-a, queueId=2], queueOffset=0]
SendResult [sendStatus=SEND_OK, msgId=7F000001151418B4AAC214847D0C0007, offsetMsgId=C0A86A8100002A9F0000000000004E9B, messageQueue=MessageQueue [topic=helloworld, brokerName=broker-a, queueId=3], queueOffset=0]
SendResult [sendStatus=SEND_OK, msgId=7F000001151418B4AAC214847D0F0008, offsetMsgId=C0A86A8100002A9F0000000000004F5C, messageQueue=MessageQueue [topic=helloworld, brokerName=broker-a, queueId=4], queueOffset=0]
SendResult [sendStatus=SEND_OK, msgId=7F000001151418B4AAC214847D110009, offsetMsgId=C0A86A8100002A9F000000000000501D, messageQueue=MessageQueue [topic=helloworld, brokerName=broker-a, queueId=5], queueOffset=0]
SendResult [sendStatus=SEND_OK, msgId=7F000001151418B4AAC214847D12000A, offsetMsgId=C0A86A8100002A9F00000000000050DE, messageQueue=MessageQueue [topic=helloworld, brokerName=broker-a, queueId=6], queueOffset=0]
SendResult [sendStatus=SEND_OK, msgId=7F000001151418B4AAC214847D16000B, offsetMsgId=C0A86A8100002A9F00000000000051A0, messageQueue=MessageQueue [topic=helloworld, brokerName=broker-a, queueId=7], queueOffset=0]
SendResult [sendStatus=SEND_OK, msgId=7F000001151418B4AAC214847D19000C, offsetMsgId=C0A86A8300002A9F0000000000004F5E, messageQueue=MessageQueue [topic=helloworld, brokerName=broker-b, queueId=0], queueOffset=0]
SendResult [sendStatus=SEND_OK, msgId=7F000001151418B4AAC214847D1B000D, offsetMsgId=C0A86A8300002A9F0000000000005020, messageQueue=MessageQueue [topic=helloworld, brokerName=broker-b, queueId=1], queueOffset=0]
SendResult [sendStatus=SEND_OK, msgId=7F000001151418B4AAC214847D1D000E, offsetMsgId=C0A86A8300002A9F00000000000050E2, messageQueue=MessageQueue [topic=helloworld, brokerName=broker-b, queueId=2], queueOffset=0]
SendResult [sendStatus=SEND_OK, msgId=7F000001151418B4AAC214847D1F000F, offsetMsgId=C0A86A8300002A9F00000000000051A4, messageQueue=MessageQueue [topic=helloworld, brokerName=broker-b, queueId=3], queueOffset=0]
SendResult [sendStatus=SEND_OK, msgId=7F000001151418B4AAC214847D210010, offsetMsgId=C0A86A8300002A9F0000000000005266, messageQueue=MessageQueue [topic=helloworld, brokerName=broker-b, queueId=4], queueOffset=1]
SendResult [sendStatus=SEND_OK, msgId=7F000001151418B4AAC214847D230011, offsetMsgId=C0A86A8300002A9F0000000000005328, messageQueue=MessageQueue [topic=helloworld, brokerName=broker-b, queueId=5], queueOffset=1]
SendResult [sendStatus=SEND_OK, msgId=7F000001151418B4AAC214847D250012, offsetMsgId=C0A86A8300002A9F00000000000053EA, messageQueue=MessageQueue [topic=helloworld, brokerName=broker-b, queueId=6], queueOffset=1]
SendResult [sendStatus=SEND_OK, msgId=7F000001151418B4AAC214847D2A0013, offsetMsgId=C0A86A8300002A9F00000000000054AC, messageQueue=MessageQueue [topic=helloworld, brokerName=broker-b, queueId=7], queueOffset=1]
23:37:07.135 [NettyClientSelector_1] INFO RocketmqRemoting - closeChannel: close the connection to remote address[192.168.106.131:9876] result: true
23:37:07.145 [NettyClientSelector_1] INFO RocketmqRemoting - closeChannel: close the connection to remote address[192.168.106.131:10911] result: true
23:37:07.145 [NettyClientSelector_1] INFO RocketmqRemoting - closeChannel: close the connection to remote address[192.168.106.129:11011] result: true
23:37:07.145 [NettyClientSelector_1] INFO RocketmqRemoting - closeChannel: close the connection to remote address[192.168.106.129:10911] result: true
23:37:07.145 [NettyClientSelector_1] INFO RocketmqRemoting - closeChannel: close the connection to remote address[192.168.106.131:11011] result: true

Process finished with exit code 0
5、测试mqadmin管理工具
RocketMQ的源代码中并没有为我们提供类似于Nacos或者RabbitMQ那样的控制台,只提供了一个mqadmin指令来管理RocketMQ,命令在bin目录下。使用方式是 mqadmin {command} {args}
所有指令如下:
Topic相关:
#查看 Topic 列表信息
mqadmin topicList -n 192.168.106.129:9876  -c rocketmq-cluster
6、搭建管理控制台
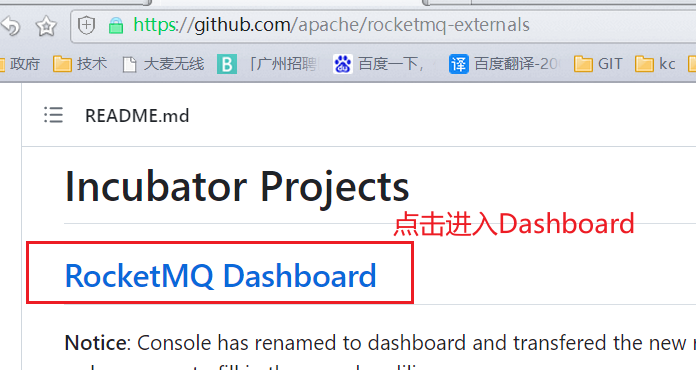
RocketMQ源代码中并没有提供控制台,但是有一个Rocket的社区扩展项目中提供了一个控制台,地址: https://github.com/apache/rocketmq-externals
然后进入dashboard:https://github.com/apache/rocketmq-dashboard
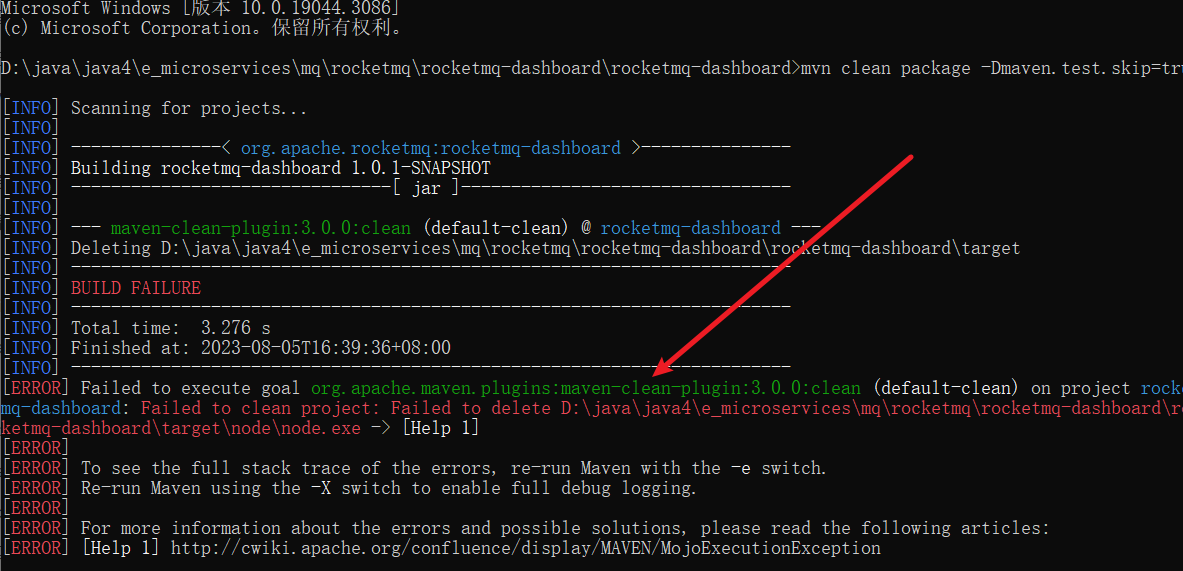
1、用GIT下载dashboard源码,用IDEA打开
如果编译出现如下错误:
把pom.xml中的frontend-maven-plugin和maven-antrun-plugin插件注释掉即可
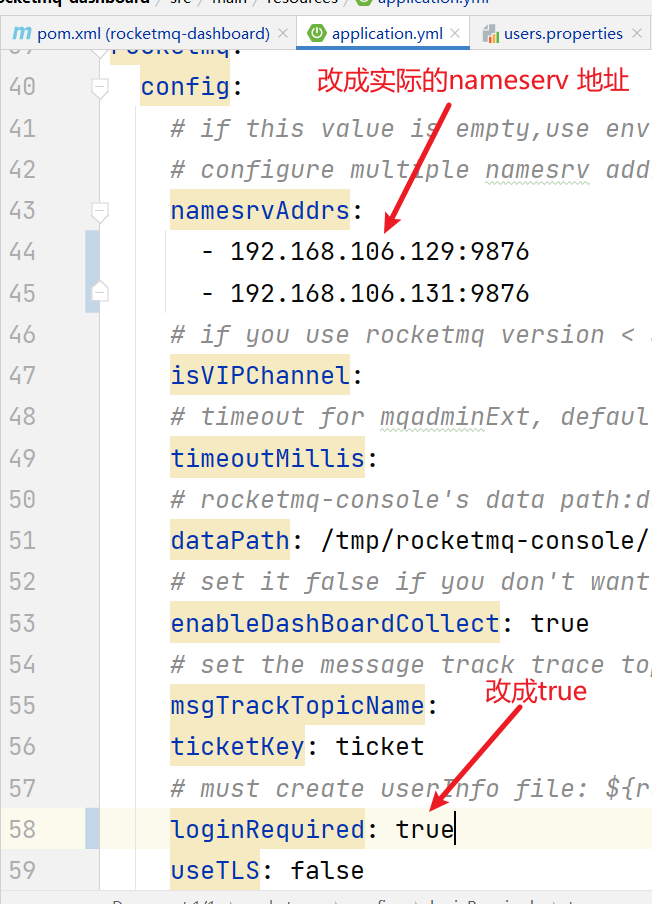
2、application.yml
rocketmq:
  config:
    # if this value is empty,use env value rocketmq.config.namesrvAddr  NAMESRV_ADDR | now, default localhost:9876
    # configure multiple namesrv addresses to manage multiple different clusters
    namesrvAddrs:
      - 192.168.106.129:9876
      - 192.168.106.131:9876
  loginRequired: true
3、运行dashboard
默认端口:8080
java -jar target/rocketmq-dashboard-1.0.1-SNAPSHOT.jar
4、测试
控制台访问地址: http://localhost:8080/#/login
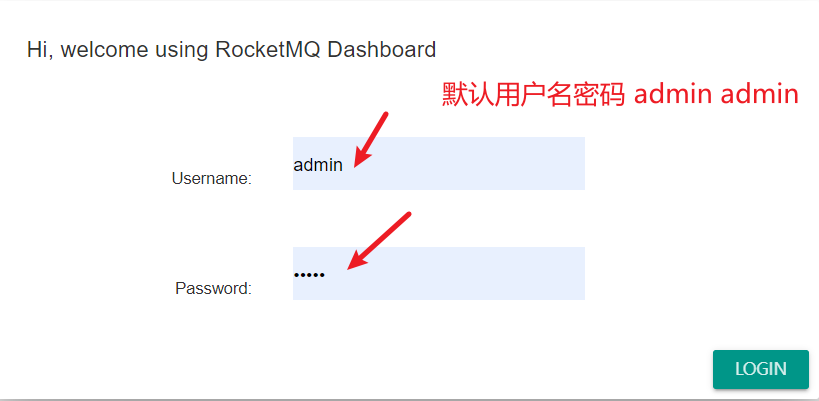
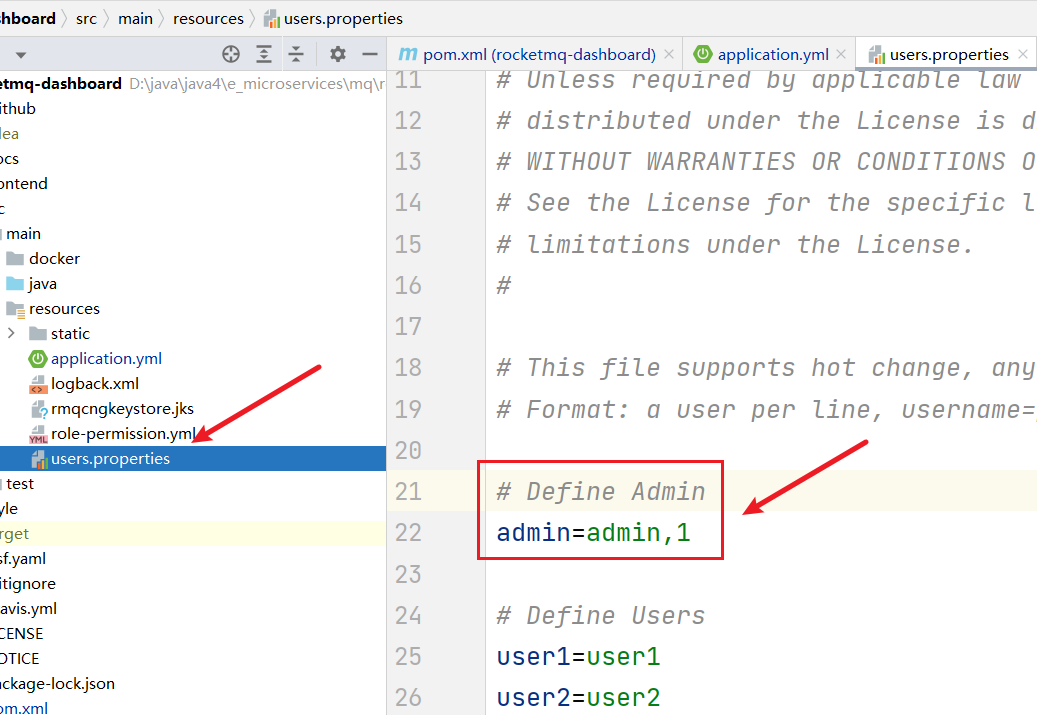
users.properties 配置用户和密码