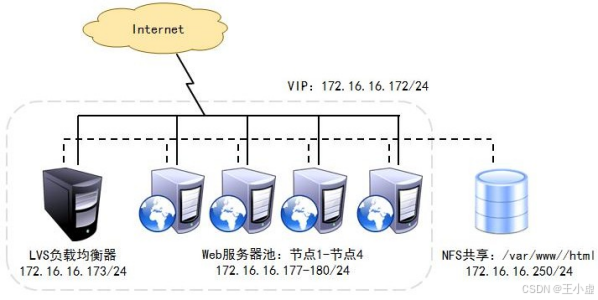
LVS-DR(Linux Virtual Server Director Server)工作模式,是生产环境中最常用的一种工作模式。 LVS-DR 模式,Director Server 作为群集的访问入口,不作为网关使用,节点 Director Server 与 Real Server 需要在同一个网络中,返回给客户端的数据不需要经过 Director Server。 为了响应对整个群集的访问,Director Server 与 Real Server 都需要配置 VIP 地址 以下为数据包流向分析步骤
客户端发送请求到 Director Server,请求的数据报文(源 IP 是 CIP,目标 IP 是 VIP) 到达内核空间。
Director Server 和 Real Server 在同一个网络中,数据通过二层数据链路层来传输。
内核空间判断数据包的目标 IP 是本机 VIP,此时 IPVS 比对数据包请求的服务是否是集群服务,是集群服务就重新封装数据包。修改源 MAC 地址为 Director Server 的 MAC 地址,修改目标 MAC 地址为Real Server 的 MAC 地址,源 IP 地址与目标 IP 地址没有改变,然后将数据包发送给 Real Server。
到达 Real Server 的请求报文的 MAC 地址是自身的 MAC 地址,就接收此报文。数据包重新封装报文(源 IP 地址为 VIP,目标 IP 为 CIP),将响应报文通过 lo 接口传送给物理网卡然后向外发出。
Real Server 直接将响应报文传送到客户端。 下面是LVS-DR 模式的特点
Director Server 和 Real Server 必须在同一个物理网络中。 Real Server 可以使用私有地址,也可以使用公网地址。如果使用公网地址,可以通过互联网对 RIP 进行直接访问。 所有的请求报文经由 Director Server,但回复响应报文不能经过 Director Server。 Real Server 的网关不允许指向 Director Server IP,即不允许数据包经过 Director S erver。 Real Server 上的 lo 接口配置 VIP 的 IP 地址。
主机 操作系统 IP 配置 lvs CentOS7 192.168.72.131 2C4G web01 CentOS7 192.168.72.132 2C4G web02 CentOS7 192.168.72.133 2C4G web03 CentOS7 192.168.72.134 2C4G nfs CentOS7 192.168.72.135 2C4G
systemctl stop firewalld
systemctl disable firewalld
setenforce 0
sed - i "s/^SELINUX=.*/SELINUX=disabled/g" / etc/ selinux/ config
hostnamectl set - hostname lvs
hostnamectl set - hostname web01
hostnamectl set - hostname web02
hostnamectl set - hostname web03
hostnamectl set - hostname nfs
[ root@lvs ~ ]
[ root@lvs network- scripts]
[ root@lvs network- scripts]
[ root@lvs network- scripts]
[ root@lvs network- scripts]
TYPE= Ethernet
PROXY_METHOD= none
BROWSER_ONLY= no
BOOTPROTO= static
DEFROUTE= yes
IPV4_FAILURE_FATAL= no
IPV6INIT= yes
IPV6_AUTOCONF= yes
IPV6_DEFROUTE= yes
IPV6_FAILURE_FATAL= no
IPV6_ADDR_GEN_MODE= stable- privacy
NAME= ens33: 0
DEVICE= ens33: 0
ONBOOT= yes
IPADDR= 192.168 .72 .200
NETMASK= 255.255 .255 .255
[ root@lvs network- scripts]
[ root@lvs network- scripts]
ens33: 0 : flags= 4163 < UP, BROADCAST, RUNNING, MULTICAST> mtu 1500
inet 192.168 .72 .200 netmask 255.255 .255 .255 broadcast 192.168 .72 .200
ether 00 : 0c: 29 : c9: ff: b1 txqueuelen 1000 ( Ethernet)
echo 'net.ipv4.conf.all.send_redirects = 0' >> / etc/ sysctl. conf
echo 'net.ipv4.conf.default.send_redirects = 0' >> / etc/ sysctl. conf
echo 'net.ipv4.conf.ens33.send_redirects = 0' >> / etc/ sysctl. conf
sysctl - p
modprobe ip_vs
cat / proc/ net/ ip_vs
yum - y install ipvsadm
ipvsadm - v
ipvsadm - A - t 192.168 .72 .200 : 80 - s rr
ipvsadm - a - t 192.168 .72 .200 : 80 - r 192.168 .72 .132 - g - w 1
ipvsadm - a - t 192.168 .72 .200 : 80 - r 192.168 .72 .133 - g - w 1
ipvsadm - a - t 192.168 .72 .200 : 80 - r 192.168 .72 .134 - g - w 1
[ root@lvs ~ ]
IP Virtual Server version 1.2 .1 ( size= 4096 )
Prot LocalAddress: Port Scheduler Flags
- > RemoteAddress: Port Forward Weight ActiveConn InActConn
TCP 192.168 .72 .200 : 80 rr
- > 192.168 .72 .132 : 80 Route 1 0 0
- > 192.168 .72 .133 : 80 Route 1 0 0
- > 192.168 .72 .134 : 80 Route 1 0 0
cat > / etc/ sysconfig/ network- scripts/ ifcfg- lo: 0 << EOF
DEVICE= lo: 0
IPADDR= 192.168 .72 .200
NETMASK= 255.255 .255 .255
ONBOOT= yes
EOF
ifup lo: 0
ifconfig lo: 0
route add - host 192.168 .72 .200 dev lo: 0
echo 'route add -host 192.168.72.200 dev lo:0' >> / etc/ rc. local
chmod + x / etc/ rc. d/ rc. local
cat >> / etc/ sysctl. conf << EOF
net. ipv4. conf. all . arp_ignore = 1
net. ipv4. conf. all . arp_announce = 2
net. ipv4. conf. default. arp_ignore = 1
net. ipv4. conf. default. arp_announce = 2
net. ipv4. conf. lo. arp_ignore = 1
net. ipv4. conf. lo. arp_announce = 2
EOF
sysctl - p
yum - y install httpd
systemctl start httpd
systemctl enable httpd
echo 'This is web01' > / var/ www/ html/ index. html
echo 'This is web02' > / var/ www/ html/ index. html
echo 'This is web03' > / var/ www/ html/ index. html
yum - y install nfs- utils rpcbind
systemctl enable nfs
systemctl enable rpcbind
mkdir - p / opt/ wwwroot
echo '/opt/wwwroot 192.168.72.0/24(rw,sync,no_root_squash)' > / etc/ exports
systemctl start rpcbind nfs
showmount - e
yum - y install rpcbind nfs- utils
systemctl enable rpcbind
systemctl start rpcbind
echo '192.168.72.135:/opt/wwwroot /var/www/html nfs defaults,_netdev 0 0' >> / etc/ fstab
mount - a
df - Th
echo 'This is NFS' >> / var/ www/ html/ index. html
echo 'This is NFS' >> / opt/ wwwroot/ index. html
[ root@client ~ ]
This is NFS
