基础
- 安全套接字层超文本传输协议HTTPS。HTTPS(全称:Hyper Text Transfer Protocol over Secure Socket Layer 或 Hypertext Transfer Protocol Secure,超文本传输安全协议),是以安全为目标的HTTP通道。HTTPS并不是一个新协议,而是HTTP+SSL(TLS)。
- SSL 是“Secure Sockets Layer”的缩写,中文叫做“安全套接层”。标准化之后SSL被改为 TLS(Transport Layer Security传输层安全协议)ssl协议可以说是https的核心,对数据进行加密就是通过ssl,而ssl协议既不是工作在应用层也不是工作在传输层而是工作在他们之间的ssl。
证书链
证书链是证书列表(通常以终端实体证书开头)后跟一个或多个CA证书(通常最后一个是自签名证书),具有以下属性:
- 每个证书(最后一个证书除外)的颁发者与列表中下一个证书的主题相匹配。
- 每个证书(最后一个证书除外)都应该由链中下一个证书对应的密钥签名(即一个证书的签名可以使用包含在后续证书中的公钥来验证)。
- 列表中的最后一个证书是信任锚:您信任的证书,因为它是由一些值得信赖的程序交付给您的。信任锚是CA证书(或更准确地说,是CA的公共验证密钥),被依赖方用作路径验证的起点。
在RFC5280中,证书链或信任链被定义为“证书路径”。换句话说,信任链是指您的SSL证书以及它如何链接回受信任的证书颁发机构。为了使SSL证书可信,它必须可以追溯到它被签署的信任根,这意味着链中的所有证书——服务器、中间证书和根证书,都需要得到适当的信任。信任链分为三个部分:
开发环境
IDE:Visual Studio 2022 17.9.x
Operation:Windows 11 专业工作站版
单向验证实战
主要内容为:
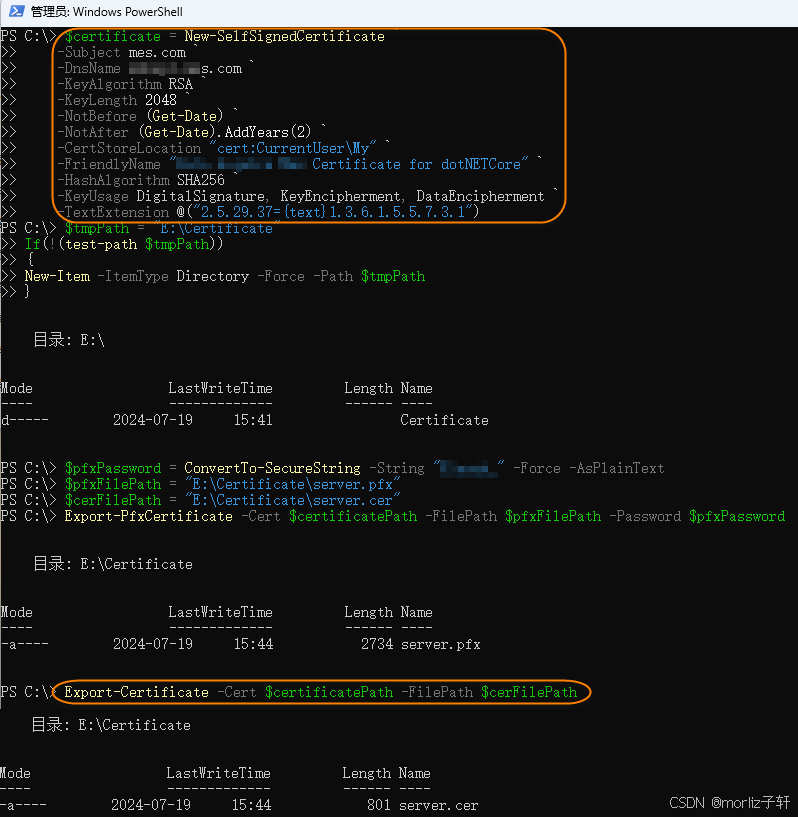
PowerShell CLI环境,先创建一个自签服务器CA证书,以用于生产环境客户端测试。
1、创建CA X509证书
# 定义私有证书[成员属性]的变量
# setup certificate properties including the commonName (DNSName) property for Chrome
$certificate = New-SelfSignedCertificate `
    -Subject [颁发者] `
    -DnsName [Web域名] `
    -KeyAlgorithm RSA `
    -KeyLength 2048 `
    -NotBefore (Get-Date) `
    -NotAfter (Get-Date).AddYears(2) `
    -CertStoreLocation "cert:CurrentUser\My" `
    -FriendlyName ["在IIS指定的时候显示Certificate for .NET Core"] `
    -HashAlgorithm SHA256 `
    -KeyUsage DigitalSignature, KeyEncipherment, DataEncipherment `
    -TextExtension @("2.5.29.37={text}1.3.6.1.5.5.7.3.1")
$certificatePath = 'Cert:\CurrentUser\My\' + ($certificate.ThumbPrint)
(1) 定义存放路径的变量
# create temporary certificate path
$tmpPath = "E:\Certificate"
>> If(!(test-path $tmpPath))
>> {
>> New-Item -ItemType Directory -Force -Path $tmpPath
>> }
(2) 生成证书
# set certificate password here
$pfxPassword = ConvertTo-SecureString -String "newPwd" -Force -AsPlainText
$pfxFilePath = "E:\Certificate\server.pfx"
$cerFilePath = "E:\Certificate\server.cer"

# Export PfxCertificate the file.
Export-PfxCertificate -Cert $certificatePath -FilePath $pfxFilePath -Password $pfxPassword
# Export Certificate the file.
Export-Certificate -Cert $certificatePath -FilePath $cerFilePath
具体实操如下
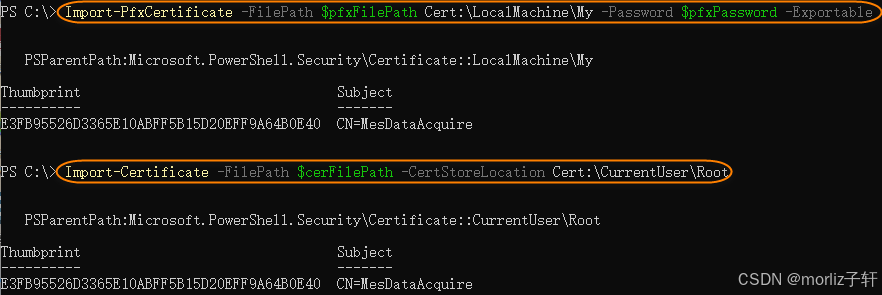
(3) 导入证书
#Import PfxCertificate the LocalMachine.
Import-PfxCertificate -FilePath $pfxFilePath Cert:\LocalMachine\My -Password $pfxPassword -Exportable

#Import PfxCertificate the CertStoreLocation.
Import-Certificate -FilePath $cerFilePath -CertStoreLocation Cert:\CurrentUser\Root
具体实操如下
2、NETCore项目配置
1、服务器端证书配置
先将server.pfx文件拷贝到项目根下,同时设置[复制到输出目录]为始终复制。再配置appsetting.json内容如下:
{
  "Logging": {
    "LogLevel": {
      "Default": "Information",
      "Microsoft.AspNetCore": "Warning"
    }
  },
  "AllowedHosts": "*",
  "Connection": {
    "Port": 9991,
    "EnableHttps": true,
    "HttpsScertPath": "./server.pfx",
    "HttpsScertPwd": "[CertPwd]"
  }
}
2、AppSetting配置读取类
public static class AppSetting
{
    public static Connection HostUrl { get; set; } = null!;

    public static void Init(IServiceCollection services, IConfiguration configuration)
    {
        services.Configure<Connection>(configuration.GetSection("Connection"));

        var provider = services.BuildServiceProvider();
        HostUrl = provider.GetRequiredService<IOptions<Connection>>().Value;
    }
}

public class Connection
{
    //public string RequestUrl { get; set; } = null!;

    public int Port { get; set; }

    public bool EnableHttps { get; set; }

    public string HttpsScertPath { get; set; } = null!;

    public string HttpsScertPwd { get; set; } = null!;
}
3、Kestrel服务配置
public static void Main(string[] args)
{
    var builder = WebApplication.CreateBuilder(args);

    // Add services to the container.
    AppSetting.Init(builder.Services, builder.Configuration);


    builder.WebHost.ConfigureKestrel(serverOption =>
    {
        var hostUrl = AppSetting.HostUrl;

        serverOption.ListenAnyIP(9990);
        serverOption.ListenAnyIP(hostUrl.Port, listenOptions =>
            {
                if (hostUrl.EnableHttps)
                    listenOptions.UseHttps(hostUrl.HttpsScertPath, hostUrl.HttpsScertPwd);
            });
    });

    // Learn more about configuring Swagger/OpenAPI at https://aka.ms/aspnetcore/swashbuckle
    builder.Services.AddEndpointsApiExplorer();

    builder.Services.AddHttpClient();

    var app = builder.Build();

    // Configure the HTTP request pipeline.
    if (app.Environment.IsDevelopment())
    {
        app.UseDeveloperExceptionPage();
    }
    else
    {
        app.UseExceptionHandler("/Error");
        app.UseHsts();        //重点
    }

    //app.UseRouting();
    //app.UseCors();

    app.UseHttpsRedirection();    //重点

    app.UseAuthorization();

    app.MapControllers();

    app.Run();
}
编译发布到生产环境
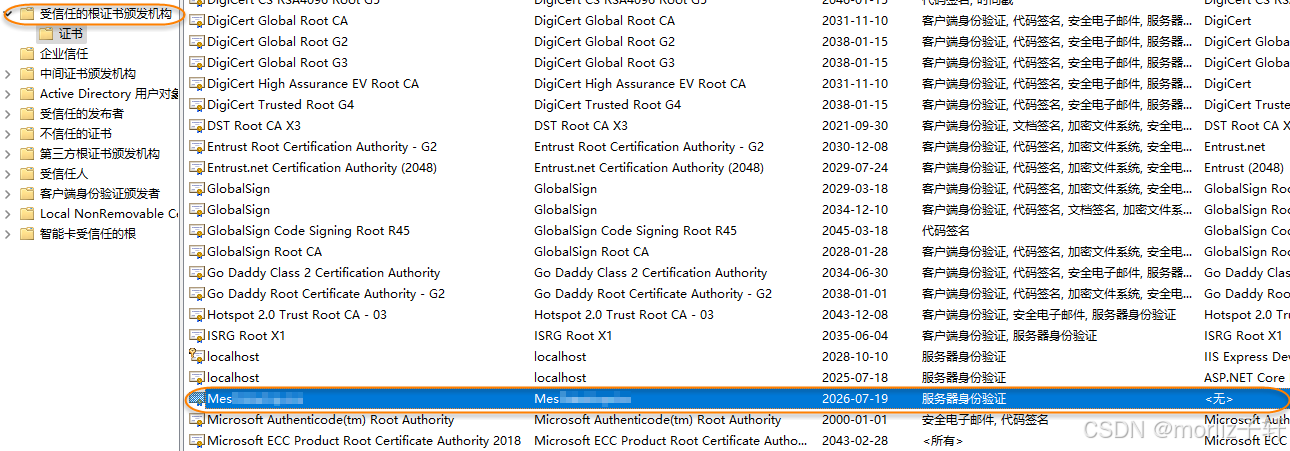
注意,检查证书是否在服务器上导入成功。(在Win+R运行中输入:certmgr.msc确定)
3、客户端配置
1、在host中添加解析域名
# host默认存放位置:c:\windows\system32\drivers\etc\hosts
# 有两种方式添加:
# 1、直接右键该文件,编辑即可打开。但如果有UAC保护的情况下,是不能直接保存的。
# 2、打开CMD控制台环境(以管理员身份打开),编辑插入指令如下:
cd C:\Windows\System32\drivers\etc
echo 10.0.5.27 webapi.xxxxx.com>>hosts
注意,此处IP为webapi服务器地址,紧跟用的是证书注册时的私有域名(非公有域)。
2、导入pfx证书
由于创建证书采用的是单向验证,所以直接将server.pfx证书拷贝到客户端中导入即可。后期笔者会考虑持续再更新,双向验证模式实战,请客官静待佳音吧。
# Specify the certificate password here.
$pfxPassword = ConvertTo-SecureString -String  "certificatePwd" -Force -AsPlainText
# Obtain the certificate storage path.
$pfxFilePath = "D:\Certificate\server.pfx"
#Import PfxCertificate the LocalMachine.
Import-PfxCertificate -FilePath $pfxFilePath Cert:\LocalMachine\My -Password $pfxPassword -Exportable
$pfxPassword是指定该证书创建时的密码变量对象,而$pfxFilePath则是pfx证书拷贝过来存放路径,其后就是通过Import-PfxCertificate进行本机证书导入。
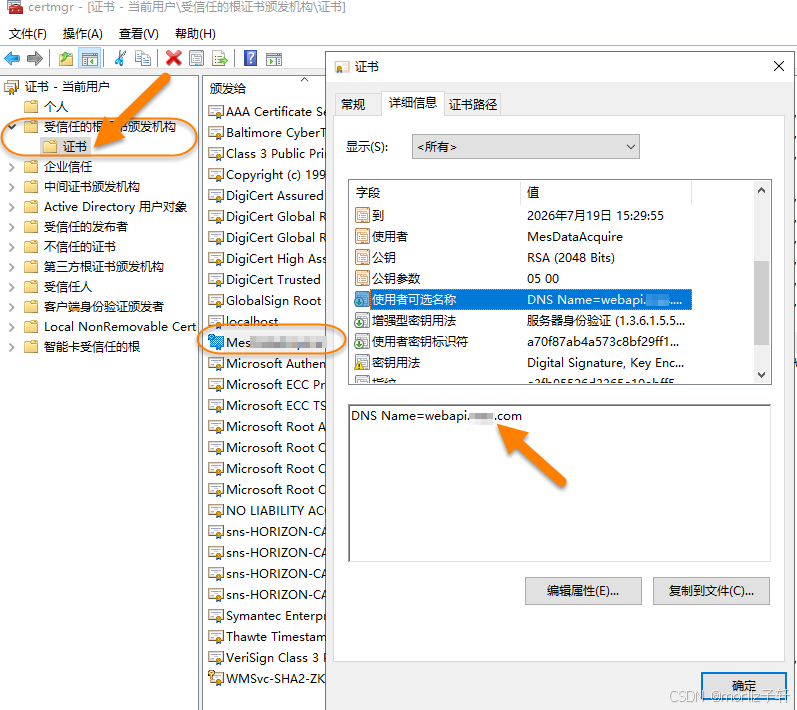
导入完成后,可在此处进行检查是否成功:
当然,也可以双击证书通过导入向导完成,建议这样操作可能会更稳妥。
客户机Web端测试
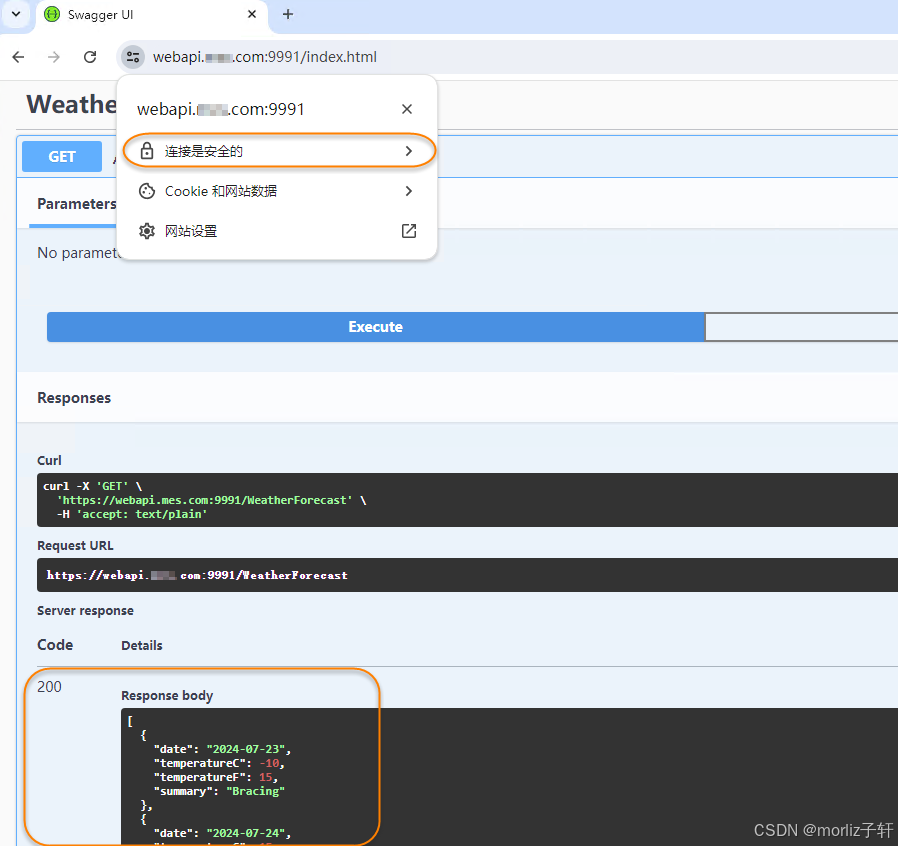
此时浏览器解析时,不会再警告该来源不安全,且调用接口时则采用TSL协议进行数据传输层加密。另外,在服务器上不能采用域名访问,当然在host文件中添加该地址解析也可以,但不建议这样做。

