一.HTTP协议讲解
1.1rsync服务重构
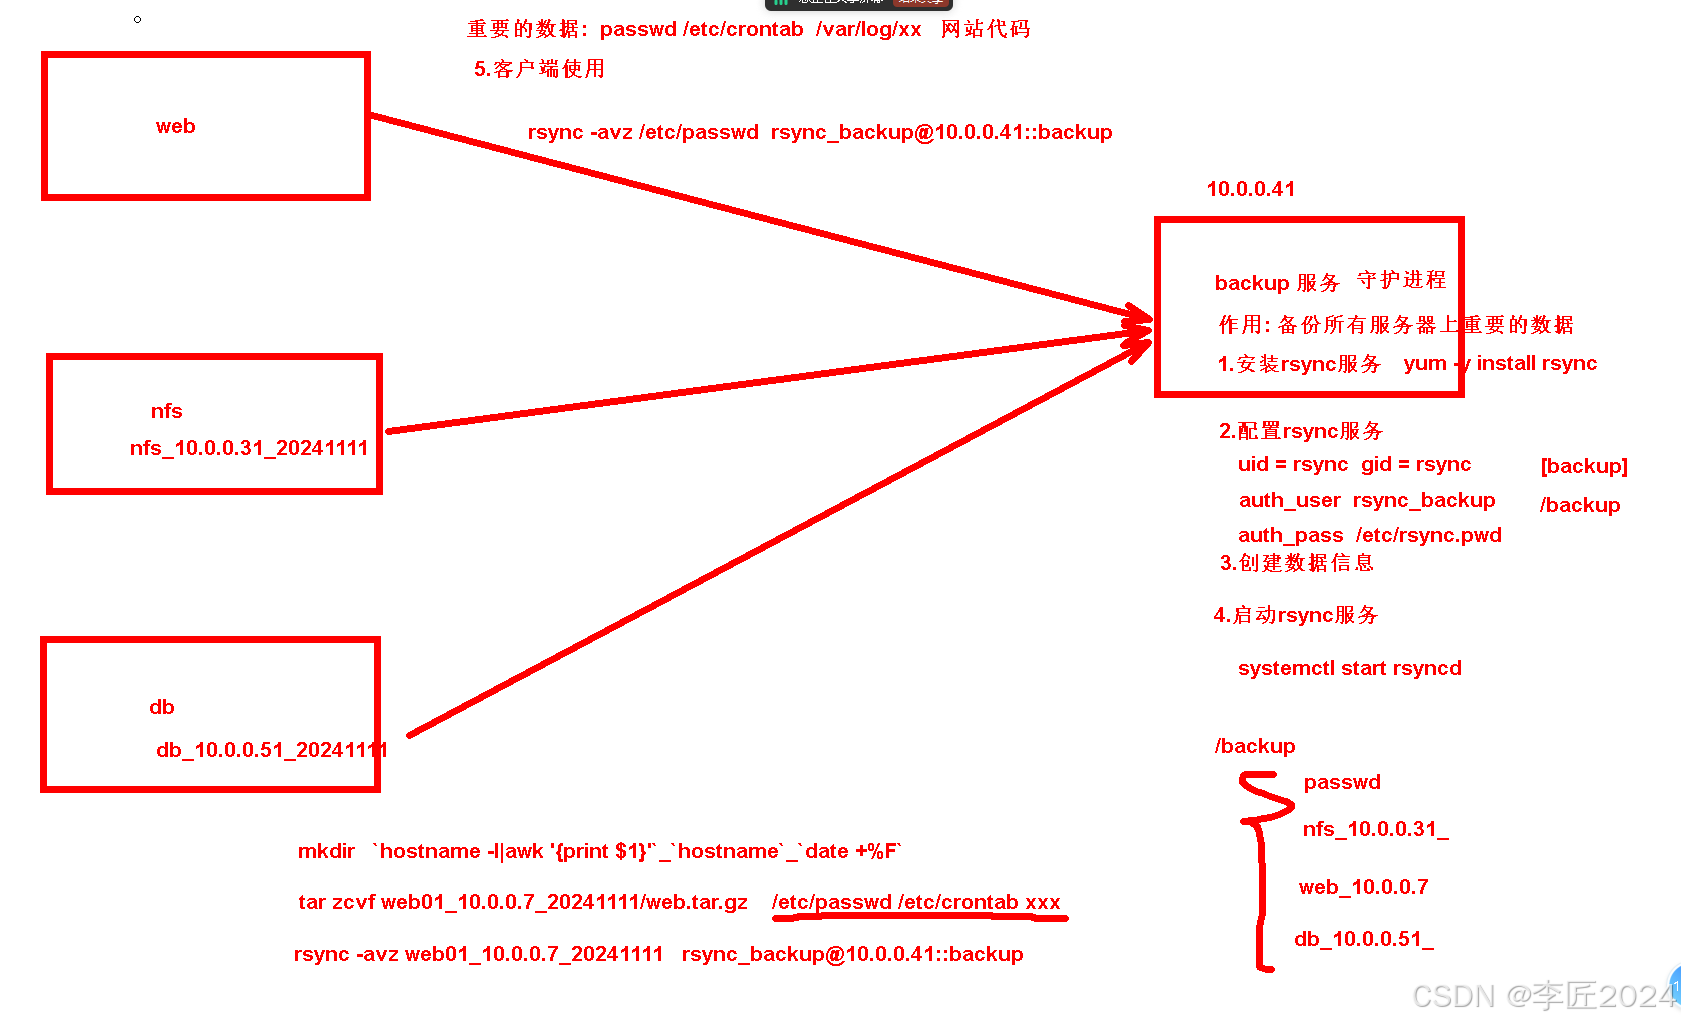
```bash 部署服务端: 1.安装服务 [root@backup ~]# yum -y install rsync
2.配置服务 [root@backup ~]# vim /etc/rsyncd.conf uid = rsync gid = rsync port = 873 fake super = yes use chroot = no max connections = 200 timeout = 600 ignore errors read only = false list = false auth users = rsync_backup secrets file = /etc/rsync.passwd log file = /var/log/rsyncd.log
[backup] path = /backup
3.配置必要的数据 创建用户 [root@backup ~]# useradd -M -s /sbin/nologin rsync
创建密码文件并授权为600 [root@backup ~]# echo rsync_backup:123456 >/etc/rsync.passwd [root@backup ~]# chmod 600 /etc/rsync.passwd
创建目录并修改属主属组为rsync [root@backup ~]# mkdir /backup [root@backup ~]# chown rsync.rsync /backup/
4.启动rsync服务 [root@backup ~]# systemctl start rsyncd [root@backup ~]# systemctl enable rsyncd
客户端使用 [root@web01 ~]# mkdir /server/scripts -p
[root@web01 scripts]# cat backup.sh
!/bin/bash
1.创建以主机名称和IP和时间命名的目录
dir=hostnamehostname -I|awk '{print $2}'date +%F mkdir -p /opt/$dir
2.打包重要的数据放到已创好的目录中
tar zcf /opt/$dir/code.tar.gz /etc/passwd /etc/hosts &>/dev/null
3.将目录推送到backup服务器的backup模块
export RSYNCPASSWORD=123456 rsync -avz /opt/$dir rsync[email protected]::backup &>/dev/null
写入定时任务测试 [root@web01 ~]# tail -1 /etc/crontab * * * * * root sh /server/scripts/backup.sh ``
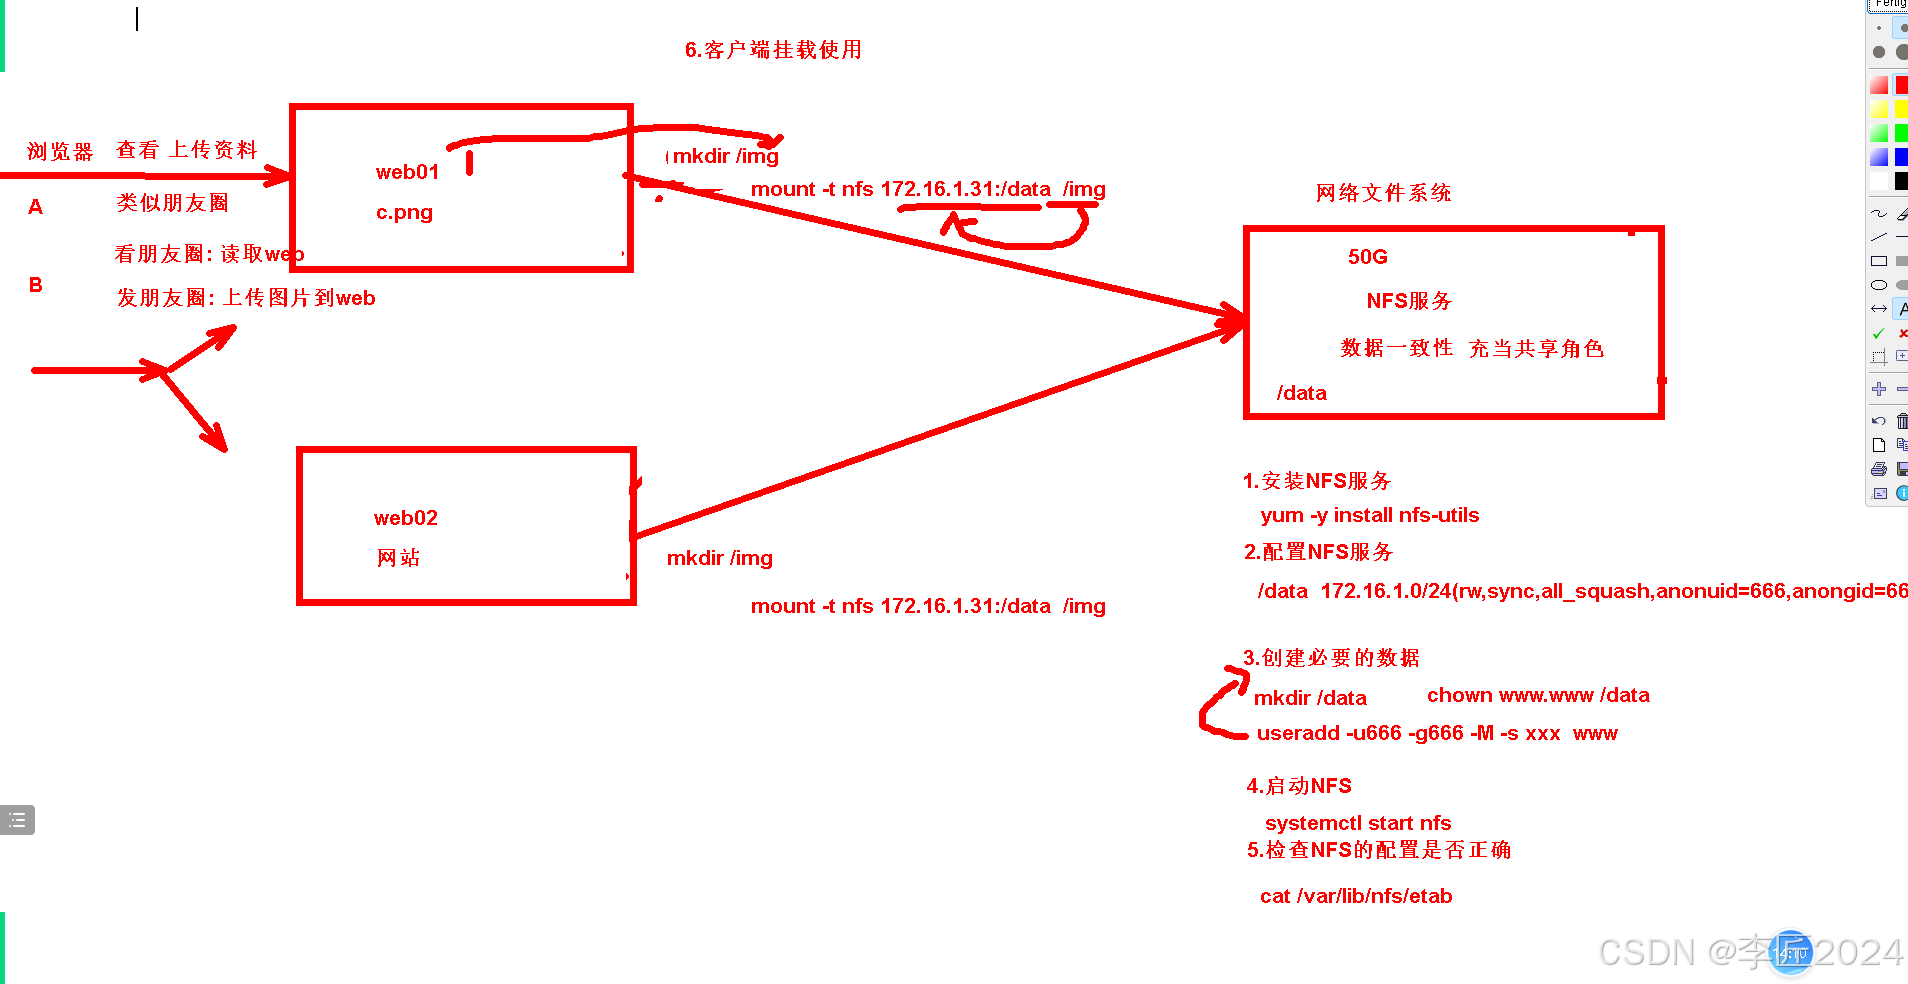
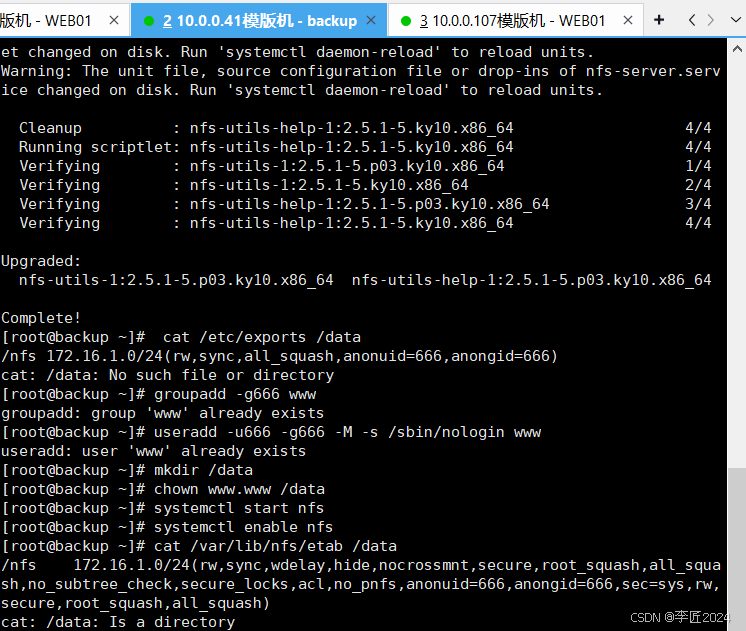
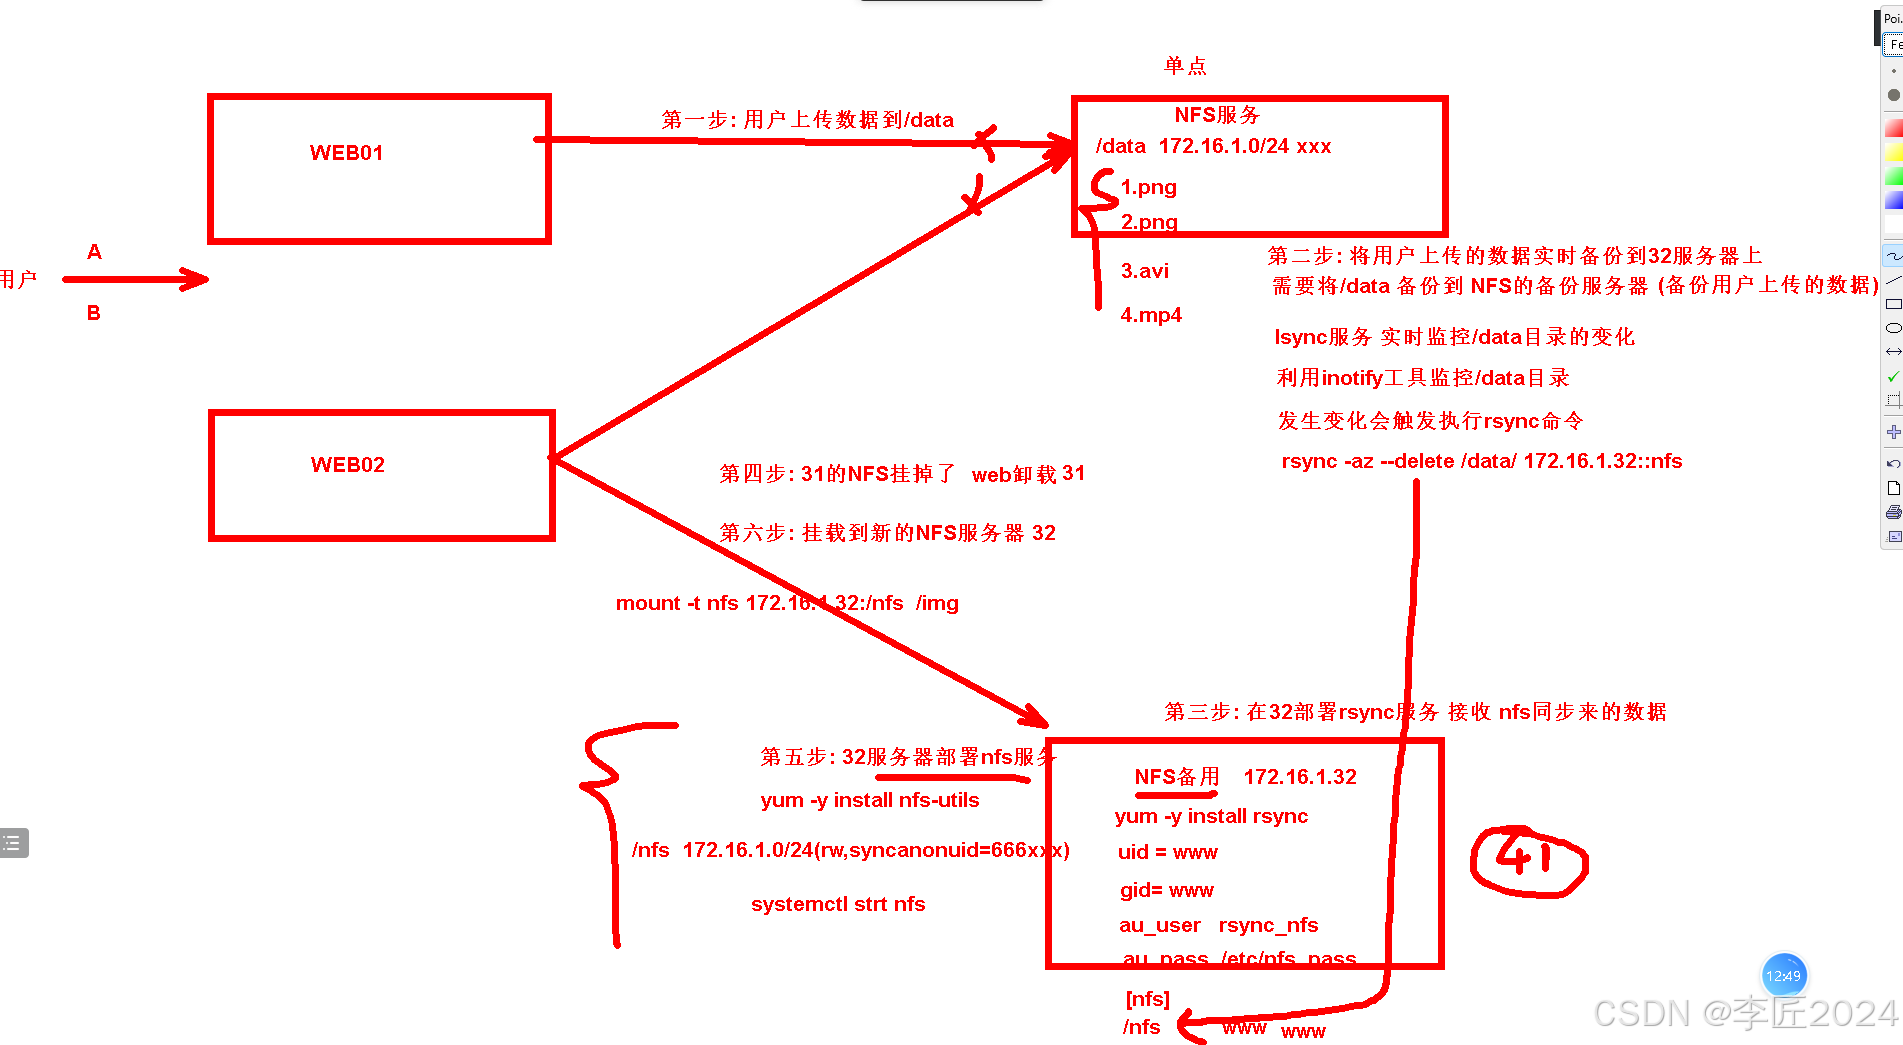
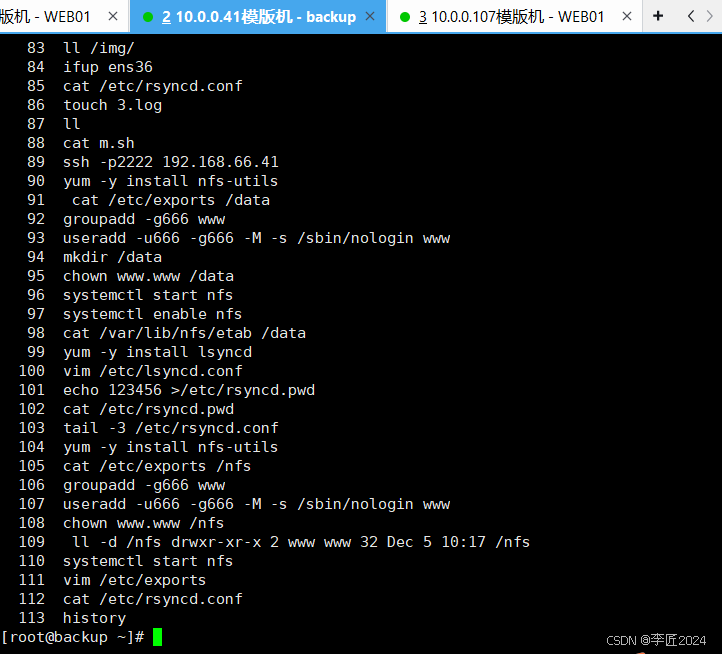
1.2NFS服务

1.3lsync服务
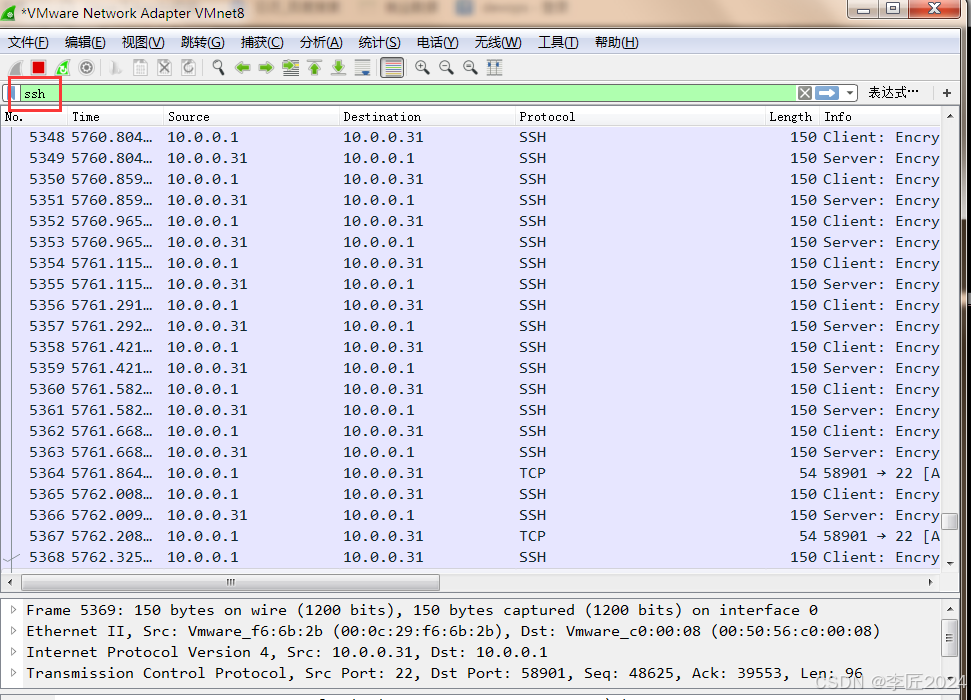
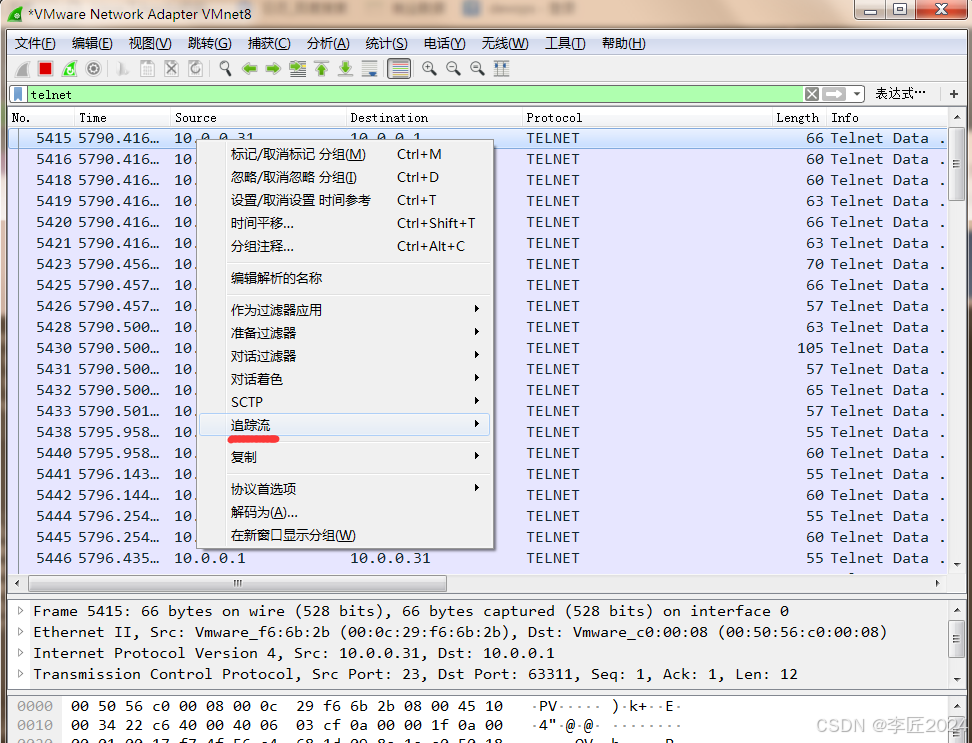
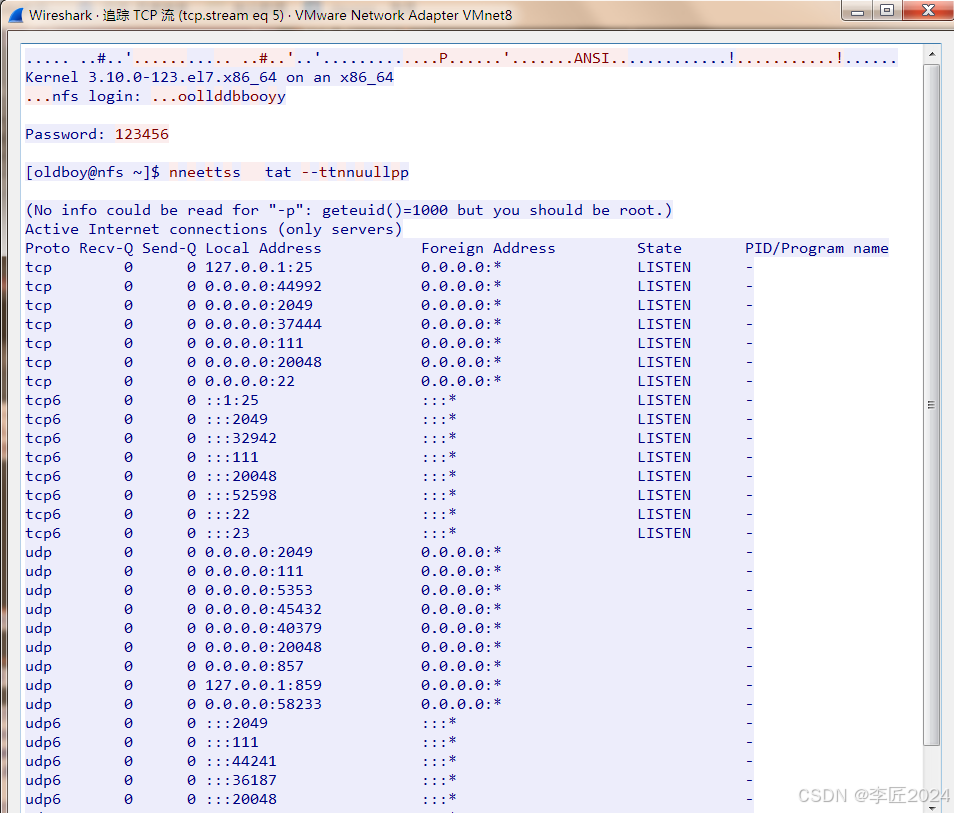
1.4SSH基于秘钥方式连接

``bash 远程连接 windows连接linux命令
linux连接linux ssh ip
基于用户名和密码的方式远程连接 ssh [email protected]
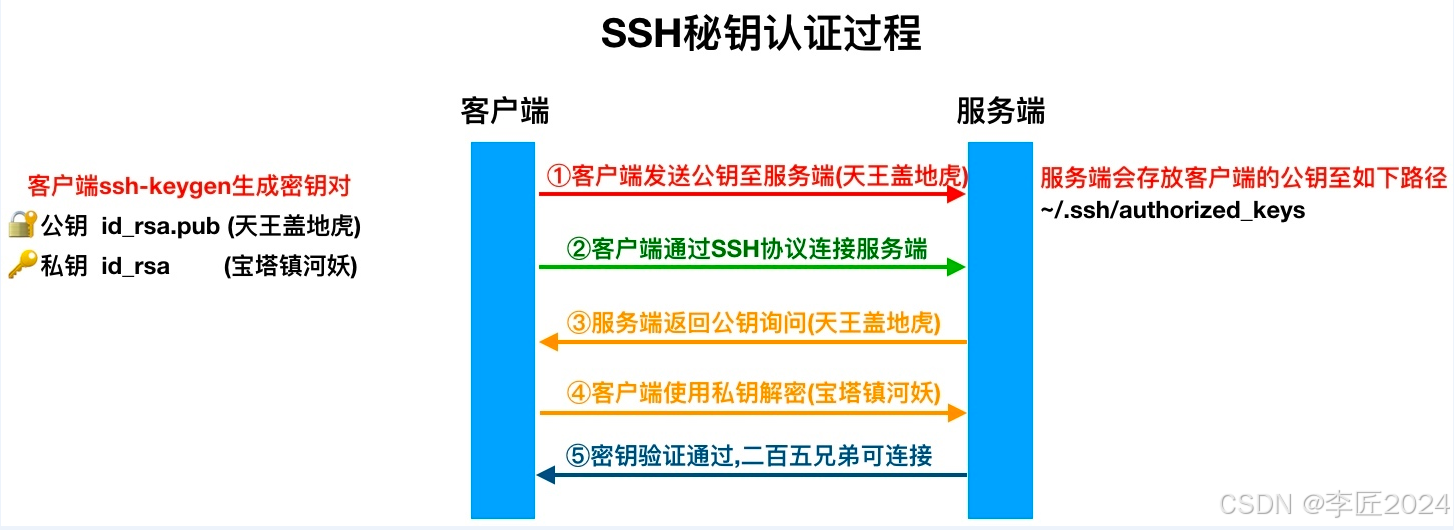
ssh基于秘钥的方式远程连接
```
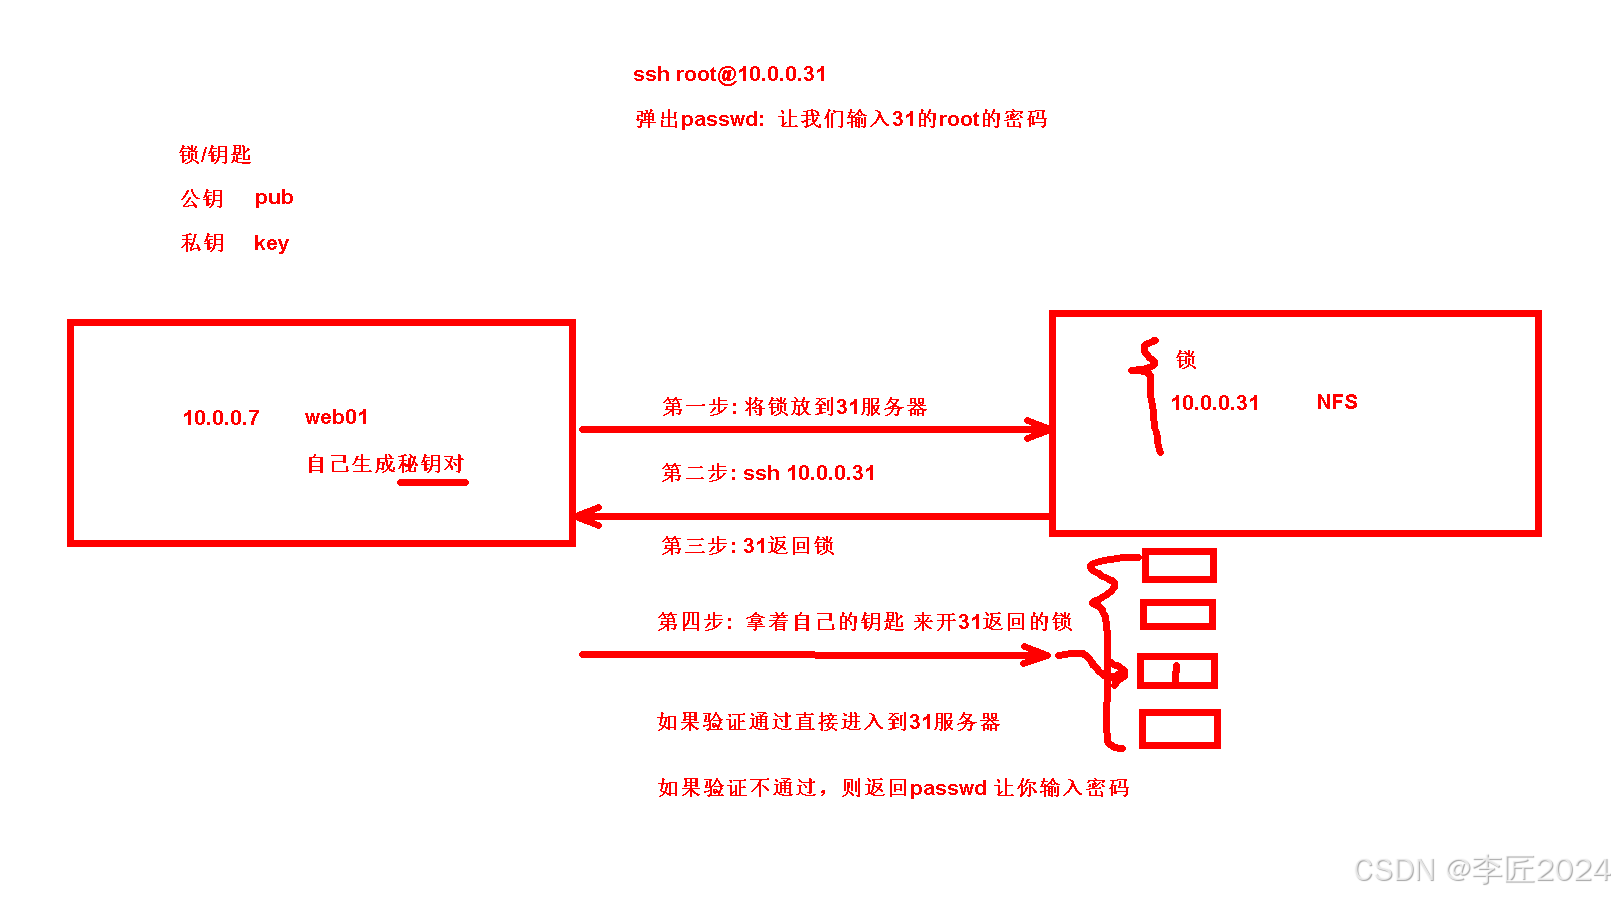
```bash web01免秘钥连接nfs服务器 第一步: web01生成秘钥对 [root@web01 ~]# ssh-keygen # 一路回车即可 Generating public/private rsa key pair. Enter file in which to save the key (/root/.ssh/idrsa): Enter passphrase (empty for no passphrase): Enter same passphrase again: Your identification has been saved in /root/.ssh/idrsa Your public key has been saved in /root/.ssh/id_rsa.pub The key fingerprint is: SHA256:Myktf2IVel+ed3n5wZ8CHz7n87eO3xIL1VRPzXrwIqA root@web01 The key's randomart image is: +---[RSA 3072]----+ | .=| | . ..=| | ... *.| | .Eo .. + +| | o S o o.o | | + = o.+o.o| | + . =.+B+| | . o =++X| | .BBX| +----[SHA256]-----+
第二步: 查看秘钥对 [root@web01 ~]# ll .ssh/ total 12 -rw------- 1 root root 2590 Dec 5 10:42 idrsa -rw-r--r-- 1 root root 564 Dec 5 10:42 idrsa.pub
第三步: 将公钥拷贝到10.0.0.31 [root@web01 ~]# ssh-copy-id 10.0.0.31 中间需要输入31服务器的密码
第四步: ssh远程面秘钥连接 [root@web01 ~]# ssh 10.0.0.31
[root@nfs ~]# ll .ssh/ total 8 -rw------- 1 root root 564 Dec 5 10:45 authorized_keys ```
1.5WINDOWS免密连接web01
SSH远程连接注意事项
```bash 所有目录的权限必须正确: [root@nfs ~]# ll -d / # 根目录555 dr-xr-xr-x. 21 root root 276 Dec 5 10:30 / [root@nfs ~]# ll -d /root # 家目录权限为550 dr-xr-x--- 4 root root 154 Dec 5 10:30 /root [root@nfs ~]# ll -d .ssh # .ssh存放公钥和秘钥的目录 700 drwx------ 2 root root 48 Dec 5 10:45 .ssh [root@nfs ~]# ll .ssh/ #存放公钥的文件必须为600 total 8 -rw------- 1 root root 1129 Dec 5 10:48 authorized_keys
私钥的权限: 600 [root@web01 ~]# ll .ssh/ total 12 -rw------- 1 root root 2590 Dec 5 10:42 idrsa -rw-r--r-- 1 root root 564 Dec 5 10:42 idrsa.pub
```
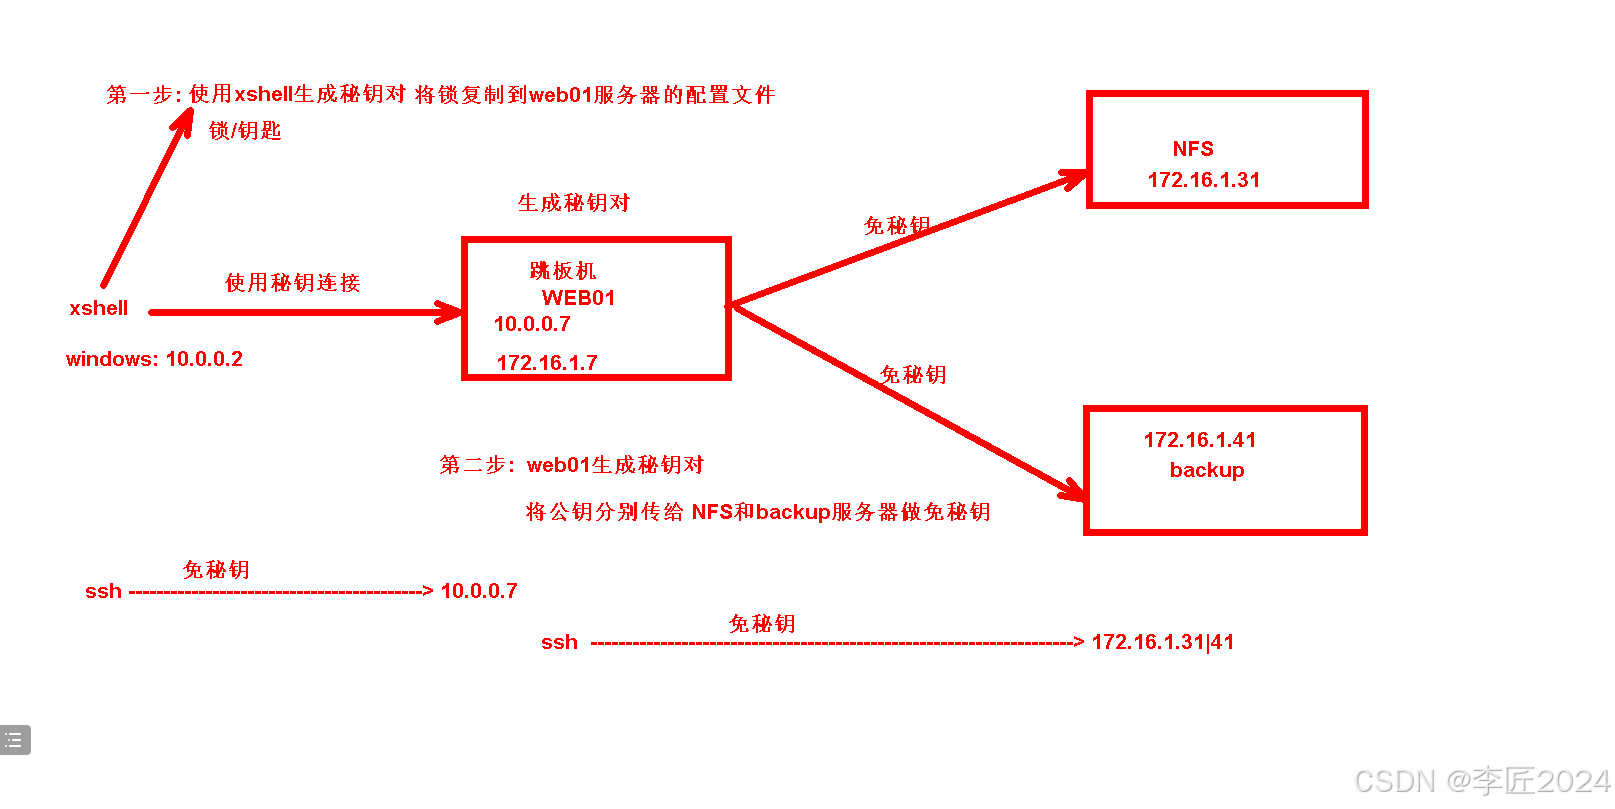
远程连接案例
bash 需求: 1.xshell通过免秘钥连接10.0.0.7 2.nfs和backup都关闭公网网卡ens33 只留下172.16.1段 3.通过web01作为跳板机连接 backup和nfs服务器
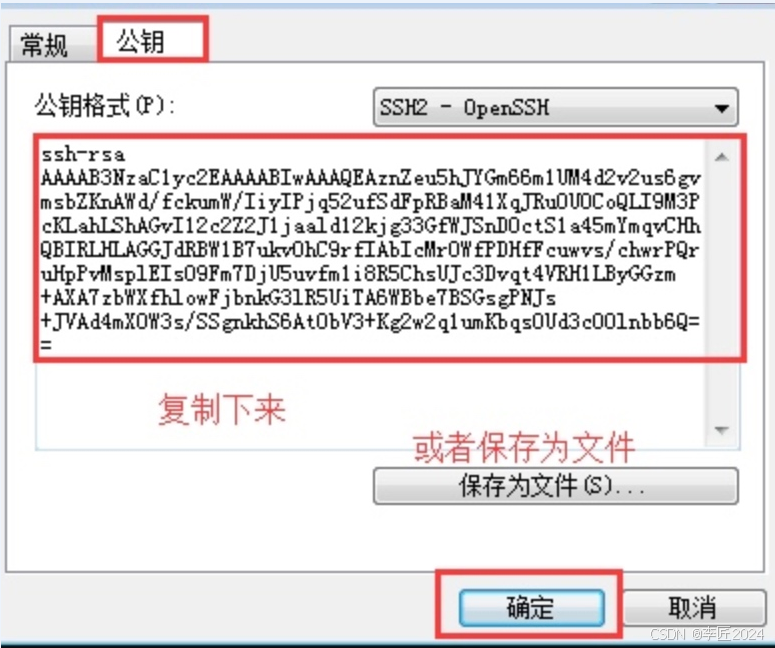
第一步:xshell生成秘钥对
xshell-->工具-->新建生成秘钥向导
第二步: 将生成的公钥写入到web01服务器
```bash [root@web01 ~]# vim .ssh/authorizedkeys # 将公钥粘贴到此文件中 [root@web01 ~]# ll .ssh/authorizedkeys -rw-r--r-- 1 root root 381 Dec 5 11:25 .ssh/authorizedkeys [root@web01 ~]# chmod 600 .ssh/authorizedkeys # 授权为600 [root@web01 ~]# ll .ssh/authorizedkeys -rw------- 1 root root 381 Dec 5 11:25 .ssh/authorizedkeys
```
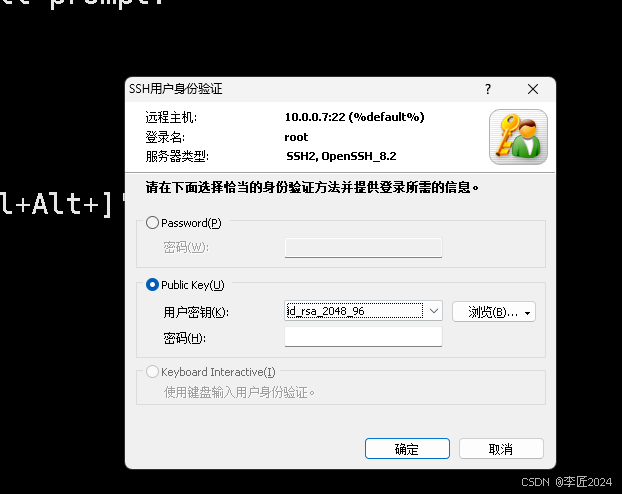
第三步:windows使用秘钥连接服务器
bash 修改ssh配置文件禁止root和密码登录 [root@web01 ~]# awk 'NR==66' /etc/ssh/sshd_config PasswordAuthentication no [root@web01 ~]# systemctl restart sshd
在尝试远程连接登录
通过WEB01和nfs及backup服务器做免秘钥
```bash 第一步: web01生成秘钥对 [root@web01 ~]# ssh-keygen 第二步: 将公钥拷贝到 172.16.1.31和41
1.6web和后端做免密钥
通过WEB01和nfs及backup服务器做免秘钥
```bash 第一步: web01生成秘钥对 [root@web01 ~]# ssh-keygen 第二步: 将公钥拷贝到 172.16.1.31和41
1.7SSH远程执行命令
拷贝的过程中要31和41的root密码
[root@web01 ~]# ssh-copy-id 10.0.0.31 [root@web01 ~]# ssh-copy-id 172.16.1.41
第三步: 远程连接登录测试 [root@web01 ~]# ssh 172.16.1.41
```
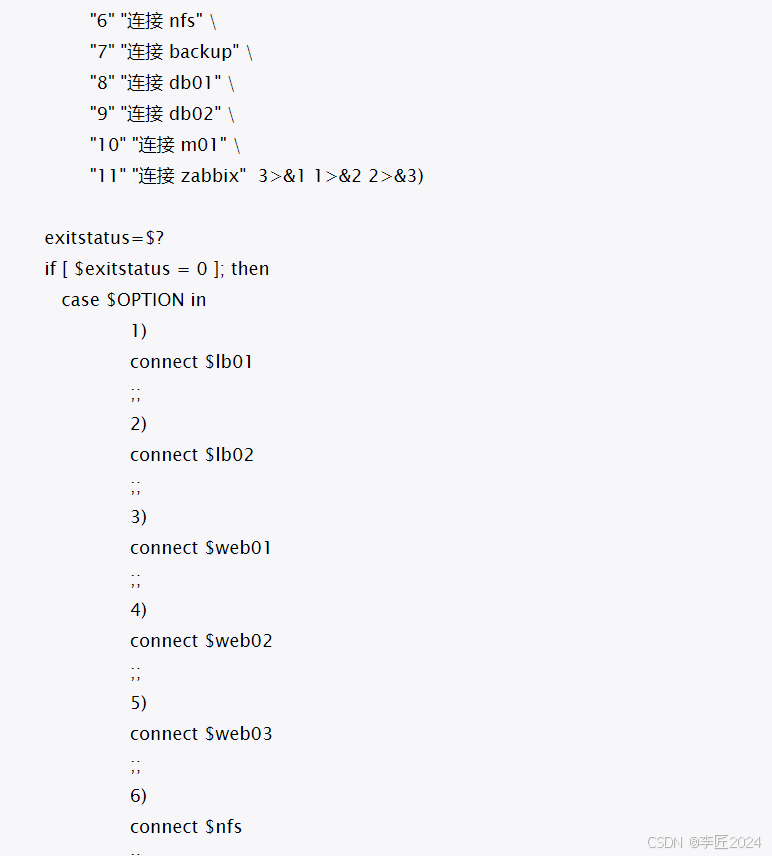
有需要时候可以优化登录配置
```bash 每次连接31和41都要先连接web01才可以。麻烦 设置登录脚本自动连接到31和41即可
``
```bash 上午重点: RSYNC 作用 搭建使用 客户端如何使用 NFS 网站常用 云服务器 NAS 网站数据一致性 lsync 实时同步工具+rsync使用
SSH远程连接 linux连接linux linux免秘钥连接如何做
扩展远程执行命令: [root@web01 ~]# ssh 10.0.0.31 'touch /root/1.txt' ```

1.8HTTP请求协议


1.9http请求头部信息
HTTP重点: DNS解析流程 TCP三次握手 HTTP请求头部 HTTP响应头部 TCP四次挥手
HTTP常见状态码 IP PV UV 概念 ```

1.10HTTP状态码
HTTP请求标头 accept: image/avif,image/webp,image/apng # 请求的资源类型 accept-encoding: gzip, deflate # 使用gzip进行压缩 accept-language: zh-CN,zh;q=0.9,en;q=0.8 # 请求的语言 cache-control: no-cache # 当前的页面是否被缓存 connection: keep-alive # 长连接 默认使用http1.1协议 1.0短连接 2.0为并发连接 host: 10.0.0.7 # 请求的主机 pragma: no-cache # 是否缓存 referer: http://10.0.0.7/ # 来源页面 user-agent: Mozilla/5.0 (Windows NT 10.0; Win64; x64) AppleWebKit/537.36 (KHTML, like Gecko) Chrome/131.0.0.0 Safari/537.36 Edg/131.0.0.0 # 客户端
HTTP响应标头 accept-ranges: bytes # 响应长度字节 connection: keep-alive # 响应长连接 content-length: 368 # 资源的大小 content-type: image/png # 响应的资源类型 date: Thu, 05 Dec 2024 08:05:19 GMT # 响应时间 etag: "66ed190e-170" # 缓存相关 last-modified: Fri, 20 Sep 2024 06:41:18 GMT # 缓存 server: nginx/1.21.5 # 响应服务版本
GMT,即格林尼治标准时间,是零时区的时间。 北京时间,位于中国标准时间(CST),比GMT快8小时,即UTC+8
HTTP状态码 200 OK:请求成功。 201 Created:请求已经成功,并因此创建了一个新的资源。 202 Accepted:请求已被接受,但还未处理。 203 Non-Authoritative Information:服务器已成功处理了请求,但返回的信息可能来自另一个来源。

1.11IP-PV-UV
P(Internet Protocol)独立IP数,是指1天内多少个独立的IP浏览了页面,即统计不同的IP浏览用户数量。同一IP不管访问了几个页面,独立IP数均为1;不同的IP浏览页面,计数会加1。 IP是基于用户广域网IP地址来区分不同的访问者的,所以,多个用户(多个局域网IP)在同一个路由器(同一个广域网IP)内上网,可能被记录为一个独立IP访问者。如果用户不断更换IP,则有可能被多次统计。 IP: 公网IP地址
假设公司有一座大厦,大厦有100人,每个人有一台电脑和一部手机,上网都是通过nat转换出口,每个人点击网站2次, 请问对应的pv,uv,ip分别是多少? PV: 100x2x2=400 UV: 100x2=200 IP: 1个IP
你们公司的网站每天PV UV IP 根据业务类型计算 200万PV/100=2万UV 3K-6K公网IP地址


1.12阶段小测


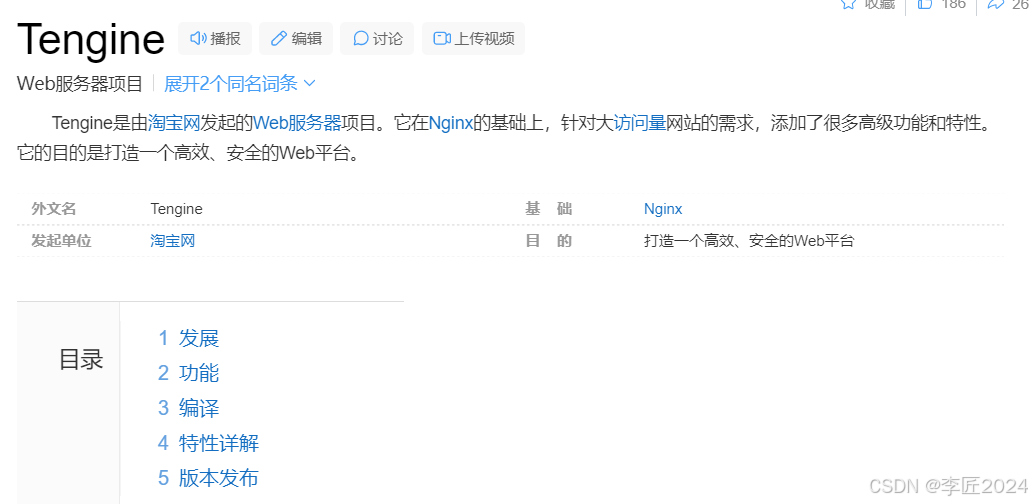
二.Nginx常用模块
2.1前三件事情的重要性
```bash
切忌摸鱼,不是特别的忙的工作,相关但是不大(处理工单)自研产品。
过渡1年(除非公司非常重视你 机遇 8次左右)
网管--过渡 每天学习网络 Linux
公司-->S子
```
2.2nginx服务安装方式
```bash
Nginx服务安装
Nginx是一个WEB服务,部署小霸王游戏机
需求: 通过nginx服务部署游戏服务
安装方式:
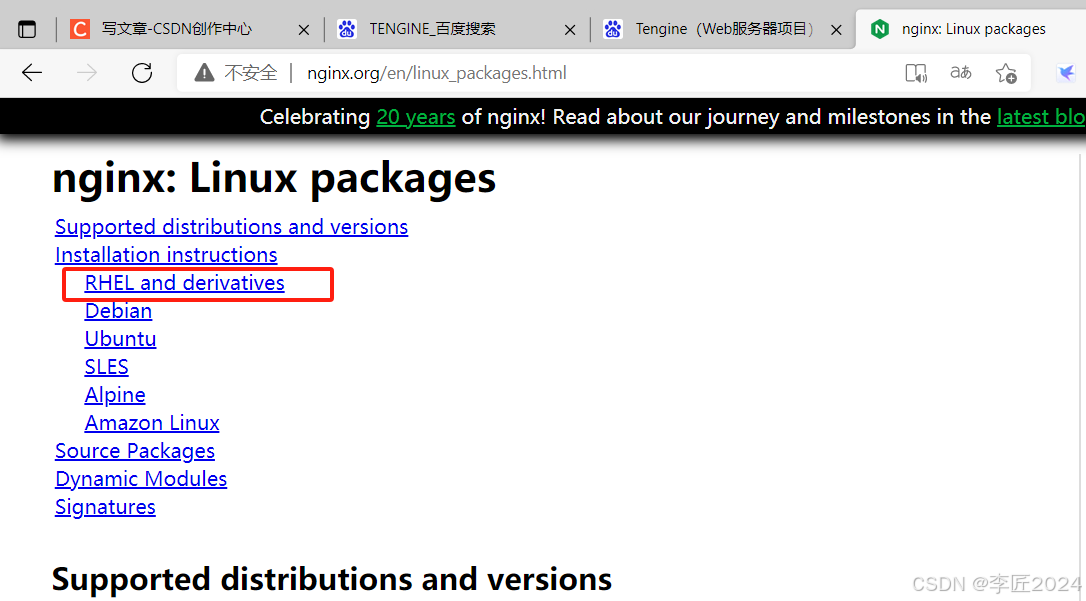
第一种: 基于官网仓库的安装方式,版本较新,配置易读
第二种: 使用默认的仓库安装,版本较低,配置不易读
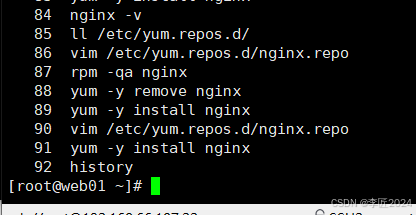
[root@web01 ~]# nginx -v
nginx version: nginx/1.21.5
第三种: 编译方式安装,需要其他功能模块的时候 自定义安装

安装方式:
基于官网仓库的安装方式,版本较新,配置易读
第一步: 配置Nginx官网仓库
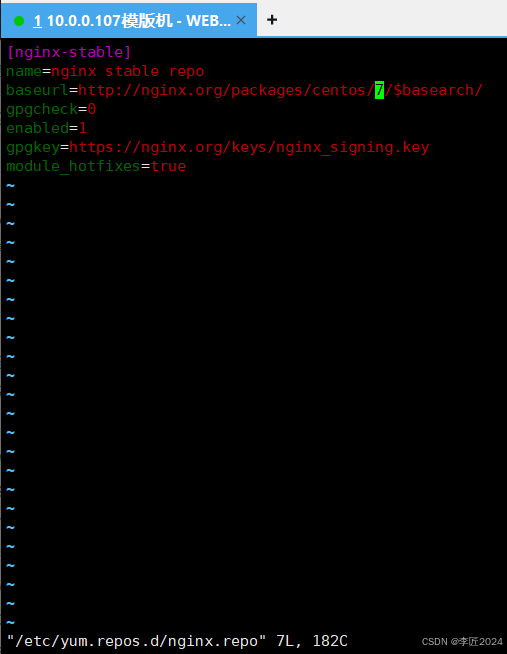
[root@web01 ~]# vim /etc/yum.repos.d/nginx.repo
[nginx-stable]
name=nginx stable repo
baseurl=http://nginx.org/packages/centos/$releasever/$basearch/
gpgcheck=0
enabled=1
gpgkey=https://nginx.org/keys/nginx_signing.key
module_hotfixes=true
第二步: 安装Nginx服务
[root@web01 ~]# yum -y install nginx
[root@web01 ~]# nginx -v
nginx version: nginx/1.26.1
2.3nginx配置文件
# 核心区块
user nginx; # 运行nginx的用户 安装nginx自动创建此用户
worker_processes auto; # nginx启动进程数量 以核心为准
error_log /var/log/nginx/error.log notice; # 错误日志的位置
pid /var/run/nginx.pid; # nginx的pid号写入到此文件中
#事件模块
events {
worker_connections 25532; # 每个进程最大的连接数
}
# http区块 接收浏览器请求 并且响应浏览器请求
http {
include /etc/nginx/mime.types; # 网站支持的文件类型
default_type application/octet-stream; # 如果网站不支持的类型变为下载到本地
log_format main '$remote_addr - $remote_user [$time_local] "$request" '
'$status $body_bytes_sent "$http_referer" '
'"$http_user_agent" "$http_x_forwarded_for"'; # 日志格式
access_log /var/log/nginx/access.log main; # 访问日志的位置
sendfile on; # 文件传输
#tcp_nopush on;
keepalive_timeout 65; # 长连接 65秒自动和浏览器断开
#gzip on; # 是否资源压缩
include /etc/nginx/conf.d/*.conf; # 将conf.d下的*.conf引入到当前的文件
}
2.4nginx-server配置
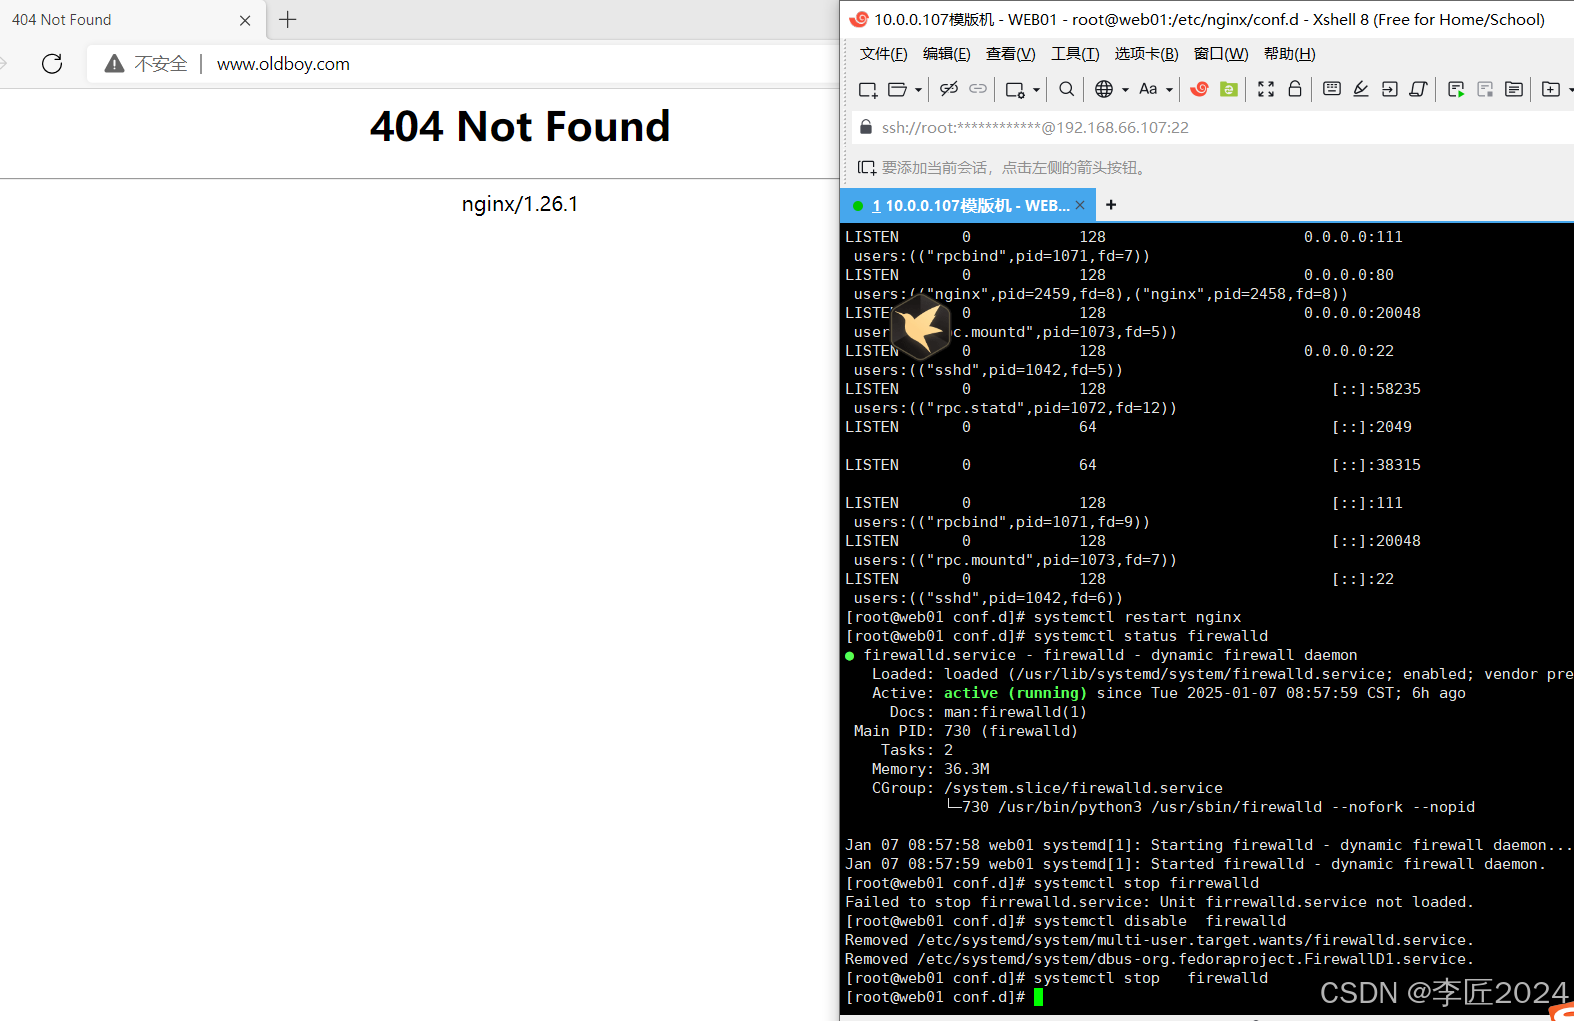
[root@web01 conf.d]# cat default.conf
server {
listen 80; # 监听的端口
server_name www.oldboy.com; # 自己购买的域名 hosts解析
location / { # 路径匹配 www.oldboy.com/
root /code; # 让用户去/code目录获取网站信息
index index.html; # 默认给浏览器返回的文件 index.html
}
}
# 创建代码目录
mkdir /code
上传游戏代码到/code目录并且解压
[root@web01 code]# ll renzhegame.tar.gz
-rw-r--r-- 1 root root 1904843 Dec 6 11:33 renzhegame.tar.gz
[root@web01 code]# tar xf renzhegame.tar.gz
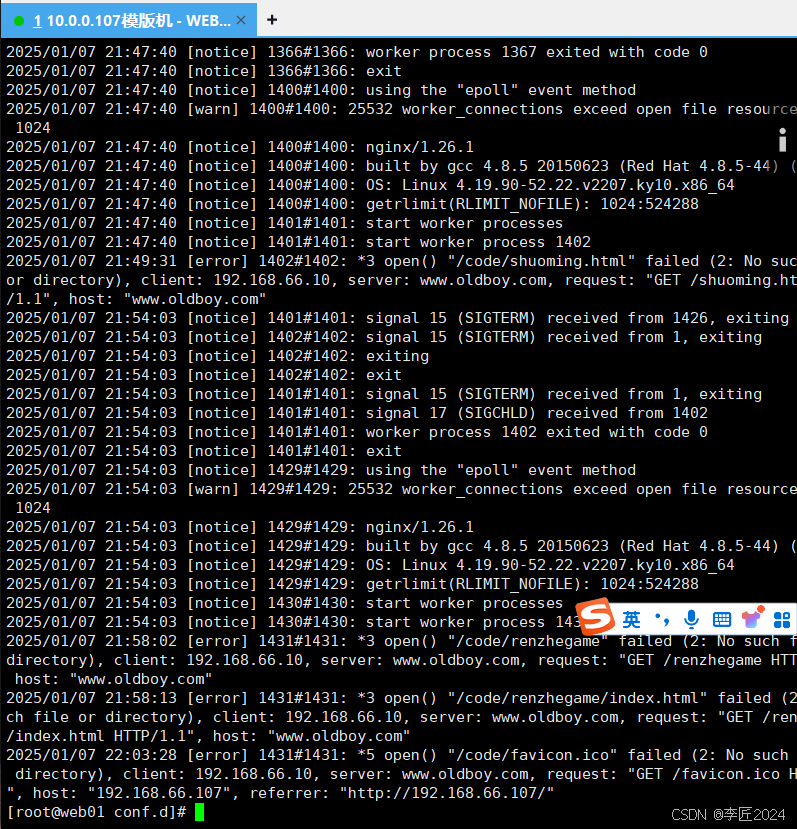
第四步: 检查nginx配置文件
[root@web01 conf.d]# nginx -t
nginx: the configuration file /etc/nginx/nginx.conf syntax is ok
nginx: configuration file /etc/nginx/nginx.conf test is successful
第五步: 启动Nginx服务
[root@web01 conf.d]# systemctl start nginx
[root@web01 conf.d]# netstat -tnulp
Active Internet connections (only servers)
Proto Recv-Q Send-Q Local Address Foreign Address State PID/Program name
tcp 0 0 0.0.0.0:80 0.0.0.0:* LISTEN 30632/nginx: master
HTTP 404 # 代码目录不存在
HTTP 403 # 有代码目录但是没有文件

rm -rf /etc/nginx/conf.d/nginx.conf
2.5nginx-代码配置
[root@web01 conf.d]# mkdir /game
[root@web01 conf.d]# cd /game/
3.上传小霸王游戏包
[root@web01 game]# ll
total 7708
-rw-r--r-- 1 root root 7890373 Dec 6 11:34 game.zip
[root@web01 game]# unzip game.zip
4.检测配置文件
[root@web01 game]# nginx -t
nginx: the configuration file /etc/nginx/nginx.conf syntax is ok
nginx: configuration file /etc/nginx/nginx.conf test is successful
5.重启nginx
[root@web01 game]# systemctl restart nginx

2.6nginx-基于IP配置多业务
基于多端口 常用 80是给用户用的,自己的业务的后台不能让用户访问。自定义后台的端口
10.0.0.7:80------>忍者
10.0.0.7:81------>小霸王
忍者配置文件
[root@web01 conf.d]# cat default.conf
server {
listen 80; # 监听的端口
server_name _; # 自己购买的域名 hosts解析
location / { # 路径匹配 www.oldboy.com/
root /code; # 让用户去/code目录获取网站信息
index index.html; # 默认给浏览器返回的文件 index.html
}
}
小霸王配置文件
[root@web01 conf.d]# cat game.conf
server {
listen 81;
server_name _;
location / {
root /game;
index index.html;
}
}
[root@web01 conf.d]# nginx -t
nginx: the configuration file /etc/nginx/nginx.conf syntax is ok
nginx: configuration file /etc/nginx/nginx.conf test is successful
[root@web01 conf.d]# systemctl restart nginx
访问测试:
10.0.0.7:80
10.0.0.7:81

2.7nginx基于多域名配置
基于多域名 常用
www.oldboy.com-------->忍者
www.game.com-------->小霸王
配置忍者业务
[root@web01 conf.d]# cat default.conf
server {
listen 80; # 监听的端口
server_name www.oldboy.com; # 自己购买的域名 hosts解析
location / { # 路径匹配 www.oldboy.com/
root /code; # 让用户去/code目录获取网站信息
index index.html; # 默认给浏览器返回的文件 index.html
}
}
配置小霸王游戏业务
[root@web01 conf.d]# cat game.conf
server {
listen 80;
server_name www.game.com;
location / {
root /game;
index index.html;
}
}
[root@web01 conf.d]# nginx -t
nginx: the configuration file /etc/nginx/nginx.conf syntax is ok
nginx: configuration file /etc/nginx/nginx.conf test is successful
[root@web01 conf.d]# systemctl restart nginx
测试访问:
www.oldboy.com 对应的忍者
www.game.com 对应的小霸王 植物大战僵尸
重点:
安装nginx服务 通过官网仓库
nginx.conf 配置文件
server.conf server区块 网站
基于多IP地址 练习一遍
基于多端口 重点
基于多域名 重点
三.Nginx服务实战
3.1nginx-索引模块