BeanFactory 与 ApplicationContext 的区别
-
到底什么是 BeanFactory
-
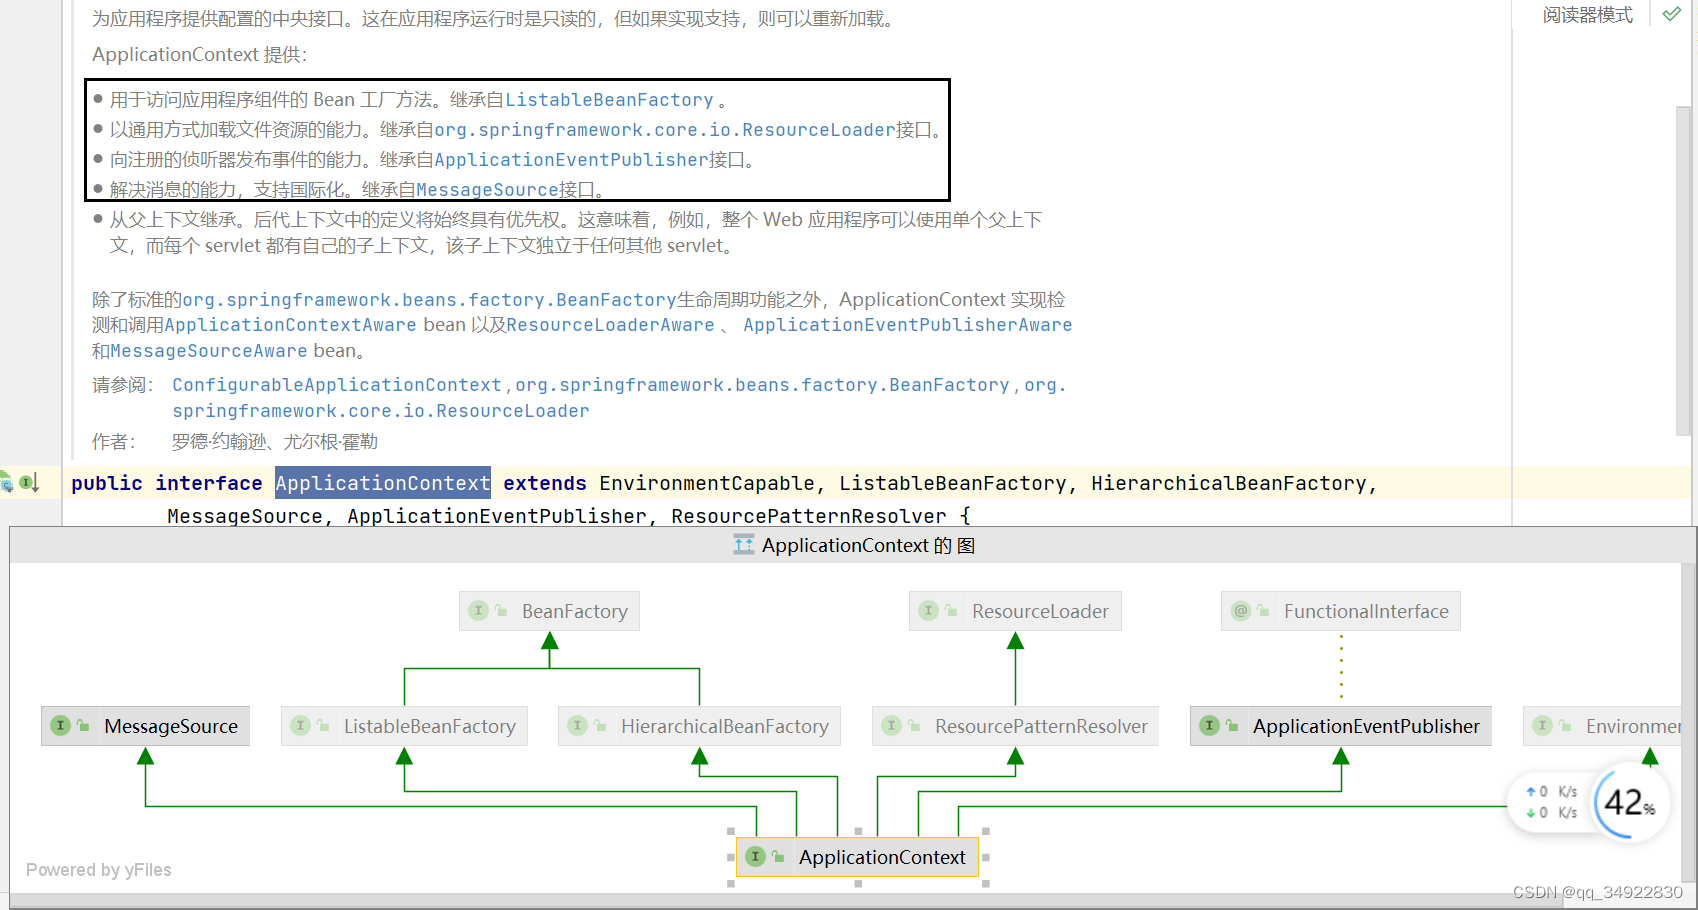
它是 ApplicationContext 的父接口
-
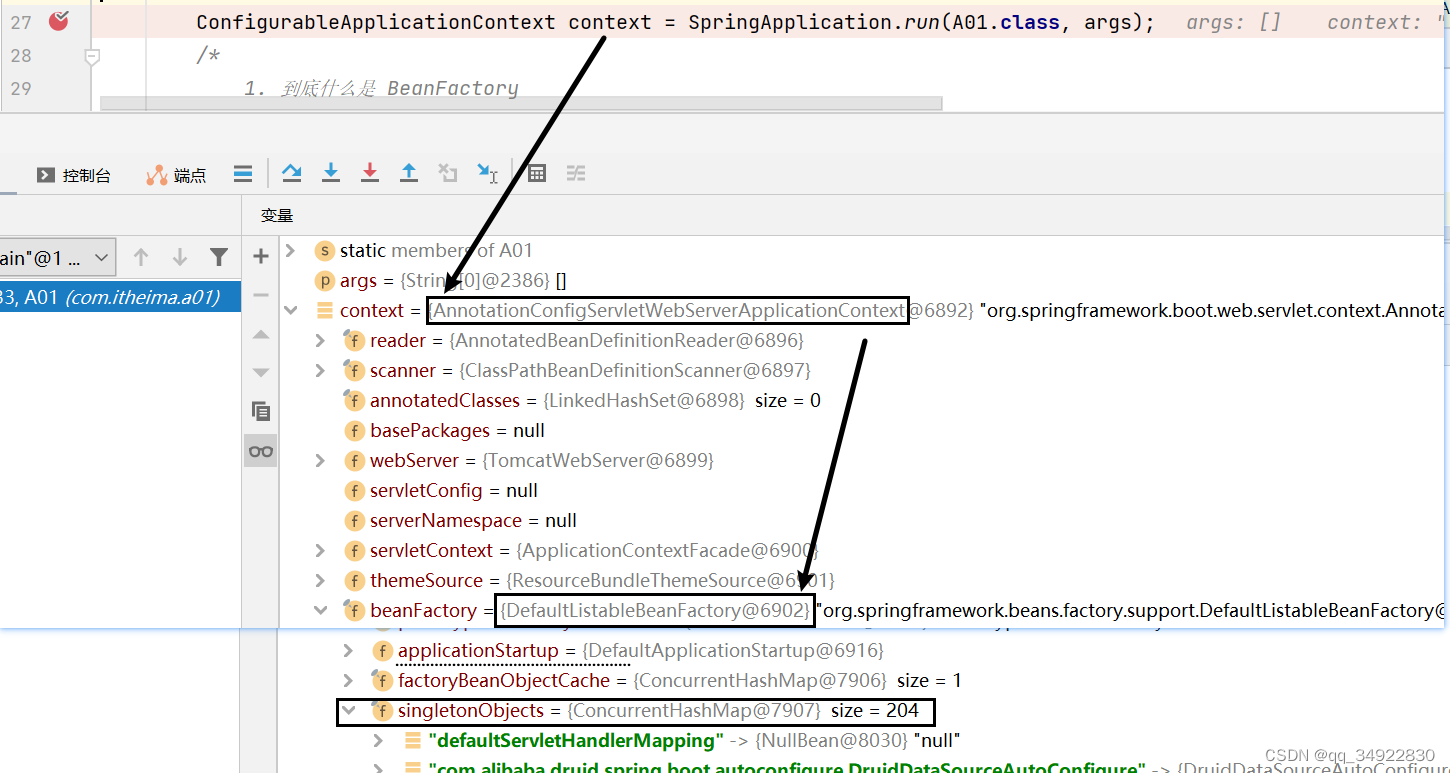
它才是 Spring 的核心容器, 主要的 ApplicationContext 实现都【组合】了它的功能,【组合】是指 ApplicationContext 的一个重要成员变量就是 BeanFactory
-
-
BeanFactory 能干点啥
-
表面上只有 getBean
-
实际上控制反转、基本的依赖注入、直至 Bean 的生命周期的各种功能,都由它的实现类提供
-
例子中通过反射查看了它的成员变量 singletonObjects,内部包含了所有的单例 bean
-
-
ApplicationContext 比 BeanFactory 多点啥
-
ApplicationContext 组合并扩展了 BeanFactory 的功能
-
国际化、通配符方式获取一组 Resource 资源、整合 Environment 环境、事件发布与监听
-
事件解耦(org.springframework.context.ApplicationEventPublisher#publishEvent(java.lang.Object) 、org.springframework.context.event.EventListener)
-
2) 容器实现
-
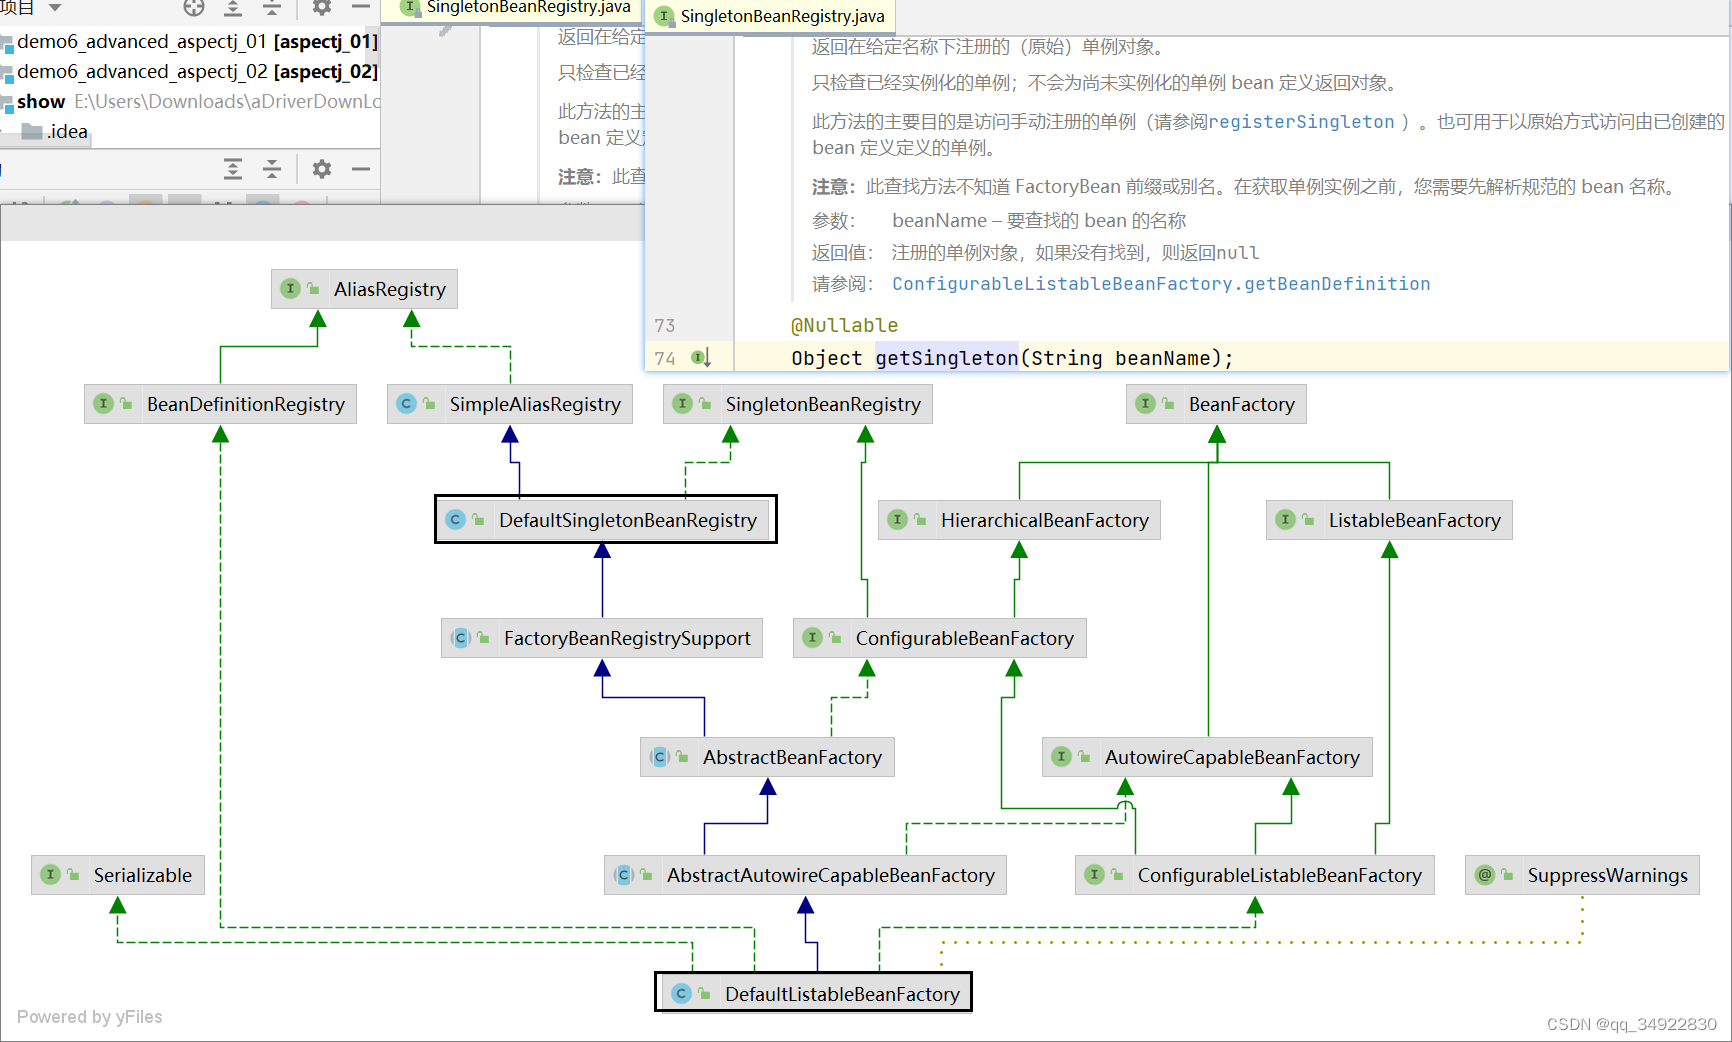
DefaultListableBeanFactory,是 BeanFactory 最重要的实现,像控制反转和依赖注入功能,都是它来实现
-
ClassPathXmlApplicationContext,从类路径查找 XML 配置文件,创建容器(旧)
-
FileSystemXmlApplicationContext,从磁盘路径查找 XML 配置文件,创建容器(旧)
-
XmlWebApplicationContext,传统 SSM 整合时,基于 XML 配置文件的容器(旧)
-
AnnotationConfigWebApplicationContext,传统 SSM 整合时,基于 java 配置类的容器(旧)
-
AnnotationConfigApplicationContext,Spring boot 中非 web 环境容器(新)
-
AnnotationConfigServletWebServerApplicationContext,Spring boot 中 servlet web 环境容器(新)
-
AnnotationConfigReactiveWebServerApplicationContext,Spring boot 中 reactive web 环境容器(新)
另外要注意的是,后面这些带有 ApplicationContext 的类都是 ApplicationContext 接口的实现,但它们是组合了 DefaultListableBeanFactory 的功能,并非继承而来。
-
beanFactory 可以通过 registerBeanDefinition 注册一个 bean definition 对象
-
我们平时使用的配置类、xml、组件扫描等方式都是生成 bean definition 对象注册到 beanFactory 当中
-
bean definition 描述了这个 bean 的创建蓝图:scope 是什么、用构造还是工厂创建、初始化销毁方法是什么,等等
-
    DefaultListableBeanFactory beanFactory = new DefaultListableBeanFactory();
        // bean 的定义(class, scope, 初始化, 销毁)
        // My: 使用建造者模式 生成bean的定义( bean 类名) 设置作用域 单例。 建造
        AbstractBeanDefinition beanDefinition =
                                        BeanDefinitionBuilder.genericBeanDefinition(Config.class).setScope("singleton").getBeanDefinition();
        // My:在beanFactory添加(注册Bean定义)一个Bean
beanFactory.registerBeanDefinition("config", beanDefinition);-
beanFactory 需要手动调用 beanFactory 后处理器对它做增强
-
例如通过解析 @Bean、@ComponentScan 等注解,来补充一些 bean definition
-
-
beanFactory 需要手动添加 bean 后处理器,以便对后续 bean 的创建过程提供增强
-
例如 @Autowired,@Resource 等注解的解析都是 bean 后处理器完成的
-
bean 后处理的添加顺序会对解析结果有影响,见视频中同时加 @Autowired,@Resource 的例子
-
-
beanFactory 需要手动调用方法来初始化单例
-
beanFactory 需要额外设置才能解析 ${} 与 #{}
3) Bean 的生命周期
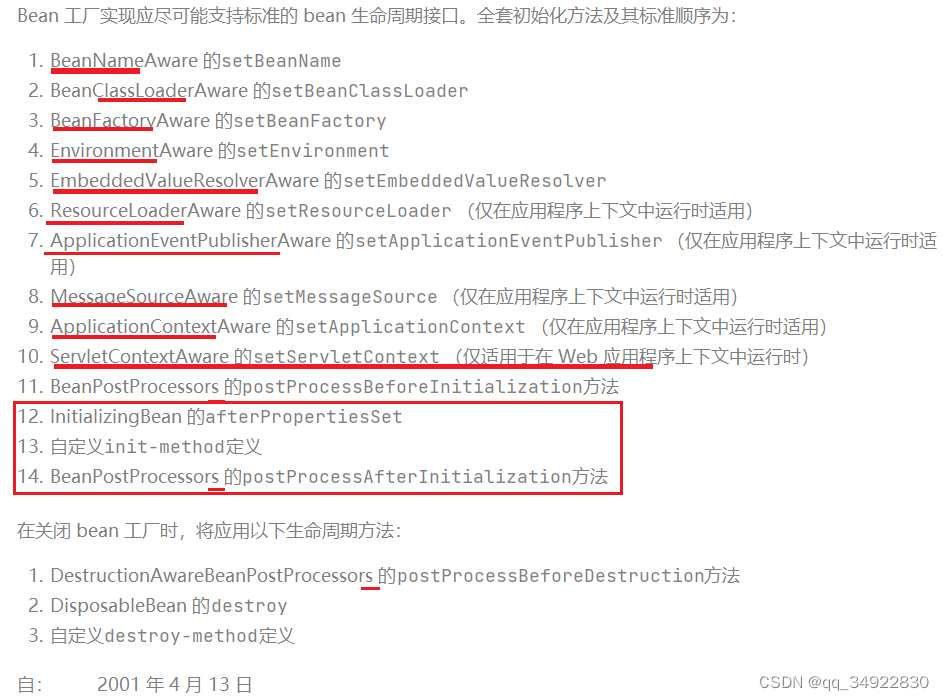
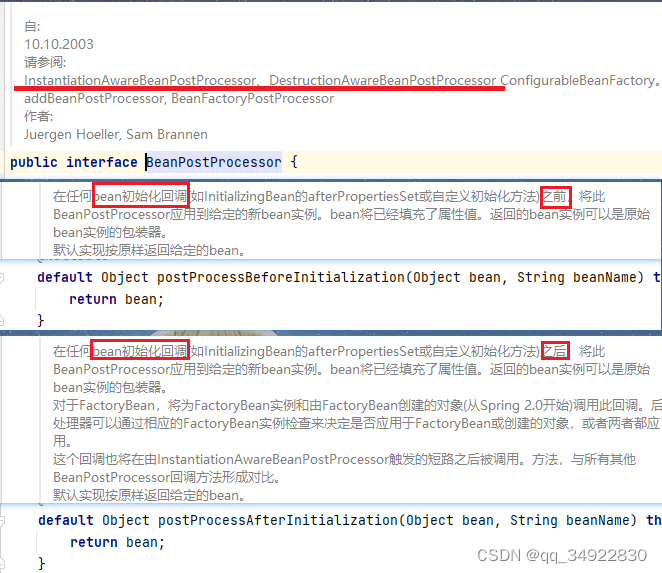
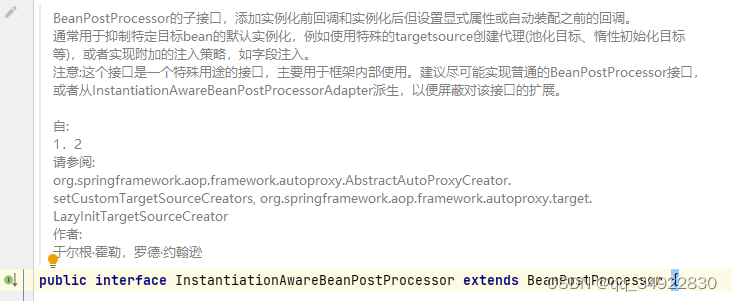
BeanFactory 文档注释未提及 InstantiationAwareBeanPostProcessor
InstantiationAwareBeanPostProcessor ->
BeanPostProcessor -> DestructionAwareBeanPostProcessor
创建前后的增强
-
postProcessBeforeInstantiation
-
这里返回的对象若不为 null 会替换掉原本的 bean,并且仅会走 postProcessAfterInitialization 流程
-
-
postProcessAfterInstantiation
-
这里如果返回 false 会跳过依赖注入阶段
-
依赖注入前的增强
-
postProcessProperties
-
如 @Autowired、@Value、@Resource
-
初始化前后的增强
-
postProcessBeforeInitialization
-
这里返回的对象会替换掉原本的 bean
-
如 @PostConstruct、@ConfigurationProperties
-
-
postProcessAfterInitialization
-
这里返回的对象会替换掉原本的 bean
-
如代理增强
-
销毁之前的增强
-
postProcessBeforeDestruction
-
如 @PreDestroy
-
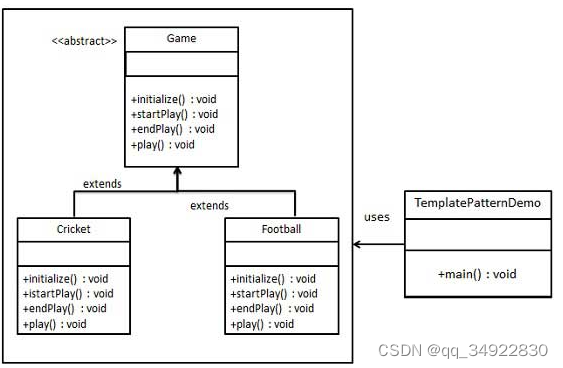
演示2 - 模板方法设计模式
Bean的生命周期 第14 步可添加多个 BeanPostProcessor 在这里拓展一种模板方法设计模式
import java.util.function.BiFunction;

/**
 * 自定义的函数对象 参照了 org.springframework.beans.factory.config.BeanPostProcessor#postProcessBeforeInitialization(java.lang.Object, java.lang.String)
 * @author Jay
 */
public class MyBeanPostProcessor {
    /**
     * Bean 后处理器
      */
    private BiFunction function;

    /**
     * T,参数一
     */
    private Object bean;

    /**
     * U, 参数二
     */
    private String beanName;

    /**
     * R, BiFunction 的返回值
     */
    private Object returnValue;

    /**
     * 需要全部的参数才能实例化
     * @param bean
     * @param beanName
     * @param function
     */
    public MyBeanPostProcessor(Object bean, String beanName, BiFunction function) {
        this.bean = bean;
        this.beanName = beanName;
        this.function = function;
    }

    public BiFunction getFunction() {
        return function;
    }

    public void setFunction(BiFunction function) {
        this.function = function;
    }

    public Object getBean() {
        return bean;
    }

    public void setBean(Object bean) {
        this.bean = bean;
    }
import java.util.ArrayList;
import java.util.List;

public abstract class Game {

    private List<MyBeanPostProcessor> processors = new ArrayList<>();

    /**
     * 初始化游戏
     */
    abstract void initialize();

    /**
     * 开始游戏
     */
    abstract void startPlay();

    /**
     * 结束游戏
     */
    abstract void endPlay();

    public void addFunction(MyBeanPostProcessor function) {
        processors.add(function);
    }

    /**
     * 模板方法 不可重写
     */
    public final void play() {

        initialize();

        startPlay();
        // 依次执行 MyBeanPostProcessor 的 getReturnValue
        for (MyBeanPostProcessor processor : processors) {
//            processor.getFunction().apply(processor.getBean(), processor.getBeanName());
            processor.getReturnValue();
        }

        endPlay();
    }
}
public class FootBall extends Game{
    @Override
    void initialize() {
        System.out.println("FootBall Game initializing...");
    }

    @Override
    void startPlay() {
        System.out.println("FootBall Game  startPlay");
    }

    @Override
    void endPlay() {
        System.out.println("FootBall Game is end");
    }
}
public class Cricket extends Game{
@Override
public final void initialize() {
System.out.println("Cricket Game initialize");
}
@Override
public final void startPlay() {
System.out.println("Cricket Game startPlay");
}
@Override
public final void endPlay() {
System.out.println("Cricket Game endPlay");
}
}/**
* @author Jay
*/
public class TemplatePatternDemo {
public static void main(String[] args) {
Game footBall = new FootBall();
// 添加 BeanPostProcessor
footBall.addFunction(
new MyBeanPostProcessor("1", "1", (bean, beanName) -> {
System.out.println("解析 @Bean");
return bean;
})
);
footBall.addFunction(
new MyBeanPostProcessor("1", "1", (bean, beanName) -> {
System.out.println("解析 @Resource");
return bean;
})
);
footBall.addFunction(
new MyBeanPostProcessor("1", "1", (bean, beanName) -> {
System.out.println("解析 @Autowired");
return bean;
})
);
footBall.play();
Game cricket = new Cricket();
cricket.play();
}
}
bean(后处理器)排序
收获💡
-
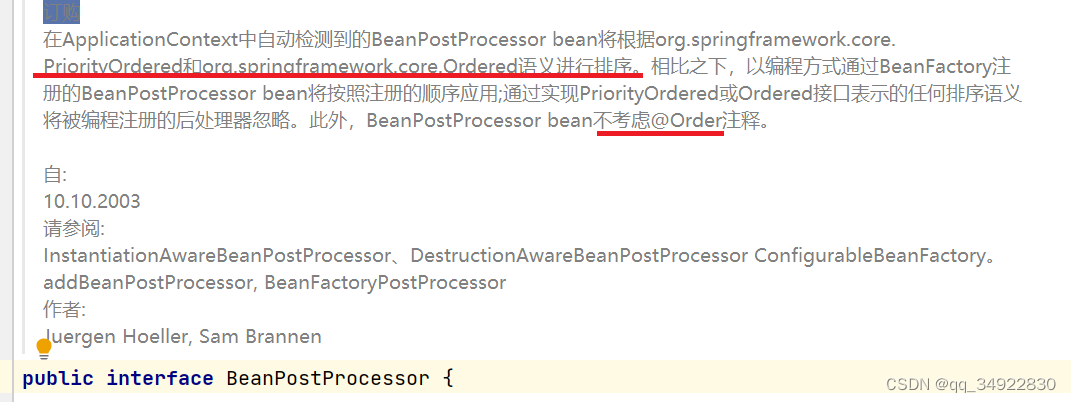
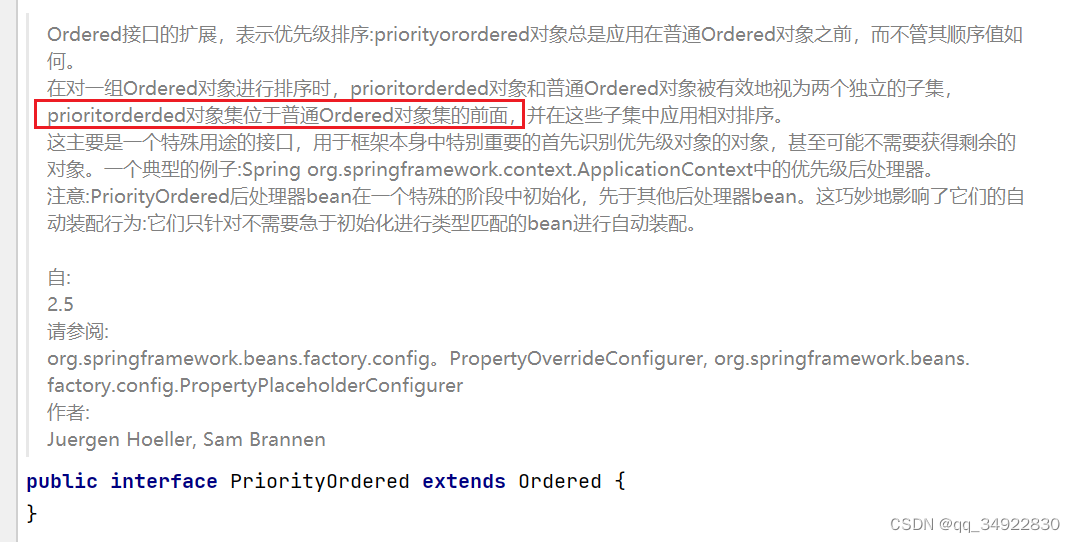
实现了 PriorityOrdered 接口的优先级最高
-
实现了 Ordered 接口与加了 @Order 注解的平级, 按数字升序
-
其它的排在最后
PostProcessorRegistrationDelegate[ AbstractApplicationContext的后处理器处理的委托]
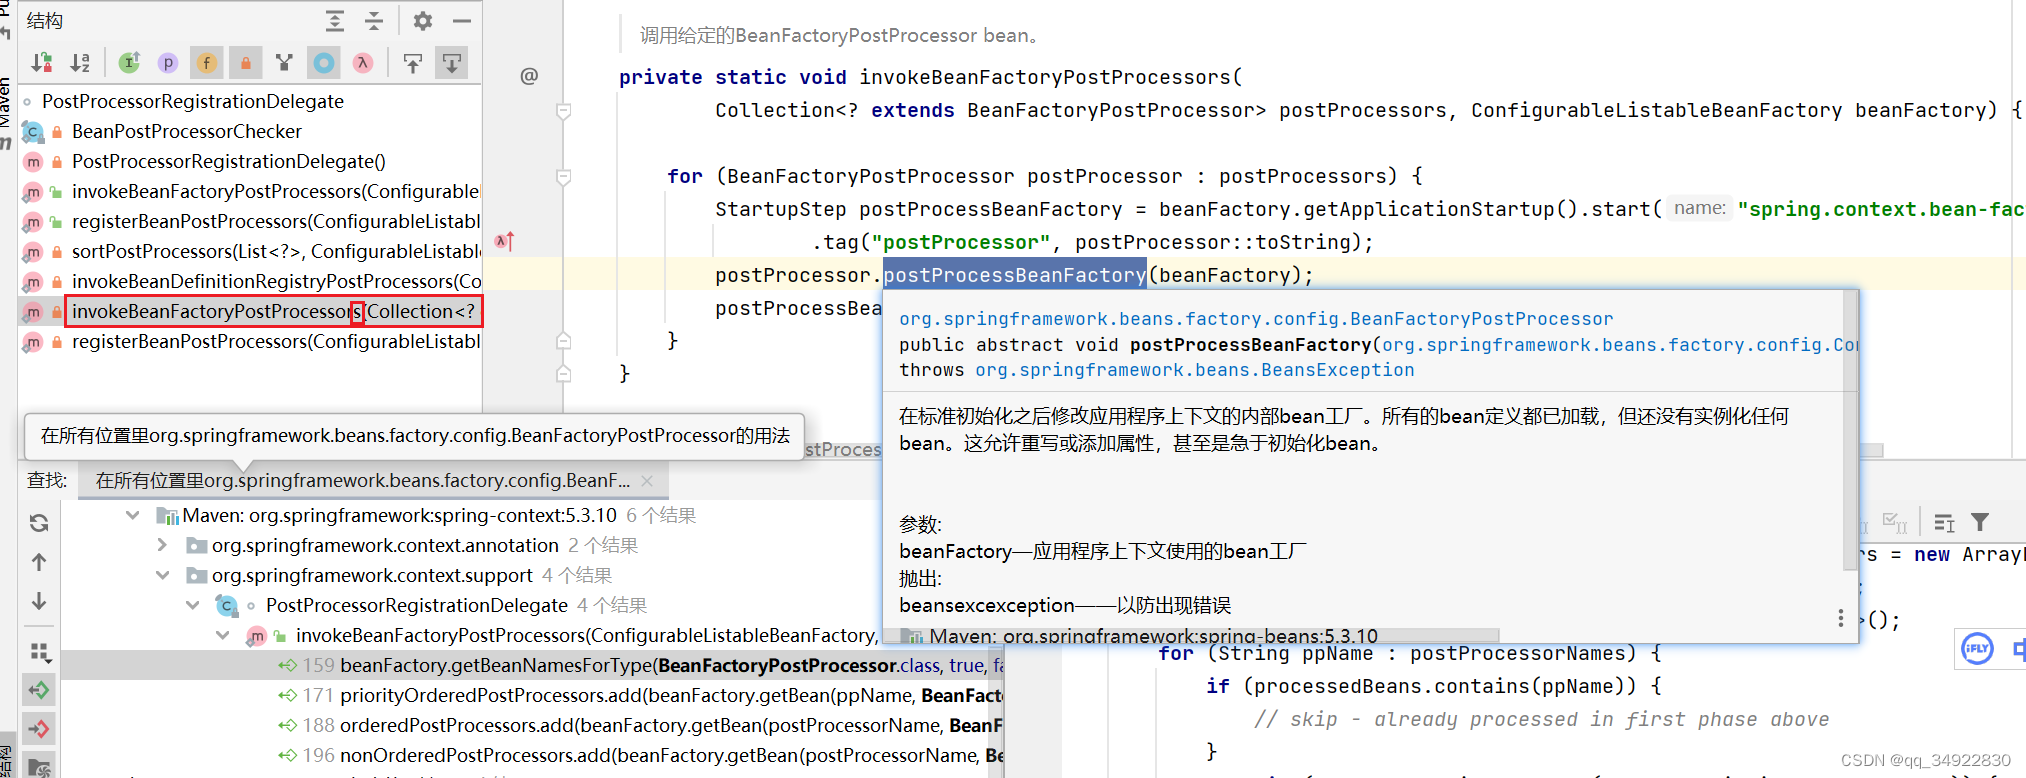
注册与调用 BeanFactoryPostProcessor bean
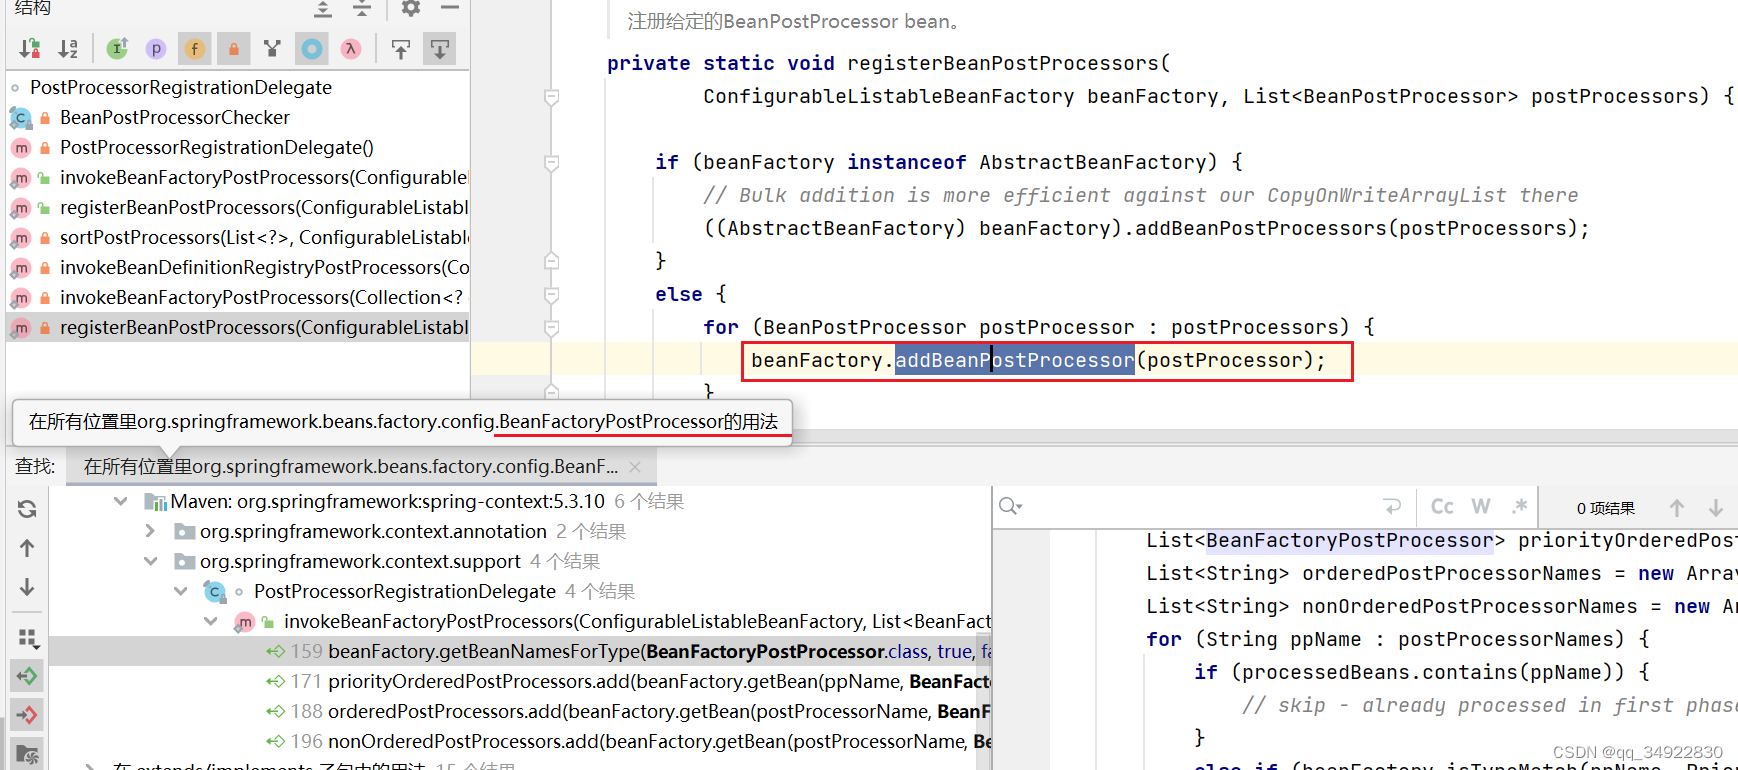
Bean后处理器的注册与使用
注册 :org.springframework.beans.factory.config.ConfigurableBeanFactory#addBeanPostProcessor
调用:org.springframework.context.support.PostProcessorRegistrationDelegate#invokeBeanFactoryPostProcessors(java.util.Collection<? extends org.springframework.beans.factory.config.BeanFactoryPostProcessor>, org.springframework.beans.factory.config.ConfigurableListableBeanFactory)
import org.slf4j.Logger;
import org.slf4j.LoggerFactory;
import org.springframework.beans.factory.annotation.Autowired;
import org.springframework.beans.factory.config.BeanFactoryPostProcessor;
import org.springframework.beans.factory.config.BeanPostProcessor;
import org.springframework.beans.factory.support.AbstractBeanDefinition;
import org.springframework.beans.factory.support.BeanDefinitionBuilder;
import org.springframework.beans.factory.support.DefaultListableBeanFactory;
import org.springframework.context.annotation.AnnotationConfigUtils;
import org.springframework.context.annotation.Bean;
import org.springframework.core.Ordered;

import javax.annotation.Resource;

public class TestBeanFactory {

    public static void main(String[] args) {
        DefaultListableBeanFactory beanFactory = new DefaultListableBeanFactory();
        // bean 的定义(class, scope, 初始化, 销毁)
        // My: 使用建造者模式 生成bean的定义( bean 类名) 设置作用域 单例。 建造
        AbstractBeanDefinition beanDefinition =
                BeanDefinitionBuilder.genericBeanDefinition(Config.class).setScope("singleton").getBeanDefinition();
        // My:在beanFactory添加(注册Bean定义)一个Bean
        beanFactory.registerBeanDefinition("config", beanDefinition);

        // 给 BeanFactory 添加一些常用的后处理器
        // My:在给定的注册表中注册所有相关的注释后处理器
        AnnotationConfigUtils.registerAnnotationConfigProcessors(beanFactory);

        // BeanFactory 后处理器主要功能,补充了一些 bean 定义
        // 通过Bean的类型获取(后处理器)PostProcessor
        beanFactory.getBeansOfType(BeanFactoryPostProcessor.class).values().forEach(beanFactoryPostProcessor -> {
            // 执行BeanFactory后处理器
            beanFactoryPostProcessor.postProcessBeanFactory(beanFactory);
        });


        // Bean 后处理器, 针对 bean 的生命周期的各个阶段提供扩展, 例如 @Autowired @Resource ...
        // 先加入的 Bean后处理器的优先级更高一点。 所以 @Autowired 高于 @Resource 但是顺序也是可以控制的
        beanFactory.getBeansOfType(BeanPostProcessor.class).values().stream()
                .sorted(beanFactory.getDependencyComparator())
                .forEach(beanPostProcessor -> {
            System.out.println(">>>>" + beanPostProcessor);
            beanFactory.addBeanPostProcessor(beanPostProcessor);
        });

        for (String name : beanFactory.getBeanDefinitionNames()) {
            System.out.println(name);
        }
    }
    interface Inter {

    }

    static class Bean3 implements Inter {

    }

    static class Bean4 implements Inter {

    }

    static class Bean1 {
        private static final Logger log = LoggerFactory.getLogger(Bean1.class);

        public Bean1() {
            log.debug("构造 Bean1()");
        }

        @Autowired
        private Bean2 bean2;

        public Bean2 getBean2() {
            return bean2;
        }

        @Autowired
        @Resource(name = "bean4") // resource 比Autowired 找的就高级一些了
        // 当我使用接口时候 使用的是成员变量的名字 inter去找 就可能找不到了
        // 两个同时存在的话  因为BeanPostProcessor相关的后处理器的默认顺序AutowiredAnnotation比CommonAnnotation 优先级高所以 AutoWired高
        // 可通过 sorted 的 dependencyComparator控制顺序
        private Inter bean3;

        public Inter getInter() {
            return bean3;
        }
    }

    static class Bean2 {
        private static final Logger log = LoggerFactory.getLogger(Bean2.class);

        public Bean2() {
            log.debug("构造 Bean2()");
        }
    }
}
4) Bean 后处理器
自定义修改新bean实例
演示1 - 后处理器作用
代码参考
com.itheima.a04 包
收获💡
-
@Autowired 等注解的解析属于 bean 生命周期阶段(依赖注入, 初始化)的扩展功能,这些扩展功能由 bean 后处理器来完成
-
每个后处理器各自增强什么功能
-
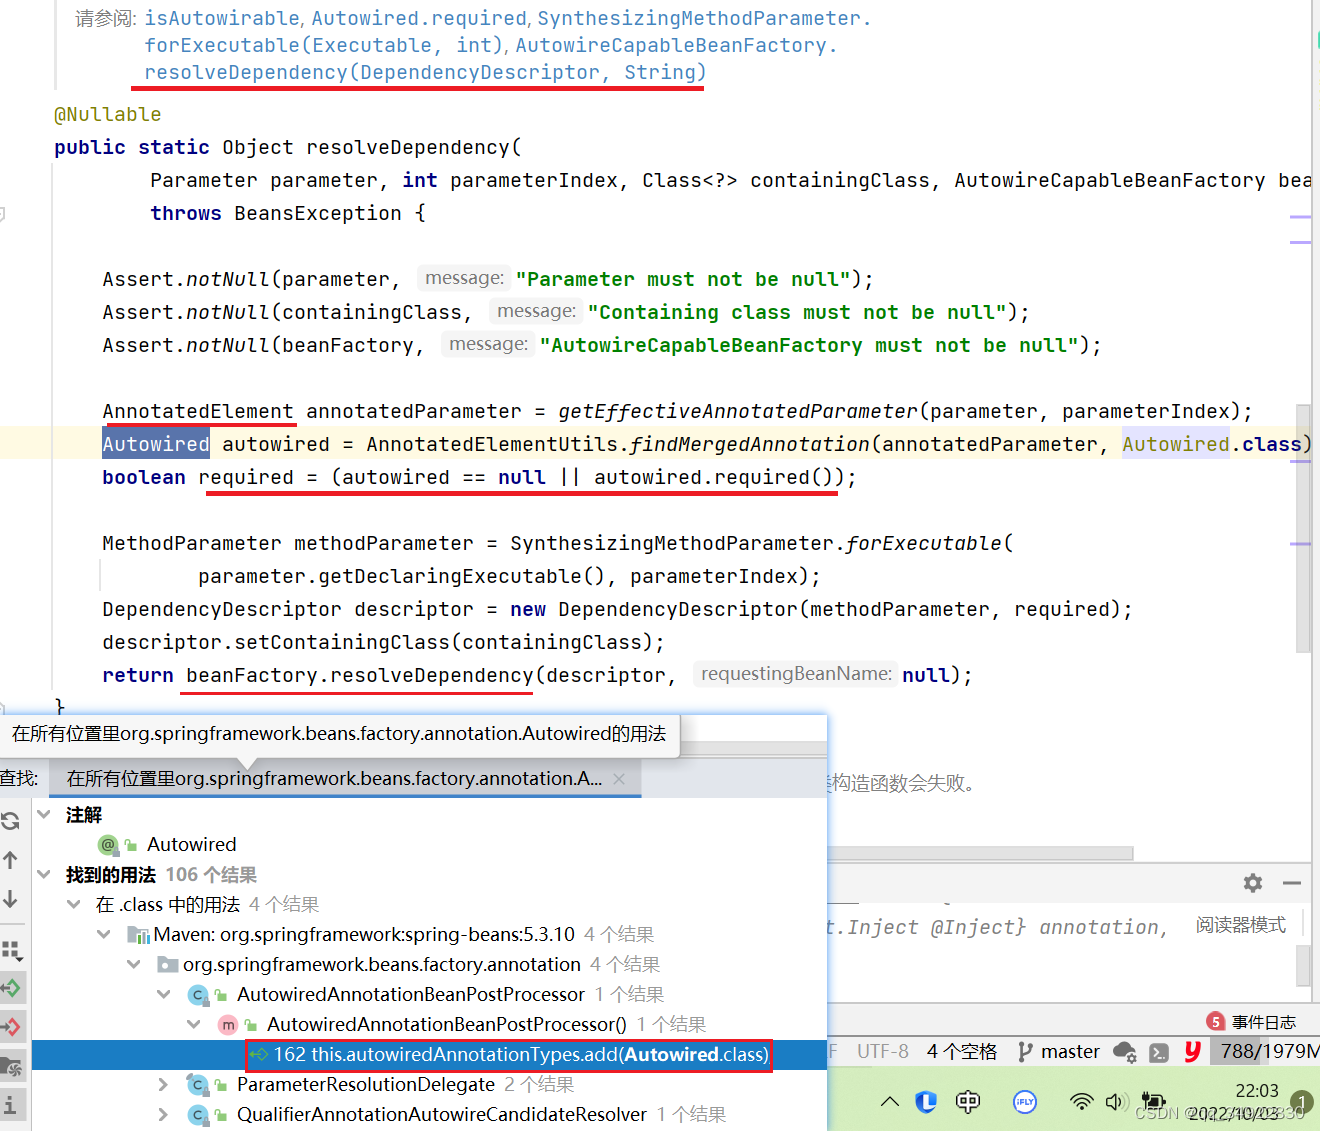
AutowiredAnnotationBeanPostProcessor 解析 @Autowired 与 @Value
-
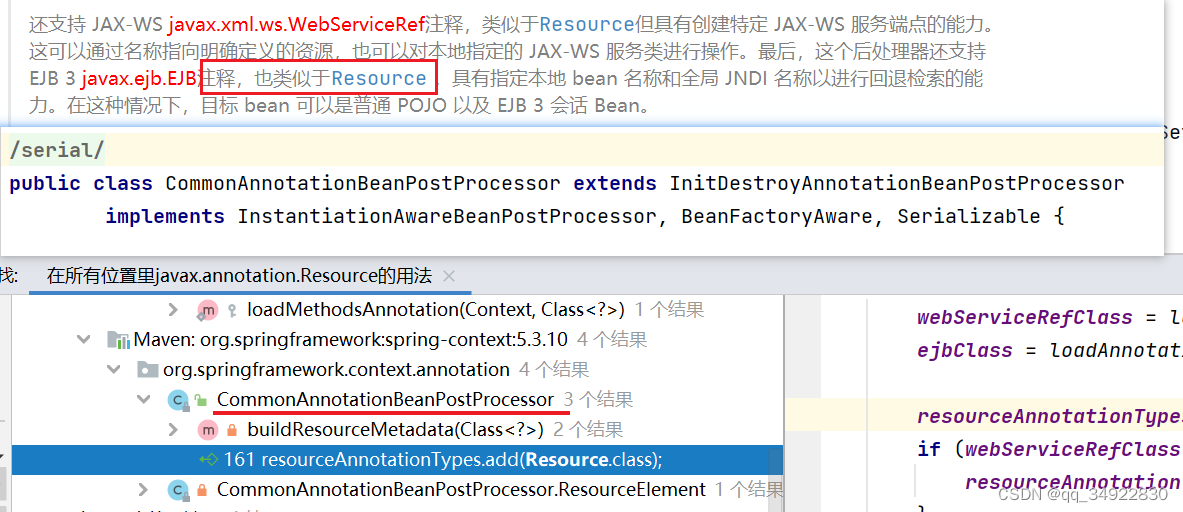
CommonAnnotationBeanPostProcessor 解析 @Resource、@PostConstruct、@PreDestroy
-
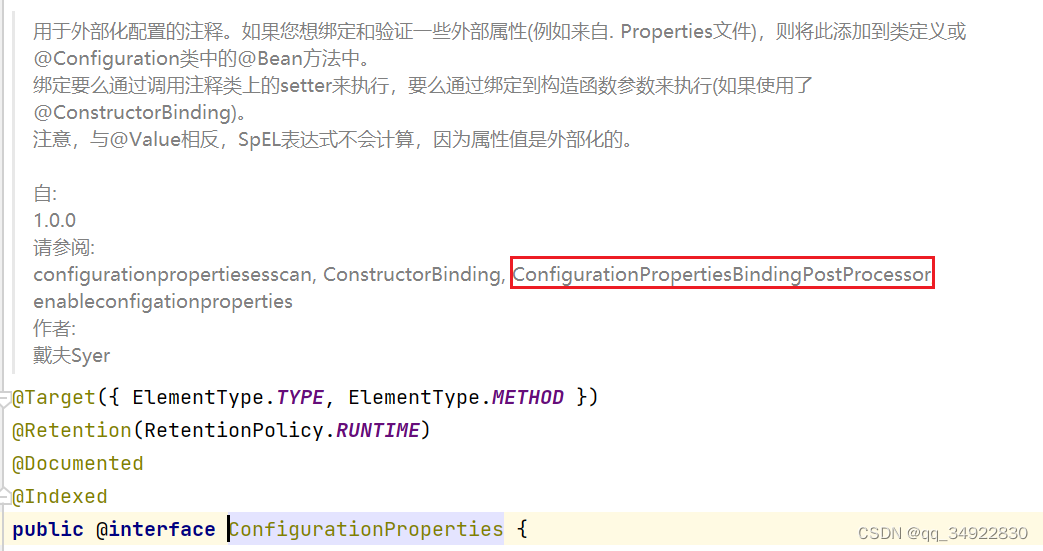
ConfigurationPropertiesBindingPostProcessor 解析 @ConfigurationProperties
-
-
另外 ContextAnnotationAutowireCandidateResolver 负责获取 @Value 的值,解析 @Qualifier、泛型、@Lazy 等
演示2 - @Autowired bean 后处理器运行分析
代码参考
com.itheima.a04.DigInAutowired
import org.springframework.beans.PropertyValues;
import org.springframework.beans.factory.annotation.AutowiredAnnotationBeanPostProcessor;
import org.springframework.beans.factory.annotation.InjectionMetadata;
import org.springframework.beans.factory.config.DependencyDescriptor;
import org.springframework.beans.factory.support.DefaultListableBeanFactory;
import org.springframework.context.annotation.ContextAnnotationAutowireCandidateResolver;
import org.springframework.core.MethodParameter;
import org.springframework.core.env.StandardEnvironment;

import java.lang.reflect.Field;
import java.lang.reflect.Method;

// AutowiredAnnotationBeanPostProcessor 运行分析
public class DigInAutowired {
    public static void main(String[] args) throws Throwable {
        DefaultListableBeanFactory beanFactory = new DefaultListableBeanFactory();
        beanFactory.registerSingleton("bean2", new Bean2()); // 创建过程,依赖注入,初始化
        beanFactory.registerSingleton("bean3", new Bean3());
        beanFactory.setAutowireCandidateResolver(new ContextAnnotationAutowireCandidateResolver()); // @Value
        // 添加字符串解析器
        beanFactory.addEmbeddedValueResolver(new StandardEnvironment()::resolvePlaceholders); // ${} 的解析器

        // 1. 查找哪些属性、方法加了 @Autowired, 这称之为 InjectionMetadata
        AutowiredAnnotationBeanPostProcessor processor = new AutowiredAnnotationBeanPostProcessor();
        processor.setBeanFactory(beanFactory);

        Bean1 bean1 = new Bean1();
        System.out.println(bean1);
        processor.postProcessProperties(null, bean1, "bean1"); // 执行依赖注入 @Autowired @Value
        System.out.println(bean1);

        // processor.postProcessProperties 所做的工作: 1\查找注解 @Autowired @Value findAutowiringMetadata() 2\执行注入 metadata.inject()
        // 解析{} 需要使用EmbeddedValueResolver
        Method findAutowiringMetadata = AutowiredAnnotationBeanPostProcessor.class
                .getDeclaredMethod("findAutowiringMetadata", String.class, Class.class, PropertyValues.class);
        findAutowiringMetadata.setAccessible(true);
        InjectionMetadata metadata = (InjectionMetadata) findAutowiringMetadata
                .invoke(processor, "bean1", Bean1.class, null);// 获取 Bean1 上加了 @Value @Autowired 的成员变量,方法参数信息
        System.out.println(metadata);

        // 2. 调用 InjectionMetadata 来进行依赖注入, 注入时按类型查找值
        metadata.inject(bean1, "bean1", null);
        System.out.println(bean1);

        // 3. 如何按类型查找值
        Field bean3 = Bean1.class.getDeclaredField("bean3");
        DependencyDescriptor dd1 = new DependencyDescriptor(bean3, false);
        // 根据一个依述赖描(字段)获取一个对象
        Object o = beanFactory.doResolveDependency(dd1, null, null, null);
        System.out.println(o);

        Method setBean2 = Bean1.class.getDeclaredMethod("setBean2", Bean2.class);
        DependencyDescriptor dd2 =
                new DependencyDescriptor(new MethodParameter(setBean2, 0), true);
        Object o1 = beanFactory.doResolveDependency(dd2, null, null, null);
        System.out.println(o1);

        Method setHome = Bean1.class.getDeclaredMethod("setHome", String.class);
        DependencyDescriptor dd3 = new DependencyDescriptor(new MethodParameter(setHome, 0), true);
        Object o2 = beanFactory.doResolveDependency(dd3, null, null, null);
        System.out.println(o2);

    }
}
收获💡
-
AutowiredAnnotationBeanPostProcessor.findAutowiringMetadata 用来获取某个 bean 上加了 @Value @Autowired 的成员变量,方法参数的信息,表示为 InjectionMetadata
-
InjectionMetadata 可以完成依赖注入
-
InjectionMetadata 内部根据成员变量,方法参数封装为 DependencyDescriptor 类型
-
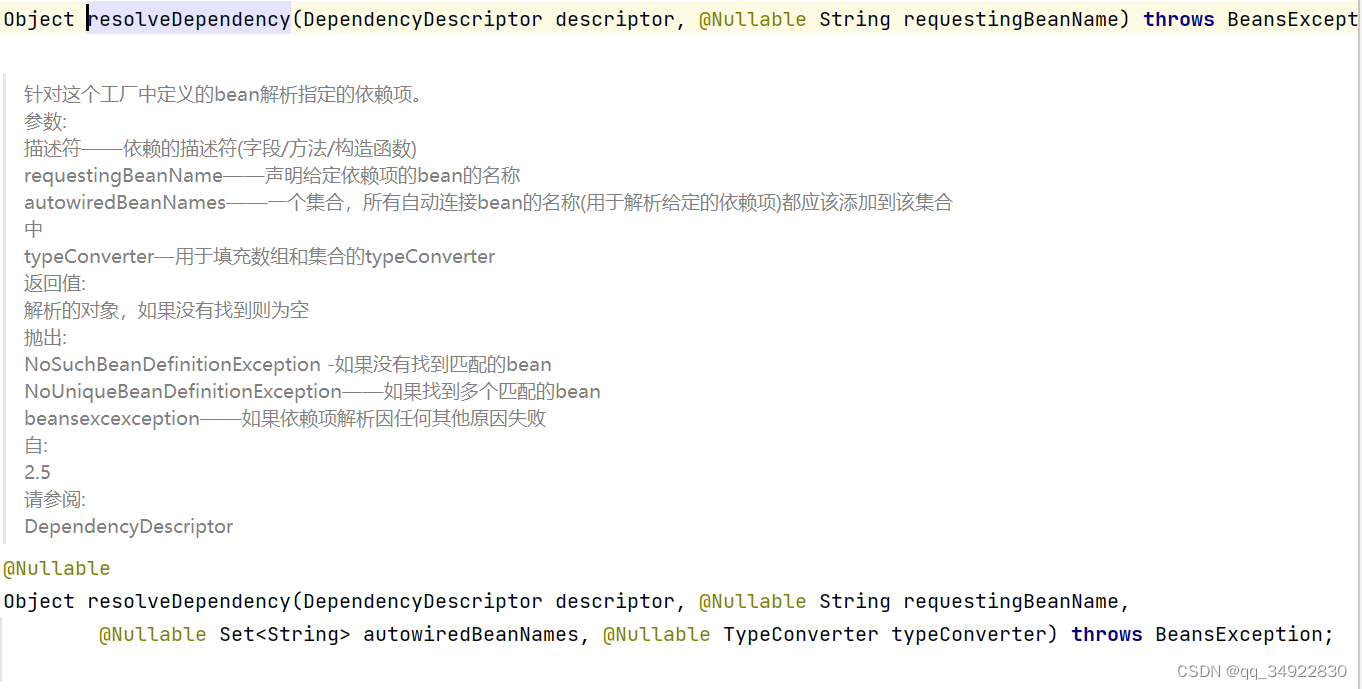
有了 DependencyDescriptor,就可以利用 beanFactory.doResolveDependency 方法进行基于类型的查找
5) BeanFactory 后处理器
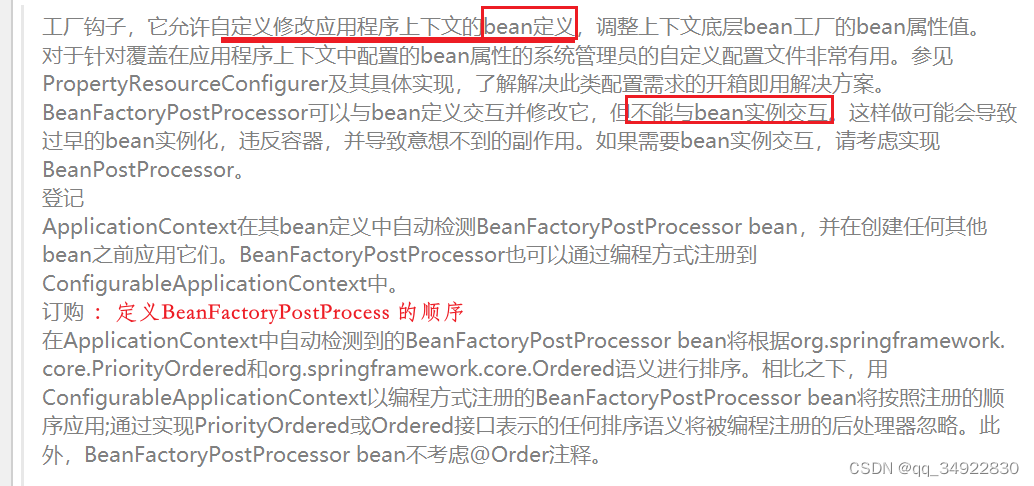
它允许自定义修改应用程序上下文的bean定义,但不能与bean实例交互。
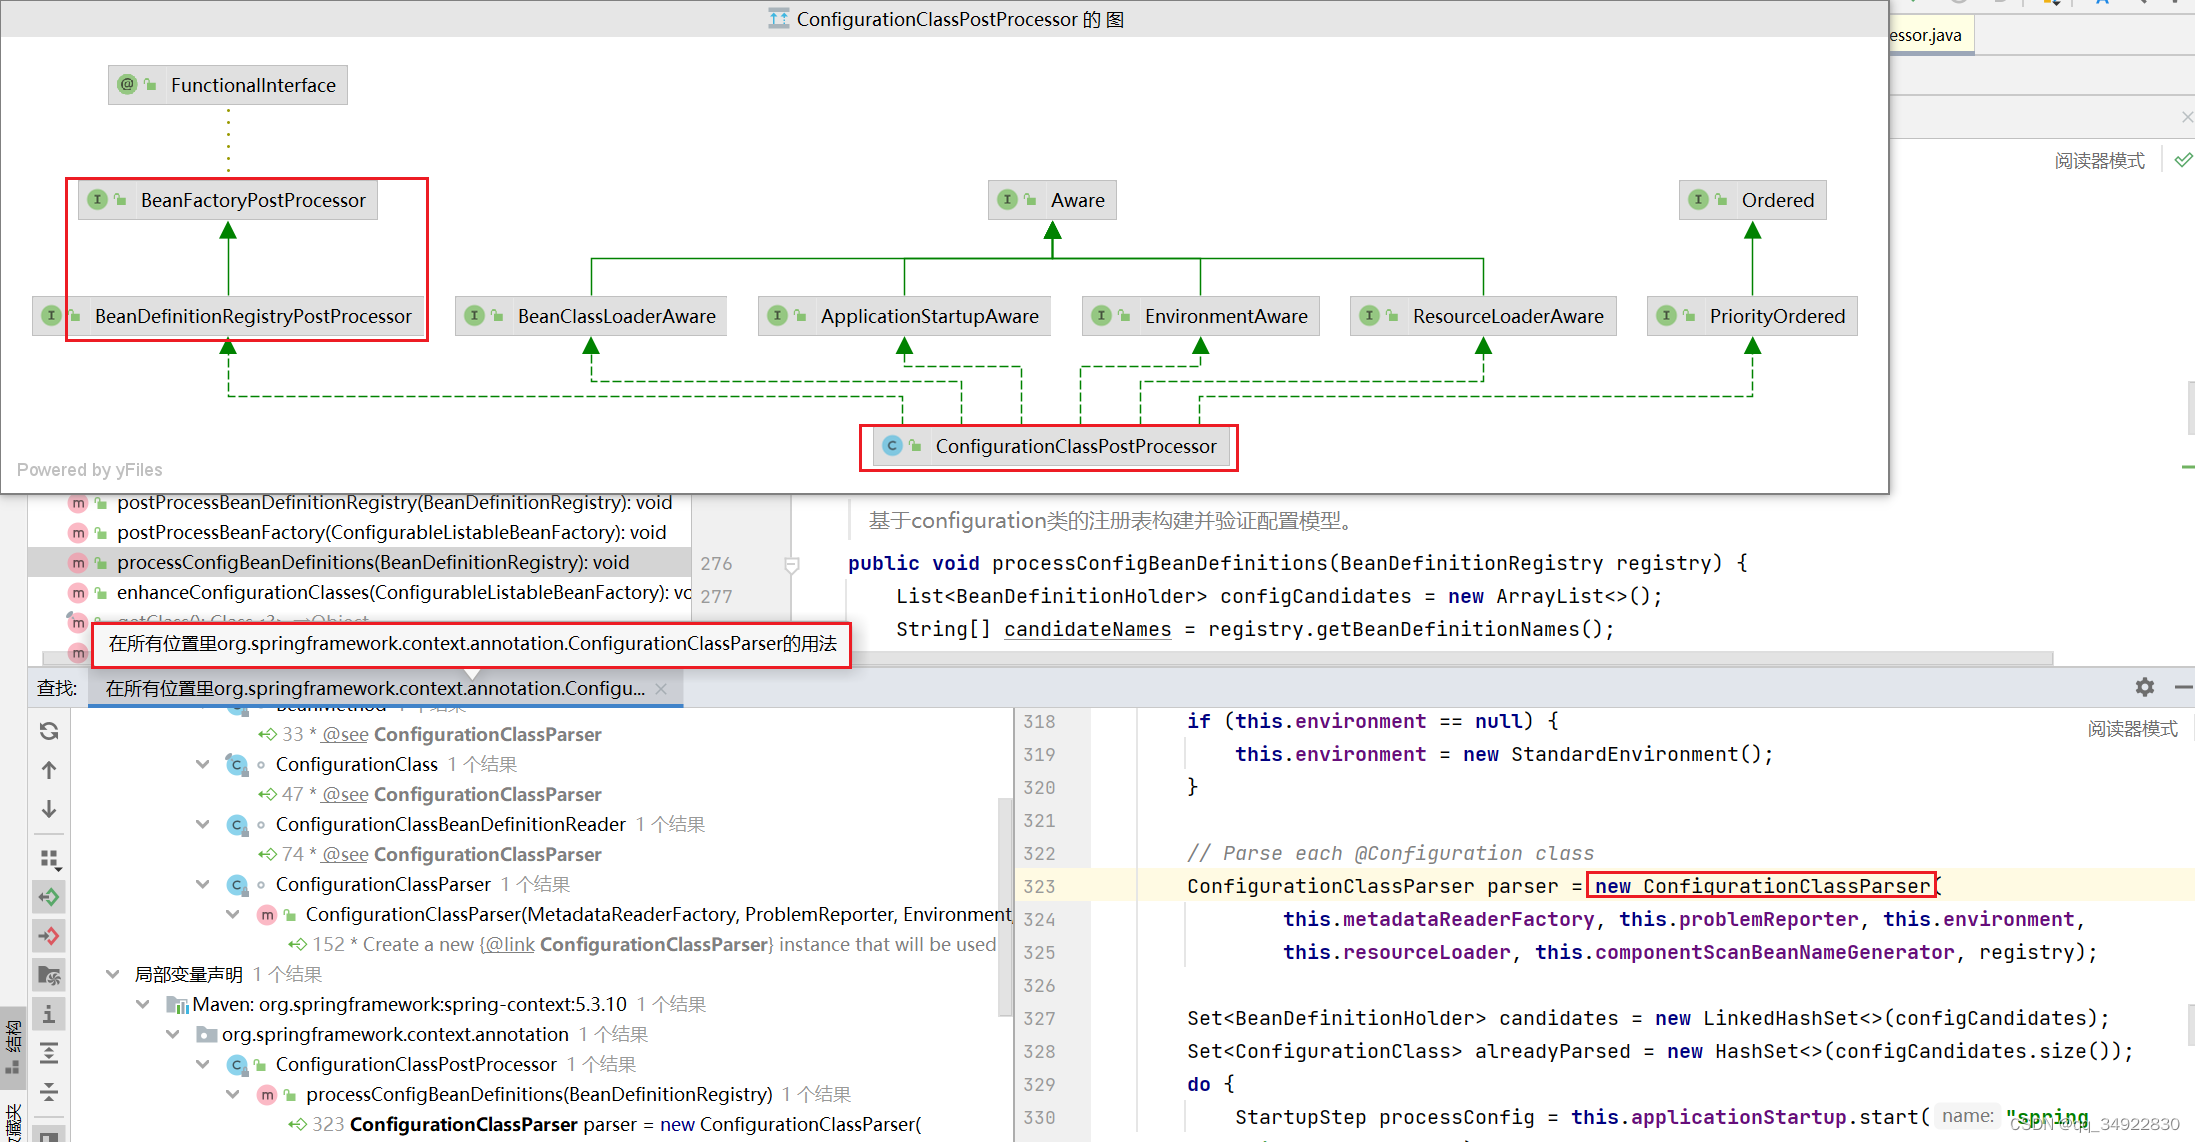
使用方法:实现了BeanFactoryPostProcessor 接口(子接口也可以 BeanDefinitionRegistryPostProcessor)
定义顺序: 接口 Ordered 与 接口 PriorityOrdered
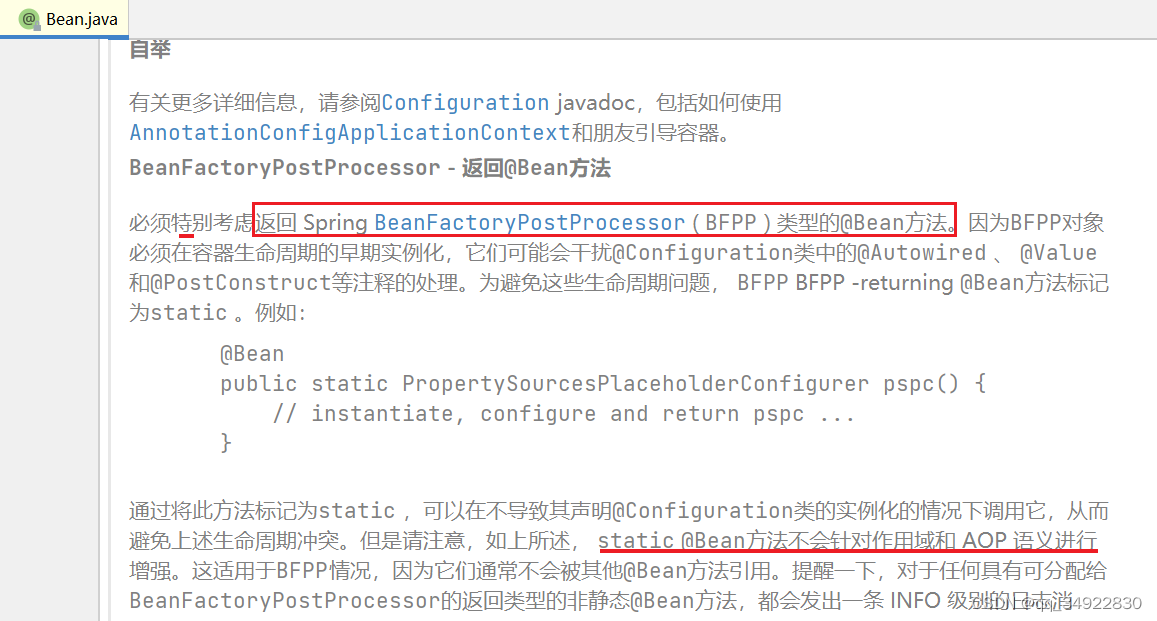
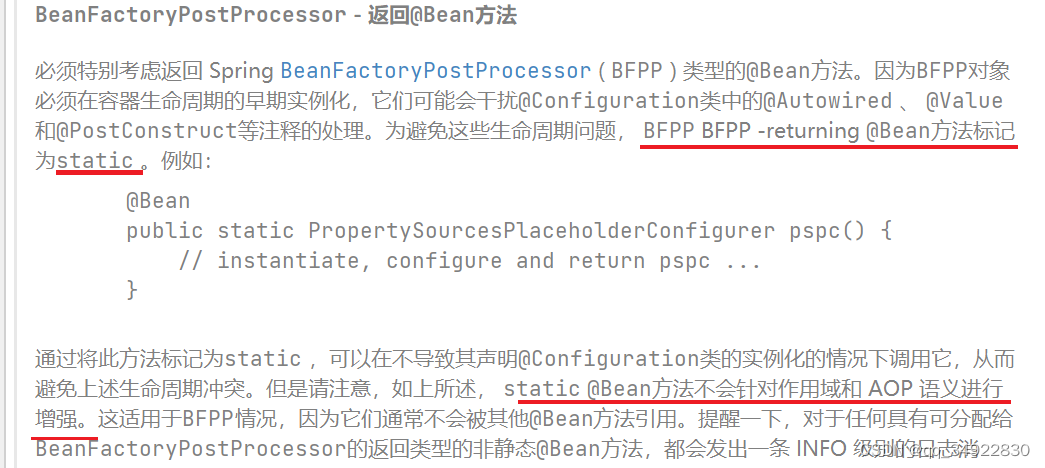
特别考虑返回 Spring BeanFactoryPostProcessor ( BFPP ) 类型的@Bean方法
-
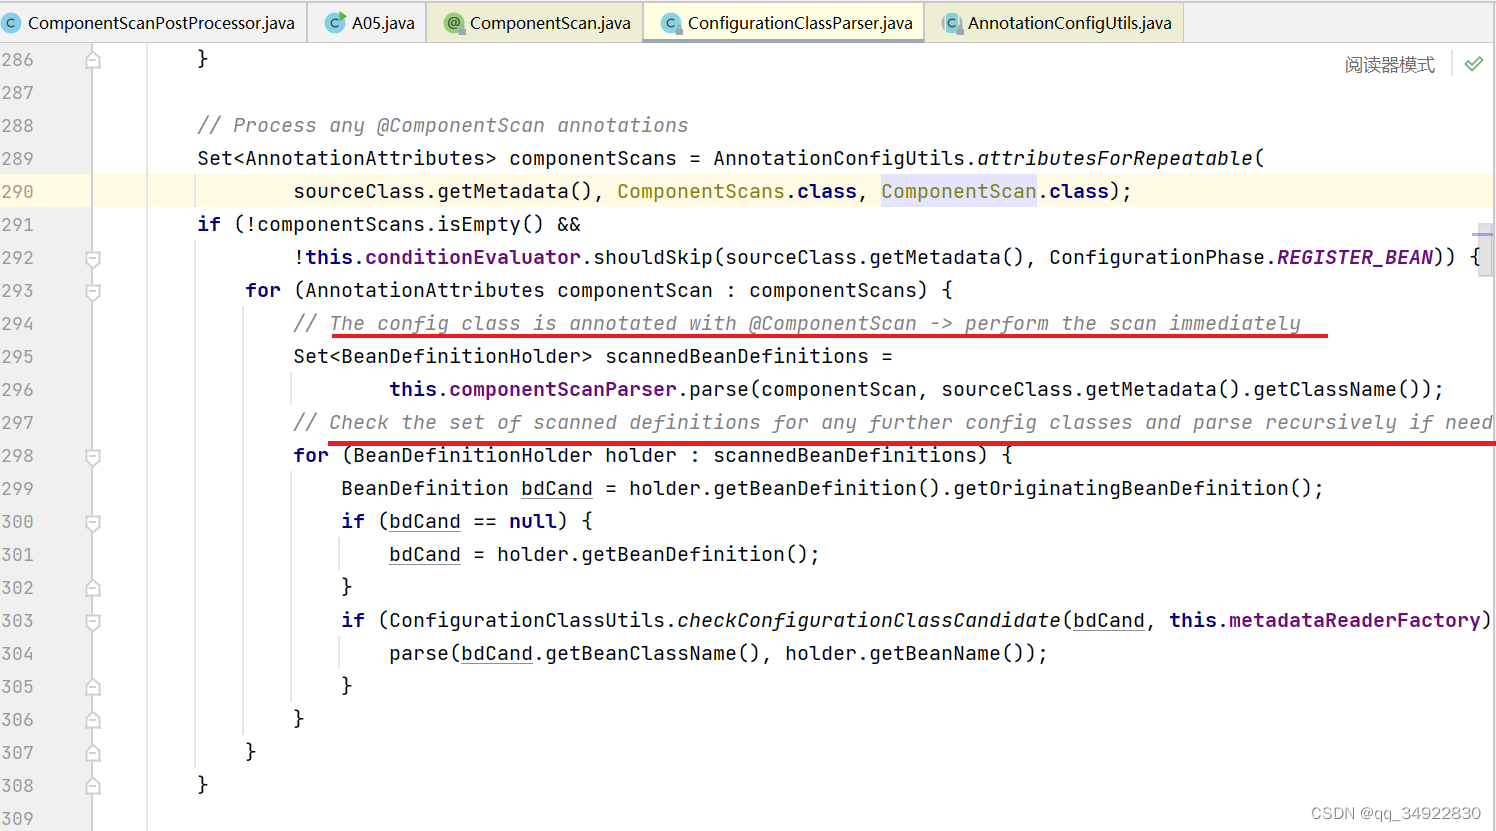
ConfigurationClassPostProcessor 可以解析:@ComponentScan、@Bean、@Import、@ImportResource
-
MapperScannerConfigurer 可以解析:Mapper 接口(@MapperScan)
演示2 - 模拟解析 @ComponentScan
BeanFactoryPostProcessor 解析@Configuration 类的注册信息,利用 ConfigurationClassParser 进行解析并添加Bean的定义
public class ComponentScanPostProcessor implements BeanDefinitionRegistryPostProcessor {
    @Override // context.refresh
    public void postProcessBeanFactory(ConfigurableListableBeanFactory configurableListableBeanFactory) throws BeansException {

    }
    // 标准初始化之后修改应用程序上下文的内部 bean 定义注册表(加更多的 bean 定义)
    @Override
    public void postProcessBeanDefinitionRegistry(BeanDefinitionRegistry beanFactory) throws BeansException {
        try {
            // AnnotationUtils 扫描 Config.class 类上的 @ComponentScan的 basePackages
            ComponentScan componentScan = AnnotationUtils.findAnnotation(Config.class, ComponentScan.class);
            if (componentScan != null) {
                for (String p : componentScan.basePackages()) {
                    System.out.println(p);
                    // com.itheima.a05.component -> classpath*:com/itheima/a05/component/**/*.class
                    String path = "classpath*:" + p.replace(".", "/") + "/**/*.class";
                    System.out.println(path);
                    // MetadataReader 不走反射,效率很高  使用工厂方法创建,
                    CachingMetadataReaderFactory factory = new CachingMetadataReaderFactory();
                    Resource[] resources = new PathMatchingResourcePatternResolver().getResources(path);

                    AnnotationBeanNameGenerator generator = new AnnotationBeanNameGenerator();
                    for (Resource resource : resources) {
                        // System.out.println(resource);
                        MetadataReader reader = factory.getMetadataReader(resource);
                        // System.out.println("类名:" + reader.getClassMetadata().getClassName());
                        AnnotationMetadata annotationMetadata = reader.getAnnotationMetadata();
                        // System.out.println("是否加了 @Component:" + annotationMetadata.hasAnnotation(Component.class.getName()));
                        // System.out.println("是否加了 @Component 派生:" + annotationMetadata.hasMetaAnnotation(Component.class.getName()));
                        if (annotationMetadata.hasAnnotation(Component.class.getName())
                            || annotationMetadata.hasMetaAnnotation(Component.class.getName())) {
                            AbstractBeanDefinition bd = BeanDefinitionBuilder
                                    .genericBeanDefinition(reader.getClassMetadata().getClassName())
                                    .getBeanDefinition();
                            String name = generator.generateBeanName(bd, beanFactory);
                            beanFactory.registerBeanDefinition(name, bd);
                        }
                    }
                }
            }
        } catch (IOException e) {
            e.printStackTrace();
        }
    }
}
// 表示一个类声明了一个或多个@Bean方法
@Configuration
// Configuration组件扫描指令以与@Configuration 类一起使用。
// 提供与 Spring XML 的<context:component-scan>元素并行的支持
@ComponentScan("component")
public class Config {
}package component;
@Component
public class Bean2 {
private static final Logger log = LoggerFactory.getLogger(Bean2.class);
public Bean2() {
log.debug("我被 Spring 管理啦");
}
}
package component;
import org.slf4j.Logger;
import org.slf4j.LoggerFactory;
import org.springframework.stereotype.Controller;
@Controller
public class Bean3 {
private static final Logger log = LoggerFactory.getLogger(Bean3.class);
public Bean3() {
log.debug("我被 Spring 管理啦");
}
}/*
BeanFactory 后处理器的作用
*/
public class A05 {
private static final Logger log = LoggerFactory.getLogger(A05.class);
public static void main(String[] args) throws IOException {
// ⬇️GenericApplicationContext 是一个【干净】的容器
GenericApplicationContext context = new GenericApplicationContext();
// 使用此方式注册Bean @Configuration注解并未生效。 而是手动指定的
context.registerBean("config", Config.class);
// Config类需要先被加载进来
// ConfigurationClass PostProcessor 会扫描具有@Configuration注解的类
// 间接注册了 ComponentScanPostProcessor AtBeanPostProcessor
// context.registerBean(ConfigurationClassPostProcessor.class); // @ComponentScan @Bean @Import @ImportResource
// context.registerBean(MapperScannerConfigurer.class, bd -> { // @MapperScanner
// bd.getPropertyValues().add("basePackage", "com.itheima.a05.mapper");
// });
//
context.registerBean(ComponentScanPostProcessor.class); // 解析 @ComponentScan
// context.registerBean(AtBeanPostProcessor.class); // 解析 @Bean
// context.registerBean(MapperPostProcessor.class); // 解析 Mapper 接口
// ⬇️初始化容器
context.refresh();
for (String name : context.getBeanDefinitionNames()) {
System.out.println(name);
}
// ⬇️销毁容器
context.close();
/*
学到了什么
a. @ComponentScan, @Bean, @Mapper 等注解的解析属于核心容器(即 BeanFactory)的扩展功能
b. 这些扩展功能由不同的 BeanFactory 后处理器来完成, 其实主要就是补充了一些 bean 定义
*/
}
}6) Aware 接口
-
Aware 接口提供了一种【内置】 的注入手段,例如
-
BeanNameAware 注入 bean 的名字
-
BeanFactoryAware 注入 BeanFactory 容器
-
ApplicationContextAware 注入 ApplicationContext 容器
-
EmbeddedValueResolverAware 注入 ${} 解析器
-
-
InitializingBean 接口提供了一种【内置】的初始化手段
-
对比
-
内置的注入和初始化不受扩展功能的影响,总会被执行
-
而扩展功能受某些情况影响可能会失效
-
因此 Spring 框架内部的类常用内置注入和初始化
-
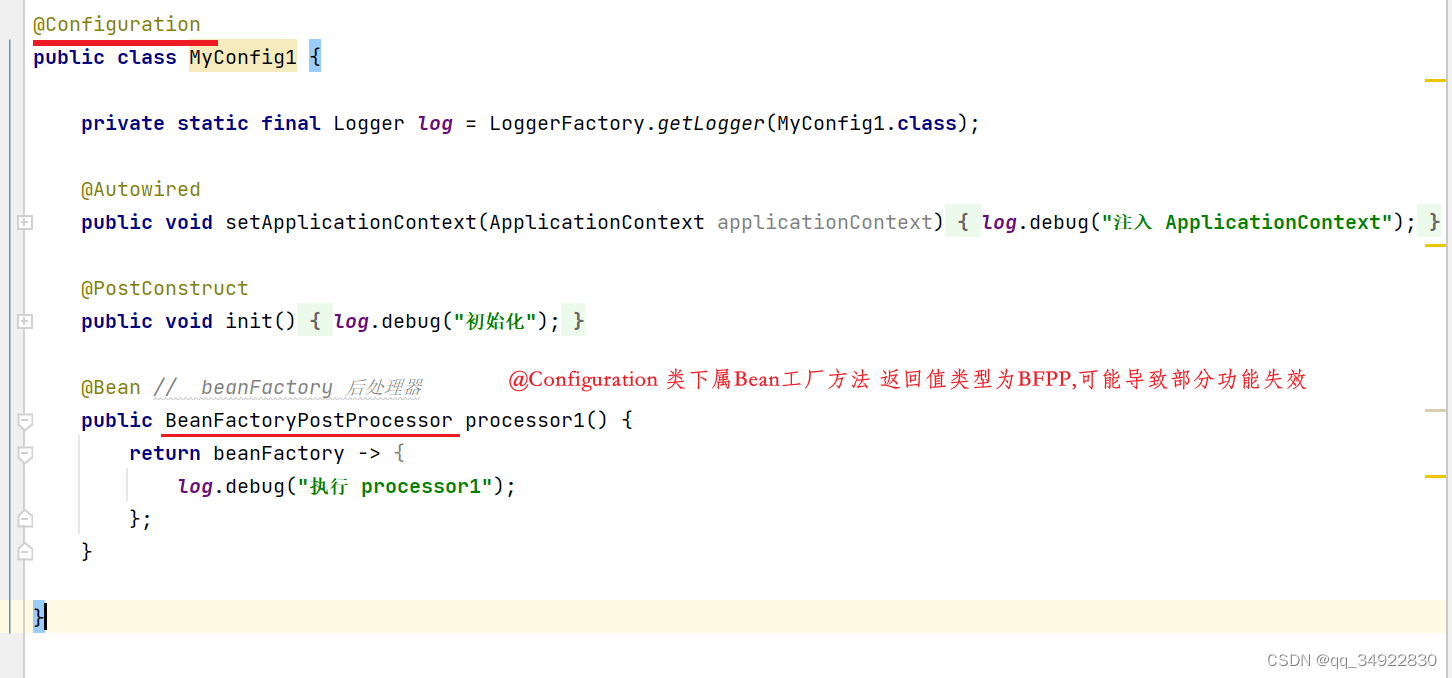
配置类 @Autowired 失效
原因分析:
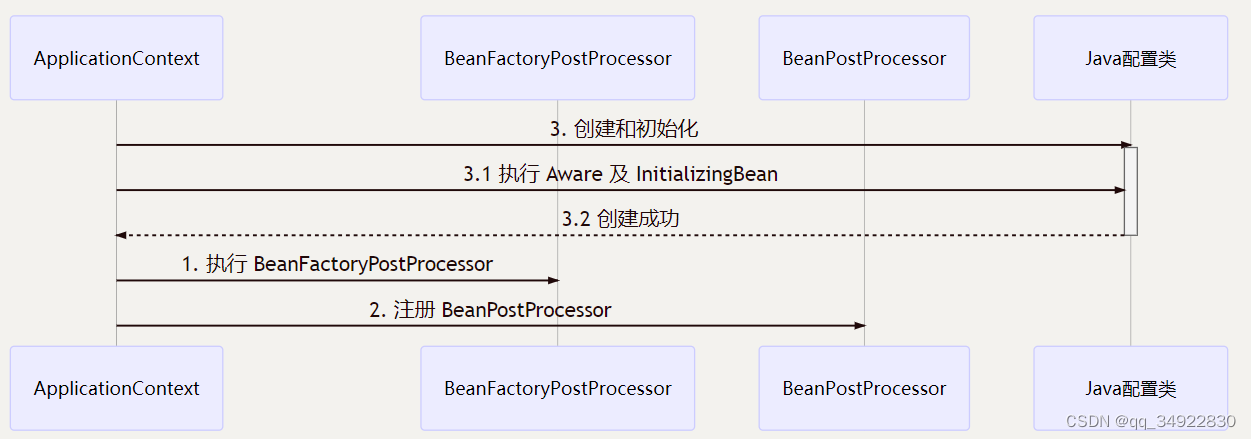
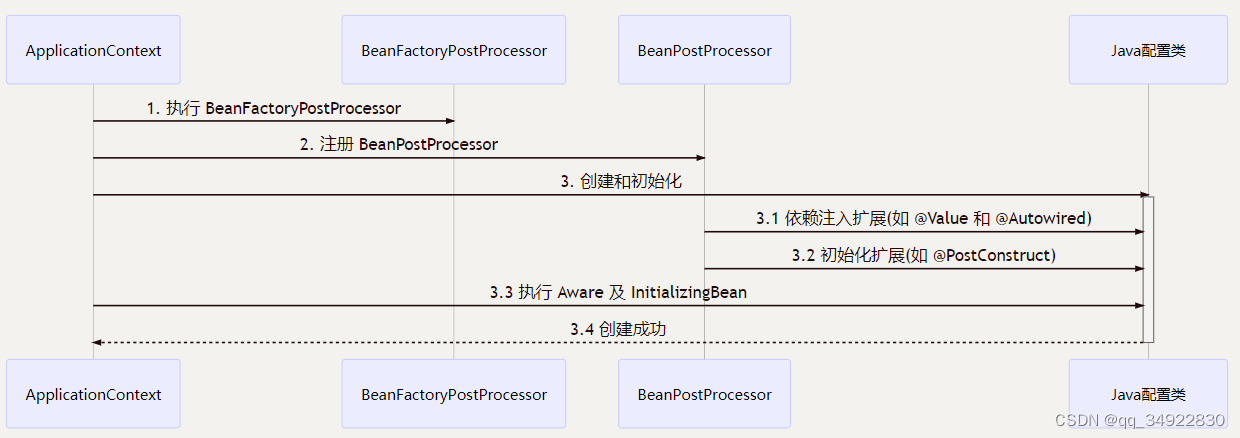
Java 配置类包含 BeanFactoryPostProcessor 的情况,因此要创建其中的BeanFactory-PostProcessor 必须提前创建 Java 配置类,而此时的 BeanPostProcessor 还未准备好,导致 @Autowired 等注解失效
正常情况应为:
解决方法为:
用静态工厂方法代替实例工厂方法,避免工厂对象提前被创建(不会针对作用域和AOP语义进行增强)
使用Aware接口(ApplicationContextAware实现依赖注入、BeanNameAware 自定义 Bean 的名字)实现 InitializingBean 接口(对初始化进行增强)
import org.slf4j.Logger;
import org.slf4j.LoggerFactory;
import org.springframework.beans.BeansException;
import org.springframework.beans.factory.BeanNameAware;
import org.springframework.beans.factory.InitializingBean;
import org.springframework.beans.factory.annotation.Autowired;
import org.springframework.context.ApplicationContext;
import org.springframework.context.ApplicationContextAware;

import javax.annotation.PostConstruct;

/**
 *  可以继续使用 @Autowired @PostConstruct 等注解了
 * @author Jay
 */
public class MyBean implements BeanNameAware, ApplicationContextAware, InitializingBean {

    private static final Logger log = LoggerFactory.getLogger(MyBean.class);

    @Override
    public void setBeanName(String name) {
        log.debug("当前bean " + this + " 名字叫:" + name);
    }

    @Override
    public void setApplicationContext(ApplicationContext applicationContext) throws BeansException {
        log.debug("当前bean " + this + " 容器是:" + applicationContext);
    }

    @Override
    public void afterPropertiesSet() throws Exception {
        log.debug("当前bean " + this + " 初始化");
    }

    @Autowired
    public void aaa(ApplicationContext applicationContext) {
        log.debug("当前bean " + this + " 使用@Autowired 容器是:" + applicationContext);
    }

    @PostConstruct
    public void init() {
        log.debug("当前bean " + this + " 使用@PostConstruct 初始化");
    }
}








 https://www.bilibili.com/video/BV1P44y1N7QG?share_source=copy_web&vd_source=35de0ae939ec5cd0c4e3d33b6b5d3192