推荐阅读,可以补足一些平常没注意的知识点。
密码学是网络安全、信息安全、区块链等产品的基础,常见的非对称加密、对称加密、散列函数等,都属于密码学范畴。密码学有数千年的历史,从最开始的替换法到如今的非对称加密算法,经历了古典密码学,近代密码学和现代密码学三个阶段。
1、密码学
1.1、古典密码学
在古代的战争中,多见使用隐藏信息的方式保护重要的通信资料。比如先把需要保护的信息用化学药水写到纸上,药水干后,纸上看不出任何的信息,需要使用另外的化学药水涂抹后才可以阅读纸上的信息。
这些方法都是在保护重要的信息不被他人获取,但藏信息的方式比较容易被他人识破,例如增加哨兵的排查力度,就会发现其中的猫腻,因而随后发展出了较难破解的古典密码学。
1.1.1、替换法
替换法很好理解,就是用固定的信息将原文替换成无法直接阅读的密文信息。例如将 b 替换成 w ,e 替换成p ,这样bee 单词就变换成了wpp,不知道替换规则的人就无法阅读出原文的含义。
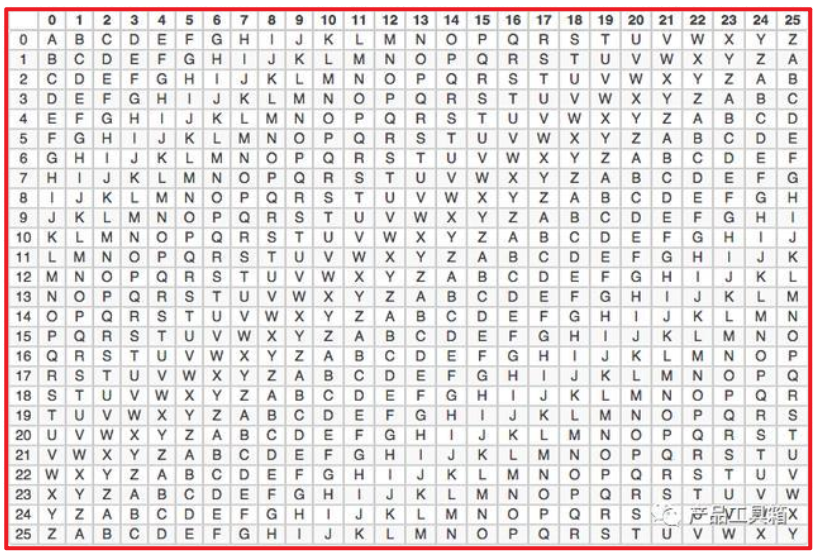
替换法有单表替换和多表替换两种形式。单表替换即只有一张原文密文对照表单,发送者和接收者用这张表单来加密解密。在上述例子中,表单即为:a b c d e - s w t r p 。
多表替换即有多张原文密文对照表单,不同字母可以用不同表单的内容替换。例如约定好表单为:表单 1:abcde-swtrp 、表单2:abcde-chfhk 、表单 3:abcde-jftou。规定第一个字母用第三张表单,第二个字母用第一张表单,第三个字母用第二张表单,这时 bee单词就变成了
(312)fpk ,破解难度更高,其中 312 又叫做密钥,密钥可以事先约定好,也可以在传输过程中标记出来。
1.1.2、移位法
移位法就是将原文中的所有字母都在字母表上向后(或向前)按照一个固定数目进行偏移后得出密文,典型的移位法应用有 “ 恺撒密码 ”。例如约定好向后移动2位(abcde - cdefg),这样 bee 单词就变换成了dgg 。
同理替换法,移位法也可以采用多表移位的方式,典型的多表案例是“维尼吉亚密码”(又译维热纳尔密码),属于多表密码的一种形式。
1.1.3、古典密码破解方式
古典密码虽然很简单,但是在密码史上是使用的最久的加密方式,直到“概率论”的数学方法被发现,古典密码就被破解了。
英文单词中字母出现的频率是不同的,e以12.702%的百分比占比最高,z 只占到0.074%,感兴趣的可以去百科查字母频率详细统计数据。如果密文数量足够大,仅仅采用频度分析法就可以破解单表的替换法或移位法。
多表的替换法或移位法虽然难度高一些,但如果数据量足够大的话,也是可以破解的。以维尼吉亚密码算法为例,破解方法就是先找出密文中完全相同的字母串,猜测密钥长度,得到密钥长度后再把同组的密文放在一起,使用频率分析法破解。
1.2、近代密码学
古典密码的安全性受到了威胁,外加使用便利性较低,到了工业化时代,近现代密码被广泛应用。恩尼格玛机是二战时期纳粹德国使用的加密机器,后被英国破译,参与破译的人员有被称为计算机科学之父、人工智能之父的图灵。
恩尼格玛机使用的加密方式本质上还是移位和替代,只不过因为密码表种类极多,破解难度高,同时加密解密机器化,使用便捷,因而在二战时期得以使用。
1.3、现代密码学
1.3.1、散列函数
散列函数,也见杂凑函数、摘要函数或哈希函数,可将任意长度的消息经过运算,变成固定长度数值,常见的有MD5、SHA-1、SHA256,多应用在文件校验,数字签名中。
- MD5 可以将任意长度的原文生成一个128位(16字节)的哈希值
- SHA-1可以将任意长度的原文生成一个160位(20字节)的哈希值
1.3.2、对称密码
对称密码应用了相同的加密密钥和解密密钥。对称密码分为:序列密码(流密码),分组密码(块密码)两种。流密码是对信息流中的每一个元素(一个字母或一个比特)作为基本的处理单元进行加密,块密码是先对信息流分块,再对每一块分别加密。
例如原文为1234567890,流加密即先对1进行加密,再对2进行加密,再对3进行加密……最后拼接成密文;块加密先分成不同的块,如1234成块,5678成块,90XX(XX为补位数字)成块,再分别对不同块进行加密,最后拼接成密文。前文提到的古典密码学加密方法,都属于流加密。
1.3.3、非对称密码
对称密码的密钥安全极其重要,加密者和解密者需要提前协商密钥,并各自确保密钥的安全性,一但密钥泄露,即使算法是安全的也无法保障原文信息的私密性。
在实际的使用中,远程的提前协商密钥不容易实现,即使协商好,在远程传输过程中也容易被他人获取,因此非对称密钥此时就凸显出了优势。
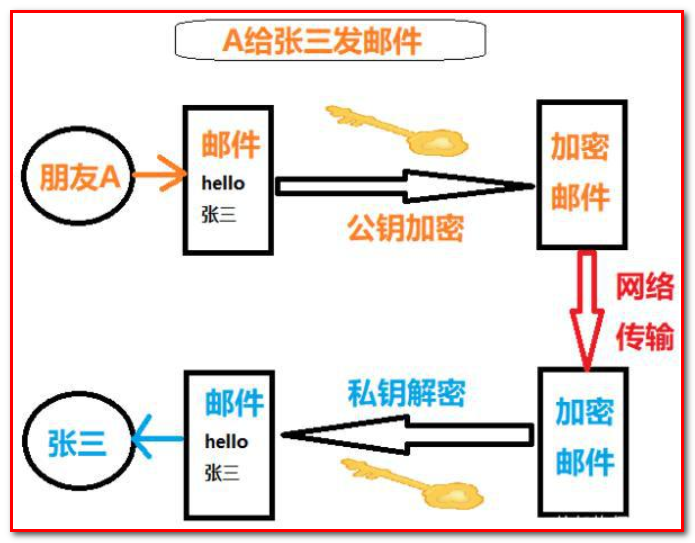
非对称密码有两支密钥,公钥(publickey)和私钥(privatekey),加密和解密运算使用的密钥不同。用公钥对原文进行加密后,需要由私钥进行解密;用私钥对原文进行加密后(此时一般称为签名),需要由公钥进行解密(此时一般称为验签)。公钥可以公开的,大家使用公钥对信息进行加密,再发送给私钥的持有者,私钥持有者使用私钥对信息进行解密,获得信息原文。因为私钥只有单一人持有,因此不用担心被他人解密获取信息原文。
1.4、如何设置密码才安全
- 密码不要太常见,不要使用类似于123456式的常用密码。
- 各应用软件密码建议不同,避免出现一个应用数据库被脱库,全部应用密码崩塌,
- 可在设置密码时增加注册时间、注册地点、应用特性等方法。例如tianjin123456,表示在天津注册的该应用。
2、ASCII编码
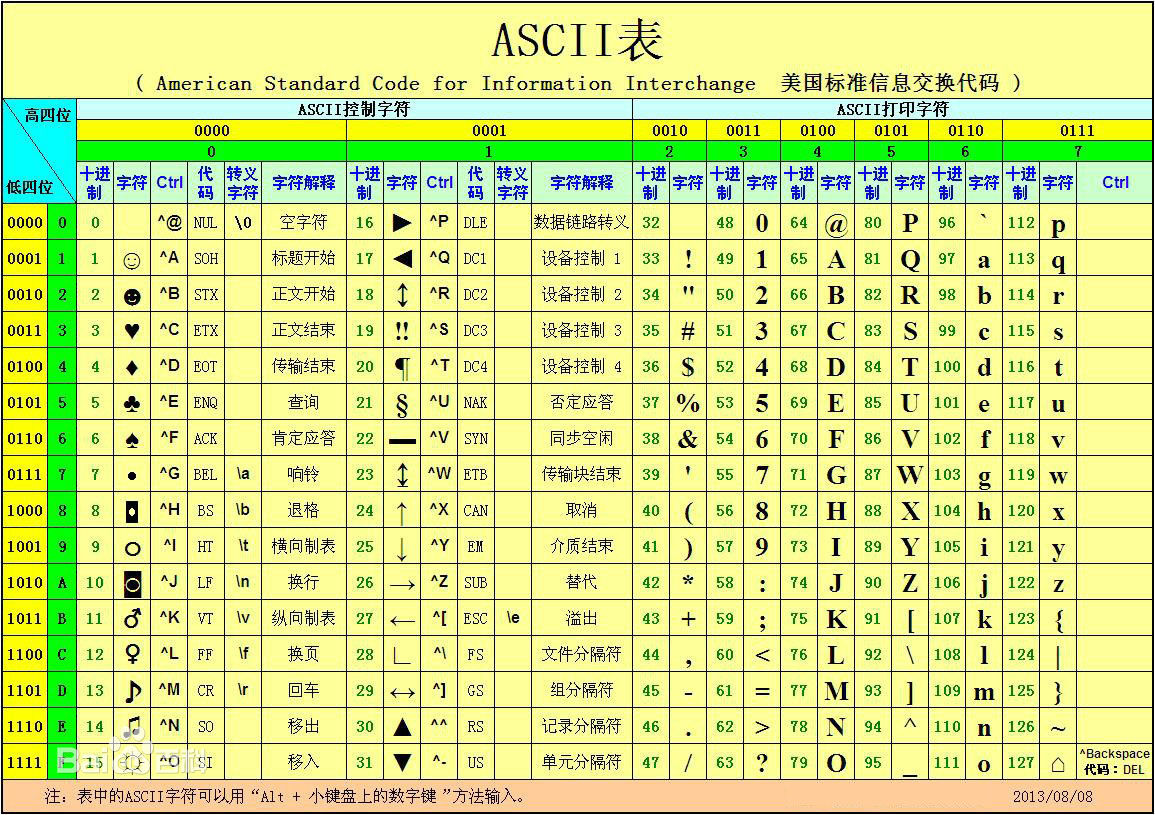
ASCII(American Standard Code for Information Interchange,美国信息交换标准代码)是基于拉丁字母的一套电脑编码系统,主要用于显示现代英语和其他西欧语言。它是现今最通用的单字节编码系统,并等同于国际标准ISO/IEC 646。
创建工程:
<dependencies>
	<dependency>
		<groupId>commons-io</groupId>
		<artifactId>commons-io</artifactId>
		<version>2.6</version>
	</dependency>
</dependencies>
创建类 AsciiDemo
/**
 * AsciiDemo
 *
 * @Author: blnp
 * @CreateTime: 2024-03-17
 * @Description:
 */
public class AsciiDemo {

    public static void main(String[] args) {
        char a = 'A';
        int b = a;
        // 打印ascii码
        System.out.println(b);
    }
}
字符串转换成ascii码
public class AsciiDemo {

    public static void main(String[] args) {
        //        char a = 'A';
        //        int b = a;
        //        System.out.println(b);
        String a = "AaZ";
        // 获取ascii码,需要把字符串转成字符
        char[] chars = a.toCharArray();
        for (char c: chars) {

            int asciiCode = c;
            System.out.println(asciiCode);
        }
    }
}
3、恺撒加密
3.1、中国古代加密
公元683年,唐中宗即位。随后,武则天废唐中宗,立第四子李旦为皇帝,但朝政大事均由她自己专断。
裴炎、徐敬业和骆宾王等人对此非常不满。徐敬业聚兵十万,在江苏扬州起兵。裴炎做内应,欲以拆字手段为其传递秘密信息。后因有人告密,裴炎被捕,未发出的密信落到武则天手中。这封密信上只有“青鹅”二字,群臣对此大惑不解。
武则天破解了“青鹅”的秘密:“青”字拆开来就是“十二月”,而“鹅”字拆开来就是“我自与”。密信的意思是让徐敬业、骆宾王等率兵于十二月进发,裴炎在内部接应。“青鹅”破译后,裴炎被杀。接着,武则天派兵击败了徐敬业和骆宾王。
3.2、外国加密
在密码学中,恺撒密码是一种最简单且最广为人知的加密技术。
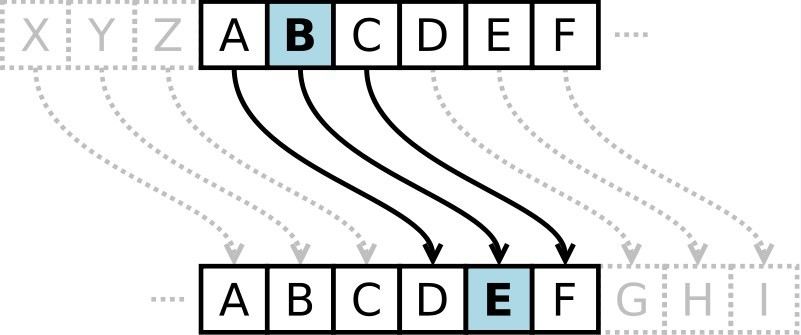
凯撒密码最早由古罗马军事统帅盖乌斯·尤利乌斯·凯撒在军队中用来传递加密信息,故称凯撒密码。这是一种位移加密方式,只对26个字母进行位移替换加密,规则简单,容易破解。下面是位移1次的对比:
将明文字母表向后移动1位,A变成了B,B变成了C……,Z变成了A。同理,若将明文字母表向后移动3位:
则A变成了D,B变成了E……,Z变成了C。字母表最多可以移动25位。凯撒密码的明文字母表向后或向前移动都是可以的,通常表述为向后移动,如果要向前移动1位,则等同于向后移动25位,位移选择为25即可。
它是一种替换加密的技术,明文中的所有字母都在字母表上向后(或向前)按照一个固定数目进行偏移后被替换成密文。例如,当偏移量是3的时候,所有的字母A将被替换成D,B变成E,以此类推。
这个加密方法是以恺撒的名字命名的,当年恺撒曾用此方法与其将军们进行联系。恺撒密码通常被作为其他更复杂的加密方法中的一个步骤。
简单来说就是当秘钥为n,其中一个待加密字符ch,加密之后的字符为ch+n,当ch+n超过’z’时,回到’a’计数。
3.3、凯撒位移加密
创建类 KaiserDemo,把 hello world 往右边移动3位
public class KaiserDemo {
    public static void main(String[] args) {
        String input = "Hello world";
        // 往右边移动3位
        int key = 3;
        // 用来拼接
        StringBuilder sb = new StringBuilder();
        // 字符串转换成字节数组
        char[] chars = input.toCharArray();
        for (char c : chars) {
            int asciiCode = c;
            // 移动3位
            asciiCode = asciiCode + key;
            char newChar = (char) asciiCode;
            sb.append(newChar);
        }

        System.out.println(sb.toString());
    }
}
3.4、凯撒加密和解密
public class KaiserDemo {
    public static void main(String[] args) {
        String orignal = "Hello world";
        // 往右边偏移三位
        int key = 3;
        // 选中我即将抽取的代码,按快捷键Ctrl + Alt + M
        String encryptKaiser =  encryptKaiser(orignal,key);
        System.out.println("加密:" + encryptKaiser);
        String decryptKaiser =  decryptKaiser(encryptKaiser,key);
        System.out.println("解密:" + decryptKaiser);
    }

    /**
     * 使用凯撒加密方式解密数据
     *
     * @param encryptedData :密文
     * @param key           :密钥
     * @return : 源数据
     */
    public static String decryptKaiser(String encryptedData, int key) {
        // 将字符串转为字符数组
        char[] chars = encryptedData.toCharArray();
        StringBuilder sb = new StringBuilder();
        for (char aChar : chars) {
            // 获取字符的ASCII编码
            int asciiCode = aChar;
            // 偏移数据
            asciiCode -= key;
            // 将偏移后的数据转为字符
            char result = (char) asciiCode;
            // 拼接数据
            sb.append(result);
        }
        return sb.toString();
    }

    /**
     * 使用凯撒加密方式加密数据
     *
     * @param orignal :原文
     * @param key     :密钥
     * @return :加密后的数据
     */
    public static String encryptKaiser(String orignal, int key) {
        // 将字符串转为字符数组
        char[] chars = orignal.toCharArray();
        StringBuilder sb = new StringBuilder();
        for (char aChar : chars) {
            // 获取字符的ascii编码
            int asciiCode = aChar;
            // 偏移数据
            asciiCode += key;
            // 将偏移后的数据转为字符
            char result = (char) asciiCode;
            // 拼接数据
            sb.append(result);
        }
        return sb.toString();
    }
}
4、频度分析法破解恺撒加密
4.1、密码棒
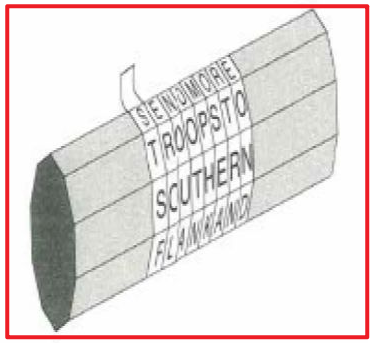
公元前5世纪的时候,斯巴达人利用一根木棒,缠绕上皮革或者羊皮纸,在上面横向写下信息,解下这条皮带。展开来看,这长串字母没有任何意义。比如这样:
信差可以将这条皮带当成腰带,系在腰上。比如这样:
然后收件人将这条皮带缠绕在相同的木棒上,就能恢复信息了。前404年,一位遍体鳞伤的信差来到斯巴达将领利桑德面前,这趟波斯之旅只有他和四位同伴幸存,利桑德接下腰带,缠绕到他的密码棒上,得知波斯的发那巴祖斯准备侵袭他,多亏密码棒利桑德才能够预先防范,击退敌军。
4.2、频率分析解密法
加密者选择将组成信息的字母替代成别的字母,比如说将a写成1,这样就不能被解密者直接拿到信息了。
这难不倒解密者,以英文字母为例,为了确定每个英文字母的出现频率,分析一篇或者数篇普通的英文文章,英文字母出现频率最高的是e,接下来是t,然后是a……,然后检查要破解的密文,也将每个字母出现的频率整理出来,假设密文中出现频率最高的字母是j,那么就可能是e的替身,如果密码文中出现频率次高的但是P,那么可能是t的替身,以此类推便就能解开加密信息的内容。这就是频率分析法。
- 将明文字母的出现频率与密文字母的频率相比较的过程
- 通过分析每个符号出现的频率而轻易地破译代换式密码
- 在每种语言中,冗长的文章中的字母表现出一种可对之进行分辨的频率。
- e是英语中最常用的字母,其出现频率为八分之一
如使用以下示例文件,可以得出以下信息:
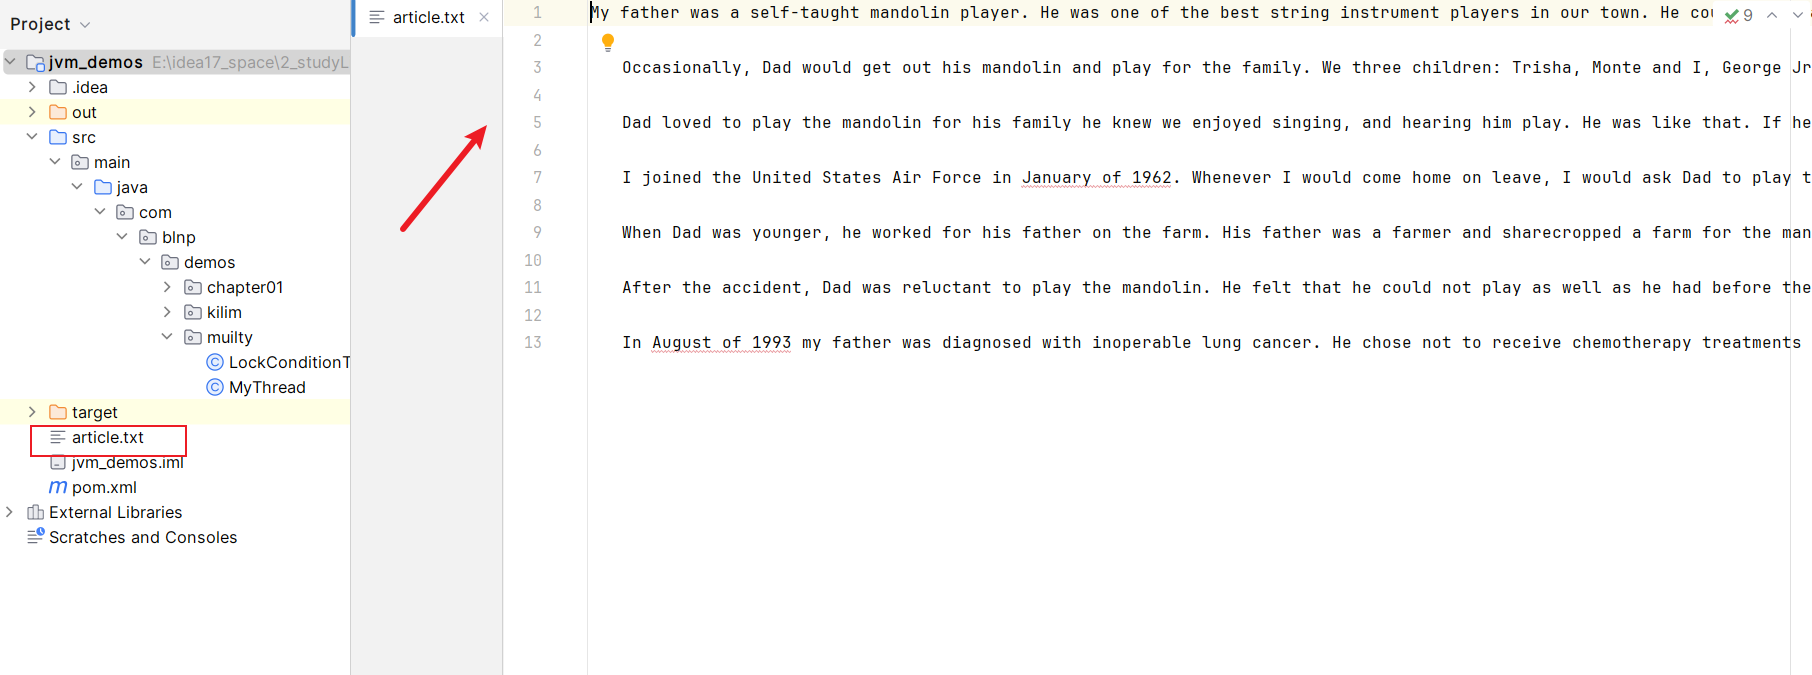
My father was a self-taught mandolin player. He was one of the best string instrument players in our town. He could not read music, but if he heard a tune a few times, he could play it. When he was younger, he was a member of a small country music band. They would play at local dances and on a few occasions would play for the local radio station. He often told us how he had auditioned and earned a position in a band that featured Patsy Cline as their lead singer. He told the family that after he was hired he never went back. Dad was a very religious man. He stated that there was a lot of drinking and cursing the day of his audition and he did not want to be around that type of environment.

  Occasionally, Dad would get out his mandolin and play for the family. We three children: Trisha, Monte and I, George Jr., would often sing along. Songs such as the Tennessee Waltz, Harbor Lights and around Christmas time, the well-known rendition of Silver Bells. "Silver Bells, Silver Bells, its Christmas time in the city" would ring throughout the house. One of Dad's favorite hymns was "The Old Rugged Cross". We learned the words to the hymn when we were very young, and would sing it with Dad when he would play and sing. Another song that was often shared in our house was a song that accompanied the Walt Disney series: Davey Crockett. Dad only had to hear the song twice before he learned it well enough to play it. "Davey, Davey Crockett, King of the Wild Frontier" was a favorite song for the family. He knew we enjoyed the song and the program and would often get out the mandolin after the program was over. I could never get over how he could play the songs so well after only hearing them a few times. I loved to sing, but I never learned how to play the mandolin. This is something I regret to this day.

  Dad loved to play the mandolin for his family he knew we enjoyed singing, and hearing him play. He was like that. If he could give pleasure to others, he would, especially his family. He was always there, sacrificing his time and efforts to see that his family had enough in their life. I had to mature into a man and have children of my own before I realized how much he had sacrificed.

  I joined the United States Air Force in January of 1962. Whenever I would come home on leave, I would ask Dad to play the mandolin. Nobody played the mandolin like my father. He could touch your soul with the tones that came out of that old mandolin. He seemed to shine when he was playing. You could see his pride in his ability to play so well for his family.

  When Dad was younger, he worked for his father on the farm. His father was a farmer and sharecropped a farm for the man who owned the property. In 1950, our family moved from the farm. Dad had gained employment at the local limestone quarry. When the quarry closed in August of 1957, he had to seek other employment. He worked for Owens Yacht Company in Dundalk, Maryland and for Todd Steel in Point of Rocks, Maryland. While working at Todd Steel, he was involved in an accident. His job was to roll angle iron onto a conveyor so that the welders farther up the production line would have it to complete their job. On this particular day Dad got the third index finger of his left hand mashed between two pieces of steel. The doctor who operated on the finger could not save it, and Dad ended up having the tip of the finger amputated. He didn't lose enough of the finger where it would stop him picking up anything, but it did impact his ability to play the mandolin.

  After the accident, Dad was reluctant to play the mandolin. He felt that he could not play as well as he had before the accident. When I came home on leave and asked him to play he would make excuses for why he couldn't play. Eventually, we would wear him down and he would say "Okay, but remember, I can't hold down on the strings the way I used to" or "Since the accident to this finger I can't play as good". For the family it didn't make any difference that Dad couldn't play as well. We were just glad that he would play. When he played the old mandolin it would carry us back to a cheerful, happier time in our lives. "Davey, Davey Crockett, King of the Wild Frontier", would again be heard in the little town of Bakerton, West Virginia.

  In August of 1993 my father was diagnosed with inoperable lung cancer. He chose not to receive chemotherapy treatments so that he could live out the rest of his life in dignity. About a week before his death, we asked Dad if he would play the mandolin for us. He made excuses but said "okay". He knew it would probably be the last time he would play for us. He tuned up the old mandolin and played a few notes. When I looked around, there was not a dry eye in the family. We saw before us a quiet humble man with an inner strength that comes from knowing God, and living with him in one's life. Dad would never play the mandolin for us again. We felt at the time that he wouldn't have enough strength to play, and that makes the memory of that day even stronger. Dad was doing something he had done all his life, giving. As sick as he was, he was still pleasing others. Dad sure could play that Mandolin!
package com.blnp.demos;
import java.io.IOException;
import java.util.ArrayList;
import java.util.Collections;
import java.util.Comparator;
import java.util.HashMap;
import java.util.List;
import java.util.Map;
import java.util.Map.Entry;
/**
* 频率分析法破解凯撒密码
*/
public class FrequencyAnalysis {
//英文里出现次数最多的字符
private static final char MAGIC_CHAR = 'e';
//破解生成的最大文件数
private static final int DE_MAX_FILE = 4;
public static void main(String[] args) throws Exception {
//测试1,统计字符个数
printCharCount("article.txt");
//加密文件
int key = 3;
//encryptFile("article.txt", "article_en.txt", key);
//读取加密后的文件
// String artile = Util.file2String("article_en.txt");
//解密(会生成多个备选文件)
// decryptCaesarCode(artile, "article_de.txt");
}
public static void printCharCount(String path) throws IOException{
String data = Util.file2String(path);
List<Entry<Character, Integer>> mapList = getMaxCountChar(data);
for (Entry<Character, Integer> entry : mapList) {
//输出前几位的统计信息
System.out.println("字符'" + entry.getKey() + "'出现" + entry.getValue() + "次");
}
}
public static void encryptFile(String srcFile, String destFile, int key) throws IOException {
String artile = Util.file2String(srcFile);
//加密文件
String encryptData = KaiserDemo.encryptKaiser(artile, key);
//保存加密后的文件
Util.string2File(encryptData, destFile);
}
/**
* 破解凯撒密码
* @param input 数据源
* @return 返回解密后的数据
*/
public static void decryptCaesarCode(String input, String destPath) {
int deCount = 0;//当前解密生成的备选文件数
//获取出现频率最高的字符信息(出现次数越多越靠前)
List<Entry<Character, Integer>> mapList = getMaxCountChar(input);
for (Entry<Character, Integer> entry : mapList) {
//限制解密文件备选数
if (deCount >= DE_MAX_FILE) {
break;
}
//输出前几位的统计信息
System.out.println("字符'" + entry.getKey() + "'出现" + entry.getValue() + "次");
++deCount;
//出现次数最高的字符跟MAGIC_CHAR的偏移量即为秘钥
int key = entry.getKey() - MAGIC_CHAR;
System.out.println("猜测key = " + key + ", 解密生成第" + deCount + "个备选文件" + "\n");
String decrypt = KaiserDemo.decryptKaiser(input, key);
String fileName = "de_" + deCount + destPath;
Util.string2File(decrypt, fileName);
}
}
//统计String里出现最多的字符
public static List<Entry<Character, Integer>> getMaxCountChar(String data) {
Map<Character, Integer> map = new HashMap<Character, Integer>();
char[] array = data.toCharArray();
for (char c : array) {
if(!map.containsKey(c)) {
map.put(c, 1);
}else{
Integer count = map.get(c);
map.put(c, count + 1);
}
}
//输出统计信息
/*for (Entry<Character, Integer> entry : map.entrySet()) {
System.out.println(entry.getKey() + "出现" + entry.getValue() + "次");
}*/
//获取获取最大值
int maxCount = 0;
for (Entry<Character, Integer> entry : map.entrySet()) {
//不统计空格
if (/*entry.getKey() != ' ' && */entry.getValue() > maxCount) {
maxCount = entry.getValue();
}
}
//map转换成list便于排序
List<Entry<Character, Integer>> mapList = new ArrayList<Entry<Character,Integer>>(map.entrySet());
//根据字符出现次数排序
Collections.sort(mapList, new Comparator<Entry<Character, Integer>>(){
@Override
public int compare(Entry<Character, Integer> o1,
Entry<Character, Integer> o2) {
return o2.getValue().compareTo(o1.getValue());
}
});
return mapList;
}
}
util
package com.blnp.demos;

import java.io.ByteArrayOutputStream;
import java.io.File;
import java.io.FileReader;
import java.io.FileWriter;
import java.io.IOException;
import java.io.InputStream;

public class Util {

	public static void print(byte[] bytes) {
		StringBuffer sb = new StringBuffer();
		for (int i = 0; i < bytes.length; i++) {
			sb.append(bytes[i]).append(" ");
		}
		System.out.println(sb);
	}

	public static String file2String(String path) throws IOException {
		FileReader reader = new FileReader(new File(path));
		char[] buffer = new char[1024];
		int len = -1;
		StringBuffer sb = new StringBuffer();
		while ((len = reader.read(buffer)) != -1) {
			sb.append(buffer, 0, len);
		}
		return sb.toString();
	}

	public static void string2File(String data, String path){
		FileWriter writer = null;
		try {
			writer = new FileWriter(new File(path));
			writer.write(data);
		} catch (Exception e) {
			e.printStackTrace();
		}finally {
			if (writer != null) {
				try {
					writer.close();
				} catch (IOException e) {
					e.printStackTrace();
				}
			}
		}

	}

	public static String inputStream2String(InputStream in) throws IOException {
		int len = -1;
		byte[] buffer = new byte[1024];
		ByteArrayOutputStream baos = new ByteArrayOutputStream();
		while((len = in.read(buffer)) != -1) {
			baos.write(buffer, 0, len);
		}
		baos.close();

		return baos.toString("UTF-8");
	}


}
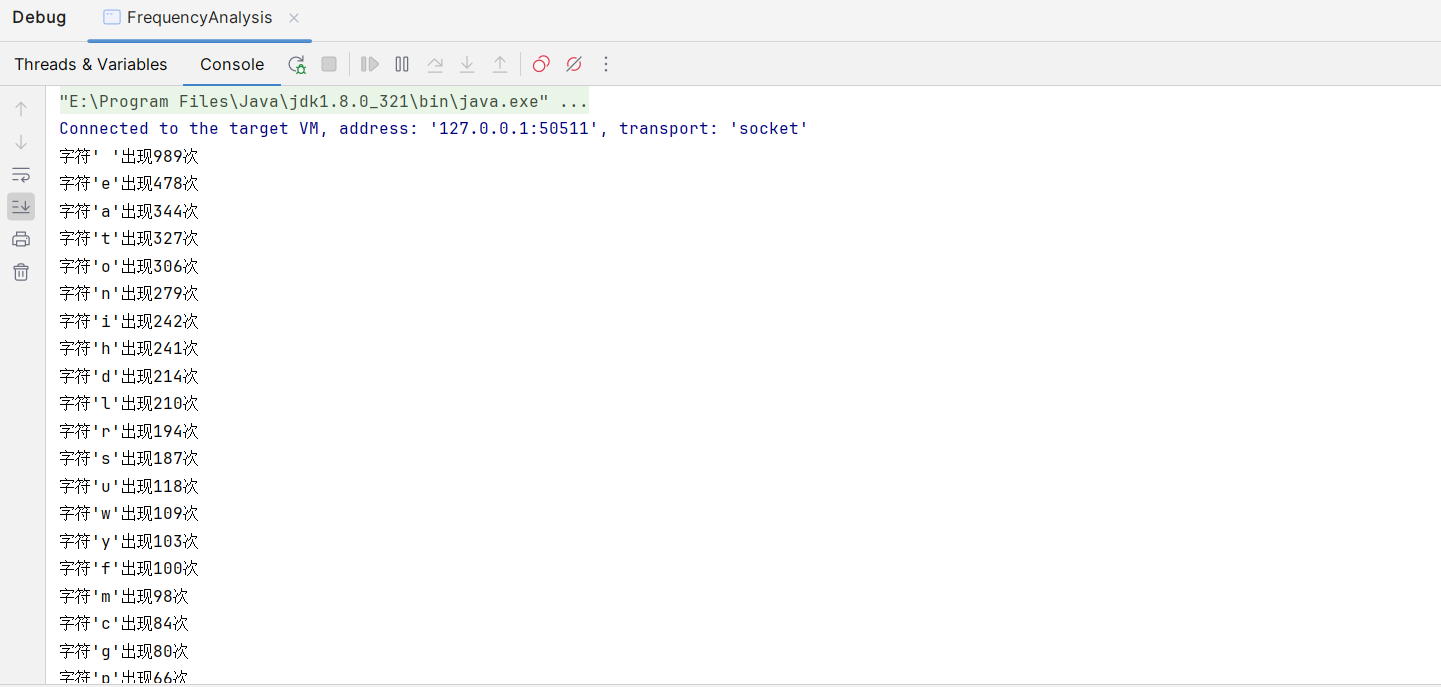
运行 FrequencyAnalysis.java 里面 main 函数里面的 encryptFile 方法 对程序进行加密。在根目录会生成一个 article_en.txt 文件,然后我们统计这个文件当中每个字符出现的次数
然后,我们这边在使用频度分析算法来猜测还原下明文是什么。这里猜测的字母也是根据上文提到的概率论中的出现字母最高的来的。
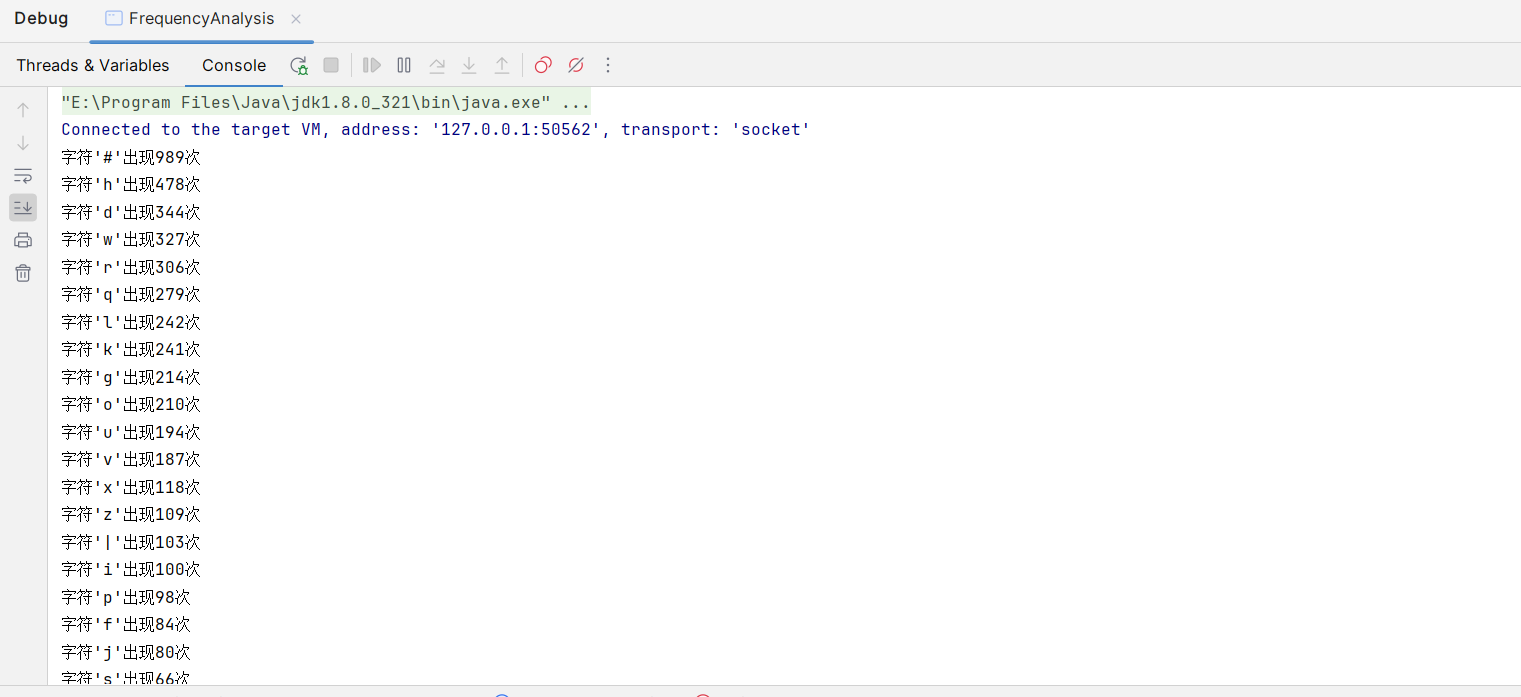
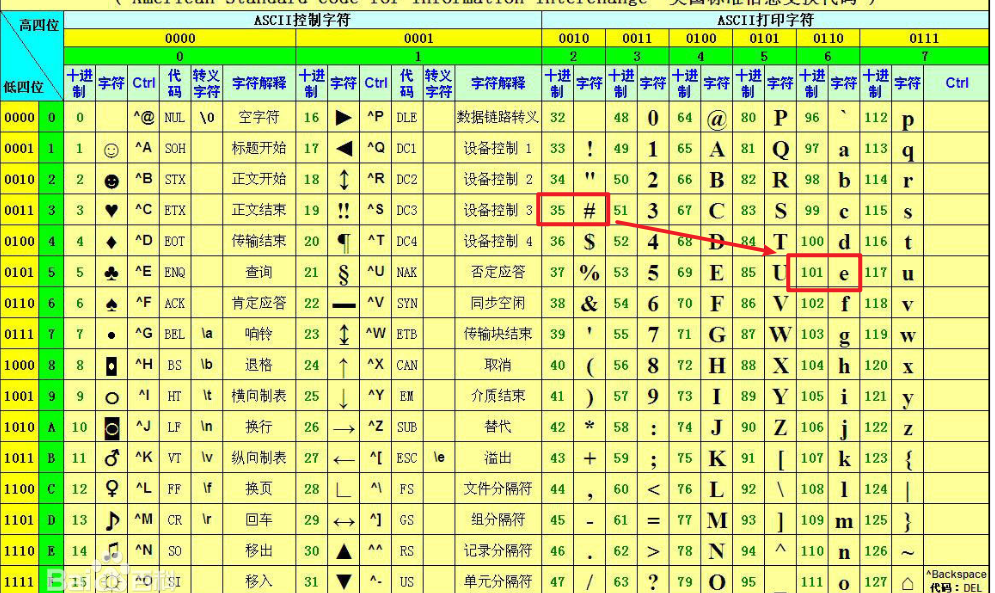
运行结果 # 出现次数最多, 我们知道在英文当中 e 出现的频率是最高的,我们假设现在 # 号,就是 e ,变形而来的 ,我们可以对照 ascii 编码表 ,我们的凯撒加密当中位移是加了一个 key ,所以我们 猜测 两个值直接相差 -66 ,我们现在就以 -66 进行解密 生成一个文件,我们查看第一个文件发现,根本读不懂,所以解密失败,我们在猜测 h 是 e ,h 和 e 之间相差3 ,所以我们在去看第二个解密文件,发现我们可以读懂,解密成功。
5、Byte 和 bit
Byte : 字节. 数据存储的基本单位,比如移动硬盘1T , 单位是byte
bit : 比特, 又叫位. 一个位要么是0要么是1. 数据传输的单位 , 比如家里的宽带100MB,下载速度并没有达到100MB,一般都是12-13MB,那么是因为需要使用 100 / 8
关系: 1Byte = 8bit
5.1、获取字符串 byte
public class ByteBit {
    public static void main(String[] args) {
        String a = "a";
        byte[] bytes = a.getBytes();
        for (byte b : bytes) {
            int c=b;
            // 打印发现byte实际上就是ascii码
            System.out.println(c);
        }
    }
}
5.2、byte 对应 bit
public class ByteBit {
    public static void main(String[] args) {
        String a = "a";
        byte[] bytes = a.getBytes();
        for (byte b : bytes) {
            int c=b;
            // 打印发现byte实际上就是ascii码
            System.out.println(c);
            // 我们在来看看每个byte对应的bit,byte获取对应的bit
            String s = Integer.toBinaryString(c);
            System.out.println(s);
        }
    }
}
打印出来应该是8个bit,但前面是0,没有打印 ,从打印结果可以看出来,一个英文字符 ,占一个字节。
5.3、中文对应的字节
/**
 * @Author: blnp [email protected]
 * @Date: 2024-12-07 21:57:09
 * @LastEditors: blnp [email protected]
 * @LastEditTime: 2024-12-07 21:57:40
 * @FilePath: src/main/java/com/blnp/demos/ByteBitDemo.java
 * @Description: 这是默认设置, 可以在设置》工具》File Description中进行配置
 */
package com.blnp.demos;

/**
 * <p></p>
 *
 * @author lyb [email protected]
 * @version 1.0
 * @since 2024/12/7/007 21:57
 */
public class ByteBitDemo {

    public static void main(String[] args) throws Exception{
        // 中文在GBK编码下, 占据2个字节
        // 中文在UTF-8编码下, 占据3个字节
        String a = "喵";
        byte[] bytes = a.getBytes();
        for (byte b : bytes) {
            System.out.print(b + "   ");
            String s = Integer.toBinaryString(b);
            System.out.println(s);
        }
    }
}
我们修改 编码格式 , 编码格式改成 GBK ,我们在运行发现变成了 2 个字节。
public static void main(String[] args) throws Exception {
    String a = "喵";
    // 在中文情况下,不同的编码格式,对应不同的字节
    //GBK :编码格式占2个字节
    // UTF-8:编码格式占3个字节
    byte[] bytes = a.getBytes("GBK");
    // byte[] bytes = a.getBytes("UTF-8");
    for (byte b: bytes) {
        System.out.print(b + "   ");
        String s = Integer.toBinaryString(b);
        System.out.println(s);
    }
}
5.4、英文对应的字节
public class ByteBit {
    public static void main(String[] args) throws Exception {
        String a = "A";
        byte[] bytes = a.getBytes();
        // 在中文情况下,不同的编码格式,对应不同的字节
        // byte[] bytes = a.getBytes("GBK");
        for (byte b: bytes) {
            System.out.print(b + "   ");
            String s = Integer.toBinaryString(b);
            System.out.println(s);
        }
    }
}
6、常见的加密方式
6.1、对称加密
采用单钥密码系统的加密方法,同一个密钥可以同时用作信息的加密和解密,这种加密方法称为对称加密,也称为单密钥加密。例如:
- 我们现在有一个原文3要发送给B
- 设置密钥为108, 3 * 108 = 324, 将324作为密文发送给B
- B拿到密文324后, 使用324/108 = 3 得到原文
常见的加密算法:
- DES : Data Encryption Standard,即数据加密标准,是一种使用密钥加密的块算法,1977年被美国联邦政府的国家标准局确定为联邦资料处理标准(FIPS),并授权在非密级政府通信中使用,随后该算法在国际上广泛流传开来。
- AES : Advanced Encryption Standard, 高级加密标准 .在密码学中又称Rijndael加密法,是美国联邦政府采用的一种区块加密标准。这个标准用来替代原先的DES,已经被多方分析且广为全世界所使用。
特点:
- 加密速度快, 可以加密大文件
- 密文可逆, 一旦密钥文件泄漏, 就会导致数据暴露
- 加密后编码表找不到对应字符, 出现乱码
- 一般结合Base64使用
6.2、DES 加密
Java 加解密的核心类是 Cipher,文档 :
package com.blnp.demos;

import javax.crypto.Cipher;
import javax.crypto.spec.SecretKeySpec;

/**
 * <p></p>
 *
 * @author lyb [email protected]
 * @version 1.0
 * @since 2024/12/7/007 22:04
 */
public class DesAesDemo {

    public static void main(String[] args) throws Exception {
        // 原文
        String input = "妲己";
        // des加密必须是8位
        String key = "123456";
        // 算法
        String algorithm = "DES";

        String transformation = "DES";
        // Cipher:密码,获取加密对象
        // transformation:参数表示使用什么类型加密
        Cipher cipher = Cipher.getInstance(transformation);
        // 指定秘钥规则
        // 第一个参数表示:密钥,key的字节数组
        // 第二个参数表示:算法
        SecretKeySpec sks = new SecretKeySpec(key.getBytes(), algorithm);
        // 对加密进行初始化
        // 第一个参数:表示模式,有加密模式和解密模式
        // 第二个参数:表示秘钥规则
        cipher.init(Cipher.ENCRYPT_MODE, sks);
        // 进行加密
        byte[] bytes = cipher.doFinal(input.getBytes());
        // 打印字节,因为ascii码有负数,解析不出来,所以乱码
//        for (byte b : bytes) {
//            System.out.println(b);
//        }
        // 打印密文
        System.out.println(new String(bytes));
    }
}
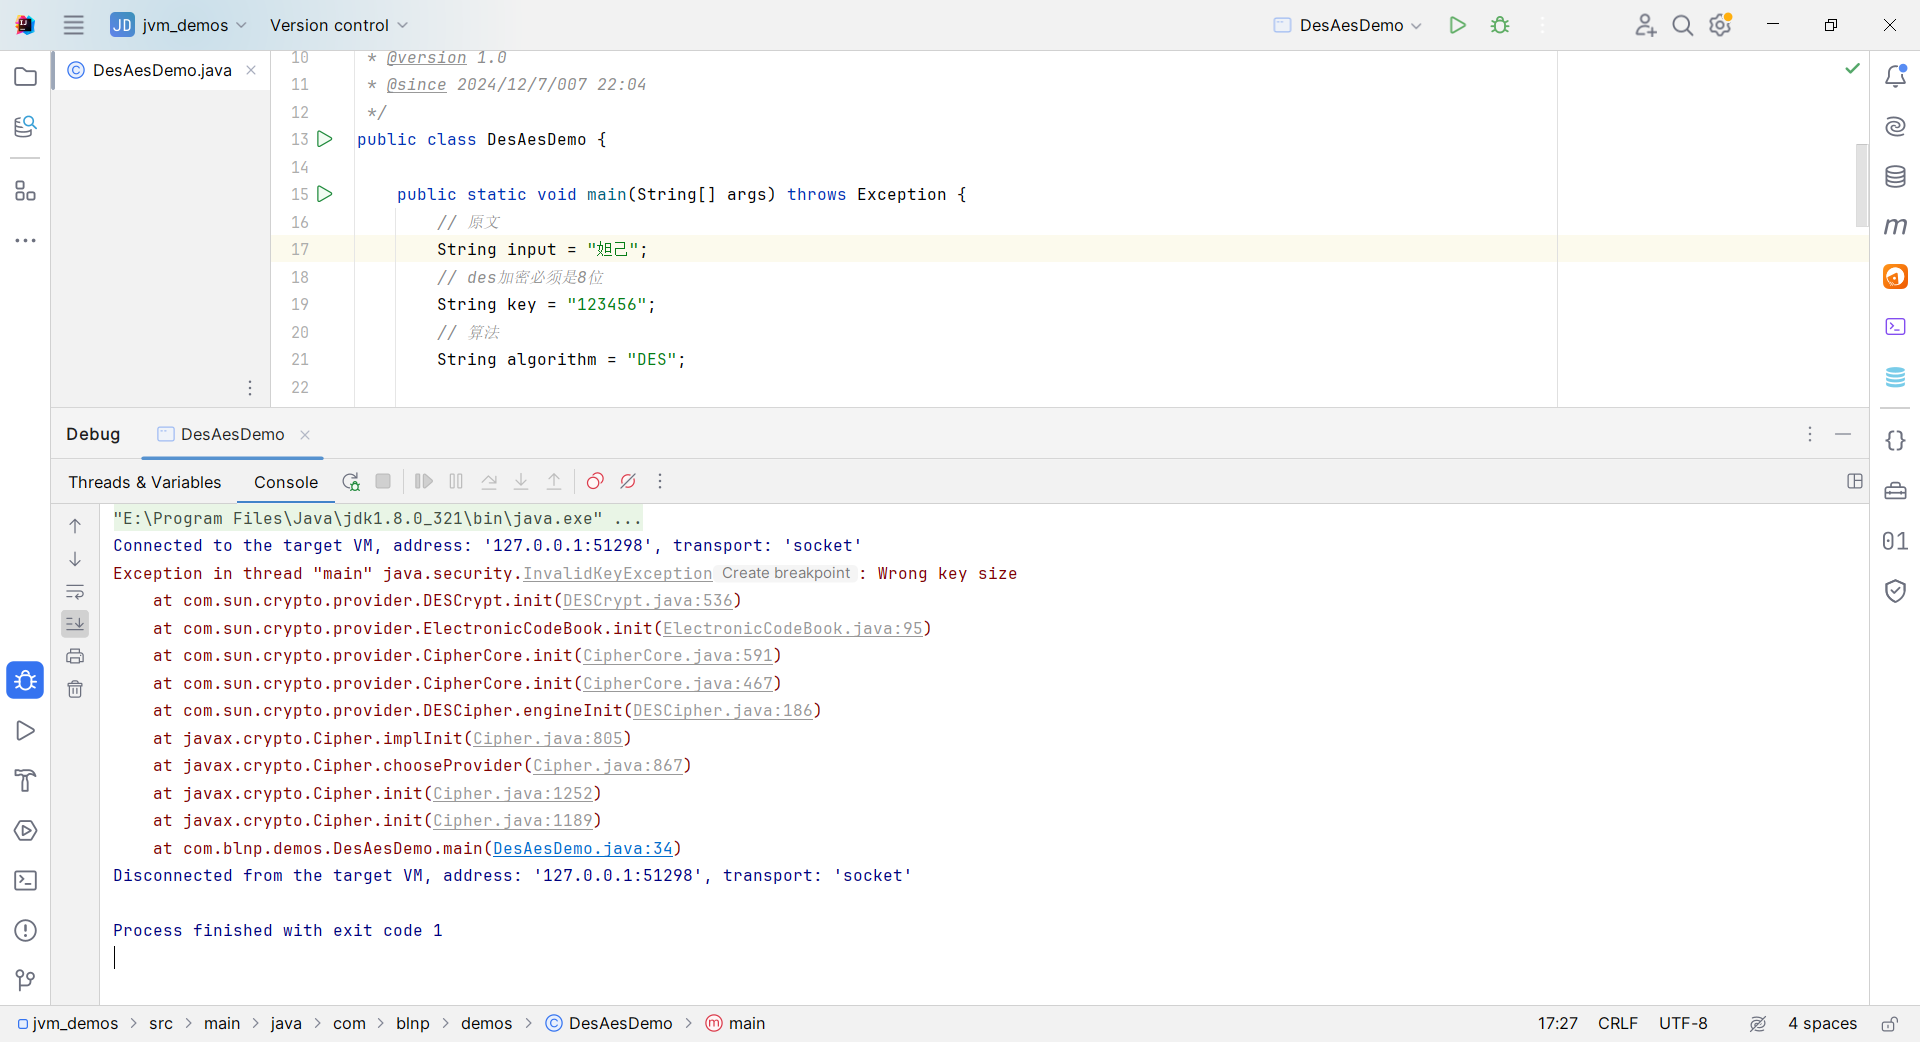
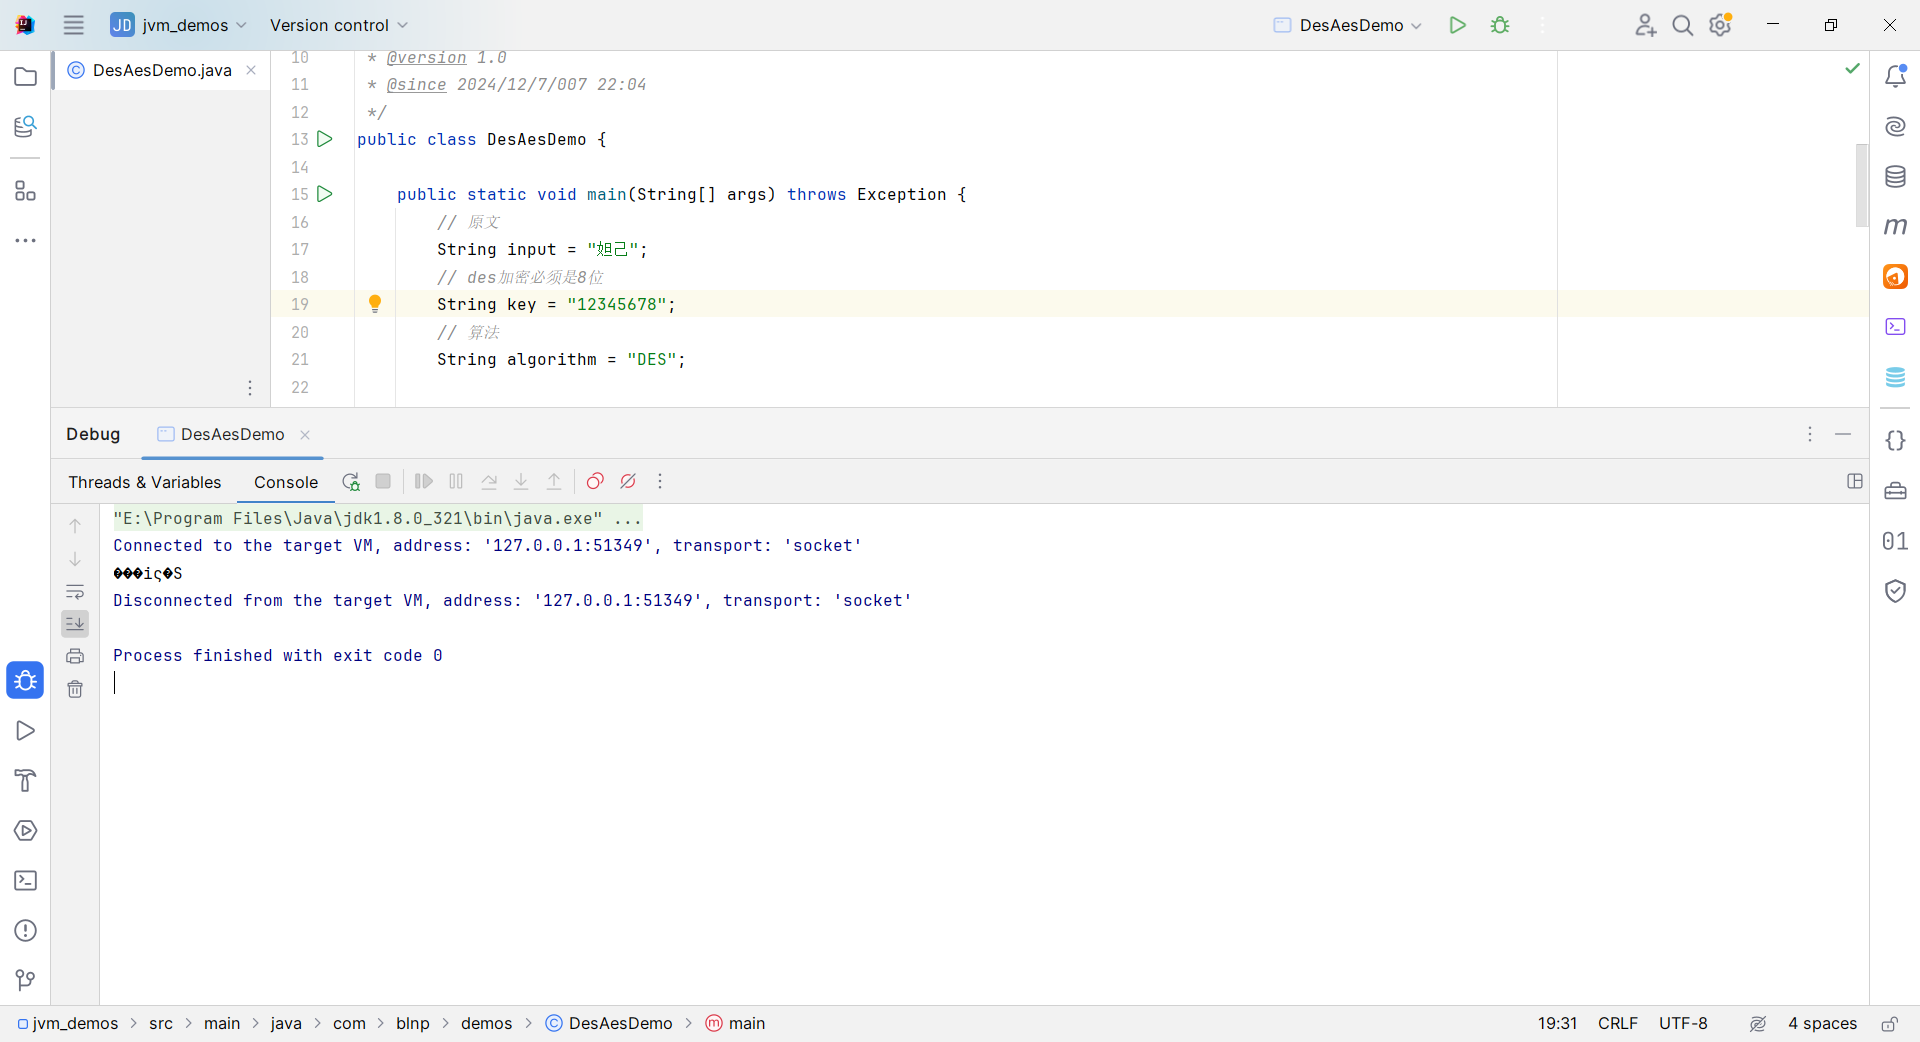
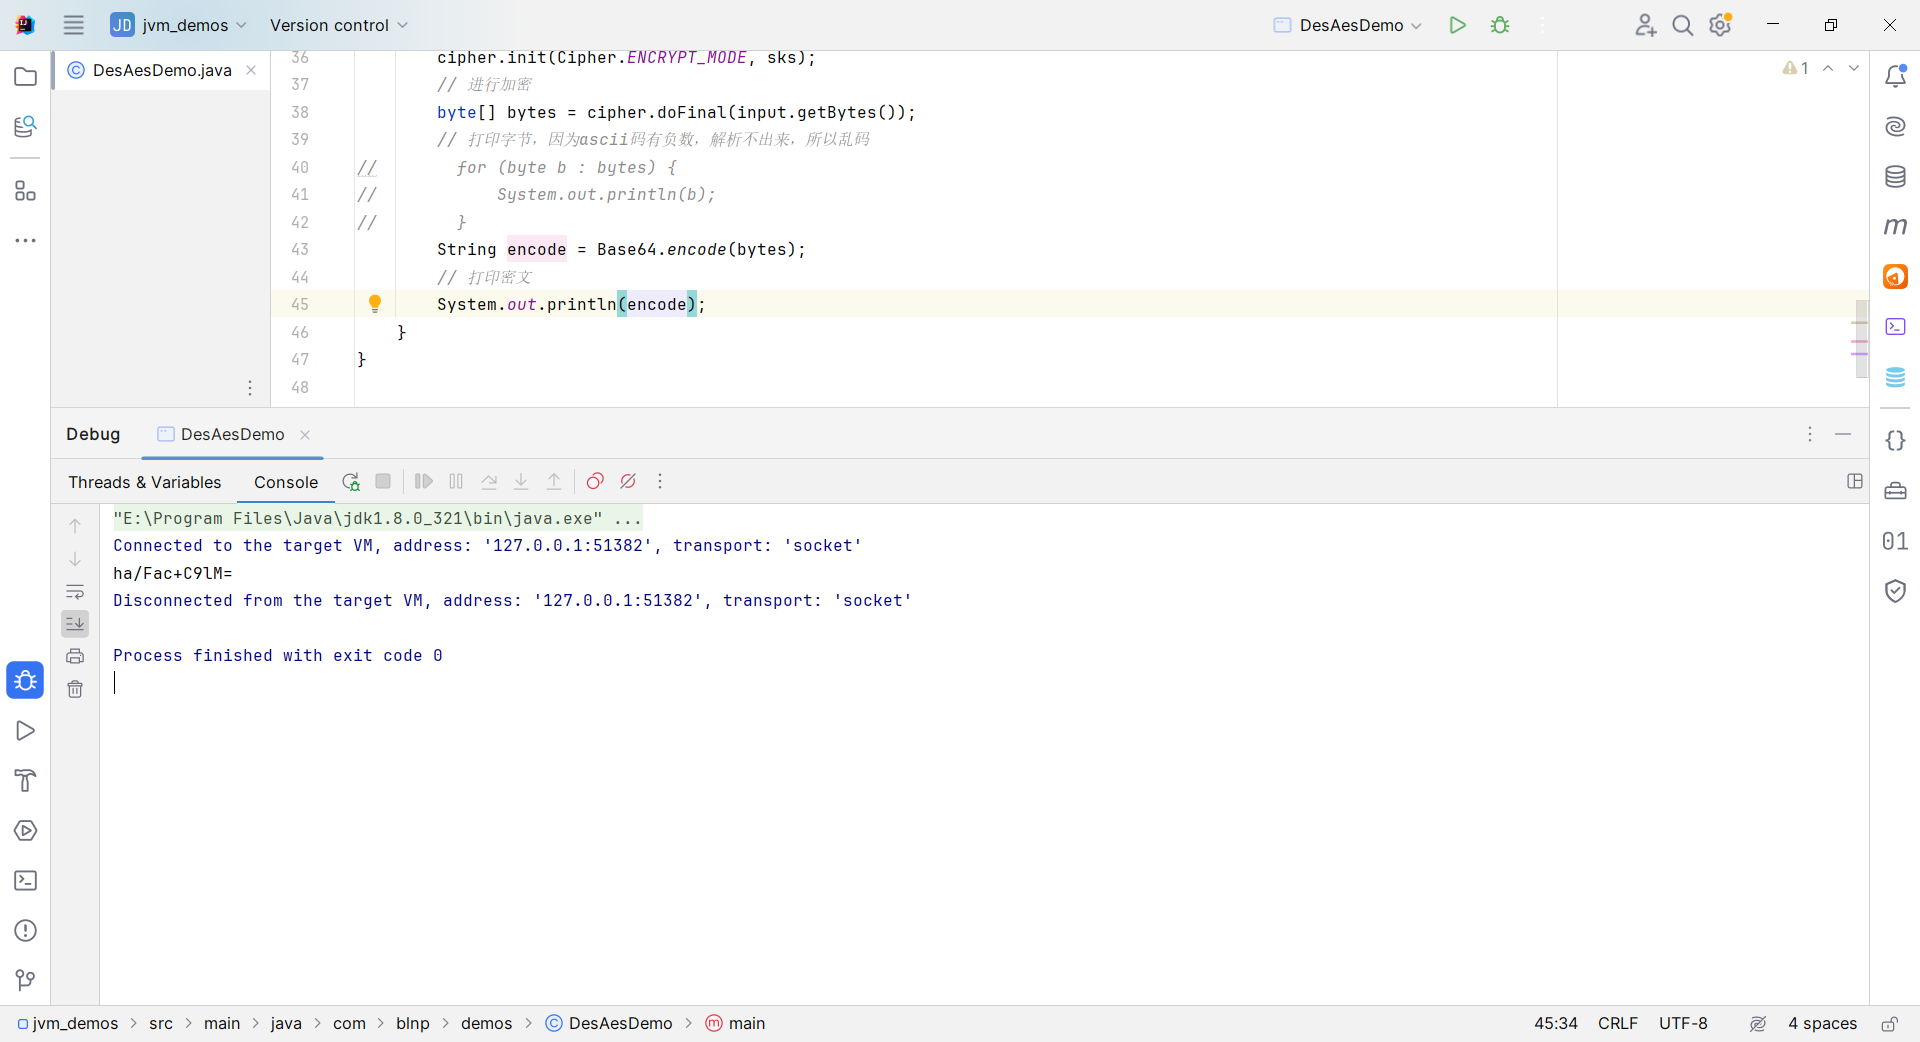
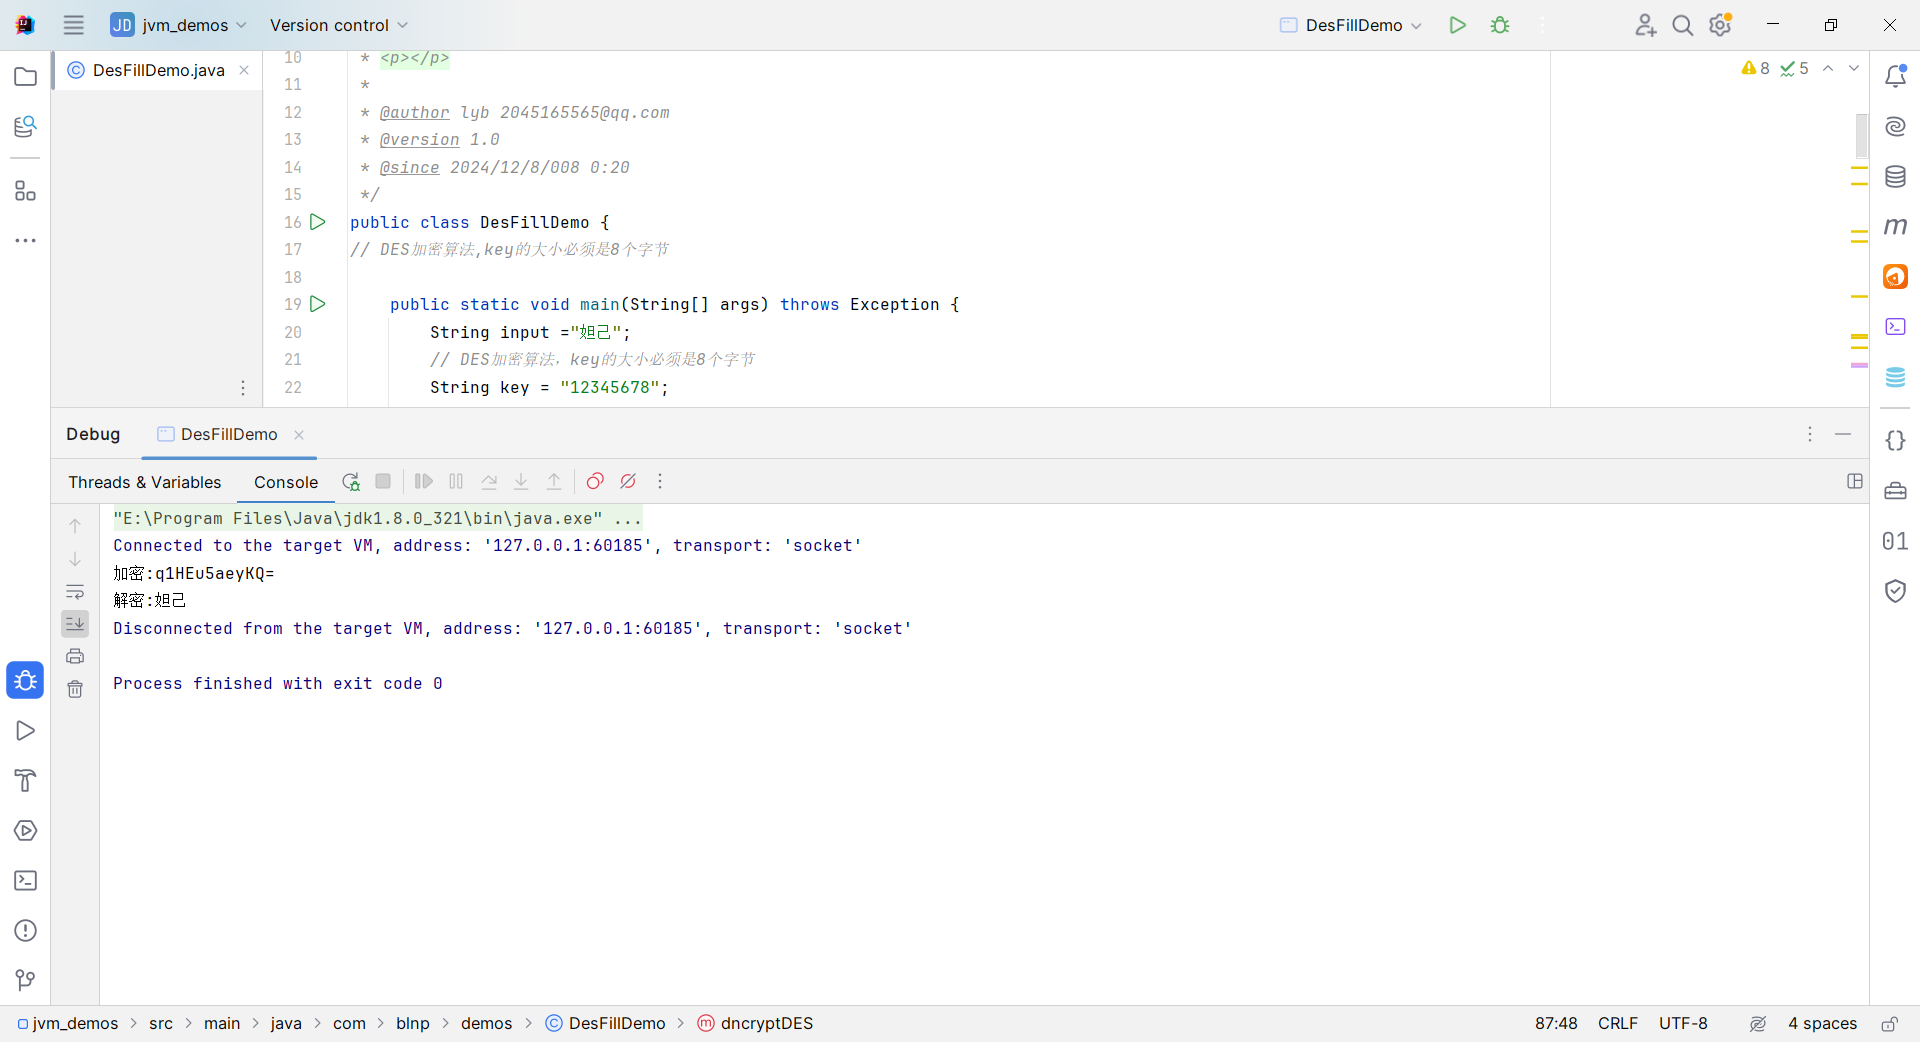
修改 密钥 key = “12345678” ,再次运行 ,出现乱码是因为对应的字节出现负数,但负数,没有出现在 ascii 码表里面,所以出现乱码,需要配合base64进行转码。
使用 base64 进行编码,base64 导包的时候,需要注意 ,别导错了,需要导入 apache 包。
6.3、DES 解密
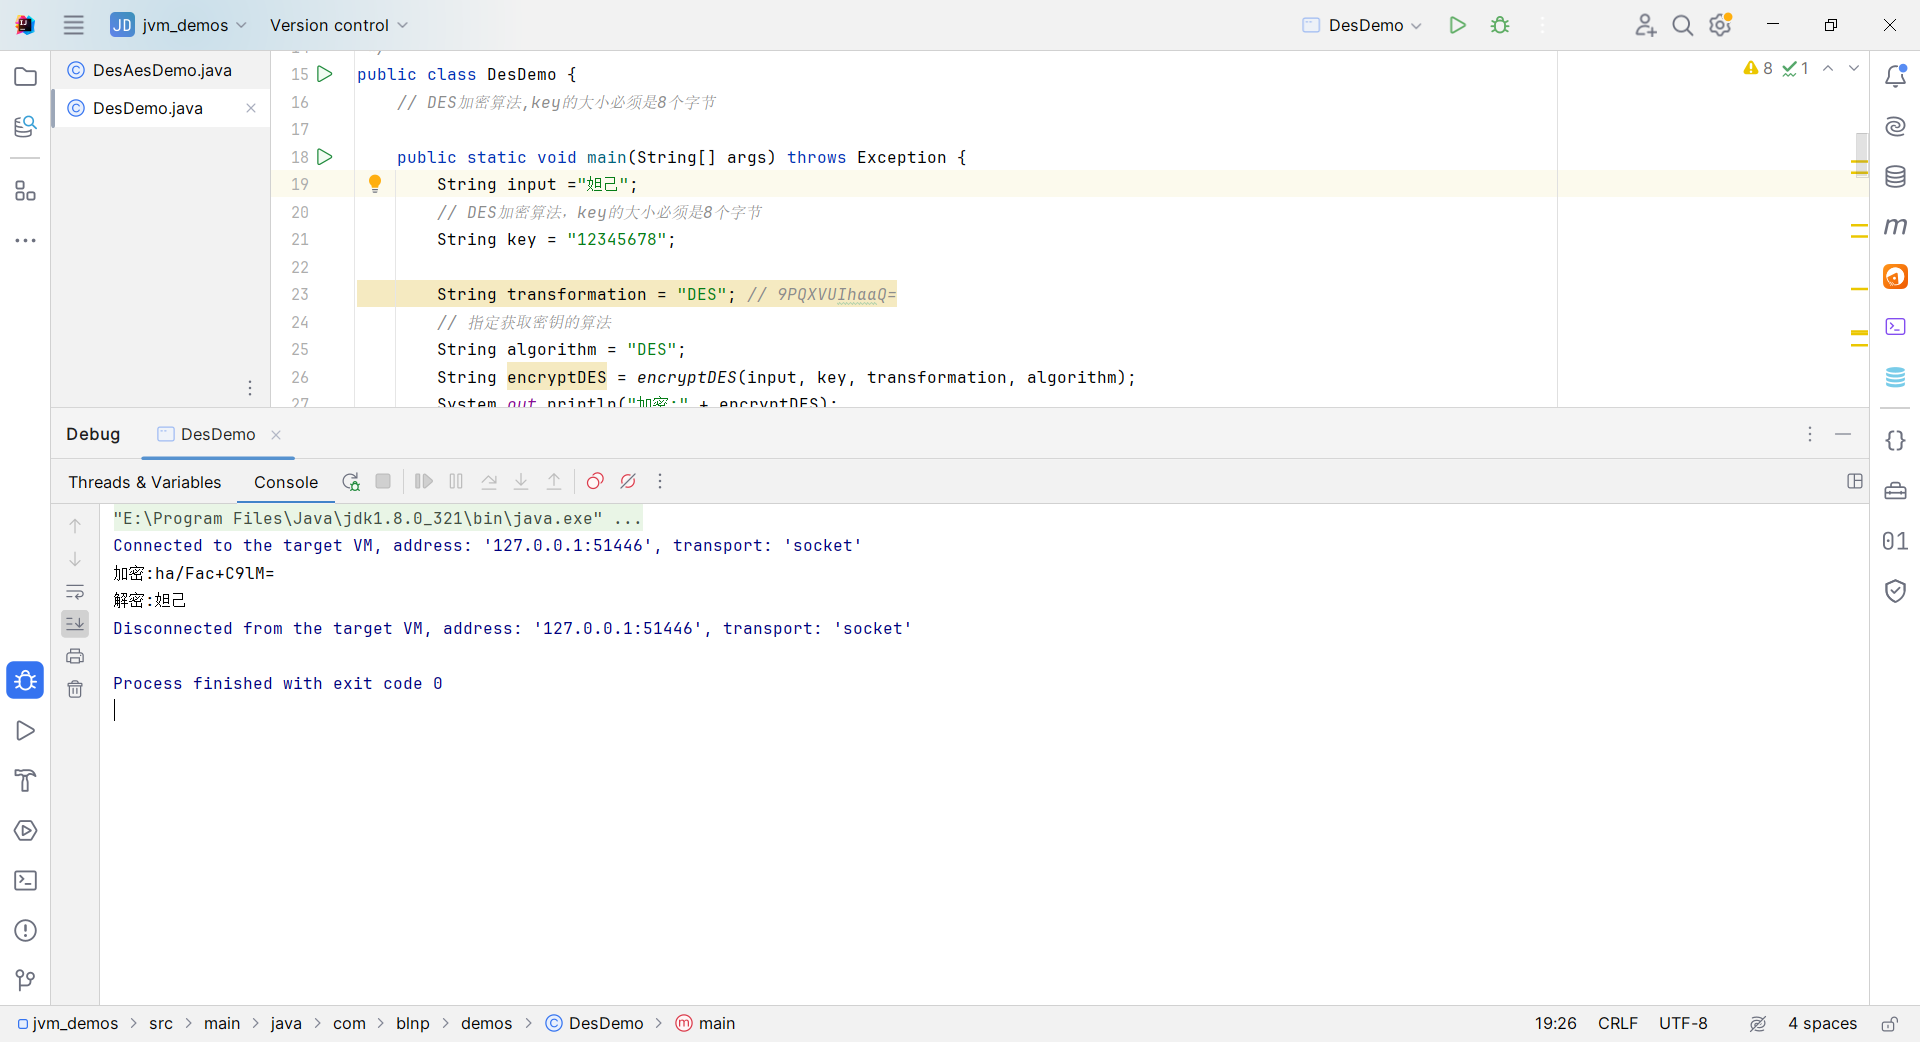
使用 ctrl + alt + m 快捷键抽取代码。
package com.blnp.demos;

import com.sun.org.apache.xerces.internal.impl.dv.util.Base64;

import javax.crypto.Cipher;
import javax.crypto.spec.SecretKeySpec;

/**
 * <p></p>
 *
 * @author lyb [email protected]
 * @version 1.0
 * @since 2024/12/7/007 22:08
 */
public class DesDemo {
    // DES加密算法,key的大小必须是8个字节

    public static void main(String[] args) throws Exception {
        String input ="妲己";
        // DES加密算法,key的大小必须是8个字节
        String key = "12345678";

        String transformation = "DES"; // 9PQXVUIhaaQ=
        // 指定获取密钥的算法
        String algorithm = "DES";
        String encryptDES = encryptDES(input, key, transformation, algorithm);
        System.out.println("加密:" + encryptDES);
        String s = decryptDES(encryptDES, key, transformation, algorithm);
        System.out.println("解密:" + s);

    }

    /**
     * 使用DES加密数据
     *
     * @param input          : 原文
     * @param key            : 密钥(DES,密钥的长度必须是8个字节)
     * @param transformation : 获取Cipher对象的算法
     * @param algorithm      : 获取密钥的算法
     * @return : 密文
     * @throws Exception
     */
    private static String encryptDES(String input, String key, String transformation, String algorithm) throws Exception {
        // 获取加密对象
        Cipher cipher = Cipher.getInstance(transformation);
        // 创建加密规则
        // 第一个参数key的字节
        // 第二个参数表示加密算法
        SecretKeySpec sks = new SecretKeySpec(key.getBytes(), algorithm);
        // ENCRYPT_MODE:加密模式
        // DECRYPT_MODE: 解密模式
        // 初始化加密模式和算法
        cipher.init(Cipher.ENCRYPT_MODE,sks);
        // 加密
        byte[] bytes = cipher.doFinal(input.getBytes());

        // 输出加密后的数据
        String encode = Base64.encode(bytes);

        return encode;
    }

    /**
     * 使用DES解密
     *
     * @param input          : 密文
     * @param key            : 密钥
     * @param transformation : 获取Cipher对象的算法
     * @param algorithm      : 获取密钥的算法
     * @throws Exception
     * @return: 原文
     */
    private static String decryptDES(String input, String key, String transformation, String algorithm) throws Exception {
        // 1,获取Cipher对象
        Cipher cipher = Cipher.getInstance(transformation);
        // 指定密钥规则
        SecretKeySpec sks = new SecretKeySpec(key.getBytes(), algorithm);
        cipher.init(Cipher.DECRYPT_MODE, sks);
        // 3. 解密,上面使用的base64编码,下面直接用密文
        byte[] bytes = cipher.doFinal(Base64.decode(input));
        //  因为是明文,所以直接返回
        return new String(bytes);
    }
}
6.4、关于 Base64
6.4.1、Base64 算法简介
Base64是网络上最常见的用于传输8Bit字节码的可读性编码算法之一,可读性编码算法不是为了保护数据的安全性,而是为了可读性。可读性编码不改变信息内容,只改变信息内容的表现形式。
所谓Base64,即是说在编码过程中使用了64种字符:大写A到Z、小写a到z、数字0到9、“+”和“/”;Base58是Bitcoin(比特币)中使用的一种编码方式,主要用于产生Bitcoin的钱包地址相比Base64,Base58不使用数字"0",字母大写"O",字母大写"I",和字母小写"i",以及"+"和"/"符号。
6.4.2、Base64 算法原理
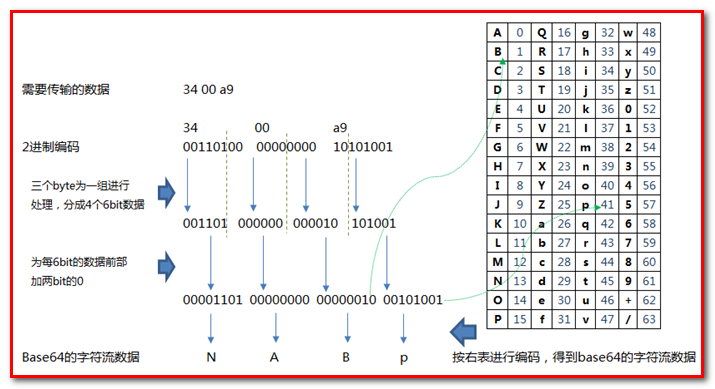
base64 是 3个字节为一组,一个字节 8位,一共 就是24位 ,然后,把3个字节转成4组,每组6位,3 * 8 = 4 * 6 = 24 ,每组6位,缺少的2位,会在高位进行补0 ,这样做的好处在于 ,base取的是后面6位,去掉高2位 ,那么base64的取值就可以控制在0-63位了,所以就叫base64,111 111 = 32 + 16 + 8 + 4 + 2 + 1 = 64。
6.4.3、base64 构成原则
① 小写 a - z = 26个字母
② 大写 A - Z = 26个字母
③ 数字 0 - 9 = 10 个数字
④ + / = 2个符号
大家可能发现一个问题,咱们的base64有个 = 号,但是在映射表里面没有发现 = 号 , 这个地方需要注意,等号非常特殊,因为base64是三个字节一组 ,如果当我们的位数不够的时候,会使用等号来补齐。
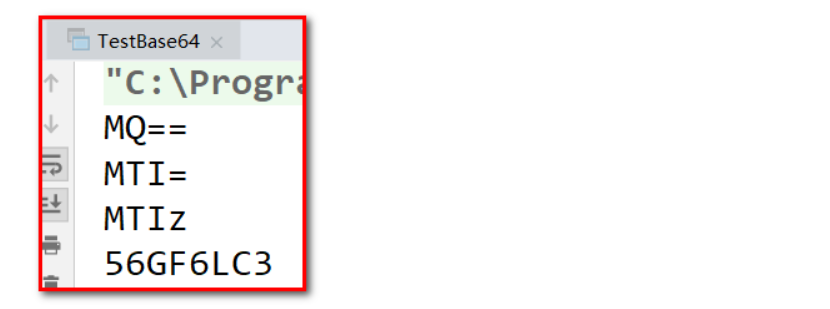
6.4.4、base64 补等号验证
public class TestBase64 {
    public static void main(String[] args) {
        //  1:MQ== 表示一个字节,不够三个字节,所以需要后面通过 == 号补齐
        System.out.println(Base64.encode("1".getBytes()));
        System.out.println(Base64.encode("12".getBytes()));
        System.out.println(Base64.encode("123".getBytes()));
        // 硅谷:中文占6个字节,6 * 8 = 48 ,刚刚好被整除,所以没有等号
        System.out.println(Base64.encode("妲己".getBytes()));
    }
}
6.5、AES 加密解密
AES 加密解密和 DES 加密解密代码一样,只需要修改加密算法就行,拷贝 ESC 代码。
public class AesDemo {
    // DES加密算法,key的大小必须是8个字节

    public static void main(String[] args) throws Exception {
        String input ="妲己";
        // AES加密算法,比较高级,所以key的大小必须是16个字节
        String key = "1234567812345678";

        String transformation = "AES"; // 9PQXVUIhaaQ=
        // 指定获取密钥的算法
        String algorithm = "AES";
        // 先测试加密,然后在测试解密
        String encryptDES = encryptDES(input, key, transformation, algorithm);
        System.out.println("加密:" + encryptDES);
        String s = dncryptDES(encryptDES, key, transformation, algorithm);
        System.out.println("解密:" + s);

    }

    /**
     * 使用DES加密数据
     *
     * @param input          : 原文
     * @param key            : 密钥(DES,密钥的长度必须是8个字节)
     * @param transformation : 获取Cipher对象的算法
     * @param algorithm      : 获取密钥的算法
     * @return : 密文
     * @throws Exception
     */
    private static String encryptDES(String input, String key, String transformation, String algorithm) throws Exception {
        // 获取加密对象
        Cipher cipher = Cipher.getInstance(transformation);
        // 创建加密规则
        // 第一个参数key的字节
        // 第二个参数表示加密算法
        SecretKeySpec sks = new SecretKeySpec(key.getBytes(), algorithm);
        // ENCRYPT_MODE:加密模式
        // DECRYPT_MODE: 解密模式
        // 初始化加密模式和算法
        cipher.init(Cipher.ENCRYPT_MODE,sks);
        // 加密
        byte[] bytes = cipher.doFinal(input.getBytes());

        // 输出加密后的数据
        String encode = Base64.encode(bytes);

        return encode;
    }

    /**
     * 使用DES解密
     *
     * @param input          : 密文
     * @param key            : 密钥
     * @param transformation : 获取Cipher对象的算法
     * @param algorithm      : 获取密钥的算法
     * @throws Exception
     * @return: 原文
     */
    private static String dncryptDES(String input, String key, String transformation, String algorithm) throws Exception {
        // 1,获取Cipher对象
        Cipher cipher = Cipher.getInstance(transformation);
        // 指定密钥规则
        SecretKeySpec sks = new SecretKeySpec(key.getBytes(), algorithm);
        cipher.init(Cipher.DECRYPT_MODE, sks);
        // 3. 解密
        byte[] bytes = cipher.doFinal(Base64.decode(input));

        return new String(bytes);
    }
}
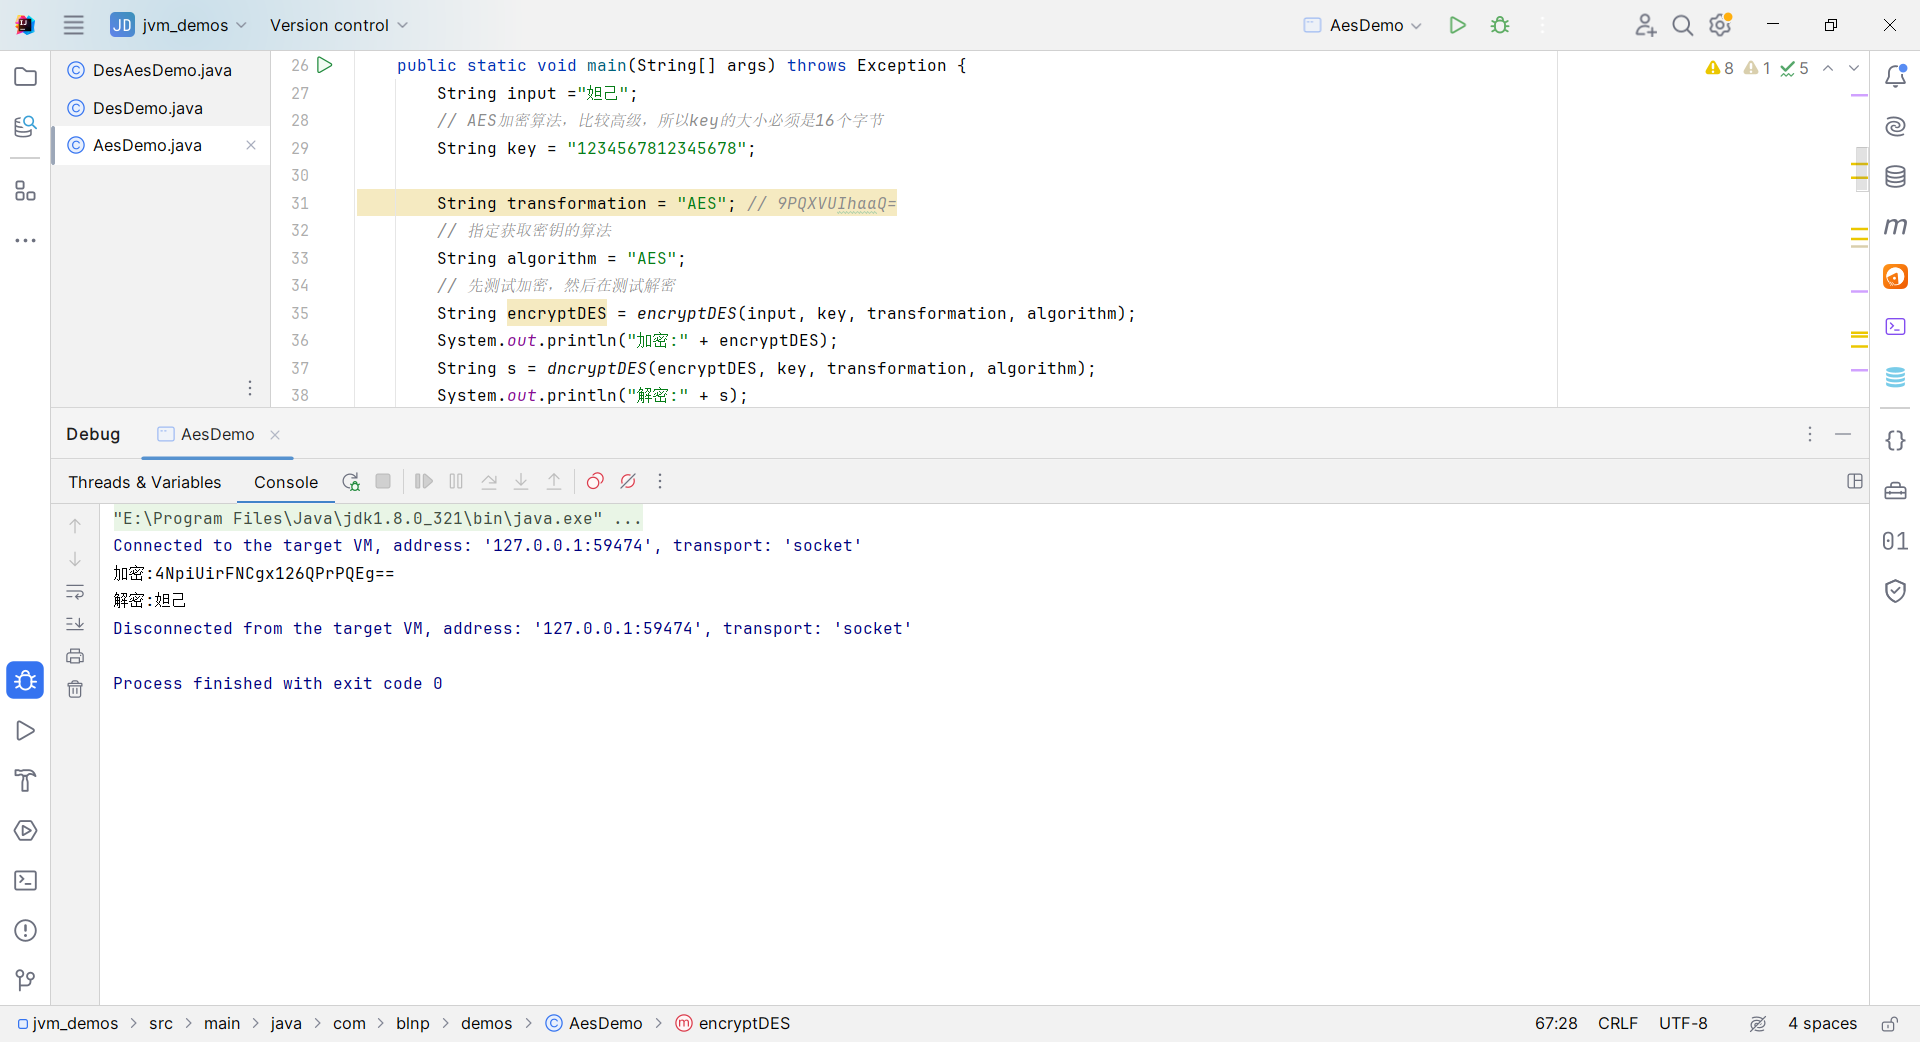
运行程序:AES 加密的密钥key , 需要传入16个字节。
6.6、toString() 和 new String() 的用法区别
package com.blnp.demos;

import com.sun.org.apache.xerces.internal.impl.dv.util.Base64;

/**
 * <p></p>
 *
 * @author lyb [email protected]
 * @version 1.0
 * @since 2024/12/8/008 0:11
 */
public class TestBase64 {

    public static void main(String[] args) {
        String str="TU0jV0xBTiNVYys5bEdiUjZlNU45aHJ0bTdDQStBPT0jNjQ2NDY1Njk4IzM5OTkwMDAwMzAwMA==";
        String rlt1=new String(Base64.decode(str));
        String rlt2=Base64.decode(str).toString();
        System.out.println(rlt1);
        System.out.println(rlt2);
    }
}
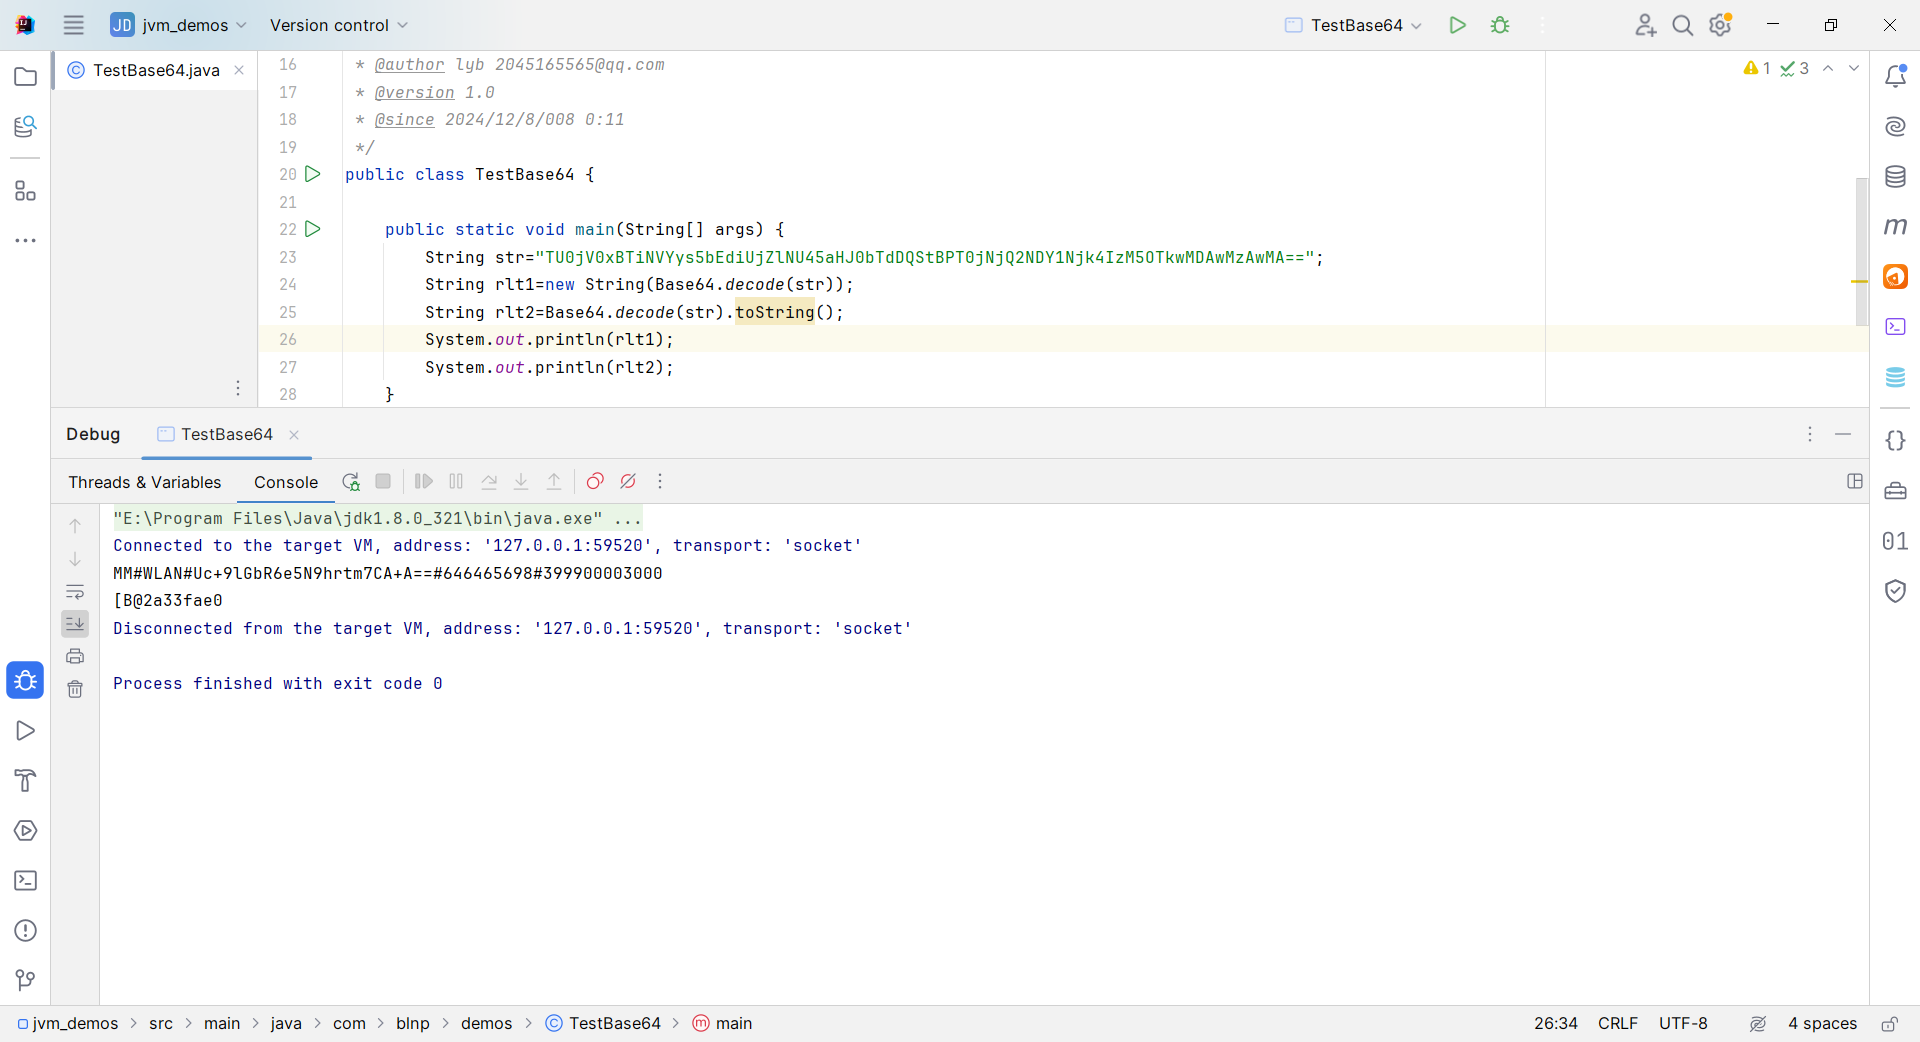
哪一个是正确的?为什么?
这里应该用new String()的方法,因为Base64加解密是一种转换编码格式的原理
toString()与new String ()用法区别
str.toString是调用了这个object对象的类的toString方法。一般是返回这么一个String:[class name]@[hashCode]。
new String(str)是根据parameter是一个字节数组,使用java虚拟机默认的编码格式,将这个字节数组decode为对应的字符。若虚拟机默认的编码格式是ISO-8859-1,按照ascii编码表即可得到字节对应的字符。
7、加密模式
7.1、ECB
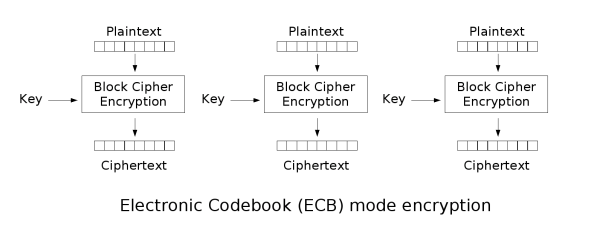
ECB : Electronic codebook, 电子密码本. 需要加密的消息按照块密码的块大小被分为数个块,并对每个块进行独立加密。
- 优点 : 可以并行处理数据
- 缺点 : 同样的原文生成同样的密文, 不能很好的保护数据
- 同时加密,原文是一样的,加密出来的密文也是一样的
7.2、CBC
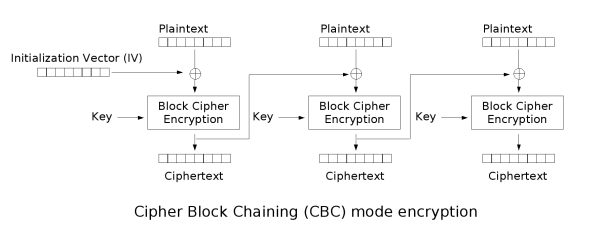
CBC : Cipher-block chaining, 密码块链接. 每个明文块先与前一个密文块进行异或后,再进行加密。在这种方法中,每个密文块都依赖于它前面的所有明文块。
- 优点 : 同样的原文生成的密文不一样
- 缺点 : 串行处理数据.
8、填充模式
当需要按块处理的数据, 数据长度不符合块处理需求时, 按照一定的方法填充满块长的规则。
8.1、NoPadding
- 不填充.
- 在DES加密算法下, 要求原文长度必须是8byte的整数倍
- 在AES加密算法下, 要求原文长度必须是16byte的整数倍
8.2、PKCS5Padding
- 数据块的大小为8位, 不够就补足
8.3、拓展
- 默认情况下, 加密模式和填充模式为 : ECB/PKCS5Padding
- 如果使用CBC模式, 在初始化Cipher对象时, 需要增加参数, 初始化向量IV : IvParameterSpec iv = new IvParameterSpec(key.getBytes());
加密模式和填充模式:
AES/CBC/NoPadding (128)
AES/CBC/PKCS5Padding (128)
AES/ECB/NoPadding (128)
AES/ECB/PKCS5Padding (128)
DES/CBC/NoPadding (56)
DES/CBC/PKCS5Padding (56)
DES/ECB/NoPadding (56)
DES/ECB/PKCS5Padding (56)
DESede/CBC/NoPadding (168)
DESede/CBC/PKCS5Padding (168)
DESede/ECB/NoPadding (168)
DESede/ECB/PKCS5Padding (168)
RSA/ECB/PKCS1Padding (1024, 2048)
RSA/ECB/OAEPWithSHA-1AndMGF1Padding (1024, 2048)
RSA/ECB/OAEPWithSHA-256AndMGF1Padding (1024, 2048)
加密模式和填充模式例子:
package com.blnp.demos;

import com.sun.org.apache.xerces.internal.impl.dv.util.Base64;

import javax.crypto.Cipher;
import javax.crypto.spec.SecretKeySpec;

/**
 * <p></p>
 *
 * @author lyb [email protected]
 * @version 1.0
 * @since 2024/12/8/008 0:20
 */
public class DesFillDemo {
// DES加密算法,key的大小必须是8个字节

    public static void main(String[] args) throws Exception {
        String input ="妲己";
        // DES加密算法,key的大小必须是8个字节
        String key = "12345678";
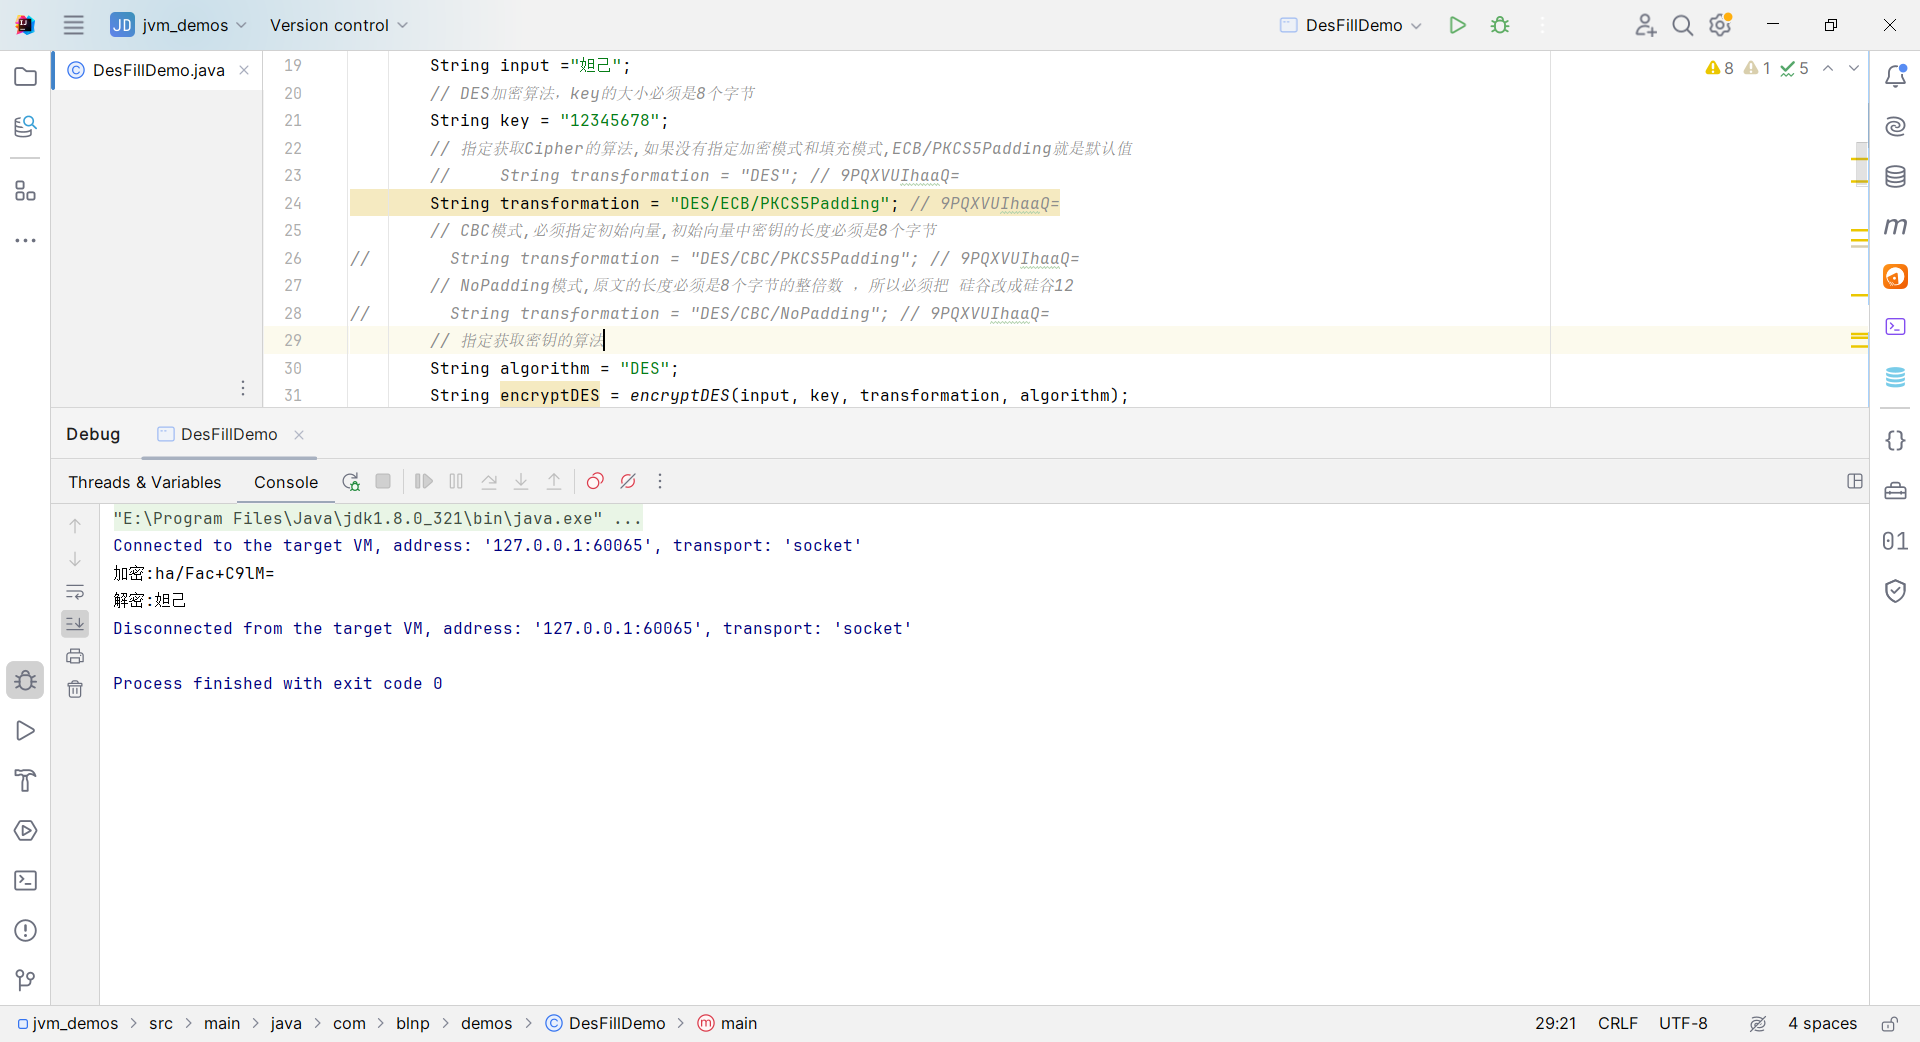
        // 指定获取Cipher的算法,如果没有指定加密模式和填充模式,ECB/PKCS5Padding就是默认值
        //     String transformation = "DES"; // 9PQXVUIhaaQ=
        String transformation = "DES/ECB/PKCS5Padding"; // 9PQXVUIhaaQ=
        // CBC模式,必须指定初始向量,初始向量中密钥的长度必须是8个字节
//        String transformation = "DES/CBC/PKCS5Padding"; // 9PQXVUIhaaQ=
        // NoPadding模式,原文的长度必须是8个字节的整倍数 ,所以必须把 硅谷改成硅谷12
//        String transformation = "DES/CBC/NoPadding"; // 9PQXVUIhaaQ=
        // 指定获取密钥的算法
        String algorithm = "DES";
        String encryptDES = encryptDES(input, key, transformation, algorithm);
        System.out.println("加密:" + encryptDES);
        String s = dncryptDES(encryptDES, key, transformation, algorithm);
        System.out.println("解密:" + s);

    }

    /**
     * 使用DES加密数据
     *
     * @param input          : 原文
     * @param key            : 密钥(DES,密钥的长度必须是8个字节)
     * @param transformation : 获取Cipher对象的算法
     * @param algorithm      : 获取密钥的算法
     * @return : 密文
     * @throws Exception
     */
    private static String encryptDES(String input, String key, String transformation, String algorithm) throws Exception {
        // 获取加密对象
        Cipher cipher = Cipher.getInstance(transformation);
        // 创建加密规则
        // 第一个参数key的字节
        // 第二个参数表示加密算法
        SecretKeySpec sks = new SecretKeySpec(key.getBytes(), algorithm);
        // ENCRYPT_MODE:加密模式
        // DECRYPT_MODE: 解密模式
        // 初始向量,参数表示跟谁进行异或,初始向量的长度必须是8位
//        IvParameterSpec iv = new IvParameterSpec(key.getBytes());
        // 初始化加密模式和算法
        cipher.init(Cipher.ENCRYPT_MODE,sks);
        // 加密
        byte[] bytes = cipher.doFinal(input.getBytes());

        // 输出加密后的数据
        String encode = Base64.encode(bytes);

        return encode;
    }

    /**
     * 使用DES解密
     *
     * @param input          : 密文
     * @param key            : 密钥
     * @param transformation : 获取Cipher对象的算法
     * @param algorithm      : 获取密钥的算法
     * @throws Exception
     * @return: 原文
     */
    private static String dncryptDES(String input, String key, String transformation, String algorithm) throws Exception {
        // 1,获取Cipher对象
        Cipher cipher = Cipher.getInstance(transformation);
        // 指定密钥规则
        SecretKeySpec sks = new SecretKeySpec(key.getBytes(), algorithm);
//        IvParameterSpec iv = new IvParameterSpec(key.getBytes());
        cipher.init(Cipher.DECRYPT_MODE, sks);
        // 3. 解密
        byte[] bytes = cipher.doFinal(Base64.decode(input));

        return new String(bytes);
    }
}
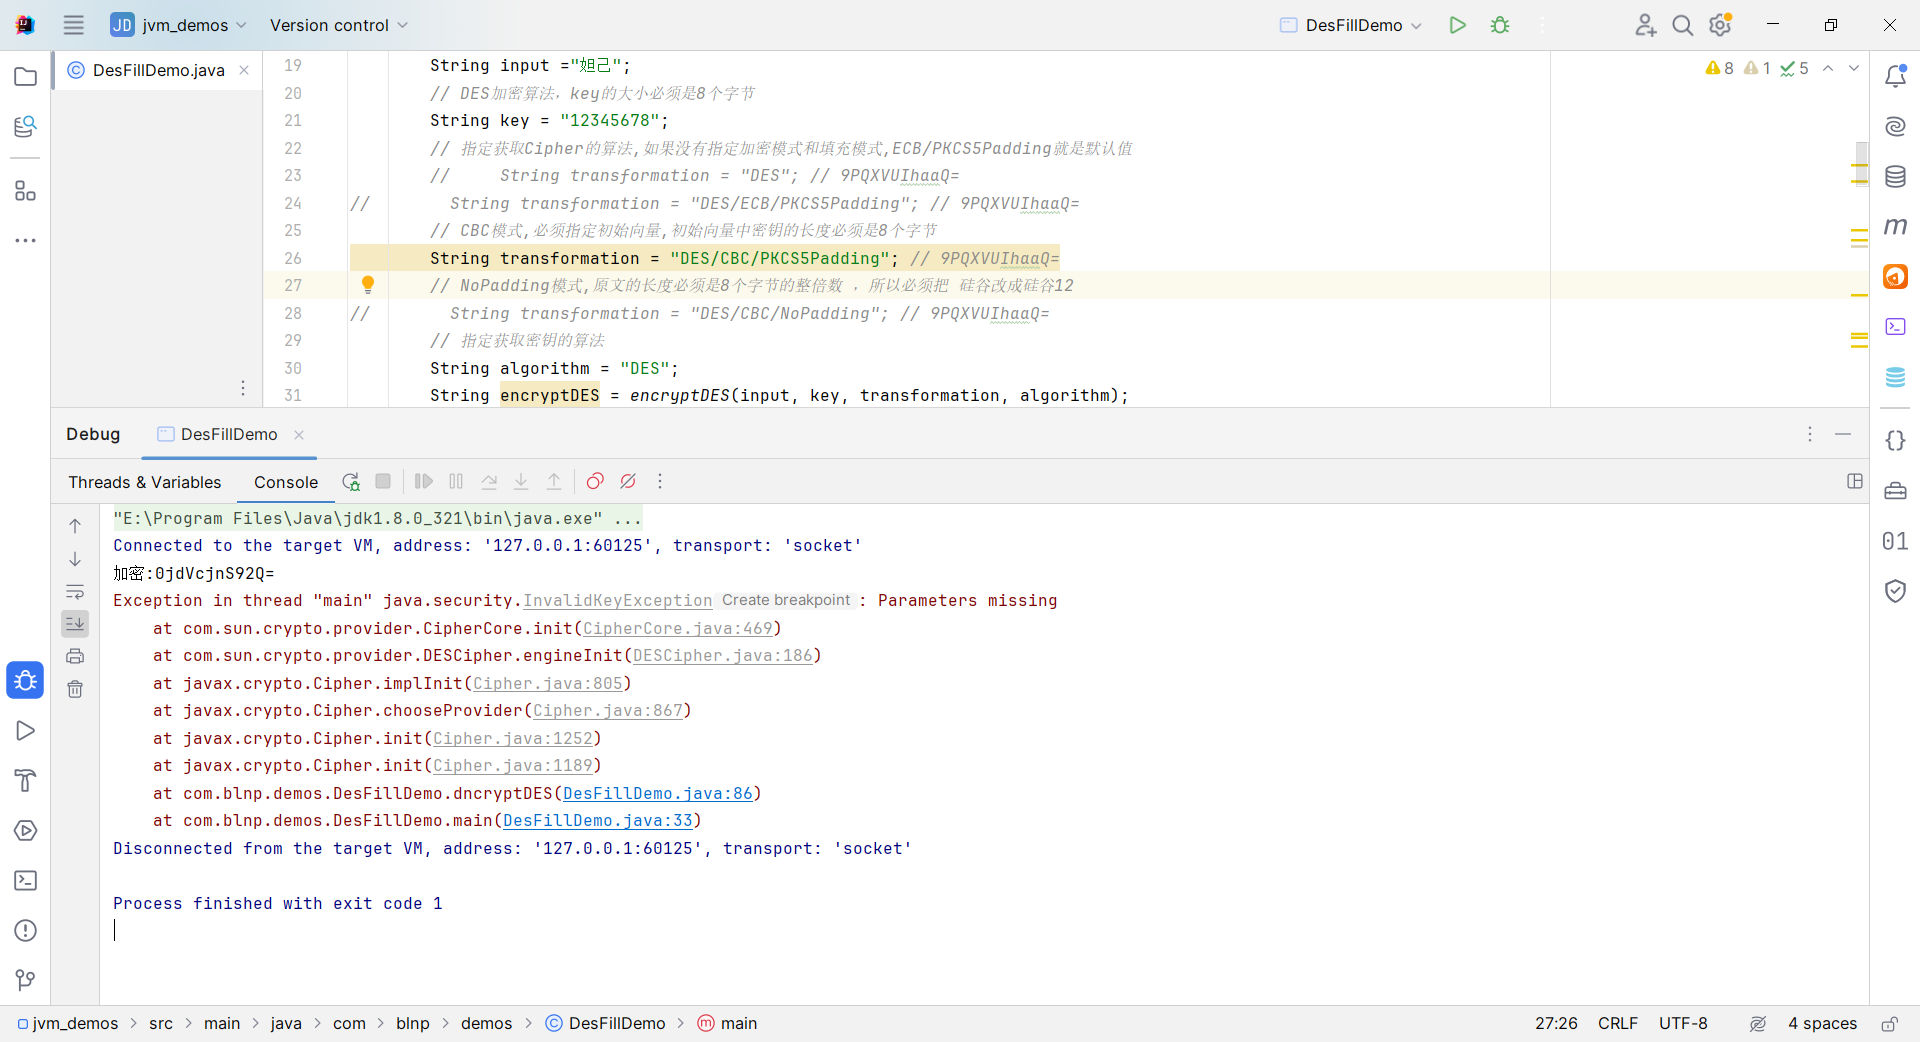
修改成 CBC 加密 模式,执行程序输出以下错误信息:
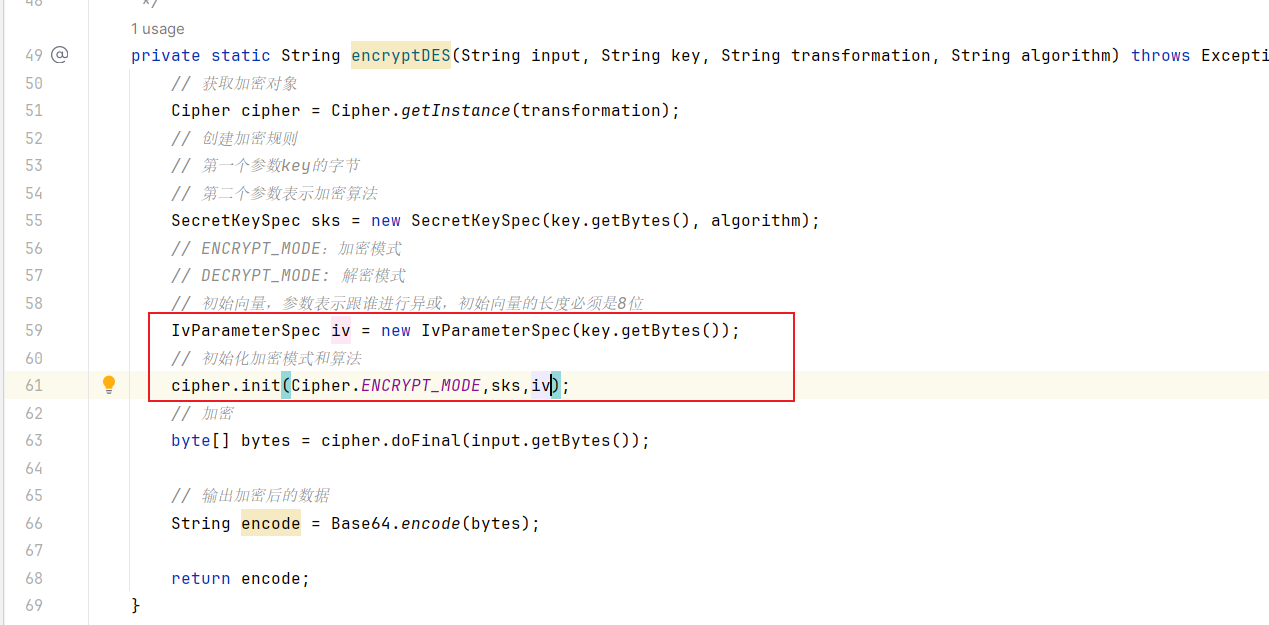
根据提示以及接口要求可知,我们需要对加解密方法新增向量参数。如下所示:
修改填充模式:
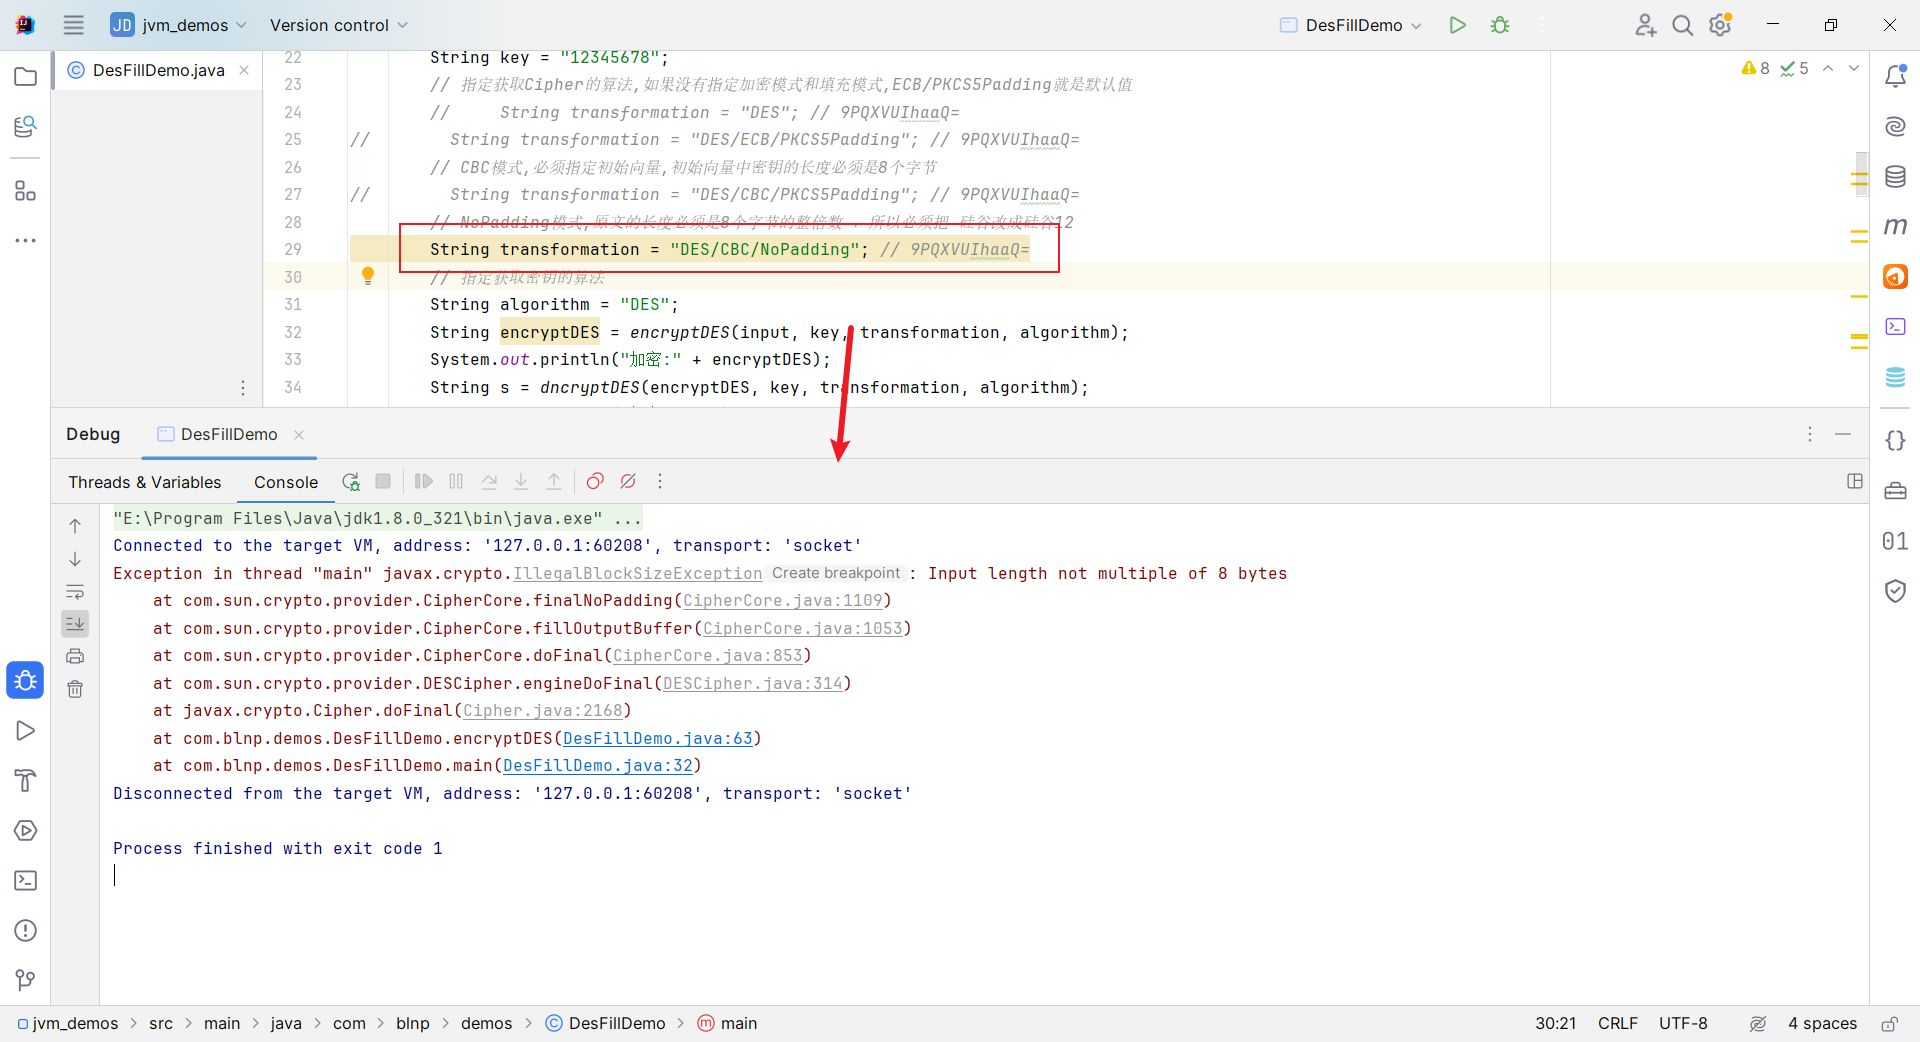
运行报错 NoPadding 这种填充模式 原文必须是8个字节的整倍数。
9、消息摘要
9.1、特点
无论输入的消息有多长,计算出来的消息摘要的长度总是固定的。例如应用MD5算法摘要的消息有128个比特位,用SHA-1算法摘要的消息最终有160比特位的输出。
只要输入的消息不同,对其进行摘要以后产生的摘要消息也必不相同;但相同的输入必会产生相同的输出。消息摘要是单向、不可逆的,常见算法 :
- MD5
- SHA1
- SHA256
- SHA512 百度搜索 tomcat ,进入官网下载 ,会经常发现有 sha1,sha512 , 这些都是数字摘要。
9.2、获取字符串消息摘要
package com.blnp.demos;

import java.security.MessageDigest;

/**
 * <p></p>
 *
 * @author lyb [email protected]
 * @version 1.0
 * @since 2024/12/8/008 0:32
 */
public class DigestDemo1 {

    public static void main(String[] args) throws Exception{
        // 原文
        String input = "aa";
        // 算法
        String algorithm = "MD5";
        // 获取数字摘要对象
        MessageDigest messageDigest = MessageDigest.getInstance(algorithm);
        // 获取消息数字摘要的字节数组
        byte[] digest = messageDigest.digest(input.getBytes());
        System.out.println(new String(digest));
    }
}
9.3、base64 编码
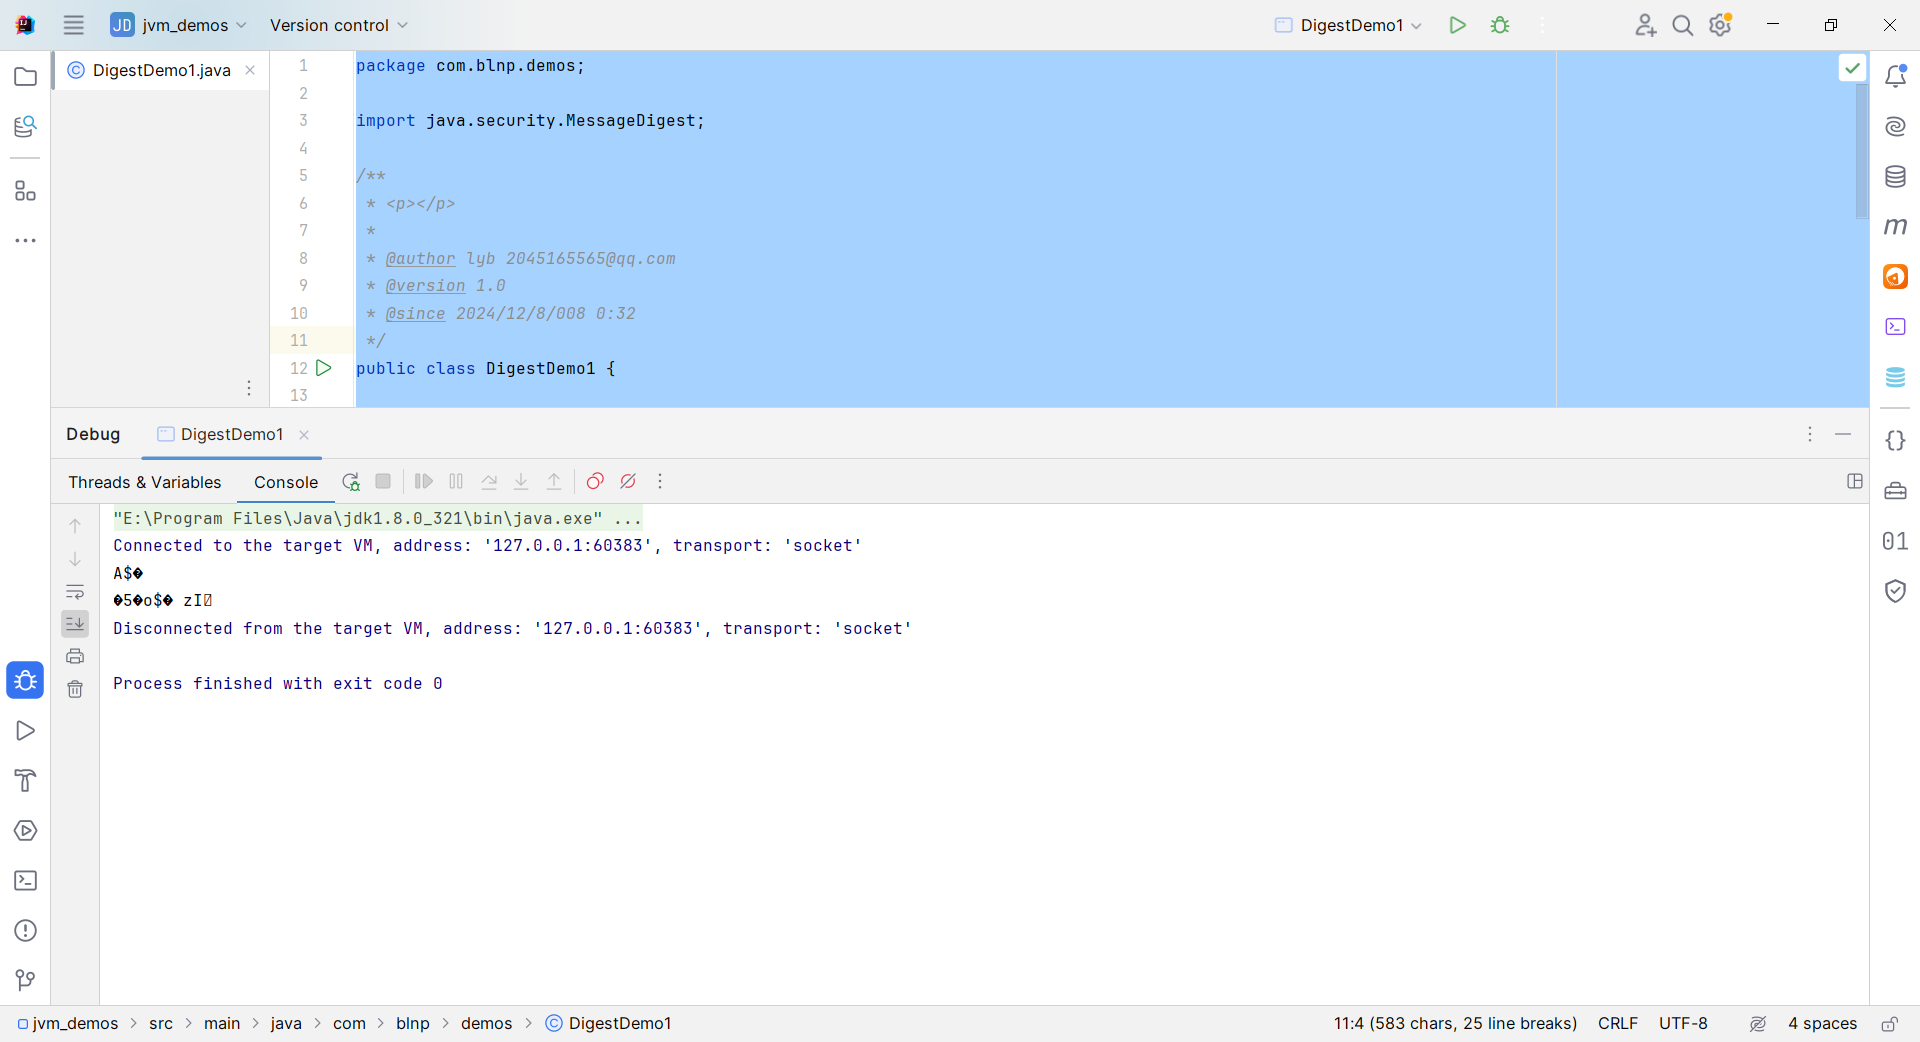
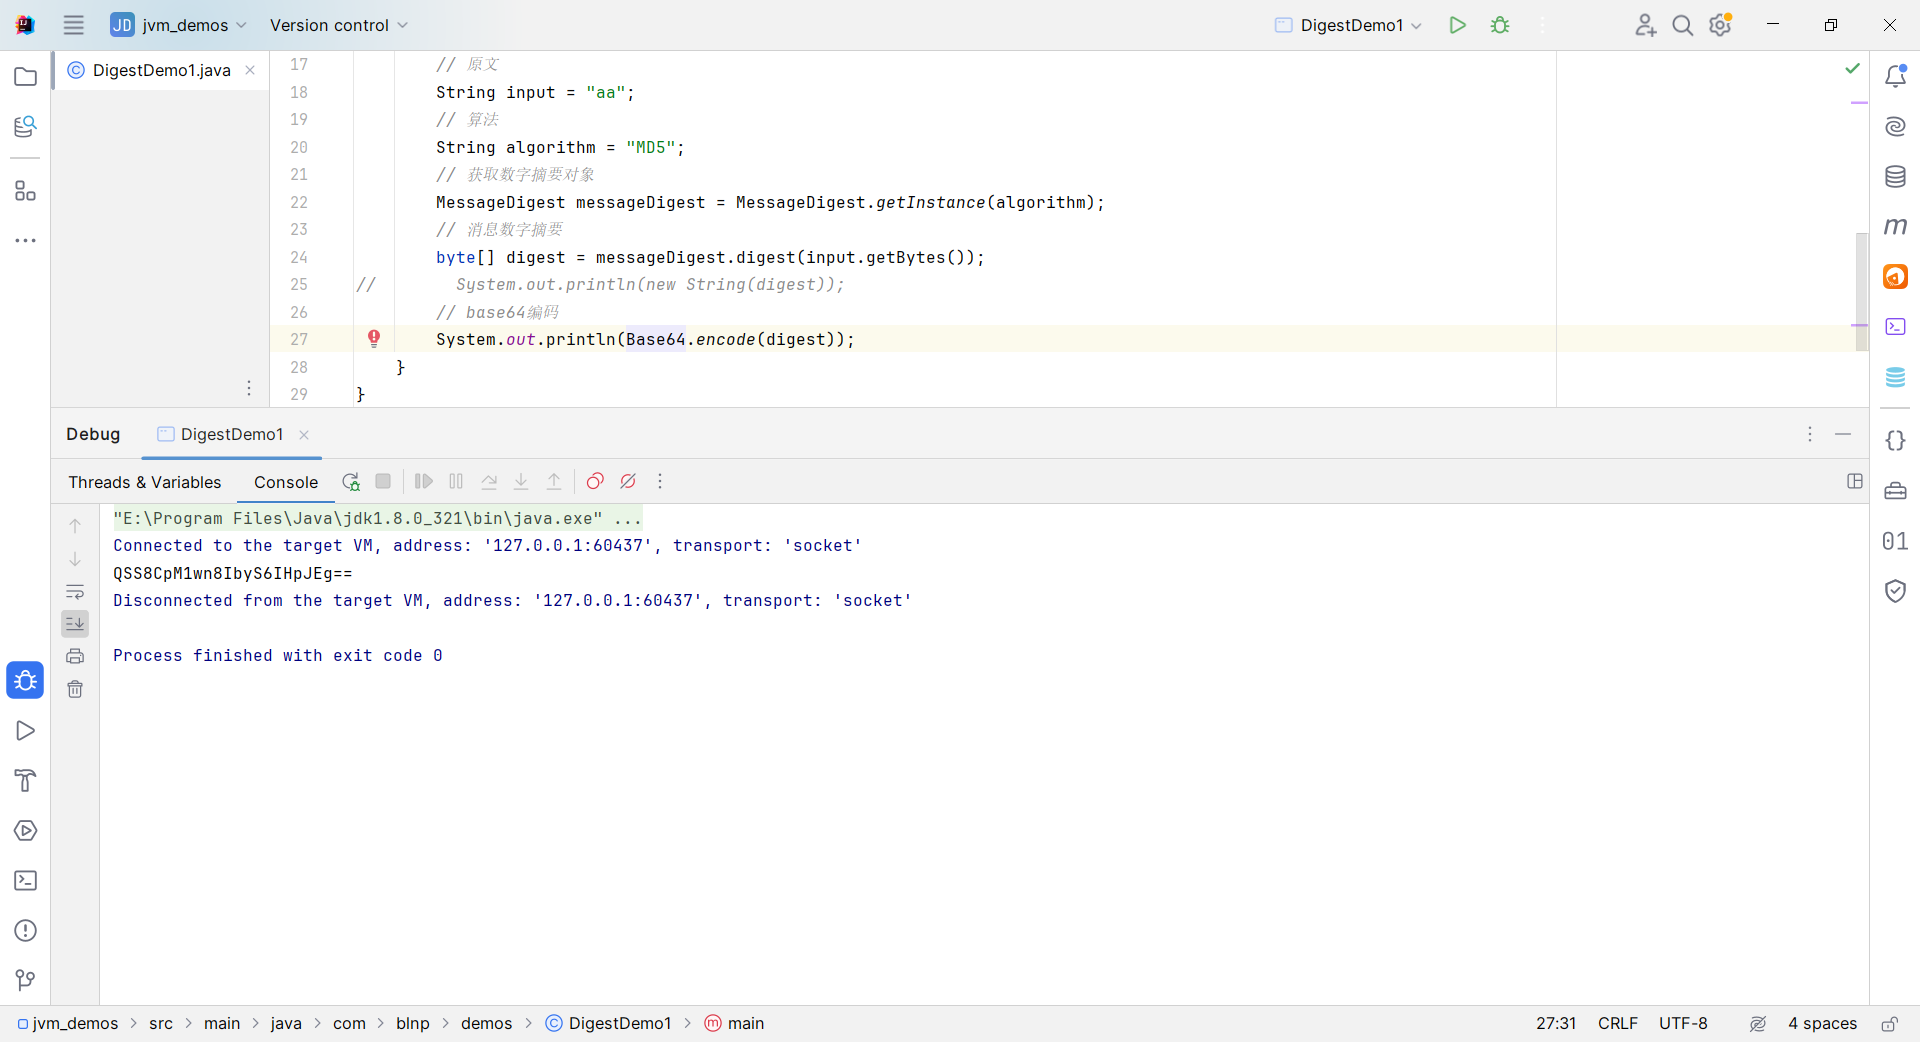
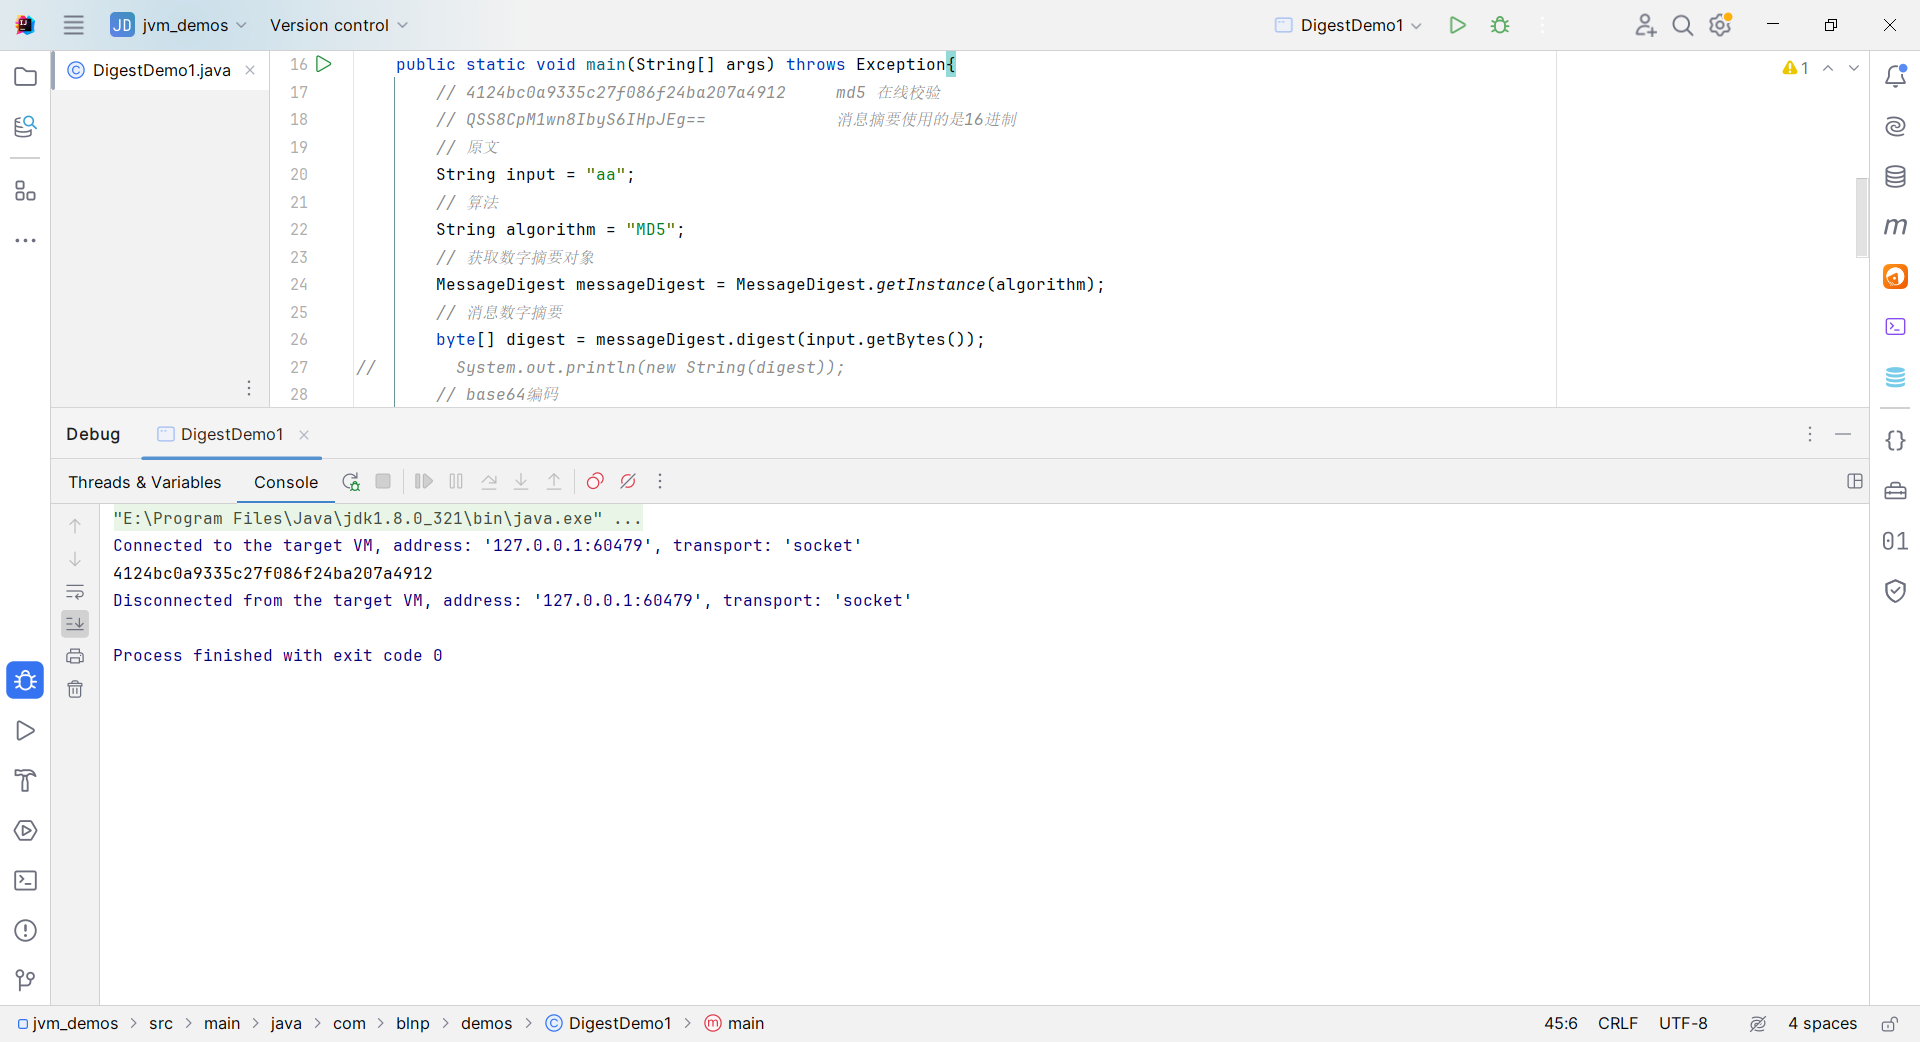
使用在线 md5 加密 ,发现我们生成的值和代码生成的值不一样,那是因为消息摘要不是使用base64进行编码的,所以我们需要把值转成16进制。
数字摘要转换成 16 进制:
// 4124bc0a9335c27f086f24ba207a4912     md5 在线校验
// QSS8CpM1wn8IbyS6IHpJEg==             消息摘要使用的是16进制
package com.blnp.demos;
import com.sun.org.apache.xerces.internal.impl.dv.util.Base64;
import java.security.MessageDigest;
/**
* <p></p>
*
* @author lyb [email protected]
* @version 1.0
* @since 2024/12/8/008 0:32
*/
public class DigestDemo1 {
public static void main(String[] args) throws Exception{
// 4124bc0a9335c27f086f24ba207a4912 md5 在线校验
// QSS8CpM1wn8IbyS6IHpJEg== 消息摘要使用的是16进制
// 原文
String input = "aa";
// 算法
String algorithm = "MD5";
// 获取数字摘要对象
MessageDigest messageDigest = MessageDigest.getInstance(algorithm);
// 消息数字摘要
byte[] digest = messageDigest.digest(input.getBytes());
// System.out.println(new String(digest));
// base64编码
// System.out.println(Base64.encode(digest));
// 创建对象用来拼接
StringBuilder sb = new StringBuilder();
for (byte b : digest) {
// 转成 16进制
String s = Integer.toHexString(b & 0xff);
//System.out.println(s);
if (s.length() == 1){
// 如果生成的字符只有一个,前面补0
s = "0"+s;
}
sb.append(s);
}
System.out.println(sb.toString());
}
}
9.4、其它数字摘要算法
package com.blnp.demos;

import com.sun.org.apache.xerces.internal.impl.dv.util.Base64;

import java.security.MessageDigest;

/**
 * <p></p>
 *
 * @author lyb [email protected]
 * @version 1.0
 * @since 2024/12/8/008 0:32
 */
public class DigestDemo1 {

    public static void main(String[] args) throws Exception{
        // 4124bc0a9335c27f086f24ba207a4912     md5 在线校验
        // QSS8CpM1wn8IbyS6IHpJEg==             消息摘要使用的是16进制
        // 原文
        String input = "aa";
        // 算法
        String algorithm = "MD5";
        // 获取数字摘要对象
        String md5 = getDigest(input, "MD5");
        System.out.println(md5);

        String sha1 = getDigest(input, "SHA-1");
        System.out.println(sha1);

        String sha256 = getDigest(input, "SHA-256");
        System.out.println(sha256);

        String sha512 = getDigest(input, "SHA-512");
        System.out.println(sha512);


    }

    private static String toHex(byte[] digest) throws Exception {

//        System.out.println(new String(digest));
        // base64编码
//        System.out.println(Base64.encode(digest));
        // 创建对象用来拼接
        StringBuilder sb = new StringBuilder();

        for (byte b : digest) {
            // 转成 16进制
            String s = Integer.toHexString(b & 0xff);
            if (s.length() == 1){
                // 如果生成的字符只有一个,前面补0
                s = "0"+s;
            }
            sb.append(s);
        }
        System.out.println("16进制数据的长度:" + sb.toString().getBytes().length);
        return sb.toString();
    }

    private static String getDigest(String input, String algorithm) throws Exception {
        MessageDigest messageDigest = MessageDigest.getInstance(algorithm);
        // 消息数字摘要
        byte[] digest = messageDigest.digest(input.getBytes());
        System.out.println("密文的字节长度:" + digest.length);

        return toHex(digest);
    }
}
9.5、获得文件消息摘要
public class DigestDemo {

    public static void main(String[] args) throws Exception{
        String input = "aa";
        String algorithm = "MD5";

        // sha1 可以实现秒传功能

        String sha1 = getDigestFile("apache-tomcat-9.0.10-windows-x64.zip", "SHA-1");
        System.out.println(sha1);

        String sha512 = getDigestFile("apache-tomcat-9.0.10-windows-x64.zip", "SHA-512");
        System.out.println(sha512);

        String md5 = getDigest("aa", "MD5");
        System.out.println(md5);

        String md51 = getDigest("aa ", "MD5");
        System.out.println(md51);
    }

    private static String getDigestFile(String filePath, String algorithm) throws Exception{
        FileInputStream fis = new FileInputStream(filePath);
        int len;
        byte[] buffer = new byte[1024];
        ByteArrayOutputStream baos = new ByteArrayOutputStream();
        while ( (len =  fis.read(buffer))!=-1){
            baos.write(buffer,0,len);
        }
        // 获取消息摘要对象
        MessageDigest messageDigest = MessageDigest.getInstance(algorithm);
        // 获取消息摘要
        byte[] digest = messageDigest.digest(baos.toByteArray());
        System.out.println("密文的字节长度:"+digest.length);
        return toHex(digest);
    }

    private static String getDigest(String input, String algorithm) throws Exception{
        MessageDigest messageDigest = MessageDigest.getInstance(algorithm);
        byte[] digest = messageDigest.digest(input.getBytes());
        System.out.println("密文的字节长度:"+digest.length);
        return toHex(digest);
    }

    private static String toHex(byte[] digest) {
        //        System.out.println(new String(digest));
        // 消息摘要进行表示的时候,是用16进制进行表示
        StringBuilder sb = new StringBuilder();
        for (byte b : digest) {
            // 转成16进制

            String s = Integer.toHexString(b & 0xff);
            // 保持数据的完整性,前面不够的用0补齐
            if (s.length()==1){
                s="0"+s;
            }
            sb.append(s);
        }
        System.out.println("16进制数据的长度:"+ sb.toString().getBytes().length);
        return sb.toString();
    }
}
运行程序 ,获取
sha-1和sha-512的值
查看 tomcat 官网上面 sha-1 和 sha-512 的值
使用 sha-1 算法,可以实现秒传功能,不管咱们如何修改文件的名字,最后得到的值是一样的。
运行程序 ,获取 sha-1 和 sha-512 的值:
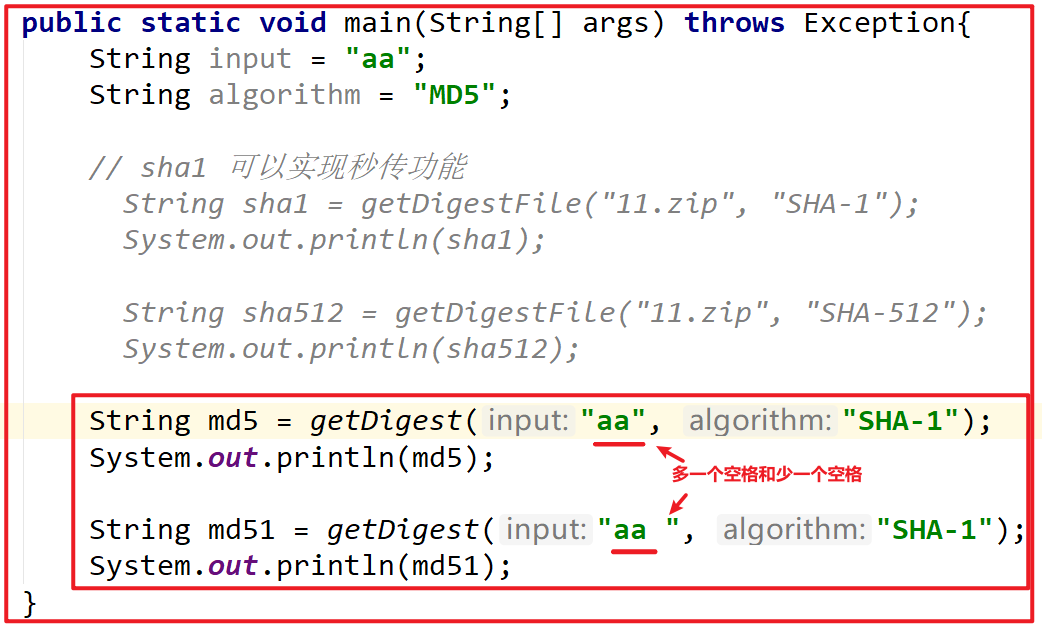
如果原文修改了,那么sha-1值 就会不一样:
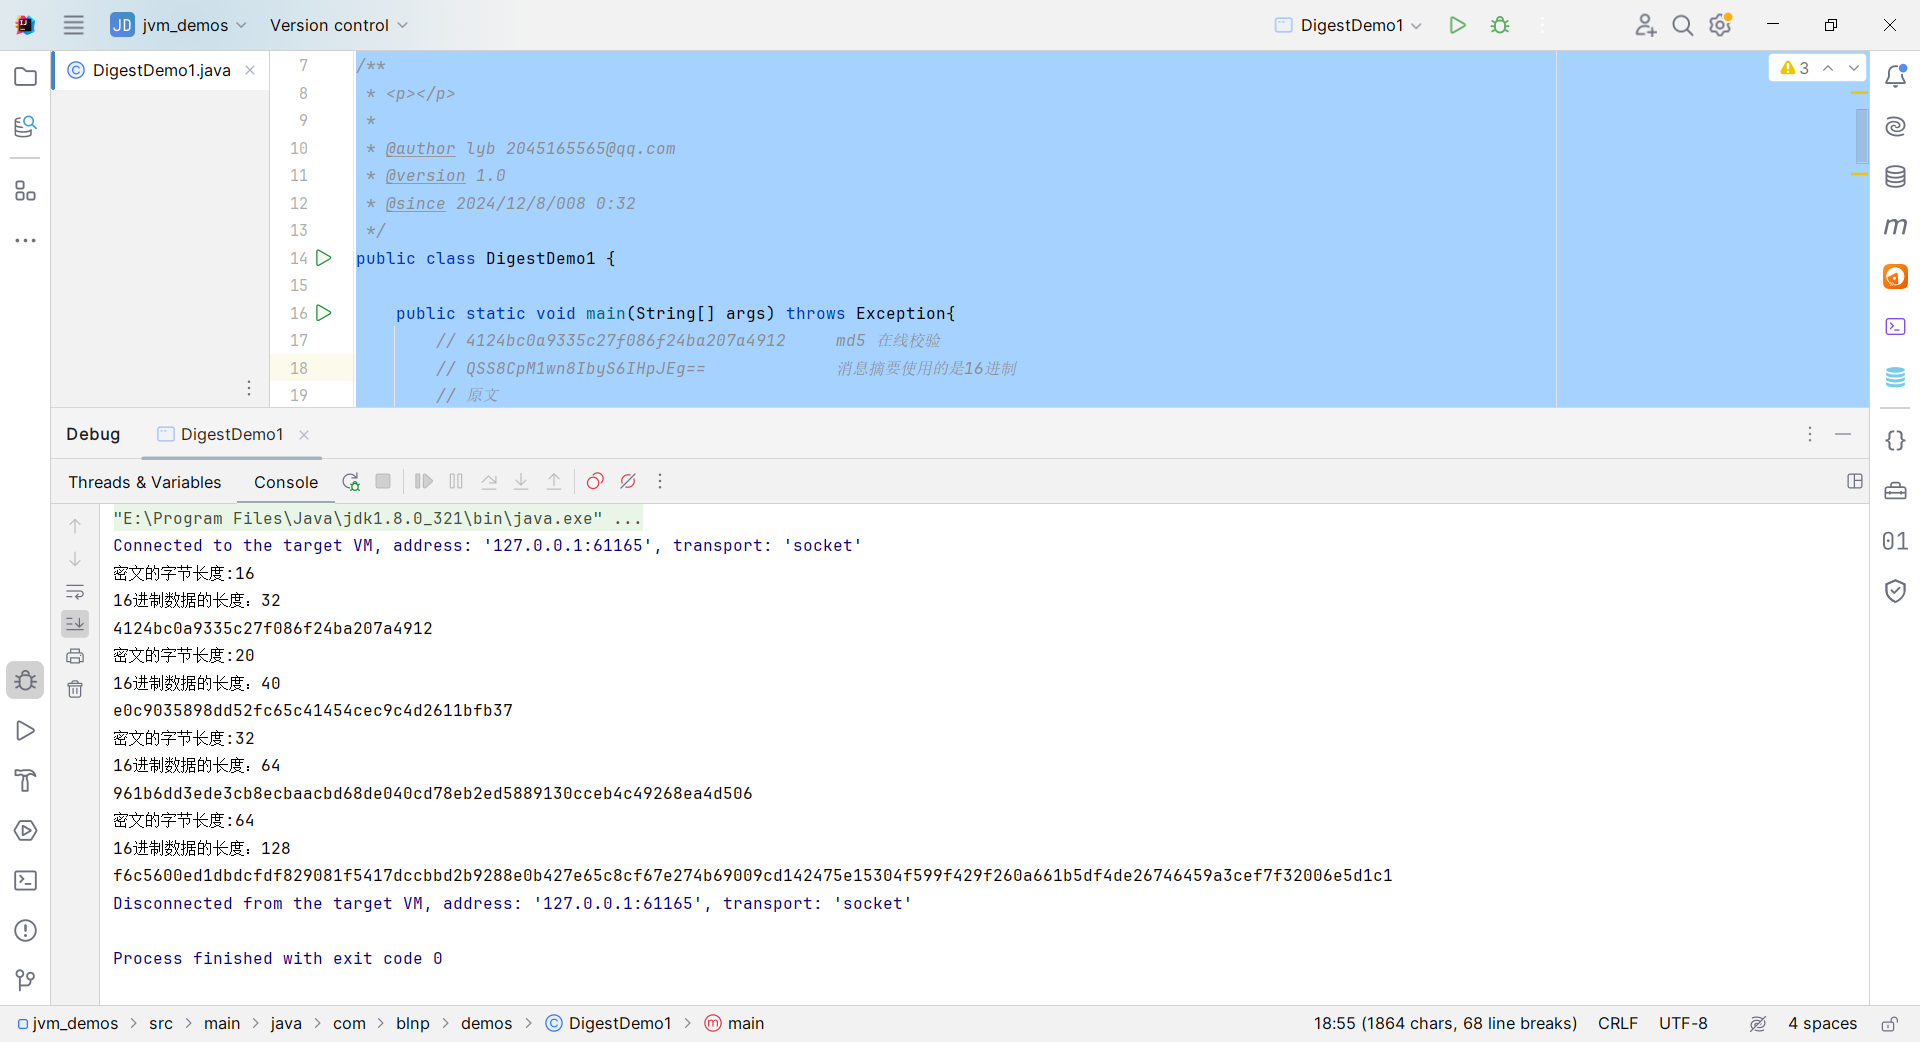
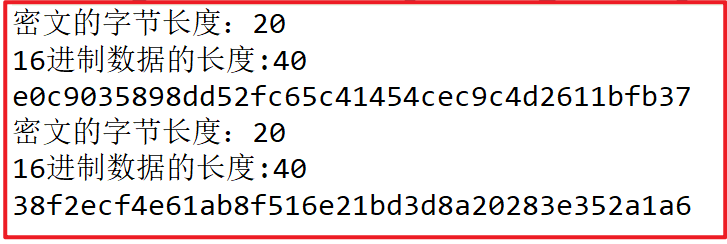
- MD5算法 : 摘要结果16个字节, 转16进制后32个字节
- SHA1算法 : 摘要结果20个字节, 转16进制后40个字节
- SHA256算法 : 摘要结果32个字节, 转16进制后64个字节
- SHA512算法 : 摘要结果64个字节, 转16进制后128个字节
10、非对称加密
10.1、简介
- 非对称加密算法又称
现代加密算法。 - 非对称加密是计算机通信安全的基石,保证了加密数据
不会被破解。 - 与对称加密算法不同,非对称加密算法需要两个密钥:
公开密钥(publickey)和私有密(privatekey) - 公开密钥和私有密钥是
一对 - 如果用
公开密钥对数据进行加密,只有用对应的私有密钥才能解密。 - 如果用
私有密钥对数据进行加密,只有用对应的公开密钥才能解密。 - 因为加密和解密使用的是两个
不同的密钥,所以这种算法叫作非对称加密算法。
举例:
- 首先生成密钥对, 公钥为(5,14), 私钥为(11,14)
- 现在A希望将原文2发送给B
- A使用公钥加密数据. 2的5次方mod 14 = 4 , 将密文4发送给B
- B使用私钥解密数据. 4的11次方mod14 = 2, 得到原文2
特点:
- 加密和解密使用不同的密钥
- 如果使用私钥加密, 只能使用公钥解密
- 如果使用公钥加密, 只能使用私钥解密
- 处理数据的速度较慢, 因为安全级别高
常见算法:
- RSA
- ECC
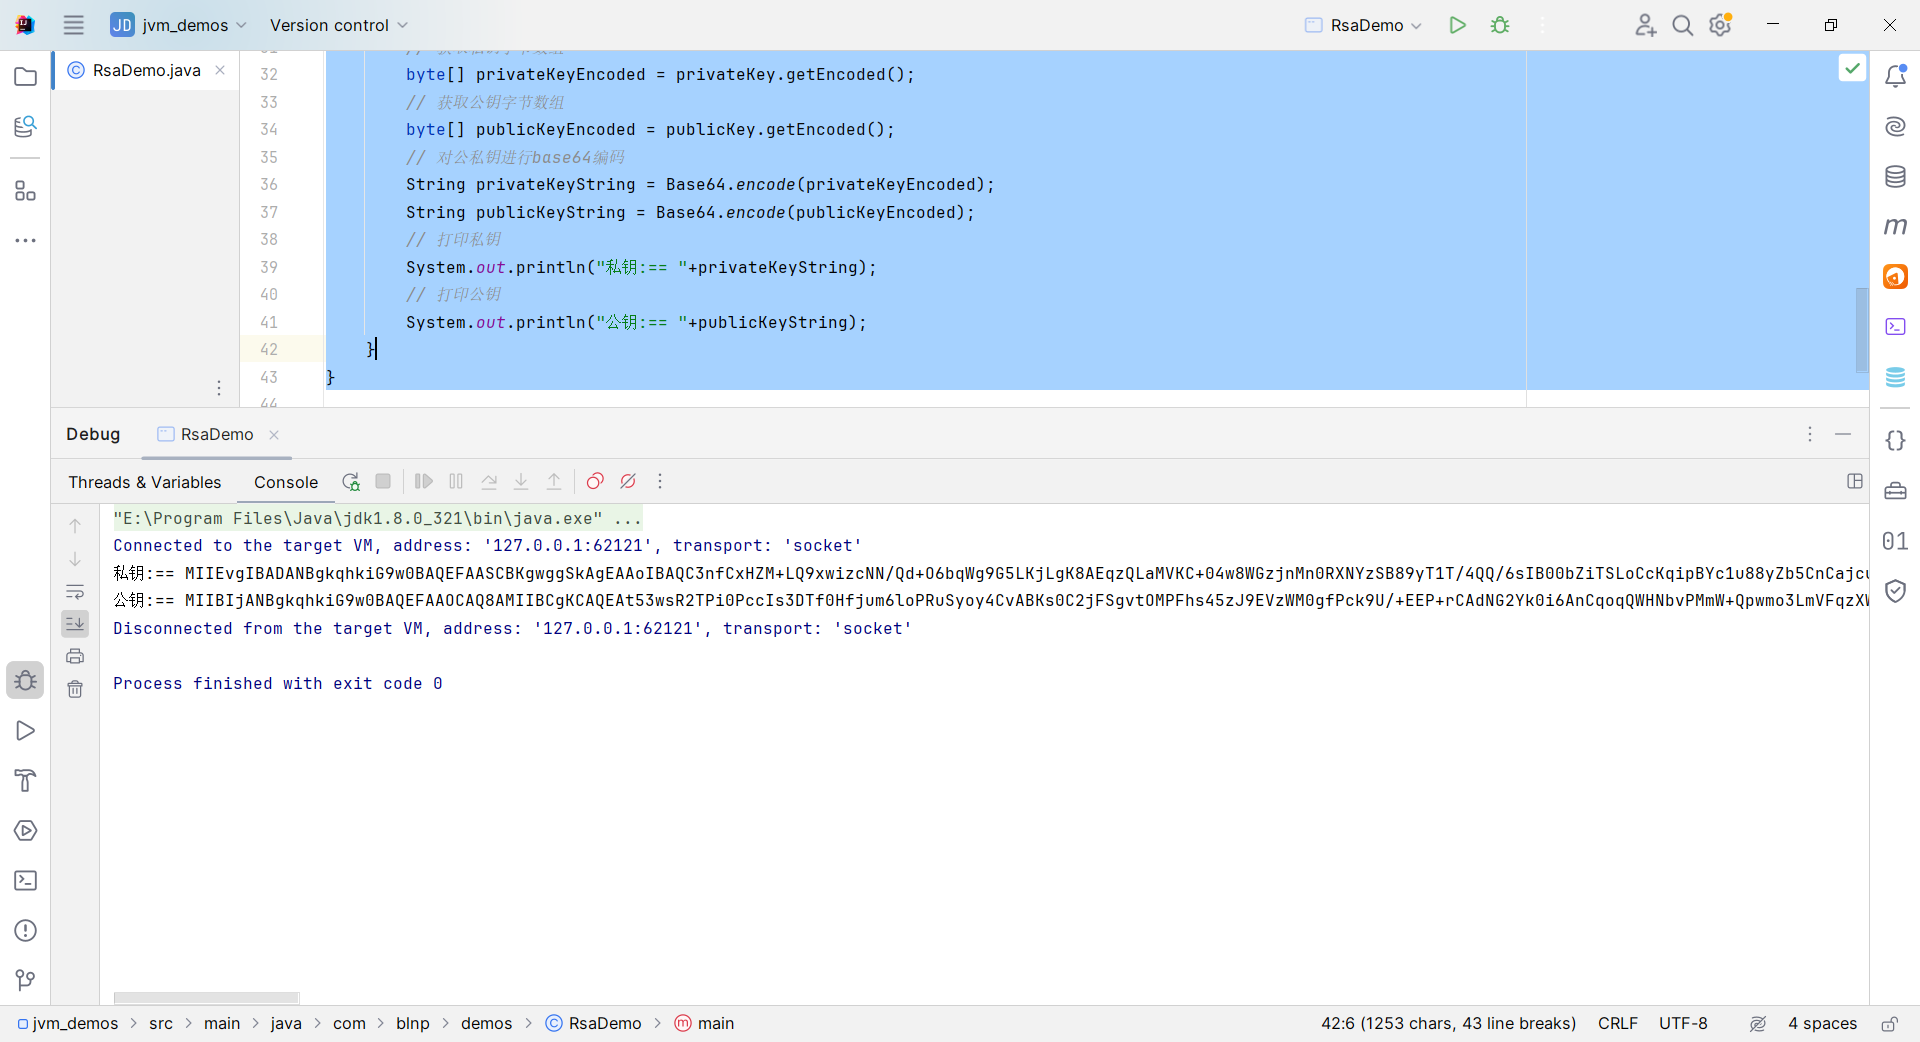
10.2、生成公钥和私钥
package com.blnp.demos;

import com.sun.org.apache.xerces.internal.impl.dv.util.Base64;

import java.security.KeyPair;
import java.security.KeyPairGenerator;
import java.security.PrivateKey;
import java.security.PublicKey;

/**
 * <p></p>
 *
 * @author lyb [email protected]
 * @version 1.0
 * @since 2024/12/8/008 12:03
 */
public class RsaDemo {

    public static void main(String[] args) throws Exception {

        // 加密算法
        String algorithm = "RSA";
        //  创建密钥对生成器对象
        KeyPairGenerator keyPairGenerator = KeyPairGenerator.getInstance(algorithm);
        // 生成密钥对
        KeyPair keyPair = keyPairGenerator.generateKeyPair();
        // 生成私钥
        PrivateKey privateKey = keyPair.getPrivate();
        // 生成公钥
        PublicKey publicKey = keyPair.getPublic();
        // 获取私钥字节数组
        byte[] privateKeyEncoded = privateKey.getEncoded();
        // 获取公钥字节数组
        byte[] publicKeyEncoded = publicKey.getEncoded();
        // 对公私钥进行base64编码
        String privateKeyString = Base64.encode(privateKeyEncoded);
        String publicKeyString = Base64.encode(publicKeyEncoded);
        // 打印私钥
        System.out.println("私钥:== "+privateKeyString);
        // 打印公钥
        System.out.println("公钥:== "+publicKeyString);
    }
}
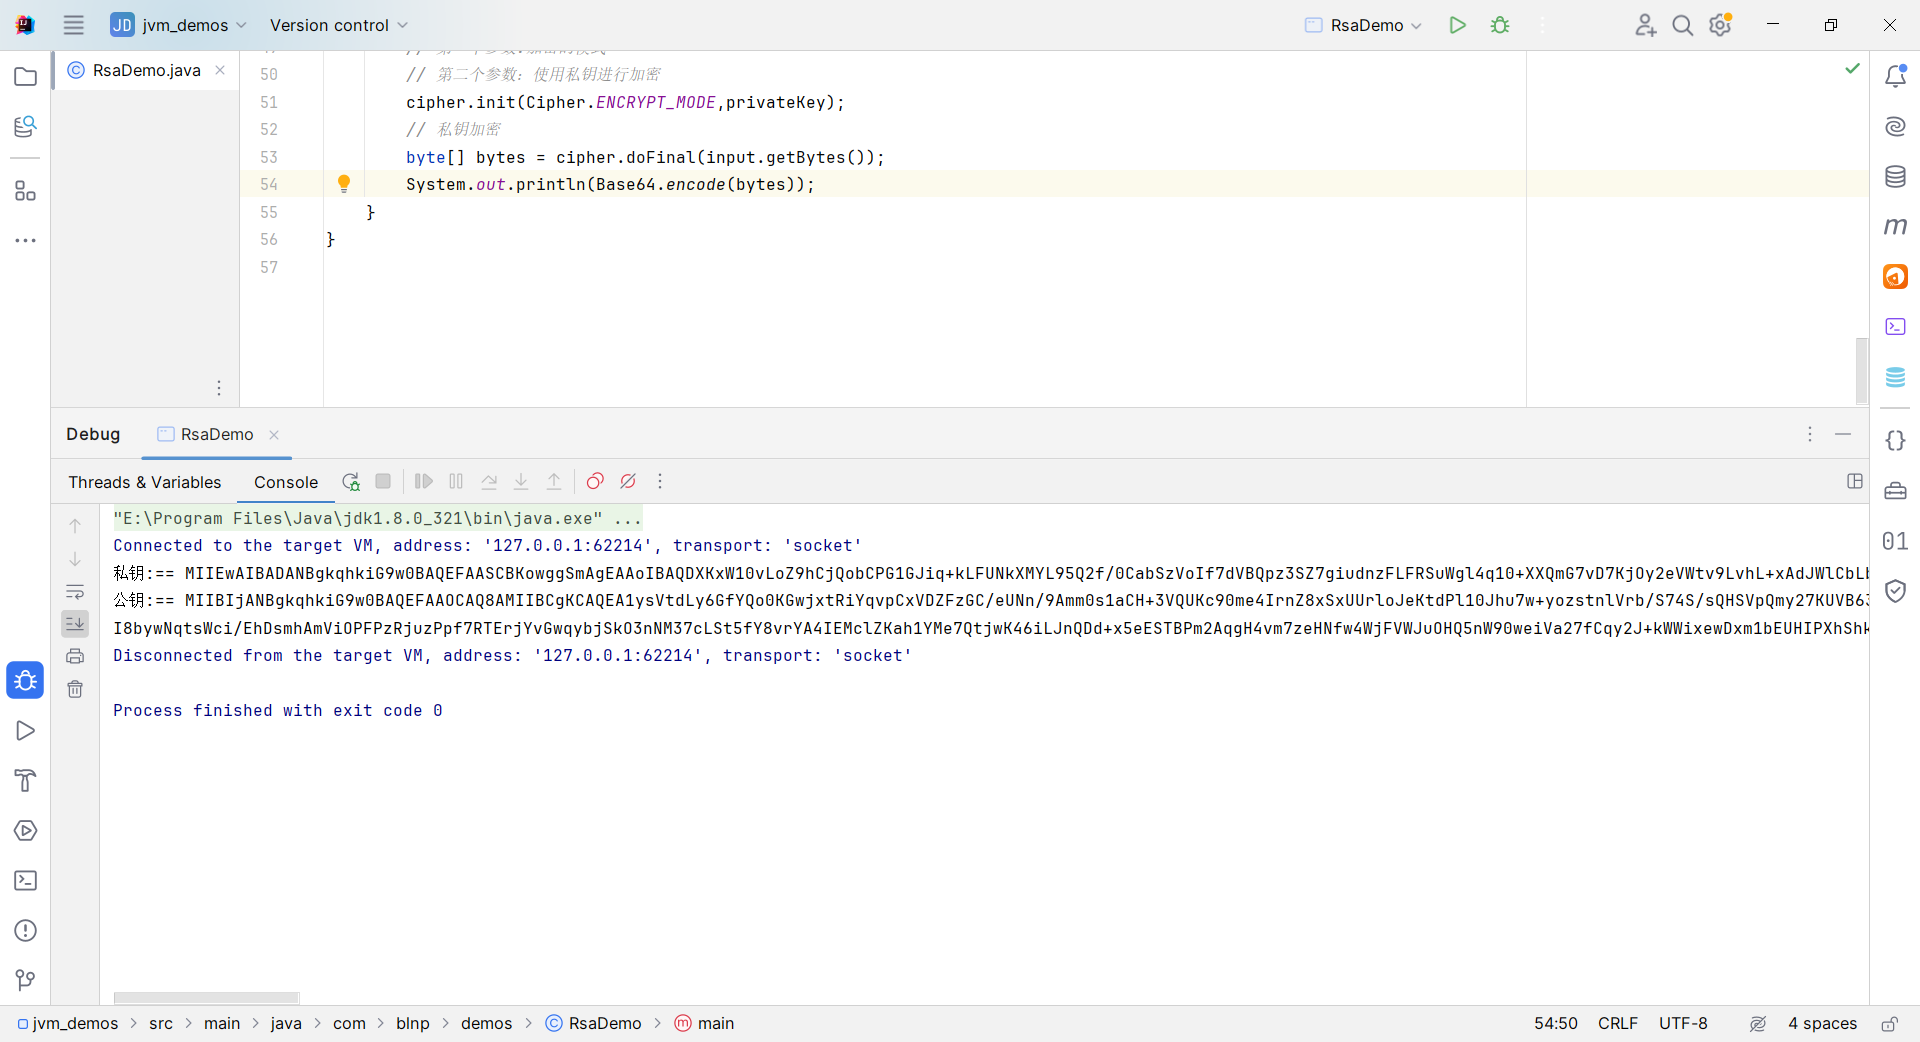
10.3、私钥加密
public static void main(String[] args) throws Exception {

        // 加密算法
        String algorithm = "RSA";
        //  创建密钥对生成器对象
        KeyPairGenerator keyPairGenerator = KeyPairGenerator.getInstance(algorithm);
        // 生成密钥对
        KeyPair keyPair = keyPairGenerator.generateKeyPair();
        // 生成私钥
        PrivateKey privateKey = keyPair.getPrivate();
        // 生成公钥
        PublicKey publicKey = keyPair.getPublic();
        // 获取私钥字节数组
        byte[] privateKeyEncoded = privateKey.getEncoded();
        // 获取公钥字节数组
        byte[] publicKeyEncoded = publicKey.getEncoded();
        // 对公私钥进行base64编码
        String privateKeyString = Base64.encode(privateKeyEncoded);
        String publicKeyString = Base64.encode(publicKeyEncoded);
        // 打印私钥
        System.out.println("私钥:== "+privateKeyString);
        // 打印公钥
        System.out.println("公钥:== "+publicKeyString);

        String input = "妲己";
        // 创建加密对象
        // 参数表示加密算法
        Cipher cipher = Cipher.getInstance(algorithm);
        // 初始化加密
        // 第一个参数:加密的模式
        // 第二个参数:使用私钥进行加密
        cipher.init(Cipher.ENCRYPT_MODE,privateKey);
        // 私钥加密
        byte[] bytes = cipher.doFinal(input.getBytes());
        System.out.println(Base64.encode(bytes));
    }
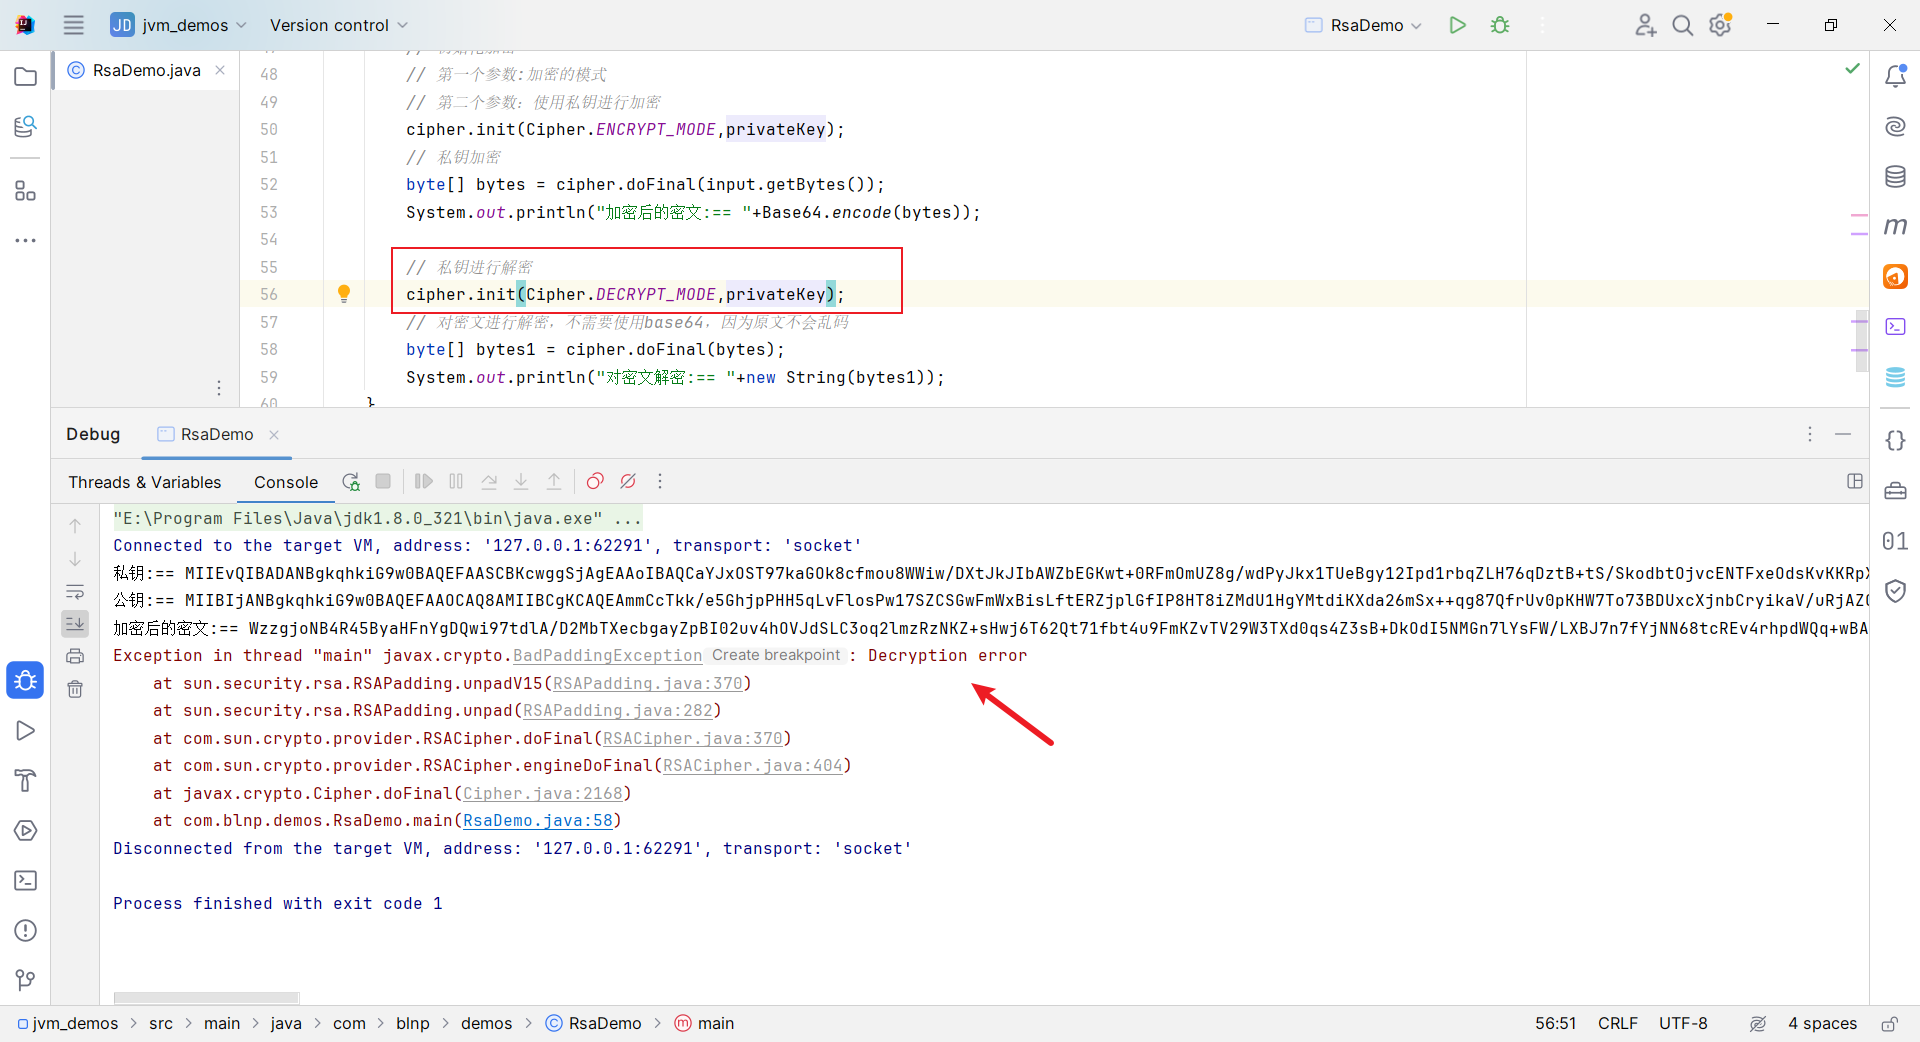
10.4、私钥加密私钥解密
public static void main(String[] args) throws Exception {
        // 加密算法
        String algorithm = "RSA";
        //  创建密钥对生成器对象
        KeyPairGenerator keyPairGenerator = KeyPairGenerator.getInstance(algorithm);
        // 生成密钥对
        KeyPair keyPair = keyPairGenerator.generateKeyPair();
        // 生成私钥
        PrivateKey privateKey = keyPair.getPrivate();
        // 生成公钥
        PublicKey publicKey = keyPair.getPublic();
        // 获取私钥字节数组
        byte[] privateKeyEncoded = privateKey.getEncoded();
        // 获取公钥字节数组
        byte[] publicKeyEncoded = publicKey.getEncoded();
        // 对公私钥进行base64编码
        String privateKeyString = Base64.encode(privateKeyEncoded);
        String publicKeyString = Base64.encode(publicKeyEncoded);
        // 打印私钥
        System.out.println("私钥:== "+privateKeyString);
        // 打印公钥
        System.out.println("公钥:== "+publicKeyString);

        String input = "妲己";
        // 创建加密对象
        // 参数表示加密算法
        Cipher cipher = Cipher.getInstance(algorithm);
        // 初始化加密
        // 第一个参数:加密的模式
        // 第二个参数:使用私钥进行加密
        cipher.init(Cipher.ENCRYPT_MODE,privateKey);
        // 私钥加密
        byte[] bytes = cipher.doFinal(input.getBytes());
        System.out.println("加密后的密文:== "+Base64.encode(bytes));

        // 私钥进行解密
        cipher.init(Cipher.DECRYPT_MODE,publicKey);
        // 对密文进行解密,不需要使用base64,因为原文不会乱码
        byte[] bytes1 = cipher.doFinal(bytes);
        System.out.println("对密文解密:== "+new String(bytes1));
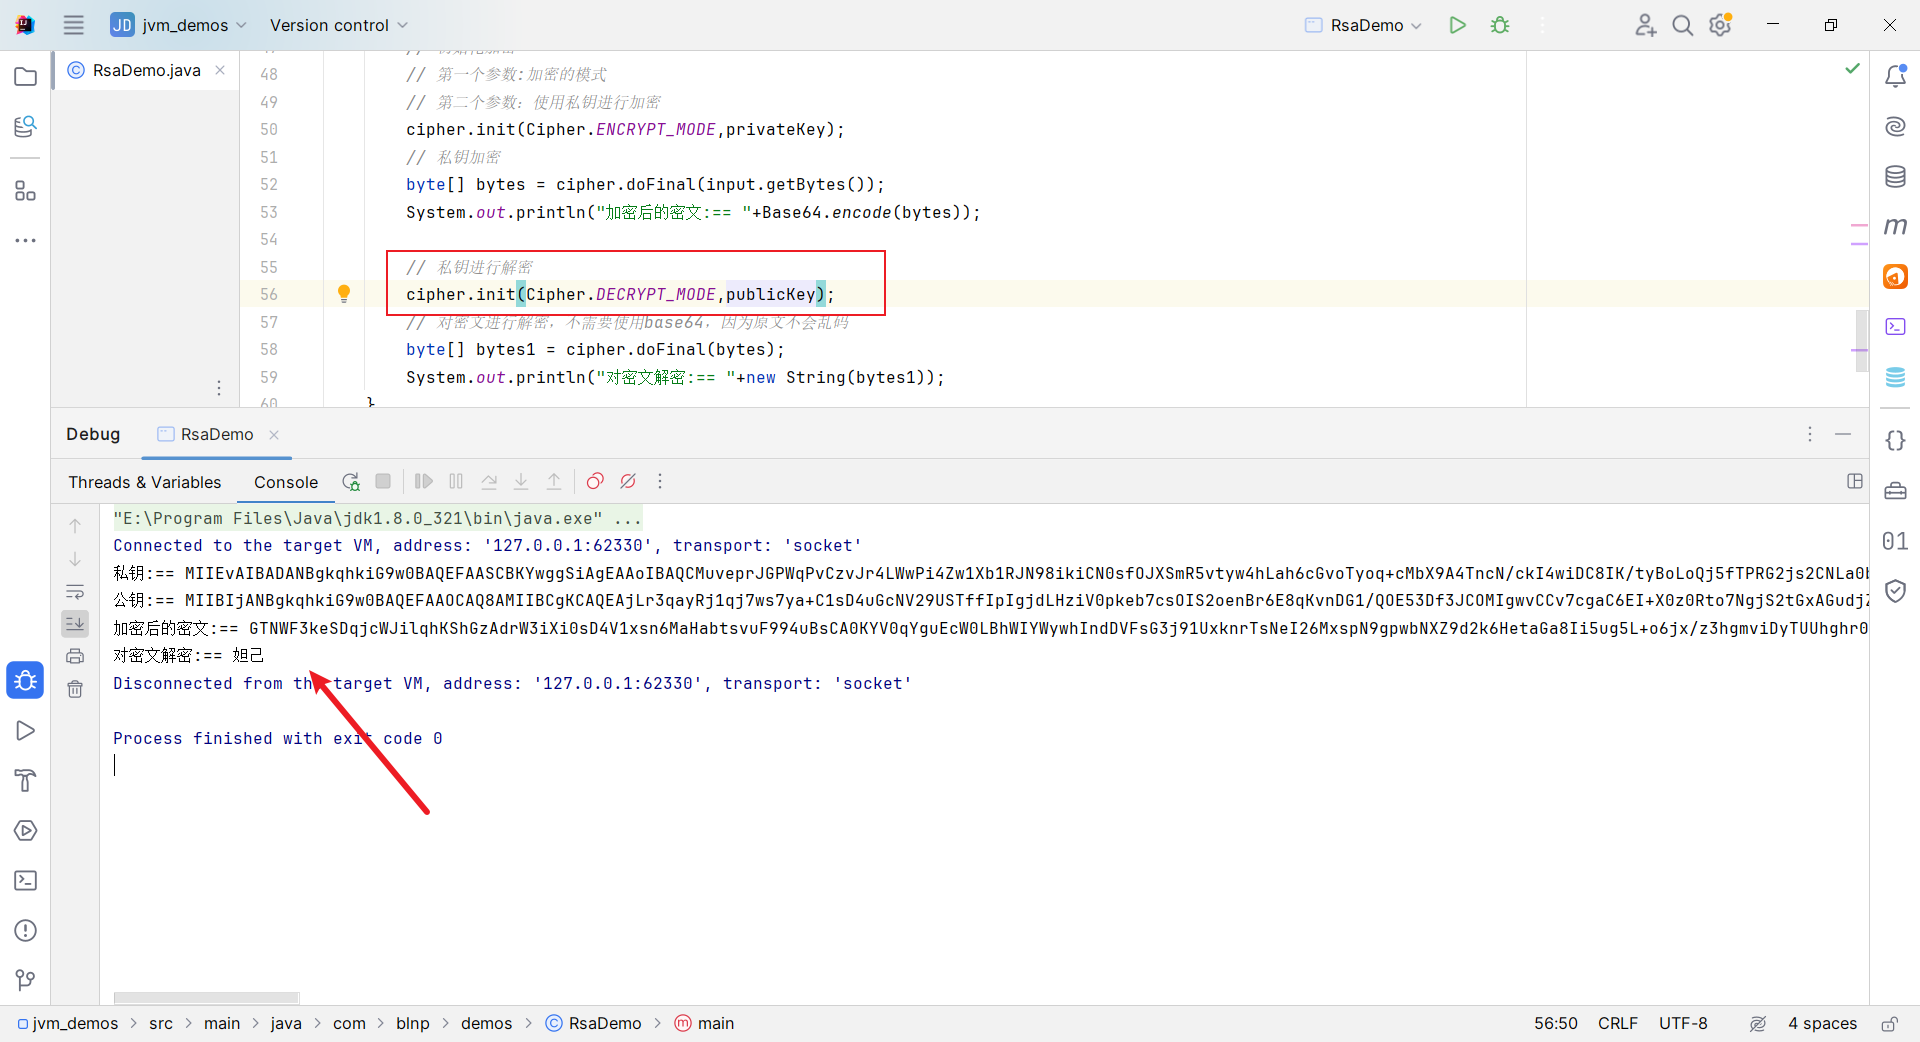
    }
因为私钥加密,只能公钥解密。
10.5、私钥加密公钥解密
10.6、公钥加密和公钥解密
一样会报错,是无法正常解析的。
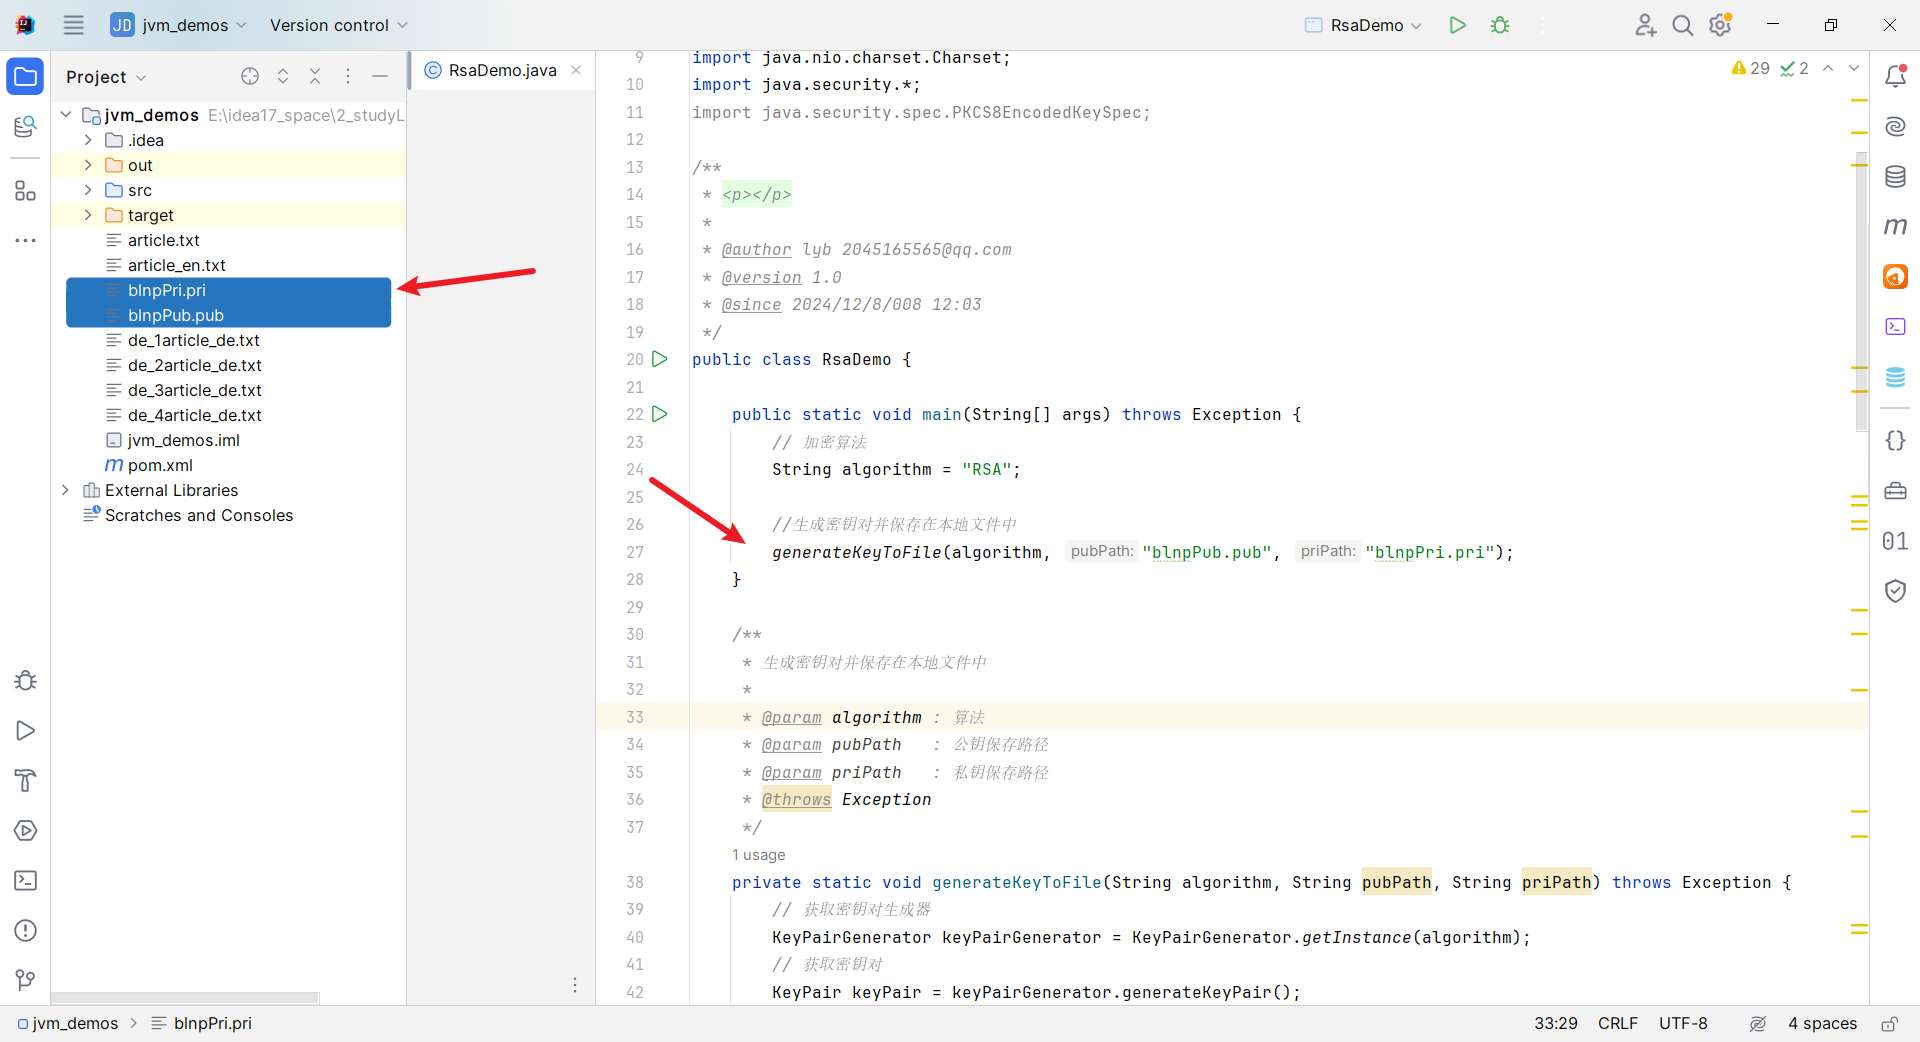
10.7、保存公钥和私钥
package com.blnp.demos;

import com.sun.org.apache.xml.internal.security.utils.Base64;
import org.apache.commons.io.FileUtils;

import javax.crypto.Cipher;
import javax.crypto.spec.SecretKeySpec;
import java.io.File;
import java.nio.charset.Charset;
import java.security.*;
import java.security.spec.PKCS8EncodedKeySpec;

/**
 * <p></p>
 *
 * @author lyb [email protected]
 * @version 1.0
 * @since 2024/12/8/008 12:03
 */
public class RsaDemo {

    public static void main(String[] args) throws Exception {
        // 加密算法
        String algorithm = "RSA";

        //生成密钥对并保存在本地文件中
        generateKeyToFile(algorithm, "blnpPub.pub", "blnpPri.pri");
    }

    /**
     * 生成密钥对并保存在本地文件中
     *
     * @param algorithm : 算法
     * @param pubPath   : 公钥保存路径
     * @param priPath   : 私钥保存路径
     * @throws Exception
     */
    private static void generateKeyToFile(String algorithm, String pubPath, String priPath) throws Exception {
        // 获取密钥对生成器
        KeyPairGenerator keyPairGenerator = KeyPairGenerator.getInstance(algorithm);
        // 获取密钥对
        KeyPair keyPair = keyPairGenerator.generateKeyPair();
        // 获取公钥
        PublicKey publicKey = keyPair.getPublic();
        // 获取私钥
        PrivateKey privateKey = keyPair.getPrivate();
        // 获取byte数组
        byte[] publicKeyEncoded = publicKey.getEncoded();
        byte[] privateKeyEncoded = privateKey.getEncoded();
        // 进行Base64编码
        String publicKeyString = Base64.encode(publicKeyEncoded);
        String privateKeyString = Base64.encode(privateKeyEncoded);
        // 保存文件
        FileUtils.writeStringToFile(new File(pubPath), publicKeyString, Charset.forName("UTF-8"));
        FileUtils.writeStringToFile(new File(priPath), privateKeyString, Charset.forName("UTF-8"));
    }

    /**
     * 解密数据
     *
     * @param algorithm      : 算法
     * @param encrypted      : 密文
     * @param key            : 密钥
     * @return : 原文
     * @throws Exception
     */
    public static String decryptRSA(String algorithm,Key key,String encrypted) throws Exception{
        // 创建加密对象
        // 参数表示加密算法
        Cipher cipher = Cipher.getInstance(algorithm);
        // 私钥进行解密
        cipher.init(Cipher.DECRYPT_MODE,key);
        // 由于密文进行了Base64编码, 在这里需要进行解码
        byte[] decode = Base64.decode(encrypted);
        // 对密文进行解密,不需要使用base64,因为原文不会乱码
        byte[] bytes1 = cipher.doFinal(decode);
        System.out.println(new String(bytes1));
        return new String(bytes1);

    }

    /**
     * 使用密钥加密数据
     *
     * @param algorithm      : 算法
     * @param input          : 原文
     * @param key            : 密钥
     * @return : 密文
     * @throws Exception
     */
    public static String encryptRSA(String algorithm,Key key,String input) throws Exception{
        // 创建加密对象
        // 参数表示加密算法
        Cipher cipher = Cipher.getInstance(algorithm);
        // 初始化加密
        // 第一个参数:加密的模式
        // 第二个参数:使用私钥进行加密
        cipher.init(Cipher.ENCRYPT_MODE,key);
        // 私钥加密
        byte[] bytes = cipher.doFinal(input.getBytes());
        // 对密文进行Base64编码
        System.out.println(Base64.encode(bytes));
        return Base64.encode(bytes);
    }
}
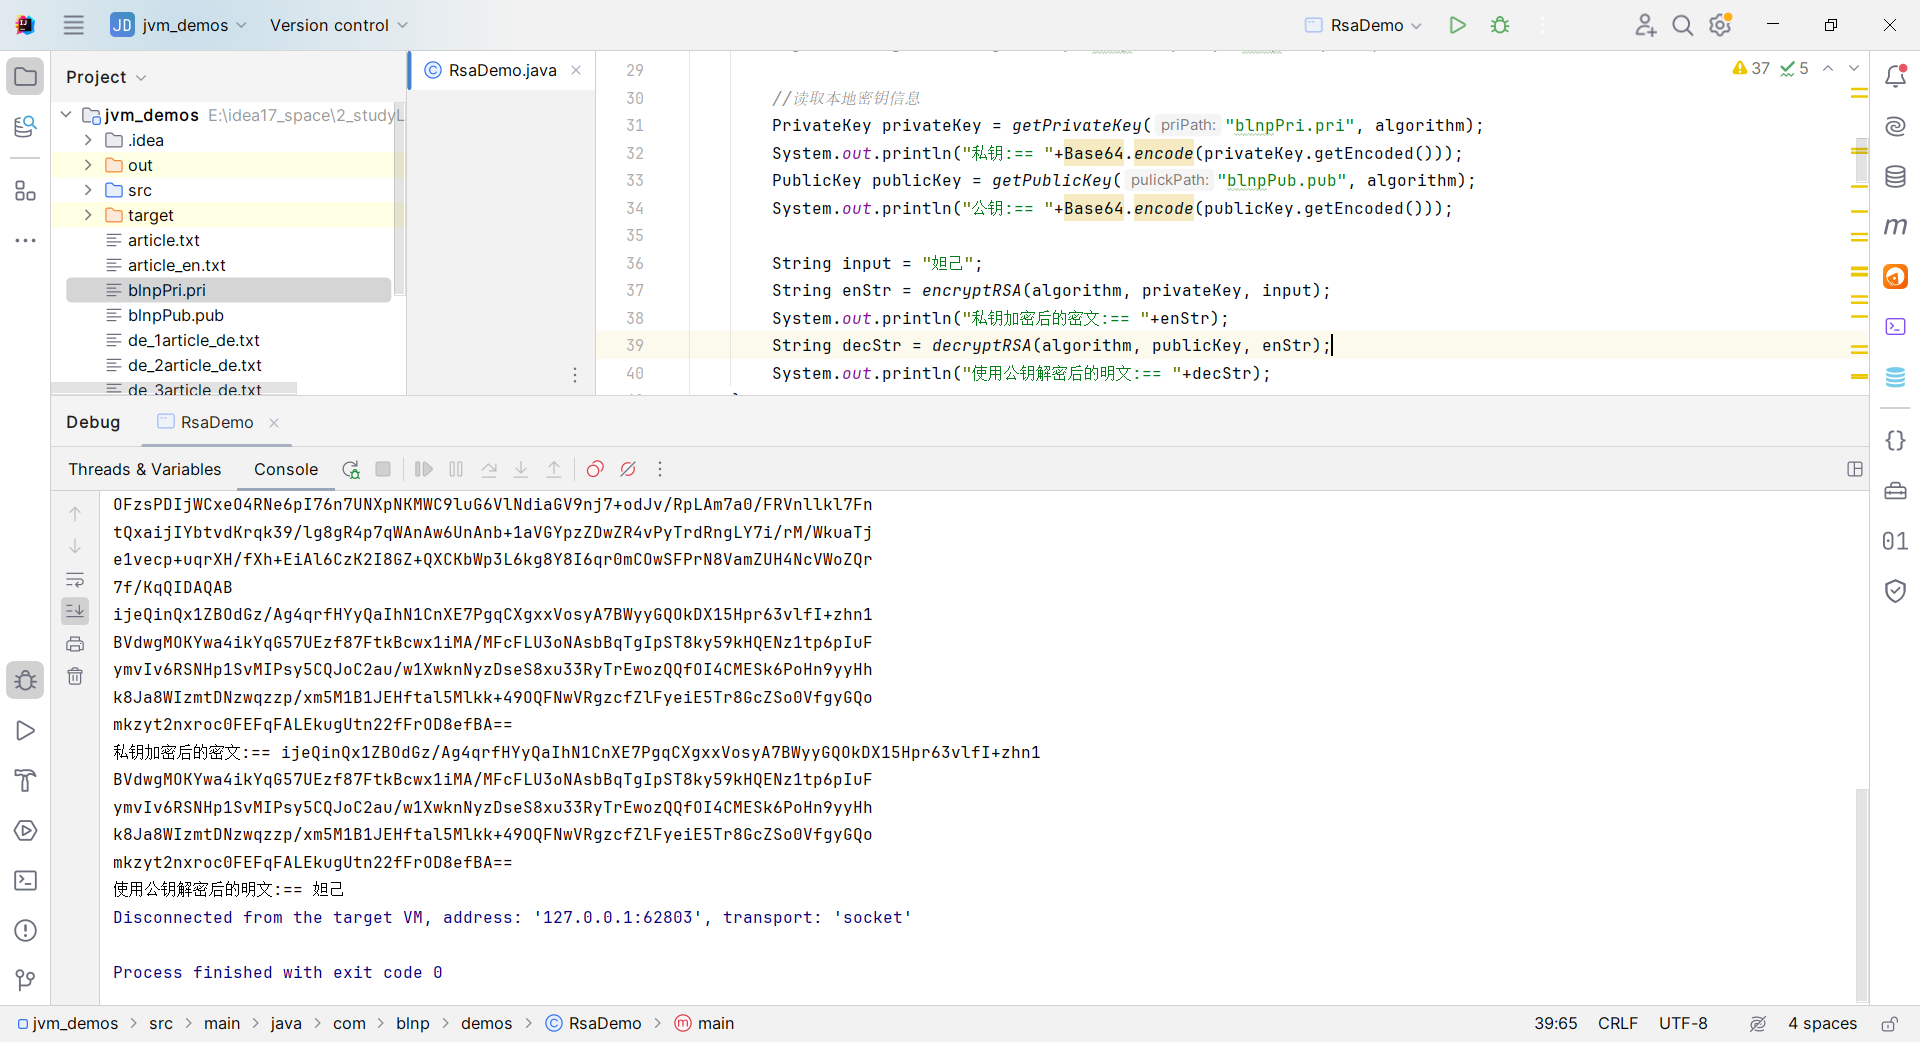
10.8、密钥读取并使用
package com.blnp.demos;

import com.sun.org.apache.xml.internal.security.utils.Base64;
import org.apache.commons.io.FileUtils;

import javax.crypto.Cipher;
import javax.crypto.spec.SecretKeySpec;
import java.io.File;
import java.nio.charset.Charset;
import java.security.*;
import java.security.spec.PKCS8EncodedKeySpec;
import java.security.spec.X509EncodedKeySpec;

/**
 * <p></p>
 *
 * @author lyb [email protected]
 * @version 1.0
 * @since 2024/12/8/008 12:03
 */
public class RsaDemo {

    public static void main(String[] args) throws Exception {
        // 加密算法
        String algorithm = "RSA";

        //生成密钥对并保存在本地文件中
//        generateKeyToFile(algorithm, "blnpPub.pub", "blnpPri.pri");

        //读取本地密钥信息
        PrivateKey privateKey = getPrivateKey("blnpPri.pri", algorithm);
        System.out.println("私钥:== "+Base64.encode(privateKey.getEncoded()));
        PublicKey publicKey = getPublicKey("blnpPub.pub", algorithm);
        System.out.println("公钥:== "+Base64.encode(publicKey.getEncoded()));

        String input = "妲己";
        String enStr = encryptRSA(algorithm, privateKey, input);
        System.out.println("私钥加密后的密文:== "+enStr);
        String decStr = decryptRSA(algorithm, publicKey, enStr);
        System.out.println("使用公钥解密后的明文:== "+decStr);
    }

    public static PublicKey getPublicKey(String pulickPath,String algorithm) throws Exception{
        // 将文件内容转为字符串
        String publicKeyString = FileUtils.readFileToString(new File(pulickPath), Charset.defaultCharset());
        // 获取密钥工厂
        KeyFactory keyFactory = KeyFactory.getInstance(algorithm);
        // 构建密钥规范 进行Base64解码
        X509EncodedKeySpec spec = new X509EncodedKeySpec(Base64.decode(publicKeyString));
        // 生成公钥
        return keyFactory.generatePublic(spec);
    }

    public static PrivateKey getPrivateKey(String priPath,String algorithm) throws Exception{
        // 将文件内容转为字符串
        String privateKeyString = FileUtils.readFileToString(new File(priPath), Charset.defaultCharset());
        // 获取密钥工厂
        KeyFactory keyFactory = KeyFactory.getInstance(algorithm);
        // 构建密钥规范 进行Base64解码
        PKCS8EncodedKeySpec spec = new PKCS8EncodedKeySpec(Base64.decode(privateKeyString));
        // 生成私钥
        return keyFactory.generatePrivate(spec);
    }

    /**
     * 生成密钥对并保存在本地文件中
     *
     * @param algorithm : 算法
     * @param pubPath   : 公钥保存路径
     * @param priPath   : 私钥保存路径
     * @throws Exception
     */
    private static void generateKeyToFile(String algorithm, String pubPath, String priPath) throws Exception {
        // 获取密钥对生成器
        KeyPairGenerator keyPairGenerator = KeyPairGenerator.getInstance(algorithm);
        // 获取密钥对
        KeyPair keyPair = keyPairGenerator.generateKeyPair();
        // 获取公钥
        PublicKey publicKey = keyPair.getPublic();
        // 获取私钥
        PrivateKey privateKey = keyPair.getPrivate();
        // 获取byte数组
        byte[] publicKeyEncoded = publicKey.getEncoded();
        byte[] privateKeyEncoded = privateKey.getEncoded();
        // 进行Base64编码
        String publicKeyString = Base64.encode(publicKeyEncoded);
        String privateKeyString = Base64.encode(privateKeyEncoded);
        // 保存文件
        FileUtils.writeStringToFile(new File(pubPath), publicKeyString, Charset.forName("UTF-8"));
        FileUtils.writeStringToFile(new File(priPath), privateKeyString, Charset.forName("UTF-8"));
    }

    /**
     * 解密数据
     *
     * @param algorithm      : 算法
     * @param encrypted      : 密文
     * @param key            : 密钥
     * @return : 原文
     * @throws Exception
     */
    public static String decryptRSA(String algorithm,Key key,String encrypted) throws Exception{
        // 创建加密对象
        // 参数表示加密算法
        Cipher cipher = Cipher.getInstance(algorithm);
        // 私钥进行解密
        cipher.init(Cipher.DECRYPT_MODE,key);
        // 由于密文进行了Base64编码, 在这里需要进行解码
        byte[] decode = Base64.decode(encrypted);
        // 对密文进行解密,不需要使用base64,因为原文不会乱码
        byte[] bytes1 = cipher.doFinal(decode);
        return new String(bytes1);

    }

    /**
     * 使用密钥加密数据
     *
     * @param algorithm      : 算法
     * @param input          : 原文
     * @param key            : 密钥
     * @return : 密文
     * @throws Exception
     */
    public static String encryptRSA(String algorithm,Key key,String input) throws Exception{
        // 创建加密对象
        // 参数表示加密算法
        Cipher cipher = Cipher.getInstance(algorithm);
        // 初始化加密
        // 第一个参数:加密的模式
        // 第二个参数:使用私钥进行加密
        cipher.init(Cipher.ENCRYPT_MODE,key);
        // 私钥加密
        byte[] bytes = cipher.doFinal(input.getBytes());
        // 对密文进行Base64编码
        System.out.println(Base64.encode(bytes));
        return Base64.encode(bytes);
    }
}
11、数字签名
数字签名(又称公钥数字签名)是只有信息的发送者才能产生的别人无法伪造的一段数字串,这段数字串同时也是对信息的发送者发送信息真实性的一个有效证明。它是一种类似写在纸上的普通的物理签名,但是使用了公钥加密领域的技术来实现的,用于鉴别数字信息的方法。一套数字签名通常定义两种互补的运算,一个用于签名,另一个用于验证。数字签名是非对称密钥加密技术与数字摘要技术的应用。
11.1、基本原理
为了理解得清楚,我们通过案例一步一步来讲解。话说张三有俩好哥们A、B。由于工作原因,张三和AB写邮件的时候为了安全都需要加密。于是张三想到了数字签名,整个思路是这个样子的:
- 第一步:加密采用非对称加密,张三有三把钥匙,两把公钥,送给朋友。一把私钥留给自己。
- 第二步:A或者B写邮件给张三:A先用公钥对邮件加密,然后张三收到邮件之后使用私钥解密。
- 第三步:张三写邮件给A或者B:
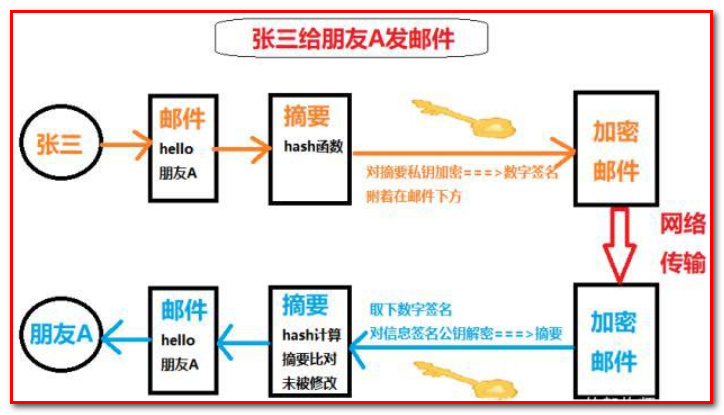
- 张三写完邮件,先用hash函数生成邮件的摘要,附着在文章上面,这就完成了数字签名,然后张三再使用私钥加密。就可以把邮件发出去了。
- A或者是B收到邮件之后,先把数字签名取下来,然后使用自己的公钥解密即可。这时候取下来的数字签名中的摘要若和张三的一致,那就认为是张三发来的,再对信件本身使用Hash函数,将得到的结果,与上一步得到的摘要进行对比。如果两者一致,就证明这封信未被修改过。
11.2.数字证书
上面提到我们对签名进行验证时,需要用到公钥。如果公钥是伪造的,那我们无法验证数字签名了,也就根本不可能从数字签名确定对方的合法性了。这时候证书就闪亮登场了。我们可能都有考各种证书的经历,比如说普通话证书,四六级证书等等,但是归根结底,到任何场合我们都能拿出我们的证书来证明自己确实已经考过了普通话,考过了四六级。这里的证书也是同样的道理。
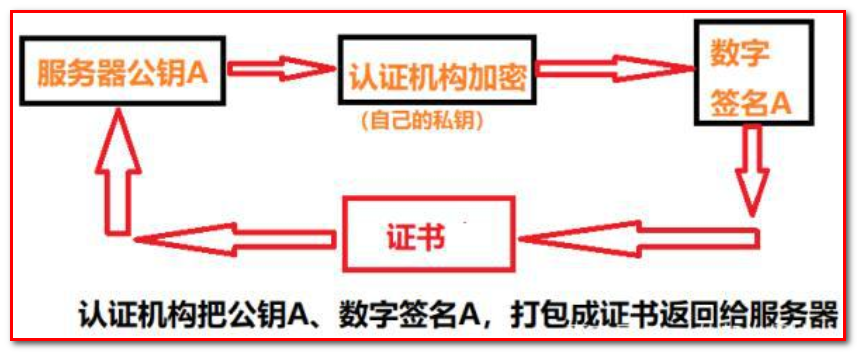
如果不理解证书的作用,我们可以举一个例子,比如说我们的毕业证书,任何公司都会承认。为什么会承认?因为那是国家发得,大家都信任国家。也就是说只要是国家的认证机构,我们都信任它是合法的。那么这个证书是如何生成的呢?我们再来看一张图:
11.3、网页加密
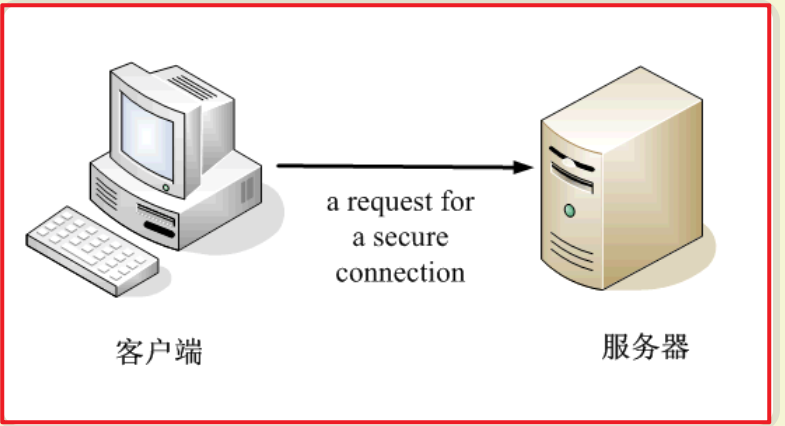
我们看一个应用“数字证书”的实例:https协议。这个协议主要用于网页加密,首先,客户端向服务器发出加密请求。
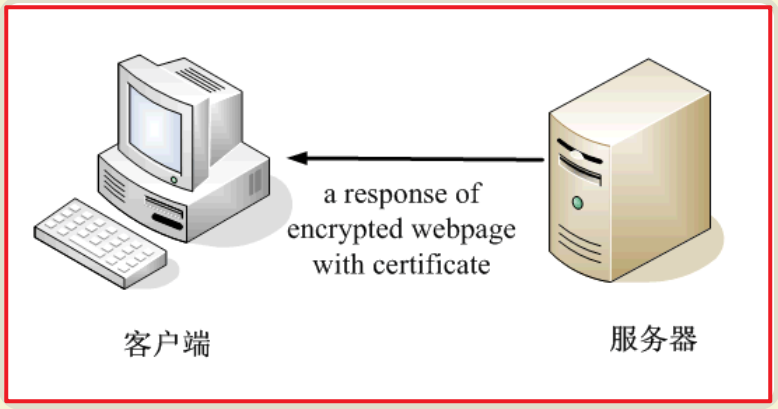
服务器用自己的私钥加密网页以后,连同本身的数字证书,一起发送给客户端。
客户端(浏览器)的“证书管理器”,有“受信任的根证书颁发机构”列表。客户端会根据这张列表,查看解开数字证书的公钥是否在列表之内。
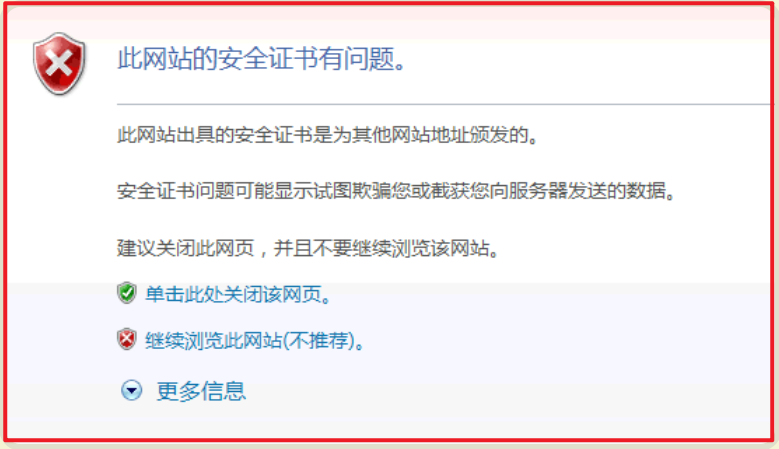
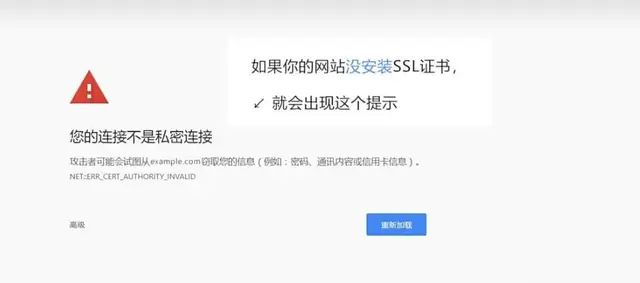
如果数字证书记载的网址,与你正在浏览的网址不一致,就说明这张证书可能被冒用,浏览器会发出警告。
如果这张数字证书不是由受信任的机构颁发的,浏览器会发出另一种警告。
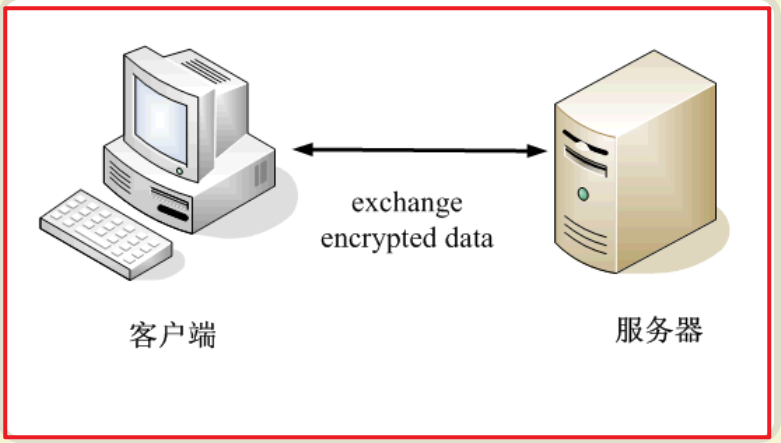
如果数字证书是可靠的,客户端就可以使用证书中的服务器公钥,对信息进行加密,然后与服务器交换加密信息。
11.4、编码实现
package com.blnp.demos;

import java.security.*;
import com.sun.org.apache.xml.internal.security.utils.Base64;

/**
 * <p></p>
 *
 * @author lyb [email protected]
 * @version 1.0
 * @since 2024/12/8/008 12:41
 */
public class SignatureDemo {
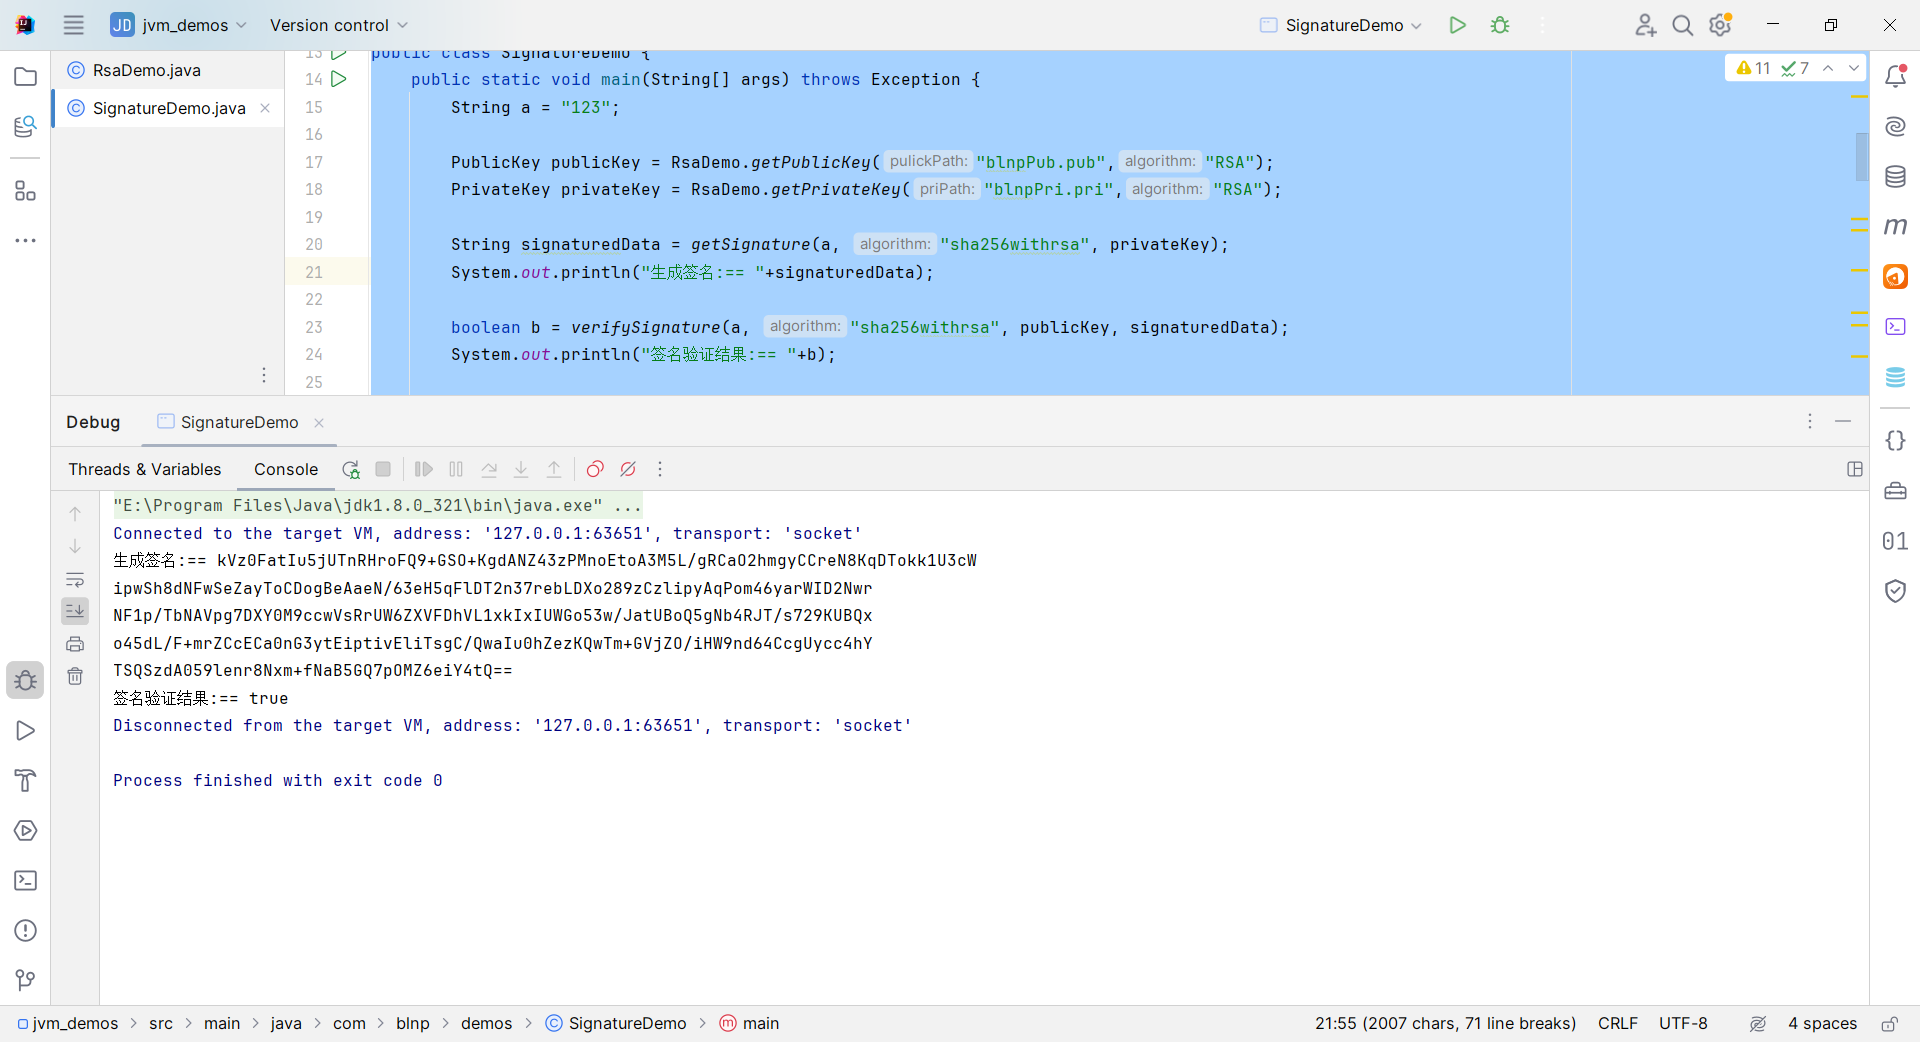
    public static void main(String[] args) throws Exception {
        String a = "123";

        PublicKey publicKey = RsaDemo.getPublicKey("blnpPub.pub","RSA");
        PrivateKey privateKey = RsaDemo.getPrivateKey("blnpPri.pri","RSA");

        String signaturedData = getSignature(a, "sha256withrsa", privateKey);
        System.out.println("生成签名:== "+signaturedData);

        boolean b = verifySignature(a, "sha256withrsa", publicKey, signaturedData);
        System.out.println("签名验证结果:== "+b);

    }

    /**
     * 生成签名
     *
     * @param input      : 原文
     * @param algorithm  : 算法
     * @param privateKey : 私钥
     * @return : 签名
     * @throws Exception
     */
    private static String getSignature(String input, String algorithm, PrivateKey privateKey) throws Exception {
        // 获取签名对象
        Signature signature = Signature.getInstance(algorithm);
        // 初始化签名
        signature.initSign(privateKey);
        // 传入原文
        signature.update(input.getBytes());
        // 开始签名
        byte[] sign = signature.sign();
        // 对签名数据进行Base64编码
        return Base64.encode(sign);
    }

    /**
     * 校验签名
     *
     * @param input          : 原文
     * @param algorithm      : 算法
     * @param publicKey      : 公钥
     * @param signaturedData : 签名
     * @return : 数据是否被篡改
     * @throws Exception
     */
    private static boolean verifySignature(String input, String algorithm, PublicKey publicKey, String signaturedData) throws Exception {
        // 获取签名对象
        Signature signature = Signature.getInstance(algorithm);
        // 初始化签名
        signature.initVerify(publicKey);
        // 传入原文
        signature.update(input.getBytes());
        // 校验数据
        return signature.verify(Base64.decode(signaturedData));

    }
}
12、keytool工具使用
12.1、基本使用
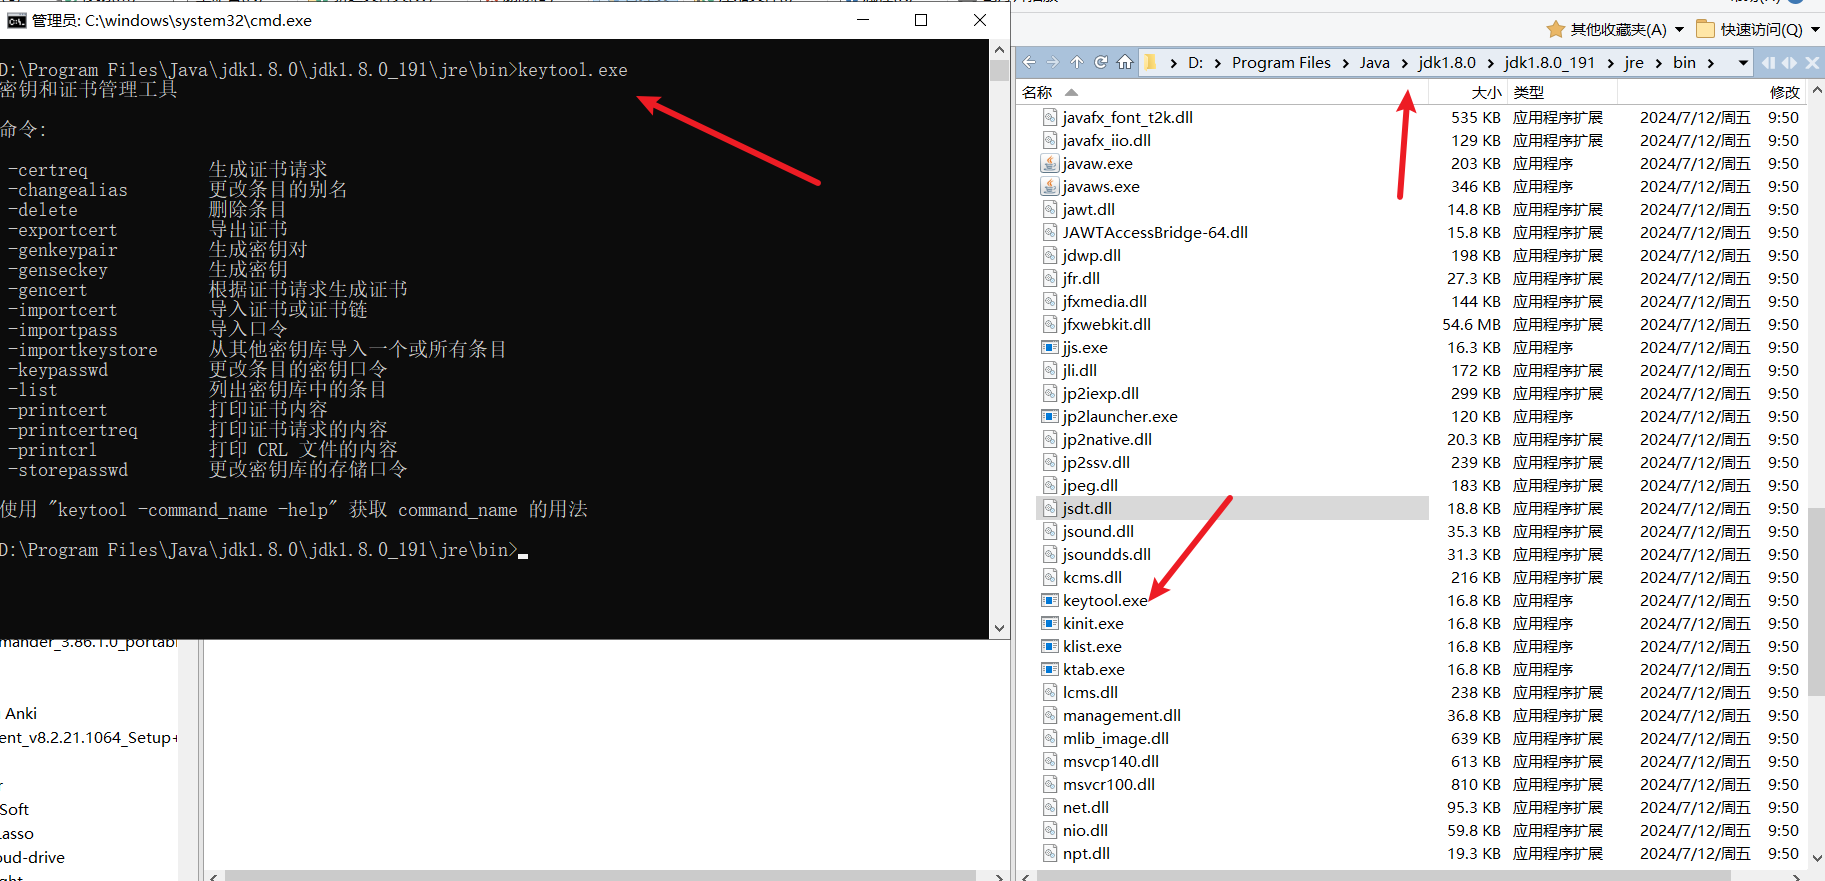
要使用该工具需要安装JDK,安装后在JDK的 /jre/bin 目录可以查看到该工具。
常用命令:
- 生成keypair:
keytool -genkeypair
#keytool -genkeypair -alias lisi(后面部分是为证书指定别名,否则采用默认的名称为mykey)- 看看keystore中有哪些项目:
#keytool -list或keytool -list -v
keytool -exportcert -alias lisi -file lisi.cer- 生成可打印的证书:
keytool -exportcert -alias lisi -file lisi.cer –rfc- 显示数字证书文件中的证书信息:
keytool -printcert -file lisi.cer
#直接双击lisi.cer,用window系统的内置程序打开lisi.cer
12.2、生成私钥公钥
12.2.1、生成密钥证书
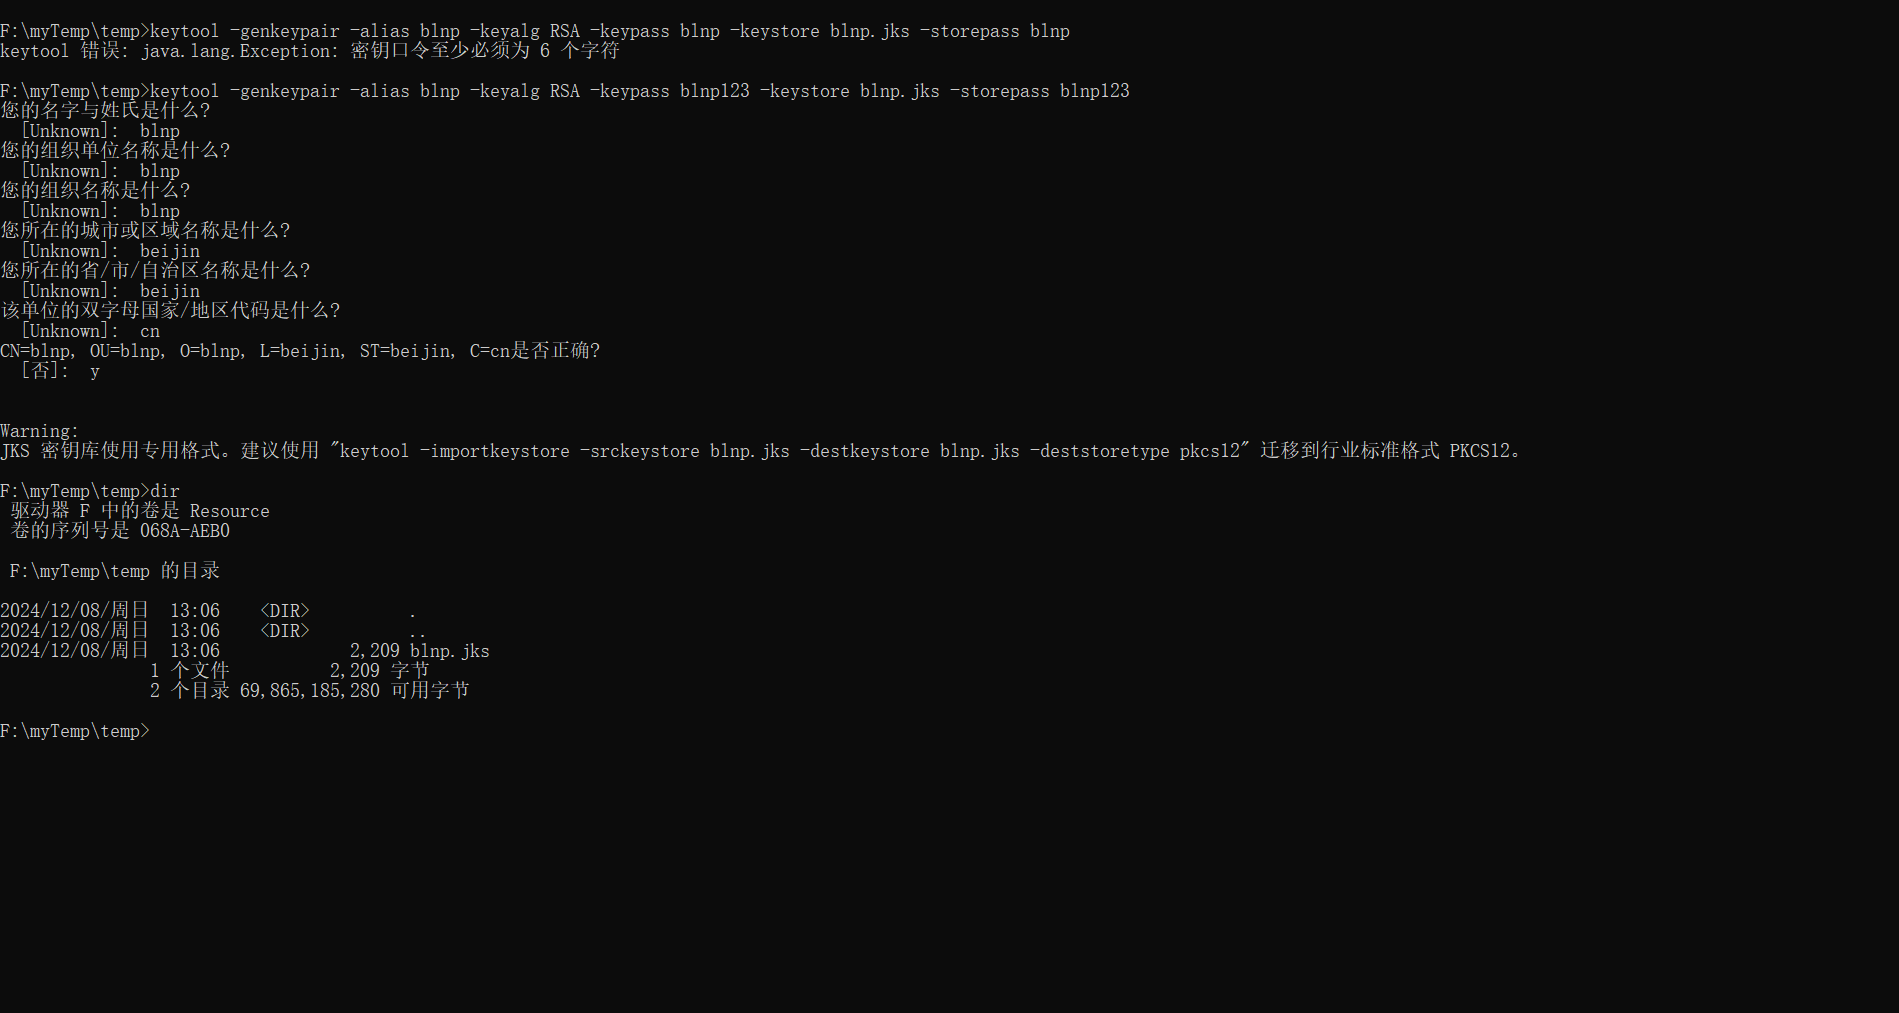
成密钥证书 下边命令生成密钥证书,采用RSA 算法每个证书包含公钥和私钥。创建一个文件夹,在该文件夹下执行如下命令行:
keytool -genkeypair -alias blnp -keyalg RSA -keypass blnp123 -keystore blnp.jks -storepass blnp123Keytool 是一个java提供的证书管理工具:
-alias:密钥的别名
-keyalg:使用的hash算法
-keypass:密钥的访问密码
-keystore:密钥库文件名,xc.keystore保存了生成的证书
-storepass:密钥库的访问密码
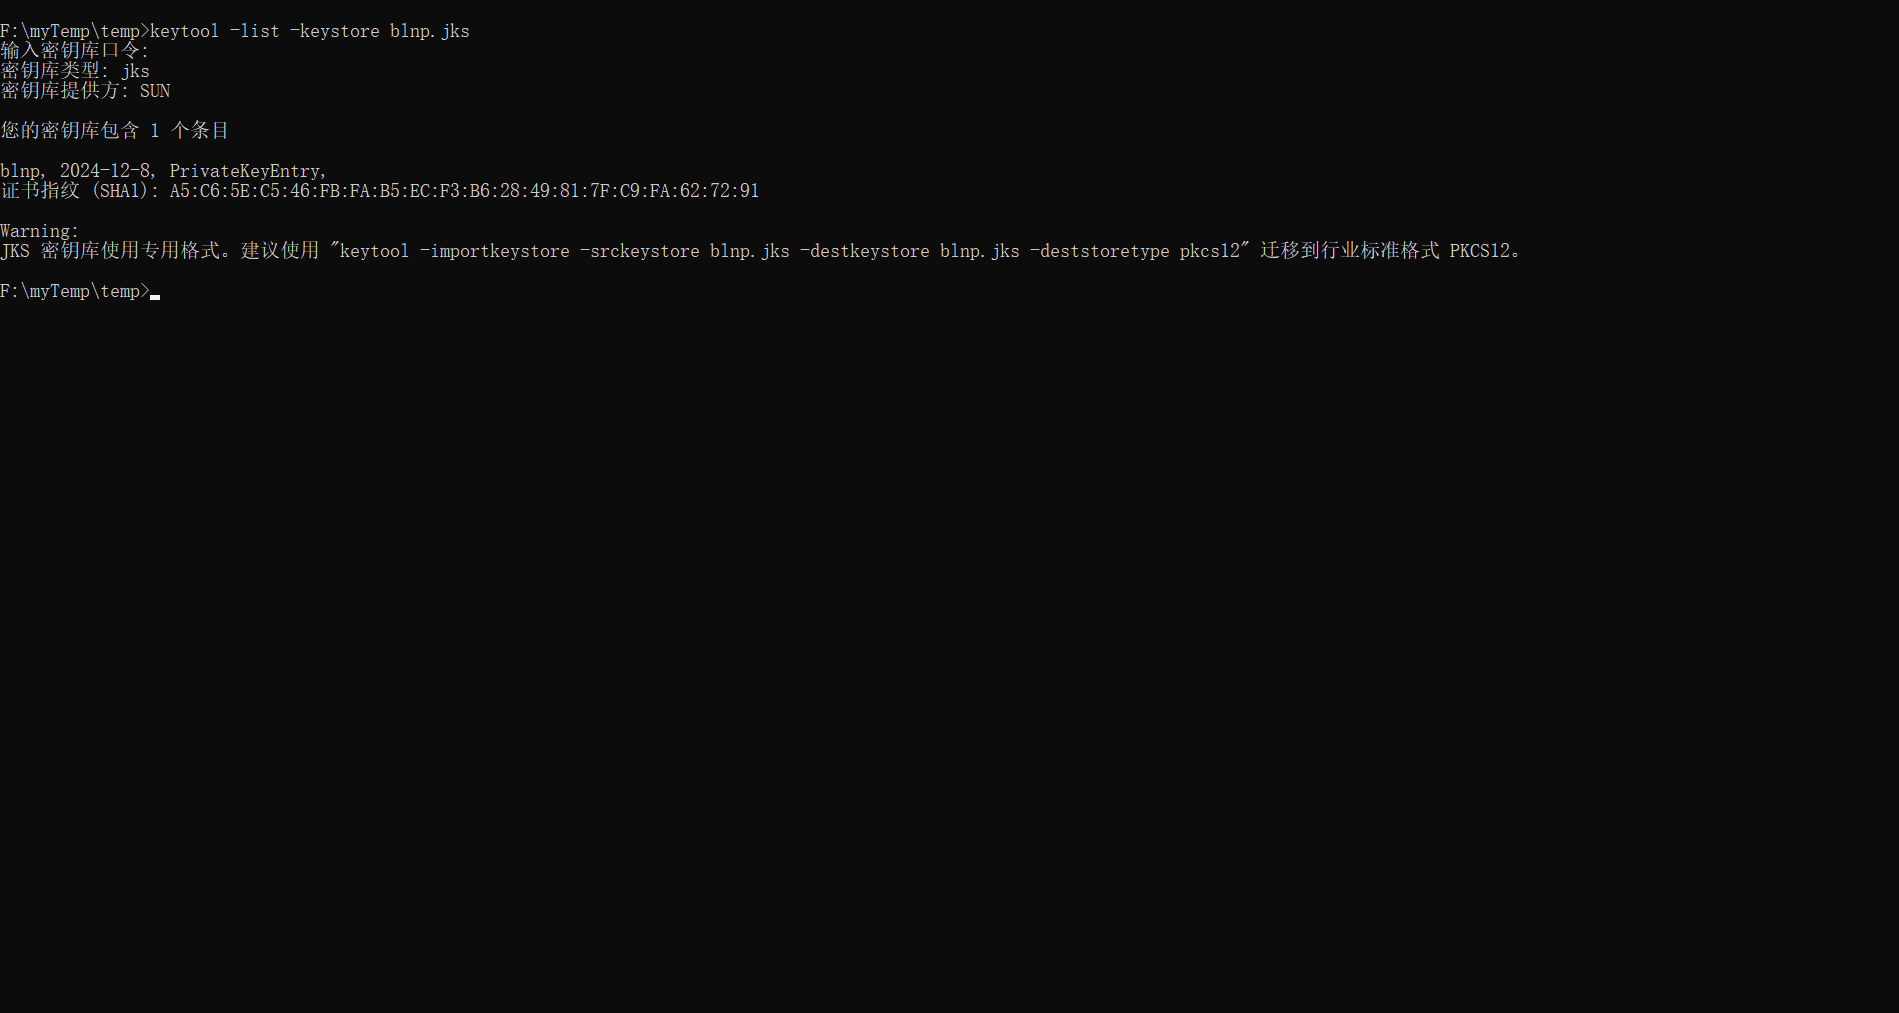
12.2.2、查询证书信息
keytool -list -keystore blnp.jks12.2.3、删除别名
keytool -delete -alias blnp -keystore blnp.jks12.3、导出公钥
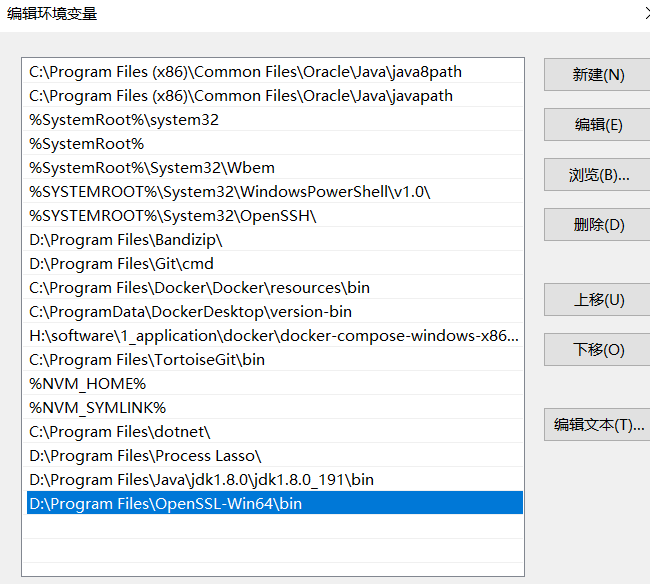
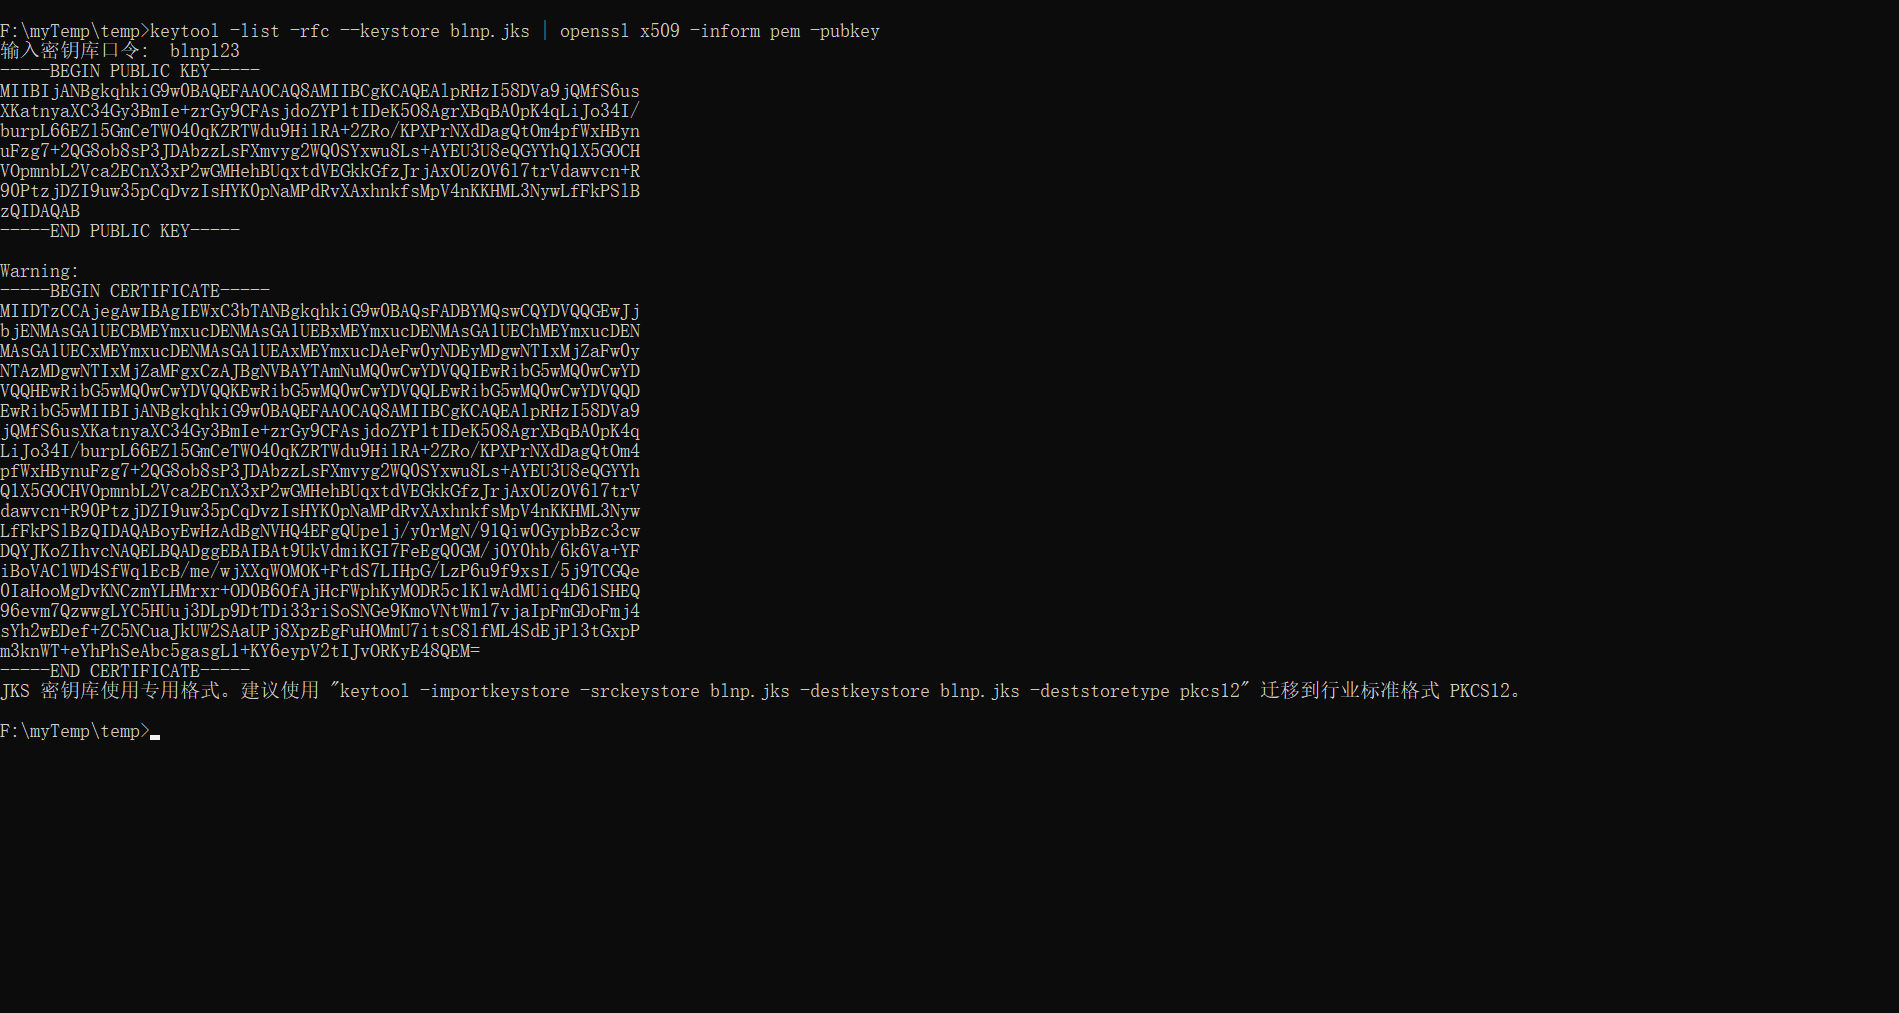
openssl是一个加解密工具包,这里使用openssl来导出公钥信息。下载安装 openssl,并配置环境变量。
cmd进入 jks 文件所在目录执行如下命令(如下命令在windows下执行,会把-变成中文方式,请将它改成英文的-):
keytool -list -rfc --keystore blnp.jks | openssl x509 -inform pem -pubkey