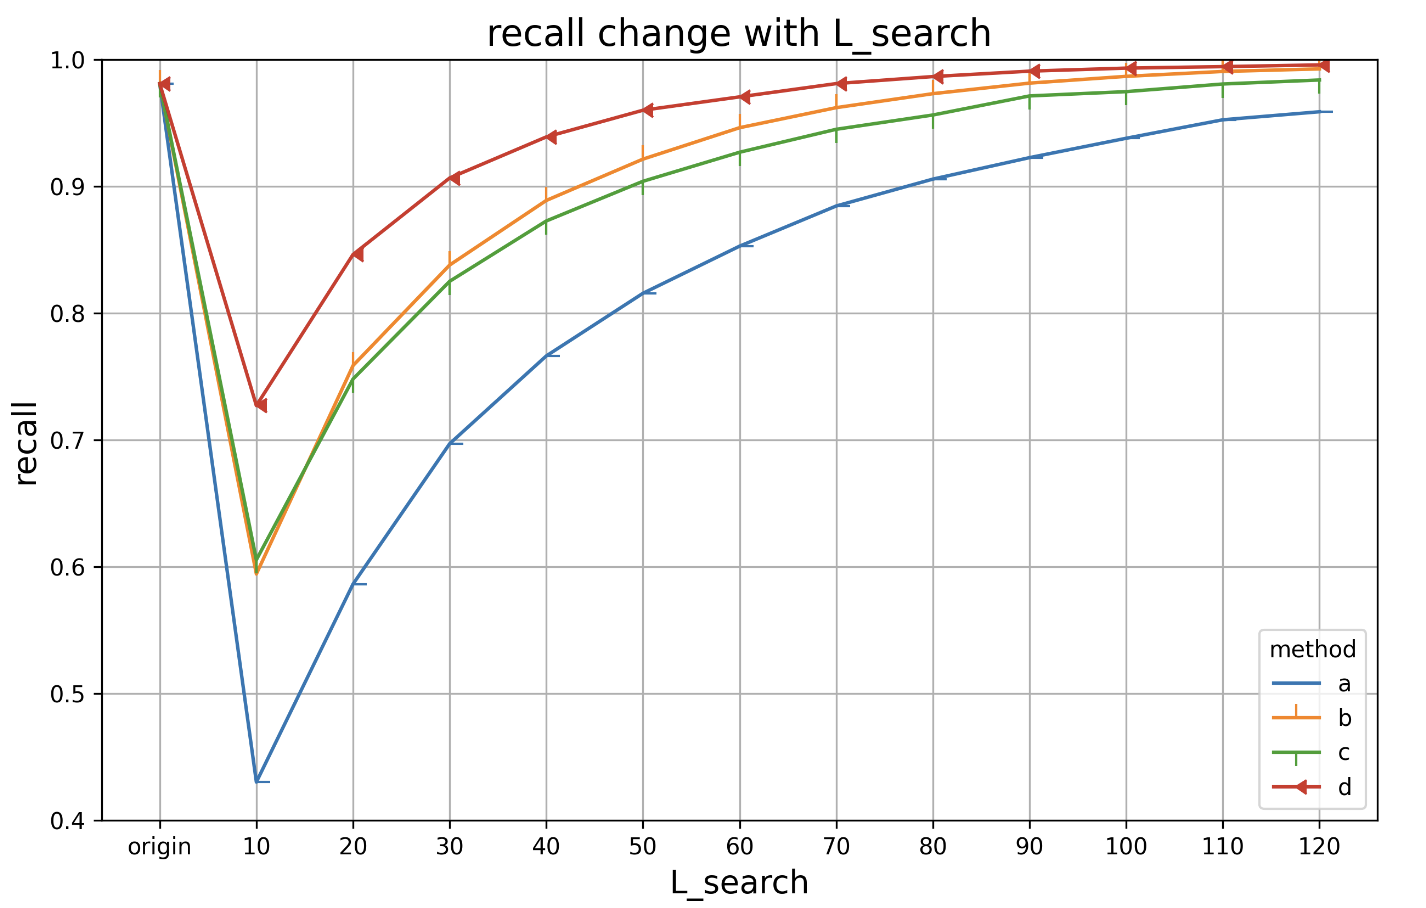
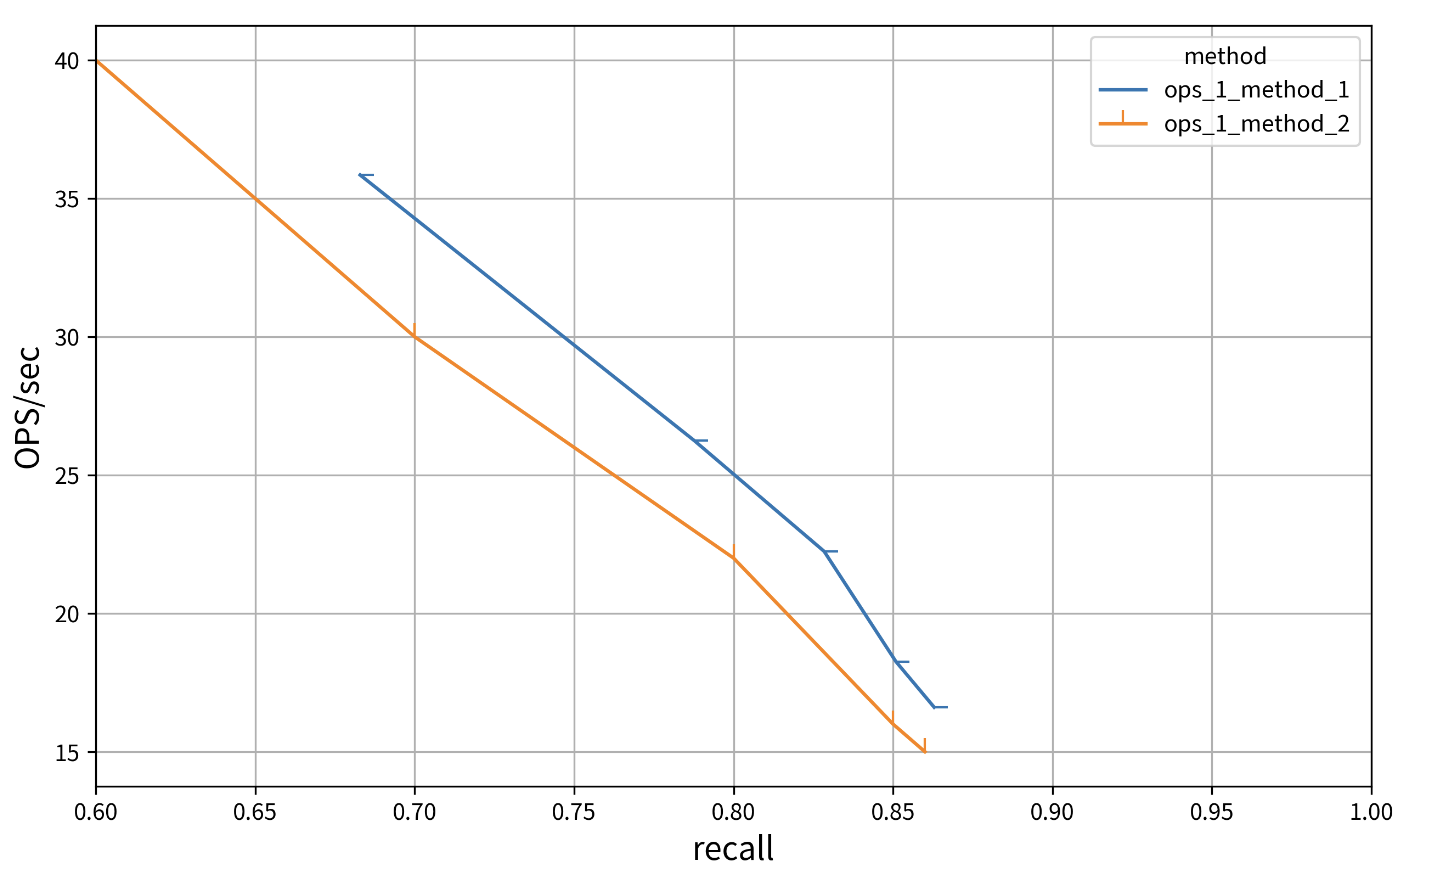
多组折线图
数据:
- 第1行为x轴标签
- 第2/3/…行等为数据,其中第一列为标签,后面为y值
图片:
代码:
import matplotlib.pyplot as plt

# 原始数据字符串
# 第1行为x轴标签
# 第2/3/...行等为数据,其中第一列为标签,后面为y值
data = """
expr_xx	origin	10	20	30	40	50	60	70	80	90	100	110	120
a	0.98105	0.43018	0.5863	0.69702	0.76626	0.81566	0.85283	0.88451	0.90571	0.92265	0.93791	0.9525	0.95883
b	0.98105	0.59431	0.75864	0.83794	0.88888	0.92147	0.94625	0.96207	0.97309	0.98141	0.98676	0.99062	0.99264
c	0.98105	0.60546	0.74805	0.82512	0.8727	0.90399	0.9269	0.945	0.95627	0.97132	0.9747	0.98073	0.98389
d	0.98105	0.72712	0.84623	0.90659	0.93898	0.96003	0.97057	0.98104	0.98659	0.99086	0.99325	0.99443	0.99578
"""

# x轴标签
lines = data.strip().split('\n')
header = lines[0].split('\t')   # 第一行是x轴标签
x = list(range(len(header)-1))  # 构建x轴的坐标值,从第二列开始

# 获取 y 值
y_values = []
for line in lines[1:]:
    print(line)
    y_values.append((line.split('\t')[0], list(map(float, line.split('\t')[1:]))))

# 打印结果
print("X values:", x)
print("header len:", len(header))

# 创建图形
plt.figure(figsize=(10, 6))

# 定义 10 个不同的标记
markers = ['o', 's', '^', 'v', '<', '>', 'p', 'P', '*', 'x']

# 绘制折线图
# plt.plot(x, y_0_1, marker='o', label='0.1', color='blue')
# plt.plot(x, y_0_2, marker='o', label='0.2', color='green')
i = 0
for lable, y_value in y_values:
    print(lable, y_value)
    plt.plot(x, y_value, marker=markers[i], label=lable)
    i += 1

# 设置 x 轴刻度和标签
# plt.xticks(x, ['100', '110', '120', '130', '140', '150', '160', '170', '180', '190', '200'])  # 可以指定自定义标签
plt.xticks(x, header[1:])  # 可以指定自定义标签


# 设置标题和标签
plt.title('recall change with L_search', fontsize=16)
plt.xlabel('L_search', fontsize=14)
plt.ylabel('recall', fontsize=14)

# 设置 x 轴刻度
plt.xticks(x)

# 设置y轴的范围
plt.ylim(0.4, 1)

# 显示图例
plt.legend(title='method', loc='lower right')

# 添加网格
plt.grid()

# 保存图形
plt.savefig('performance_comparison.png', dpi=300)  # 保存为 PNG 文件,设置分辨率为 300 DPI

# 显示图形
# plt.tight_layout()
# plt.show()
点坐标的折线图
数据:
- 第i行和第i+1行作为一组数据,其中i行为x轴值,i+1行为y轴值
- 第一列为标签
图片:
代码:
import matplotlib.pyplot as plt
from matplotlib.font_manager import FontProperties

# 设置字体为支持中文的字体
plt.rcParams['font.family'] = ['Noto Sans CJK JP']
plt.rcParams['axes.unicode_minus'] = False  # 用来正常显示负号

# 原始数据字符串
# 第i行和第i+1行作为一组数据,其中i行为x轴值,i+1行为y轴值
data = """
recall_method_1	0.6829	0.7877	0.8284	0.8509	0.8629
ops_1_method_1	35.8491	26.2454	22.2438	18.26	16.6084
recall_method_2	0.6	0.7	0.8	0.85	0.86
ops_1_method_2	40	30	22	16	15
"""

# x轴标签
lines = data.strip().split('\n')
# header = lines[0].split('\t')   # 第一行是x轴标签
# x = list(range(len(header)-1))  # 构建x轴的坐标值,从第二列开始

# 获取 y 值
data_pair = []
for line_cnt in range(len(lines)//2):
    x_line = lines[line_cnt*2]
    y_line = lines[line_cnt*2+1]
    print(x_line)
    print(y_line)
    x_values = ((x_line.split('\t')[0], list(map(float, x_line.split('\t')[1:]))))
    y_values = ((y_line.split('\t')[0], list(map(float, y_line.split('\t')[1:]))))
    data_pair.append((x_values, y_values))

# 创建图形
plt.figure(figsize=(10, 6))

# 定义 10 个不同的标记
markers = ['o', 's', '^', 'v', '<', '>', 'p', 'P', '*', 'x']

i = 0
for x_values, y_values in data_pair:
    print(" ", i, "x_values", x_values)
    print(" ", i, "y_values", y_values)
    plt.plot(x_values[1], y_values[1], marker=markers[i], label=y_values[0])
    i += 1


# 设置 x 轴刻度和标签
# plt.xticks(x, ['100', '110', '120', '130', '140', '150', '160', '170', '180', '190', '200'])  # 可以指定自定义标签
# plt.xticks(x, header[1:])  # 可以指定自定义标签

# 设置标题和标签
# plt.title('xxxxx', fontsize=16)
plt.xlabel('recall', fontsize=14)
plt.ylabel('OPS/sec', fontsize=14)

# 设置 x 轴刻度
# plt.xticks(x)

# 设置轴的范围
# plt.ylim(0.4, 1)
plt.xlim(0.6, 1)

# 显示图例
plt.legend(title='method', loc='upper right')

# 添加网格
plt.grid()

# 保存图形
plt.savefig('performance_comparison.png', dpi=300)  # 保存为 PNG 文件,设置分辨率为 300 DPI

# 显示图形
# plt.tight_layout()
# plt.show()


