转载自:https://blog.csdn.net/u014201191/article/details/85112590
检查是否开启了ipv6
输入命令ip addr | grep inet6
如果返回中带有ipv6的字段,则表示已经开启了,如果没有请按照下列方式开启
添加ipv6模块
1、修改 /etc/modprobe.d/disable_ipv6.conf
-
#修改前 -
alias net-pf-10 off -
options ipv6 disable=1 -
#修改后 -
alias net-pf-10 off -
options ipv6 disable=0
2、修改/etc/sysconfig/network
-
修改前 -
PEERNTP=no -
NETWORKING_IPV6=no -
修改后 -
PEERNTP=no -
NETWORKING_IPV6=yes
3、修改 /etc/sysconfig/network-scripts/ifcfg-eth0
-
## 添加 IPV6INIT 为 yes 和 IPV6_AUTOCONF 为 yes -
IPV6INIT=yes -
IPV6_AUTOCONF=yes
4、 修改 /etc/sysctl.conf
-
## 修改 net.ipv6.conf.all.disable_ipv6 为 0, net.ipv6.conf.default.disable_ipv6 为 0 和 net.ipv6.conf.lo.disable_ipv6 为 0 -
修改前 -
net.ipv6.conf.all.disable_ipv6 = 1 -
net.ipv6.conf.default.disable_ipv6 = 1 -
net.ipv6.conf.lo.disable_ipv6 = 1 -
net.ipv4.conf.lo.arp_announce=2 -
修改后 -
net.ipv6.conf.all.disable_ipv6 = 0 -
net.ipv6.conf.default.disable_ipv6 = 0 -
net.ipv6.conf.lo.disable_ipv6 = 0
5、创建系统在启动时自动加载 IPv6 模块的脚本
-
创建脚本文件 ipv6.modules -
vi /etc/sysconfig/modules/ipv6.modules -
脚本内容 -
!/bin/sh -
if [ ! -c /proc/net/if_inet6 ] ; then -
exec /sbin/insmod /lib/modules/uname -r/kernel/net/ipv6/ipv6.ko -
fi
授权:chmod +x /etc/sysconfig/modules/ipv6.modules
6、重启系统,加载 IPv6 模块并查看
-
ifconfig | grep -i inet6 #### 查看ipv6的信息,有看到输出就可以 -
inet6 fe80::216:3eff:fe00:6fb8 prefixlen 64 scopeid 0x20<link> -
inet6 ::1 prefixlen 128 scopeid 0x10<host>
现在已经证明服务器支持ipv6的功能模块了
申请IPV6地址
1、在 tunnelbroker.net 上申请一个免费的 IPv6 地址,现注册个账号。
2、选择 Create Regular Tunnel 创建一个到自己公网 IP 的通道。(输入框内输入自己的ipv4公网ip地址)
3、选择HK,不过有时候也满了,选择Freemont,CA,US 也可以。
4、找到 Example Configurations,centos7.x 选择 linux-net-tools,复制命令,去服务器上执行。

5、ping6 {ipv6地址}测试是否能够入网
-
[root@izhp34ij40k1dgq89lnntdz ~]# ping6 2001:470:23:999::2 -
PING 2001:470:23:999::2(2001:470:23:999::2) 56 data bytes -
64 bytes from 2001:470:23:999::2: icmp_seq=1 ttl=64 time=0.019 ms -
64 bytes from 2001:470:23:999::2: icmp_seq=2 ttl=64 time=0.031 ms -
64 bytes from 2001:470:23:999::2: icmp_seq=3 ttl=64 time=0.031 ms -
64 bytes from 2001:470:23:999::2: icmp_seq=4 ttl=64 time=0.032 ms -
64 bytes from 2001:470:23:999::2: icmp_seq=5 ttl=64 time=0.031 ms -
64 bytes from 2001:470:23:999::2: icmp_seq=6 ttl=64 time=0.033 ms
说明此时我们的ipv6环境已经准备好了,在查看一下ecs返回的ipv6模块;
-
[root@izhp34ij40k1dgq89lnntdz ~]# ifconfig | grep -i inet6 -
inet6 fe80::216:3eff:fe00:6fb8 prefixlen 64 scopeid 0x20<link> -
inet6 ::1 prefixlen 128 scopeid 0x10<host> -
inet6 ::127.0.0.1 prefixlen 96 scopeid 0x90<compat,host> -
inet6 ::192.168.0.5 prefixlen 96 scopeid 0x80<compat,global> -
inet6 fe80::c0a8:5 prefixlen 64 scopeid 0x20<link> -
inet6 2001:470:23:999::2 prefixlen 64 scopeid 0x0<global>
6、ifconfig查看ipv6模块开启状态
-
[root@izhp34ij40k1dgq89lnntdz ~]# ifconfig -
eth0: flags=4163<UP,BROADCAST,RUNNING,MULTICAST> mtu 1500 -
inet 192.168.0.5 netmask 255.255.255.0 broadcast 192.168.0.255 -
inet6 fe80::216:3eff:fe00:6fb8 prefixlen 64 scopeid 0x20<link> -
ether 00:16:3e:00:6f:b8 txqueuelen 1000 (Ethernet) -
RX packets 7006 bytes 9477709 (9.0 MiB) -
RX errors 0 dropped 0 overruns 0 frame 0 -
TX packets 1610 bytes 178352 (174.1 KiB) -
TX errors 0 dropped 0 overruns 0 carrier 0 collisions 0 -
lo: flags=73<UP,LOOPBACK,RUNNING> mtu 65536 -
inet 127.0.0.1 netmask 255.0.0.0 -
inet6 ::1 prefixlen 128 scopeid 0x10<host> -
loop txqueuelen 1 (Local Loopback) -
RX packets 12 bytes 1248 (1.2 KiB) -
RX errors 0 dropped 0 overruns 0 frame 0 -
TX packets 12 bytes 1248 (1.2 KiB) -
TX errors 0 dropped 0 overruns 0 carrier 0 collisions 0 -
sit0: flags=193<UP,RUNNING,NOARP> mtu 1480 -
inet6 ::127.0.0.1 prefixlen 96 scopeid 0x90<compat,host> -
inet6 ::192.168.0.5 prefixlen 96 scopeid 0x80<compat,global> -
sit txqueuelen 1 (IPv6-in-IPv4) -
RX packets 0 bytes 0 (0.0 B) -
RX errors 0 dropped 0 overruns 0 frame 0 -
TX packets 0 bytes 0 (0.0 B) -
TX errors 0 dropped 0 overruns 0 carrier 0 collisions 0 -
sit1: flags=209<UP,POINTOPOINT,RUNNING,NOARP> mtu 1480 -
inet6 fe80::c0a8:5 prefixlen 64 scopeid 0x20<link> -
inet6 2001:470:23:999::2 prefixlen 64 scopeid 0x0<global> -
sit txqueuelen 1 (IPv6-in-IPv4) -
RX packets 0 bytes 0 (0.0 B) -
RX errors 0 dropped 0 overruns 0 frame 0 -
TX packets 0 bytes 0 (0.0 B) -
TX errors 0 dropped 0 overruns 0 carrier 0 collisions 0
注意必须是上面那样子的,负责是不正确的。
7、添加域名解析记录AAAA;
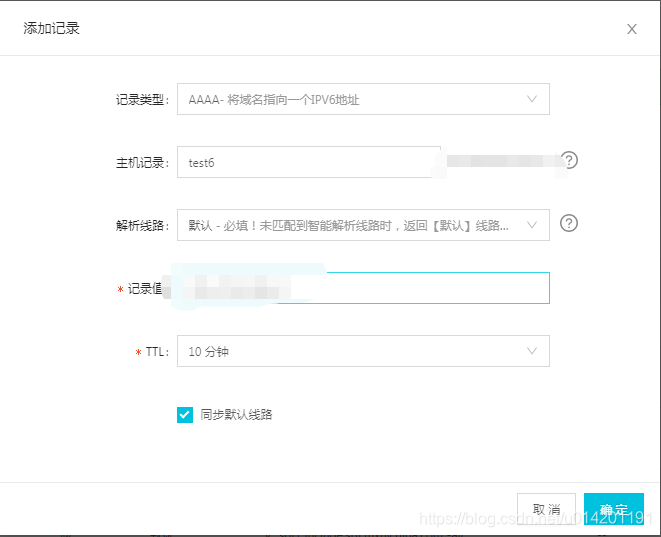
注意在填写ipv6地址的时候,后面的/24是不需要填写的;
8、使用测试网站进行域名测试http://ipv6-test.com/validate.php
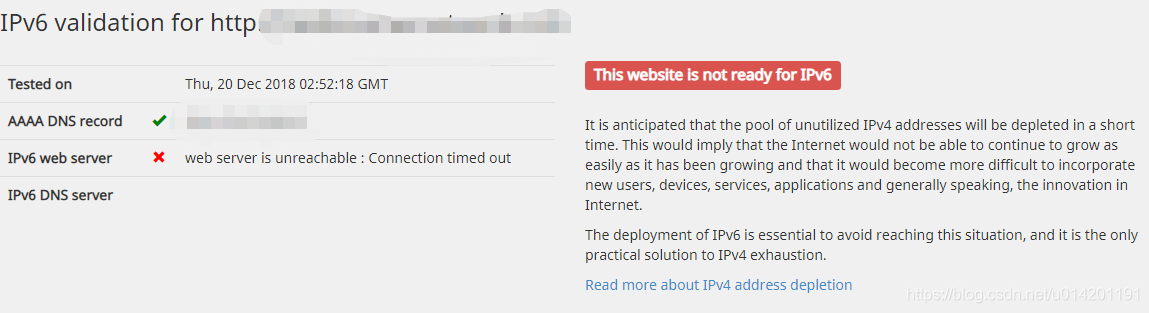
那此时此刻,我们的解析已经完成了,只是我们没有提供ipv6的访问服务,接下来使用nginx部署服务;
nginx开启IPV6支持配置
安装nginx的时候,使用--with-ipv6进行编译安装,然后添加对ipv6的监听;
-
server { -
listen 80; -
listen [::]:80 ipv6only=on; -
server_name example.com; -
…… -
}
接下来我们从刚才的测试网站,再次查看一下测评的效果:

这里有一个注意的地方,如果你购买的是阿里云的ecs,务必开放ipv4的所有安全组访问,这样才能ping通顺,另外,如果想检查ecs是否配置好了ipv6的网快,使用 ping -6 ipv6.google.com,如果返回信息中包含了字节数,那么恭喜你,配置完成了。感谢
另外,还有一个残留的问题,在执行命令后,如果机器重启,还需要在隧道上面执行命令,才能生效,如果大家有什么解决的办法,就在下面留言吧~