一. Java基础语法
1. 类型转换
        // 强制类型转换
        float a = 20.34f;
        int b = (int)a;
        //自动类型转换
        int c = 10;
        float d = c;
        //操作较大的数时,注意溢出问题
        //JDK7新特性,数字之间可以用下划线分割
        int money = 10_0000_0000;
        int years = 20;
        long total = money * years;//默认两个参数都是int,计算的时候产生溢出
        System.out.println(total);//-1474836480

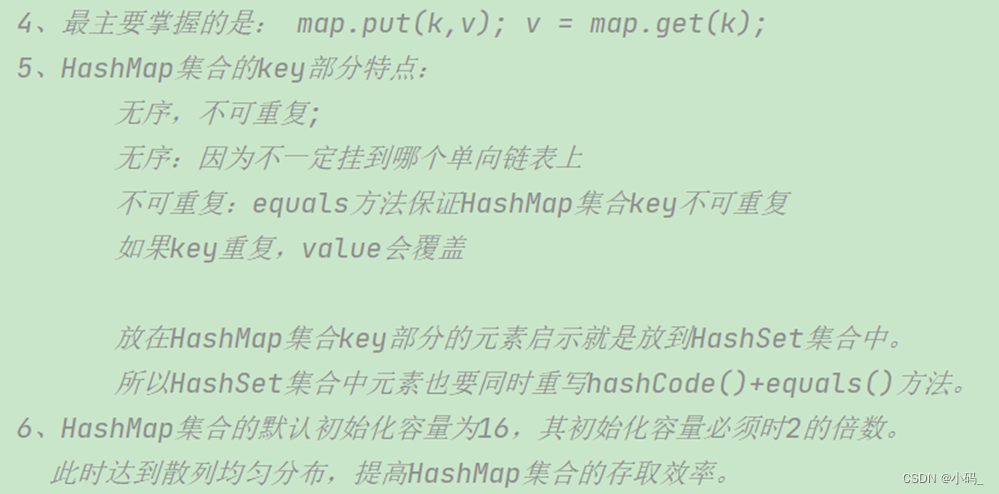
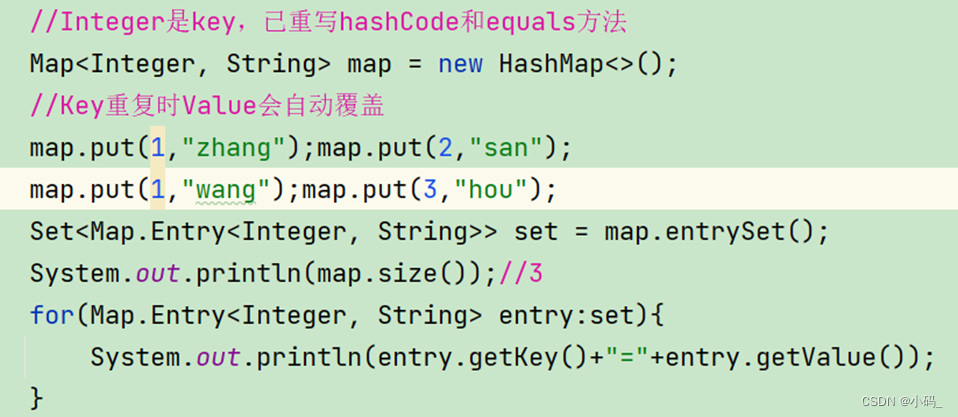
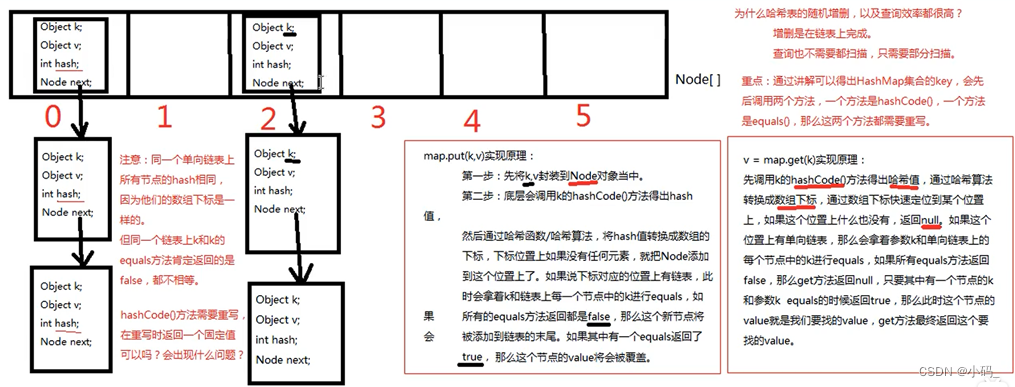
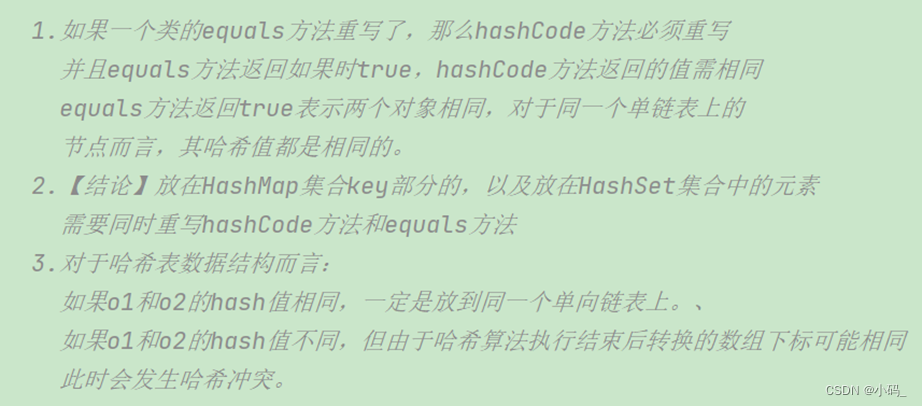
        long total_2 = money*((long)years);//先把一个数转化为long
        System.out.println(total_2);//20000000000
2. 方法
    public static void main(String[] args) {
        // 可变参数的传递
        Demo01 demo = new Demo01();
        demo.printMax(2,485,1,2,344,5);
    }

    public void printMax(int ...numbers){ //仅能为最后一个参数才能使用...}
3. 位运算
       //位运算
        /*
        * A = 0011 1100
        * B = 0000 1101
        * --------------
        * A & B = 0000 1100       对应位置都为1才为1
        * A | B = 0011 1101       对应位置有一个为1,结果为1
        * A ^ B = 0011 0001       对应位置相同为0,不同为1
        * ~ B = 1111 0010         对应位置取反
        *
        *
        * 2 * 8 =16,  2*2*2*2
        * << 左移  *2
        * >> 右移  /2
        *
        * 0000 0000   0
        * 0000 0001   1
        * 0000 0010   2
        * 0000 0011   3
        * 0000 0100   4
        * 0000 1000   8
        * 0001 0000   16
        *
        * */
4. 循环
        //增强for循环
        int[] numbers = {10,20,30,40};

        for (int x:numbers){
            System.out.println(x);
        }
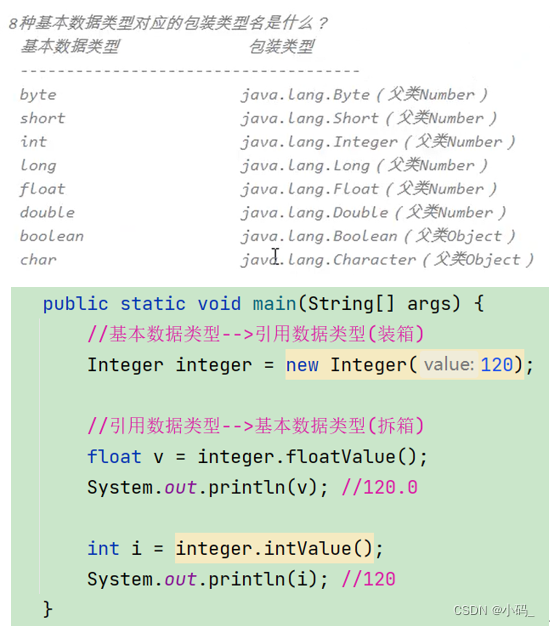
5. 装箱与拆箱
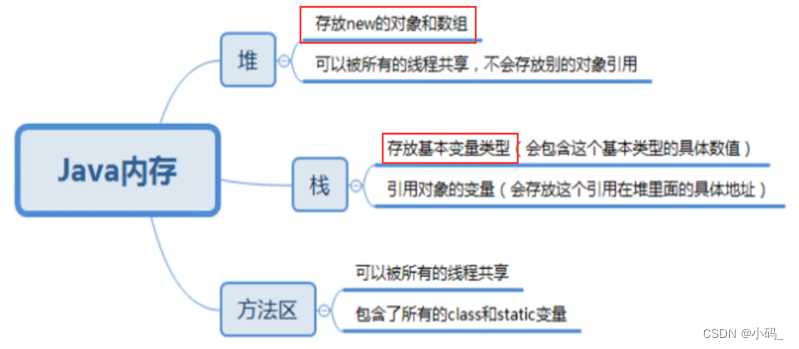
6. 内存分析
二. 面向对象
1. 概念
面向对象的本质:以类的方式组织代码,以对象的方式封装数据。
三大特性:封装,继承,多态。
2. 对象的初始化与创建
使用new关键字创建的时候,除了分配内存空间之外,还会给创建好的对象进行默认的初始化以及对类中的构造器的调用。一旦定义了有参构造,无参构造就必须要显示定义。
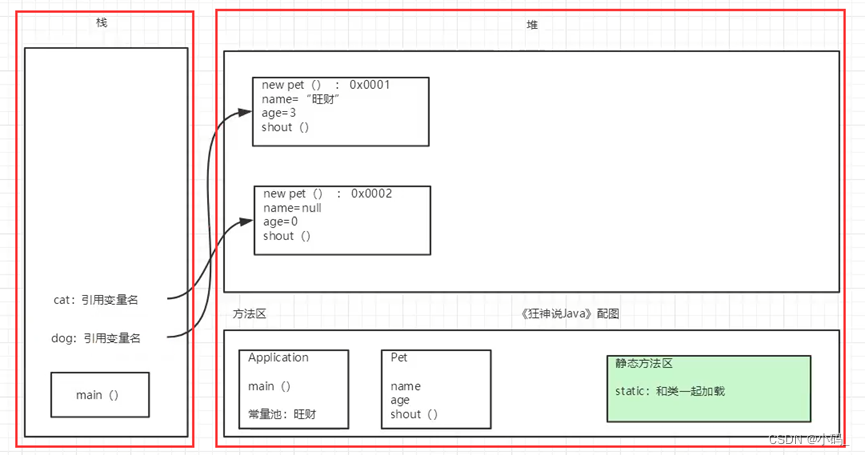
3. 创建对象的内存分析
4. 封装
程序设计的要求:“高内聚,低耦合”。高内聚就是类的内部数据操作细节自己完成,不允许外部干涉;低耦合:仅暴露少量的方法给外部使用。
封装(数据的隐藏):应禁止直接访问一个对象中数据的实际表示,而应通过操作接口来访问。
5. 继承
所有的类都默认直接或者间接继承Object类。JAVA中类只有单继承,无多继承。私有的东西无法被类继承。
6. 多态
多态存在的条件:① 有继承关系。② 子类重写父类的方法。③ 父类引用指向子类对象。④ 多态是方法的多态,属性没有多态。⑤ 对象能够执行的方法,主要看左边的类型。当子类重写了父类的方法,所调用的皆是子类的方法。
7. Instanceof
Java 中的instanceof 运算符是用来在运行时指出对象是否是特定类的一个实例。instanceof通过返回一个布尔值来指出,这个对象是否是这个特定类或者是它的子类的一个实例。
8. Static关键字、代码块
Static关键字:和类一起加载,可以直接通过 (类名.静态方法) 调用方法。
代码块:执行顺序:静态代码块 > 构造方法 > 匿名代码块。静态代码块只执行一次,即使有多个同一个类的实例,仍只运行一次。
9. 抽象类
① 抽象方法,只有方法的名字,没有方法的实现。② 不能new抽象类,只能靠子类来实现。③ 抽象方法必须在抽象类中,抽象类中可以有普通方法。 ③ 抽象类的所有方法,都需要由它的子类来实现。 除非子类为抽象类,则由子子类实现。
10. 接口
① Interface 定义的关键字,接口都需要有实现类。② 接口中所有方法都是抽象的:public abstract,接口只可做方法的声明。 ③ 类实现接口需要重写接口中的所有方法。④ 利用接口可以实现多继承。
11. 方法的重写和重载
-
方法的重写
① 需要有继承关系,子类重写父类的方法,与属性无关。
② 方法名相同,参数列表必须相同,方法体不同。
③ 修饰符范围可以扩大但不能缩小:public>protected>default>private。
④ 抛出的异常范围可以缩小但不能扩大。
⑤ 重写的原因:父类的功能,子类可能不需要或不满足。 -
方法的重载
① 重载就是在同一个类中,有相同的函数名称,但形参不同的函数。
② 方法名必须相同,参数列表必须不同(参数个数不同,或类型不同,或参数排列顺序不同等)
③ 方法的返回类型可以相同也可以不同。
④ 仅仅返回类型不同不足以构成方法的重载。
三. 异常处理
- 异常两大类:Exception、Error。
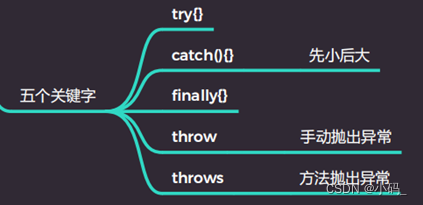
- 若多个catch捕获异常,异常等级由小到大。 Finally可以不要,一定会执行,用于处理善后工作。
- 自定义异常类:类继承Exception。Throw new MyException():抛出自定义异常。
四. 集合
1. 集合的概念
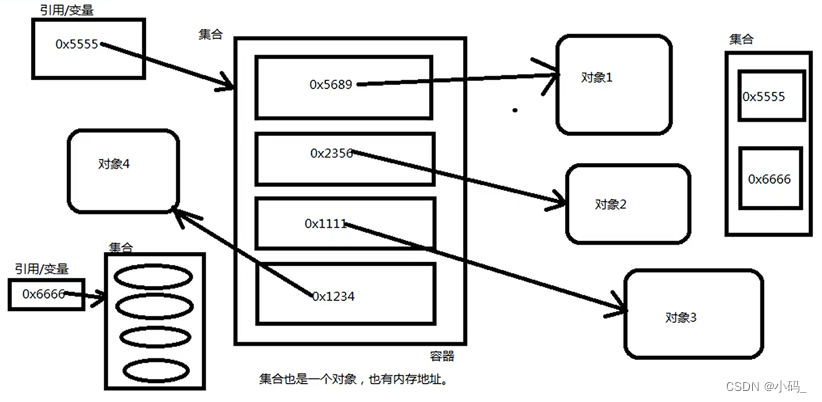
① 集合是对象的容器。
② 集合不能直接存储基本数据类型,集合也不能直接存储java对象,集合当中存储的都是java对象的内存地址。(或者说集合中存储的是引用)
③ 集合类和集合接口都在java.util.* 包下。
④ 数组可存储基本类型和引用类型,集合只能存储引用类型。
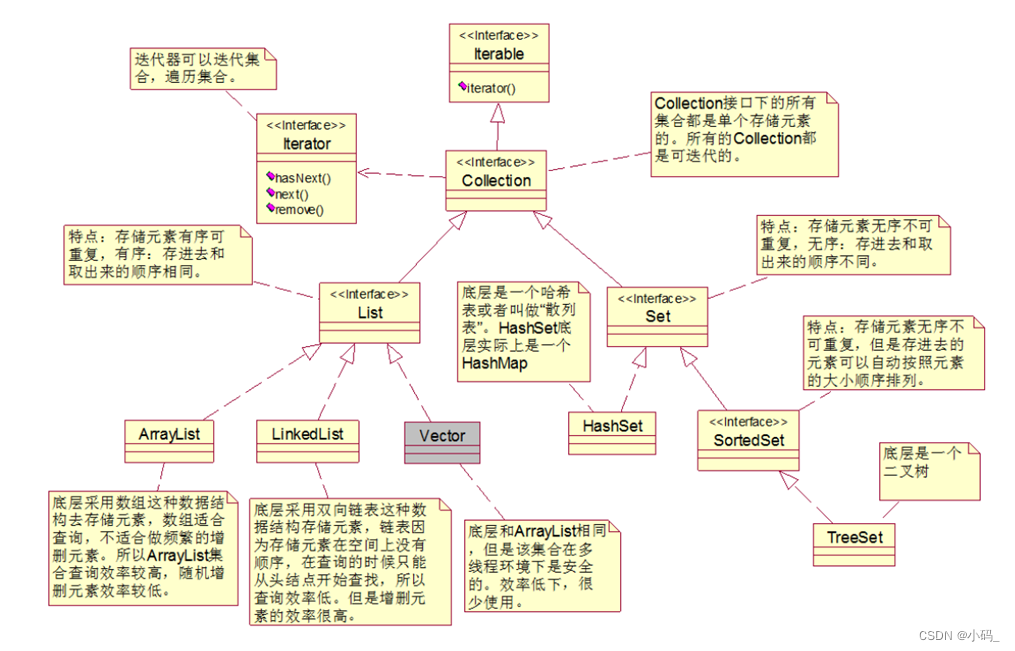
2. Collection体系
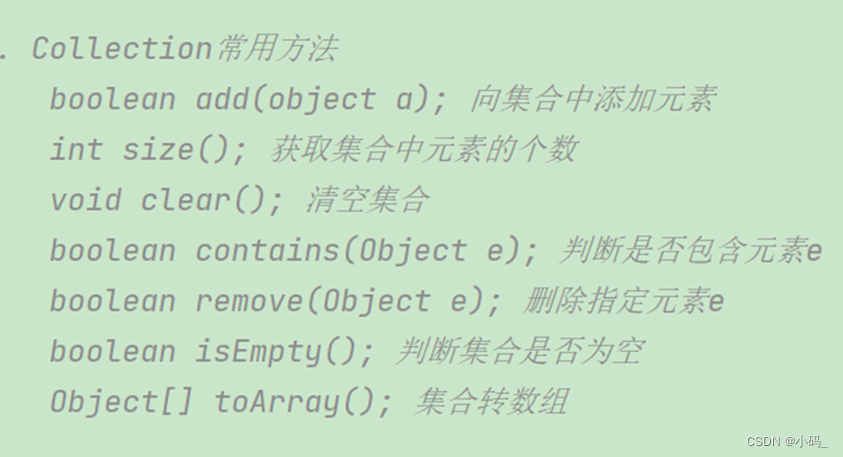
3. Collection中常用方法
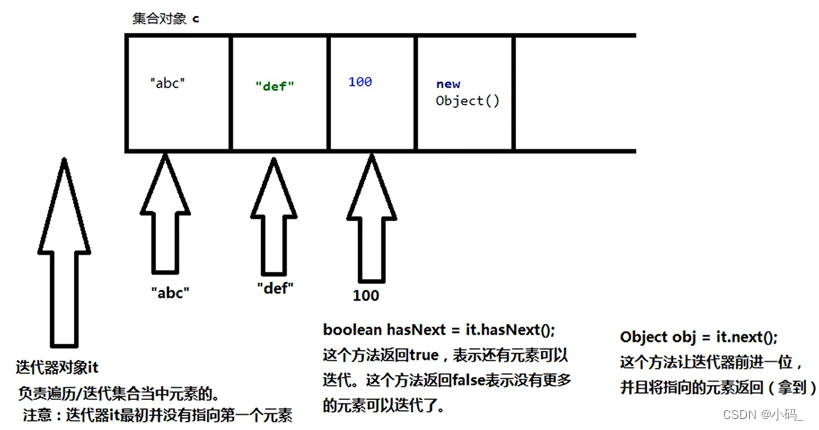
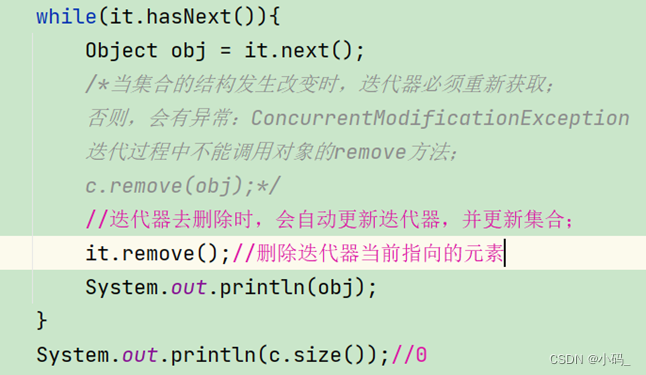
4. Iterator迭代器
 public static void main(String[] args) {
        //以下遍历方式/迭代方式,是所有collection通用的一种方式。 在Map集合中不能使用。
        //创建集合对象
        Collection c = new ArrayList();//后面的集合无所谓,主要是看前面的collection接口,怎么遍历/迭代。
        //添加元素
        c.add(120);
        c.add("hello");
        c.add(new Object());

        //对集合Collection进行遍历/迭代
        //第一步:获取集合对象的迭代器对象Iterator
        Iterator it = c.iterator();
        //第二步:通过上步获得的迭代器进行遍历
        /*
        * 迭代器对象iterator中的方法:
        * boolean hasNext(); 如果仍有元素可以迭代,返回true。
        * Object next(); 返回迭代的下一个元素。Object obj = it.next();
        * */
        System.out.println("集合中元素有:");
        while(it.hasNext()){
            Object o = it.next();
            System.out.println(o);
        }

    }
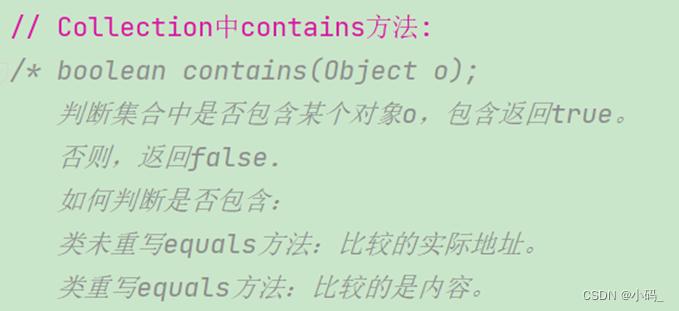
5. Contains方法
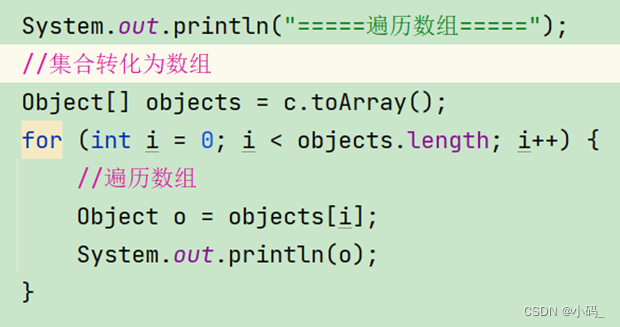
6. 集合转数组
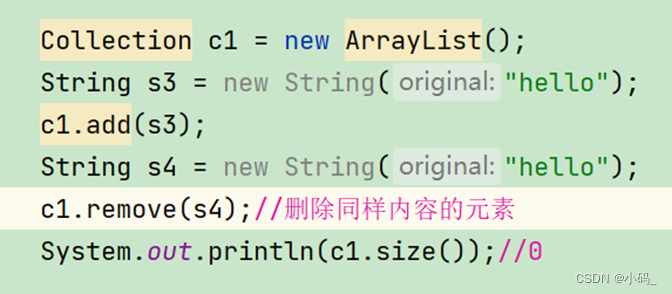
7. Remove方法
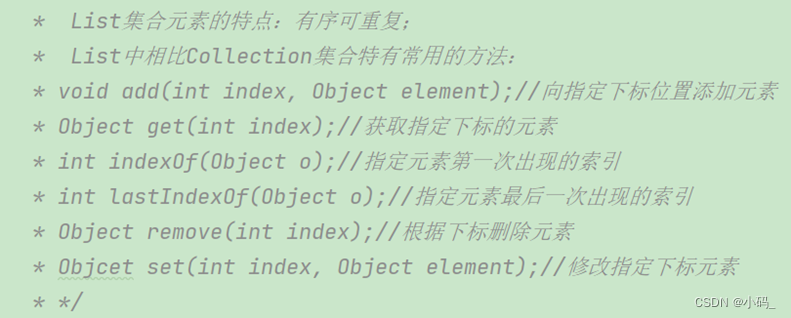
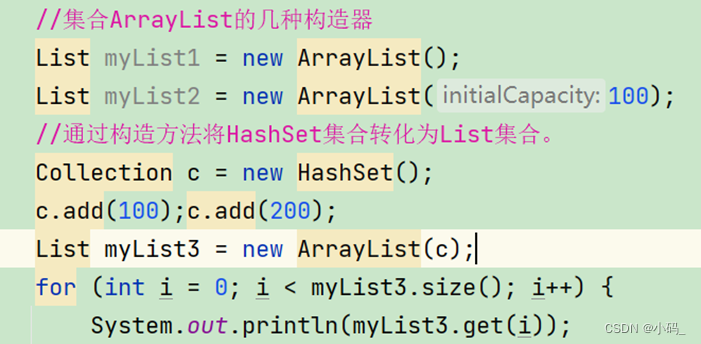
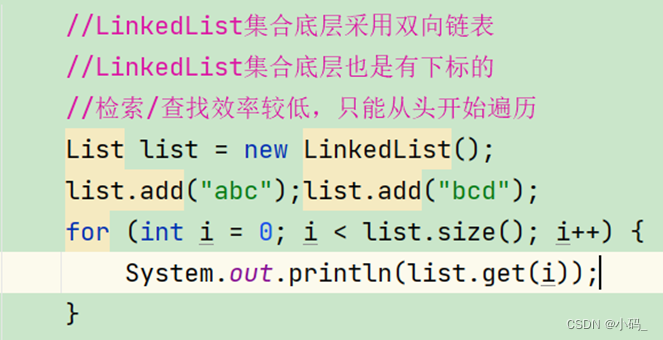
8. List集合
9. 泛型
10. HashSet集合
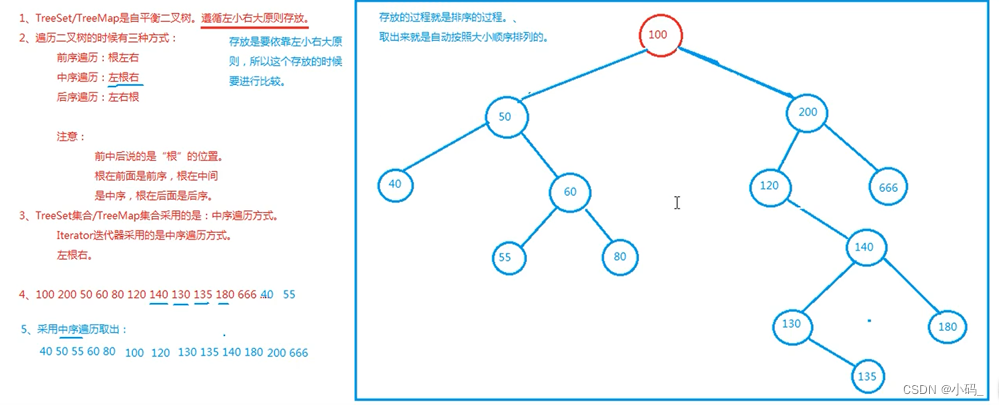
11. TreeSet集合
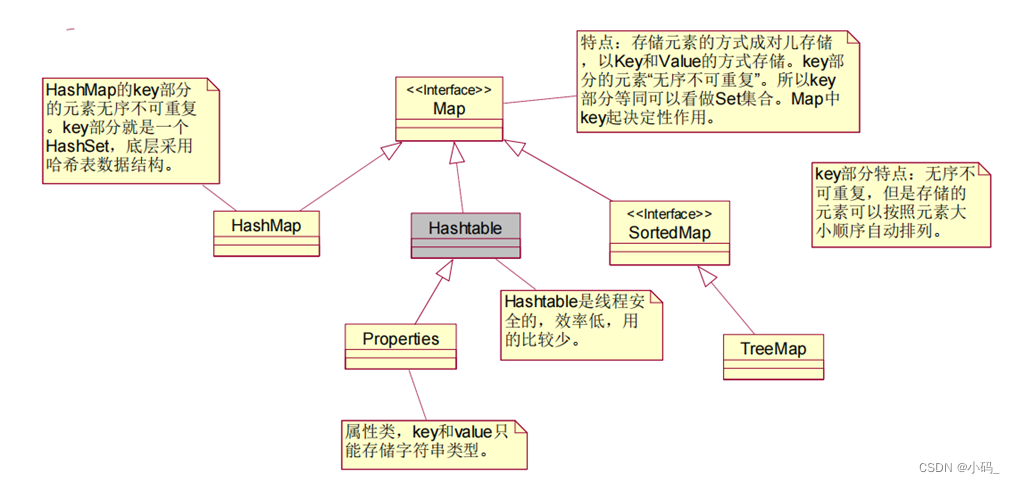
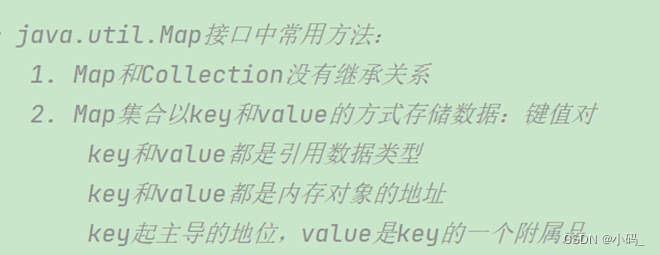
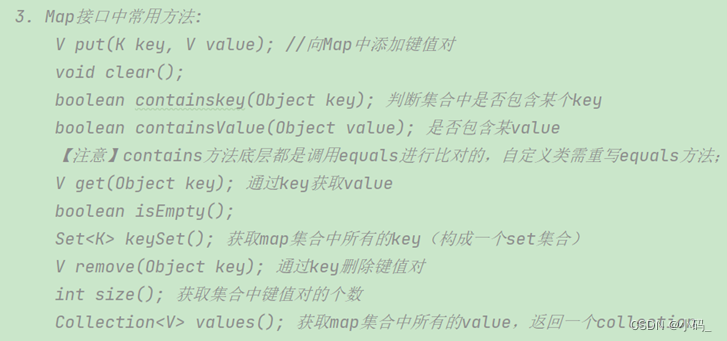
12. Map接口常用方法
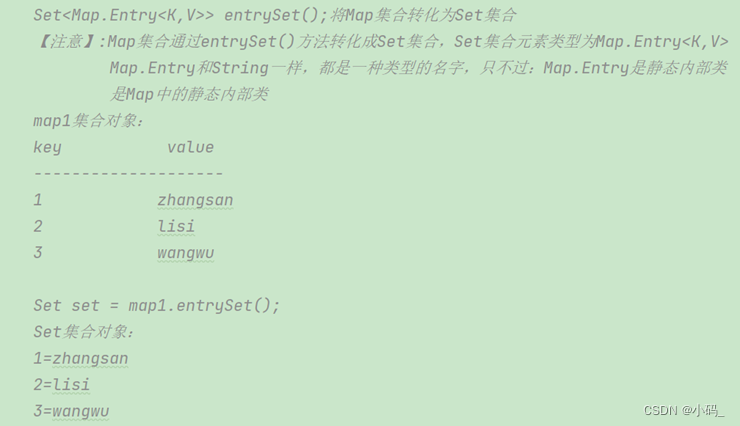
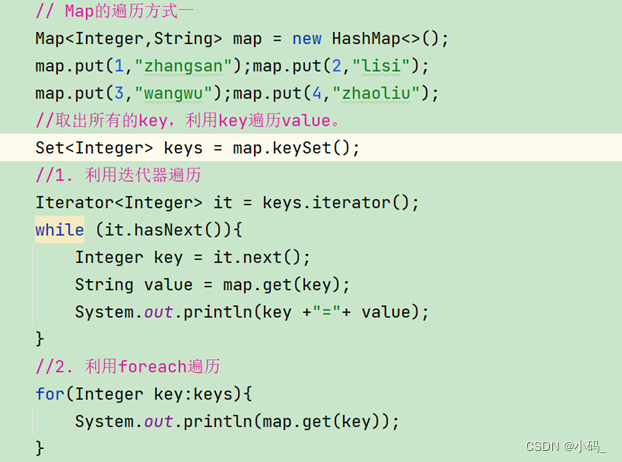
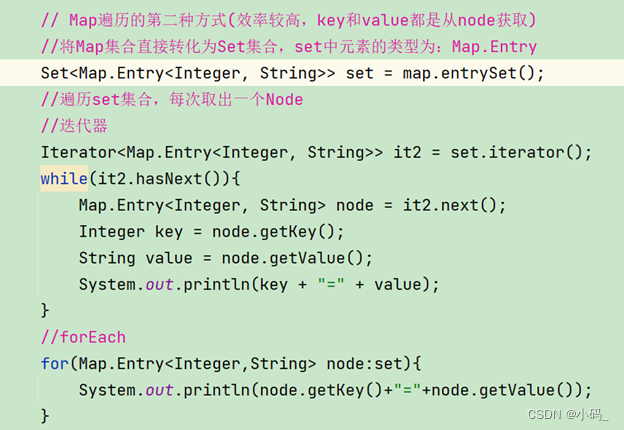
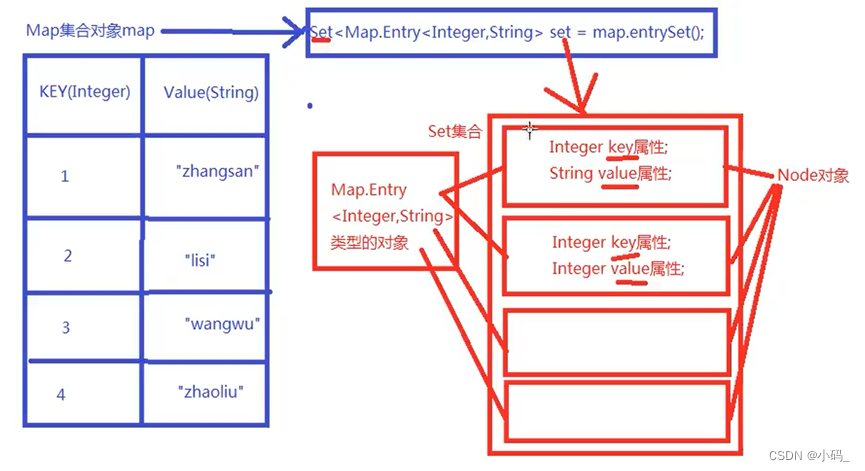
13. Map的遍历
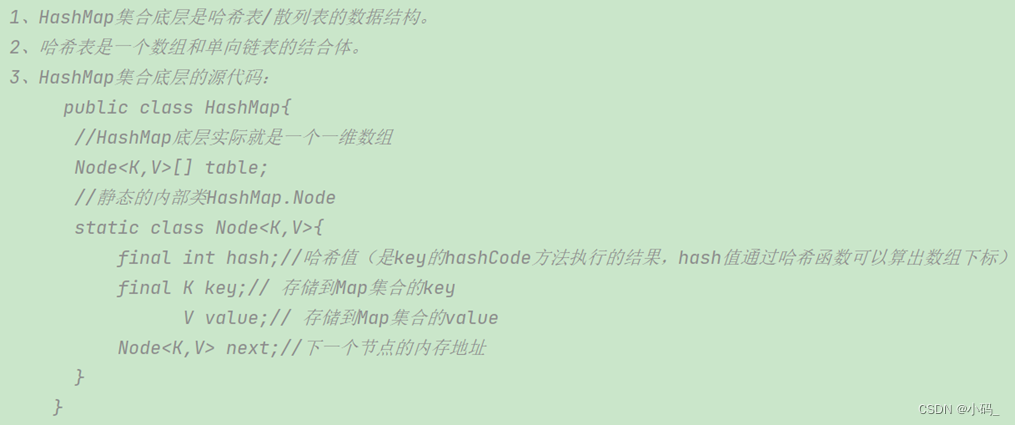
14. HashMap
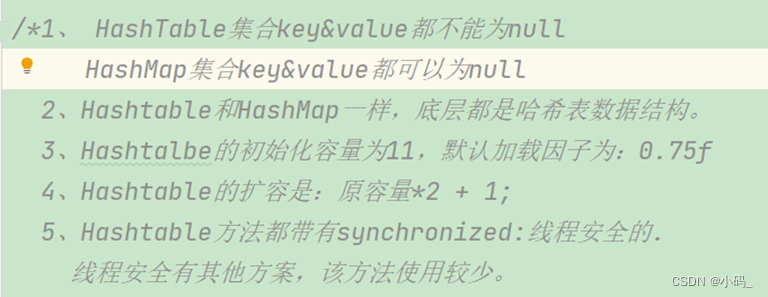
15. HashTable集合
16. Properties集合
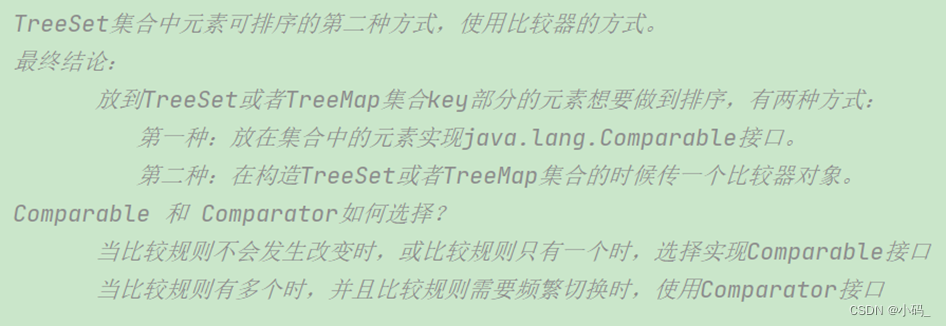
17. TreeSet集合元素排序
方法一:类实现Comparable接口,重写compareTo方法。

//自定义类型实现comparable接口,放在TreeSet集合后实现排序。
//放在TreeSet集合中的元素需要实现java.lang.Comparable接口。
//并且实现compareTo方法,equals方法可以不写。
class Customer implements Comparable<Customer>{
    int age;

    public Customer(int age) {
        this.age = age;
    }

    //需要在这个方法中实现比较的逻辑或规则,有程序员指定。
    @Override
    public int compareTo(Customer o) {
        return this.age - o.age;//比较年龄大小
    }

    @Override
    public String toString() {
        return "Customer{" +
                "age=" + age +
                '}';
    }
}
方法二:编写一个类,实现Comparator接口,重写compare方法。

//给构造方法传递一个比较器
TreeSet<WuGui> wuGuis = new TreeSet<>(new WuGuiComparator());
//单独写一个比较器,实现java.util.Comparator接口。
//而Comparable是Java.lang包下的。
class WuGuiComparator implements Comparator<WuGui> {
    @Override
    public int compare(WuGui o1, WuGui o2) {
        return o1.age - o2.age;
    }
}

class WuGui{
    int age;

    public WuGui(int age) {
        this.age = age;
    }

    @Override
    public String toString() {
        return "WuGui{" +
                "age=" + age +
                '}';
    }
}
方式三:匿名内部类,不单独写构造器。

//第三种方式使用匿名内部类,不用单独写构造器,直接new接口
TreeSet<WuGui> wuGuis = new TreeSet<>(new Comparator<WuGui>() {
	  @Override
	  public int compare(WuGui o1, WuGui o2) {
	     return o1.age - o2.age;
	  }
});
18. 自平衡二叉树
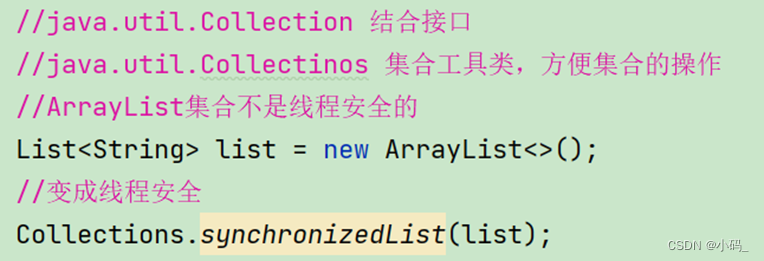
19. Collections工具类
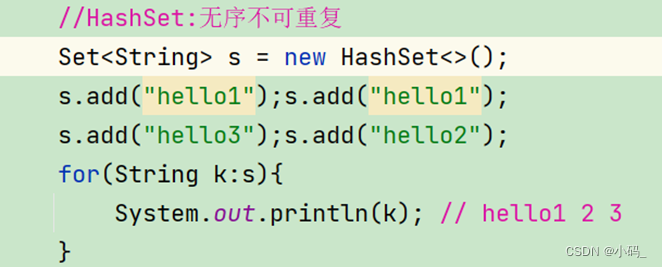
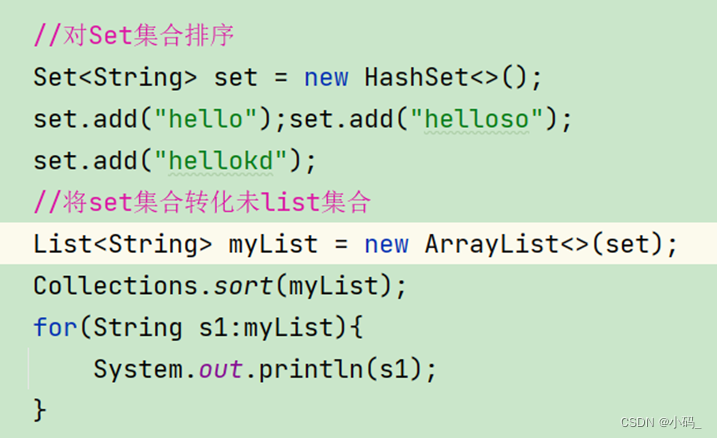
① HashSet输出的元素是无序的(存储自定义类型元素,需重写equals和hashcode方法,避免重复的问题),TreeSet输出的元素自动排序(实现接口,编写比较器)。
② HashMap中元素是没有顺序的;TreeMap中所有元素都是有某一固定顺序的。
五. IO流
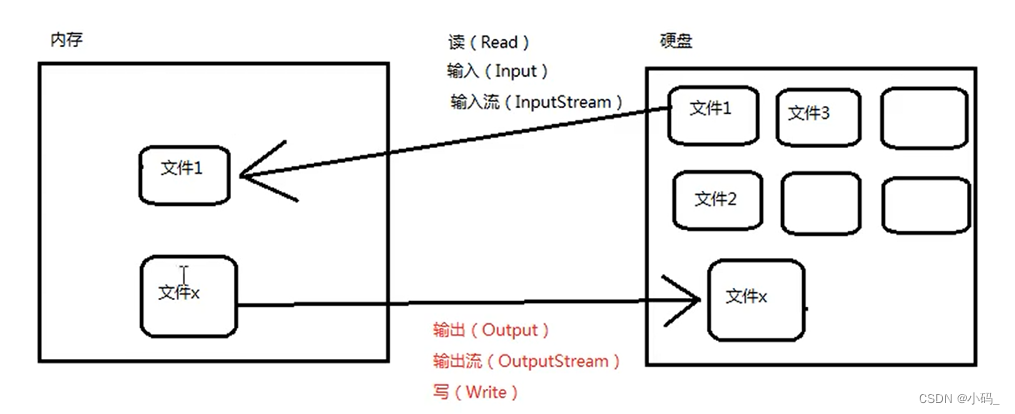
1. 什么是IO
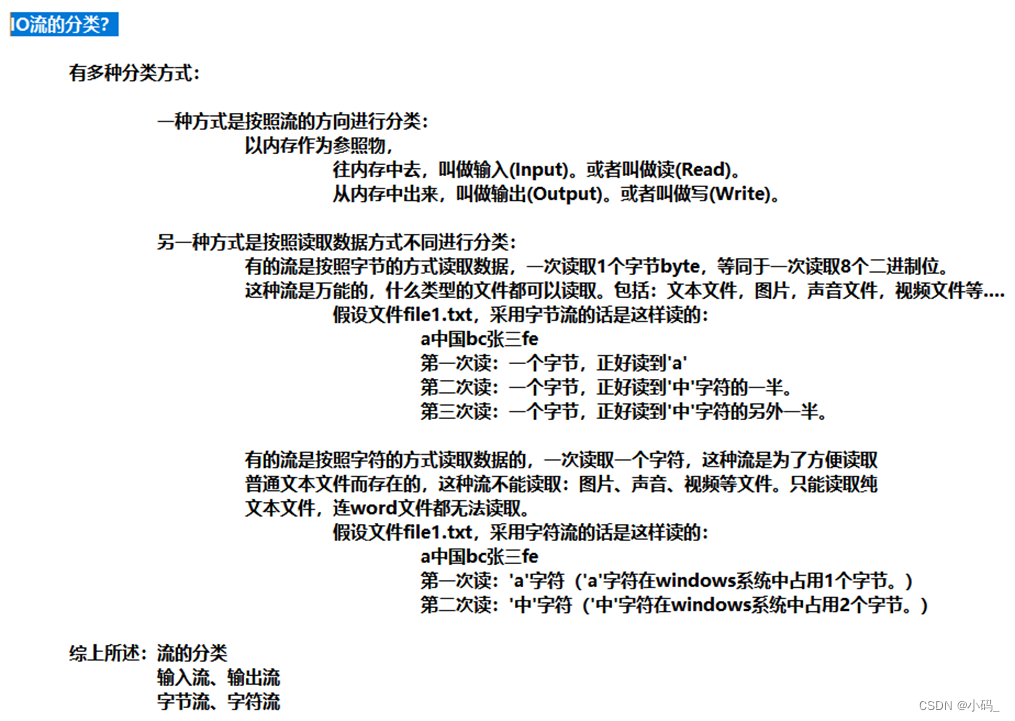
2. IO流的分类
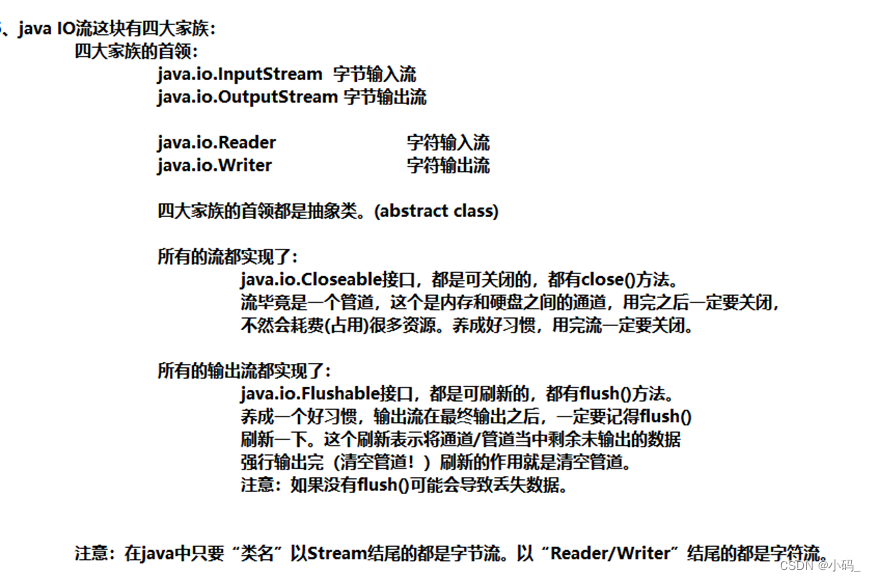
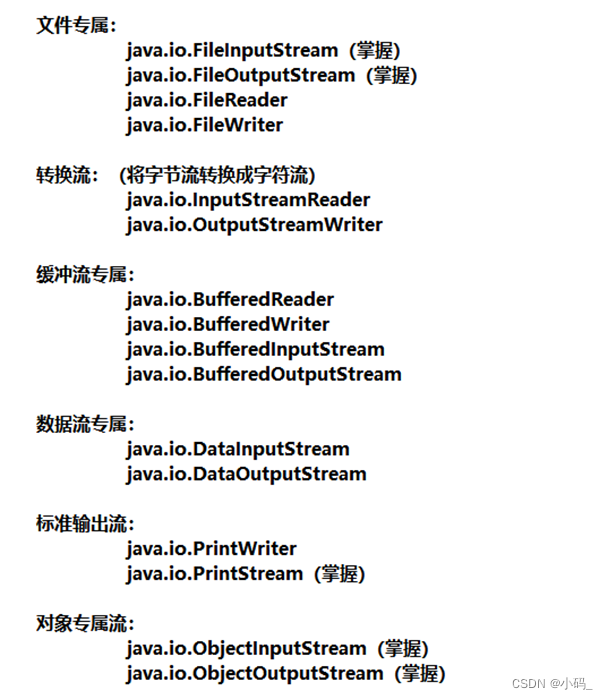
3. IO流四大家族
4. FileInputStream和FileOutputStream
public class FileInputStreamTest03 {
    public static void main(String[] args) {
        FileInputStream fis = null;
        try {
            fis = new FileInputStream("tempfile");
            byte[] bytes = new byte[4];
            int readCount = 0;
            while ((readCount = fis.read(bytes)) != -1){
                System.out.print(new String(bytes,0,readCount));
            }
        } catch (FileNotFoundException e) {
            e.printStackTrace();
        } catch (IOException e) {
            e.printStackTrace();
        } finally {
            if (fis != null) {
                try {
                    fis.close();
                } catch (IOException e) {
                    e.printStackTrace();
                }
            }
        }
    }
}
  public static void main(String[] args) {
        FileOutputStream fos = null;
        try {
            //文件不存在会自动新建
            //该语句执行时,会先清空文件内容,然后再写
//            fos = new FileOutputStream("testfile.txt");
            //以追加的方式在文件末尾写,不清空源文件
            fos = new FileOutputStream("testfile.txt",true);
            //开始写
            byte[] bytes = {97,98,99,100};
            //将byte数组全部写出
            fos.write(bytes); //abcd
            //将byte数组部分写出
            fos.write(bytes,0,2);//abcdab

            String s = "我是中国人";
            //将字符串转化为字符数组
            byte[] bs = s.getBytes();
            fos.write(bs);//abcdab我是中国人

            //输出流最后要刷新
            fos.flush();

        } catch (FileNotFoundException e) {
            e.printStackTrace();
        } catch (IOException e) {
            e.printStackTrace();
        } finally {
            if (fos != null) {
                try {
                    fos.close();
                } catch (IOException e) {
                    e.printStackTrace();
                }
            }
        }
    }
5. FileReader和FileWriter
   public static void main(String[] args) {
        FileReader reader = null;
        try {
            //创建文件字符流
            reader = new FileReader("tempfile");
            //开始读
            char[] chars = new char[4];
            //往char数组读
            reader.read(chars);
            for(char c : chars){
                System.out.print(c);
            }
/*            int readCount = 0;
            while((readCount = reader.read(chars)) != -1){
                System.out.print(new String(chars,0,readCount));
            }*/
        } catch (FileNotFoundException e) {
            e.printStackTrace();
        } catch (IOException e) {
            e.printStackTrace();
        } finally {
            if (reader != null) {
                try {
                    reader.close();
                } catch (IOException e) {
                    e.printStackTrace();
                }
            }
        }
    }
 public static void main(String[] args) {
        FileWriter out = null;
        try {
//            out = new FileWriter("myfile.txt");
            out = new FileWriter("myfile.txt",true);
            char[] chars = {'我','是','中','国','人'};
            out.write(chars);
            out.write(chars,0,2);

            out.write("java工程师");
            out.write("\n");
            out.write("你好");

            out.flush();

        } catch (IOException e) {
            e.printStackTrace();
        }finally {
            if (out != null) {
                try {
                    out.close();
                } catch (IOException e) {
                    e.printStackTrace();
                }
            }
        }
    }
6. 文件拷贝
    public static void main(String[] args) {
        FileInputStream fis = null;
        FileOutputStream fos = null;
        try {
            fis = new FileInputStream("E:\\PPT模板\\An Improved DV-Hop Localization Algorithm Based on Selected Anchors.pdf");
            fos = new FileOutputStream("E:\\An Improved DV-Hop Localization Algorithm Based on Selected Anchors.pdf");

            byte[] bytes = new byte[1024*1024]; //每次最多读取1M
            int readCount = 0;
            while((readCount = fis.read(bytes)) != -1){
                fos.write(bytes,0,readCount);
            }
            //刷新
            fos.flush();
            //fos和fis关闭时,分开try。否则会影响另一个。


        } catch (FileNotFoundException e) {
            e.printStackTrace();
        } catch (IOException e) {
            e.printStackTrace();
        } finally {
            //fos和fis关闭时,分开try。否则会影响另一个。
            if (fos != null) {
                try {
                    fos.close();
                } catch (IOException e) {
                    e.printStackTrace();
                }
            }

            if (fis != null) {
                try {
                    fis.close();
                } catch (IOException e) {
                    e.printStackTrace();
                }
            }
        }
 public static void main(String[] args) {
        FileReader fr = null;
        FileWriter fw = null;
        try {

            fr = new FileReader("javase/src/com/IOStream/FileReaderTest01.java");
            fw = new FileWriter("fileReaderText.txt");

            char[] chars = new char[1024*512];
            int readCount = 0;
            while ((readCount = fr.read(chars)) != -1){
                fw.write(chars,0,readCount);
            }

            fw.flush();

        } catch (FileNotFoundException e) {
            e.printStackTrace();
        } catch (IOException e) {
            e.printStackTrace();
        }finally {
            if (fw != null) {
                try {
                    fw.close();
                } catch (IOException e) {
                    e.printStackTrace();
                }
            }

            if (fr != null) {
                try {
                    fr.close();
                } catch (IOException e) {
                    e.printStackTrace();
                }
            }
        }
    }
7. BufferedReader和BufferedWriter
 public static void main(String[] args) throws Exception{
        //当一个流的构造方法中需要一个流时,被传进来的流称为节点流
        //外部负责包装的这个流叫包装流或处理流
        FileReader reader = new FileReader("fileReaderText.txt");//节点流
        BufferedReader br = new BufferedReader(reader);//包装流

        //读行
        String s = null;
        while ((s = br.readLine()) != null){//读一行文本,不读换行符
            System.out.println(s);
        }

        br.close();//关闭包装流自动关闭节点流
    }
    public static void main(String[] args) throws Exception{

        //字节流
        FileInputStream in = new FileInputStream("fileReaderText.txt");
        //字节流转化为字符流
        InputStreamReader reader = new InputStreamReader(in);
        //BufferedReader构造器只能传字符流
        BufferedReader br = new BufferedReader(reader);

//        //以上合并写法:
//        BufferedReader br = new BufferedReader(new InputStreamReader
//                (new FileInputStream("fileReaderText.txt")));

        String s = null;
        while ((s = br.readLine()) != null){
            System.out.println(s);
        }

        br.close();
    }
    public static void main(String[] args) throws Exception{
//        BufferedWriter bw = new BufferedWriter(new FileWriter("copy.txt"));
        BufferedWriter bw = new BufferedWriter(new OutputStreamWriter
                (new FileOutputStream("copy.txt",true)));//追加
        bw.write("hello");bw.write("\n");
        bw.write("houshuaixin");
        bw.flush();bw.close();
    }
8. PrintStream
    public static void main(String[] args) throws FileNotFoundException {
        //java.io.PrintStream:标准的字节输入流,默认输出至控制台
        //分开写,标准输出流不需要close()关闭
        PrintStream ps = System.out;
        ps.println("hello");ps.println("better");
        //联合写
        System.out.println("helloword");

        //改变标准输出流的输出方向
        //标准输出流不在指向控制台,指向“log”文件
        PrintStream printStream = new PrintStream(new FileOutputStream("log.txt"));
        //修改输出方向至“log.txt”文件
        System.setOut(printStream);
        System.out.println("helloword");
        System.out.println("hellokitty");
    }
六. 注解
//测试元注解
@MyAnnotation
public class TestAnnotation01 {
    public void test(){

    }
}

//定义一个注解
//Target 表示我们的注解可以用在那些地方
@Target(value = {ElementType.METHOD,ElementType.TYPE})

//Retention 表示我们的注解在什么地方还有效
// runtime>class>source
@Retention(value = RetentionPolicy.RUNTIME)

//Documented 表示是否将我们的注解生成在JAVAdoc中
@Documented

//Inherited 子类可以继承父类的注解
@Inherited

@interface MyAnnotation{

}
使用@interface自定义注解时,自动继承了java.lang.annotation.Annotation接口。
//自定义注解
public class TestAnnotation02 {
    //注解可以显式赋值,如果没有默认值,必须给注解赋值。
    @MyAnnotation2(name = "hou")
    public void test(){}
}

@Target({ElementType.TYPE,ElementType.METHOD})
@Retention(RetentionPolicy.RUNTIME)
@interface MyAnnotation2{
    //注解的参数:参数类型 + 参数名 + ();
    String name();
    //String name() default "";
    int age() default 15;
    String[] schools() default {"北大","清华"};
}
七. 反射
1. Class类
① Class本身也是一个类,Class对象只能由系统建立。
②一个加载的类在JVM中只会有一个Class实例(Class对象只有一个)。
③ 一个Class对象对应的是一个加载到JVM中的一个 .class 文件。
④ 通过Class实例可以获得一个类中所有被加载的结构。
2. Class类的实例
    public static void main(String[] args) throws ClassNotFoundException {
        //通过反射获取类的Class对象
        Class c1 = Class.forName("Reflections.User");
        System.out.println(c1); //class Reflections.User

        Class c2 = Class.forName("Reflections.User");
        Class c3 = Class.forName("Reflections.User");

        //一个类在内存中只有一个Class对象
        //一个类被加载后,类的整个结构都会被封装在Class对象中
        System.out.println(c1.hashCode());//21685669
        System.out.println(c2.hashCode());//21685669
        System.out.println(c3.hashCode());//21685669
    }
3. Class类的创建方式
    public static void main(String[] args) throws ClassNotFoundException {
        Person person = new Student();
        System.out.println("这个人是:"+person.name);

        //方式一:通过对象获得
        Class c1 = person.getClass();
        System.out.println(c1);//class Reflections.Student

        //方式二:forname获得
        Class c2 = Class.forName("Reflections.Student");
        System.out.println(c2);//class Reflections.Student

        //方式三:通过类名.class获得
        Class c3 = Student.class;
        System.out.println(c3);//class Reflections.Student

        //方式四:基本内置类型的包装类有一个TYPE属性
        Class c4 = Integer.TYPE;
        System.out.println(c4);//int

        //获得父类类型
        Class c5 = c1.getSuperclass();
        System.out.println(c5);//class Reflections.Person
    }
4. 类加载器
    public static void main(String[] args) throws ClassNotFoundException {

        //获取系统类加载器
        ClassLoader systemClassLoader = ClassLoader.getSystemClassLoader();
        System.out.println(systemClassLoader);

        //获取系统类加载器的父类加载器---》扩展类加载器
        ClassLoader parent = systemClassLoader.getParent();
        System.out.println(parent);

        //获取扩展类加载器的父类加载器---》根加载器(C、C++)
        ClassLoader parent1 = parent.getParent();
        System.out.println(parent1); //null

        //测试当前类是那个加载器加载的
        ClassLoader classLoader = Class.forName("Reflections.Test04").getClassLoader();
        System.out.println(classLoader);

        //测试JDK内置的类是谁加载的
        ClassLoader classLoader1 = Class.forName("java.lang.Object").getClassLoader();
        System.out.println(classLoader1);
    }
5. 获取类运行时完整结构
    public static void main(String[] args) throws ClassNotFoundException, NoSuchFieldException, NoSuchMethodException {
        Class c1 = Class.forName("Reflections.User");

        //获得类的名字
        System.out.println(c1.getName());//获得包名+类名
        System.out.println(c1.getSimpleName()); //获得类名

        //获得类的属性
        System.out.println("==========获得类的属性===========");
        Field[] fields = c1.getFields(); //只能找到public属性
        fields = c1.getDeclaredFields(); //找到所有属性
        for (Field field:fields){
            System.out.println(field);
        }

        //获得指定类型的属性
        Field name = c1.getDeclaredField("name");
        System.out.println(name);

        //获得类的方法
        System.out.println("==========获得类的方法===========");
        Method[] methods = c1.getMethods(); // 获得本类及其父类的所有public方法
        methods = c1.getDeclaredMethods(); // 获得本类的所有方法
        for(Method method:methods){
            System.out.println(method);
        }

        //获得指定方法(因重载问题,需出入指定方法的参数)
        Method getName = c1.getMethod("getName", null);
        Method setName = c1.getMethod("setName", String.class);
        System.out.println(getName);
        System.out.println(setName);

        //获得类的构造器
        System.out.println("==========获得指定的构造器===========");
        Constructor[] constructors = c1.getConstructors();//本类的public
        constructors = c1.getDeclaredConstructors();//本类所有的

        //获得类的指定构造器
        Constructor deConstructor = c1.getDeclaredConstructor(String.class, int.class, int.class);
        System.out.println(deConstructor);

    }
6. 动态创建对象调用方法和属性
    public static void main(String[] args) throws ClassNotFoundException, InstantiationException, IllegalAccessException, NoSuchMethodException, InvocationTargetException, NoSuchFieldException {

        //获得class对象
        Class c1 = Class.forName("Reflections.User");

        //创建一个对象   (针对有无参构造器)
        User user1 = (User) c1.newInstance(); //本质是调用了类的无参构造
        System.out.println(user1);

        //通过构造器创建对象   (针对没有无参构造器)
        Constructor constructor = c1.getDeclaredConstructor(String.class, int.class, int.class);
        User user2 = (User)constructor.newInstance("hou", 45, 12);
        System.out.println(user2);

        //通过反射调用普通方法
        User user3 = (User) c1.newInstance();
        //通过反射获得一个方法
        Method setName = c1.getDeclaredMethod("setName", String.class);
        setName.invoke(user3,"hou");//invoke(对象,“传入的值”)
        System.out.println(user3.getName());

        //通过反射操作属性
        User user4 = (User)c1.newInstance();
        Field name = c1.getDeclaredField("name");
        //不能直接操作私有属性,需关闭程序的安全检测,属性(方法).setAccessible(true);
        name.setAccessible(true);
        name.set(user4,"侯帅鑫");
        System.out.println(user4.getName());

    }
八. 多线程
1. 概念
① 进程:是一次执行程序的过程,是系统资源分配的单位。
② 线程:一个进程通常包括若干个线程,一个进程中至少有一个线程,线程是CPU调度和执行的单位。
③ Main()为主线程,为系统的入口。
2. 创建线程的三种方式
① 自定义类继承Thread类,重写run方法,创建线程对象,调用start方法启动。
② 自定义类实现Runnable接口,重现run方法。
③ 自定义类实现Callable接口,重写call方法,需抛出异常。
public class TestThreads {
    public static void main(String[] args) {
        //方式一启动线程
        new MyThread1().start();

        //方式二启动线程
        new Thread(new MyThread2()).start();

        //方式三启动线程(了解)
        FutureTask<Integer> futureTask = new FutureTask<>(new MyThread3());
        new Thread(futureTask).start();

        Integer integer = null;
        try {
            integer = futureTask.get();
        } catch (InterruptedException e) {
            e.printStackTrace();
        } catch (ExecutionException e) {
            e.printStackTrace();
        }
        System.out.println(integer);
    }
}

//1.继承Thread类
class MyThread1 extends Thread{
    @Override
    public void run() {
        System.out.println("MyThread1");
    }
}

//2.实现Runnable接口
class MyThread2 implements Runnable{

    @Override
    public void run() {
        System.out.println("MyThread2");
    }
}

//3.实现Callable接口
class MyThread3 implements Callable<Integer>{
    @Override
    public Integer call() throws Exception {
        System.out.println("MyThread3");
        return 100;
    }
}
3. 静态代理
① 真实角色和代理角色都要实现同一个接口。
② 代理对象要代理真实角色。
③ 优点:代理对象可以做真实对象做不了的事,真实对象专注于做自己的事。
//静态代理
public class StaticProxy {
    public static void main(String[] args) {
        You you = new You();
        new Thread( ()-> System.out.println("我爱你")).start();
        new WeddingComp(new You()).HappyMarry();
    }
}

interface Marry{

    void HappyMarry();

}

//真是角色
class You implements Marry{

    @Override
    public void HappyMarry() {
        System.out.println("我要结婚了");
    }
}

//代理角色
class WeddingComp implements Marry{

    private Marry target;

    public WeddingComp(Marry target) {
        this.target = target;
    }

    @Override
    public void HappyMarry() {
        before();
        this.target.HappyMarry();
        after();
    }

    private void after() {
        System.out.println("收尾款");
    }

    private void before() {
        System.out.println("布置婚礼现场");
    }
}
4. Lambda表达式
public class TestLambda02 {

    public static void main(String[] args) {

        // Lambda表示简化
        ILove iLove = (int a)->{
            System.out.println("I Love You -->" + a);
        };

        //简化1.参数类型
        iLove = (a)->{
            System.out.println("I Love You -->" + a);
        };

        //简化2,简化括号
        iLove = a->{
            System.out.println("I Love You -->" + a);
        };

        //简化3,去掉花括号 ,仅适用于只有一行代码的情况
        iLove = a -> System.out.println("I Love You -->" + a);

        //前提接口为函数式接口
        //多个参数的类型名可同时省略,但括号必须保留

        iLove.love(2);
    }

}
interface ILove{  //函数式接口
    void love(int a);
}
5. 停止线程
//停止线程
//测试Stop
//1.建议线程正常停止--->利用次数,不建议死循环
//2.建议使用标志位---->设置一个标志位
//3.不要使用stop或者destroy等过时或者JDK不建议使用的方法
public class TestStop implements Runnable{

    //1.设置一个标识位
    private boolean flag = true;

    @Override
    public void run() {
        int i = 0;
        while(flag){
            System.out.println("run....." + i++);
        }
    }

    //2.设置一个公开的方法停止线程
    public void stop(){
        this.flag = false;
    }

    public static void main(String[] args) {

        TestStop testStop = new TestStop();
        new Thread(testStop).start();

        for (int i = 0; i < 1000; i++) {
            System.out.println("main--->"+i);
            if(i == 900){
                //转换标识位,停止线程
                testStop.stop();
                System.out.println("线程停止==========");
            }
        }

    }
}
6. 线程休眠
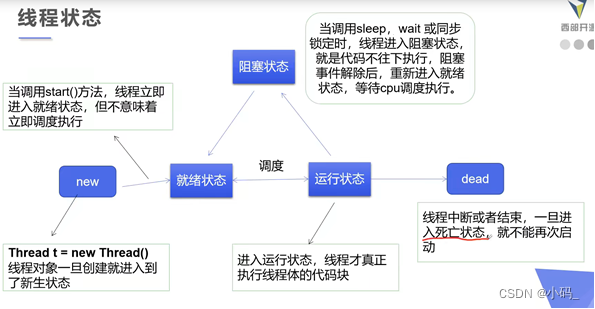
sleep时间达到后线程进入就绪状态,sleep可以模拟网络延时,倒计时等。每个对象都有一个锁,sleep不会释放锁。
//模拟倒计时
public class TestSleep {
    public static void main(String[] args) {

        //倒计时
        try {
            tenDown();
        } catch (InterruptedException e) {
            e.printStackTrace();
        }

        //打印当前系统时间
        Date startTime = new Date(System.currentTimeMillis());//获取系统当前时间

        while (true){
            try {
                Thread.sleep(1000);
                System.out.println(new SimpleDateFormat("HH:mm:ss").format(startTime));
                startTime = new Date(System.currentTimeMillis());
            } catch (InterruptedException e) {
                e.printStackTrace();
            }
        }
    }

        //模拟倒计时
    public static void tenDown() throws InterruptedException {
        int num = 10;
        while(true){
            Thread.sleep(1000);
            System.out.println(num--);
            if(num<=0){
                break;
            }
        }
    }
}
7. 线程礼让
让当前正在执行的线程暂停,但不阻塞,将线程由运行状态转为就绪状态,让cpu重新调度,礼让不一定成功,看cpu心情。
//测试线程礼让
public class TestYield implements Runnable{

    @Override
    public void run() {
        System.out.println(Thread.currentThread().getName() + "线程开始");
        Thread.yield();//线程礼让,礼让不一定成功,看CPU心情
        System.out.println(Thread.currentThread().getName() + "线程停止");
    }

    public static void main(String[] args) {

        TestYield testYield = new TestYield();

        new Thread(testYield,"a").start();
        new Thread(testYield,"b").start();

    }
}
8. 线程强制执行
待该线程执行完后,再执行其他线程,使其他线程阻塞,可以想象为插队。
public class TestJoin implements Runnable{
    @Override
    public void run() {
        for (int i = 0; i < 500; i++) {
            System.out.println("线程Vip。。。。。" + i);
        }
    }
    public static void main(String[] args) {
        //启动线程
        TestJoin testJoin = new TestJoin();
        Thread thread = new Thread(testJoin);
        thread.start();
        //主线程
        for (int i = 0; i < 300; i++) {
            if(i==200){
                try {
                    thread.join();//线程插队
                } catch (InterruptedException e) {
                    e.printStackTrace();
                }
            }
            System.out.println("主线程。。。" + i);
        }
    }
}
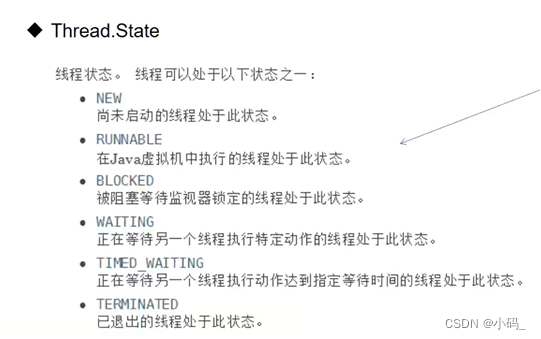
9. 线程状态
10. 线程优先级
线程的优先级用数字表示,范围1-10。优先级低只是表示获得调度的概率低,并不是优先级低不会被调用,具体要看CPU的调度。改变优先级和获取优先级:setPriority(int xxx)、getPriority()。
//测试线程优先级
public class TestPriority {
    public static void main(String[] args) {
        //主线程的优先级
        System.out.println(Thread.currentThread().getName()+"--->"+Thread.currentThread().getPriority());

        MyPriority myPriority = new MyPriority();

        Thread t1 = new Thread(myPriority);
        Thread t2 = new Thread(myPriority);
        Thread t3 = new Thread(myPriority);
        Thread t4 = new Thread(myPriority);

        t1.setPriority(8);t1.start();

        t2.setPriority(1);t2.start();

        t3.setPriority(Thread.MAX_PRIORITY);t3.start();

        t4.setPriority(6);t4.start();
    }
}

class MyPriority implements Runnable{
    @Override
    public void run() {
        System.out.println(Thread.currentThread().getName()+"--->"+Thread.currentThread().getPriority());
    }
}
11. 守护线程
线程分为用户线程和守护线程。虚拟机必须确保用户线程执行完毕,不用等待守护线程执行完毕。
public class TestDaemon {
    public static void main(String[] args) {
        God god = new God();
        Your your = new Your();

        Thread thread = new Thread(god);
        thread.setDaemon(true); //默认是false表示用户线程,正常的线程都是用户线程。
        thread.start();//上帝守护线程启动,虽然god为死循环,但是用户线程结束后,它也结束

        new Thread(your).start();//你,用户线程启动
    }

}

//上帝
class God implements Runnable{

    @Override
    public void run() {
        while(true){
            System.out.println("上帝守护着你");
        }
    }
}
//你
class Your implements Runnable{

    @Override
    public void run() {
        for (int i = 0; i < 36500; i++) {
            System.out.println("开心每一天");
        }
        System.out.println("=================goodbye==================");
    }
}
12. 线程同步机制
多个线程操作同一个资源。线程同步形成的条件:队列+锁。锁机制:synchronized。
Synchronized默认锁的是this。锁的对象就是变化的量,需要增删改查的对象。
同步块:synchronized(obj){ }
//不安全的买票方案
public class UnSafeBuyTicket {
    public static void main(String[] args) {
        BuyTicket station = new BuyTicket();

        new Thread(station,"aa").start();
        new Thread(station,"bb").start();
        new Thread(station,"cc").start();
    }

}

class BuyTicket implements Runnable{

    private int ticketNums = 10;
    boolean flag = true;
    @Override
    public void run() {
        while(flag){
            try {
                buy();
            } catch (InterruptedException e) {
                e.printStackTrace();
            }
        }
    }
    //同步方法,安全的
    //public synchronized void buy() throws InterruptedException
    public  void buy() throws InterruptedException {
        if(ticketNums<=0){
            flag = false;
            return;
        }
        //模拟延时
        Thread.sleep(100);
        System.out.println(Thread.currentThread().getName() + "拿到----->" + ticketNums--);
    }
}
13. 死锁
死锁产生的条件:
① 互斥条件:一个资源每次只能被一个进程使用。
② 请求与保持条件:一个进程因请求资源而阻塞时,对已获得的资源保持不放。
③ 不剥夺条件:进程已获得的资源,在未使用完前,不能强行剥夺。
④ 循环等待条件:若干进程之间形成一种头尾相接的循环等待资源关系。
//测试死锁:多个线程互相抱着对方需要的资源,形成僵持
public class TestDeadLock {
    public static void main(String[] args) {

        Makeup g1 = new Makeup(0, "灰姑娘");
        Makeup g2 = new Makeup(1, "白雪公主");

        g1.start();
        g2.start();

    }
}

//口红
class LipStick{

}

//镜子
class Mirror{

}

class Makeup extends Thread {
    //需要的资源只有一份,用static来保证只有一份
    static LipStick lipStick = new LipStick();
    static Mirror mirror = new Mirror();

    int choice;//选择
    String name;//使用化妆品的人

    public Makeup(int choice, String name) {
        this.choice = choice;
        this.name = name;
    }

    @Override
    public void run() {
        try {
            makeup();
        } catch (InterruptedException e) {
            e.printStackTrace();
        }
    }

    //化妆,互相持有对方的锁,就是需要拿到对方的资源
    //避免死锁
    private void makeup() throws InterruptedException {
        if (choice == 0) {
            synchronized (lipStick) {
                System.out.println(this.getName() + "获得口红的锁");
                Thread.sleep(2000);
            }
            synchronized (mirror) {
                System.out.println(this.getName() + "获得镜子的锁");
            }
        } else {
            synchronized (mirror) {
                System.out.println(this.getName() + "获得镜子的锁");
                Thread.sleep(2000);
            }
            synchronized (lipStick) {
                System.out.println(this.getName() + "获得口红的锁");
            }
        }
    }
}
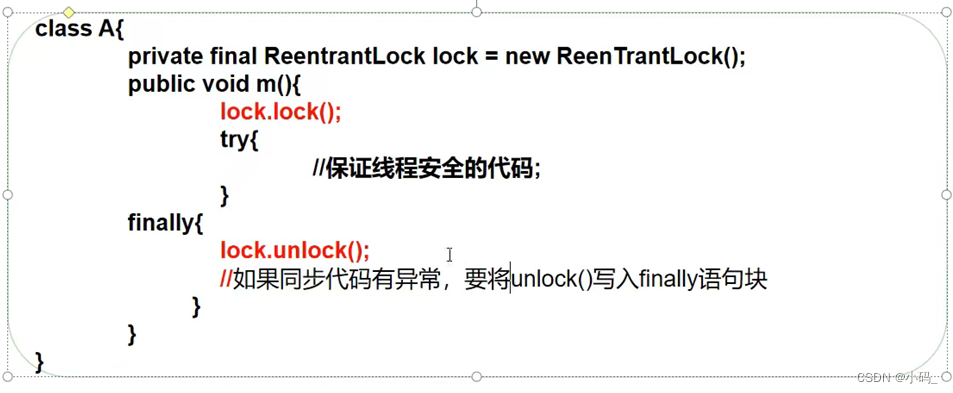
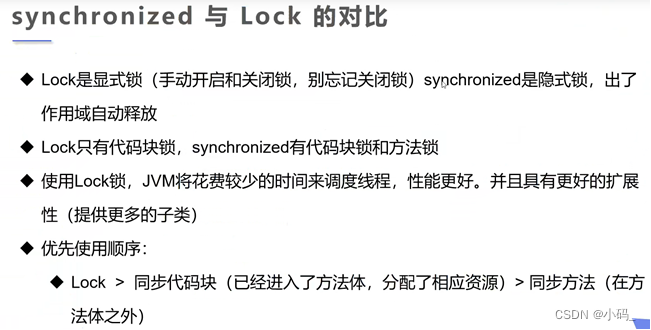
14. Lock(锁)
public class TestLock {
    public static void main(String[] args) {
        Buyticket buyticket = new Buyticket();

        new Thread(buyticket).start();
        new Thread(buyticket).start();
        new Thread(buyticket).start();

    }
}

class Buyticket implements Runnable{

    int tickeNums = 10;
    //定义lock锁
    private final ReentrantLock lock = new ReentrantLock();
    @Override
    public void run() {
        while(true){

            try {
                lock.lock(); //加锁
                if(tickeNums>0){
                    try {
                        Thread.sleep(1000);
                    } catch (InterruptedException e) {
                        e.printStackTrace();
                    }
                    System.out.println(tickeNums--);
                }else{
                    break;
                }
            }finally {
                lock.unlock();//解锁
            }

        }

    }
}
15. 线程池
//测试线程池
public class TestPool {
    public static void main(String[] args) {
        //1.创建服务,创建线程池
        //newFixedThreadPool  参数为:线程池大小
        ExecutorService service = Executors.newFixedThreadPool(10);
        //执行
        service.execute(new MyThread());
        service.execute(new MyThread());
        service.execute(new MyThread());

        //2.关闭链接
        service.shutdown();
    }
}

class MyThread implements Runnable{

    @Override
    public void run() {
        System.out.println(Thread.currentThread().getName());
    }
}
16. wait和notify
- tt.wait(): 让正在tt对象上活动的线程进入等待状态。
- wait(): 无限期等待,直至被唤醒。
- tt.notify():唤醒正在tt对象上等待的线程。
- tt.notifyAll(): 唤醒tt对象上处于等待的所有线程。
17. 生产者消费者
package multiThreads.PCModel;

public class TestBestPC {
    public static void main(String[] args) {
        Resources resources = new Resources();
        Thread threadProduct = new Thread(new Producers(resources));
        Thread threadConsume = new Thread(new Consumers(resources));
        threadProduct.setName("Producers");
        threadConsume.setName("Consumers");
        threadProduct.start();
        threadConsume.start();
    }
}

//资源
class Resources{

    //当前资源的数量
    int num = 0;
    //当前资源的上限
    int size = 100;

}

//消费者
class Consumers implements Runnable{

    private Resources resources;

    public Consumers(Resources resources) {
        this.resources = resources;
    }

    @Override
    public void run() {
        while (true){
            synchronized (resources){
                if(resources.num == 0){
                    System.out.println("========消费者等待=======");
                    try {
                        resources.wait();
                    } catch (InterruptedException e) {
                        e.printStackTrace();
                    }
                }
                resources.num--;
                System.out.println("消费者:"+Thread.currentThread().getName()+",剩余资源"+resources.num);
                resources.notify();
            }
        }
    }
}

//生产者
class Producers implements Runnable{

    private Resources resources;

    public Producers(Resources resources) {
        this.resources = resources;
    }

    @Override
    public void run() {
        while (true){
            synchronized (resources){
                if(resources.num == resources.size){
                    System.out.println("========生产者等待=======");
                    try {
                        resources.wait();
                    } catch (InterruptedException e) {
                        e.printStackTrace();
                    }
                }
                resources.num++;
                System.out.println("生产者:"+Thread.currentThread().getName()+",剩余资源"+resources.num);
                resources.notify();
            }
        }
    }
}
