Vue使用Element-ui upload组件进行多文件上传(视频或者图片)
最近有个小的功能需求需要能够支持多文件上传图片或者视频文件。话不多说,上干货。
1、按需对接口请求进行封装(可以根据你自己的需求来)
// body传参
function bodyParams (method, url, params, contentType) {
  return new Promise((resolve, reject) => {
    Axios({
      url,
      method,
      data: contentType == 'json' ? params : qs.stringify(params),
      headers: {
        "Content-Type": contentType == 'json' ? 'application/json;charset=UTF-8' : 'application/x-www-form-urlencoded;charset=UTF-8'
      }
    }).then(
      res => {
        resolve(res);
      },
      error => {
        reject(error)
      }
    ).catch((error) => {
      reject(error);
    })
  })
}

// body传参上传文件
function bodyParams1 (method, url, params) {
  return new Promise((resolve, reject) => {
    Axios({
      url,
      method,
      data: params,
      headers: {
        "Content-Type": 'multipart/form-data'
      }
    }).then(
      res => {
        resolve(res);
      },
      error => {
        reject(error)
      }
    ).catch((error) => {
      reject(error);
    })
  })
}


export function fetchPost (url, params, contentType) {
  return bodyParams("post", url, params, contentType);
}

export function fetchPostFile (url, params, contentType) {
  return bodyParams1("post", url, params, contentType);
}
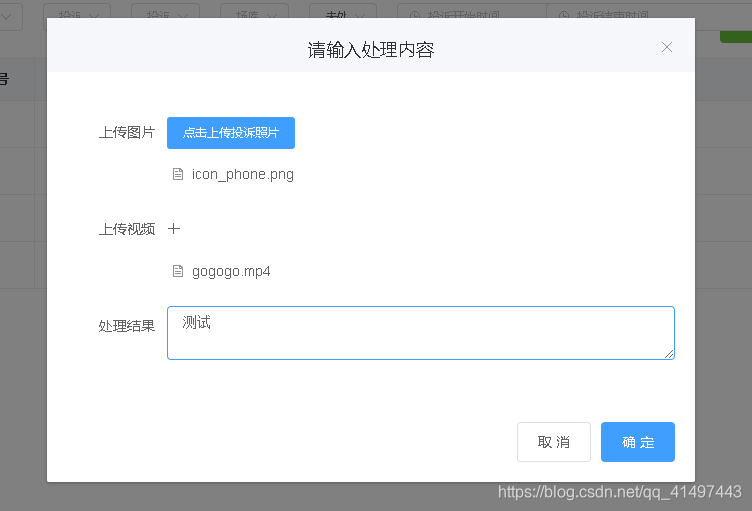
2、上传文件部分使用Element-ii upload组件
 <el-dialog
                    title="请输入处理内容"
                    :visible.sync="goDealDialogVisible"
                    width="50%"
                    :before-close="goDealHandleClose">
                <template>
                    <div>
                        <div style="margin: 10px;"></div>
                        <el-form label-width="100px">
                            <!--投诉照片上传-->
                            <el-form-item label="上传图片">
                                <el-upload
                                        action
                                        class="upload-demo"
                                        :on-preview="goDealPicHandPreview"
                                        :on-remove="goDealPicHandRemove"
                                        :file-list="picFileList"
                                        accept="file/*"
                                        multiple
                                        :auto-upload="false"
                                        :on-change="uploadFile"
                                        ref="upload">
                                    <el-button size="small" type="primary">点击上传投诉照片</el-button>
                                </el-upload>
                            </el-form-item>

                            <!--投诉视频上传-->
                            <el-form-item label="上传视频">
                                <!--<el-input  placeholder="请输入内容"></el-input>-->
                                <template slot-scope="scope">
                                    <el-upload class="avatar-uploader el-upload--text"
                                               action
                                               :show-file-list="true"
                                               :on-preview="videoHandlePreview"
                                               :on-remove="videoHandleRemove"
                                               :file-list="videoFileList"
                                               accept="file/*"
                                               :on-success="handleVideoSuccess"
                                               :before-upload="beforeUploadPicVideo"
                                               multiple
                                               :auto-upload="false"
                                               :on-change="uploadFile"
                                               ref="upload">
                                        <i class="el-icon-plus avatar-uploader-icon"></i>
                                        <el-progress v-if="videoFlag == true"
                                                     type="circle"
                                                     :percentage="videoUploadPercent"
                                                     style="margin-top:30px;"></el-progress>
                                        <el-button class="video-btn"
                                                   slot="trigger"
                                                   size="small"
                                                   v-if="isShowUploadVideo"
                                                   type="primary">选取文件
                                        </el-button>
                                    </el-upload>
                                </template>
                                <P v-if="isShowUploadVideo"
                                   class="text">请保证视频格式正确,且不超过20M</P>
                            </el-form-item>

                            <!--投诉处理结果-->
                            <el-form-item label="处理结果">
                                <el-input v-model="reportingResult" type="textarea" placeholder="请输入投诉处理结果"></el-input>
                            </el-form-item>
                        </el-form>
                    </div>
                </template>

                <span slot="footer" class="dialog-footer">
        <el-button @click="goDealDialogVisible = false,cancelBtn">取 消</el-button>
        <el-button type="primary" @click="determineBtn">确 定</el-button>
        </span>
            </el-dialog>
其中:
组件上的on-preview、on-remove、before-upload、on-success等方法根据自己的需求进行书写
3、使用自己封装好的方法进行接口请求调用
            determineBtn () {
                this.goDealDialogVisible = false
                this.formData.append('id', this.reportId);
                this.formData.append('reportingResult', this.reportingResult);
                this.$fetchPostFile('你的后台接口请求地址', this.formData).then(response => {
                    // this.getComplaintManagementInfo();//调数据接口方法,获取投诉数据信息
                }).catch(function (error) {
                    console.log(error);
                })
                this.$message({
                    message: '上传成功!!!',
                    type: 'success',
                    center: true,
                    showClose: true,
                    offset: 50,
                })

            },
4、进行数据测试

