目标检测中的数据增强
技术标签: 深度学习 人工智能
一、图像遮挡
①random erase
用随机值或训练集的平均像素替换图像区域。
URL: https://arxiv.org/pdf/1708.04896.pdf
代码:

import os
import io
import math
import sys
import random
import argparse
import cv2
import numpy as np

def get_files(dir, suffix):
    res = []
    for root, directory, files in os.walk(dir):
        for filename in files:
            name, suf = os.path.splitext(filename)
            if suf in suffix:
                #res.append(filename)
                res.append(os.path.join(root, filename))
    return res

class RandomErasing:
    """Random erasing the an rectangle region in Image.
    Class that performs Random Erasing in Random Erasing Data Augmentation by Zhong et al.
    Args:
        sl: min erasing area region
        sh: max erasing area region
        r1: min aspect ratio range of earsing region
        p: probability of performing random erasing
    """

    def __init__(self, p=0.5, sl=0.02, sh=0.4, r1=0.3):

        self.p = p
        self.s = (sl, sh)
        self.r = (r1, 1/r1)


    def __call__(self, img):
        """
        perform random erasing
        Args:
            img: opencv numpy array in form of [w, h, c] range
                 from [0, 255]

        Returns:
            erased img
        """

        assert len(img.shape) == 3, 'image should be a 3 dimension numpy array'

        if random.random() > self.p:
            return img

        else:
            while True:
                Se = random.uniform(*self.s) * img.shape[0] * img.shape[1]
                re = random.uniform(*self.r)

                He = int(round(math.sqrt(Se * re)))
                We = int(round(math.sqrt(Se / re)))

                xe = random.randint(0, img.shape[1])
                ye = random.randint(0, img.shape[0])

                if xe + We <= img.shape[1] and ye + He <= img.shape[0]:
                    img[ye : ye + He, xe : xe + We, :] = np.random.randint(low=0, high=255, size=(He, We, img.shape[2]))

                    return img


if __name__ == "__main__":
    img = cv2.imread('C:\\Users\\Administrator\\Desktop\\000026.jpg')
    RE = RandomErasing(p=1)
    for i in range(20):
        img1 = RE(img.copy())
        cv2.imshow("test", img1)
        cv2.waitKey(1000)
②CutOut
仅对CNN第一层的输入图像使用随机剪切框Mask。
URL: https://arxiv.org/pdf/1708.04552.pdf
代码:

import torch
import numpy as np


class Cutout(object):
    """Randomly mask out one or more patches from an image.
    Args:
        n_holes (int): Number of patches to cut out of each image.
        length (int): The length (in pixels) of each square patch.
    """
    def __init__(self, n_holes, length):
        self.n_holes = n_holes
        self.length = length

    def __call__(self, img):
        """
        Args:
            img (Tensor): Tensor image of size (C, H, W).
        Returns:
            Tensor: Image with n_holes of dimension length x length cut out of it.
        """
        h = img.size(1)
        w = img.size(2)

        mask = np.ones((h, w), np.float32)

        for n in range(self.n_holes):
            y = np.random.randint(h)  # 返回随机数/数组(整数)
            x = np.random.randint(w)

            y1 = np.clip(y - self.length // 2, 0, h) #截取函数
            y2 = np.clip(y + self.length // 2, 0, h) #用于截取数组中小于或者大于某值的部分,
            x1 = np.clip(x - self.length // 2, 0, w) #并使得被截取的部分等于固定的值
            x2 = np.clip(x + self.length // 2, 0, w)

            mask[y1: y2, x1: x2] = 0.

        mask = torch.from_numpy(mask)   #数组转换成张量,且二者共享内存,对张量进行修改比如重新赋值,那么原始数组也会相应发生改变
        mask = mask.expand_as(img)  #把一个tensor变成和函数括号内一样形状的tensor
        img = img * mask

        return img
③Hide and Seek(HaS)
将图像分割成一个由S*S大小的网格,根据概率设置随机隐藏一些网格,从而让模型学习整个对象的样子。

URL: https://arxiv.org/pdf/1811.02545.pdf
代码:
import random
import numpy as np
from PIL import Image
from torchvision.transforms import functional as F


class HidePatch(object):
    def __init__(self, hide_prob=0.5):
        self.hide_prob = hide_prob

    def __call__(self, img):
        # get width and height of the image
        wd, ht = F.get_image_size(img)

        grid_size = 8   # For cifar, the patch size is set to be 8.

        # hide the patches
        if grid_size > 0:
            img = np.asarray(img)
            for x in range(0, wd, grid_size):
                for y in range(0, ht, grid_size):
                    x_end = min(wd, x + grid_size)
                    y_end = min(ht, y + grid_size)
                    if random.random() <= self.hide_prob:
                        img[x:x_end, y:y_end, :] = 0

        return Image.fromarray(img)
④GridMask
将图像的区域隐藏在网格中,作用是让模型学习目标的整个组成部分。

URL: https://arxiv.org/pdf/2001.04086.pdf
代码:
import cv2
import os
import numpy as np

def get_files(dir, suffix):
    res = []
    for root, directory, files in os.walk(dir):
        for filename in files:
            name, suf = os.path.splitext(filename)

            if suf in suffix:
                #res.append(filename)
                res.append(os.path.join(root, filename))
    return res

def GridMask(img_path,save_base_dir):
    image_list = get_files(img_path, ['.jpg'])
    total_len = len(image_list)
    print('total_label_len', total_len)
    for i in range(0, total_len):
        image_file = image_list[i]
        #print('image_file**********',image_file)
        img=cv2.imread(image_file)
        GridMaskimg = img.copy()
        #GridMaskimg = np.full((img.shape[0], img.shape[1], img.shape[2]), 114, dtype=np.uint8)
        #GridMaskimg[:, :] = img[:, :]

        img_h,img_w=img[:,:,0].shape
        #start GridMask
        #------------------------------------------参数--------------------------------------------------
        x=50
        y=50
        w=100
        h=100
        l=20
        #-----------------------------------------------------------------------------------------------
        temp=x
        while y<img_h:
            x=temp
            while x<img_w :
                if x+l>=img_w or y+l>img_h:break
                for m in range(x,x+l):
                    for n in range(y,y+l):
                        for k in range(3):
                            GridMaskimg[n,m,k]=0
                x=x+l+w
            y=y+l+h
        image_name = image_file.split('\\')[-2]
        image_name = image_name + '_' + str(i) + '.jpg'
        #print("image_name**********",image_name)
        save_image_dir = os.path.join(save_base_dir, image_name)
        print("save_base_dir**********",save_image_dir)
        cv2.imwrite(save_image_dir,GridMaskimg)


def main():
    img_path = r'E:\projection\fair\data\dataset\GridMask_test\CA28_S20201015133001_E20201015163000'
    save_base_dir= r'E:\projection\fair\data\dataset\GridMask_test\GridMask'

    GridMask(img_path,save_base_dir)

if __name__ == '__main__':

    main()
二、多图组合
①Mix Up
对图像进行混类增强的算法,不同类图像间的混合。
URL: https://arxiv.org/pdf/1710.09412.pdf
代码:

import matplotlib.pyplot as plt
import matplotlib.image as Image
import cv2
im1 = Image.imread("cat1.jpg")
im1 = im1/255.
im2 = Image.imread("cat2.jpg")
im2 = im2/255.

lam= 4*0.1
im_mixup = (im1*lam+im2*(1-lam))
cv2.imwrite('mixup.jpg', im_mixup)
plt.imshow(im_mixup)
plt.show()
②CutMix
将另一个图像中的剪切部分粘贴到增强的图像中。
URL: https://arxiv.org/pdf/1710.09412.pdf
代码:

import matplotlib.pyplot as plt
import numpy as np
plt.rcParams['figure.figsize'] = [10, 10]
import cv2
def rand_bbox(size, lamb):
"""
生成随机的bounding box
:param size:
:param lamb:
:return:
"""
W = size[0]
H = size[1]
# 得到一个bbox和原图的比例
cut_ratio = np.sqrt(1.0 - lamb)
cut_w = int(W * cut_ratio)
cut_h = int(H * cut_ratio)
# 得到bbox的中心点
cx = np.random.randint(W)
cy = np.random.randint(H)
bbx1 = np.clip(cx - cut_w // 2, 0, W)
bby1 = np.clip(cy - cut_h // 2, 0, H)
bbx2 = np.clip(cx + cut_w // 2, 0, W)
bby2 = np.clip(cy + cut_h // 2, 0, H)
return bbx1, bby1, bbx2, bby2
def cutmix(image_batch, image_batch_labels, alpha=1.0):
# 决定bbox的大小,服从beta分布
lam = np.random.beta(alpha, alpha)
# permutation: 如果输入x是一个整数,那么输出相当于打乱的range(x)
rand_index = np.random.permutation(len(image_batch))
# 对应公式中的y_a,y_b
target_a = image_batch_labels
target_b = image_batch_labels[rand_index]
# 根据图像大小随机生成bbox
bbx1, bby1, bbx2, bby2 = rand_bbox(image_batch[0].shape, lam)
image_batch_updated = image_batch.copy()
# image_batch的维度分别是 batch x 宽 x 高 x 通道
# 将所有图的bbox对应位置, 替换为其他任意一张图像
# 第一个参数rand_index是一个list,可以根据这个list里索引去获得image_batch的图像,也就是将图片乱序的对应起来
image_batch_updated[:, bbx1: bbx2, bby1:bby2, :] = image_batch[rand_index, bbx1:bbx2, bby1:bby2, :]
# 计算 1 - bbox占整张图像面积的比例
lam = 1 - ((bbx2 - bbx1) * (bby2 - bby1)) / (image_batch.shape[1] * image_batch.shape[2])
# 根据公式计算label
label = target_a * lam + target_b * (1. - lam)
return image_batch_updated, label
if __name__ == '__main__':
cat = cv2.cvtColor(cv2.imread("data/neko.png"), cv2.COLOR_BGR2RGB)
dog = cv2.cvtColor(cv2.imread("data/inu.png"), cv2.COLOR_BGR2RGB)
updated_img, label = cutmix(np.array([cat, dog]), np.array([[0, 1], [1, 0]]), 0.5)
print(label)
fig, axs = plt.subplots(nrows=1, ncols=2, squeeze=False)
ax1 = axs[0, 0]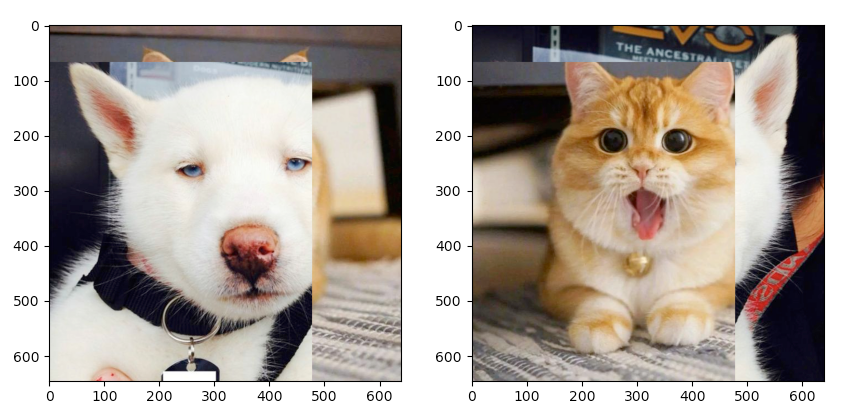
ax2 = axs[0, 1]
ax1.imshow(updated_img[0])
ax2.imshow(updated_img[1])
plt.show()
③Mosaic
Mosaic是CutMix的扩展,CutMix为两张图像,而Mosaic数据增强是4张图像混合。好处非常明显是一张图相当于4张图,等价于batch增加了,可以显著减少训练需要的batch size大小。

URL:https://arxiv.org/pdf/2004.10934.pdf
代码:
1 将图片与标注文件进行mosaic操作
import random
import cv2
import os
import glob
import numpy as np
from PIL import Image
from lxml import etree
# from ipdb import set_trace

OUTPUT_SIZE = (1024, 1024)  # Height, Width
SCALE_RANGE = (0.5, 0.5)
FILTER_TINY_SCALE = 1 / 50
# voc格式的数据集,anno_dir是标注xml文件,img_dir是对应jpg图片
ANNO_DIR = 'JPEGImages'
IMG_DIR = 'Annotations'
# category_name = ['background', 'person']
def main():
    img_paths, annos = get_dataset(ANNO_DIR, IMG_DIR)
    print(img_paths, annos)
    for i in range(1, 30, 1):
        idxs = random.sample(range(len(annos)), 4)  # 从annos列表长度中随机取4个数
        # set_trace()

        new_image, new_annos = update_image_and_anno(img_paths, annos,
                                                    idxs,
                                                    OUTPUT_SIZE, SCALE_RANGE,
                                                    filter_scale=FILTER_TINY_SCALE)
        # 更新获取新图和对应anno
        img_output_folder = "./img_mos/"
        if not os.path.exists(img_output_folder):
            os.mkdir(img_output_folder)
        img_name = 'mosic_20220814_{}.jpg'.format(i)
        img_path = img_output_folder + img_name
        cv2.imwrite(img_path, new_image)
        # annos是
        result_list = []
        for anno in new_annos:
            start_point = (int(anno[1] * OUTPUT_SIZE[1]), int(anno[2] * OUTPUT_SIZE[0]))  # 左上角点
            end_point = (int(anno[3] * OUTPUT_SIZE[1]), int(anno[4] * OUTPUT_SIZE[0]))  # 右下角点
            result = [anno[0], 1, int(anno[1] * OUTPUT_SIZE[1]), int(anno[2] * OUTPUT_SIZE[0]), int(anno[3] * OUTPUT_SIZE[1]), int(anno[4] * OUTPUT_SIZE[0])]
            result_list.append(result)
            cv2.rectangle(new_image, start_point, end_point, (0, 255, 0), 1, cv2.LINE_AA)  # 每循环一次在合成图画一个矩形

        xml_output_folder = "./xml_mos/"
        if not os.path.exists(xml_output_folder):
            os.mkdir(xml_output_folder)
        if (xml_output_folder is not None) and (os.path.exists(xml_output_folder)):
            output_xml(result_list, img_name, new_image.shape, os.path.join(xml_output_folder, img_name.split('.')[0]+".xml"))


        cv2.imwrite('wind_output_box.jpg', new_image)

        new_image = cv2.cvtColor(new_image, cv2.COLOR_BGR2RGB)
        new_image = Image.fromarray(new_image.astype(np.uint8))
        i = i + 1
        # new_image.show()
        # cv2.imwrite('./img/wind_output111.jpg', new_image)


def update_image_and_anno(all_img_list, all_annos, idxs, output_size, scale_range, filter_scale=0.):
    output_img = np.zeros([output_size[0], output_size[1], 3], dtype=np.uint8)
    scale_x = scale_range[0] + random.random() * (scale_range[1] - scale_range[0])
    scale_y = scale_range[0] + random.random() * (scale_range[1] - scale_range[0])
    divid_point_x = int(scale_x * output_size[1])
    divid_point_y = int(scale_y * output_size[0])

    new_anno = []
    for i, idx in enumerate(idxs):
        # set_trace()
        path = all_img_list[idx]
        img_annos = all_annos[idx]

        img = cv2.imread(path)
        if i == 0:  # top-left
            img = cv2.resize(img, (divid_point_x, divid_point_y))
            output_img[:divid_point_y, :divid_point_x, :] = img
            for bbox in img_annos:
                xmin = bbox[1] * scale_x
                ymin = bbox[2] * scale_y
                xmax = bbox[3] * scale_x
                ymax = bbox[4] * scale_y
                new_anno.append([bbox[0], xmin, ymin, xmax, ymax])

        elif i == 1:  # top-right
            img = cv2.resize(img, (output_size[1] - divid_point_x, divid_point_y))
            output_img[:divid_point_y, divid_point_x:output_size[1], :] = img
            for bbox in img_annos:
                xmin = scale_x + bbox[1] * (1 - scale_x)
                ymin = bbox[2] * scale_y
                xmax = scale_x + bbox[3] * (1 - scale_x)
                ymax = bbox[4] * scale_y
                new_anno.append([bbox[0], xmin, ymin, xmax, ymax])
        elif i == 2:  # bottom-left
            img = cv2.resize(img, (divid_point_x, output_size[0] - divid_point_y))
            output_img[divid_point_y:output_size[0], :divid_point_x, :] = img
            for bbox in img_annos:
                xmin = bbox[1] * scale_x
                ymin = scale_y + bbox[2] * (1 - scale_y)
                xmax = bbox[3] * scale_x
                ymax = scale_y + bbox[4] * (1 - scale_y)
                new_anno.append([bbox[0], xmin, ymin, xmax, ymax])
        else:  # bottom-right
            img = cv2.resize(img, (output_size[1] - divid_point_x, output_size[0] - divid_point_y))
            output_img[divid_point_y:output_size[0], divid_point_x:output_size[1], :] = img
            for bbox in img_annos:
                xmin = scale_x + bbox[1] * (1 - scale_x)
                ymin = scale_y + bbox[2] * (1 - scale_y)
                xmax = scale_x + bbox[3] * (1 - scale_x)
                ymax = scale_y + bbox[4] * (1 - scale_y)
                new_anno.append([bbox[0], xmin, ymin, xmax, ymax])

    return output_img, new_anno


def get_dataset(anno_dir, img_dir):
    # class_id = category_name.index('person')

    img_paths = []
    annos = []
    # for anno_file in glob.glob(os.path.join(anno_dir, '*.txt')):
    for anno_file in glob.glob(os.path.join(anno_dir, '*.xml')):
       # print(anno_file)
        anno_id = anno_file.split('/')[-1].split('.')[0]
        #img_name = anno_id + '.jpg'
        #anno_id = anno_file.split('\\')[-1].split('x')[0]
        # set_trace()

        # with open(anno_file, 'r') as f:
        #     num_of_objs = int(f.readline())

        # set_trace()
        img_path = os.path.join(img_dir, f'{anno_id}.jpg')
        print(img_path)

        img = cv2.imread(img_path)
        # set_trace()
        img_height, img_width, _ = img.shape
        del img

        boxes = []
        bnd_box = parseXmlFiles(anno_file)

        #print(bnd_box)
        for bnd_id, box in enumerate(bnd_box):
            # set_trace()
            # result = (box[0], 1, box[1],box[2], box[3], box[4])

            categories_id = box[0]

            xmin = max(int(box[1]), 0) / img_width

            ymin = max(int(box[2]), 0) / img_height

            xmax = min(int(box[3]), img_width) / img_width

            ymax = min(int(box[4]), img_height) / img_height

            boxes.append([categories_id, xmin, ymin, xmax, ymax])


            if not boxes:
                continue
        # result_list.append(result)
        img_paths.append(img_path)
        annos.append(boxes)
    #print(result_list,6666666)
    print("annos:所有对原图缩放后的坐标:", annos)
    print(img_paths)
    return img_paths, annos


def parseXmlFiles(anno_dir):
    tree = etree.parse(anno_dir)
    root = tree.getroot()
    objectes = root.findall('.//object')
    bnd_box = []
    for object in objectes:
        name = object.find("name").text

        bndbox = object.find("bndbox")
        xmin = float(bndbox.find("xmin").text)
        xmax = float(bndbox.find("xmax").text)
        ymin = float(bndbox.find("ymin").text)
        ymax = float(bndbox.find("ymax").text)

        # bnd_box.append([name, xmin, xmax, ymin, ymax])
        bnd_box.append([name, xmin, ymin, xmax, ymax])
        # print(len(bnd_box),bnd_box)
    return bnd_box


def output_xml(result_list, src_img_name,img_shape, xml_path):
    """output result to xml

    Args:
        result_list (list): [ (code,score,xmin,ymin,xmax,ymax), ]
        src_img_name (str): source image name.
        img_shape(list): img_shape
        xml_path: xml path
    Returns:
        None
    """
    if 0 == len(result_list):
        return None
    xml_fmt = '''<annotation>
<folder>VOC2007</folder>
<filename>{:}</filename>
<size>
<width>{:d}</width>
<height>{:d}</height>
<depth>{:d}</depth>
</size>
<objectsum>{:d}</objectsum>
{:}</annotation>'''

    object_fmt = '''<object>
<Serial>{:d}</Serial>
<name>{:}</name>
<bndbox>
<xmin>{:d}</xmin>
<ymin>{:d}</ymin>
<xmax>{:d}</xmax>
<ymax>{:d}</ymax>
</bndbox>
</object>'''

    h,w,c = img_shape
    objects_str = ""
    for inx, res in enumerate(result_list):
        item_str = object_fmt.format(
            (inx + 1),
            res[0],
            int(res[2]),
            int(res[3]),
            int(res[4]),
            int(res[5])
            )
        objects_str = objects_str + item_str
    xml_str = xml_fmt.format(
        src_img_name,
        w,
        h,
        c,
        len(result_list),
        objects_str
    )
    with open(xml_path, "w") as outfile:
        outfile.write(xml_str)


if __name__ == '__main__':
    main()
2 选取相似图片与标注文件进行mosaic操作
import random

import cv2
import os
import glob
import numpy as np
from PIL import Image
from lxml import etree
import random
import requests
from io import BytesIO
import matplotlib
matplotlib.use('TkAgg')
import matplotlib.pyplot as plt
import xml.etree.ElementTree as ET
from xml.etree.ElementTree import Element
import gflags
import sys


def aHash(img):
    # 均值哈希算法
    # 缩放为8*8
    img = cv2.resize(img, (8, 8))
    # 转换为灰度图
    gray = cv2.cvtColor(img, cv2.COLOR_BGR2GRAY)
    # s为像素和初值为0,hash_str为hash值初值为''
    s = 0
    hash_str = ''
    # 遍历累加求像素和
    for i in range(8):
        for j in range(8):
            s = s+gray[i, j]
    # 求平均灰度
    avg = s/64
    # 灰度大于平均值为1相反为0生成图片的hash值
    for i in range(8):
        for j in range(8):
            if gray[i, j] > avg:
                hash_str = hash_str+'1'
            else:
                hash_str = hash_str+'0'
    return hash_str


def dHash(img):
    # 差值哈希算法
    # 缩放8*8
    img = cv2.resize(img, (9, 8))
    # 转换灰度图
    gray = cv2.cvtColor(img, cv2.COLOR_BGR2GRAY)
    hash_str = ''
    # 每行前一个像素大于后一个像素为1,相反为0,生成哈希
    for i in range(8):
        for j in range(8):
            if gray[i, j] > gray[i, j+1]:
                hash_str = hash_str+'1'
            else:
                hash_str = hash_str+'0'
    return hash_str


def pHash(img):
    # 感知哈希算法
    # 缩放32*32
    img = cv2.resize(img, (32, 32))   # , interpolation=cv2.INTER_CUBIC

    # 转换为灰度图
    gray = cv2.cvtColor(img, cv2.COLOR_BGR2GRAY)
    # 将灰度图转为浮点型,再进行dct变换
    dct = cv2.dct(np.float32(gray))
    # opencv实现的掩码操作
    dct_roi = dct[0:8, 0:8]

    hash = []
    avreage = np.mean(dct_roi)
    for i in range(dct_roi.shape[0]):
        for j in range(dct_roi.shape[1]):
            if dct_roi[i, j] > avreage:
                hash.append(1)
            else:
                hash.append(0)
    return hash


def calculate(image1, image2):
    # 灰度直方图算法
    # 计算单通道的直方图的相似值
    hist1 = cv2.calcHist([image1], [0], None, [256], [0.0, 255.0])
    hist2 = cv2.calcHist([image2], [0], None, [256], [0.0, 255.0])
    # 计算直方图的重合度
    degree = 0
    for i in range(len(hist1)):
        if hist1[i] != hist2[i]:
            degree = degree + \
                (1 - abs(hist1[i] - hist2[i]) / max(hist1[i], hist2[i]))
        else:
            degree = degree + 1
    degree = degree / len(hist1)
    return degree


def classify_hist_with_split(image1, image2, size=(256, 256)):
    # RGB每个通道的直方图相似度
    # 将图像resize后,分离为RGB三个通道,再计算每个通道的相似值
    image1 = cv2.resize(image1, size)
    image2 = cv2.resize(image2, size)
    sub_image1 = cv2.split(image1)
    sub_image2 = cv2.split(image2)
    sub_data = 0
    for im1, im2 in zip(sub_image1, sub_image2):
        sub_data += calculate(im1, im2)
    sub_data = sub_data / 3
    return sub_data


def cmpHash(hash1, hash2):
    # Hash值对比
    # 算法中1和0顺序组合起来的即是图片的指纹hash。顺序不固定,但是比较的时候必须是相同的顺序。
    # 对比两幅图的指纹,计算汉明距离,即两个64位的hash值有多少是不一样的,不同的位数越小,图片越相似
    # 汉明距离:一组二进制数据变成另一组数据所需要的步骤,可以衡量两图的差异,汉明距离越小,则相似度越高。汉明距离为0,即两张图片完全一样
    n = 0
    # hash长度不同则返回-1代表传参出错
    if len(hash1) != len(hash2):
        return -1
    # 遍历判断
    for i in range(len(hash1)):
        # 不相等则n计数+1,n最终为相似度
        if hash1[i] != hash2[i]:
            n = n + 1
    return n


def getImageByUrl(url):
    # 根据图片url 获取图片对象
    html = requests.get(url, verify=False)
    image = Image.open(BytesIO(html.content))
    return image


def PILImageToCV():
    # PIL Image转换成OpenCV格式
    path = "/Users/waldenz/Documents/Work/doc/TestImages/t3.png"
    img = Image.open(path)
    plt.subplot(121)
    plt.imshow(img)
    print(isinstance(img, np.ndarray))
    img = cv2.cvtColor(np.asarray(img), cv2.COLOR_RGB2BGR)
    print(isinstance(img, np.ndarray))
    plt.subplot(122)
    plt.imshow(img)
    plt.show()


def CVImageToPIL():
    # OpenCV图片转换为PIL image
    path = "/Users/waldenz/Documents/Work/doc/TestImages/t3.png"
    img = cv2.imread(path)
    # cv2.imshow("OpenCV",img)
    plt.subplot(121)
    plt.imshow(img)

    img_b = Image.fromarray(cv2.cvtColor(img, cv2.COLOR_BGR2RGB))
    plt.subplot(122)
    plt.imshow(img_b)
    plt.show()

def bytes_to_cvimage(filebytes):
    # 图片字节流转换为cv image
    image = Image.open(filebytes)
    img = cv2.cvtColor(np.asarray(image), cv2.COLOR_RGB2BGR)
    return img

def runAllImageSimilaryFun(img_a, img_b):
    # 均值、差值、感知哈希算法三种算法值越小,则越相似,相同图片值为0
    # 三直方图算法和单通道的直方图 0-1之间,值越大,越相似。 相同图片为1

    # t1,t2   14;19;10;  0.70;0.75
    # t1,t3   39 33 18   0.58 0.49
    # s1,s2  7 23 11     0.83 0.86  挺相似的图片
    # c1,c2  11 29 17    0.30 0.31

    # if para1.startswith("http"):
    #      # 根据链接下载图片,并转换为opencv格式
    #     img_a = getImageByUrl(para1)
    #     img_a = cv2.cvtColor(np.asarray(img_a), cv2.COLOR_RGB2BGR)

    #     img_b = getImageByUrl(para2)
    #     img_b = cv2.cvtColor(np.asarray(img_b), cv2.COLOR_RGB2BGR)
    # else:
    #     # 通过imread方法直接读取物理路径
    #     img_a = cv2.imread(para1)
    #     img_b = cv2.imread(para2)

    hash1 = aHash(img_a)
    hash2 = aHash(img_b)
    n1 = cmpHash(hash1, hash2)
    n1 = 1-float(n1/64)
    # print('均值哈希算法相似度aHash:', n1)

    hash1 = dHash(img_a)
    hash2 = dHash(img_b)
    n2 = cmpHash(hash1, hash2)
    n2 = 1 - float(n2/64)
    # print('差值哈希算法相似度dHash:', n2)

    hash1 = pHash(img_a)
    hash2 = pHash(img_b)
    n3 = cmpHash(hash1, hash2)
    n3 = 1-float(n3/64)
    # print('感知哈希算法相似度pHash:', n3)

    n4 = classify_hist_with_split(img_a, img_b)
    n4 = round(n4[0], 2)
    # print('三直方图算法相似度:', n4)

    n5 = calculate(img_a, img_b)
    n5 = n5[0]
    # print("单通道的直方图", n5)
    # print("%d %d %d %.2f %.2f " % (n1, n2, n3, round(n4[0], 2), n5[0]))
    # print("%.2f %.2f %.2f %.2f %.2f " % (1-float(n1/64), 1 -
    #                                      float(n2/64), 1-float(n3/64), round(n4[0], 2), n5[0]))

    print(n1,n2,n3,n4,n5)
    print(min(n1,n2,n3,n4,n5))
    return min(n1,n2,n3,n4,n5)

OUTPUT_SIZE = (600, 600)  # Height, Width
SCALE_RANGE = (0.5, 0.5)
FILTER_TINY_SCALE = 1 / 50  # if height or width lower than this scale, drop it.

# voc格式的数据集,anno_dir是标注xml文件,img_dir是对应jpg图片
ANNO_DIR = 'Annotations'
IMG_DIR = 'JPEGImages'

# category_name = ['background', 'person']


def main():
    img_paths, annos = get_dataset(ANNO_DIR, IMG_DIR)
    print(img_paths, annos,66666666666666666666666666666666666666666666)

    for i in range(1, 1600, 1):
        idxs = random.sample(range(len(annos)), 4)  # 从annos列表长度中随机取4个数
        # print(idxs,111111111111)
        # set_trace()
        # idxs = [i for i in annos]
        new_image, new_annos = update_image_and_anno(img_paths, annos,
                                                    idxs,
                                                    OUTPUT_SIZE, SCALE_RANGE,
                                                    filter_scale=FILTER_TINY_SCALE)
        # 更新获取新图和对应anno
        img_output_folder = "./augment_1207/mosic_jpg/"
        if not os.path.exists(img_output_folder):
            os.mkdir(img_output_folder)
        img_name = '{}.jpg'.format(str(idxs[0])+'_'+str(idxs[1])+'_'+str(idxs[2])+'_'+str(idxs[3]))
        img_path = img_output_folder + img_name
        cv2.imwrite(img_path, new_image)
        # annos是
        result_list = []
        for anno in new_annos:
            start_point = (int(anno[1] * OUTPUT_SIZE[1]), int(anno[2] * OUTPUT_SIZE[0]))  # 左上角点
            end_point = (int(anno[3] * OUTPUT_SIZE[1]), int(anno[4] * OUTPUT_SIZE[0]))  # 右下角点
            result = [anno[0], 1, int(anno[1] * OUTPUT_SIZE[1]), int(anno[2] * OUTPUT_SIZE[0]), int(anno[3] * OUTPUT_SIZE[1]), int(anno[4] * OUTPUT_SIZE[0])]
            result_list.append(result)
            cv2.rectangle(new_image, start_point, end_point, (0, 255, 0), 1, cv2.LINE_AA)  # 每循环一次在合成图画一个矩形

        xml_output_folder = "./augment_1207/mosic_xml/"
        if not os.path.exists(xml_output_folder):
            os.mkdir(xml_output_folder)
        if (xml_output_folder is not None) and (os.path.exists(xml_output_folder)):
            output_xml(result_list, img_name, new_image.shape, os.path.join(xml_output_folder, img_name.split('.')[0]+".xml"))


        cv2.imwrite('wind_output_box.jpg', new_image)

        new_image = cv2.cvtColor(new_image, cv2.COLOR_BGR2RGB)
        new_image = Image.fromarray(new_image.astype(np.uint8))
        i = i + 1
        # new_image.show()
        # cv2.imwrite('./img/wind_output111.jpg', new_image)


def update_image_and_anno(all_img_list, all_annos, idxs, output_size, scale_range, filter_scale=0.):
    output_img = np.zeros([output_size[0], output_size[1], 3], dtype=np.uint8)
    scale_x = scale_range[0] + random.random() * (scale_range[1] - scale_range[0])
    scale_y = scale_range[0] + random.random() * (scale_range[1] - scale_range[0])
    divid_point_x = int(scale_x * output_size[1])
    divid_point_y = int(scale_y * output_size[0])

    new_anno = []
    for i, idx in enumerate(idxs):
        # set_trace()
        path = all_img_list[idx]
        img_annos = all_annos[idx]

        img = cv2.imread(path)
        if i == 0:  # top-left
            img = cv2.resize(img, (divid_point_x, divid_point_y))
            output_img[:divid_point_y, :divid_point_x, :] = img
            for bbox in img_annos:
                xmin = bbox[1] * scale_x
                ymin = bbox[2] * scale_y
                xmax = bbox[3] * scale_x
                ymax = bbox[4] * scale_y
                new_anno.append([bbox[0], xmin, ymin, xmax, ymax])

        elif i == 1:  # top-right
            img = cv2.resize(img, (output_size[1] - divid_point_x, divid_point_y))
            output_img[:divid_point_y, divid_point_x:output_size[1], :] = img
            for bbox in img_annos:
                xmin = scale_x + bbox[1] * (1 - scale_x)
                ymin = bbox[2] * scale_y
                xmax = scale_x + bbox[3] * (1 - scale_x)
                ymax = bbox[4] * scale_y
                new_anno.append([bbox[0], xmin, ymin, xmax, ymax])
        elif i == 2:  # bottom-left
            img = cv2.resize(img, (divid_point_x, output_size[0] - divid_point_y))
            output_img[divid_point_y:output_size[0], :divid_point_x, :] = img
            for bbox in img_annos:
                xmin = bbox[1] * scale_x
                ymin = scale_y + bbox[2] * (1 - scale_y)
                xmax = bbox[3] * scale_x
                ymax = scale_y + bbox[4] * (1 - scale_y)
                new_anno.append([bbox[0], xmin, ymin, xmax, ymax])
        else:  # bottom-right
            img = cv2.resize(img, (output_size[1] - divid_point_x, output_size[0] - divid_point_y))
            output_img[divid_point_y:output_size[0], divid_point_x:output_size[1], :] = img
            for bbox in img_annos:
                xmin = scale_x + bbox[1] * (1 - scale_x)
                ymin = scale_y + bbox[2] * (1 - scale_y)
                xmax = scale_x + bbox[3] * (1 - scale_x)
                ymax = scale_y + bbox[4] * (1 - scale_y)
                new_anno.append([bbox[0], xmin, ymin, xmax, ymax])

    return output_img, new_anno


def get_dataset(anno_dir, img_dir):
    # class_id = category_name.index('person')

    img_paths = []
    annos = []
    # for anno_file in glob.glob(os.path.join(anno_dir, '*.txt')):
    for anno_file in glob.glob(os.path.join(anno_dir, '*.xml')):
       # print(anno_file)
        anno_id = anno_file.split('/')[-1].split('.')[0]
        #img_name = anno_id + '.jpg'
        #anno_id = anno_file.split('\\')[-1].split('x')[0]
        # set_trace()

        # with open(anno_file, 'r') as f:
        #     num_of_objs = int(f.readline())

        # set_trace()
        img_path = os.path.join(img_dir, f'{anno_id}.jpg')
        print(img_path)

        img = cv2.imread(img_path)
        # set_trace()
        img_height, img_width, _ = img.shape
        del img

        boxes = []
        bnd_box = parseXmlFiles(anno_file)

        #print(bnd_box)
        for bnd_id, box in enumerate(bnd_box):
            # set_trace()
            # result = (box[0], 1, box[1],box[2], box[3], box[4])

            categories_id = box[0]

            xmin = max(int(box[1]), 0) / img_width

            ymin = max(int(box[2]), 0) / img_height

            xmax = min(int(box[3]), img_width) / img_width

            ymax = min(int(box[4]), img_height) / img_height

            boxes.append([categories_id, xmin, ymin, xmax, ymax])


            if not boxes:
                continue
        # result_list.append(result)
        img_paths.append(img_path)
        annos.append(boxes)
    #print(result_list,6666666)
    print("annos:所有对原图缩放后的坐标:", annos)
    print(img_paths)
    return img_paths, annos


def prettyXml(element, indent, newline, level=0):
    if element:
        if element.text == None or element.text.isspace():
            element.text = newline + indent * (level + 1)
        else:
            element.text = newline + indent * (level + 1) + element.text.strip() + newline + indent * (level + 1)
    temp = list(element)
    for subelement in temp:
        if temp.index(subelement) < (len(temp) - 1):
            subelement.tail = newline + indent * (level + 1)
        else:
            subelement.tail = newline + indent * level
        prettyXml(subelement, indent, newline, level=level + 1)


def parseXmlFiles(anno_dir):
    tree = etree.parse(anno_dir)
    root = tree.getroot()
    objectes = root.findall('.//object')
    bnd_box = []
    for object in objectes:
        name = object.find("name").text

        bndbox = object.find("bndbox")
        xmin = float(bndbox.find("xmin").text)
        xmax = float(bndbox.find("xmax").text)
        ymin = float(bndbox.find("ymin").text)
        ymax = float(bndbox.find("ymax").text)

        # bnd_box.append([name, xmin, xmax, ymin, ymax])
        bnd_box.append([name, xmin, ymin, xmax, ymax])
        # print(len(bnd_box),bnd_box)
    return bnd_box


def output_xml(result_list, src_img_name,img_shape, xml_path):
    """output result to xml

    Args:
        result_list (list): [ (code,score,xmin,ymin,xmax,ymax), ]
        src_img_name (str): source image name.
        img_shape(list): img_shape
        xml_path: xml path
    Returns:
        None
    """
    if 0 == len(result_list):
        return None
    xml_fmt = '''<annotation>
<folder>VOC2007</folder>
<filename>{:}</filename>
<size>
<width>{:d}</width>
<height>{:d}</height>
<depth>{:d}</depth>
</size>
<objectsum>{:d}</objectsum>
{:}</annotation>'''

    object_fmt = '''<object>
<Serial>{:d}</Serial>
<name>{:}</name>
<bndbox>
<xmin>{:d}</xmin>
<ymin>{:d}</ymin>
<xmax>{:d}</xmax>
<ymax>{:d}</ymax>
</bndbox>
</object>'''

    h,w,c = img_shape
    objects_str = ""
    for inx, res in enumerate(result_list):
        item_str = object_fmt.format(
            (inx + 1),
            res[0],
            int(res[2]),
            int(res[3]),
            int(res[4]),
            int(res[5])
            )
        objects_str = objects_str + item_str
    xml_str = xml_fmt.format(
        src_img_name,
        w,
        h,
        c,
        len(result_list),
        objects_str
    )
    with open(xml_path, "w") as outfile:
        outfile.write(xml_str)


if __name__ == '__main__':
    main()
三、图像本身数据增强
亮度改变:图片的亮度调整是通过对图像的BGR的值进行随机或定值增加或减少。
色彩通道改变:OPENCV中图像的像素按照BGR排列,即蓝绿红,通过改变通道顺序得到不同结果。
图片翻转:也可以称为镜像,镜像分为水平镜像、垂直镜像和水平垂直镜像。通过垂直或水平中心轴为对称中心交换对应部分的像素位置。
图片平移:图片平移即在所定平面进行指定方向或指定角度进行平移。
添加噪声:高斯噪声通常被认为是一类遵循高斯分布的噪声,其概率密度函数也遵循正态分布。与椒盐噪声不同,高斯噪声是彩色的,通过添加高斯噪声,与原图进行叠加最后生成拥有高斯噪声的图片。
图片旋转:任意选择图片中一点作为旋转中心,按照一定角度对图像整体进行旋转。
# -*- coding: utf-8 -*-
"""
# 数据增强实现
"""
import cv2
import numpy as np


# 图像平移
def img_translation(image):
    # 图像平移 下、上、右、左平移
    M = np.float32([[1, 0, 0], [0, 1, 100]])
    img_down = cv2.warpAffine(image, M, (image.shape[1], image.shape[0]))

    M = np.float32([[1, 0, 0], [0, 1, -100]])
    img_up = cv2.warpAffine(image, M, (image.shape[1], image.shape[0]))

    M = np.float32([[1, 0, 100], [0, 1, 0]])
    img_right = cv2.warpAffine(image, M, (image.shape[1], image.shape[0]))

    M = np.float32([[1, 0, -100], [0, 1, 0]])
    img_left = cv2.warpAffine(image, M, (image.shape[1], image.shape[0]))

    # 显示图形
    cv2.imshow("down", img_down)
    cv2.imshow("up", img_up)
    cv2.imshow("right", img_right)
    cv2.imshow("left", img_left)
    return img_down,img_up,img_right,img_left


# 图像缩放
def img_scale(image):
    result = cv2.resize(image, (200, 100))
    cv2.imshow("scale", result)
    return result

# 图像翻转
def img_flip(image):
    # 0以X轴为对称轴翻转,>0以Y轴为对称轴翻转, <0X轴Y轴翻转
    horizontally = cv2.flip(image, 0)  # 水平镜像
    vertically = cv2.flip(image, 1)  # 垂直镜像
    hv = cv2.flip(image, -1)  # 水平垂直镜像

    # 显示图形
    cv2.imshow("Horizontally", horizontally)
    cv2.imshow("Vertically", vertically)
    cv2.imshow("Horizontally & Vertically", hv)
    return horizontally,vertically,hv


# 图像旋转
def img_rotation(image):
    # 原图的高、宽 以及通道数
    rows, cols, channel = image.shape

    # 绕图像的中心旋转
    # 参数:旋转中心 旋转度数 scale
    M = cv2.getRotationMatrix2D((cols / 2, rows / 2), 90, 1)
    # 参数:原始图像 旋转参数 元素图像宽高
    rotated = cv2.warpAffine(image, M, (cols, rows))

    # 显示图像
    cv2.imshow("rotated", rotated)
    return rotated


# 图像加噪
def img_noise(image, mean=0, var=0.001):
    '''
        添加高斯噪声
        mean : 均值
        var : 方差
    '''
    image = np.array(image / 255, dtype=float)
    noise = np.random.normal(mean, var ** 0.5, image.shape)
    out = image + noise
    if out.min() < 0:
        low_clip = -1.
    else:
        low_clip = 0.
    out = np.clip(out, low_clip, 1.0)
    out = np.uint8(out * 255)

    cv2.imshow("noise", out)
    return out


# 图像亮度调节
def img_brightness(image):
    contrast = 1  # 对比度
    brightness = 100  # 亮度
    pic_turn = cv2.addWeighted(image, contrast, image, 0, brightness)
    # cv2.addWeighted(对象,对比度,对象,对比度)
    '''cv2.addWeighted()实现的是图像透明度的改变与图像的叠加'''

    cv2.imshow('bright', pic_turn)  # 显示图片
    return pic_turn

# 镜像变换
def mirror(img, mode):
    img = cv2.flip(img, mode)  # mode = 1 水平翻转 mode = 0 垂直翻
    cv2.imshow('filp', img)  # 显示图片
    return img

# 重新组合颜色通道
def change_channel(img):
    b = cv2.split(img)[0]
    g = cv2.split(img)[1]
    r = cv2.split(img)[2]
    brg = cv2.merge([b, r, g])  # 可以自己改变组合顺序
    cv2.imshow('brg', brg)  # 显示图片
    return brg


if __name__ == '__main__':
    # src = cv2.imread('./images/jie1.jpg')
    src = cv2.imread(r'D:\python\image\tset\test\img\cow2.jpg')

    img_down,img_up,img_right,img_left=img_translation(src)
    small=img_scale(src)
    horizontally,vertically,hv=img_flip(src)
    rotated=img_rotation(src)
    noise=img_noise(src)
    brightness=img_brightness(src)
    jingxiang=mirror(src,1)
    channel_turn=change_channel(src)
    cv2.imwrite('img_down.jpg ', img_down )
    cv2.imwrite('small.jpg ', small )
    cv2.imwrite('horizontally.jpg ', horizontally )
    cv2.imwrite('rotated.jpg ', rotated )

    cv2.imwrite('noise.jpg ', noise )
    cv2.imwrite('brightness.jpg ', brightness )
    cv2.imwrite('jingxiang.jpg ', jingxiang )
    cv2.imwrite('channel_turn.jpg ', channel_turn )
    cv2.waitKey(0)
    cv2.destroyAllWindows()
四、自对抗训练(SAT)
Self-Adversarial Training是在一定程度上抵抗对抗攻击的数据增强技术。CNN计算出Loss,然后通过反向传播改变图片信息,形成图片上没有目标的假象,然后对修改后的图像进行正常的目标检测。需要注意的是在SAT的反向传播的过程中,是不需要改变网络权值的。
使用对抗生成可以改善学习的决策边界中的薄弱环节,提高模型的鲁棒性。因此这种数据增强方式被越来越多的对象检测框架运用。
自对抗训练(SAT)也是一种新的数据增强方法,它包括两个阶段。第一个阶段中,神经网络更改原始图像;第二阶段中,训练神经网络以正常方式在修改后的图像上执行目标检测任务

五 、类标签平滑
2016年,Szegedy等人提出了inception v2的模型(论文:Rethinking the inception architecture for computer vision),其中提到了Label Smoothing技术,可以看作是一种正则化方法,对于ground truth(也就是标注数据)的分布进行混合,使得标签在某种程度上软化,增加了模型的泛化能力,一定程度上防止过拟合。
Class label smoothing是一种正则化方法。如果神经网络过度拟合和/或过度自信,我们都可以尝试平滑标签。也就是说在训练时标签可能存在错误,而我们可能“过分”相信训练样本的标签,并且在某种程度上没有审视其他预测的复杂性。因此为了避免过度相信,更合理的做法是对类标签进行编码,以便在一定程度上对不确定性进行评估。YOLOv4使用了类平滑,选择模型的正确预测概率为0.9,例如[0,0,0,0.9,0…,0]。

参考博客:1.https://blog.csdn.net/YMilton/article/details/120041404
2.https://blog.csdn.net/qq_36076110/article/details/105947444