文章目录
- 一、全文检索-ElasticSearch
- 二、thymeleaf模板引擎
- 三、压力测试
- 四、缓存
- 五、线程池
- 六、 CompletableFuture异步编排
- 七. 商品详情
- 八.认证服务
- 九.短信服务
- 十.密码加密
- 十一.OAuth2.0
- 十二.购物车
- 十三.RabbitMQ
- 十四.订单服务
- 十五.RabbitMQ延时队列(实现定时任务)
- 十六.支付宝支付
- 十七.秒杀服务
- 十八.SpringCloud Alibaba-Sentinel
- 十九.Sleuth+Zipkin服务链路追踪
一、全文检索-ElasticSearch
1.基础概念
ES 对应 mysql
索引Index 对应 insert
类型Type 对应 不同表
一条条的记录称为文档Document 对应 一条条的记录称为记录
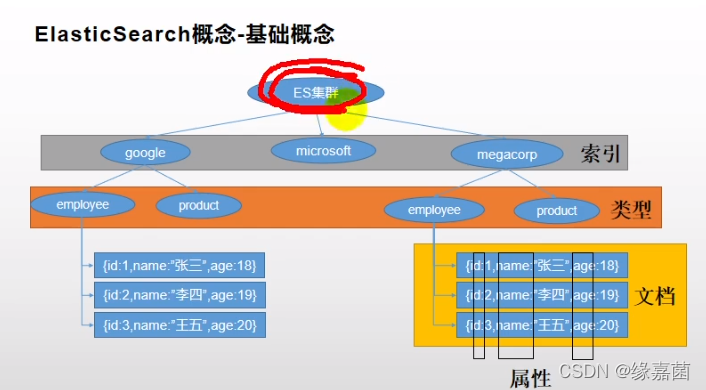
概念理解:数据库=》数据表=》数据=》属性(列名)
1.1倒排索引

2.docker安裝elasticsearch、kibana
3.初步检索
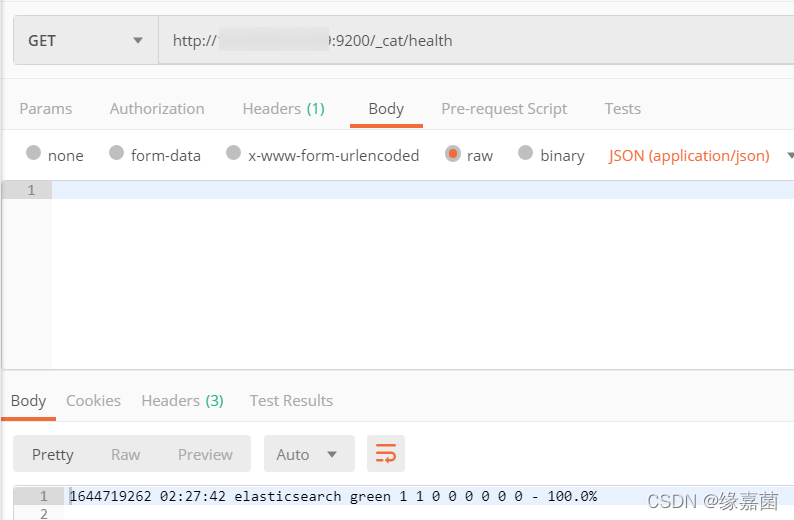
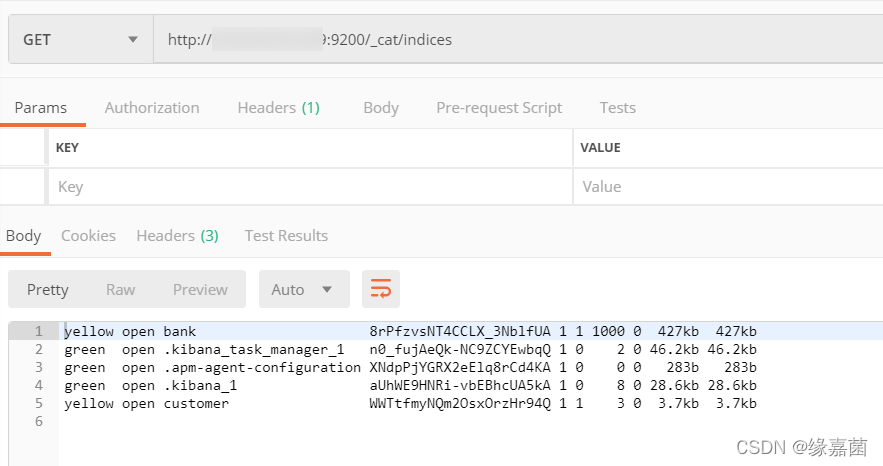
3.1 _cat
GET/_cat/nodes:查看所有节点
GET/_cat/health:查看es 健康状况
GET/_cat/master:查看主节点
GET/_cat/indices:查看所有索引,等价于数据库的show databases;
总结:用于查看elasticsearch的基本信息
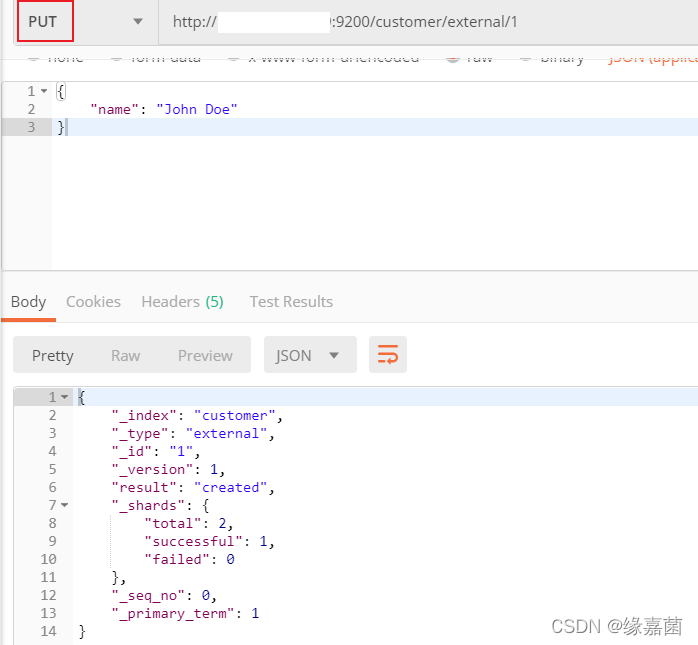
3.2 _put
保存一个数据,保存在哪个索引的哪个类型下,指定用哪个唯一标识
PUT customer/external/1;在 customer索引下的 external类型下保存1号数据为
PUT customer/external/1
语法
{
“name”: “John Doe”
}
PUT和 POST都可以,
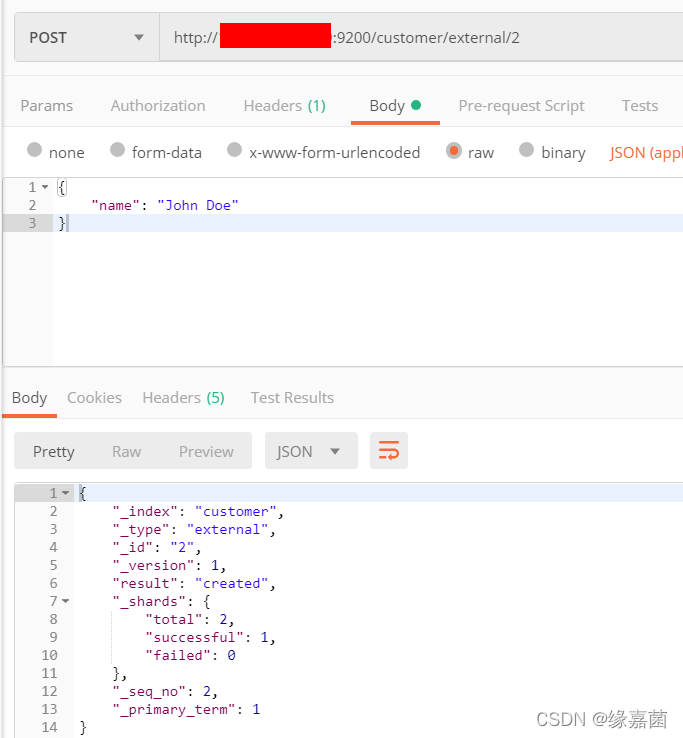
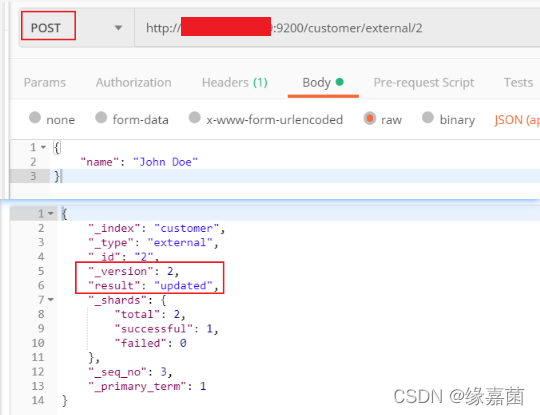
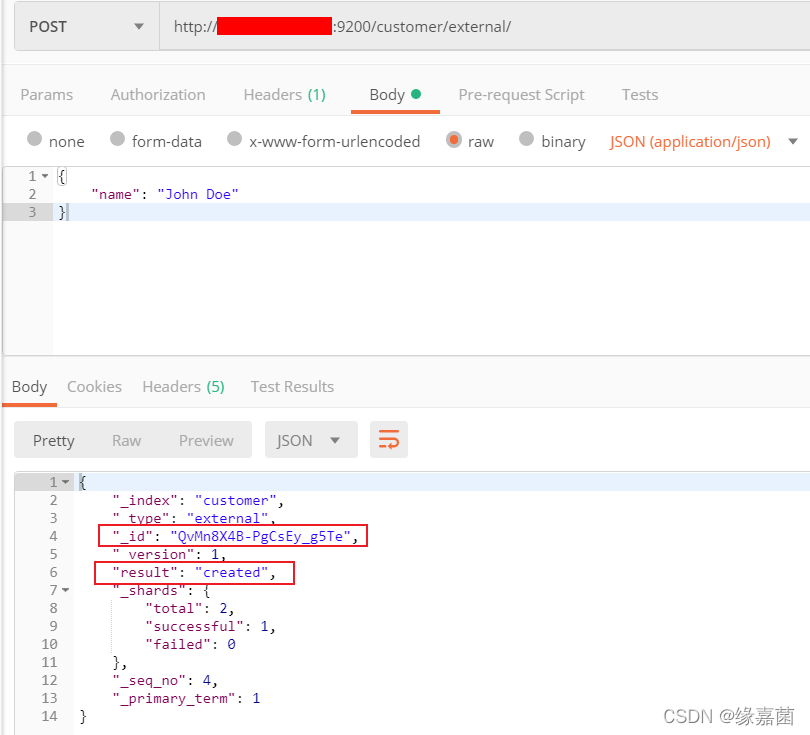
POST 新增。如果不指定id,会自动生成id。指定id就会修改这个数据,并新增版本号
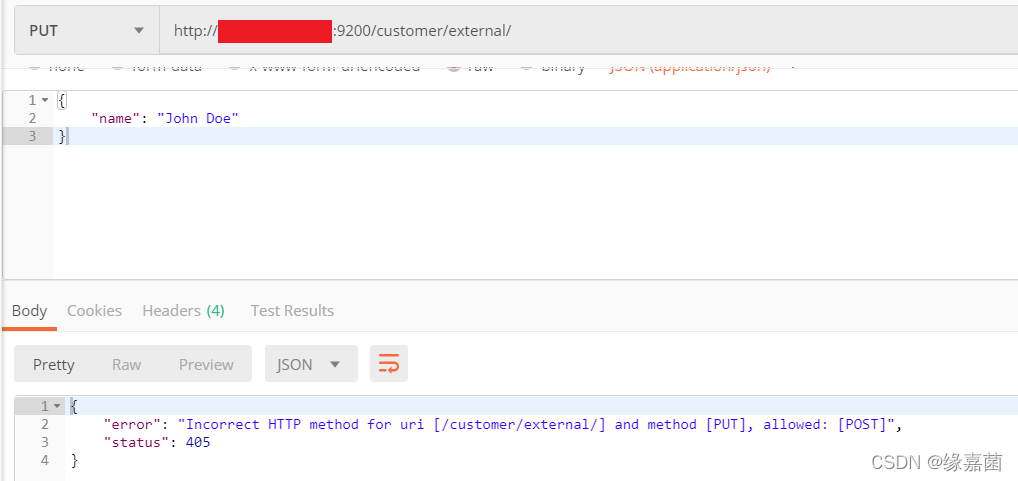
PUT可以新增可以修改。PUT必须指定id;由于PUT需要指定id,我们一般都用来做修改操作,不指定id会报错。
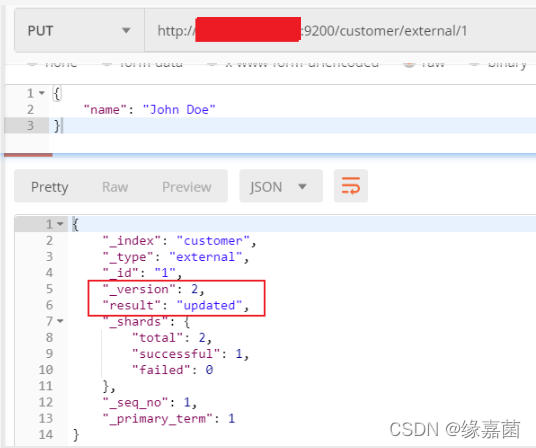
3.2.1 put操作
携带id新增
携带id更新
不携带id报错
3.2.2 post操作
携带id新增
携带id更新
不携带id新增并生成id唯一值
3.3 查看文档
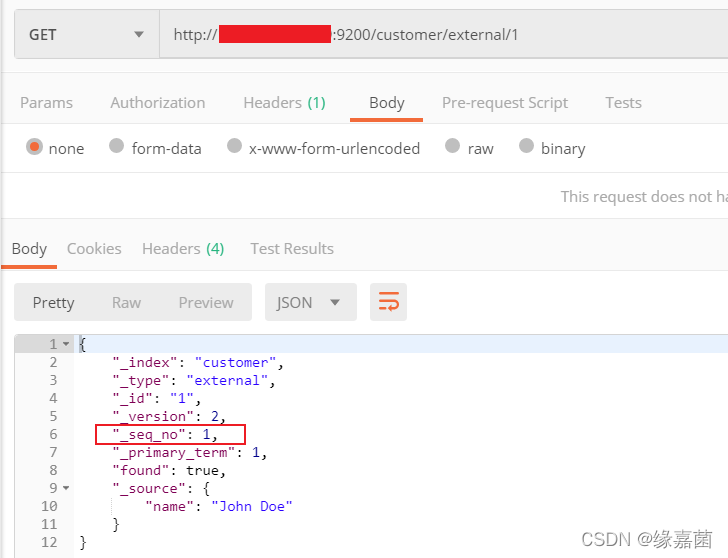
_get查询数据&乐观锁字段
3.3.1 查询数据信息
3.3.2 A B同时操作更新

A更新name为 “name”: “yellow”
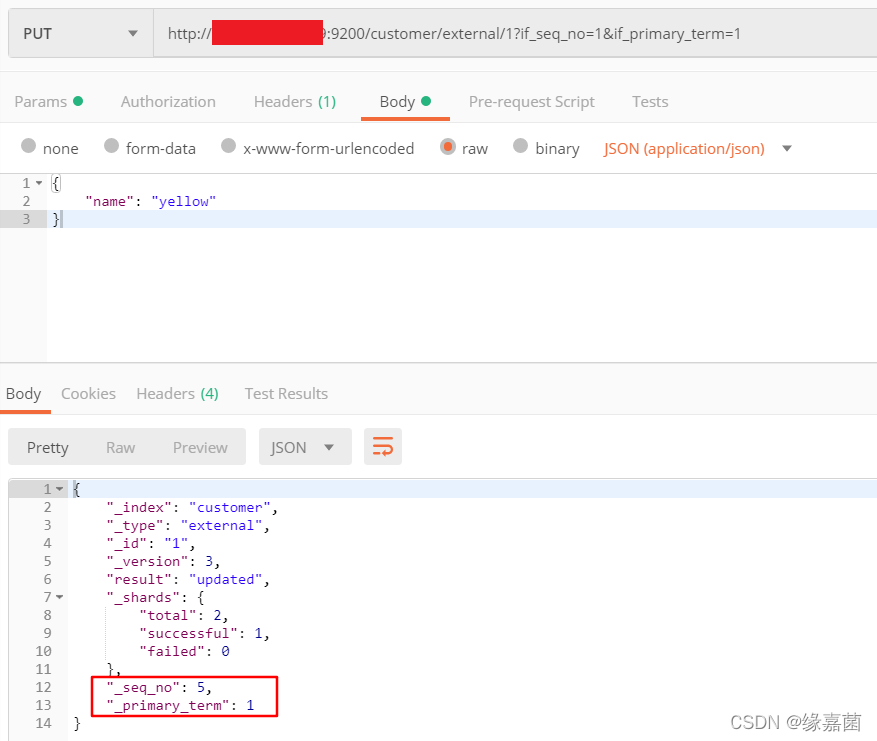
B更新name为 “name”: “red”
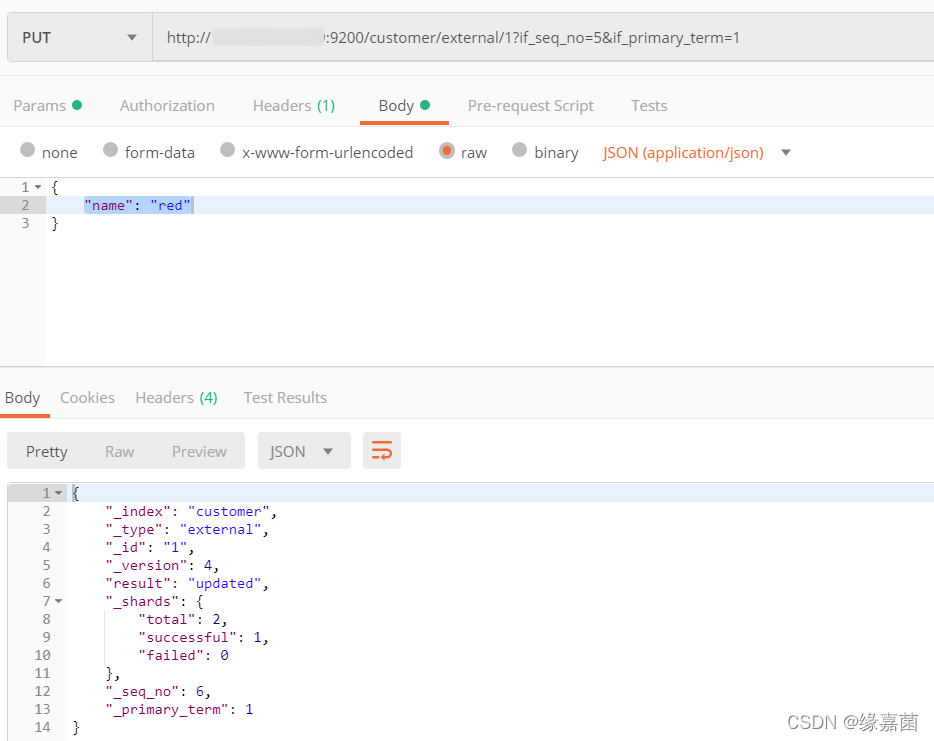
修改seq_no值重新操作更新,更新成功,seq_no会发生变化
注:primary_term代表机器重启,重启会发生变化
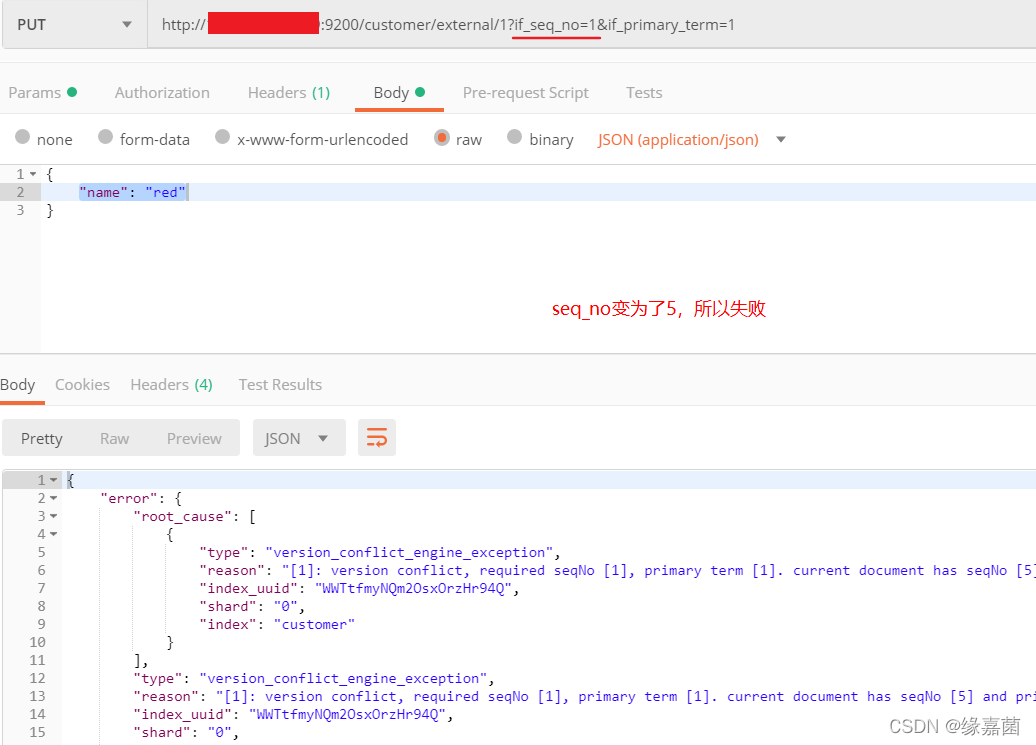
总结:A B修改同一条记录,假设版本号1,A改了-版本号更新2,B再更改则失败(版本号发生变化了)=》此操作过程请求需要携带看到的数据记录版本号
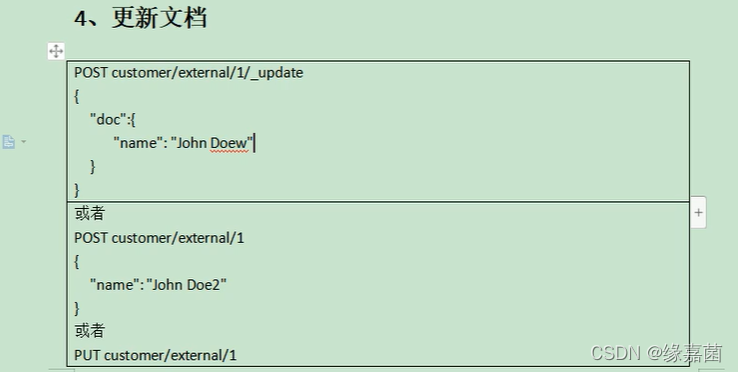
3.4 更新文档
put&post修改数据
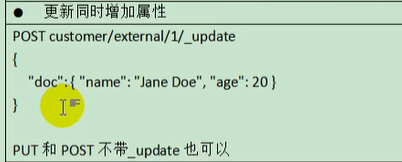
注意:_update更新,会对比原来数据,若没有新数据,version和seq_no不会发生变化,即什么都不变。修改的数据发生变化才会更新版本号等其他值。
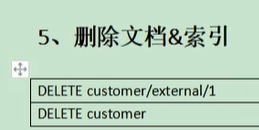
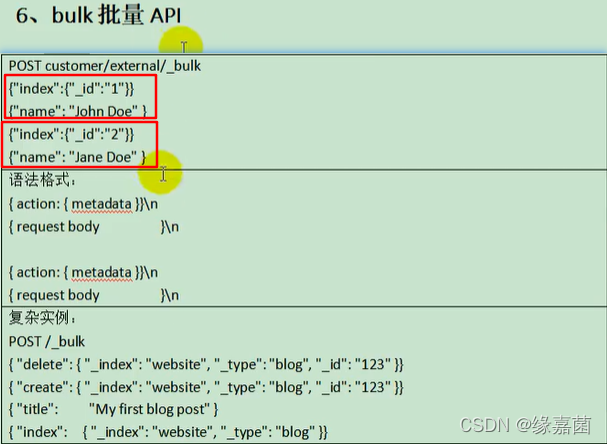
3.5 删除数据&bulk批量操作导入样本测试数据
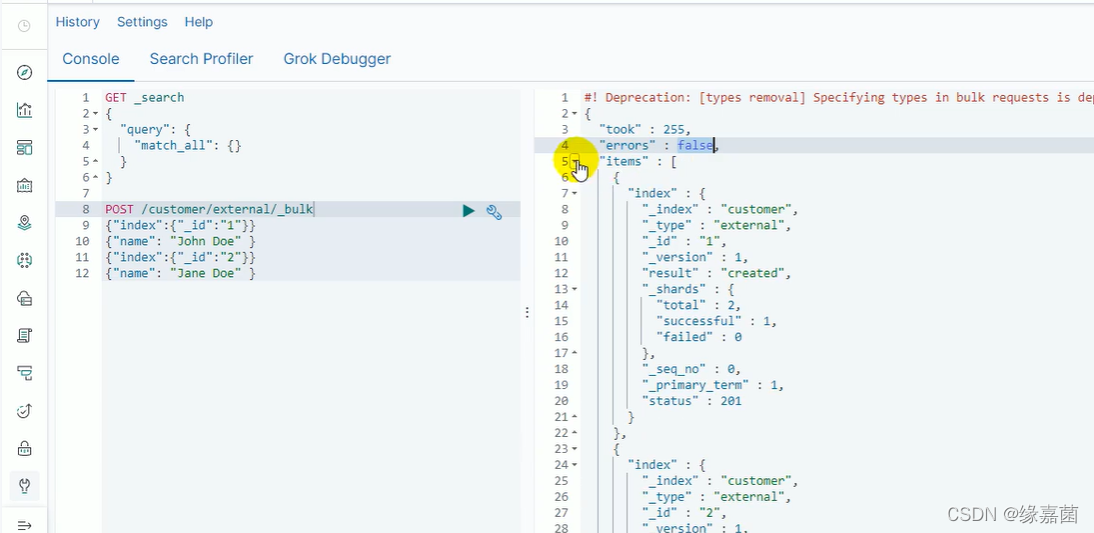
使用kibana客户端操作
样本测试数据
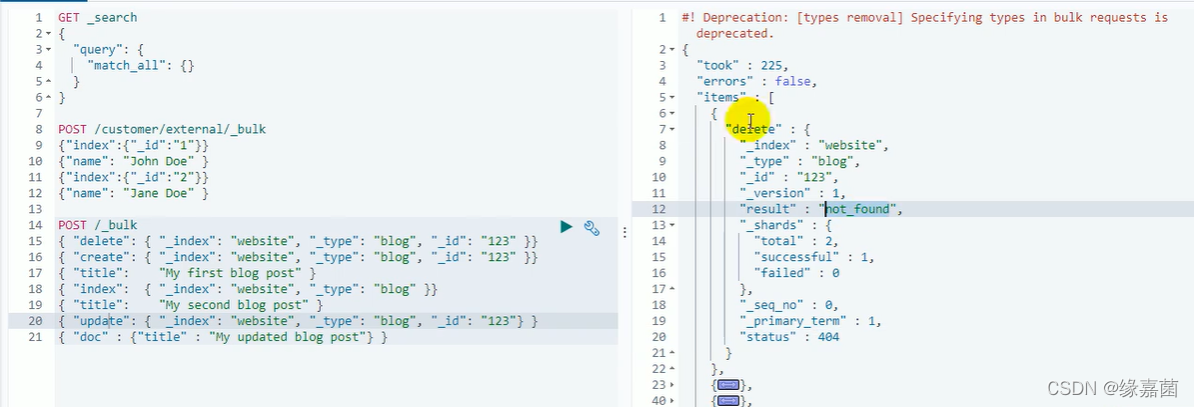
执行
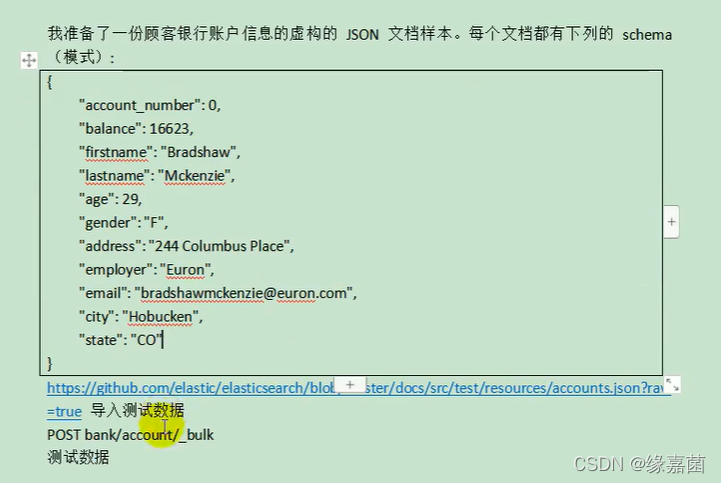
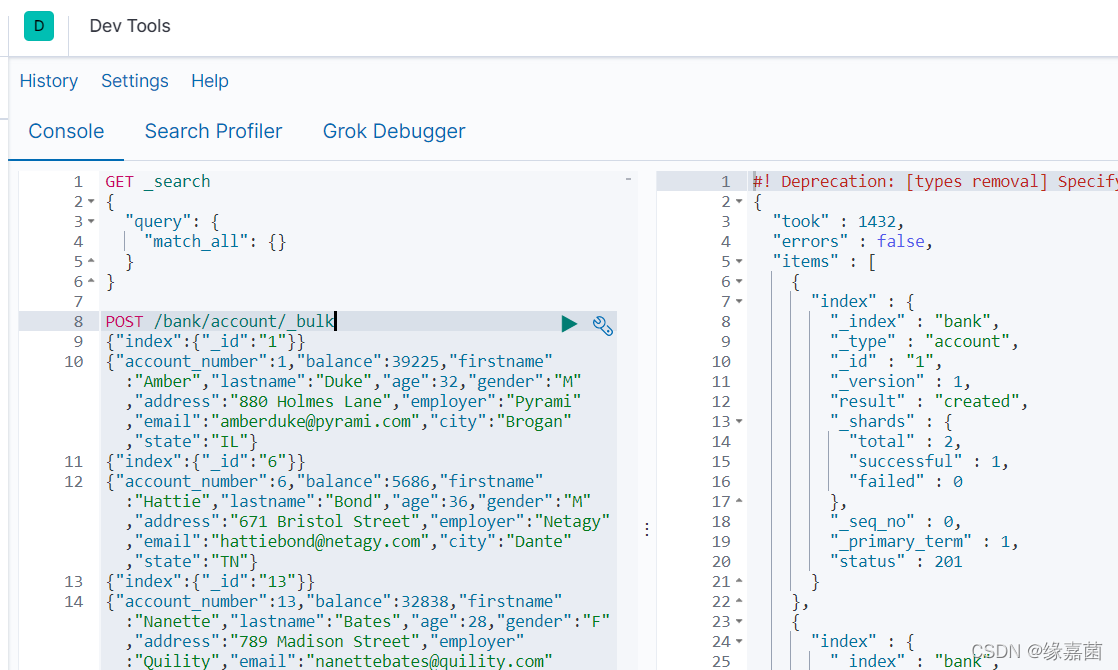
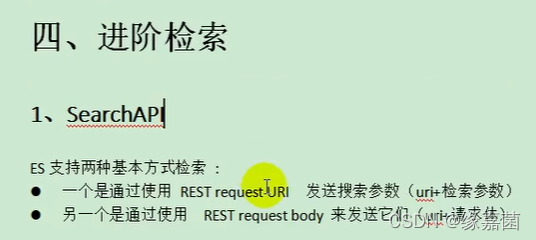
3.6 两种查询方式
实例

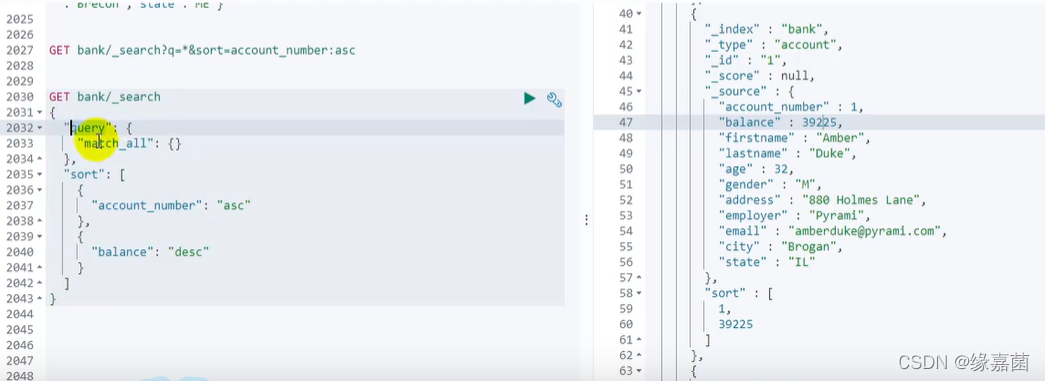
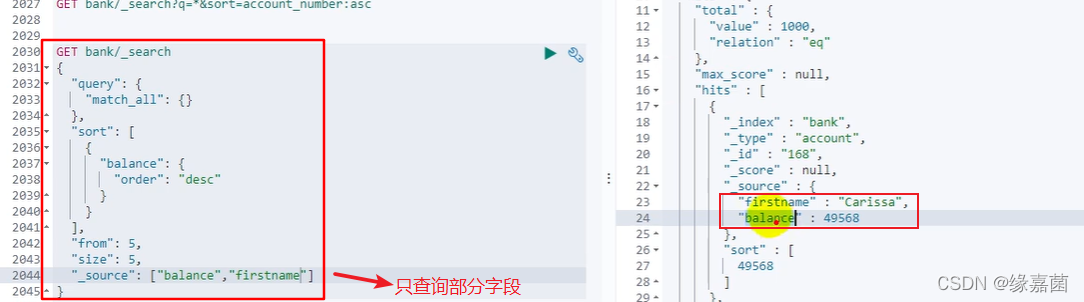
3.7 QueryDSL基本使用&match_all
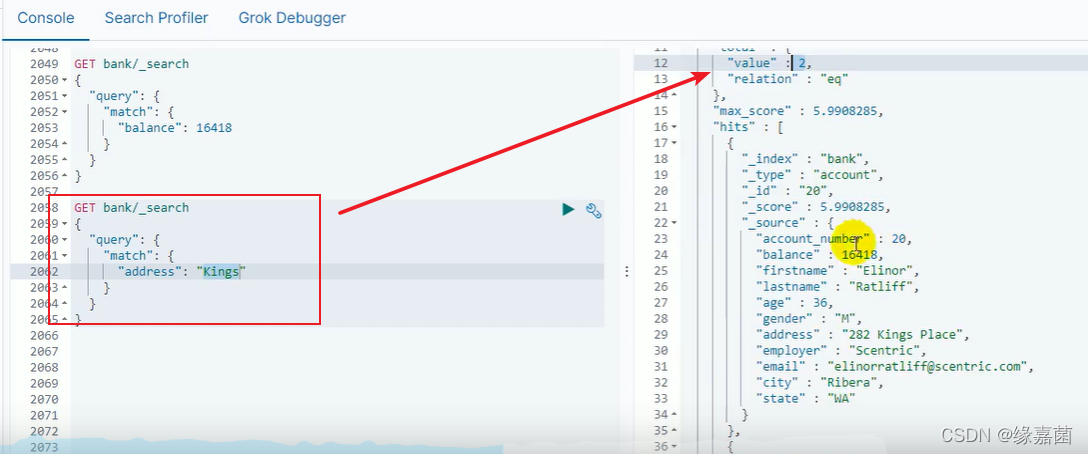
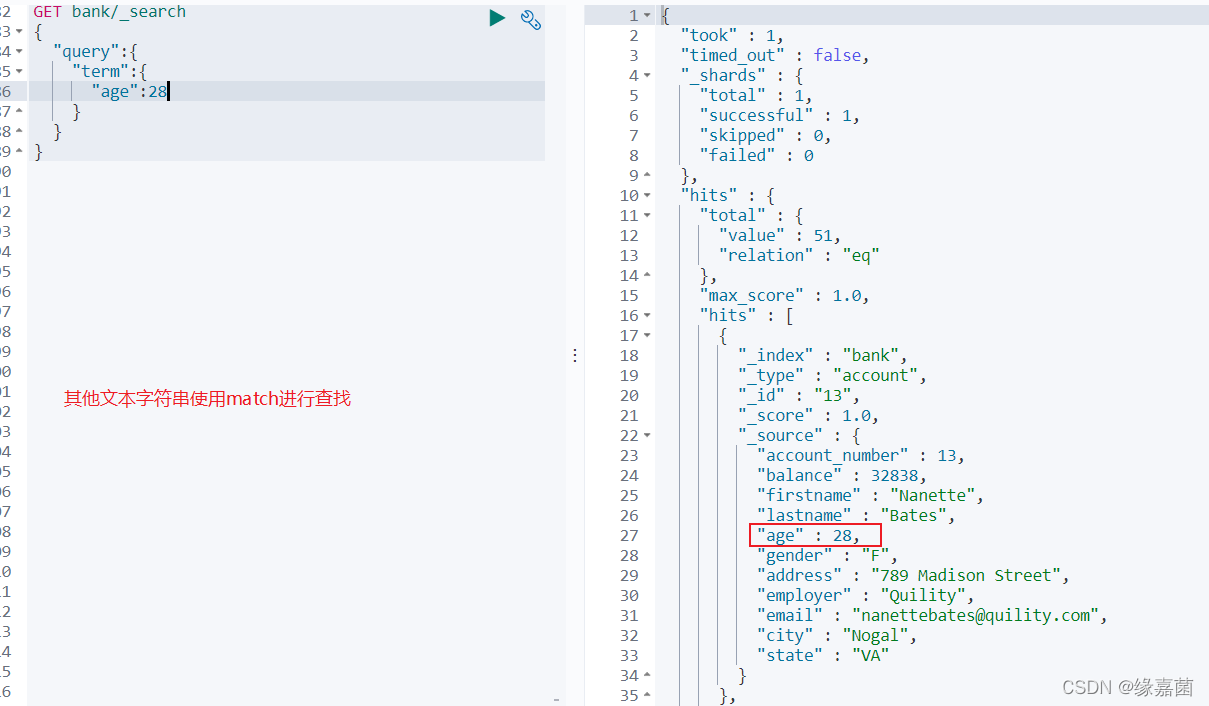
3.8 match 匹配查询
若是查询字符串,进行分词+全文检索
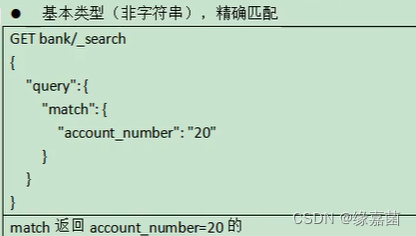
案列:
注:_score代表查询命中得分
全文检索按照评分进行排序,会对检索条件进行分词匹配。
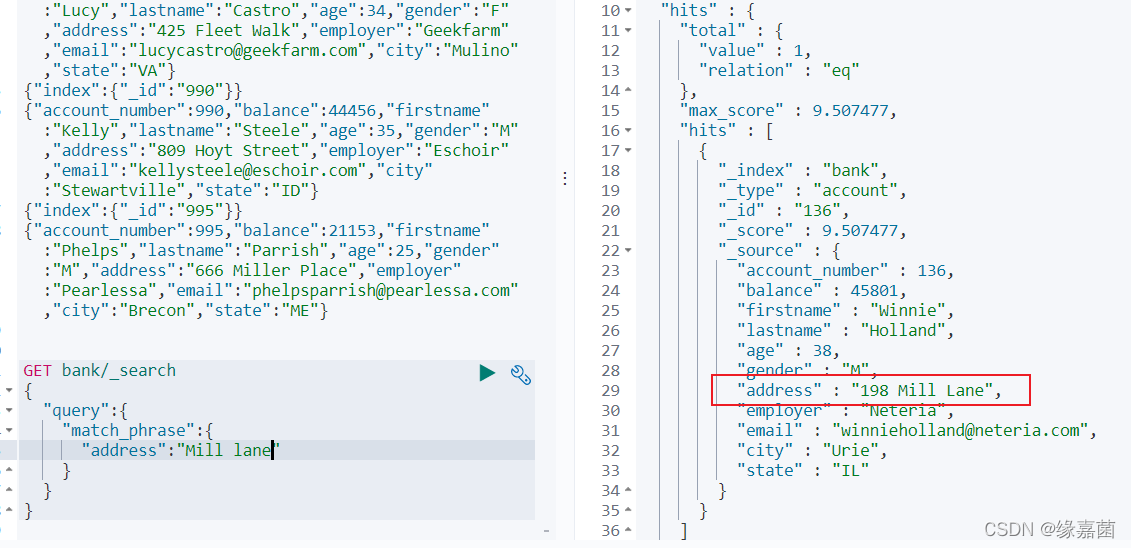
3.9 match_phrase 短语匹配
注意:不分词检索

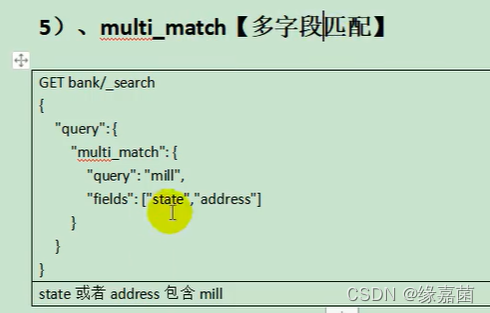
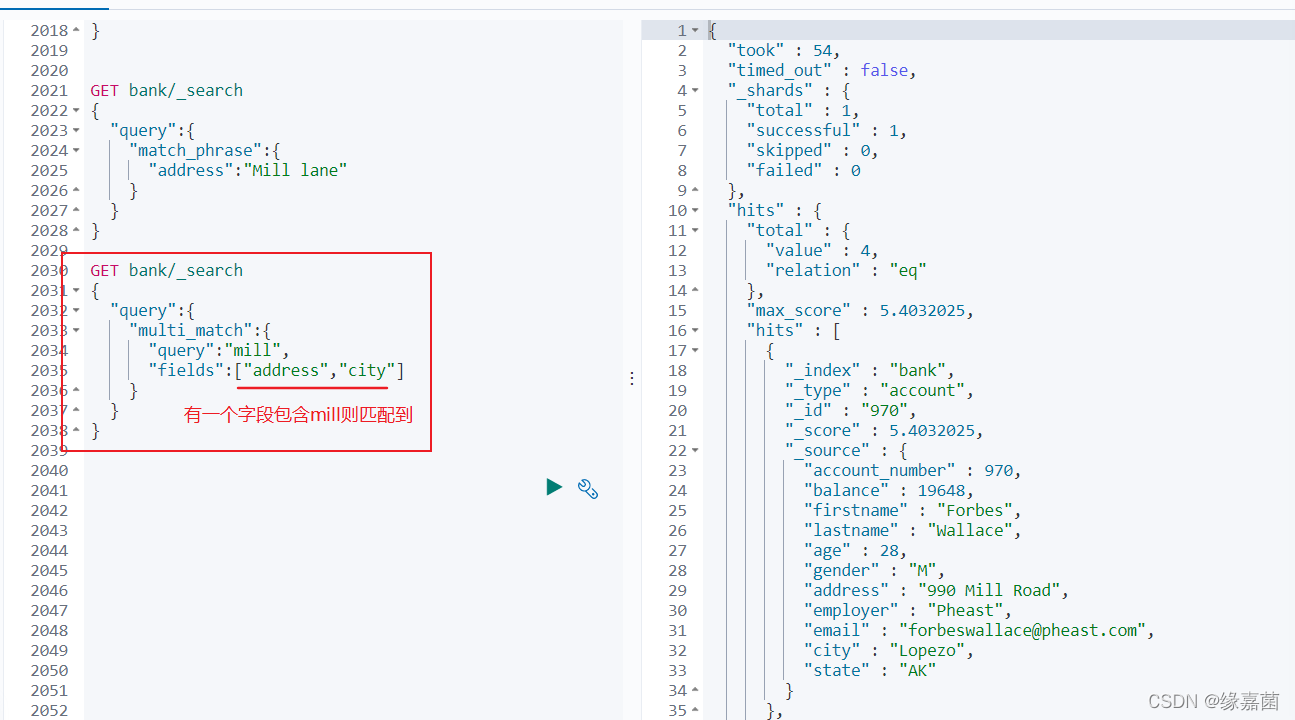
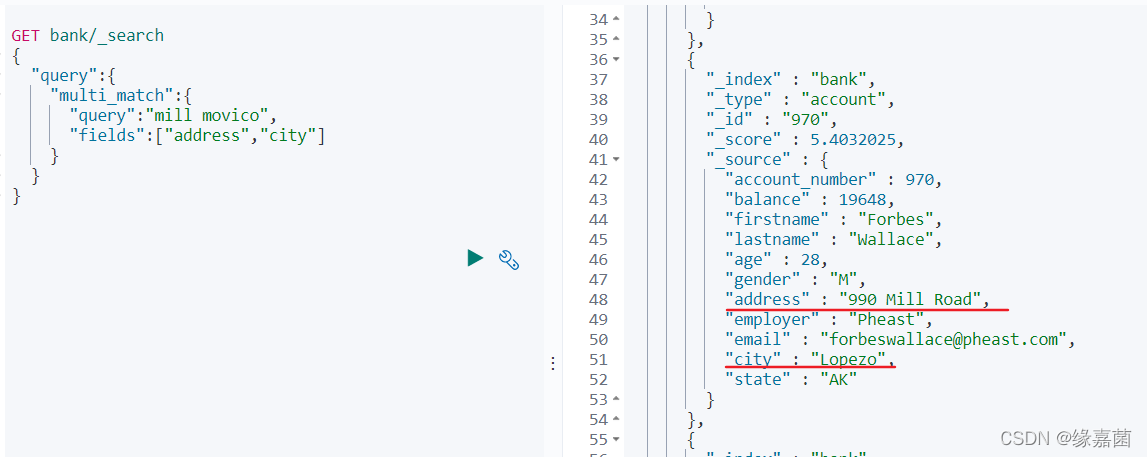
4.0 multi_match 多字段匹配
注意:分词+全文检索
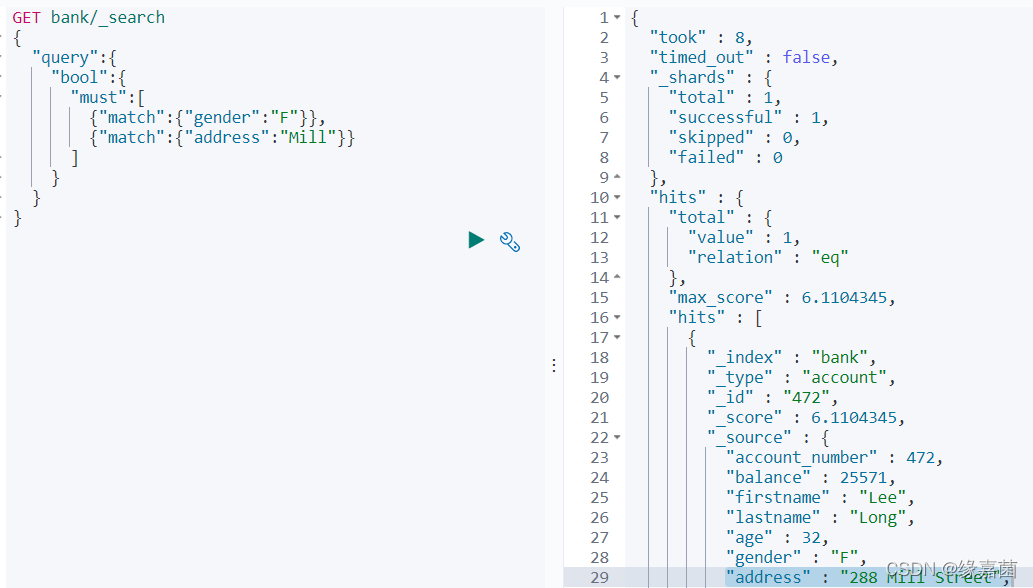
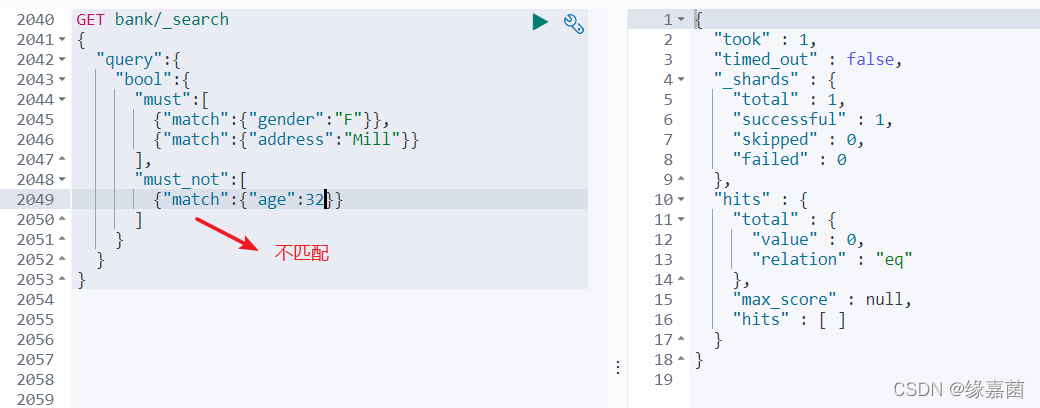
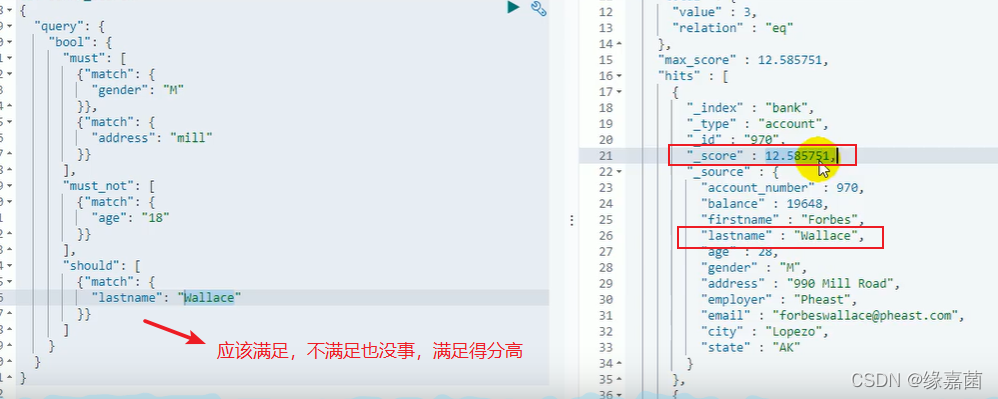
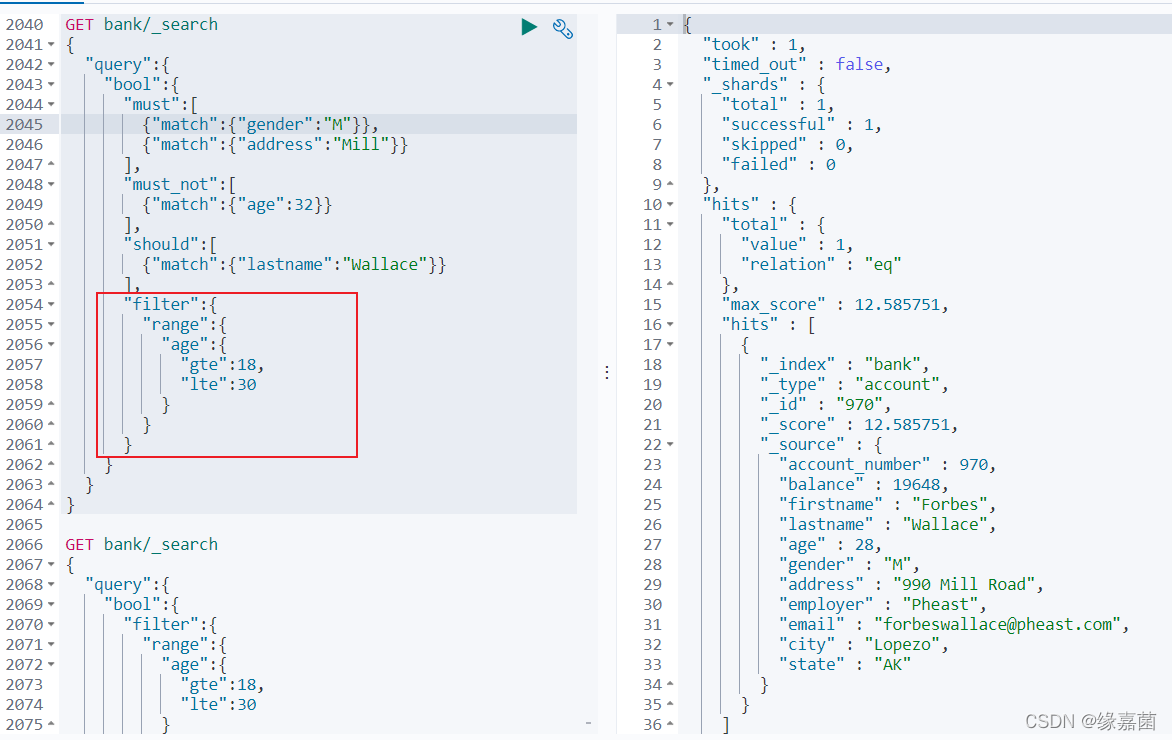
4.2 bool 复合查询
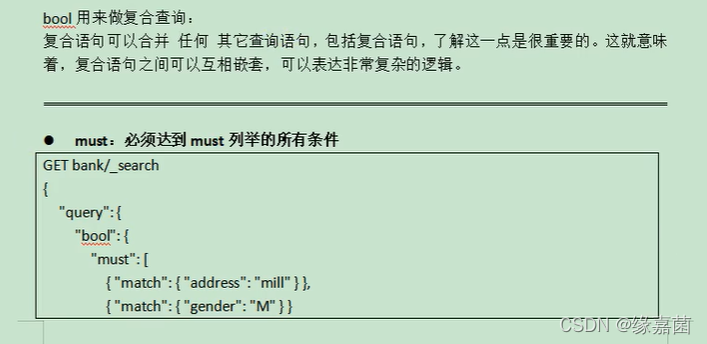
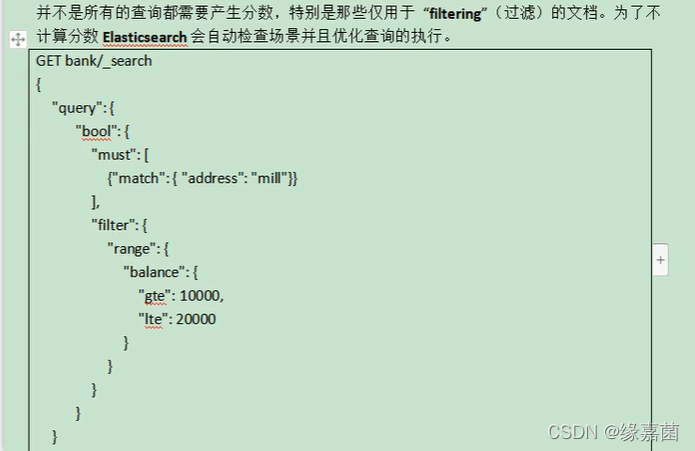
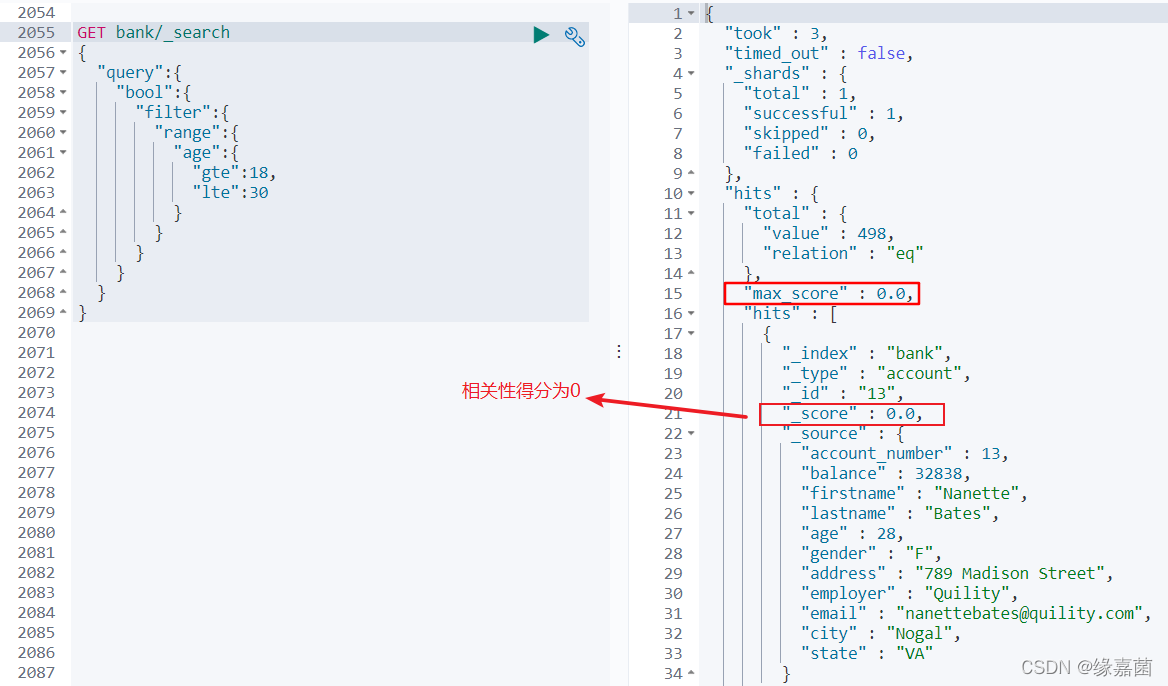
4.3 filter结果过滤
filter不会计算相关性得分
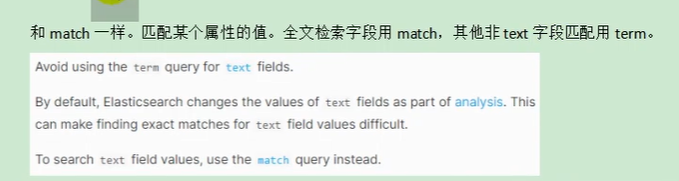
4.4 term

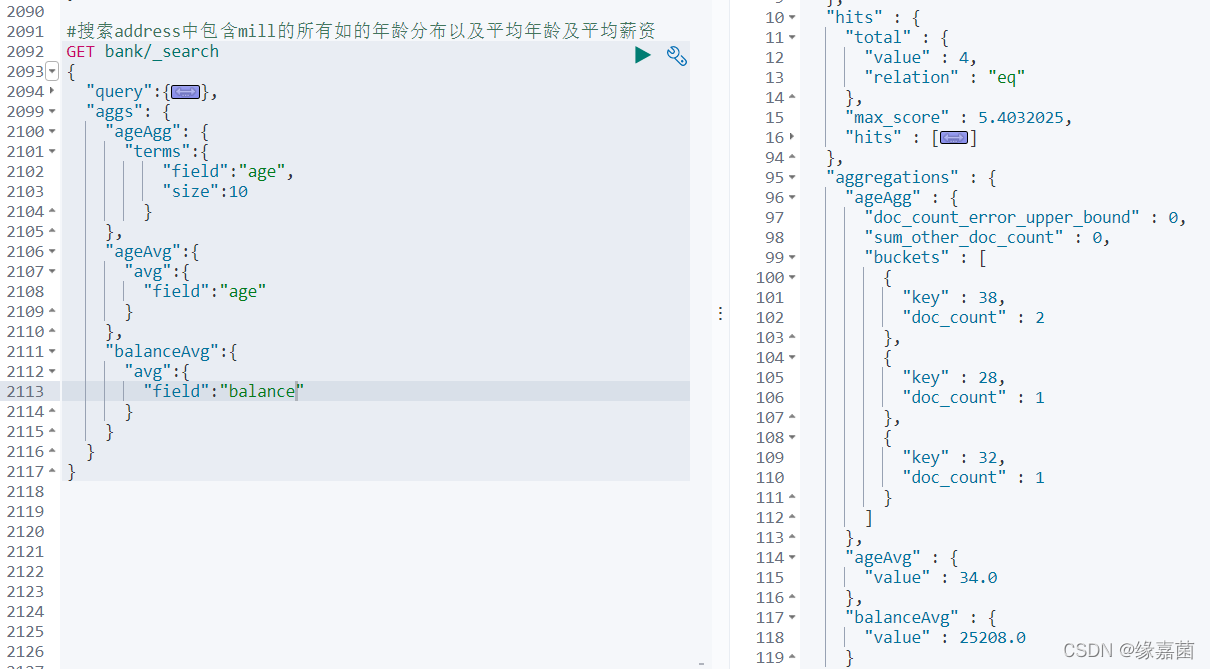
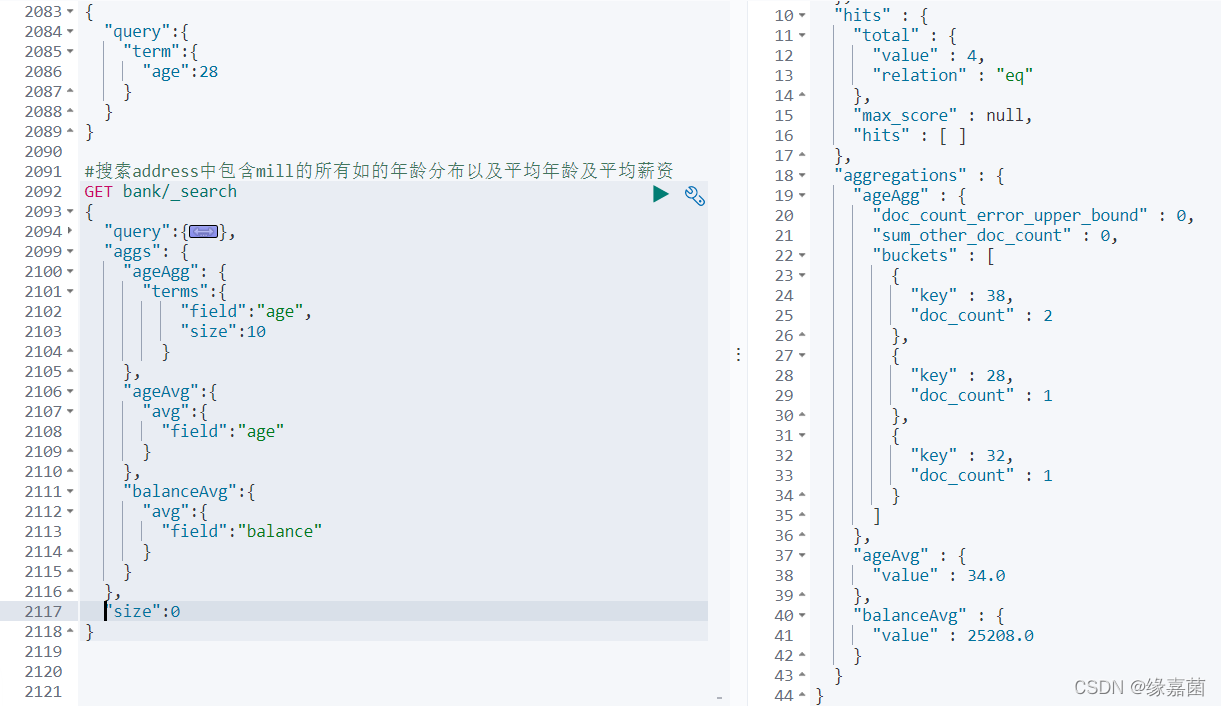
4.5 aggregations 执行聚合
1.搜索address中包含mill的所有人的年龄分布以及平均年龄及平均薪资
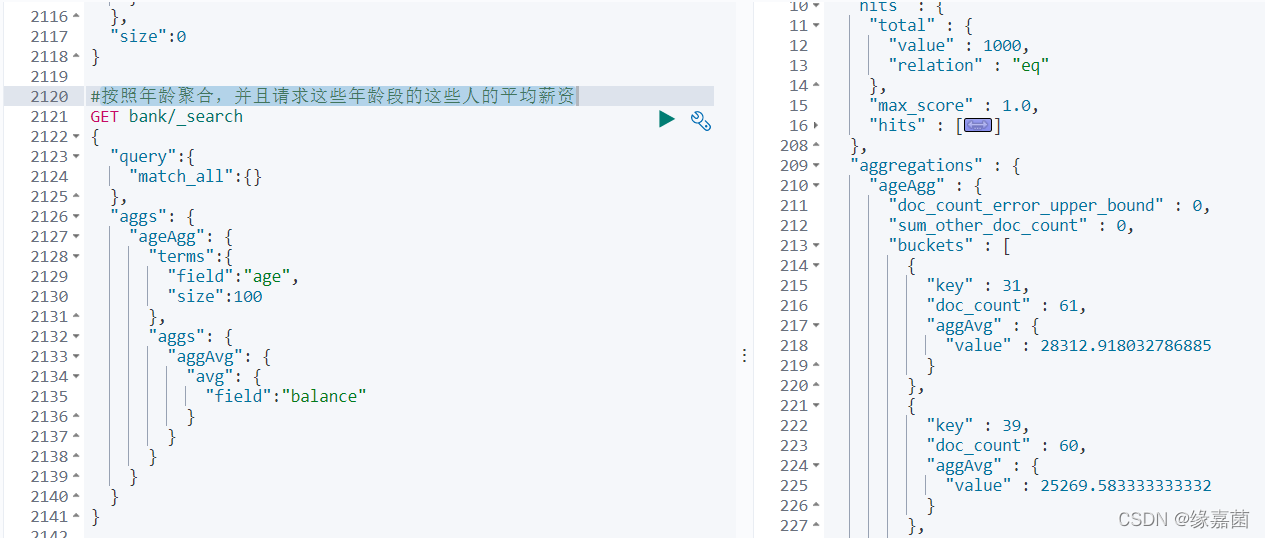
2.按照年龄聚合,并且请求这些年龄段的这些人的平均薪资
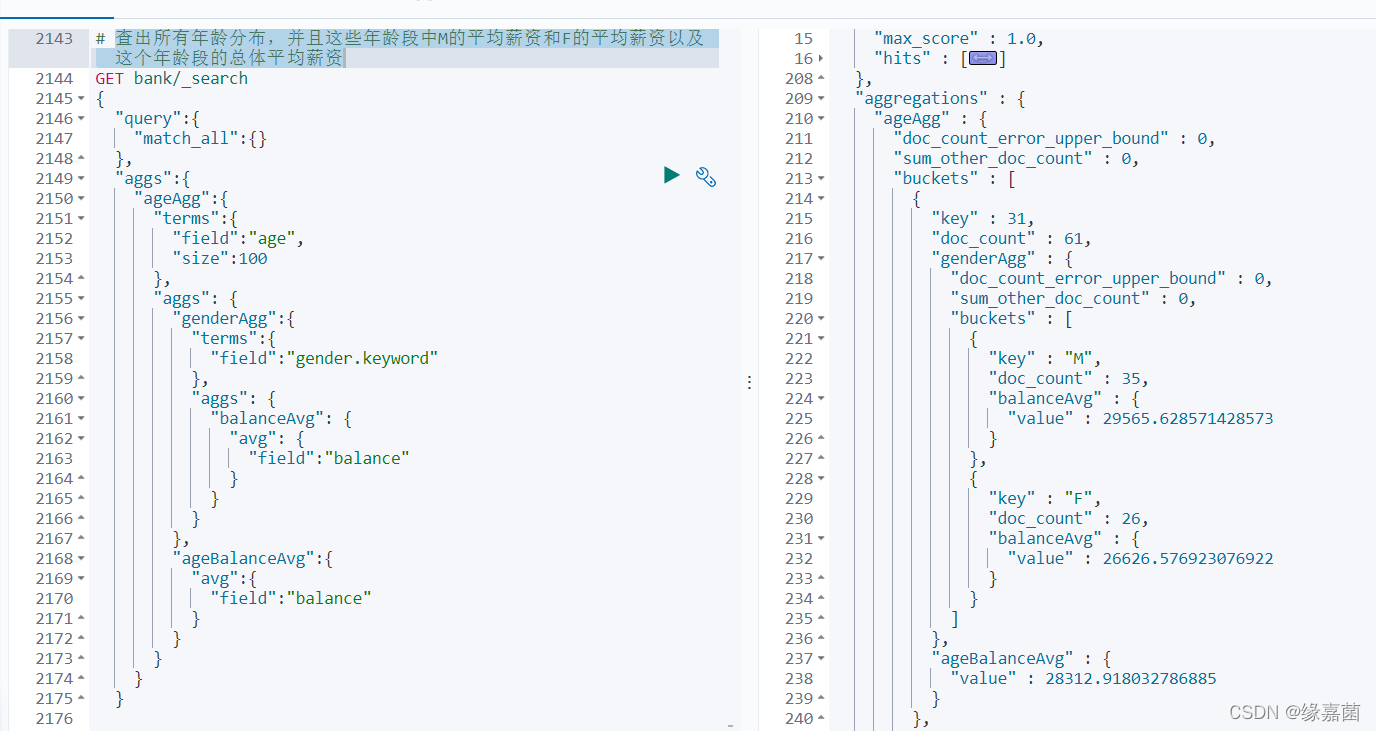
3.查出所有年龄分布,并且这些年龄段中M的平均薪资和F的平均薪资以及这个年龄段的总体平均薪资

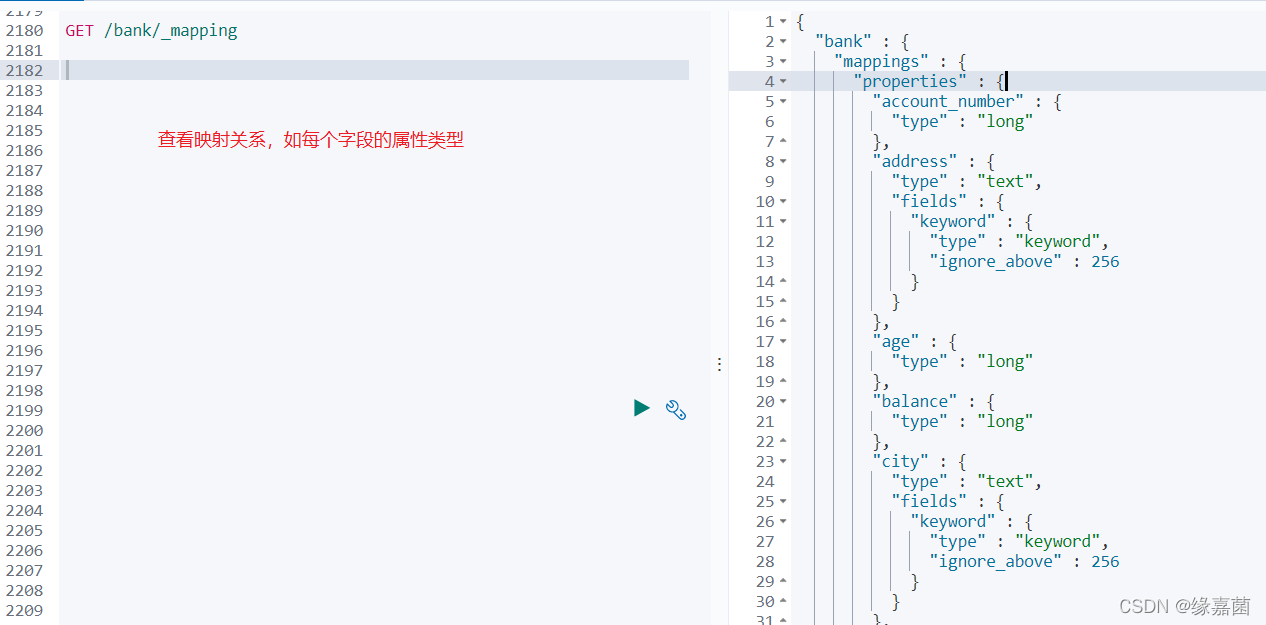
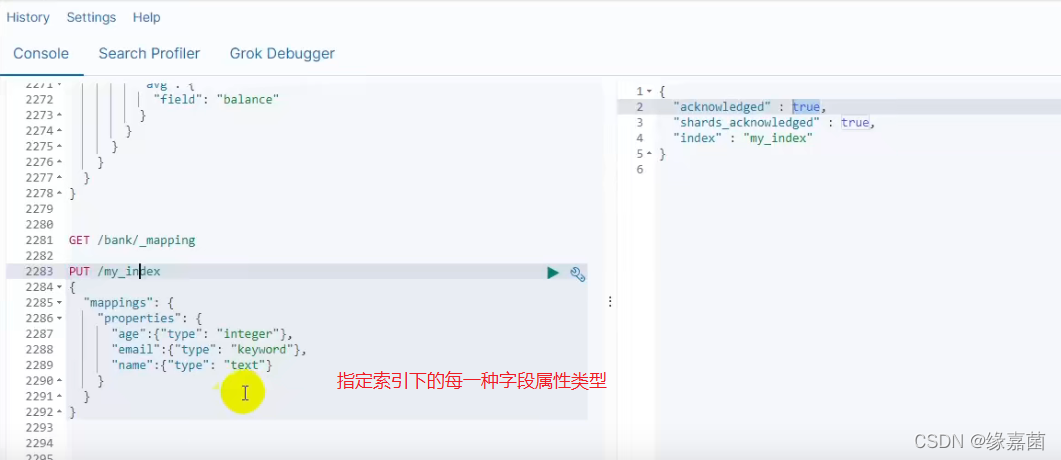
4.6 映射-mapping创建
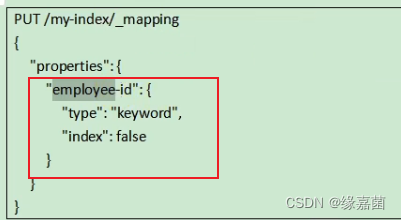
4.7 添加新的字段映射
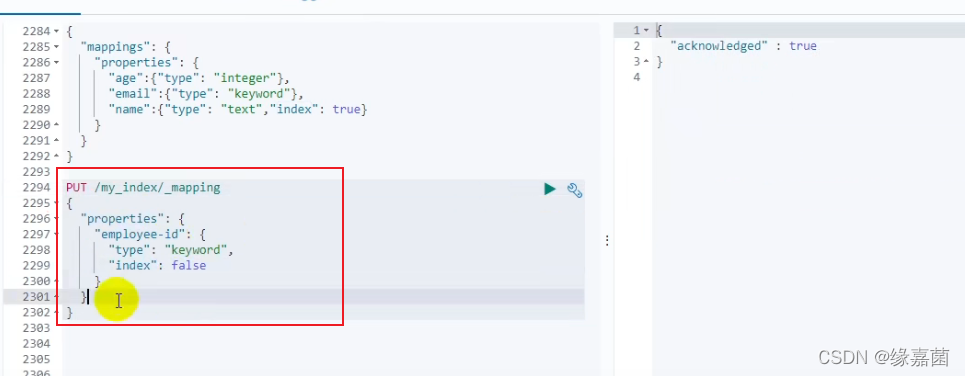
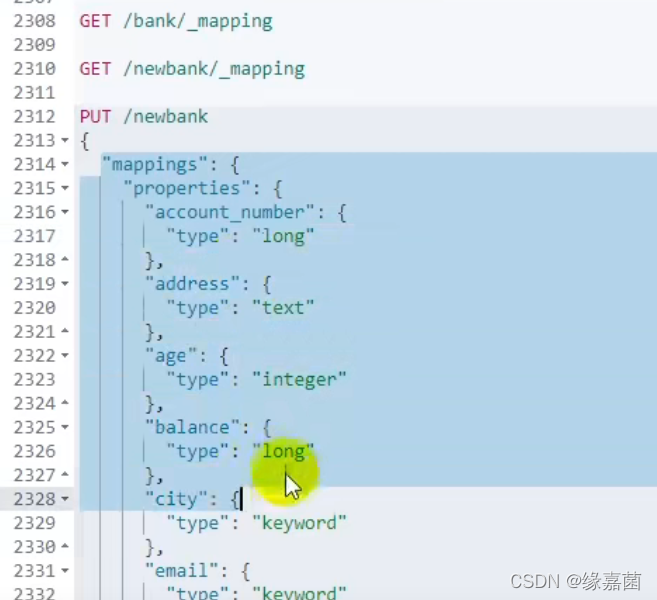
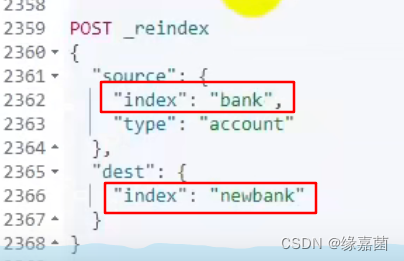
4.8 更新映射&数据迁移
数据迁移(创建新的索引)

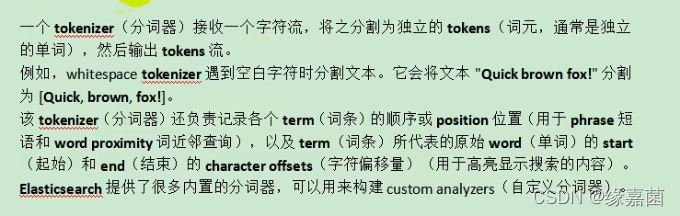
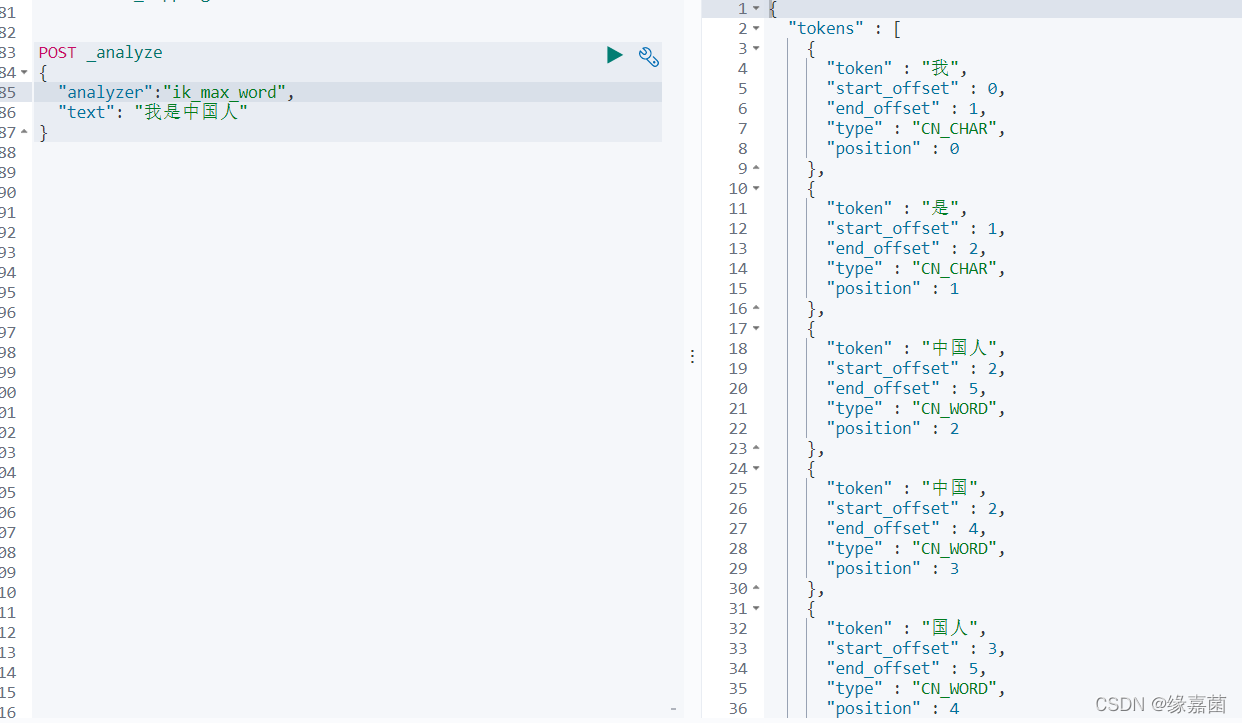
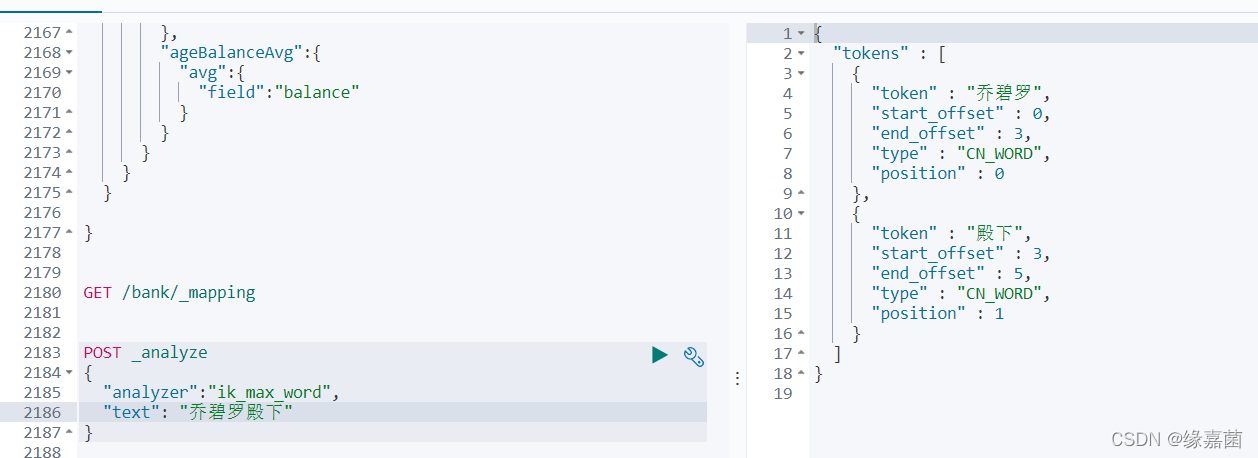
4.9 分词&安装ik分词
分词
对于中文需要专门安装分词器
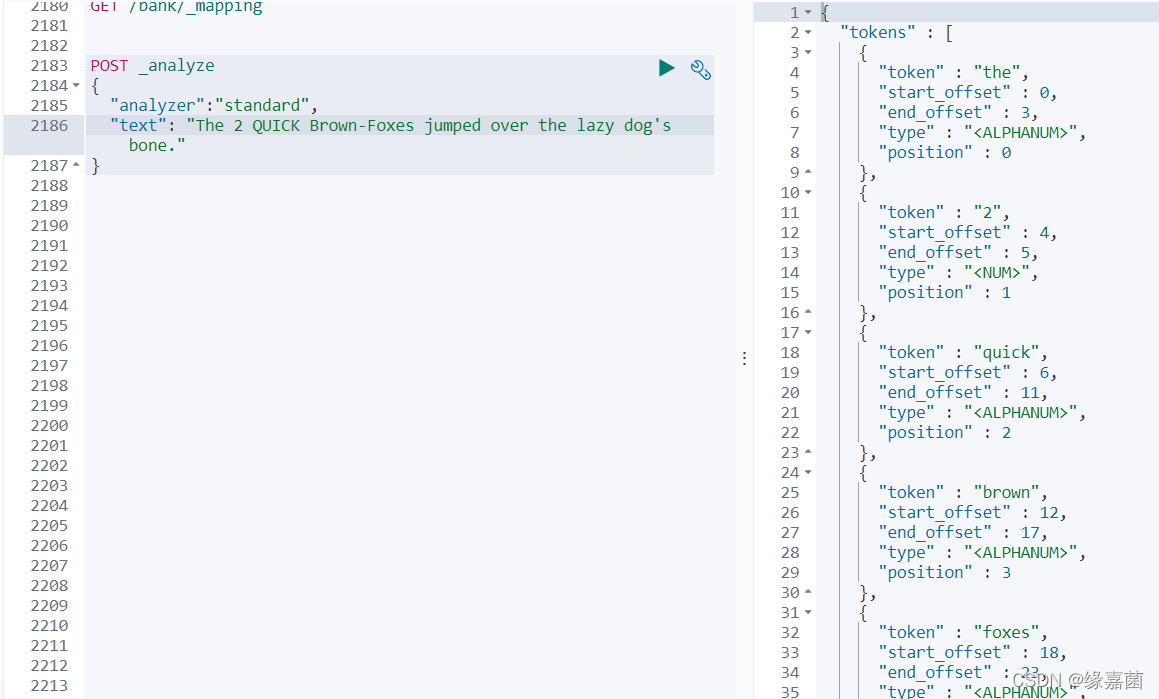
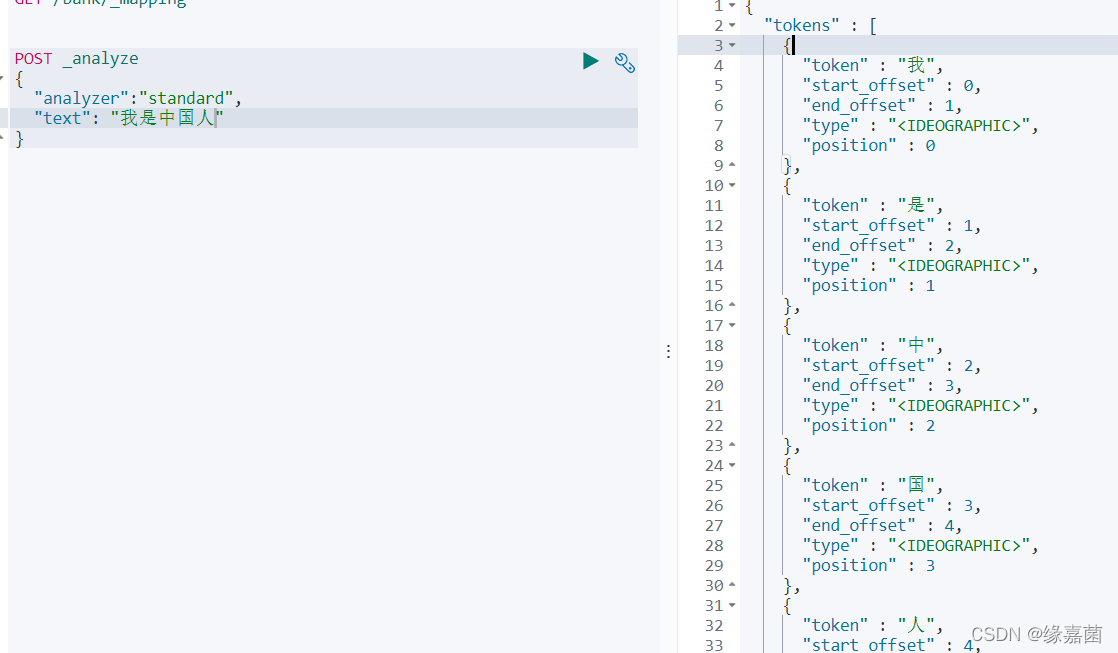
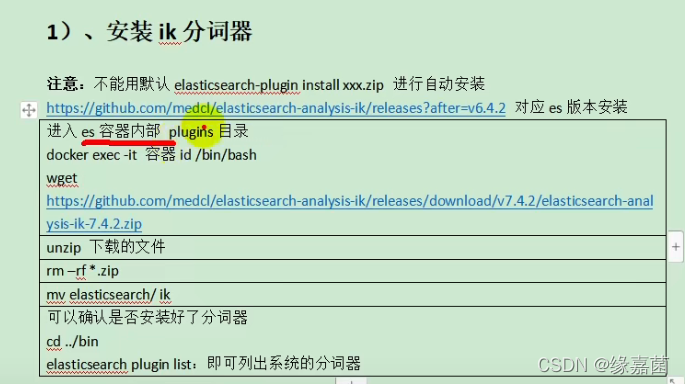
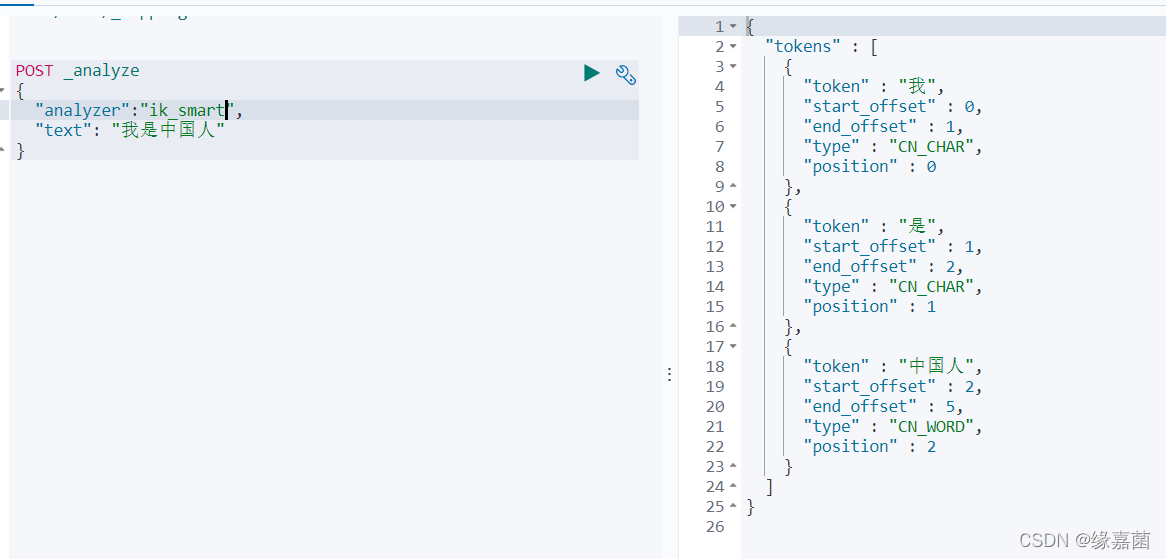
安装ik分词器(安装过程忽略)=>用于支持中文分词
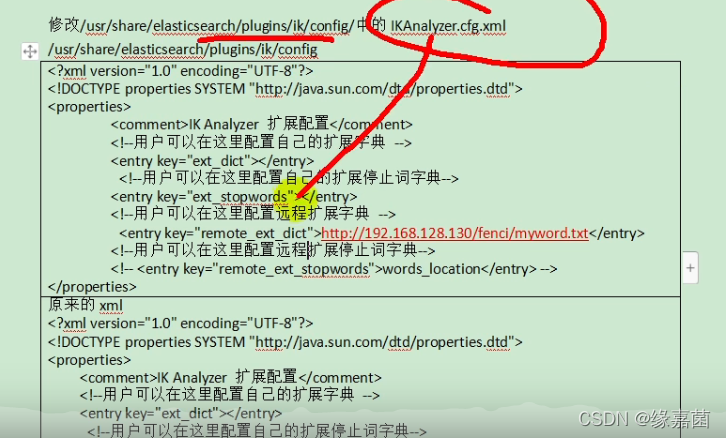
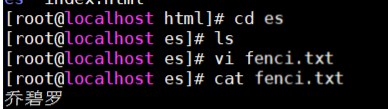
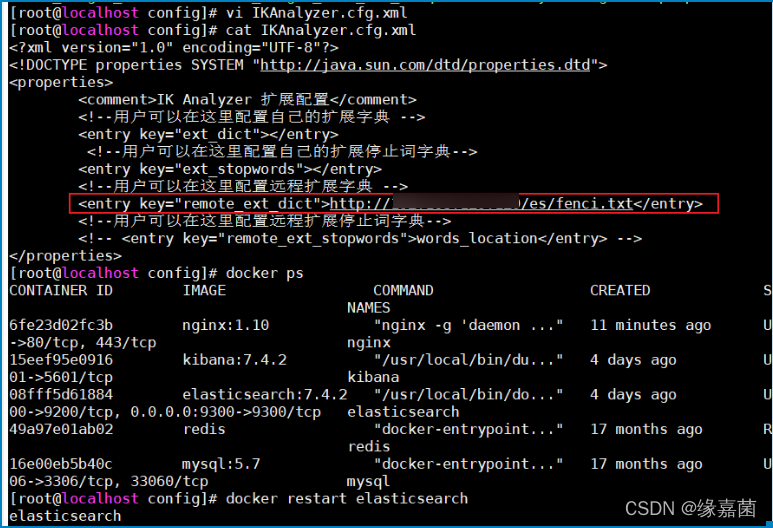
5.0 自定义扩展词库
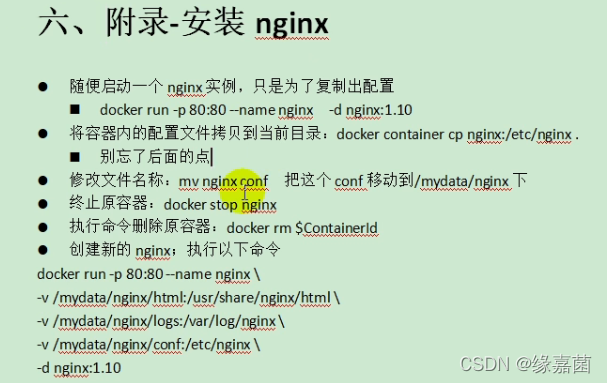
使用nginx配置
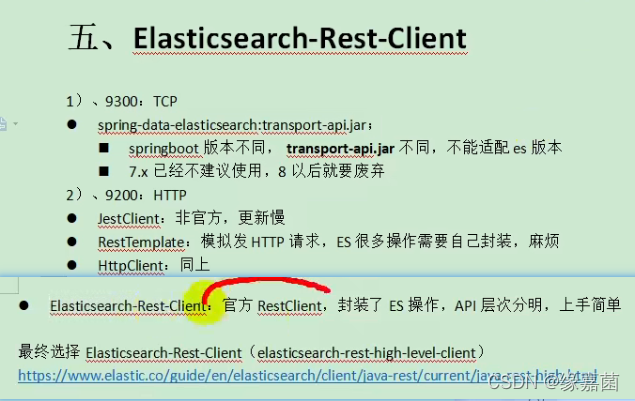
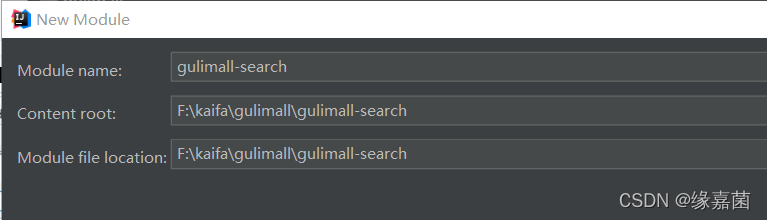
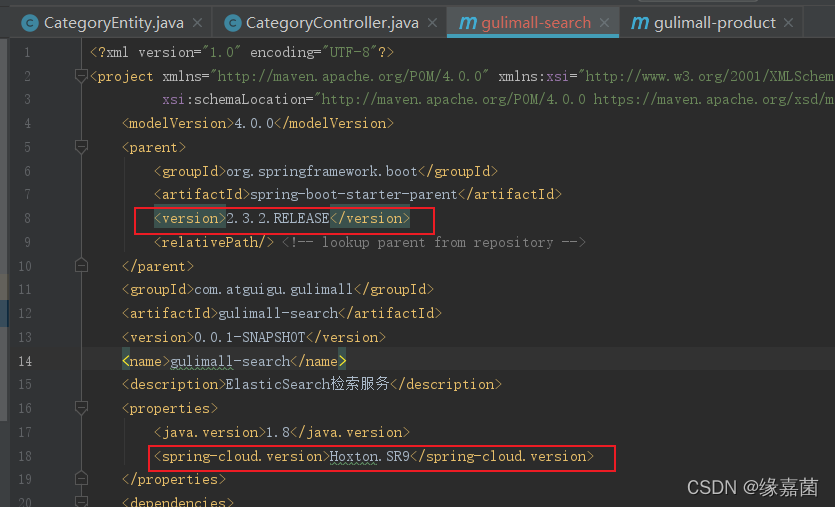
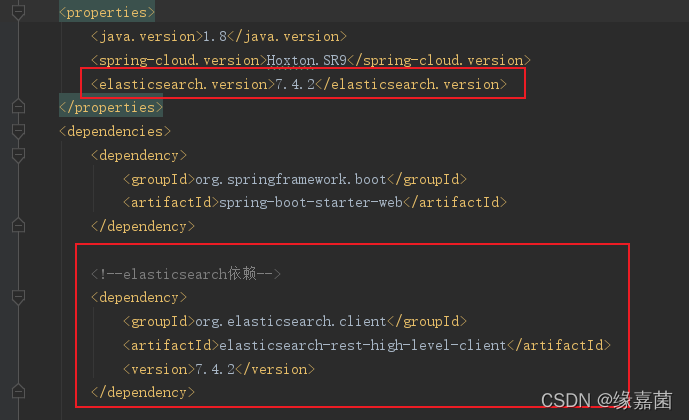
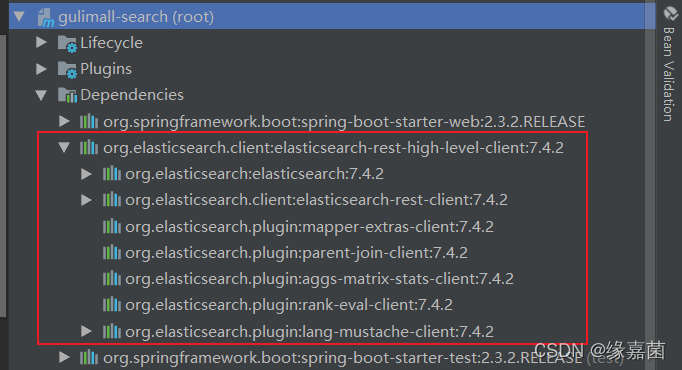
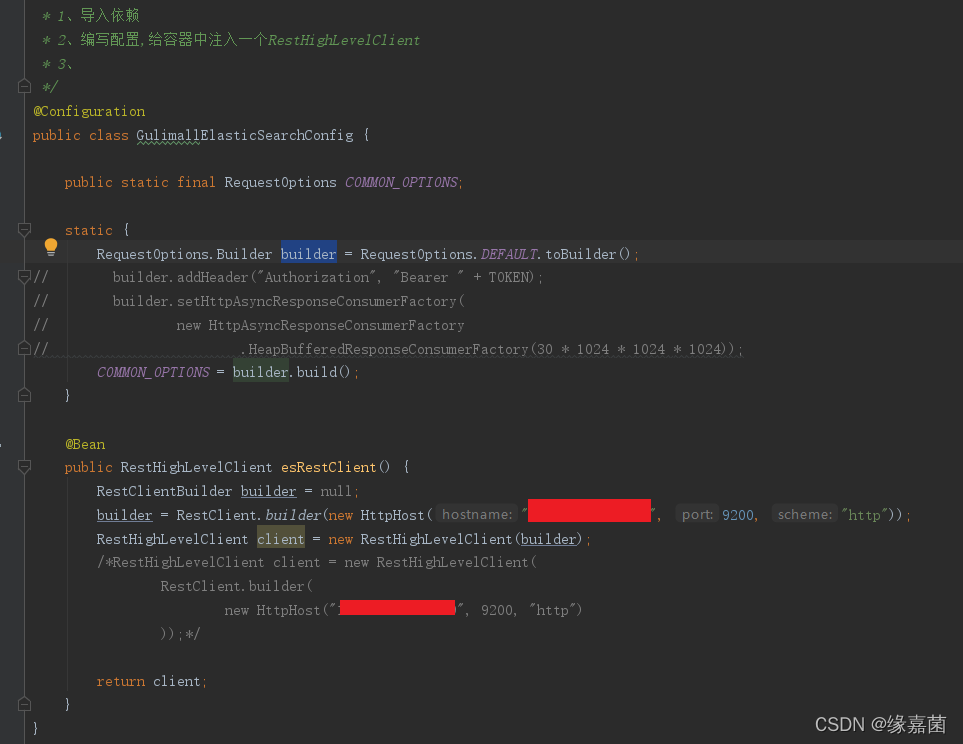
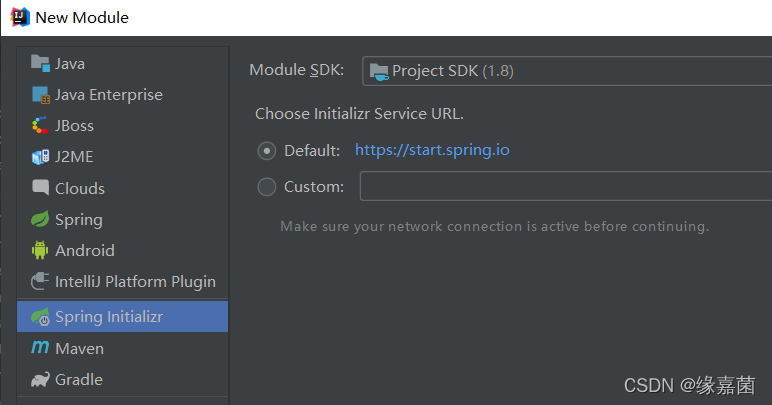
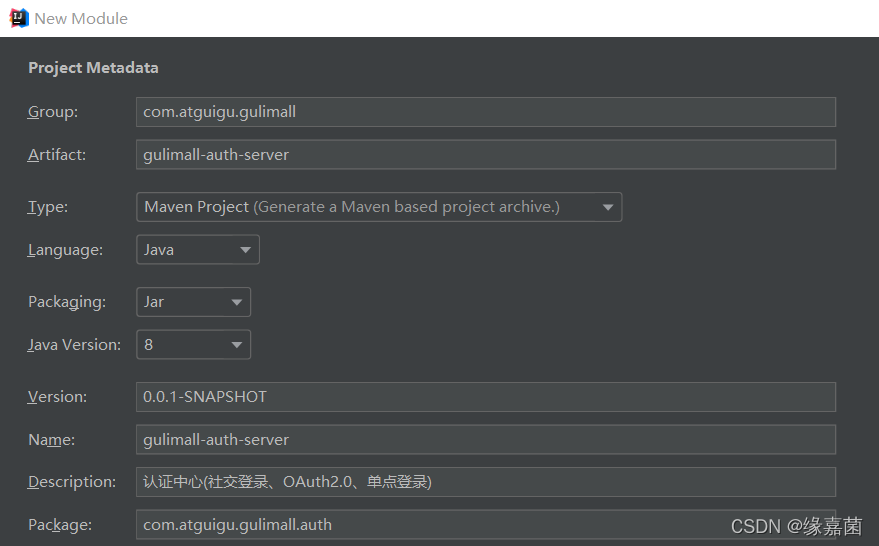
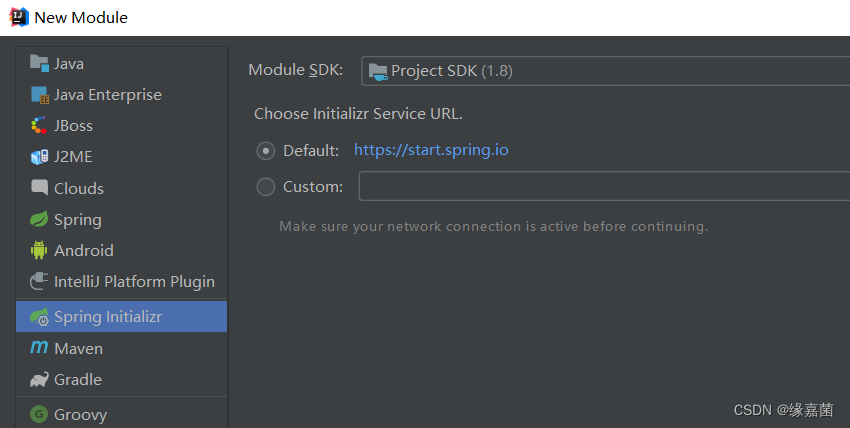
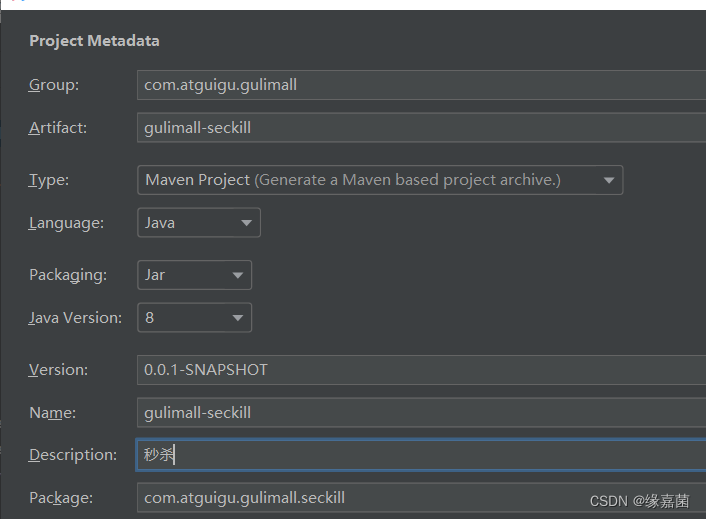
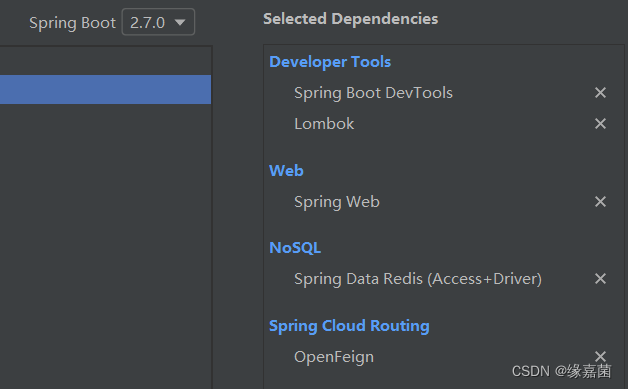
4.SpringBoot中使用Elasticsearch Java Rest Client
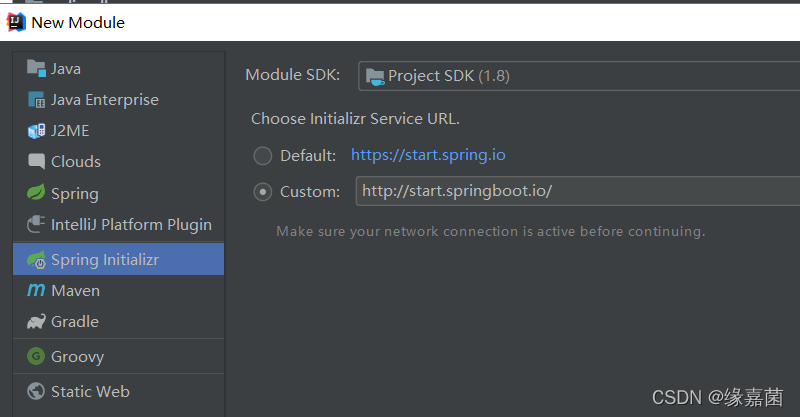
1、新建项目=》new module
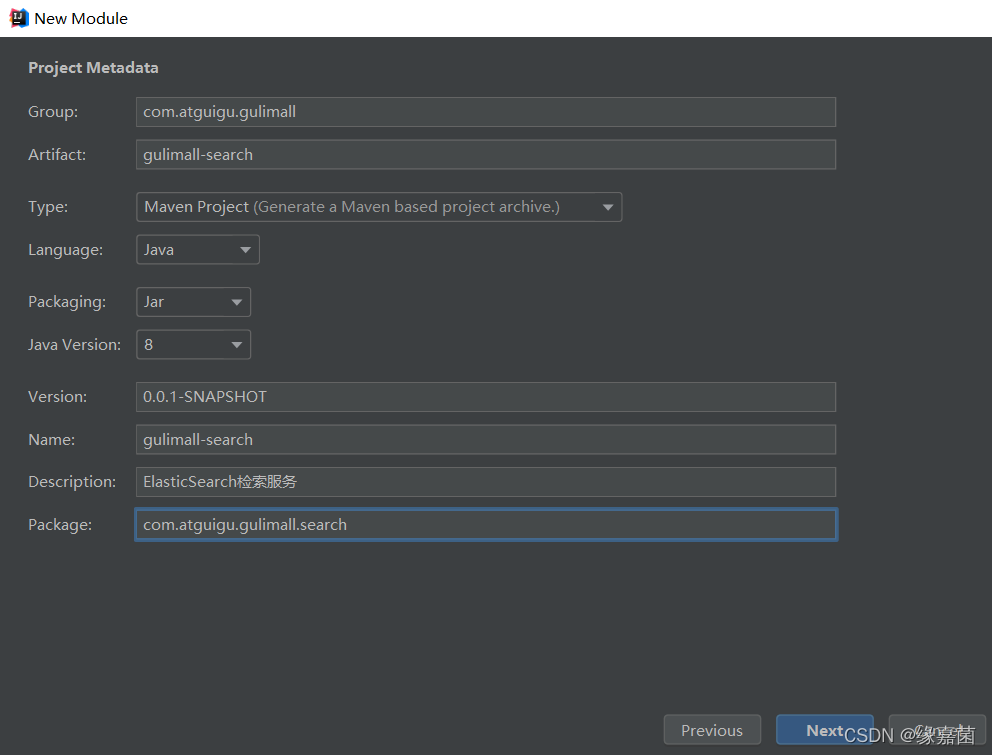

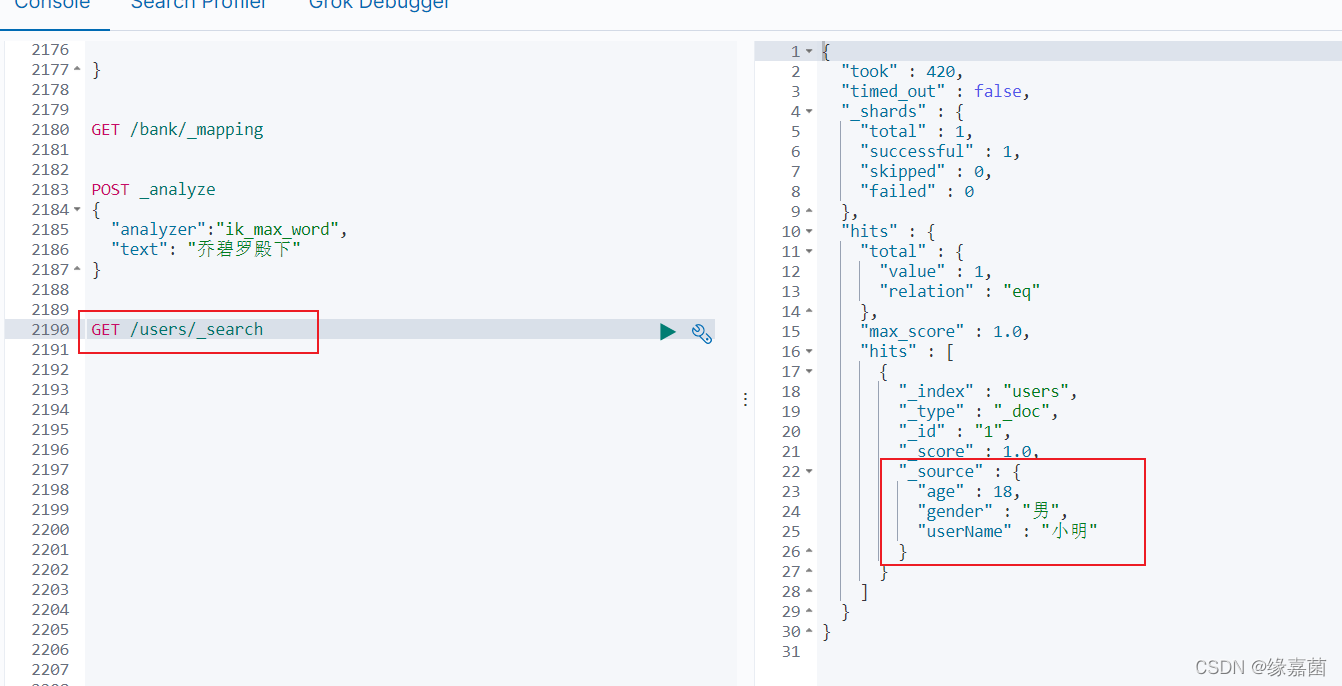
测试保存

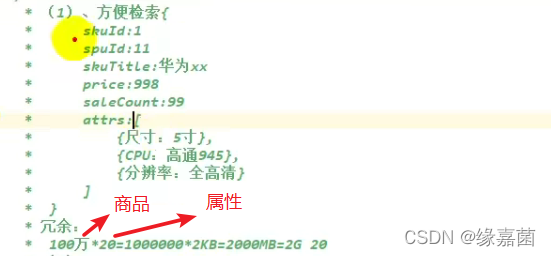
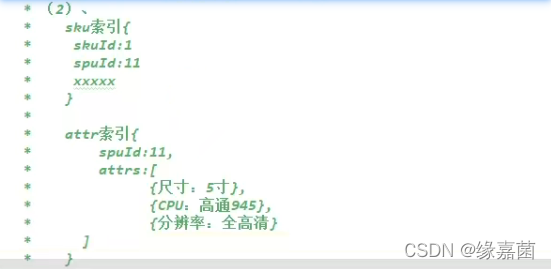
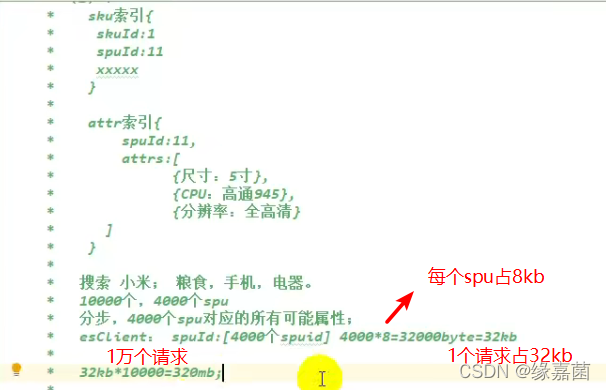
5.sku在es中存储模型分析
1Mb=1024kb
1G=1024Mb
100万个请求:32kb*1000000=32000mb=32G =>网络阻塞
PUT product
{
"mappings":{
"properties": {
"skuId":{
"type":"long"
},
"spuId":{
"type":"keyword"
},
"skuTitle":{
"type":"text",
"analyzer": "ik_smart"
},
"skuPrice":{
"type":"keyword"
},
"skuImg":{
"type":"keyword",
"index":false,
"doc_values":false
},
"saleCount":{
"type":"long"
},
"hasStock":{
"type":"boolean"
},
"hasScore":{
"type":"long"
},
"brandId":{
"type":"long"
},
"catalogId":{
"type":"long"
},
"brandName":{
"type":"keyword",
"index":false,
"doc_values":false
},
"brandImg":{
"type":"keyword",
"index":false,
"doc_values":false
},
"catalogName":{
"type":"keyword",
"index":false,
"doc_values":false
},
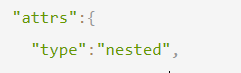
"attrs":{
"type":"nested",
"properties": {
"attrId":{
"type":"long"
},
"attrName":{
"type":"keyword",
"index":false,
"doc_values":false
},
"attrValue":{
"type":"keyword"
}
}
}
}
}
}
GET /product/_search
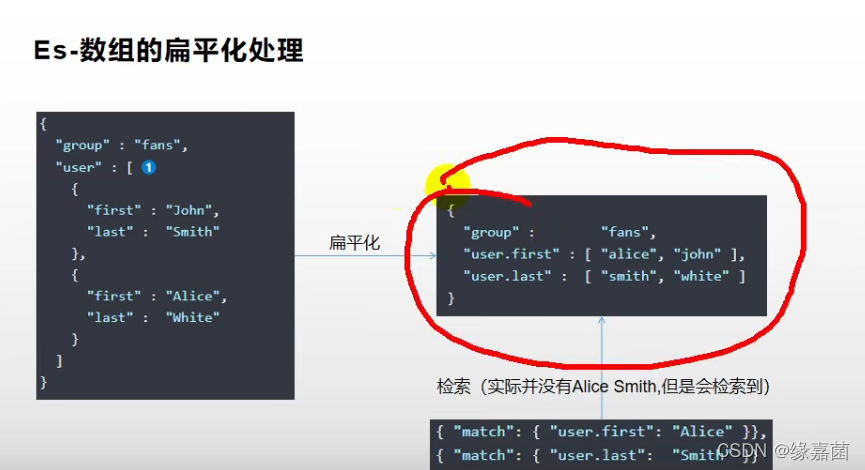
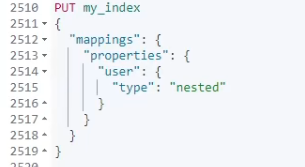
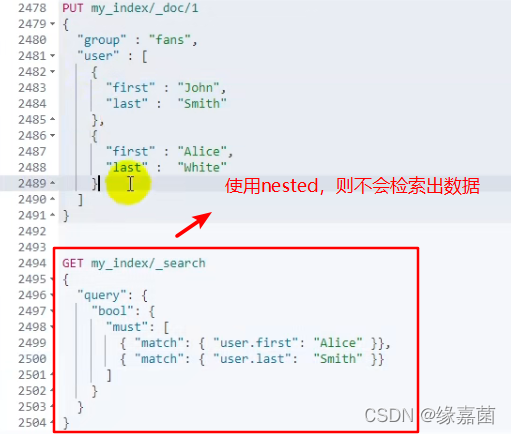
6.nested数据类型场景
nested嵌入式的
扁平化
嵌入式
二、thymeleaf模板引擎
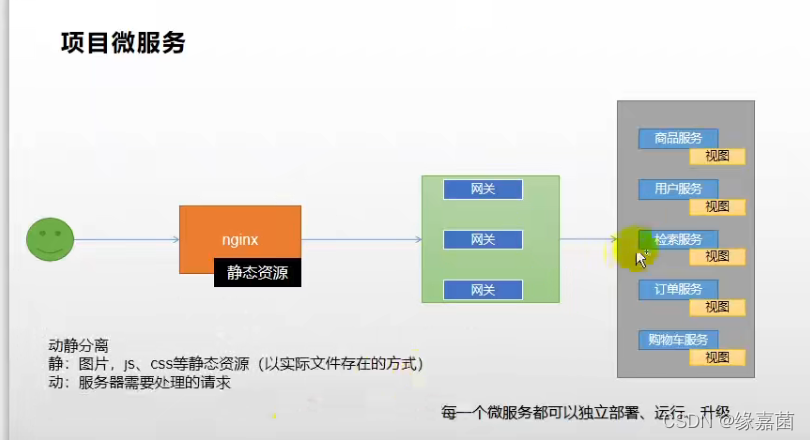
1.项目微服务
1.1 添加thymeleaf依赖
<!--模板引擎:thymeleaf-->
<dependency>
    <groupId>org.springframework.boot</groupId>
    <artifactId>spring-boot-starter-thymeleaf</artifactId>
</dependency>
1.2 thymeleaf-starter:关闭缓存
spring:
  thymeleaf:
    cache: false
1.3 添加静态资源
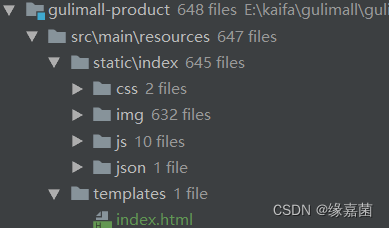
1.4 访问http://localhost:10000/
注:SpringBoot,访问项目的时候,默认会找index

1.5 MVC默认配置参考
WebMvcAutoConfiguration.class
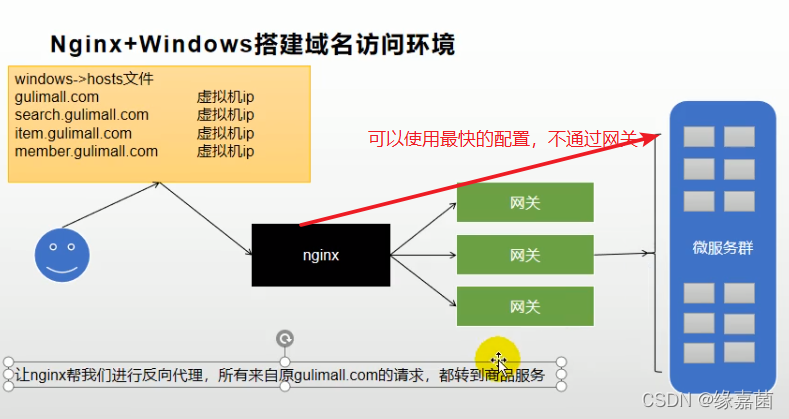
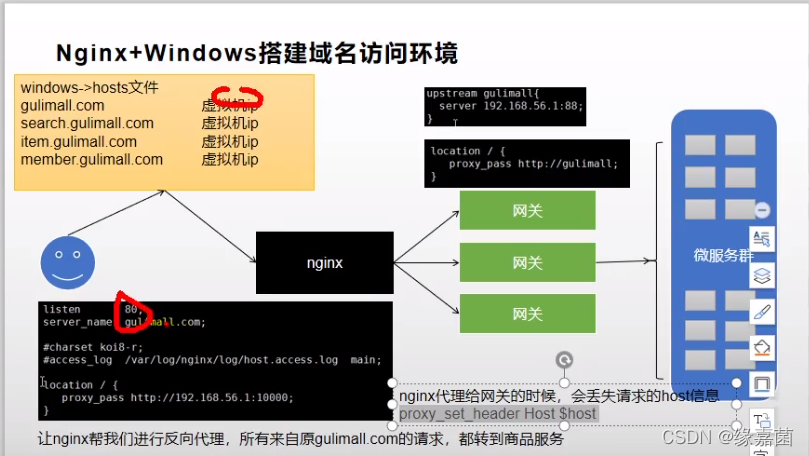
2.Nginx+Windows搭建域名访问环境
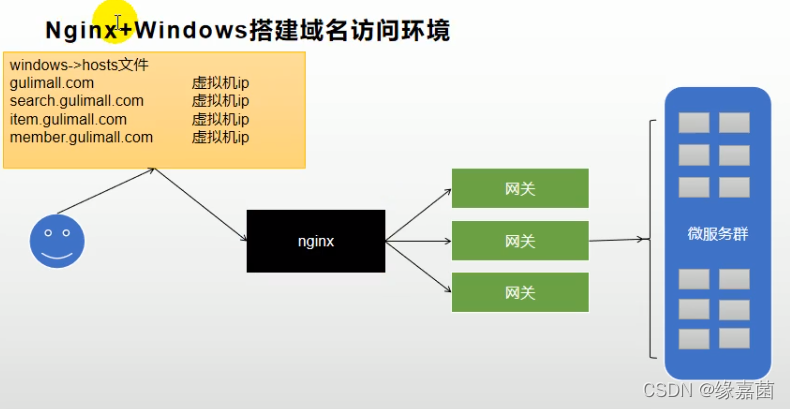
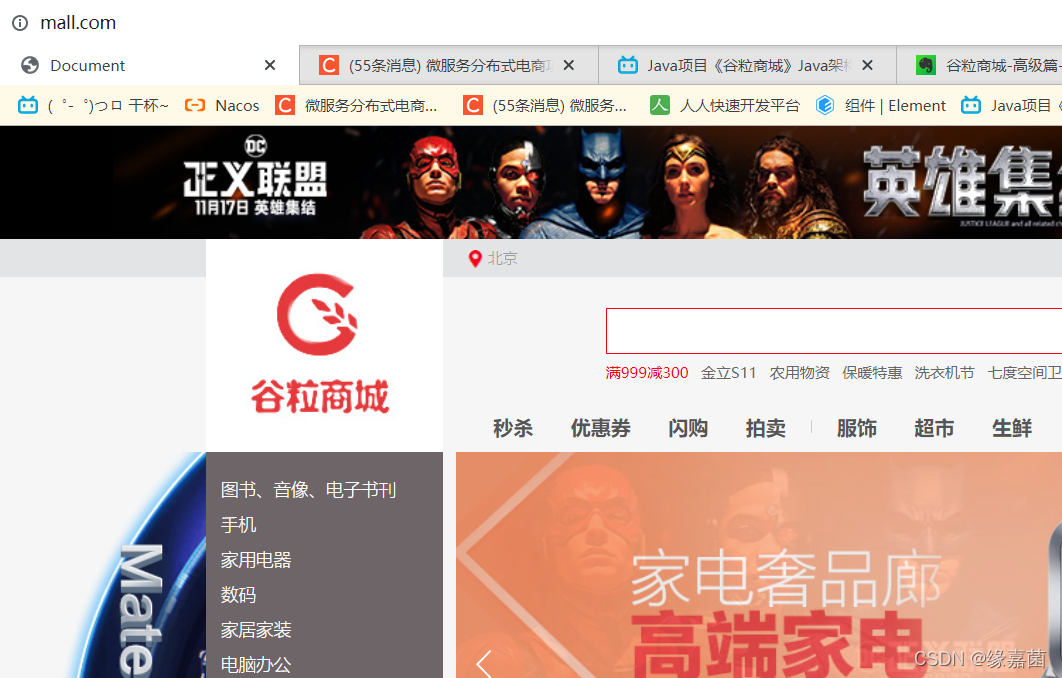
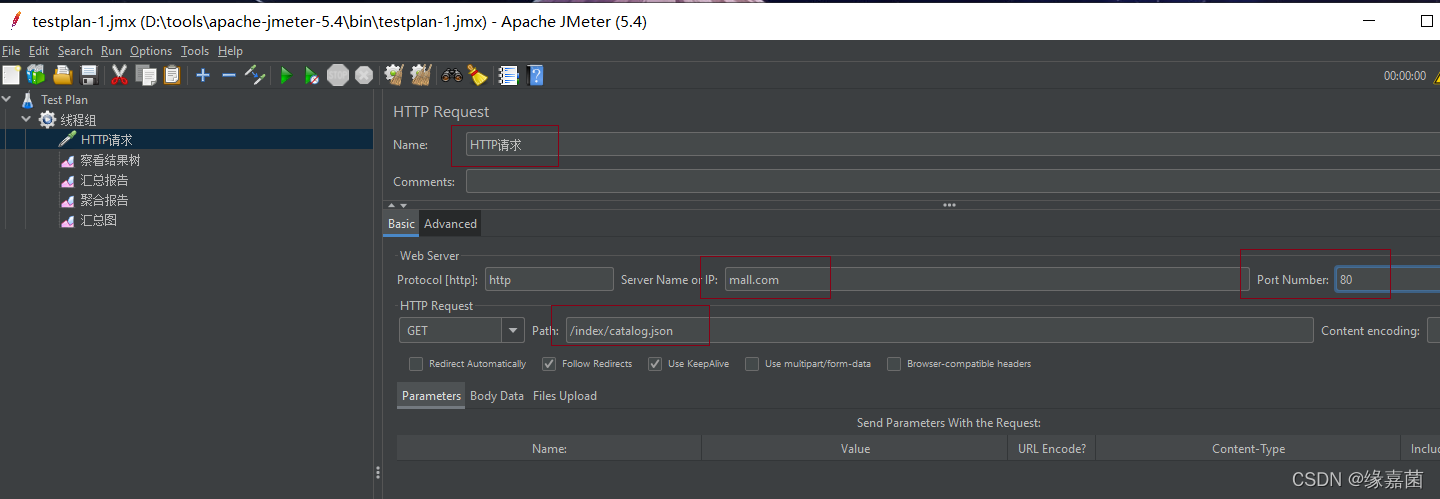
2.1 通过mall.com替代localhost:10000访问商品首页
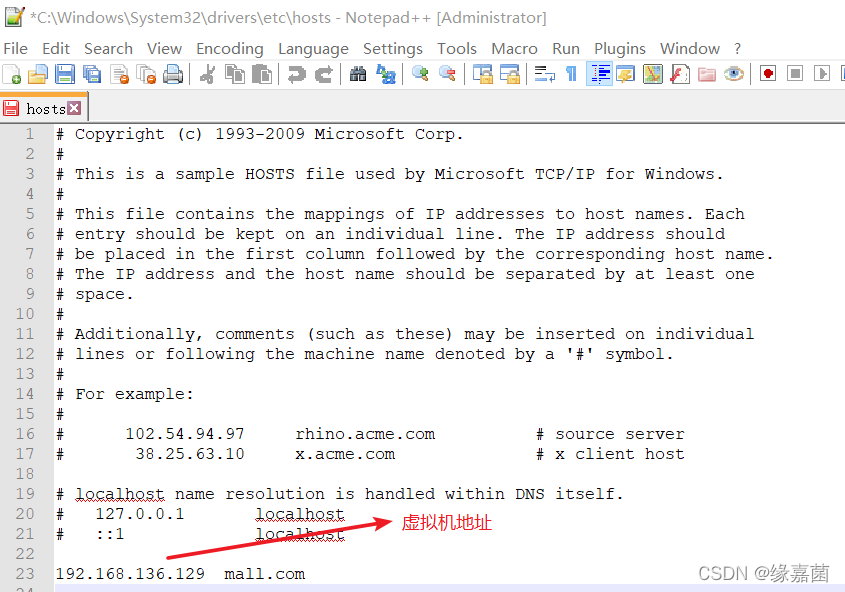
2.1.1 虚拟机地址映射到mall.com
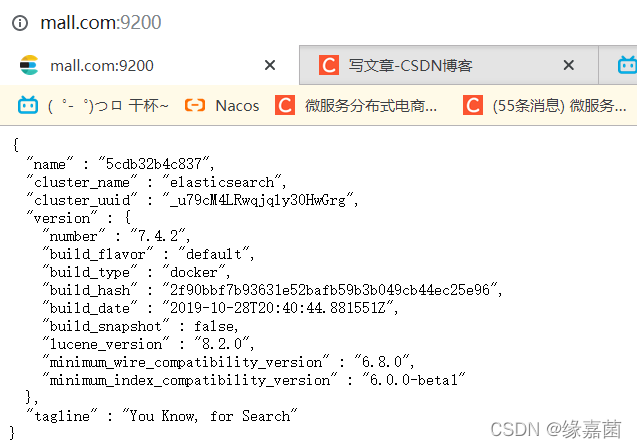
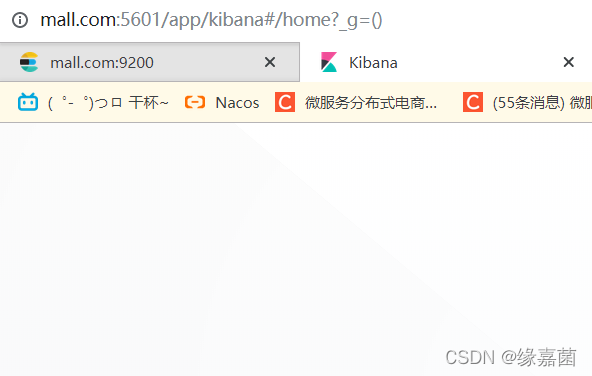
2.1.2 mall.com:9200 可以访问到es等
注:即域名映射ip
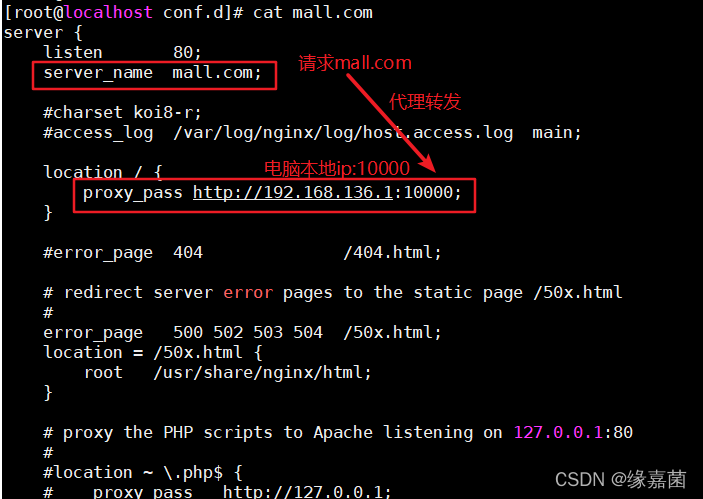
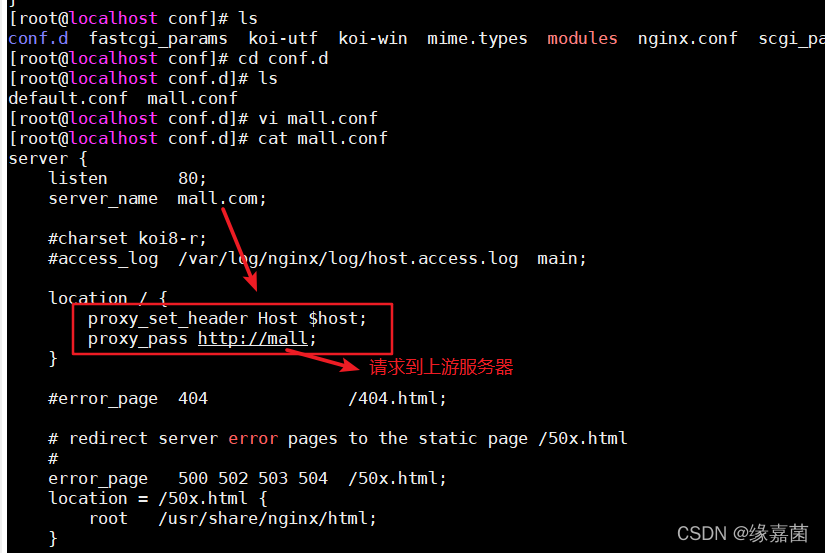
2.2 通过mall.com映射localhost:10000到商品首页
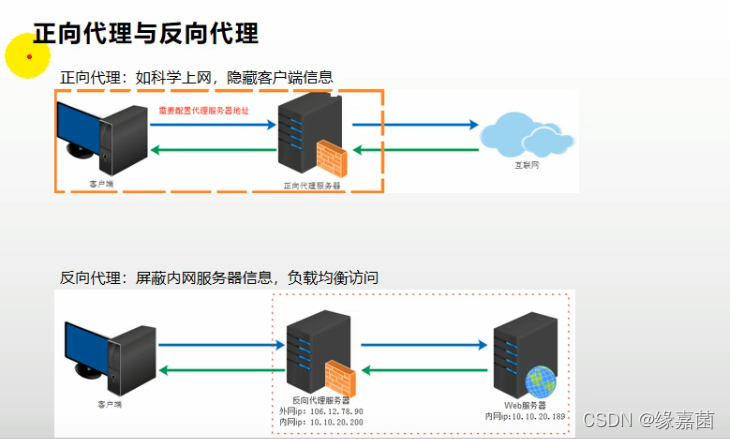
2.2.1 nginx描述
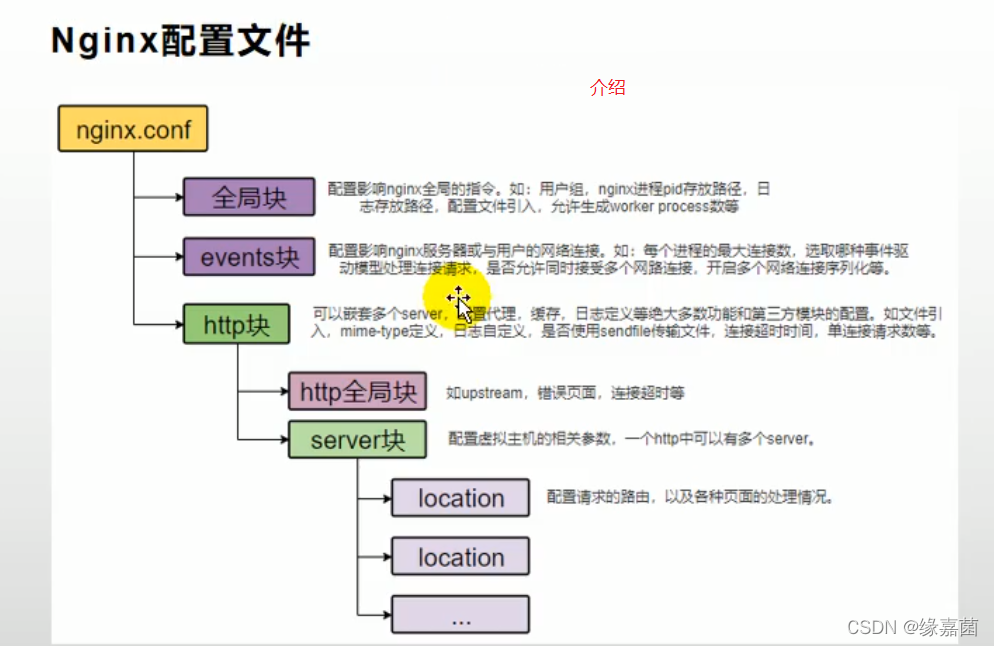
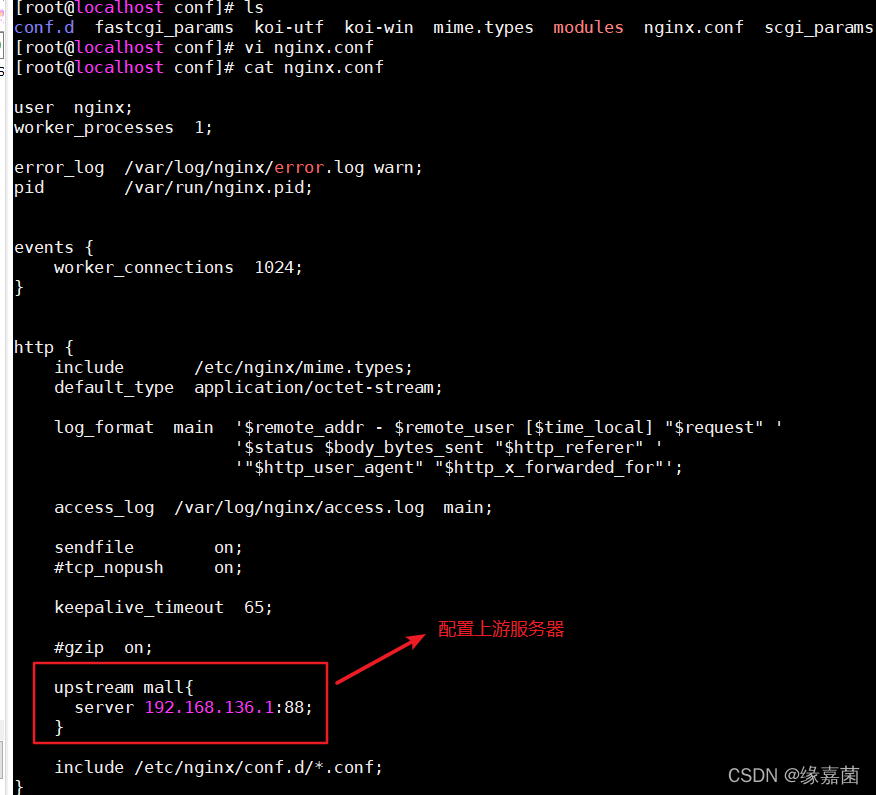
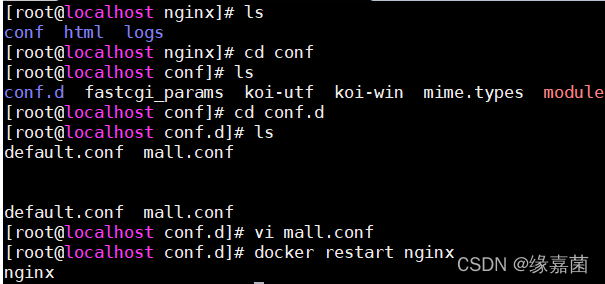
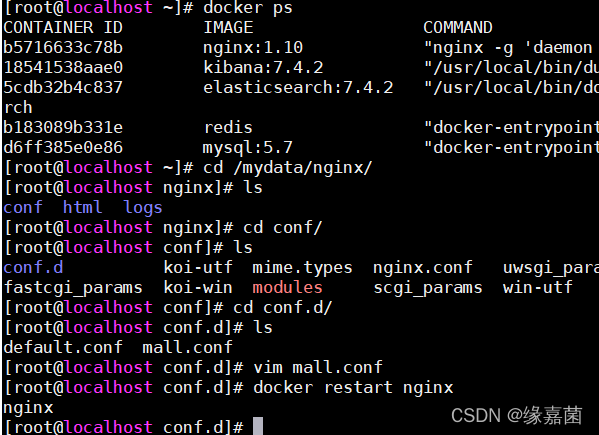
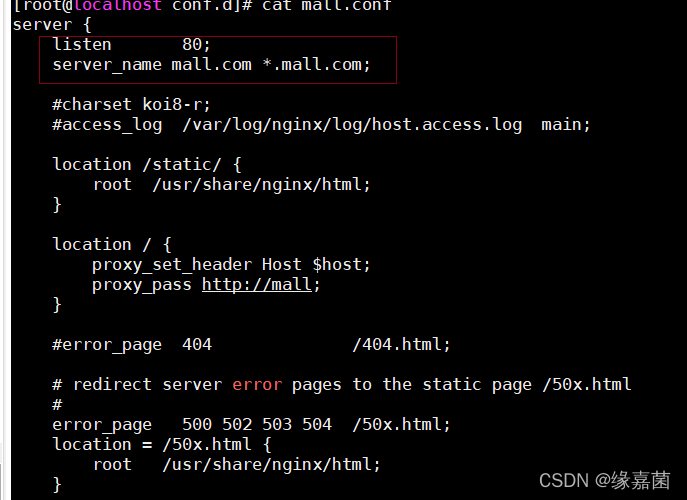
2.2.2 nginx配置

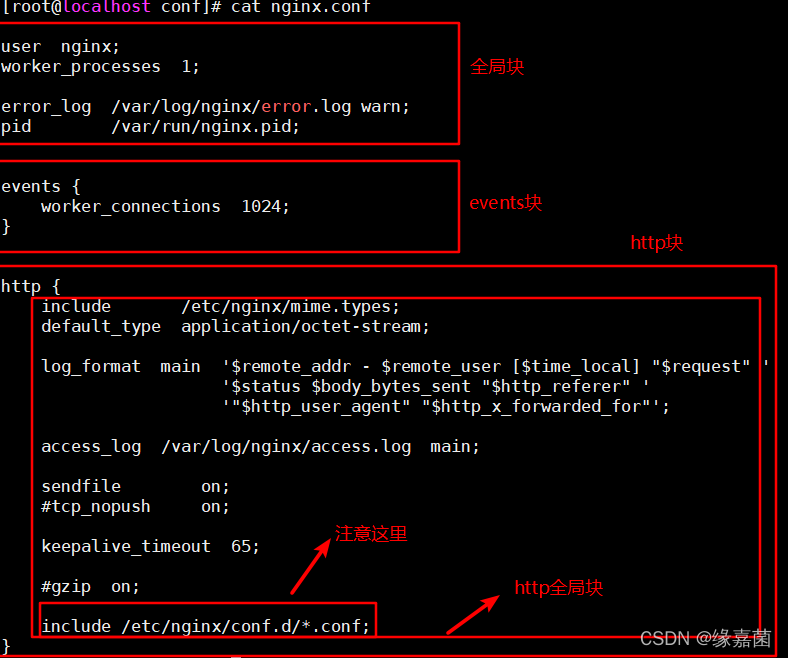
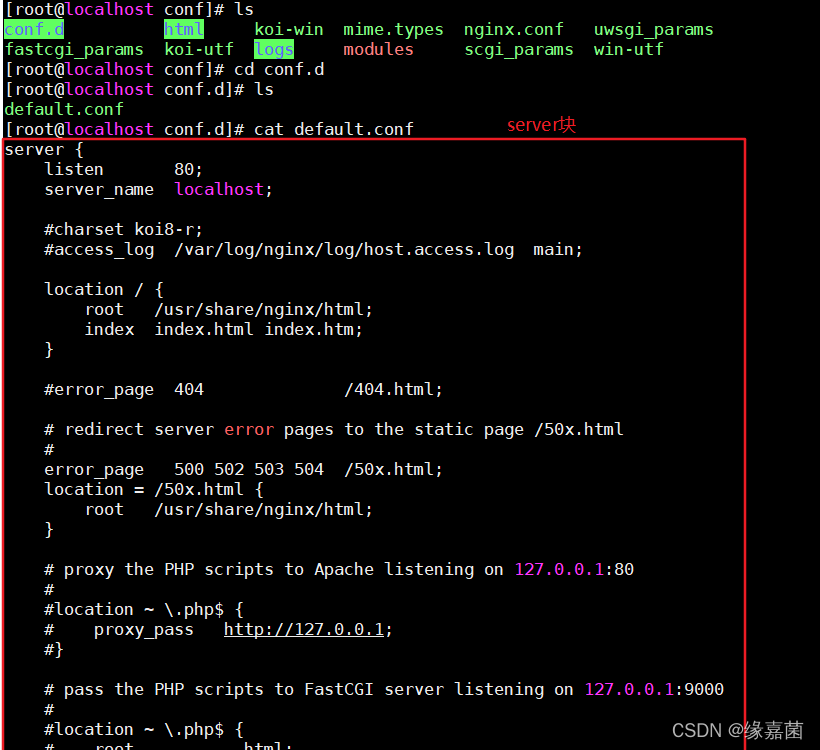
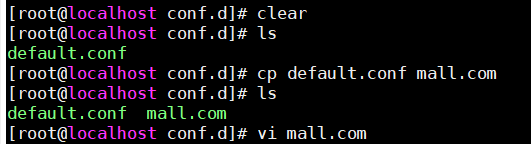
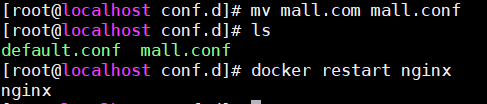
mall.com文件名需改为mall.conf
配置完重启下nginx: docker restart nginx
2.2.3 文件名写错修改
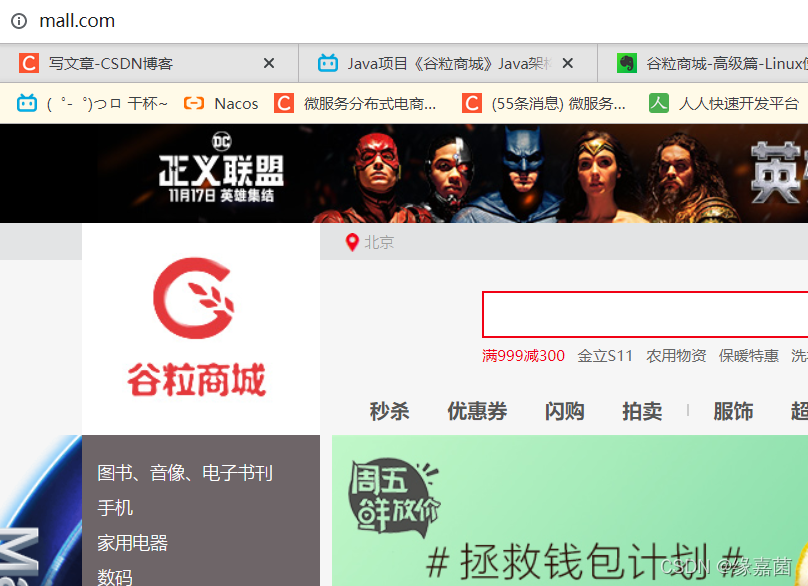
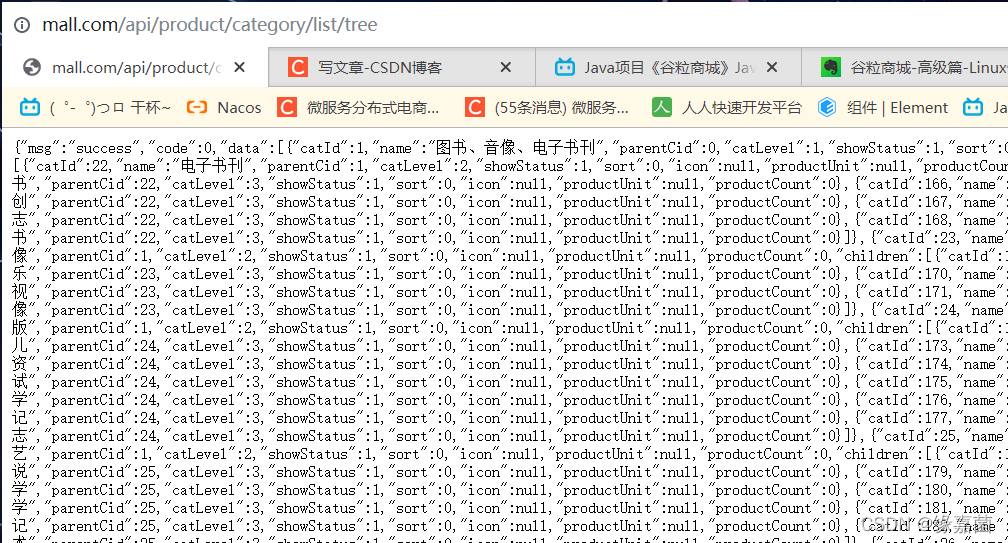
2.2.4 访问mall.com
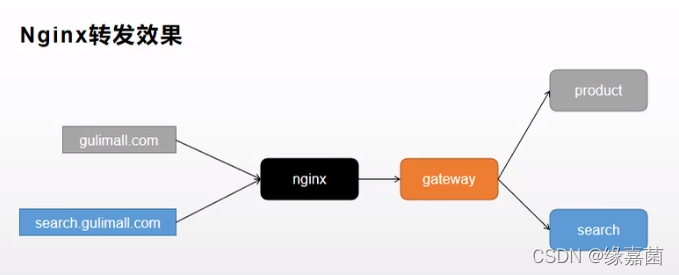
2.2.5 流程描述
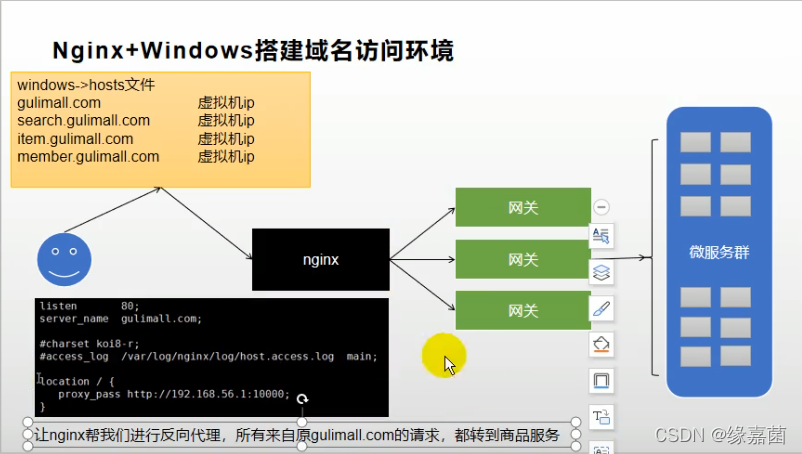
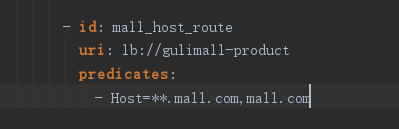
2.3 通过mall.com映射nginx,nginx路由到网关,再网关请求服务
docker restart nginx
三、压力测试
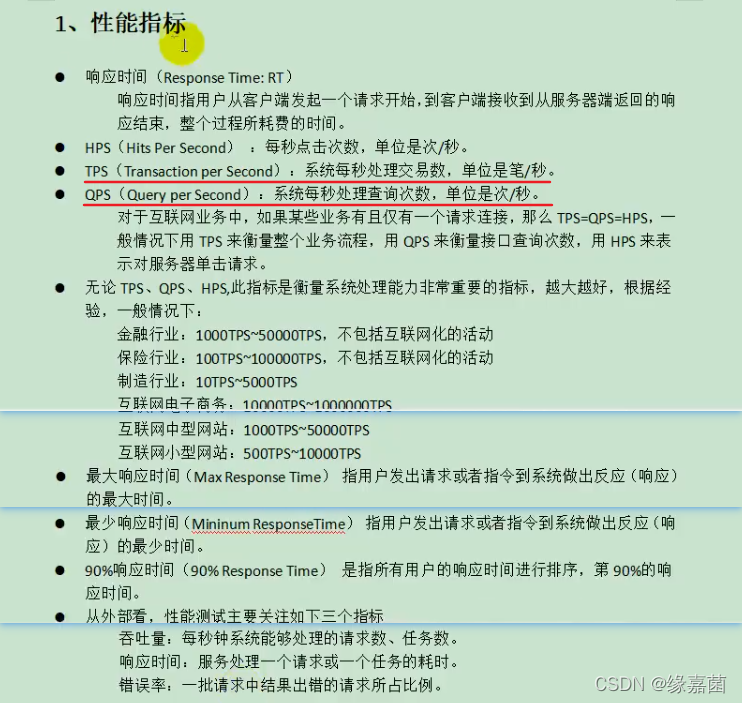
1.介绍

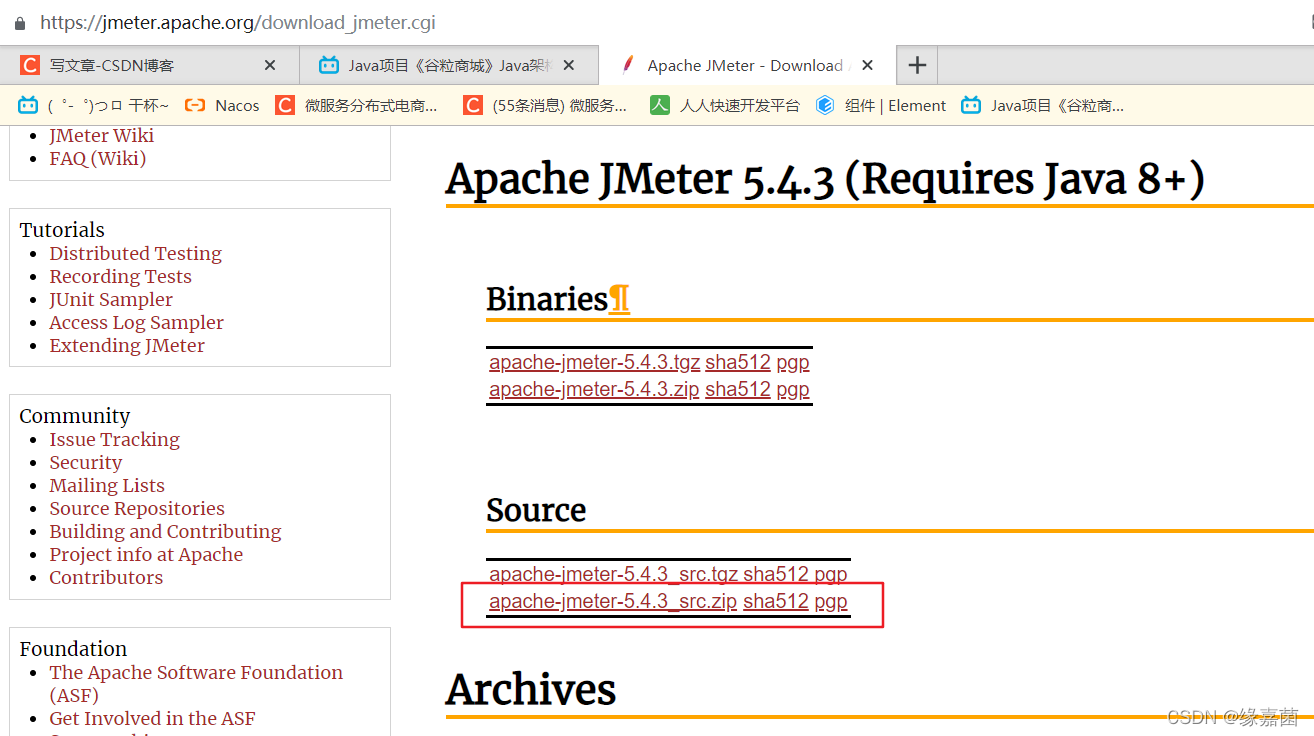
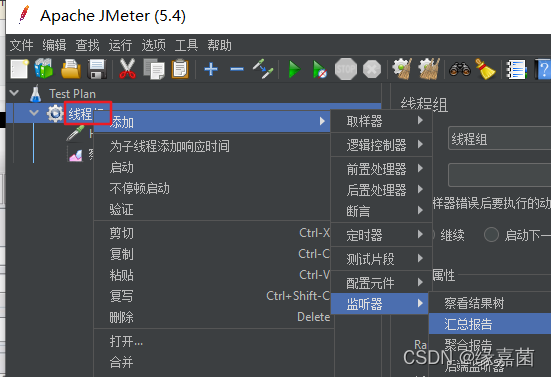
2.JMeter
官网下载:https://jmeter.apache.org/download_jmeter.cgi
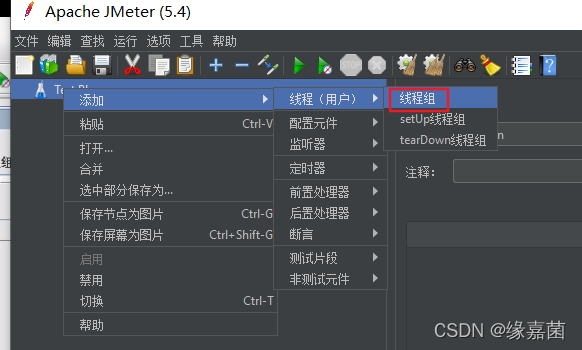
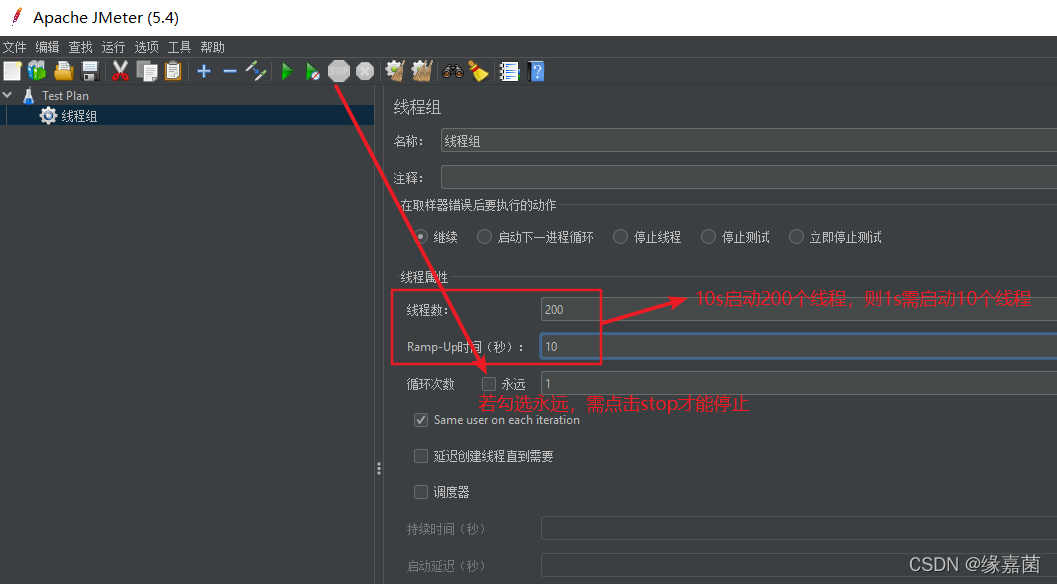
2.1 线程组
注:循环次数,若为10,则代表每个线程发10次请求,若线程数为200,则总共发2000个请求
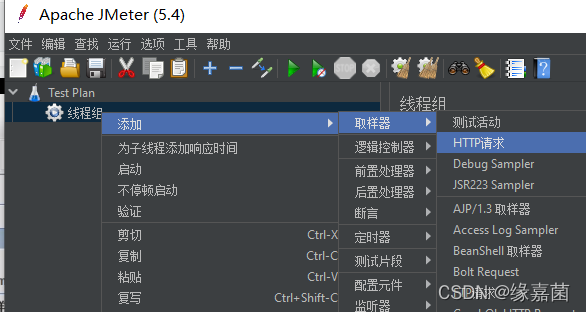
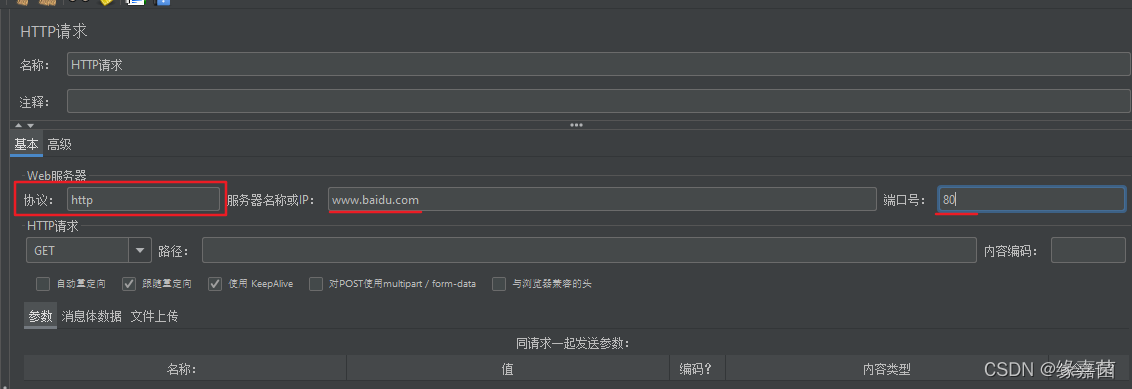
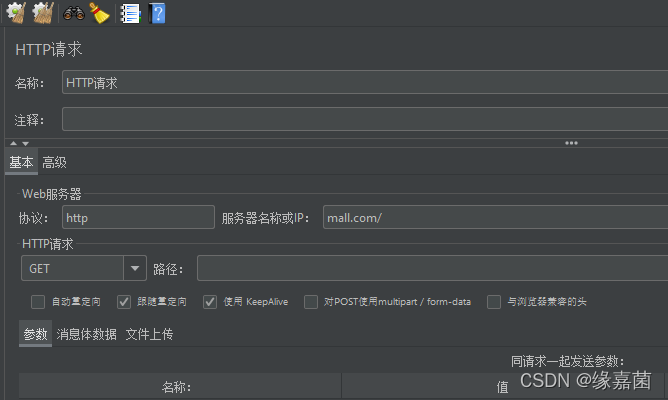
2.2 http请求
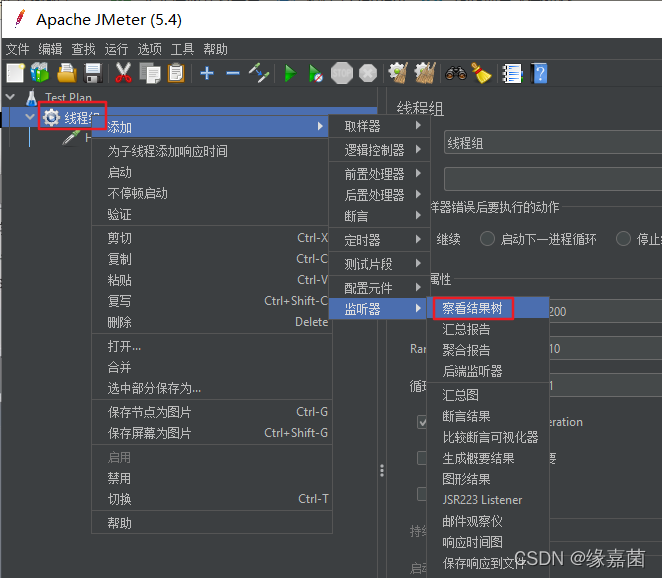
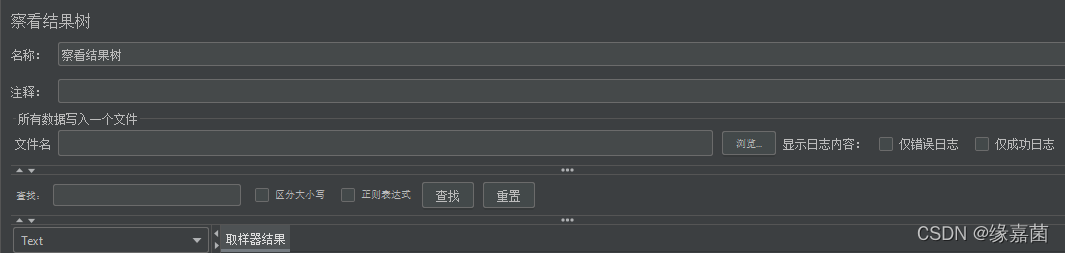
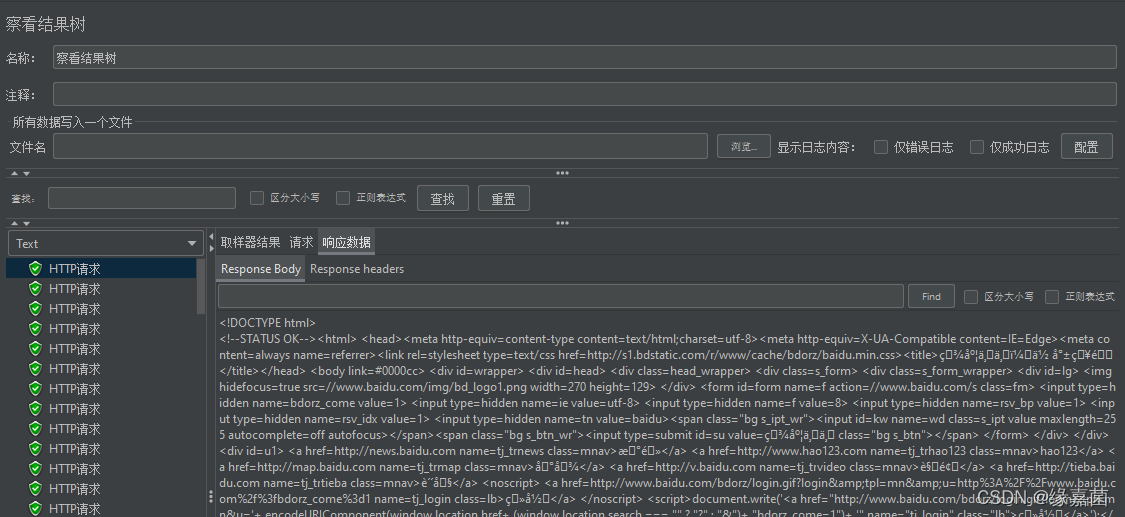
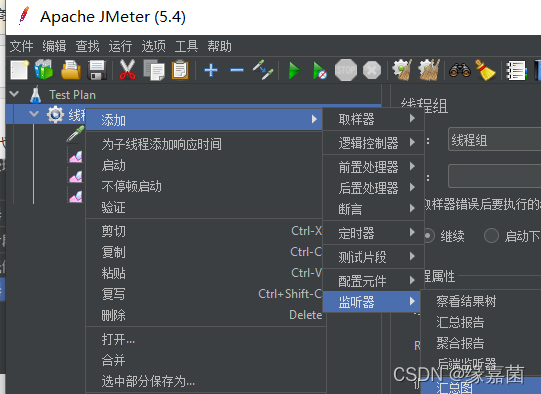
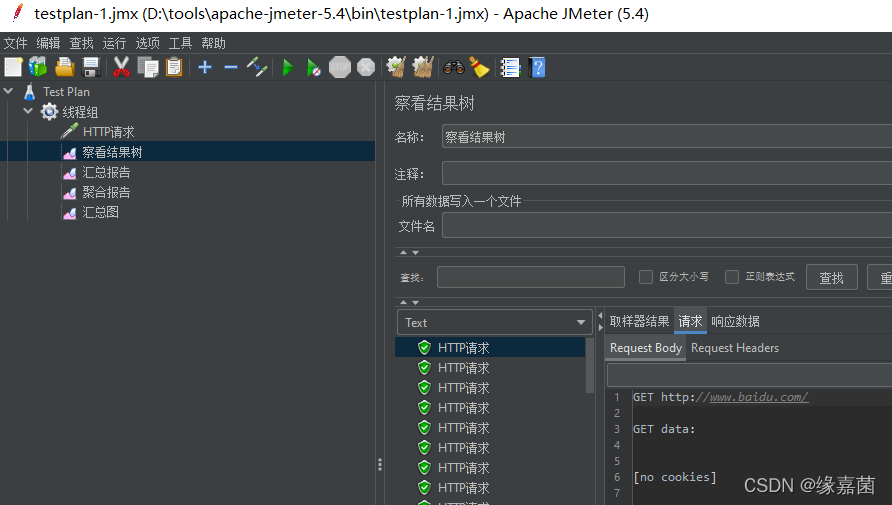
2.3 查看结果树
测试效果
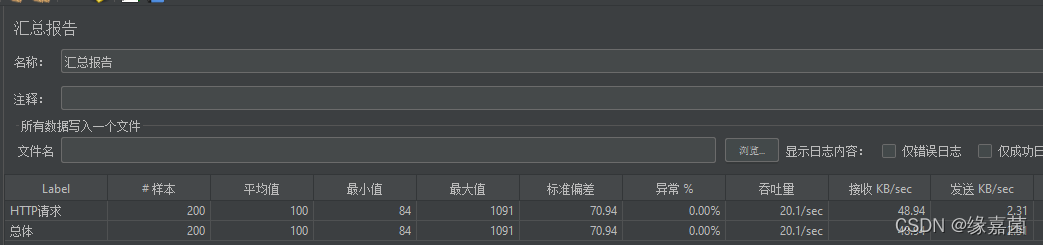
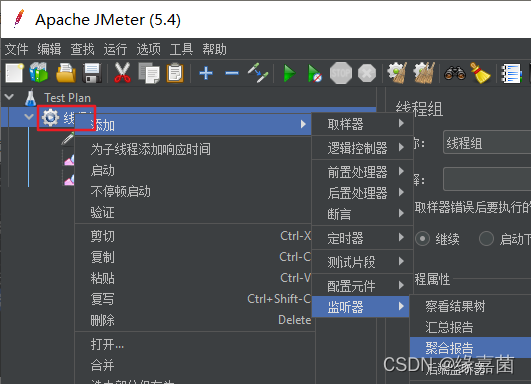
2.4 汇总报告
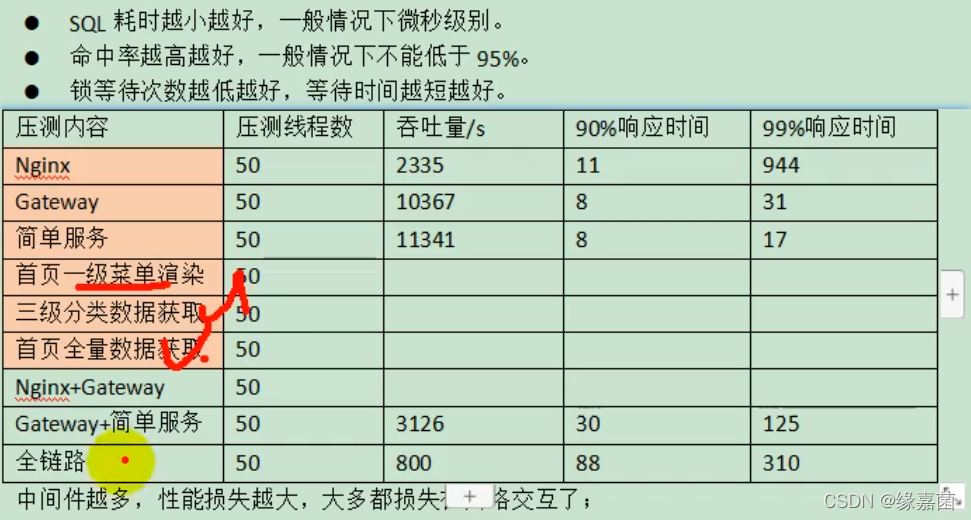
测试效果:注意吞吐量
吞吐量:每秒钟系统能够处理的请求数、任务数。

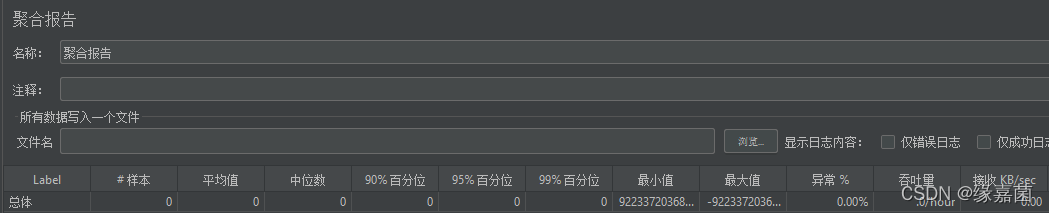
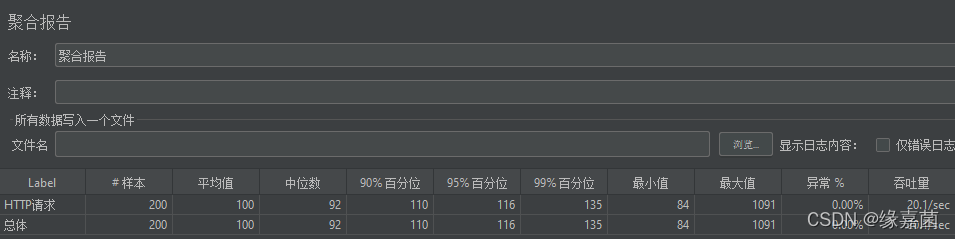
2.5 聚合报告
测试效果
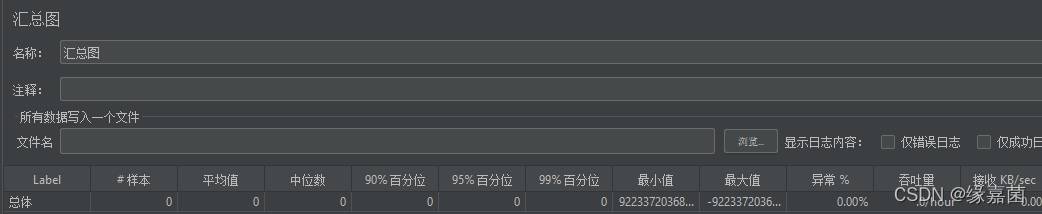
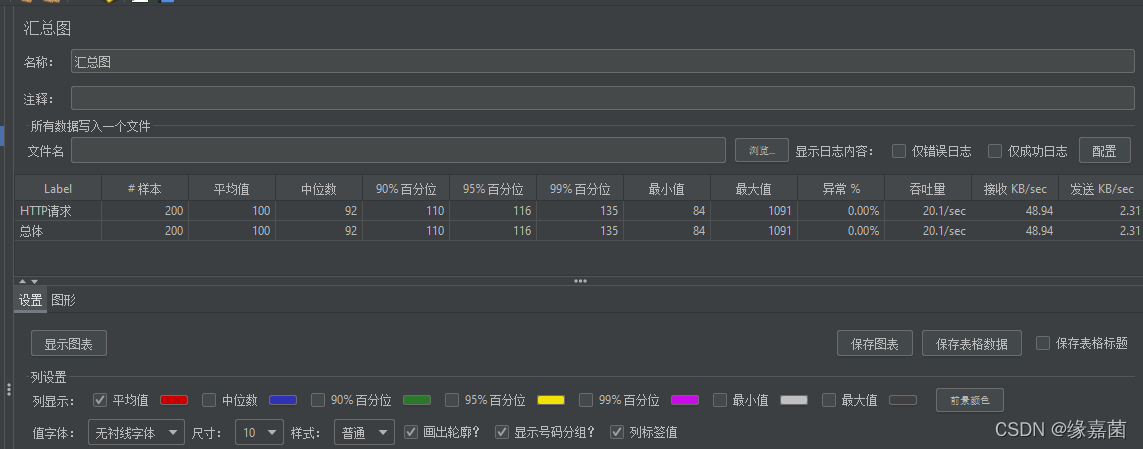
2.6 汇总图
测试效果:根据勾选如中位数显示图形-显示效果
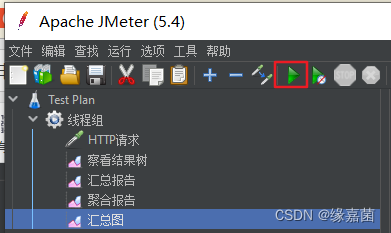
2.7 启动测试
保存测试计划-方便下次

2.8 响应数据
2.9 清空报告(每个都选中然后清除)
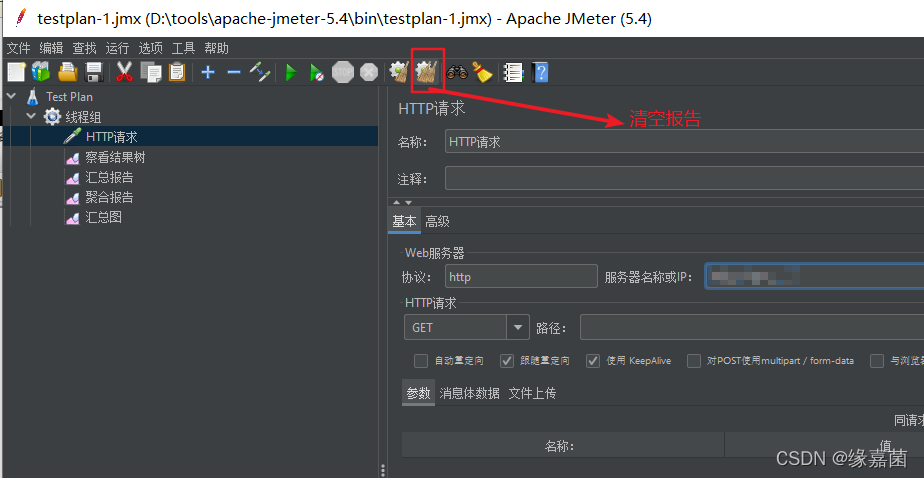
2.10 测试新接口
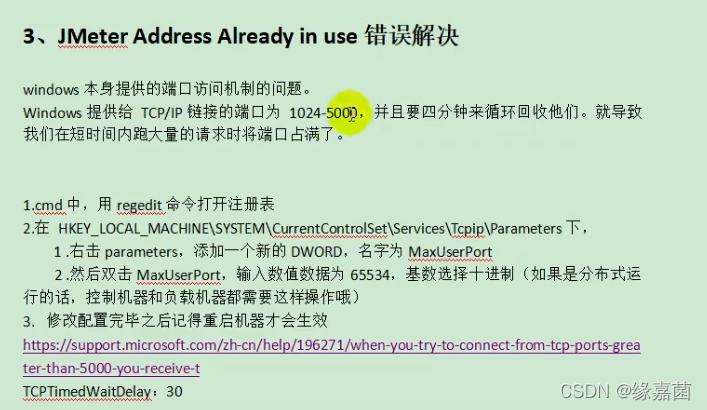
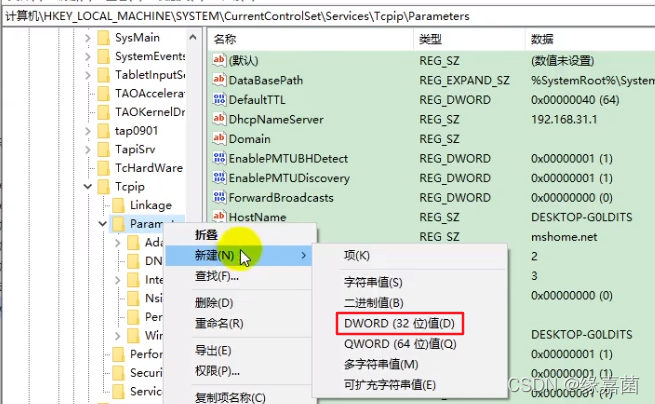
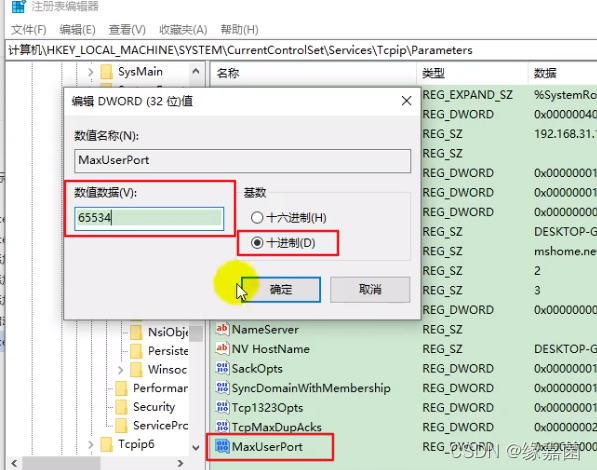
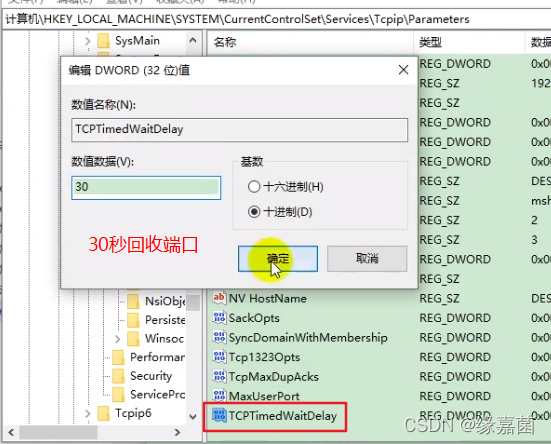
3.JMeter Address Already in use错误解决
设置回收端口时间
更多参考windows帮助文档
退出注册表,重启计算机才生效

4.性能监控-堆内存、垃圾回收、jconsole与jvisualvm
CPU密集型:如查询出数据,然后进行处理,排序,筛选等
IO密集型:如从redis缓存读取数据,读文件等

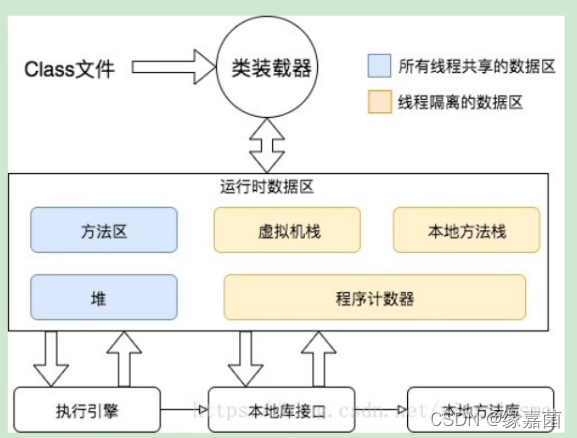
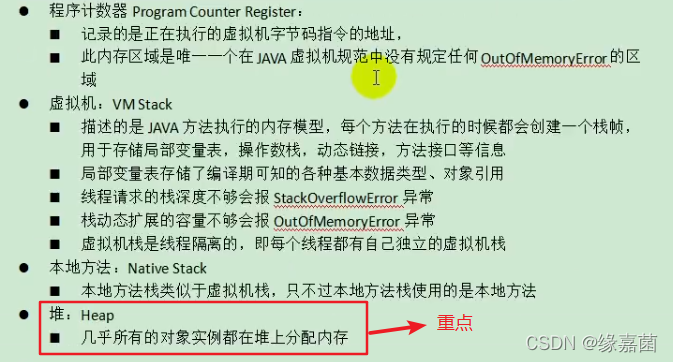
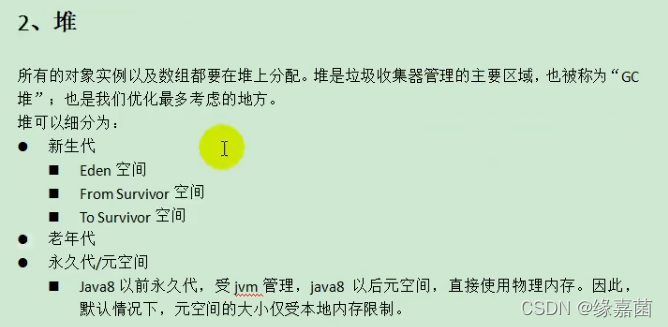
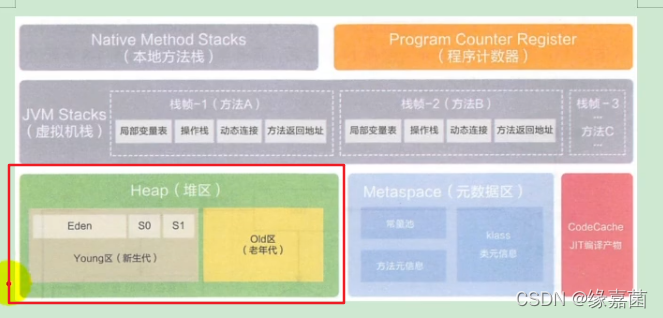
4.1 JVM内存模型
元数据区:用于直接操作物理地址
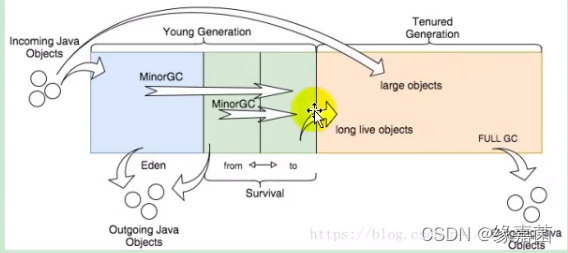
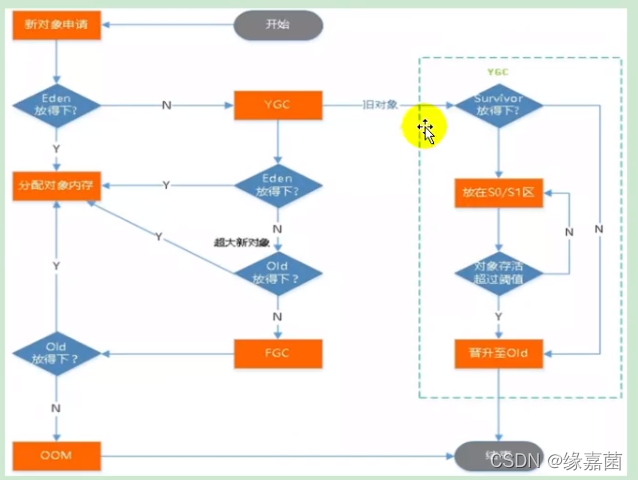
4.2 垃圾回收
注:假设进行100次 MinorGc花费1s。但10次Full Gc就要花费1s,非常慢(慢将近10倍),尽量减少Full Gc的次数。
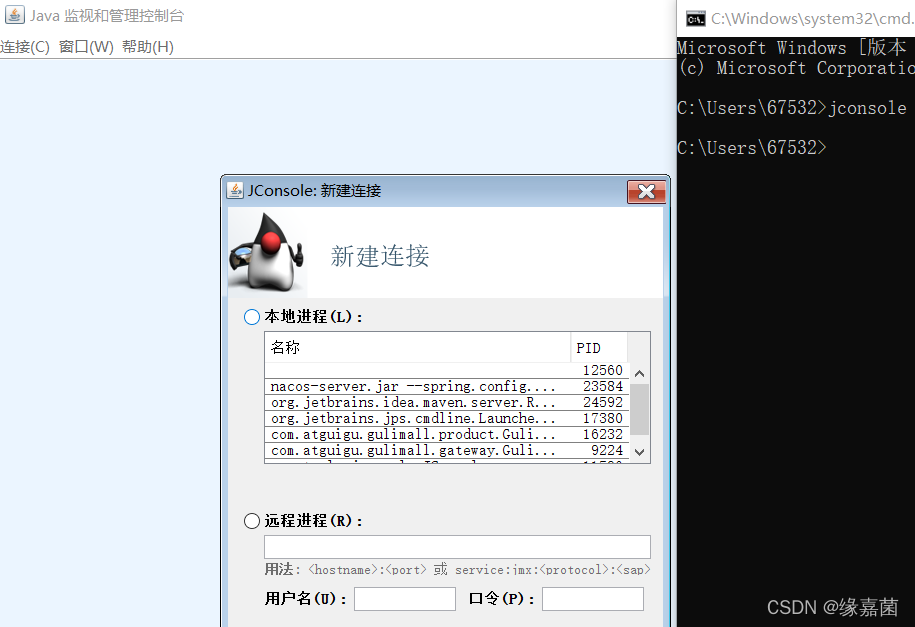
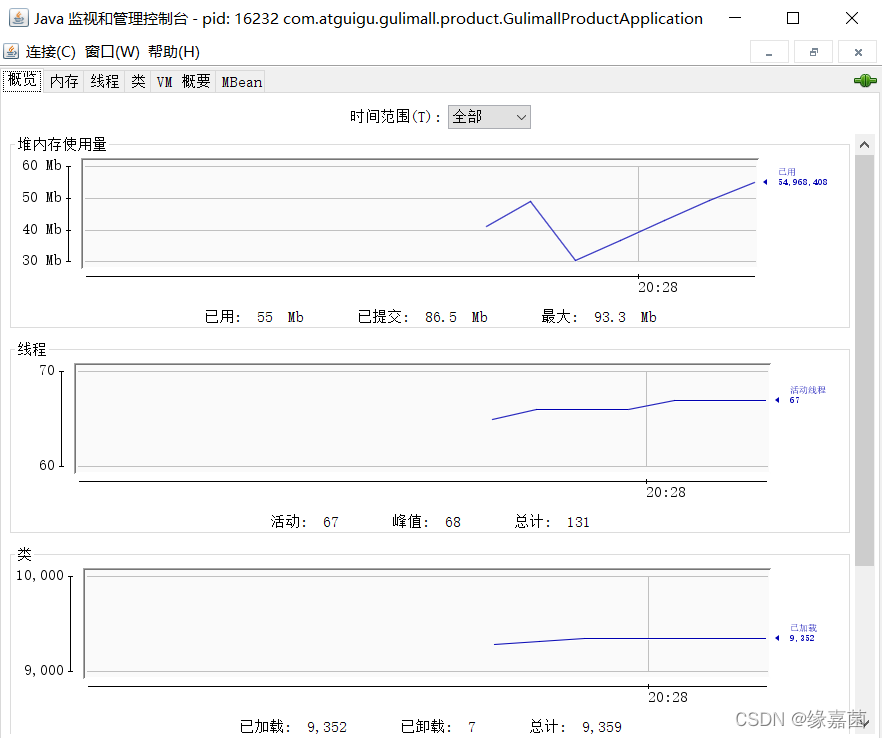
4.3 java监视和管理控制台

4.3.1 jconsole
双击项目查看内存信息
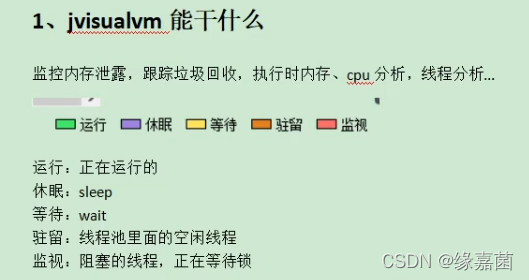
4.3.2 jvisualvm
1)、下载插件
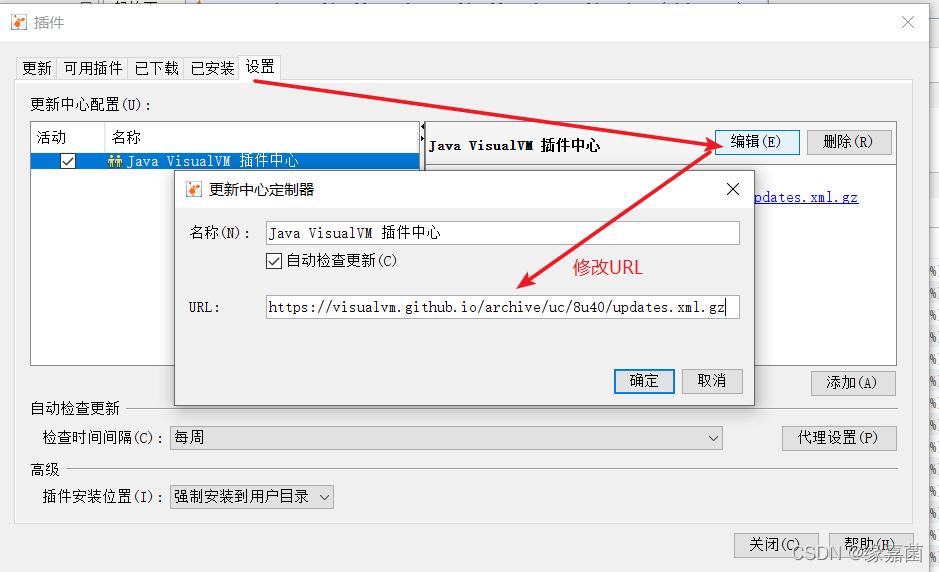
2)、问题解决方案
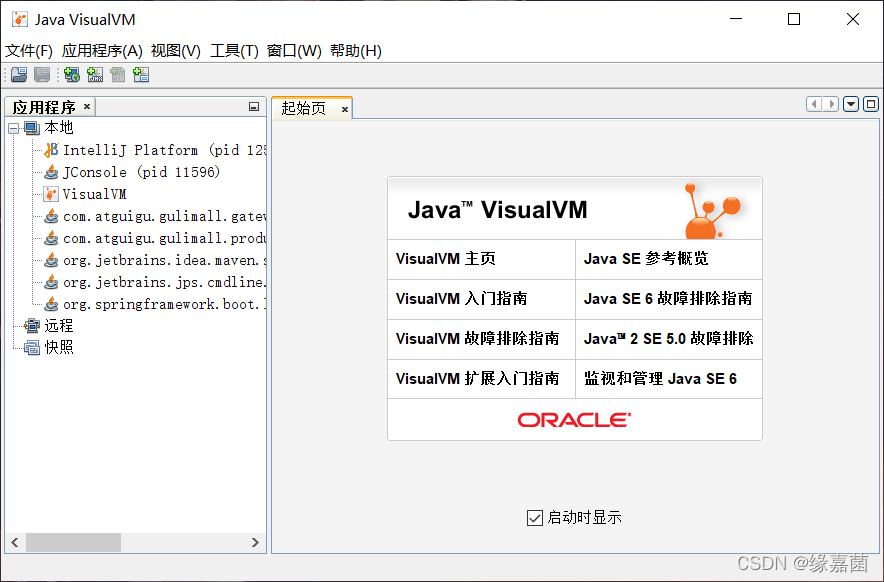
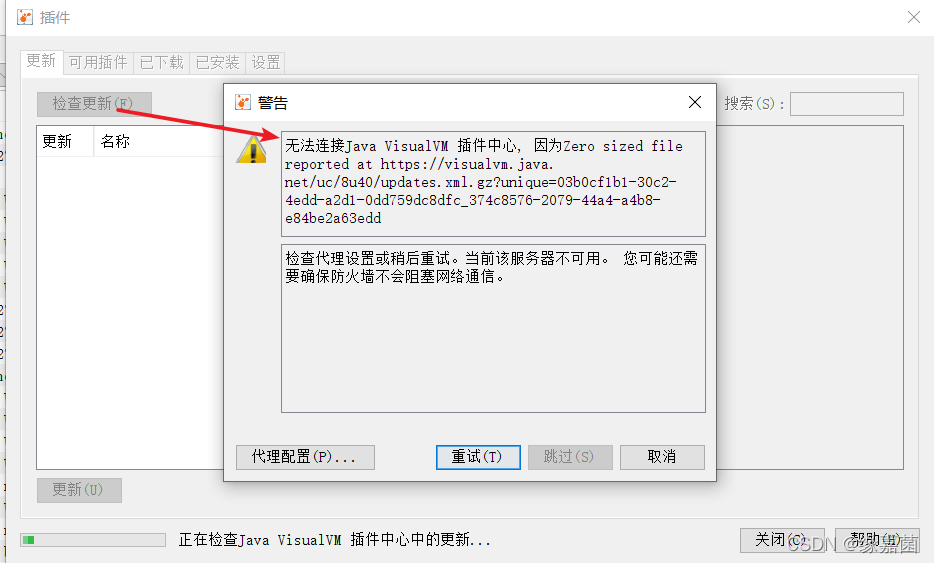
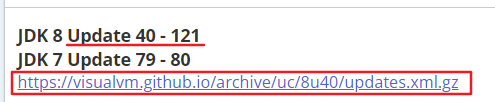
1.打开 https://visualvm.github.io/pluginscenters.html
2.查看jdk版本
3.使用https://visualvm.github.io/archive/uc/8u40/updates.xml.gz
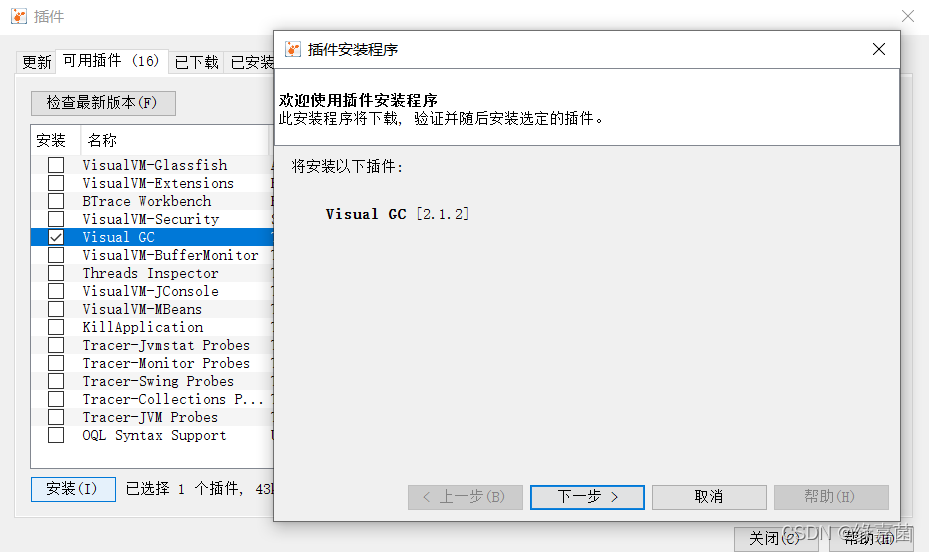
3)、安装GC插件-查看完整GC过程
重启jvisualvm


4.4 中间件对性能的影响
4.5 优化吞吐量测试
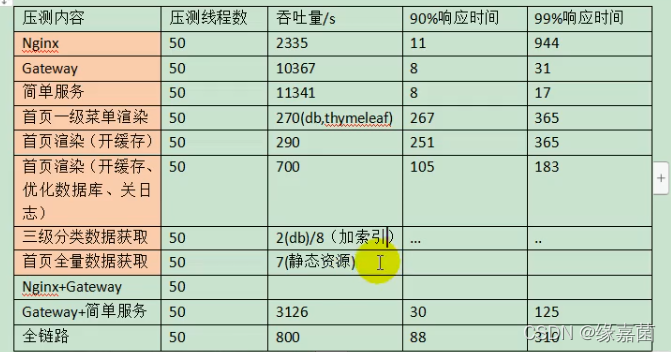
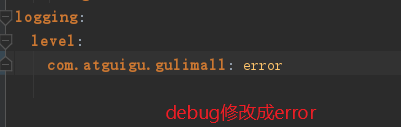
4.5.1 日志
4.5.2 索引

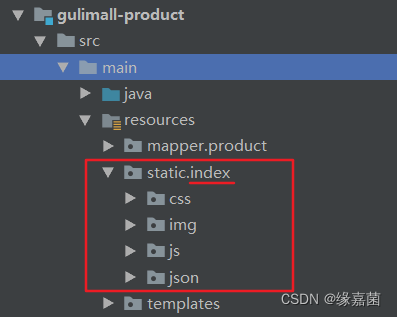
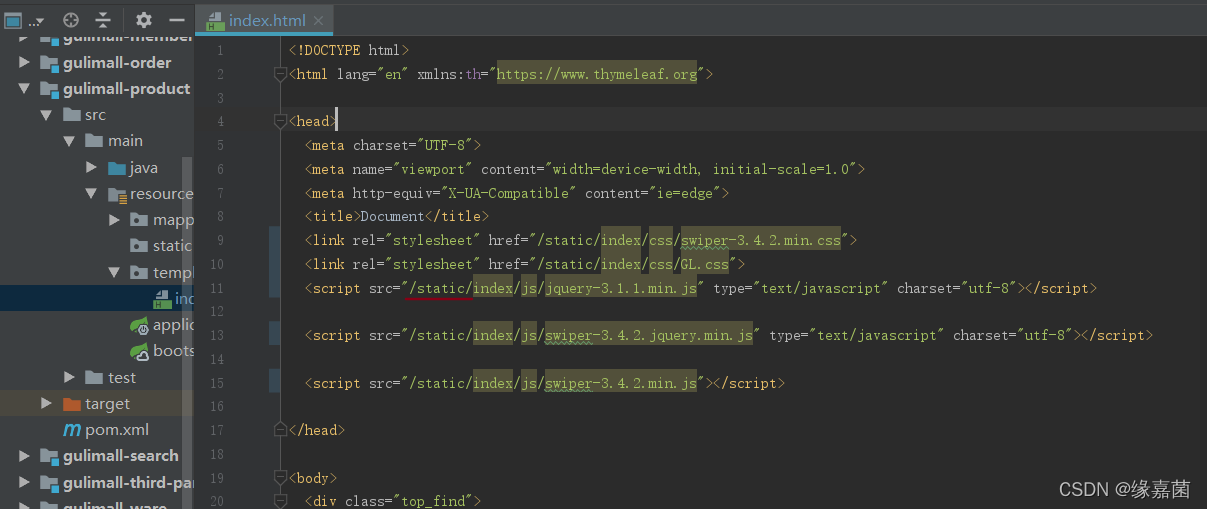
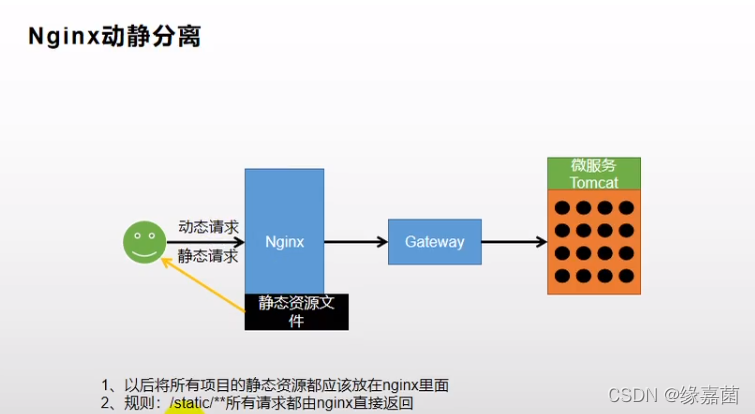
4.6 nginx动静分离
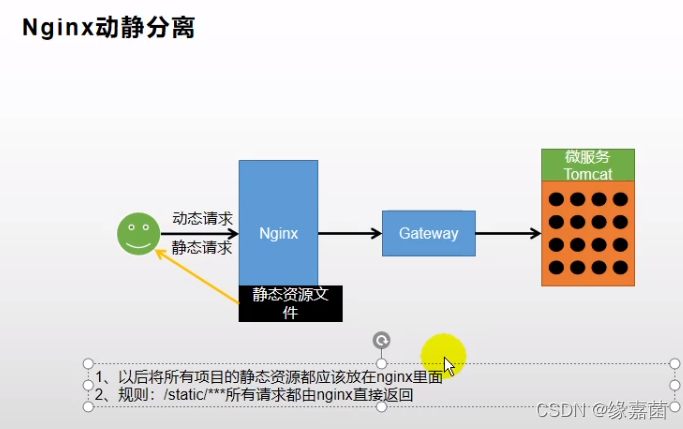
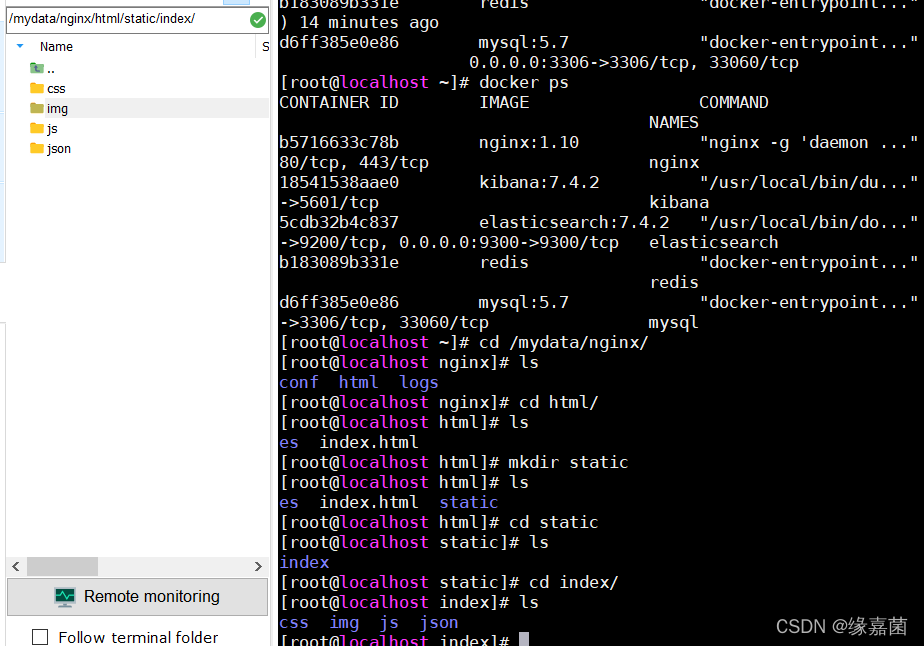
将静态资源上传到linux下的nginx/html/static下
配置nginx访问静态资源
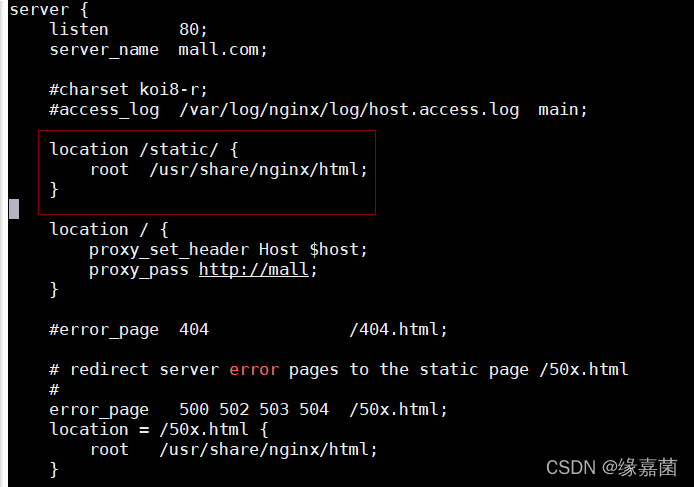
注:root用于配置资源路径

静态资源添加/static访问
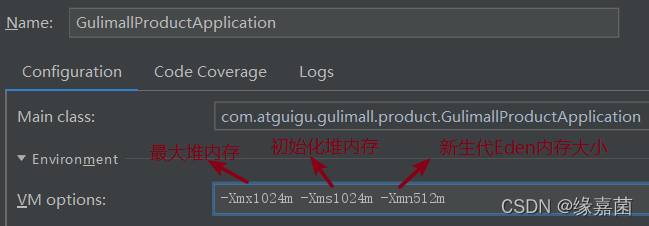
4.7 JVM参数
4.8 优化三级分类

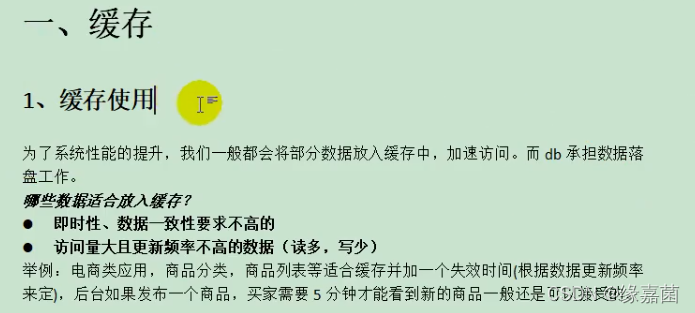
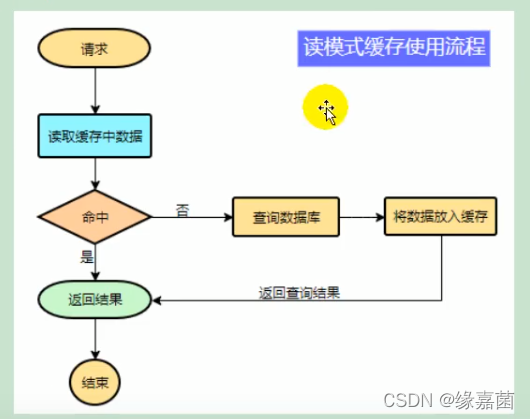
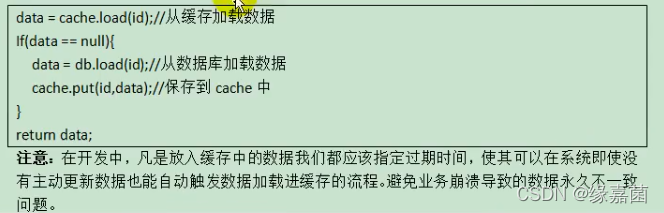
四、缓存
伪代码
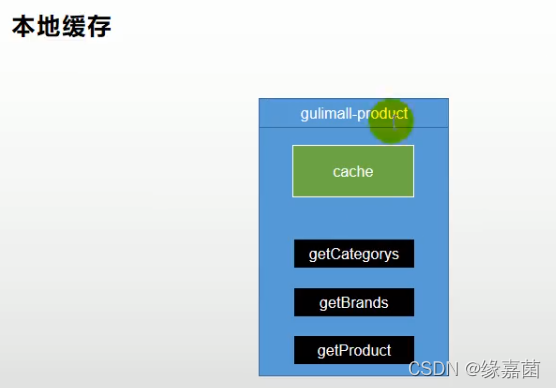
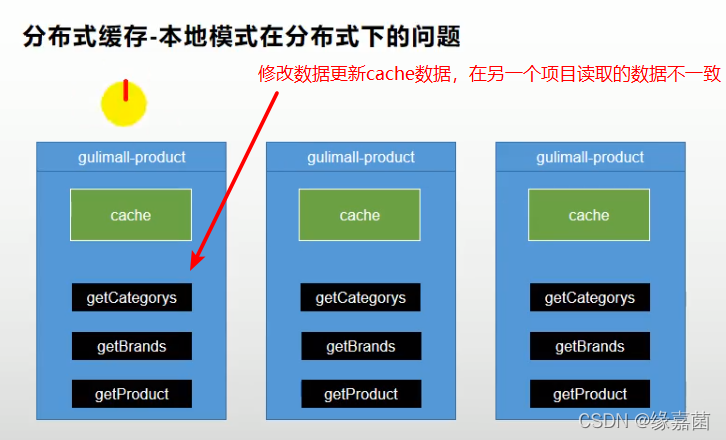
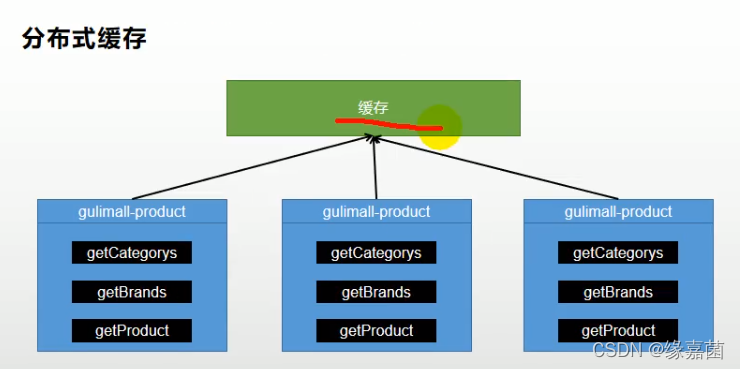
1.本地缓存与分布式缓存
分布式下解决方案
2.整合redis
2.1 导入依赖
<!--整合redis-->
<dependency>
    <groupId>org.springframework.data</groupId>
    <artifactId>spring-data-redis</artifactId>
</dependency>
项目其他模块使用了2.2.4.RELEASE,这里使用下面配置
<!--整合redis-->
<dependency>
    <groupId>org.springframework.boot</groupId>
    <artifactId>spring-boot-starter-data-redis</artifactId>
    <version>2.2.4.RELEASE</version>
</dependency>
2.2 核心代码
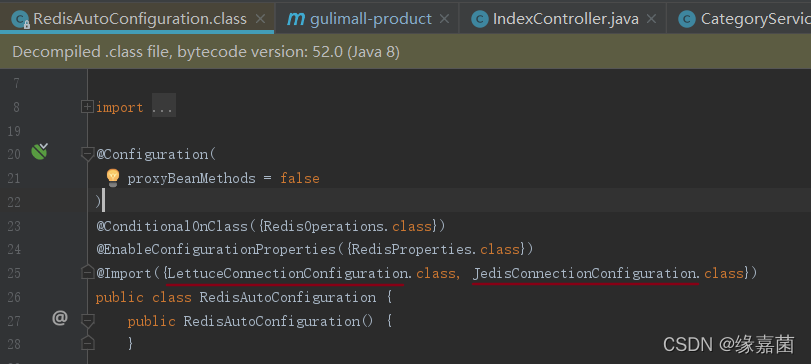
RedisAutoConfiguration.class=>StringRedisTemplate
2.3 配置redis信息
  redis:
    host: xxx.xxx.xxx.xxx
    port: 6379
    passsword:
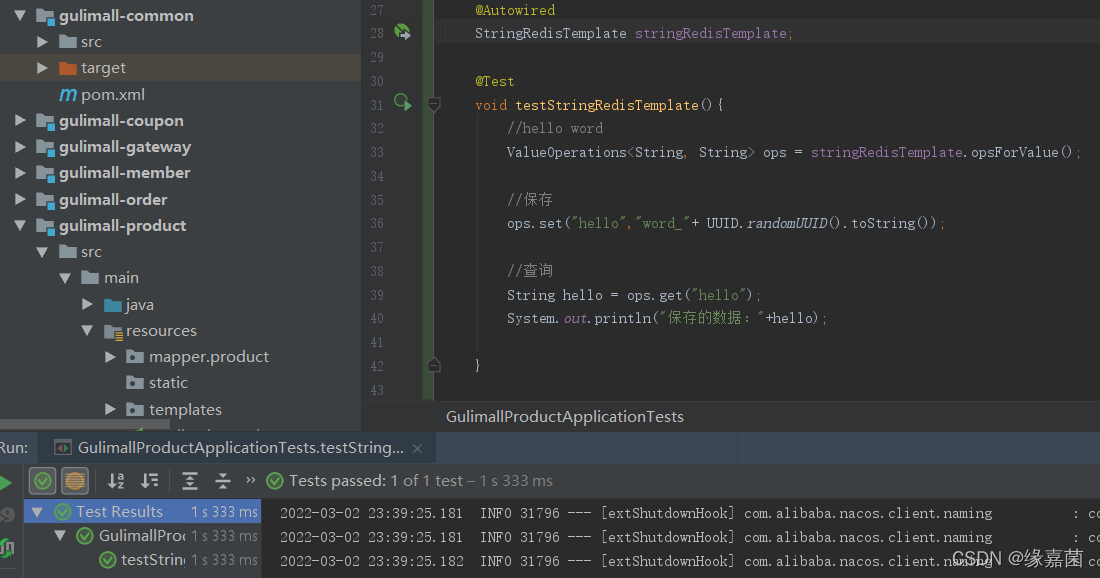
2.4 使用StringRedisTemplate操作redis
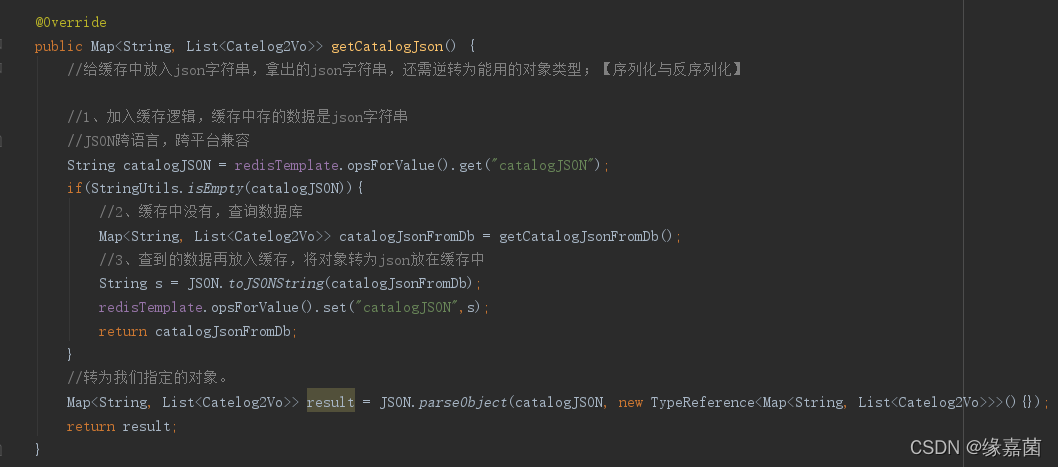
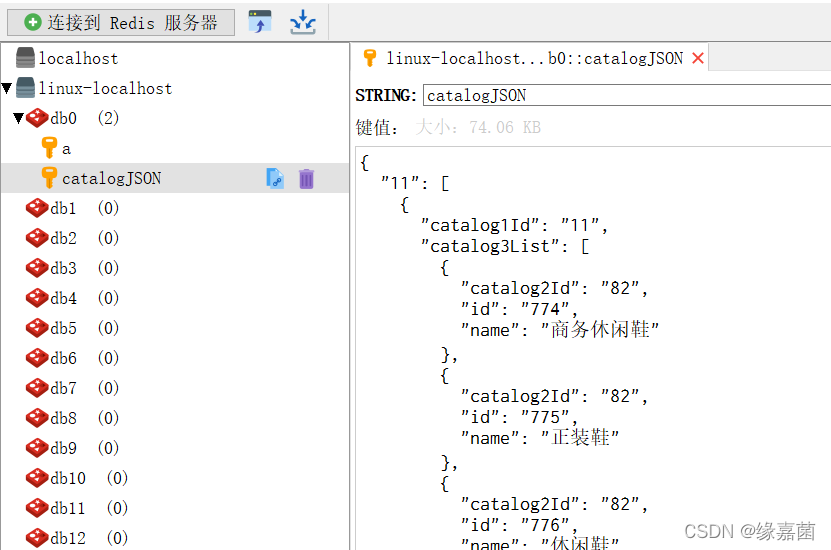
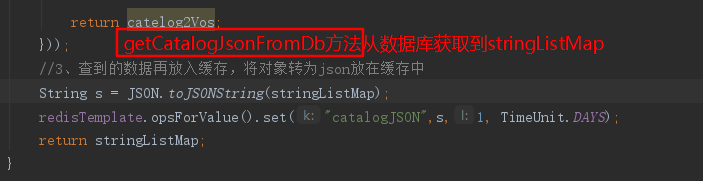
2.5 使用redis优化三级分类数据
2.6 使用jedis
<!--整合redis-->
<dependency>
    <groupId>org.springframework.boot</groupId>
    <artifactId>spring-boot-starter-data-redis</artifactId>
    <version>2.2.4.RELEASE</version>
    <exclusions>
        <exclusion>
            <groupId>io.lettuce</groupId>
            <artifactId>lettuce-core</artifactId>
        </exclusion>
    </exclusions>
</dependency>
<dependency>
    <groupId>redis.clients</groupId>
    <artifactId>jedis</artifactId>
    <version>3.1.0</version>
</dependency>
注:
=>使用lettuce、jedis操作redis的底层客户端。Spring再次封装redisTemplate
=>即无论使用ettuce还是jedis,都可以使用redisTemplate操作redis
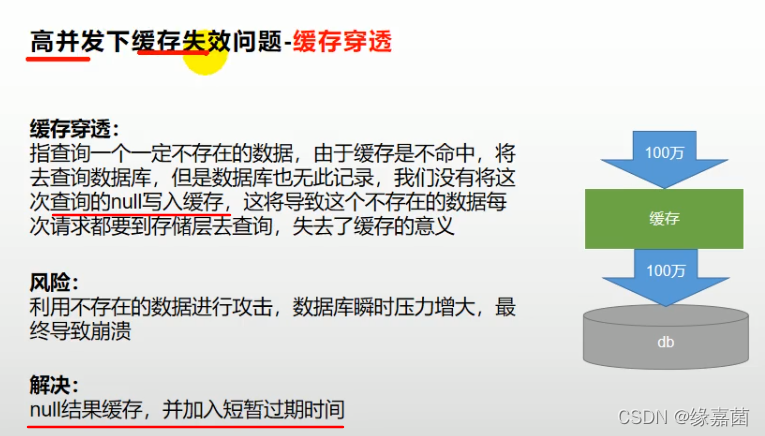
3.缓存穿透、雪崩、击穿
3.1 缓存穿透
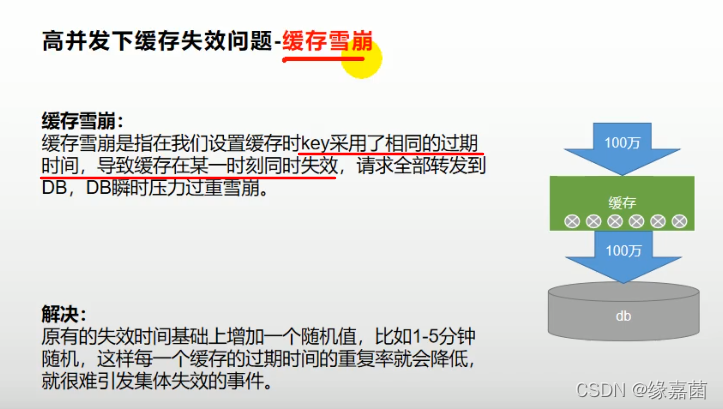
3.2 缓存雪崩
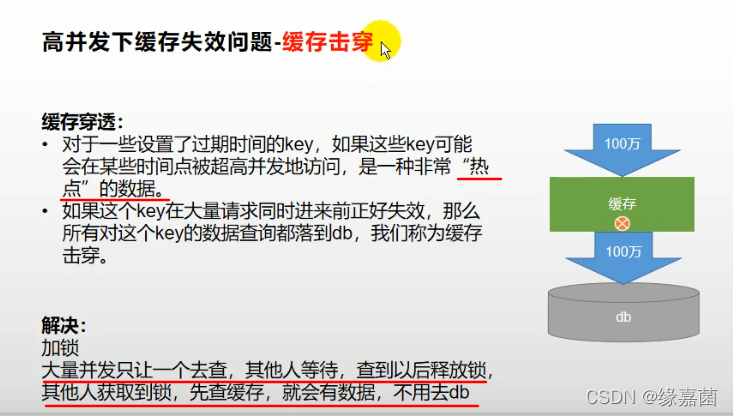
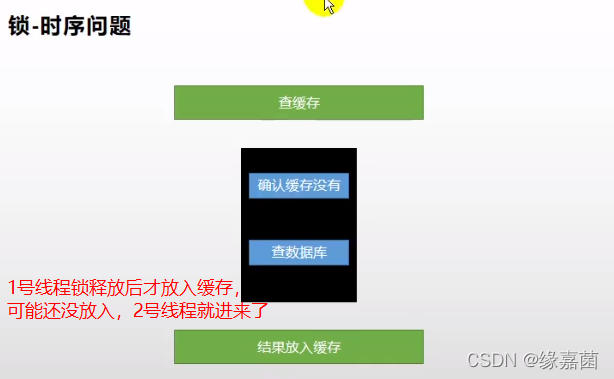
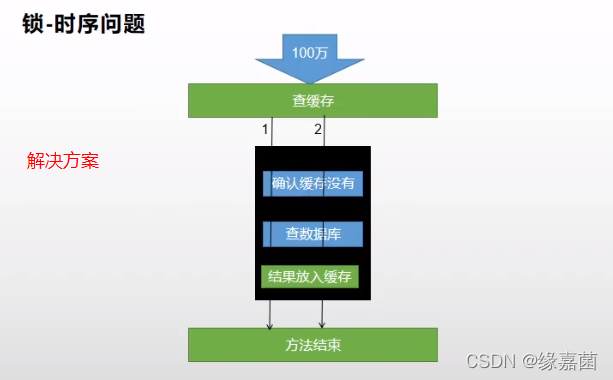
3.3 缓存击穿
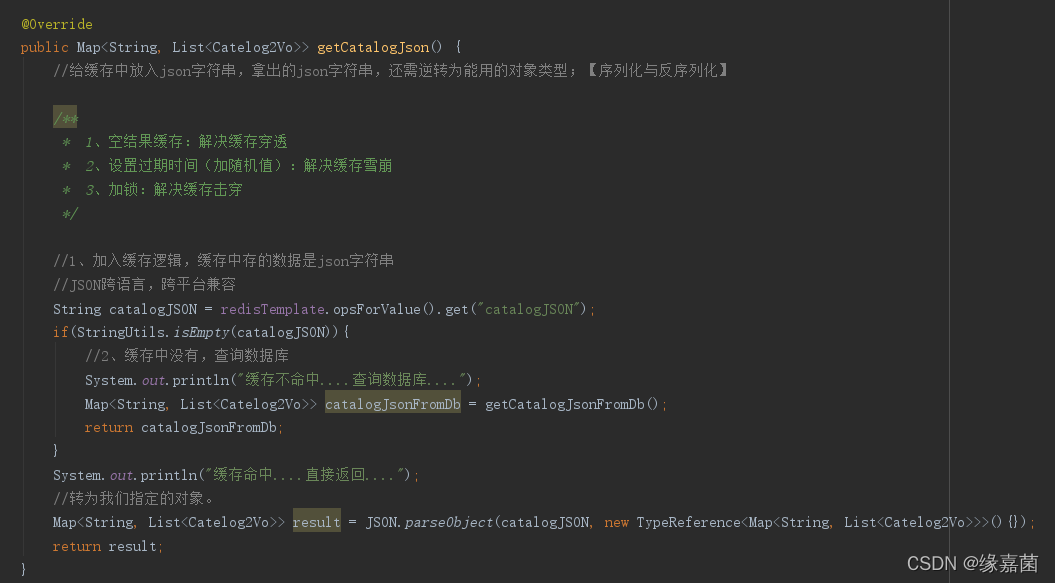
3.4 总结
/**
 *  1、空结果缓存:解决缓存穿透
 *  2、设置过期时间(加随机值):解决缓存雪崩
 *  3、加锁:解决缓存击穿
 */
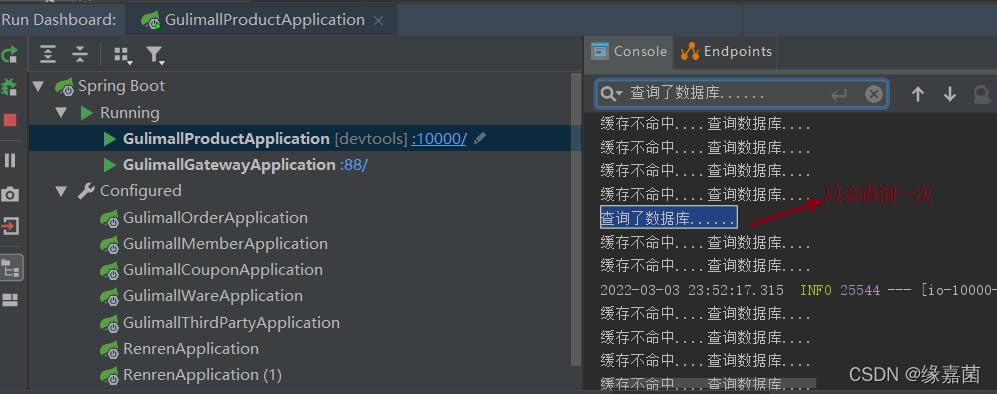
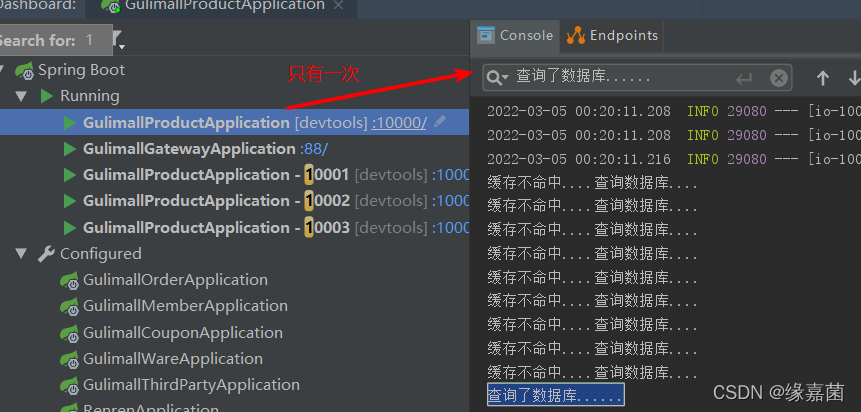
3.5 本地锁解决缓存击穿
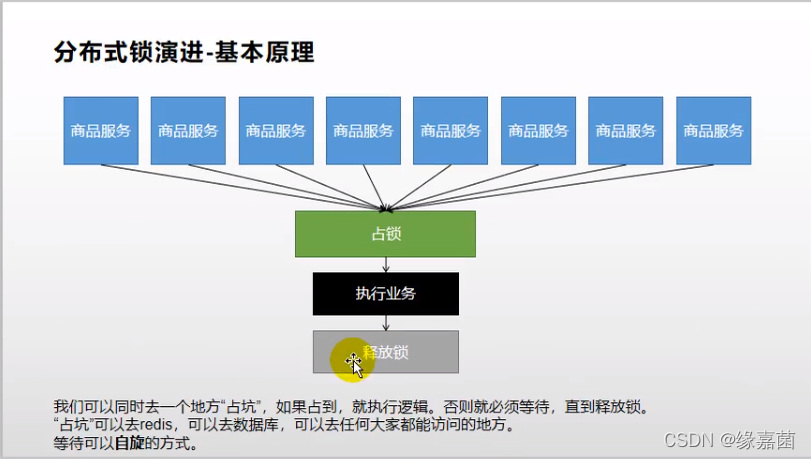
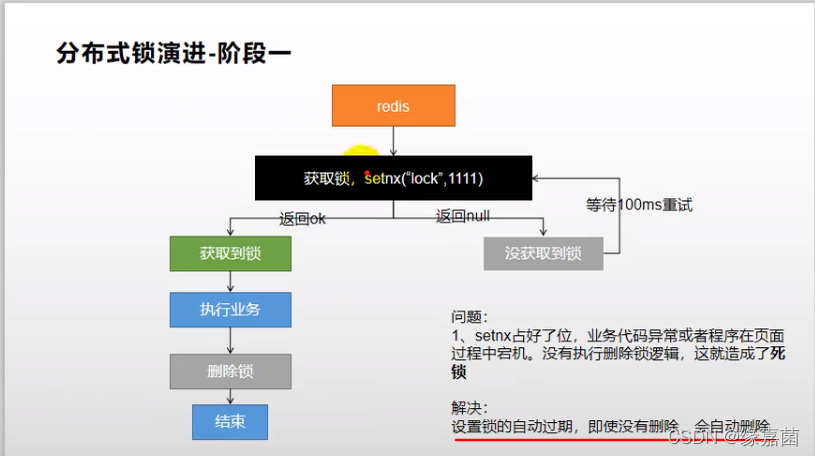
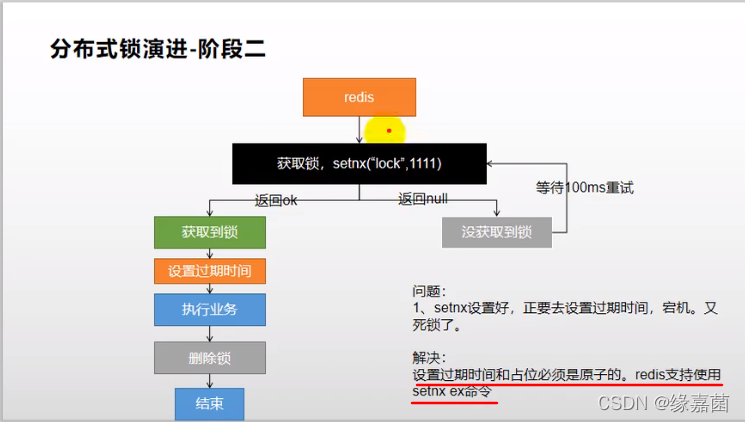
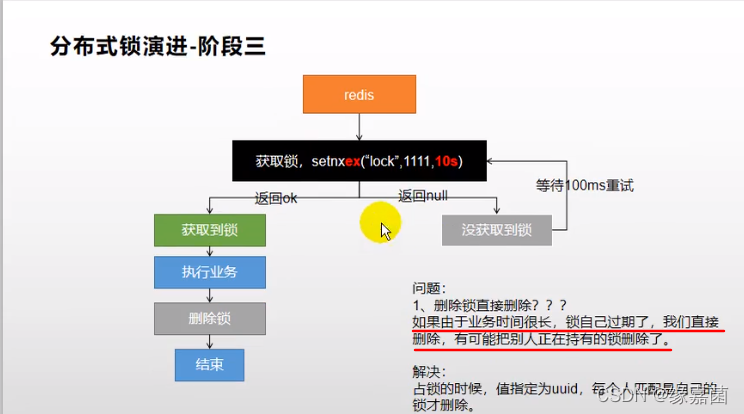
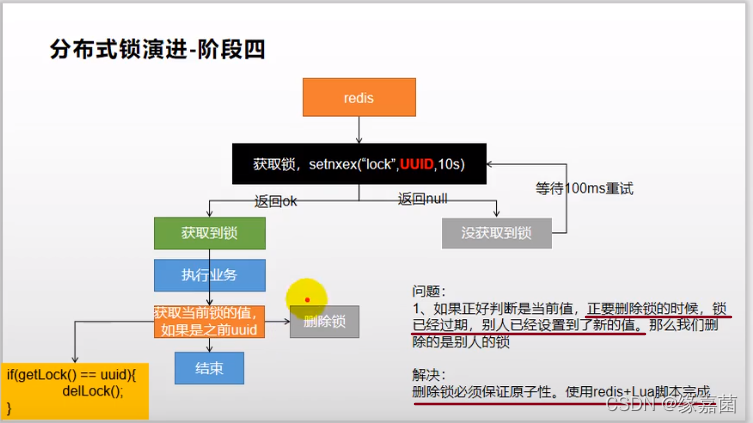
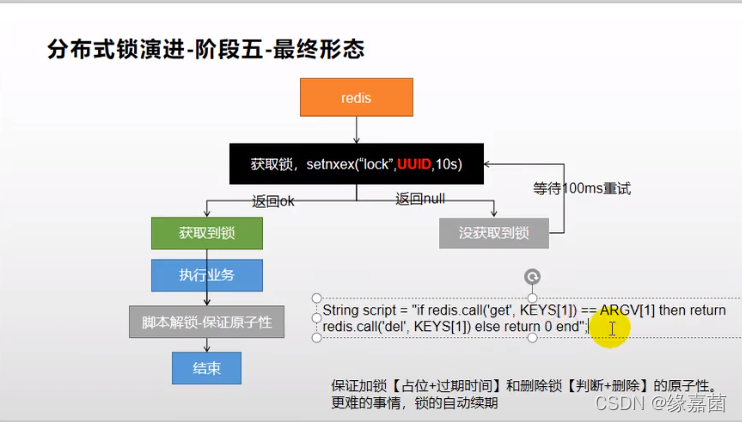
3.6 分布式锁
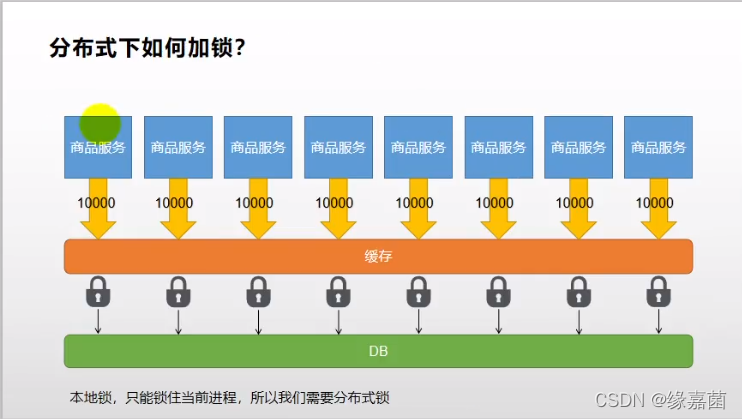
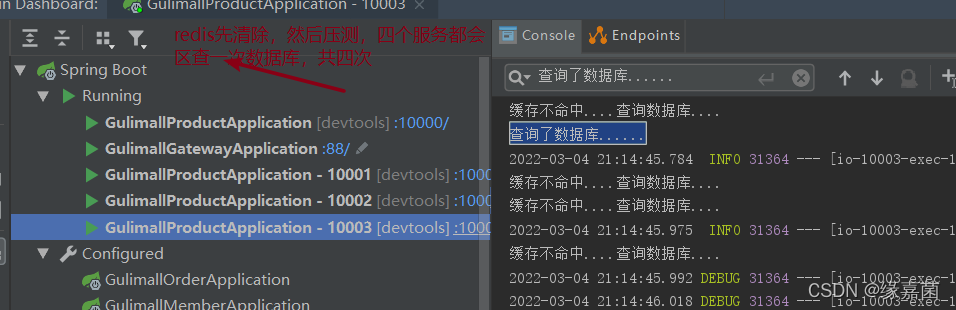
3.6.1 本地锁问题
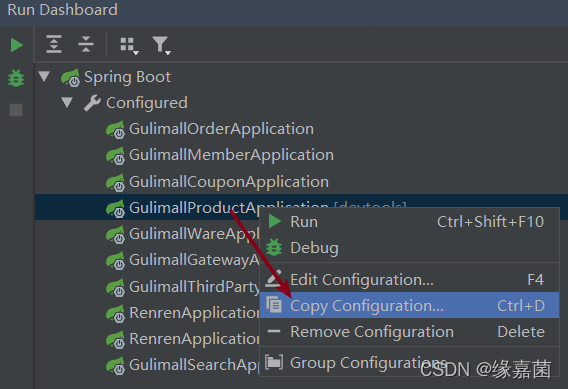
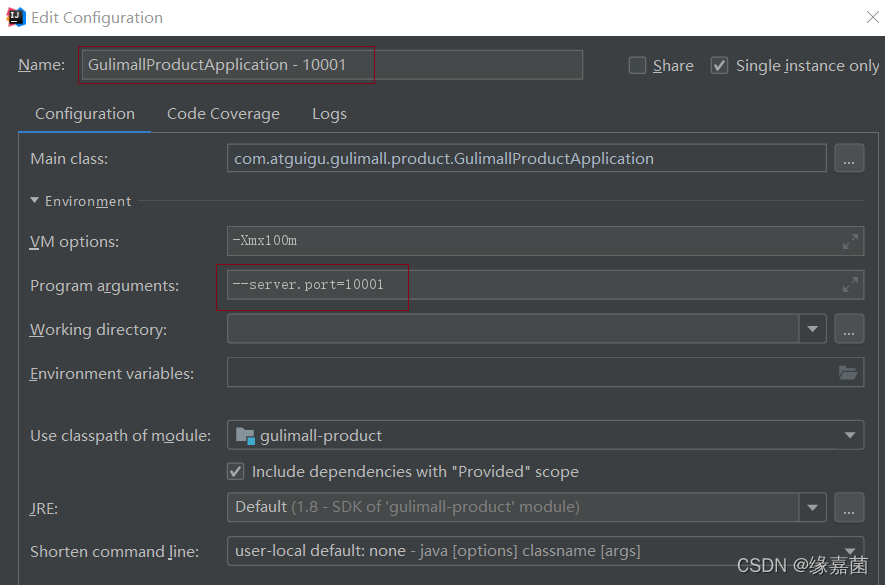
启动多个服务:可以复制10001,10002,10003启动多个服务
进行压测
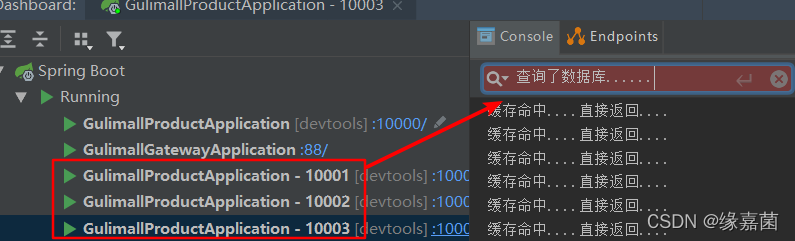
3.6.2 使用分布式锁解决本地锁问题
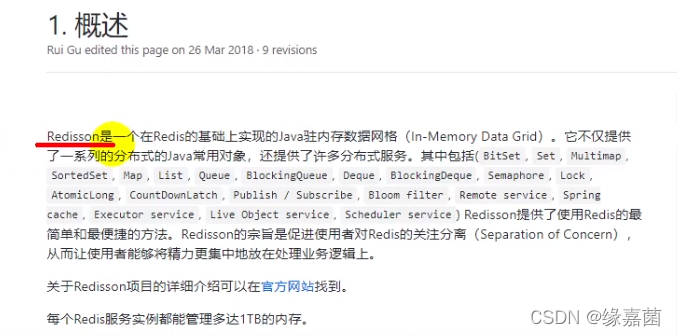
4.Redisson
4.1 概述
4.2 添加依赖
<!--以后使用redisson作为所有分布式锁,分布式对象等功能框架-->
<dependency>
   <groupId>org.redisson</groupId>
   <artifactId>redisson-spring-boot-starter</artifactId>
   <version>3.13.5</version>
</dependency>
4.3 配置redisson
官方文档:
可参考:https://blog.csdn.net/liu320yj/article/details/109026854
@Configuration
public class MyRedissonConfig {

    /**
     * 所有对Redisson的使用都是通过RedissonClient对象
     * @return
     * @throws IOException
     */
    @Bean(destroyMethod = "shutdown")
    public RedissonClient redisson() throws IOException {
        //1、创建配置
        Config config = new Config();
        config.useSingleServer().setAddress("redis://xxx.xxx.xxx.xxx:6379");
        //2、根据Config创建出RedissonClient示例
        RedissonClient redissonClient = Redisson.create(config);
        return redissonClient;
    }

}
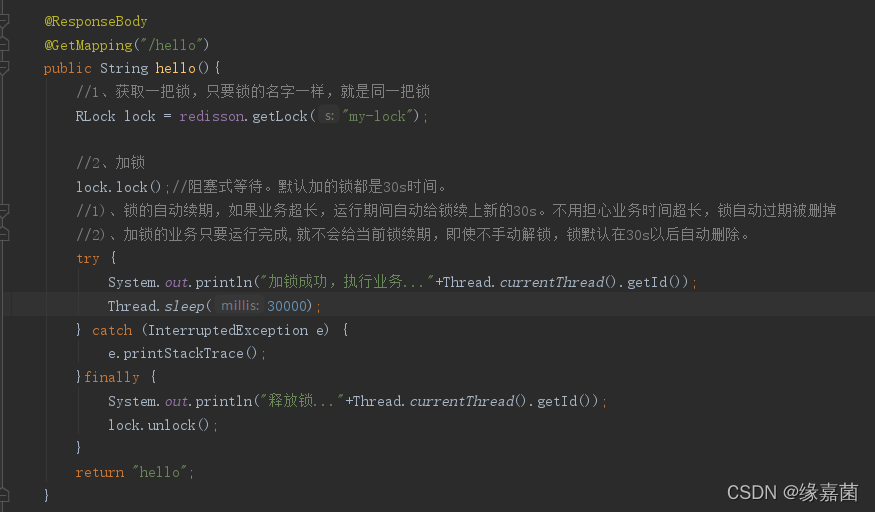
4.4 使用redisson可重入锁
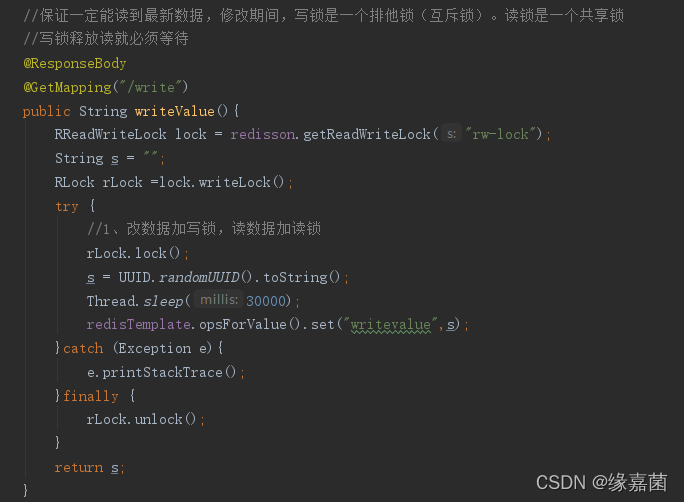
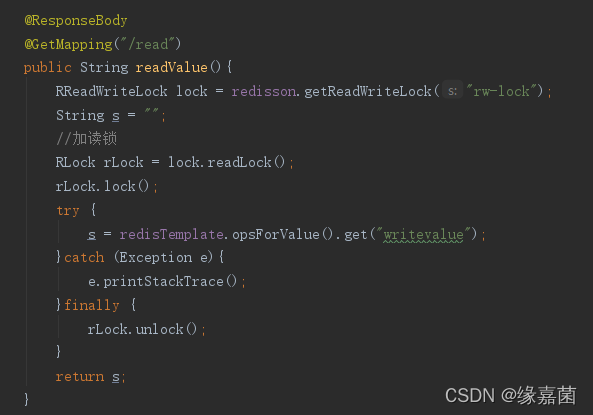
4.5 使用redisson读写锁
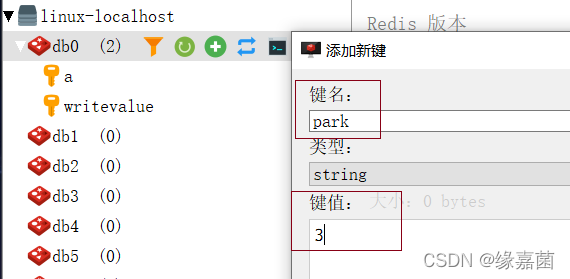
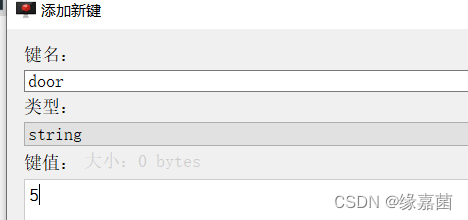
4.6 使用redisson信号量

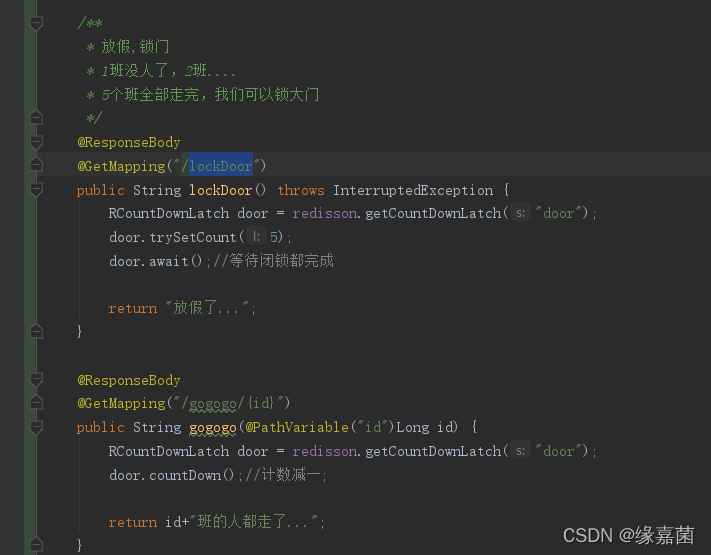
4.7 使用redisson闭锁
4.8 缓存数据一致性
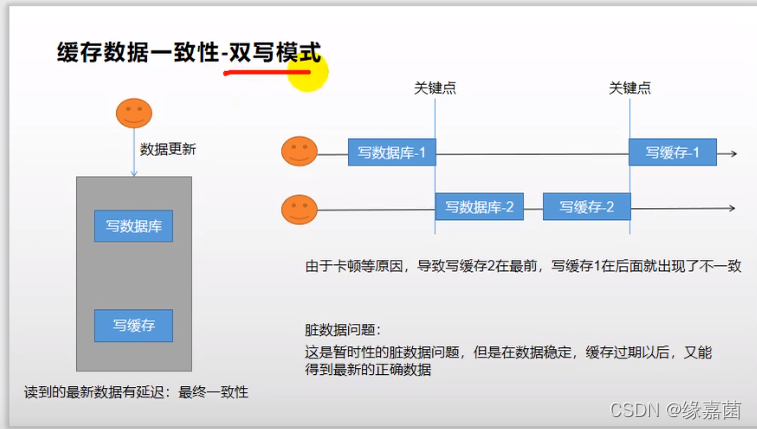
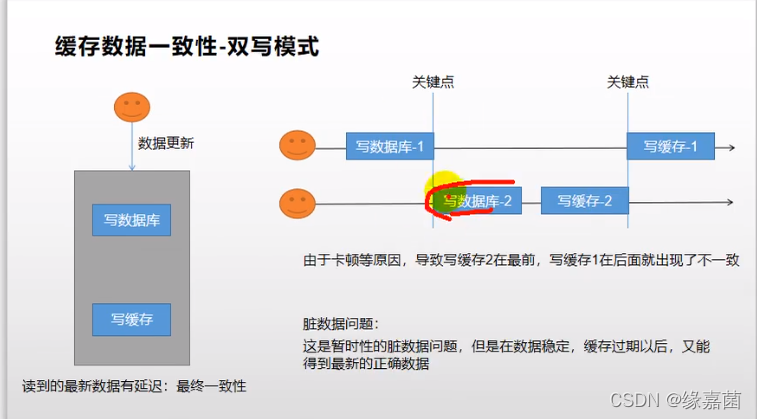
4.8.1 双写模式
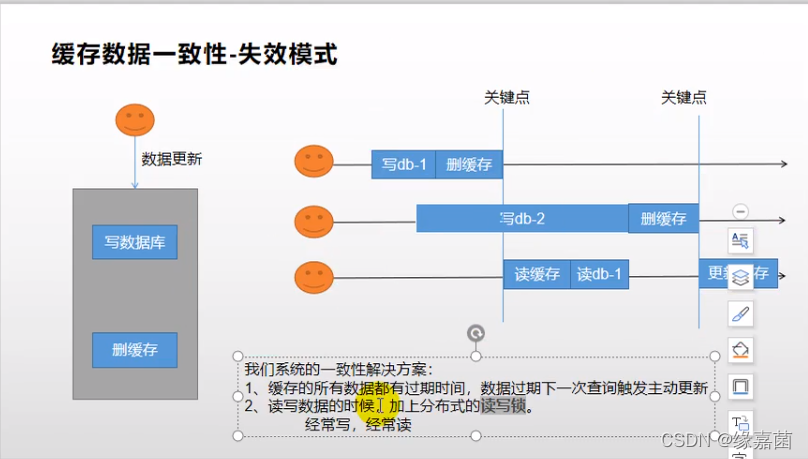
4.8.2 失效模式
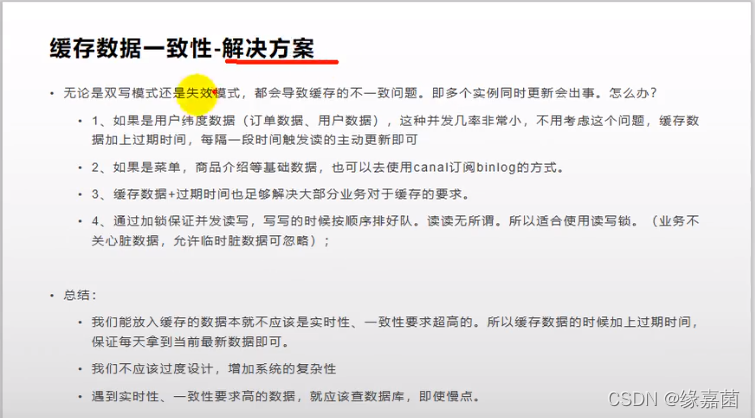
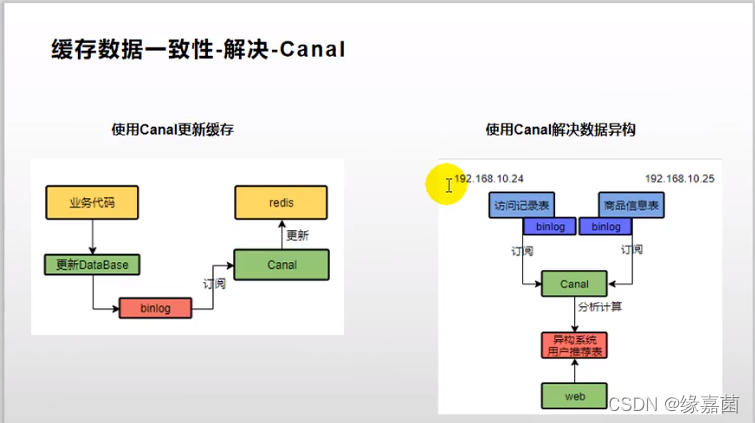
4.8.3 解决方案
5.Spring Cache
https://docs.spring.io/spring-framework/docs/5.2.19.RELEASE/spring-framework-reference/integration.html#cache-jsr-107
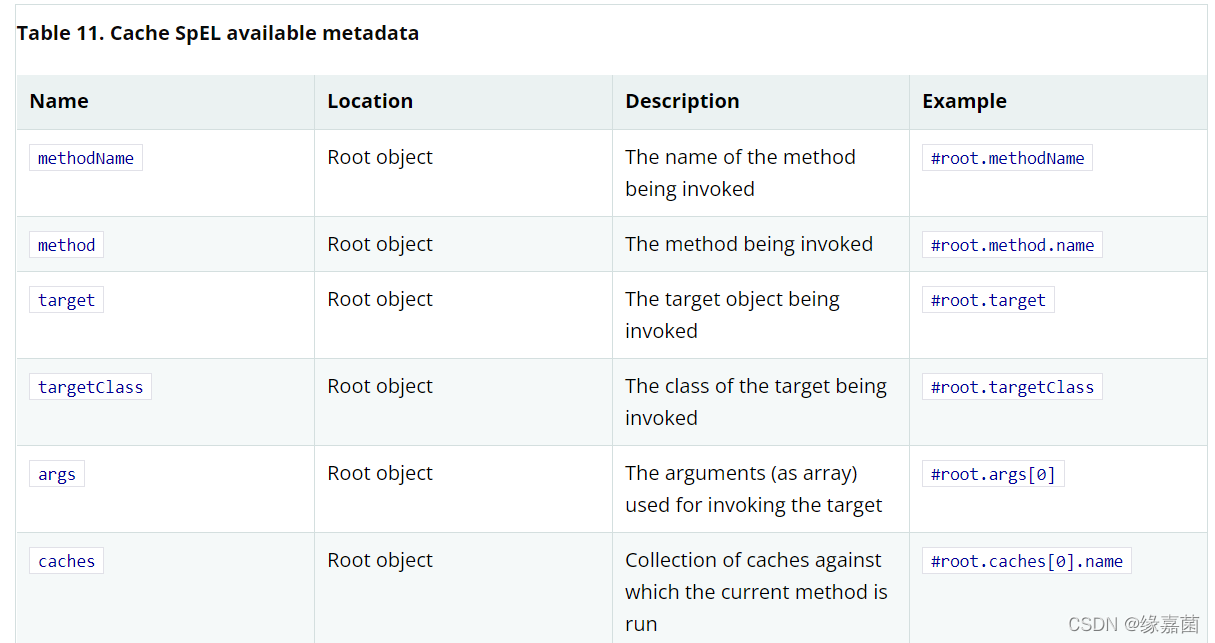
https://docs.spring.io/spring-framework/docs/5.2.19.RELEASE/spring-framework-reference/integration.html#cache-spel-context
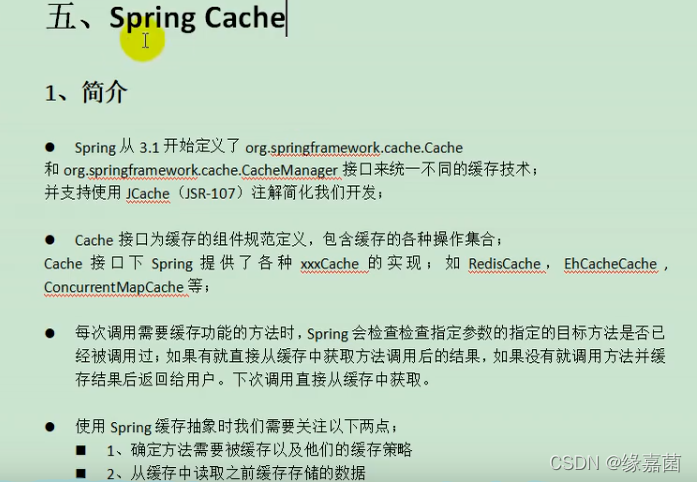
5.1 简介
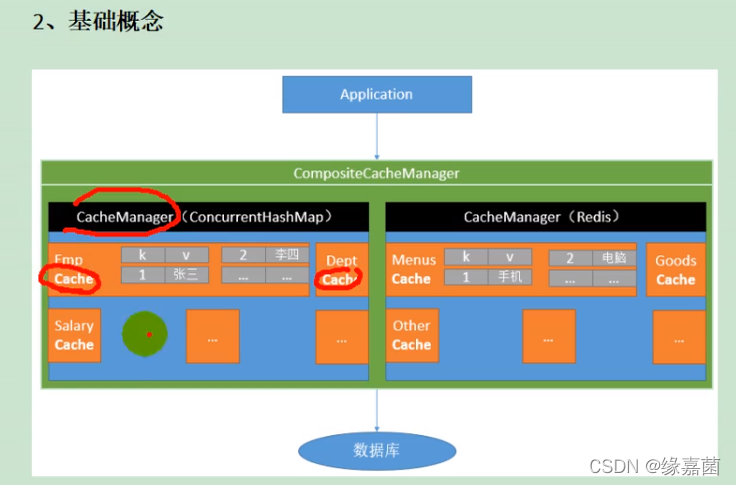
org.springframework.cache.CacheManager
org.springframework.cache.Cache
5.2 整合SpringCache简化缓存开发
5.2.1 引入依赖
spring-boot-starter-cache、spring-boot-starter-data-redis
<!--整合redis-->
<dependency>
    <groupId>org.springframework.boot</groupId>
    <artifactId>spring-boot-starter-data-redis</artifactId>
    <version>2.2.4.RELEASE</version>
    <exclusions>
        <exclusion>
            <groupId>io.lettuce</groupId>
            <artifactId>lettuce-core</artifactId>
        </exclusion>
    </exclusions>
</dependency>
<dependency>
    <groupId>redis.clients</groupId>
    <artifactId>jedis</artifactId>
    <version>3.1.0</version>
</dependency>
<dependency>
    <groupId>org.springframework.boot</groupId>
    <artifactId>spring-boot-starter-cache</artifactId>
</dependency>
org.springframework.boot.autoconfigure.cache.CacheAutoConfiguration
注意
CacheConfigurations.getConfigurationClass(types[i])
Class<?> configurationClass = MAPPINGS.get(cacheType);
static {
		Map<CacheType, Class<?>> mappings = new EnumMap<>(CacheType.class);
		mappings.put(CacheType.GENERIC, GenericCacheConfiguration.class);
		mappings.put(CacheType.EHCACHE, EhCacheCacheConfiguration.class);
		mappings.put(CacheType.HAZELCAST, HazelcastCacheConfiguration.class);
		mappings.put(CacheType.INFINISPAN, InfinispanCacheConfiguration.class);
		mappings.put(CacheType.JCACHE, JCacheCacheConfiguration.class);
		mappings.put(CacheType.COUCHBASE, CouchbaseCacheConfiguration.class);
		mappings.put(CacheType.REDIS, RedisCacheConfiguration.class);
		mappings.put(CacheType.CAFFEINE, CaffeineCacheConfiguration.class);
		mappings.put(CacheType.SIMPLE, SimpleCacheConfiguration.class);
		mappings.put(CacheType.NONE, NoOpCacheConfiguration.class);
		MAPPINGS = Collections.unmodifiableMap(mappings);
	}
5.2.2 写配置
1)、自动配置了哪些
CacheAutoConfiguration会导入RedisCacheConfiguration;
自动配好了缓存管理器RedisCacheManager
2)、配置使用redis作为缓存
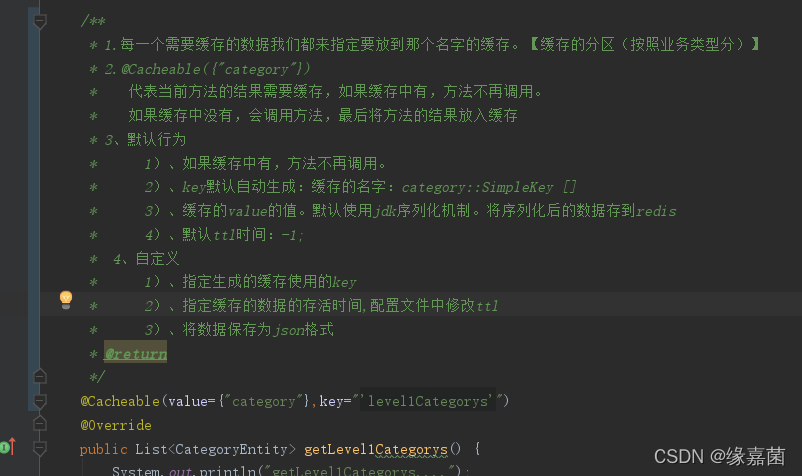
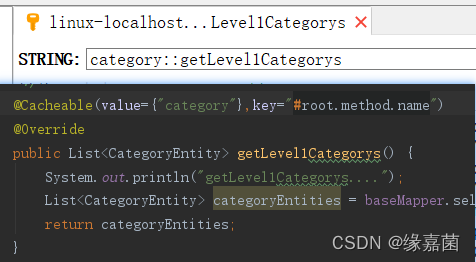
3)、测试使用缓存
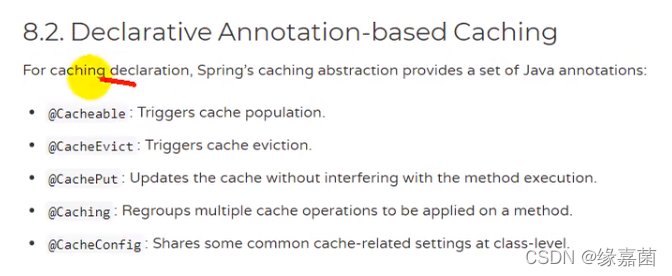
@Cacheable: Triggers cache popuLation.触发将数据保存到缓存的操作
@cacheEvict:Triggers cache eviction.触发将数据从缓存删除的操作
@CachePut: Updatcs the cache without intcrfcring with the mcthod execution.不影响方法执行更新缓存
@Caching: Regroups multiple cache operations to be applied on a method.组合以上多个操作
@CacheConfig: Shares some common cache-rclated settings at class-level.在类级别共享缓存的相同配置
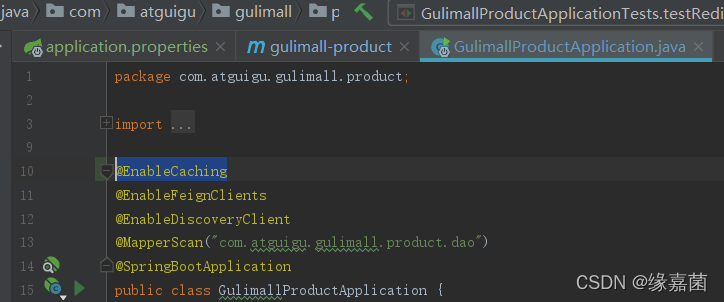
3.1)、开启缓存功能:@EnableCaching
3.2)、只需要注解就能完成缓存操作
调用方法

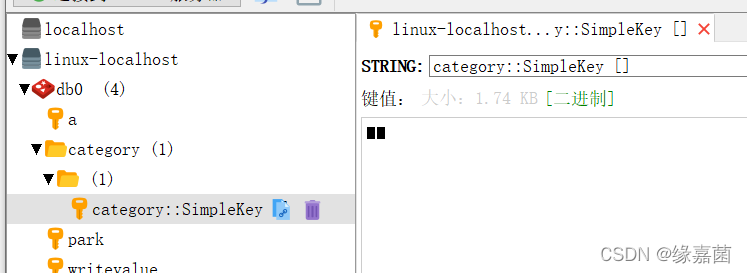
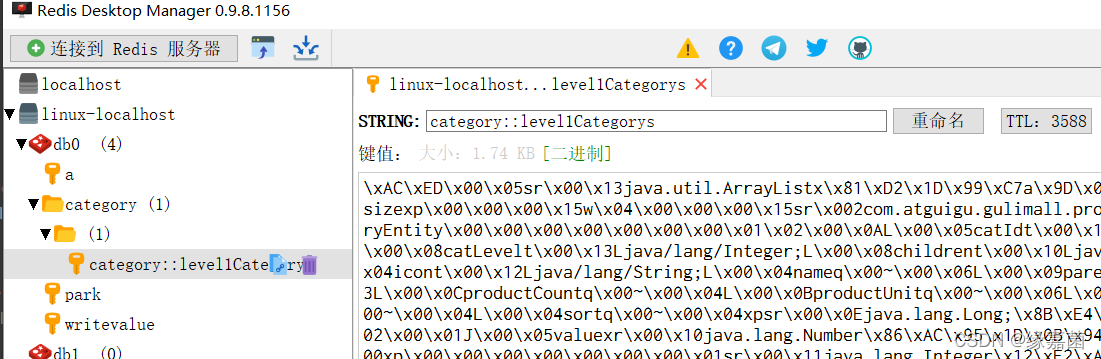
5.2.3 自定义配置
指定缓存的数据存活时间
指定缓存使用的key
数据保存为json格式
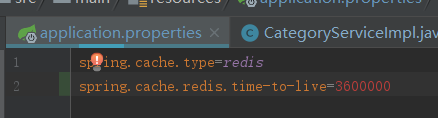
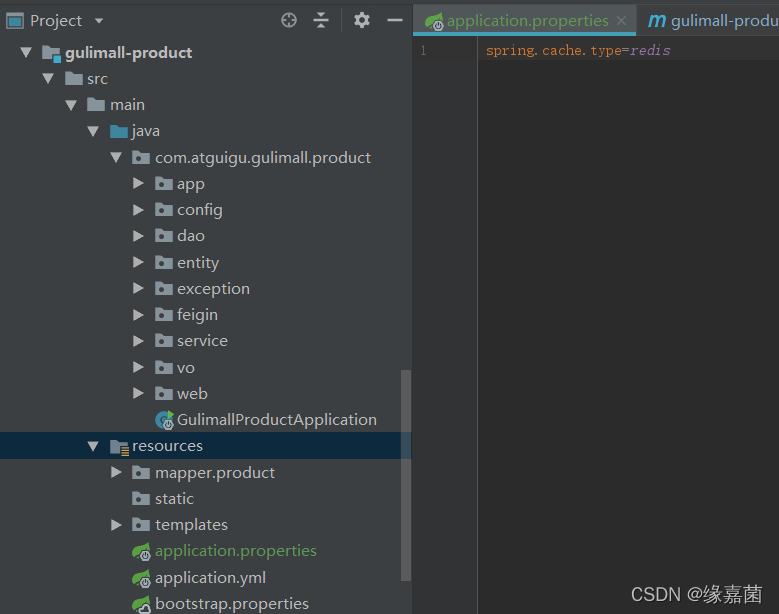
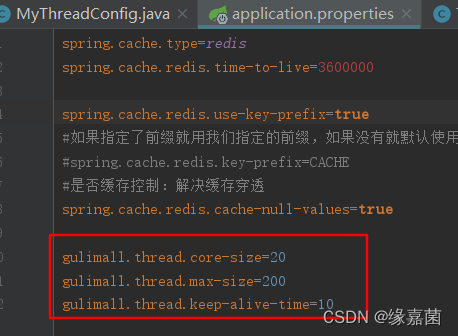
#application.properties
spring.cache.type=redis
spring.cache.redis.time-to-live=3600000

spring.cache.redis.use-key-prefix=true
#如果指定了前缀就用我们指定的前缀,如果没有就默认使用缓存的名字作为前缀
#spring.cache.redis.key-prefix=CACHE
#是否缓存控制:解决缓存穿透
spring.cache.redis.cache-null-values=true
import org.springframework.beans.factory.annotation.Autowired;
import org.springframework.boot.autoconfigure.cache.CacheProperties;
import org.springframework.boot.context.properties.EnableConfigurationProperties;
import org.springframework.cache.annotation.EnableCaching;
import org.springframework.context.annotation.Bean;
import org.springframework.context.annotation.Configuration;
import org.springframework.data.redis.cache.RedisCacheConfiguration;
import org.springframework.data.redis.serializer.GenericJackson2JsonRedisSerializer;
import org.springframework.data.redis.serializer.RedisSerializationContext;
import org.springframework.data.redis.serializer.StringRedisSerializer;

@EnableConfigurationProperties(CacheProperties.class)
@Configuration
@EnableCaching
public class MyCacheConfig {

    /*@Autowired
    CacheProperties cacheProperties;*/

    /**
     * 配置文件中的东西没有用上:
     * 1、原来和配置文件绑定的配置类是这样子的
     *      @ConfigurationProperties(prefix = "spring.cache")
     *      public class CacheProperties
     * 2、要让他生效
     *      @EnableConfigurationProperties(CacheProperties.class)
     * @return
     */
    @Bean
    RedisCacheConfiguration redisCacheConfiguration(CacheProperties cacheProperties){

        RedisCacheConfiguration config = RedisCacheConfiguration.defaultCacheConfig();
        //config = config.entryTtl();
        config = config.serializeKeysWith(RedisSerializationContext.SerializationPair.fromSerializer(new StringRedisSerializer()));

        config = config.serializeValuesWith(RedisSerializationContext.SerializationPair.fromSerializer(new GenericJackson2JsonRedisSerializer()));

        //将配置文件中的所有配置都生效
        CacheProperties.Redis redisProperties = cacheProperties.getRedis();
        if (redisProperties.getTimeToLive() != null) {
            config = config.entryTtl(redisProperties.getTimeToLive());
        }

        if (redisProperties.getKeyPrefix() != null) {
            config = config.prefixCacheNameWith(redisProperties.getKeyPrefix());
        }

        if (!redisProperties.isCacheNullValues()) {
            config = config.disableCachingNullValues();
        }

        if (!redisProperties.isUseKeyPrefix()) {
            config = config.disableKeyPrefix();
        }
        return config;

    }
}
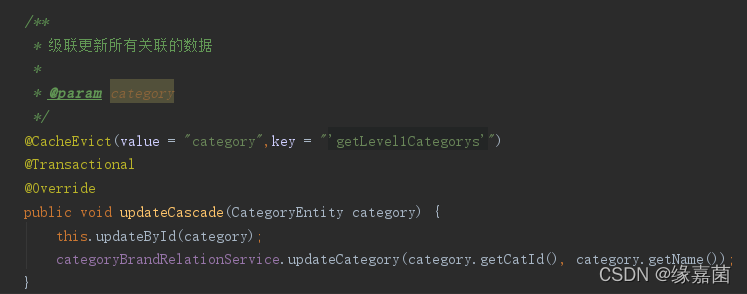
5.2.4 使用注解
@CacheEvict : 触发将数据从缓存删除的操作
@Caching: 组合多种缓存操作
@CachePut:双写模式,用于更新缓存

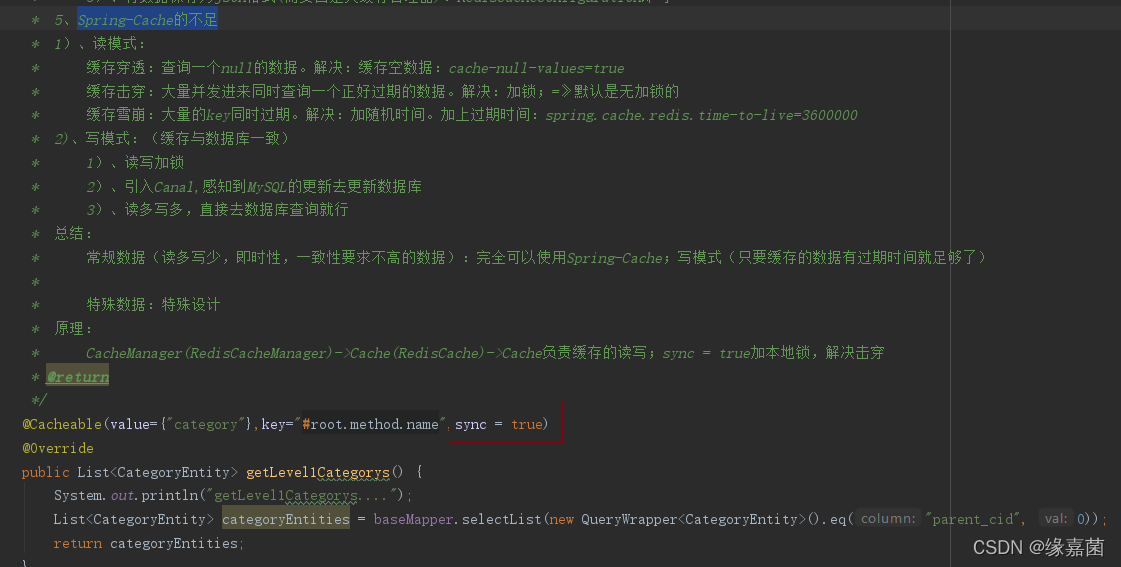
5.2.5 Spring-Cache原理与不足
6.搭建搜索页面
6.1 导入资源到nginx,配置搜索静态资源到search

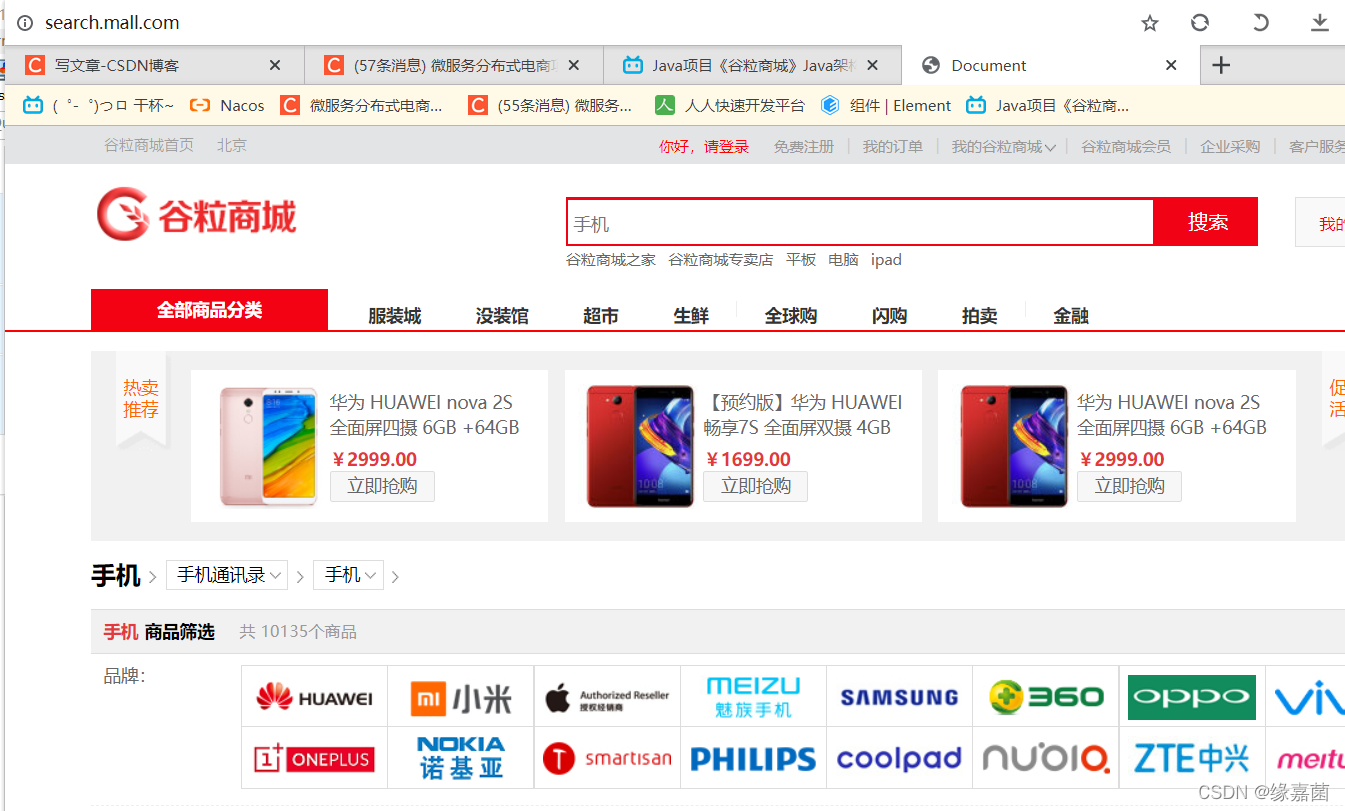
6.2 在首页点击搜索需要跳转到搜索页面
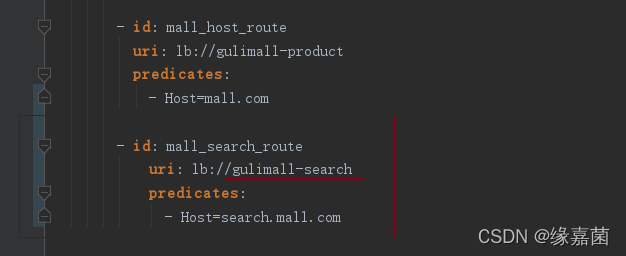
配置nginx:把search.mall.com也转发到网关
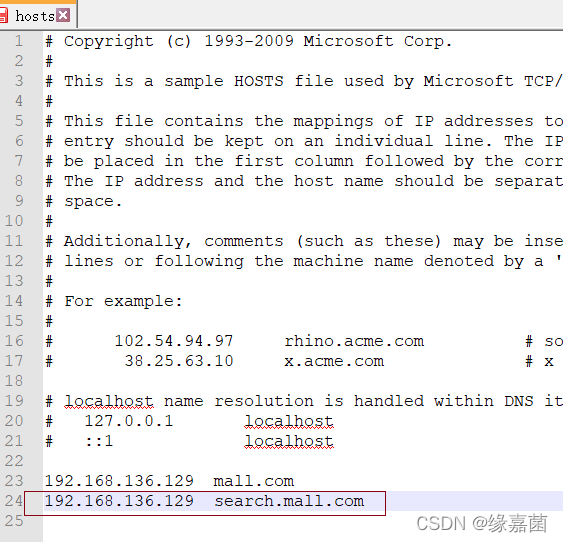
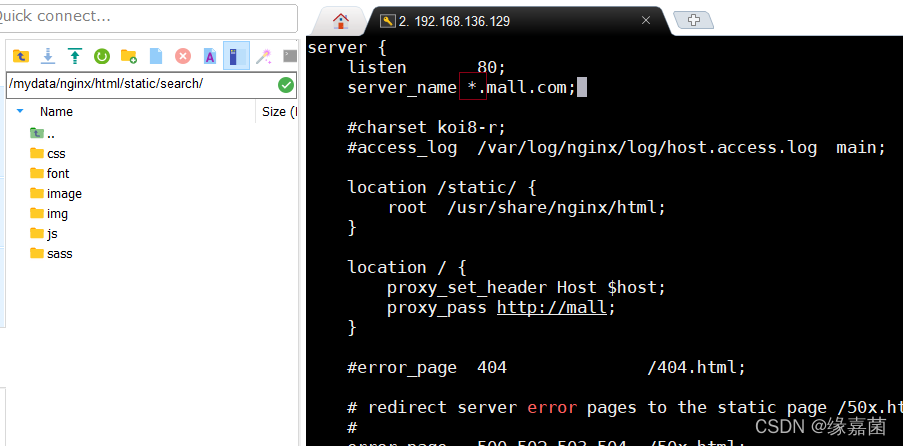
网关根据$host负载均衡到gulimall-search
跳转到搜索页面
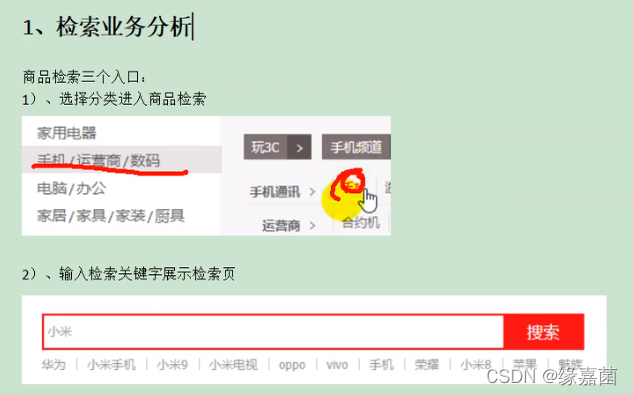
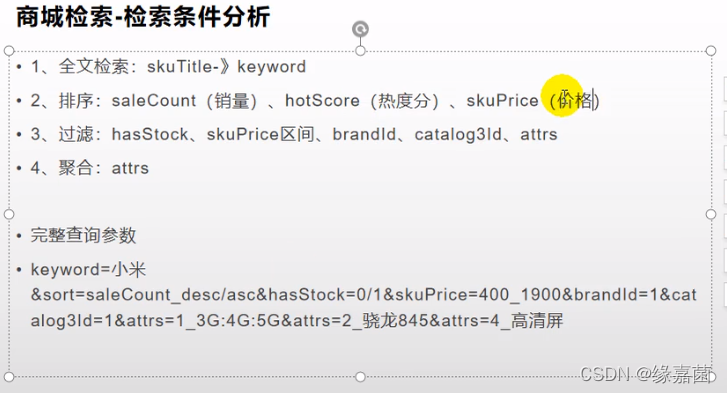
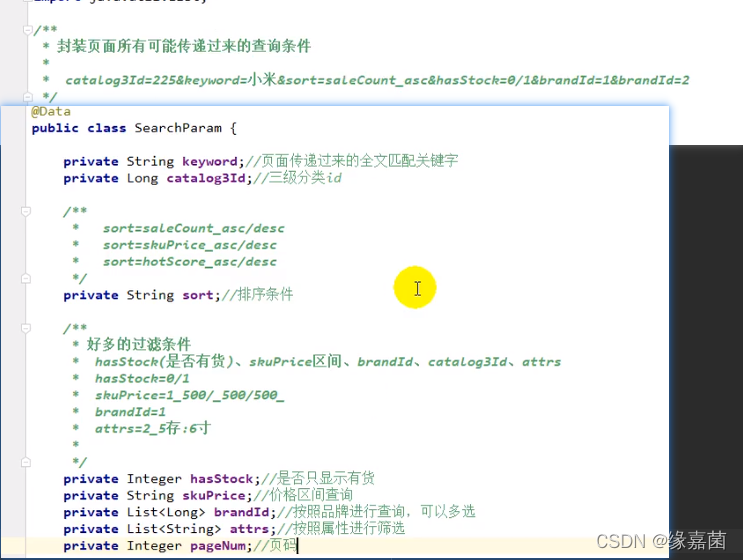
6.3 检索业务分析
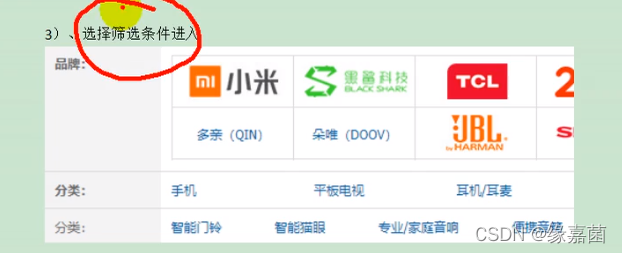
6.4 使用ES测试复杂查询
search.mall.com/list.html?catalog3ld=225&keyword=华为&brandld=1&brandld=2&attrs=1_5.56以上&attrs=2_白色:蓝色
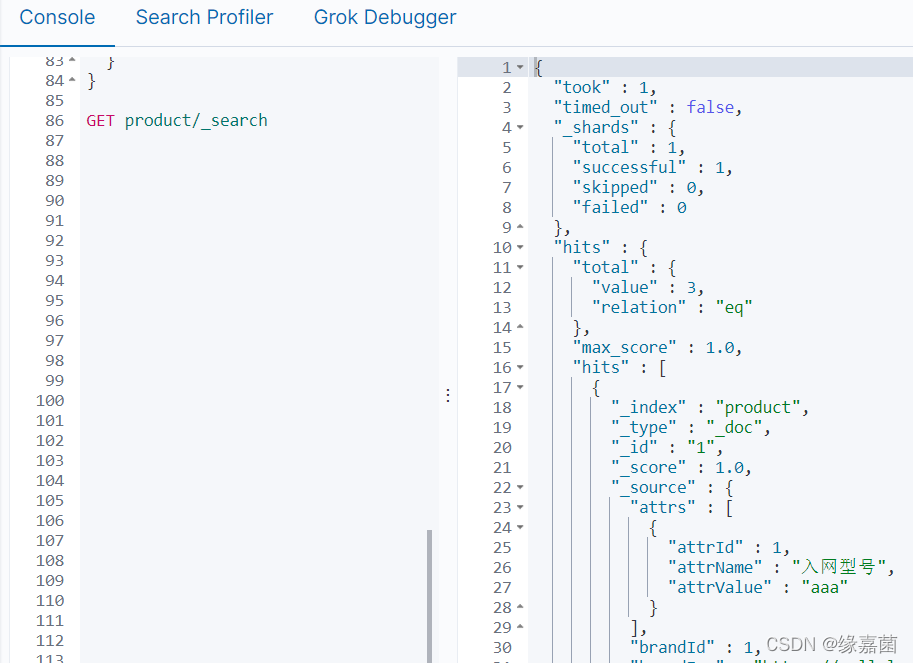
GET product/_search
{
  "query": {
    "bool": {
      "must": [
        {
          "match": {
            "skuTitle": "华为"
          }
        }
      ],
      "filter": [
        {
          "term": {
            "catalogId": "225"
          }
        },
        {
          "terms": {
            "brandId": [
              "1",
              "2",
              "9"
            ]
          }
        },
        {
          "nested": {
            "path": "attrs",
            "query": {
              "bool": {
                "must": [
                  {
                    "term": {
                      "attrs.attrId": {
                        "value": "1"
                      }
                    }
                  },
                  {
                    "terms": {
                      "attrs.attrValue": [
                        "aaa",
                        "bbb"
                      ]
                    }
                  }
                ]
              }
            }
          }
        },
        {
          "range": {
            "skuPrice": {
              "gte": 0,
              "lte": 9000
            }
          }
        }
      ]
    }
  },
  "sort": [
    {
      "skuPrice": {
        "order": "desc"
      }
    }
  ],
  "from":0,
  "size":2,
  "highlight":{
    "fields": {"skuTitle":{}},
    "pre_tags": "<b style='color:red'>",
    "post_tags": "</b>"
  }
}
模糊匹配,过滤(按照属性,分类,品牌,价格区间,库存),排序,分页,高亮,聚合分析
6.5 聚合分析
1.修改映射
先查看原映射:GET product/_mapping
{
  "product" : {
    "mappings" : {
      "properties" : {
        "attrs" : {
          "type" : "nested",
          "properties" : {
            "attrId" : {
              "type" : "long"
            },
            "attrName" : {
              "type" : "keyword",
              "index" : false,
              "doc_values" : false
            },
            "attrValue" : {
              "type" : "keyword"
            }
          }
        },
        "brandId" : {
          "type" : "long"
        },
        "brandImg" : {
          "type" : "keyword",
          "index" : false,
          "doc_values" : false
        },
        "brandName" : {
          "type" : "keyword",
          "index" : false,
          "doc_values" : false
        },
        "catalogId" : {
          "type" : "long"
        },
        "catalogName" : {
          "type" : "keyword",
          "index" : false,
          "doc_values" : false
        },
        "hasScore" : {
          "type" : "long"
        },
        "hasStock" : {
          "type" : "boolean"
        },
        "hotScore" : {
          "type" : "long"
        },
        "saleCount" : {
          "type" : "long"
        },
        "skuId" : {
          "type" : "long"
        },
        "skuImg" : {
          "type" : "keyword",
          "index" : false,
          "doc_values" : false
        },
        "skuPrice" : {
          "type" : "keyword"
        },
        "skuTitle" : {
          "type" : "text",
          "analyzer" : "ik_smart"
        },
        "spuId" : {
          "type" : "keyword"
        }
      }
    }
  }
}
修改映射
PUT mall_product
{
  "mappings" : {
    "properties" : {
      "attrs" : {
        "type" : "nested",
        "properties" : {
          "attrId" : {
            "type" : "long"
          },
          "attrName" : {
            "type" : "keyword"
          },
          "attrValue" : {
            "type" : "keyword"
          }
        }
      },
      "brandId" : {
        "type" : "long"
      },
      "brandImg" : {
        "type" : "keyword"
      },
      "brandName" : {
        "type" : "keyword"
      },
      "catalogId" : {
        "type" : "long"
      },
      "catalogName" : {
        "type" : "keyword"
      },
      "hasScore" : {
        "type" : "long"
      },
      "hasStock" : {
        "type" : "boolean"
      },
      "hotScore" : {
        "type" : "long"
      },
      "saleCount" : {
        "type" : "long"
      },
      "skuId" : {
        "type" : "long"
      },
      "skuImg" : {
        "type" : "keyword"
      },
      "skuPrice" : {
        "type" : "keyword"
      },
      "skuTitle" : {
        "type" : "text",
        "analyzer" : "ik_smart"
      },
      "spuId" : {
        "type" : "keyword"
      }
    }
  }
}
查看映射信息:GET mall_product/_mapping
查看数据:GET mall_product/_search
进行数据迁移
#迁移数据
POST _reindex
{
  "source":{
    "index":"product"
  },
  "dest": {
    "index":"mall_product"
  }
}
#如果是嵌入式的属性,查询,聚合,分析都应该用嵌入式的
#检索
GET mall_product/_search
{
  "query": {
    "bool": {
      "must": [
        {
          "match": {
            "skuTitle": "华为"
          }
        }
      ],
      "filter": [
        {
          "term": {
            "catalogId": "225"
          }
        },
        {
          "terms": {
            "brandId": [
              "1",
              "2",
              "9"
            ]
          }
        },
        {
          "nested": {
            "path": "attrs",
            "query": {
              "bool": {
                "must": [
                  {
                    "term": {
                      "attrs.attrId": {
                        "value": "1"
                      }
                    }
                  },
                  {
                    "terms": {
                      "attrs.attrValue": [
                        "aaa",
                        "bbb"
                      ]
                    }
                  }
                ]
              }
            }
          }
        },
        {
          "range": {
            "skuPrice": {
              "gte": 0,
              "lte": 9000
            }
          }
        }
      ]
    }
  },
  "sort": [
    {
      "skuPrice": {
        "order": "desc"
      }
    }
  ],
  "from":0,
  "size":2,
  "highlight":{
    "fields": {"skuTitle":{}},
    "pre_tags": "<b style='color:red'>",
    "post_tags": "</b>"
  },
    "aggs":{
    "brand_agg":{
      "terms": {
        "field":"brandId",
        "size":10
      },
      "aggs": {
        "brand_name_agg": {
          "terms": {
            "field": "brandName",
            "size": 10
          }
        },
        "brand_img_agg":{
          "terms": {
            "field": "brandImg",
            "size": 10
          }
        }
      }
    },
    "catalog_agg":{
      "terms": {
        "field": "catalogId",
        "size": 10
      },
      "aggs": {
        "catalog_name_agg": {
          "terms": {
            "field": "catalogName",
            "size": 10
          }
        }
      }
    },
    "attr_agg":{
      "nested": {
        "path": "attrs"
      },
      "aggs":{
        "attr_id_agg":{
          "terms": {
            "field":"attrs.attrId",
            "size":10
          },
          "aggs":{
            "attr_name_agg":{
              "terms": {
                "field": "attrs.attrName",
                "size": 10
              }
            },
            "attr_value_agg":{
              "terms": {
                "field": "attrs.attrValue",
                "size": 10
              }
            }
          }
        }
      }
    }
  }
}
五、线程池
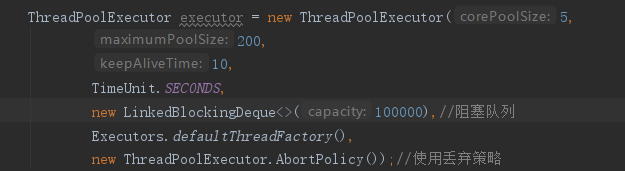
1.初始化线程数的4种方式
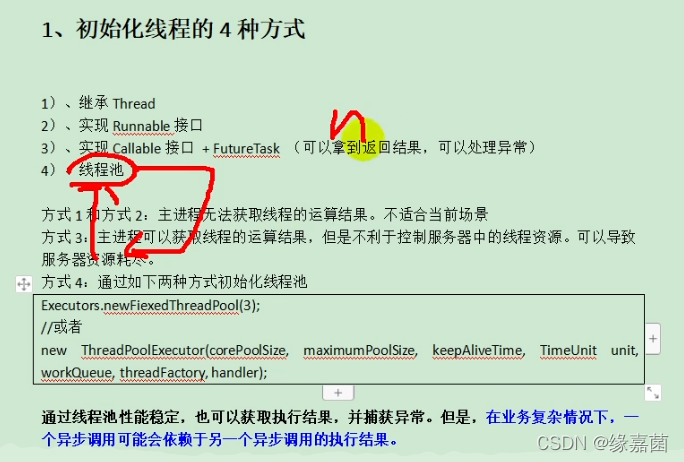
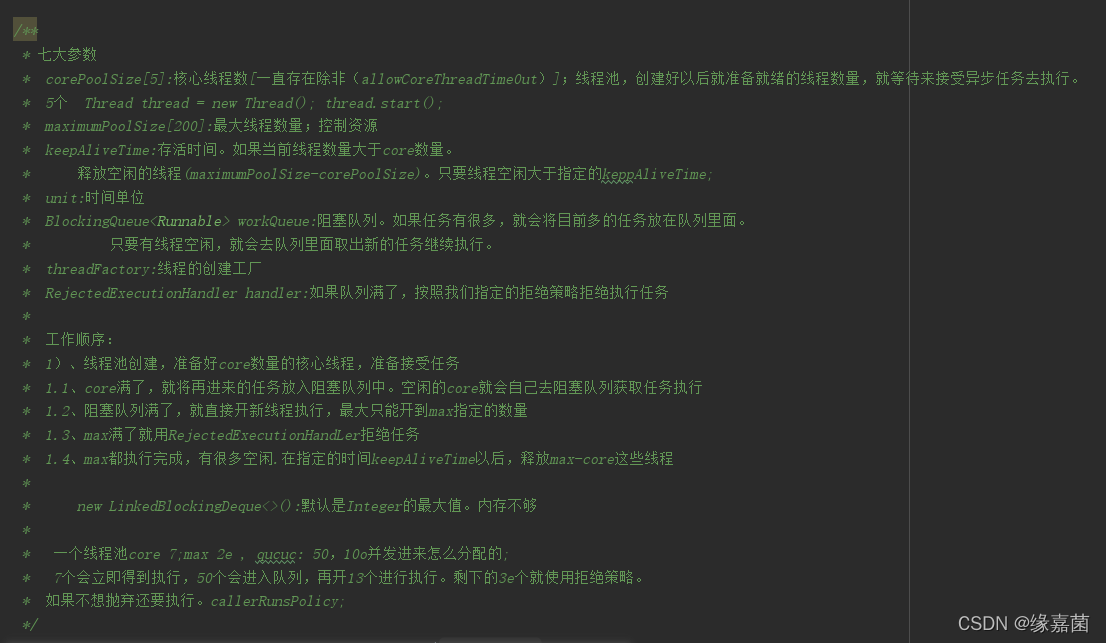
1.1 创建方式一
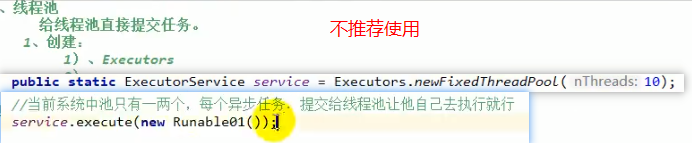
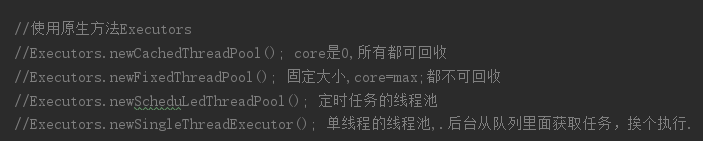
1.2 创建方式二
通过execute方法
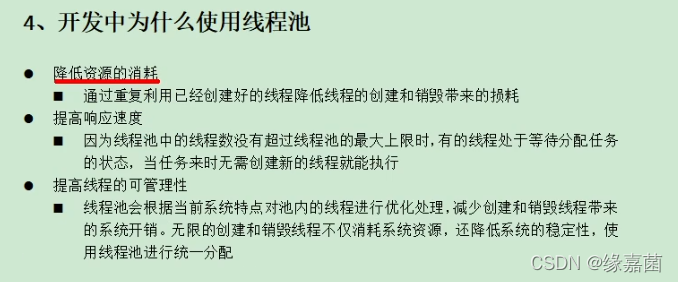
2 好处
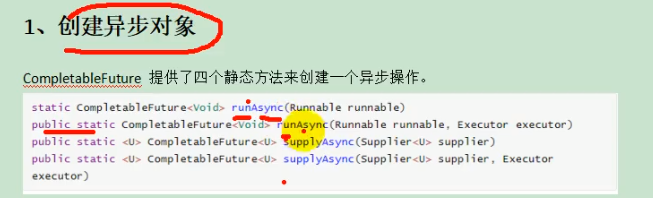
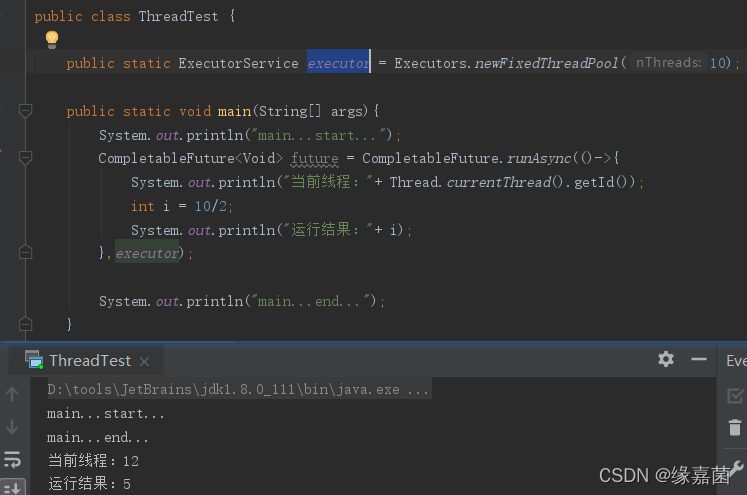
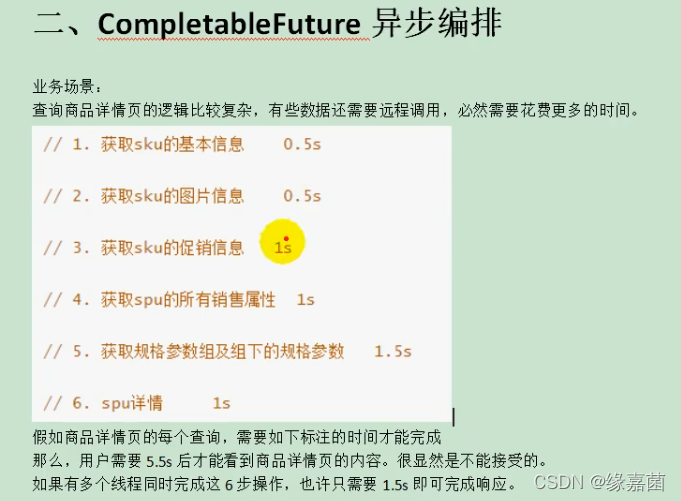
六、 CompletableFuture异步编排
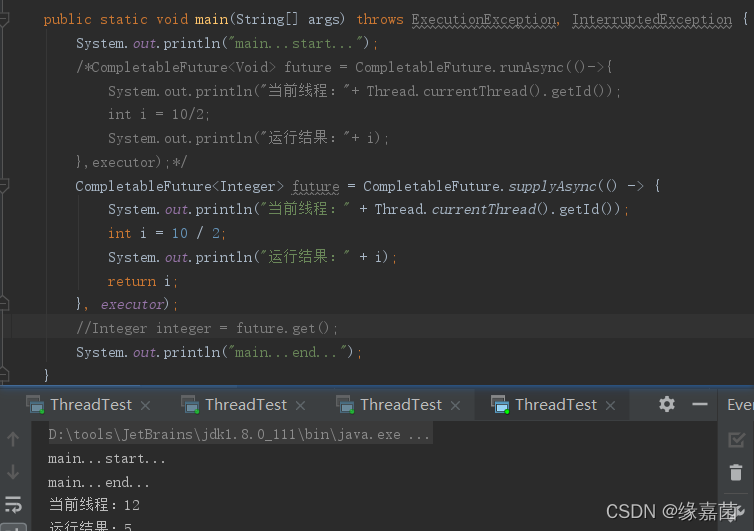
1. 创建异步对象
可以传入自定义线程池
案例一:
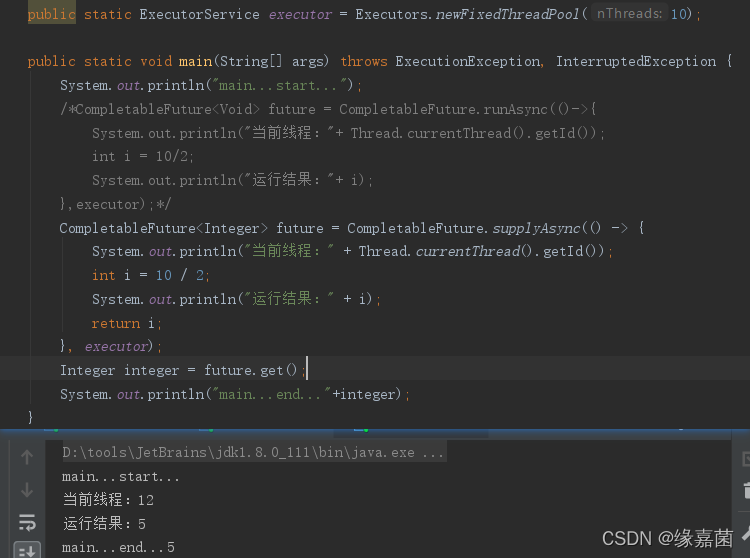
案例二:可以带返回值
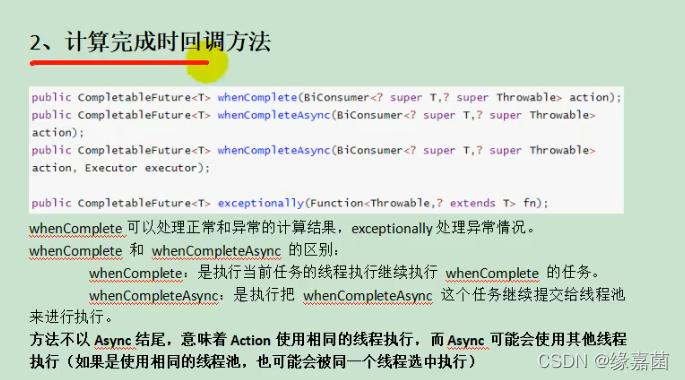
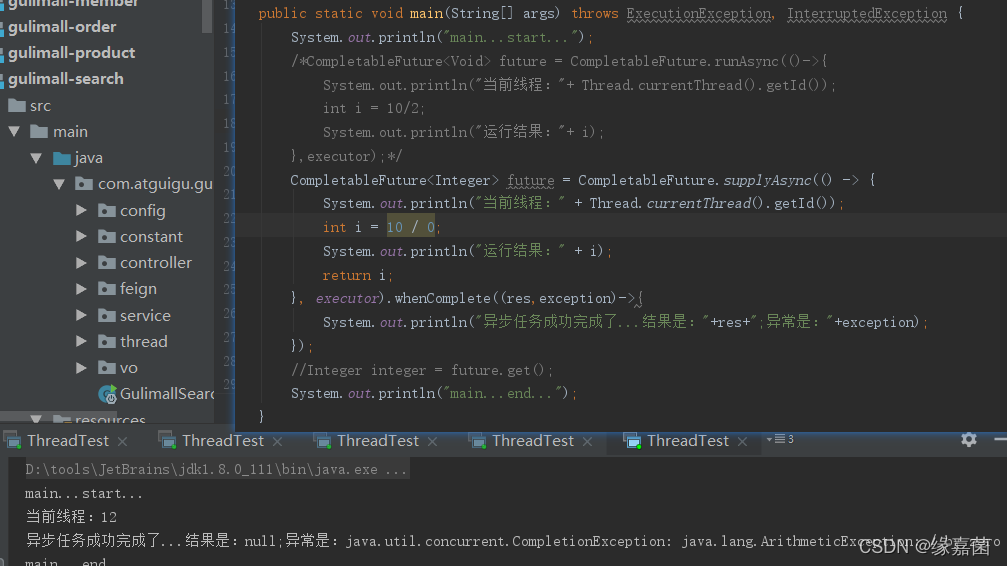
2. 计算完成时回调方法
whenComplete 不用开启新线程
whenCompleteAsyn 需要开启新线程
exceptionally 可以用来进行异常处理


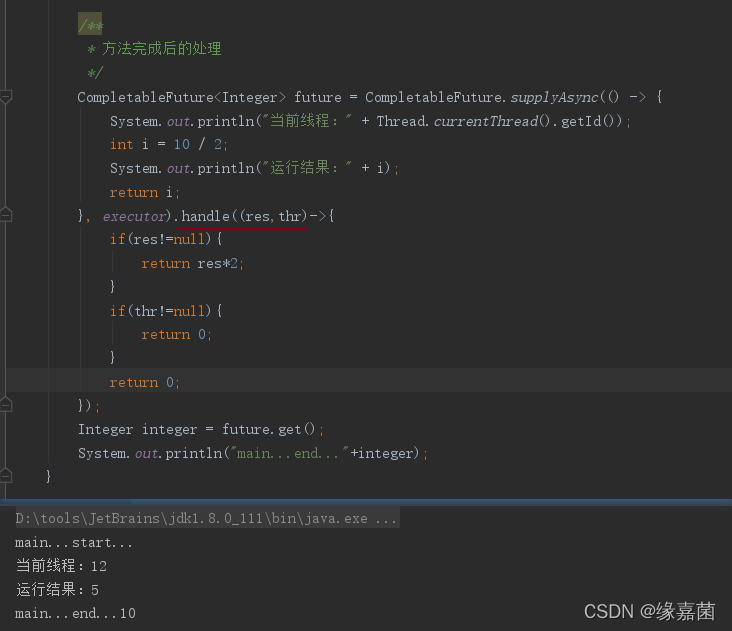
3. handle
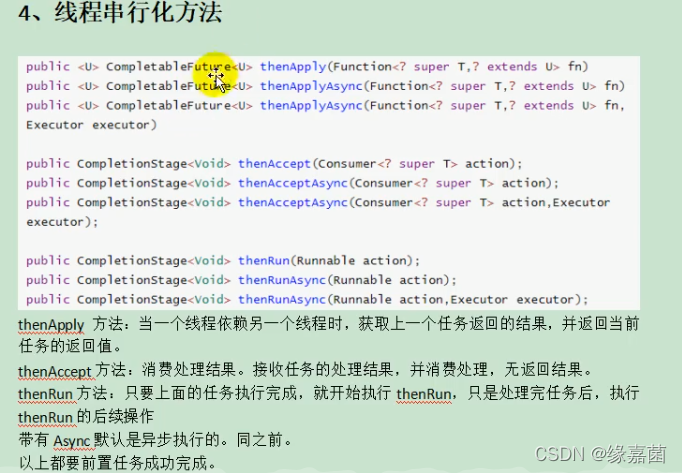
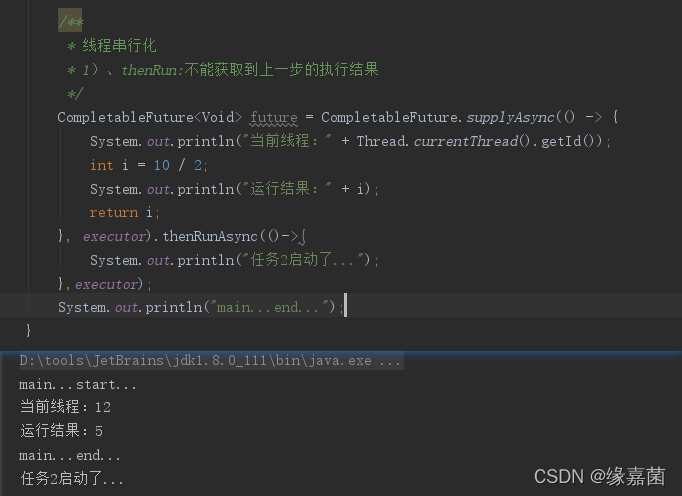
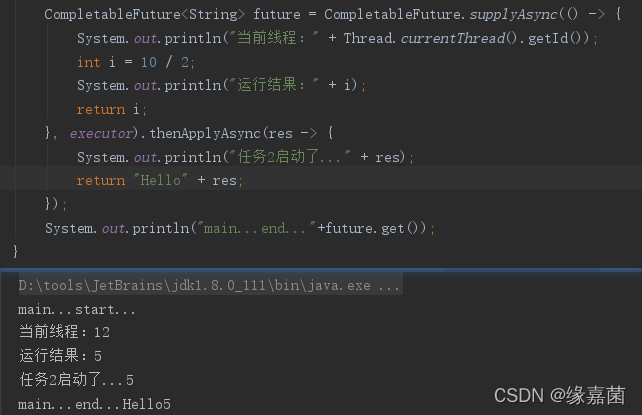
4. 线程串行化
thenRunAsync
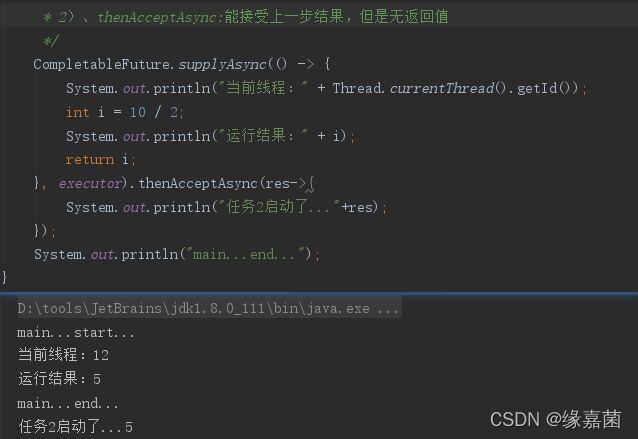
thenAcceptAsync
thenApplyAsync
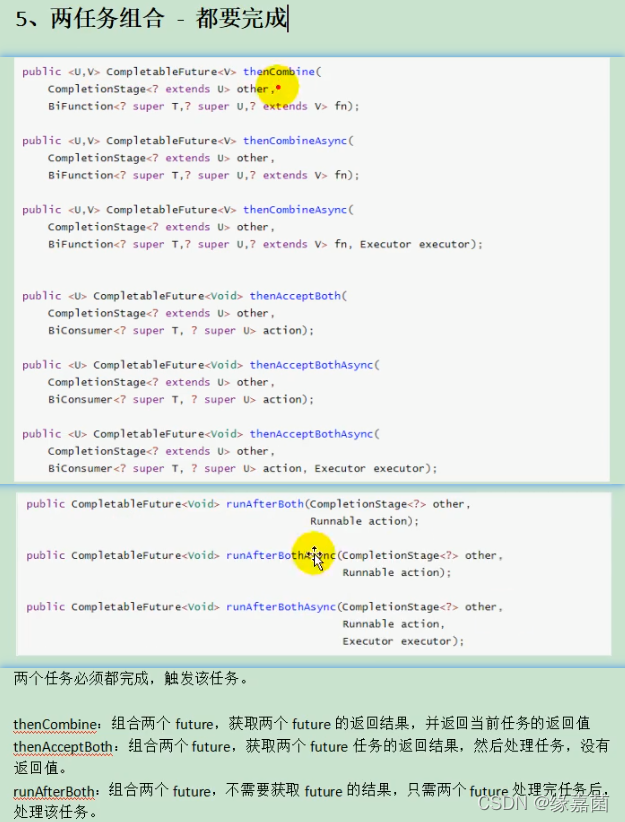
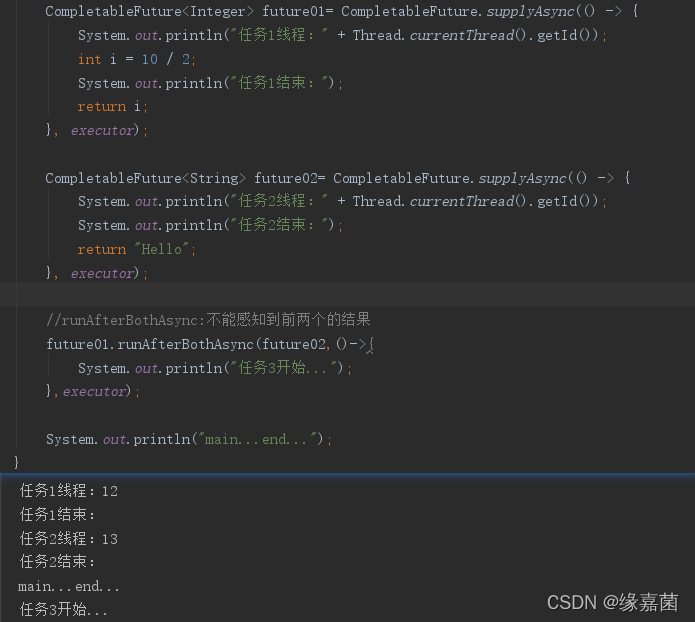
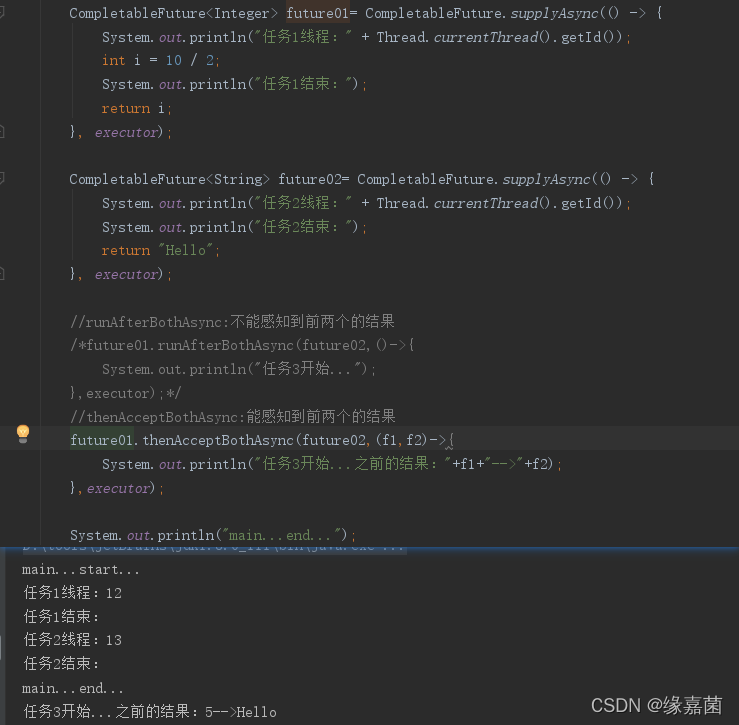
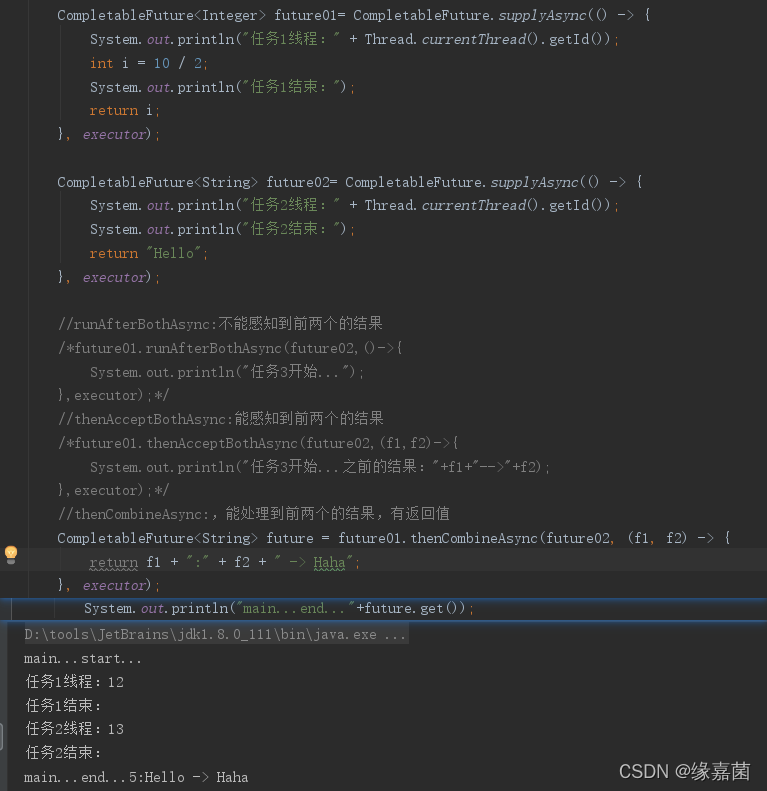
5. 两任务组合 - 都要完成
runAfterBothAsync:不能感知到前两个的结果
thenAcceptBothAsync:能感知到前两个的结果
thenCombineAsync:能处理到前两个的结果,有返回值
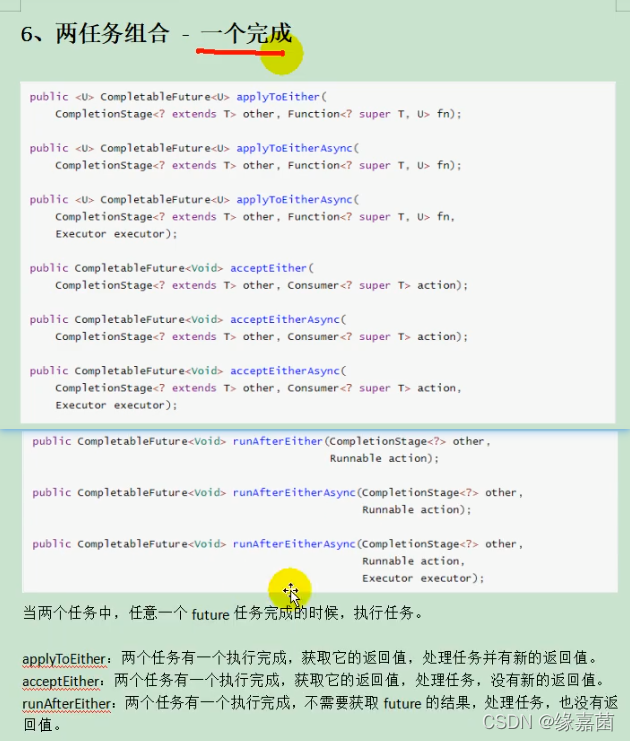
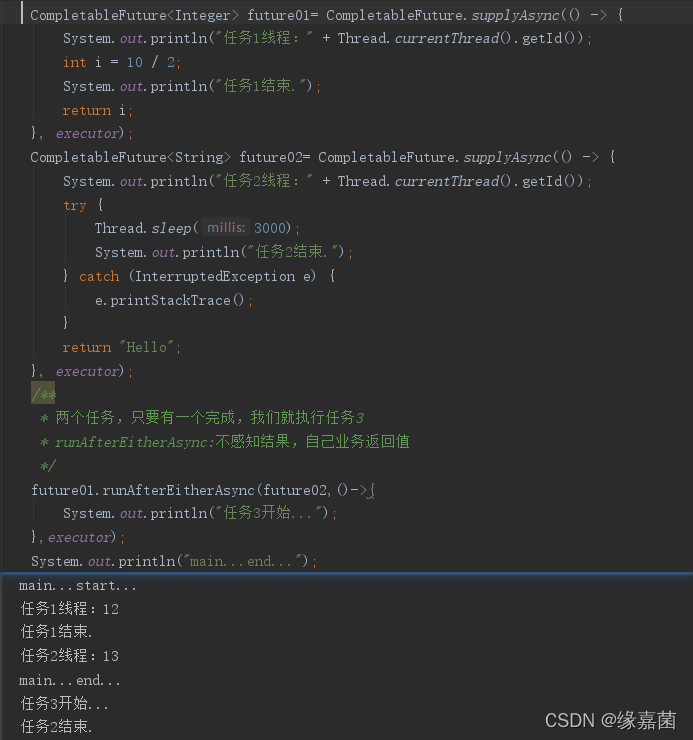
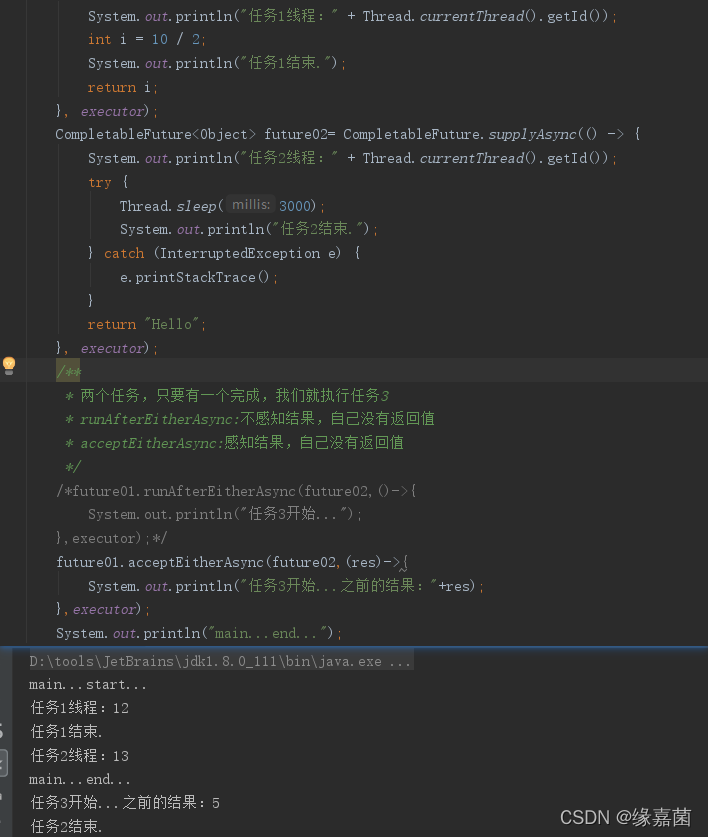
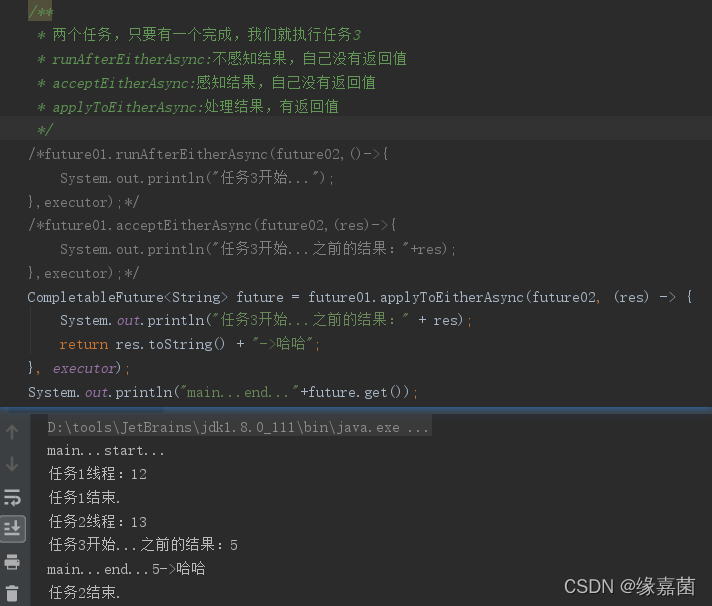
6. 两任务组合 - 一个完成
runAfterEitherAsync:不感知结果,自己没有返回值
acceptEitherAsync:感知结果,自己没有返回值
applyToEitherAsync:处理结果,有返回值

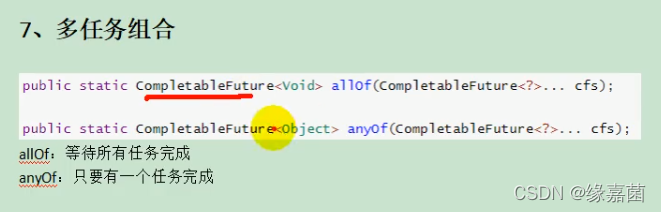
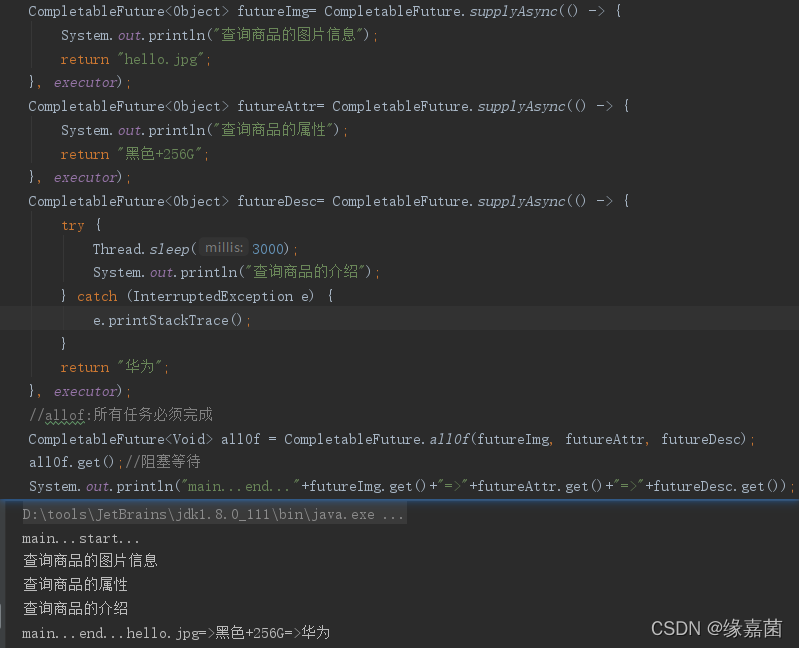
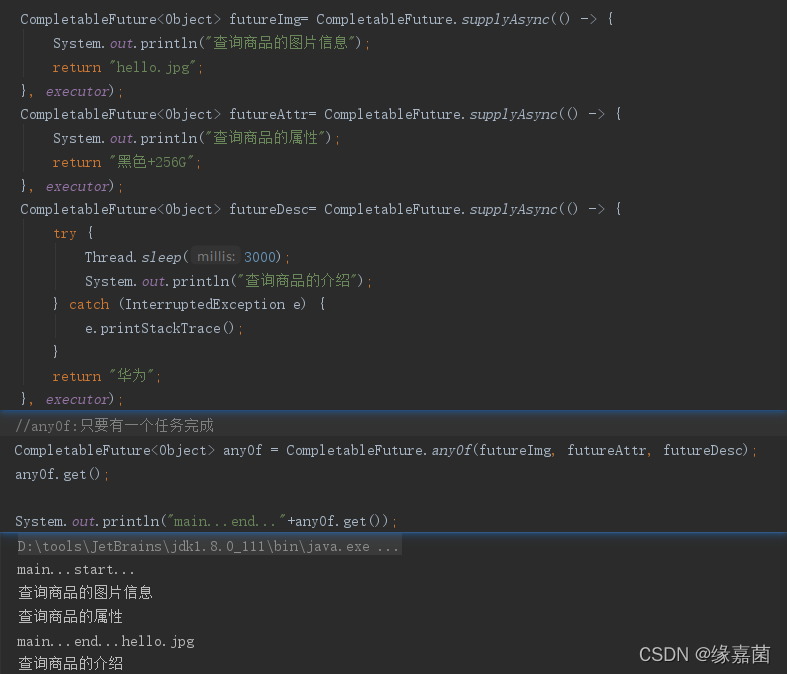
7. 多任务组合
allof:所有任务必须完成
anyOf:只要有一个任务完成
8. 业务场景
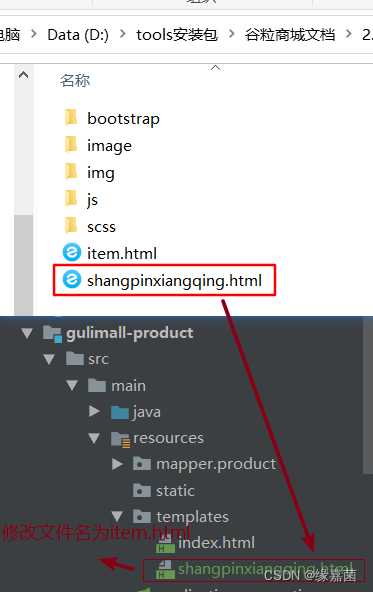
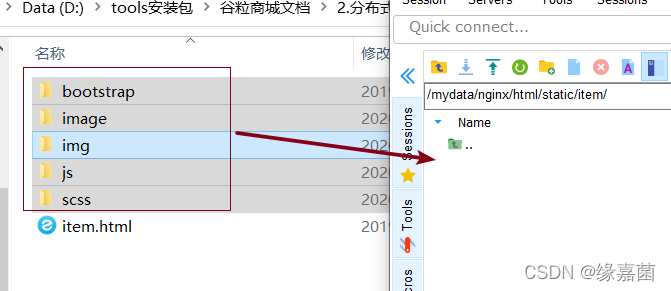
七. 商品详情
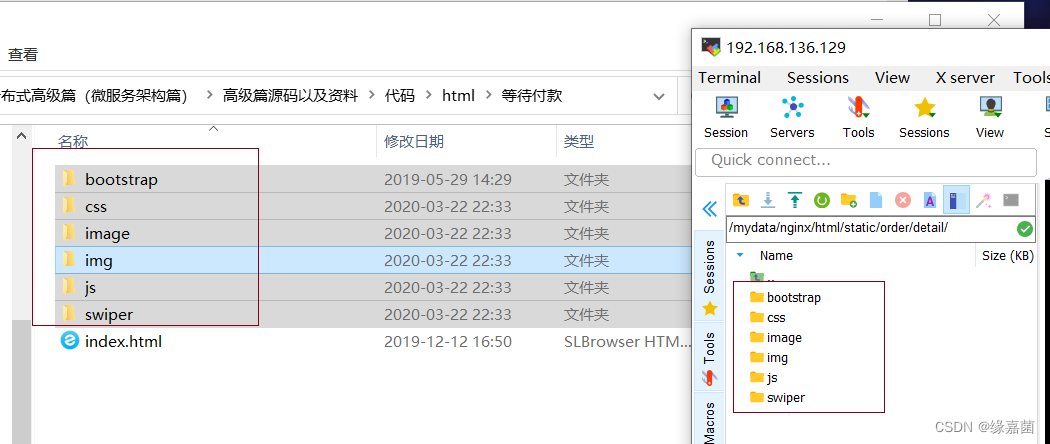
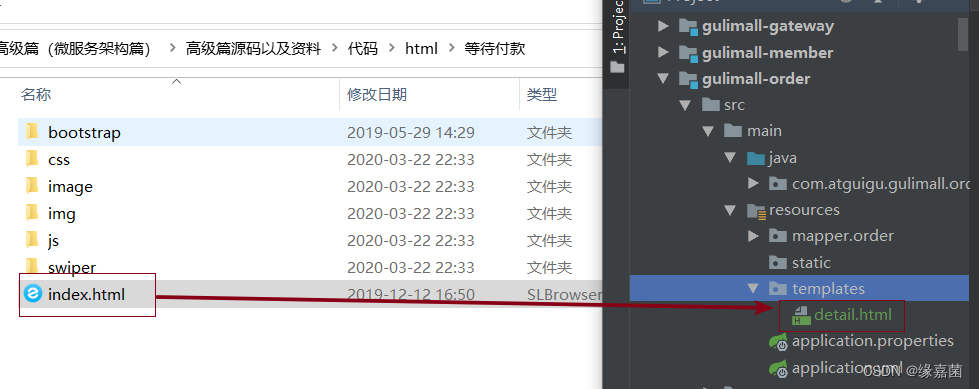
1. 环境搭建
静态资源放在nginx上
2.使用异步编排
2.1 MyThreadConfig
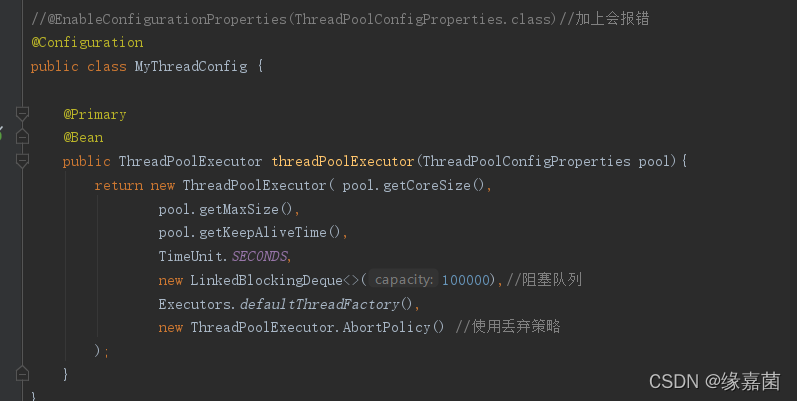
2.2 ThreadPoolConfigProperties
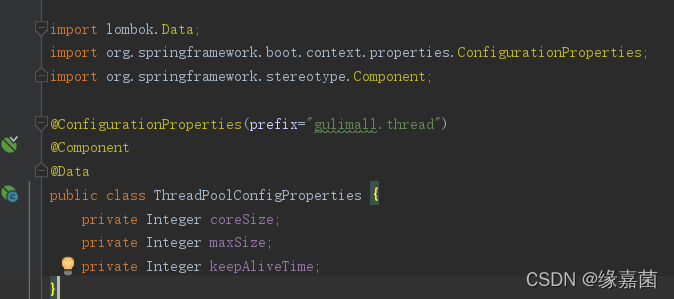
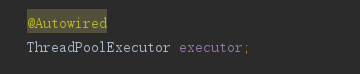
2.3 使用
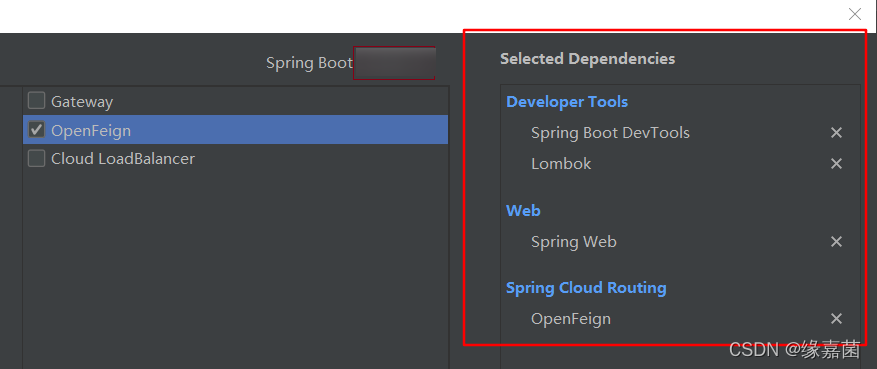
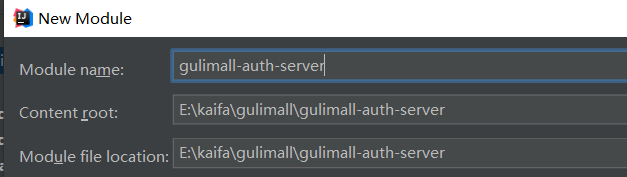
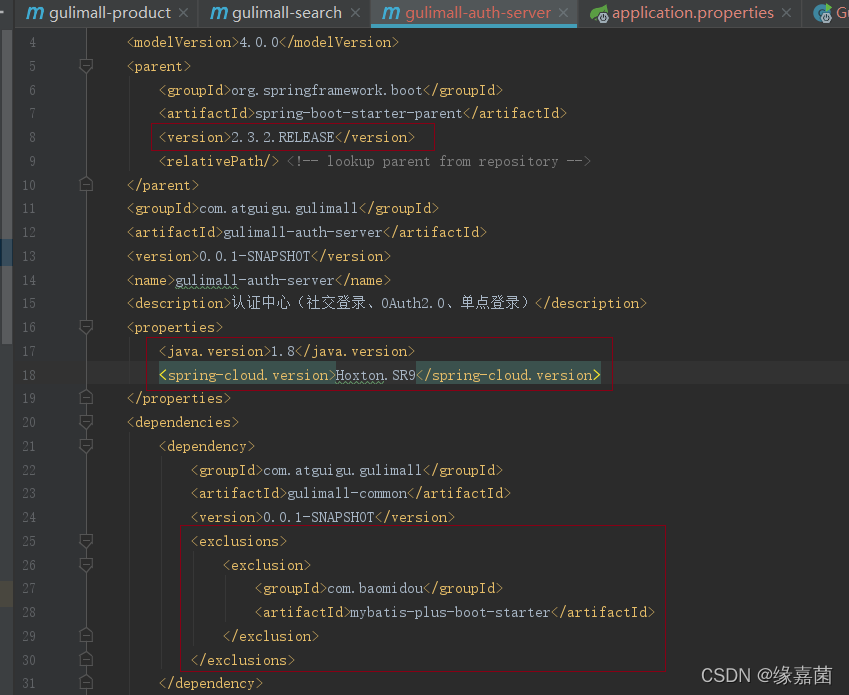
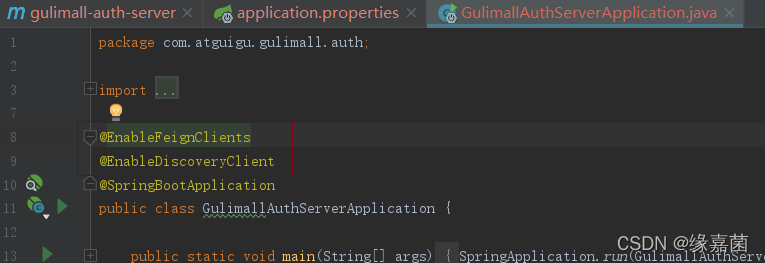
八.认证服务
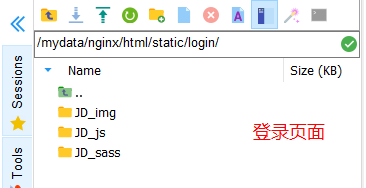
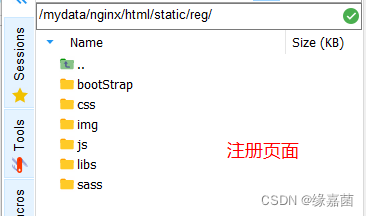
1. 环境搭建
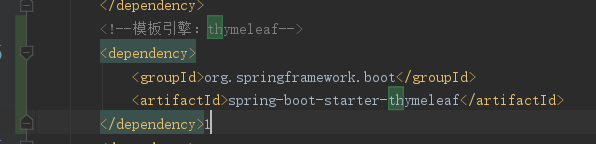
还有thymeleaf也得加上,这里忘记加了
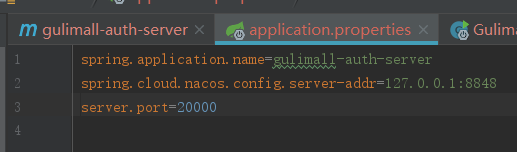
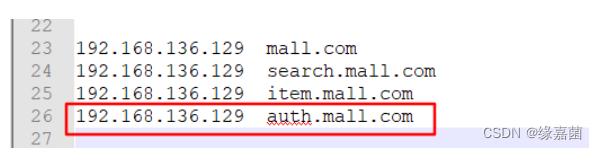
2.配置域名映射
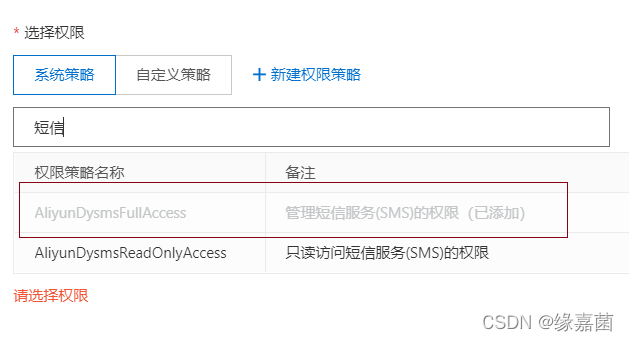
九.短信服务
参考:https://blog.csdn.net/qq_44035485/article/details/121174570
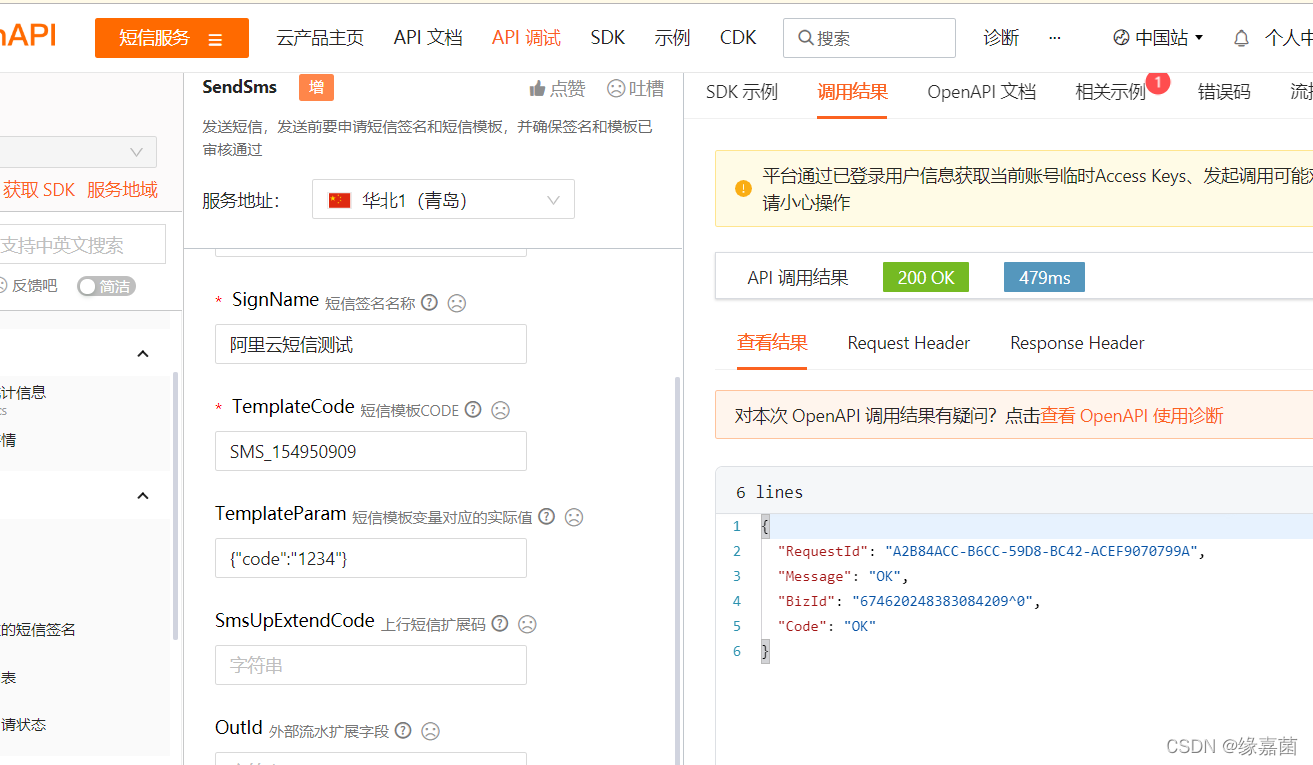
 <!--短信-->
 <dependency>
     <groupId>com.aliyun</groupId>
     <artifactId>tea-openapi</artifactId>
     <version>0.0.19</version>
 </dependency>
 <dependency>
     <groupId>com.aliyun</groupId>
     <artifactId>dysmsapi20170525</artifactId>
     <version>2.0.6</version>
 </dependency>

 <!--整合redis-->
 <dependency>
     <groupId>org.springframework.boot</groupId>
     <artifactId>spring-boot-starter-data-redis</artifactId>
     <version>2.2.4.RELEASE</version>
     <exclusions>
         <exclusion>
             <groupId>io.lettuce</groupId>
             <artifactId>lettuce-core</artifactId>
         </exclusion>
     </exclusions>
 </dependency>
 <dependency>
     <groupId>redis.clients</groupId>
     <artifactId>jedis</artifactId>
     <version>3.1.0</version>
 </dependency>
十.密码加密

1.MD5
String s = DigestUtils.md5Hex(“123456”);
不可逆(使用彩虹表可以破解),MD5不能直接进行密码的加密存储
2.盐值(知道盐也能破解)
String s = Md5Crypt.md5Crypt(“123456”.getBytes(), “abc”);
3.BCrypt
盐值使用特别方式
BCryptPasswordEncoder passwordEncoder = new BCryptPasswordEncoder();
String encode = passwordEncoder.encode("123456");
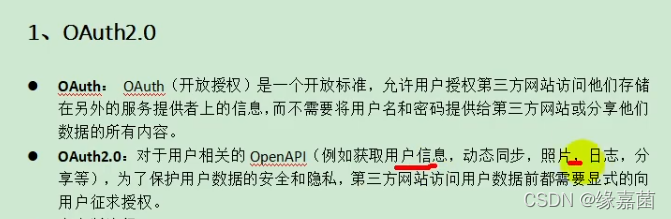
十一.OAuth2.0
1.简介
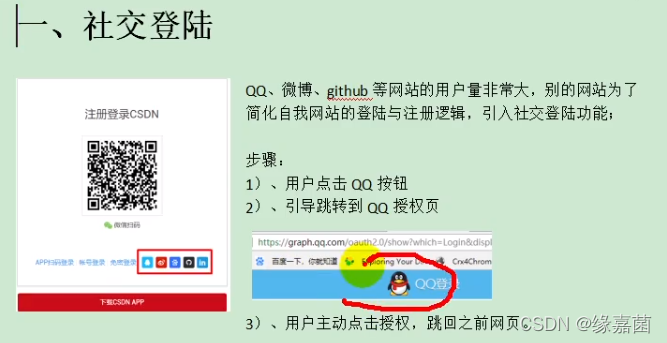
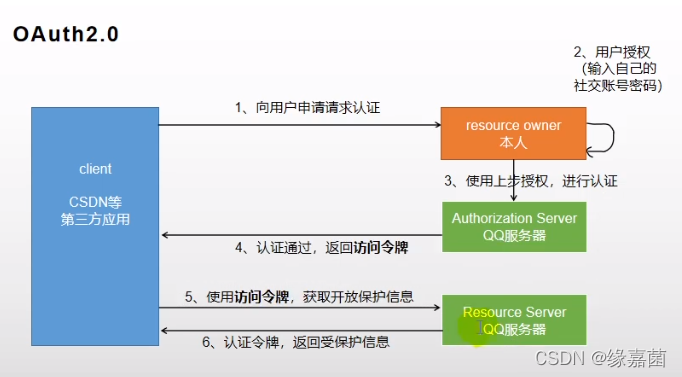
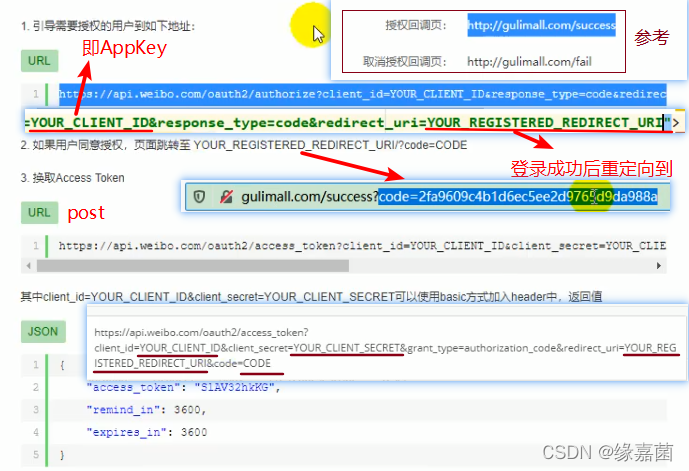
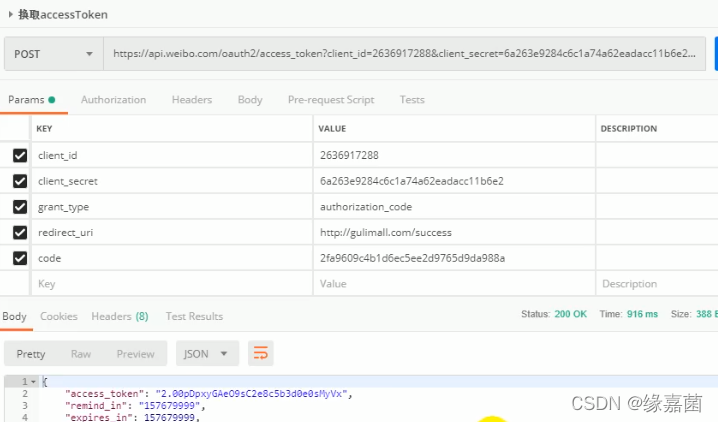
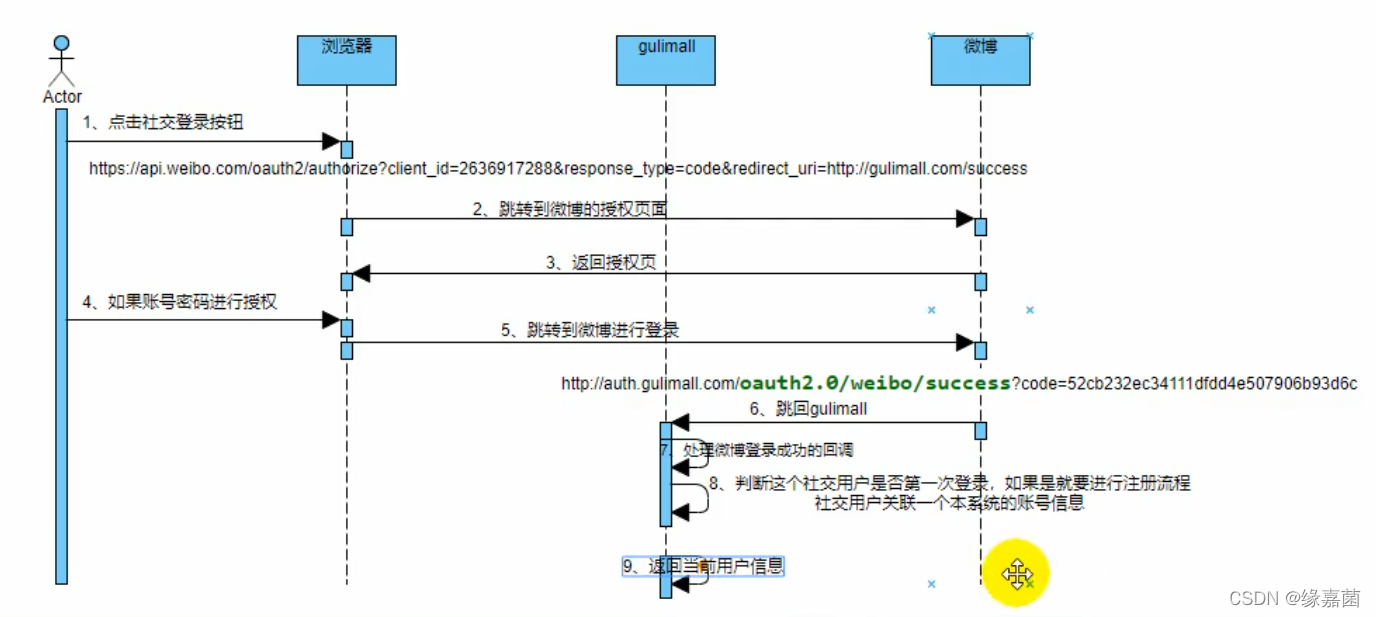
2.流程(微博)
注:
1.使用code(有效期内可换取)换取AccessToken,Code只能使用一次
2.同一个用户的accessToken一段时间是不会变化的,即使多次获取。
3.ums_member表添加字段

4.session
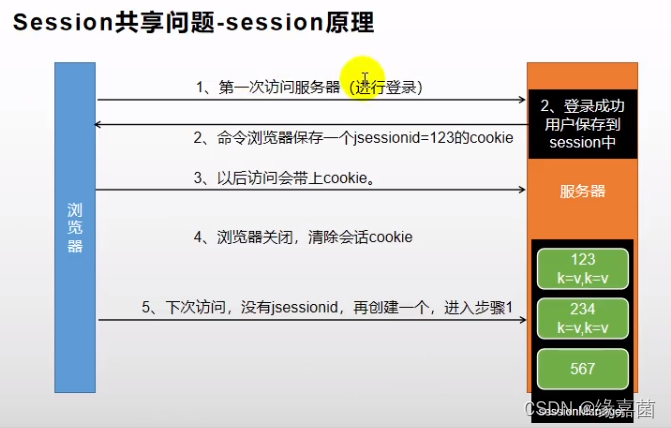
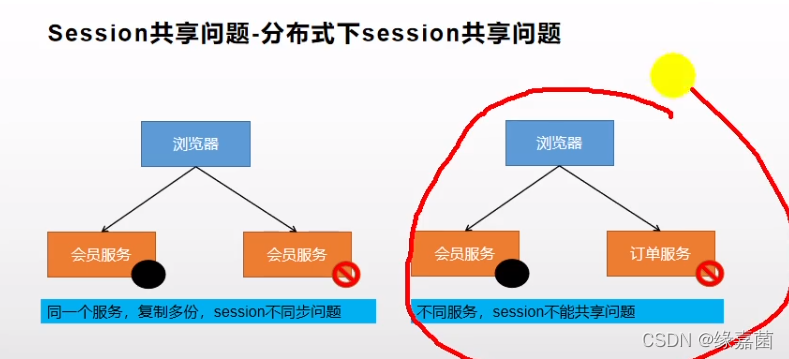
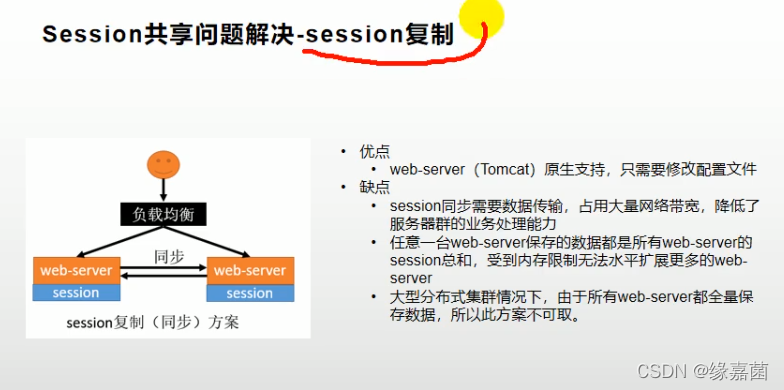
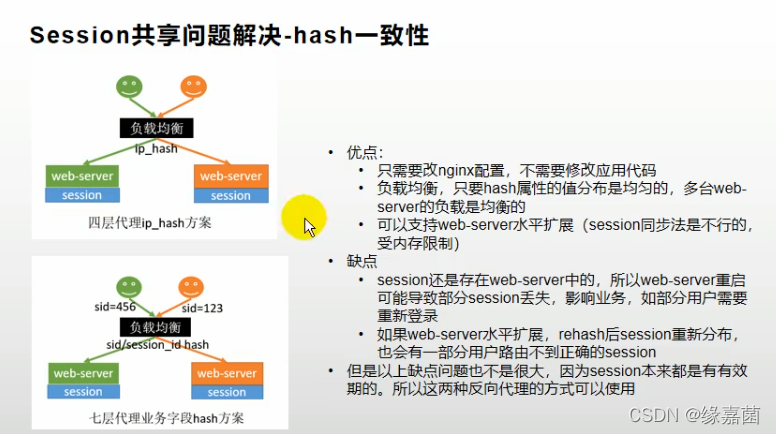
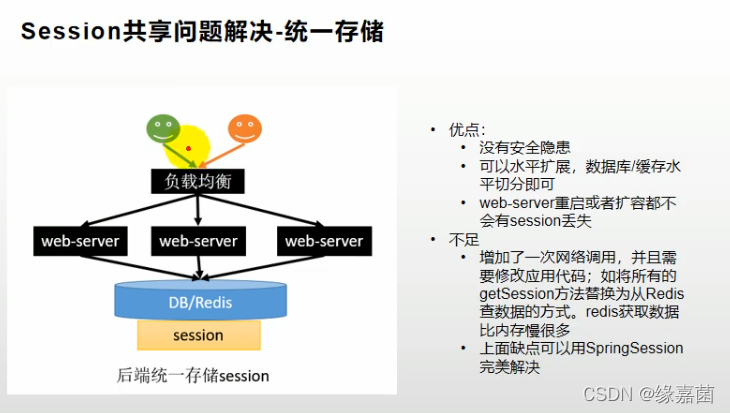
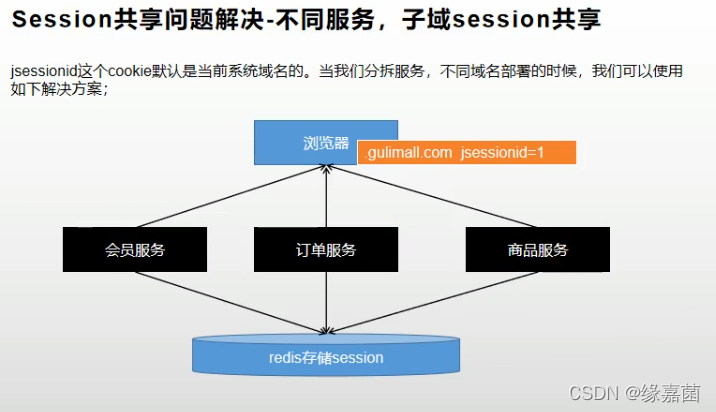
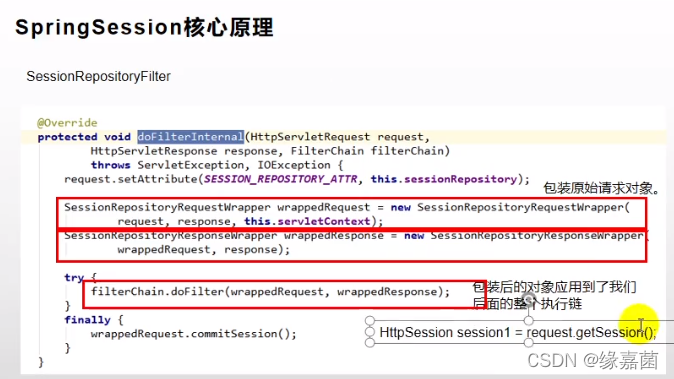
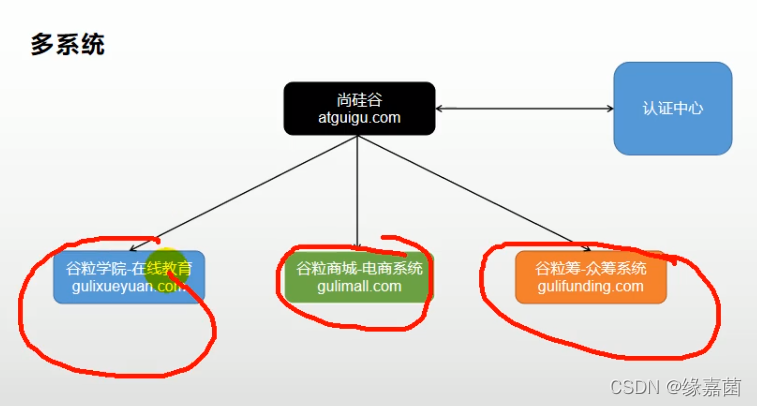
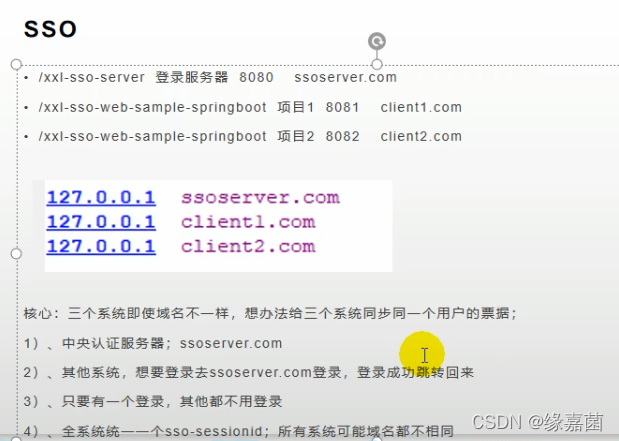
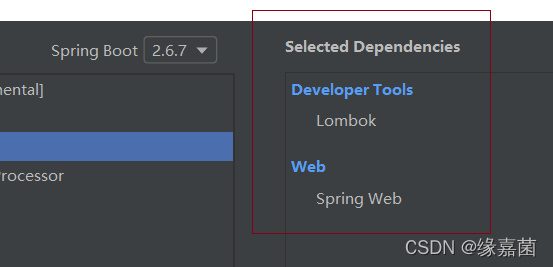
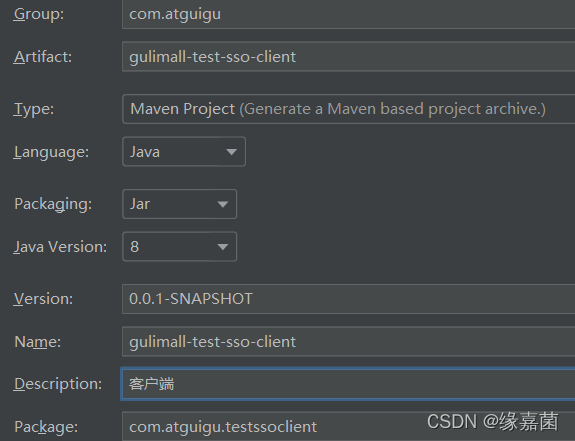
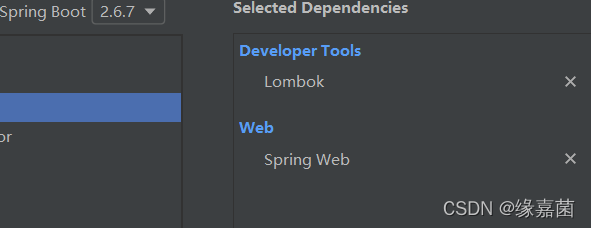
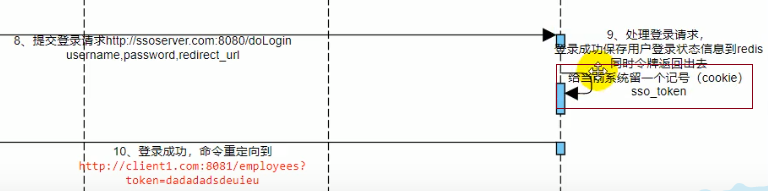
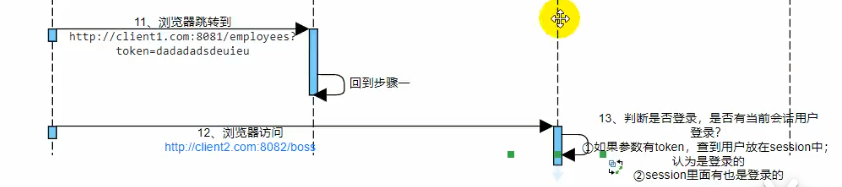
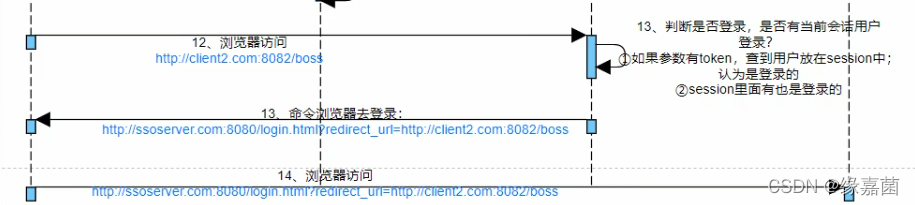
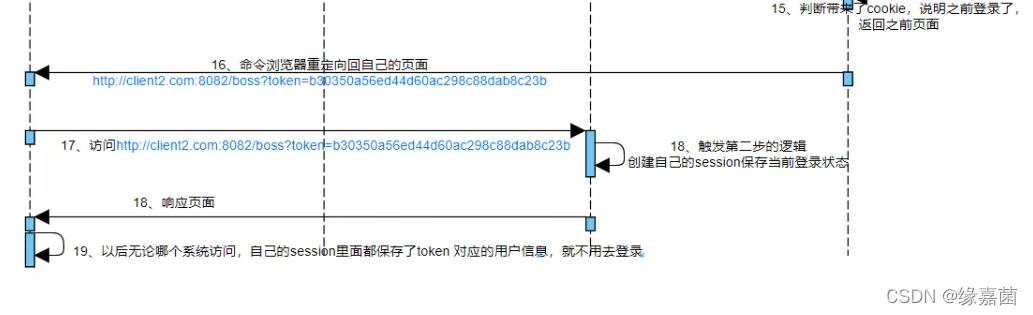
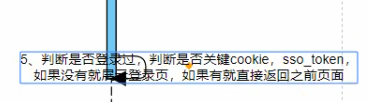
5.单点登录
spring session共享不能解决以下问题
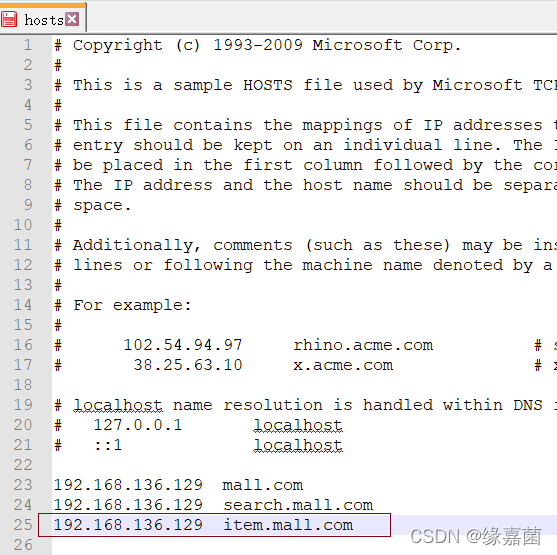
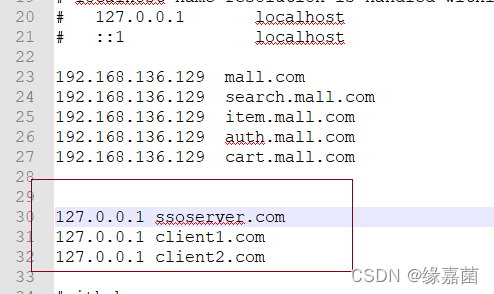
配置hosts文件
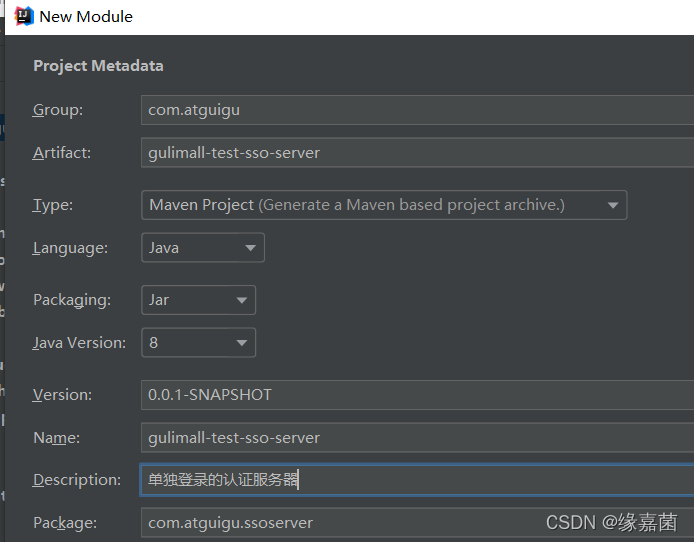
认证服务
客户端服务
流程
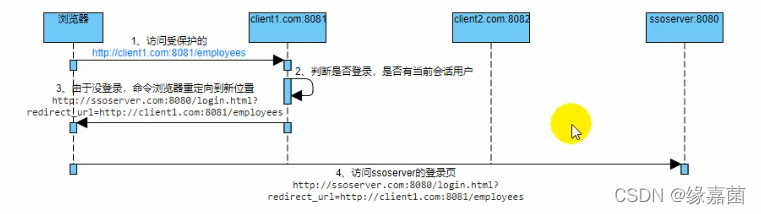
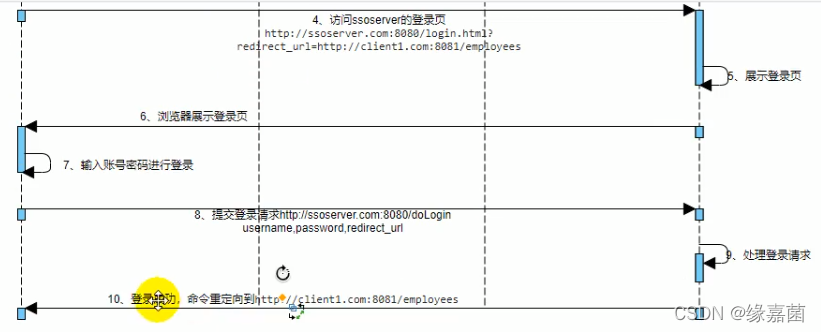
问题client1.com可以登录了但
client2.com:8081//employees还是不能登录
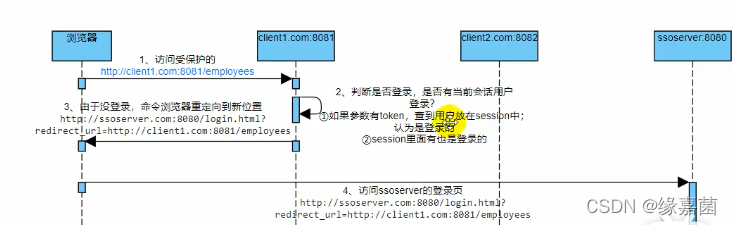
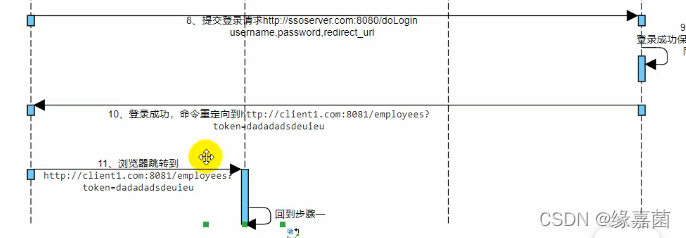
复制一份client服务作为client2,修改端口为8082


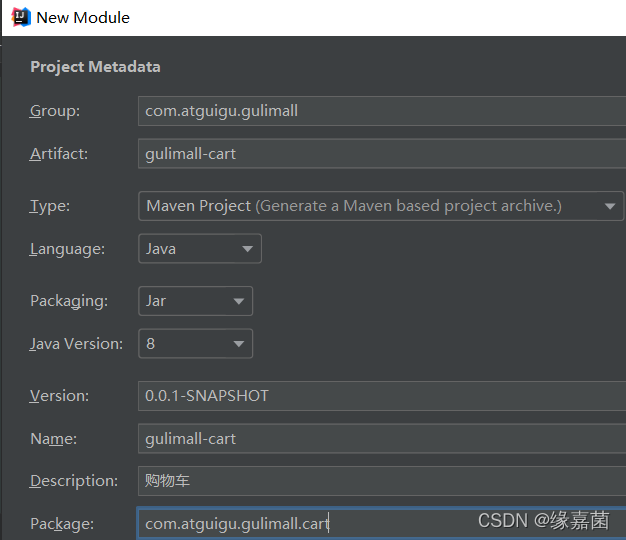
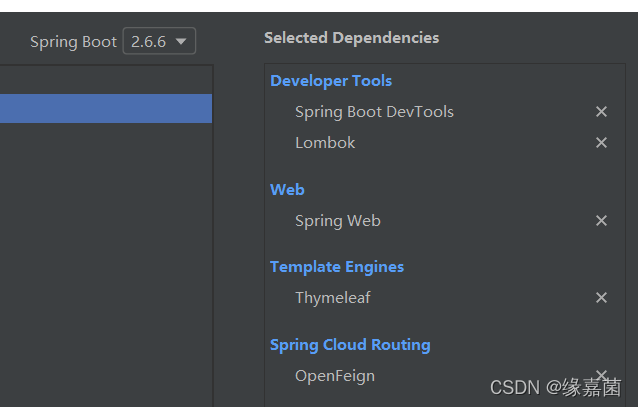
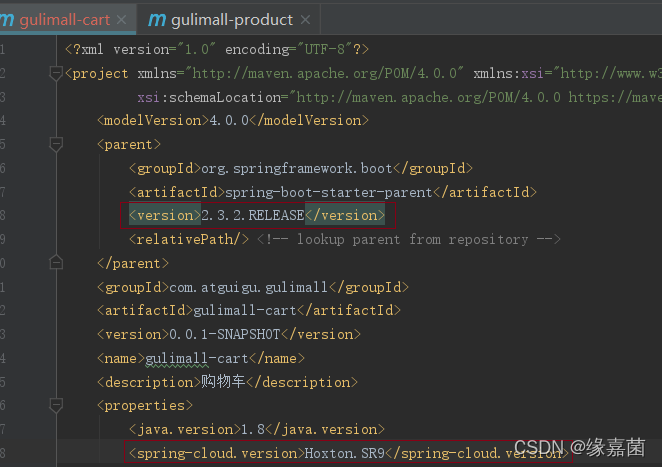
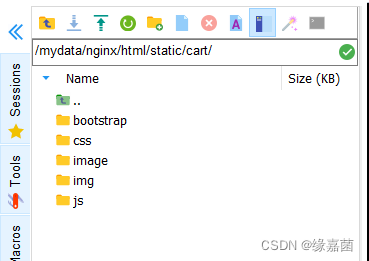
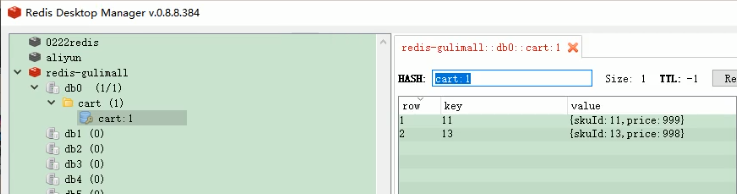
十二.购物车
1.环境搭建
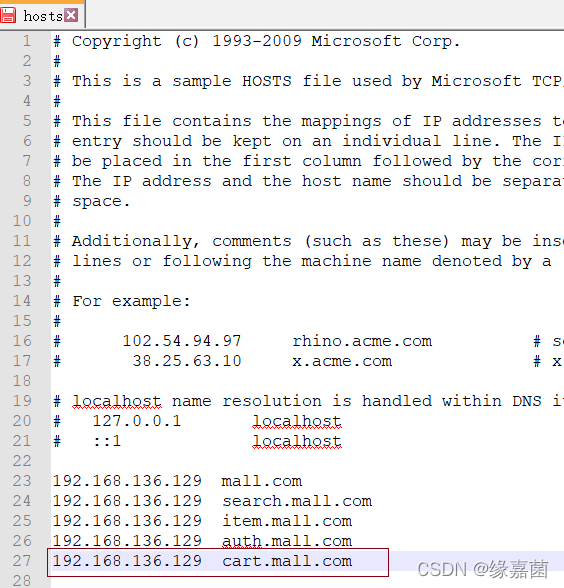
2.静态资源动静分离
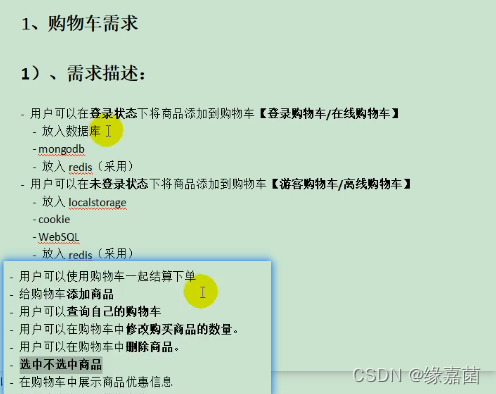
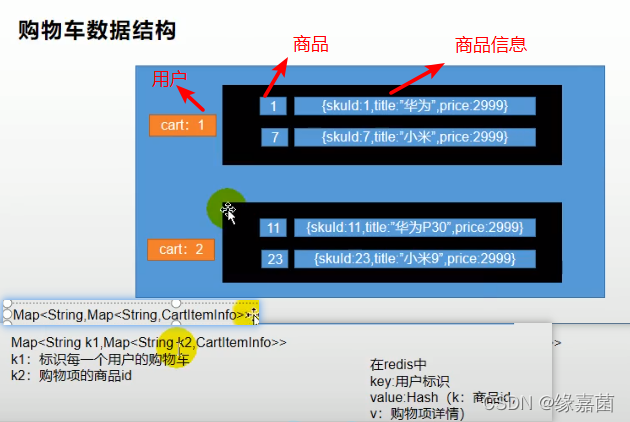
3.购物车需求
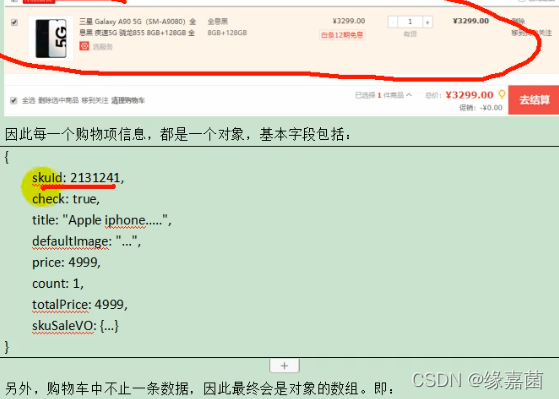
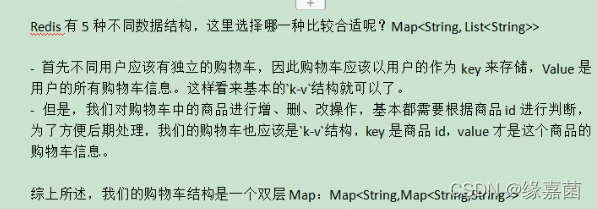
4.从需求分析出模型
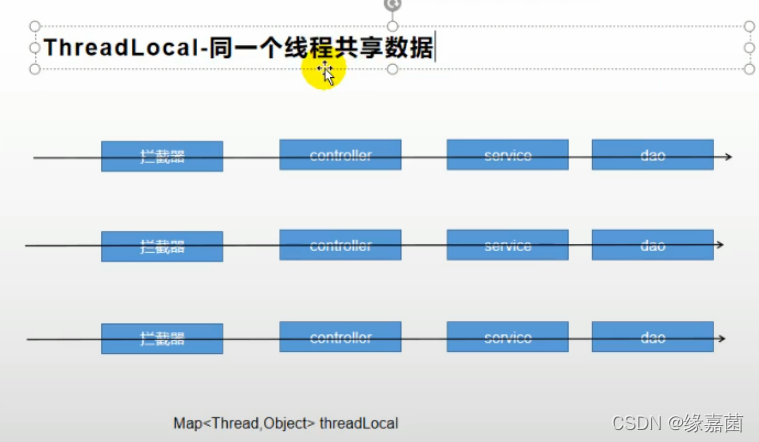
5.ThreadLocal
十三.RabbitMQ
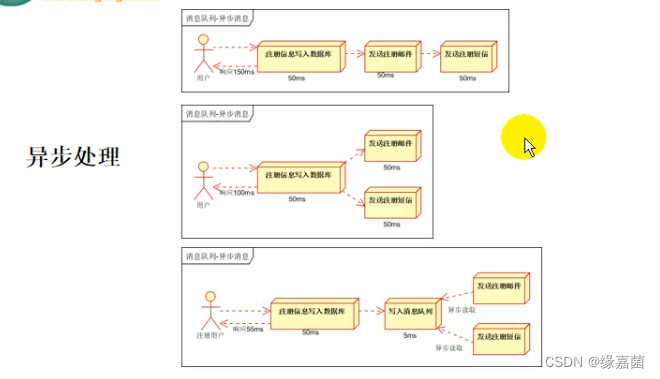
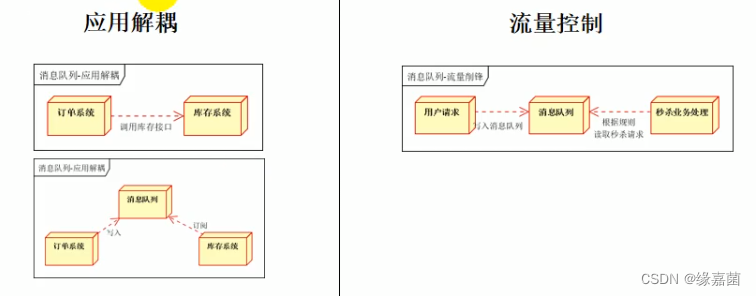
1.Message Queue消息队列简介
使用场景
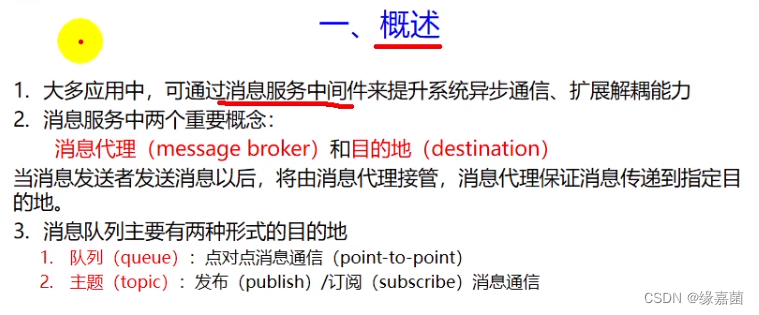
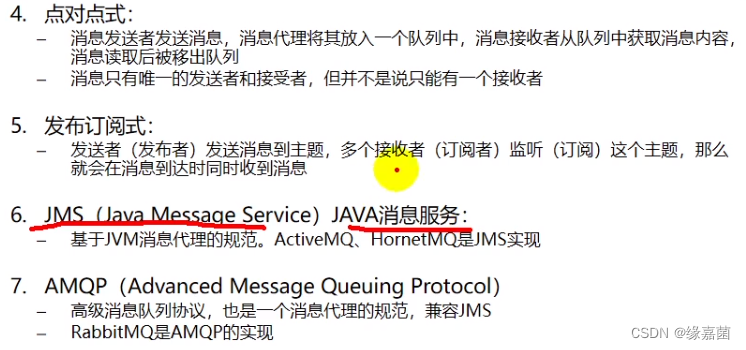
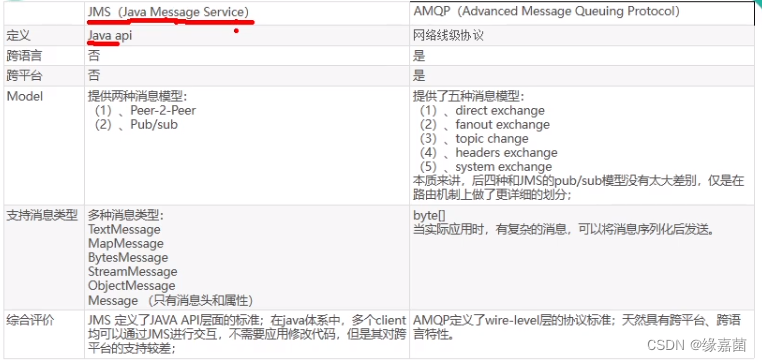
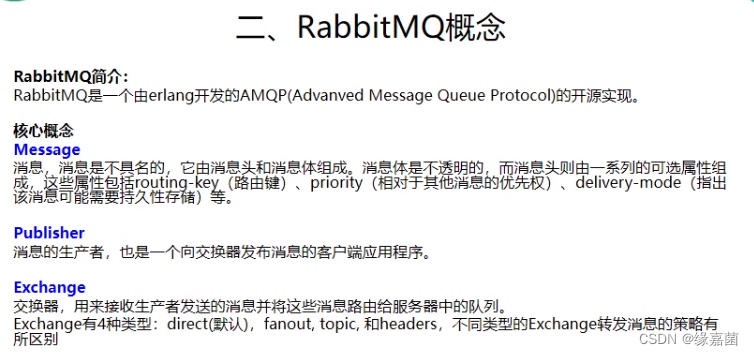
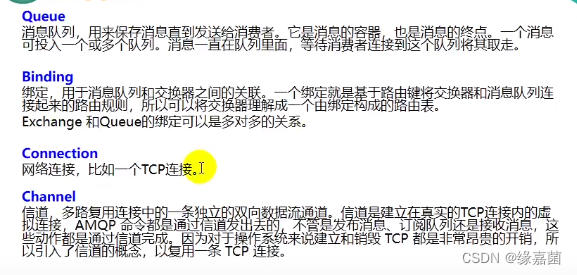
2.消息中间件常用概念
3.RabbitMQ简介

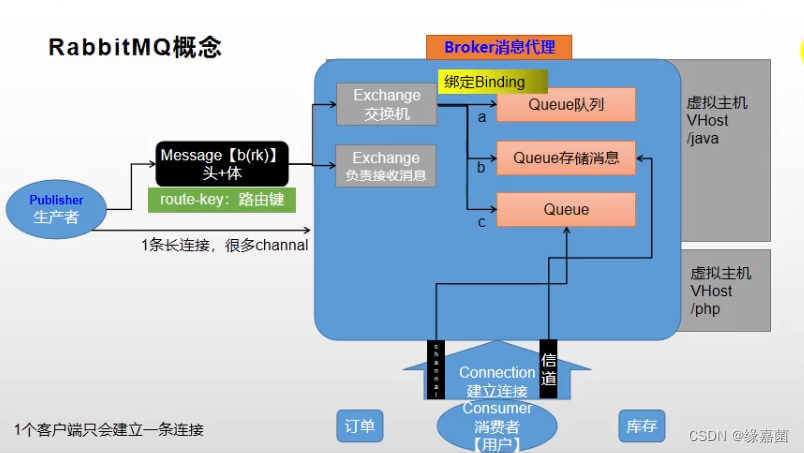
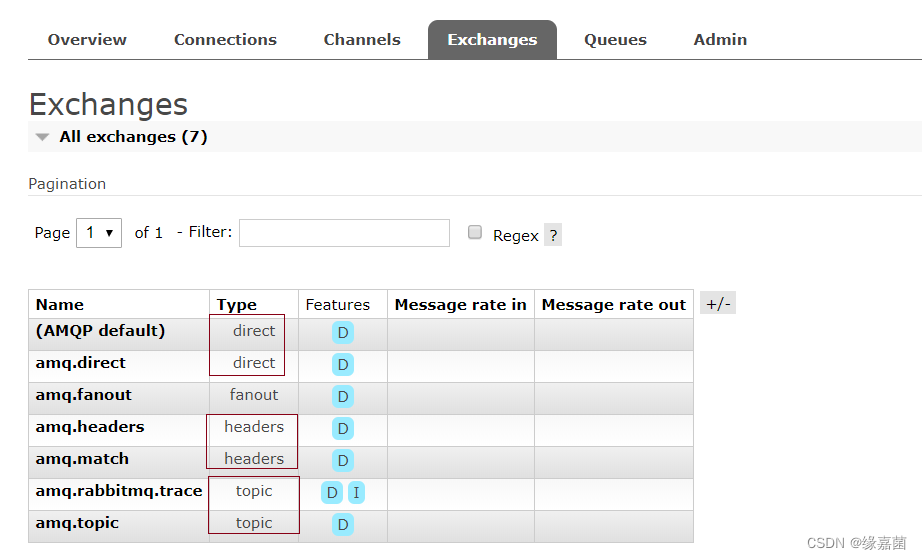
4.RabbitMQ运行机制
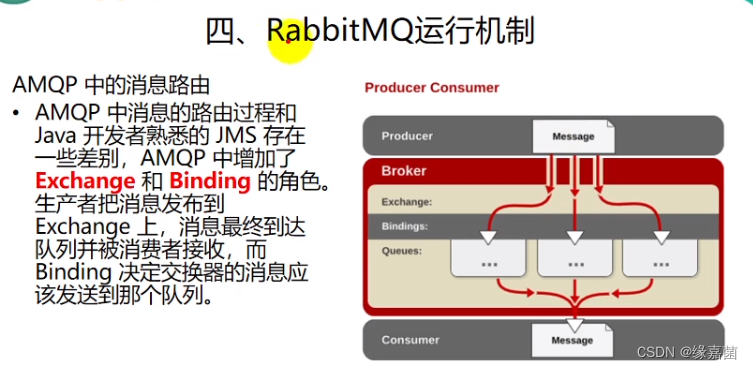
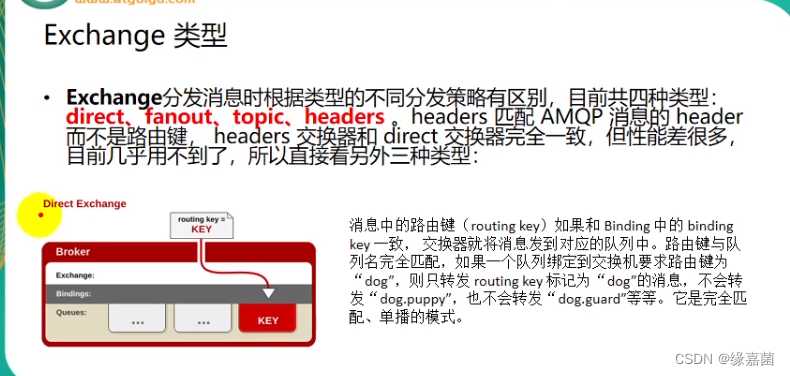
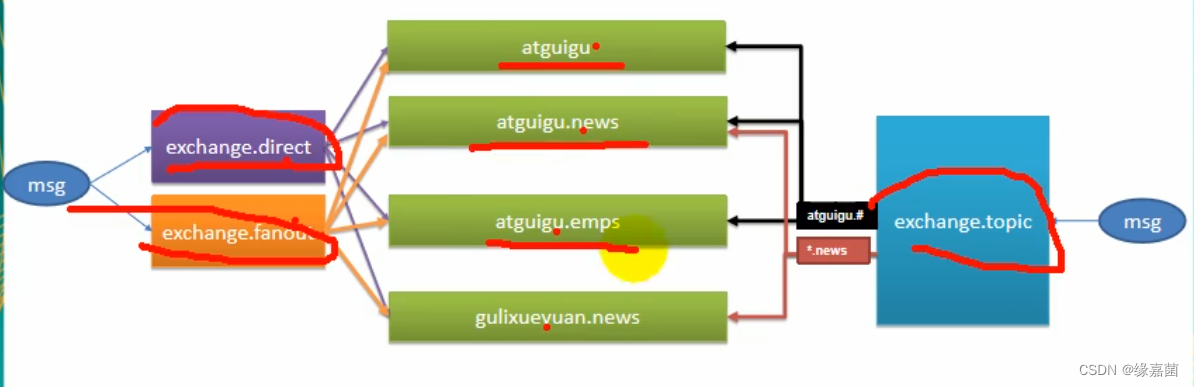
4.1 Exchange类型
direct、fanout、topic
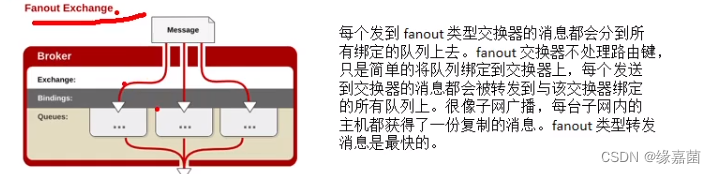
fanout:广播类型
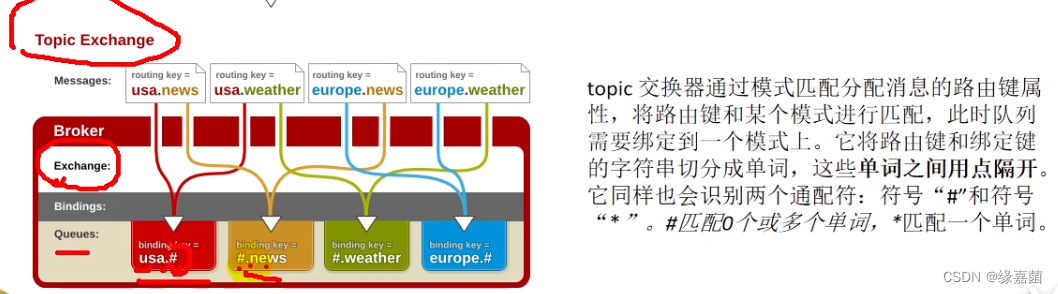
topic:主题类型(重点)
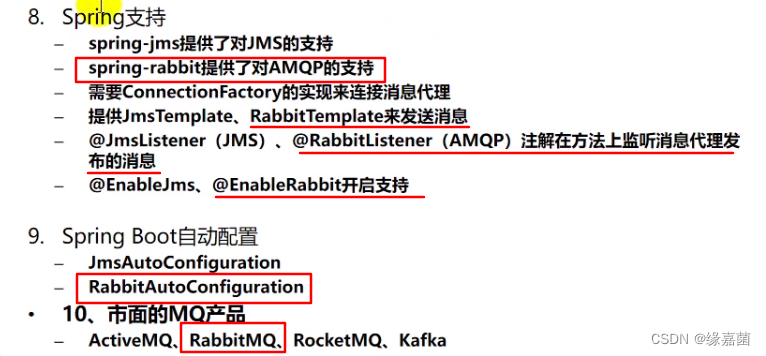
5.Springboot整合RabbitMQ
5.1 引入spring-boot-starter-amqp
<dependency>
    <groupId>org.springframework.boot</groupId>
    <artifactId>spring-boot-starter-amqp</artifactId>
</dependency>
5.2 application.yml配置
spring.rabbitmq.host=192.168.136.129
spring.rabbitmq.port=5672
spring.rabbitmq.virtual-host=/
5.3 测试RabbitMQ
5.3.1 AmqpAdmin-管理组件
    @Autowired
    AmqpAdmin amqpAdmin;

    /**
     * 1、如何创建Exchange[hello.java.exchange]、Queue、Binding
     *      1)、使用AmqpAdmin进行创建
     */
    @Test
    void createExchange() {
        //DirectExchange(String name, boolean durable, boolean autoDelete, Map<String, Object> arguments)
        //durable:是否持久化
        DirectExchange directExchange = new DirectExchange("hello-java-exchange",true,false);
        amqpAdmin.declareExchange(directExchange);
        log.info("exchange:[{}]创建成功","hello-java-exchange");
    }

    @Test
    void createQueue() {
        //exclusive:是否排他的,false:允许同时有多个连接到此queue
        Queue queue = new Queue("hello-java-queue",true,false,false);
        amqpAdmin.declareQueue(queue);
        log.info("queue:[{}]创建成功","hello-java-queue");
    }

    @Test
    void createBinding(){
        // String destination【目的地】,
        // DestinationType destinationType 【目的地类型】
        // String exchange【交换机】,
        // String routingKey【路由键】,
        // Map<String, Object> arguments【自定义参数】
        // 将exchange指定的交换机和destination目的地进行绑定,使用routingKey作为指定的路由键
        Binding binding = new Binding("hello-java-queue", Binding.DestinationType.QUEUE,
                "hello-java-exchange",
                "hello.java",null);
        amqpAdmin.declareBinding(binding);
        log.info("binding:[{}]创建成功","hello-java-binding");
    }
5.3.2 RabbitTemplate-消息发送处理组件
    @Test
    void sendMessageTests() {

        //1、发送消息,如果发送的消息是个对象,我们会使用序列化机制,将对象写出去。对象必须实现Serializable
        String msg = "Hello World";
        OrderReturnReasonEntity entity = new OrderReturnReasonEntity();
        entity.setId(1L);
        entity.setCreateTime(new Date());

        //2、发送的对象类型的消息,可以是一个json
        for (int i = 0;i<10;i++) {
            if(i%2==0) {
                entity.setName("Vc" + i);
                rabbitTemplate.convertAndSend("hello-java-exchange", "hello.java", entity);
            }else {
                OrderEntity orderEntity = new OrderEntity();
                orderEntity.setOrderSn(UUID.randomUUID().toString());
                rabbitTemplate.convertAndSend("hello-java-exchange","hello.java",orderEntity);
            }
            log.info("消息发送完成{}" + entity);
        }
    }
5.3.3 RabbitListener&RabbitHandle接收消息
@RabbitListener(queues = {"hello-java-queue"})
@Service("orderItemService")
public class OrderItemServiceImpl extends ServiceImpl<OrderItemDao, OrderItemEntity> implements OrderItemService
    /**
     * queue:声明需要监听的所有队列
     *
     * org.springframework.amqp.core.Message
     *
     * 参考可以写一下类型
     * 1、Message message:原生消息详细信息。头+体
     * 2、T<发送的消息的类型> OrderReturnReasonEntity content
     * 3、Channel channel: 当前传输数据的通道
     *
     * Queue: 可以很多人都来监听。只要收到消息,队列删除消息,而且只能有一个收到此消息
     * 场景:
     *      1)、订单服务启动多个;同一个消息,只能有一个客户端收到
     *      2)、只有一个消息完全处理完,方法运行结束,我们就可以接收到下一个消息
     * @param message
     */
    //RabbitListener(queues = {"hello-java-queue"})
    @RabbitHandler
    public void recieveMessage(Message message,
                               OrderReturnReasonEntity content,
                               Channel channel) throws InterruptedException {
        //{"id":1,"name":"哈哈","sort":null,"status":null,"createTime":1652100907404}
        System.out.println("接收到消息..."+content);
        byte[] body = message.getBody();
        //消息头属性信息
        MessageProperties properties = message.getMessageProperties();
        Thread.sleep(3000);
        System.out.println("消息处理完成=》"+content.getName());
    }

    @RabbitHandler
    public void recieveMessage2(OrderEntity content) {
        //{"id":1,"name":"哈哈","sort":null,"status":null,"createTime":1652100907404}
        System.out.println("接收到消息..."+content);
    }

}
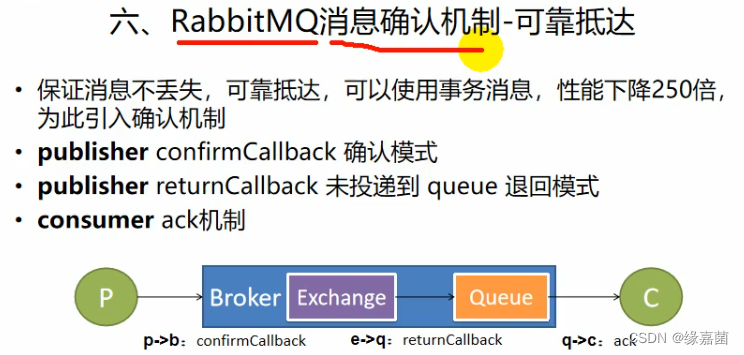
5.4 RibbitMQ消息确认机制-可靠抵达(发送端确认)
注:springboot.rabbitmq.publisher-confirm 已被弃用.
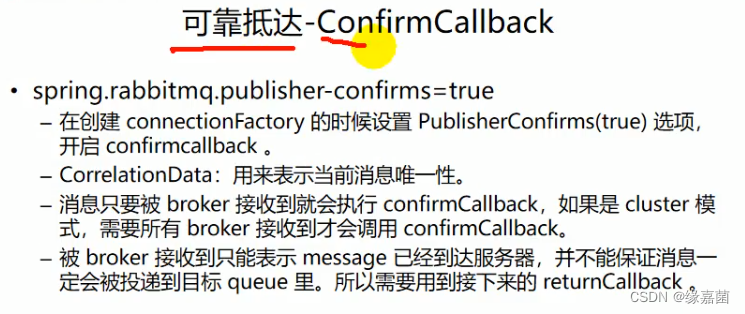
#新版使用
#开启发送端确认
spring.rabbitmq.publisher-confirm-type=correlated
参考https://blog.csdn.net/z69183787/article/details/109371628
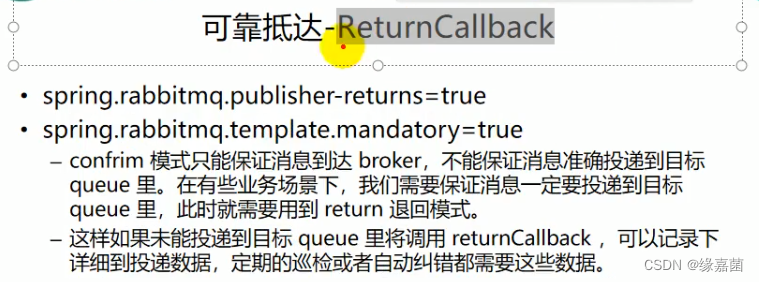
#开启发送端消息抵达队列的确认
spring.rabbitmq.publisher-returns=true
#只要抵达队列,以异步发送优先回调我们这个return
spring.rabbitmq.template.mandatory=true
5.5 RibbitMQ消息确认机制-可靠抵达(消费端确认)
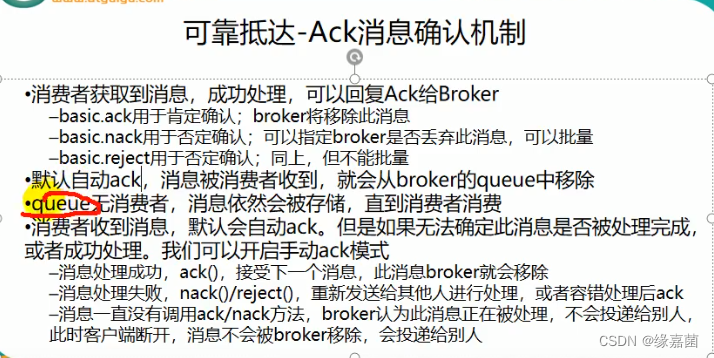
#手动ack消息
spring.rabbitmq.listener.simple.acknowledge-mode=manual
    @RabbitHandler
    public void recieveMessage(Message message,
                               OrderReturnReasonEntity content,
                               Channel channel) throws InterruptedException {
        //{"id":1,"name":"哈哈","sort":null,"status":null,"createTime":1652100907404}
        System.out.println("接收到消息..."+content);
        byte[] body = message.getBody();
        //消息头属性信息
        MessageProperties properties = message.getMessageProperties();
        Thread.sleep(3000);
        System.out.println("消息处理完成=》"+content.getName());
        //Channel内按顺序自增
        long deliveryTag = message.getMessageProperties().getDeliveryTag();

        //签收货物,非批量模式
        try {

            if(deliveryTag%2==0){
                //收货
                channel.basicAck(deliveryTag,false);
                System.out.println("签收了货物..."+deliveryTag);
            }else {
                //退货 requeue=false 丢弃 requeue=true 发回服务器,服务器重新入队
                //deliveryTag, multiple, requeue(false不再入队)
                channel.basicNack(deliveryTag,false,false);
                System.out.println("没有签收了货物..."+deliveryTag);
            }
        } catch (Exception e) {
            //网络中断

        }
    }
十四.订单服务
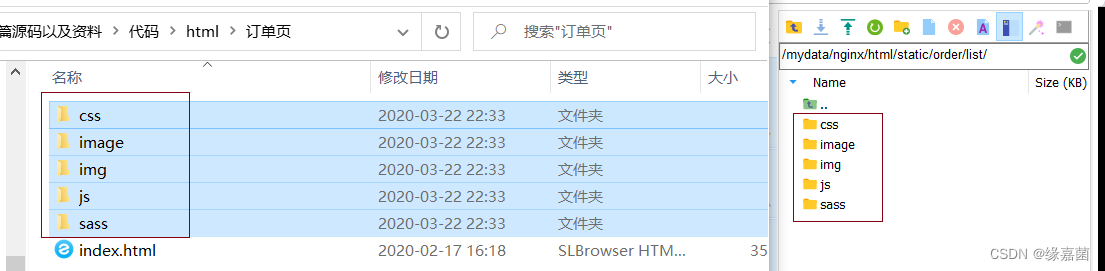
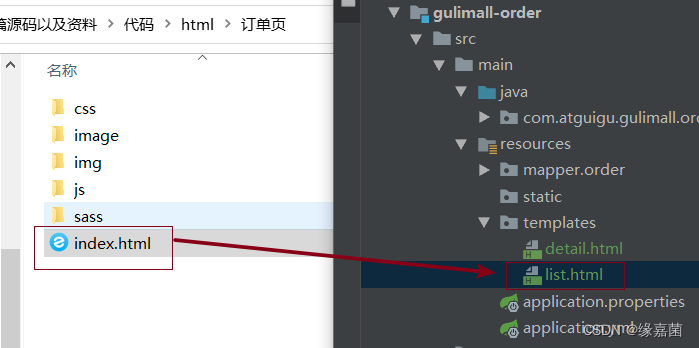
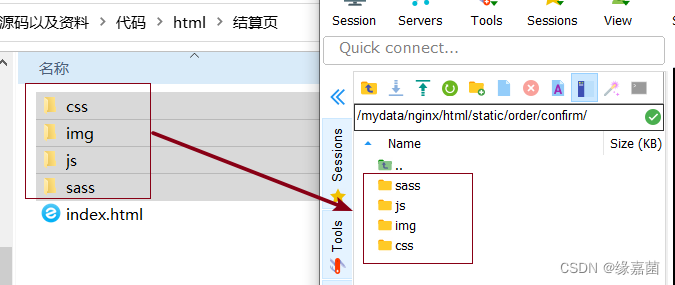
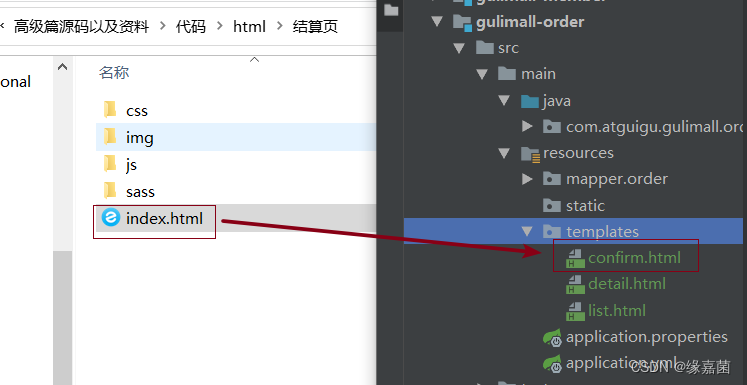
1.搭建订单页面
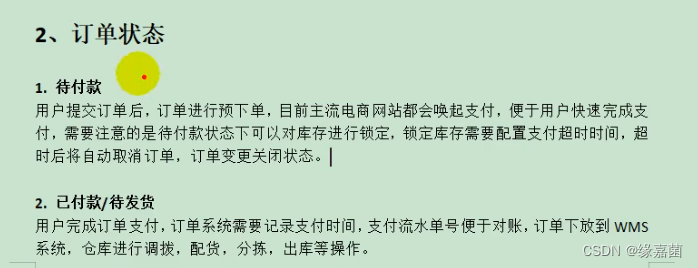
等待付款
订单页
结算页
收银页

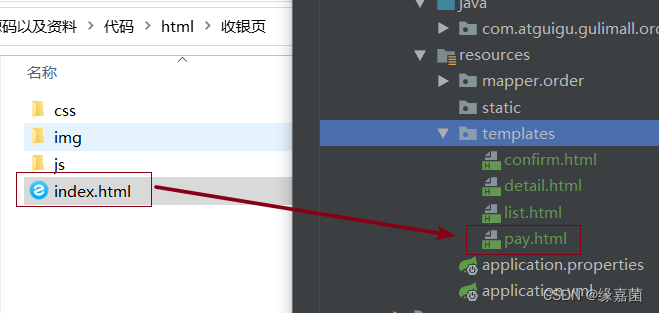
2.配置域名服务
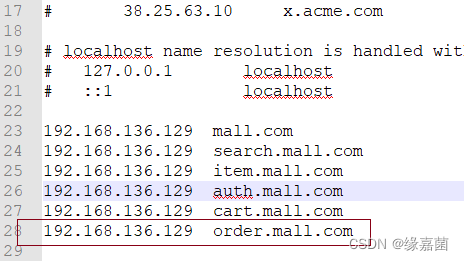
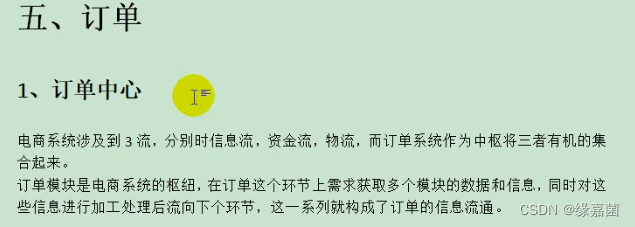
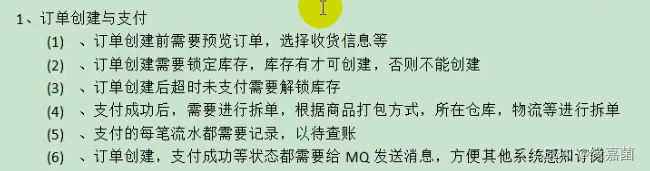
3.订单
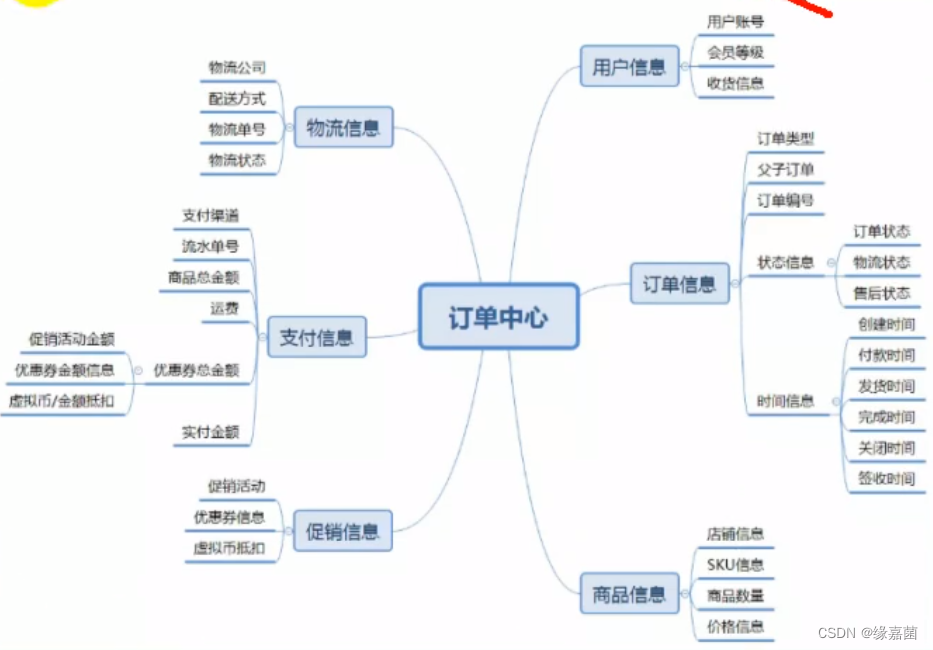
3.1 基本概念
3.2 订单构成
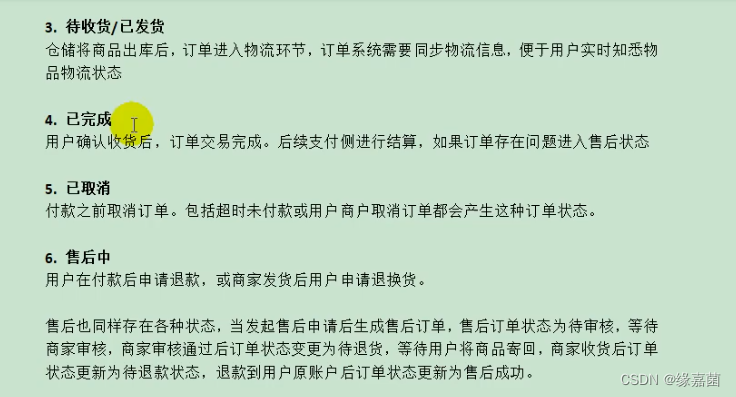
3.3 订单状态
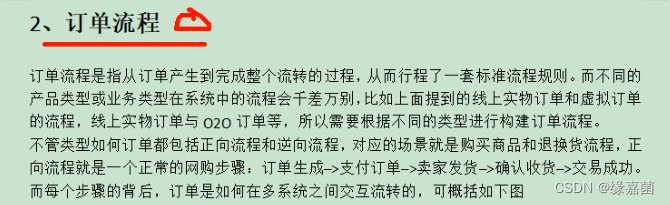
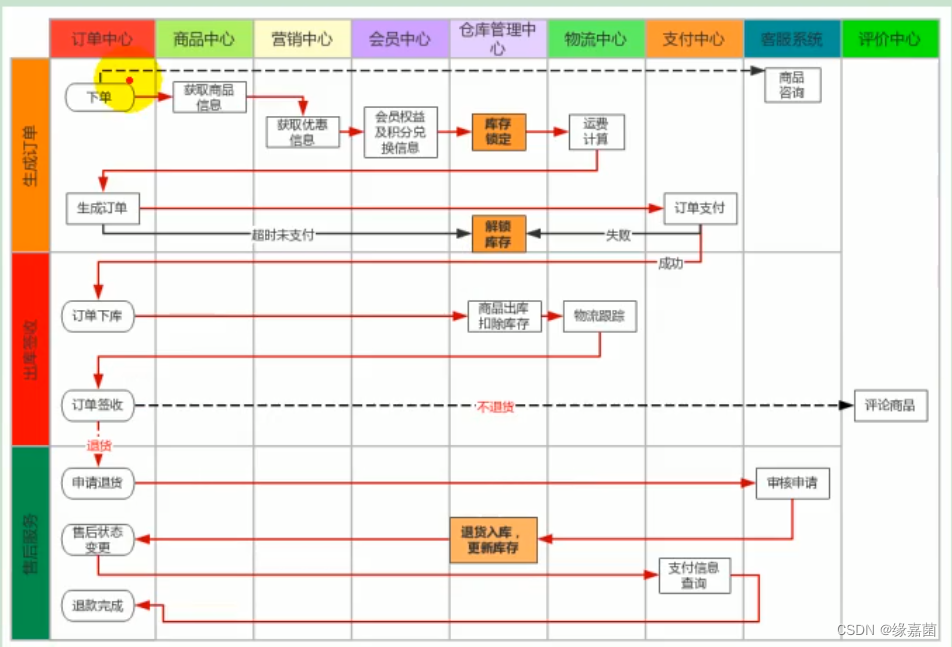
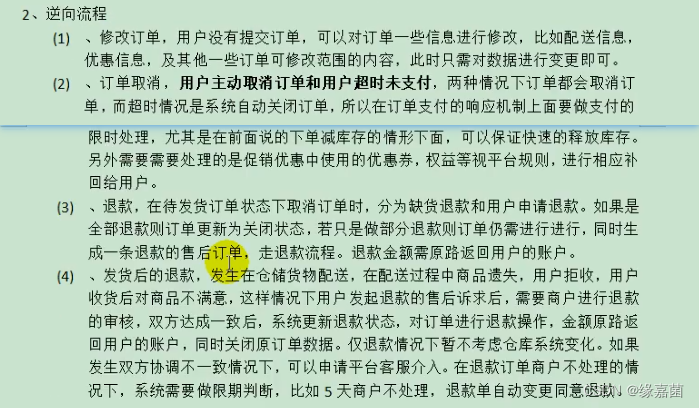
3.4 订单流程
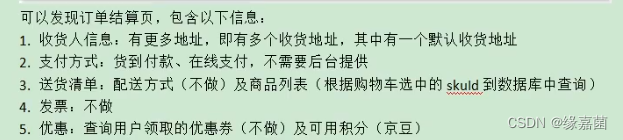
3.5 订单确认页模型抽取
vo略
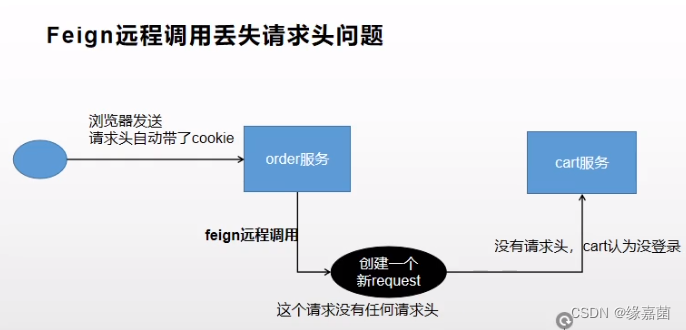
3.6 Feign远程调用丢失请求头
解决方案
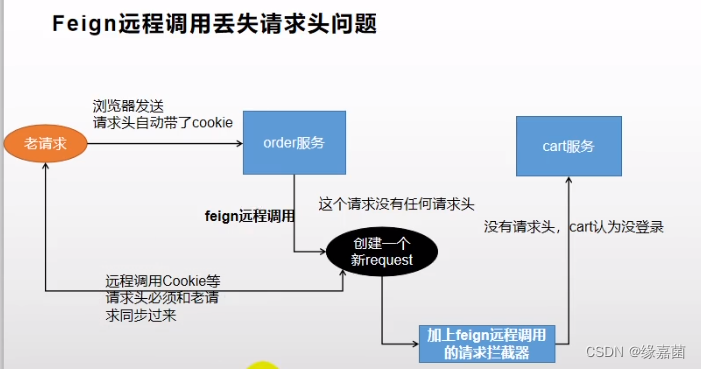
@Configuration
public class GulimallFeignConfig {

    @Bean("requestInterceptor")
    public RequestInterceptor requestInterceptor(){
        return new RequestInterceptor() {

            @Override
            public void apply(RequestTemplate template) {
                //1、RequestContextHolder拿到刚进来的这个请求
                ServletRequestAttributes attributes = (ServletRequestAttributes) RequestContextHolder.getRequestAttributes();
                HttpServletRequest request = attributes.getRequest(); //旧请求
                //同步请求头数据,Cookie、
                String cookie = request.getHeader("Cookie");
                //给新请求同步了旧请求的cookie
                template.header("Cookie",cookie);

            }
        };
    }

}
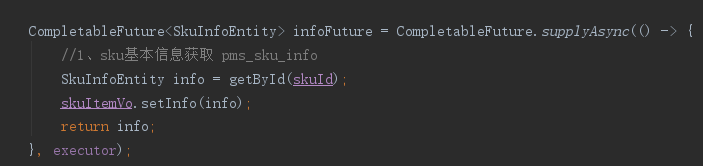
3.7 Feign异步调用丢失请求头问题
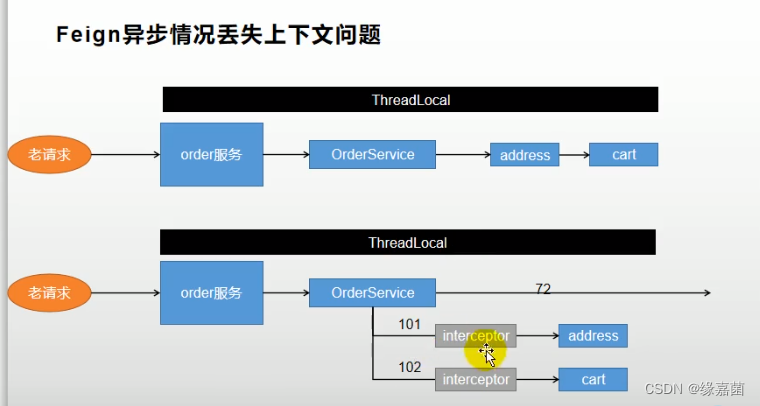
    @Override
    public OrderConfirmVo confirmOrder() throws ExecutionException, InterruptedException {
        OrderConfirmVo confirmVo = new OrderConfirmVo();
        MemberRespVo memberRespVo = LoginUserInterceptor.loginUser.get();
        System.out.println("主线程..."+Thread.currentThread().getId());

        //获取之前的请求
        RequestAttributes requestAttributes = RequestContextHolder.getRequestAttributes();

        CompletableFuture<Void> getAddressFuture = CompletableFuture.runAsync(() -> {
            //1、远程查询所有的收货地址列表
            System.out.println("member线程..."+Thread.currentThread().getId());
            //每一个线程都来共享之前的请求数据
            RequestContextHolder.setRequestAttributes(requestAttributes);
            List<MemberAddressVo> address = memberFeignService.getAddress(memberRespVo.getId());
            confirmVo.setAddress(address);
        }, executor);

        CompletableFuture<Void> cartFuture = CompletableFuture.runAsync(() -> {
            //2、远程查询购物车所有选中的购物项
            System.out.println("cart线程..."+Thread.currentThread().getId());
            //每一个线程都来共享之前的请求数据
            RequestContextHolder.setRequestAttributes(requestAttributes);
            List<OrderItemVo> items = cartFeignService.getCurrentUserCartItems();
            confirmVo.setItems(items);
            //feign在远程调用之前要构造请求,调用很多的拦截器
            //RequestInterceptor interceptor : requestInterceptors
        }, executor);


        //3、查询用户积分
        Integer integration = memberRespVo.getIntegration();
        confirmVo.setIntegration(integration);

        //4、其他数据自动计算

        //TODO 5、防重令牌

        CompletableFuture.allOf(getAddressFuture,cartFuture).get();

        return confirmVo;
    }
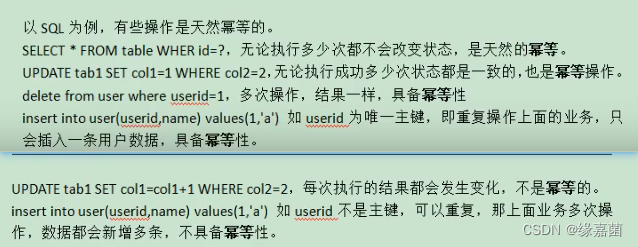
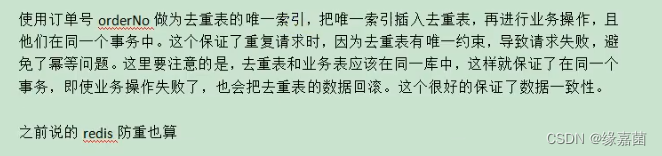
3.8 接口幂等性
一、什么是接口幂等性
二、哪些情况需要防止
三、什么情况需要幂等
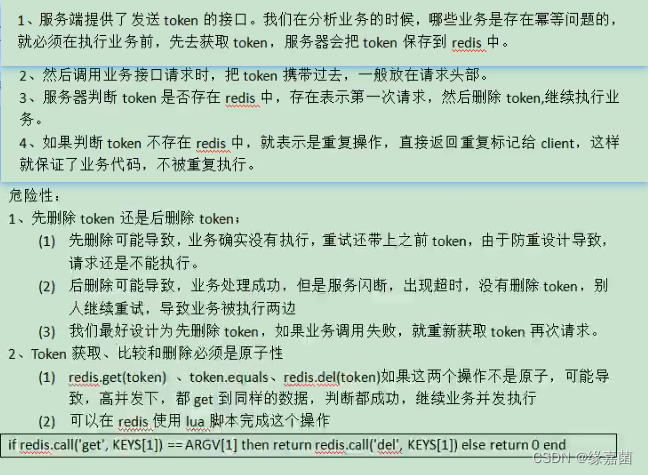
四、幂等解决方案


1.token机制
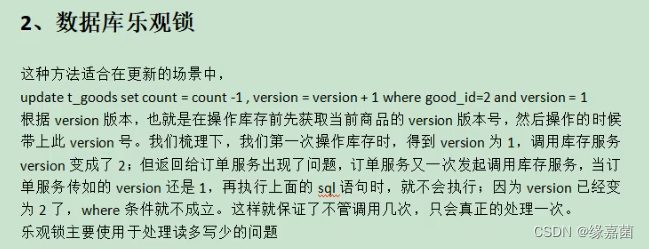
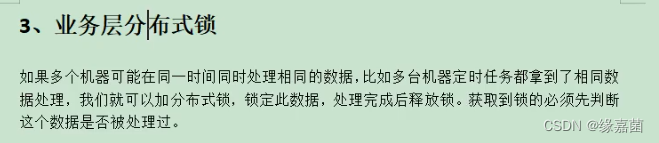
2.各种锁机制
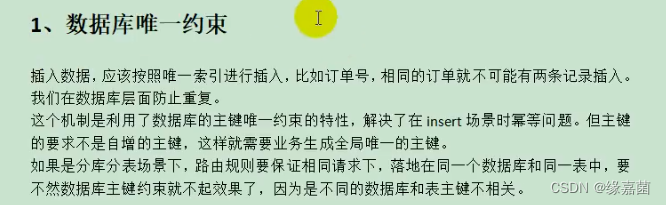
3.各种唯一约束
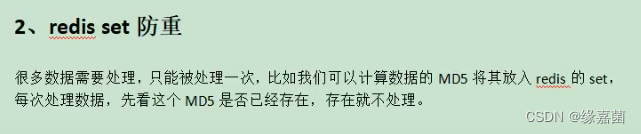
4.防重表
5.全局请求唯一id


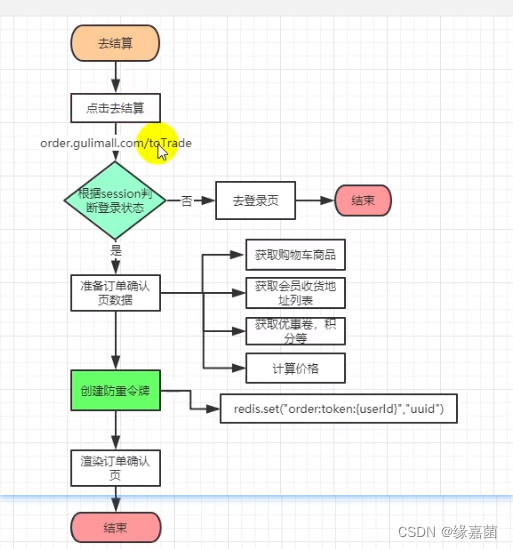
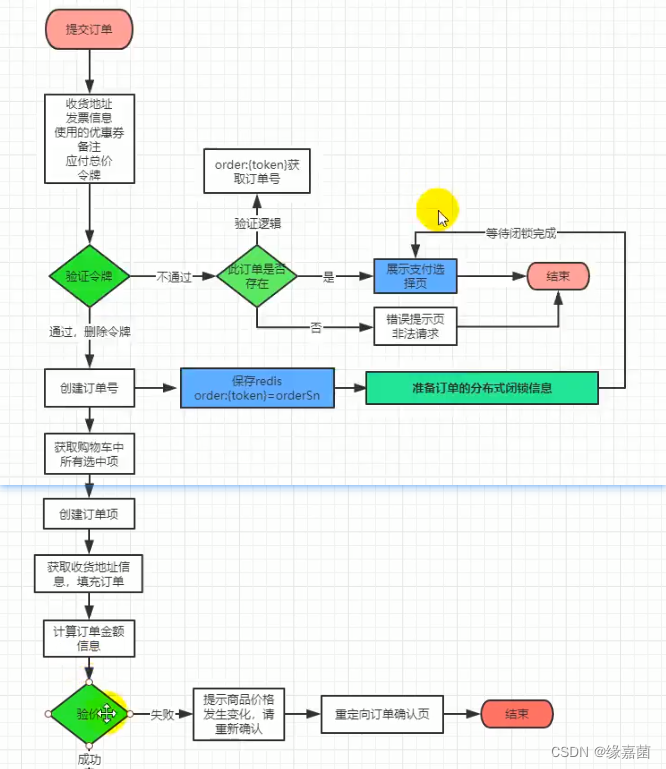
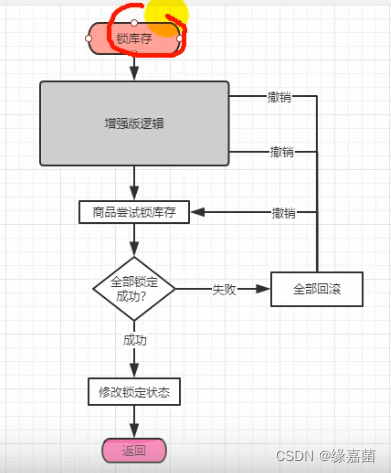
4.订单业务流程
4.1 去结算
4.2 下订单
4.3 锁库存
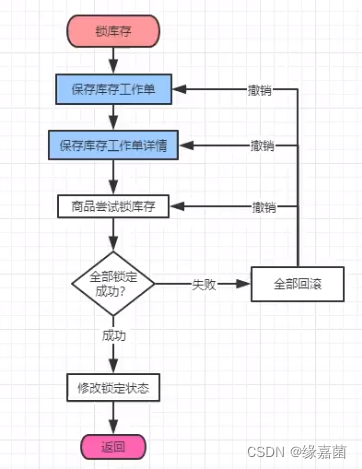
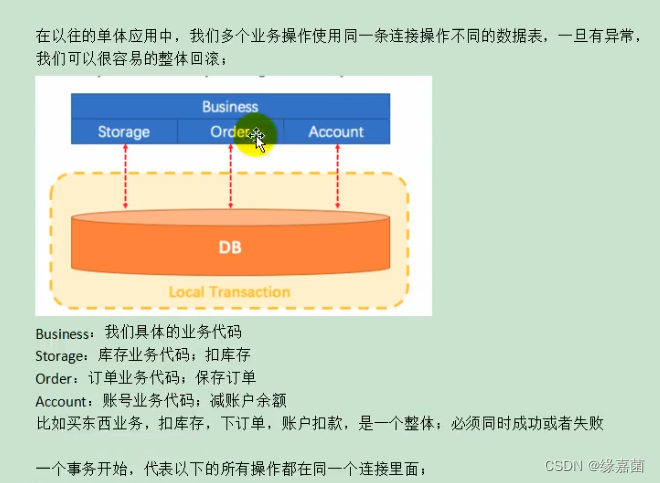
5.本地事务
5.1 本地事务在分布式下的问题
5.2 本地事务
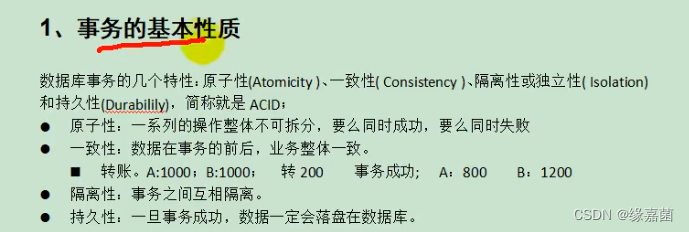
1.事务的基本性质
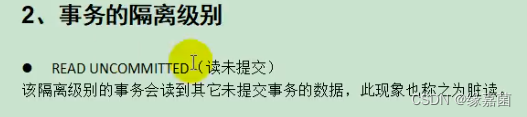
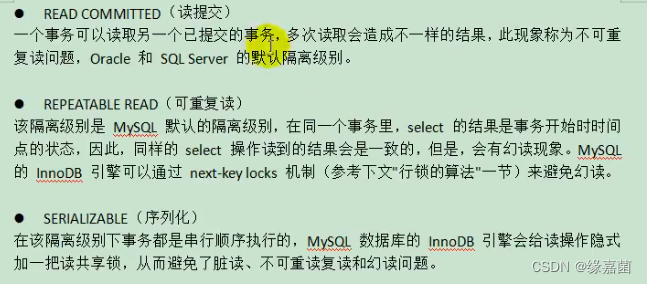
2.事务的隔离级别
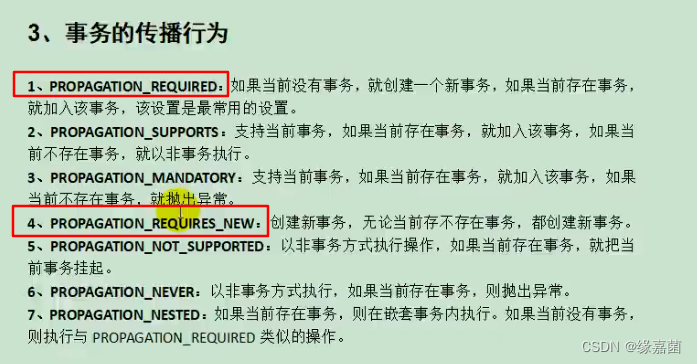
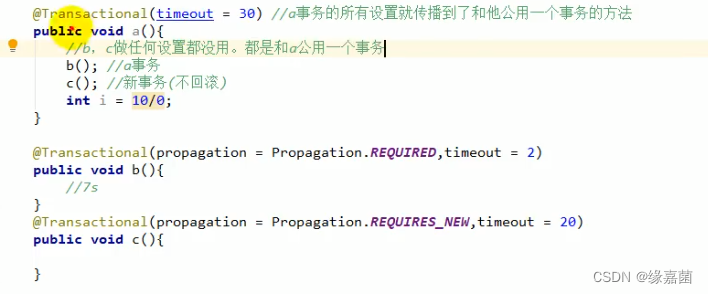
3.事务的传播行为
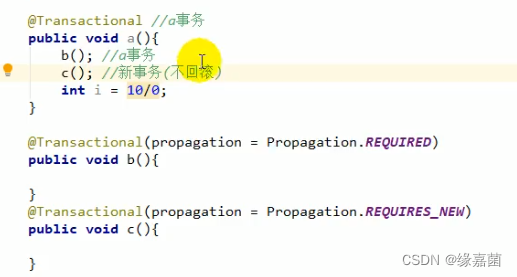
伪代码
同理,c发送生异常,c回滚。b,c不回滚。
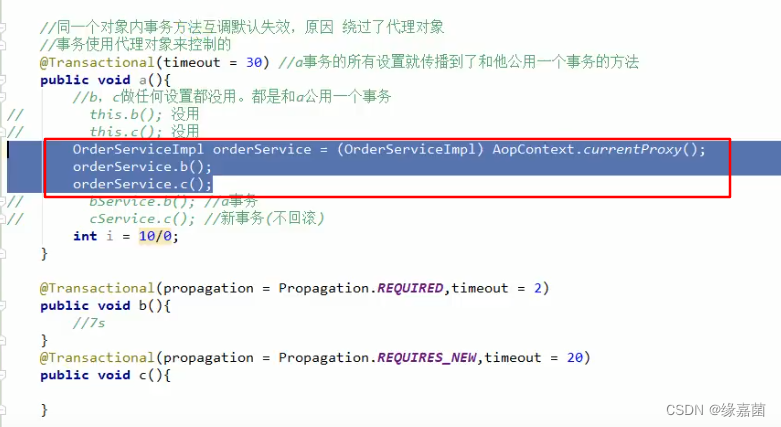
注:应该在不同service,直接调用同个类里的事务方法会导致事务失效
可提供的解决方案:
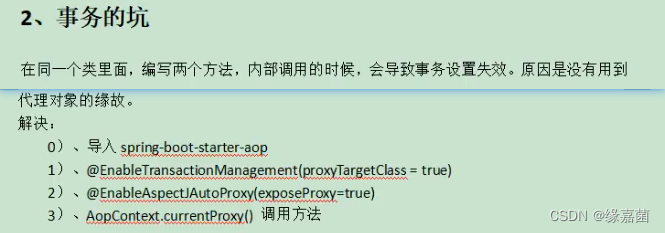
  <!-- 引入aop -->
  <dependency>
      <groupId>org.springframework.boot</groupId>
      <artifactId>spring-boot-starter-aop</artifactId>
  </dependency>
主类开启
@EnableAspectJAutoProxy(exposeProxy = true) //开启了aspect动态代理模式,对外暴露代理对象
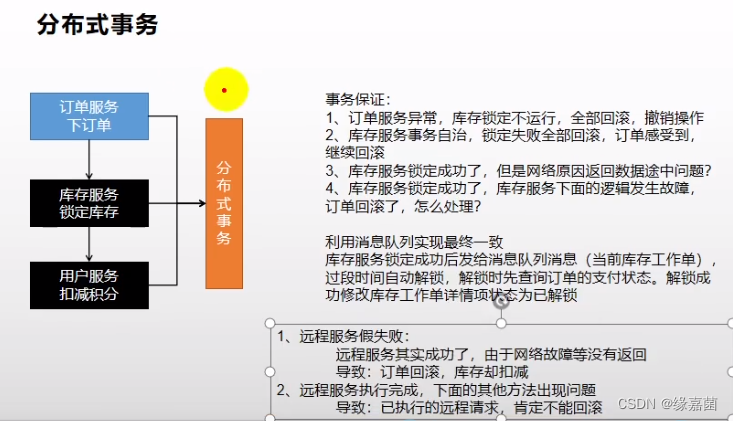
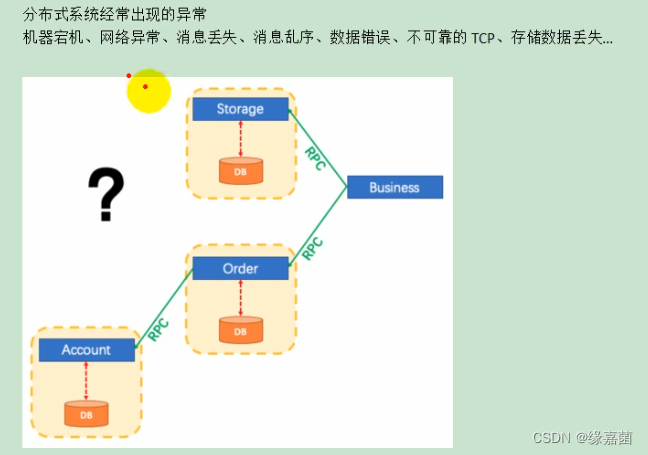
6.分布式事务
6.1 为什么有分布式事务
6.2 CAP定理和BASE理论
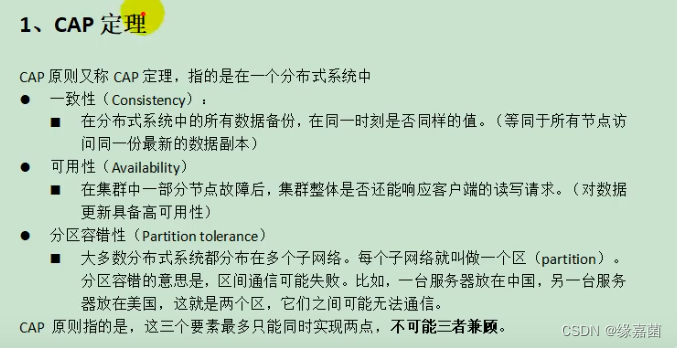
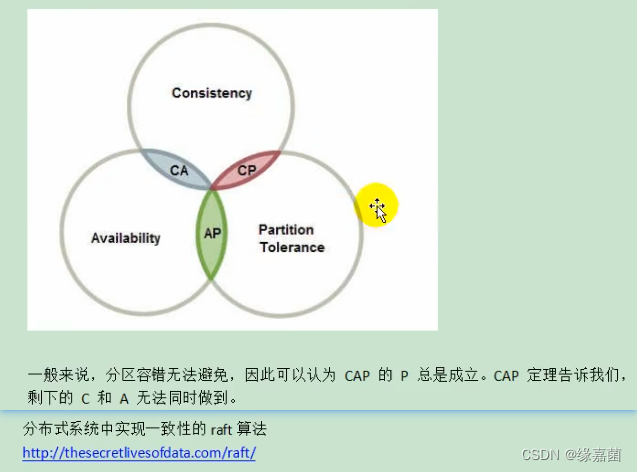
一、CAP定理
raft动画演示:raft.github.io
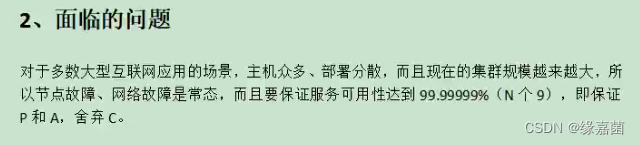
二 、面临的问题
三、BASE理论
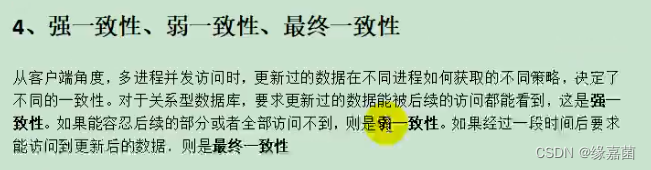
四、强一致性、弱一致性、最终一致性


6.3 分布式事务几种方案
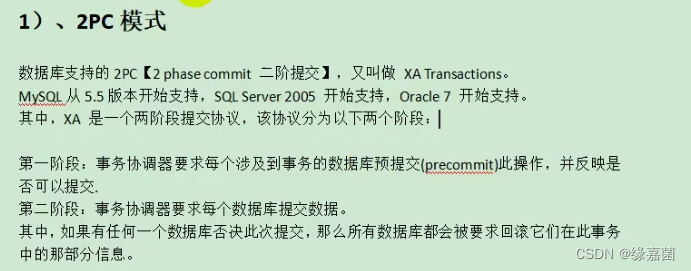
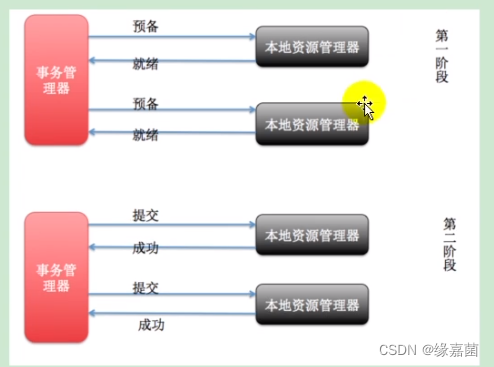
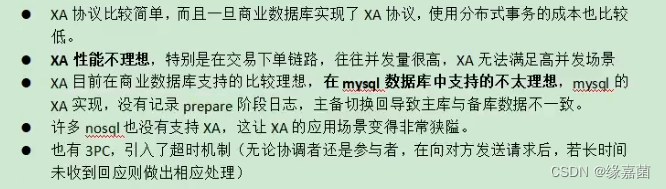
6.3.1 2PC模式
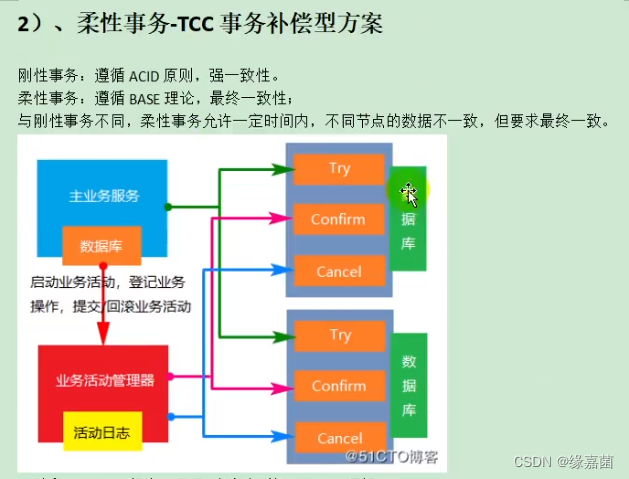
6.3.2 柔性事务-TCC事务补偿型方案

6.3.3 柔性事务-最大努力通知型方案
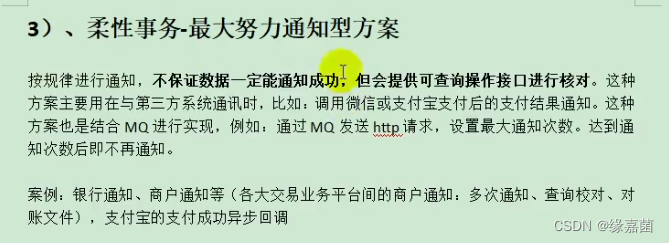
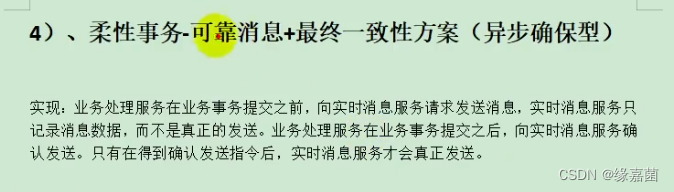
6.3.4 柔性事务-可靠消息+最终一致性方案(异步确保型)
采用该方案
注:根据业务场景选择合适方案
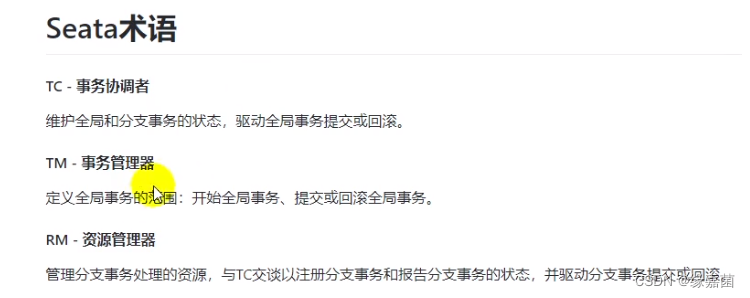
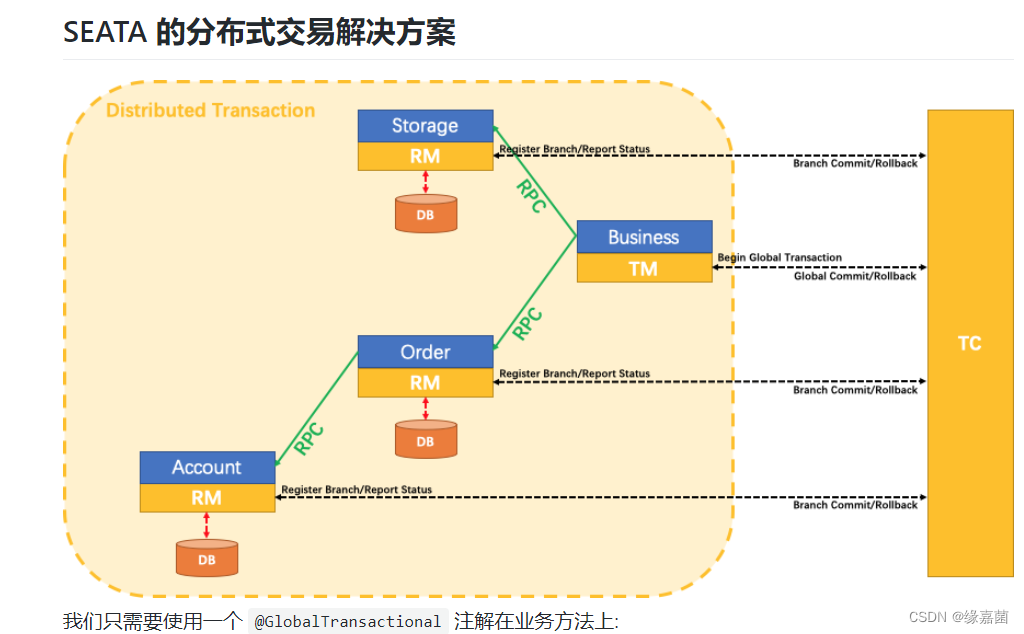
7.Seata(可忽略)

文档:https://seata.io/zh-cn/docs/overview/what-is-seata.html
7.1 Seata是什么

7.2 创建 UNDO_LOG 表
wms、ums、sms、pms、oms、admin数据库
-- 注意此处0.3.0+ 增加唯一索引 ux_undo_log
CREATE TABLE `undo_log` (
  `id` bigint(20) NOT NULL AUTO_INCREMENT,
  `branch_id` bigint(20) NOT NULL,
  `xid` varchar(100) NOT NULL,
  `context` varchar(128) NOT NULL,
  `rollback_info` longblob NOT NULL,
  `log_status` int(11) NOT NULL,
  `log_created` datetime NOT NULL,
  `log_modified` datetime NOT NULL,
  `ext` varchar(100) DEFAULT NULL,
  PRIMARY KEY (`id`),
  UNIQUE KEY `ux_undo_log` (`xid`,`branch_id`)
) ENGINE=InnoDB AUTO_INCREMENT=1 DEFAULT CHARSET=utf8;
7.3 启动服务
从 https://github.com/seata/seata/releases,下载服务器软件包,将其解压缩。
Usage: sh seata-server.sh(for linux and mac) or cmd seata-server.bat(for windows) [options]
  Options:
    --host, -h
      The address is expose to registration center and other service can access seata-server via this ip
      Default: 0.0.0.0
    --port, -p
      The port to listen.
      Default: 8091
    --storeMode, -m
      log store mode : file、db
      Default: file
    --help

e.g.

sh seata-server.sh -p 8091 -h 127.0.0.1 -m file
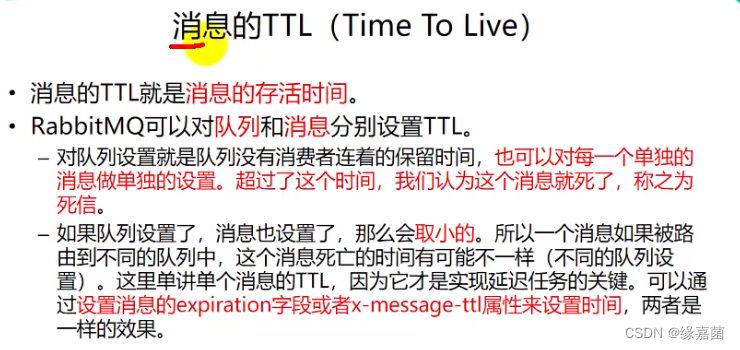
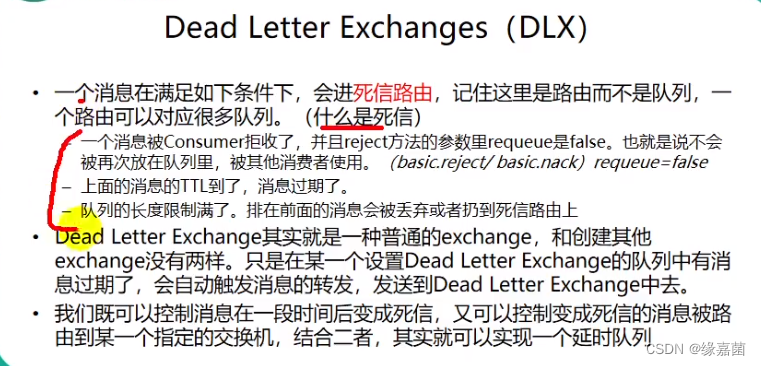
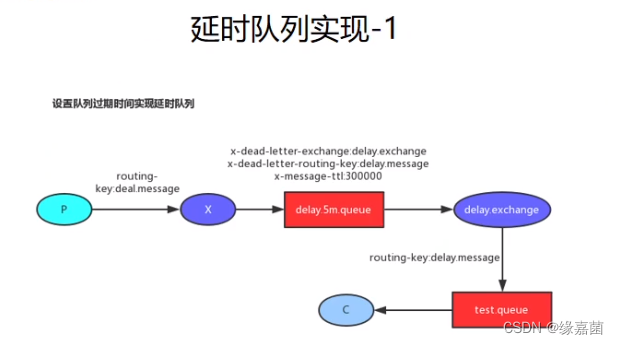
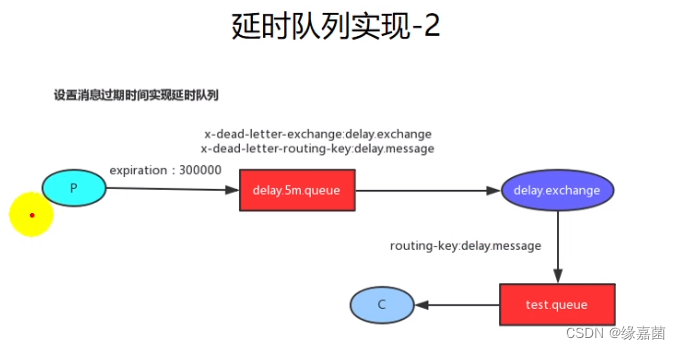
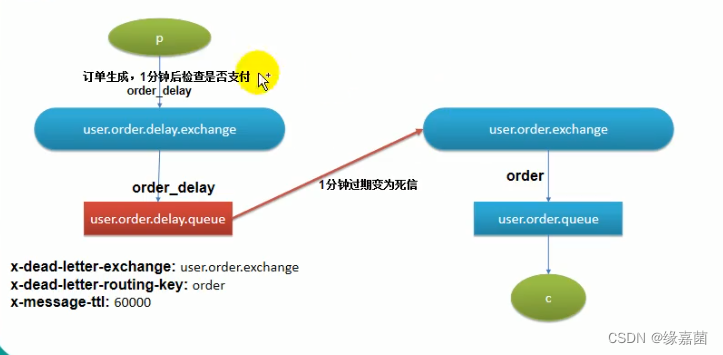
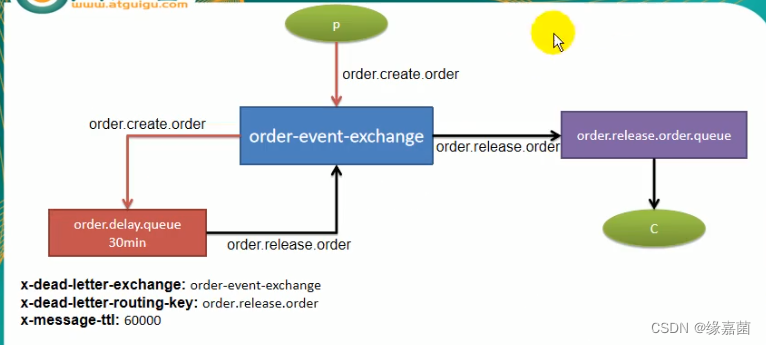
十五.RabbitMQ延时队列(实现定时任务)
1.场景
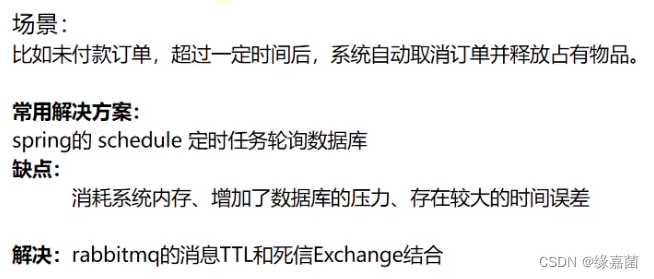
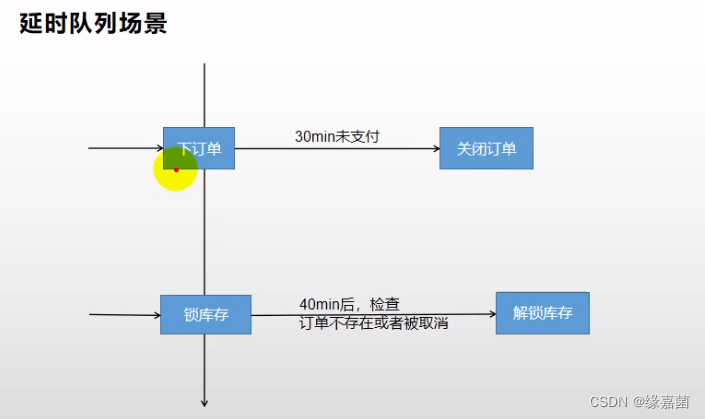
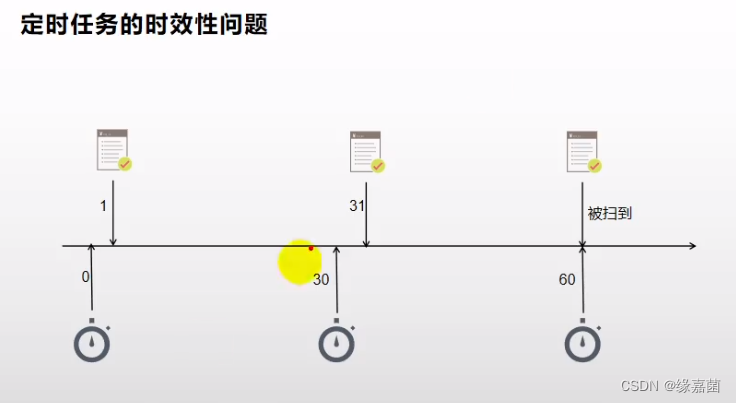
2.解决方案
推荐使用延时队列实现-1
3.具体实现
使用下面方案:
WareOrderTaskDetailEntity添加wareId,lockStatus字段
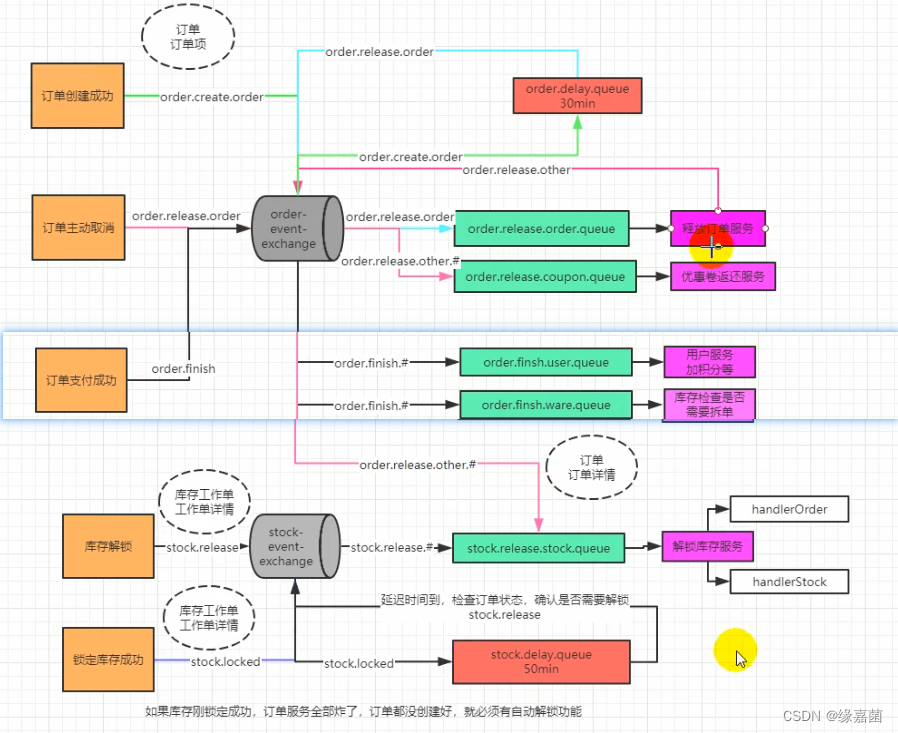
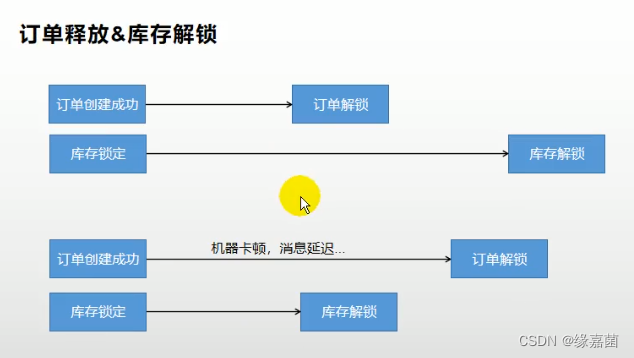
4.问题
关单时再去发一个消息
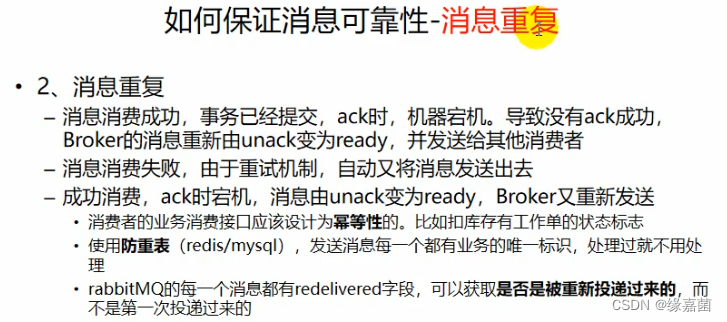
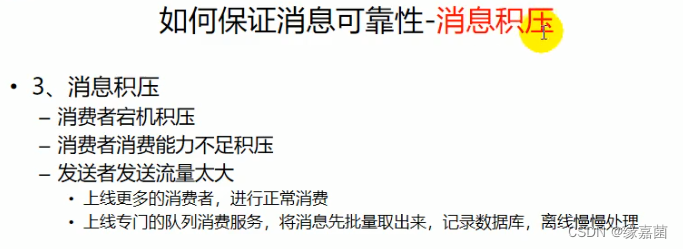
5.消息丢失、积压、重复等解决方案
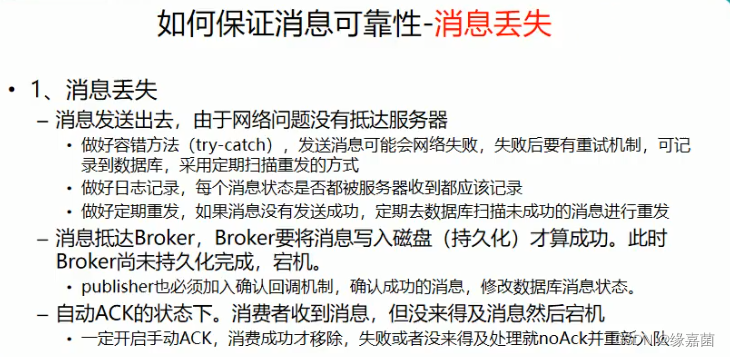
保证消息一定会发送出去,每一个消息都可以做好日志记录。
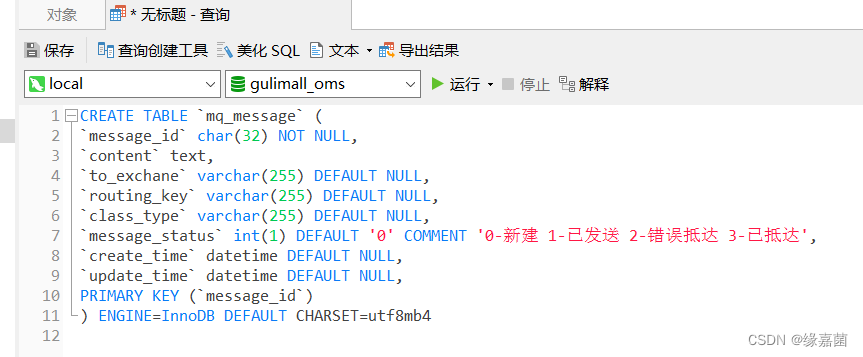
CREATE TABLE `mq_message` (
`message_id` char(32) NOT NULL,
`content` text,
`to_exchane` varchar(255) DEFAULT NULL,
`routing_key` varchar(255) DEFAULT NULL,
`class_type` varchar(255) DEFAULT NULL,
`message_status` int(1) DEFAULT '0' COMMENT '0-新建 1-已发送 2-错误抵达 3-已抵达',
`create_time` datetime DEFAULT NULL,
`update_time` datetime DEFAULT NULL,
PRIMARY KEY (`message_id`)
) ENGINE=InnoDB DEFAULT CHARSET=utf8mb4
十六.支付宝支付
1.流程
1.进入“蚂蚁金服开放平台”
https://open.alipay.com/platform/home.htm
2.创建应用,进行配置测试
2.测试环境
测试环境使用沙箱环境:https://opendocs.alipay.com/open/02np8i
具体流程根据官方文档
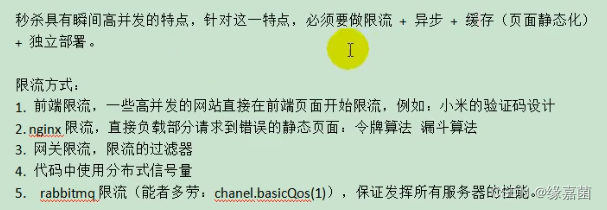
十七.秒杀服务
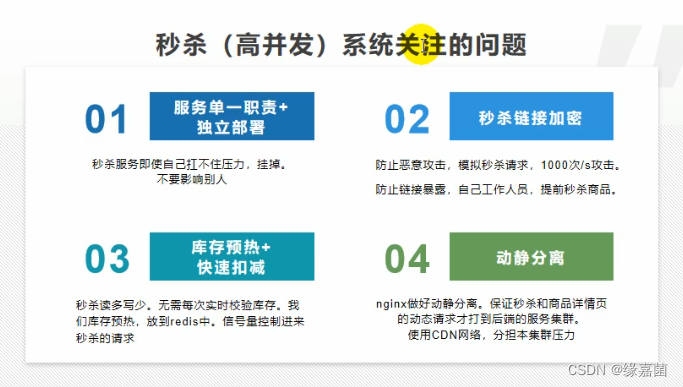
1.秒杀业务
2.搭建环境
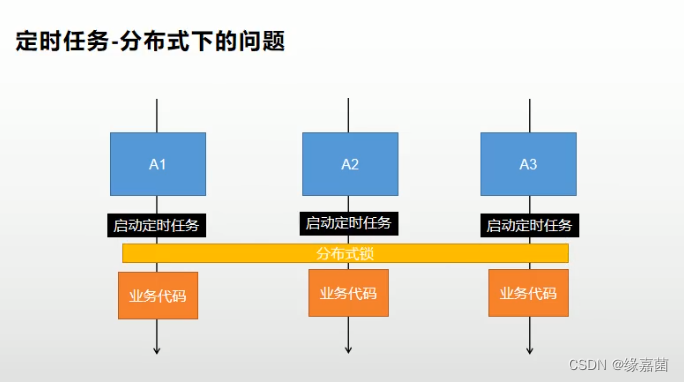
3.定时任务
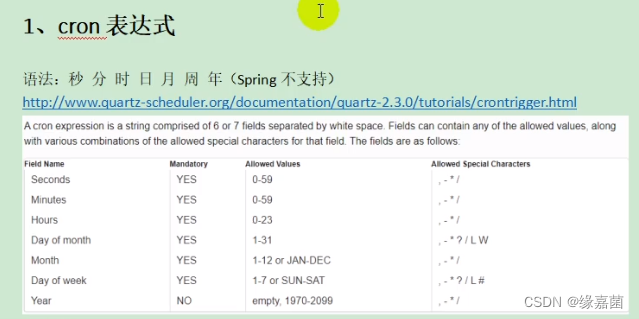
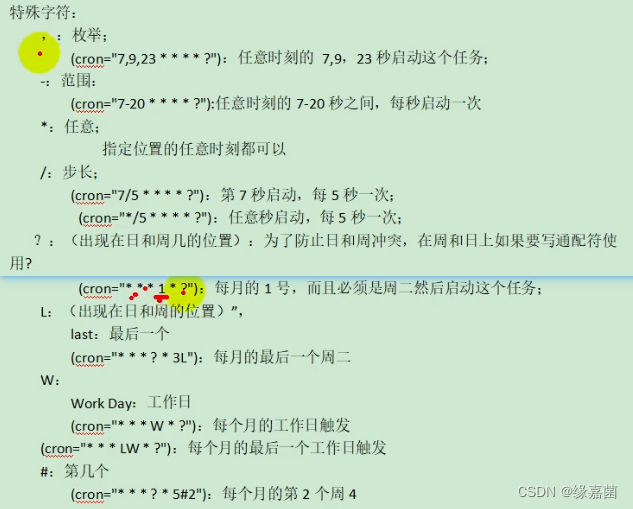
3.1 cron表达式
可以使用在线cron表达式生成器
通过空格区分
注:Spring不支持年
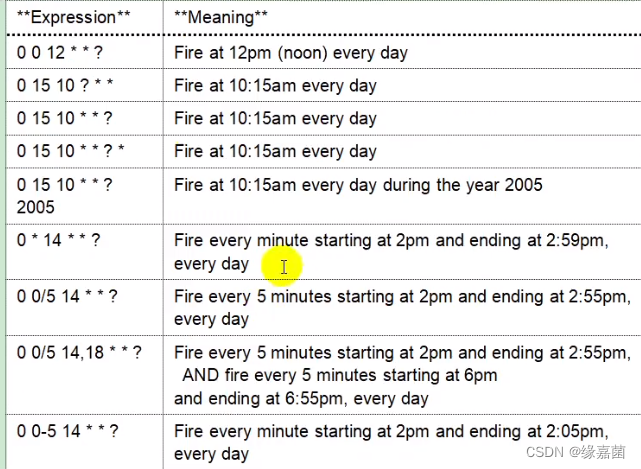
3.1 cron表达式示例
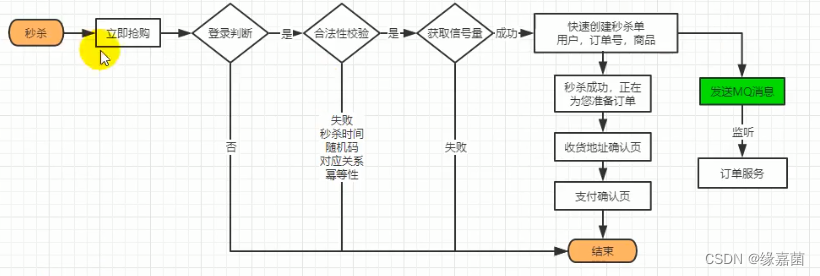
4.秒杀流程
4.1 基本流程
秒杀商品采用该方案
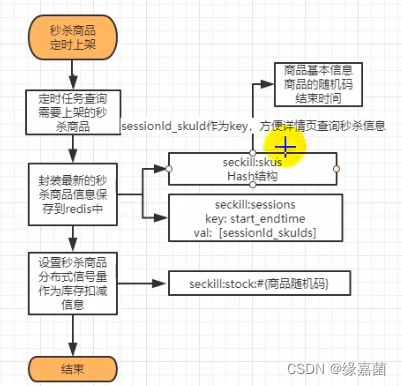
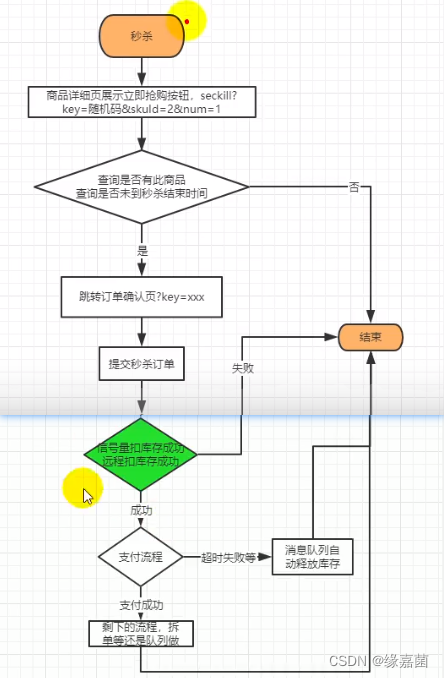

4.2 分布下秒杀商品缓存redis问题
4.3 秒杀设计

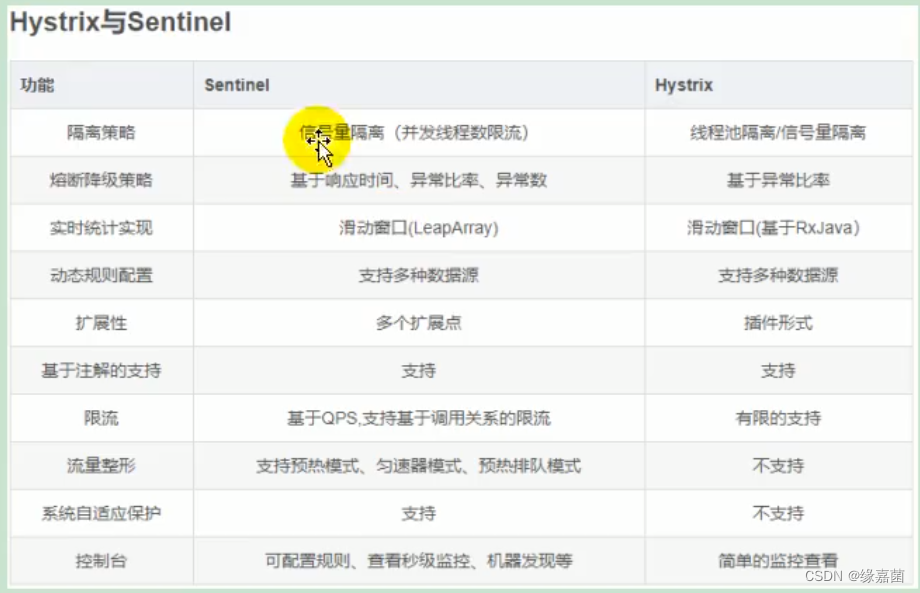
十八.SpringCloud Alibaba-Sentinel
1.简介
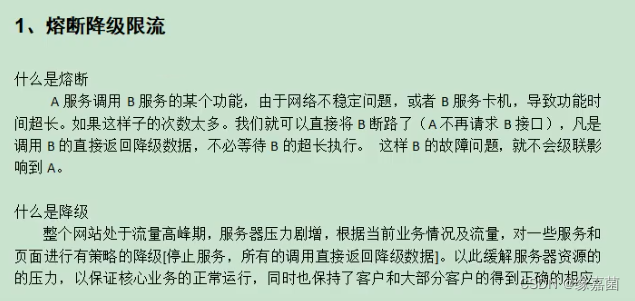
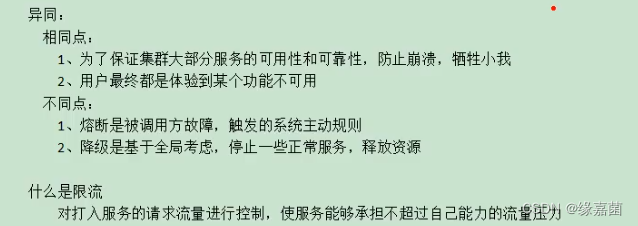
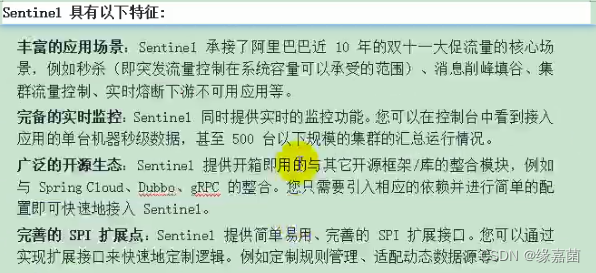
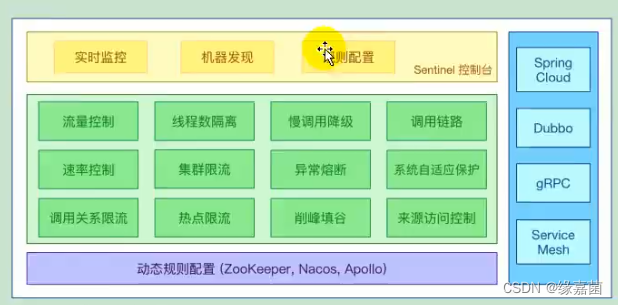
2.Sentinel简介

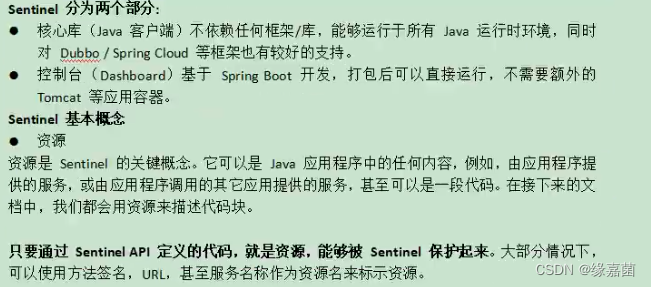

3.使用
看官网文档
github: https://github.com/alibaba/Sentinel
https://github.com/alibaba/spring-cloud-alibaba/wiki/Sentinel
从 release 页面 下载最新版本的控制台 jar 包: https://github.com/alibaba/Sentinel/releases
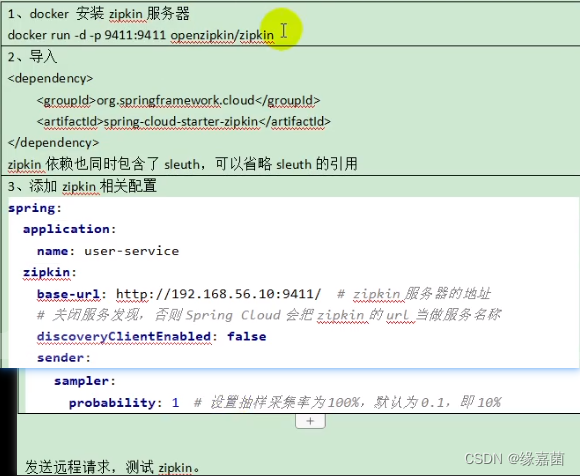
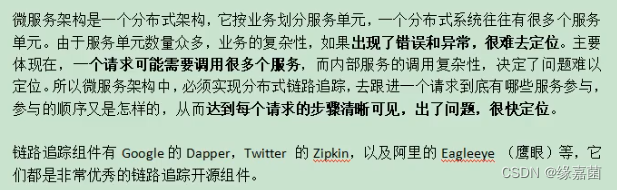
十九.Sleuth+Zipkin服务链路追踪
1.为什么用
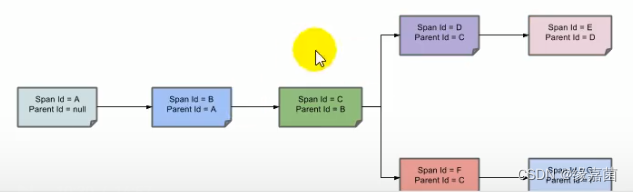
2.基本术语
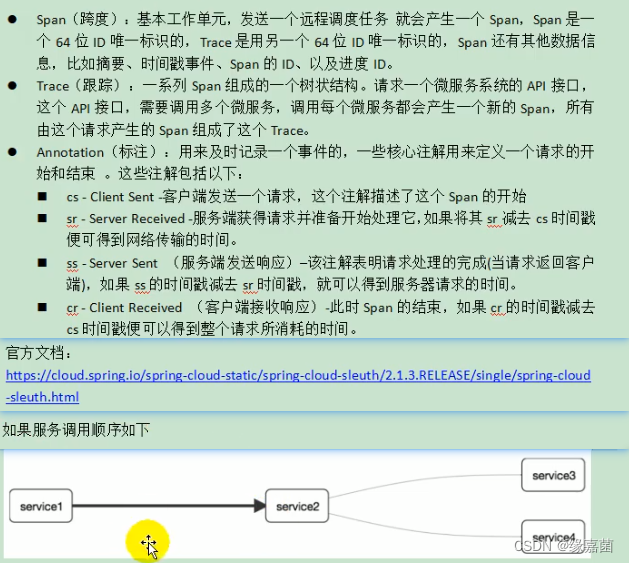
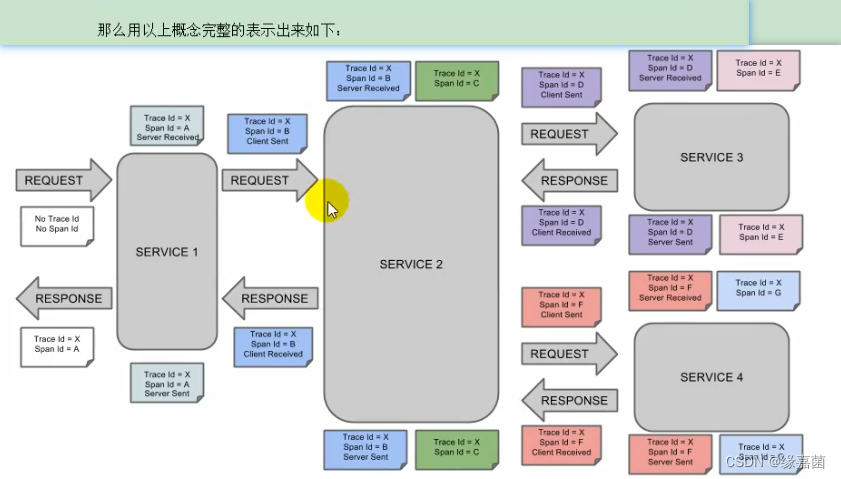
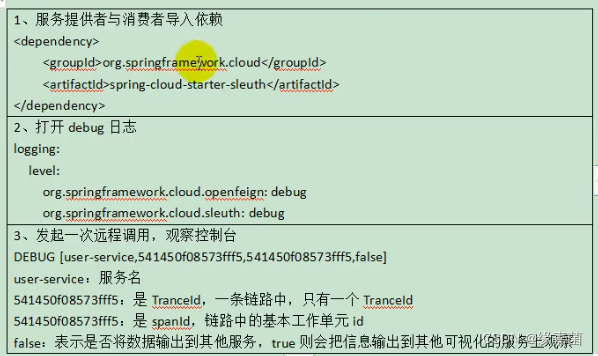
3.整合sleuth
4.整合zipkin可视化观察