文章目录
一、jsx事件绑定
1. 回顾this的绑定方式
(绑定方式就是指this值的几种指向)
- 默认绑定。 函数独立执行
fun()—此时this指向window - 隐式绑定。被一个对象调用指向
obj.foo()—此时this指向obj - 显示绑定。通过call/apply/bind明确规定this的指向 —
foo.call('aaa') - new绑定。 new Foo()—> 创建一个实例,this指向实例
仔细看下边这段代码,分析两次函数调用分别打印什么值
 const obj = {
   name: "obj",
   foo: function () {
     console.log("foo:", this)
   }
 }
 obj.foo() // obj

 const config = {
   onClick: obj.foo
 }
 const click = config.onClick //这句话实际是click = obj.foo
 click()  // 等价于foo(), 独立执行,指向window(严格模式值为undefined)
若修改为
 const config = {
   onClick: obj.foo.bind(obj)
 }
 const click = config.onClick //这句话实际是click = obj.foo
 click()  // 等价于obj.foo(), 打印出来的this指向obj
2. jsx中的this绑定问题
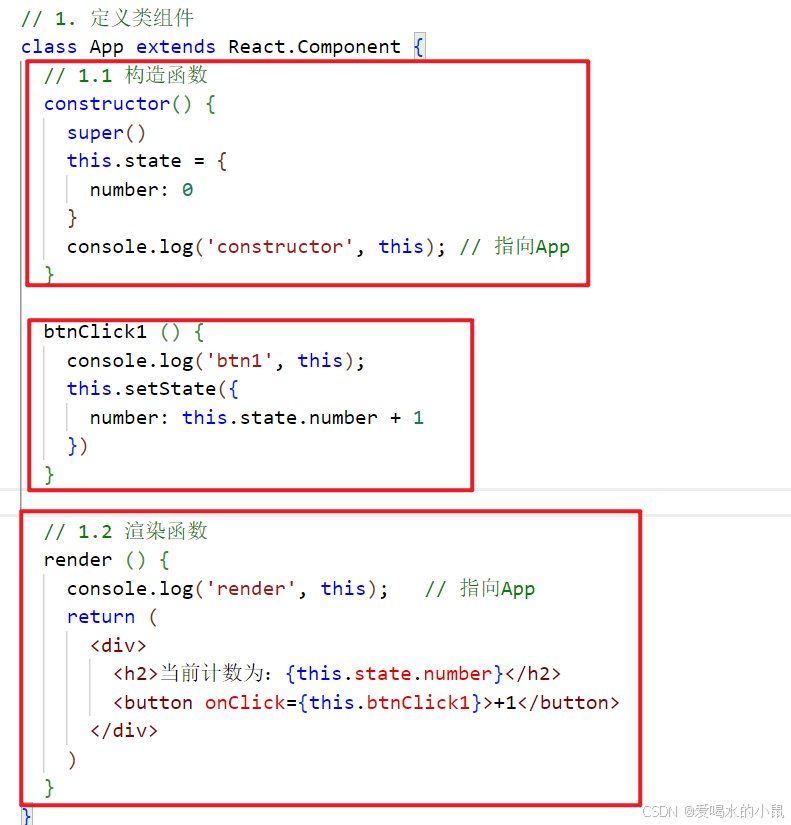
如之前所说,在这个类组件中,事件的处理函数需要对数据进行处理;
在严格模式下,构造函数与render里的this指向实例对象,而类里的方法中的this值为undefined。undefined.setState会报错,所以需要处理this绑定问题
(1) 方式一:bind绑定
   constructor() {
     super()
     this.state = {
       number: 0
     }
     // bind改变btnClick1 方法里this的指向
     this.btnClick1 = this.btnClick1.bind(this)
   }

   btnClick1 () {
     console.log('btn1', this);
     this.setState({
       number: this.state.number + 1
     })
   }
   render(){
    ...
     <button onClick={this.btnClick1}>+1</button>
    ...
   }
(2) 方式二:使用 ES6 class fields 语法
es6中,在类里可以省略constructor,直接给变量赋值,这就是class fileds。
 class App extends React.Component {
    ...
   // 给变量btn2Click 赋值一个箭头函数
   btn2Click = () => {
     console.log("btn2Click", this)
     this.setState({ number: 1000 })
   }
   render () {
     return (
       <div>
         {/* 2.this绑定方式二: ES6 class fields */}
         <button onClick={this.btn2Click}>按钮2</button>
       </div>
     )
   }
 }
当调用箭头函数时,箭头函数没有自己的this,会向上层作用域查找,而上层作用域是类的作用域(App类),指向的则会是类的实例。
(3) 方式三:直接传入一个箭头函数(重要)
 class App extends React.Component {
    ...
   // 给变量btn2Click 赋值一个箭头函数
   btn3Click = () => {
   // 隐式绑定后,这里的this就是render函数里的this,就是当前对象实例
     console.log("btn3Click", this)
     this.setState({ number: 666})
   }
   render () {
     return (
       <div>
         {/* 3.this绑定方式三: 直接传入一个箭头函数 */}
          <button onClick={() => this.btn3Click()}>按钮3</button>
       </div>
     )
   }
 }
当点击按钮时,onClick被触发,执行箭头函数。而在代码逻辑在btn3Click里,所以箭头函数调用了btn3Click,而在调用btn3Click时,是this在调用,也就是一个对象调用了btn3Click,即进行了隐式绑定。
3.事件参数传递
(1) 传递事件对象event
   btnClick (event) {
     console.log("btnClick:", event, this)
   }
   render () {
     return (
       <div>
         {/*默认参数传递*/}
         <button onClick={this.btnClick}>按钮1</button>
         <button onClick={this.btnClick.bind(this)}>按钮2</button>
         <button onClick={() => this.btnClick()}>按钮3</button>
         <button onClick={(event) => this.btnClick(event)}>按钮4</button>
       </div>
     )
   }
点击按钮1:默认传递了事件对象event,this是undefined
点击按钮2:默认传递了事件对象event,this是组件实例
点击按钮3:调用了btnClick函数,什么参数也没传。所以event是undefined;this是组件实例。
点击按钮4:传递了事件对象,所以event和this都有值
(2) 传递其他参数
在传递了事件对象的基础上,再传递其他参数
btnClick (event, name, age) {
	console.log("btnClick:", event, this)
	console.log("name,age:", name, age)
}
...
<button onClick={(event) => this.btnClick(event, 'tom', 18)}>按钮5</button>
4. 事件绑定小案例
二、条件渲染
vue中是通过指令来控制:比如v-if、v-show;
在React中,所有的条件判断都和普通的JavaScript代码一致
1. if-else、三元运算符,逻辑与&&
- if-else:条件判断语句,适合逻辑较多的情况
- 三元运算符:适合逻辑简单的情况
- 与运算符&&:适合于条件成立,则渲染组件;条件不成立,则什么也不渲染
 this.state = {
   isReady: true,
   friend: {
     name: 'tom',
     desc: '很棒!'
   }
 }
render () {
  const { isReady, friend } = this.state
  let showEle = null
    // 采用if判断是否生成页面内容
  if (isReady) {
    showEle = <h2>准备开始比赛! </h2>
  } else {
    showEle = <h2>请提前做好准备</h2>
  }

  return (
    <div>
      {/* 1.方式一: 根据条件给变量赋值不同的内容*/}
      {showEle}
      {/* 2.方式二: 三元运算符*/}
      {isReady ? <button>点击开始战斗</button> : <h2>赶紧准备!</h2>}
      {/* 3.方式三: &&逻辑运算,friend为空则不显示,有值则显示*/}
      {friend && <h2>{friend.name + ':' + friend.desc}</h2>}
    </div>
  )
}
2. 模拟v-show的效果
控制display属性是否为none;
需求:点击按钮,实现文字的隐藏与显示
  btnClick () {
    this.setState({
      isShow: !this.state.isShow
    })
  }
  render () {
    const { msg, isShow } = this.state
    return (
      <div>
        <button onClick={() => this.btnClick()}>切换</button>
         {/*逻辑与&&*/}
        {isShow && <h2>{msg}</h2>}
        {/*v-show的效果*/}
        <h2 style={{ display: isShow ? 'block' : 'none' }}>{msg}</h2>
      </div >
    )
  }
采用了两种实现方式,加深一下对逻辑与&&的运用
三、列表渲染
React中没有像Vue模块语法中的v-for指令,React渲染列表就是采用JS里的一些方法对列表进行遍历或其他处理。
◼ 如何展示列表呢?
在React中,展示列表最多的方式就是使用数组的map高阶函数;
◼ 很多时候我们在展示一个数组中的数据之前,需要先对它进行一些处理:
比如过滤掉一些内容:filter函数
比如截取数组中的一部分内容:slice函数
注意:这里要注意map中这个返回标签的话,返回的东西要和return写在一行(比如这个括号),不然默认就return跳出去了,什么也不会渲染。(其他博主踩的坑)
案例:展示学生信息。
// 数据
   students: [
     { id: 111, name: "why", score: 199 },
     { id: 112, name: "kobe", score: 98 },
     { id: 113, name: "james", score: 199 },
     { id: 114, name: "curry", score: 188 },
   ]
map函数展示
  render () {
    const { students } = this.state
    return (
      <div>
        {
          students.map((item) => {
            return (
              <div className="item" key={item.id}>
                <h2>学号: {item.id}</h2>
                <h3>姓名: {item.name}</h3>
                <h1>分数: {item.score}</h1>
              </div>
            )
          })
        }
      </div>
    )
  }
展示分数大于100的学生:filter
render () {
   ...
  const filterStus = students.filter((item) => item.score > 100)
  return (
   ...
    filterStus.map((item) => {
      return (
        <div className="item" key={item.id}>
         ...
        </div>
      )
    })
    ...
  )
}
展示分数大于100的前两位学生:slice
  return (
    <div>
      {
        filterStus.slice(0, 2).map((item) => {
          return (
            <div className="item" key={item.id}>
              <h2>学号: {item.id}</h2>
              <h3>姓名: {item.name}</h3>
              <h1>分数: {item.score}</h1>
            </div>
          )
        })
      }
    </div>
  )
其中key的唯一标识和vue中原理差不多。
四、JSX的本质
Jsx的本质是 React.createElement(type, config, ...children) 函数的语法糖。所有的jsx最终都会被转换成React.createElement的函数调用。
先看这个函数的参数:
- 参数一:type
当前ReactElement的类型;
如果是标签元素,那么就使用字符串表示 “div”;
如果是组件元素,那么就直接使用组件的名称; - 参数二:config
所有jsx中的属性都在config中以对象的属性和值的形式存储;
比如传入className作为元素的class; - 参数三:children
存放在标签中的内容,以children数组的方式进行存储;
1. babel转译JSX
babel将JSX语句转换成React.createElement的函数,这个函数会创建element,element最终会形成元素树。每个元素就是虚拟DOM。
比如render函数里有这样一段JSX代码
<div>
    <h2>{count}</h2>
    <ul className='active'>
        <li>我是li1</li>
        <li>我是li2</li>
        <li>我是li3</li>
    </ul>
    <button>按钮</button>
</div>
经babel转译,得到原生的React:
<script>
    /*#__PURE__*/React.createElement("div", null, /*#__PURE__*/
    React.createElement("h2", null, count),

     /*#__PURE__*/React.createElement("ul", {className: "active"},
      /*#__PURE__*/React.createElement("li", null, "\u6211\u662Fli1"),
       /*#__PURE__*/React.createElement("li", null, "\u6211\u662Fli2")),

     /*#__PURE__*/React.createElement("button", null, "\u6309\u94AE"));
</script>
(因为版本问题,我自己没有转换成这样的原生React,原因见博客:jsx的转换)
不用babel的话,需要写原生的React(React.createElement)来展示页面内容;所以JSX能够方便开发,是个语法糖,其本质就是在调用React.createElement
2. 虚拟DOM到真实DOM
(1) 、虚拟DOM的创建
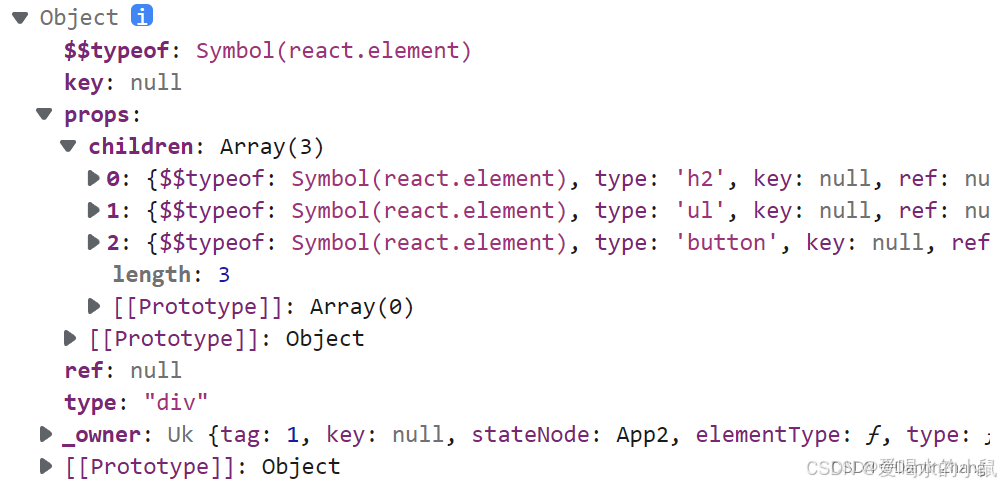
React.createElement最终创建出来一个个ReactElement对象,这些对象则组成了一个JavaScript的对象树,而这个对象树就是虚拟DOM
查看ReactElement树结构(这就是虚拟DOM):
(2) 、虚拟DOM到真实DOM
流程是:
编写JSX代码
---------->经过babel转译,转成React.createElement函数的调用
--------->该函数调用生成ReactElement对象,形成虚拟DOM
--------->虚拟DOM经过渲染生成真实DOM,这个渲染的过程就是React做的。
(3) 、虚拟DOM的作用
主要的作用:
-
当更新数据时,不用将所有DOM重新渲染;新旧虚拟DOM对比,来快速决定哪些东西更新,哪些东西不用更新。
-
做跨平台应用程序。虚拟DOM的本质就是JS对象,下一步是要渲染到页面上,
- React可以将其渲染到Web应用的界面上(就是调用原生的
document.createElement),将按钮渲染成网页的按钮button等。 - 也可以将其渲染到IOS/Android端,渲染成IOS/Android控件,将按钮渲染成移动端的UIButton控件。
- React可以将其渲染到Web应用的界面上(就是调用原生的
-
虚拟DOM帮助我们从命令式编程转到了声明式编程的模式。
你只需要告诉React希望让UI是什么状态; React来确保DOM和这些状态是匹配的;(也就是 你不需要直接进行DOM操作,不需要手动渲染。只需要写好状态(state的数据),写好页面结构即可。更改DOM,渲染的事交给React。)
五、购物车案例
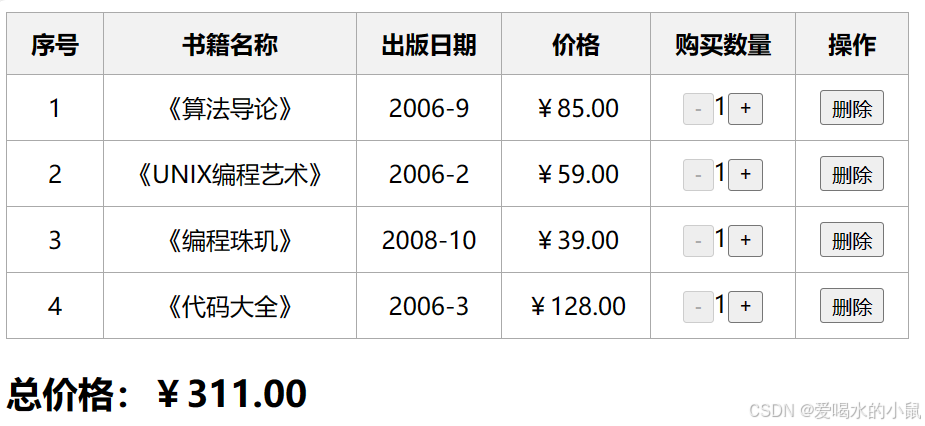
实现以下这个页面及功能:
  <script src="./data.js"></script>
  <div id="root"></div>
  <script type="text/babel">

    // 1. 定义类组件
    class App extends React.Component {
      // 1.1 构造函数
      constructor() {
        super()
        this.state = {
          books: books
        }
      }
      render () {
        const { books } = this.state
        return (
          <div>
            <table>
              <thead>
                <tr>
                  <th>序号</th>
                  <th>书籍名称</th>
                  <th>出版日期</th>
                  <th>价格</th>
                  <th>购买数量</th>
                  <th>操作</th>
                </tr>
              </thead>
              <tbody>
                {books.map((item, index) => {
                  return (
                    <tr key={index}>
                      <td>{index + 1}</td>
                      <td>{item.name}</td>
                      <td>{item.date}</td>
                      <td>{item.price}</td>
                      <td>
                        <button disabled>-</button>
                        {item.count}
                        <button>+</button>
                      </td>
                      <td><button>删除</button></td>
                    </tr>
                  )
                })}
              </tbody>
            </table>
            <h2>总价格:¥311</h2>
          </div>
        )
      }
    }

    // 2. 渲染类组件
    const root = ReactDOM.createRoot(document.querySelector('#root'))
    root.render(<App />)

  </script>
data.js里的数据为
const books = [
  {
    id: 1,
    name: '《算法导论》',
    date: '2006-9',
    price: 85.00,
    count: 1
  },
  {
    id: 2,
    name: '《UNIX编程艺术》',
    date: '2006-2',
    price: 59.00,
    count: 1
  }
  ...
]
1. 总价格与格式化
(1)计算总价格:每本书的单价*数量,相加
方式一:for循环遍历计算
方式二:reduce函数
// 封装为函数
 getTotalPrice () {
   let totalPrice = this.state.books.reduce((preValue, current) => {
     return preValue + current.count * current.price
   }, 0)
   return totalPrice
 }
(2)格式化:
表格里显示价格的地方,格式都是¥xxx.xx,因此可写个函数格式化
function formatPrice (price) {
  // toFixed,保留两位小数
  return '¥' + Number(price).toFixed(2)
}
// 应用:
//表格中价格一列
<td>{formatPrice(item.price)}</td>
//总价格
<h2>总价格:{formatPrice(this.getTotalPrice())}</h2>
2. 商品数量+和-的操作
  // 加
  increment (index) {
    const newBooks = [...this.state.books]
    newBooks[index].count += 1
    this.setState({ books: newBooks })
  }
  // 减
  decrement (index) {
    const newBooks = [...this.state.books]
    newBooks[index].count += -1
    this.setState({ books: newBooks })
  }
可以看出,这两个操作十分相似,唯一的区别是对count的操作数不一样。所以可以进一步封装。
我们不能直接去修改state中的数据,我们要借助调用setState这个方法去修改,从而可以执行render函数更新页面。
React官方推荐的做法是使用一个新的变量浅拷贝原来的数据,然后修改结束之后把新的浅拷贝赋值给state中数据
 // 商品数量变化,count为+1或-1
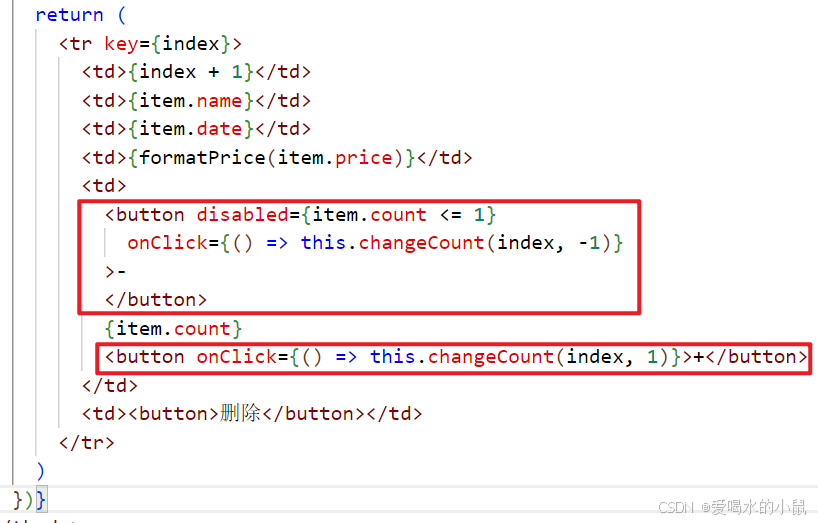
 changeCount (index, count) {
   const newBooks = [...this.state.books]
   newBooks[index].count += count
   this.setState({
     books: newBooks
   })
 }
需要注意当数量小于或等于1时,减号按钮应该禁用。
3. 删除
数组中删除数据,用到splice函数
  // 处理删除
  removeItem (index) {
    const newBooks = [...this.state.books]
    // 删除数据
    newBooks.splice(index, 1)
    this.setState({ books: newBooks })
  }
 // 页面
<td><button onClick={() => this.removeItem(index)}>删除</button></td>
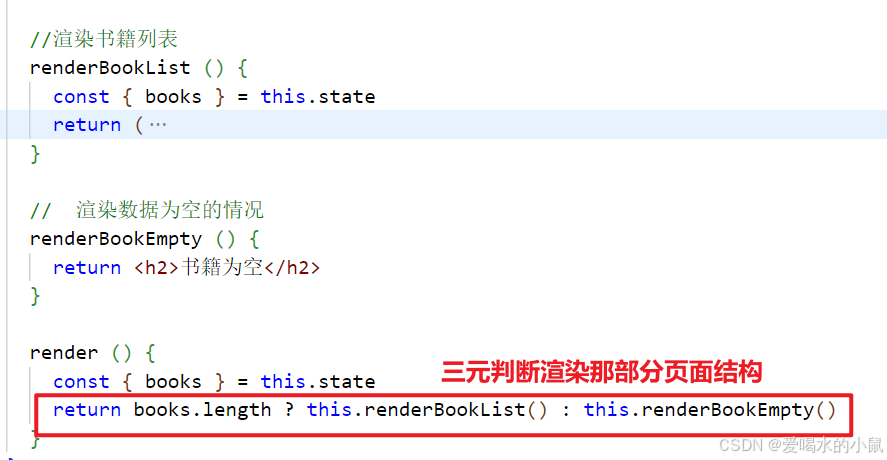
4. 无数据时给提示
考虑到条件渲染,当有数据时展示表格,无数据时隐藏表格。可将有数据与无数据时的页面结构封装到不同的函数里。

