导入,导出、模板下载等的前后端写法
文章目录
闲来无事,自己写了一个小demo,向着全栈再迈出一小步,而且这些demo以后工作也可以用到。这个目前都是基于若依写的。
一、导入实现
1.1 后端的导入
后端我就只列举核心的方法了,简单的sql就不加上来了。
BookController
    // 导入方法
    @PostMapping("/importData")
    @ResponseBody
    public AjaxResult importData(MultipartFile file, boolean updateSupport) throws Exception
    {
        ExcelUtil<Book> util = new ExcelUtil<Book>(Book.class);
        List<Book> bookList = util.importExcel(file.getInputStream());
        AjaxResult result = bookService.importBookList(bookList);
        return result;
    }
BookServiceImpl
下面这一段才是我写的导入的核心,以后改改就可以直接拿来用的
@Override
    @Transactional(rollbackFor = Exception.class)
    public AjaxResult importBookList(List<Book> bookList) {
        //========= 可有可无,如果哪一列必填项为空,就中断程序,并抛出异常 ======================
        if (CollectionUtils.isEmpty(bookList)) {
            throw new ServiceException("导入书籍数据不能为空!");
        }
        List<Integer> errorRows = new ArrayList<Integer>();
        for (int i = 0; i < bookList.size(); i++) {
            if (StringUtils.isEmpty(bookList.get(i).getBookName())) {
                int rowNumber = i + 1;
                errorRows.add(rowNumber);
            }
        }
        if (errorRows.size() > 0) {
            StringBuilder errorMessage = new StringBuilder();
            errorMessage.append("导入书籍数据不能为空,以下行的书籍名称为空:");
            for (int row : errorRows) {
                errorMessage.append("第").append(row).append("行、");
            }
            errorMessage.deleteCharAt(errorMessage.length() - 1);
            throw new ServiceException(errorMessage.toString());
        }
        //============= 可有可无,如果哪一列必填项为空,就中断程序,并抛出异常 ==================
        //============= 逐行校验导入 ===================================================
        int successNum = 0;
        int failureNum = 0;
        //用于判断第几行出现了错误
        int row = 0;
        StringBuilder successMsg = new StringBuilder();
        StringBuilder failureMsg = new StringBuilder();
        for (Book book : bookList) {
            try {
                //根据书籍名称查询是否已存在
                if (ObjectUtils.isNotEmpty(book.getBookName())) {
                    Book bookSize = bookMapper.selectBookByName(book.getBookName());
                    if (ObjectUtils.isEmpty(bookSize)) {
                        book.setCreateBy(SecurityUtils.getUsername());
                        book.setCreateTime(new Date());
                        bookMapper.insertBook(book);
                        successNum++;
                        successMsg.append("<br/>" + "书籍信息" + book.getBookName() + " 导入成功");
                    } else {
                        book.setUpdateTime(new Date());
                        book.setUpdateBy(SecurityUtils.getUsername());
                        bookMapper.updateBookName(book);
                        successNum++;
                        successMsg.append("<br/>" + "书籍信息" + book.getBookName() + " 更新成功");
                    }
                    row ++;
                }
            } catch (Exception e) {
                failureNum++;
                String msg = "<br/>" + failureNum + "书籍名称为:" + book.getBookName() + " 的数据导入失败:"+"其行号为"+ row ;
                failureMsg.append(msg + e.getMessage());
                log.error(e.getMessage(), e);
            }
        }
        if (failureNum > 0) {
            failureMsg.insert(0, "很抱歉,导入失败!共 " + failureNum + " 条数据格式不正确,错误如下:");
            throw new ServiceException(failureMsg.toString());
        } else {
            successMsg.insert(0, "恭喜您,数据已全部导入成功!共 " + successNum + " 条,数据如下:");
        }
        return AjaxResult.success(successMsg);
    }
1.2 前端的导入
这里前端我就不分三大块了,相信都看得懂应该加在哪
      <el-col :span="1.5">
        <el-button
          type="info"
          plain
          icon="el-icon-upload2"
          size="mini"
          @click="handleImport"

        >导入</el-button>

 <!--书籍导入对话框-->
    <el-dialog :title="upload.title" :visible.sync="upload.open" width="400px" append-to-body>
      <el-upload
        ref="upload"
        :limit="1"
        accept=".xlsx, .xls"
        :headers="upload.headers"
        :action="upload.url + '?updateSupport=' + upload.updateSupport"
        :disabled="upload.isUploading"
        :on-progress="handleFileUploadProgress"
        :on-success="handleFileSuccess"
        :auto-upload="false"
        drag
      >
        <i class="el-icon-upload"></i>
        <div class="el-upload__text">将文件拖到此处,或<em>点击上传</em></div>
        <div class="el-upload__tip text-center" slot="tip">
          <div class="el-upload__tip" slot="tip">
            <el-checkbox v-model="upload.updateSupport" /> 是否更新已经存在的用户数据
          </div>
          <span>仅允许导入xls、xlsx格式文件。</span>
          <el-link type="primary" :underline="false" style="font-size:12px;vertical-align: baseline;" @click="exportTemplate">下载模板</el-link>
        </div>
      </el-upload>
      <div slot="footer" class="dialog-footer">
        <el-button type="primary" @click="submitFileForm">确 定</el-button>
        <el-button @click="upload.open = false">取 消</el-button>
      </div>
    </el-dialog>

  =============================
     写在data里面
 // 书籍导入参数
      upload: {
        // 是否显示弹出层(用户导入)
        open: false,
        // 弹出层标题(用户导入)
        title: "",
        // 是否禁用上传
        isUploading: false,
        // 是否更新已经存在的用户数据
        updateSupport: 0,
        // 设置上传的请求头部
        headers: { Authorization: "Bearer " + getToken() },
        // 上传的地址
        // url: process.env.VUE_APP_BASE_API + "/system/user/importData"
        url:  process.env.NODE_ENV === "production"
          ? getBaseUrl() + "/system/book/importData"
          : process.env.VUE_APP_BASE_API + "/system/book/importData"

      },
=================================
    写在method里面
    /** 导入按钮操作 */
    handleImport() {
      this.upload.title = "用户导入";
      this.upload.open = true;
    },
    // 文件上传中处理
    handleFileUploadProgress(event, file, fileList) {
      this.upload.isUploading = true;
      // this.$set(this.upload,'open',true)
    },
 // 文件上传成功处理
    handleFileSuccess(response, file, fileList) {
      debugger;
      this.upload.open = false;
      this.upload.isUploading = false;
      // this.$set(this.upload,'open',false)
      this.$refs.upload.clearFiles();
      let previewText = response.data.length > 100 ? response.data.substring(0, 100)+ "..." : response.data;
      this.$alert(previewText, "导入结果", { dangerouslyUseHTMLString: true });
      this.getList();
    },
// 提交上传文件
    submitFileForm() {
      this.$refs.upload.submit();
    },
  }
二、基础的模板下载
这里的模板下载写法是和数据导出的写法是一样的,但是我想再加一个读取资源文件中已经定义的模板进行下载
2.1 后端的模板下载-若依基础版本
这里用的是若依的注解导出空的集合就相当于是一个模板了,但是不好的是模板不能够限定属性字段的格式,不方便导入。后面会介绍另一种 Java基础的读取资源文件的模板下载。
    //下载模板
    @PostMapping("/exportTemplate")
    @ResponseBody
    public void exportTemplate(HttpServletResponse response)
    {
        ExcelUtil<Book> util = new ExcelUtil<Book>(Book.class);
        util.importTemplateExcel(response,"书籍数据");
    }
Book.java
@Data
public class Book extends BaseEntity
{
    private static final long serialVersionUID = 1L;

    /** 主键 */
    private Long id;

    /** 书名 */
    @Excel(name = "书名")
    private String bookName;

    /** 图书类型(1:名著,2:历史,3:社科) */
    @Excel(name = "图书类型", readConverterExp = "1=:名著,2:历史,3:社科")
    private String bookType;

    /** 作者 */
    @Excel(name = "作者")
    private String author;

    /** 编辑 */
    @Excel(name = "编辑")
    private String edithor;

    /** 出版日期 */
    @JsonFormat(pattern = "yyyy-MM-dd")
    @Excel(name = "出版日期", width = 30, dateFormat = "yyyy-MM-dd")
    private Date publishDate;

    /** 出版社 */
    @Excel(name = "出版社")
    private String publisher;

    /** 售价 */
    @Excel(name = "售价")
    private BigDecimal price;
2.2 前端的模板下载
这里就用的是若依的基础下载方式
      <el-button
          type="warning"
          plain
          icon="el-icon-download"
          size="mini"
          @click="exportTemplate"
        >模板下载</el-button>

   下面这个其实就是若依整了一个全局的下载方法
    exportTemplate() {
      this.download('system/book/exportTemplate', {
      }, `书籍_${new Date().getTime()}.xlsx`)
      // exportTemplate().then(response => {
      // });
    },

比如在main.js里面全局挂载
import { download } from '@/utils/request'
Vue.prototype.download = download
然后可以具体看看它在request.js里面是怎么封装的
2.3 后端的模板下载 - 基于资源文件读取
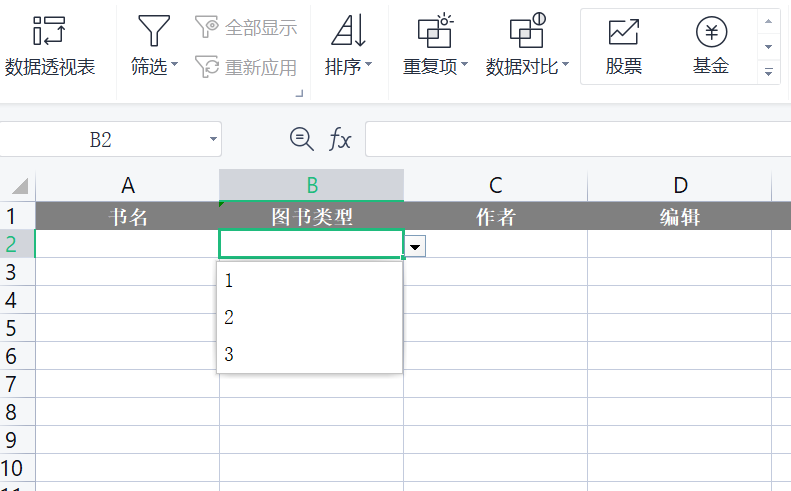
基于资源文件读取的方式下载模板可以先定义好excel的格式,比如限制输入字典类型的字段的时候,在excel里面先限制好格式。而且这种方法也比较通用(文件名称前端都是可以设置的) 前端的写法不变
//基于资源文件读取下载模板
    @PostMapping("/exportResourceTemplate")
    public void exportResourceTemplate(HttpServletResponse response)
    {
        ClassPathResource resource = new ClassPathResource("template/book_1720181938018.xlsx");
        InputStream inputStream = null;
        OutputStream outputStream = null;
        try {
            inputStream = resource.getInputStream();
            outputStream = response.getOutputStream();
            response.setContentType("application/vnd.openxmlformats-officedocument.spreadsheetml.sheet");
            String fileName = "书籍模板.xlsx";
            String encodedFileName = UriUtils.encode(fileName, "UTF-8");
            response.setHeader("Content-Disposition", "attachment; filename=\"" + encodedFileName + "\"");
            //这里定义了一个大小为 1024 字节(1 KB)的字节数组 buffer。这个缓冲区用于暂存从 InputStream 中读取的数据。
            byte[] buffer = new byte[1024];
            int bytesRead;
            while ((bytesRead = inputStream.read(buffer)) != -1) {
                outputStream.write(buffer, 0, bytesRead);
            }
        } catch (IOException e) {
            e.printStackTrace();
            // 处理异常
        } finally {
            if (inputStream != null) {
                try {
                    inputStream.close();
                } catch (IOException e) {
                    e.printStackTrace();
                }
            }
            if (outputStream != null) {
                try {
                    outputStream.close();
                } catch (IOException e) {
                    e.printStackTrace();
                }
            }
        }
    }
2.4 excel制作下载模板
这里顺带讲一下怎么制作excel下载模板中的字典类型字段下拉限制
这样就可以实现输入限制了
三、结语
后续我还会实现附件上传,xml解析下载,pdf预览等功能,这些东西其实我觉得确实得自己留一个demo,方便自己后续需要的时候可以直接拿来用,挺好的。

