文章目录
前言
本章内容详细介绍了RBAC模型和SpringSecurity框架的使用。
一、RBAC模型
1. 概述
- 在企业系统中,通过配置用户的功能权限可以解决不同的人分管不同业务的需求,基于RBAC模型,RBAC(Role Based Access Control)模型,它的中文是基于角色的访问控制,主要是将功能组合成角色,再将角色分配给用户,也就是说角色是功能的合集。
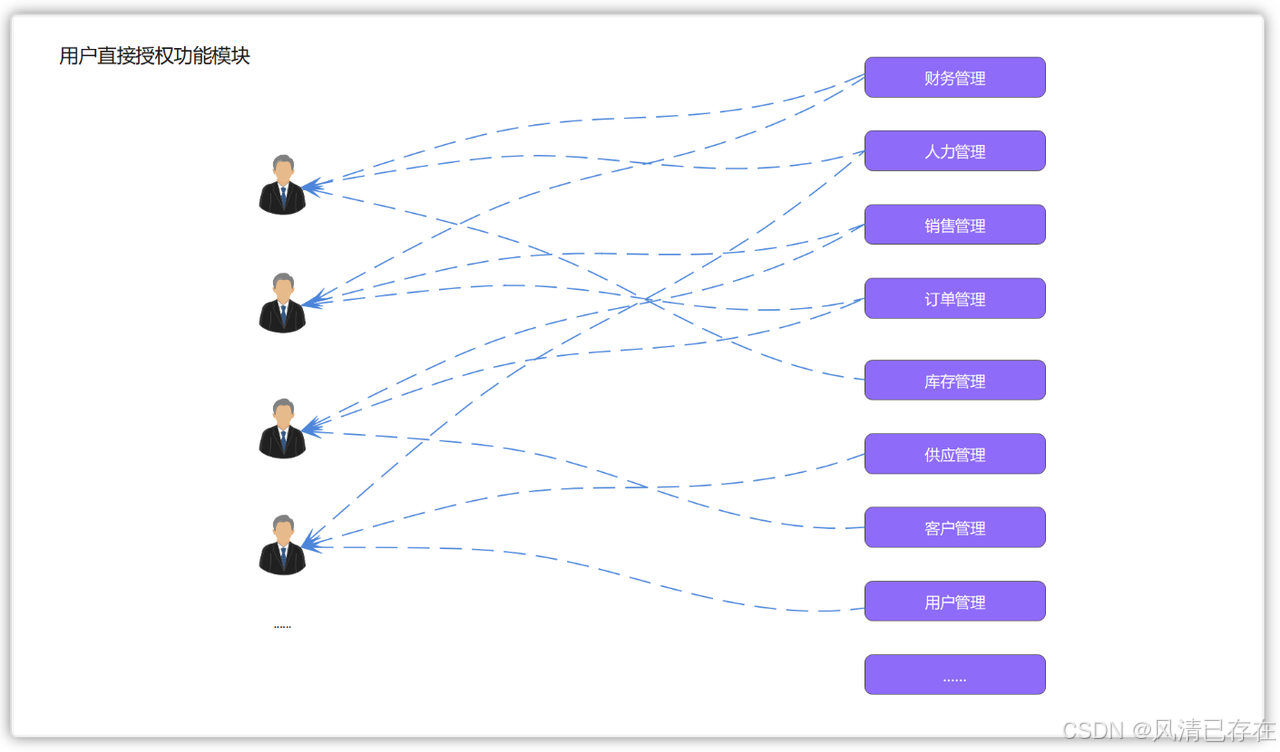
- 比如:企业A总共有12个功能,需要创建100个用户。这些用户包括财务管理、人事管理、销售管理等等。如果不引入基于角色的访问控制(RBAC)模型,我们就需要每创建一个用户就要分配一次功能,这将至少需要进行100次操作(每个用户只能拥有一个功能)。如果用户数量增加到1000甚至10000,并且一个用户可能会拥有多个功能,操作将会变得非常繁琐。如图:
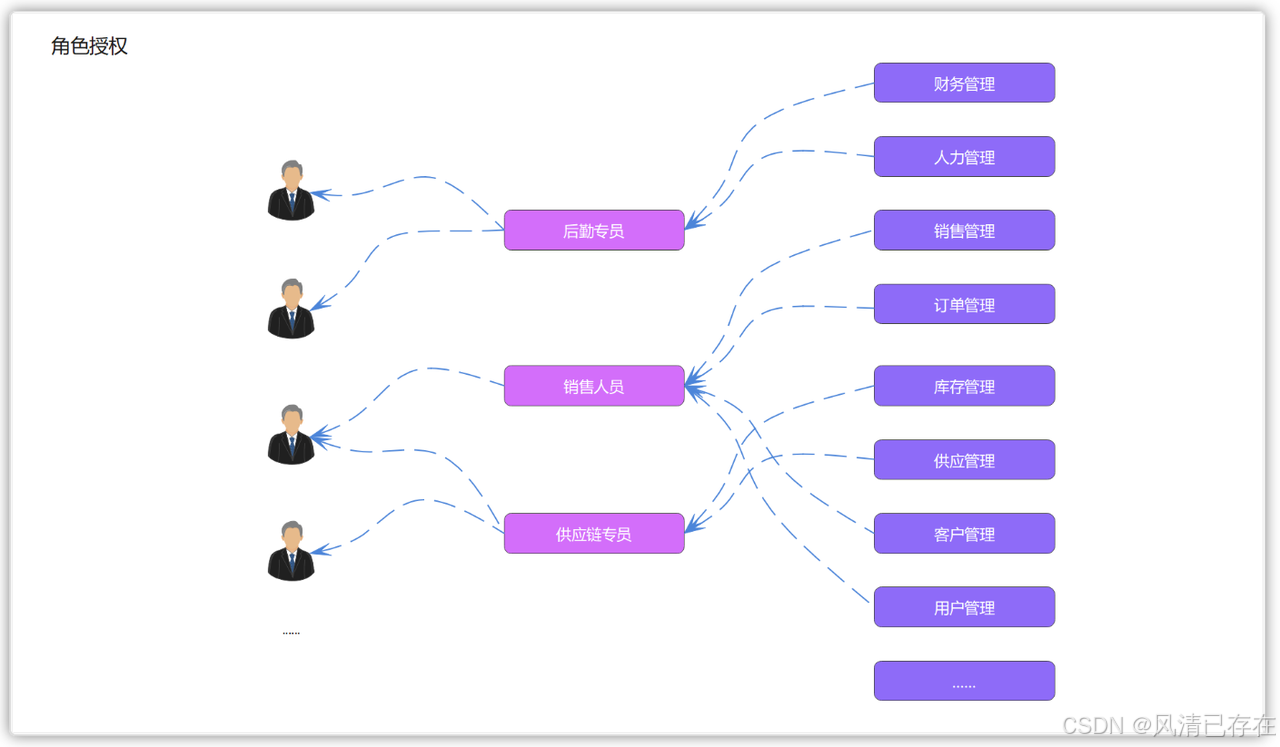
- 经过多次操作后发现,有些人被分配了相同的功能。例如,A、B等10个用户都被分配了客户管理、订单管理和供应商管理这几个模块。其实我们完全可以将这几个功能模块组合成一个包,然后将整个包分配给需要的用户,这个包被称为角色。由于角色和功能之间的对应关系相对稳定,在分配权限时只需分配角色即可,如下图所示:
- 基于RBAC授权模式后,我们可以达到以下2个目标:
- 解耦用户和功能,降低操作错误率
- 降低功能权限分配的繁琐程度
2. ER图与关系梳理
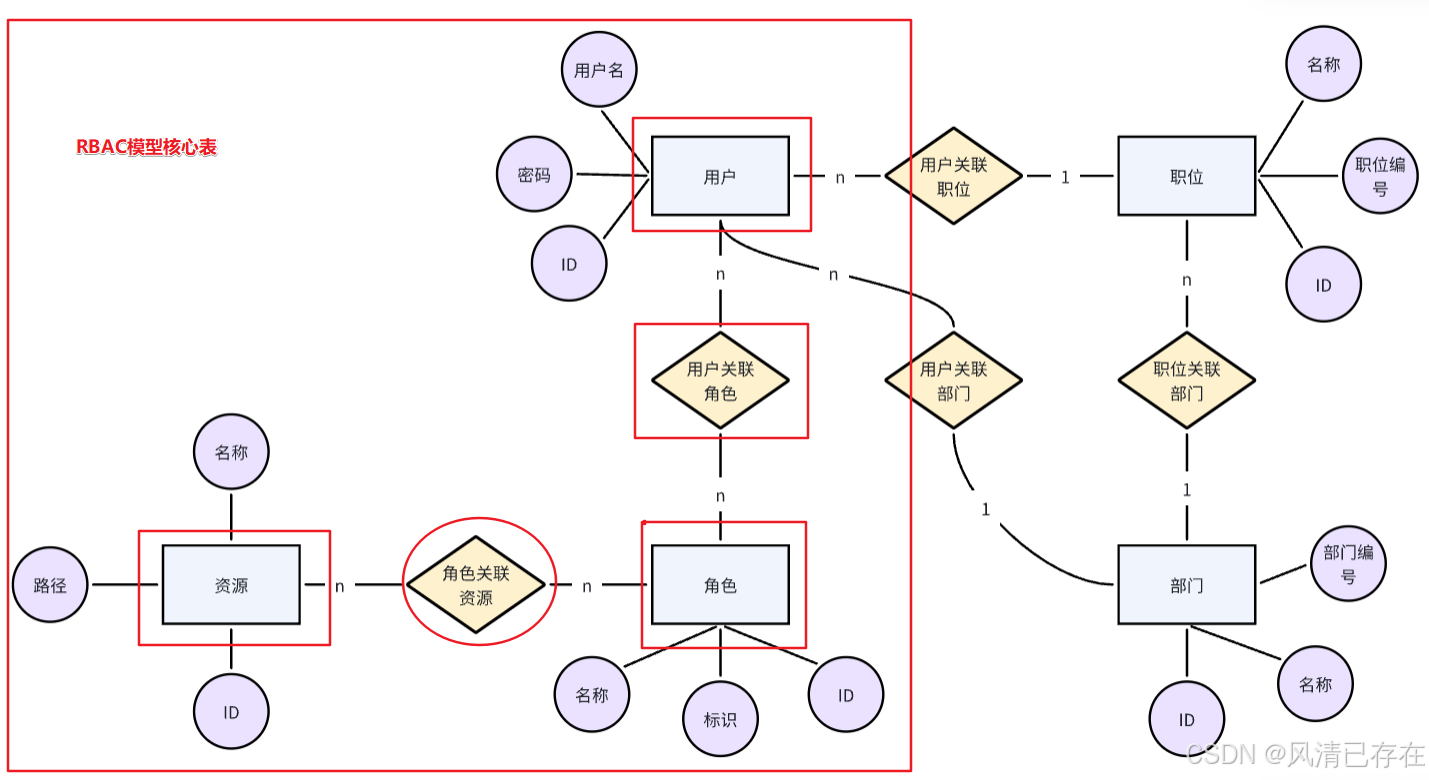
在一个核心业务系统中,我们通常通过业务分析,从而抽离出数据库表,表确定之后我们会进一步分析表中应该有的字段,下面我们先看下RBAC模型涉及的业务ER图:
- 上图中清楚的描述用户、角色、资源、职位、部门之间的关系,同时我们进一步推导出以下结果:
- 用户与职位是N:1关系
- 用户与部门是N:1关系
- 用户与角色是N:N关系,则它们之间必然有一个中间表
- 角色与资源是N:N关系,则它们之间必然有一个中间表
3. 总结
- RBAC模型是基于角色的访问控制模型,该模型最常应用于系统权限设计中
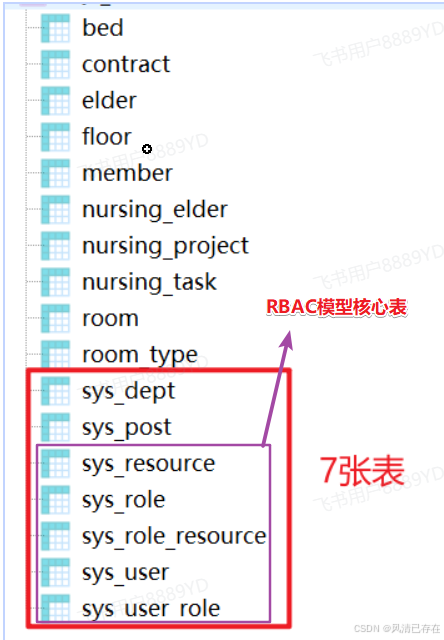
- RBAC模型中,一般会有是三个基本对象,用户,角色和权限,他们三个分别都是多对多关系,那么也就意味着有两张中间表,所以数据库表层面共有五张表
二、SpringSecurity认证授权
1. 权限框架
- 权限管理是所有后台系统的都会涉及的一个重要组成部分,主要目的是对不同的人访问资源进行权限的控制,避免因权限控制缺失或操作不当引发的风险问题,如操作错误,隐私数据泄露等问题。
- 权限管理实现方式
- 方案一:使用拦截器(过滤器)+JWT 实现地址鉴权
- 方案二:使用权限框架 Apache Shiro
- Shiro是apache旗下一个开源框架,它将软件系统的安全认证相关的功能抽取出来,实现用户身份 认证,权限授权、加密、会话管理等功能,组成了一个通用的安全认证框架。Shiro最大的特点是 不跟任何的框架或者容器捆绑,可以独立运行。
如果我们项目,没有使用到Spring框架,可以考虑使用Shiro。Shiro在小项目使用比较常见。 - Shiro 最大的问题在于和 Spring 家族的产品进行整合时较为不便。在Spring Boot 推出的很长一段时间里,Shiro 都没有提供相应的 starter,后来虽然有一个 shiro-spring-boot-web-starter 出来,但配置并没有简化多少。所以在 Spring Boot/Spring Cloud 技术栈的微服务项目中,Shiro 几乎不存在优势。
- Shiro是apache旗下一个开源框架,它将软件系统的安全认证相关的功能抽取出来,实现用户身份 认证,权限授权、加密、会话管理等功能,组成了一个通用的安全认证框架。Shiro最大的特点是 不跟任何的框架或者容器捆绑,可以独立运行。
- 方案三:使用权限框架Spring Security
- Spring Security是一个功能强大且高度可定制的,主要负责为Java程序提供声明式的身份验证和访问控制的安全框架。其前身是Acegi Security,后来被收纳为Spring的一个子项目,并更名为了Spring Security。
- 优点:
Spring Security基于Spring开发,所以Spring Security与Spring更契合;
Spring Security功能比Shiro更加强大,尤其是在安全防护方面;
Spring Security社区资源比Shiro更加丰富;
Spring Boot/Spring Cloud环境中,更容易集成Spring Security;
Spring Security 具备良好的扩展性,可以满足自定义的要求;
Spring Security对 OAuth2框架支持很好,而Shiro则对 OAuth2 支持不够。
- 方案四:使用AOP实现方法鉴权
- 方案一:使用拦截器(过滤器)+JWT 实现地址鉴权
2. 核心概念
-
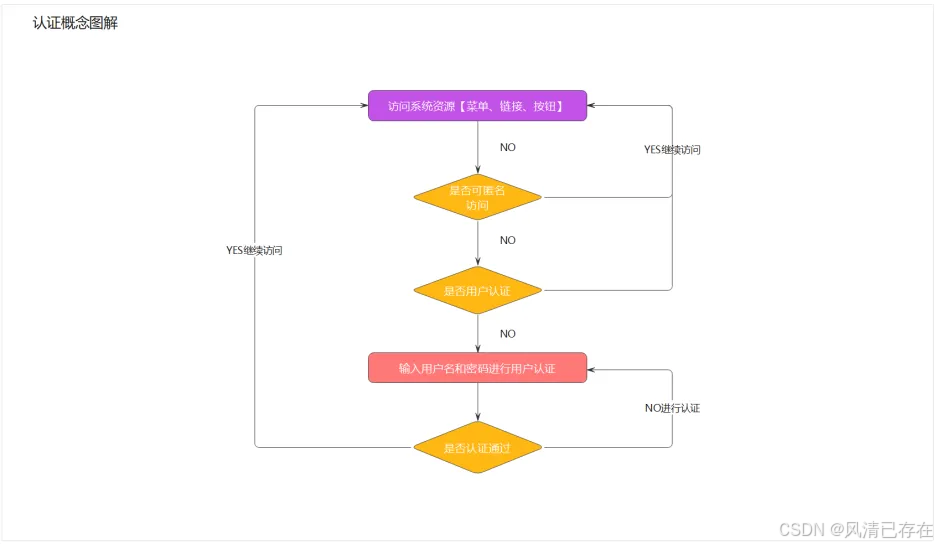
认证
大家可以简单的理解为:用户登录的行为就是认证(你是谁)
判断用户是否存在,判断用户密码是否正确
-
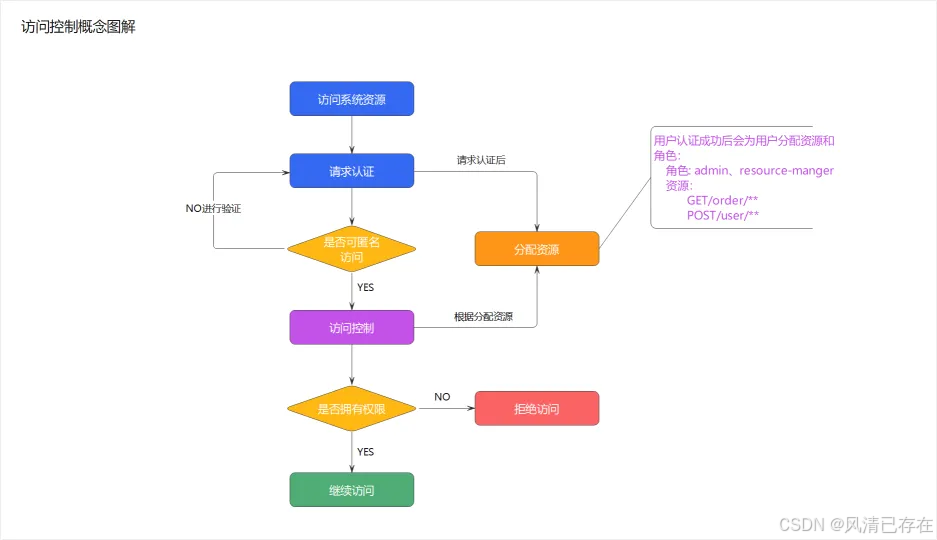
授权
授权就是用户登录后,给用户授予访问哪些资源的权限,这样用户登录后就只看相关权限资源。
我们有很多的资源api列表,那这个登录后的用户是否拥有这个api访问权限 -
鉴权:
用户通过认证并被授权后进行的一道安全检查,判断用户是否有权利执行或访问该资源(校验资源)
3. SpringSecurity
Spring Security 是 Spring家族中的一个安全管理框架。相比与另外一个安全框架Shiro,它提供了更丰富的功能,社区资源也比Shiro丰富。
一般来说中大型的项目都是使用SpringSecurity来做安全框架。小项目有Shiro的比较多,因为相比与SpringSecurity,Shiro的上手更加的简单。
3.1 SpringSecurity入门
3.1.1. 简单登录
首先我们先进行一个简单的登录案例演示
- 在SpringBoot空项目中引入引入依赖
<dependency>
  <groupId>org.springframework.boot</groupId>
  <artifactId>spring-boot-starter-security</artifactId>
</dependency>
- 定义一个Controller类
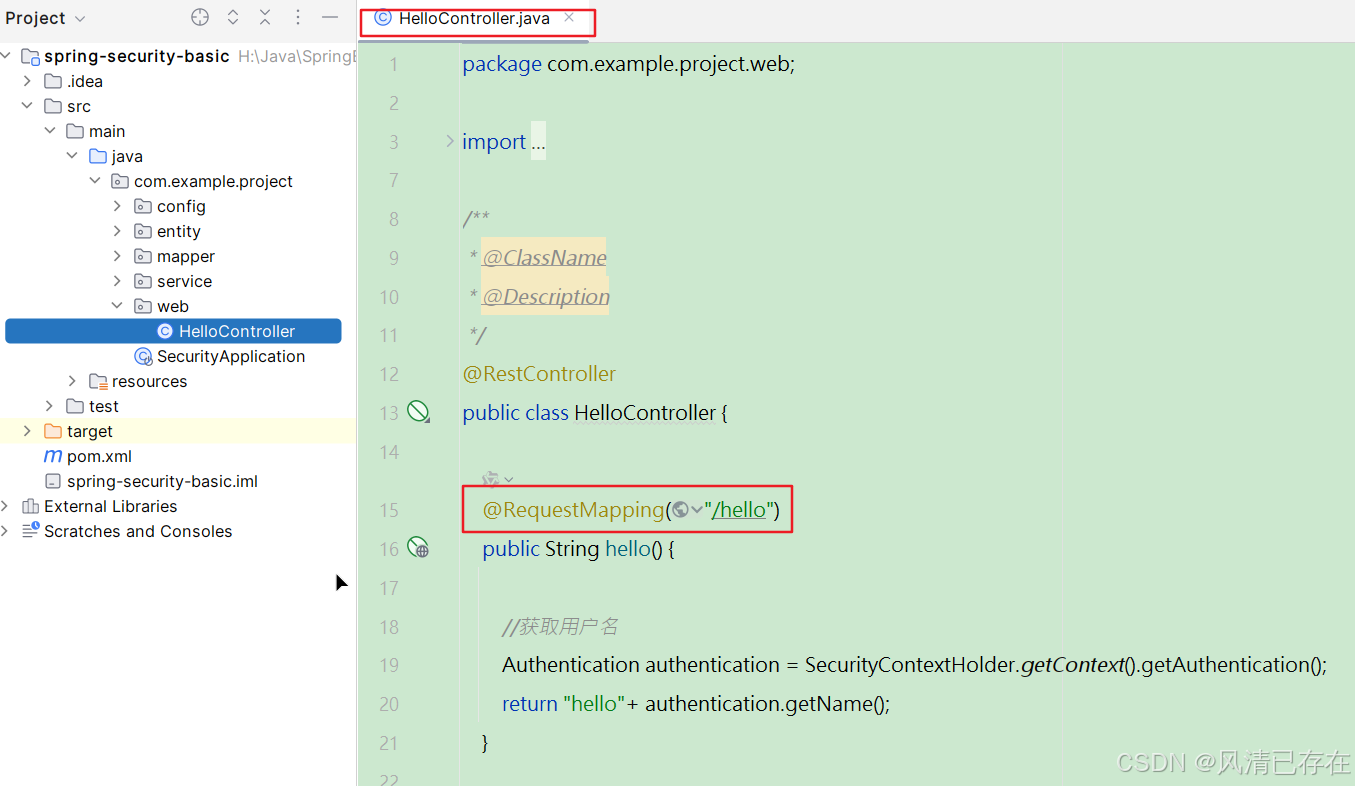
下图中仅仅在web包中存在一个HelloController类,类中仅仅定义了一个hello方法。
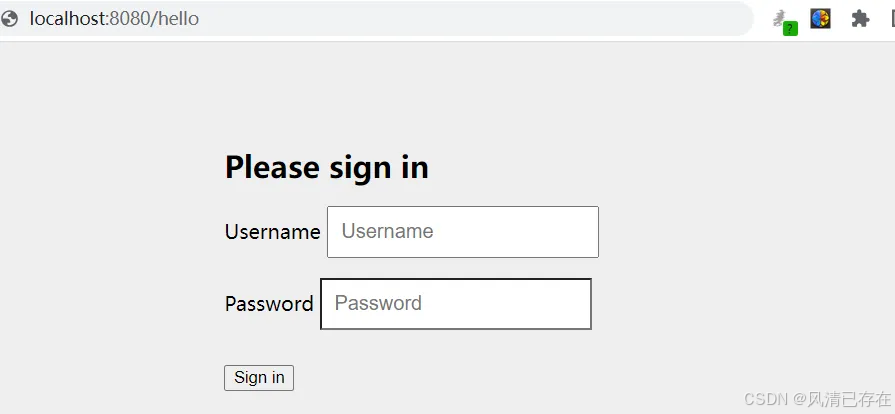
- 启动项目访问http://localhost:8080/hello 这时会自动跳转到一个默认登陆页面
该页面有框架提供,默认用户名为user,密码会在控制台打印
- 输入用户名user(默认值)和密码后,会再次跳回到hello的输入页面。
页面内容为:hellouser - 如果退出登录,则需要访问:http://localhost:8080/logout
到这里演示完成了,我们只是引入了一个依赖,什么代码都没写,就实现了一套简单的权限控制了,当然实际的项目,肯定不能这么做的。
3.1.2. 自定义登录页
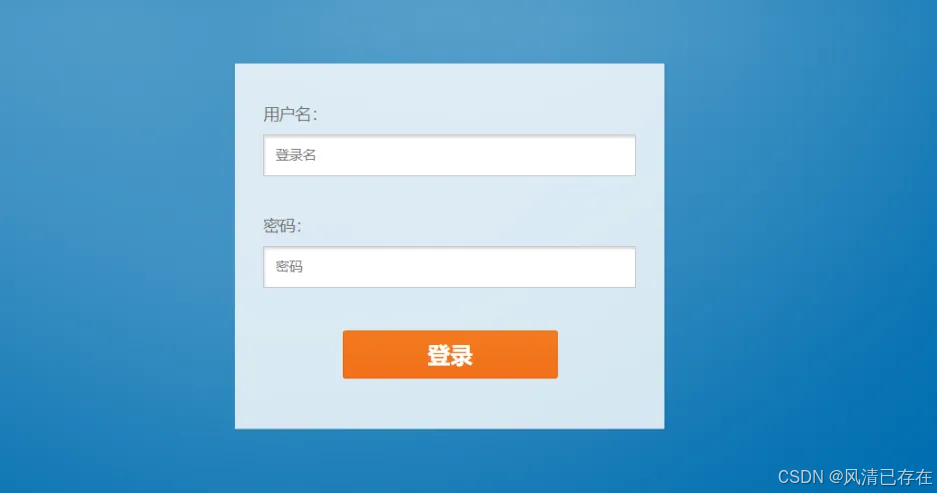
运行完刚才的例子,你会有两个感觉,第一个是登录窗口出现的特别慢,第二个感觉是登录窗口特别简陋。实际上,更多的项目是用自己的登录页,而不是框架自带的页面!
接下来我们自定义登录页面。
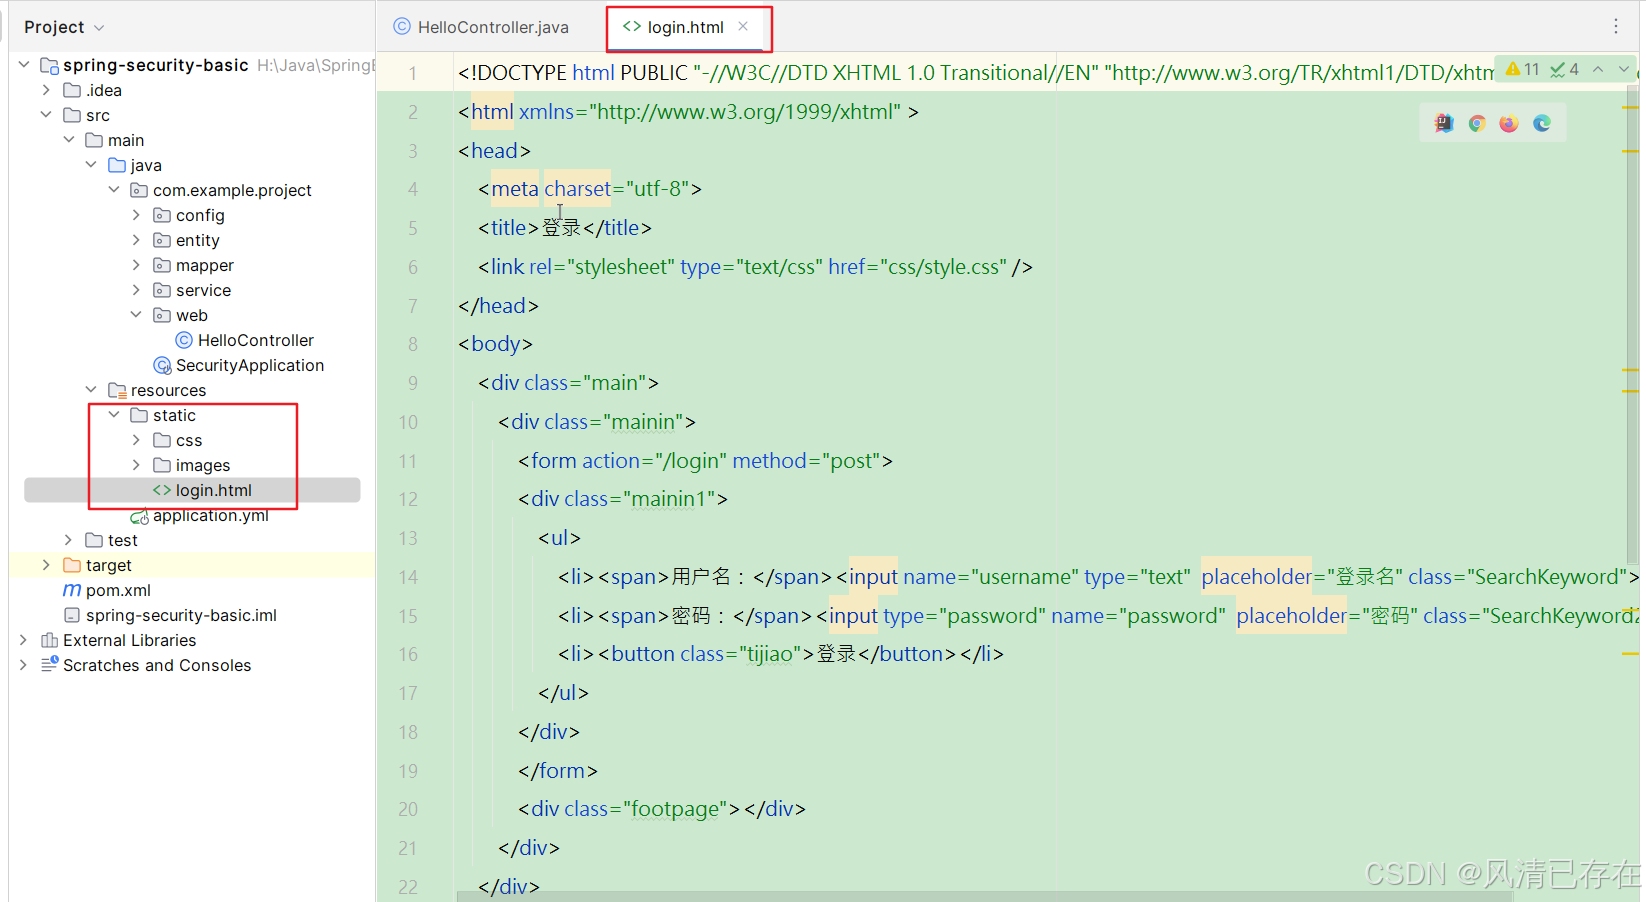
- 下图红框则为自定义登录页面
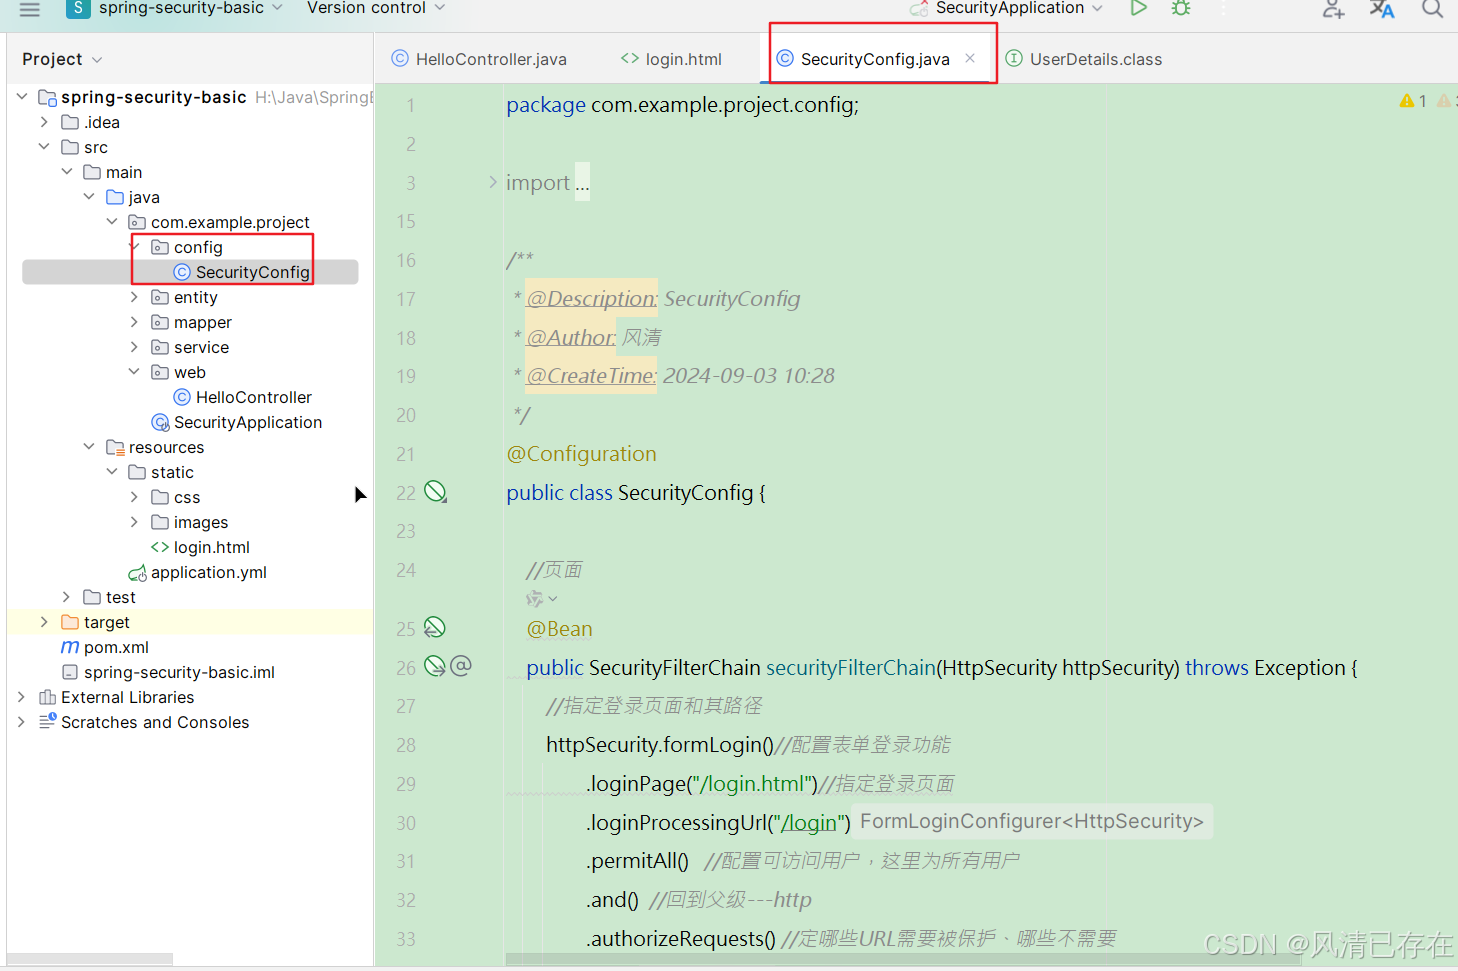
- 这个时候继续创建对应的配置类,配置登录页
@Configuration
public class SecurityConfig {

    @Bean
    public SecurityFilterChain securityFilterChain(HttpSecurity http) throws Exception {

        http
        .formLogin()             //自定义自己编写的登陆页面
        .loginPage("/login.html")    //登录页面设置  以resources包下的static为根
        .loginProcessingUrl("/login") //登录访问路径   以端口号为根
        .permitAll()//登录页和登录访问路径无需登录也可以访问


        .and()//回到http

        .authorizeRequests()
        .antMatchers("/css/**","/images/**").permitAll()
        .anyRequest().authenticated()
        .and()
        .csrf().disable();    //关闭csrf防护
        return http.build();
    }

}
代码分析
- @Configuration 注解表明这是一个配置类。
SecurityConfig 类包含了一个名为 securityFilterChain 的bean,该bean负责配置安全过滤器链(SecurityFilterChain),这是Spring Security用来保护HTTP请求的主要机制。- 在 securityFilterChain 方法中,通过 HttpSecurity 对象来定义安全规则。首先调用 formLogin() 来配置表单登录功能。
.loginPage(“/login.html”) 指定了自定义登录页面的位置。
.loginProcessingUrl(“/login”) 设置了处理登录请求的URL,当用户尝试访问受保护资源但尚未认证时,Spring Security会重定向到此URL。
.permitAll() 表示任何用户都可以访问登录页面和登录处理URL。- 接下来调用 .authorizeRequests() 来指定哪些URL需要被保护、哪些不需要。
.antMatchers(“/css/", "/images/”).permitAll() 允许未认证的用户访问CSS和图片资源,这对于前端开发是非常有用的,因为这些通常是静态资源,不应该受到安全限制。
.anyRequest().authenticated() 表示所有其他请求都需要经过身份验证。
.csrf().disable() 是用来禁用跨站请求伪造(CSRF)保护的。在生产环境中,禁用CSRF保护是不推荐的,因为它可以保护应用程序免受某些类型的攻击。如果你的应用程序确实需要CSRF保护,那么你应该保留这个保护措施,并且确保你的客户端请求正确地包含了CSRF令牌。- .and() 方法通常用于结束当前的配置块并回到父配置级别,允许你继续进行其他的配置。这是因为Spring Security的配置API是基于流式风格(Fluent API)
的设计,使得配置更加连贯和易读。
在这个例子中:
formLogin() 配置块包括了 .loginPage(“/login.html”), .loginProcessingUrl(“/login”), 和 .permitAll() 这些方法调用。当你调用 .and() 时,就结束了 formLogin() 的配置,并回到了 HttpSecurity 的配置级别。
接下来的 .authorizeRequests() 开始了一个新的配置块,用于定义哪些请求是公开的,哪些请求需要认证。当 .authorizeRequests() 配置块完成后,再次调用 .and() 回到 HttpSecurity 的配置级别。
最后,.csrf().disable(); 用于禁用CSRF保护。
- 修改HelloController
@RequestMapping("/hello")
public String hello(){
    //认证成功,得到认证成功之后用户信息
    Authentication authentication = SecurityContextHolder.getContext().getAuthentication();
    String userName = authentication.getName();
    return "hello  "+userName;
}
代码分析
- @RequestMapping(“/hello”):这个注解指定了一个HTTP请求处理器,它将处理所有发送到 /hello 路径的请求。
- public String hello():这是一个返回字符串的方法,通常情况下,这个字符串会被解析为视图的名称,用于渲染响应给客户端的HTML页面。
- 在方法内部,首先通过 SecurityContextHolder 获取当前上下文中的 Authentication 对象。
SecurityContextHolder 是Spring Security提供的一个线程绑定的上下文对象,它持有当前认证状态。- Authentication 对象代表了当前执行操作的主体(通常是用户)。从这个对象中,可以通过 getName() 方法获取用户的名称。
- 最后,方法返回一个字符串 "hello "+userName,这通常会被解析为一个视图名,并且 userName 可能会被作为模型属性传递给视图,以便在视图中显示用户的名称。
- 再次运行项目,我们会看到登录页面,变成下面这个样子啦
运行后效果如下:
3.1.3. SpringSecurity基本原理
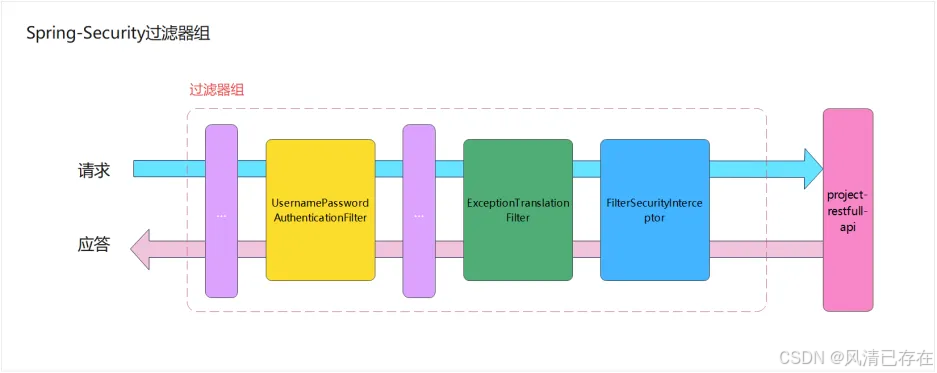
Spring-Security其内部基础的处理方式就是通过过滤器来实现的,来我们看下刚才的例子用到的一些过滤器,如图所示:
这几个过滤器负责工作内容如下
- UsernamePasswordAuthenticationFilter:负责处理我们在登陆页面填写了用户名密码后的登陆请求。入门案例的认证工作主要有它负责。
- ExceptionTranslationFilter:处理过滤器链中抛出的任何AccessDeniedException和AuthenticationException。
- FilterSecurityInterceptor:负责权限校验的过滤器。
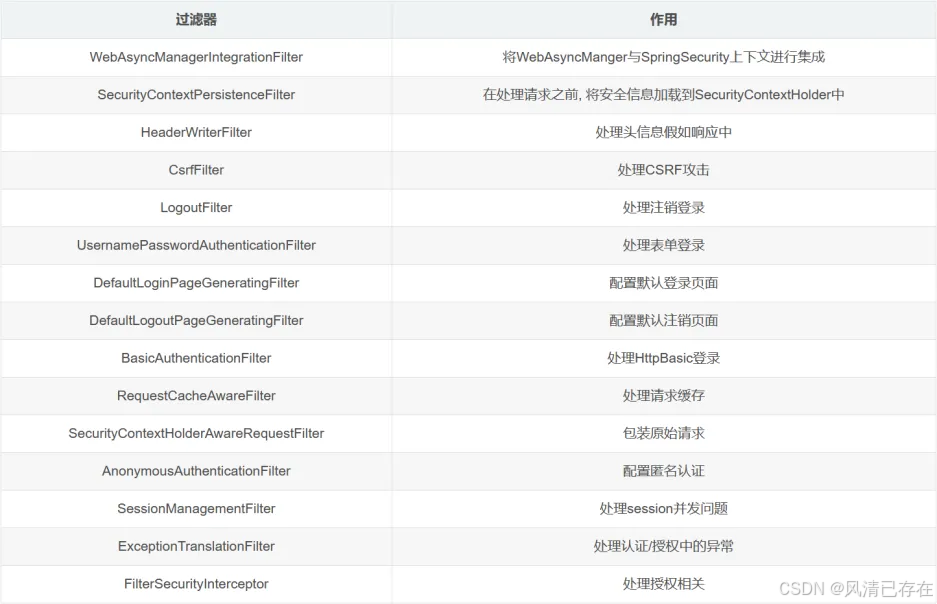
当然,SpringSecurity过滤器不止这些的,下面我们把他们展示出来,不需要同学们记忆,只需了解即可!
3.2 认证
3.2.1. 基于内存模型实现认证
- 修改配置类 SecurityConfig,添加两个bean的配置
    @Bean
    PasswordEncoder passwordEncoder() {
        return NoOpPasswordEncoder.getInstance();
    }

    @Bean
    public UserDetailsService users() {
        UserDetails user = User.builder()
                .username("user")
                .password("123456")
                .roles("USER")
                .build();
        UserDetails admin = User.builder()
                .username("admin")
                .password("112233")
                .roles("USER", "ADMIN")
                .build();
        return new InMemoryUserDetailsManager(user, admin);
    }
代码分析
- PasswordEncoder Bean
定义了一个 PasswordEncoder bean,用于加密和验证用户的密码。使用了 NoOpPasswordEncoder,这是一种不进行任何加密的编码器,仅用于演示目的。
在实际应用中,应该使用更强的加密方式来保护用户密码。- UserDetailsService Bean
定义了一个 UserDetailsService bean,它负责加载用户信息。这里使用了 InMemoryUserDetailsManager 来在内存中管理用户。该信息用户后续认证授权- UserDetails:这是Spring Security中的一个UserDetailsService 接口实例,表示一个用户的信息。它包含了用户名、密码、权限等信息。
- User.builder():这是一个工厂方法,用于创建 UserDetails 的实例。这里使用了 User 类的 builder() 方法来构建用户信息。
4.1. username 和 password:分别设置了用户的用户名和密码。注意,这里的密码是以明文形式存储的,这在实际应用中是不可取的。应该使用加密后的密码来
提高安全性。
4.2 roles:设置了用户的权限角色。在这个例子中,“user”用户只有一个“USER”角色,而“admin”用户同时具有“USER”和“ADMIN”两个角色。
4.3 InMemoryUserDetailsManager:这是一个实现了 UserDetailsService 接口的类,用于在内存中管理用户。在这里,我们创建了两个用户并将它们传递给InMemoryUserDetailsManager 的构造函数。
- 再次测试,输入用户名 user 密码123456
运行后效果如下:
3.2.2. 基于JDBC数据库实现认证
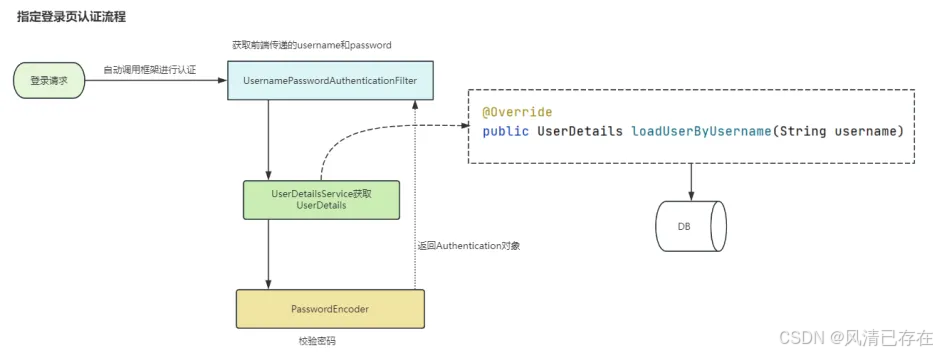
在Spring Security框架中提供了一个UserDetailsService 接口,它的主要作用是提供用户详细信息。具体来说,当用户尝试进行身份验证时,UserDetailsService 会被调用,以获取与用户相关的详细信息。这些详细信息包括用户的用户名、密码、角色等
执行流程如下:
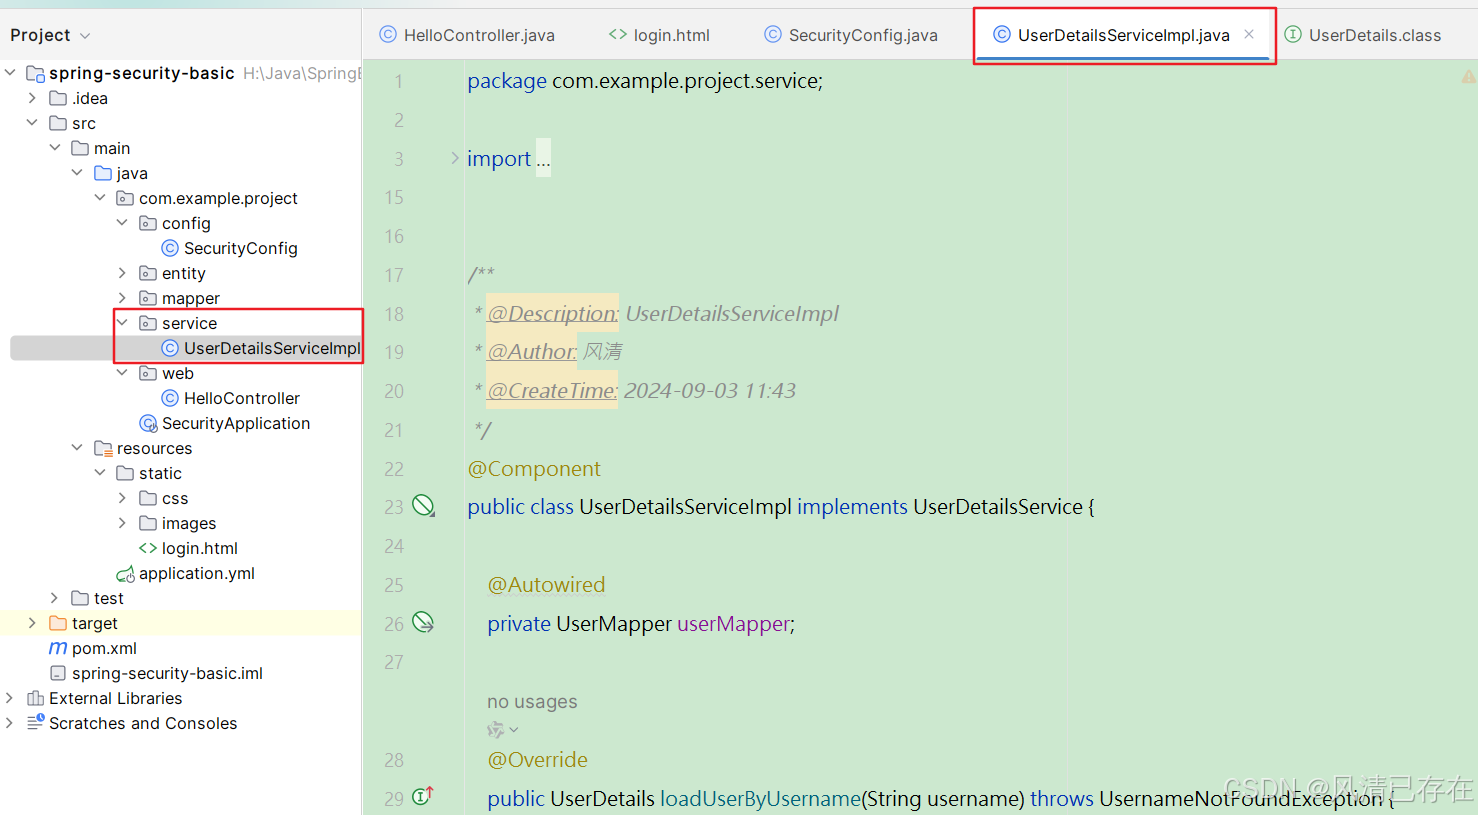
- 新创建一个UserDetailsServiceImpl,让它实现UserDetailsService ,代码如下
@Component
public class UserDetailsServiceImpl  implements UserDetailsService {


    @Override
    public UserDetails loadUserByUsername(String username) throws UsernameNotFoundException {

        if(username.equals("user")){
            UserDetails user= User.builder()
                    .username("user")                  .password("$2a$10$8V3UHgnnI/3RCKhg5aklz.sw448DP4.x9P2hFl/fnw99QU86POlgm")
                    .roles("USER")
                    .build();
            return user;
        }
        if(username.equals("admin")){
            UserDetails admin= User.builder()
                    .username("admin")                    .password("$2a$10$pCQMCKRUi7iUXGBd14a3oetcdgD1MwgKLenxXHidq1pcfmuva1QjW")
                    .roles("ADMIN","USER")
                    .build();
            return admin;
        }
        return null;
    }
}
代码分析
- 当前对象需要让spring容器管理,所以在类上添加注解@Component
- loadUserByUsername方法的返回值,叫做UserDetails,这也是框架给提供了保存用户的类,并且也是一个接口,如果我们有自定义的用户信息存储,可以实现这个接口
- 既然以上能使用这个类来查询用户信息,那么我们之前在SecurityConfig中定义的用户信息,可以注释掉了,如下:
    /*
    @Bean
    public UserDetailsService users() {
        UserDetails user = User.builder()
                .username("user")
                .password("$2a$10$2VCyByZ5oeiXCEN73wvBB.xpmJgPBbZVS/Aallmdyij2G7hmAKQTG")
                .roles("USER")
                .build();
        UserDetails admin = User.builder()
                .username("admin")
                .password("$2a$10$cRH8iMMh6XO0T.ssZ/8qVOo8ThWs/qfntIH3a7yfpbPd05h9ZGx8y")
                .roles("USER", "ADMIN")
                .build();
        return new InMemoryUserDetailsManager(user, admin);
    }*/
- 重启项目,然后进行测试,发现跟之前没什么区别,一样是实现了安全校验
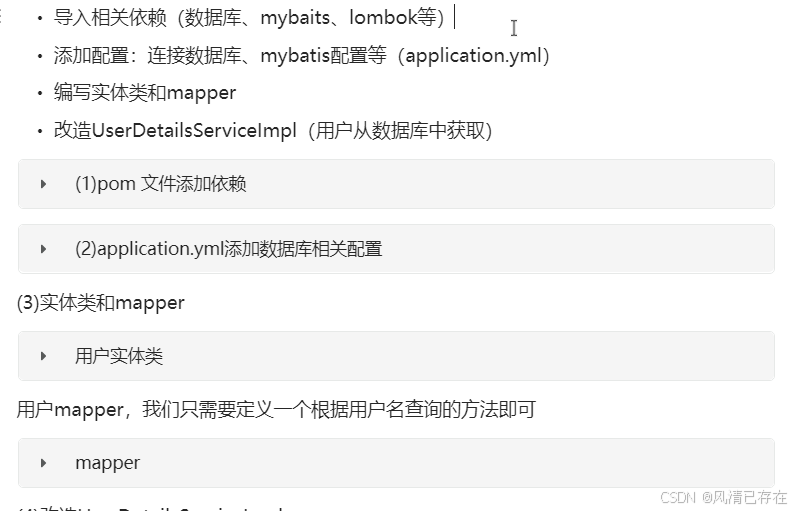
当然我们最终不能把用户静态的定义在代码中的,我们需要到数据库去查询用户,我们可以直接使用我们项目中的用户表,实现的步骤如下:
根据自的数据库和字段进行配置即可
- 改造UserDetailsServiceImpl
package com.zzyl.security.service;

import com.zzyl.security.entity.User;
import com.zzyl.security.entity.UserAuth;
import com.zzyl.security.mapper.UserMapper;
import org.springframework.beans.factory.annotation.Autowired;
import org.springframework.security.core.GrantedAuthority;
import org.springframework.security.core.authority.SimpleGrantedAuthority;
import org.springframework.security.core.userdetails.UserDetails;
import org.springframework.security.core.userdetails.UserDetailsService;
import org.springframework.security.core.userdetails.UsernameNotFoundException;
import org.springframework.stereotype.Component;

import java.util.ArrayList;
import java.util.Collection;
import java.util.List;
import java.util.SimpleTimeZone;

/**
 * @author sjqn
 * @date 2023/9/1
 */
@Component
public class UserDetailsServiceImpl implements UserDetailsService {


    @Autowired
    private UserMapper userMapper;

    @Override
    public UserDetails loadUserByUsername(String username) throws UsernameNotFoundException {

        //查询用户(框架提供的User)
        User user = userMapper.findByUsername(username);
        if(user == null){
            throw new RuntimeException("用户不存在或已被禁用");
        }
        //SimpleGrantedAuthorit是GrantedAuthority的实现类
        //该类用于分组角色信息 User构造方法需要GrantedAuthority集合
        SimpleGrantedAuthority user_role = new SimpleGrantedAuthority("user");
        SimpleGrantedAuthority admin_role = new SimpleGrantedAuthority("admin");
        List<GrantedAuthority> list = new ArrayList<GrantedAuthority>();

        list.add(user_role);
        list.add(admin_role);

        return new org.springframework.security.core.userdetails.User(user.getUsername()
                ,user.getPassword()
                , list);
    }
}
- 上述代码中,返回的UserDetails或者是User都是框架提供的类,我们在项目开发的过程中,很多需求都是我们自定义的属性,我们可以自定义一个类,来实现UserDetails,在自己定义的类中,就可以扩展自己想要的内容,如下代码:
package com.zzyl.security.entity;

import lombok.Data;
import org.springframework.security.core.GrantedAuthority;
import org.springframework.security.core.authority.SimpleGrantedAuthority;
import org.springframework.security.core.userdetails.UserDetails;

import java.util.Collection;
import java.util.List;
import java.util.stream.Collectors;

/**
 * @author sjqn
 * @date 2023/9/1
 */
@Data
public class UserAuth implements UserDetails {

    private String username; //固定不可更改
    private String password;//固定不可更改

    private String nickName;  //扩展属性  昵称
    private List<String> roles; //角色列表,这里用的是String集合,下面get方法中需要转换


    @Override
    public Collection<? extends GrantedAuthority> getAuthorities() {
        if(roles==null) return null;
        //把角色类型转换并放入对应的集合   角色默认有一个RELO_前缀
        return roles.stream().map(role -> new SimpleGrantedAuthority("ROLE_"+role)).collect(Collectors.toList());
    }


//以下方法开启,均改为true
    @Override
    public boolean isAccountNonExpired() {
        return true;
    }

    @Override
    public boolean isAccountNonLocked() {
        return true;
    }

    @Override
    public boolean isCredentialsNonExpired() {
        return true;
    }

    @Override
    public boolean isEnabled() {
        return true;
    }
}
注意:
- username,password为固定字段。
- 角色集合如果采用自定义的形式,get方法中需要转换
- 然后,我们可以继续改造UserDetailsServiceImpl中检验用户的逻辑,代码如下:
package com.itheima.project.service;

import com.itheima.project.entity.User;
import com.itheima.project.mapper.UserMapper;
import com.itheima.project.vo.UserAuth;
import org.springframework.beans.factory.annotation.Autowired;
import org.springframework.security.core.userdetails.UserDetails;
import org.springframework.security.core.userdetails.UserDetailsService;
import org.springframework.security.core.userdetails.UsernameNotFoundException;
import org.springframework.stereotype.Component;

import java.util.ArrayList;
import java.util.List;

/**
 * @author sjqn
 * @date 2023/10/19
 */
@Component
public class UserDetailServiceImpl implements UserDetailsService {

    @Autowired
    private UserMapper userMapper;

    @Override
    public UserDetails loadUserByUsername(String username) throws UsernameNotFoundException {
        //查询用户
        User user = userMapper.findByUsername(username);
        if(user == null){
            throw new RuntimeException("用户不存在或已被禁用");
        }
        UserAuth userAuth = new UserAuth();
        userAuth.setUsername(user.getUsername());
        userAuth.setPassword(user.getPassword());
        userAuth.setNickName(user.getNickName());

        //添加角色
        List<String> roles=new ArrayList<>();
        if("[email protected]".equals(username)){
            roles.add("USER");
            userAuth.setRoles(roles);
        }
        if("[email protected]".equals(username)){
            roles.add("USER");
            roles.add("ADMIN");
            userAuth.setRoles(roles);
        }
        return userAuth;
    }
}
- 修改HelloController,使用getPrincipal()方法读取认证主体对象。
/**
 * @ClassName
 * @Description
 */
@RestController
public class HelloController {

    @RequestMapping("/hello")
    public String hello(){
        //获取当前登录用户名称
        String name = SecurityContextHolder.getContext().getAuthentication().getName();
        UserAuth userAuth = (UserAuth)SecurityContextHolder.getContext().getAuthentication().getPrincipal();//取出认证主体对象

        return "hello "+userAuth.getName();
    }

}
运行后效果如下:
3.3 授权
授权的方式包括 web授权和方法授权,web授权是通过 url 拦截进行授权,方法授权是通过方法拦截进行授权。如果同时使用 web 授权和方法授权,则先执行web授权,再执行方法授权,最后决策都通过,则允许访问资源,否则将禁止访问。接下来,我们就主要分析web授权,方法授权是通过注解进行授权的,粒度较小,耦合度太高。
3.3.1 WEB授权-简单例子
我们先做个简单的例子:
- 修改HelloController,增加两个方法 (根据hello方法复制后修改即可),主要是为了方便后边进行测试
@RequestMapping("/hello/user")
public String helloUser(){
    Authentication authentication = SecurityContextHolder.getContext().getAuthentication();
    String name = authentication.getName();
    return "hello-user  "+name;
}


@RequestMapping("/hello/admin")
public String helloAdmin(){
    Authentication authentication = SecurityContextHolder.getContext().getAuthentication();
    String name = authentication.getName();
    return "hello-admin  "+name;
}
- 修改 SecurityConfig 的securityFilterChain方法 ,添加对以上两个地址的角色控制
@Bean
public SecurityFilterChain securityFilterChain(HttpSecurity http) throws Exception {

    http.formLogin()             //自定义自己编写的登陆页面
        .loginPage("/login.html")    //登录页面设置
        .loginProcessingUrl("/login") //登录访问路径
        .permitAll()//登录页和登录访问路径无需登录也可以访问
        .and()
        .authorizeRequests()
        .antMatchers("/css/**","/images/**").permitAll()
        .antMatchers("/hello/user").hasRole("USER")
        .antMatchers("/hello/admin").hasAnyRole("ADMIN")
        .anyRequest().authenticated()
        .and()
        .csrf().disable();    //关闭csrf防护
    return http.build();
}
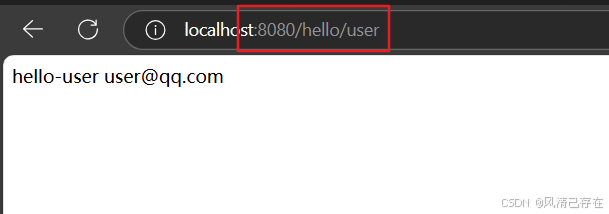
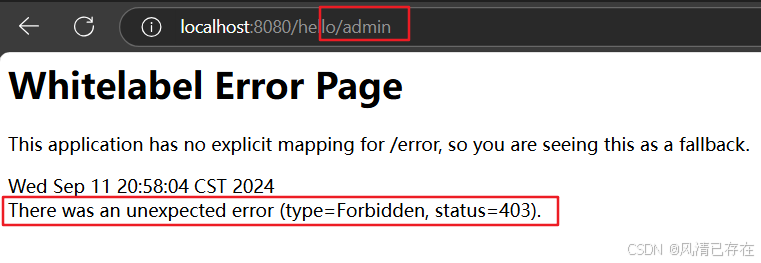
- 分别以user 和admin用户登录,进行测试。只允许指定角色登录
再次进行访问,发现user用户只能访问/hello/user,而admin则都允许访问
user:
admin:
- 控制操作方法
- 上文只是将请求接口路径与配置的规则进行匹配,Spring Security 内置了一些其他的控制操作。
- permitAll() 方法,所有用户可访问。
- denyAll() 方法,所有用户不可访问。
- authenticated() 方法,登录用户可访问。
- anonymous() 方法,匿名用户可访问。
- rememberMe() 方法,通过 remember me 登录的用户可访问。
- fullyAuthenticated() 方法,非 remember me 登录的用户可访问。
- hasIpAddress(String ipaddressExpression) 方法,来自指定 IP 表达式的用户可访问。
- hasRole(String role) 方法, 拥有指定角色的用户可访问,传入的角色将被自动增加 “ROLE_” 前缀。
- hasAnyRole(String… roles) 方法,拥有指定任意角色的用户可访问。传入的角色将被自动增加 “ROLE_” 前缀。
- hasAuthority(String authority) 方法,拥有指定权限( authority )的用户可访问。
- hasAnyAuthority(String… authorities) 方法,拥有指定任意权限( authority )的用户可访问。
// 如果用户具备 admin 权限,就允许访问。
.antMatchers("/hello/admin").hasAuthority("admin")
// 如果用户具备给定权限中某一个,就允许访问。
.antMatchers("/admin/user").hasAnyAuthority("admin","user")
// 如果用户具备 user 权限,就允许访问。注意不需要手动写 ROLE_ 前缀,写了会报错
.antMatchers("/security/**").hasRole("user")
//如果请求是指定的 IP 就允许访问。
.antMatchers("/admin/demo").hasIpAddress("192.168.200.129")
3.4. SpringSecurity整合JWT
3.4.1. 前后端分离的权限方案
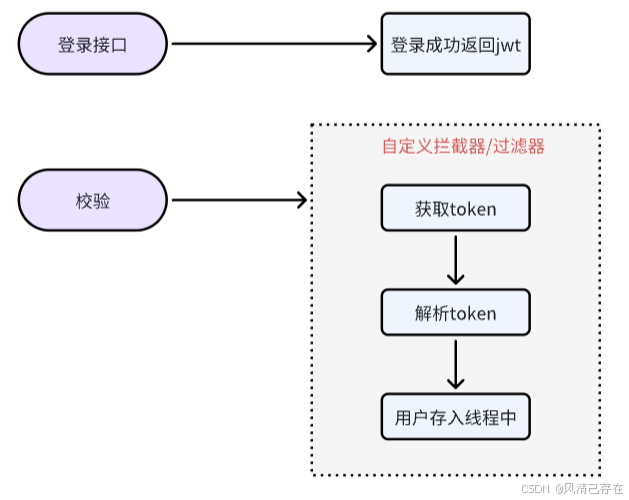
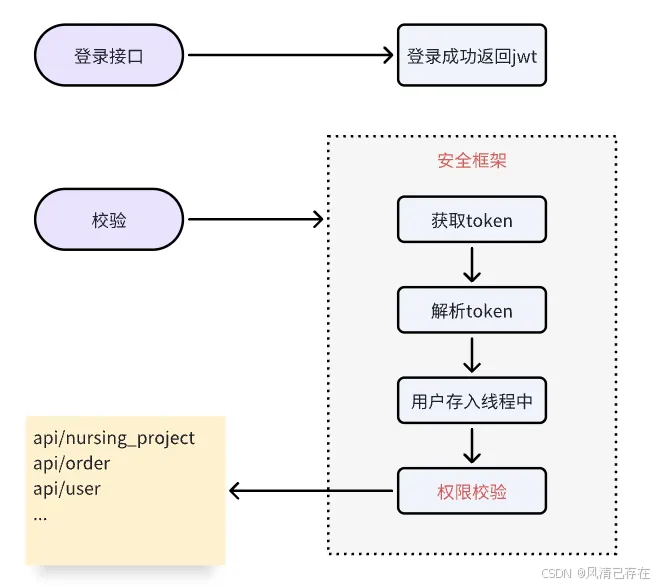
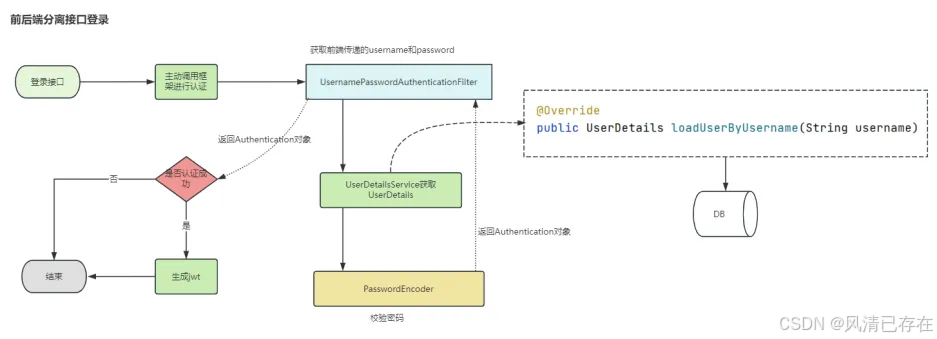
我们前实现的是非前后端分离情况下的认证与授权的处理,目前大部分项目,都是使用前后端分离的模式。前后端分离的情况下,我们通常通过SpringSecurity+JWT 来解决权限问题。
整体实现思路:
3.4.2. 实现登录
导入依赖
<!--JWT-->
<dependency>
    <groupId>com.auth0</groupId>
    <artifactId>java-jwt</artifactId>
    <version>3.8.1</version>
</dependency>

<dependency>
    <groupId>io.jsonwebtoken</groupId>
    <artifactId>jjwt</artifactId>
    <version>0.9.1</version>
</dependency>

<!--工具包-->
<dependency>
    <groupId>cn.hutool</groupId>
    <artifactId>hutool-all</artifactId>
    <version>5.8.0.M3</version>
</dependency>

<dependency>
    <groupId>javax.xml.bind</groupId>
    <artifactId>jaxb-api</artifactId>
</dependency>

<dependency>
    <groupId>com.alibaba</groupId>
    <artifactId>fastjson</artifactId>
    <version>1.2.75</version>
</dependency>
- 创建LoginController(这里需要主动调用认证管理器)
package com.itheima.project.web;

import com.itheima.project.dto.LoginDto;
import com.itheima.project.util.JwtUtil;
import org.springframework.beans.factory.annotation.Autowired;
import org.springframework.security.authentication.AuthenticationManager;
import org.springframework.security.authentication.UsernamePasswordAuthenticationToken;
import org.springframework.security.core.Authentication;
import org.springframework.web.bind.annotation.PostMapping;
import org.springframework.web.bind.annotation.RequestBody;
import org.springframework.web.bind.annotation.RequestMapping;
import org.springframework.web.bind.annotation.RestController;

import java.util.HashMap;
import java.util.Map;

@RestController
@RequestMapping("security")
public class LoginController {

    @Autowired
    AuthenticationManager authenticationManager;

    @PostMapping("/login")
    public String login(@RequestBody LoginDto loginDto){
        UsernamePasswordAuthenticationToken authentication
                =new UsernamePasswordAuthenticationToken(loginDto.getUsername(),loginDto.getPassword());
        Authentication authenticate = authenticationManager.authenticate(authentication);
        if( authenticate.isAuthenticated() ){ //认证通过
            Object principal = authenticate.getPrincipal();
            Map<String, Object> claims = new HashMap<>();
            claims.put("user",principal);
            String token = JwtUtil.createJWT("itcast",360000, claims);
            return token;
        }else{
            return "";
        }
    }
}
代码分析
- 创建一个 UsernamePasswordAuthenticationToken 对象。UsernamePasswordAuthenticationToken 是 Spring Security 中的一个类,它代表了一个基于用户名和密码的身份验证请求。当应用程序需要对用户进行身份验证时,就会创建这样一个对象,并将其传递给 AuthenticationManager 进行身份验证处理。
该类用于异步请求接收参数信息- authenticationManager.authenticate(…): 这个方法执行实际的身份验证工作。它会根据提供的凭证去查找用户,并验证所提供的凭证是否正确。
如果凭证正确,authenticate 方法会返回一个 Authentication 对象,该对象代表了经过验证的用户信息;如果凭证不正确,它将抛出一个 BadCredentialsException 或其他类型的AuthenticationException 异常。
- 修改SecurityConfig
package com.itheima.project.config;

import org.springframework.context.annotation.Bean;
import org.springframework.context.annotation.Configuration;
import org.springframework.security.authentication.AuthenticationManager;
import org.springframework.security.config.annotation.authentication.configuration.AuthenticationConfiguration;
import org.springframework.security.config.annotation.web.builders.HttpSecurity;
import org.springframework.security.crypto.bcrypt.BCryptPasswordEncoder;
import org.springframework.security.crypto.password.PasswordEncoder;
import org.springframework.security.web.SecurityFilterChain;

/**
 * @author sjqn
 * @date 2023/10/19
 */
@Configuration
public class SecurityConfig {

    @Bean
    public SecurityFilterChain securityFilterChain(HttpSecurity http) throws Exception {

        http.authorizeHttpRequests().antMatchers("/security/login").permitAll();
        http.csrf().disable();
        //返回
        return http.build();

    }

    @Bean
    public AuthenticationManager authenticationManager(AuthenticationConfiguration authenticationConfiguration) throws Exception {
        return authenticationConfiguration.getAuthenticationManager();
    }

    @Bean  //这里使用的加盐加密
    PasswordEncoder passwordEncoder() {
        return new BCryptPasswordEncoder();
    }
}
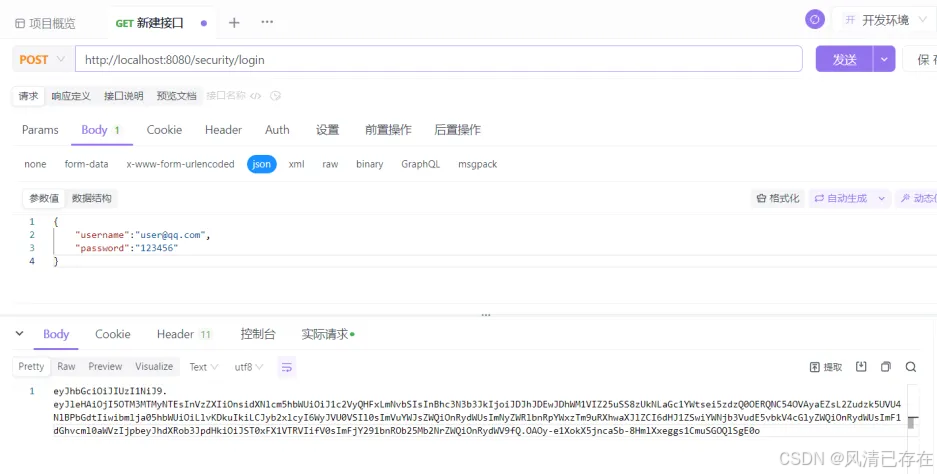
- 使用ApiFox测试
3.4.3 自定义授权管理器
以上内容我们只进行了登录认证的逻辑实现,其授权采用的是框架提供的授权管理器实现的,开发中,框架提供的授权管理器往往无法满足我们的业务需求,所以需要我们自定义授权管理器。
- 执行流程:
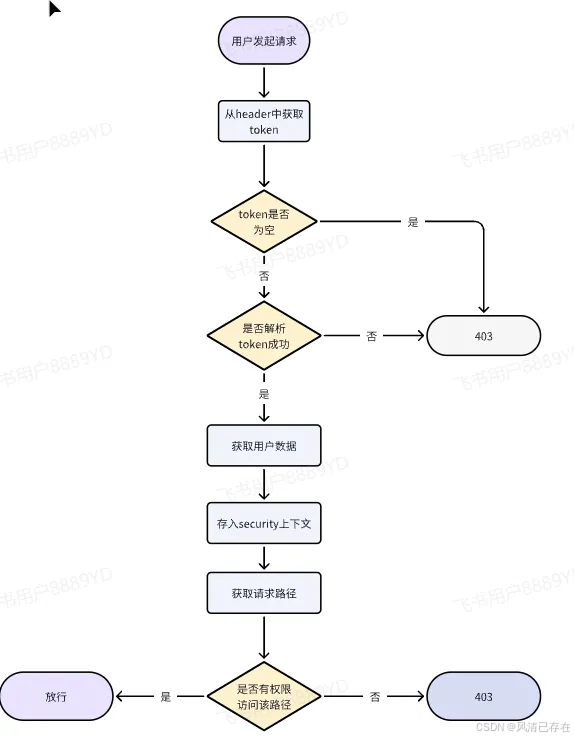
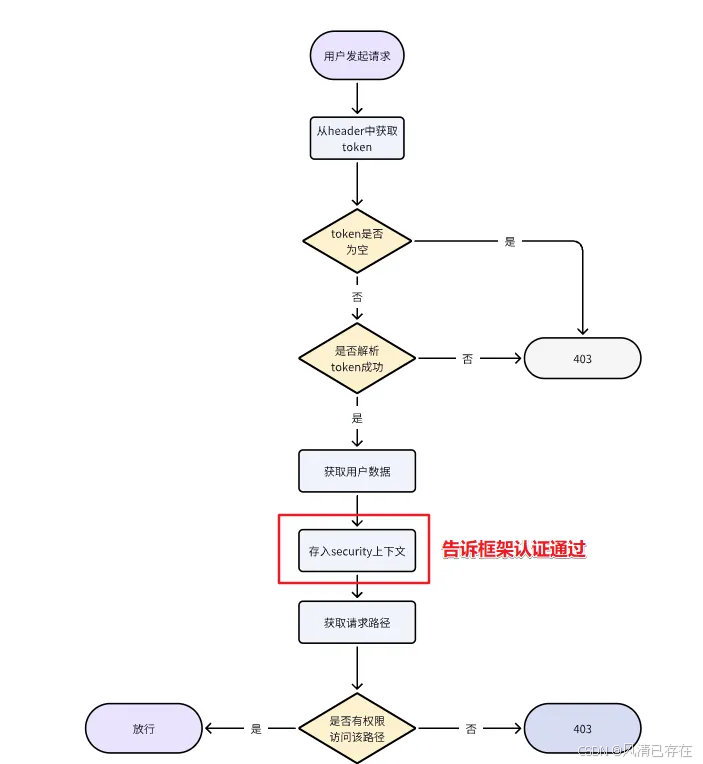
当用户登录以后,携带了token访问后端,那么此时Spring
Security框架就要对当前请求进行验证,验证包含了两部分,第一验证携带的token是否合法,第二验证当前用户是否拥有当前访问资源的权限。
- 自定义授权管理器TokenAuthorizationManager
package com.itheima.project.config;

import cn.hutool.core.util.ObjectUtil;
import com.alibaba.fastjson.JSON;
import com.alibaba.fastjson.JSONObject;
import com.itheima.project.util.JwtUtil;
import com.itheima.project.vo.UserAuth;
import io.jsonwebtoken.Claims;
import org.springframework.security.authentication.UsernamePasswordAuthenticationToken;
import org.springframework.security.authorization.AuthorizationDecision;
import org.springframework.security.authorization.AuthorizationManager;
import org.springframework.security.core.Authentication;
import org.springframework.security.core.context.SecurityContextHolder;
import org.springframework.security.web.access.intercept.RequestAuthorizationContext;
import org.springframework.stereotype.Component;

import javax.servlet.http.HttpServletRequest;
import java.util.function.Supplier;

/**
 * @author sjqn
 * @date 2023/9/1
 */
@Component
                                                        //RequestAuthorizationContext请求上下文
public class TokenAuthorizationManager implements AuthorizationManager<RequestAuthorizationContext> {

    @Override
    public AuthorizationDecision check(Supplier<Authentication> authentication, RequestAuthorizationContext requestAuthorizationContext) {

        //获取request
        HttpServletRequest request = requestAuthorizationContext.getRequest();
        //获取用户当前的请求地址
        String requestURI = request.getRequestURI();
        //获取token
        String token = request.getHeader("token");
        if(null == token || "".equals(token)){
            return new AuthorizationDecision(false);
        }


        //解析token
        Claims claims = JwtUtil.parseJWT("itcast", token);
        if (ObjectUtil.isEmpty(claims)) {
            //token失效
            return new AuthorizationDecision(false);
        }


        //获取userAuth
        UserAuth userAuth = JSONObject.parseObject(JSON.toJSONString(claims.get("user")),UserAuth.class);
        //存入上下文,告诉Security框架认证通过  SecurityContextHolder线程绑定的上下文,用于在整个请求周期内保存当前认证的状态。

        UsernamePasswordAuthenticationToken auth
                =new UsernamePasswordAuthenticationToken( userAuth, userAuth.getPassword(), userAuth.getAuthorities());
        SecurityContextHolder.getContext().setAuthentication(auth);


        //判断地址与对象中的角色是否匹配
        if(userAuth.getRoles().contains("ADMIN")){
            if("/hello/admin".equals(requestURI)){
                return new AuthorizationDecision(true);
            }
        }
        if(userAuth.getRoles().contains("USER")){
            if("/hello/user".equals(requestURI)){
                return new AuthorizationDecision(true);
            }
        }
        return new AuthorizationDecision(false);
    }
}
- 修改SecurityConfig,注册授权管理器
package com.itheima.project.config;

import org.springframework.beans.factory.annotation.Autowired;
import org.springframework.context.annotation.Bean;
import org.springframework.context.annotation.Configuration;
import org.springframework.security.authentication.AuthenticationManager;
import org.springframework.security.config.annotation.authentication.configuration.AuthenticationConfiguration;
import org.springframework.security.config.annotation.web.builders.HttpSecurity;
import org.springframework.security.config.http.SessionCreationPolicy;
import org.springframework.security.crypto.bcrypt.BCryptPasswordEncoder;
import org.springframework.security.crypto.password.PasswordEncoder;
import org.springframework.security.web.SecurityFilterChain;

/**
 * @author sjqn
 * @date 2023/10/19
 */
@Configuration
public class SecurityConfig {

    @Autowired
    private TokenAuthorizationManager tokenAuthorizationManager;

    @Bean
    public SecurityFilterChain securityFilterChain(HttpSecurity http) throws Exception {
    // 配置请求级别的访问控制
        http.authorizeHttpRequests().antMatchers("/security/login").permitAll() // 允许所有用户访问登录端点
                .anyRequest().access(tokenAuthorizationManager); // 所有其他请求都通过 tokenAuthorizationManager 授权

        //关闭session
        http.sessionManagement().sessionCreationPolicy(SessionCreationPolicy.STATELESS);
        //关闭缓存
        http.headers().cacheControl().disable();

        http.csrf().disable();
        //返回
        return http.build();

    }

    @Bean
    public AuthenticationManager authenticationManager(AuthenticationConfiguration authenticationConfiguration) throws Exception {
        return authenticationConfiguration.getAuthenticationManager();
    }

    @Bean
    PasswordEncoder passwordEncoder() {
        return new BCryptPasswordEncoder();
    }
}
测试一:
登录账号:[email protected]
拥有角色:USER
可以访问:/hello/user 其他请求返回403
测试二:
登录账号:[email protected]
拥有角色:USER、ADMIN
可以访问:/hello/user、/hello/user
3.5. 总结
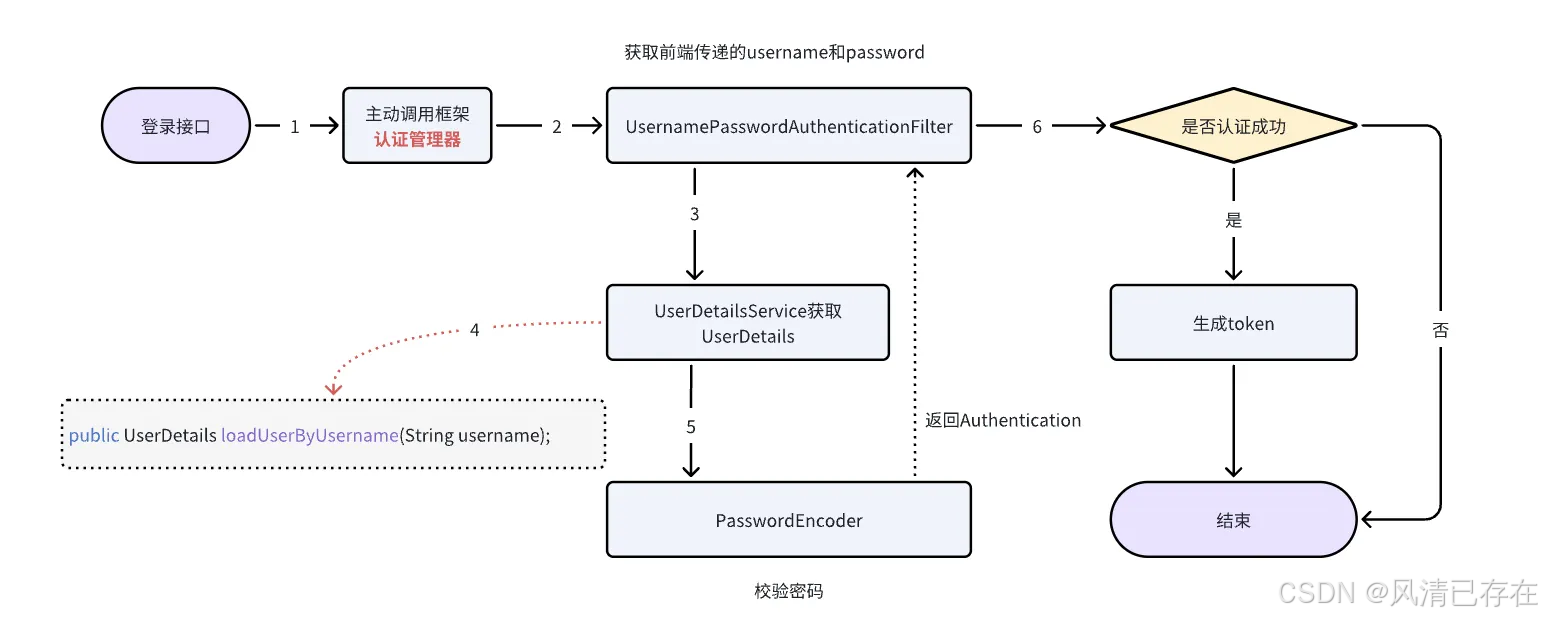
1. Spring Security 执行流程
- 用户尝试登录
- 用户通过一个表单提交用户名和密码。
- 请求被发送到一个特定的登录处理URL(例如 /login)。
- 创建认证令牌
- 在控制器中,使用 UsernamePasswordAuthenticationToken 创建一个包含用户名和密码的认证令牌。
- 这个令牌被传递给 AuthenticationManager 进行认证。
- 认证处理
- AuthenticationManager 负责处理认证请求。
- 它会委托给 UserDetailsService 加载用户信息。
- UserDetailsService 实现 loadUserByUsername 方法,根据用户名从数据库或其他数据源加载用户信息。
- 加载的用户信息包含密码和权限信息。
- AuthenticationManager 会比较提交的密码和存储的密码,验证用户身份。
- 认证结果
- 如果密码匹配,认证成功,AuthenticationManager 返回一个 Authentication 对象。
- 如果密码不匹配或用户不存在,AuthenticationManager 抛出一个 AuthenticationException。
- 处理认证结果
- 如果认证成功,返回的 Authentication 对象包含用户信息和权限。
- 控制器可以使用这个对象生成 JWT 令牌或其他形式的认证凭据,并返回给客户端。
- 如果认证失败,控制器捕获异常并返回错误响应给客户端。
- 保存认证状态
- 成功认证后,Authentication 对象会被保存到 SecurityContextHolder 中。
- SecurityContextHolder 是一个线程绑定的上下文,用于在整个请求周期内保存当前认证的状态。
- 只有存入上下文框架才会确认认证通过
- 访问受保护资源
- 当用户尝试访问受保护的资源时,请求会被 FilterChainProxy 拦截。
- FilterChainProxy 是 Spring Security 的核心组件之一,它管理着一系列过滤器,用于处理请求。
- 过滤器会检查 SecurityContextHolder 中的 Authentication 对象,以确定用户是否有权访问请求的资源。
- 授权检查
- FilterChainProxy 会委托给 AccessDecisionManager 进行授权检查。
- AccessDecisionManager 根据配置的访问决策投票器 (AccessDecisionVoter) 来决定用户是否有权访问请求的资源。
- 如果用户有足够的权限,请求将继续处理;否则,将抛出 AccessDeniedException。
- 处理授权结果
- 如果用户有权访问资源,请求将被传递给相应的控制器方法进行处理。
- 如果用户无权访问资源,将返回一个授权失败的响应。
2. AuthorizationManager 与AuthenricationManager
- 在 Spring Security 中,AuthorizationManager 和 AuthenticationManager 是两个不同的概念,分别负责不同的职责。下面详细介绍这两个概念的区别和它们各自的作用:
- AuthenticationManager 负责处理用户的认证过程,即验证用户的身份。它的主要职责包括:
- 验证用户凭证:接收用户的凭证(如用户名和密码),并验证这些凭证是否有效。
- 加载用户信息:如果凭证有效,从数据源(如数据库)加载用户信息。
- 创建认证对象:如果认证成功,创建一个 Authentication 对象,该对象包含了用户的详细信息和权限。
- AuthorizationManager 负责处理用户的授权过程,即决定用户是否有权限访问某个资源。它的主要职责包括:
- 决定访问权限:根据用户的认证信息和请求的资源,决定用户是否有权限访问该资源。
- 访问控制决策:返回一个 AuthorizationDecision 对象,指示是否允许访问。
- AuthenticationManager 负责处理用户的认证过程,即验证用户的身份。它的主要职责包括:
- 详细解释
- AuthenticationManager 是 Spring Security 中的核心组件之一,它通过一系列的
- AuthenticationProvider 来实现用户的认证。当用户尝试登录时,AuthenticationManager 会调用这些 AuthenticationProvider 来验证用户的身份。
- 示例代码
@Autowired
public void configureGlobal(AuthenticationManagerBuilder auth) throws Exception {
    auth
    .userDetailsService(userDetailsService)
    .passwordEncoder(passwordEncoder());
}

@Bean
public AuthenticationManager authenticationManagerBean() throws Exception {
return authenticationManager();
}
/*
这个例子中,configureGlobal 方法配置了 AuthenticationManager,指定了 UserDetailsService 和密码编码器。
*/
- AuthorizationManager 是一个更高级别的接口,用于在请求级别上决定用户是否有权限访问某个资源。它在请求到达具体的资源之前被调用,以决定是否允许该请求继续。
- 示例代码
@Component
public class TokenAuthorizationManager implements AuthorizationManager<RequestAuthorizationContext> {

    @Override
    public AuthorizationDecision check(Supplier<Authentication> authentication,
                                       RequestAuthorizationContext requestAuthorizationContext) {
        // 实现具体的授权逻辑
    }
}
/*
在这个例子中,TokenAuthorizationManager 实现了 AuthorizationManager 接口,并在 check 方法中实现了具体的授权逻辑。
*/
- 区别总结
- AuthenticationManager:负责用户的认证过程,包括验证用户的凭证和加载用户信息。
- AuthorizationManager:负责用户的授权过程,决定用户是否有权限访问某个资源。
- 使用场景
- 登录时:通常使用 AuthenticationManager 来处理用户的登录请求,验证用户的用户名和密码,并返回一个包含用户信息的 Authentication 对象。
- 访问受保护资源时:使用 AuthorizationManager 来决定用户是否有权限访问特定的资源。
3. Authentication常用方法
在Java Spring Security框架中,Authentication 对象是一个非常重要的组件,它封装了当前用户的认证状态。Authentication 对象会被保存到 SecurityContextHolder 中。
Authentication authentication = SecurityContextHolder.getContext().getAuthentication();
- 常用的 Authentication 方法
- 获取认证状态
- boolean isAuthenticated(): 检查当前 Authentication 是否已经被认证。
- void setAuthenticated(boolean flag): 设置认证状态。注意,这个方法通常不应直接在应用代码中调用。
- 获取凭证
- Object getCredentials(): 返回认证过程中使用的凭证,通常是一个 Password 类型的对象。
- Object getDetails(): 返回认证过程中使用的详细信息,如 WebAuthenticationDetails,包含了客户端IP地址等信息。
- Object getPrincipal(): 返回认证的主体,通常是 UserDetails 类型的对象,也可以是任何实现了 Principal 接口的对象。
- getName():返回认证对象的用户名
- 获取权限
- Collection<? extends GrantedAuthority> getAuthorities(): 返回当前认证对象拥有的权限集合,通常是一个 List,其中 GrantedAuthority 包含权限名称。
- boolean hasRole(String role): 检查当前认证对象是否拥有指定的角色。
- boolean hasAnyRole(String… roles): 检查当前认证对象是否拥有任何一个指定的角色。
- boolean hasAuthority(String authority): 检查当前认证对象是否拥有指定的权限。
- boolean hasAnyAuthority(String… authorities): 检查当前认证对象是否拥有任何一个指定的权限。
- 获取认证类型
- Authentication getPreviousAuthentication(): 获取之前的认证。
- Authentication getDetailsAuthentication(): 获取详细信息认证。
- void setPreviousAuthentication(Authentication previousAuth): 设置之前的认证。
- void setDetailsAuthentication(Authentication detailsAuth): 设置详细信息认证。
- 获取认证异常
- AuthenticationException getFailure(): 获取认证失败时的异常。
- void setFailure(AuthenticationException failure): 设置认证失败时的异常。
- 获取认证状态
示例
import org.springframework.security.core.Authentication;
import org.springframework.security.core.context.SecurityContextHolder;
import org.springframework.security.core.userdetails.UserDetails;
import java.util.Collection;

public class SecurityUtil {

    /**
     * 打印当前认证信息。
     * 此方法获取当前 Spring Security 上下文中的认证信息,并打印用户名、认证状态、凭证、详细信息、主体和权限。
     */
    public static void printAuthenticationInfo() {
        // 获取当前的安全上下文中的认证对象
        Authentication authentication = SecurityContextHolder.getContext().getAuthentication();

        if (authentication != null) {
            // 打印用户名
            System.out.println("Name: " + authentication.getName());

            // 打印认证状态
            System.out.println("Is Authenticated: " + authentication.isAuthenticated());

            // 获取认证时提供的凭证,如密码
            Object credentials = authentication.getCredentials();
            System.out.println("Credentials: " + credentials);

            // 获取认证时的详细信息,如 IP 地址等
            Object details = authentication.getDetails();
            System.out.println("Details: " + details);

            // 如果认证主体是 UserDetails 类型,则打印用户名
            if (authentication.getPrincipal() instanceof UserDetails) {
                UserDetails principal = (UserDetails) authentication.getPrincipal();
                System.out.println("Principal: " + principal.getUsername());
            }

            // 获取用户的所有权限,并打印出来
            Collection<? extends GrantedAuthority> authorities = authentication.getAuthorities();
            System.out.println("Authorities: ");
            for (GrantedAuthority authority : authorities) {
                System.out.println(authority.getAuthority());
            }
        }
    }

    // 示例主方法,用于测试
    public static void main(String[] args) {
        printAuthenticationInfo();
    }
}
4. Security的User类
该类实现了UserDetails接口,用于构建UserDetails实例
- 创建实例的两种方法
- 构造方法
public User(String username, String password, Collection<? extends GrantedAuthority> authorities) {
    this(username, password, true, true, true, true, authorities);
}

public User(String username, String password, boolean enabled, boolean accountNonExpired, boolean credentialsNonExpired, boolean accountNonLocked, Collection<? extends GrantedAuthority> authorities) {
    Assert.isTrue(username != null && !"".equals(username) && password != null, "Cannot pass null or empty values to constructor");
    this.username = username;
    this.password = password;
    this.enabled = enabled;
    this.accountNonExpired = accountNonExpired;
    this.credentialsNonExpired = credentialsNonExpired;
    this.accountNonLocked = accountNonLocked;
    this.authorities = Collections.unmodifiableSet(sortAuthorities(authorities));
}
- 构造方法中需要传入Collection<? extends GrantedAuthority>角色集合,该集合元素通常使用为SimpleGrantedAuthority类
示例
List<SimpleGrantedAuthority> authorityList = new ArrayList<>();
    if (user.getUsername().equals("[email protected]")){
        authorityList.add(new SimpleGrantedAuthority("USER"));
    }else if (user.getUsername().equals("[email protected]")){
        authorityList.add(new SimpleGrantedAuthority("ADMIN"));
    }


new org.springframework.security.core.userdetails.User(user.getUsername(),user.getPassword(),authorityList);
- 构建者模式
格式
UserDetails user = User
.builder()
.username(String username)
.password(String password)
.roles(String...role)
.build();
示例
UserDetails user = User
.builder()
.username("user")
.password("$2a$10$2VCyByZ5oeiXCEN73wvBB.xpmJgPBbZVS/Aallmdyij2G7hmAKQTG")
.roles("USER")
.build();
5. 认证和授权流程
- 认证
接收用户登录信息,手动调用认证管理器(这里框架会调用UserDetailsServiceI实现类的loadUserByUsername方法生成一个UserDetails实现类,用于与登录信息对比验证验证),认证成功生成返回信息。
- 配置SecurityConfig配置类
package com.itheima.project.config;

import org.springframework.beans.factory.annotation.Autowired;
import org.springframework.context.annotation.Bean;
import org.springframework.context.annotation.Configuration;
import org.springframework.security.authentication.AuthenticationManager;
import org.springframework.security.config.annotation.authentication.configuration.AuthenticationConfiguration;
import org.springframework.security.config.annotation.web.builders.HttpSecurity;
import org.springframework.security.config.http.SessionCreationPolicy;
import org.springframework.security.crypto.bcrypt.BCryptPasswordEncoder;
import org.springframework.security.crypto.password.PasswordEncoder;
import org.springframework.security.web.SecurityFilterChain;

/**
 * @author sjqn
 * @date 2023/10/19
 */
@Configuration
public class SecurityConfig {

    @Autowired
    private TokenAuthorizationManager tokenAuthorizationManager;

    //配置路径权限,注册授权管理器(这里的access是授权的配置)
    @Bean
    public SecurityFilterChain securityFilterChain(HttpSecurity http) throws Exception {
    // 配置请求级别的访问控制
        http
        .authorizeHttpRequests()
        .antMatchers("/security/login").permitAll() // 允许所有用户访问登录端点
        .anyRequest().access(tokenAuthorizationManager); //所有其他请求都通过tokenAuthorizationManager 授权

        //关闭session
        http.sessionManagement().sessionCreationPolicy(SessionCreationPolicy.STATELESS);
        //关闭缓存
        http.headers().cacheControl().disable();
        http.csrf().disable();
        //返回
        return http.build();

    }

    //手动创建认证管理器,用于手动调用
    @Bean
    public AuthenticationManager authenticationManager(AuthenticationConfiguration authenticationConfiguration) throws Exception {
        return authenticationConfiguration.getAuthenticationManager();
    }

    //根据加密方式创建对应解密类
    @Bean
    PasswordEncoder passwordEncoder() {
        return new BCryptPasswordEncoder();
    }
}
- 配置UserDetails实现类
package com.zzyl.vo;

import lombok.Data;
import lombok.NoArgsConstructor;
import org.springframework.security.core.GrantedAuthority;
import org.springframework.security.core.authority.SimpleGrantedAuthority;
import org.springframework.security.core.userdetails.UserDetails;

import java.time.LocalDateTime;
import java.util.Collection;
import java.util.List;
import java.util.stream.Collectors;

/**
 *  自定认证用户   Security提供的不足以满足我们的业务需求
 */
@Data
@NoArgsConstructor
public class UserAuth implements UserDetails {

    private String id;

    /**
     * 用户账号
     */
    private String username;

    /**
     * 密码
     */
    private String password;

    /**
     * 权限内置
     */
    private List<SimpleGrantedAuthority> authorities;

    /**
     * 用户类型(00系统用户)
     */
    private String userType;

    /**
     * 用户昵称
     */
    private String nickName;

    /**
     * 用户邮箱
     */
    private String email;

    /**
     * 真实姓名
     */
    private String realName;

    /**
     * 手机号码
     */
    private String mobile;

    /**
     * 用户性别(0男 1女 2未知)
     */
    private String sex;

    /**
     * 创建者
     */
    private Long createBy;

    /**
     * 创建时间
     */
    private LocalDateTime createTime;

    /**
     * 更新者
     */
    private Long updateBy;

    /**
     * 更新时间
     */
    private LocalDateTime updateTime;

    /**
     * 备注
     */
    private String remark;

    /**
     * 部门编号【当前】
     */
    private String deptNo;

    /**
     * 职位编号【当前】
     */
    private String postNo;

    @Override
    public Collection<? extends GrantedAuthority> getAuthorities() {
        if(authorities==null) return null;
        //把角色类型转换并放入对应的集合
        return authorities.stream().map(role -> new SimpleGrantedAuthority("ROLE_"+role)).collect(Collectors.toList());
    }

    @Override
    public String getPassword() {
        return this.password;
    }

    @Override
    public String getUsername() {
        return this.username;
    }

    @Override
    public boolean isAccountNonExpired() {
        return true;
    }

    @Override
    public boolean isAccountNonLocked() {
        return true;
    }

    @Override
    public boolean isCredentialsNonExpired() {
        return true;
    }

    @Override
    public boolean isEnabled() {
        return true;
    }
}
- 配置UserDetailsService实现类
package com.zzyl.service.impl;

import cn.hutool.core.bean.BeanUtil;
import cn.hutool.core.util.ObjectUtil;
import com.zzyl.constant.SuperConstant;
import com.zzyl.entity.User;
import com.zzyl.enums.BasicEnum;
import com.zzyl.exception.BaseException;
import com.zzyl.mapper.UserMapper;
import com.zzyl.vo.UserAuth;
import org.springframework.beans.factory.annotation.Autowired;
import org.springframework.security.core.userdetails.UserDetails;
import org.springframework.security.core.userdetails.UserDetailsService;
import org.springframework.security.core.userdetails.UsernameNotFoundException;
import org.springframework.stereotype.Component;

/**
 * @Description: UserDetailsServiceImpl
 * @Author: 风清
 * @CreateTime: 2024-09-09 16:04
 */
@Component
public class UserDetailsServiceImpl implements UserDetailsService {
    @Autowired
    private UserMapper userMapper;
    @Override
    public UserDetails loadUserByUsername(String username) throws UsernameNotFoundException {
        //从数据库中读数据
        User user = userMapper.findUserVoForLogin(username);

        UserAuth userAuth = BeanUtil.toBean(user, UserAuth.class);
        return userAuth;
    }
}
- 在登录接口中手动调用认证管理器
 @Autowired
private AuthenticationManager authenticationManager
/**
     * 用户登录
     *
     * @param loginDto
     * @return
     */
    @Override
    public UserVo login(LoginDto loginDto) {
        //接收异步请求的用户信息
        UsernamePasswordAuthenticationToken usernamePasswordAuthenticationToken
                = new UsernamePasswordAuthenticationToken(loginDto.getUsername(), loginDto.getPassword());
        /*手动调用认证管理器,这里会调用UserDetailsServices的loadUserByUsername
     方法,获取UserDetails对象进行账号密码校验(调用我们配置的解码类)*/
        Authentication authenticate = authenticationManager.authenticate(usernamePasswordAuthenticationToken);
        //判断是否认证成功
        if (!authenticate.isAuthenticated()) {
            throw new BaseException(BasicEnum.LOGIN_FAIL);
        }

        //通过则生成token
        UserAuth userAuth = (UserAuth) authenticate.getPrincipal();
        UserVo userVo = BeanUtil.toBean(userAuth, UserVo.class);
        userVo.setPassword("");//覆盖隐私信息


        userVo.setUserToken(token);
        return userVo;
    }
- 授权
- 这里只需要定义授权管理器写授权逻辑,并注册授权管理器即可
package com.zzyl.security;

import cn.hutool.core.bean.BeanUtil;
import cn.hutool.core.util.ObjectUtil;
import cn.hutool.core.util.StrUtil;
import cn.hutool.json.JSONUtil;
import com.zzyl.config.JwtTokenManagerProperties;
import com.zzyl.constant.UserCacheConstant;
import com.zzyl.utils.JwtUtil;
import com.zzyl.vo.UserVo;
import io.jsonwebtoken.Claims;
import org.springframework.beans.factory.annotation.Autowired;
import org.springframework.context.annotation.Configuration;
import org.springframework.data.redis.core.StringRedisTemplate;
import org.springframework.security.authorization.AuthorizationDecision;
import org.springframework.security.authorization.AuthorizationManager;
import org.springframework.security.core.Authentication;
import org.springframework.security.web.access.intercept.RequestAuthorizationContext;
import org.springframework.util.AntPathMatcher;

import javax.servlet.http.HttpServletRequest;
import java.util.List;
import java.util.function.Supplier;

/**
 * @Description: JwtAuthorizationManager
 * @Author: 风清
 * @CreateTime: 2024-09-09 19:53
 */
@Configuration
public class JwtAuthorizationManager implements AuthorizationManager<RequestAuthorizationContext> {
    @Autowired
    private JwtTokenManagerProperties jwtTokenManagerProperties;
    @Autowired
    private StringRedisTemplate redisTemplate;
    private AntPathMatcher antPathMatcher = new AntPathMatcher();
    @Override
    public AuthorizationDecision check(Supplier<Authentication> authentication, RequestAuthorizationContext requestAuthorizationContext) {
        //获取token
        HttpServletRequest request = requestAuthorizationContext.getRequest();
        String token = request.getHeader("authorization");
        if (StrUtil.isBlankIfStr(token)){
            return new AuthorizationDecision(false);
        }
        //解析token
        Claims claims = JwtUtil.parseJWT(jwtTokenManagerProperties.getBase64EncodedSecretKey(), token);
        if (ObjectUtil.isEmpty(claims)){
            return new AuthorizationDecision(false);
        }
        //获取用户数据
        String user = String.valueOf(claims.get("currentUser"));
        //解析用户
        UserVo userVo = JSONUtil.toBean(user,UserVo.class);

        //读取redis中数据(获取资源)
        String accessUrlsCacheKey = UserCacheConstant.ACCESS_URLS_CACHE+userVo.getId();
        String string = redisTemplate.opsForValue().get(accessUrlsCacheKey);
        List<String> list = JSONUtil.toList(string, String.class);

        //判断
        //获取当前请求路径
        String path = request.getMethod() + request.getRequestURI();
        for (String url : list) {
            if (antPathMatcher.match(url,path)){
                return new AuthorizationDecision(true);
            }
        }
        return new AuthorizationDecision(false);
    }
}
