目录
方法二:在QGC端连接PX4,打开MAVLLINK终端,即可实现。
一、在PX4平台中添加自己的应用程序
附上添加自定义程序的PX4官方教程!
1.建立应用程序
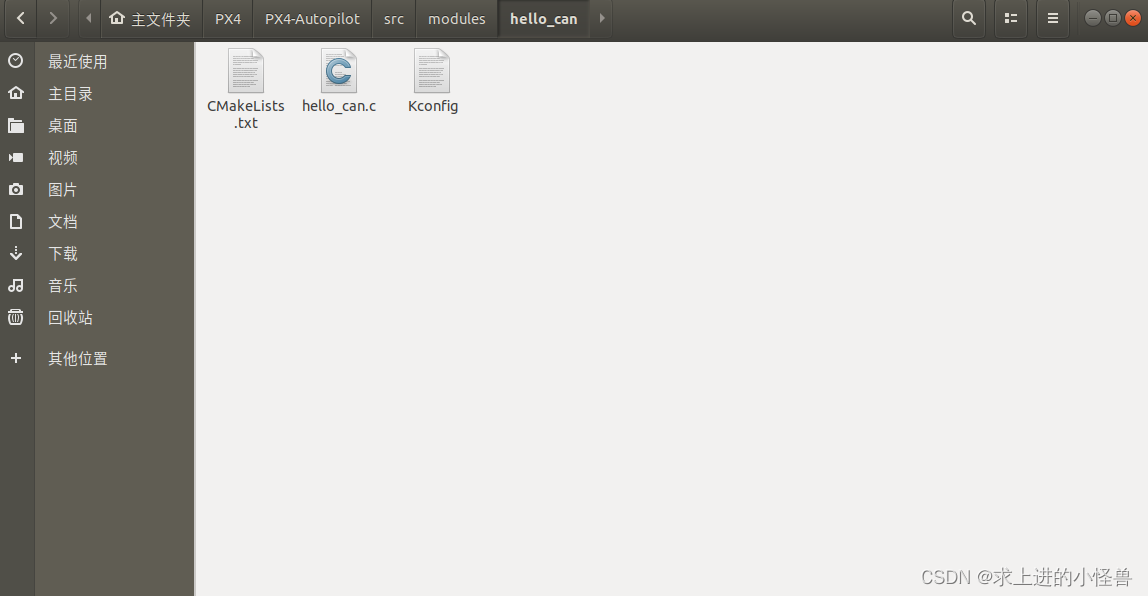
在PX4源码的 [src/module] 文件夹下建立自己的文件(添加的应用名称为hello_can),对应添加编译文件:(1)最重要的 .c编程文件,(2)CMakeList.txt文件,(3)Kconfig文件。注:在PX4 1.13.0版本固件中包含了一个模板文件放在[src/templates/module]下,可以利用该模板进行自定义应用的编程。
编译所需的三个文件
Hello_can.c文件:
#include <sys/types.h>
#include <sys/ioctl.h>

#include <px4_platform_common/px4_config.h>
#include <px4_platform_common/tasks.h>
#include <px4_platform_common/posix.h>

#include <stdio.h>
#include <stdlib.h>
#include <unistd.h>
#include <string.h>
#include <fcntl.h>
#include <errno.h>
#include <debug.h>

#include <nuttx/can/can.h>
#include <nuttx/config.h>

__EXPORT int hello_can_main(int argc, char *argv[]);

int hello_can_main(int argc, char *argv[])
{
	PX4_INFO("Hello Can!");
	PX4_INFO("exiting!\n");
	return 0;
}
Kconfig文件:
menuconfig MODULES_HELLO_CAN
	bool "hello_can"
	default n
	---help---
		Enable support for hello_can
CMakeLists.txt文件:
px4_add_module(
	MODULE modules__hello_can
	MAIN hello_can
	SRCS
		hello_can.c
	DEPENDS
	)
注:确保三个文件中的程序名称对应无误。
2.编译应用程序及固件
为了保证程序的正常运行,需要确保自己添加的应用程序会在PX4固件中进行编译,应修改对应的PX4配置文件,此处我们修改的是boards/px4/fmu-v3/default.px4board,并在其末尾/对应模块后新加入一行:
CONFIG_MODULES_HELLO_CAN=y
其中,HELLO_CAN为自定义的文件名称,可以根据自己的文件自行修改。
3.测试应用(硬件)
执行编译指令,将程序烧录到飞控板,即可在QGC控制端进行测试:
make px4_fmu-v3_default
```
make px4_fmu-v3_default upload
编译成功之后,可以在命令端直接启动NUTTX系统的命令脚本,可以连接QGC地面控制端:
方法一:直接用命令脚本启动NUTTX系统
./Tools/mavlink_shell.py
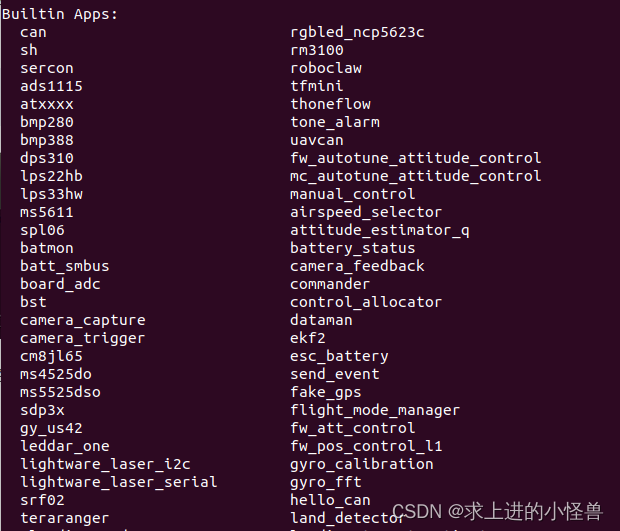
输入help,系统会给出当前可运行的应用程序,在列表中找到自己定义的应用名称(hello_can)
找到之后,输入名称运行即可实现自定义效果;
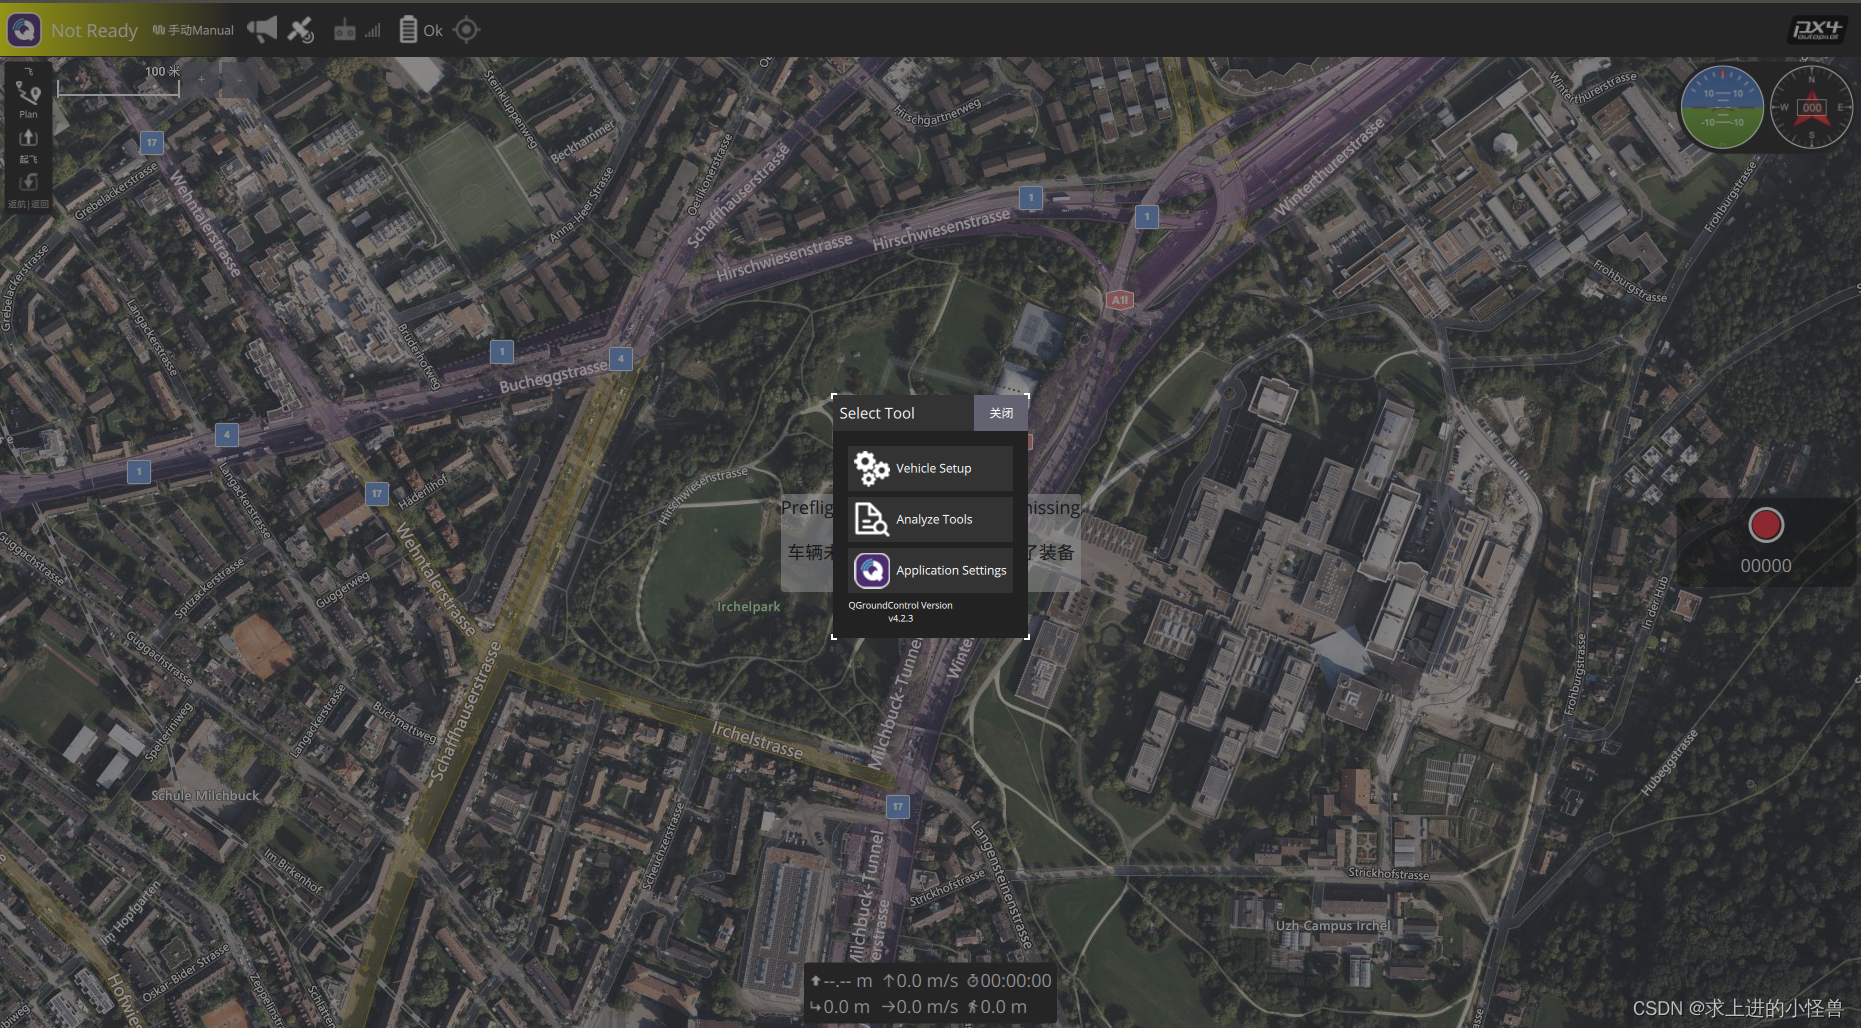
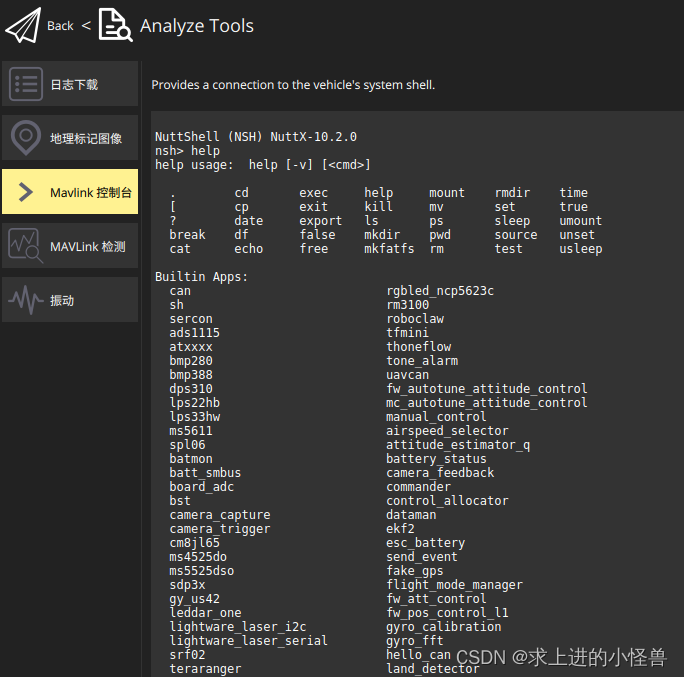
方法二:在QGC端连接PX4,打开MAVLLINK终端,即可实现。
点击Analyze Tools
二、CAN相关协议理解
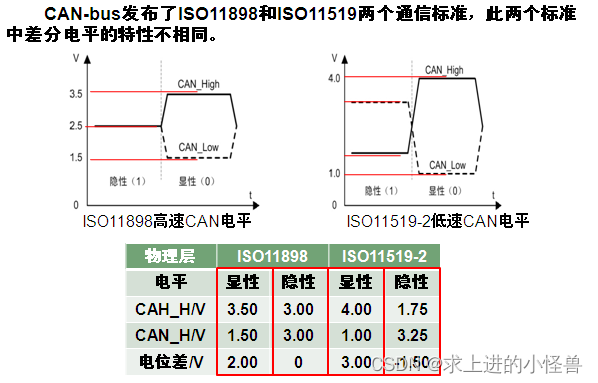
CAN 数据线为两根:CAN_High和CAN_Low,使用差分信号进行传输数据。
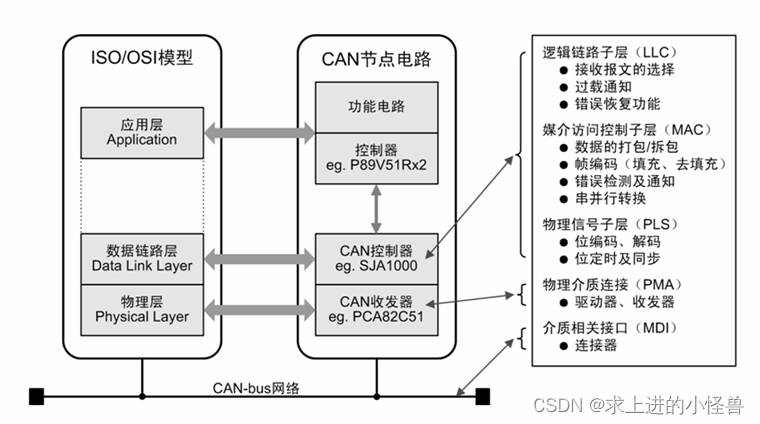
相关系统结构及链路模型
数据传输:
CAN总线节点上的节点发送数据是以报文的形式广播给网络中所有节点。收发器接收到数据就把数据传送给控制器,再由控制器检查判断是不是所需数据。不是则忽略。
- 网络上任何一个节点在任何时候都可以发送数据
- 多个节点发送数据,优先级低主动退出发送
- 短帧结构,每帧数据信息为0~8字节(具体用户定义),对数据编码而不是地址编码
- CAN每帧都有CRC校验和其他检验措施,严重错误的情况下具有自动关闭输出的功能
CAN总线数据分5种类型:数据帧、远程帧、错误帧、过载帧和帧间隔
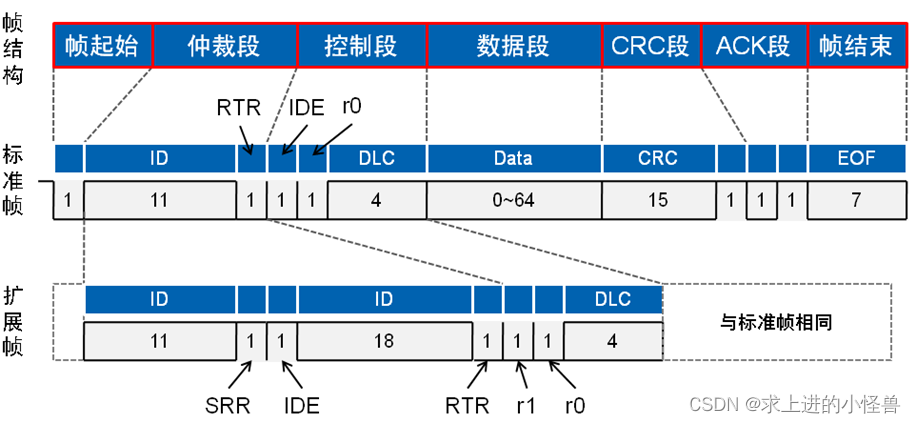
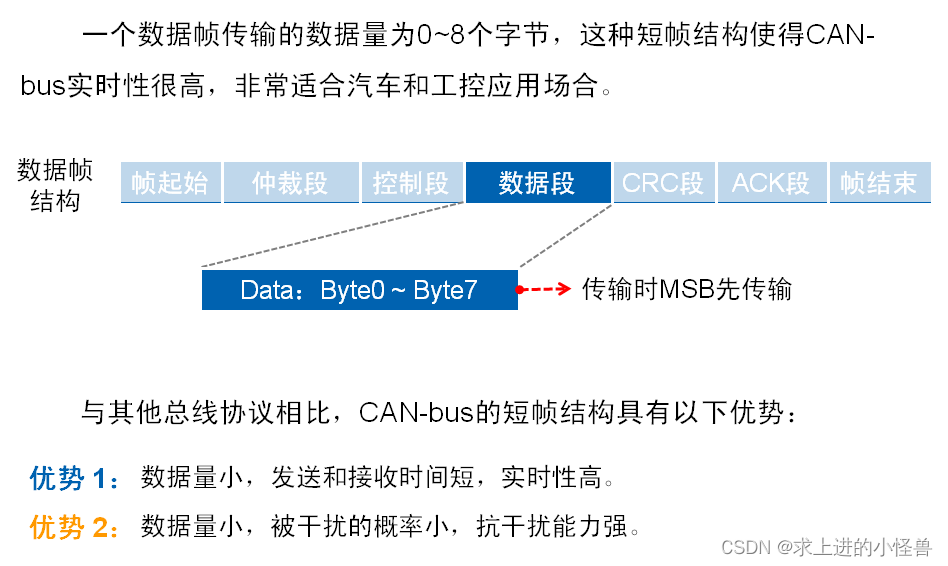
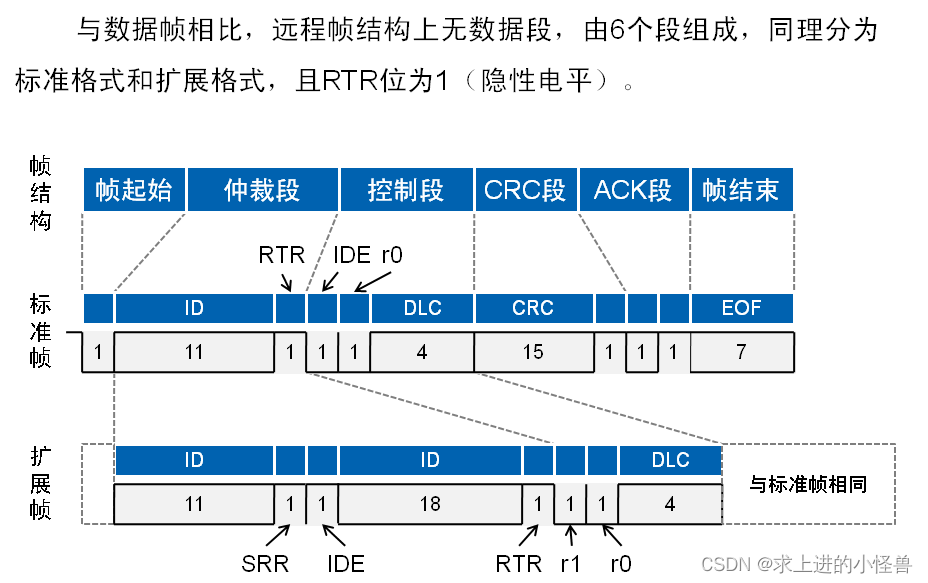
1. 数据帧:结构上由7个段组成,其中根据仲裁段ID码长度的不同,分为标准帧(CAN2.0A)和扩展帧(CAN2.0B)
起始帧和结束帧用于界定一个数据帧;
起始帧由单个显性位组成;(总线空闲时,发送节点发送起始帧,其他节点开始同步接收)
结束帧由连续的7个隐性位组成;
仲裁段用于解决总线竞争问题(多个节点同时发送数据冲突)
显性、隐性 电平
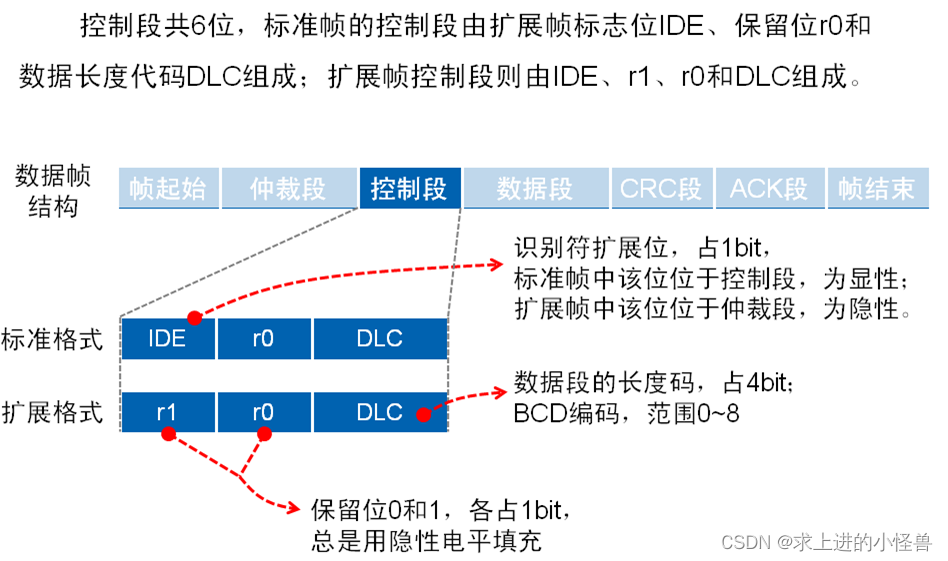
控制段
数据段:(实际的数据字节,保证了实时性)
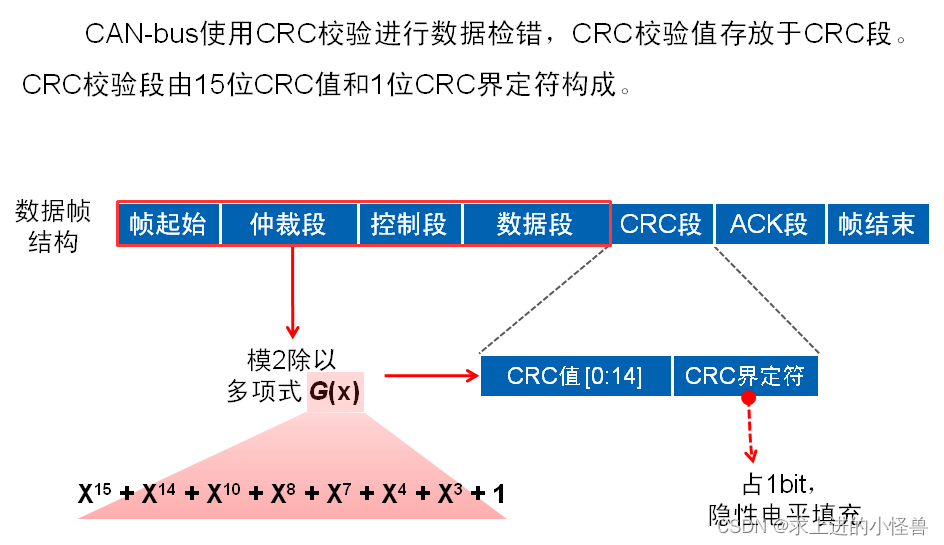
CRC段:(校验)
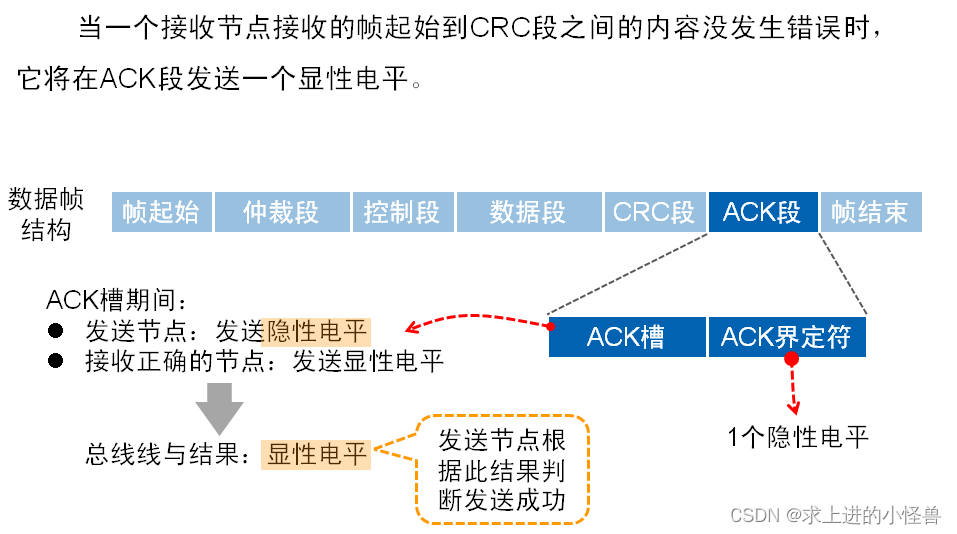
ACK段:(应答)
远程帧
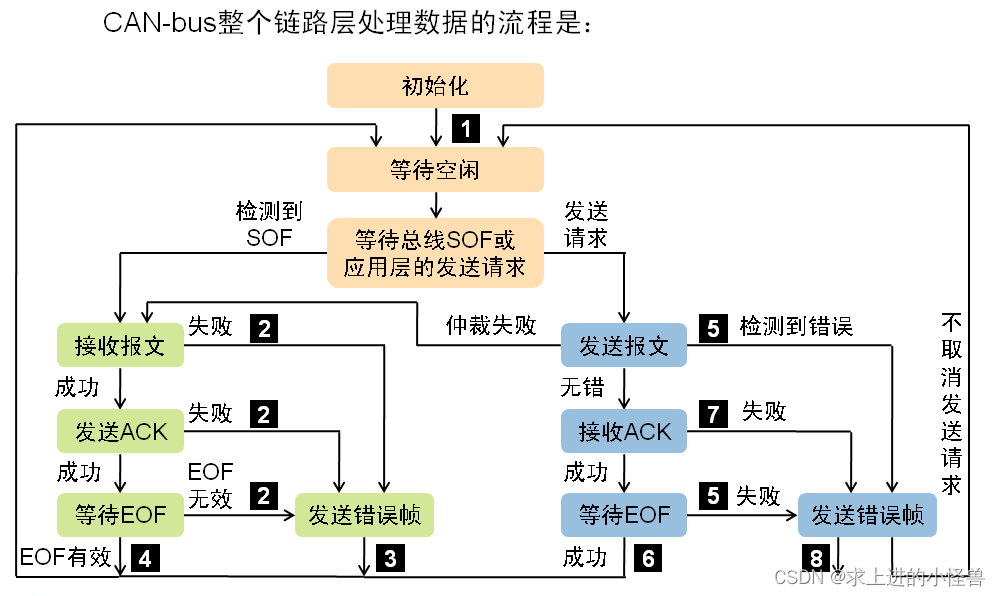
CAN整个链路层处理数据的顺序为:
根据CAN_main.c文件改写自己的CAN程序:
#include <sys/types.h>
#include <sys/ioctl.h>

#include <px4_platform_common/px4_config.h>
#include <px4_platform_common/tasks.h>
#include <px4_platform_common/posix.h>

#include <stdio.h>
#include <stdlib.h>
#include <unistd.h>
#include <string.h>
#include <fcntl.h>
#include <errno.h>
#include <debug.h>

#include <nuttx/can/can.h>
#include <nuttx/config.h>

#  define MAX_ID CAN_MAX_STDMSGID
#  define CAN_OFLAGS O_RDWR

//从源文件中找到can的初始化函数
int can_devinit(void)
{
	static bool initialized = false;
	struct can_dev_s *can;
	int ret;
	/* Check if we have already initialized */

	if (!initialized) {
		/* Call stm32_caninitialize() to get an instance of the CAN interface */

		can = stm32_caninitialize(1);//'CAN_PORT

		if (can == NULL) {
			canerr("ERROR:  Failed to get CAN interface\n");
			return -ENODEV;
		}

		/* Register the CAN driver at "/dev/can0" */

		ret = can_register("/dev/can0", can);

		if (ret < 0) {
			canerr("ERROR: can_register failed: %d\n", ret);
			return ret;
		}

		/* Now we are initialized */

		initialized = true;
	}

	return 0;
}

__EXPORT int hello_can_main(int argc, char *argv[]);

int hello_can_main(int argc, char *argv[])
{
	struct can_msg_s txmsg;  //CAN结构体定义
	int i;
	int fd;
	int msgdlc;

	size_t  msgsize;
	uint16_t msgid;
	PX4_INFO("Hello Can!");

	can_devinit();
	fd = open(CONFIG_EXAMPLES_CAN_DEVPATH, CAN_OFLAGS);
	msgdlc  =4;
	msgid   = 1;

	txmsg.cm_hdr.ch_id     = msgid;
    txmsg.cm_hdr.ch_rtr    = false;
    txmsg.cm_hdr.ch_dlc    = msgdlc;
	txmsg.cm_hdr.ch_unused = 0;

    for (i = 0; i < msgdlc; i++) {
          txmsg.cm_data[i] = (i+1);
        }
    for(int cnt=0; cnt<40; cnt++){
		/* Send the TX message */
		msgsize = CAN_MSGLEN(msgdlc);
		write(fd, &txmsg, msgsize);//nbytes  CAN 数据发送
	}
    printf("  ID: %4" PRIu16 " DLC: %d\n", msgid, msgdlc);

    PX4_INFO("exiting!\n");

	close(fd);     //关闭接口设备
    fflush(stdout);//清空输出缓存区
	return 0;
}
三、PX4中CAN配置
使用PX4固件中的配置框架进行CAN的相关设置
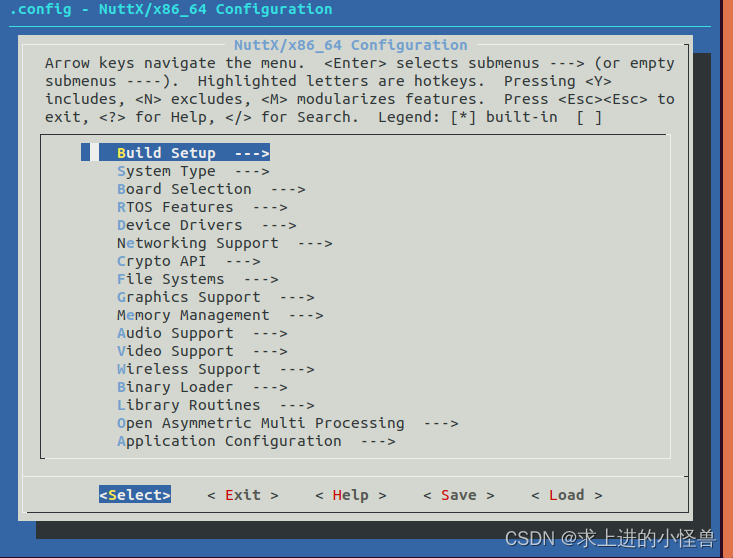
make px4_fmu-v3_default menuconfig config命令错误的相关链接——>menuconfig错误处理
配置界面如下:(配置视频)
分别选择打开以下几项配置选项->原文链接
- Device Drivers ---> CAN Driver Support
- Application Configuration ---> CAN Utilities ---> CAN utility library #
- optional
- Application Configuration ---> Examples ---> CAN example
- System Type ---> STM32 Peripheral Support ---> CAN1
- 保存退出
