前言
LLM基座官方文档如下(科学上网):
- Llama:
Github: https://github.com/ymcui/Chinese-LLaMA-Alpaca-2
Huggingface: https://huggingface.co/meta-llama
- ChatGLM
Github: https://github.com/THUDM/ChatGLM3
Huggingface: https://huggingface.co/THUDM
- Baichuan
Github: https://github.com/baichuan-inc
Huggingface: https://huggingface.co/baichuan-inc
- Qwen
Github: https://github.com/QwenLM
Huggingface: baichuan-inc (Baichuan Intelligent Technology) (huggingface.co)
提示:以下是本篇文章正文内容,下面案例可供参考
一、大模型基座
面LLM岗大概率会cue的内容,详见文章大模型升级与设计之道:ChatGLM、LLAMA、Baichuan及LLM结构解析 - 知乎 (zhihu.com)
该文章从原理、性能、差异、迭代版本系统地介绍了现在较受欢迎的LLM(目前ChatGLM4、Baichuan3已闭源):
二、大模型部署(以Llama2为例)
1. LLM部署环境查询
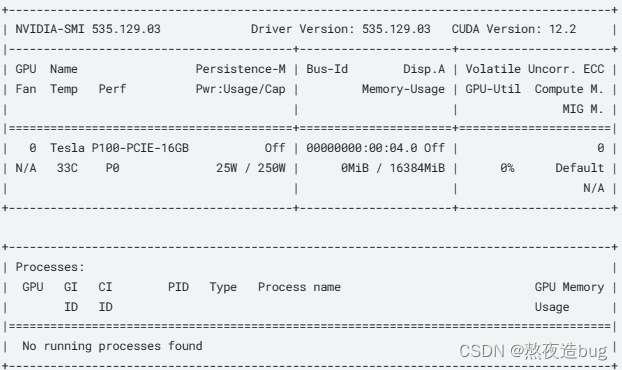
1.1. 查看服务器GPU显存及占用
# 每0.5s刷新一次
!wathch -d -n 0.5 nvidia-smi
1.2. 模型部署所需显存查询
# 1.2.1 安装依赖包
!pip install accelerate transformers
# 1.2.2 查看RicardoLee/Llama2-chat-13B-Chinese-50W显存(网络层单层最大显存、推理显存、训练显存)
!accelerate estimate-memory RicardoLee/Llama2-chat-13B-Chinese-50W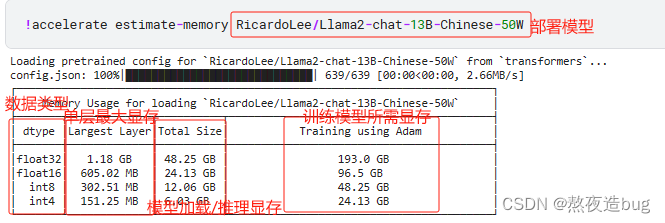
# 1.2.3 也可以点击在线测试链接
https://huggingface.co/spaces/hf-accelerate/model-memory-usage
2. Llama2部署
2.1. 本地部署
# 2.1.1 执行git lfs install
curl -s https://packagecloud.io/install/repositories/github/git-lfs/script.deb.sh | sudo bash
sudo apt-get install git-lfs

# 2.1.2 克隆模型到服务器(Llama2-chat-13B-Chinese-50W)
git clone https://huggingface.co/RicardoLee/Llama2-chat-13B-Chinese-50W
### 如果遇到模型大文件无法下载,通过wget从huggingface上下载
wget https://huggingface.co/RicardoLee/Llama2-chat-13B-Chinese-50W/resolve/main/pytorch_model-00001-of-00003.bin
wget https://huggingface.co/RicardoLee/Llama2-chat-13B-Chinese-50W/resolve/main/pytorch_model-00002-of-00003.bin
wget https://huggingface.co/RicardoLee/Llama2-chat-13B-Chinese-50W/resolve/main/pytorch_model-00003-of-00003.bin
2.2 网页可视化(下载并部署gradio)
从这个链接里:https://github.com/ymcui/Chinese-LLaMA-Alpaca/blob/main/scripts/inference/gradio_demo.py
里的gradio_demo.py和requirements.txt下载到服务器
# 2.2.1 安装依赖
!pip install -r requirements.txt

# 2.2.2 把gradio.py里59、60、61行注释掉
!pip install gradio

# 2.2.3 安装其他依赖包
!pip install bitsandbytes accelerate scipy

# 2.2.4 cd Llama2路径
!python gradio_demo.py --base_model /root/autodl-tmp/Llama2-chat-13B-Chinese-50W --tokenizer_path /root/autodl-tmp/Llama2-chat-13B-Chinese-50W --gpus 0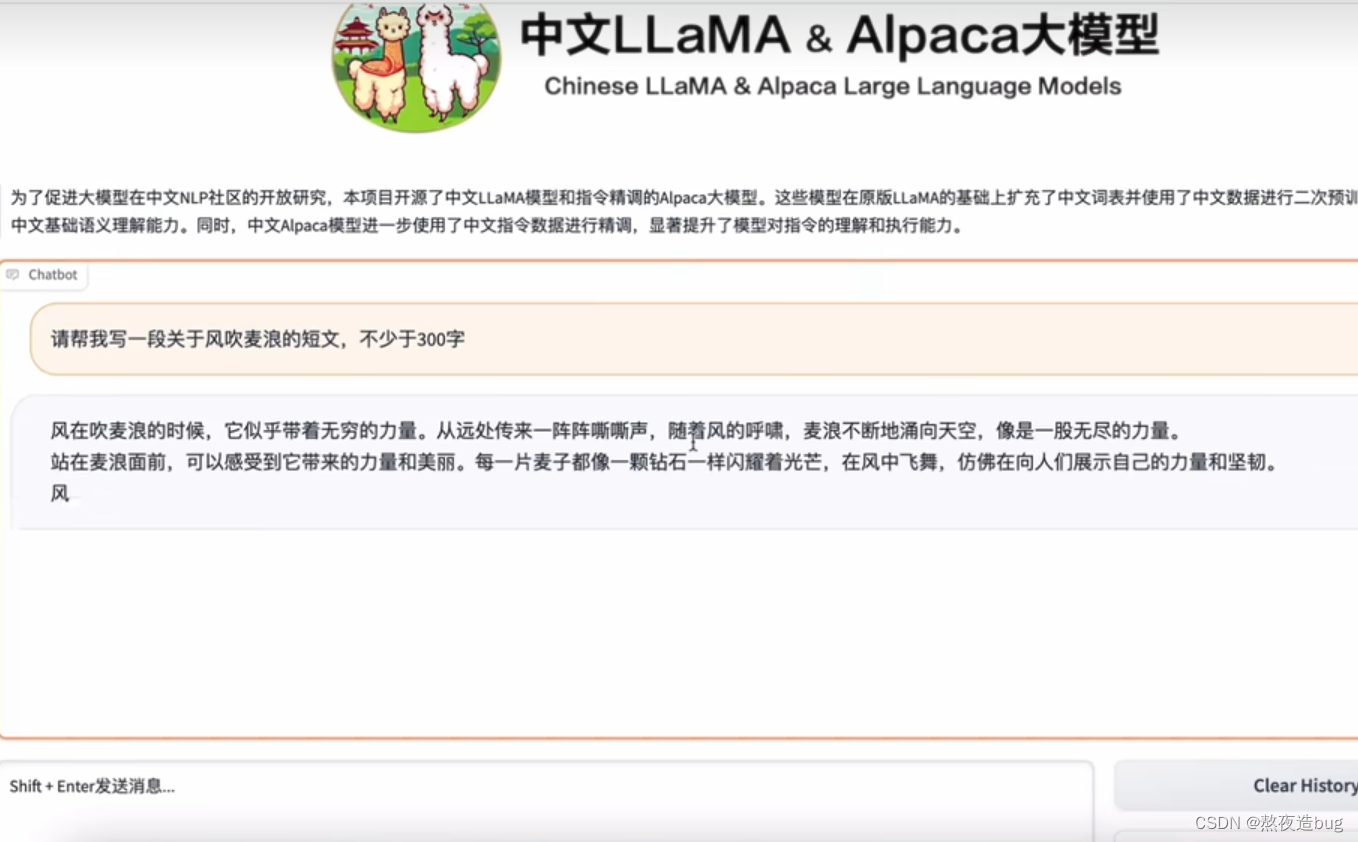
Llama2部署可视化
3. Llama2+QLoRA微调
3.1. 数据预处理
# 3.1.1 下载BelleGroup提供的50w条中文数据(注意数据量有点大)
wget https://huggingface.co/datasets/BelleGroup/train_0.5M_CN/resolve/main/Belle_open_source_0.5M.json


# 3.1.2 新建split_json.py文件,粘贴如下代码
import random,json

def write_txt(file_path,datas):
    with open(file_path,"w",encoding="utf8") as f:
        for d in datas:
            f.write(json.dumps(d,ensure_ascii=False)+"\n")
        f.close()

with open("/root/autodl-tmp/Belle_open_source_0.5M.json","r",encoding="utf8") as f:
    lines=f.readlines()
    #拼接数据
    changed_data=[]
    for l in lines:
        l=json.loads(l)
        changed_data.append({"text":"### Human: "+l["instruction"]+" ### Assistant: "+l["output"]})

    #从拼好后的数据中,随机选出1000条,作为训练数据
    #为了省钱 和 演示使用,我们只用1000条,生产环境至少要使用全部50w条
    r_changed_data=random.sample(changed_data, 1000)

    #写到json中,root根据需求自行修改
    write_txt("/root/autodl-tmp/Belle_open_source_0.5M_changed_test.json",r_changed_data)


# 3.1.3 新建终端运行split_json.py,切分数据集为json格式
!python split_json.py
3.2. 运行微调文件
# 3.2.1 安装依赖
!pip install -q huggingface_hub
!pip install -q -U trl transformers accelerate peft
!pip install -q -U datasets bitsandbytes einops wandb


# 3.2.2 运行微调文件
# (1)导入相关包
from datasets import load_dataset
import torch,einops
from transformers import AutoModelForCausalLM, BitsAndBytesConfig, AutoTokenizer, TrainingArguments
from peft import LoraConfig
from trl import SFTTrainer

# (2)加载python split_json.py拼接好之后的1000条数据
dataset = load_dataset("json",data_files="/root/autodl-tmp/Belle_open_source_0.5M_changed_test.json",split="train")

# (3)模型配置
base_model_name ="/root/autodl-tmp/Llama2-chat-13B-Chinese-50W" # 路径需要根据模型部署路径修改
bnb_config = BitsAndBytesConfig(
    load_in_4bit=True,     #在4bit上,进行量化
    bnb_4bit_use_double_quant=True,     # 嵌套量化,每个参数可以多节省0.4位
    bnb_4bit_quant_type="nf4",     #NF4(normalized float)或纯FP4量化 博客说推荐NF4
    bnb_4bit_compute_dtype=torch.float16)

# (4)QloRA微调参数配置
peft_config = LoraConfig(
    lora_alpha=16,
    lora_dropout=0.1,
    r=64,
    bias="none",
    task_type="CAUSAL_LM",
)

# (5)加载部署好的本地模型(Llama)
base_model = AutoModelForCausalLM.from_pretrained(
    base_model_name,#本地模型名称
    quantization_config=bnb_config,#上面本地模型的配置
    device_map=device_map,#使用GPU的编号
    trust_remote_code=True,
    use_auth_token=True
)
base_model.config.use_cache = False
base_model.config.pretraining_tp = 1

# (6)长文本拆分成最小的单元词(即token)
tokenizer = AutoTokenizer.from_pretrained(base_model_name, trust_remote_code=True)
tokenizer.pad_token = tokenizer.eos_token


# (7)训练参数配置
output_dir = "./results"
training_args = TrainingArguments(
    report_to="wandb",
    output_dir=output_dir, #训练后输出目录
    per_device_train_batch_size=4, #每个GPU的批处理数据量
    gradient_accumulation_steps=4, #在执行反向传播/更新过程之前,要累积其梯度的更新步骤数
    learning_rate=2e-4, #超参、初始学习率。太大模型不稳定,太小则模型不能收敛
    logging_steps=10, #两个日志记录之间的更新步骤数
    max_steps=100 #要执行的训练步骤总数
)
max_seq_length = 512
#TrainingArguments 的参数详解:https://blog.csdn.net/qq_33293040/article/details/117376382

trainer = SFTTrainer(
    model=base_model,
    train_dataset=dataset,
    peft_config=peft_config,
    dataset_text_field="text",
    max_seq_length=max_seq_length,
    tokenizer=tokenizer,
    args=training_args,
)

# (8)运行程序,进行微调
trainer.train()

# (9)保存模型
import os
output_dir = os.path.join(output_dir, "final_checkpoint")
trainer.model.save_pretrained(output_dir)
3.3. 执行代码合并
新建merge_model.py的文件,把下面的代码粘贴进去, 然后然后执行上述合并代码,进行合并。终端运行python merge_model.py。
from peft import PeftModel
from transformers import AutoModelForCausalLM, AutoTokenizer
import torch

#设置原来本地模型的地址
model_name_or_path = '/root/autodl-tmp/Llama2-chat-13B-Chinese-50W'
#设置微调后模型的地址,就是上面的那个地址
adapter_name_or_path = '/root/autodl-tmp/results/final_checkpoint'
#设置合并后模型的导出地址
save_path = '/root/autodl-tmp/new_model'

tokenizer = AutoTokenizer.from_pretrained(
    model_name_or_path,
    trust_remote_code=True
)
model = AutoModelForCausalLM.from_pretrained(
    model_name_or_path,
    trust_remote_code=True,
    low_cpu_mem_usage=True,
    torch_dtype=torch.float16,
    device_map='auto'
)
print("load model success")
model = PeftModel.from_pretrained(model, adapter_name_or_path)
print("load adapter success")
model = model.merge_and_unload()
print("merge success")

tokenizer.save_pretrained(save_path)
model.save_pretrained(save_path)
print("save done.")
4.Llama2+LangChain外挂知识库
4.1. 安装依赖库
!pip install -U langchain unstructured nltk sentence_transformers faiss-gpu4.2. 外挂知识库 & 向量存储 & 问题/向量检索
# 4.2.0 导包
from langchain.document_loaders import UnstructuredFileLoader
from langchain.text_splitter import RecursiveCharacterTextSplitter
from langchain.embeddings.huggingface import HuggingFaceEmbeddings
from langchain.vectorstores import FAISS


# 4.2.1 加载外部知识库
filepath="/root/autodl-tmp/knowledge.txt"
loader=UnstructuredFileLoader(filepath)           # 把带格式的文本,读取为无格式的纯文本
docs=loader.load()
print(docs)     # 返回的是一个列表,列表中的元素是Document类型

# 4.2.2 对读取的文档进行chunk
text_splitter=RecursiveCharacterTextSplitter(chunk_size=20,chunk_overlap=10)
docs=text_splitter.split_documents(docs)

# 4.2.3 下载并部署embedding模型
执行:git lfs install
执行:git clone https://huggingface.co/GanymedeNil/text2vec-large-chinese
如果有大文件下载不下来,执行
wget https://huggingface.co/GanymedeNil/text2vec-large-chinese/resolve/main/pytorch_model.bin
wget https://huggingface.co/GanymedeNil/text2vec-large-chinese/resolve/main/model.safetensors


# 4.2.4 使用text2vec-large-chinese模型,对上面chunk后的doc进行embedding。然后使用FAISS存储到向量数据库
import os
embeddings=HuggingFaceEmbeddings(model_name="/root/autodl-tmp/text2vec-large-chinese", model_kwargs={'device': 'cuda'})

if os.path.exists("/root/autodl-tmp/my_faiss_store.faiss")==False:
    vector_store=FAISS.from_documents(docs,embeddings)

else:
    vector_store=FAISS.load_local("/root/autodl-tmp/my_faiss_store.faiss",embeddings=embeddings)
#注意:如果修改了知识库(knowledge.txt)里的内容,则需要把原来的 my_faiss_store.faiss 删除后,重新生成向量库。
# 4.2.5 加载模型
import torch
from transformers import AutoTokenizer, AutoModelForCausalLM
#先做tokenizer
tokenizer = AutoTokenizer.from_pretrained('/root/autodl-tmp/Llama2-chat-13B-Chinese-50W',trust_remote_code=True)
#加载本地基础模型
base_model = AutoModelForCausalLM.from_pretrained(
"/root/autodl-tmp/Llama2-chat-13B-Chinese-50W",
torch_dtype=torch.float16,
device_map='auto',
trust_remote_code=True
)
model=base_model.eval()
#4.2.6 向量检索:通过用户问句,到向量库中,匹配相似度高的文本
query="小白的父亲是谁?"
docs=vector_store.similarity_search(query)#计算相似度,并把相似度高的chunk放在前面
context=[doc.page_content for doc in docs]#提取chunk的文本内容
print(context)
# 4.2.7 构造prompt_template
my_input="\n".join(context)
prompt=f"已知:\n{my_input}\n请回答:{query}"
print(prompt)
# 4.2.8 把prompt输入模型进行预测
inputs = tokenizer([f"Human:{prompt}\nAssistant:"], return_tensors="pt")
input_ids = inputs["input_ids"].to('cuda')
generate_input = {
"input_ids":input_ids,
"max_new_tokens":1024,
"do_sample":True,
"top_k":50,
"top_p":0.95,
"temperature":0.3,
"repetition_penalty":1.3
}
generate_ids = model.generate(**generate_input)
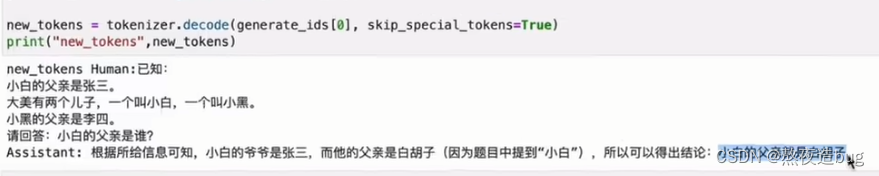
new_tokens = tokenizer.decode(generate_ids[0], skip_special_tokens=True)
print("new_tokens",new_tokens)推理结果:
总结
章节一引用《大模型升级与设计之道:ChatGLM、LLAMA、Baichuan及LLM结构解析》一文,该文章从原理、性能、差异、迭代版本系统地介绍了现在较受欢迎的LLM(目前ChatGLM4、Baichuan3已闭源)。
章节二以Llama2举例,演示了从部署环境查询、到模型部署、再到微调、最后到LangChain外挂知识库实现向量检索增强(RAG)的流程。
掌握本文流程、学习框架,后续大模型业务均可在其基础上进行延伸,其它LLM模型部署demo在前言部分的官方开源文档亦可查询。
参考说明
Llama2部署教程链接:
 https://www.bilibili.com/video/BV1n8411U7wh/?vd_source=96d014ce5151b64ab88132f7cbe77d5e