目录
摘要
本周主要学习单阶段的目标检测算法,如SSD、YOLO模型。详细学习了每个模型的原理,以及SSD和YOLO模型之间的异同。在本篇博客中将展示SSD的PyTorch实现代码,以及在第三章会介绍一下Termius的使用,便于连接服务器。
Abstract
This week, I will mainly learn single-stage object detection algorithms such as SSD and YOLO models. I have studied in detail the principles of each model, as well as the similarities and differences between SSD and YOLO models. In this blog post, we will showcase the PyTorch implementation code for SSD, and in Chapter 3, we will introduce the use of Termius for easy server connection.
一、SSD
1.1 模型结构
上一篇博客学习了R-CNN系列,其都为2步走系列,先进行候选区域的提取,再进行候选区域的分类等操作。而Single Shot MultiBox Detector(SSD)为单发的目标检测,即通过一次网络便可以完成边框的预测和类概率的输出。
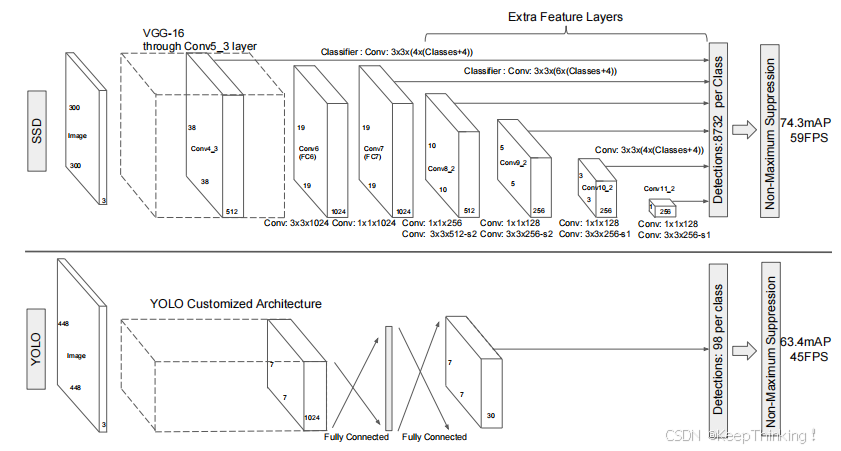
正因为是Single Shot,极大提高了目标检测的速度,如下图所示:
SSD能做到每秒59帧的速度,比上一篇博客中提到的Faster R-CNN的每秒7帧,拥有更高的准确率。
我们来看看SSD是做了哪些改进得到如此优异的效果吧!SSD结构图如下所示:
SSD接入 300x300 大小的图像,首先,通过ImageNet上预训练的分类模型VGG-16(去除最后1000维的全连接层)进行特征提取。
SSD的核心思想是,通过不同维度的特征图像,达到预测不同大小目标的目的。如上图所示,在VGG-16提取特征之后,通过卷积将特征图像转变为不同大小和维度的特征图像,如:FC6——FC11。然后,在不同维度的特征图像(检测层)上进行目标检测。
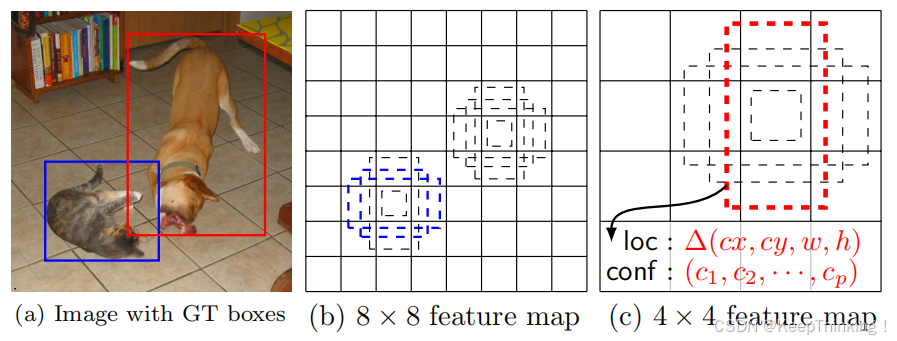
关键在于怎样对不用检测层进行检测。这里作者对每一层设置了不同大小的anchor,同一层的anchor也有不同的比例,如1:1、1:2、1:3、2:1、3:1。在上述6个不同的检测层中,以每个特征图像的像素点为中心,同一层中每个像素点绘制大小相同,但有5种比例的anchor。如下图所示:
正因为特征图像的大小不同,所以即使大小相同的anchor得到的特征,再映射回原图像,也会得到大小不同的原图像截取。于是,SSD通过这种方式就能实现对不同尺寸的目标进行检测。
在每个检测层中,anchor像滑动窗口一样依次滑动,然后再通过 3x3 的卷积连接两个并行层,即分类和框回归。
经过上述步骤,再将预测框和分类概率映射回原图像。通过非极大值抑制等操作留下最终的预测框,与样本框进行误差计算,再经反向传播更新参数得以训练SSD模型。
正因为上述所说anchor是作者事先设置好的,针对于每一层都有不同大小的anchor,所以不需要后期训练,也不需要通过算法进行候选区域的提取,极大提高了目标检测的速度。
1.2 代码
骨干网络采用在ImageNet上预训练的VGG-16来提取图像特征,下面是SSD网络模型PyTorch代码:
import colorsys
import os
import time
import warnings

import numpy as np
import torch
import torch.backends.cudnn as cudnn
from PIL import Image, ImageDraw, ImageFont

from nets.ssd import SSD300
from utils.anchors import get_anchors
from utils.utils import (cvtColor, get_classes, preprocess_input, resize_image,
                         show_config)
from utils.utils_bbox import BBoxUtility

warnings.filterwarnings("ignore")

#--------------------------------------------#
#   使用自己训练好的模型预测需要修改3个参数
#   model_path、backbone和classes_path都需要修改!
#   如果出现shape不匹配
#   一定要注意训练时的config里面的num_classes、
#   model_path和classes_path参数的修改
#--------------------------------------------#
class SSD(object):
    _defaults = {
        #--------------------------------------------------------------------------#
        #   使用自己训练好的模型进行预测一定要修改model_path和classes_path!
        #   model_path指向logs文件夹下的权值文件,classes_path指向model_data下的txt
        #
        #   训练好后logs文件夹下存在多个权值文件,选择验证集损失较低的即可。
        #   验证集损失较低不代表mAP较高,仅代表该权值在验证集上泛化性能较好。
        #   如果出现shape不匹配,同时要注意训练时的model_path和classes_path参数的修改
        #--------------------------------------------------------------------------#
        "model_path"        : 'logs/ssd_weights.pth',
        "classes_path"      : 'model_data/voc_classes.txt',
        #---------------------------------------------------------------------#
        #   用于预测的图像大小,和train时使用同一个即可
        #---------------------------------------------------------------------#
        "input_shape"       : [300, 300],
        #-------------------------------#
        #   主干网络的选择
        #   vgg或者mobilenetv2或者resnet50
        #-------------------------------#
        "backbone"          : "vgg",
        #---------------------------------------------------------------------#
        #   只有得分大于置信度的预测框会被保留下来
        #---------------------------------------------------------------------#
        "confidence"        : 0.5,
        #---------------------------------------------------------------------#
        #   非极大抑制所用到的nms_iou大小
        #---------------------------------------------------------------------#
        "nms_iou"           : 0.45,
        #---------------------------------------------------------------------#
        #   用于指定先验框的大小
        #---------------------------------------------------------------------#
        'anchors_size'      : [30, 60, 111, 162, 213, 264, 315],
        #---------------------------------------------------------------------#
        #   该变量用于控制是否使用letterbox_image对输入图像进行不失真的resize,
        #   在多次测试后,发现关闭letterbox_image直接resize的效果更好
        #---------------------------------------------------------------------#
        "letterbox_image"   : False,
        #-------------------------------#
        #   是否使用Cuda
        #   没有GPU可以设置成False
        #-------------------------------#
        "cuda"              : False,
    }

    @classmethod
    def get_defaults(cls, n):
        if n in cls._defaults:
            return cls._defaults[n]
        else:
            return "Unrecognized attribute name '" + n + "'"

    #---------------------------------------------------#
    #   初始化ssd
    #---------------------------------------------------#
    def __init__(self, **kwargs):
        self.__dict__.update(self._defaults)
        for name, value in kwargs.items():
            setattr(self, name, value)
        #---------------------------------------------------#
        #   计算总的类的数量
        #---------------------------------------------------#
        self.class_names, self.num_classes  = get_classes(self.classes_path)
        self.anchors                        = torch.from_numpy(get_anchors(self.input_shape, self.anchors_size, self.backbone)).type(torch.FloatTensor)
        if self.cuda:
            self.anchors = self.anchors.cuda()
        self.num_classes                    = self.num_classes + 1

        #---------------------------------------------------#
        #   画框设置不同的颜色
        #---------------------------------------------------#
        hsv_tuples = [(x / self.num_classes, 1., 1.) for x in range(self.num_classes)]
        self.colors = list(map(lambda x: colorsys.hsv_to_rgb(*x), hsv_tuples))
        self.colors = list(map(lambda x: (int(x[0] * 255), int(x[1] * 255), int(x[2] * 255)), self.colors))

        self.bbox_util = BBoxUtility(self.num_classes)
        self.generate()

        show_config(**self._defaults)

    #---------------------------------------------------#
    #   载入模型
    #---------------------------------------------------#
    def generate(self, onnx=False):
        #-------------------------------#
        #   载入模型与权值
        #-------------------------------#
        self.net    = SSD300(self.num_classes, self.backbone)
        device      = torch.device('cuda' if torch.cuda.is_available() else 'cpu')
        self.net.load_state_dict(torch.load(self.model_path, map_location=device))
        self.net    = self.net.eval()
        print('{} model, anchors, and classes loaded.'.format(self.model_path))
        if not onnx:
            if self.cuda:
                self.net = torch.nn.DataParallel(self.net)
                self.net = self.net.cuda()

    #---------------------------------------------------#
    #   检测图片
    #---------------------------------------------------#
    def detect_image(self, image, crop = False, count = False):
        #---------------------------------------------------#
        #   计算输入图片的高和宽
        #---------------------------------------------------#
        image_shape = np.array(np.shape(image)[0:2])
        #---------------------------------------------------------#
        #   在这里将图像转换成RGB图像,防止灰度图在预测时报错。
        #   代码仅仅支持RGB图像的预测,所有其它类型的图像都会转化成RGB
        #---------------------------------------------------------#
        image       = cvtColor(image)
        #---------------------------------------------------------#
        #   给图像增加灰条,实现不失真的resize
        #   也可以直接resize进行识别
        #---------------------------------------------------------#
        image_data  = resize_image(image, (self.input_shape[1], self.input_shape[0]), self.letterbox_image)
        #---------------------------------------------------------#
        #   添加上batch_size维度,图片预处理,归一化。
        #---------------------------------------------------------#
        image_data = np.expand_dims(np.transpose(preprocess_input(np.array(image_data, dtype='float32')), (2, 0, 1)), 0)

        with torch.no_grad():
            #---------------------------------------------------#
            #   转化成torch的形式
            #---------------------------------------------------#
            images = torch.from_numpy(image_data).type(torch.FloatTensor)
            if self.cuda:
                images = images.cuda()
            #---------------------------------------------------------#
            #   将图像输入网络当中进行预测!
            #---------------------------------------------------------#
            outputs     = self.net(images)
            #-----------------------------------------------------------#
            #   将预测结果进行解码
            #-----------------------------------------------------------#
            results     = self.bbox_util.decode_box(outputs, self.anchors, image_shape, self.input_shape, self.letterbox_image,
                                                    nms_iou = self.nms_iou, confidence = self.confidence)
            #--------------------------------------#
            #   如果没有检测到物体,则返回原图
            #--------------------------------------#
            if len(results[0]) <= 0:
                return image

            top_label   = np.array(results[0][:, 4], dtype = 'int32')
            top_conf    = results[0][:, 5]
            top_boxes   = results[0][:, :4]
        #---------------------------------------------------------#
        #   设置字体与边框厚度
        #---------------------------------------------------------#
        font = ImageFont.truetype(font='model_data/simhei.ttf', size=np.floor(3e-2 * np.shape(image)[1] + 0.5).astype('int32'))
        thickness = max((np.shape(image)[0] + np.shape(image)[1]) // self.input_shape[0], 1)
        #---------------------------------------------------------#
        #   计数
        #---------------------------------------------------------#
        if count:
            print("top_label:", top_label)
            classes_nums    = np.zeros([self.num_classes])
            for i in range(self.num_classes):
                num = np.sum(top_label == i)
                if num > 0:
                    print(self.class_names[i], " : ", num)
                classes_nums[i] = num
            print("classes_nums:", classes_nums)
        #---------------------------------------------------------#
        #   是否进行目标的裁剪
        #---------------------------------------------------------#
        if crop:
            for i, c in list(enumerate(top_boxes)):
                top, left, bottom, right = top_boxes[i]
                top     = max(0, np.floor(top).astype('int32'))
                left    = max(0, np.floor(left).astype('int32'))
                bottom  = min(image.size[1], np.floor(bottom).astype('int32'))
                right   = min(image.size[0], np.floor(right).astype('int32'))

                dir_save_path = "img_crop"
                if not os.path.exists(dir_save_path):
                    os.makedirs(dir_save_path)
                crop_image = image.crop([left, top, right, bottom])
                crop_image.save(os.path.join(dir_save_path, "crop_" + str(i) + ".png"), quality=95, subsampling=0)
                print("save crop_" + str(i) + ".png to " + dir_save_path)
        #---------------------------------------------------------#
        #   图像绘制
        #---------------------------------------------------------#
        for i, c in list(enumerate(top_label)):
            predicted_class = self.class_names[int(c)]
            box             = top_boxes[i]
            score           = top_conf[i]

            top, left, bottom, right = box

            top     = max(0, np.floor(top).astype('int32'))
            left    = max(0, np.floor(left).astype('int32'))
            bottom  = min(image.size[1], np.floor(bottom).astype('int32'))
            right   = min(image.size[0], np.floor(right).astype('int32'))

            label = '{} {:.2f}'.format(predicted_class, score)
            draw = ImageDraw.Draw(image)
            label_size = draw.textsize(label, font)
            label = label.encode('utf-8')
            print(label, top, left, bottom, right)

            if top - label_size[1] >= 0:
                text_origin = np.array([left, top - label_size[1]])
            else:
                text_origin = np.array([left, top + 1])

            for i in range(thickness):
                draw.rectangle([left + i, top + i, right - i, bottom - i], outline=self.colors[c])
            draw.rectangle([tuple(text_origin), tuple(text_origin + label_size)], fill=self.colors[c])
            draw.text(text_origin, str(label,'UTF-8'), fill=(0, 0, 0), font=font)
            del draw

        return image

    def get_FPS(self, image, test_interval):
        #---------------------------------------------------#
        #   计算输入图片的高和宽
        #---------------------------------------------------#
        image_shape = np.array(np.shape(image)[0:2])
        #---------------------------------------------------------#
        #   在这里将图像转换成RGB图像,防止灰度图在预测时报错。
        #   代码仅仅支持RGB图像的预测,所有其它类型的图像都会转化成RGB
        #---------------------------------------------------------#
        image       = cvtColor(image)
        #---------------------------------------------------------#
        #   给图像增加灰条,实现不失真的resize
        #   也可以直接resize进行识别
        #---------------------------------------------------------#
        image_data  = resize_image(image, (self.input_shape[1], self.input_shape[0]), self.letterbox_image)
        #---------------------------------------------------------#
        #   添加上batch_size维度,图片预处理,归一化。
        #---------------------------------------------------------#
        image_data = np.expand_dims(np.transpose(preprocess_input(np.array(image_data, dtype='float32')), (2, 0, 1)), 0)

        with torch.no_grad():
            #---------------------------------------------------#
            #   转化成torch的形式
            #---------------------------------------------------#
            images = torch.from_numpy(image_data).type(torch.FloatTensor)
            if self.cuda:
                images = images.cuda()
            #---------------------------------------------------------#
            #   将图像输入网络当中进行预测!
            #---------------------------------------------------------#
            outputs     = self.net(images)
            #-----------------------------------------------------------#
            #   将预测结果进行解码
            #-----------------------------------------------------------#
            results     = self.bbox_util.decode_box(outputs, self.anchors, image_shape, self.input_shape, self.letterbox_image,
                                                    nms_iou = self.nms_iou, confidence = self.confidence)

        t1 = time.time()
        for _ in range(test_interval):
            with torch.no_grad():
                #---------------------------------------------------------#
                #   将图像输入网络当中进行预测!
                #---------------------------------------------------------#
                outputs     = self.net(images)
                #-----------------------------------------------------------#
                #   将预测结果进行解码
                #-----------------------------------------------------------#
                results     = self.bbox_util.decode_box(outputs, self.anchors, image_shape, self.input_shape, self.letterbox_image,
                                                        nms_iou = self.nms_iou, confidence = self.confidence)

        t2 = time.time()
        tact_time = (t2 - t1) / test_interval
        return tact_time

    def convert_to_onnx(self, simplify, model_path):
        import onnx
        self.generate(onnx=True)

        im                  = torch.zeros(1, 3, *self.input_shape).to('cpu')  # image size(1, 3, 512, 512) BCHW
        input_layer_names   = ["images"]
        output_layer_names  = ["output"]

        # Export the model
        print(f'Starting export with onnx {onnx.__version__}.')
        torch.onnx.export(self.net,
                        im,
                        f               = model_path,
                        verbose         = False,
                        opset_version   = 12,
                        training        = torch.onnx.TrainingMode.EVAL,
                        do_constant_folding = True,
                        input_names     = input_layer_names,
                        output_names    = output_layer_names,
                        dynamic_axes    = None)

        # Checks
        model_onnx = onnx.load(model_path)  # load onnx model
        onnx.checker.check_model(model_onnx)  # check onnx model

        # Simplify onnx
        if simplify:
            import onnxsim
            print(f'Simplifying with onnx-simplifier {onnxsim.__version__}.')
            model_onnx, check = onnxsim.simplify(
                model_onnx,
                dynamic_input_shape=False,
                input_shapes=None)
            assert check, 'assert check failed'
            onnx.save(model_onnx, model_path)

        print('Onnx model save as {}'.format(model_path))

    def get_map_txt(self, image_id, image, class_names, map_out_path):
        f = open(os.path.join(map_out_path, "detection-results/"+image_id+".txt"),"w")
        #---------------------------------------------------#
        #   计算输入图片的高和宽
        #---------------------------------------------------#
        image_shape = np.array(np.shape(image)[0:2])
        #---------------------------------------------------------#
        #   在这里将图像转换成RGB图像,防止灰度图在预测时报错。
        #   代码仅仅支持RGB图像的预测,所有其它类型的图像都会转化成RGB
        #---------------------------------------------------------#
        image       = cvtColor(image)
        #---------------------------------------------------------#
        #   给图像增加灰条,实现不失真的resize
        #   也可以直接resize进行识别
        #---------------------------------------------------------#
        image_data  = resize_image(image, (self.input_shape[1], self.input_shape[0]), self.letterbox_image)
        #---------------------------------------------------------#
        #   添加上batch_size维度,图片预处理,归一化。
        #---------------------------------------------------------#
        image_data = np.expand_dims(np.transpose(preprocess_input(np.array(image_data, dtype='float32')), (2, 0, 1)), 0)

        with torch.no_grad():
            #---------------------------------------------------#
            #   转化成torch的形式
            #---------------------------------------------------#
            images = torch.from_numpy(image_data).type(torch.FloatTensor)
            if self.cuda:
                images = images.cuda()
            #---------------------------------------------------------#
            #   将图像输入网络当中进行预测!
            #---------------------------------------------------------#
            outputs     = self.net(images)
            #-----------------------------------------------------------#
            #   将预测结果进行解码
            #-----------------------------------------------------------#
            results     = self.bbox_util.decode_box(outputs, self.anchors, image_shape, self.input_shape, self.letterbox_image,
                                                    nms_iou = self.nms_iou, confidence = self.confidence)
            #--------------------------------------#
            #   如果没有检测到物体,则返回原图
            #--------------------------------------#
            if len(results[0]) <= 0:
                return

            top_label   = np.array(results[0][:, 4], dtype = 'int32')
            top_conf    = results[0][:, 5]
            top_boxes   = results[0][:, :4]

        for i, c in list(enumerate(top_label)):
            predicted_class = self.class_names[int(c)]
            box             = top_boxes[i]
            score           = str(top_conf[i])

            top, left, bottom, right = box
            if predicted_class not in class_names:
                continue

            f.write("%s %s %s %s %s %s\n" % (predicted_class, score[:6], str(int(left)), str(int(top)), str(int(right)),str(int(bottom))))

        f.close()
        return
采用图片进行预测:
#-----------------------------------------------------------------------#
#   predict.py将单张图片预测、摄像头检测、FPS测试和目录遍历检测等功能
#   整合到了一个py文件中,通过指定mode进行模式的修改。
#-----------------------------------------------------------------------#
import time
import cv2
import numpy as np
from PIL import Image
from matplotlib import pyplot as plt

from ssd import SSD

if __name__ == "__main__":
    ssd = SSD()
    #----------------------------------------------------------------------------------------------------------#
    #   mode用于指定测试的模式:
    #   'predict'           表示单张图片预测,如果想对预测过程进行修改,如保存图片,截取对象等,可以先看下方详细的注释
    #   'video'             表示视频检测,可调用摄像头或者视频进行检测,详情查看下方注释。
    #   'fps'               表示测试fps,使用的图片是img里面的street.jpg,详情查看下方注释。
    #   'dir_predict'       表示遍历文件夹进行检测并保存。默认遍历img文件夹,保存img_out文件夹,详情查看下方注释。
    #   'export_onnx'       表示将模型导出为onnx,需要pytorch1.7.1以上。
    #----------------------------------------------------------------------------------------------------------#
    mode = "predict"
    #-------------------------------------------------------------------------#
    #   crop                指定了是否在单张图片预测后对目标进行截取
    #   count               指定了是否进行目标的计数
    #   crop、count仅在mode='predict'时有效
    #-------------------------------------------------------------------------#
    crop            = False
    count           = False
    #----------------------------------------------------------------------------------------------------------#
    #   video_path          用于指定视频的路径,当video_path=0时表示检测摄像头
    #                       想要检测视频,则设置如video_path = "xxx.mp4"即可,代表读取出根目录下的xxx.mp4文件。
    #   video_save_path     表示视频保存的路径,当video_save_path=""时表示不保存
    #                       想要保存视频,则设置如video_save_path = "yyy.mp4"即可,代表保存为根目录下的yyy.mp4文件。
    #   video_fps           用于保存的视频的fps
    #
    #   video_path、video_save_path和video_fps仅在mode='video'时有效
    #   保存视频时需要ctrl+c退出或者运行到最后一帧才会完成完整的保存步骤。
    #----------------------------------------------------------------------------------------------------------#
    video_path      = 0
    video_save_path = ""
    video_fps       = 25.0
    #----------------------------------------------------------------------------------------------------------#
    #   test_interval       用于指定测量fps的时候,图片检测的次数。理论上test_interval越大,fps越准确。
    #   fps_image_path      用于指定测试的fps图片
    #
    #   test_interval和fps_image_path仅在mode='fps'有效
    #----------------------------------------------------------------------------------------------------------#
    test_interval = 100
    fps_image_path = "img/"
    #-------------------------------------------------------------------------#
    #   dir_origin_path     指定了用于检测的图片的文件夹路径
    #   dir_save_path       指定了检测完图片的保存路径
    #
    #   dir_origin_path和dir_save_path仅在mode='dir_predict'时有效
    #-------------------------------------------------------------------------#
    dir_origin_path = "img/"
    dir_save_path = "img_out/"
    #-------------------------------------------------------------------------#
    #   simplify            使用Simplify onnx
    #   onnx_save_path      指定了onnx的保存路径
    #-------------------------------------------------------------------------#
    simplify        = True
    onnx_save_path  = "model_data/models.onnx"

    if mode == "predict":
        '''
        1、如果想要进行检测完的图片的保存,利用r_image.save("img.jpg")即可保存,直接在predict.py里进行修改即可。
        2、如果想要获得预测框的坐标,可以进入ssd.detect_image函数,在绘图部分读取top,left,bottom,right这四个值。
        3、如果想要利用预测框截取下目标,可以进入ssd.detect_image函数,在绘图部分利用获取到的top,left,bottom,right这四个值
        在原图上利用矩阵的方式进行截取。
        4、如果想要在预测图上写额外的字,比如检测到的特定目标的数量,可以进入ssd.detect_image函数,在绘图部分对predicted_class进行判断,
        比如判断if predicted_class == 'car': 即可判断当前目标是否为车,然后记录数量即可。利用draw.text即可写字。
        '''
        while True:
            # img = input('Input image filename:')
            # try:
            #     image = Image.open(img)
            # except:
            #     print('Open Error! Try again!')
            #     continue
            # else:
            #     r_image = ssd.detect_image(image, crop = crop, count=count)
            #     r_image.show()
            image = Image.open("img/street.jpg")
            plt.imshow(image)
            plt.show()
            r_image = ssd.detect_image(image, crop=crop, count=count)
            plt.imshow(r_image)
            plt.show()

    elif mode == "video":
        capture = cv2.VideoCapture(video_path)
        if video_save_path != "":
            fourcc = cv2.VideoWriter_fourcc(*'XVID')
            size = (int(capture.get(cv2.CAP_PROP_FRAME_WIDTH)), int(capture.get(cv2.CAP_PROP_FRAME_HEIGHT)))
            out = cv2.VideoWriter(video_save_path, fourcc, video_fps, size)

        ref, frame = capture.read()
        if not ref:
            raise ValueError("未能正确读取摄像头(视频),请注意是否正确安装摄像头(是否正确填写视频路径)。")

        fps = 0.0
        while(True):
            t1 = time.time()
            # 读取某一帧
            ref, frame = capture.read()
            if not ref:
                break
            # 格式转变,BGRtoRGB
            frame = cv2.cvtColor(frame,cv2.COLOR_BGR2RGB)
            # 转变成Image
            frame = Image.fromarray(np.uint8(frame))
            # 进行检测
            frame = np.array(ssd.detect_image(frame))
            # RGBtoBGR满足opencv显示格式
            frame = cv2.cvtColor(frame,cv2.COLOR_RGB2BGR)

            fps  = ( fps + (1./(time.time()-t1)) ) / 2
            print("fps= %.2f"%(fps))
            frame = cv2.putText(frame, "fps= %.2f"%(fps), (0, 40), cv2.FONT_HERSHEY_SIMPLEX, 1, (0, 255, 0), 2)

            cv2.imshow("video",frame)
            c= cv2.waitKey(1) & 0xff
            if video_save_path!="":
                out.write(frame)

            if c==27:
                capture.release()
                break

        print("Video Detection Done!")
        capture.release()
        if video_save_path!="":
            print("Save processed video to the path :" + video_save_path)
            out.release()
        cv2.destroyAllWindows()

    elif mode == "fps":
        img = Image.open(fps_image_path)
        tact_time = ssd.get_FPS(img, test_interval)
        print(str(tact_time) + ' seconds, ' + str(1/tact_time) + 'FPS, @batch_size 1')

    elif mode == "dir_predict":
        import os

        from tqdm import tqdm

        img_names = os.listdir(dir_origin_path)
        for img_name in tqdm(img_names):
            if img_name.lower().endswith(('.bmp', '.dib', '.png', '.jpg', '.jpeg', '.pbm', '.pgm', '.ppm', '.tif', '.tiff')):
                image_path = os.path.join(dir_origin_path, img_name)
                image = Image.open(image_path)
                r_image = ssd.detect_image(image)
                if not os.path.exists(dir_save_path):
                    os.makedirs(dir_save_path)
                r_image.save(os.path.join(dir_save_path, img_name.replace(".jpg", ".png")), quality=95, subsampling=0)

    elif mode == "export_onnx":
        ssd.convert_to_onnx(simplify, onnx_save_path)

    else:
        raise AssertionError("Please specify the correct mode: 'predict', 'video', 'fps' or 'dir_predict'.")
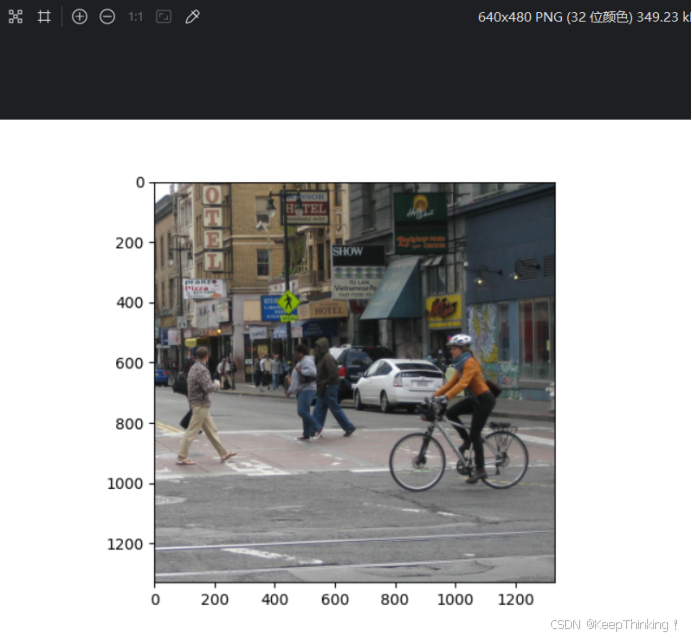
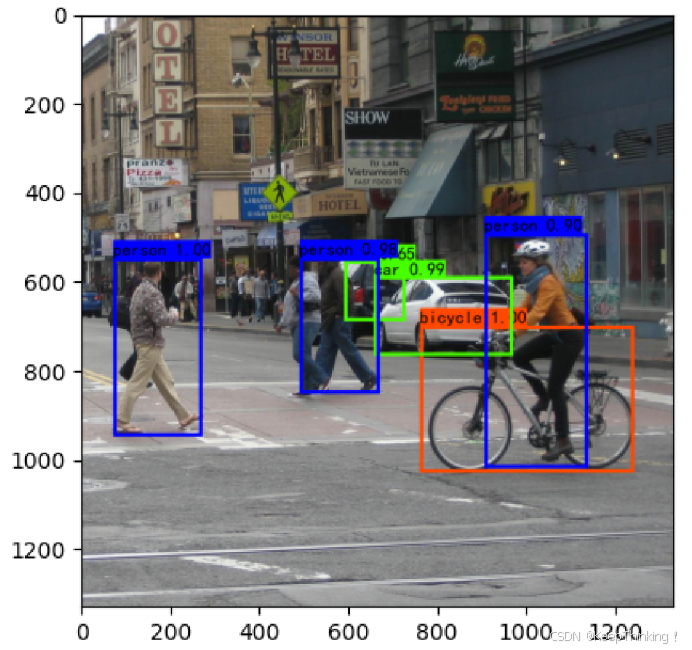
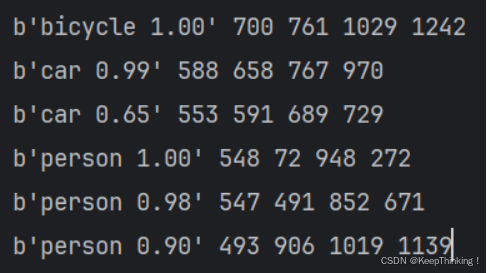
代码预测结果如下:
- 输入图像
- 预测结果
预测的准确率还是十分高的,但是预测的时间还是有点长。
二、YOLO
这次我主要学习了YOLO-v1,因为YOLO是个很大的系列,我这次对其主体思想进行了学习。SSD是在YOLO-v1之后出来的,比第一版本的YOLO效果好,但是SSD的作者后期没用继续对其优化,但是YOLO一直源源不断更新,目前以高精度、高速率广泛应用于各商业之中。
我们先来看看YOLO和SSD之间有何异同,两个模型网络结构对比图如下所示:
这里我们可以看出,YOLO在提取特征之后,直接进入预测环节。相比于上面的SSD将特征图像分为6个维度,采用不同尺寸的anchor而言简洁了许多,简洁代表了更易于训练模型,但是准确度会不会依旧能够保持较高水准呢?让我们先来了解了解YOLO的原理吧。
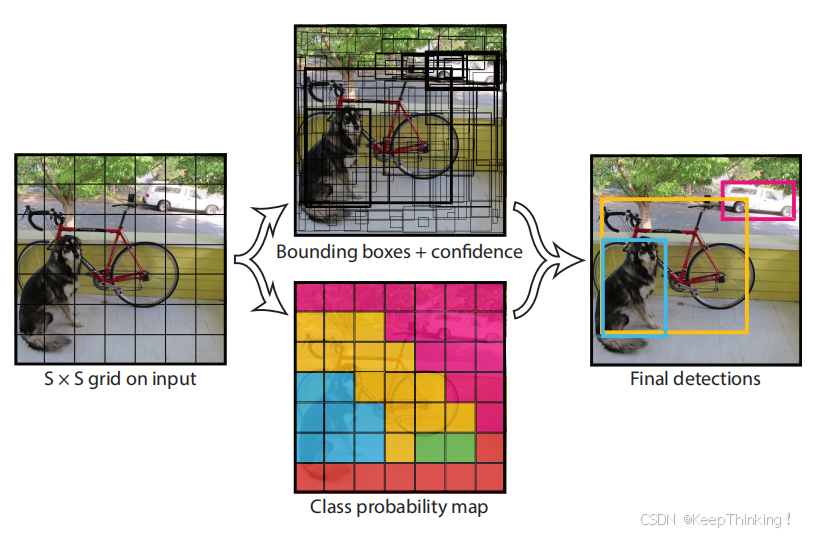
YOLO是将图像分为 7x7 的网格,每个网格就类似于感兴趣区域。如果某个目标的中心在这个网格之中,则该网格负责预测这个目标。 每个网格需要预测B个bounding box,每个bounding box除了预测目标框位置外,还需要附带confidence值,以及C个类别的预测分数。
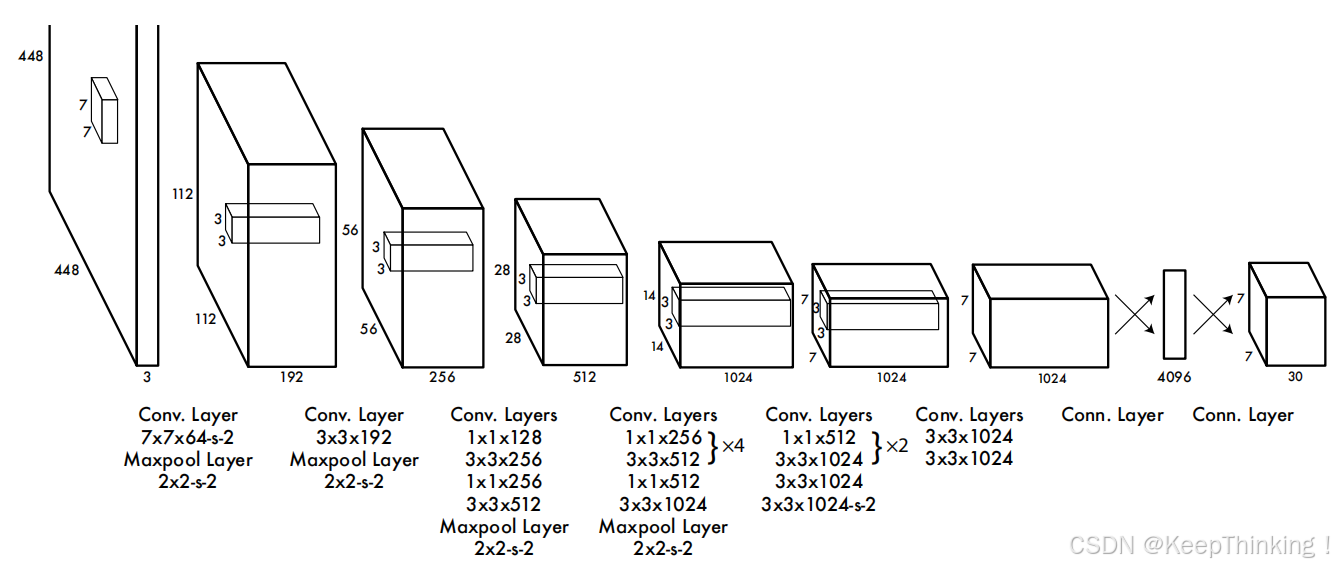
我们先看看YOLO模型的整体过程,接受 448x448 大小的图像输入,经过卷积、池化等操作得到 7x7x1024 的特征图像,将其展平后连接4096维的全连接层,得到4096维的特征向量。最后,在接入一个1470维(7x7x30)的全连接层后,将其reshape为 7x7x30 的特征图像,即上图结构中最右侧。
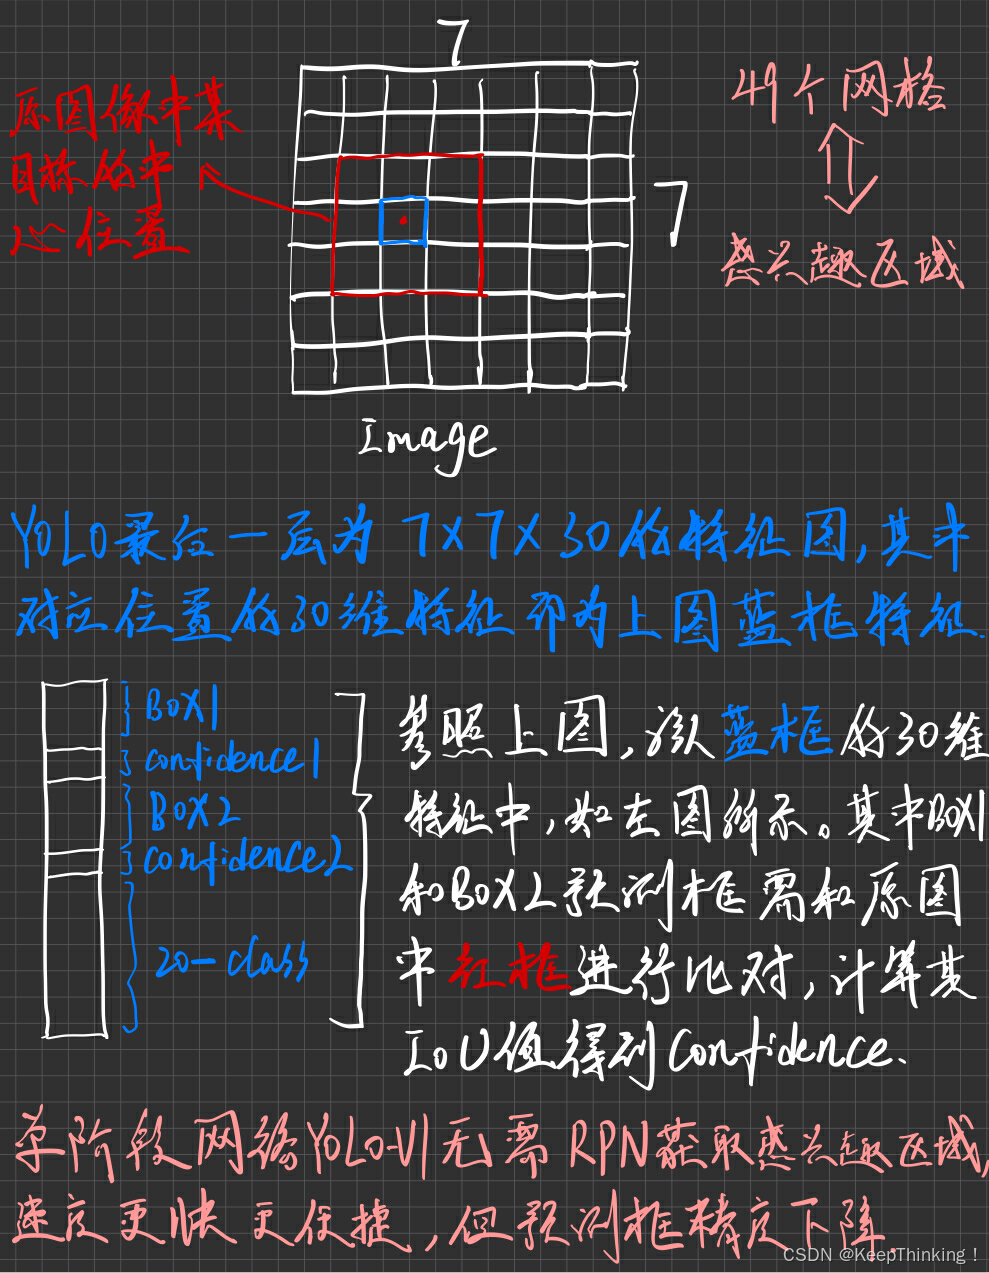
这里的 7x7x30 的特征图像对应了原图像 7x7=49 个网格,即每30维的特征向量代表着每个表格预测值。因为这30不是凭空出现的,而是B=2,即预测两个bounding box,每个bounding box有4个值(x,y,w,h);以及一个confidence值,conference值代表预测的目标框与真实框的交并比IoU。又因为VOC数据集类别为20类,所以c=20。于是,。
用一张图片来帮助理解,如下所示:
YOLO的bounding box预测的坐标是直接预测原图对应的位置,再加上整个网络没有使用anchor,直接将图像分为49个网格,所以速度特别快,能够达到45FPS。也因此可想而知,必然牺牲一些准确率,比使用anchor的SSD准确率低。这也回应开篇的疑问,同时也暗示了YOLO系列后期的优化路线。 下周还会继续完成YOLO系列的学习。
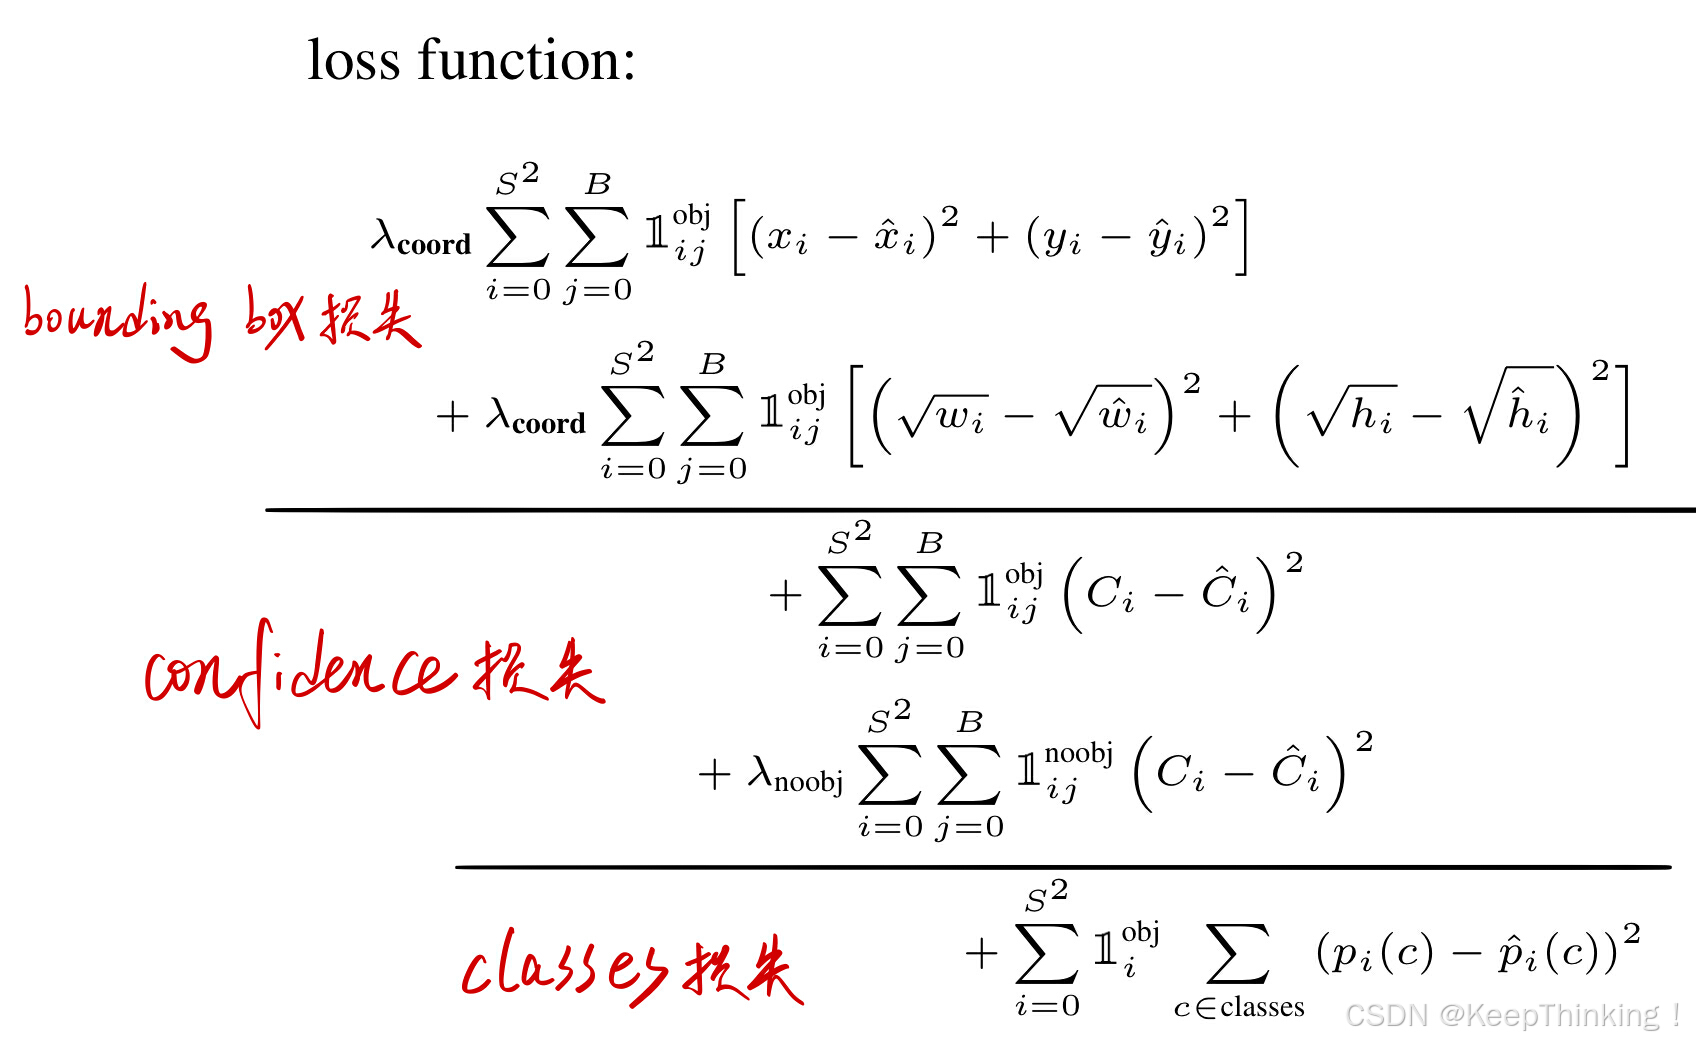
最后,我们再来看看YOLO模型的损失计算吧。
可能会疑惑在计算bounding box损失时,为什么计算w和h时,需要先开根号。
因为如果两个大小不同的框,但是w和h相差相同,如果不进行开根号操作,则计算出来的误差是相同的。这显然不符合逻辑,因为

三、Termius
英文需要频繁使用租用的服务器,但服务器管理又比较麻烦,上传数据也会消耗很多时间。于是,我学习使用了Termius,用以管理服务器数据,便于数据传输,同时结合PyCharm实现本地与远程服务器之间同步操作。
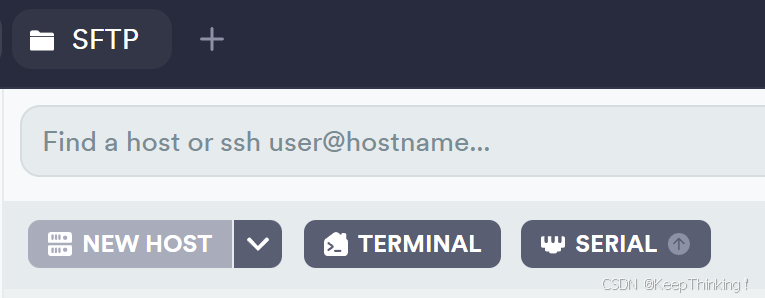
首先,点击NEW HOST就可以创建一个新的服务器连接。
输入服务器ip地址,以及用户名、密码和端口号,就可以进行服务器连接了。
连接成功之后,会自动进入服务器终端界面,如下图所示:
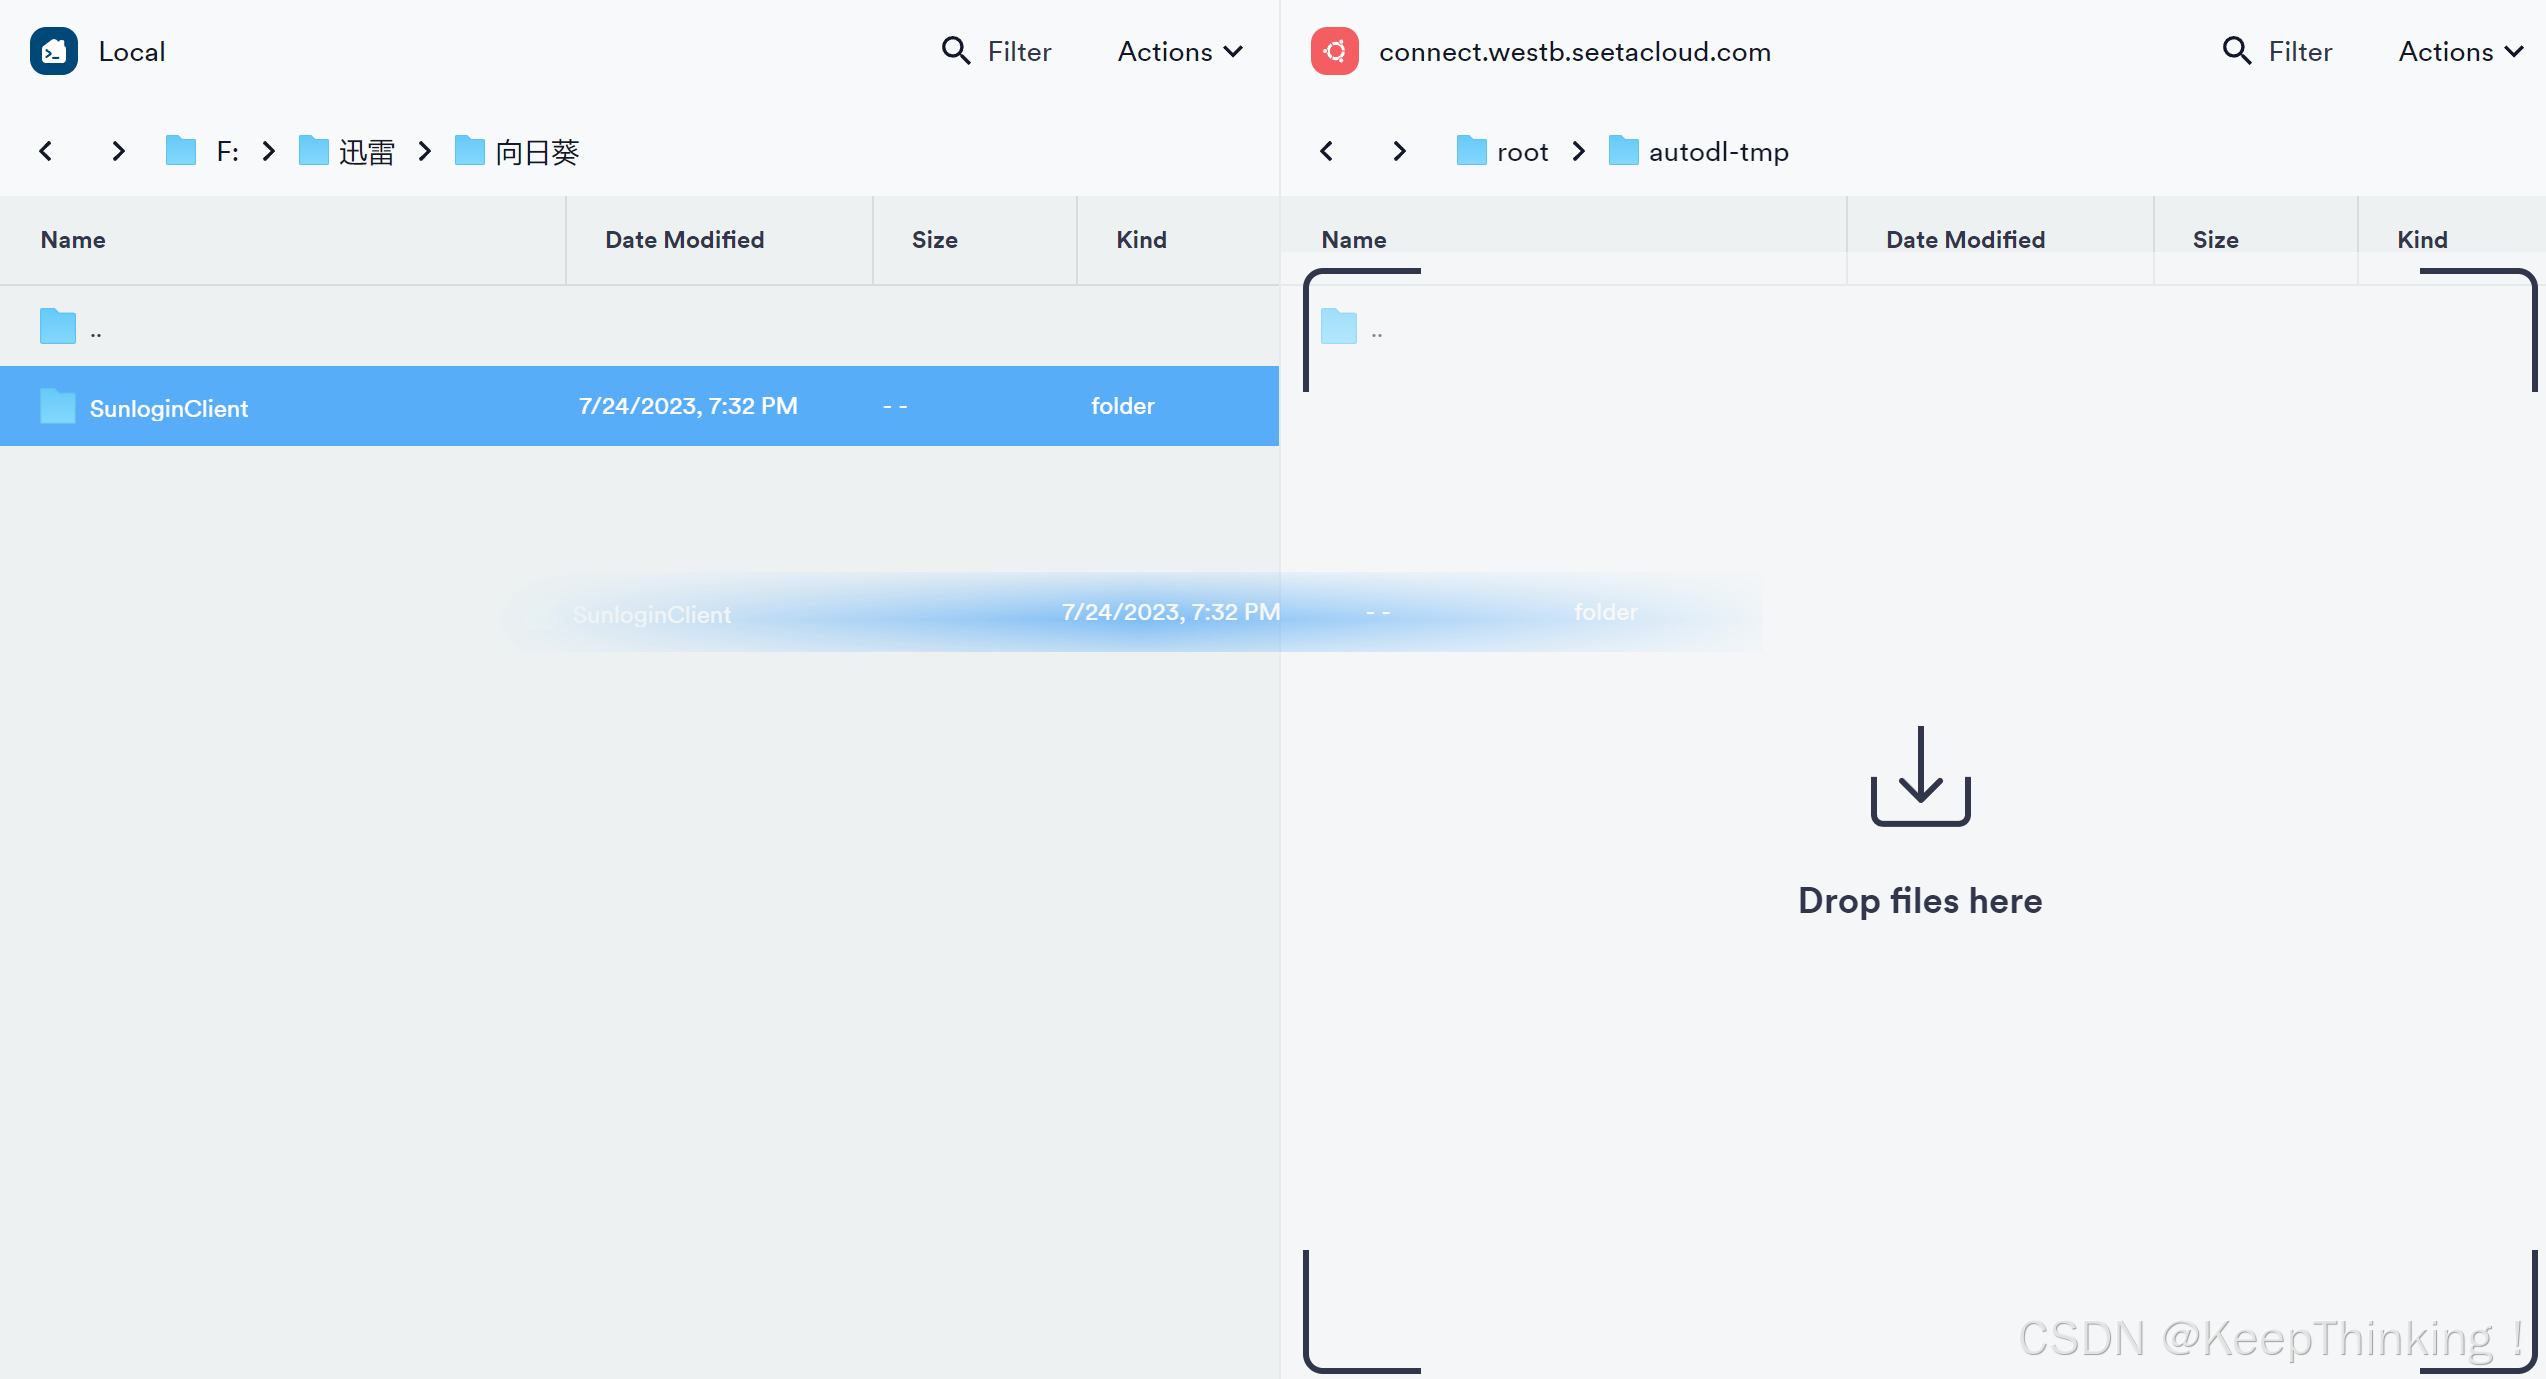
点击SFTP,便可进行服务器端和本地之间的数据传输界面,如下图所示:
直接拖过去,就能实现服务器端和本地直接的数据传输,大大提高了速度。
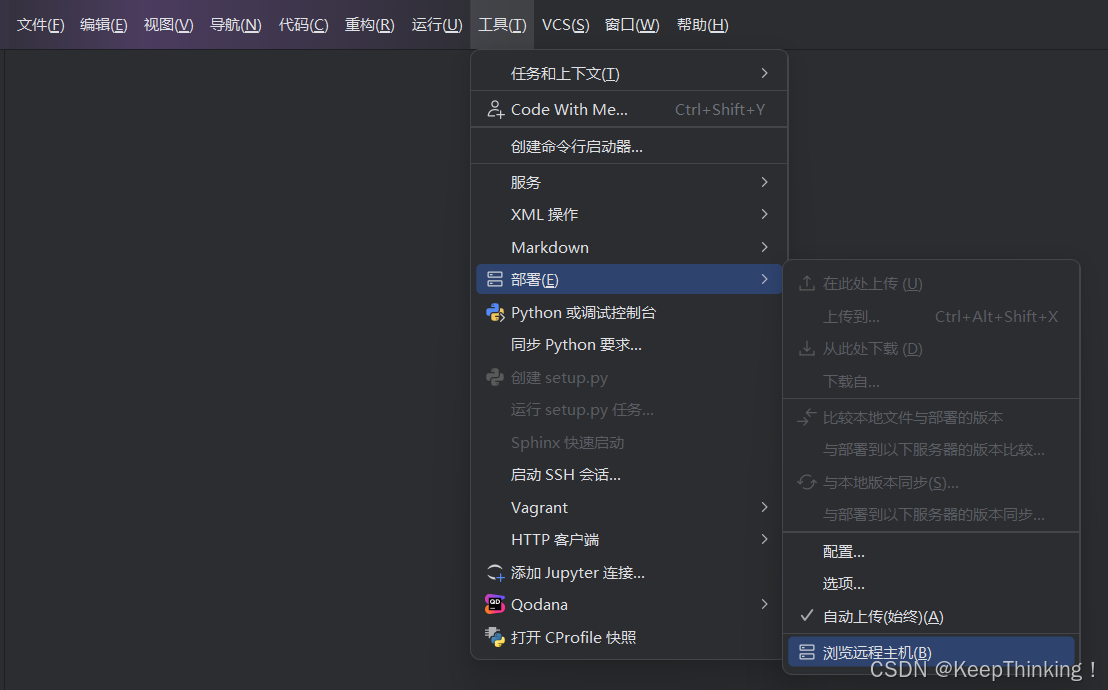
然后,确保您的PyCharm已通过SSH连接到远程服务器,然后通过下图的操作,就能够看到刚才通过Termius上传到远程服务器的代码和数据。
如果想同步到本地,在本地进行修改等操作,可以从服务器端将文件下载到本地,操作如下:
一切就大功告成啦,可以在本地调试,然后通过远程服务器的资源训练自己的模型了。
总结
本周的学习到此结束,下周将学习YOLO系列更新最大的几个版本,以及目前使用最为广泛的版本,并成功跑通其代码。
如有错误,请各位大佬提出,谢谢!


